Filling the floor with expanded clay
Pouring a floor with expanded clay is very simple in its technology, so even a non-professional can handle it
The only point that is important to consider when pouring the screed is the thickness of its layer. The minimum size is 30 millimeters
If the screed is planned to be more than 10 cm in thickness, then it should not be made from a pure mixture of sand and cement. Since in this case the probability of fracture of concrete floor slabs greatly increases, because they also have their own certain margin of safety. Therefore, experts recommend using lightweight fillers, which include expanded clay and foam crumbs, or you can lay GVL.
Preparatory work
When leveling any floor, first of all, you have to set the level to which the new base will reach. To do this, you will need any type of level, for example, a hydro level or a laser level.
It is very important to carry out the entire procedure accurately: make markings in the form of lines on the walls, along which the surface will be aligned
The second stage consists of patching up large defects on the floor. Most people think that the screed itself will fill in all cracks, holes, grooves and chips, but if you decide to make an expanded clay screed, so there is a chance that not all flaws will be eliminated. Therefore, this is not something worth saving on. For sealing, a liquid solution is used, the same as for the screed.
Installation of beacons
The third stage is to install beacons. To do this, you need to determine the highest point of the genital base. It is on it that the first beacon will be installed. Lighthouses are metal slats that are laid along and across the room, dividing it into sections. Expanded clay is poured just between them.
To install lighthouses in a plane, wooden linings of various thicknesses are placed under them. But there is an easier way. For this, gypsum is diluted with water and the resulting mass is placed in the form of slides along the line of laying the lighthouse, which is installed on them. Further, using the usual level, it is set horizontally, and gypsum mortar is placed under the low areas.
To align the beacons in one plane, a long two-meter level or rule is used. The distance between the profiles is set so that it is convenient for you to lay the rule on two adjacent slats or through one. For example, when the width of the room is 4 m, the distance between the profiles should not be more than 70 cm. Thus, the level will calmly cover three beacons at the same time.
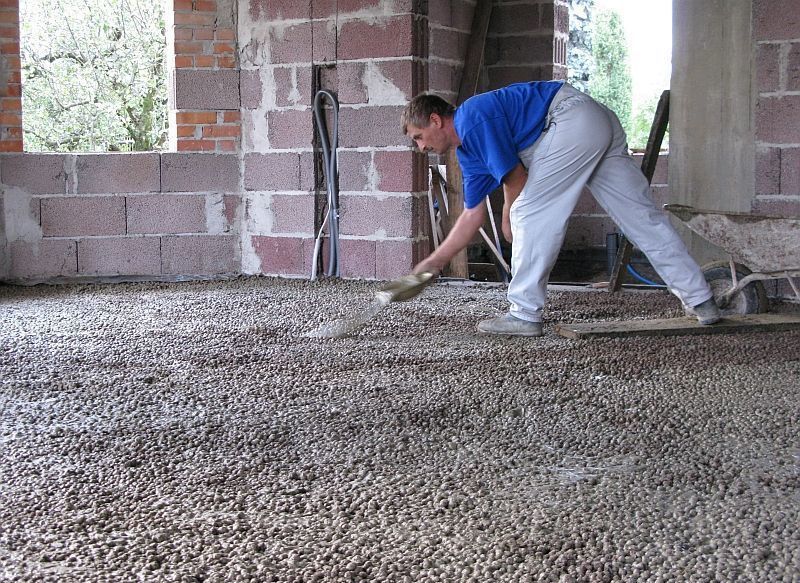
Backfill of expanded clay
The next stage is to backfill with expanded clay. This is the easiest way to do this, because you will have to fill in the material exactly in accordance with the dimensions of the areas determined by the beacons.
The only point you need to pay attention to is the height of the expanded clay backfill layer. The material should be distributed so that you have space for the screed.
Thus, the distance from the expanded clay layer to the upper edge of the lighthouses should be approximately 15-20 millimeters. Cover the floor with expanded clay and level it well.
Pouring cement laitance
Now prepare the cement milk, which you need to fill in the expanded clay. Milk is a bonding material and creates conditions when it will be safe to walk on the expanded clay layer. It also covers the granules with a film, protecting them from moisture penetrating from the screed.
This is important, since if the cement slurry quickly begins to lose moisture, lowering the quality characteristics of the screed, as a result of which cracks, chips and other flaws will appear on it
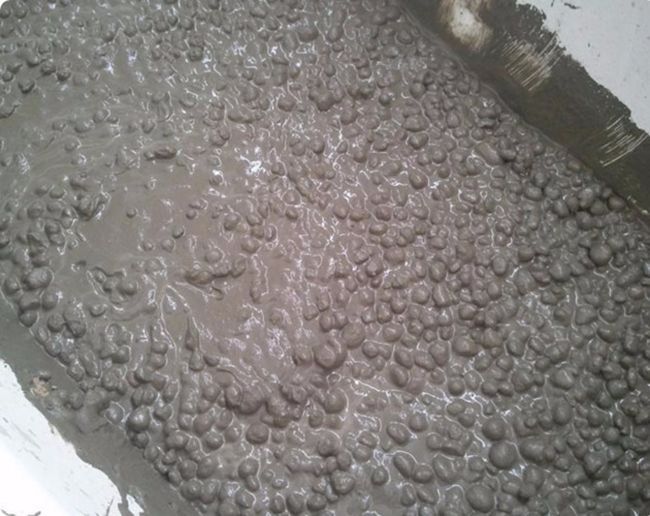
Cement milk is a sand-cement screed only in liquid form.About 3 times more water is poured into a mixture of sand and cement than for a screed. fill a small area with expanded clay, if the milk passed through it without leaving a trace, then there is too much water. If the solution remains on the surface of expanded clay, there is too little water. You need to find a middle ground.
After the entire surface is filled with cement laitance, leave the floor for at least a day to dry.
Screed mortar
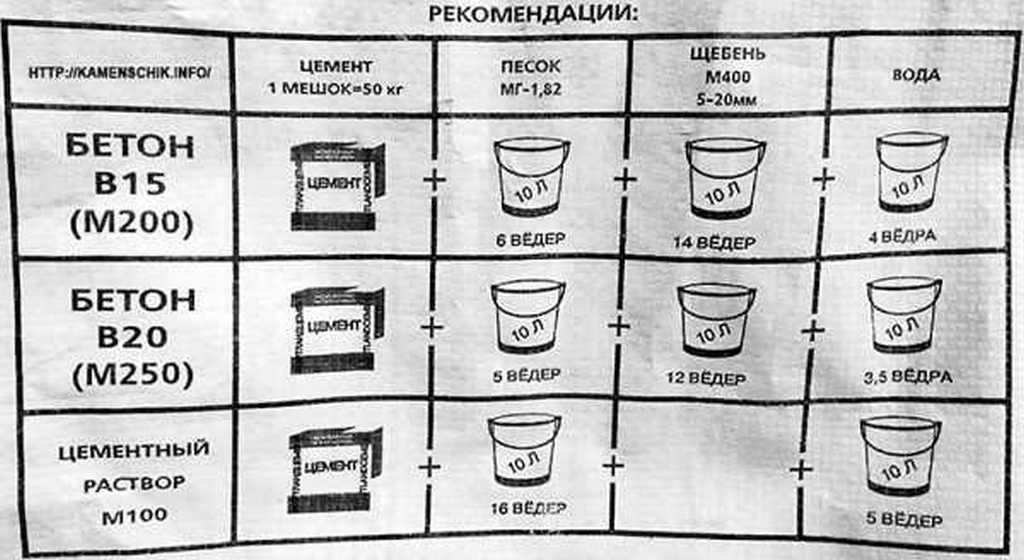
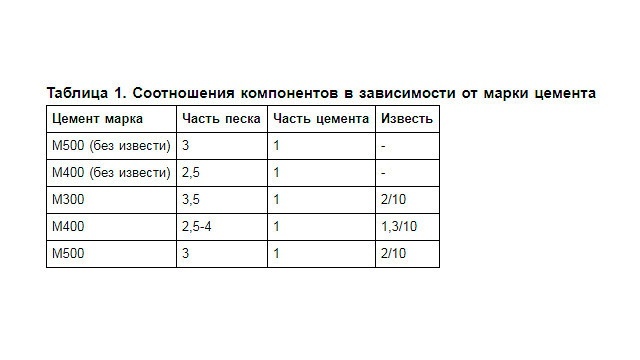
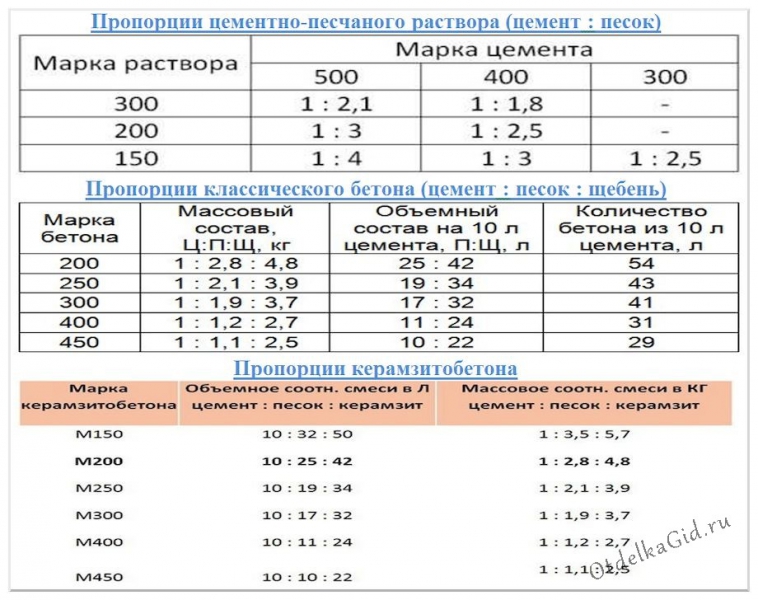
The first step is to prepare a screed solution. For this, cement of the M400 brand is taken (higher, but not lower) and construction (not river) sand. The ratio of sand and cement is 3: 1. The solution is prepared using a mixer, not a shovel.
Please note that, as a rule, there are 10 kg of ready-mixed mixture for 2 liters of water. But experts say that it is necessary to pour the mixture into the water, and not pour water into the mixture. After that, the whole mixture is stirred with a mixer for five minutes. After that, the sediment is given 5 minutes, and again stirred for two minutes. The solution can now be poured onto the floor.
The mixture is leveled with a trowel, and for even distribution over the entire surface of the floor, you can take a rule by laying it on the beacons to stretch the mass along the length of the site.
Consumption of materials for construction
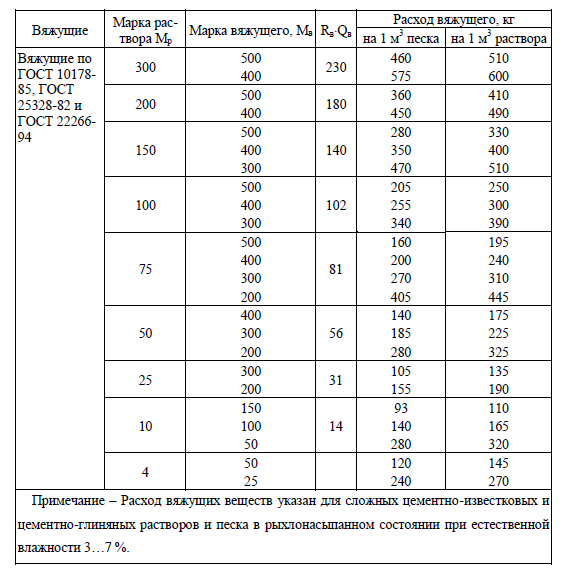
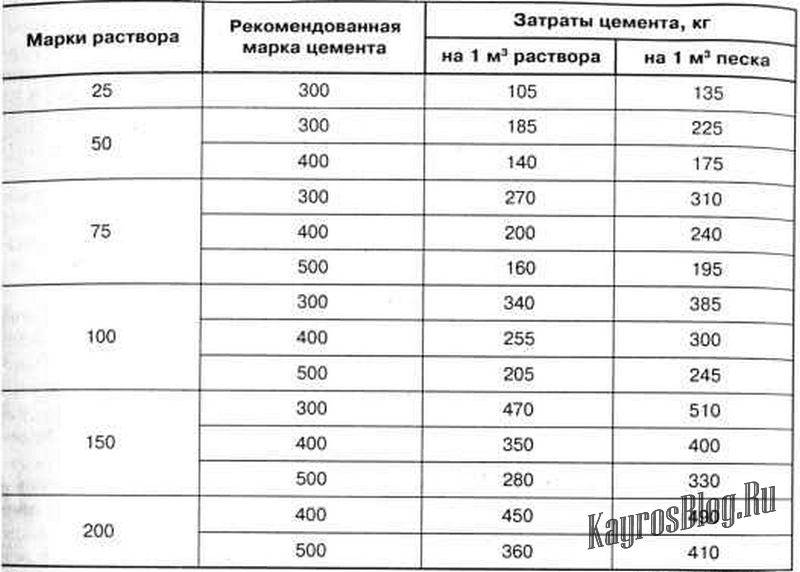
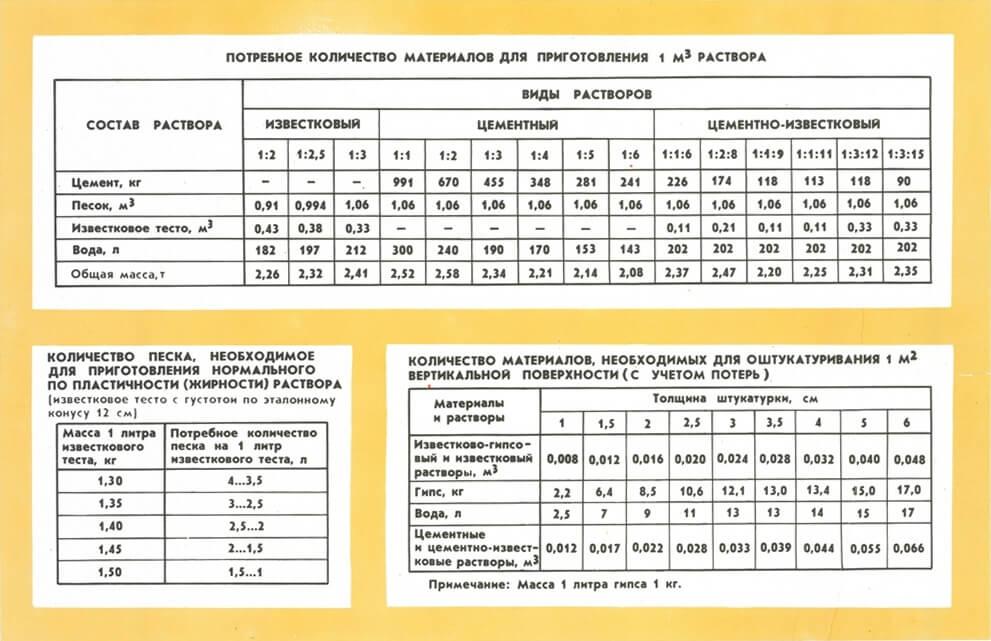
| Consumption of cement mortar for | According to consumption rates 404 pcs. single brick per 1 m3 of masonry. Solution consumption rate is per 1 m3 - 0.25 m3 |
|---|---|
| Consumption of cement mortar for wall blocks | Mortar consumption during laying is two times less than when laying a brick wall |
| Approximate consumption of sand concrete M - 300 per screed. The approximate density of the sand concrete mixture: 1.7-1.75 kg / cu. dm | |
| For 1m / 2 with a thickness of 1cm = 18-20 kg. mixes | |
| Tile adhesive consumption | The consumption of tile adhesive per 1 m2 of the laid tiles is 10 kg. dry mixture with a layer thickness of the finished solution of 10 mm. |
| Adhesive consumption for | Consumption of glue for foam concrete per 1 m3 of laid foam concrete masonry is 40 kg. dry mix. |
| Self-leveling floor consumption | The consumption of self-leveling floors per 1 m2 of the finished solution is 6 kg. dry mix, with a recommended layer thickness of 5 mm. |
| Plaster consumption | Consumption of plaster per 1 m2 of the finished solution is 10 kg. dry mix, with a recommended layer thickness of 10 mm. |
| Putty consumption | The consumption of the putty per 1 m2 of the finished solution is 0.9-1.0 kg. mixtures. |
| Grout consumption | Grout consumption per 1 m2 of tiles laid is 120 g, with a recommended joint thickness of 2 mm. |
| Consumption of universal mixture M -150 |
Consumption of the universal M-150 mixture per 1 m3 of the finished solution is 1450 kg. dry mix. |
| Consumption of masonry mixture M-200 | Consumption of M-200 masonry mixture per 1 m3 of masonry is 350 kg. dry masonry mixture. |
| Consumption of waterproofing material | Waterproofing consumption per 1 m2 of surface will require 700 gr. dry mixture diluted to the state of sludge for brushing (roller). |
| Paint consumption | The consumption of paint per 1 m2 of walls or ceilings during the first application on a primed flat surface is 0.3 liters, the second coat when applied correctly is 0.2 liters per 1 m2. |
| Consumption of polyurethane floors | Consumption of a polyurethane self-leveling floor when applied to a dust-free primer is 1.5 kg per 1 m2 of concrete floor surface, with a thickness of 1 mm. |
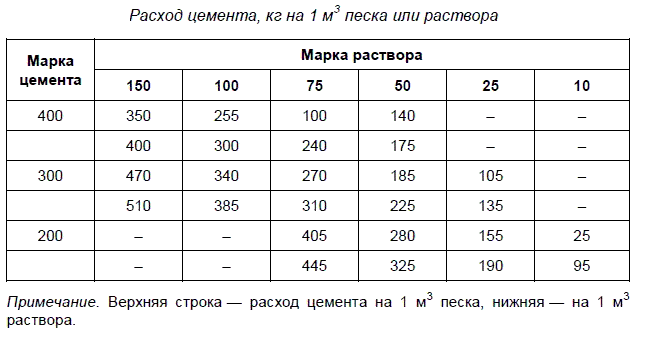
| The amount of cement per masonry | To prepare 1 m3 of cement mortar, 8 bags of cement, 50 kg each, are needed. and kneaded in proportion with sand 1: 4, where one part of sand is also equal to 50 kg. |
| The consumption of materials (excluding losses) for the construction of 1m2 of the surface of a brick wall with a thickness of a quarter of a brick is: | |
| cement (with M-100 solution grade) –5 kg; | |
| cement (with M-75 solution grade) –4 kg; | |
| cement (with M-50 solution grade) –2.5 kg. | |
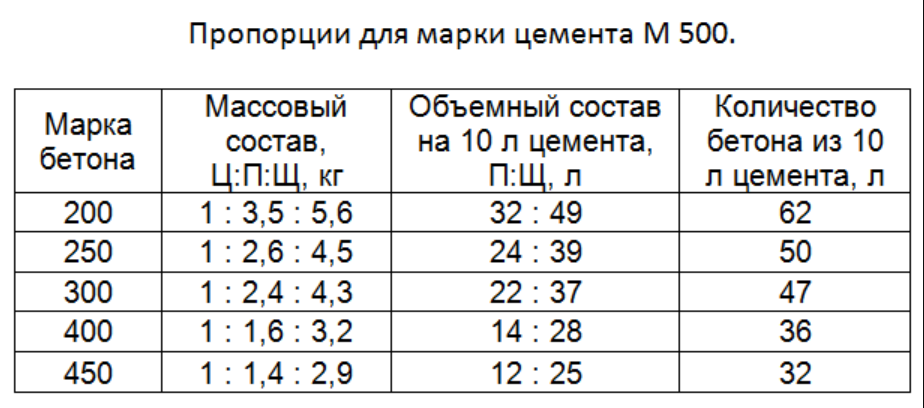
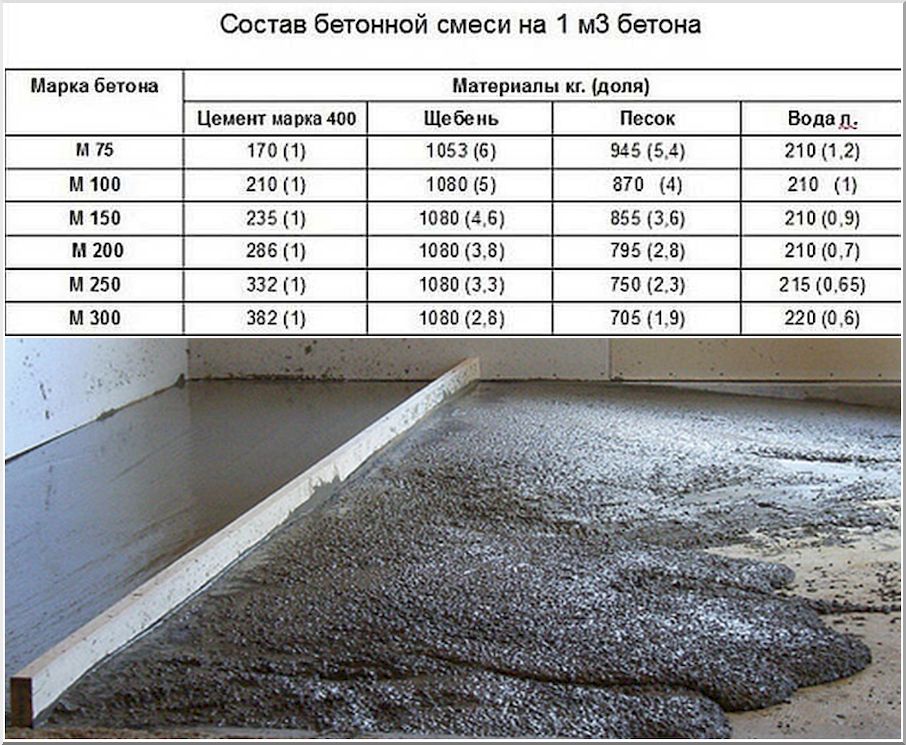
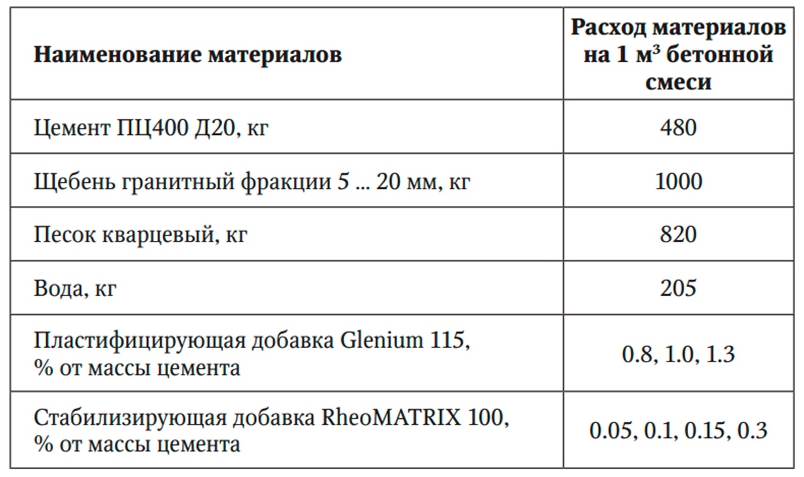
| The amount of cement, sand, crushed stone in 1m3 of concrete | 1m3 M of concrete 150 contains: 220 kg of cement, 0.6 m3 of sand, 0.8 m3 of crushed stone. |
| 1m3 M of concrete 200 contains: 280 kg of cement, 0.5 m3 of sand, 0.8 m3 of crushed stone. | |
| 1m3 M of concrete 250 contains: 330 kg of cement, 0.5 m3 of sand, 0.8 m3 of crushed stone. | |
| 1m3 M of concrete 300 contains: 380 kg of cement, 0.5 m3 of sand, 0.8 m3 of crushed stone. | |
| Clay-sand solution | Clay mortar is a ratio of 1: 3, where one part of clay slurry and three parts of vermiculite. The resulting solution is poured with a layer of up to 50 mm |
| To make a layer of clay-sand mortar for warm screed or building walls even warmer, you need to mix a clay-sand mortar in a 1: 1 ratio with sawdust or flooring (fine chopped straw). The prepared solution is poured with a layer 20-30 cm thick. | |
| Proportion of concrete and foam chips | In order to create such a solution, which is mainly used for insulating floors and floors of baths, you need to mix 1 part of ordinary cement mortar (or ready-made concrete mortar) and 3 parts of foam crumbs |
| Number of blocks in 1 m3 of masonry | Size 200x300x600 - 27 blocks in 1m3 |
| Size 200 (188) x200 (188) x400 - 62 blocks in 1 m3 | |
| Mystery brick or, masonry mortar + black seam | Consumption - 1-1.5 buckets of solution per 1m2. Instead of an expensive plasticizer, 2 caps of cheap shampoo (for plasticity) for a batch of 1 / 4.1L. a can of black pigment, and in order to avoid efflorescence 200g. 9% solution of vinegar. |
| Consumption of penetrating waterproofing penecrite and penetron | Penecrite gram for a seam of 25x25 mm per 1 running meter of a groove |
| Penetron (for 2 layers according to technology) from 0.8 kg - 1.1 kg per 1 m2, depending on the looseness and unevenness of the surface |
Floor pouring technology with expanded clay
In the construction industry, there are two main options for flooring:
Expanded clay is allowed to be used in any of the ways, for this reason, the positive and negative sides must be considered for each case.
Self-leveling floors are arranged in houses or low-rise apartments. The device of rough and final screeds reduces the height of the premises by four to five centimeters, and this indicator depends on the slope and defective areas on the floor surface. The monolith, as it were, minimizes vibration, hum, excludes the possibility of parasites appearing under the floor. But there is another side of the coin - the monolith is a cold bridge. To keep the floor warm, it should be equipped with a heating system.
The advantages also include:
- efficiency of installation work;
- long operational period;
- wear resistance;
- high resistance to mechanical damage;
- a wide selection of materials for finishing and finishing.
Only such floors do not have natural insulation and are distinguished by minimal sound insulation.
The version of the inlaid floor is more complicated. First, you need to prepare a frame base, into which expanded clay will then be poured or another insulation material will be laid, on top of which the screed will be poured. The process is laborious, but the results are fully justified.
The positive qualities of this floor are:
- high degree of noise insulation;
- natural insulation;
- reduction of financial costs for the implementation of a rough screed;
- resistance to temperature extremes.
In addition to the listed advantages, there are also negative aspects:
- duration of installation work;
- the height of the frame and the filling layer is about ten centimeters;
- there is a high probability of damage from mechanical influences.
If we consider the aesthetic side of the issue, the choice of flooring option depends only on the height of the ceiling. From the point of view of practice, everyone wants to get a good result. If it is necessary to arrange underfloor heating in a private house, it is recommended to choose a type-setting design.
Tools and materials
The technology of concrete production and the spilling of expanded clay with cement milk implies the presence of the following materials and tools:
- expanded clay, sand, cement material;
- shovels shovel;
- concrete mixers or large capacity for making mixes;
- regulations;
- building level;
- metal profile;
- rammer or roller.

Preparation of the base
The base of the old concrete floor is cleaned of debris and dust. In order to make the new floor even, beacons are set. The easiest way is to use metal profiles. The slats are set from wall to wall with a step equal to the length of the rule.The level is used to determine the inclined angle. If the floor differences are noticeable, stones or boards must be placed under the slats. It is much more economical to use nails and a cord as beacons. But in this case, you will have to take into account the maximum fluidity of the solution so that the surface is flat.
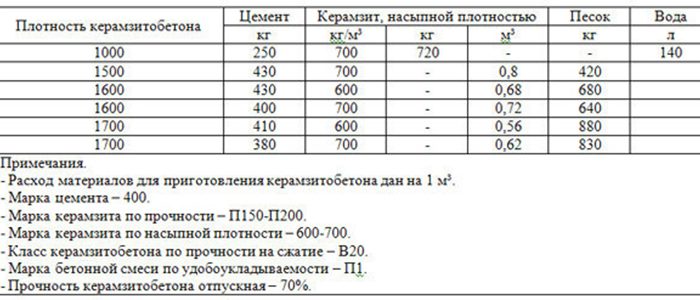
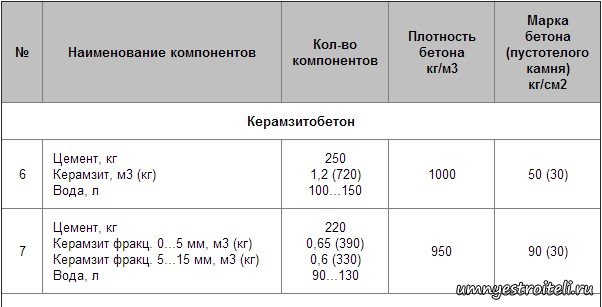
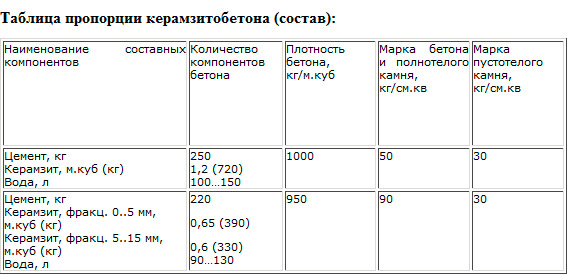
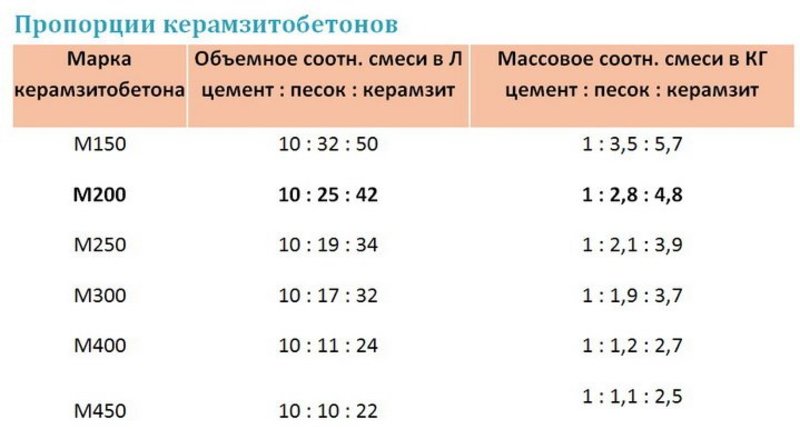
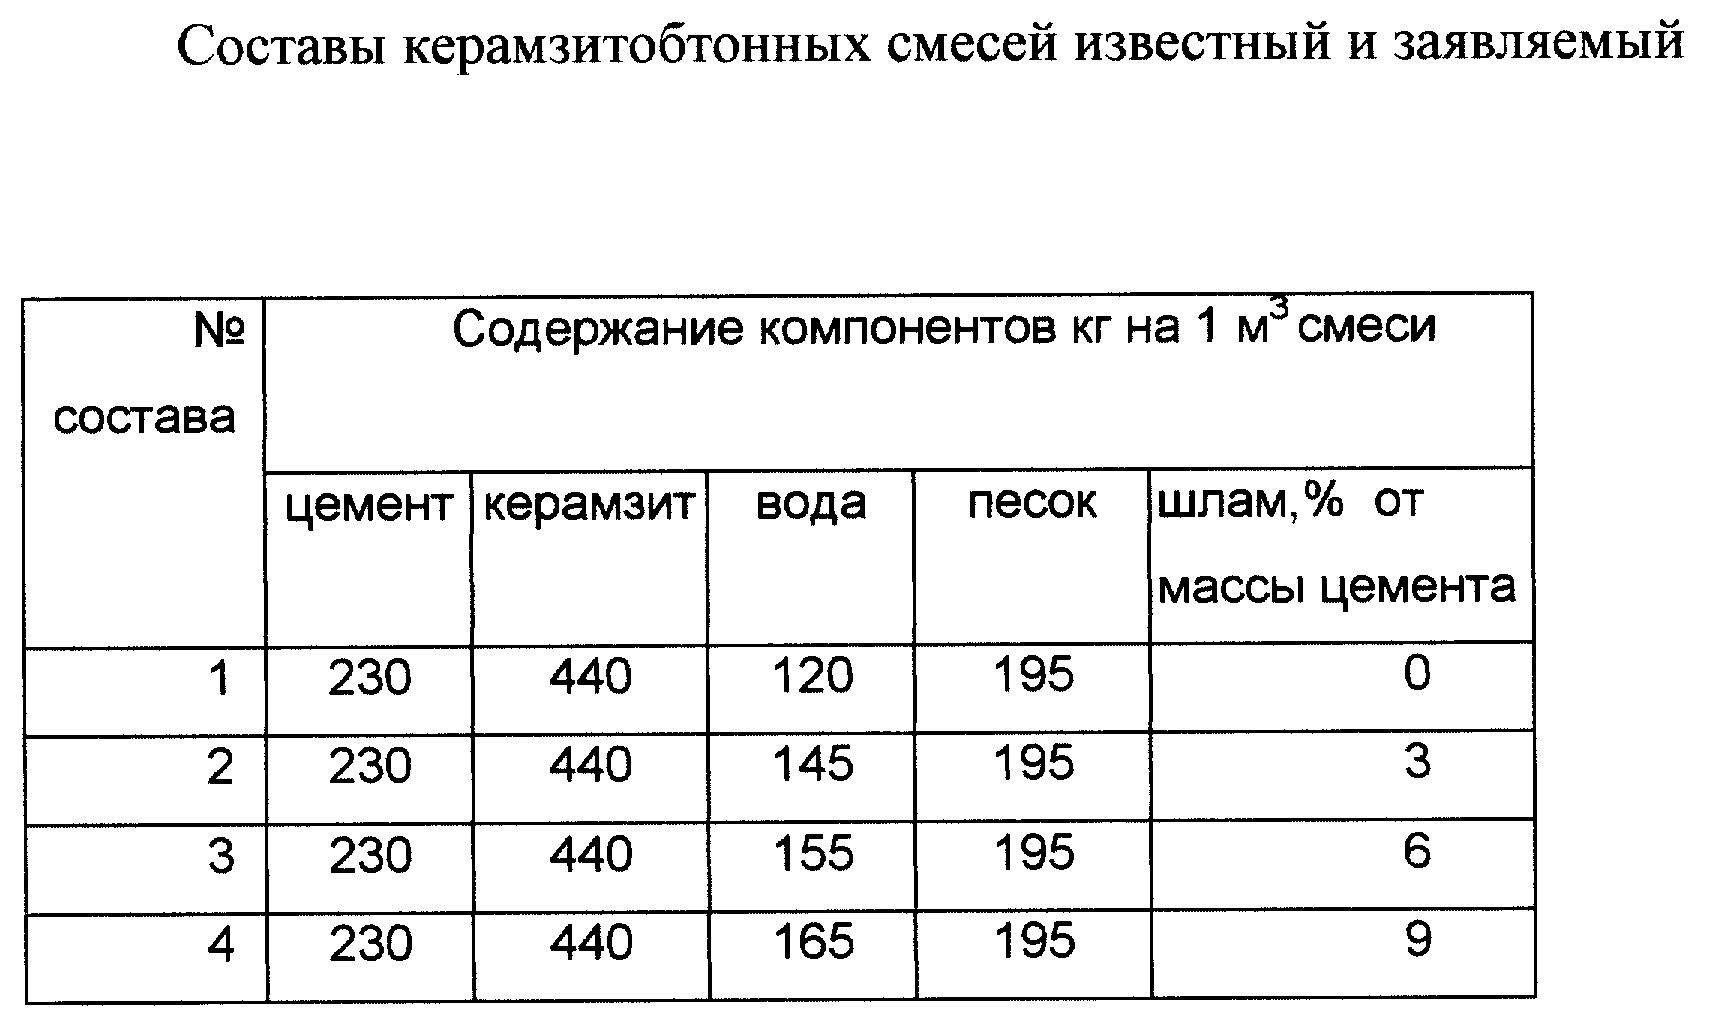
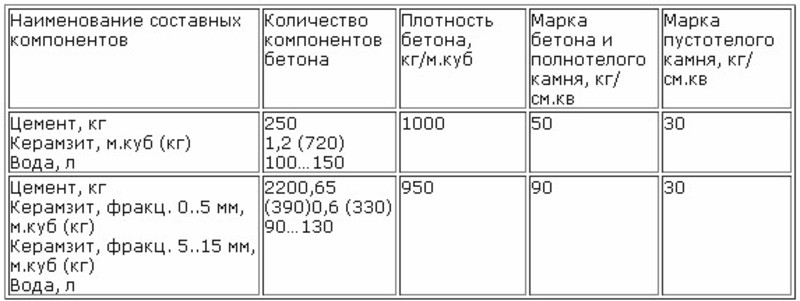
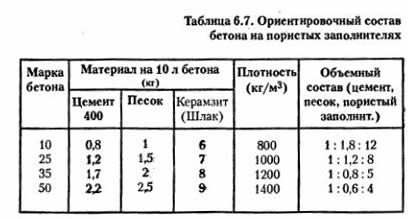
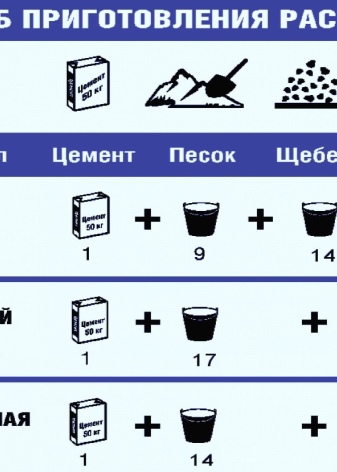
Filling is carried out with prepared expanded clay concrete. To do this, combine three parts of sand, one - cement material and one - expanded clay. Such a solution has a good strength indicator. With an increase in the proportion of expanded clay, the floor turns out to be warmer, but it quickly begins to crack and crumble. The exact same situation occurs when manipulating sand. The solution should turn out to be sparse in order to fill all voids and irregularities.
Filling the rough screed
Let's move on to the next working step. The prepared solution is poured onto the floor in sections arranged with metal slats. After that, the mass is leveled and rammed. To work comfortably, you should start from the far walls and gradually move towards the exit. The leveled floor should stand within three days. The rough screed is watered daily with water so that cracks do not appear.
Pouring the finishing screed
This element is necessary when it is planned to use a self-leveling self-leveling floor. Materials, as a rule, are sold in a state prepared for work, and all that remains is to carefully pour the contents of the buckets onto the surface.

But if everything is done correctly when arranging the rough screed, then the floor turns out to be even enough to lay tiles, parquet or laminate boards on its surface.
Cement milk and its application
Many materials are used in construction. Working with them requires special knowledge and techniques. One of these materials is cement milk, which is both production waste and a special solution necessary to work with this or that material. Its use is not regulated by GOST standards, therefore the correct proportions and application depend only on the knowledge of the master.
Cement milk. Definition. Composition and proportions
There are two concepts of cement milk: 1. Cement milk is a water-cement mixture that is diluted to a liquid state, without the use of sand or filler. There are no exact proportions for the preparation of such cement mixtures, they are selected in each specific situation. 2. During the construction of a reinforced concrete structure, a little liquid is released by vibration, this is cement milk. After its release, it is necessary to stop vibration so that the solution does not stratify. The basis for the formation of milk can be an aqueous solution of calcium hydroxide, which, after laying the coating, comes to the surface and, in reaction with carbon dioxide, turns into a water-insoluble film of calcium carbonate.
It can also be formed from alkali metal salts in concrete, ash waste from power plants, or other impurities added to concrete. When creating a water-cement mortar, the interaction with other substances in the mixture and when it goes out into the air (under the influence of CO2) is carbonized. Misuse of the water in the solution can be another cause of skin formation. The film interferes with the adhesion of the concrete base and finishing materials. Milk must be removed, otherwise it will flake off and fall off along with the paint. Instead of a monolith, three layers of material are obtained, which halves the expected strength. Each layer accepts the load separately, not as a whole. If too much liquid is released, this means that the water-cement balance or the number of constituents has been disturbed.
How to remove cement laitance?
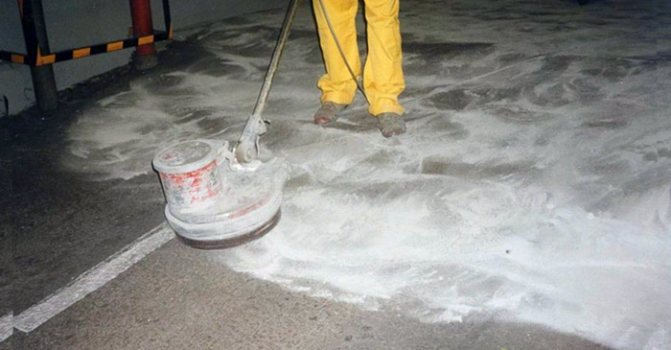
The film is removed by chemical or mechanical action.The chemical method consists in the use of acid solutions, which destroy not only the film, but also negatively affect the concrete itself. Mechanical methods for removing milk are its "scraping" with sand or shot blasting machines, the disadvantage of using this method is that the use of the necessary equipment is an expensive, laborious process, at the same time it does not work well in hard-to-reach places. The easiest way to remove the film, although not the most effective, is to use a water jet or water / air jet. This method cannot be used when water-insoluble films are formed, since instead of removing it, an adhesive oil film forms on the surface. Mechanical dry cleaning is also done by hand using metal brushes and brooms.
Milk skimming using hydrochloric or acetic acid is an acceptable but unreasonable method. To protect against the negative effect of cold hydrochloric acid on the cement, it is neutralized using concentrated alkali, which is applied to the concrete coating, after which the surface is washed with water. This reduces the erosion of the coating, but anyway, before the subsequent coating of the base with a decorative material, the surface must be dedusted.
Cement milk - application
Cement milk is used as: • a surface fixer, when it is necessary to protect a stone surface from the effects of the external environment, this is a method of concrete ironing, • protection against corrosion of the inside of metal containers, • as a component of the cement part of a light foundation made of granular slag or expanded clay (1 part of cement 2 part of the water), • the first stage when using concrete pumps.
Cement milk is a product that is released from a water-cement mixture after it has been laid. It forms a film on the surface of the coating, which prevents the monolithic connection of the base and the decorative coating, due to which the strength of the structure decreases. To remove cement laitance, chemical and mechanical methods are used, each of which has its own pros and cons of use.
Formulation types and requirements
The main characteristic of a cement slurry is its strength. It is due to the ratio of cement and sand. The composition of the product can be changed per piece, which makes it possible to obtain several types of mixtures. Each of them is intended to be used in a specific environment.
Therefore, it is important to properly prepare products during the construction of various facilities.
Types
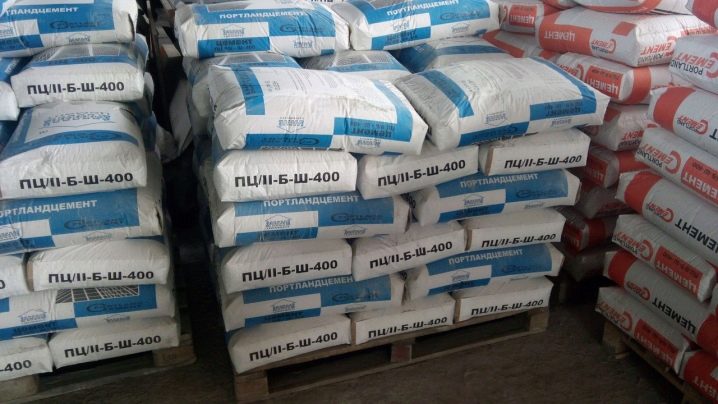
One of the criteria for dividing cement mixtures into types is the proportions of internal components
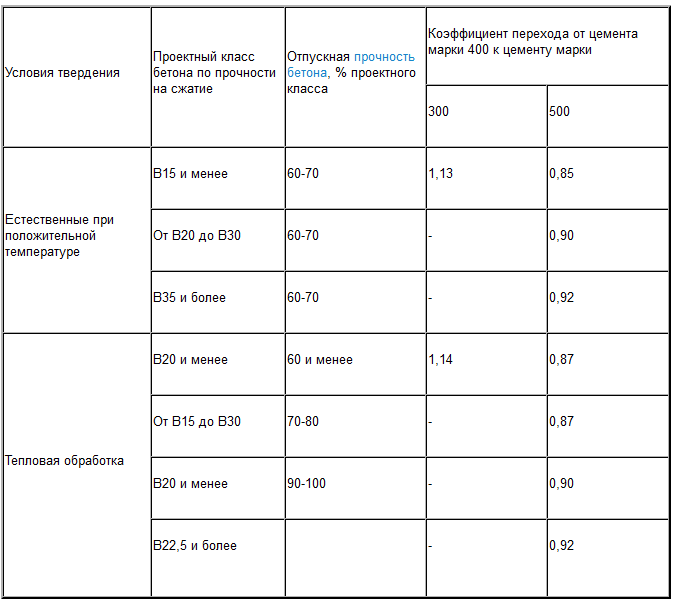
It is worth noting that only one brand of cement can be present in one composition. But they can also change, since the strength will depend only on the concentration of the components.
They are conventionally divided into several brands.
- M100 (M150) - these mixtures are characterized by low strength. For their preparation, you can use cement grades M200 – M500. But at the same time, it is necessary to correctly select the proportions of the cement-sand components.
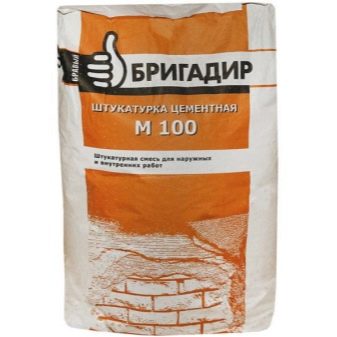
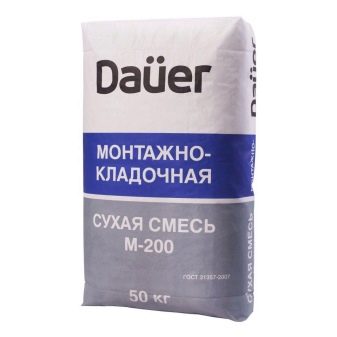
- M200 is one of the most common types of solutions. It is used very often in everyday life for the construction of paths and or the formation of coatings that do not lend themselves to significant loads. This mixture dries relatively quickly, but at the same time it requires compliance with certain microclimatic conditions.
- M300 - this type of solution can already be attributed to concrete types. It is used to prepare concrete, from which strong floor slabs are then made, foundations are poured and much more.
- M400 is durable concrete, which consists of high quality cement grades (M350, M400, M500). It is used in the construction of foundations for multi-storey buildings. This solution forms the basis for the manufacture of reinforced concrete floor slabs and other similar products.
- M500 is the most durable concrete that can withstand very high loads. It retains its original properties for many years and under the influence of various irritants.
Additives
Cement quality depends on almost all of its components that are present inside. Sometimes the properties of a sand-cement mixture are not enough, so you need to adapt them to certain conditions.
Several products are used today as cement mortar additives.
Lime. Only its quenched types are used as additives. The introduction of this substance allows you to slightly increase vapor permeability and strength. But in order to prepare such products, you must observe the exact proportions. Very often plasters are made on the basis of lime, which are perfectly applied to the walls.
PVA. Adhesive improves the adhesion and plasticity of the mortar
It is important to choose the correct concentration of the additive in order to obtain a good mixture.
Detergents. Such products affect the plasticity of the solution.
They are added to the composition only after water. Here, too, the exact dose of the impurity per unit volume must be observed.
Carbon black or graphite. These substances practically do not affect the physical properties of the mixture. They are used only as dyes to change the color of the finished product.
How are lighthouses displayed?
The highest point is chosen as a reference point. The "main" beacon is placed on it, at least 6 mm high. Others should be equated with him. They are fixed with cement mortar or alabaster. If only they stood securely. In this case, everything should be done quickly enough.
Using a level of any kind, the intended edge of the screed is marked on the walls. Lines are drawn along the marks, usually a dye thread is used
Connection of lines is important! The entire base-floor is divided by beacons into parts 1 m wide with a reference point on the line
It is easy on them to level out the expanded clay layer in the future.
When marking, take into account the height of the finishing coating in other rooms. This is necessary to avoid unnecessary sills. You should also consider the presence of wires, podiums, etc. For a more reliable installation of lighthouses, expanded clay can be spilled with a mixture. From two bags (50 kg) per 1 m2, a layer of 4 cm will turn out.
Mortar for brickwork: composition and proportions
During the construction of a building, a variety of mortars are used for masonry, because everything here depends on the number of storeys of the building, the mobility of the soil and the type of structure that is being erected. Let's find out which mortar for brickwork is applicable in this or that case.
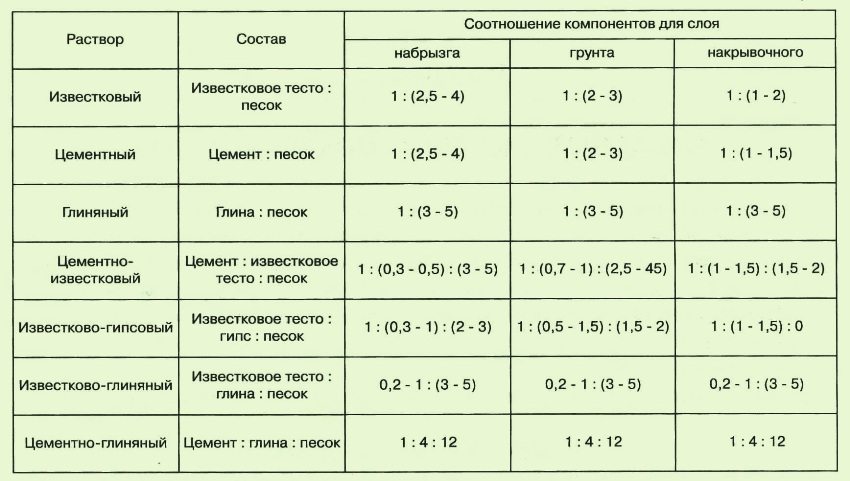
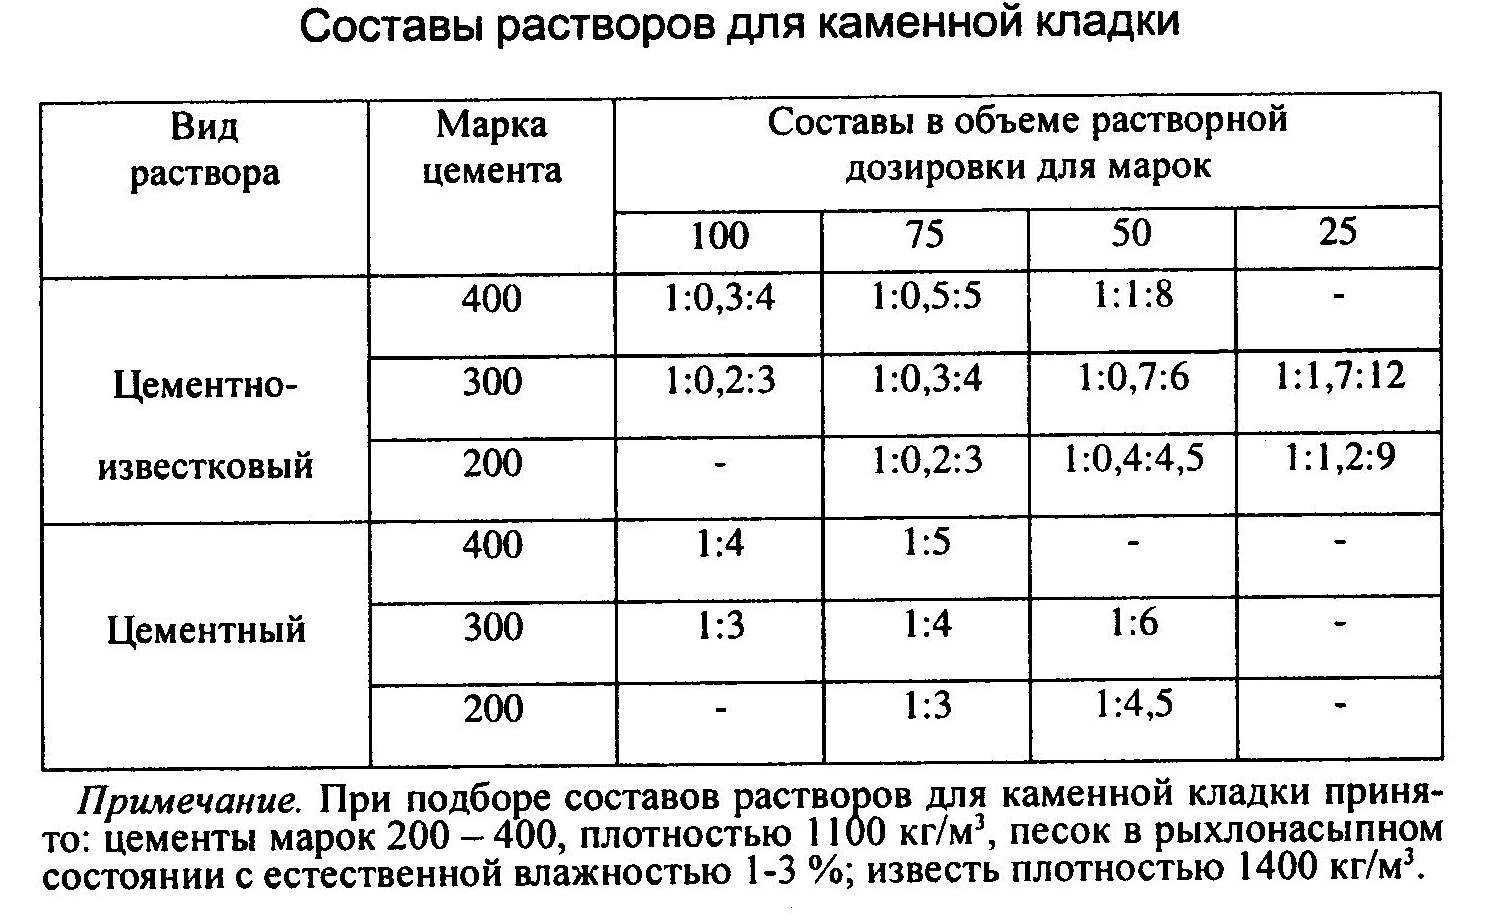
First, let's figure out the types of mortars for brickwork. There are only three of them: lime, cement-lime and cement. Mortar due to low strength, they are rarely used, although to improve the qualities of cement - yes.
Lime-cement mortar consists of slaked lime, which is diluted with water to the thickness of milk, cement and sand. To prepare such a solution, cement and sand are thoroughly mixed, after which strained lime is added. This simple technique allows you to increase the plasticity of the solution, so it is much easier to work with it. This mortar can be used for almost any type of brickwork.
Normal cement mortar also very often used in construction. It consists of sand and cement. The amount of sand in the cement slurry depends only on the quality of the cement purchased. Cement mortar is inferior to cement-lime in terms of mobility, therefore it is more difficult to work with it.
Now let's look at the brands of solutions. which are used in construction
The brand is very important to know, since the proportions of the mortar for laying bricks directly depend on it
M50 solution usually used to seal cracks and seams indoors during repairs. M75 used for partitions and walls indoors.For outdoor masonry, this solution is used only for the construction of temporary structures.
M100 brand solution used to fill the seams of panels, floor screed, masonry (from solid and large bricks). It is allowed to use mortar for laying the underground part of the brick foundation.
M150 brand solution used for filling seams of structures made of heavy concrete and screeds. This solution has a very high strength, therefore, in it, as well as in higher grades, it is unacceptable to use components that provide greater elasticity (lime, gypsum, clay).
For masonry work, they are almost never used solution M250... since it is used mainly for the manufacture of especially strong screeds and for the installation of monolithic unloaded floors.
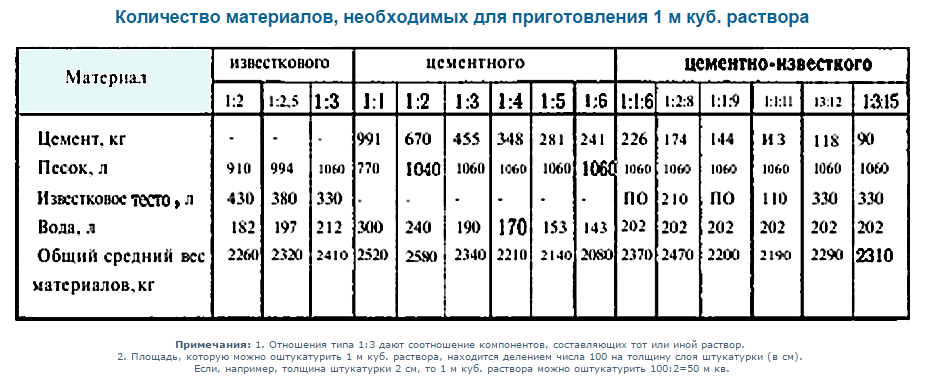
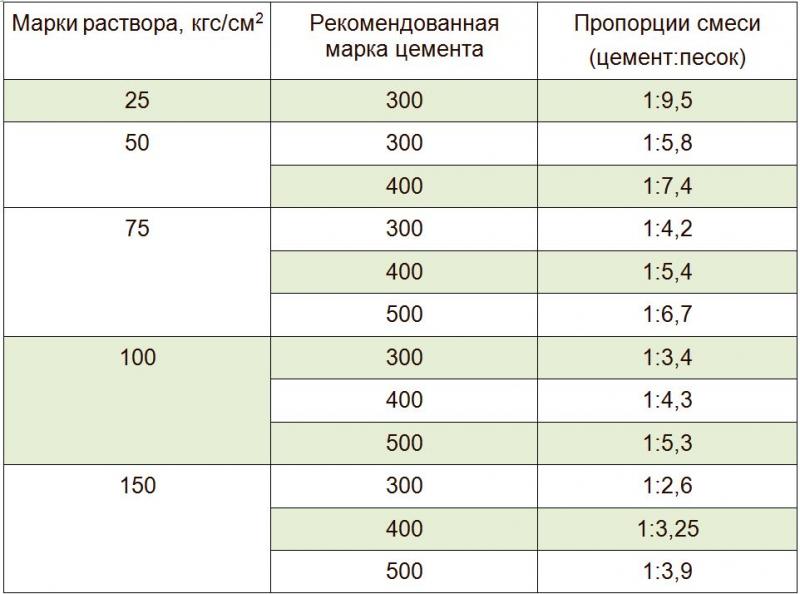
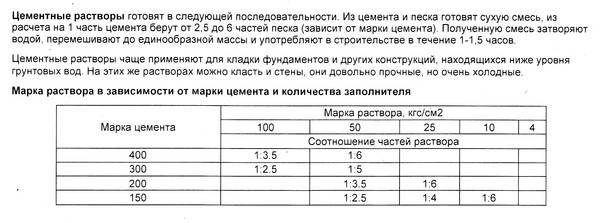
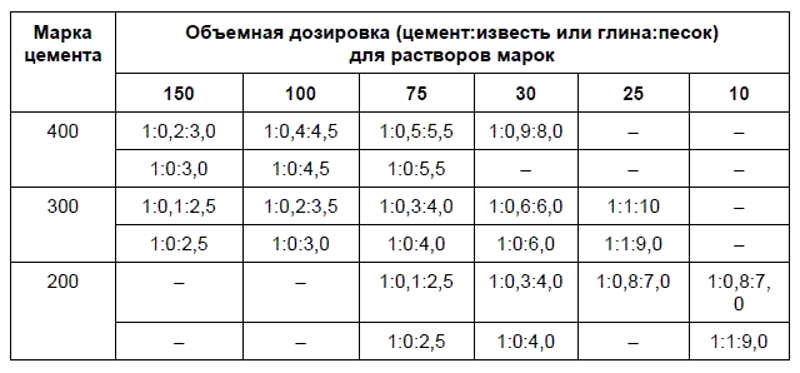
Now let's deal with the proportions of the components for the solution... Usually, for the preparation of a solution, the following ratio is used: from 1: 3 to 1: 6 (cement-sand). The amount of sand depends on the quality of the cement. The higher the quality of the cement, the more sand will be required to prepare the mortar.
For preparing M100... as one of the most popular mortars for masonry, a simple ratio of 1: 4 (if cement grade M400) or 1: 5 (cement M500) is used. To make the solution more elastic, lime can be introduced into it, in this case the proportions for M100 will be as follows: 1: 3: 0.2 (cement M400, sand, lime) or 1: 4: 0.3 (cement M500, sand , lime).
When preparing a good solution, you should take optimal amount of water... For a conventional cement mortar, the optimal amount is considered to be 0.8 parts of water per 1 part of cement. To prepare the mixture, use only cold and clean water!
In many ways, the quality of the solution depends on the sand. It must be clean, without various stones. For masonry mortars use construction sand with a grain size of 2 to 2.5 mm... Before preparing the solution, sand must be sieved, because this way it mixes much better with cement.
Never do not prepare a lot of solution... after all, after only 30 minutes, it becomes unusable. Also keep in mind that the finished solution should be stirred from time to time. When heavy particles settle to the bottom, the solution becomes heterogeneous and stratifies. It is impossible to make masonry with such a solution.
Popular Tips
- Hard erudition test: 10 We invite you to try your hand ...
- Erudition test: master 10 Ten questions, and in each ...
- Test: do you have a stable little thing that went wrong ...
- The erudition test that is passed Shake your knowledge in the company? ...
- A quick test of erudition from Try our test and ...
- Erudition Test: Show how Curiosity is a very good trait ...
- Erudition test, which is successful We invite you to test your knowledge ...
- What cannot be said in front of the mirror? Mirror as a subject of frequent use ...
- A difficult erudition test: only Ten questions, four possible answers, ...
- An interesting test: which hemisphere of the brain There is a theory that the left and ...
Cooking technology
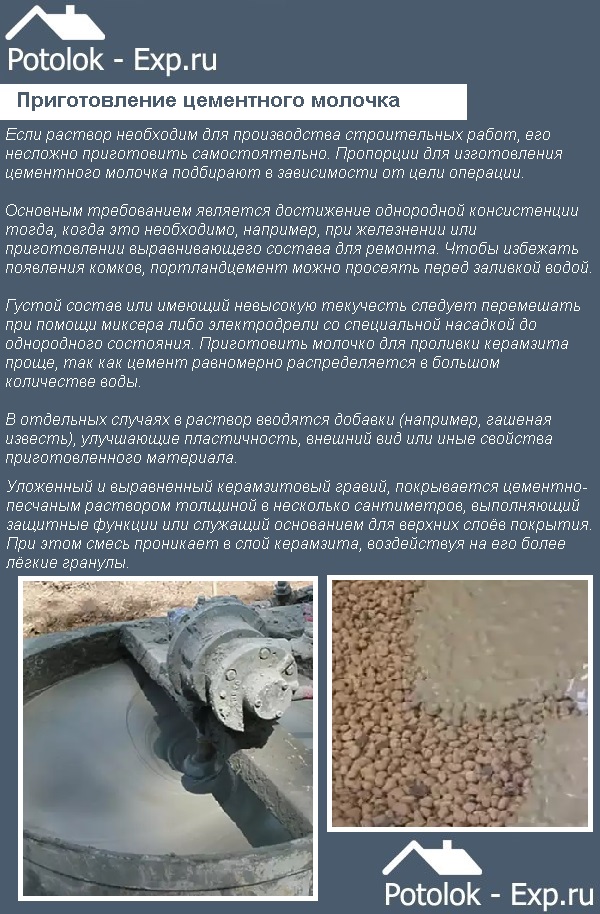
Before making cement milk, you need to determine the scope of work and perform calculations, measure the volume of components. Usually the ratio is as follows: a part of cement and 2-3 parts of water.
Solution preparation:
- Measurement of the required volume of cement.
- Adding a small volume of water to the powder, thoroughly mixing the mixture until smooth.
- Gradually adding water without stopping the stirring of the solution until the desired level of fluidity is reached.
If there is little cement, a small part of it in proportion can be replaced with slaked lime (but not much, as this will affect the quality of the mixture). Sometimes for mixing the solution, a primer is chosen as a complementary component.It must be remembered: in order for the cement milk to be homogeneous, it is preferable to sift the cement through a fine sieve.
The exact proportion of components for the preparation of cement milk is not indicated in the standards and GOSTs. Therefore, each master prepares a mixture based on his own intuition and professional advice.
Several optimal recipes for mixing a solution:
Depending on the composition, milk can have a different consistency and appearance - from a gray liquid solution to a suspension or dough. It is best to mix the solution using a special attachment for an electric drill or a hammer drill (this will help to avoid the risk of lumps). Slaked lime is added to increase the plasticity of the mixture. If the milk is kneaded for pouring, it should have a consistency of liquid glass.

Many masters also follow this rule: to get the optimal mixture of cement milk, add 3 times more water than indicated in the recipe. But there may be nuances, so the consistency needs to be checked.
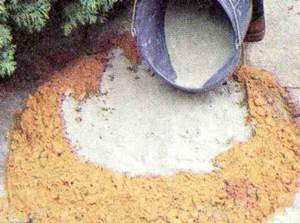
How to find out the optimum consistency for pouring expanded clay:
- Spilling a small backfill area with material.
- Waiting 15-20 minutes and observing the layer: if the solution has seeped completely down, disappearing without a trace from the surface, it is too liquid. When all the solution (at least most) is on the surface, it is better to add water.
- The most optimal option is when 75% of the milk has seeped through expanded clay, but there is not much on top.
The composition and proportions of a quality solution
 The proportions of the mortar for laying bricks are determined based on such indicators as the number of storeys of the building, the type of structure being erected, the type of soil, etc.
For the masonry of one-story buildings, a lime mortar is used, which is characterized by ease of installation and excellent "tenacity". The optimal proportions of sand and lime are 4: 1.
Cement mortar is used when laying walls with a thickness of less than 0.25 meters. The sand-cement ratio should be from 3: 1 to 6: 1, depending on the characteristics of the structure being built and on the brand of cement.
The mortar for laying bricks is prepared in two stages: first, the dry components are mixed, then water is poured. The water must be clean and cold.
The optimal water consumption for a cement-sand mortar is 0.8 parts of water per one part of cement.
The popular brand of mortar for brickwork 75 is prepared from cement, lime and sand in the following proportions: 1. 0.8. 7. Special dyes can be added to the facing brick mortar in order to achieve certain design ideas, for example, combining yellow facing bricks with brown joints.
For structures made of refractory bricks, which are expected to be exposed to high temperatures, a special sandy-clay solution is used with the addition of refractory clay or fireclay powder. This solution is perfect for laying fireclay brick stoves or fireplaces.
Preparation of the mixture
The technology for preparing the cement slurry is quite simple. First, calculate how much work is supposed to be done. Based on this, calculate and measure the required amount of cement
It is important to remember that there should be 2-3 times more water than cement. Such a solution is not regulated by any norms, therefore, depending on the specific task
The following is pretty simple:
- add a small amount of water to the measured amount of cement and stir, bringing to a homogeneous consistency .;
- without ceasing to interfere, gradually add water to make the milk more fluid and homogeneous;
- in the event that there is not enough cement to prepare the required amount of the mixture, slaked lime can save the situation. It can act as a substitute for a small portion of the cement powder.
Sometimes, for the preparation of cement milk, a primer is also used as an additional component. After stirring, the primer mixture can be passed through a sieve to remove any lumps and debris. This will help to achieve a more homogeneous mixture.
Most often, the following types of cooking recipes are used, depending on the work that needs to be done:
- if the task is to patch up cracks with a solution, you need to mix cement powder with water in a 1: 2 ratio;
- to strengthen the screed, cement should not be present in the solution by more than one third;
- to make an interlayer under the foundation, you need to mix cement with water also in equal amounts;
- if the task is to fill in a layer of milk after filling expanded clay, the mixture should be more fluid. It is necessary to observe the proportions - 1 part of cement to 3 parts of water;
- for wall decoration, a more fluid mass is also used, which can be obtained by mixing cement powder with water in proportions of 1: 3. At the same time, there is no difference whether internal or external wall decoration is performed.
To obtain a more uniform consistency of the finished solution, it is advisable to use a drill with a special nozzle in the form of a whisk. It will get rid of lumps after mixing. And by adding slaked lime to the cement mixture, you can achieve greater plasticity. The consistency in this case will resemble liquid glass.
For pouring expanded clay, you need to prepare a solution of optimal density. To check whether the obtained cement slurry meets the specified requirements, carry out the following sequence of actions:
- on a surface covered with expanded clay, select a small area, fill it with the resulting mixture;
- wait 20 minutes for the liquid to dry and saturate the expanded clay;
- after the allotted time, check the result;
- in the case when the solution escaped inside the expanded clay and nothing remained on the surface - the milk turned out to be liquid. Add more cement to it;
- if most of the solution remains on the surface - the milk turned out to be too thick, dilute it a little with water;
- a good option will be the one when most of the solution seeps into the expanded clay, but a thin layer of cement spill remains on the surface. Thus, the expanded clay particles will be reliably adhered, and its surface will be smoother and more even, due to the frozen thin layer of mortar.

