Device Models
Lg
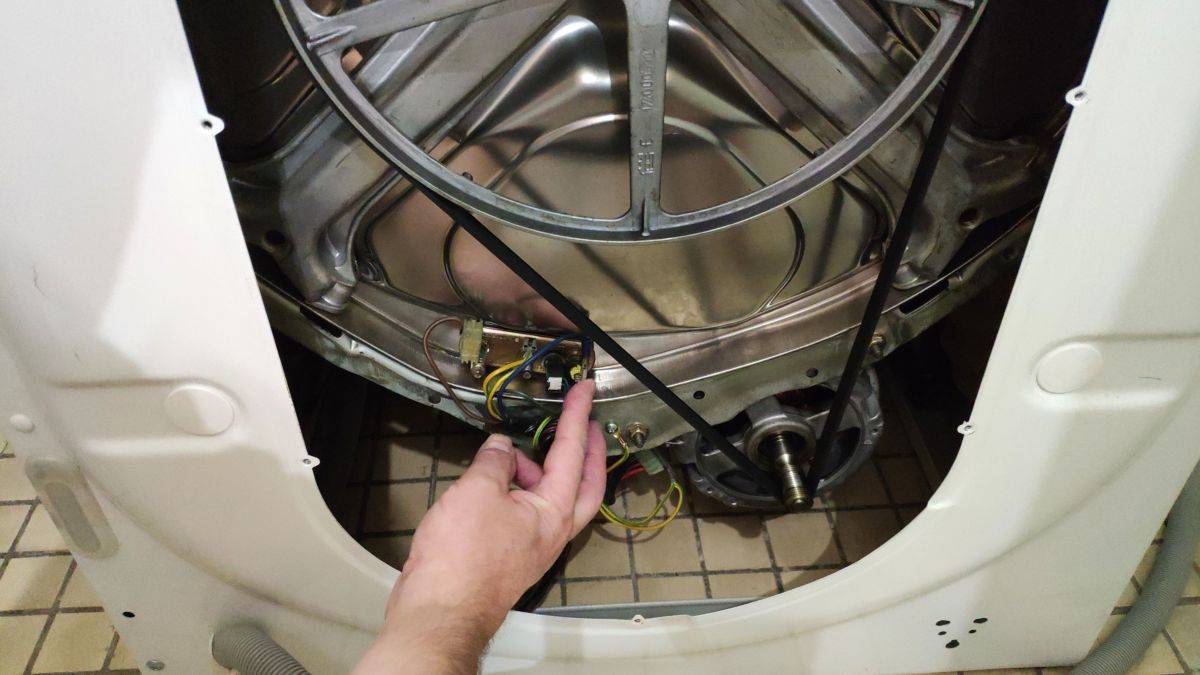
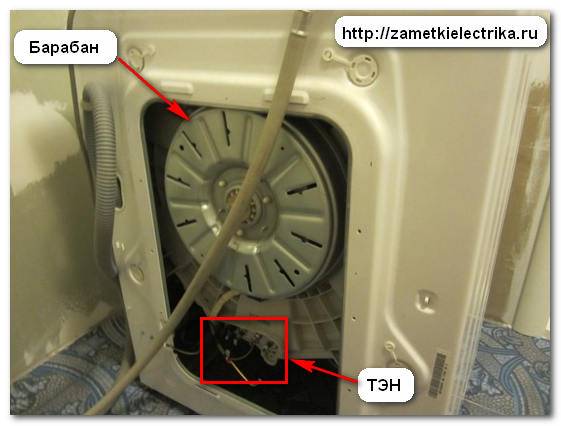
On machines from this manufacturer, the heater is often located at the back. Contacts go out, but most of the spiral is hidden inside the case. It is difficult to get confused - the device of this brand has a direct drive motor, which is attached to the tank, and the heating element is under the tank. The case does not require strong disassembly.
Advice
The power of the new heater must match the old one. LG machines have a power of 1900 to 2000 watts.
Indesite
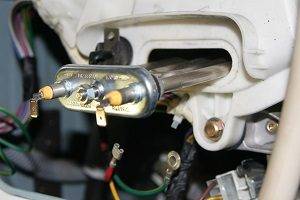
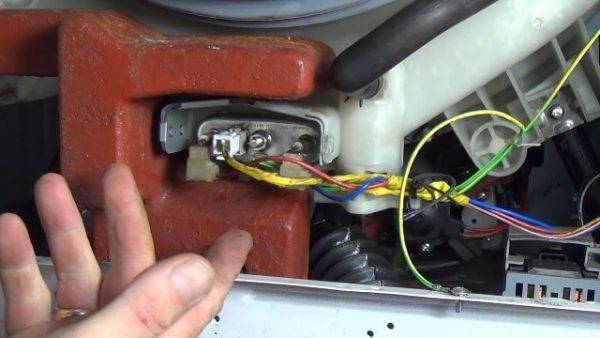
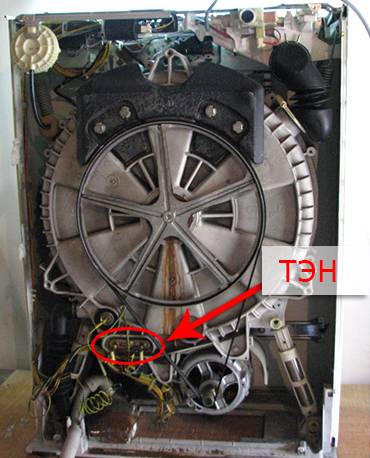
Here the heater will be located at the back. Close the inlet valve before work, disconnect communications. The rear wall of Indesit machines has a small hatch. Prepare a curly screwdriver or "star". Teng is fastened inside with a special bracket: make sure that the part falls directly into the bracket.
Samsung
Teng is located on the flange (together with the fuse). If the heaters of other machines can be repaired, then in Samsung machines this is impossible - you will need to buy a new one. Price - within 700-1500 rubles.
How to replace
To replace a non-functioning heating element with a new one, you will need:
- Disassemble the washing machine, taking into account the peculiarities of its design.
- Disconnect the wiring and check its condition with a tester.
- Dismantle.
- Install a new, serviceable heating element.
- Assemble the washing machine to its original state and check its performance.
Design features and disassembly of various models
Depending on the manufacturer of the washing machine used in your home, disassembly may have some nuances that need to be considered. Among the common models, often bought in stores, there are brands:
- Samsung;
- Ariston;
- LG;
- BOSH;
- Indesit.
Samsung
Washing machines from Samsung are among the easiest to disassemble. To work with them, you need to know the following things:
- The heating element that needs to be replaced is located under the front cover, at the bottom of the water tank. Access to it is not closed by anything, and getting to it does not present any problems.
- The compartment for loading detergent is attached to the structure with 2 self-tapping screws and, if necessary, can be easily dismantled.

Indesite
Equipment manufactured by Indesit is also easy to disassemble. Necessary:
- minimal set of tools;
- carefully disconnect the board with wires when dismantling the heating element;
- the heater itself is very convenient; to dismantle it, it is enough to unscrew the back cover of the machine.
Ariston
Replacing the heater in Ariston does not present any problems for the owners. It is located very conveniently and practically. Problems arise when the bearings inside the tank fail.
Lg
Household appliances from LG are not designed in the most convenient way, and you will have to tinker with it when disassembling it. Algorithm of actions:
- First, the nuts are unscrewed, with which the hatch cover is attached.
- As soon as the nuts are dismantled, remove the front panel.
- The next step is to unscrew the screw, with the help of which the clamps holding the cuffs are held.
- Teng is located under the tank.
- To remove the tank, you must first twist the weight.
Bosch
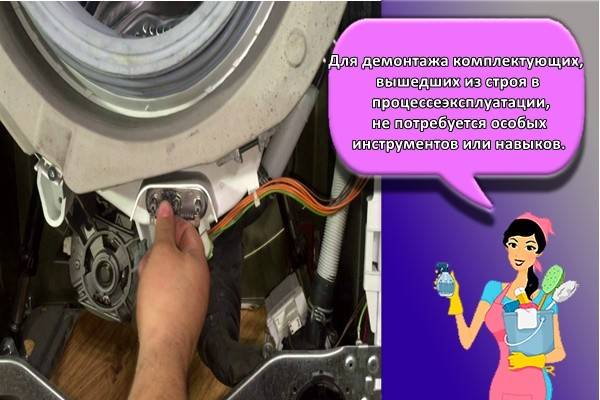
BOSH is easy to disassemble. To dismantle components that have failed during operation, no special tools or skills are required. According to the assurances of experts, for a complete disassembly of the washing machine, it is enough to have in stock:
- Phillips screwdriver
- wrench.
Disconnecting the wiring and checking with the tester
Before disconnecting the heating element from the machine, be sure to do the following:
- Unplug the appliance and turn off the water.
- Before disconnecting the wires leading to the heater, their location must be memorized or photographed.
- A tester check is carried out to determine the condition of the heater. If the tester shows several ohms, the device is working properly. When the tester determines large values, starting from 10 and above, the part can be safely thrown away.
Dismantling
The algorithm for dismantling may differ slightly, depending on the manufacturer of the unit, but, in general, it looks like this:
- It is necessary to remove the nut with which the heating element is fastened to the body.
- Using a rubber mallet, gently knock out the pin.
- We carefully take out the damaged element.
- We check it for performance.
Installing a new item
To install a new item, follow these steps:
- install the heater and tighten the nut on the main screw;
- we connect the electrical wires to the places where they were before dismantling.
Reassembly and Inspection
To reassemble, install the parts twisted from the machine in reverse order. Once the build is complete, do the following:
- We start a test wash and carefully observe if there are any leaks anywhere.
- Checking how the water heats up.
- If everything is in order, put the machine back in place.
The reasons for the breakdown of the heating element
Not a single manufacturer of washing machines independently produces all the constituent elements; a significant part of them is made at related enterprises on request. As a result, the risks of supplying low-quality goods increase. Responsible manufacturers send their representatives to suppliers to control the entire process and check products on site, and hackers buy what is cheaper. As a result, the heating elements fail. This is the most common cause of breakdowns. But there are also objective factors associated with operating conditions.
-
The heating element coil or control sensor is burnt out. In villages, the voltage in the network often jumps, because of the strong wind, it is possible to overwhelm the wires on the overhead power lines. The result is that the voltage instead of 220 V is 380 V. Either the heating element, or the automation, or all together burns out.
-
Poor water quality. Very often, water has a high concentration of calcium, at high temperatures it solidifies and settles on the surface of the heating element. Calcium greatly impairs heat transfer, which significantly reduces the heating efficiency. But these are not all the problems posed by solid calcium deposits. They provoke a significant increase in the heating temperature of the nichrome coil, it is not designed for such modes and quickly burns out. The high heating temperature of the coil causes the metal body to overheat - it also burns out.
Troubleshooting
It is easy to understand that the heating element has broken. If, while draining the dirty water, you touch the hose, and it is cold, it is time to change the heater. A few more signs:
- Deterioration in the quality of washing. Even if you raise the temperature manually or change the detergent, the laundry will not be cleaner.
- The amount of electricity consumed during washing has decreased. 80% - this is how much the washing machine uses to heat the water.
- The device shuts down on its own or the circuit breaker of the protective electrical equipment is triggered. This happens when the machine is filled with water. It is necessary to disconnect the machine from the power supply as soon as possible and not turn it on until repair.
Attention
At the first sign of a short circuit, disconnect the appliance from the mains and, if you are not experienced in troubleshooting such problems, call an electrician. Many older homes lack grounding and the risk of injury is high, so be extremely careful
But these signs are indirect. Ten will still have to be checked (if it turns out to be serviceable, the help of a person with a special technical education will be required, since there is a problem with the control electronics).The control is carried out according to 3 parameters:

- To break the chrome spiral. One of the most common reasons: the spiral burns out, and the current stops passing through it. The check is carried out by ringing the element (when the tester leads are connected to both terminals of the spiral, and the switch is placed on the "resistance" mark). Did the arrow jump to zero abruptly? The spiral is clearly burned out.
-
On the breakdown of the case. Dangerous malfunction, especially for residents of apartments without grounding and in houses with electrical wiring. In this case, the current enters the body, and a person is threatened with a serious electric shock when touched. Connect the device to the terminal with one output, and the other to the body.
Watch the arrow. If it keeps at zero - everything is in order, if it deviates - the element needs to be replaced. The switch should be set to 200 MΩ. The test is carried out on a heated heating element: connect the power to it for a few seconds, disconnect and act.
-
- Power check. This manipulation is not so necessary, but it will not be superfluous either. Switch the tester to AC amperage mode. Connect all the elements to the power source in order. An arrow pointing to 8A signals that everything is normal. If the current strength has decreased, the heating element has worn out to a critical state.

Replacing a part
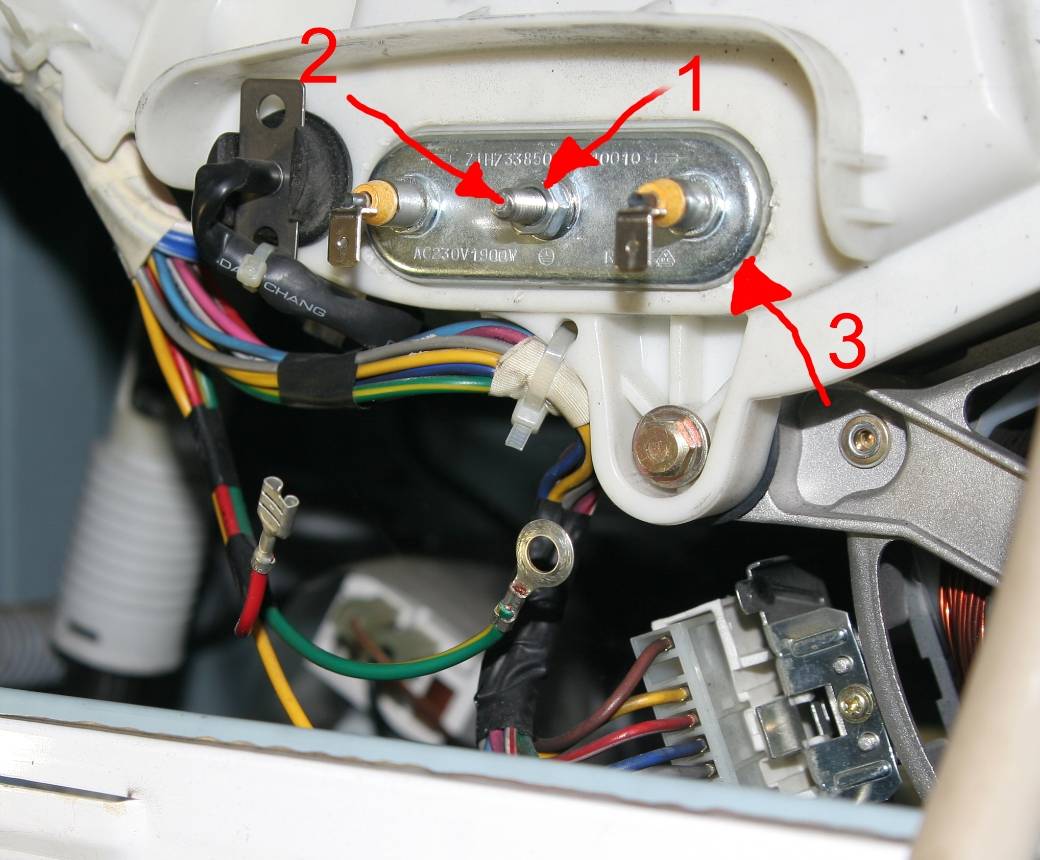
If you managed to purchase a similar serviceable heating element for a Samsung washing machine, then it's time to replace the burnt-out part and put the washing machine back into operation. We take the socket wrench and unscrew the nut, which is located between the contacts of the heating element. This nut is the main fastener that holds the heater, but in addition to the nut, there is still a spacer inside, so we proceed as follows:
- unscrew the nut;
- we take on the contacts of the heating element and slightly shake it from side to side;
- we take a small hammer and lightly hit the hairpin with which we twisted the nut;
- if everything is done correctly, the hairpin will partially fall inside;
- we take a flat screwdriver and pry the heating element as carefully as possible in order to dislodge it from the seat;
- pull the part by the contacts and pull the heating element out.

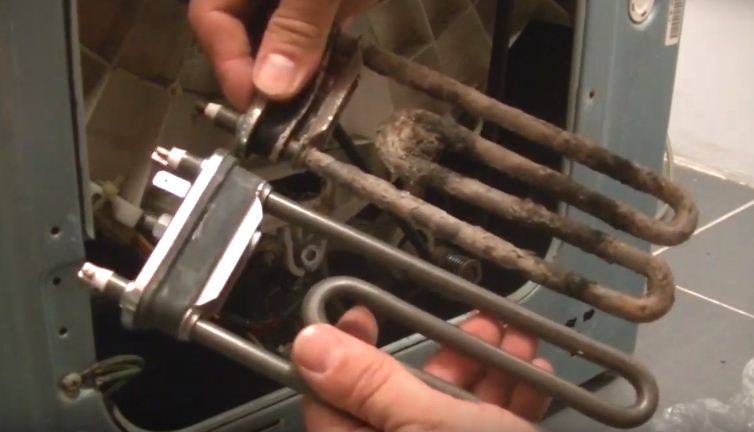
Having pulled out the old heating element, you can see in what condition it is. The part is almost certainly covered with a layer of scale, and in some places black spots are visible, which indicate that the heating element has burned out. We take a new heating element, check its resistance and make sure it is working properly. Lubricate his gum with a drop of machine oil, and then insert a new part into the tank of the Samsung machine. We put the temperature sensor in place, connect the wires to the contacts, and then assemble the washing machine in the reverse order and check its operation.
Related actions
During long-term operation, a fairly large amount of debris accumulates at the bottom of the tank of the Samsung washing machine: pieces of scale, buttons from clothes, pins, paper clips, coins and other things. Over time, this garbage can negatively affect the operation of the washing machine, so we, changing the heating element, will take the opportunity and take out all the excess from the tank. The fact is that the opening of the heating element is quite large. Through it you can relatively easily get into the tank and get out everything unnecessary with a stick or fingers.
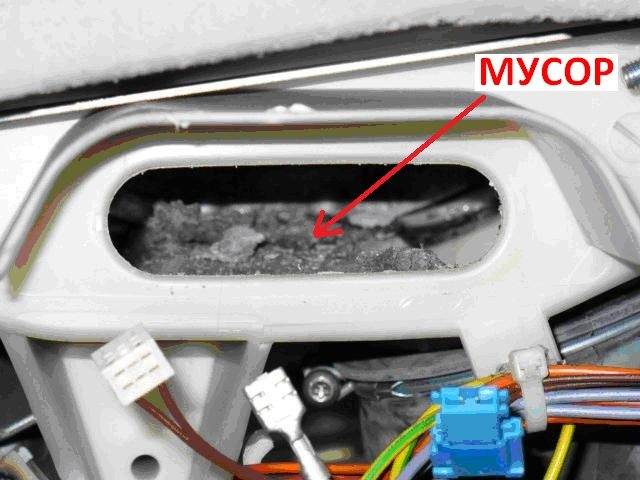
To facilitate the task, the masters advise to take a tablespoon, stick it into the hole for the heating element and slowly pull out all the garbage from there. Remember, a garbage-free washing tub is the key to the normal operation of your Samsung washing machine, so do not neglect this important concomitant action, even if replacing the heating element is a priority. Happy renovation!
How to remove and replace
 We unscrew the nut on the central screw of the heating element, but not completely.
When it comes out a little, we swing it from side to side and pull it towards ourselves, without making great efforts, so as not to damage the parts of the unit. When the ten is removed, carefully descale the cavity as much as possible.
Make sure that the sealing gum under the heating element is in a satisfactory condition, as it often becomes unusable due to scale and cannot be used anymore.
 The gum should be smooth and descaling should be easily removed.
Otherwise, it must be replaced to avoid a flood.
In the new heating element, we also push the screw all the way, so that the sealing gum enters all the way.
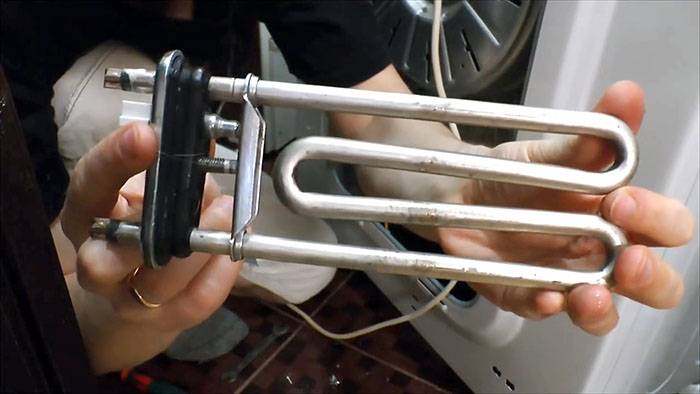
When installing, we control the fit of the heating element, it must stand between the limiting aluminum plates.
Note:
if installed incorrectly, the drum will rub against the heating element, which can damage it

If the drum touches the ten, you can tell by the characteristic sound.
Today we are changing the heating element on the Indesit WISL 82 washing machine. We tell and show how it is done.
1. According to the owner, the Indesit WISL 82 washing machine does not heat the water, stops at the “Washing” program, washes for hours and does not switch to the “Rinse” program. Moreover, if you put it manually on the "Rinse" program, then the rinsing and spinning goes completely and the machine turns off. According to our assumptions, the heating element (heating element) has failed.
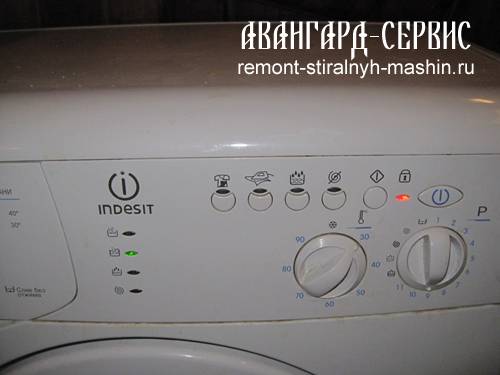
2. Set to the shortest program "Everyday wash" in order to check whether the voltage is on the heating element or not.
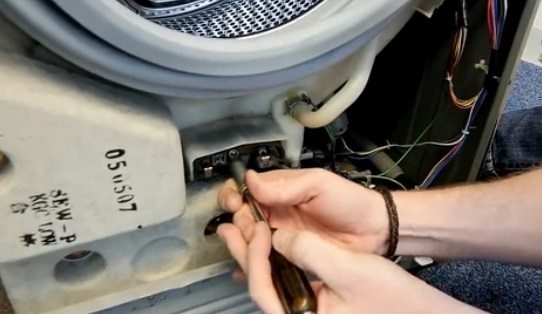
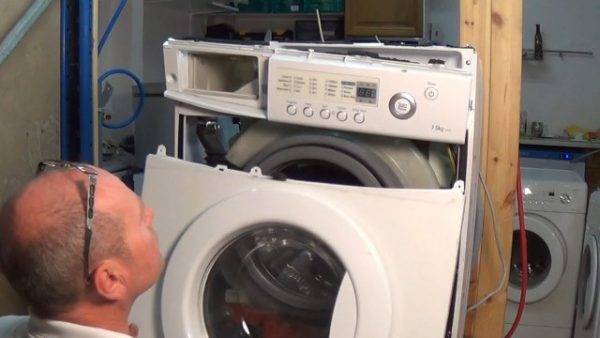
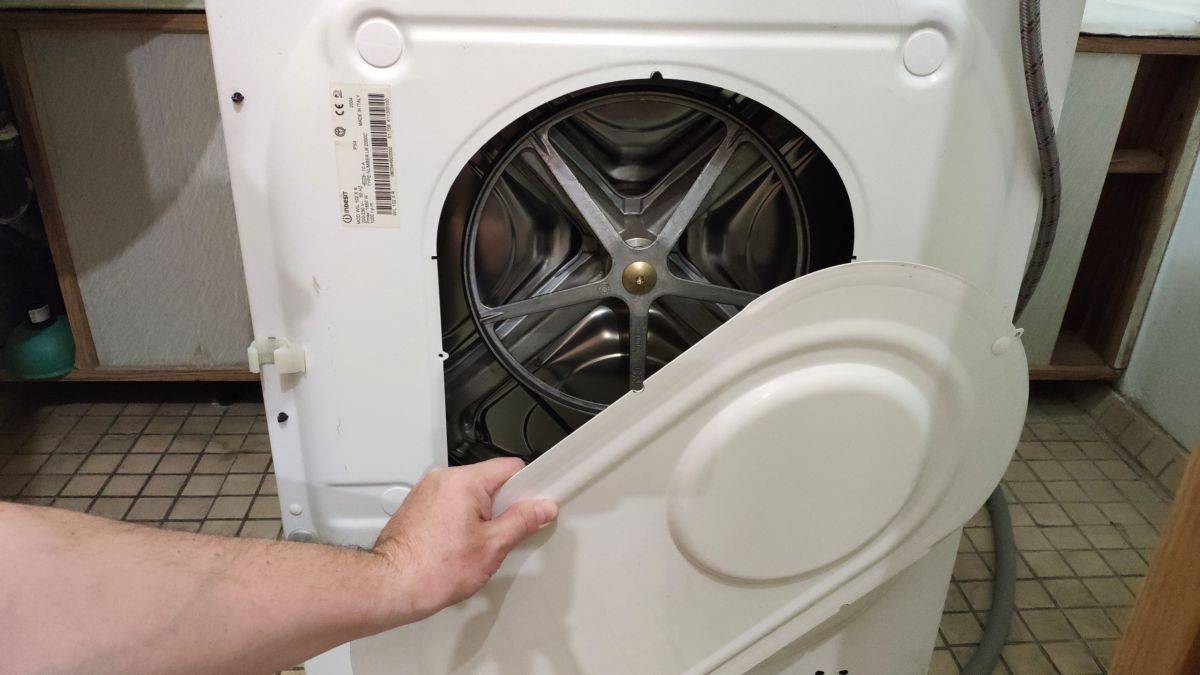
3. Without turning off the washing machine, we begin to disassemble it. For this we need a Phillips screwdriver. We unscrew the bolts from the hatch of the rear of the washing machine that hold the repair hatch.


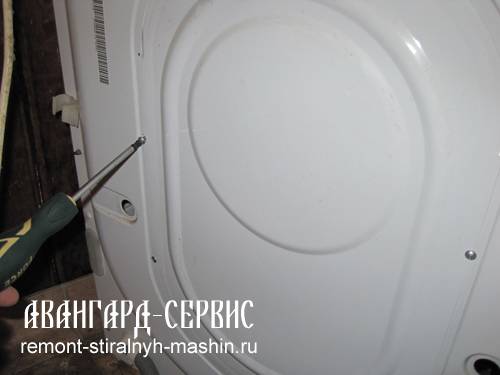
4. After unscrewing the bolts, pull the hatch towards you and lower it down from the seats. We now have access to the main nodal mechanisms of the unit.

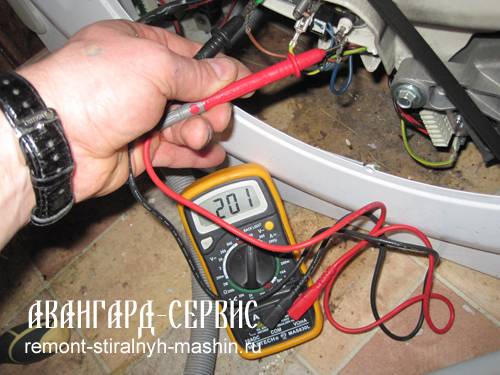
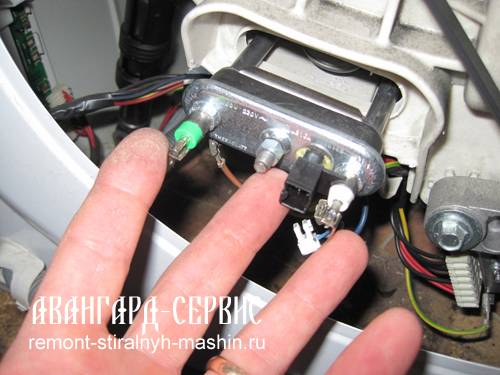
5. In time, while we were disassembling the washing machine, it was time for us to heat up. We take an electronic measuring device and check the voltage supplied to the heating element. The device shows that voltage is present. This means that the control module is working properly. And we move on.
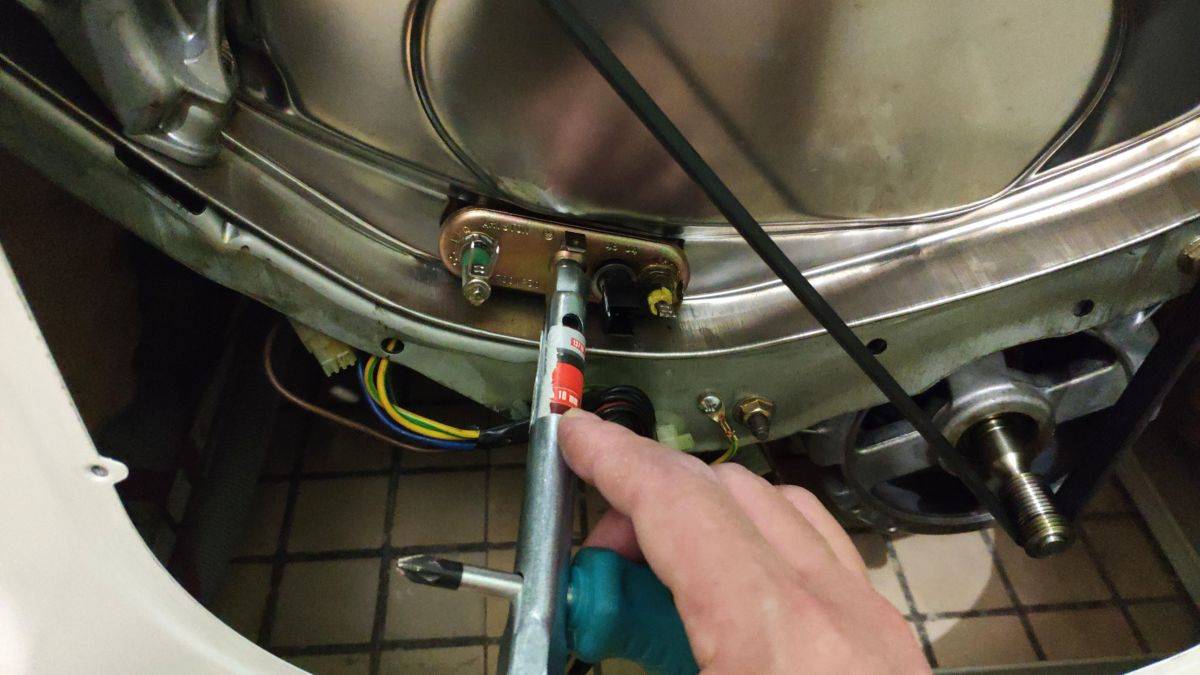
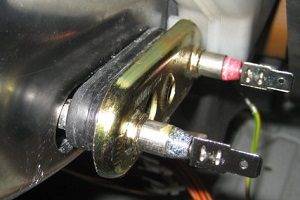
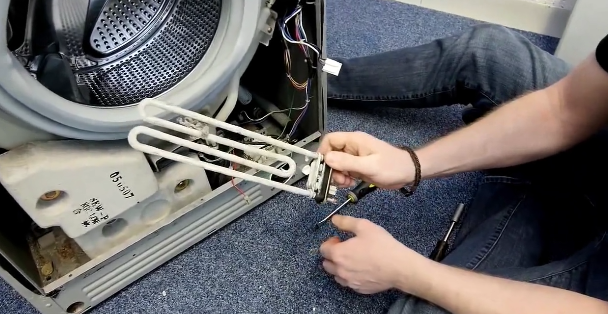
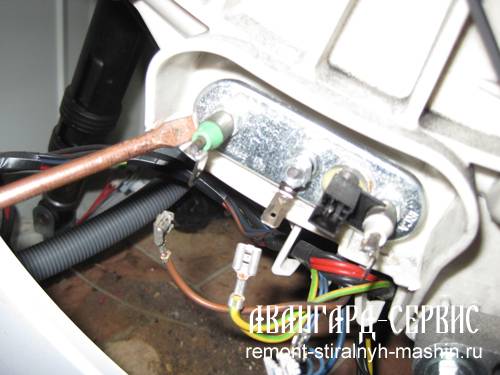
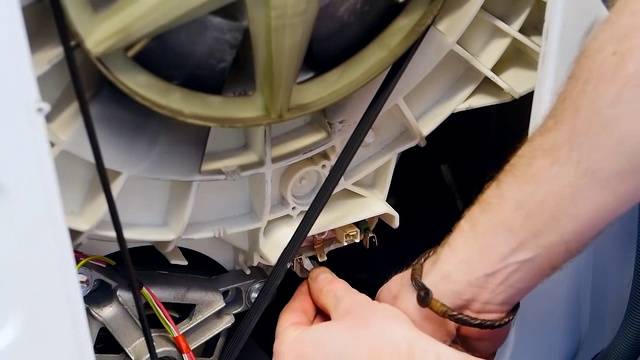
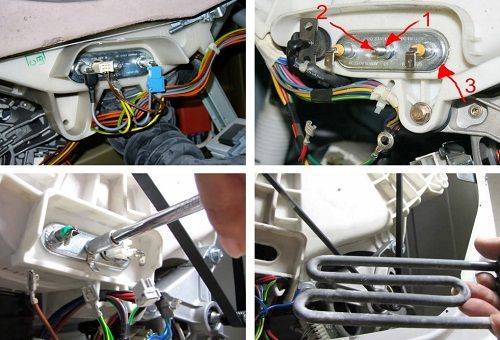
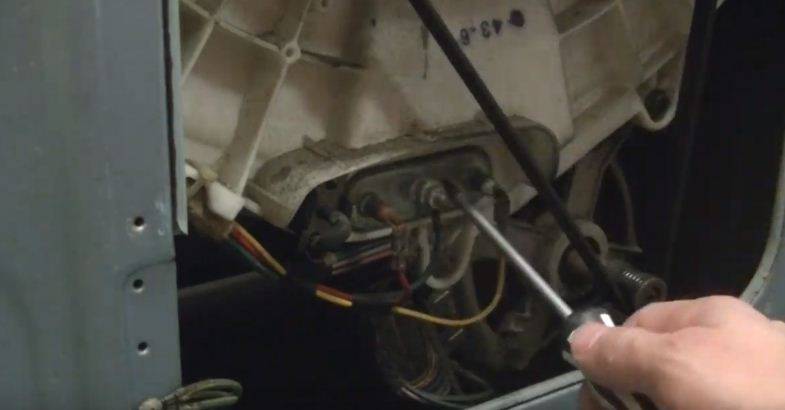
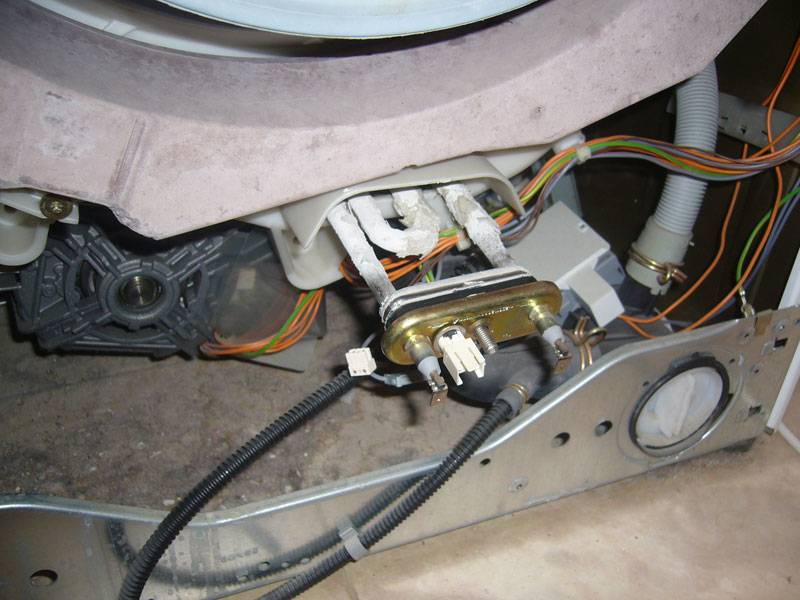
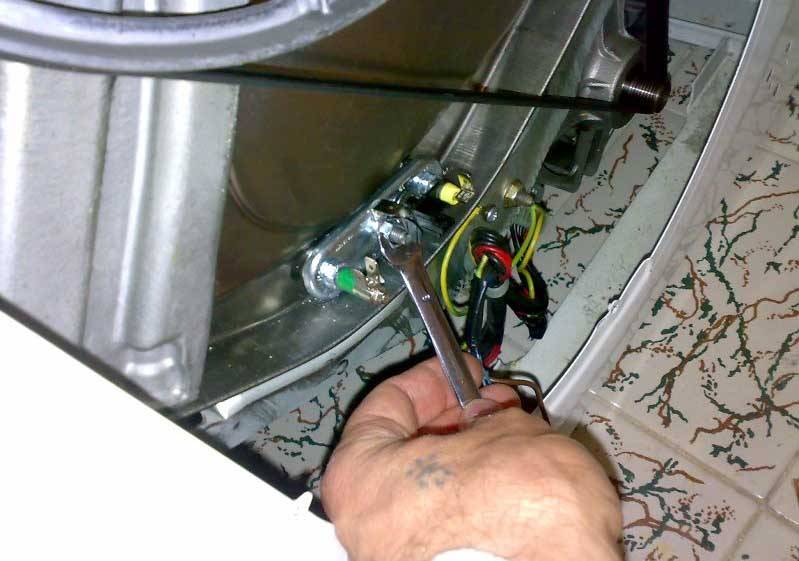
6. Turn off the washing machine by placing it on the drain. After the water leaves, we unscrew the heating element using a key and an 8 mm head, disconnect all the terminals connected to it.

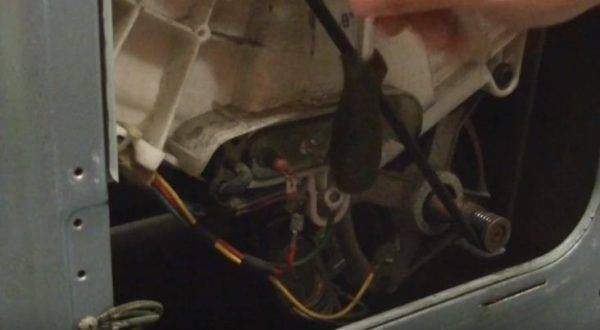
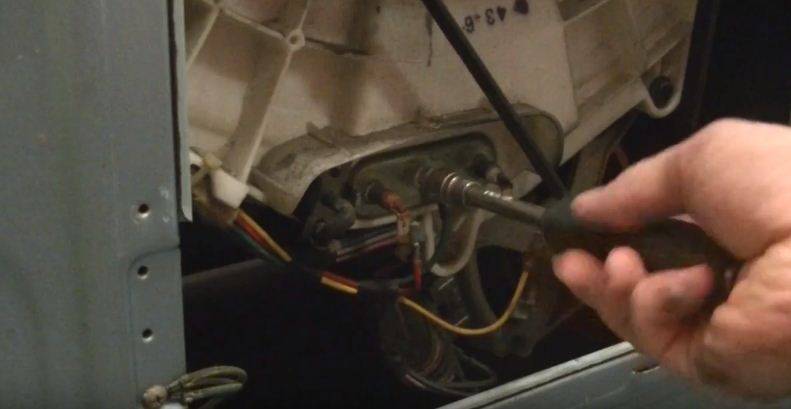
7. Using a flat screwdriver, prying under the heating element, we carefully remove it.
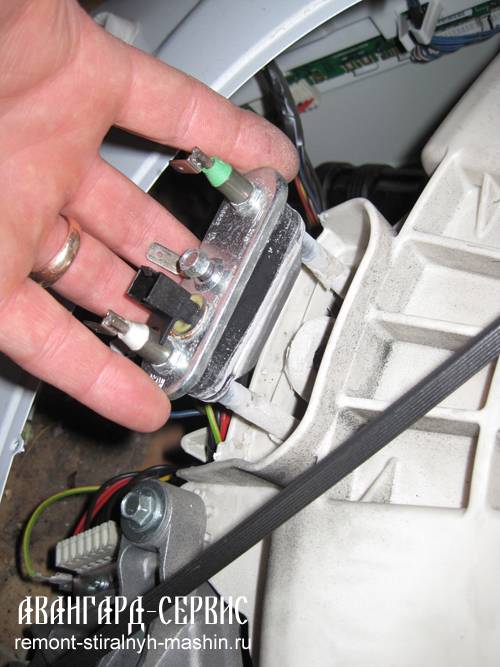
8. If it does not work on the one hand, we pry it on the other hand - in this particular situation we use curved round-nose pliers.

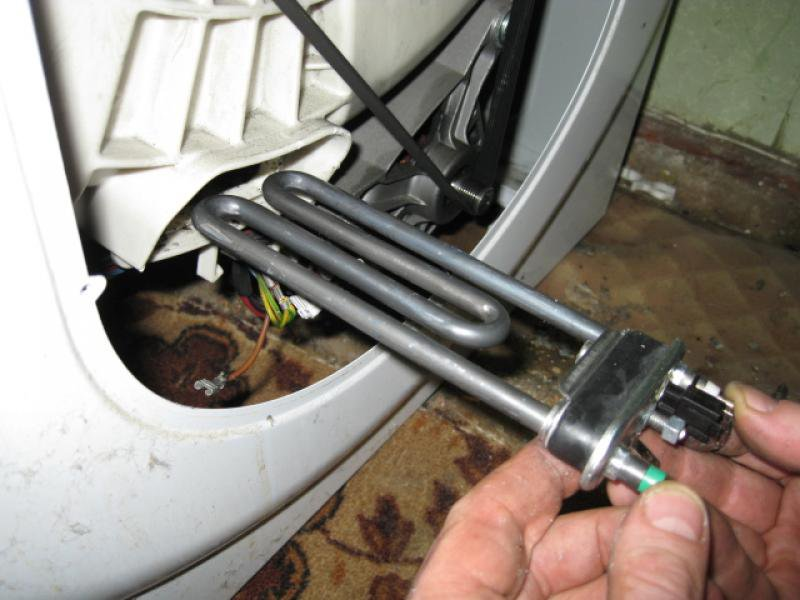
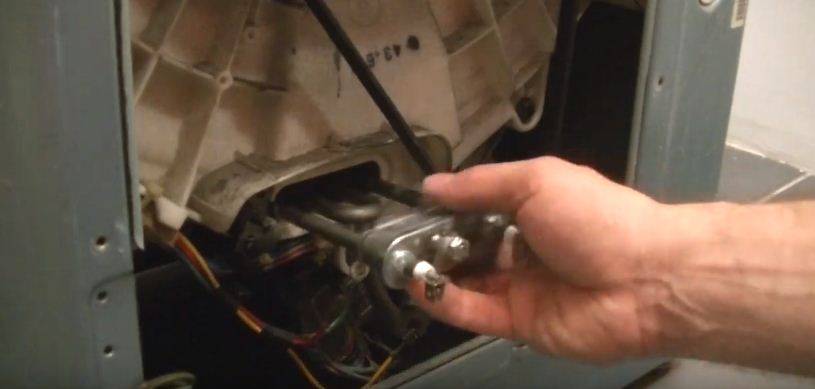
9. We take out the heating element from the seat.
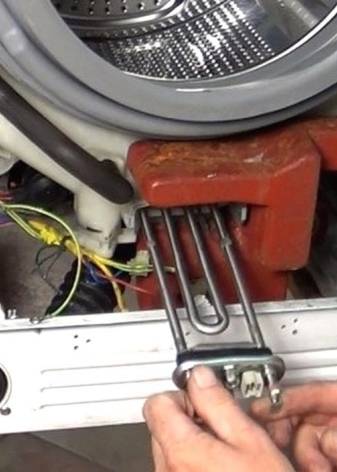
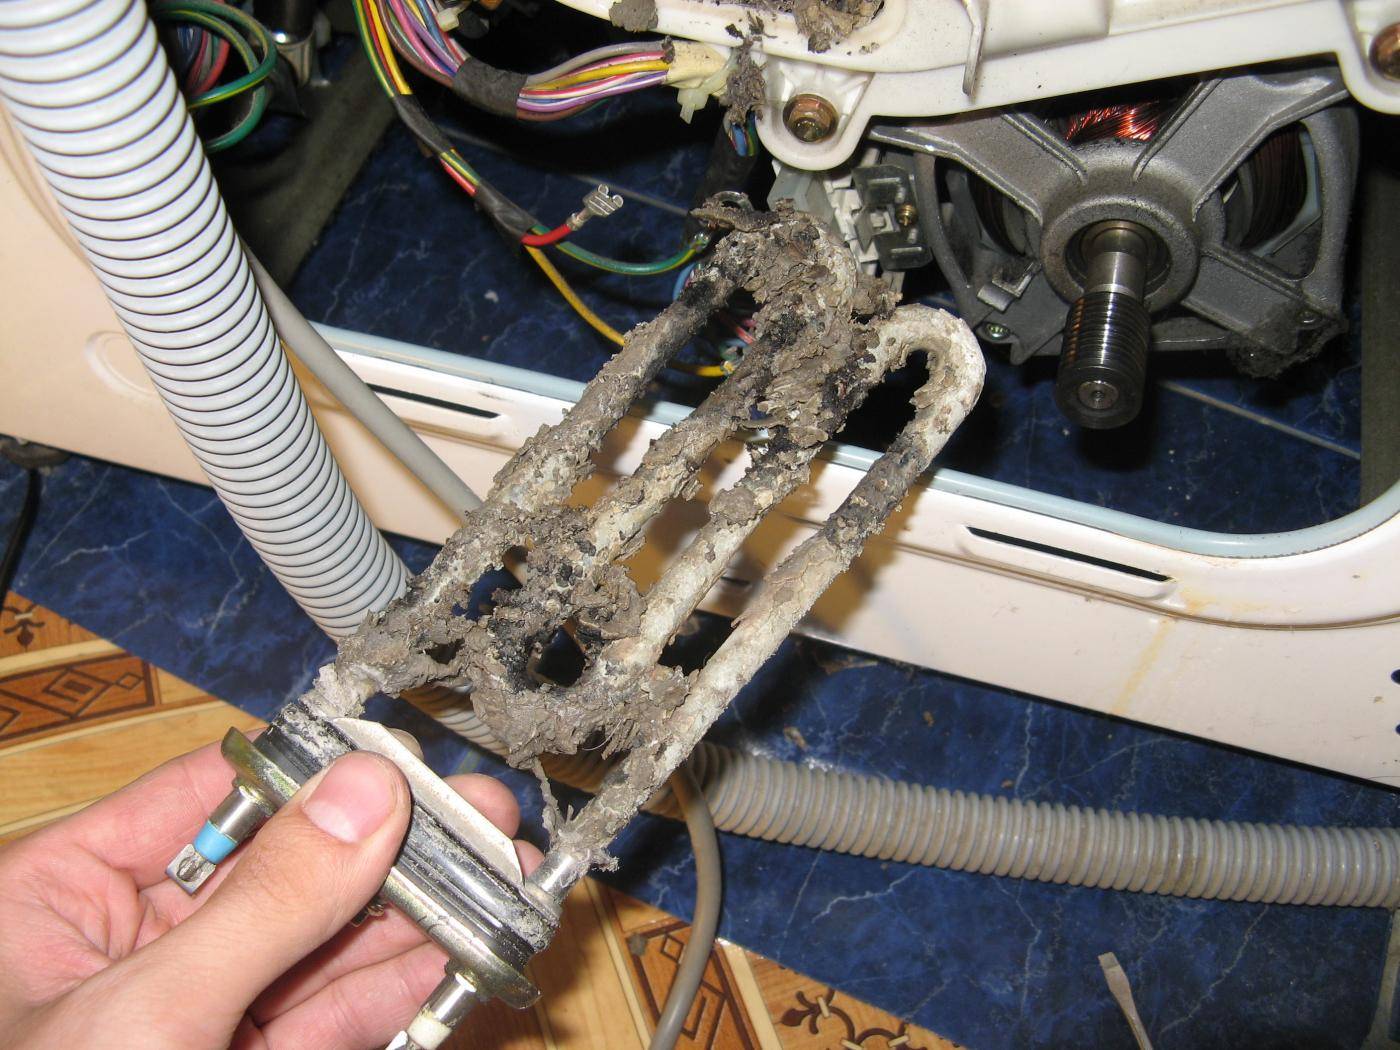
10. Using an electronic measuring device, we check the heating element and see on the device that it does not ring. Hence it burned out.

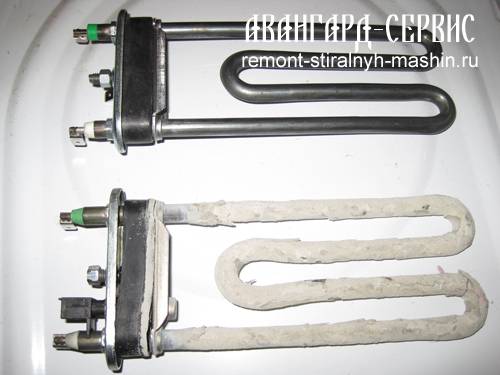
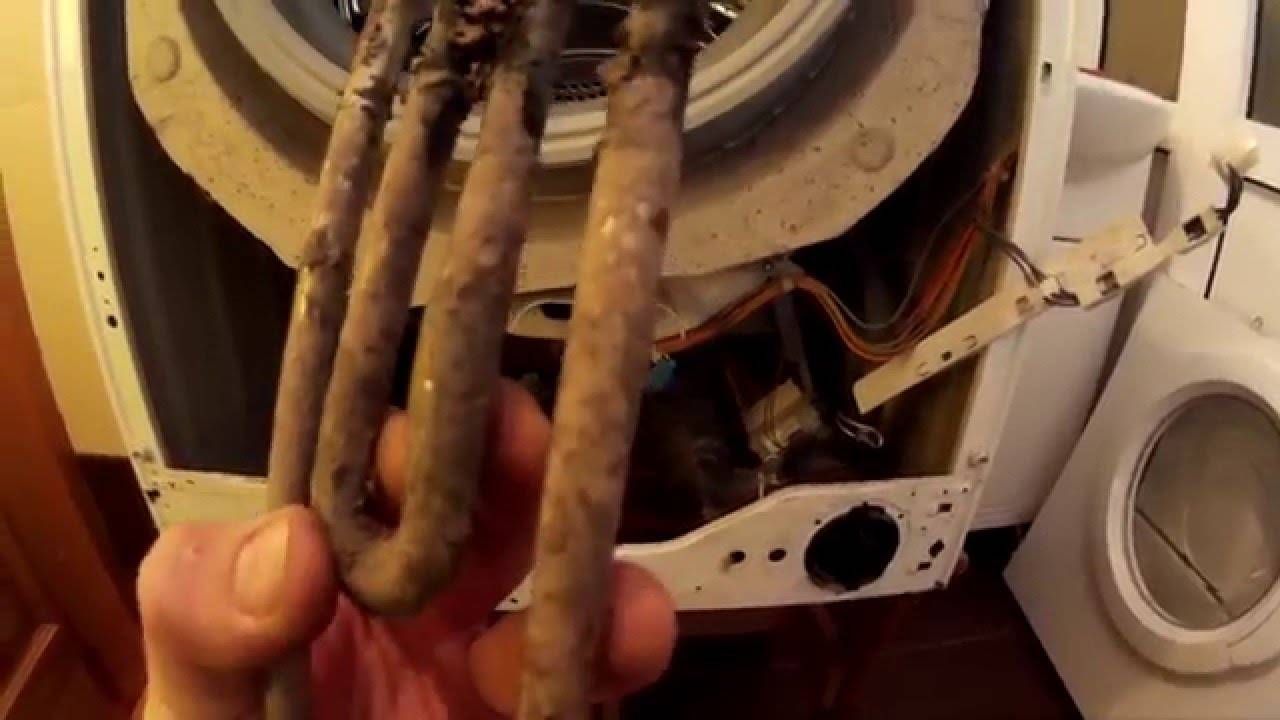
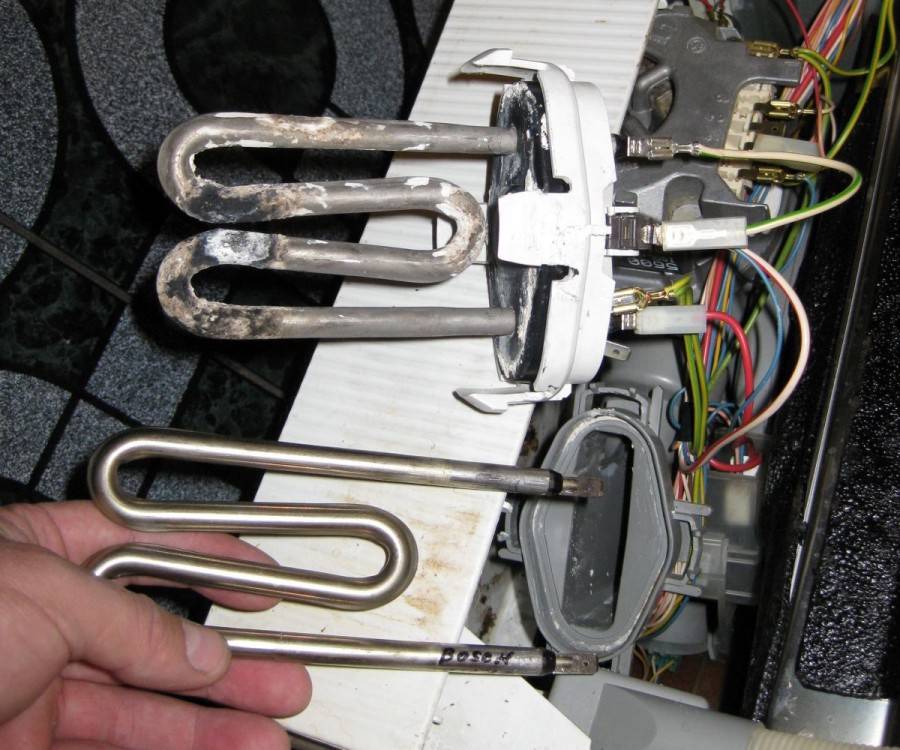
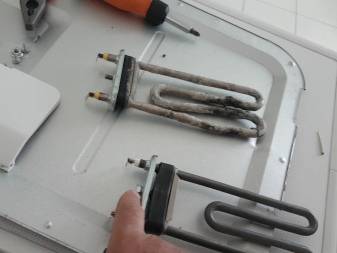
11. Let's compare the heating elements: the old heating element is covered with scale. This means that recently he heated water longer, spent more electricity on it. Accordingly, he was out of order ahead of schedule. To prevent early breakage and extend the service life, you need to use a decalcifier. But it is not worth using Calgon, since its principle of action is based on softening water, and there is a water softener in any washing powder. In our case, it is better to use citric acid or special products to remove scale. By the way, they are cheaper than Calgon.
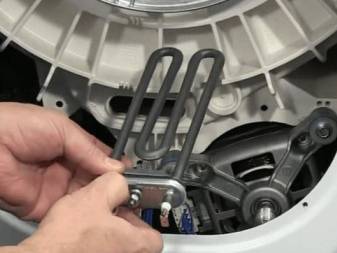
12. When installing a new heating element, we are especially careful. Ten should get into the bindings intended for him. Putting the washing machine in reverse order.
13. Successful washing.
If you do not have a strong desire to repair your washing machine yourself and would rather entrust the repair to a specialist, then we are at your service.
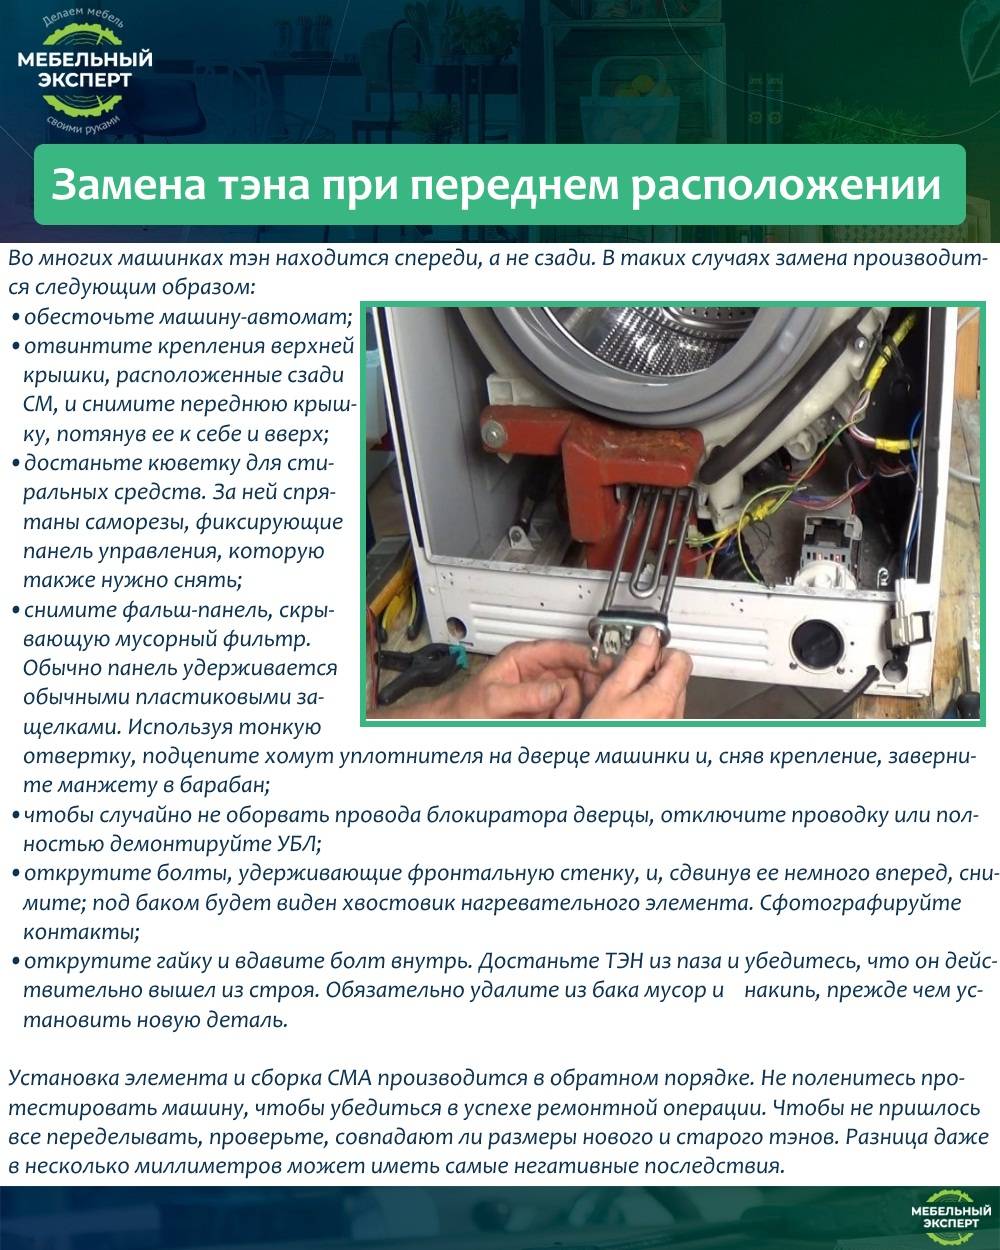
How to remove the front panel
In any case, we start by removing the top cover of the washing machine. We unscrew the two screws at the back under the cover. We move the cover to the back and remove it.

If, after removing the top cover, it is not possible to visually determine on which side of the machine the heating element is installed, then remove the back cover.
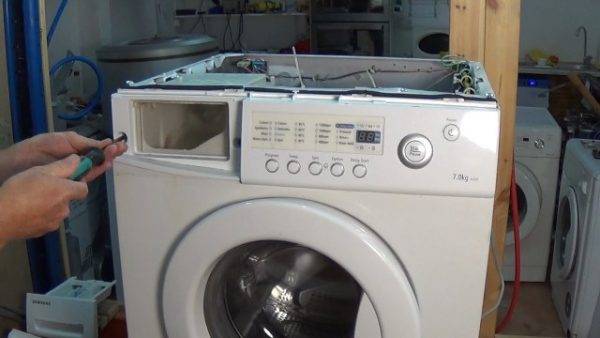
If there was no heating element behind the machine, or if it turned out from above that the heating element was located in front of the Samsung washing machine, then we follow the points:
1. Take out the powder dispenser hopper and unscrew the two screws, as well as the screw on the right of the control panel.


2. Unfasten the bottom false panel.
3. Unscrew the bottom fastening of the front panel.

4. Raising the control panel, unscrew the screws securing the front panel.
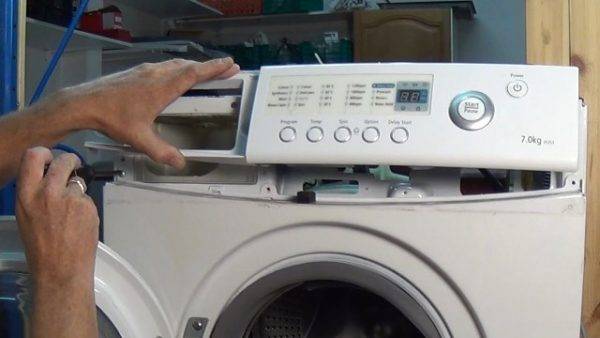
5. Remove the outer clamp of the hatch cuff, picking it up with a slotted screwdriver near the hinge of the hatch door.

6
We unscrew the fastening of the hatch lock (you can leave it, but then be careful with the wires of the lock when removing the front panel).
7. Remove the front panel
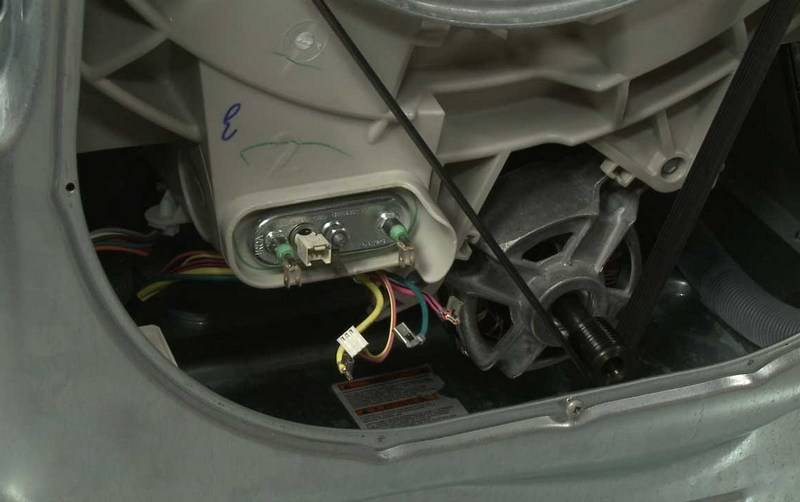
Below in front of you is a heating element.
Where is the heating element
Replacing the heating element in Indesit brand washing machines is quite simple if you know how to hold a screwdriver in your hands and use a multimeter. In different machines, you have to get to the heating element in different ways, disassembling the equipment. Italian manufacturers took care of their consumers and installed the heating element in such a way that you can get to it by opening the back cover of the car body.
That is why such repairs are simple. The only drawback is the disconnection of the washing machine from all communications. This is necessary in order to unfold the machine with the back side for repair work.
What do you need to replace
Replacing the heating element on the Indesit washing machine will require a minimum of tools from you, as a rule, two screwdrivers are enough: flat and curly and a key with a head. You also need a multimeter or tester to check the performance of the heating element. And, of course, the original spare part.
An original Italian-made heating element, depending on the model of the washing machine, costs from 700 to 1000 rubles, maybe a little more. Better save on the work of the master and try to remove and replace the heating element yourself. Of course, if the car is under warranty, then call a service center specialist, such repairs will be free.
Replacing the heating element in the washing machine
We discussed why a heating element is needed in the washing machine, and why it is still impossible to get rid of it. We get an ordinary boiler inside the device, which brings the temperature to the specified one. To be fair, let's say that there is not always the usual spiral, which is often shown in Calgon ads. There are also washing machines equipped with instantaneous water heaters. This allows you to complete the cycle much faster, but is accompanied by some technical difficulties in implementing the idea itself.
In fairness, let's say that in washing machines, unlike dishwashers, heating elements are most often installed. That is, tubular electric heaters, which have nothing to do with induction, but are made in the form of traditional spirals of various shapes. However, there is one caveat:
The heating element of a washing machine for water usually stands at the bottom of the tank, somewhere under the drum (maybe a little on the side). At the same time, the heating element for air is usually located in the upper part of the case in the area of the duct. Any of them may require replacement. The typical price of a heating element for a washing machine for water is about 1000 rubles. Of course, the cost of the issue largely depends on the brand of the device. It is also worth mentioning that in old washing machines there was an induction water heater that worked as a transformer, the secondary winding of which was a coil of aluminum, wound (on an insulator) around a steel tube. Foucault's currents quickly heated iron, and from it, and water.
And here are the first instructions! First of all, you need to look at what type of heating element the washing machine has. The easiest way to do this is by disassembling the case. In this case, the heating element is dismantled from the tank, there are probably inscriptions on it that will say what kind of model it is. The second step is to inspect whether there is a protection on the heating element.These are usually some kind of tubular structures not related to the spiral and reinforced with steel clamps. There are at least three types of heating element protection:
- Bimetallic. This triggers the microswitch, which is located outside the heating element and is visible to the eye. The causes of the malfunction are usually the following: scale deposits or switching on with an empty tank. In any case, the carbon deposits are removed and the microswitch returns to its original state. There is some chance that the heating element of the washing machine is operational again.
- The solder protection releases, due to melting, the ceramic rod on the spring, which opens the relay inside the heating element housing. The device will have to be disassembled and the stem to be shortened. In the future, overheating protection is no longer guaranteed.
- In the simplest case, there is a conventional thermal fuse inside the tube tied to the heating element of the washing machine. It needs to be replaced.
The repair is quite simple. Be sure to stock up on a waterproof sealant that is heat-resistant and non-allergic. We have already raised this topic, but you can't keep everything in your head. It is allowed to use Poxipol for the washing machine, which is NOT intended for food containers. During washing, a large amount of harmful substances will not be released. It's another matter if there is a turbo dryer. Here, the dose of formaldehyde in the air is guaranteed, and it is better not to use Poxipol.
Please note that we have not yet told you how to change the TEN on your own. There is no such thing in nature
Also, do not try to buy TEN for a washing machine from an online store. Good luck!
If suddenly such a nuisance happened that your washing machine stopped heating the water, then most likely the ten is out of order.
How to replace the heating element of the washing machine yourself, you will learn from this article.
Checking the heating element
You can start checking the heating element even before this part is completely disconnected from the wires and removed from the tank of the Samsung car. For an express assessment of the heater's performance, you can use any resistance meter. The most suitable and inexpensive device for ringing this part is a multimeter.


At the moment when the heater burns out, the spiral breaks inside the tubular element, therefore, this malfunction can be detected if the measuring device shows the presence of zero resistance between the terminals. In order not to receive incorrect information, it is necessary to switch the device to the resistance change mode, connect both probes to check its operability and then attach them to the contacts of the electrical element. If the device does not respond to the touch of the probes to the "legs" of this part, then you can proceed to the next stage of repairing the Samsung washing machine. Otherwise, it will be necessary to check the temperature sensor or the control unit of the household appliance.
Prophylaxis
Do not forget about preventive measures for the Indesit washing machine. Having changed the old heating element for a new one, it will be necessary to prevent the tank in order to remove the dangerous deposits accumulated there. Solid impurities in the form of limescale may be present in the tank. Sometimes not split fats from things are deposited there (in the form of mucus). This fat gives off an unpleasant odor.
Preventive measures should be carried out periodically, depending on how often you start the wash, at what temperature conditions. So, in order to prevent the formation of deposits in Indesit clippers, it is recommended to perform the following actions.
- A special salt filter will need to be installed in the gap in the supply of exploited water. It should be a quality softener, which will always need to be replaced in a timely manner.
- For washing, it is recommended to use exclusively high-quality powders and helium compounds - with their operation, heating elements and other components of washing machines last much longer.
- Do not forget to carry out periodic preventive maintenance of equipment against scale by using specialized products sold in many retail outlets. People often use folk remedies such as vinegar or citric acid, which can easily remove excess fat and scale. But it must be borne in mind that no one can say for sure how these agents, with their chemical composition, can affect the condition of the rubber elements and seals of the machine.
- You should not be zealous with too frequent wash cycles using high temperature water. Detergents produced by modern manufacturers can effectively deal with most contaminants in low temperatures. Thus, washing the laundry is more gentle and gentle.
- You should always keep under control the condition of your household appliances. Of course, many users do not delve into possible problems and only think about them when they encounter them. It is advisable to check from time to time whether all the units of the unit are working properly, whether there are any malfunctions.
See below for a master class on replacing the heating element.
Replacing the heating element
First you need to find out where the heating element is. If this information is absent in the technical documentation, then a visual inspection of the washing machine should be performed. Different manufacturers place the heating element from the front or rear of the main unit. The heating element is usually located at the bottom of the machine. If the back cover is impressive in size, then the heating element is most likely located in the rear compartment.
In any case, the back cover is easier to dismantle, so it is recommended to remove it first. If there is no heating element here, then putting the lid back on will not be difficult. The heating element is located below the tank. The main tube is hidden in the body of the tank.
Demolition work will require certain skills. If you are not confident in your abilities, then it is better to use the services of our masters.
After finding the heating element, you need to dismantle it. The procedure is performed in the following sequence:
- Disconnect the washing machine from the network;
- Get rid of the remaining water by unscrewing the drain filter cover;
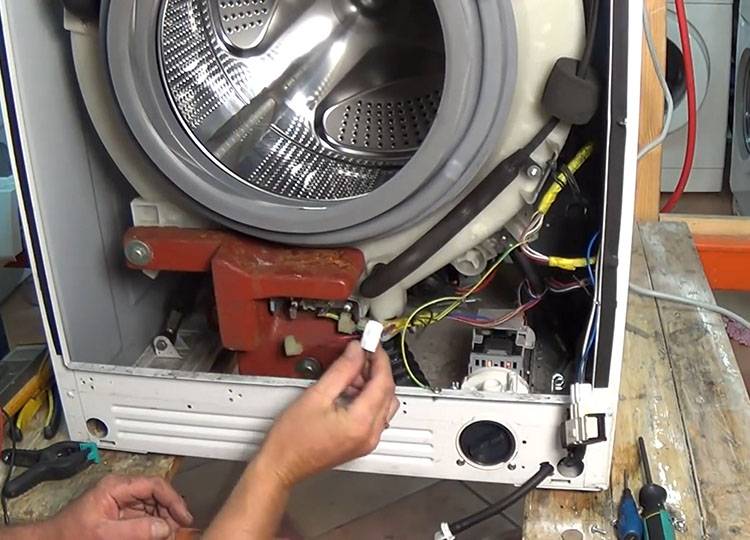
- Remove the terminals from the heating element;
- Unscrew the central fixing nut;
- The axis on which the washer and nut are attached must be pressed inward by pressing firmly or gently tapping a hammer;
- The heating element "sits" on the seal, it complicates the removal of the heater. The seal must be pry on one by one from all sides.

After dismantling the heater, you can start installing a new heating element.
Important!
The heating element must be installed in the same position as its predecessor stood. For normal operation, it must stand level, without distortions and displacements.
Then we tighten the nut and assemble the machine in reverse order.
The operation of the heating element can be checked by running the washer in a washing mode of at least 60 C. During normal operation, the door window should become warm after a few minutes.
The following video will clearly help to understand the process of replacing the heating element:
How to determine where the heater is located
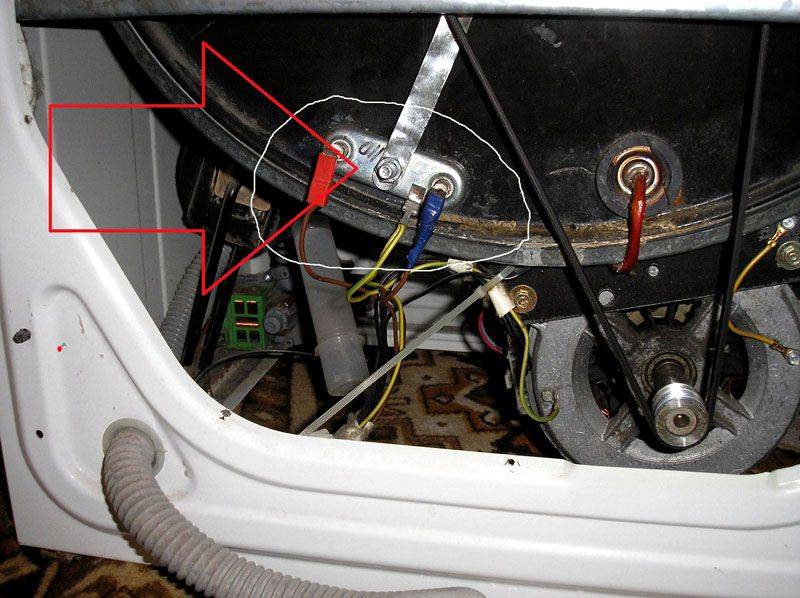
The heating element is located at the bottom of the tank. Depending on the manufacturer of the equipment, the heating element can be located in the front or back of the case. Most brands such as Candy, Indesit, Zanussi, Ariston, Electrolux, Atlant provide access to the heater through the back of the washing machine. Firms Samsung, Bosch, LG place the heating element in the front part, under the drum.
 In Samsung, Bosch and LG washing machines, the heater is usually located in the front.
To determine the location of the part, you need to look at the size of the back of the machine. If there is a large removable surface at the back, then the heating element is most likely located there. If only a small cover can be unscrewed on the back panel, then the exit to the heating element should be sought through the front panel.It is not always possible to determine the location of the part by external signs, so it is best to start looking for the location from the back - it is easier to remove and screw it into place.
Heating element device
In washing machines, a heating element is used as a heating element, which is presented in the form of a curved tube. An incandescent spiral is placed inside this part, which is separated from the tube body by a dielectric powder. The reasons for the failure of the heating element are considered:
- Long service life (after repeated heating and cooling, the spiral simply collapses);
- Scale builds up on the tube. If the machine is connected to a centralized water supply, then after several acts of work, scale remains on the tube, since the water from the tap is hard. Limescale can be prevented by using water softeners.

In addition, scale reduces the efficiency of the heating element, the water heats up more slowly, and the power consumption of the machine increases.
Work order
And, finally, we will describe the procedure for replacing the heating element.
- Disconnect the machine from the network, sewerage, water supply.
- Turn the machine towards you with the back wall.
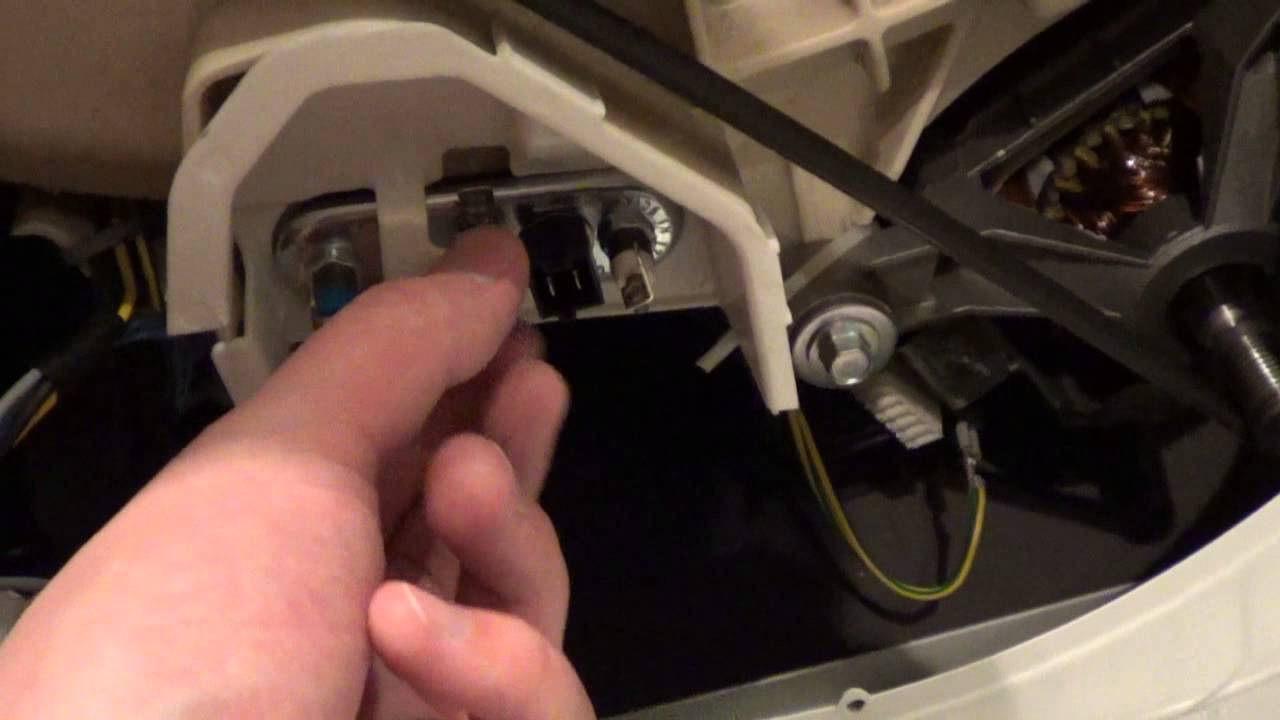
- Unscrew the bolts around the perimeter of the cover with a curly screwdriver.
- Below, under the tank, find the contacts coming from the heating element, and apply the multimeter probes to them. Normally, the resistance should be 25-35 ohms, otherwise the part is faulty.
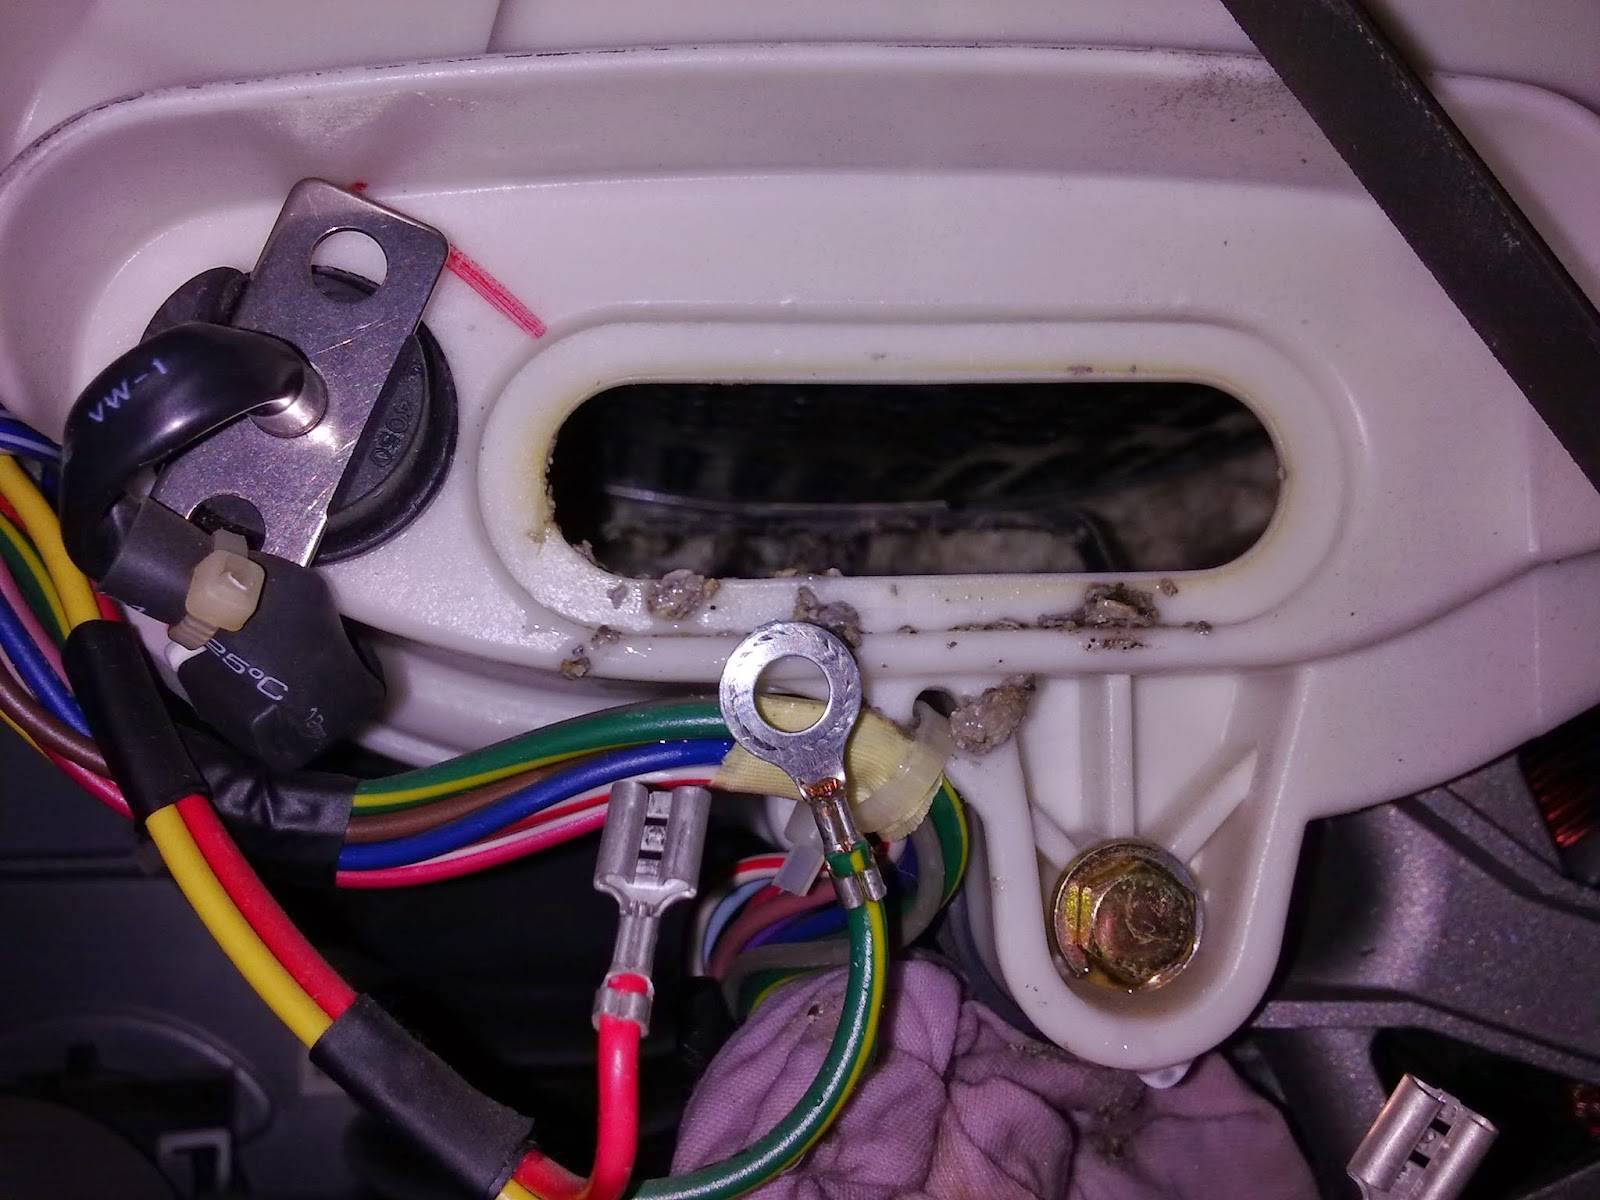
- Disconnect all wires with terminals, remembering their position.
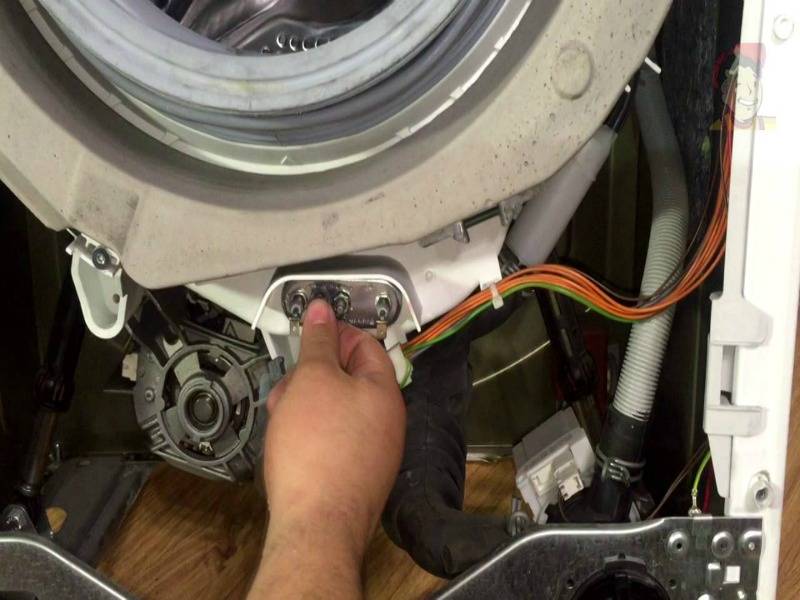
- Using a wrench with a head, unscrew the nut on the bolt, the end of which sticks out right in the center of the heating element base.
- Tap the bolt gently to slide into the hole.
- Hook up the heating element base with a flat screwdriver and pull it out towards you.
- Take a new heating element and move the temperature sensor into it, which must be removed from the old heating element.
- Clean the seat under the heating element from debris with a rag.
- Put the heating element back in place and secure with the bolt.
- Connect the wires and close the back cover of the washing machine.
- Connect the machine to the communications.
So, as you can see, it is not difficult to remove and replace the heating element. After replacement, check the functionality of the equipment. Good luck!


How to replace it with a new one?
To replace an old and defective part with a new one, you will need to purchase a suitable replacement. Visit a specialist store and name the model of your washing machine Indesit. Buy only high-quality heating elements that are in perfect condition
If you save money on the purchase of this important functional element, subsequent repairs may be required as a result.
Let's consider how the heating element should be replaced in branded household appliances from Indesit.
- Inspect the place where the heating element will land in the tank of the machine. If you notice pollution in this place, you must definitely get rid of them. Clean the desired areas thoroughly.
- Remove the special finger-type temperature sensor from the old heater. Clean it and insert it all the way into the new element.
- Replace the Indesit washer heater by tightening the nut and replacing the correct wires. At this point, you may need photographs taken at the stage of disassembling equipment.
- Do not lock the back cover until you are sure there are no leaks. Connect the appliance and put it on an accelerated wash or rinse program. If no leak is found, the machine can be reassembled to the end.
As you can understand, self-removal and installation of the heating element is not the most difficult thing. The main thing is to act carefully and take your time. It is not recommended to roughly disconnect parts in the construction of the machine, even if they are "hard to give". If you follow these simple rules, the average home craftsman will be able to successfully change the heating element without negative consequences.
If you do not dare to change the heating element in your washing machine yourself or do not have this opportunity, then it is better not to risk the technique.Consult an experienced repairer or contact an Indesit service center.
Conclusion
How to change the heating element is described in detail in this article, but when doing this work, you should be careful and perform all the above actions only on a household device disconnected from electricity. Given the fact that there are other important electronic and mechanical parts inside the device, in order to remove the heating element, which is faulty and install a new heater, you must exercise maximum caution, especially when handling heavy tools
Considering the fact that there are other important electronic and mechanical parts inside the device, in order to remove the heating element, which is faulty and install a new heater, you need to be very careful, especially when handling heavy tools.