Step three - dismantling the SMA
The main process will also have to be carried out in several stages. Do not forget to photograph the results of your labors, take pictures with your camera. This will make it easier to put everything back together. Let's get started:
- Remove the top cover:

Choose a suitable screwdriver, attachment for your favorite screwdriver, unscrew the rear bolts that secure the cover.
Pay attention to the presence of plastic washers, gaskets - put everything in one place so as not to lose.
Push the cover in front of you to release the fasteners from the slots.
When the surface moves forward, lift it up, carefully remove it.
- Remove the powder receptacle by pinching the inner latch with your finger.
- This will open access to two self-tapping screws that hold the front panel, the powder hopper - unscrew them.

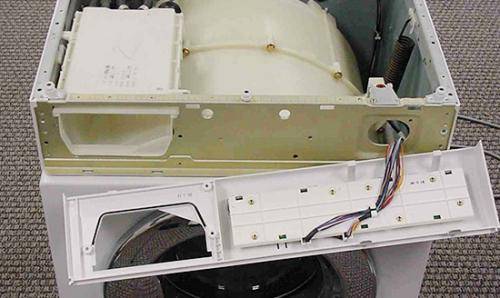
- Remove the control panel by disconnecting the wires. Samsung's CM wiring is smart. Terminals, connectors are decorated in different shapes, colors, so it will be difficult to confuse something when reassembling. But if in doubt, you can take a picture, number with a marker.
- After removing the module, you will see the self-tapping screws that hold the top of the main front wall.
- Detach the bottom panel by gently prying it off with a screwdriver - this will open access to the bottom wall mounts.
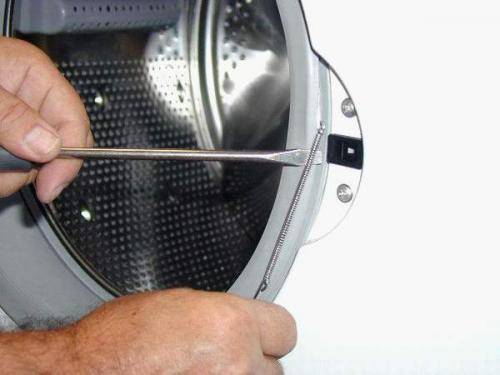
- Before unscrewing the main screws, remove the metal clamp securing the hatch collar. To do this, pry the spring with a flat screwdriver.

Insert the cuff into the drum. Now you can remove the front panel.
- Now that access to the internal components is open, remove the water supply valve, filler, air nozzles, carefully disconnect the water level sensor.

- When removing the drain pipe at the bottom of the machine, substitute the container - it often contains water after washing.
- Disconnect the bottom wiring - heating element, engine, pump, sensors, ground. Take the bundle of wires to the side, secure so that it does not interfere, does not get damaged when removing other parts.
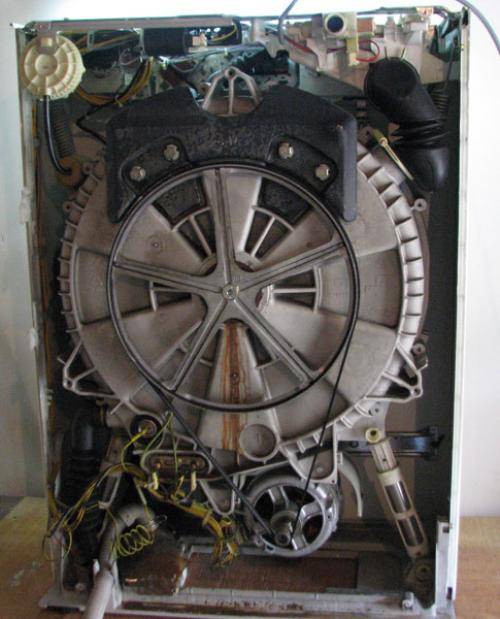
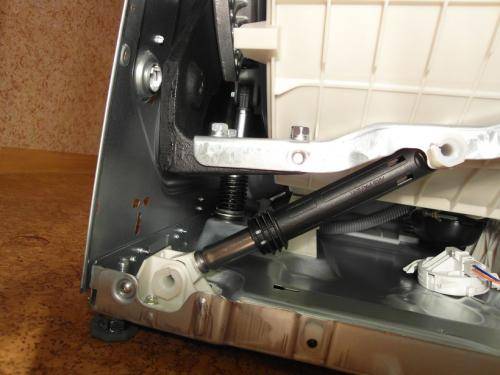
- Use a socket wrench to unscrew the shock absorber mountings, concrete counterweights.
- Now you can pull out the plastic tank by removing it from the springs.
- Dismantle all elements that may interfere: motor, belt, shock absorbers.
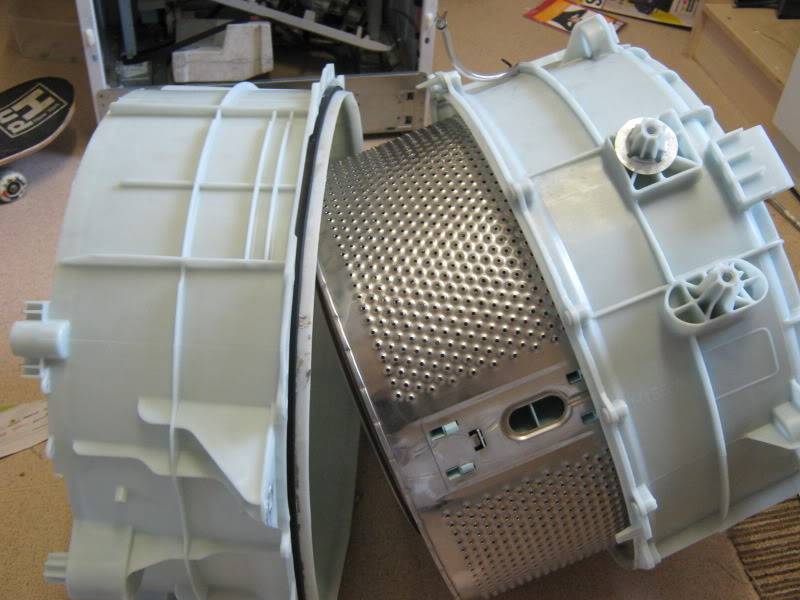
- Separate the halves of the tank by prying metal latch springs along the perimeter of the container.

- Remove the pulley. A socket wrench with a 17 head will come in handy.
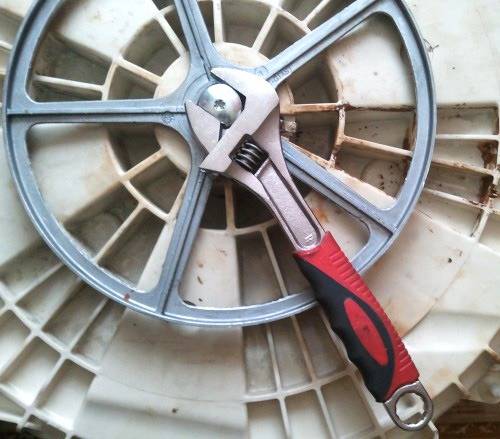
- Gently knock out the shaft with a hammer, take out the drum.
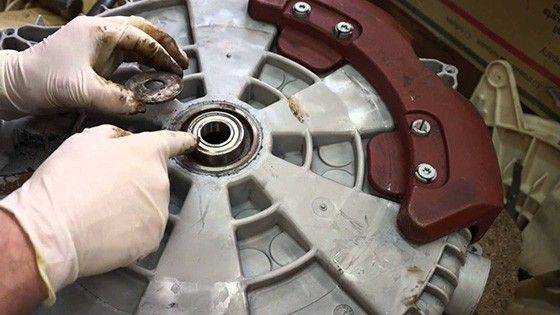
- The back cover of the tank contains bearings and an oil seal.

Pay attention to the seat before replacing the kit. If there is a large output on the shaft, notches, it makes sense to change the cross, otherwise replacing the bearings will not give the desired effect.
How to change:
Remove the oil seal.
Carefully drive the large bearing into the tank wall, the small one out.
Clean the bushing from scale, rust, lubricate with special grease.
Lubricate the oil seal, rings - refit.
Ready! It remains only to assemble the washing machine in the reverse order. The video will help you to carry out the procedure for dismantling, repair, assembly yourself:
As you can see, the front of the work is not comic. But if you are a techie at heart, you have a set of tools, the necessary components - step by step you will cope with this matter. We wish you a successful renovation!
Badly
2
Interesting
9
Super
20
Video
We suggest you watch a video on how to disassemble a Samsung washing machine at home.
About the author:
She graduated from the Institute of Tourism of the FPU with a degree in "Manager", she loves to travel and communicate with people. She is interested in psychology, enjoys dancing, studying English. For five years of maternity leave, she thoroughly mastered housekeeping, not forgetting about her own development.He skillfully wields words, can keep up a conversation on any topic due to his interest in different spheres of life.
Found a bug? Highlight it and press the buttons:
Ctrl + Enter
Interesting!
For washing small items on the road or in a hotel, it is convenient to use a regular plastic bag. Knead socks or tights inside a tied bag along with water and a little detergent. This method allows you to pre-soak things and perform washing without damaging the fabric and without spending a lot of powder and water.
How to choose bearings?
To replace a defective part, you first need to buy a new one. Bearings cannot be repaired, therefore they are changed. Also, oil seals are replaced and the lubricant is restored. All this is bought in a set, which is selected in accordance with the model of the washing machine.
You can find out the exact name of the model by the stickers that are located near the hatch and on the back of the washing machine. A repair kit is selected according to this marking. For these purposes, it is convenient to use special tables. If there is no information on the required model, then you can find information on the manufacturer's official website. If in doubt, take old bearings as a good example. According to this model, the seller can easily pick up a repair kit that will fit exactly.
Replacing a bearing in a top-loading washing machine
As we already said, it is better to purchase the part that is planned to be replaced in advance, but this is possible only when you know what it looks like. If you are faced with a similar task for the first time, then you will first need to remove the part to use it as an example, and then go to the store in order to find a similar one.
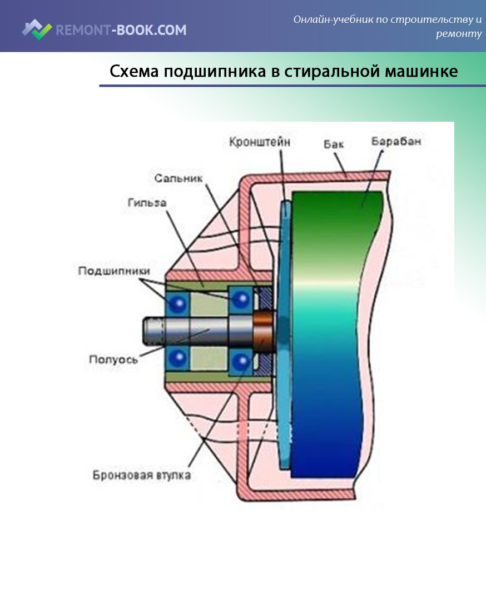 Bearing diagram in a washing machine
The process of replacing the bearing itself requires adherence to the algorithm. We will consider similar actions on the example of the Zanussi brand washing machine.
Step-by-step instruction
Step 1. We will start the analysis from the side panel (right), because this is where the pulley is located.
 Using a screwdriver, you will need to unscrew the screws
Step 2. After dismantling all fasteners, you need to open the side panel.
 The belt should be released
Step 3. Now you need to remove the support to free the pulley. If the fasteners are corroded, it can be difficult to remove them, so you will need the help of a partner.
 Here it is immediately clear why the breakdown occurred, because there is a backlash in the indicated place
Step 4. Now you need to remove the remaining traces of corrosion. This is necessary in order to see in which direction the bearing is being disassembled.
 Using a rag, it is necessary to clean the fasteners from rust
Step 5. Now you need to take two screwdrivers and place them on the sides of the mechanism.
 Using force, you should dismantle the unit
Step 6. Now you need to get the oil seal. Here it is impossible to disconnect the bearing from the support, so it is completely replaced.
 The oil seal itself and the places with which it comes into contact must be treated with a special grease included in the package
Step 7. Next, you need to install a new node.
 There should be signs on it so that you know which way to twist
Step 8. Now you need to tighten the fasteners using the same two screwdrivers. Only now it is necessary to move in the other direction. By the same principle, replace the bearing on the other side of the washing machine.
 Tighten the fasteners
Typical mistakes of "homemade"
Trying to independently replace the bearings of the drum of a Samsung washing machine, "homemade products" often make mistakes, which, as a result, complicate the repair and require additional costs for it. What are these mistakes?
- Tearing off the wire that goes to the sensor blocking hatch.
- Rupture of the cuff of the hatch of the washing machine.
- Damage to the pulley, in the process of removing it from the axis.
- Fastening of the fixing bolts.
- Tearing off the wires going to the temperature sensor and the heating element.
- Tearing off the pipes due to the fact that they have not loosened enough or forgot to loosen the clamps.
- Knocking the bearings out of the drum, break the bushing, and everything ends up replacing the drum.
You need to know about these typical mistakes and never repeat them, because replacing a drum is a serious cost, and maybe even worse.
In conclusion, we note that changing the bearings that ensure the rotation of the drum of a Samsung automatic washing machine with your own hands is not easy, but possible. The main thing is to find out what bearings are on the typewriter of your model, buy original components, pick up the right tools, and then, "roll up your sleeves," do the work in accordance with the instructions of the specialists outlined in this article. Successful renovation work!
The process of detaching accessories
Having finished the process of removing the panels, we proceed to the next stage of disassembling the machine:
Disconnect the connecting hoses from the inner base of the dispenser by loosening the metal clamps. We remove the counterweight by unscrewing the fastening screws
Attention should be paid to the large weight of this element. Dismantle the water level sensor connected with a rubber hose to the base of the dispenser
We carry out the removal of the clamp installed on the rubber hose, which will free the part from the hose. We disconnect the branch pipe, which is the connection between the tank and the dispenser element. We remove the counterweights, equipped on the plane of the tank. It is necessary to unscrew the six bolts with a socket wrench. We detach the branch pipe from the tank, equipped in the lower plane of the body. It connects the tank to the drain pump, from which we also disconnect it. Remove the horizontal metal profile located at the top of the case. To do this, unscrew several fasteners. Remove the back cover by unscrewing the screws with a screwdriver. It is necessary to disconnect the contacts of the heating device (TEN) using electrical pliers
Disconnect the tank shock absorbers and carefully remove the tank from the body
What do we need for repairs?
The bearings in the Samsung washing machine are not repaired, but changed, therefore, first of all, we should take care of purchasing the necessary components. Currently on the market you can find a bearing repair kit specifically for Samsung washing machines. There, in one package, they immediately go:
- bearings;
- oil seals;
- special grease.
True, there is one catch, repair kits are produced for different models of washing machines, therefore, in order not to accidentally confuse anything, you need to know which bearings are suitable for which models of washing machines. In order to avoid mistakes, experts have prepared a table of accessories for the Samsung washing machine. After reviewing it, you can safely purchase original bearings and start working on replacing them.
In addition to components, tools are also needed. To dismantle the fasteners, unwind the tank, knock out the bearings, we need:
- copper hammer;
- special grease for washing machine elements or WD-40 liquid;
- bent hex key;
- marker;
- steel hairpin or metal tube;
- round nose pliers or pliers;
- small adjustable wrench;
- keys (open-end and heads);
- indicator screwdriver, Phillips and flat;
- any sealant.
Replacing the bearing on the drum of the Ariston washing machine. Phased execution of work
We will tell you how to change the bearing in the Ariston washing machine. Disassembly of the CM will be identical for Hotpoint Ariston Aqualtis, Hotpoint Ariston ARSL 105, Ariston Margarita 2000 and other models.
Covers and panels
Take a Phillips screwdriver. Walk around the washer, standing to the back wall. Remove the top two bolts that secure the top cover. Then slide it forward and remove it from the case.

Proceed to the back panel. Unscrew the self-tapping screws around the perimeter, set the cover aside.At the same time, remove the drive belt - by turning the pulley by hand, pull it towards you.
Control Panel
Go to the front of the washer. Pull out the detergent dispenser: pull the drawer towards you by pressing the latch in the center; take it out and set it aside. There are several bolts behind it, another 1-2 bolts on the opposite side of the panel. Unscrew them, unfasten the plastic latches.
Now the panel rests only on the wires - you can throw it up the top of the case. But if you decide to disconnect, then it is better to immediately photograph the location of the connectors for the correct connection.
Top part
It is necessary to remove from the top of the tank anything that might prevent it from being pulled out. It:
Powder receiver. Loosen the clamp on the hose leading from the hopper to the tank. Remove the nipple. Disconnect the inlet valve contacts and remove the fixing screws. Remove the valve together with the powder receptacle.

- Counterweight. Unscrew the bolts securing the upper counterweight and remove it.
- Pressostat. Disconnect the pressure switch hose that is attached to the tank, otherwise it may break during removal.
Front Panel
Open the hatch door. Having bend the sealing rubber, pry its clamp with a screwdriver and pull it out of place.
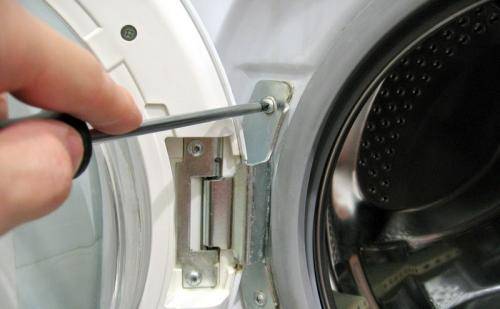
Unfasten the hatch lock wiring (UBL) by placing your hand behind the body. Unscrew the two mounting bolts first.
If you are afraid of damaging the glass of the door, we advise you to remove it immediately. To do this, unscrew the screws that secure the door hinges, set it aside.
It remains to unscrew the screws around the perimeter of the front panel and remove it. Now unscrew the bolts on the lower counterweight to remove it.
Rear part
Disconnect the wiring from the motor at the bottom of the tank. Unscrew the bolts (three to four pieces), first move the motor forward, then pull back and remove from the housing.

Disconnect the heating element wiring. The heater itself does not need to be dismantled. If you damage its sealing rubber, you will have to completely change everything.

Also, if wiring is attached around the perimeter of the tank, cut the clamps with pliers and move the wires aside.
Shock absorbers
The tank is only secured with shock absorbers and suspension hooks. Unscrew the shock absorber screws, remove the tank from the hooks and pull the tank out.
You have disassembled the washing machine. Now you need to get to the bearings.
The process of removing the drum from the tank
To disconnect the tank, it is necessary to position it so that there is a pulley in the upper part, which must also be dismantled. But first you need to remove the drive belt from the electric motor and pulley and disconnect the tank from the motor by unscrewing the motor fasteners. Only after completing these steps, unscrew the bolt installed in the center of the pulley using a hexagon. Then we remove the pulley using the slight scrolling method.
We remove the clamps, divide the tank into two parts and remove the seal installed between them. One of them will have a drum. We knock out the shaft using a hammer and remove the drum from part of the tank.
Replacing the bearing when repairing a top-loading washing machine
A distinctive feature of top-loading washing machines is that the drum is attached to the body on two semiaxes, and not on one, as in the models discussed earlier. In this case, the bearings are changed on both axle shafts at the same time, regardless of which one is out of order. Work on units of this type is carried out as follows:
- The outer and rear wall of the machine is removed.
- Disconnected electrical wires and hoses that could interfere with operation.
- The linings located on the sides of the drum are removed, under which the calipers are located, with bearings installed in them.
- The bearing changes first from the side where there is no pulley, then from the opposite side.
- The seats are cleaned and lubricated before installing a new bearing.
- The assembly of the units is carried out in the reverse order in relation to disassembly.
Important! From the side where there is no pulley, the thread that fixes the caliper is normal, right-handed, and from the side where the pulley is installed, it is left-handed.
What tools are needed?
Do not rush to disassemble the machine. First, you should take care of the tool, without which the replacement of bearings will be impossible. This foresight will save time and facilitate future work. The list of required tools will look like this:
-
the hammer will come in handy when dismantling the drum;
-
keys and heads in the kit will help you quickly deal with various types of fasteners;
-
pliers will allow you to quickly disconnect the drain pipe, which is attached with a metal clamp;
-
a chisel that can be replaced with a metal pin;
-
slotted and Phillips screwdrivers are useful, since fasteners in washing machines are different;
-
a liquid level indicator is needed to check for internal leaks near the bearings;
-
one adjustable wrench replaces a set of wrenches, which is very convenient;
-
silicone-based sealant is necessary to restore the tightness of the seams;
-
WD-40 is an anti-corrosion grease with excellent penetrating and cleaning properties.
Removing the washing unit body panels one by one
Owners of modern technology often have a question about how to change the bearing on a Samsung Diamond washing machine (6 kg). This is a fairly popular model, affordable for almost everyone. It is necessary to start dismantling work as follows:
1. Removing the top panel.
The master will:
using a screwdriver, unscrew the bolts located on the back of the case; carefully slide the panel and remove it. 2
Detaching the control panel
2. Detach the control panel.
This requires:
- Remove the detergent drawer. To do this, slide it out and press the latch located in the middle compartment of the tray.
- Unscrew the two screws on the plane of the control panel.
- Unscrew the three self-tapping screws that secure the inner base. They are located on the metal frame of the unit.
- Unscrew the screws that connect the control unit to the front panel and the device body.
- Pull the control panel in one direction (towards you), and in the opposite direction - the bladder tank. This will detach from the base of the dispenser.
Do not completely disconnect the control unit. You can leave it on the plane of the case, since it is quite possible to change the bearing on a Samsung washing machine (4-5 kg) without completely dismantling it. It will not interfere with the removal of the tank from the body.
3. Removing the narrow panel. It is located at the bottom of the case from the front side.
4. Removing the front cover of the case.
Necessary:
Unscrew the screws that secure the inner plane of the base, where the container for powdery products is installed. The rubber cuff fitted between the round bases of the hatch and the drum must be removed. To do this, bend the rubber part and slightly hook the clamp with a screwdriver. Remove it and set aside for removed parts. Unscrew the fastening elements fitted on the front of the case (3 at the top and 4 at the bottom). Removing the panel
The process of detaching the panel from the case must be carried out with special care in order to exclude mechanical damage to the plastic latches. Disconnect the electrical connector from the door interlock element
Place removed panel aside.
Parsing the Samsung washing machine

Before disassembling a Samsung washing machine, you need to prepare your phone or camera and take pictures of the equipment before removing each part, especially before disconnecting the wiring. This is necessary to avoid errors in the assembly of the device and to prevent new faults in the event of incorrect actions.
Dismantling the washing machine takes place in the following order:
Unscrew the two self-tapping screws located on the back side in the corners, slide the top cover back, lift and remove to the side.
Pull out the detergent drawer, press down on the latch, slightly raise the flask and pull it out of its seat.
Disconnect and move aside the hose for supplying water to the powder compartment and the branch pipe leading from the cuvette to the tank. To do this, unclench the retaining clamps with pliers.
Unscrew the retaining bolts and remove the upper counterweight.
Open the hatch of the Samsung washing machine. Remove the clamp to remove the cuff. To do this, pry the spring holding its edges with a screwdriver, remove and remove it together with the clamp. The edges of the cuff can then be tucked inward.
Close the hatch, unscrew the fasteners holding the front panel. Self-tapping screws are located at the top and bottom. Slide gently into the panel to access and disconnect the sunroof interlock wire. Move the panel to the side.
Turn the Samsung washing machine on its side, unscrew the screws, disconnect and remove the bottom. Take pictures and disconnect the wires going to the engine and drain pump.
Disconnect the pipe from the pump to the tank.
Unscrew the fasteners, pull out and move the motor to the side.
Remove the tank mounting racks, having previously unscrewed the retaining screws on the tank and at the bottom of the case.
Unscrew and remove the lower counterweight.
Without changing the position of the Samsung washing machine (on the side), return to the top, disconnect the pipes and wires going to the water inlet valve
Unscrew the fasteners, pull out the valve.
Disconnect the four counterweight springs holding the hopper and drum in suspension.
Unscrew the fasteners, carefully release the latches, disconnect the wires and remove the control panel.
Now you can remove the tank from the body of the Samsung washing machine.
- Lay the reservoir so that the pulley is accessible.
- Remove the belt.
- Block the pulley and remove the bolt holding it. If it doesn’t give in, lubricate it with WD-40 and wait a little.
- Remove the pulley.
- Find a bolt similar to the one holding the pulley, screw it in and knock out the shaft with light hammer blows. The blows should be applied at right angles so as not to bend the knot.
Now you need to disassemble the tank in order to pull out the drum and replace the oil seals and bearings.
The halves are connected with special clips that can be easily disconnected and removed. After they are removed, it is required to open the reservoir in two and pull out the drum.
Before replacing the bearing, other parts can be inspected and serviced, such as inspecting and descaling the heating element
It is also important to inspect the shaft and cross-piece: if they are damaged, they should be replaced, otherwise simply cleaned of dirt and grease. For the shaft, you can use fine sandpaper, for the cross - a rag or sponge
Functionality of bearings in a washing machine
The bearing performs the following functions during the operation of the washing machine:
- allows the drum to spin;
- reduces frictional force during rotation;
- minimizes noise and vibration.
 One of the most common problems is replacing a bearing in a washing machine.
Modern models of washing machines have bearing rings of two types - plastic and metal. Metal bearings are in demand. They are distinguished by the strength of the material, but the ingress of water is dangerous for them - rust may appear.
 If you suddenly feel that your machine has begun to "knock" or vibrate excessively during spinning, this is one of the sure signs that the bearings in the drum are worn out.
Plastic bearings are considered more reliable. They are made from a plastic coated metal base. Therefore, they are additionally protected from the influence of moisture.
 Bearing wear for the time being may not show itself in any way.
The main causes of deterioration
They are divided into two types:
1. Natural wear and tear. The service life of a bearing installed in a washing machine is 5-6 years. As a result, replacing a bearing after 5 years is not a breakdown, but is defined as natural wear of the part.
2. Premature failure. It can be due to several reasons, such as:
- Wear of oil seals. They protect the bearings from contact with water. A violation of its tightness due to water penetration will lead to a gradual washout of the grease, which will be the main reason for the formation of bearing corrosion.
- Failure to comply with the norm of the weight of the laundry placed in the drum of the machine for washing.
- Failure to comply with the rules for installing the unit.
Causes
There are two main reasons that contribute to bearing wear.
-
Normal wear and tear is typical for all washing machines. It is impossible to avoid this process. On average, bearings last about 5-6 years. If a part is out of order after so many years of work, then the breakdown will be retrained into normal wear and tear.
-
The situation is different with premature failure. There may be several reasons for this situation.
-
The wear of the oil seals arises from the violation of the tightness of the structure, as a result of which the parts come into contact with water, which washes out the lubricant. Their protective functions are reduced, which leads to the formation of corrosion phenomena on the bearings.
-
The violation of the norms of the weight of the loaded laundry creates an increased load on the drum and bearings.
-
Incorrect installation of the machine in violation of the rules and regulations reduces the performance of all parts and shortens their service life.
-
Replacing the bearings on the drum of the Indesit washing machine. Replacing the bearings of the indesite washing machine
When choosing bearings for a washing machine in a store, take worn-out parts with you first so as not to miss. If you buy online, make sure that the selected bearing really fits your Indesit. Prices can also be found on the Internet or by phone.
It is important that you need to buy not only the bearing itself, but the whole set: two bearings and two oil seals, they need to be changed together, otherwise the replacement will need to be repeated soon
Tools for disassembling washing machine Indesit
Replacing the bearing of an indesite washing machine with your own hands is not so difficult. The main thing is to get the bearings themselves, while you will have to disassemble the entire machine. Please be patient with the following tools: 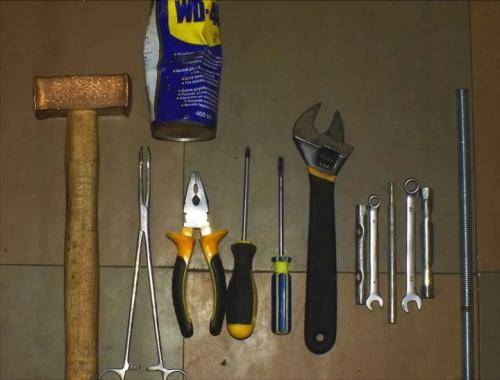
- Phillips and flathead screwdrivers;
- socket and open-end wrenches;
- hammer;
- bit;
- hacksaw;
- pliers;
- WD-40 lubricant;
- glue and finally replacement parts.
Dismantling the washing machine
First of all, disconnect the equipment from the power supply, turn off the water, drain the water and turn off all communications.

Free the pump filter from water (below the hatch, under the front panel) - unscrew and pour out the water. Next, move the device to be repaired away from the wall for further work.
Repair of washing machines indesit ws84tx, wiun 81, wisl 85, wisl 83, w84tx, iwsc 5085, iwsb 5085 and other models, when replacing the bearing, is carried out in the same way.
We proceed directly to disassembling the device:
- We remove the top cover, for this we unscrew the two self-tapping screws from the back with a Phillips screwdriver.
- Remove the back panel, unscrew the bolts and remove the panel.
- Removing the front panel:
- we take out the tray for powder and detergents by pressing the central clamp, we remove the tray;
- unscrew all the screws on the control panel, two behind the tray and one on the opposite side;
- use a flat screwdriver to open the latches on the panel;
- do not touch the wires, place the panel on the top of the case;
- to open the hatch door, bend the rubber, pry the clamp with a screwdriver, remove it;
- we unscrew the two screws on the hatch, disconnect the wiring, remove the cuff inside the tank;
- unscrew the door bolts with glass and set aside;
- removing the front panel, unscrew the screws.
- We remove the parts to pull out the tank with the drum:
- remove the drive belt, pull it towards ourselves by scrolling the pulley;
- remove the pulley, fix its wheel and unscrew the central bolt, spray with WD-40 if necessary;
- We do not remove the heating element, but disconnect the wires from it and from the electric motor;
- we take out the motor, unscrew the three bolts and swing back and forth;
- disconnect the pipe through the bottom, put the washing machine on its side, loosen the clamp with pliers and disconnect it from the tank;
- unscrew the bolts that hold the shock absorbers at the bottom of the case;
- unfasten the cuvette, first remove the pipe, loosening the clamp, then the hoses, then unscrew the bolt and remove everything together, disconnect the pressure switch hose.
- We take out the tank by pulling it up a little.
- If the tank is welded, we make holes for future bolts and saw the tank with a hacksaw.
- We take out the drum by hitting on its sleeve.
- Remove the oil seal by tightening it with a screwdriver.
We proceed to replace the bearing indesite:
- Remove the bearing with a puller, if it is not there, then use a chisel and a hammer to knock out the bearing, lightly tapping on it.
- Clean and lubricate the new bearing area.
- Fit the part straight into the seat by tapping on the outside of the bearing. Also install the second part.
- Slide the pre-lubricated oil seal onto the bearing.
- Insert the drum into the tank, glue the two parts, tighten the bolts and proceed with the reassembly of the washing machine.
Bearing replacement

The bearings and seals are located on the rear tank cover. To replace these parts, they will first have to be knocked out of their seats.
- The outer bearing is removed first. To do this, you need to take a chisel and a hammer and knock out the part with light blows in a circle, avoiding distortions. Beat only on the outside of the bearing to prevent damage to the seat. It is forbidden to hit only one point, there should be several places for impact, otherwise the bearing will be skewed or stuck in the bushing, which will lead to additional difficulties.
- The second, smaller bearing is knocked out in the same way, turning half of the tank upside down.
- It is also necessary to remove the old bearings.
- After the worn parts have been removed, wipe the inside of the bushing with a clean cloth to remove dirt and grease residues. After that, you need to apply new grease that comes with the bearings and install new oil seals.
- Now the bearings need to be replaced. You should start with the inner one. It should be installed in the bushing, make sure it is level, and then hammer it in. To do this, you need to take a chisel and a hammer and beat evenly in a circle, avoiding skewing. Beating is required only on the outside of the bearing.
- After installing the inner bearing, you need to turn over half and drive in the outer one.
Replacement of bearings is completed, you can start assembling equipment.
What is required for the repair?
Samsung is one of the world leaders in the production of washing machines. In this market niche, perhaps only LG has a greater influence. This means that many people have washing machines of this company, so the demand for information on repairs on the network is very large today.
Using the S1052 model as an example, we will analyze the process of replacing a bearing today. This machine was produced and sold in 2009-2010, so today they are being repaired in large quantities. As mentioned above, the device of the machine will not differ much from modern counterparts, so the information will be relevant for them as well.
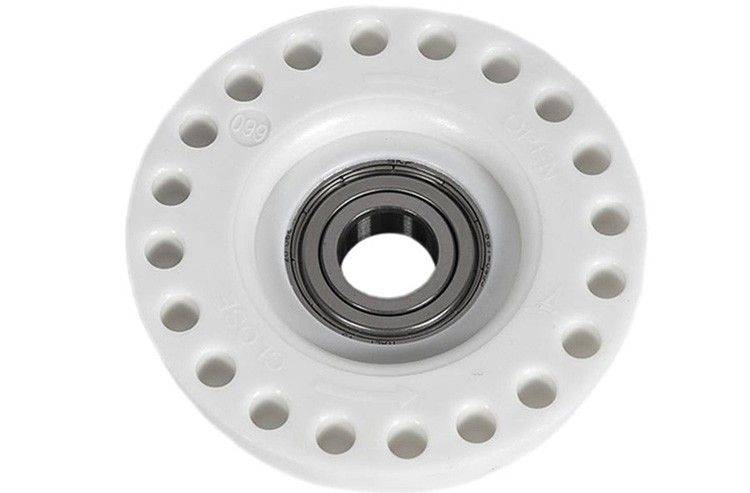
 Rolling bearing for washing machine
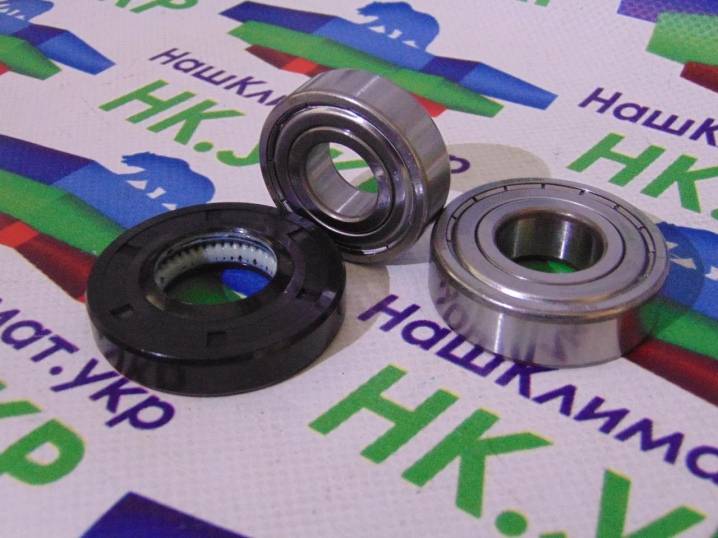
Bearing failure is a fairly common nuisance, since this part works mechanically and constantly experiences loads of various strengths and natures. They are not repaired, but immediately changed. Therefore, for work, we first need a repair kit. It includes the following components:
- Rolling bearings.
- Stuffing box.
- Lubrication - a special composition is used, so in no case change it to another.
The size and shape of spare parts may vary from model to model, so it is very important to choose the right one. Each repair kit is marked to distinguish it
The following figure shows a table in which the marking of parts for some models of washing machines is indicated.
Samsung washing machine accessories table
Table 1. Tool kit
| Tool, photo | Description |
|---|---|
 Hammer Hammer
|
When replacing a bearing, brute force will have to be applied at some stages. The hammer will help us with the installation and extraction of parts. |
 Hexagon Hexagon
|
With its help, we will unscrew the pulley. More about this - in the course of the description of the work. |
 Adjustable wrench Adjustable wrench
|
The washing machine has many assemblies connected with nuts and bolts. To disassemble and collect them, you need a small adjustable wrench. Alternatively, you can use a set of regular wrenches, but it is best to have a ratchet and a set of sockets for it. |
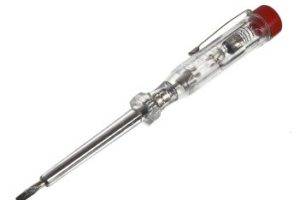 Screwdriver Screwdriver
|
Screwdrivers - Phillips and slotted ones - will definitely come in handy. If there is a screwdriver or an electric screwdriver, we also use them to increase the speed of work and convenience. |
How to disassemble with your own hands
In order to prevent serious mistakes, you need to follow a certain sequence of actions when disassembling the washing machine. In the models of the Samsung brand, the following procedure is assumed:
- Remove the top cover by unscrewing the retaining screws. Press on the front so that it is released from the latches and easily removed.
- Remove the counterweight located on the upper base of the tank. A socket wrench will help to cope with this task.
- The front panel with the control system is moved to the side and the detergent dispenser is removed.
- Unscrew the screws behind the dispenser. It is not necessary to completely dismantle the panel and disconnect the loops, since these elements will not interfere with the work.
- Dismantle the pipes and other adjacent elements that block access to the washing machine tank.
- Raise the tank slightly and release the retaining springs, then pull the tank completely out of the body.
- Having divided the tank, they clean the place around the bearings and first take out the oil seal, and then knock out the bearings one by one.
Samsung washing machine device
Let's get acquainted with the structure of the washing machine using the example of the well-known Sensor Quick model. The main front elements of the model:
- removable front panel;
- hopper-distributor of powder and special products;
- control Panel;
- electric valves;
- level switch;
- linen tank;
- adjustable legs;
- drain pump with filter;
- drain hose;
- drain hose plug.

Rear elements:
- power cable;
- counterweights;
- tank suspension springs;
- shock absorber;
- engine;
- pulley with drive belt.
The control panel is a board with buttons and indicators that turn on the wash mode, change the temperature, spin speed, wash time, delay start. It is also possible to manually set all these parameters with the "Manual program setting" button. The board shows the current state of washing, error codes.

How to identify a malfunction
It is possible to preliminarily determine the presence of a bearing breakage by external signs without disassembling the washer. To be sure that the malfunction is diagnosed correctly, it will be necessary to partially dismantle the equipment case.
Factors that indicate incorrect functioning of the bearing of the washing machine include the following:
Extraneous sound during washing and rinsing clothes
When spinning, it is more difficult to distinguish the uncharacteristic noise of the machine, so you should pay attention to the operation in other modes. As a rule, as a result of bearing breakage, knocking, grinding, clanging on metal elements are heard.
Poor spin
Due to mechanical damage to the bearings, the drum does not spin up fast enough, which impairs spinning of the laundry.
Visual imbalance. Bearing breakage causes imbalance of the washing machine, and it sways more strongly in different directions
The imbalance will be subtle, so it is important to carefully observe and take into account that the problem is especially noticeable during spinning.
Violation of the integrity of the cuff. Noticing damage on the edges of the machine's cuff, it is worth diagnosing the washing machine, since this problem is associated with a broken bearing.