The main types of malfunctions
During the operation of water heaters, several types of malfunctions can occur:
- heating element burned out, water does not heat up;
- the thermostat has deteriorated;
- the magnesium anode has used up its resource;
- a large layer of scale on the heating element and the inner surface of the boiler.
All these malfunctions, except for replacing the thermostat, require disassembling the water heater. Considering that there is no fundamental difference in connecting Ariston storage water heaters with different capacities and modifications, the disassembly process will be the same.
It can be divided into several stages:
- disconnecting the electrical supply cable;
- draining water from the boiler tank;
- dismantling the flange and directly opening the boiler.
In what options do you need to dismantle the indirect heating water heater
Gas boiler piping diagram. The magnesium anode in the storage water heater, used for the catalyst in order to protect the walls of the tank from rust and aggressive influences on the heating device, needs to be changed sometimes.
The service life of the anode is determined by the quality properties of the water used in the storage water heater (it is recommended to put on the tube cold feed water specialized filter), operating water temperature, the degree of intensity of operation of the water heater.
The usual period of application of the magnesium anode, indicated in the operating instructions for an electric storage water heater, will not be more than 6 months. When operating an electric storage water heater in a light mode, the magnesium anode will most likely last 1-1.5 years without replacement.
Together with changing the anode, to prevent water heating, you should carefully clean the space inside the tank from scale and rinse the walls.
The heating element also needs to be cleaned with special chemicals or an ordinary iron sponge for dishes.
The additional need to disassemble the water heater appears as a result of an accident, malfunction or reaction of an electric storage water heater to the original operating conditions.
Basically, the heating element fails.
Diagram of connecting an electric storage water heater to the network.If water from an electric storage water heater has a bad smell, a yellow or brownish tint, this indicates corrosion and clogging of the tank. The same is evidenced by the fact of too long heating of water, the appearance of loud foreign sounds during the working period of TENA.
It is necessary to quickly disassemble the indirect heating water heater, form with a breakdown and eliminate it. In any case, it is necessary to very carefully wash the indirect heating water heater and make sure that both the walls of the storage tank and the tubular heating element are clean.
If there is a leak in the storage water heater, you need to make sure that the rubber waterproofing gasket is reliable. If necessary, the gasket should be changed.
If the leak appeared as a result of the depressurization of the storage tank itself, this malfunction cannot be eliminated with your own hands. This may be a manufacturing defect - then the indirect heating water heater must be replaced thanks to the warranty agreements.
Sometimes, as a result of poor operation of an electric storage water heater, the walls of the storage tank can rust. In this variant, the operation of replacing the storage tank may cost more than a new water heater.
Dismantling the water heater
It will be possible to disassemble the boiler on your own only if you have a number of tools:
- screwdrivers;
knife;
rubber hose;
key;
metal brush;
anode;
cleaning agents;
water tanks.
First of all, it is necessary to eliminate the effect of electric current on the device, that is, to de-energize it
It is important to remember that the sequence of steps for disassembling the boiler can only be carried out when the device is de-energized. Violation of this rule can lead to sad consequences.
After turning off the power, it is necessary to disconnect all wires. This requires removing the cover from the bottom of the boiler and disconnecting all existing wires.
The third stage is the draining of water according to one of the above algorithms. This can be done in the most affordable and optimal way: the drain valve is equipped with a prepared hose, the diameter of which was previously selected relative to the valve. (See also: How to change TEN in a water heater)
The pipe for supplying hot water is closed, while the pipe for cold purpose is disconnected from the device, after which you can safely unscrew the valve. The other end of the hose is pulled to a designated place for draining water, this can be a sewer.
After the water issue has been resolved, go to the case, where you need to find large bolts located at the bottom of the device. Before unscrewing them, you must put the basin on the floor at their level. Firm tightening of the bolts speaks of a high-quality device, so you shouldn't spare your efforts to unscrew them.
It is not always possible to do this the first time, sometimes you have to resort to removing the device, since it is not possible to remove the bolts by weight. After removal, the device is neatly placed on a soft, flat surface, where the fight with the bolts continues until a positive result. (See also: DIY Boiler Cleaning)


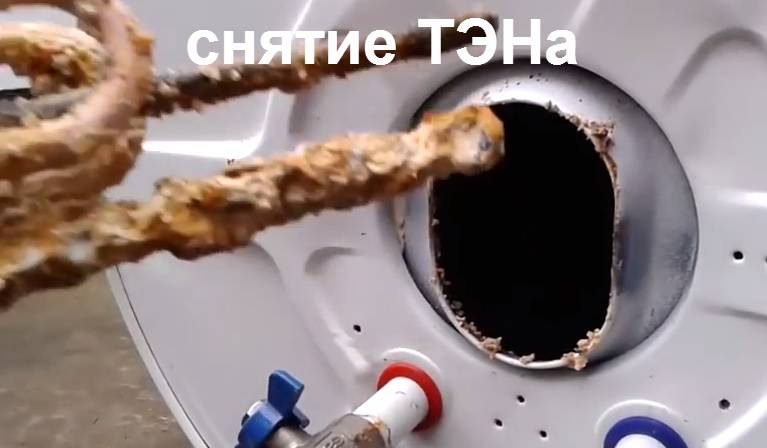
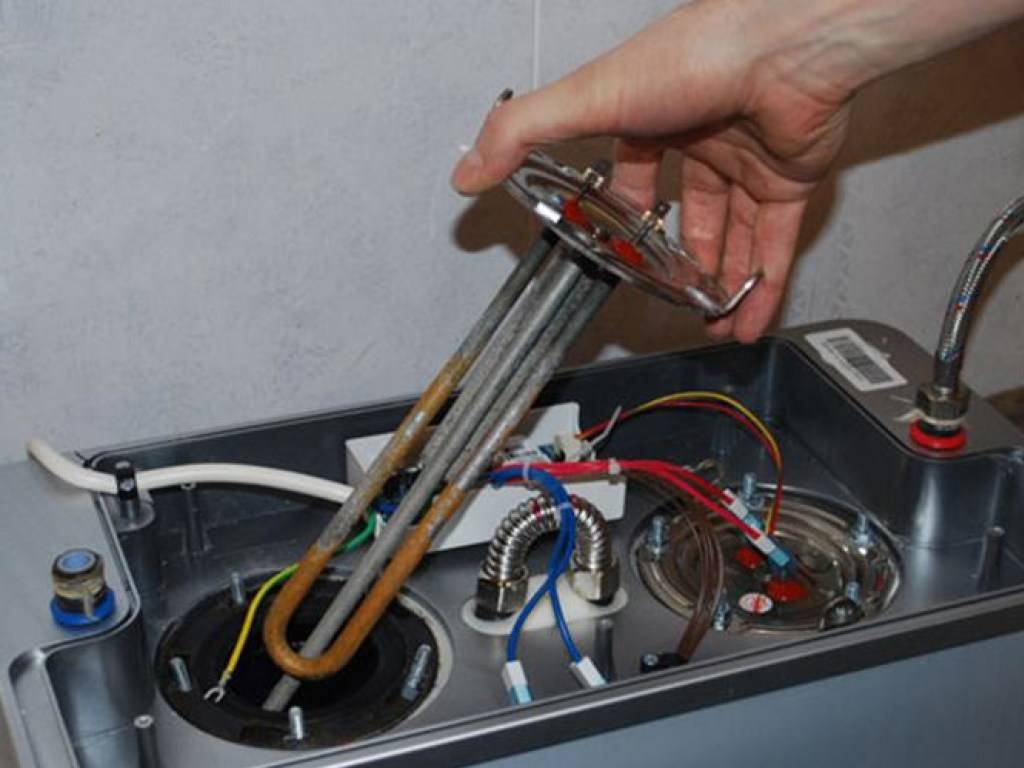
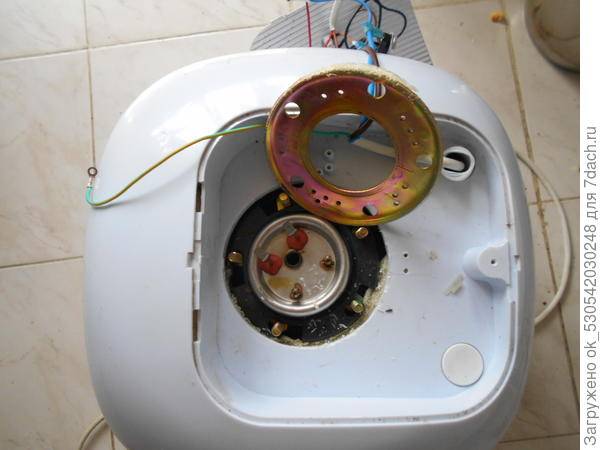
The next step is to find the electrical part of the device. Once found, you need to pull on it, however, do not apply too much force, as there is a risk of damage to the rubber pad. The anode, conveniently located near the heating element, prevents the development of corrosion, therefore, in the case of its unsightly appearance, it is best to replace it with a new one.
It is recommended to clean the electric heating part with the help of special chemical compounds. Of course, many resort to using a knife and a metal brush. For the greatest cleaning effect, it is recommended to clean the surfaces of the device themselves, the plaque on which can be easily removed with a regular sponge.
How to disassemble a water heater with a heating element

Diagram of an electric flow heater.
This is a relatively inexpensive type of boiler that has a heating element attached to nuts. This device, as a rule, does not have external adjustment. Its distinctive feature is the presence of a hex flange, which can be unscrewed with a 55 wrench or a conventional gas wrench.
Algorithm for parsing a water heater with a heating element:
the device is disconnected from the network, the water is drained and the check valve is dismantled, which will only complicate the work;
the boiler cover is removed, which is screwed closer to the nozzles with screws;
the thermostat is being dismantled;
a container is placed under the water heater into which the remnants of dirt, water and scale will be drained;
unscrew the flange counterclockwise (the existing dirt and scale can complicate the work, so they are carefully cleaned with a wooden or plastic knife; as soon as the thread ends, the flange is carefully removed);
in order to remove the heating element, remove scale in the bends of the heating element and, gently swinging to the left and right, pull out the lower part of the element.
How to disassemble an economy class water heater (boiler)
Economy class water heaters are distinguished by an oval flange shape, therefore, the principle of their parsing has some peculiarities.
Stages of analysis of an economy class boiler:
- the device is disconnected from the power supply, the water is drained and, if necessary, the check valve is unscrewed;
- there are two screws near the drain and bay nozzles, which should be unscrewed and the cover of the water heater removed;
- with a sharp downward movement, the thermostat is removed and access to the flange is opened, which is attached with a nut to the body by means of a strip; after the nut is unscrewed, the flange can be removed.
How to disassemble a medium-class water heater
Medium-class water heaters have an average price category. The set with the device includes flanges that are attached directly to the neck using 6 bolts.
The process of disassembling this water heater is as follows:
- the power of the device is turned off, the water is drained and the check valve is dismantled;
- to remove the cover, find the screws and loosen them (the location of the screws can be different);
- after that, it is necessary to remove or remove the thermostat (depending on whether it is connected to the heating element with a wire or inserted into it);
- all necessary screws or nuts are unscrewed.
DIY instantaneous water heater repair
Place a deep container under the tank, residual liquid may spill over. Using a wrench, unscrew the nut counterclockwise. For convenience, the housing can be removed from the wall and installed upside down. Now you can remove the heating element
Remove it from the housing - be careful not to damage the element. If the part does not come out due to scale, clean the hole a little using a plastic knife
Economy class This is a more modern technology. To remove the cover, you need to unscrew two bolts. They are located near the inlet and outlet hoses. The thermometer can be removed by pulling it down, but the movement must be fast and accurate.

A special nut secures the flange strip. Unscrew it and remove the flange.
How the boiler works
Rotate the part before pulling it out. Remove the cover. Remove the thermal sensor. Disconnect the contacts from the heater beforehand. Unscrew the flange bolts using a socket wrench.
Unscrew the blanking nut. Remove the plastic shields. Where can I find or what does the instruction look like for this boiler Ariston?
An electric instantaneous water heater can fully function at your home
Great article, but you can't copy it. Yes, it is understandable. The article was not prepared by humans - aliens. And they are goons.
Tell me what the problem might be: the water heater heats up, it collects water, but hot water does not flow from the tap. I disassembled everything, cleaned the boiler, filters - it still does not flow. Cleaning didn't help. How to find out the reason for the breakdown of the heating element or relay?
What you may need
- Adjustable wrench - for disconnecting pipes.
- Wrench - for unscrewing the fixing bolts of the unit to the wall (not required if the fixing is on hooks).
- A hose to the return valve or to the water inlet - for draining (not required if using containers to collect water).
- Phillips screwdriver for unscrewing the protective cap.
- Two flat screwdrivers: needed to lift the protective cap that is too tight.
- A gas wrench number two or a hub wrench for 55. Sometimes a socket wrench is preferable for twisting the nuts.
- Thin screwdriver for loosening and removing power wires.
Dismantling of boilers is preceded by preparatory stages:
- de-energizing the installation;
- draining;
- removal from the wall.
First, unplug the appliance. Then it must be lightened as much as possible by removing the water. An eighty-liter heater weighs about twenty kilograms. With water, its weight approaches the centner.
Disconnection from the mains
The beginning of the disassembly of the Ariston water heater
Before any work involving electrical devices, you must first de-energize them.
If the water heater is powered by a separate cable from the electric meter, then it is connected through a two-pole circuit breaker and must be turned off.
If the water heater is connected to a regular outlet, you just need to unplug the plug from the outlet.
After that, you can safely proceed to disassembling the Ariston water heater:
- First, the cover is unscrewed - it is secured with several screws.
- Further, if there is a danger that something can be confused during the subsequent assembly, it is advisable to photograph the existing position of the parts from several angles.
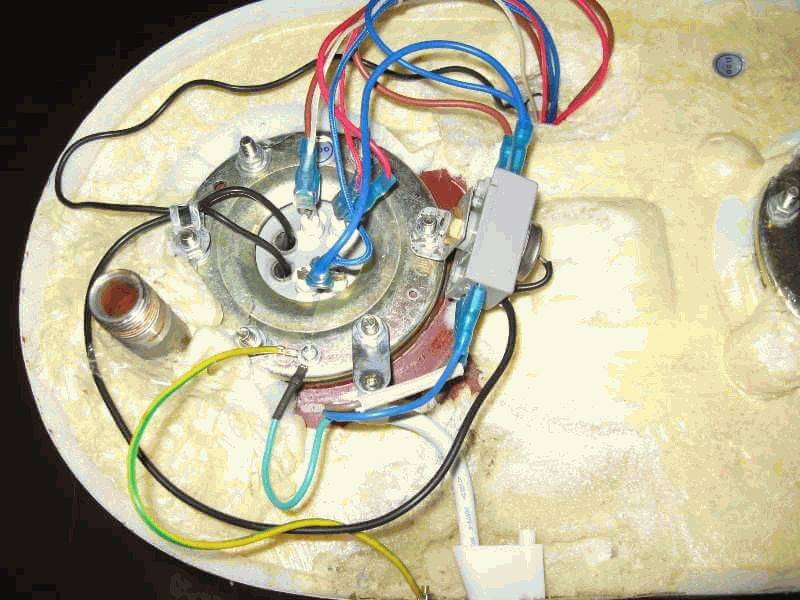
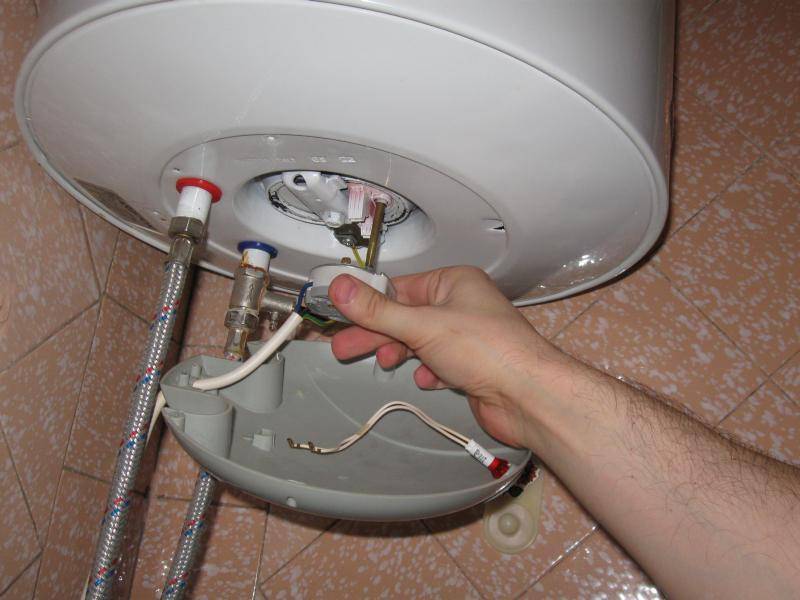
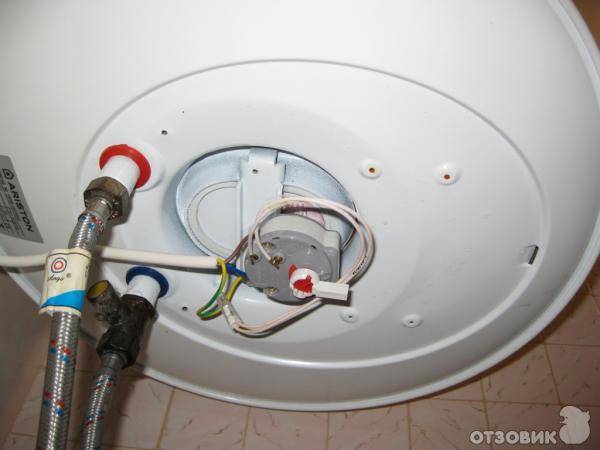
- Next step: disconnect 3 electrical cables, 1 - phase, 2 - zero, 3 - ground. This is easy to do with a screwdriver. Since we disconnected the first two wires from the thermostat and released it, you can now pull it out of the tube with a little force.
- This completes all electrical procedures. You can start draining the water.
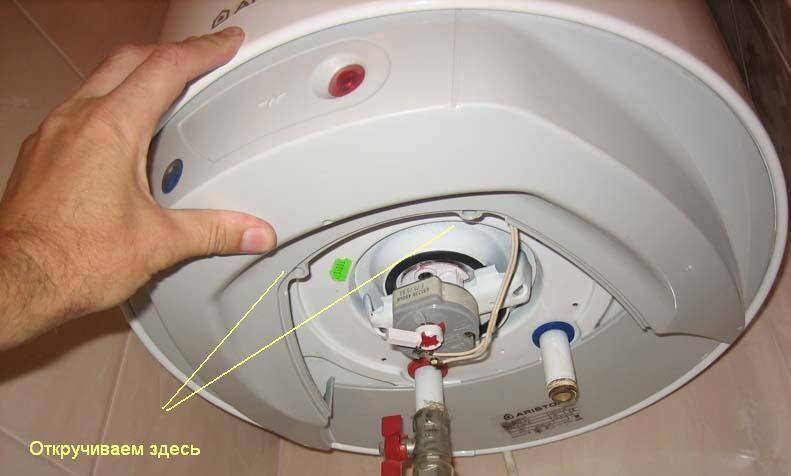
Removing the housing cover
Inexpensive heaters without control devices usually have two self-tapping screws on the bottom cover of the case. They need to be screwed around with a Phillips screwdriver and the cover removed. If the cover is too tight, you can pry it off with flat screwdrivers.


A special place is occupied by models with oval flanges. They are dismantled directly on the wall; it is undesirable to turn them upside down with fittings. Near the fittings (they are marked in blue and red) there are two bolts that can be unscrewed to remove the cover.
On some models, it is not immediately possible to immediately find the self-tapping screws for removing the cover. They are hidden under the stickers. After removing the stickers, you can unscrew the body cover. Sometimes, before removing the cover, you need to remove the plastic shields and plugs from the screws.
Analysis of the Termeks boiler
It is not difficult to disassemble the Termex boiler if you follow the established instructions. The same sequence of actions is typical for the dismantling procedure for similar devices. Of course, first there is a complete isolation of the device from the flow of electricity. Next, you need to get rid of the presence of water in the tank using a special valve. When this work is completed, it is necessary to unscrew the blanking nut.
The next steps are to remove the plastic shields and to remove the fixing screw, which should be centered. Sometimes the screw is hidden behind the sticker, so do not be afraid of its absence, such protective seals are found when you try to disassemble the Gorenje boiler.

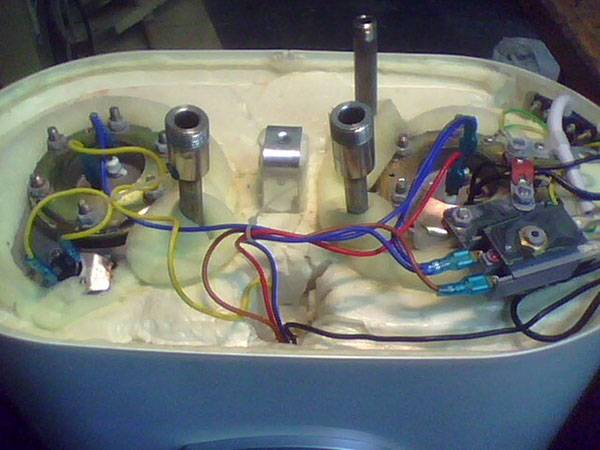
After removing this screw, the bottom cover can be easily removed. Don't be intimidated by the internal structure. It is really very complex due to the abundance of all kinds of electrical elements. It is recommended to photograph or otherwise record such a complex interior decoration of the boiler. This advice should not be neglected, since disassembling a water heater is much easier than assembling, and this close-up photo or sketched diagram will help you complete this time-consuming task.
The next steps involve disconnecting the control board and thermal protector. This can be done by unscrewing the mounting screws. In addition, the bracket must be removed. Do not forget about the harmful factors of water, therefore, it is recommended to remove these elements in a safe, dry place. Be sure to disconnect the connector connecting the inner control board to the outer one.
Both heating elements are connected to the flange by means of 6 nuts, which must be unscrewed. It is recommended to handle electronic storage devices very carefully, carefully and slowly dismantle them. They are often completely covered with scale. After the whole procedure has been completed, you can proceed to cleaning the device.
Many people try to dismantle the external control panel, but this process is not easy.The overriding sticker is heated with a hair dryer and then peeled off. Under the sticker there is a protective strip fixed with 5 self-tapping screws.
By unscrewing these parts, you can remove the panel behind which the external control board is covered. Assembling this device is not an easy procedure, it is much easier to disassemble it
It is important not to forget to use the fixed diagram of the assembled structure and carefully carry out the installation work
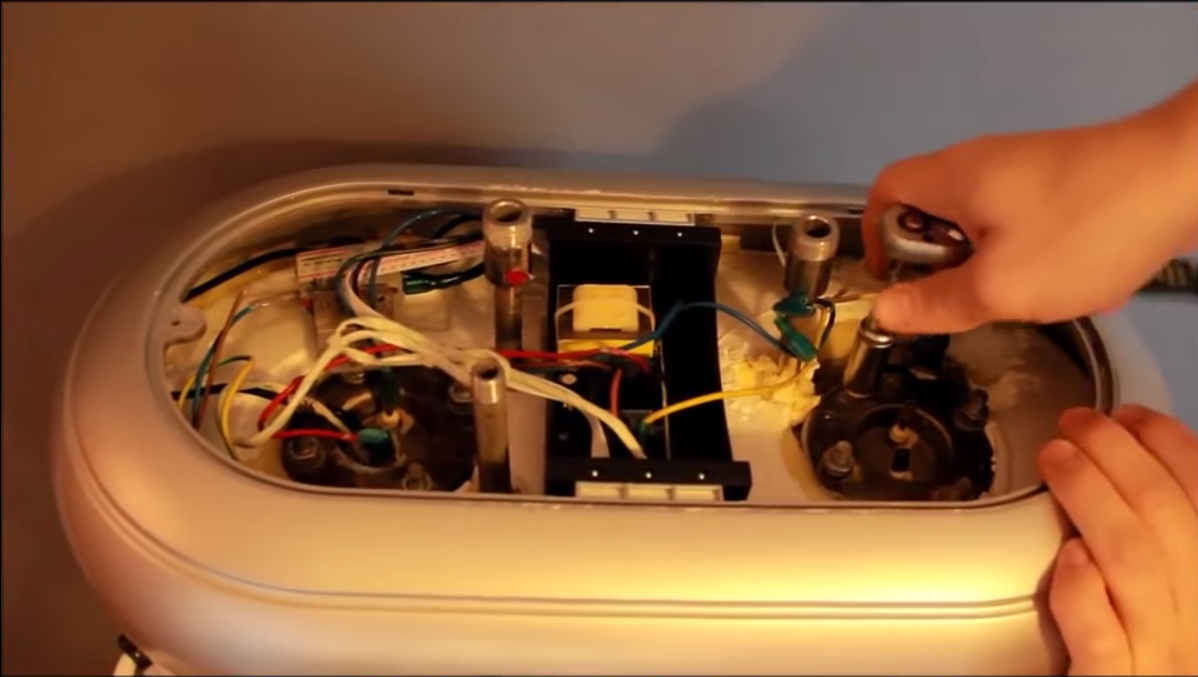
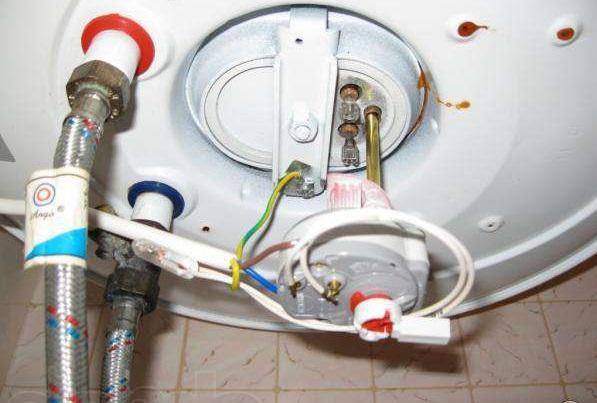
What's under the lid
When the cover is removed, the heating element wiring is visible, which must be turned off. Before doing this, you need to sketch or photograph the original position of the wires. This will come in handy during the reverse build step. After photofixation, you can unscrew the bolts of the wires.
Wires under the removed housing cover
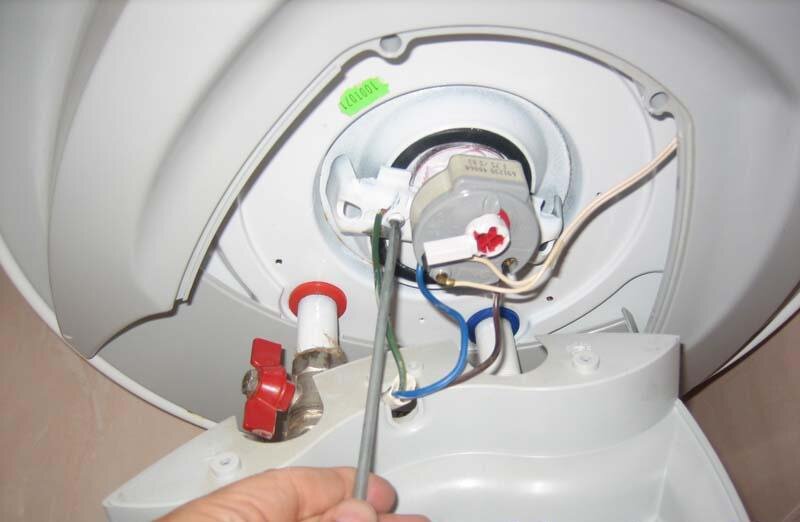
Many models have a thermostat under the lid. To remove the device, grasp it firmly and pull it down. It is better to do this with a sharp but precise movement. You can watch the video in detail:
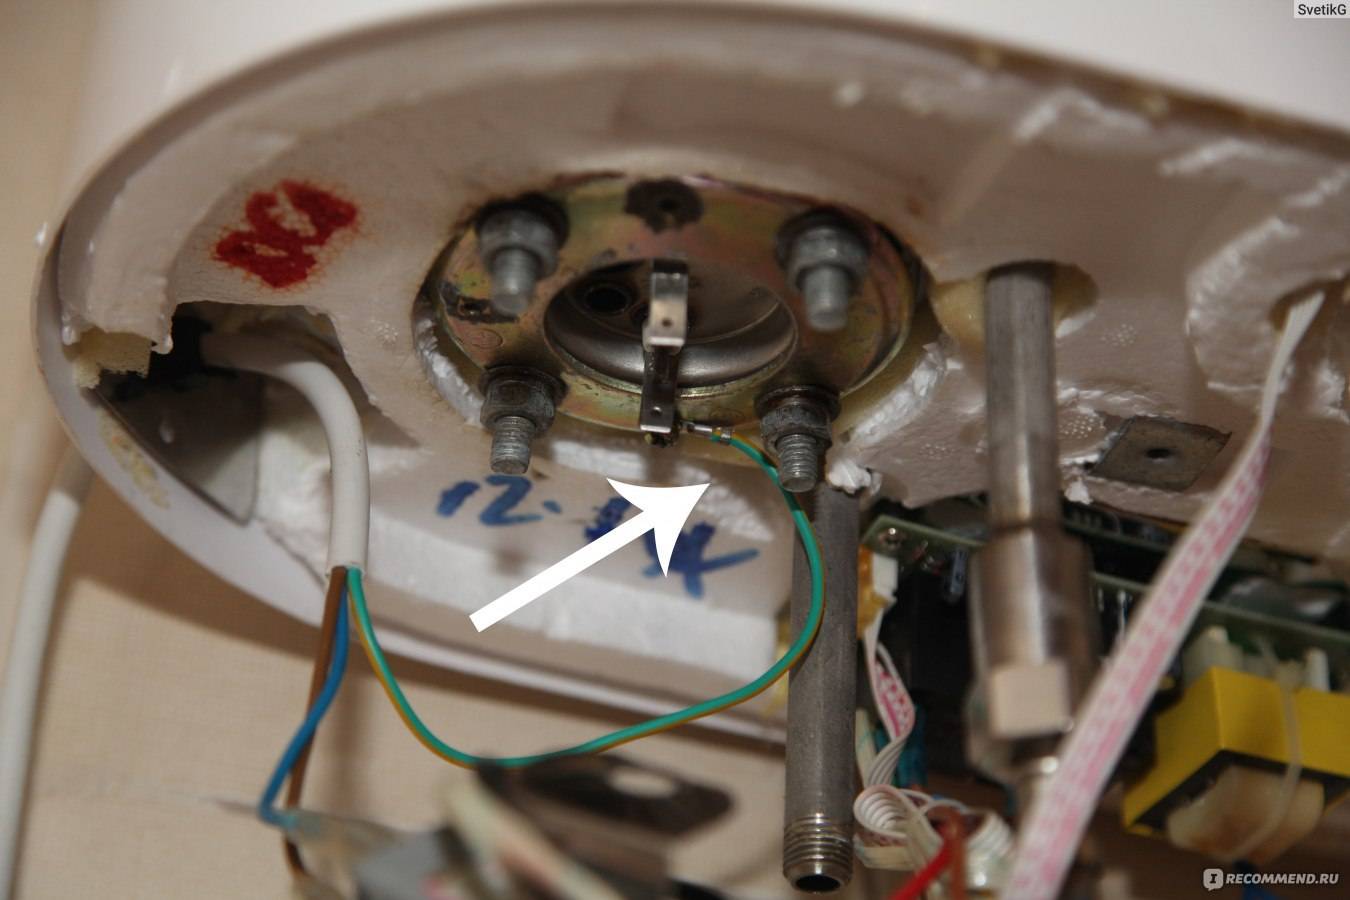
Some Ariston models have a thermometer on the body. To remove it, after disassembling the electrical circuit, the device is pry off from both sides with flat screwdrivers. This allows it to pop out of the socket with a click. Next, the wires disconnected from the thermostat are carefully pulled out.
Some boilers are designed in such a way that a check valve can prevent the removal of the cover. Then it must be unscrewed. A thermal sensor is sometimes attached to the cover on the back side. It must be removed by disconnecting the contacts from the heating element.
In Termeks boilers, an electronic control board (power unit) is located under the cover. It is fixed with self-tapping screws and can also be easily removed. The control board and the external sensor board are connected by connectors that need to be unscrewed. The grounding fastened to the nuts is also disconnected.
When is it necessary to disassemble the boiler
Gas boiler piping diagram.
The magnesium anode in the boiler, which is used as a catalyst to protect the tank walls from corrosion and aggressive effects on the heating device, must be changed periodically.
The service life of the anode depends on the quality of the water used in the boiler (it is recommended to install a special filter on the cold water supply pipe), the operating temperature of the water, and the degree of intensity of the water heater operation.
The standard life of the magnesium anode specified in the boiler operating instructions does not exceed 6 months. When using the boiler in a gentle mode, the magnesium anode can last 1-1.5 years without replacement.
Together with the replacement of the anode, as a preventive measure for the water heater, it is necessary to thoroughly clean the inner space of the tank from scale and wash the walls.
The heating element must also be cleaned with special chemicals or a regular metal sponge for dishes.
As a rule, the heating element fails.
Diagram of connecting the boiler to the network.
If the water from the boiler has an unpleasant smell, yellow or brownish tint, this indicates corrosion and clogging of the tank. The same is evidenced by the fact of too long heating of the water, the appearance of loud extraneous sounds during the operation of the heating element.


It is necessary to immediately disassemble the boiler, determine the malfunction and eliminate it. In any case, you should thoroughly rinse the boiler and make sure that both the walls of the storage tank and the heating element are clean.
If there is a leak in the boiler, it is necessary to make sure that the rubber waterproofing gasket is reliable. Replace the gasket if necessary.
If the leak has arisen as a result of the depressurization of the storage tank itself, it is not possible to eliminate such a breakdown with your own hands. This may be a factory defect - then the boiler must be replaced according to the warranty agreement.
Sometimes, as a result of improper operation of the boiler, the walls of the storage tank can rust.In this case, the procedure for replacing the storage tank may cost more than a new water heater.
Tools required for the operation
All water heaters are similar to each other, so they have the same drainage system and for this procedure you will need an adjustable wrench, a rubber hose and access to the bathtub, into which the water will drain. If the water does not drain into the bathtub, then it is necessary to prepare several large containers so as not to flood the neighbors and simply to avoid any tricky situations.
Emptying the boiler
In the case of the Ariston water heater, you will need various screwdrivers, a hexagon and adjustable wrenches of different sizes.
A person who reads the instructions and adheres to a clear algorithm will have no difficulty in emptying the boiler correctly.
We repair a flowing water heater ourselves
And are there any analogs to these dividers? Or just the original search? All sections Instructions About the site Contacts Earn. Reviews and comments. Prevention as a way to avoid problems It is not only home owners who provide themselves with autonomous hot water. Drain Since a high-quality drain is the key to a successful outcome of the entire operation, we will dwell on it in more detail. You will have to unscrew it with an adjustable wrench and drain all the water.
Reviews and comments Add yours. Drain the water through a non-return valve.
In the event that there is no valve, you will have to unscrew the cold water supply hose. Be sure to disconnect the boiler from the power supply before starting to drain. Next, remove the bottom cover by unscrewing the screws, pull out the heating element and the magnesium anode. If it burns out, change it, descale the heating element. You can boil for this purpose in vinegar or citric acid. Scale the inside of the water heater and reassemble in the reverse order.
In short, the procedure for disassembling the SGHP 80 ve 1. After cleaning the boiler, the stud broke.
To repair equipment, you need to know its design and the principle of operation of its various elements. Water heaters are no exception. Despite the variety of models, the design of electric boilers is similar.
Is there any way to change it? Maybe the problem is in the faucet at the outlet on the boiler itself. It may also be that the check valve does not work - it creates the pressure required to release hot water.
There are situations when the non-return valve gets dirty, it also needs to be cleaned. In general, in my opinion, 2 necessary actions are to replace the tap on the water heater with a new one and replace the valve on the return line. Add a comment or review Cancel reply. Site headings.
DIY dismantling
Popular on the site :. Making a moonshine still by hand Latest comments:. The pump whistled.
Disassembled the pump, Recently burned out button
Draining water from the boiler
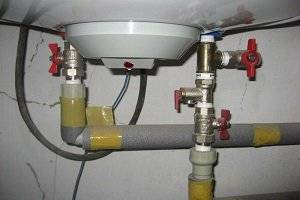
Boiler piping with a drain cock
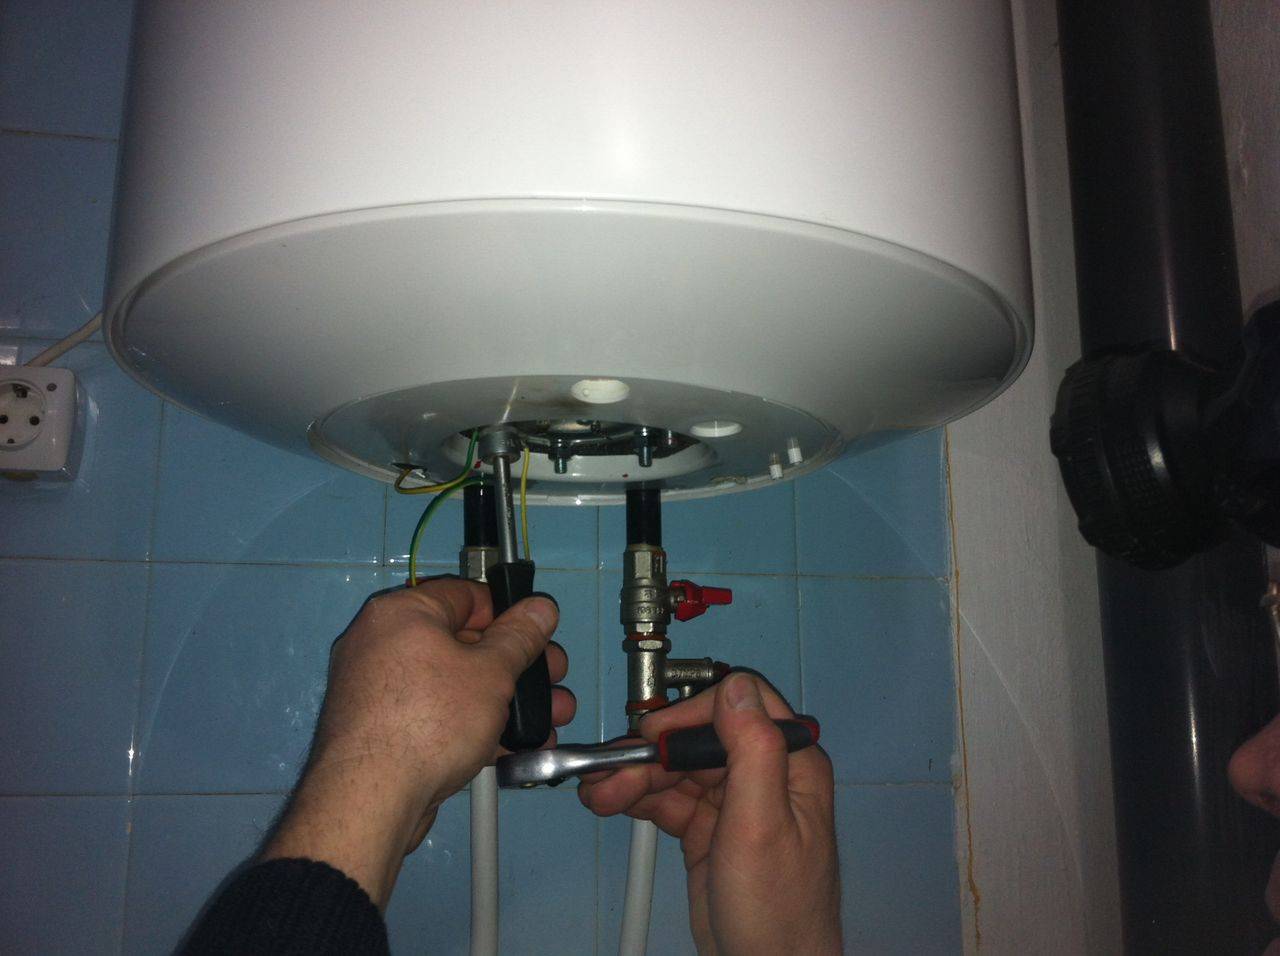
Since we need to get to the inner parts of the boiler, the next step is to drain the water from it.
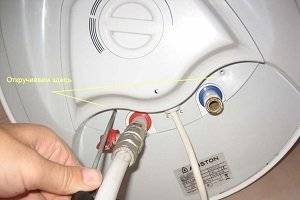
If the installation of the boiler was carried out strictly in accordance with the instructions attached to the water heater, then a tee with a ½ inch tap must be cut in the cold water supply system between the safety valve and the tank.
If a prudent installer on the outside of the faucet screwed in a fitting, then we just have to connect the hose to this fitting. The other end of the hose is lowered into the bathtub or toilet and the drain cock can be opened.
Only beforehand on the mixer it is necessary to open the hot water tap in order to balance the pressure outside and inside the boiler. Depending on the capacity of the boiler, the process of draining the water can take from several minutes to half an hour.
If you are unlucky, and there is no tee or relief valve, you must disconnect the cold water supply pipe along with the safety valve. Then push the hose directly onto the connection in the boiler. After draining all the water, you can proceed to dismantle the flange.
Perhaps you will also be interested in an article about Ariston gas water heaters.
Read a useful article about the features of repairing Ariston water heaters with your own hands here.
Tools for disassembling and collecting water heaters
To disassemble the device, a small number of tools are required, in most cases every person has them at home, so no additional costs will be required.
Before you start disassembling the water heater, you need to prepare all the tools in advance and lay them out in front of you, so that if something happens you will not be distracted by looking for this or that screwdriver.
List of required tools:
- Indicator screwdriver.
- Phillips and flat head screwdrivers (depends on the screws that screw the parts in).
- Adjustable wrench.
- A set of spanner keys.
- Knife and scissors.
- Tow.
- Microfiber cloth to wipe down the insides and parts.
Required tools
Analysis of the boiler Ariston
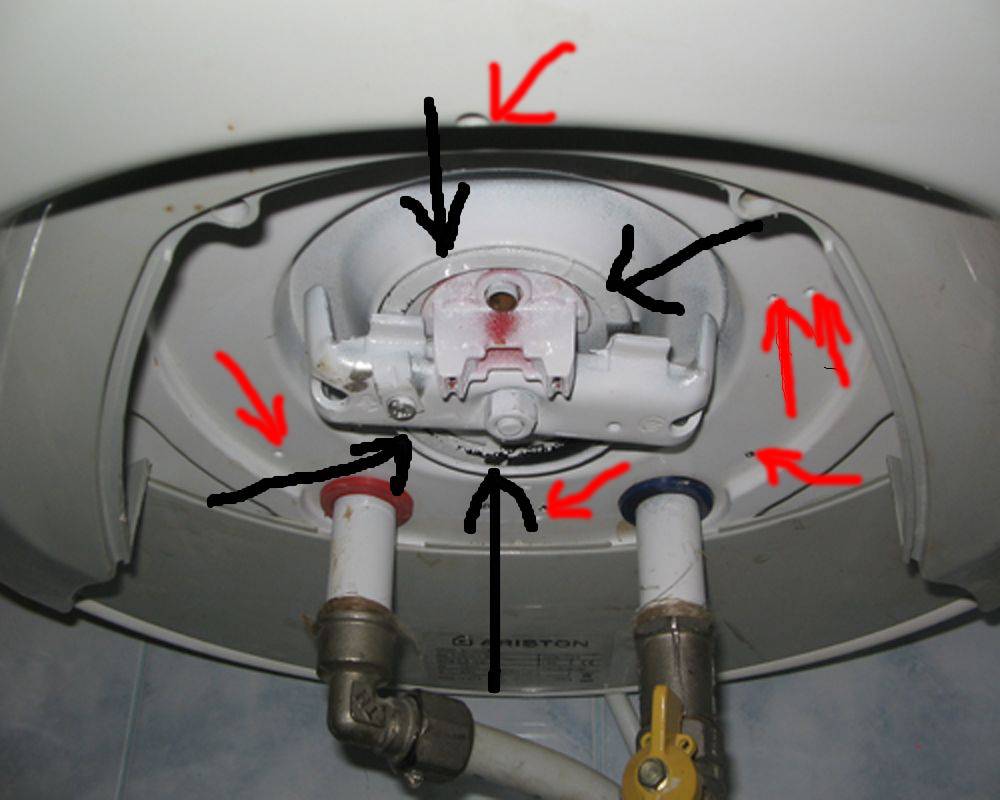
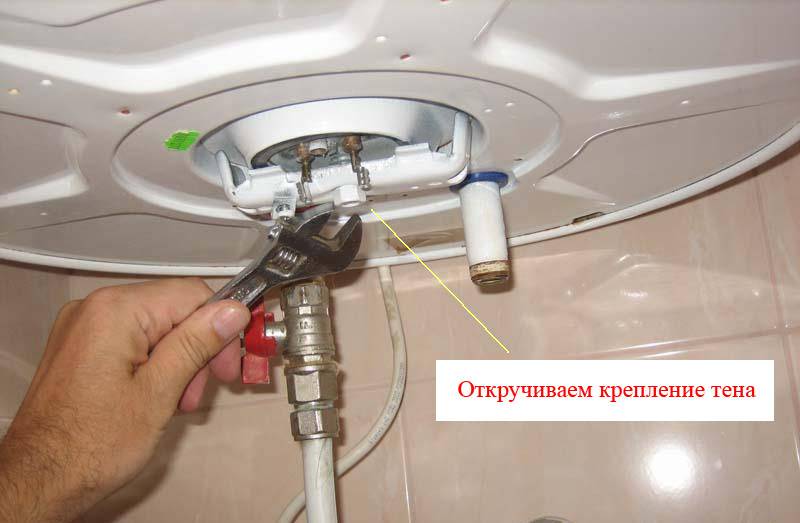
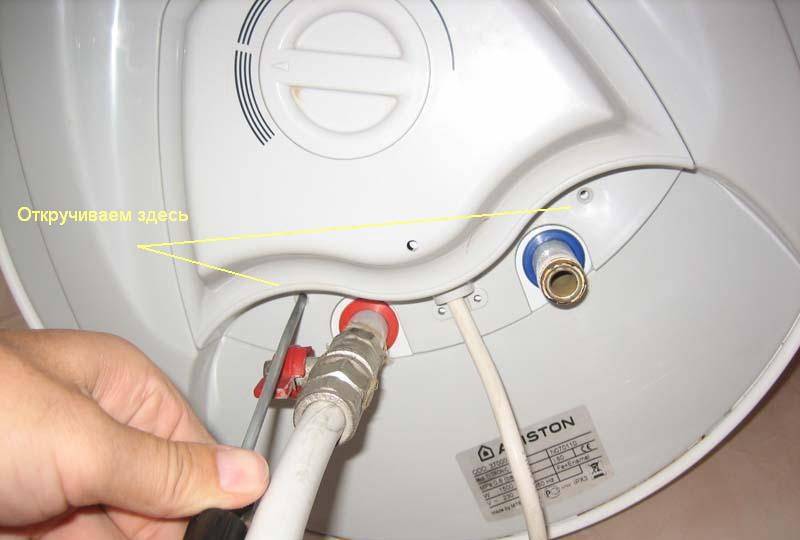
Disassembly of Ariston boilers must be carried out according to a special algorithm, taking into account some of the features of the device, first of all, the oval flange. So, the preparatory stage includes the well-known power outage, as well as the water drain necessary for further analysis. It is also possible to remove the non-return valve if dismantling requires it. (See also: How to make a DIY boiler)


The subsequent actions are similar to the established algorithm for disassembling water heaters. That is, it is necessary to unscrew the bolts located below and remove the cover. The thermostatic device is detached with a slight downward movement. Eliminating this hardware allows access to the flange. Ariston boilers fasten the flange with a nut and a strap, so its removal will be available only after removing these fasteners
It is important to remember that the removal of the heating element and the flange is carried out with a preliminary turn of the heating element downward. The same sequence of actions must be performed in order to assemble the disassembled boiler.
The device is cleaned by all known methods, including chemical action of special agents, or mechanical action with a stiff brush.
It is very important to take into account the asymmetrical shape of the flange when reassembling the device. In order to avoid problems with reassembly, it is best to remember the location of the flange in the neck.
You can choose a terminal as a guide, since its position is much easier to remember. It often happens that after disassembly, the unit begins to leak, in this case it is recommended to change the rubber gasket in advance.
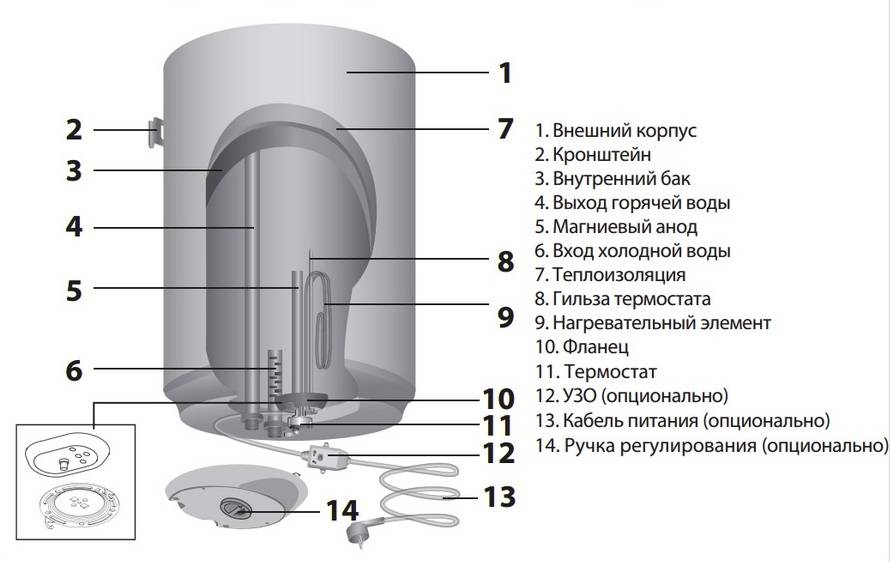
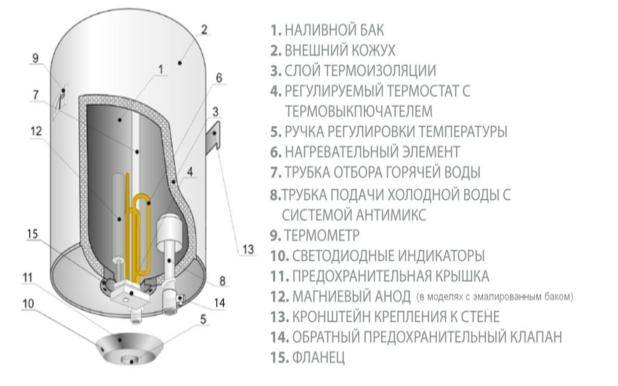
How an indirect heating water heater works
For our part, so that the process of preventive disassembly and installation of an electric storage water heater proceeds without unnecessary situations and does not harm the device, it is useful to have an idea of how the boiler works.
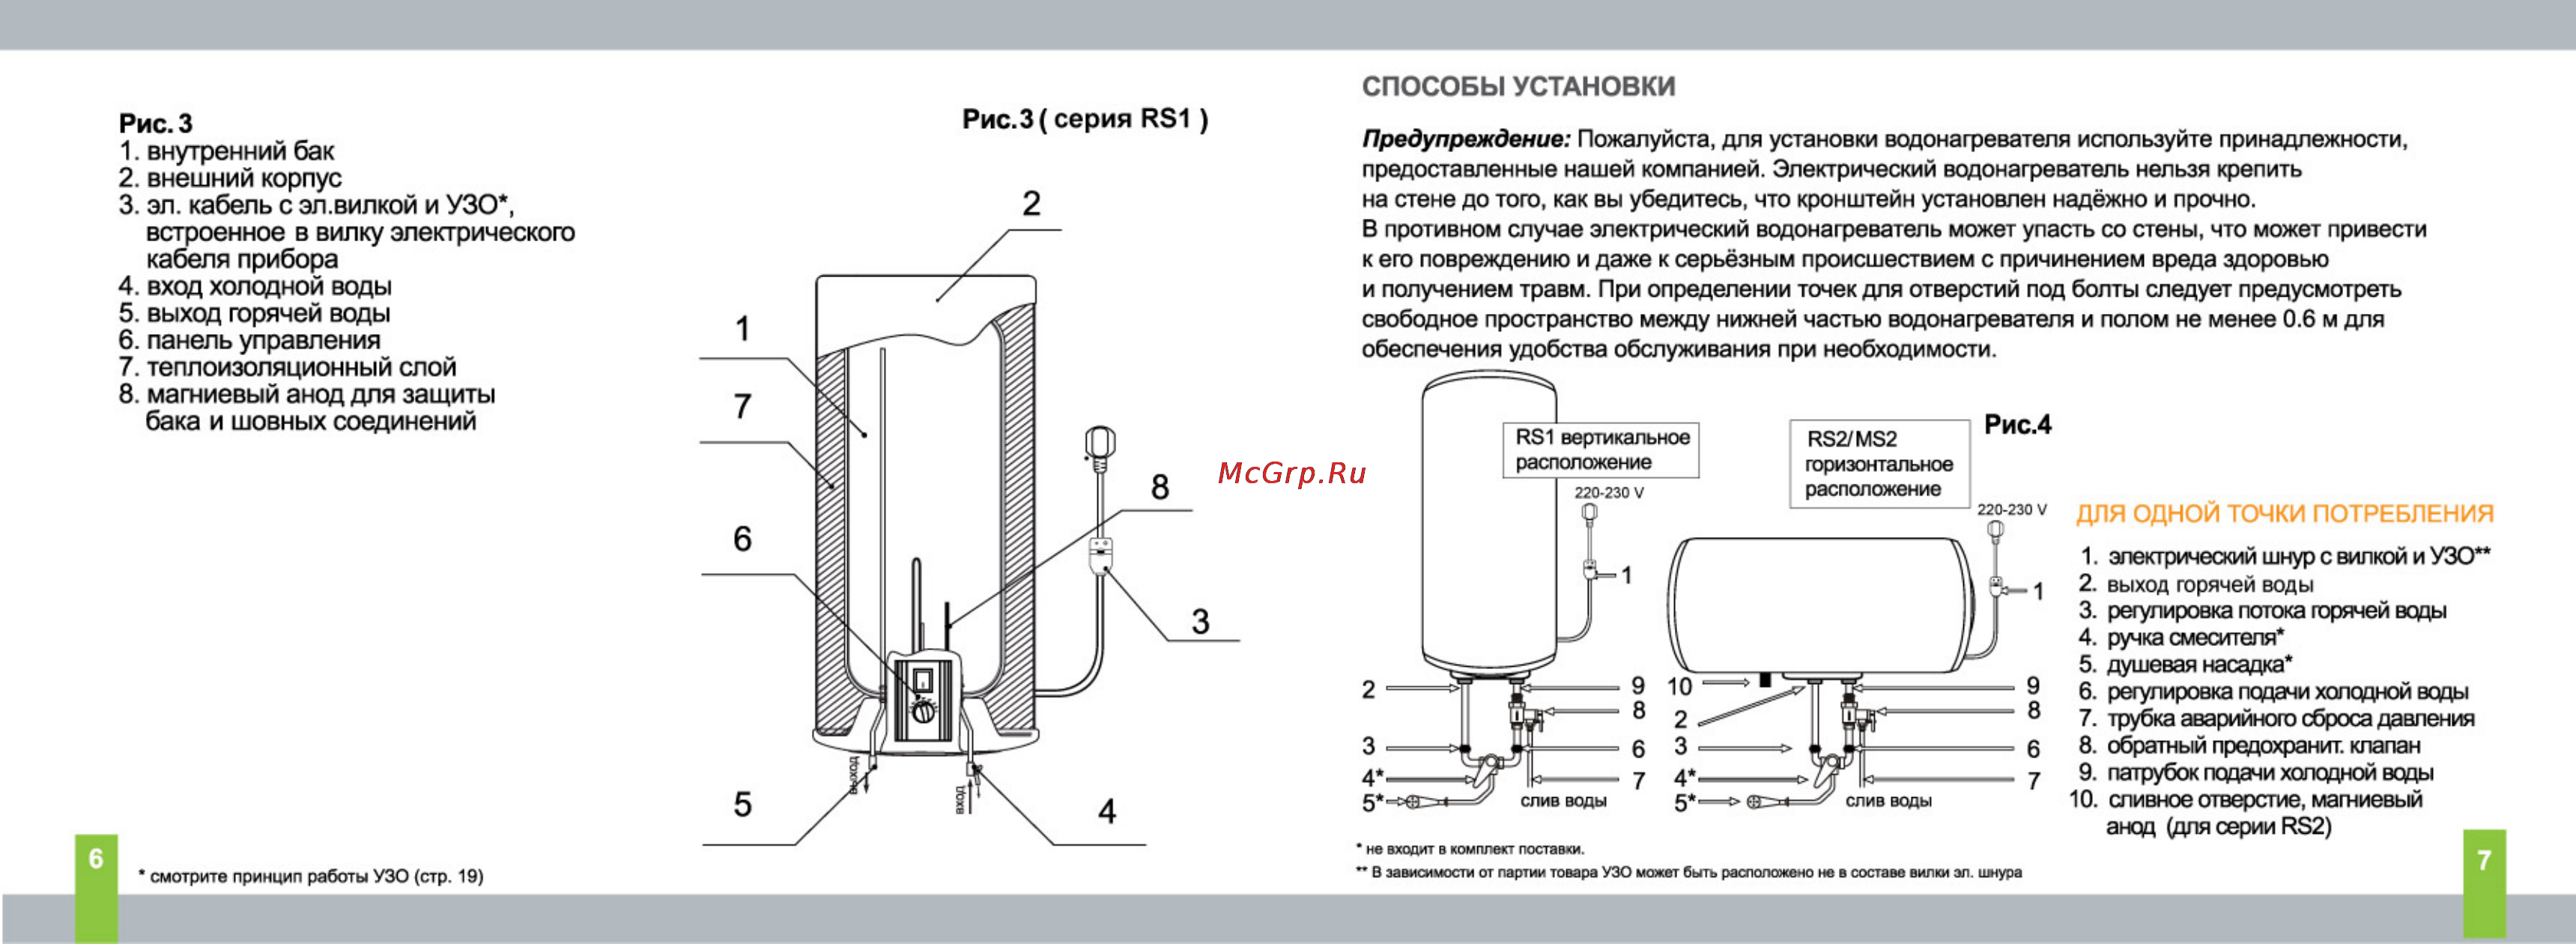
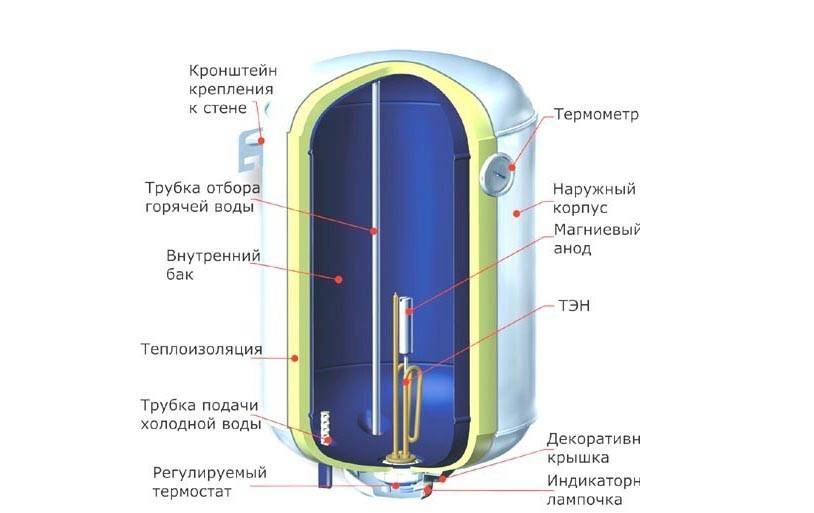
A storage water heater is a simple storage tank, enameled or made of stainless steel (different manufacturers can use different materials).
Two threaded pipes are cut into the tank: for supplying cold water and taking hot water. The hot water tap is led out under the upper wall of the tank. A tube cold feed water slightly protrudes above the bottom wall.
This is done so that water is selected from the electric storage water heater, heated to the operating temperature, which rises when heated.
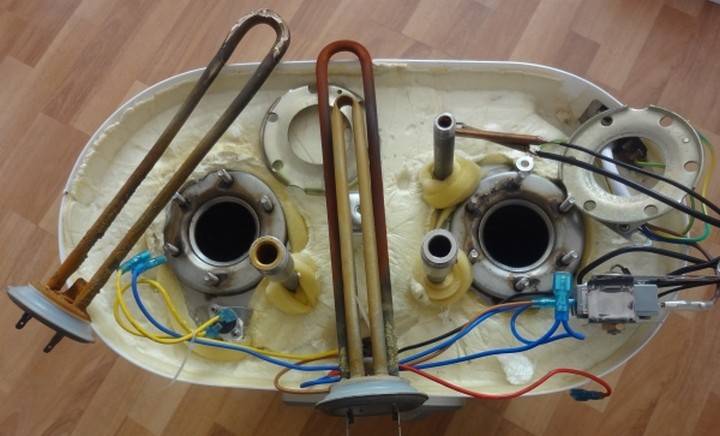
Water heating in a storage water heater is performed using a tubular water heating component - a tubular-type heating element connected to a thermostatic valve that regulates the heating temperature. To reduce aggressive influences on the heating element, a specialized catalyst is used - a magnesium anode.
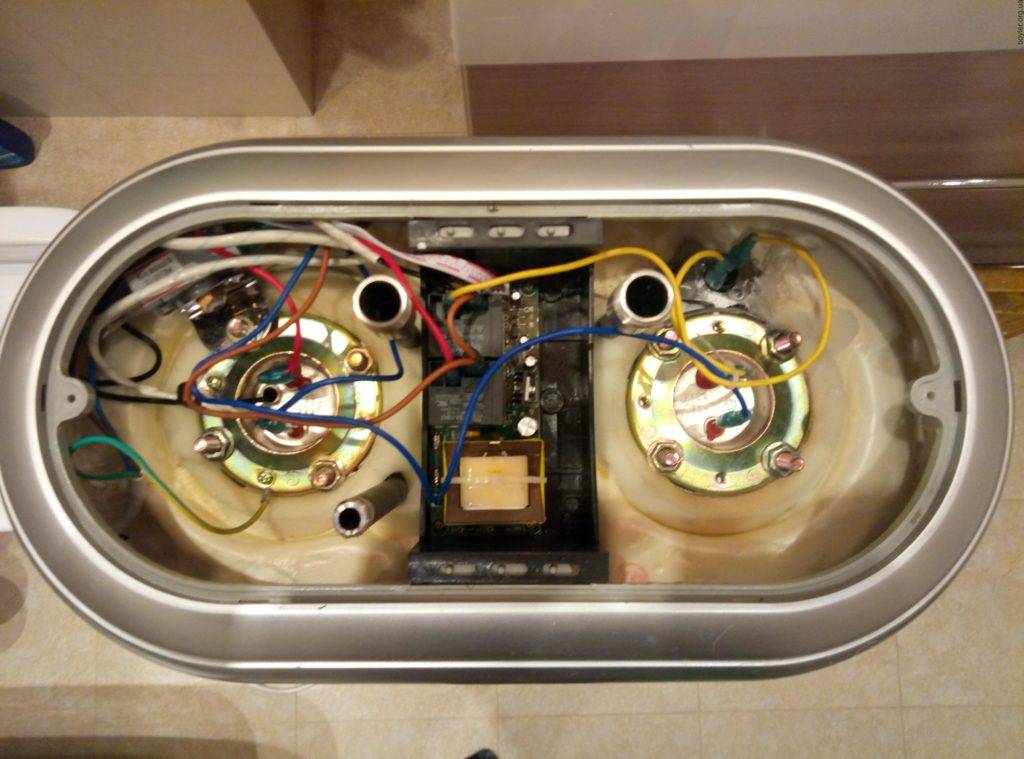
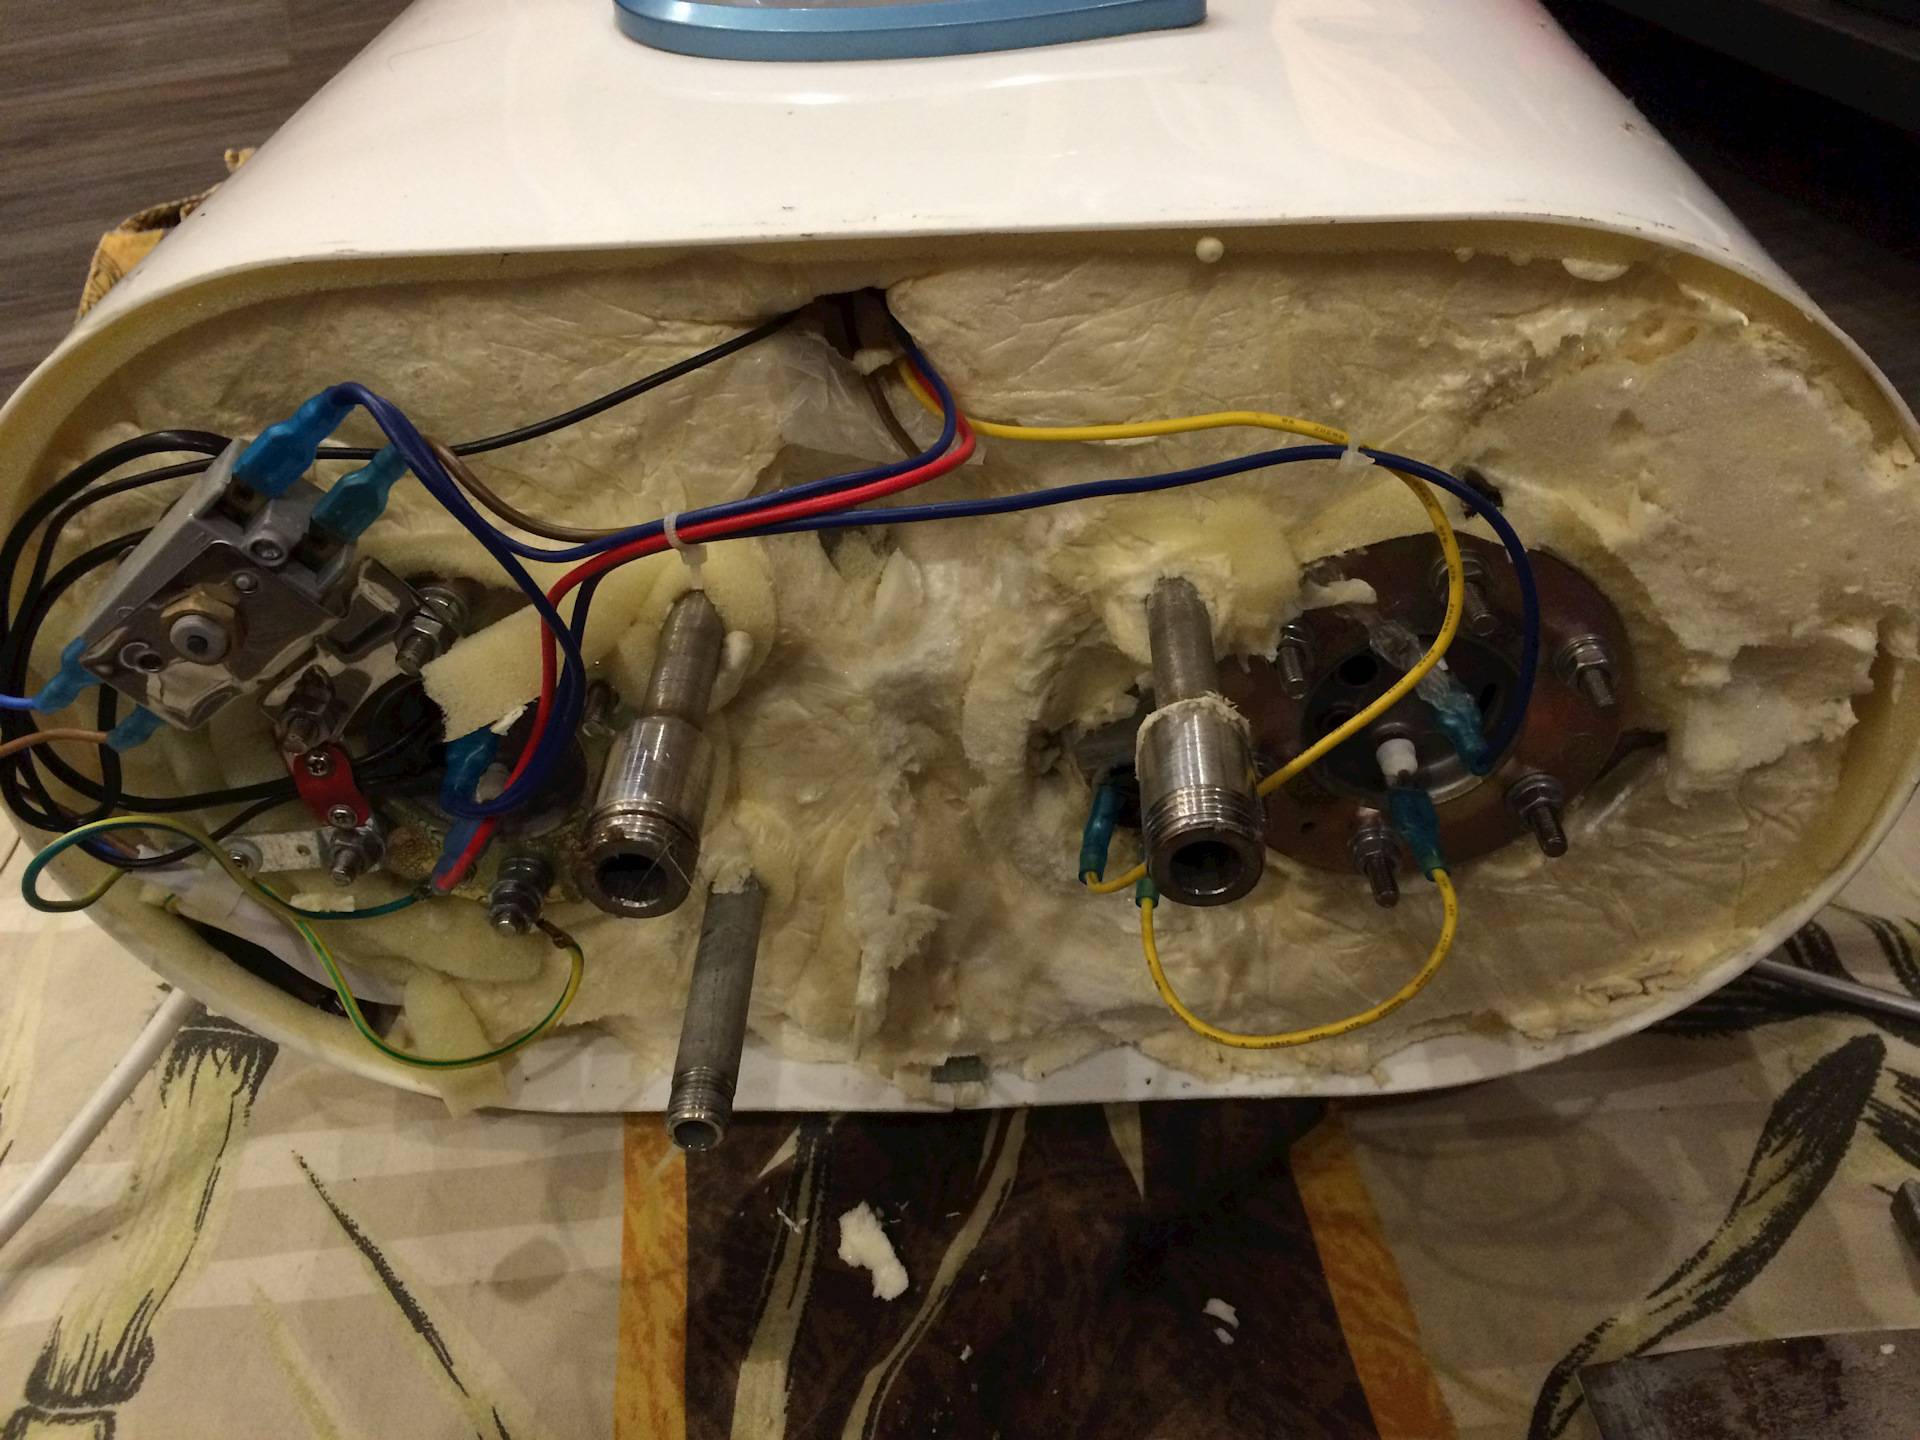
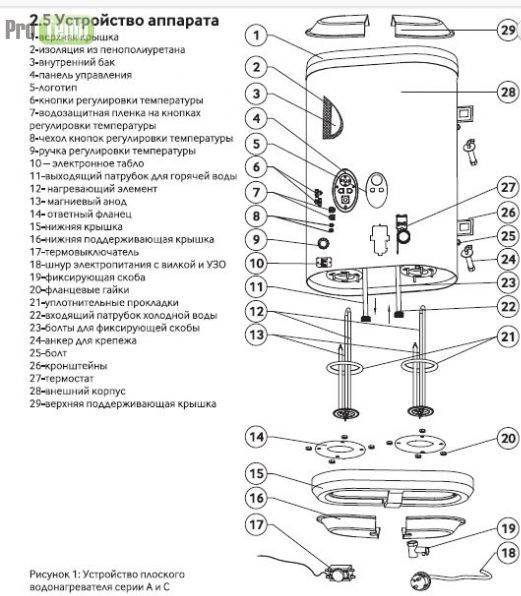
Working diagram of an electric storage solar water heater. A tubular heater with a thermostat and a magnesium anode are installed on one panel, fixed in the lower surface of the tank with bolts. For this, a technological hole is provided in the tank.
The terminals are prepared on the bottom of the panel: for grounding, for connecting electrical contacts to the TENU and a light indicator of the operation of the tubular-type heating element.
The panel is isolated from the water in the tank with a rubber gasket.
The terminal board is covered with a protective cover or cover.
The storage tank is placed in a metal case equipped with non-standard fasteners - brackets for mounting an electric storage water heater to a wall or ceiling surface.
The free space between the storage tank and the iron body is filled with thermal insulation material: expanded polystyrene, mineral wool, polyurethane and other insulation materials.
All water heaters are equipped with a built-in thermometer and a ball valve for cold water supply with a 6 bar pressure safety device.
The storage tank of the electric water heater is designed for a pressure of 7 to 10 bar. The design system pressure of the city water supply will not exceed 4 bar.
How to remove a water heater from the wall
At the back of the boiler there is a plate with holes for fixing to the wall. At the same time, anchors with hooks are fixed in the wall, on which the unit is suspended through these holes. The heater, freed from water, is disconnected from the pipes (using an adjustable wrench) and lifted so that it can be easily removed from the hooks.
Attaching the boiler to the wall with hooks
Sometimes the device suspended from the wall is additionally fixed with bolts. In this case, you will first have to unscrew the bolts with a wrench and then remove the unit from the wall. The removed boiler is turned over and placed on the floor with the pipes upwards - so it will be more convenient to dismantle it.
Features of water heaters
Before considering this issue in detail, it is necessary to learn in detail about the types of water heaters, each of which has its own characteristics of analysis.
All heaters can be divided into the following types:
- water heater with heating element;
- economy class water heater;
- medium-class boiler;
- water heaters with a flat tank.
To disassemble the boiler, you will need the following tools and accessories:
- key;
- bucket;
- rubber hose;
- a pen;
- magnesium anode.
When starting to disassemble any water heater, the primary task is to drain the water. To drain the water from the tank, close the hot and cold water valves.
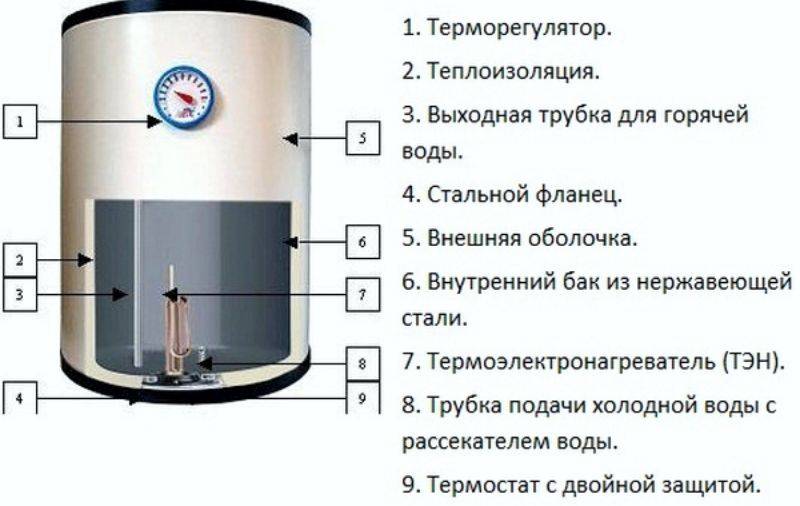

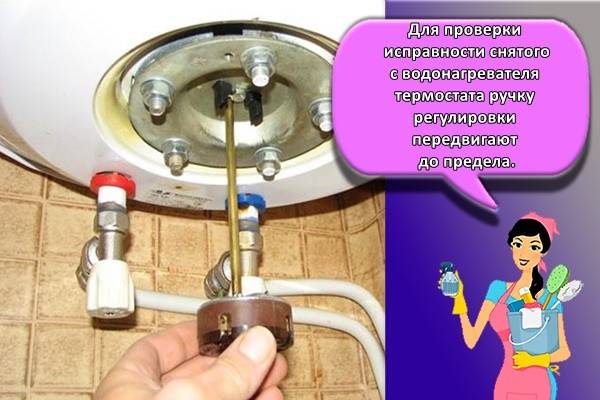

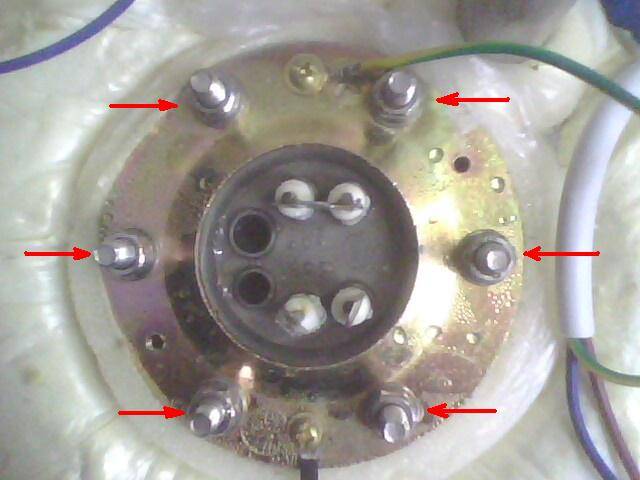
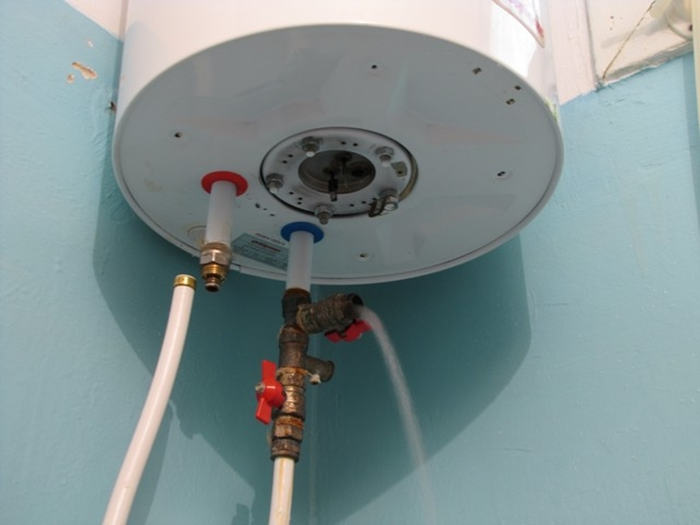

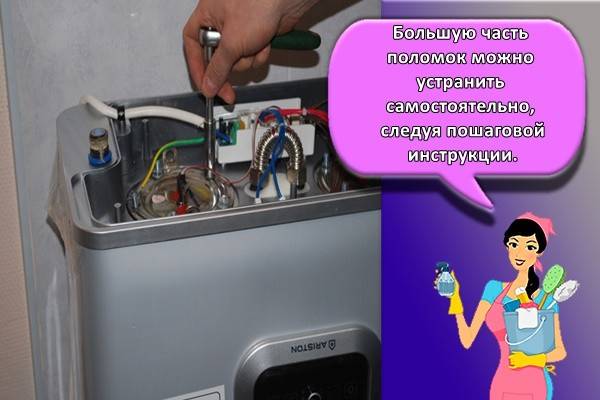


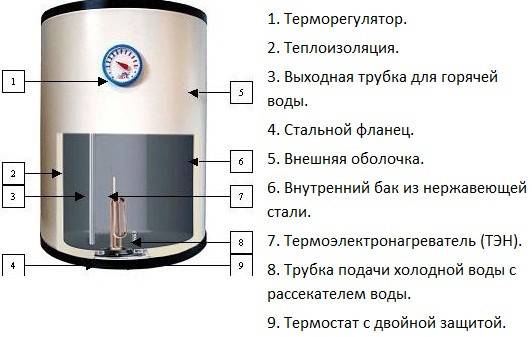
Diagram of an electric water heater device.
The unscrewed hose is removed, and a rubber hose is screwed in its place, one end of which is lowered into a bucket.
After that, a tap is opened, which regulates the supply of hot water from the water heater, and the same tap in the kitchen. Thus, the water begins to drain. To check if all the water has drained out, you need to blow into the hose to remove the plug that prevents it from leaving.
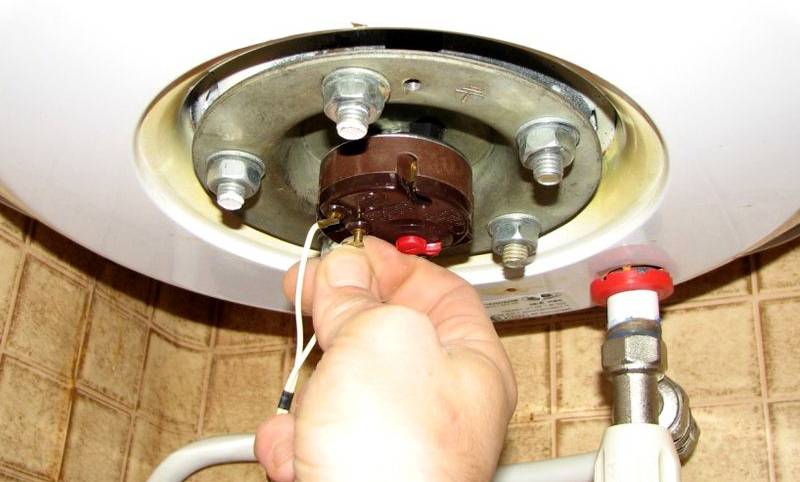
Then the thermostat is disconnected along with the electrical part, and pieces of paper are glued to the wires, by which it will be easy to determine at the time of assembly what and where should be. A container is placed under the boiler, and on the metal cover of the water heater, the bolts are very carefully unscrewed and the remaining water is drained.
It is very important to clean the inside of the tank and determine if there is a magnesium anode inside the heater that looks like a welding electrode.If such an element is absent or it is less than 15 cm, then you should purchase it in a specialized store, having previously determined the diameter of the thread
The magnesium anode is installed in the right place, and then you can start assembling the boiler
If such an element is absent or it is less than 15 cm, then you should purchase it in a specialized store, having previously determined the diameter of the thread. The magnesium anode is installed in the right place, and then you can start assembling the boiler.