Features of installing tiles on the floor
Tiling always begins with the preparation of the floor base, which is leveled with special mixtures, and also dried and cleaned of dirt. In some cases, the installation of the described tile is carried out on a wooden base, which must be scraped, and then carefully putty all the cracks that have arisen. Before laying the tiles, it will not be superfluous to carry out waterproofing work using special primers.
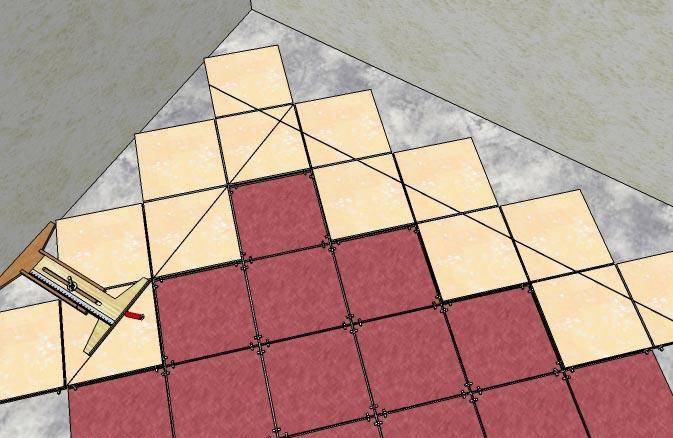
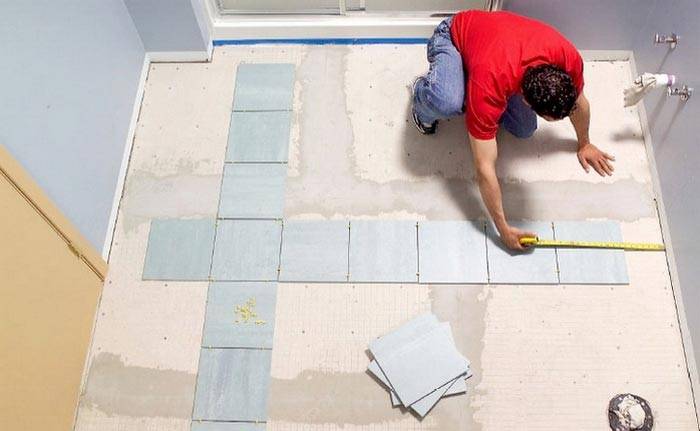
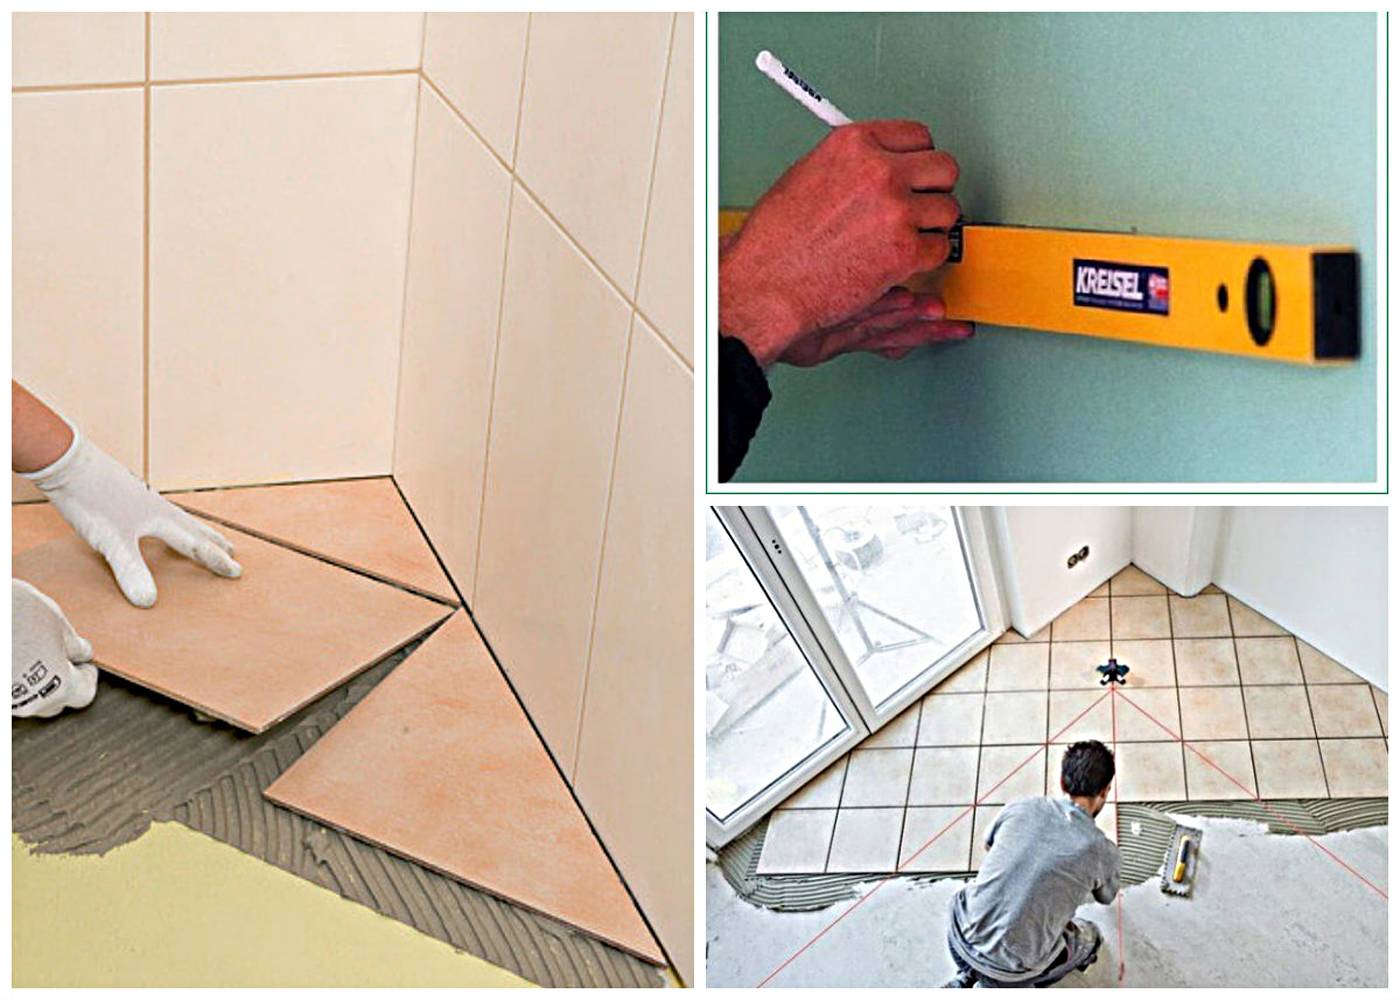
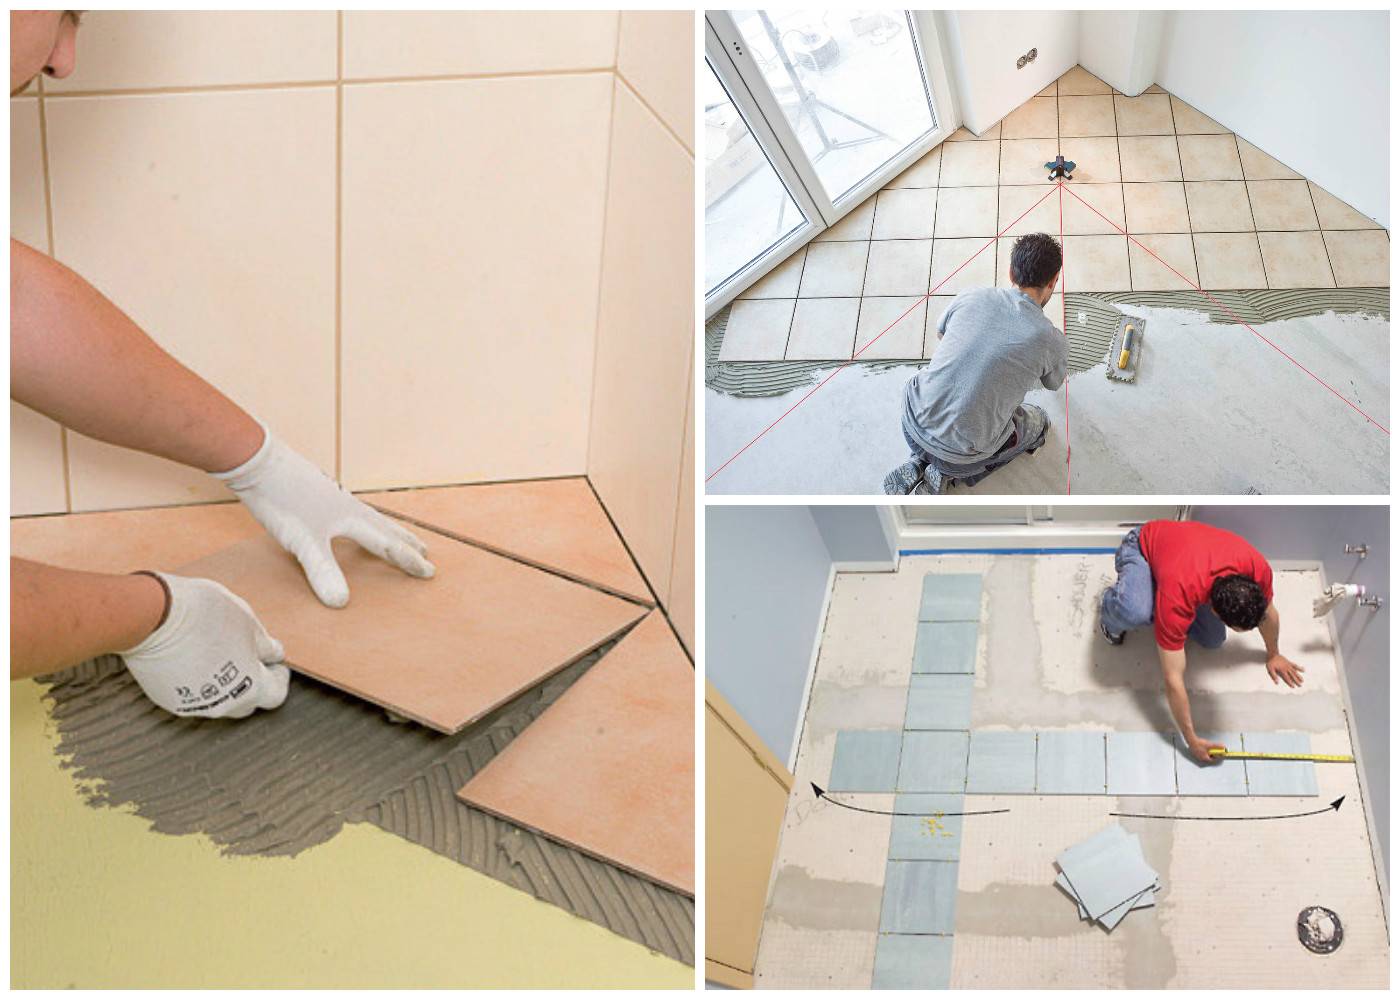
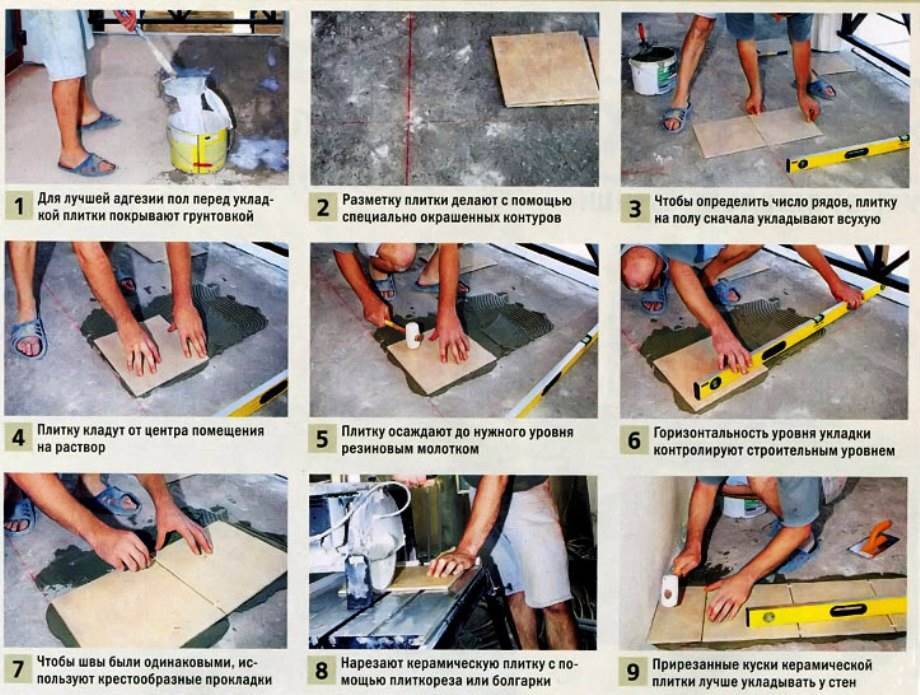
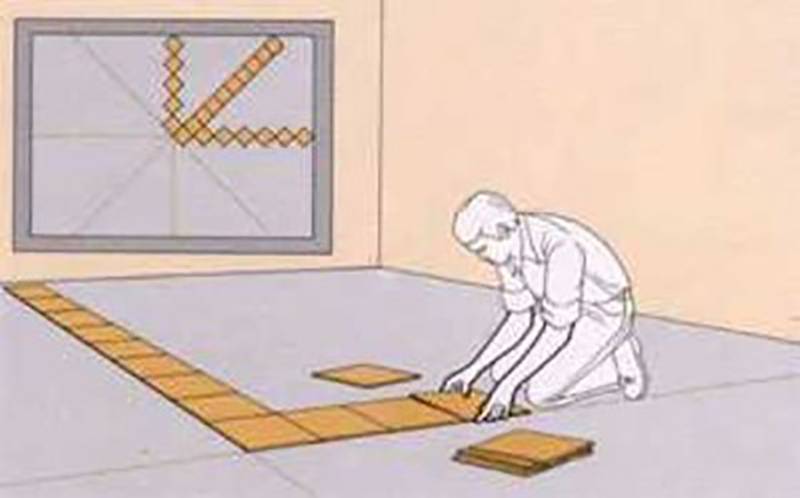
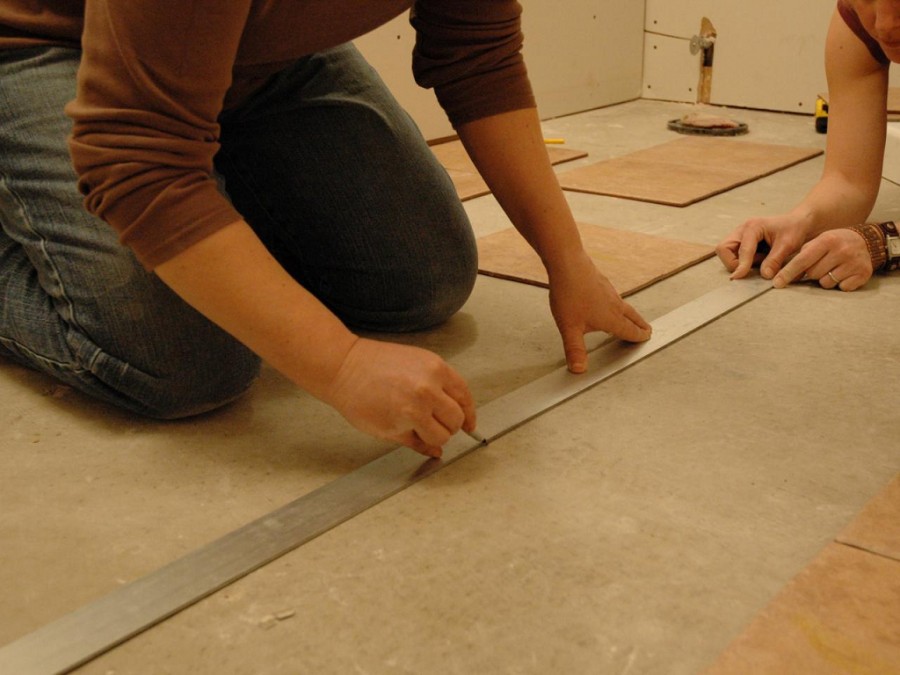
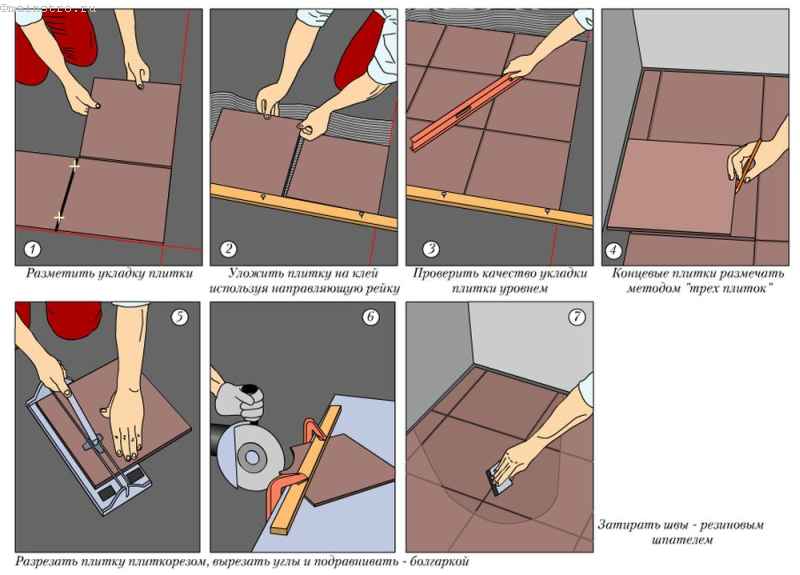
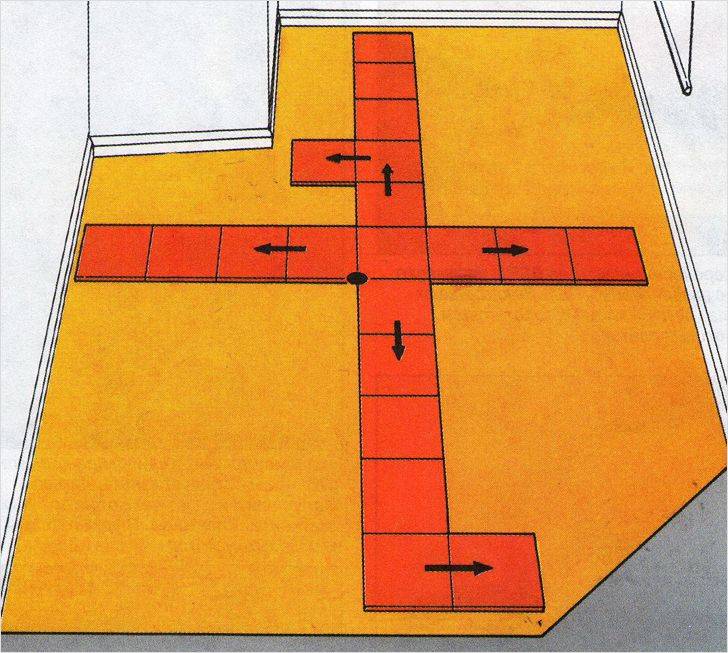
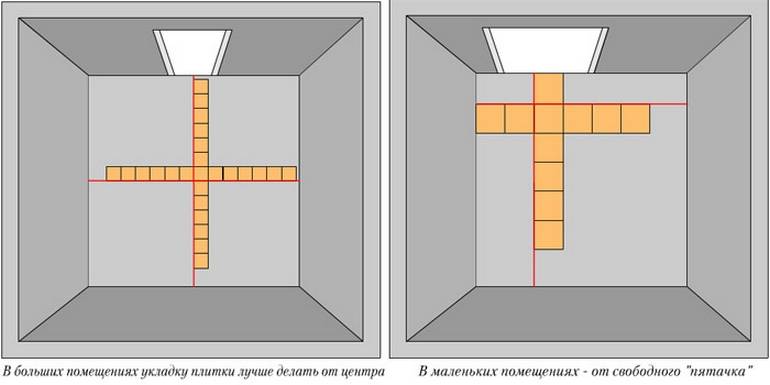
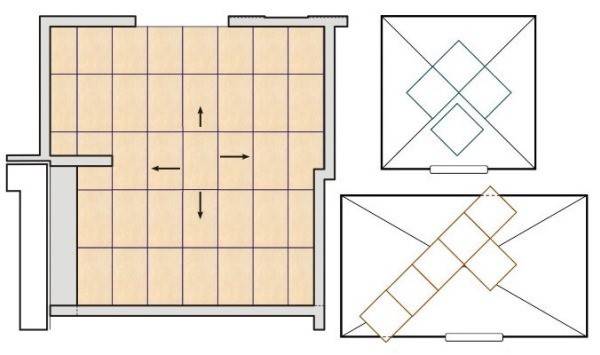
At the next stage, the surface is marked, for which it is necessary to dismantle the baseboards and door trims, as well as draw the center lines in the room. If the tiles will be laid diagonally, then the corresponding directions of installation are additionally outlined. The applied markings serve as a kind of reference point for a flat surface, so there should not be any significant deviations from the drawn lines.
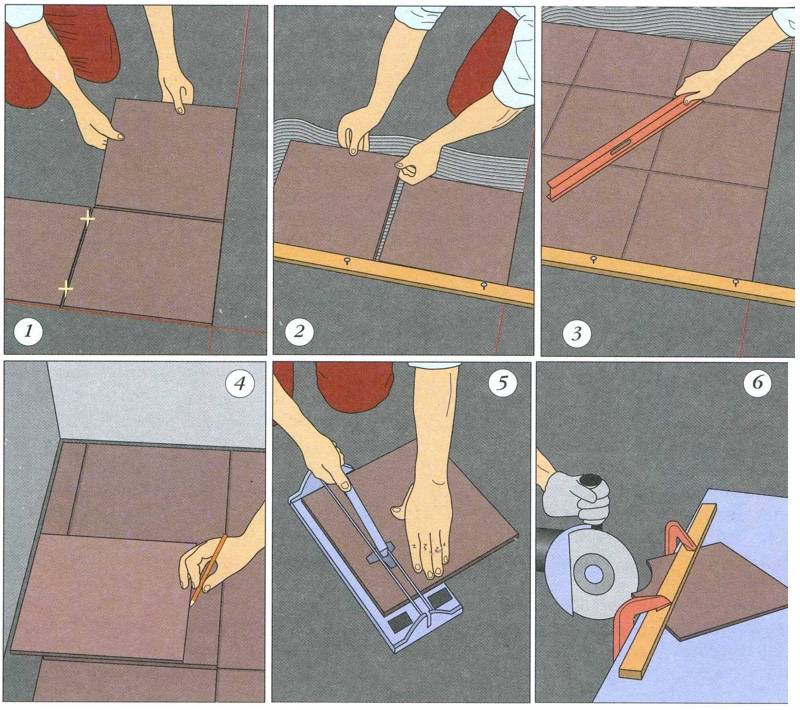
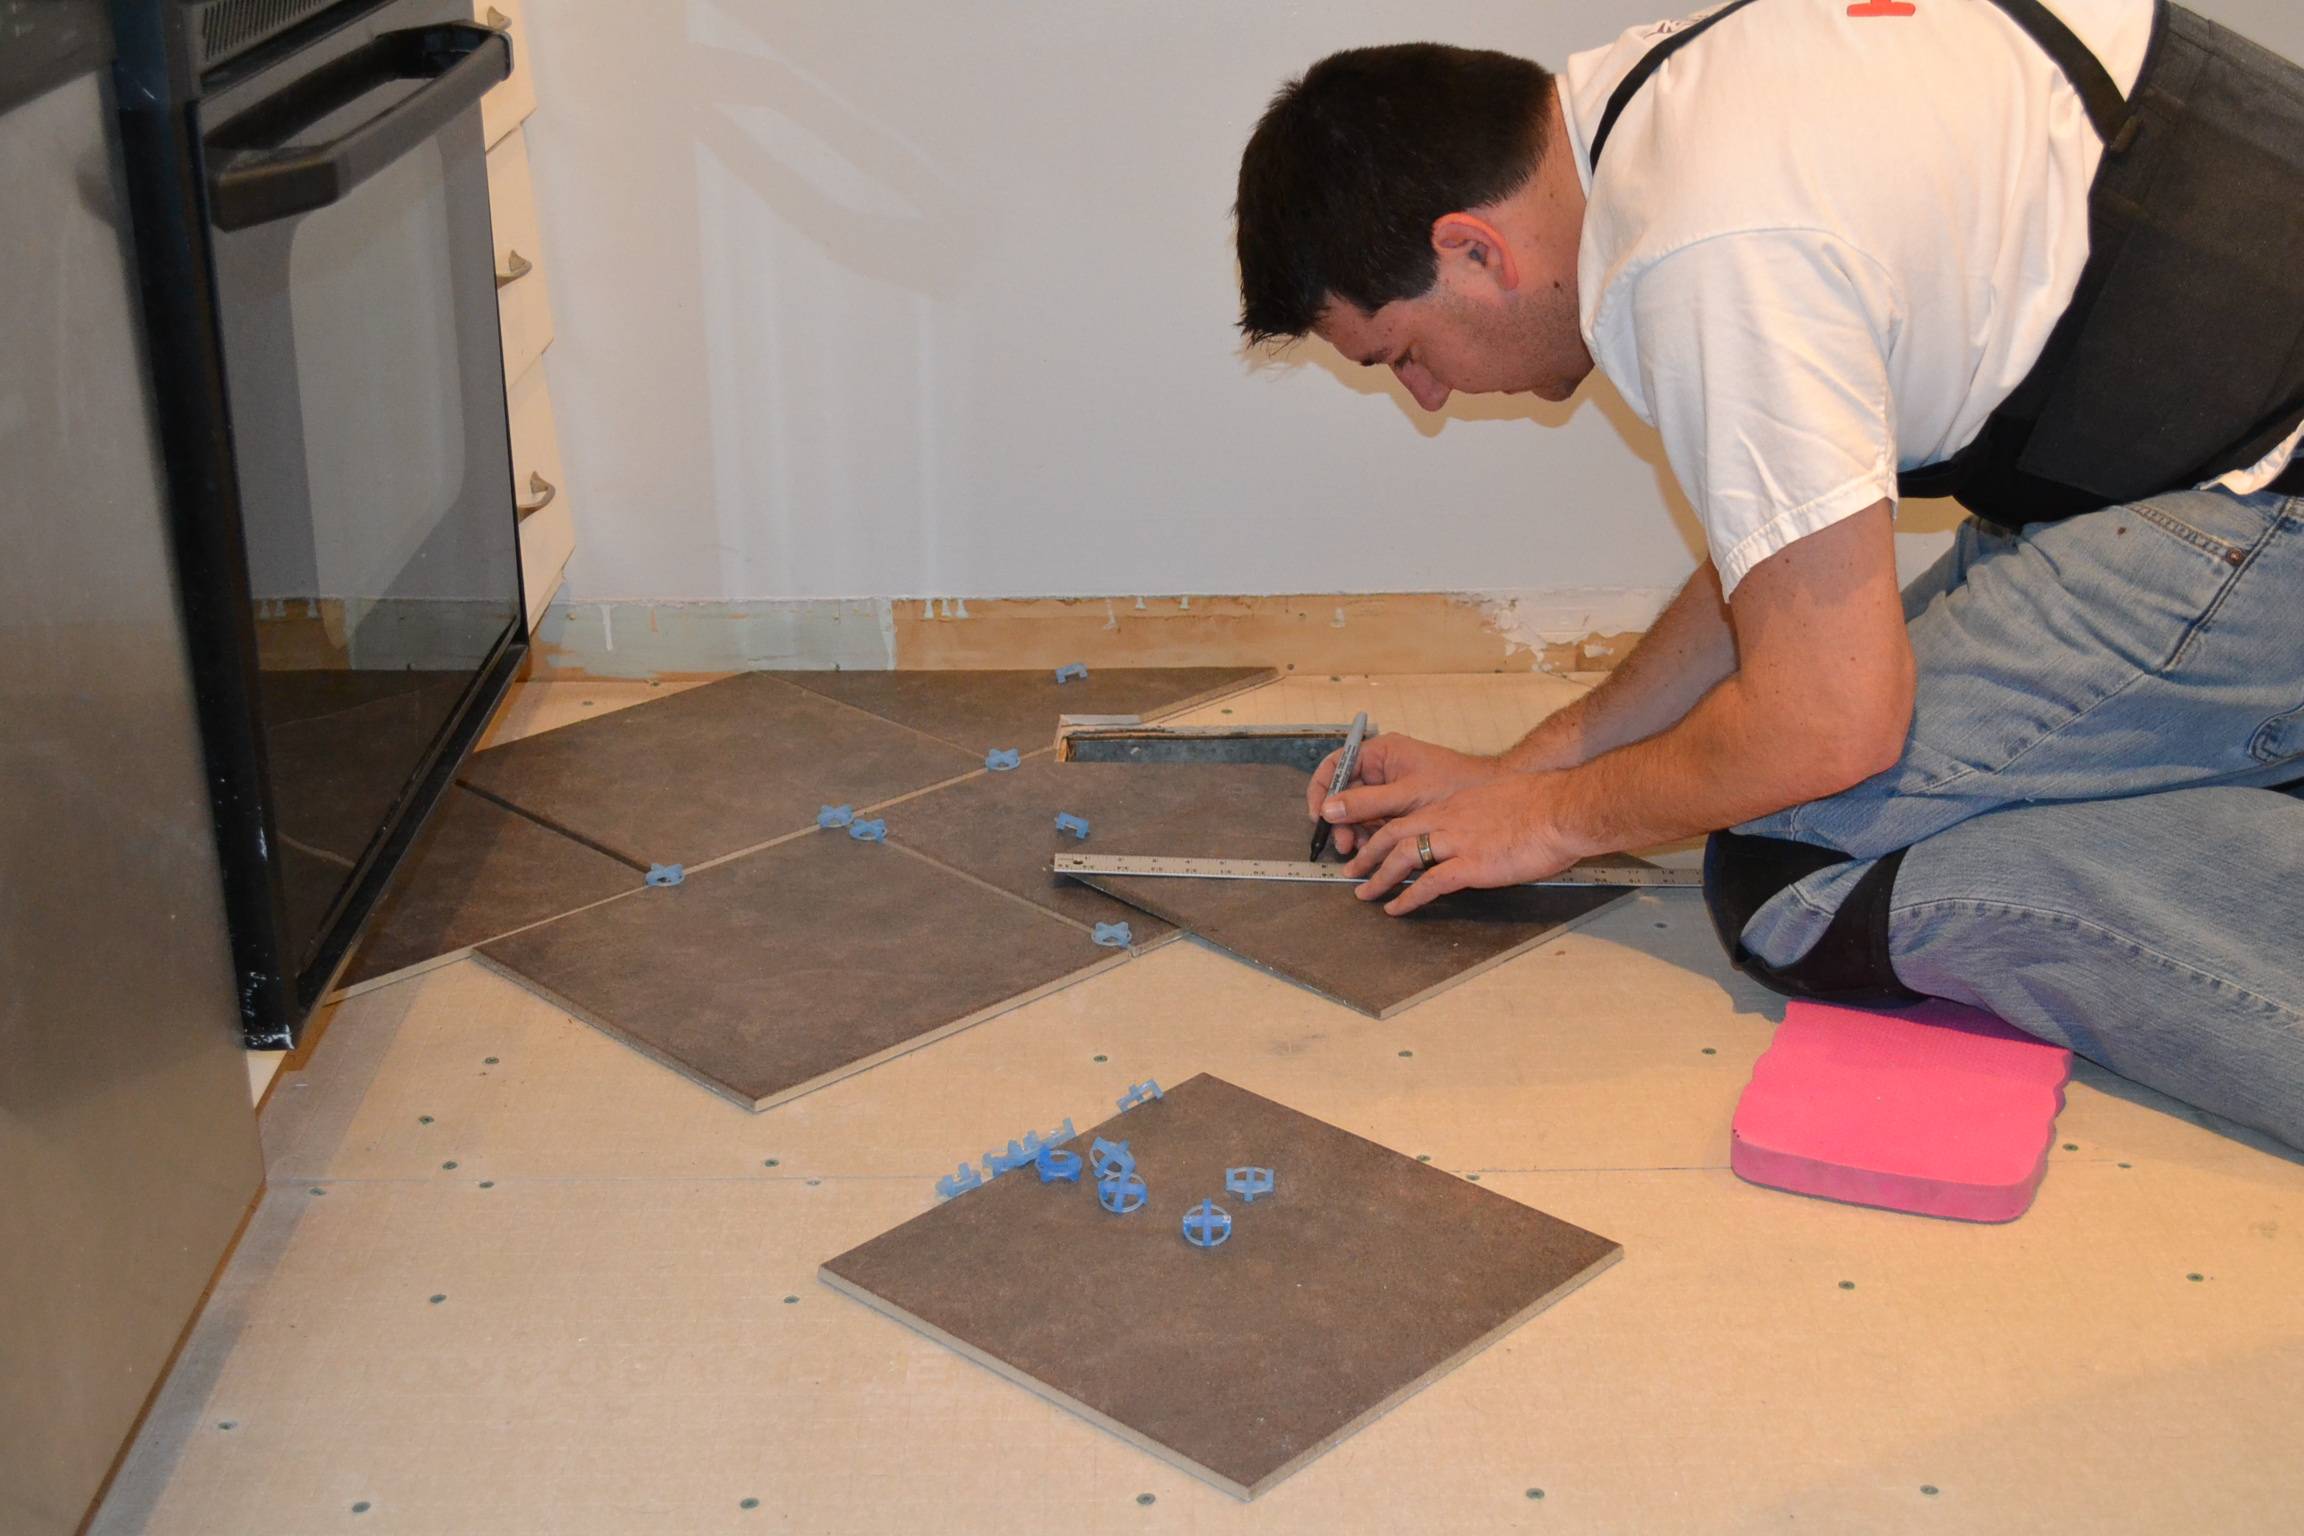
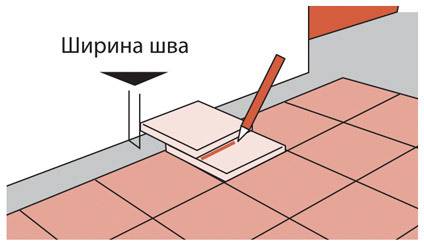
In the process of facing work, it is almost never possible to put all solid tiles, as a result of which a number of them will have to be cut off. These products are best placed against a wall, as the trimmed parts can later be hidden under furniture or skirting boards.
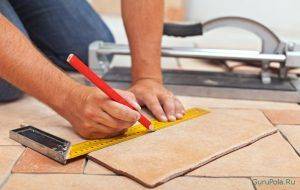
It is recommended to soak the tiles in water for about an hour before cutting, otherwise they may crumble during processing. In addition, the cut line should be more than 10 mm from the edge of the product.
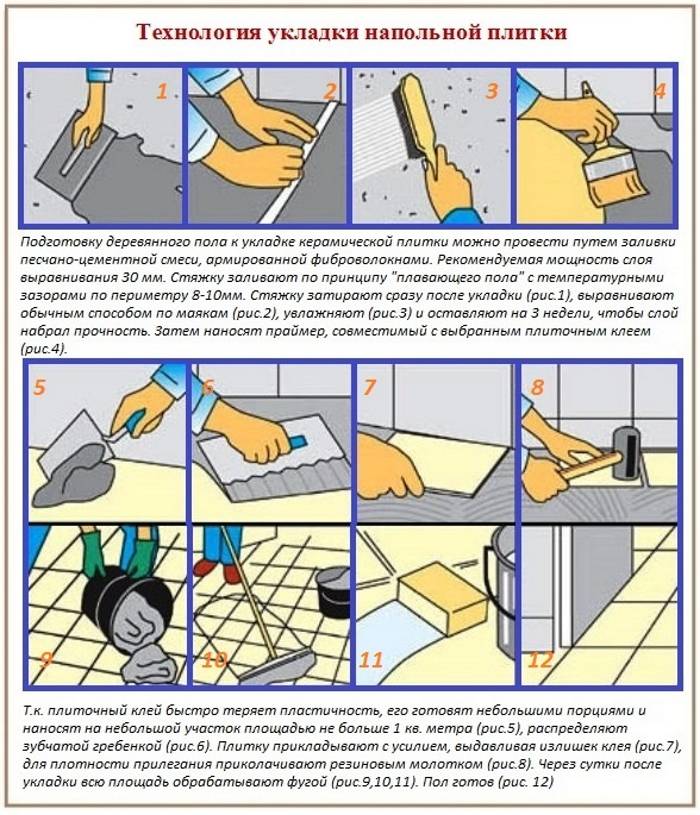
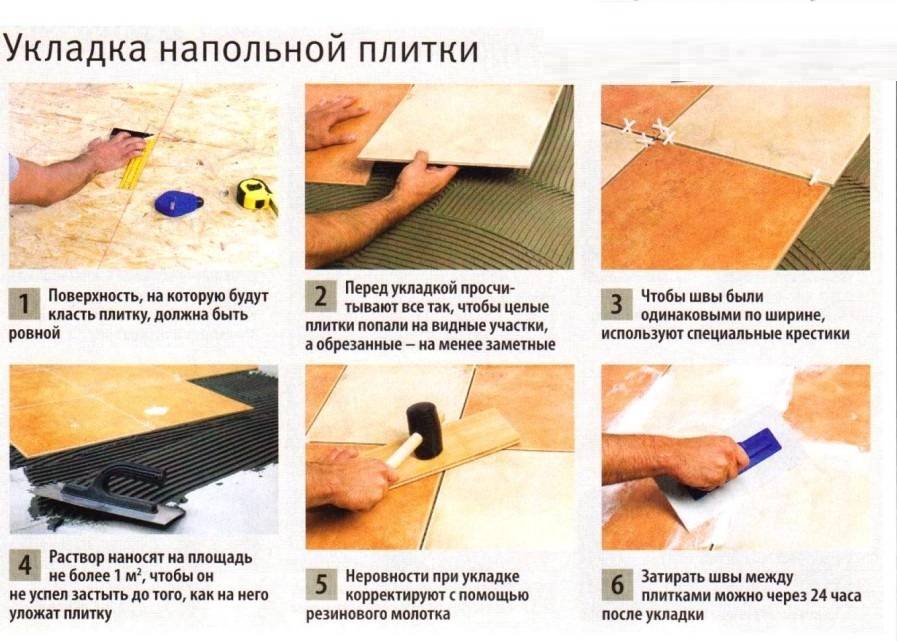
Laying tiles involves mixing the adhesive immediately before performing the main work. To do this, clear water is poured into a container (bucket or jar), and then a suitable adhesive is poured and stirred there in compliance with the proportions indicated on the package. As a rule, the mixture is allowed to brew for several minutes so that it acquires the required consistency. The resulting mass should be homogeneous, without small lumps or air bubbles, which can significantly weaken the bonding properties of the solution.
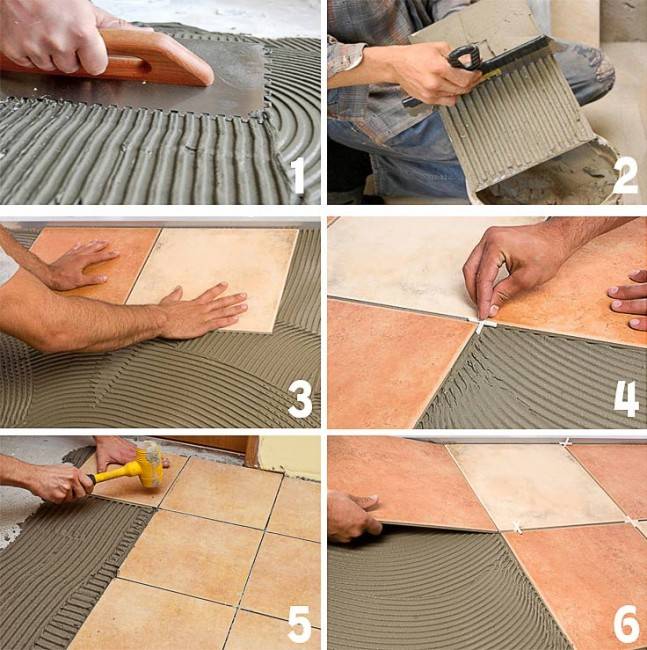
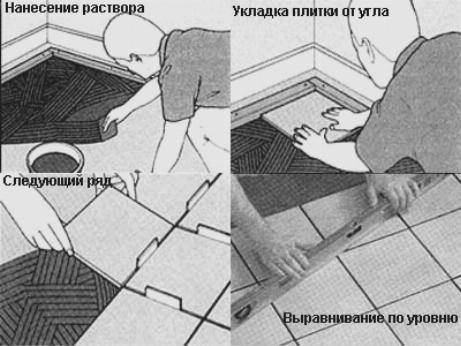
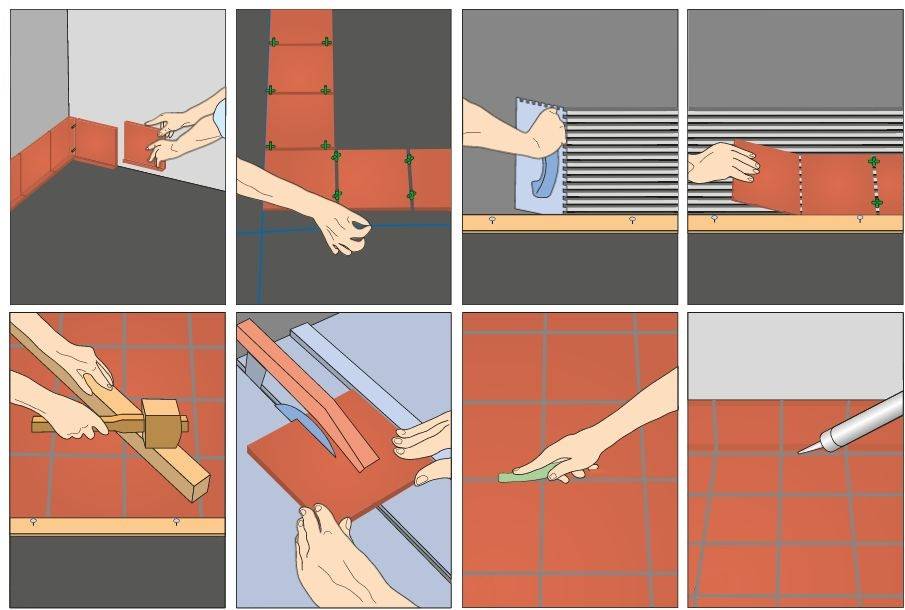
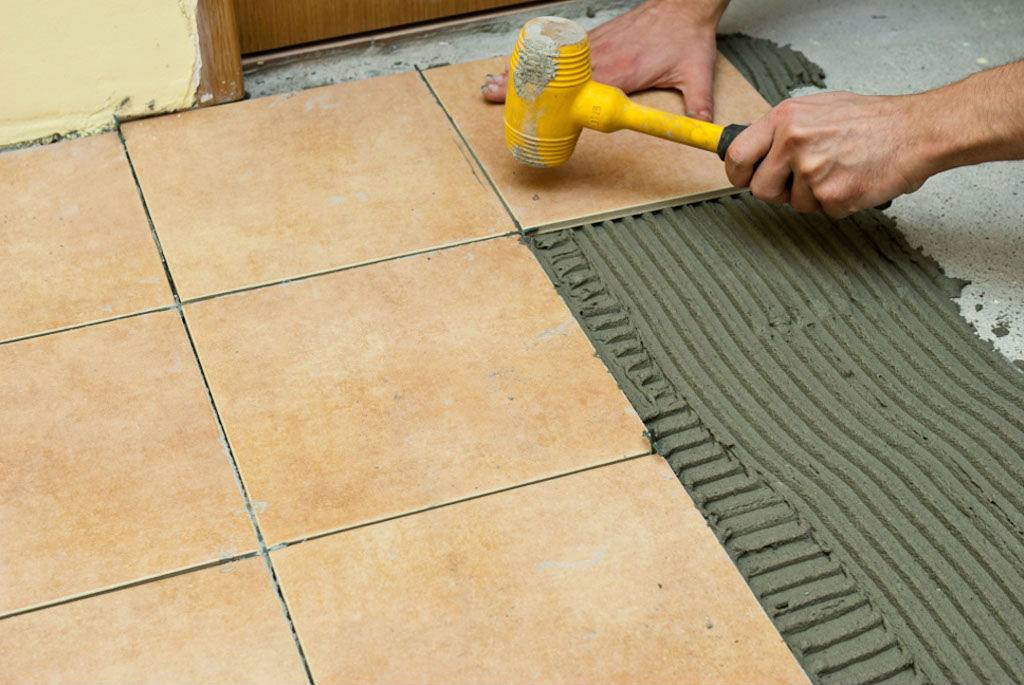
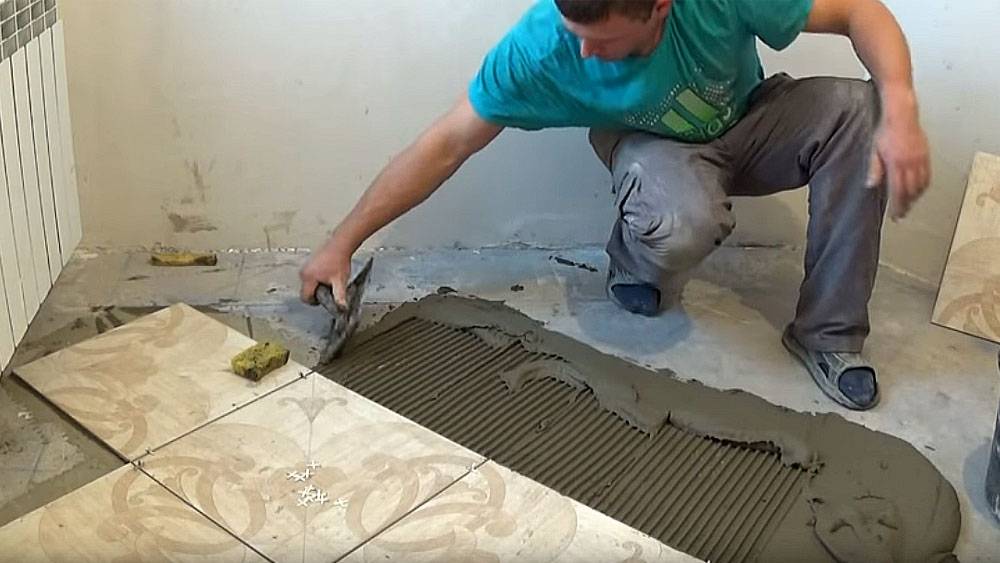
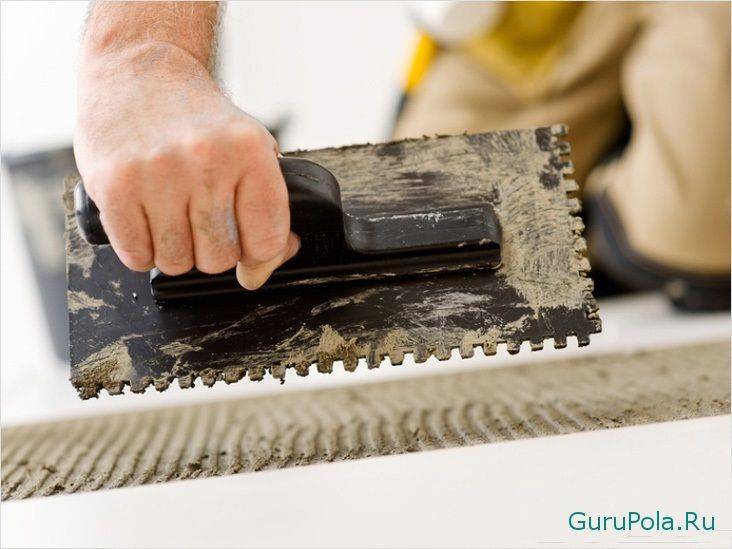
The tile laying technology involves the application of glue to the floor base with a notched trowel, after which the facing product is carefully placed and pressed onto it.
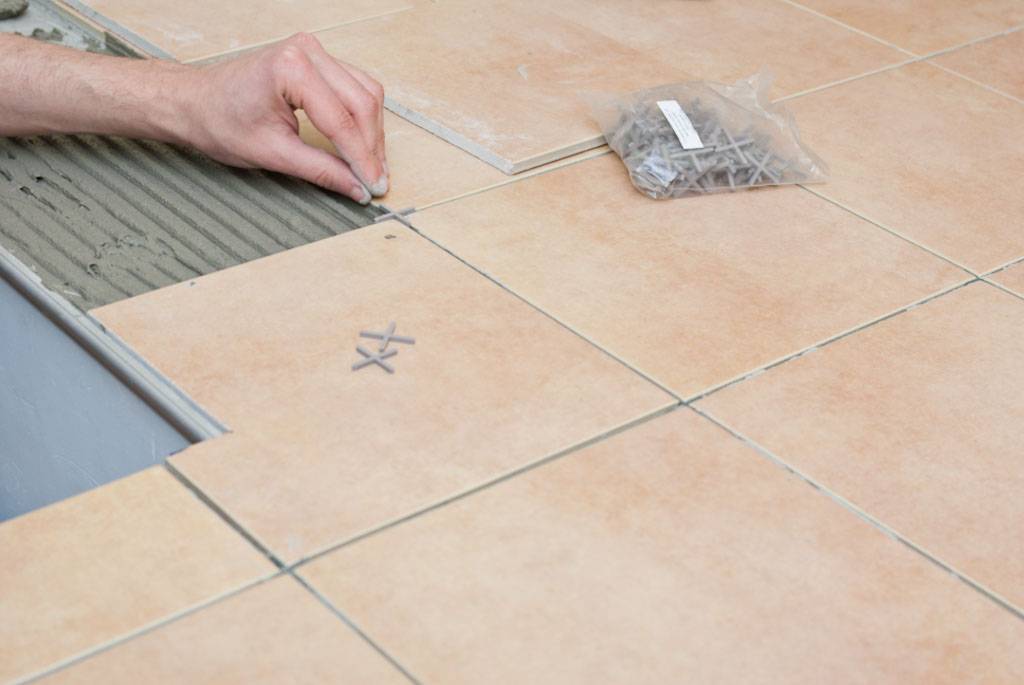
If the product is large, and the installation process itself is carried out diagonally, then a rubber hammer can be used to tap the surface. In order to keep the same distance between the tiles, plastic spacers are used, which are inserted in the corners of the material.
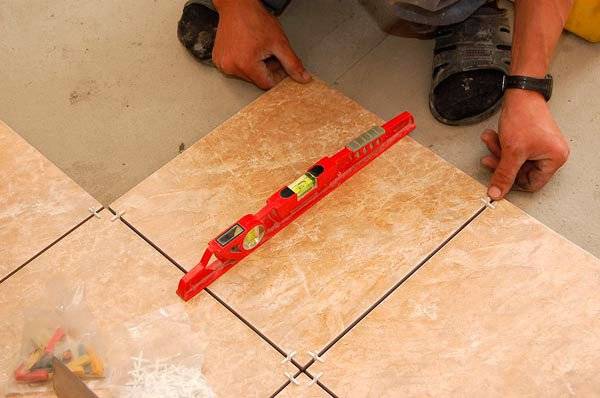
At the final stage, laying the tiles with your own hands diagonally or parallel to the wall involves applying grout in the gaps formed between the tiles. This mixture should be applied only after the glue has dried and the coating level has been checked with a special tool. The solution is evenly distributed in the recesses, and the excess composition is immediately removed with a dry cloth. After half an hour, when the solution has polymerized, you can start cleaning the tiles.
Methods, methods, options and types of laying tiles and their photos
There are various tiling methods that can add a touch of style to your room. In most cases, the tile installation methods will, of course, depend on what shape and color your tile is, as well as what decorative elements are included in the collection you choose. But even these restrictions are not critical, and you can almost always make your own changes to the styling pattern.
Many manufacturers offer ready-made combinations of tiles of various sizes and colors, as well as complete their products with various decorative inserts and friezes.Many fruitful ideas can be found in magazines and catalogs.
In this variant, the square tiles are laid in rows "seam in seam", as a result, the seams of the tiles form a mesh. From the point of view of time and labor costs, this option is the simplest, which means that it can be performed even by a novice master.
Rectangular tiles can be stacked vertically. This will slightly change the appearance of the wall.
With a horizontal pattern of laying rectangular tiles, the cladding pattern acquires a certain originality. In this case, it should be borne in mind that the appearance of the pattern largely depends on the ratio of the length and width of the tiles, as well as their location.
Even a novice tiler is able to lay square tiles "in space". Having laid it in this way, we will get a rather interesting pattern that can imitate brickwork, parquet flooring, and even the pavement of the old city. This tile laying scheme has become quite widespread, it is used, as a rule, to give the interior an old or rustic style.
Staggered tiling types are most often used to imitate parquet flooring with wood-styled tiles. But due to the fact that the tiles have an oblong shape, it is advisable to use this laying pattern only in rooms with the correct geometry.
The method of laying rectangular tiles "in space" allows the use of tiles with some deviations from the linear dimensions, since on the surface tiled in this way, differences in the width of the joints are almost invisible.
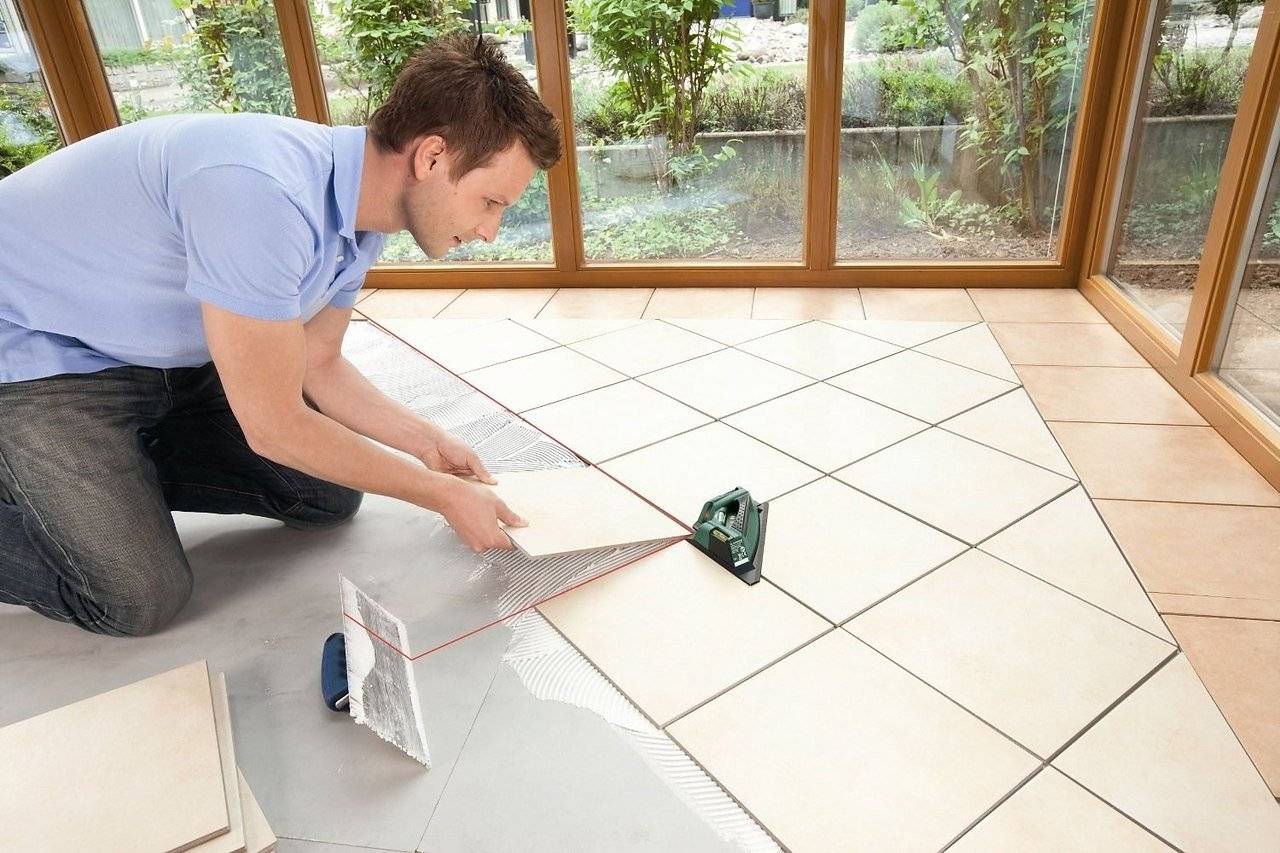
In this pattern, the tile seams are turned 45 °.
Such a pattern looks equally beautiful both on the walls and on the floor. The great advantage of such an arrangement of tiles is that, unlike the above schemes, such laying visually conceals the curvature of the wall or deviations from the geometry of the fallen. However, this scheme also presents certain difficulties associated with trimming tiles.
Preparing the wooden base
Before proceeding with the main stage of work, it is necessary to carefully inspect and assess the condition of the wood base. On beams, logs, planks and insulation, areas of rot and larvae of the woodworm beetle can be found.
All discovered flaws must be eliminated. If the boards do not creak or sag when walking on them, you can proceed to the next stage. Otherwise, the wooden floor will have to be sorted out.
Aligning and handling elements
First, you should check the geometry of the lag with a building level. They can be laid with errors, not on a horizontal plane, which will result in distortions and deformation of the ceramic coating.
Elements that have gotten out of the common plane should be leveled - lowered or raised. If the alignment cannot be done in this way, you can hem additional boards to the logs, which will allow you to achieve the optimal height.
Important! If the floor with distortions is made without logs, a new screed or plywood sheets laid in a thin layer over the floorboards will help to eliminate the errors.
Since wood is susceptible to rotting and fungal attack, all elements of the floor structure will have to be treated with special solutions with antiseptic and antifungal properties.
For this purpose, use a special impregnation intended for damp rooms, or mastic with similar properties.
Hot drying oil does a good job of protecting against damage to wood. It is applied in several layers until the solution ceases to be absorbed into the material, but no more than 5 times.
Each next layer is applied after the previous one has dried - as soon as it ceases to be sticky.
Expanded clay and installation of floorboards
When arranging a floor covering with lags, it is necessary to strictly observe the step between them.It should not exceed 50 cm, otherwise the required strength and installation strength cannot be achieved.
A technological gap of 1 cm is left between the wall and the joists, which will subsequently be glued with a damper tape.
As soon as the impregnated elements dry out, you can start filling in fine-fraction expanded clay. It is ideal for the construction of dry floor screed.
Reference! Expanded clay is a lightweight porous building material made from thermally treated clay. In the clay, voids are formed, which give the final material strength and high thermal insulation properties.
Expanded clay fill all the space between the logs, leaving a 5-centimeter gap on top for full air circulation and removal of condensate. The rough base for the tiles will be floorboards made of thick waterproof plywood or old boards.
The boards will have to be prepared in advance - remove the paint and varnish with special removers, dry with a hairdryer and process with a grinder.
Flooring and processing of floorboards
When arranging a rough flooring, sheets of plywood or boards must be laid so that small gaps remain between them - about 3-5 mm.
If this condition is not met, under the influence of high humidity in the bathroom, the boards will begin to expand, even if there is a waterproofing layer. The result will be a deformation of the subfloor, followed by the finished tile cladding.
The rough flooring is fastened with galvanized self-tapping screws, and all holes are closed with putty.
The finished substrate, if necessary, is processed again - it is sanded, leveled with a grinder or an electric drill with an emery nozzle.
Technological gaps along the perimeter of the bathroom must be filled with polyurethane foam, and the plank covering must be treated with latex impregnation. It will thoroughly fill all gaps and provide additional protection against moisture.
Tile trimming
When laying flooring, it is often necessary to trim it. This can be done with different tools.
Tile cutter
It is worth putting a tile into the tool and aligning the cut area with the marks. Then move the roller and press the cutter handle. As a result, 2 jaws will press on different fragments of the element and break it.
If you need to cut off a small piece, you should take a grinder.
Glass cutter or other sharp instrument
This method is suitable for those who want to cut some of their floor tiles. It is recommended to place it on a flat surface and draw with a glass cutter along the line
Then place the piece on the nail and gently press down on different parts of the line. As a result, it will be possible to get 2 required fragments
How to install tiles on warm floors
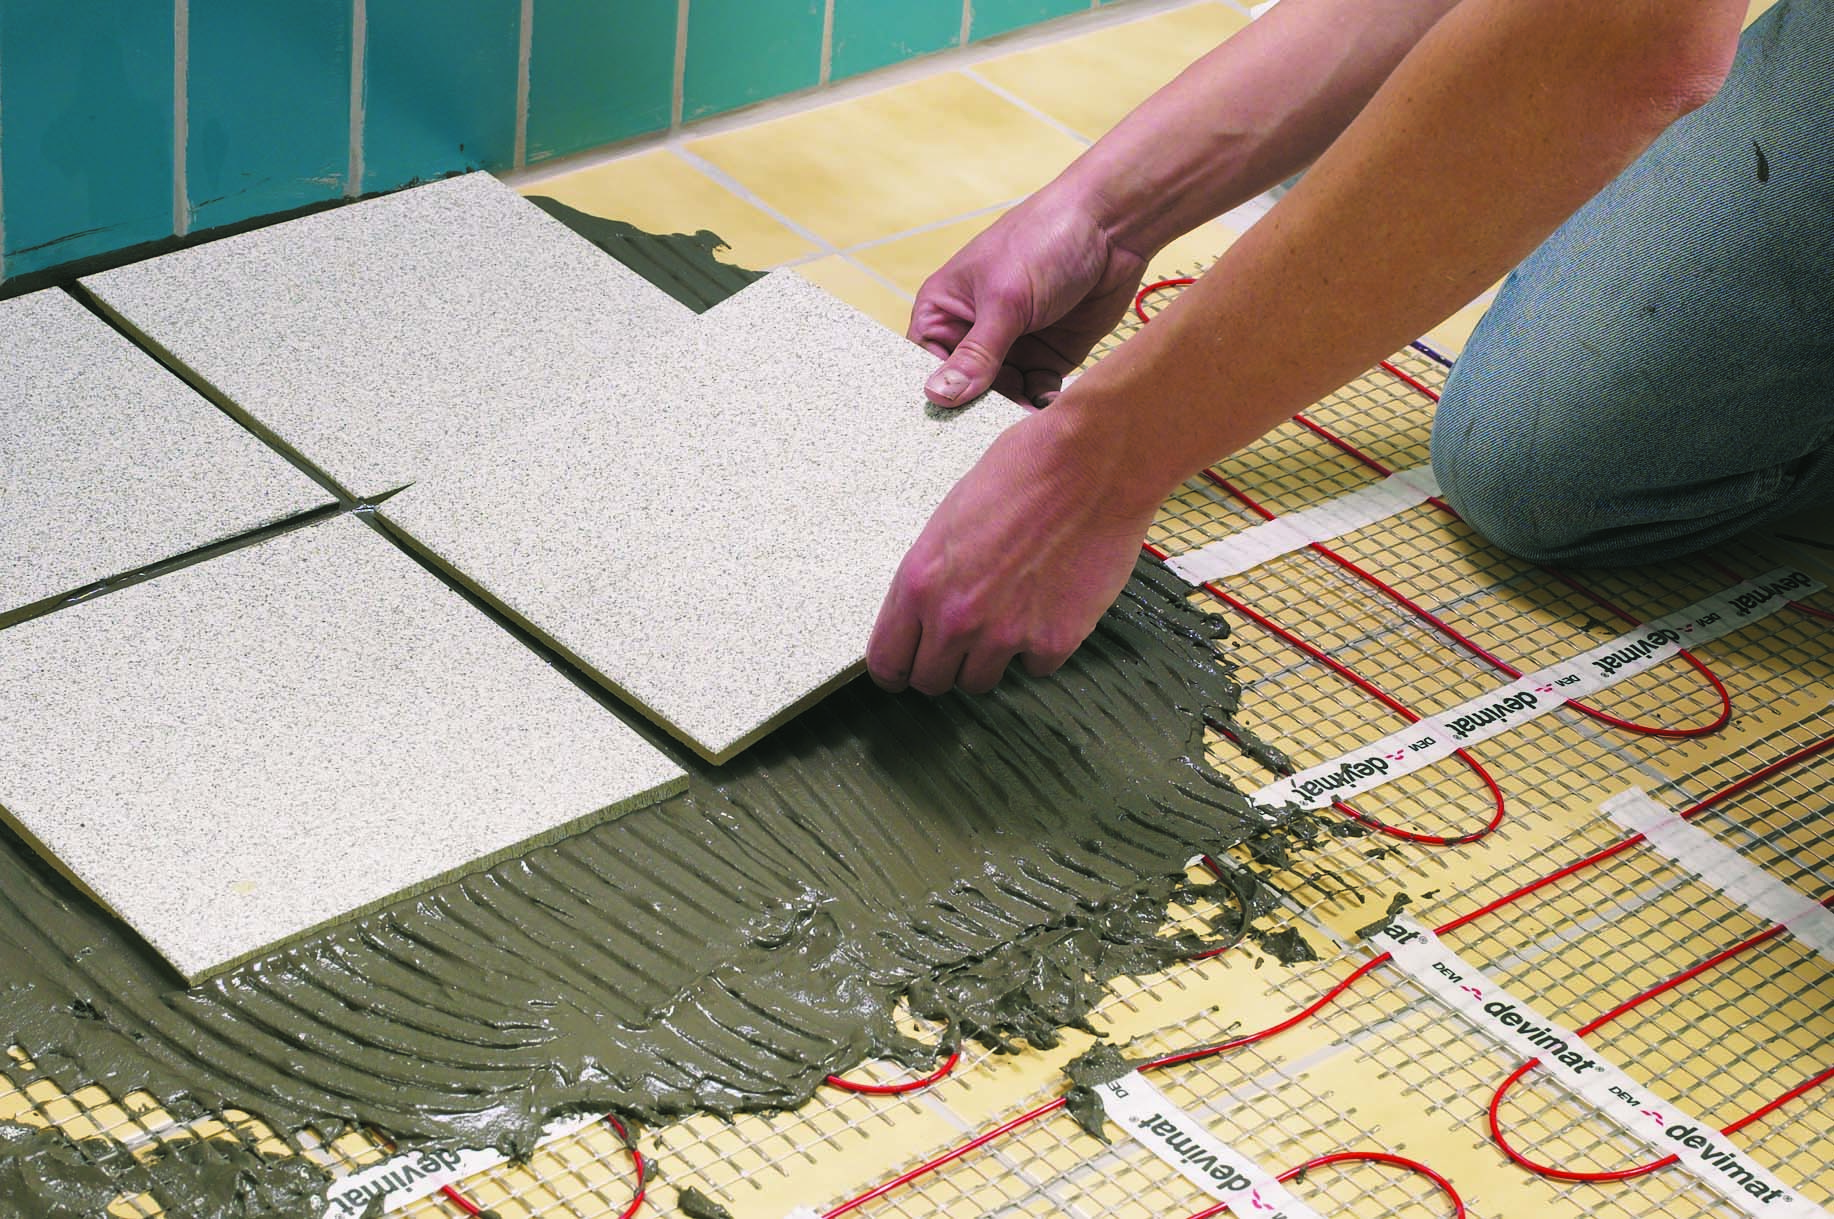
The rules for laying tiles on warm floors differ little from standard technology. The only feature is that the system is turned off 2 days before the start of finishing work. Turn on underfloor heating 3 days after finishing grouting.
Electric Floor Pie Design Features

In a cut, the floor pie looks like this from bottom to top:
- reinforced concrete slab overlap;
- a layer of heat-insulating material;
- 10 mm rough screed;
- foil layer;
- sand and cement screed 20-50 mm thick with heating elements;
- adhesive for tiles and tiles.
Laying tiles on warm electric floors is no different from conventional technology. The adhesive layer usually does not exceed 5 mm. The thickness of the cake depends on the purpose and height of the walls of the room. The higher the height of the wall and the stronger the floors, the thicker the screed, the layer of heat-insulating materials, is made.
Features of arranging a pie with warm water floors
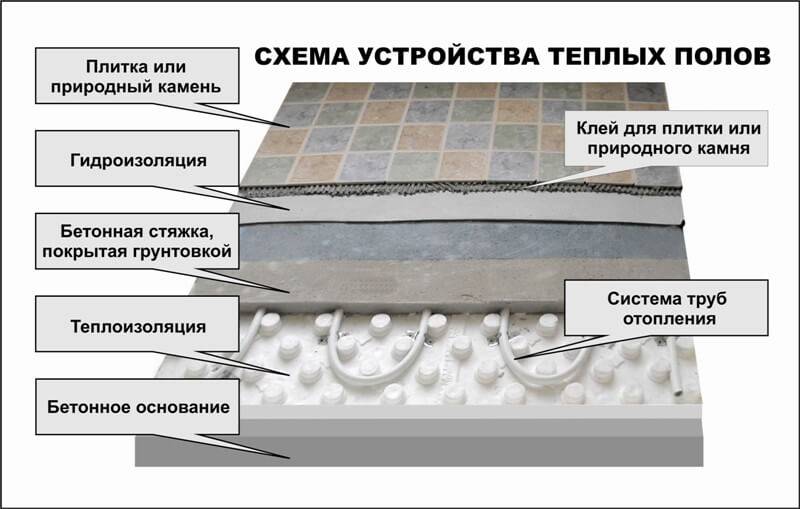
In this case, the laying technology also does not differ much from the standard installation. Layers are formed in the following sequence (from bottom to top):
- reinforced concrete floor slab;
- thermal insulation layer made of polystyrene (20 mm);
- reflective foil - spread with the shiny side in the room;
- pipes of a warm water floor with a sand backfill 30-50 mm thick;
- concrete screed with a layer of up to 20-30 mm;
- glue and tiles.
The thickness of the glue does not exceed 5 mm. The mixture is taken in cement, it adheres better to the base base.
Features of a wood floor
Construction experts argue that tiles do not go well with wood flooring for the following reasons:
- wood subtly reacts to changes in external factors - it expands at high humidity and dries up at low humidity. As a result, the tile covering can become cracked and peel off from the boards;
- the tree collapses quickly and has low performance properties. After its destruction, it is necessary to dismantle the tile, which is still suitable;
- the tiles, laid on a water-repellent glue, prevent the penetration of oxygen to the floor, which the wood needs for a long service. All this leads to quick deterioration of both the floor and the ceramics;
- the wooden floor does not withstand significant loads. The tiles for cladding should be chosen the lightest.
Advice! It is allowed to start tiling the wooden flooring only after 2 years after the initial arrangement of the floor.
Thus, when laying tiles, at least 3 conditions must be met:
- ensure free circulation of oxygen and its access to the floorboards;
- evenly distribute the planned loads over the entire floor area;
- create an even solid base on top of the boards, which will provide immobility and will firmly hold the tile.
How porcelain stoneware is made
The production of porcelain stoneware mimics the process of stone formation. Quartz sand, feldspar, clay and dyes are mixed dry. They are pressed, dried, then fired. As a result, we have a durable non-porous material that is characterized by high hardness (harder than natural granite) and strength.
There is porcelain stoneware similar to ceramic tiles. Look at the slice. If the material is dense, without voids, it is definitely porcelain stoneware.
Modern porcelain stoneware can either be immediately molded in the form of slabs of the required size, or receive blocks, from which slabs of the required format are then cut. In the first version, the material really looks more like a tile, in the second - like a stone sawn into layers. The appearance is varied. There are types that imitate wood, there are those that are similar to natural stone or marble, there are their own unique look. Here everyone chooses what he likes best.
Fill
The screed can be either concrete or cement mixed with sand. In the process of preparing the solution, it is best to use industrial water (from the tap), since the drinking liquid from the well can contain various salts that have a negative effect on concrete. You can mix the mixture either in a concrete mixer (if we are talking about a large room), or in a suitable metal container. A prerequisite is the execution of all the filling work at one time (you should not leave any imperfections the next day).
To prepare the solution manually, you will need the following tools, fixtures and materials:
- a metal container of relatively large dimensions;
- cement (better than M500);
- sifted river sand (can be bought at a hardware store);
- the required amount of crushed stone;
- a shovel;
- metal buckets;
- rule;
- narrow spatula or trowel.
With the help of buckets, ready-made concrete is brought and poured between the lighthouses so that it protrudes slightly above them. Using a spatula or trowel, it is placed in other places where it did not get, and the screed is leveled with a rule.
After completing all work, the screed must dry for about 2 days to be walkable on. Then they cut off all the remnants of the waterproofing layer protruding along the perimeter of the room and proceed to laying the floor tiles.
Grouting
To wipe the seams, you should adhere to this technology:
- make sure that the glue is completely dry - it is recommended to wait a day;
- remove debris from the seams and remove plastic crosses;
- study the instructions for grouting and combine it with water;
- leave the composition for a few minutes and mix again;
- with a small rubber spatula, apply the grouting compound, performing diagonal movements;
- remove excess mortar with a spatula.
In order for the grout mixture to set better, it is recommended to clean the joints with a damp cloth every 3 hours. This should be done 2-3 times. Finally, wipe the entire surface with a damp cloth.
Plywood base preparation
Preparing a wooden floor for tiles is not very common. The generally accepted opinion of builders is that a plywood base is poorly suited for laying tiles, since it does not have sufficient strength and stability. If the plywood bends under the weight of the tile, then it can crack during operation. If, nevertheless, you have no other options but to put the tile on the plywood, then its thickness should be at least 28 millimeters and the plywood should be laid on a sufficiently strong frame.
Using plywood will prepare the base for your flooring very quickly.
Since a very smooth surface is required for a firm adhesion of the tile, the plywood must be sanded additionally. In rooms with high humidity - bathrooms and toilets, it is recommended to apply an insulating layer over the plywood in the form of a screed. Such a coating compensates for the deformation of the wooden base under the influence of humidity and temperature in the bathroom and kitchen.
Floor tiles can be laid on a plywood base
Substrate preparation with existing ceramic coating
If there is an old tile in the bathroom or in the kitchen, then there are two options for laying a new coating:
- We cut down the old tile, and then we lay the new one.
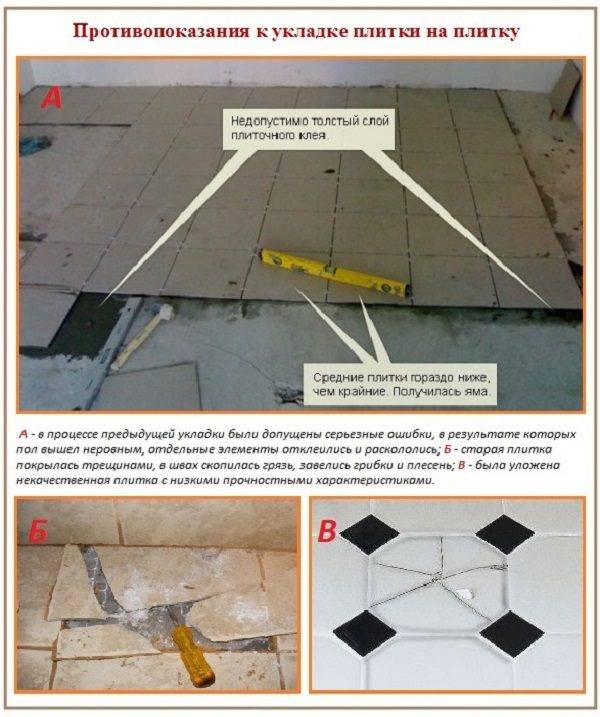
- We put the new finish on top of the existing one, on the cement mortar.
In the first case, hard and painstaking work will be necessary, while if the base remains uneven after removing the old coating, it will be necessary to level the floor by making a cement screed.
When applying the second option, do not forget to check how the floor height changes relative to doors and cabinets. In order for the new tile to adhere well to the old one, the latter should be treated with emery, giving its surface some roughness.
How to properly lay PVC tiles on the floor with your own hands
This coating can be applied to any type of surface. Moreover, the process does not take much time and effort. Before laying PVC tiles on the floor with your own hands, you need to level it to perfect condition. A self-leveling compound is applied over the screed, the thickness of which does not exceed 2-3 mm
It is very important that the substrate is dry, clean, free from wax and paint. The glue and the PVC tile itself must be stored for two days in the room where the installation will be carried out, at a temperature of 18-29 ° C
This temperature must be maintained for two days after the end of the work.
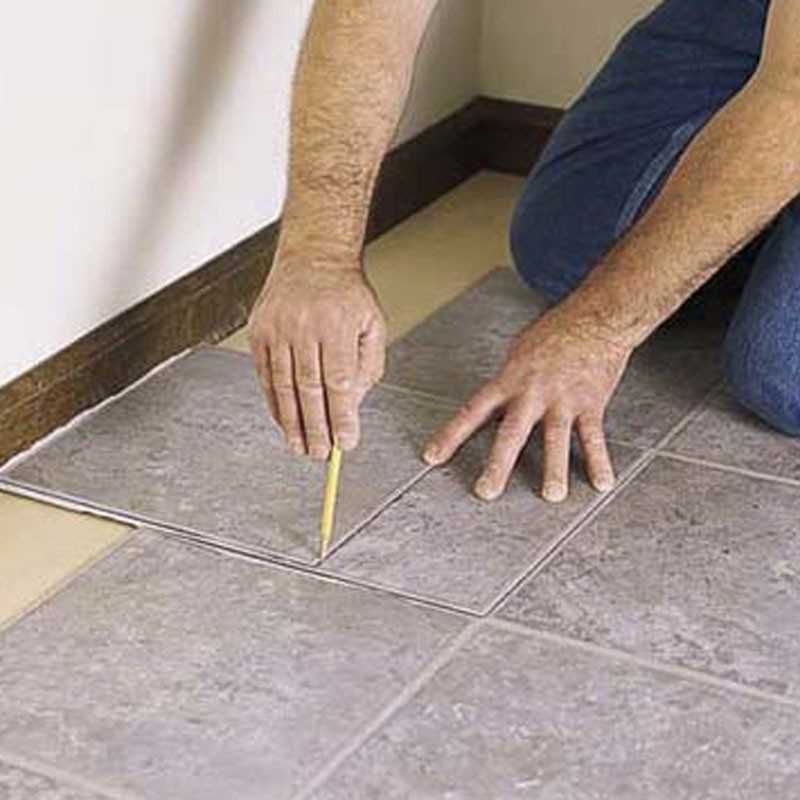
It is necessary to glue the tiles from the center of the room, which is located at the intersection of lines drawn from the center of two opposite walls. You should first check how the material is laid. For this, a trial row of tiles is made without glue. If half of the tile remains at the edge, then the initial lines will have to be moved by its size.
When choosing an adhesive, it is necessary to take into account the recommendations of the tile manufacturer. The adhesive is applied to the floor area. You can complete the work in an hour, as the glue dries quickly. The tiles are laid on the required adhesive layer, which is applied to the substrate with a notched trowel. Before laying the next tile, it should be closely adjusted to the previous one. Then it needs to be rolled with a rolling pin or roller so that it adjoins the base tightly.To get an even coverage, be guided by the drawn starting lines.
When the main space is full, the tiles are laid around the edges. To do this, you need to cut it into pieces of the required size. After styling, apply 2-3 coats of polish. The floor can be cleaned with detergents.
The advantages of PVC tiles include ease of repair. While laminate flooring must be completely disassembled to replace a damaged tile, scratched or stained tiles can be removed by simply picking them up with a knife. After that, the place where it was located is cleaned, removing irregularities, covered with glue and a new tile is installed. PVC tiles are resistant to mechanical stress; however, it is recommended to purchase the material with a margin, which in the future, if repair is necessary, will save time and effort in finding a suitable texture and color.
Here you can watch a video about PVC tiling:
What to consider when choosing a tile
If, when choosing wall tiles, the main focus is on the decorative component, then for the floor material, strength characteristics are more important. Ceramic floor tiles are manufactured in accordance with GOST 6787-2001
According to this normative document, the physical and mechanical characteristics of floor tiles must correspond to the values indicated in the table.
In addition to the indicators given in the table, the tile must have chemical resistance to certain types of solutions in accordance with GOST 27180-2001.
The size and thickness of the floor ceramics is also important. According to the current regulatory documents, floor tiles are available in the following shapes and sizes:
- Square: 150 × 150; 200 × 200; 250 × 250; 300 × 300; 330 × 330; 400 × 400; 500 × 500 mm.
- Rectangle: 150 × 200; 200 × 250; 200 × 300; 300 × 400; 300 × 500 mm.
As for the choice of the size of the tile, here it is worth starting from the dimensions of the bathroom. For compact rooms, it is better to take ceramics of the minimum size: such a design will look as harmonious as possible and visually increase the area. Large square or rectangular tiles are suitable for spacious bathrooms.
Often, for facing warm floors in bathrooms, porcelain stoneware tiles made in accordance with GOST R 57141–2016 are used. It has less water absorption, greater strength and hardness. The physical and mechanical characteristics of porcelain stoneware slabs intended for indoor flooring are shown in the table.
Note! The dimensions of the produced porcelain stoneware slabs are 300–1200 mm in width and 200–1200 mm in length. The minimum board thickness is 7 mm
Preparation of tools and materials
In the case when the tile is being laid with your own hands, you will need the following tool:
- Master OK.
- Several spatulas, in particular notched, regular and rubber.
- You should also arm yourself with several levels, small, up to 50 centimeters in size, and medium, up to 1 meter.
- The next one is the rubber mallet.
- Another necessary tool is a grinder or tile cutter, since in most cases it is simply necessary to cut tiles. Here you can also note additional devices, such as wire cutters, sandpaper and file.
- And the last fixture will be the container for the glue mixture.
We figured out the tool, now you should pay attention to the materials, or rather to their calculation and purchase
In particular, for a correct calculation it is not enough just to measure the surface area; factors such as are also important here:
- Tile size.
- The thickness of the layer of adhesive mixture.
- Tile type.
- Base material.
- The presence of obstacles.
All these factors just need to be considered.
In addition, if you need to cut tiles, you should also pay attention to the size of the segments.Since, if they make up more than half the size of the tile, then for one such row, you will need to purchase twice as many tiles
Usually, when calculating, 10-15% is added to the resulting number, which is mostly enough to cover the costs of cutting, as well as cases of marriage (damage to tiles, incorrect cutting, etc.).
Speaking of the adhesive mixture, here the calculation is carried out based on the type of tile, the type of the mixture itself, the size, and the required layer thickness, which is usually indicated on the package.
To calculate the required amount of grout and glue, you can use the calculators on our website:
- Grout consumption calculator.
- Adhesive mixture consumption calculator.
We also recommend reading:
- What kind of glue to choose.
- How to choose the required styling thickness.
With this issue sorted out, now you can go directly to the technological process.
Repair of ceramic tiles
Sometimes it becomes necessary to repair tiles. Its implementation depends on the nature of the damage.
Chips and scratches
Do-it-yourself minor damage. To do this, take a grout that matches the color and dilute with water. As a result, it is recommended to obtain the consistency of thick sour cream. Cover the tile with the resulting product.
Replacing one element
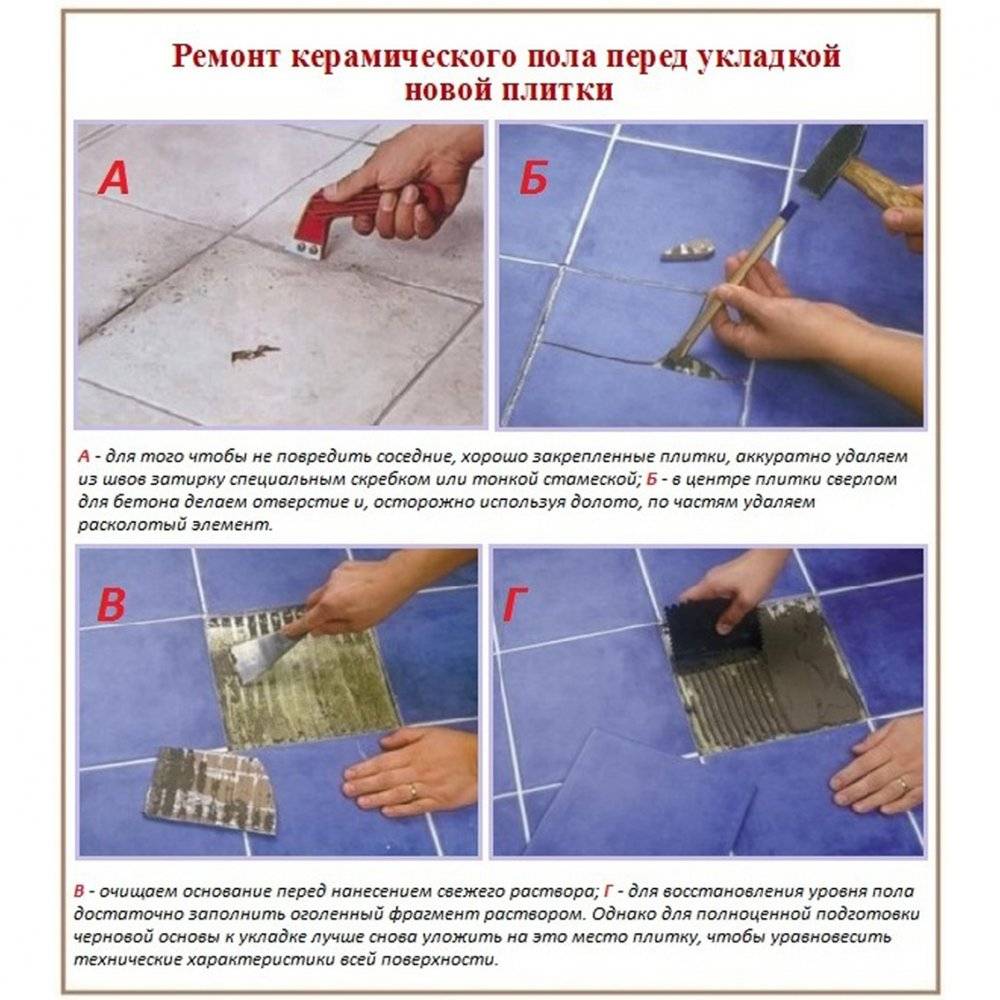
If cracks appear or the tile is severely damaged, it is worth completely replacing these areas. First, it is recommended to remove the old coating, and then apply a new one. Dismantling should be done as carefully as possible, using protective goggles.
Facing with "envelope" tiles
Envelope cladding is a specific type of floor cladding that is used in rooms where the floor is intentionally sloped to drain water. In the vast majority of cases, we are talking about showers. It should be especially emphasized that the "envelope" cladding is not performed if the floor skew is not included in the architectural project, but appeared as a result of the negligence of the builders. In this case, the surface is leveled and the tiles are laid in the usual way.
In the case of “envelope” lining, the work is carried out according to the plan, slightly modified in comparison with the standard lining.
- Floor markings. First, mark where the "ladder" is located - the hole for the drainage of water and located perpendicular to its cutting line. They form four triangles along which the tiles will be laid.
- Installation of a frieze. The frieze row is laid out along the perimeter. The tiles are laid without a slope.
- Installation of beacons. The lighthouse row is laid out in a triangle, which is opposite the entrance and perpendicular to the frieze. The direction of the beacons is controlled using a square.
- Facing the main surface. The background tiles are laid in the usual manner. The floor slope laid down in the project is maintained by changing the thickness of the adhesive. Where the floor level is lower, the adhesive is applied in a layer about 7-15 mm thick. Gradually, the layer thickness is brought to 40 mm.
Cut tiles are laid out along the cutting line.
The triangles are faced in the following order: first, the one that is located opposite the entrance. Then, one by one, its nearest neighbors are faced. The latter is faced with a triangle adjacent to the entrance.
The facing of each triangle begins with the creation of a lighthouse row in the direction of the ladder.
Laying technology on different surfaces
The step-by-step instructions for working with different surfaces are almost the same, but there are still some nuances. Therefore, you should consider each option in more detail.
Wall covering
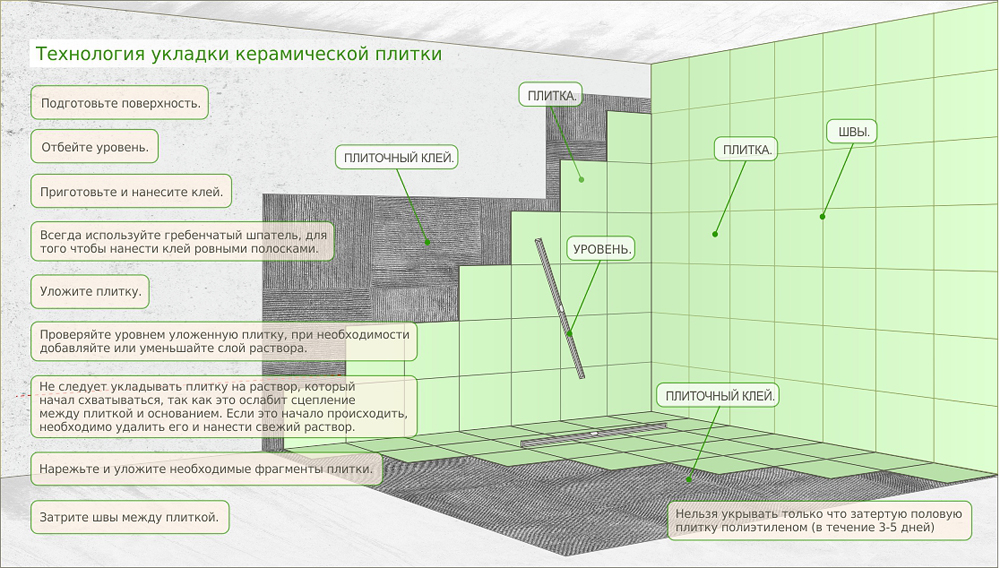
Laying ceramic tiles on the wall begins after preliminary preparation and marking. The order of this event is as follows:
- Work begins not from the first, but from the second row. This is done in order to get the most even layer.
- A metal strip or a wooden strip is installed along the line of the lower row (the size of the seams is taken into account). This is done in order to create a stop point. Otherwise, the material will slide off the wall.
- The glue is applied to the wall with a notched trowel. The mixture is not distributed over the entire work area, but only where the product will be glued. The composition must completely cover the surface.
- Further, the laying of wall tiles begins by wetting the seamy side of the product. This is done for better adhesion.
- The material is pressed against the surface and gently shifted to the desired marks.
- Each element is checked for level in all planes.
- Plastic crosses must be installed, they allow you to form an even gap.
Pay attention to correct pruning. It is impossible to perform cladding with elements that are cut off by more than 70% of the original area.
They will not only look ugly, but also will not provide the necessary reliability.
Ceiling work
You need to understand that laying tiles with your own hands on the ceiling is a complicated procedure. It requires special care. After all, you need to get a fairly strong layer. The material should hold up very well. This is done as follows:
- Re-measure the entire tile again. Distribute it based on size. Editing starts with the biggest one.
- Better to apply glue to both surfaces at once. But a small layer is applied to the ceiling, and five millimeters thick on the seamy side of the product.
- The solution is carefully distributed. There should be no flaws.
- A strip is laid along the line of the fastener, the glued element is pressed against the surface and sits in place.
- The composition that protrudes along the edges is immediately removed. It can be reused.
- Crosses are inserted into the seams.
- Lay the rest of the material.
Installation of tiles on the ceiling must be done very carefully, errors are unacceptable
Plywood cladding
Plywood is often used for wall or floor decoration. It is the last option that happens most often. Then the work is done like this:
- Plywood is chosen with high strength and moisture resistance.
- Multilayer waterproofing is pre-laid on the sheets.
- Correct installation requires the use of a special two-component adhesive. It is able to withstand the shrinkage process.
- The event itself takes place according to the principle of working with walls and floors.
Plywood is often used for leveling the floor, which is why it becomes the basis for laying tiles.
This option has the following advantages:
- The load is reduced and the need for a cement layer disappears.
- The operating time is reduced.
- The adhesive is an additional layer of waterproofing.
When using wood-based panels, you cannot arrange a warm floor.
Laying on GVL boards
Gypsum sheets allow you to create a reliable base that will not deteriorate over time. This cannot be said for drywall, which requires additional processing.
Gypsum sheets serve as a reliable base for laying tiles
Laying tiles with your own hands on GVL plates is as follows:
- A reliable metal frame is created on which sheets of material are laid.
- It is possible to lay the tiles only with the help of a special composition, which was created precisely for such works.
- Further activities look the same as in the previous cases.
Next, wait for the surface to dry and grout.
Grouting after tiling
Laying tiles on the floor with your own hands
The floor, before laying ceramic tiles on it, will also need to be leveled. Almost by analogy with the walls, but only by the screed method.
With minor irregularities of the floor surface, only self-leveling is needed - a ready-made dry mortar. It will need to be sealed with water and laid out on the floor. And this screed itself will level the surface.
If the irregularities on the floor are serious, there are tangible differences in level, it will be necessary to level the surface with a screed along the beacons. A solution of a cement-sand mixture.
With a concrete floor, everything is simple and clear, but with a wooden floor, it is more complicated.The fact is that laying tiles on old boards is by no means recommended. It is necessary to lay new ones with a thickness of at least 2.5 cm. In this case, the wooden surface must be cleaned and treated with special impregnations against fungus, water and rot. A waterproofing layer must be laid on top of the tree. You can take roll material, or you can use compounds for spreading on the surface. Next, a reinforcing mesh is placed, and after it concrete is poured. And you will have to wait until the screed hardens.
In general, concrete takes at least 4 weeks to harden (and not dry out). Only special plasticizing additives for solutions can speed up the process.
Once the preparatory steps are completed, you can start laying the tiles. How to install tiles on the floor? Step by step, of course:
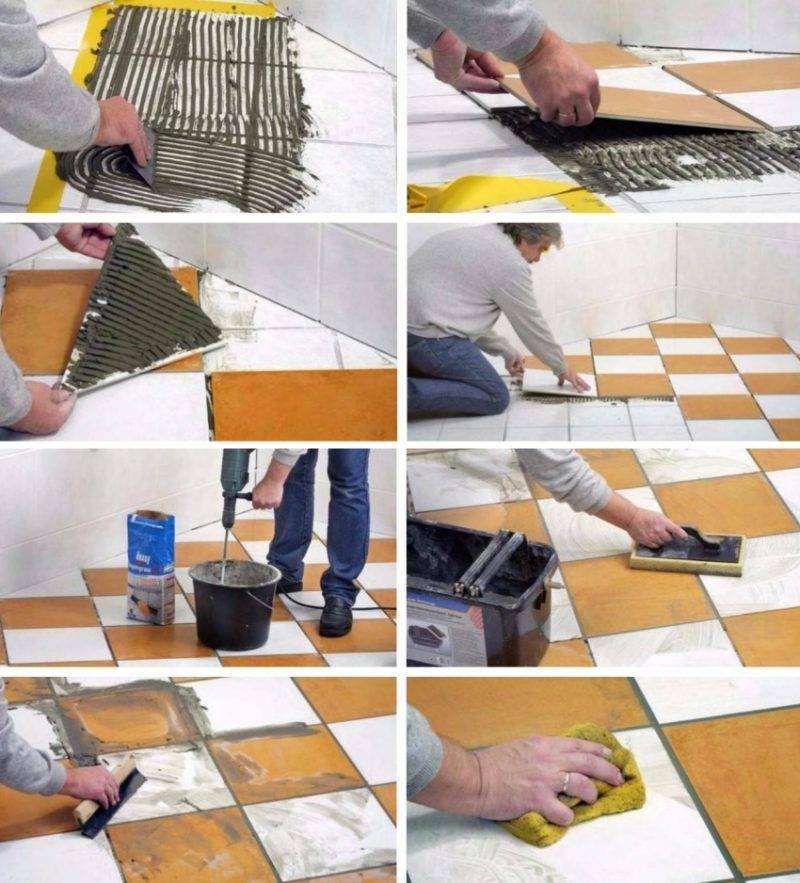
- Prepare tile adhesive by kneading the selected dry mixture as written on its packaging. And you need to do exactly as much as you plan to spend, which is called "at a time."
- Apply the correct amount of adhesive to the back of the tile and spread over the entire surface with a special notched trowel.
- Glue the tiles to the floor, starting from the far corner of the room and moving towards the exit.
The evenness of the installation is checked in each row. The width of the seams is also controlled.
Regardless of where you had to lay the tiles yourself - on the floor or on the walls, as soon as the process is completed, you need to perform another mandatory finishing operation - jointing. That is, fill the resulting seams with a special composition of a certain shade.
This is done for both practical and decorative purposes. And experts do not recommend saving on a fugue, otherwise the seams will crack.
Seams are joined using a special spatula or a special sponge. The mixture is prepared according to the recipe printed on each package. And after the composition dries, its excess is gently washed off the tile with plain water.


