Is it possible to repair interior doors with your own hands?
The appearance of malfunctions and loss of appearance is not always the reason for a complete replacement of the interior door. In many cases, it is possible to repair the product yourself and restore its aesthetic appearance without large financial and time costs. To do this, you need to determine and eliminate the cause of the breakdown, and in the future to prevent such situations.

Different types of doors can be repaired by yourself
The repair technology largely depends on the material of the door. Veneered interior systems are common, as well as wooden or laminated options. The principle of troubleshooting and restoration of such products is the same, and a professional approach is required for glass or plastic models. Therefore, significant breakdowns of glass or plastic doors must be repaired by a specialist.
Door repair tool
It is possible to eliminate breakages and defects of veneered, laminated or wooden structures using simple tools. In some cases, it is necessary to remove the canvas from the hinges and place it on a flat horizontal surface. This will allow you to properly repair or restore the door without the appearance of new defects.

Removing the door from the hinges allows for efficient troubleshooting
A set of tools and materials are selected depending on the type of breakdown and door material. For work, you may need such devices and tools as:
- screwdriver, self-tapping screws;
- PVA glue, masking tape;
- building level, tape measure and pencil;
- grinder with a set of sandpaper of different grain size;
- furniture colored wax, markers and furniture corrector;
- acrylic putty to match the door color;
- hinge lubricant, such as grease or WD40;
- napkins or rags.
Additionally, you may need a mallet, with which you can adjust the position of the box or canvas. If the replacement of broken mechanisms (locks, handles, hinges) is required, then new parts are prepared in advance. They should be the same size as the old ones.
Do-it-yourself installation of interior doors: step-by-step instructions
After all the preparatory work has been completed and the tools for installing the interior doors have been prepared, you can proceed with the installation. As for the tools, you will need few of them: a hammer with a wooden handle, a small rack level (up to half a meter), a crowbar and a cylinder with polymerization foam with low pressure during polymerization (for example, Macroflex 65) and wooden wedges. When all this is at your fingertips, you can act.

Now let's look at the process step by step.
We install the door block in the opening
To begin with, pay attention only to which side you are installing it - that is, on the side to which the doors will open.
We center the block in the opening. Moving it to the left or right, we achieve uniform gaps between the box and the opening on the left and right.
We set the level under the upper jumper and see how it is located. If necessary, we achieve its clear position on the horizon - we raise one of the pillars of the door frame with a pry bar and put a wedge under it.
In principle, if the preparation of the door block was performed correctly, then the vertical of the racks need not be checked - everything should be in order anyway. But just in case, you need to check.
We fix the block to the wall. Through the protruding parts of the jumpers, which abut against the wall, we drill holes with a diameter of 6 mm and drive dowels into them.
During the fastening process, you need to periodically (after installing each dowel) check whether the position of the door block is not violated.
We wet the frame and the end of the doorway with water - this step is necessary in order to improve the polymerization of the polyurethane foam and its adhesion to the opening.

The last check. Make sure the doors are still standing as they should. This is done with a rack level.
Also check the presence of all cardboard spacers between the canvas and the box - if necessary, replace those that fell out during the work.
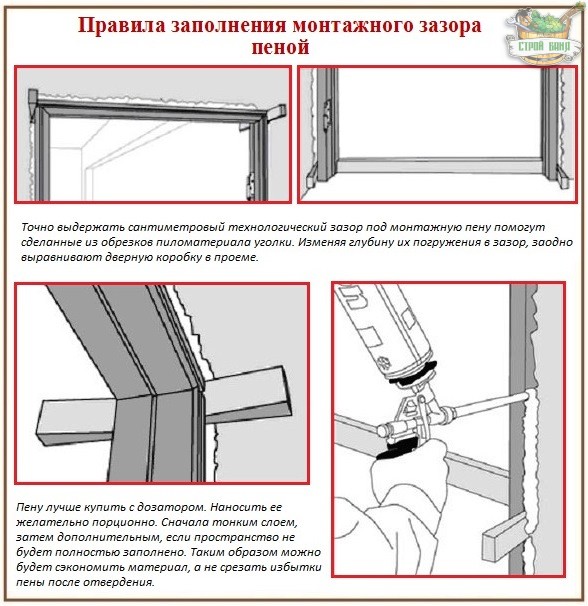
Blow out the gap with foam. With this question, I think you will figure it out yourself. Once you've got the right foam, you don't have to worry about it crushing the box.
Now a few hours of waiting until the polyurethane foam completely hardens (usually 6-10 hours) and the removal of the now unnecessary accessories. We take a screwdriver, first unscrew the dowels, then the self-tapping screws that fix the jumpers to the door frame, then remove the slats or profile (or whatever you used there) and open the doors, enjoying their flawless work.
The gaskets will fall out on their own when you first open the doors, so you just have to collect them and throw them in the trash.
As you can see, everything is simple - the correct installation of interior doors removes a lot of questions, and most importantly, it allows you to complete this process with minimal effort and stress. And in conclusion, a few words about other technologies by means of which they carry out the installation of interior doors with their own hands.
It is difficult to say that they are complex - here, most likely, the initial experience affects. Initially, a person learned to do this work in this way, and in no other way, and all other methods seem more difficult to him. Likewise, one of the wizards can tell you about the installation method described above.

Why such difficulties? Why all these adaptations and unnecessary body movements, if everything works out great without them? I will not argue - do as you like, but personally I made my choice in favor of this option through trial and error, trying other options.
Installing a sliding door
Considering the fact that the hinged door is fixed at a certain height using a special guide rail and roller elements, the hinged system is initially fastened. In this case, the guide rail is mounted, strictly focusing on the level. After marking the location for the fasteners, holes are drilled in the wall above the opening. The guide rail is screwed at a given level with self-tapping screws into the prepared holes with dowels inserted with them.

Roller mechanisms are attached to the upper end part of the door leaf. After that, it is mandatory to test the opening and closing of the web by moving it along the guide rail. After that, the guide rail and roller mechanisms are closed with a decorative bar. At the edges, rubberized elements are mounted that perform a restrictive function. Thanks to these elements, the canvas will not fly out of the rail during movement.
Installation of a double-leaf door

Installation of a double-leaf door
Start the work, as always, by dismantling the old door, if present. Align the walls of the opening and proceed to the main stages of work.
First step. Collect the door frame. For assembly, use boards about 10 cm wide and about 6 cm thick. For fastening the boards, it is most convenient to use a regular spike connection. The connection angle must be exactly 19 degrees.
Second step. Secure the aligned frame to the doorway. Pre-drill the fixing holes in the wall, and then secure the structure with pins or thick nails.
Third step. Make sure that the dimensions of the door leaves match the size of the box. If necessary, trim off the end sides of the blades to the required size.

Double doors
Fourth step. Fasten the hinges at the appropriate locations.Pre-determine in which direction it will be more convenient to open the doors.

Double doors
Fifth step. Hang the door leaves onto the hinges. Install the handles and check the quality of the work done.
Thus, there is absolutely nothing difficult in replacing interior doors on your own. By understanding the key points of the guides presented, you can handle all upcoming events without outsourcing. This will save you additional money and have complete confidence in the quality of your installation.

Double doors
Happy work!
Manufacturing material
For interiors, they are made not only of wood, manufacturers are increasingly using modern materials.

Oak, walnut, ash, teak are most often materials for door designs. Designers present premium-class goods for which rare types of raw materials are used, such as: Karelian birch, mahogany or rosewood. Veneered products are distinguished by their external aesthetics and environmental friendliness.
Doors lined with plastic panels are no less in demand on the market, since they are not expensive, and the outer surface is covered with a film that imitates wood of different species.
Glass doors are very popular in modern interiors: they perform the function of dividing the room, while visually expanding the space. Impact-resistant material is used as raw material. When installing them, special conditions must be observed, since their weight is large.
Ways to eliminate door handle breakage
The algorithm for eliminating door handle breakdowns depends on the type of defect detected. Often, to restore the locking mechanism, it is necessary to replace the failed parts.

If the handle sticks
The sticking of the handle is due to the accumulated particles of dust and dirt on the elements of the locking mechanism. To avoid this problem, the internal parts must be lubricated periodically. To do this, just drop a little oil on the bolt and turn the handle several times. Thus, the lubricant is evenly distributed over the internal parts.
When the handle falls out
The handle fell out due to the breakage of the retaining ring. The latter shifts or deforms over time, which leads to this problem. To eliminate the malfunction, you must perform the following steps:
- Remove the decorative strip that is attached to the door area. To remove this part on some models of locking mechanisms, you will need to unscrew a small bolt.
- Remove the screws and bolts that secure the main part of the door handle.
- Remove the handle and inspect the condition of the retaining ring. If visible defects are found, then this part must be replaced with a new one.
Caution is advised when installing the retaining ring. This element is small in size
Because of this, with strong pressure, the circlip can injure your hand.
Broken inner square pin
Breakage of a tetrahedral pin is possible in two cases: when excessive force is applied and if this part is made of silumin, a brittle metal alloy. The second option is considered more common. If the square pin breaks, you will need:
- Disassemble the locking mechanism by removing the handles. The latter are usually held in place by a small bolt.
- The fixing bolts are removed, and the entire structure is removed, along with the decorative strip.
- The center pin is removed and a new one is installed.
To avoid this problem, it is recommended to purchase door handles with a sturdy square pin. The purchase of a new center piece also solves the problem of the latch, which does not go into the reverse bar when the handle is turned. To solve this problem, it is enough to purchase a larger pin.
Non-return to original position
When the handle does not return to its original position after being pressed, this indicates a malfunction of the spring. It is possible that the problem arose due to the jumping off of this element. To eliminate the malfunction, you need to disassemble the locking mechanism and return the spring to its original place. The algorithm of work in this case is the same as that used when replacing the retaining ring.

If the spring has burst, then the door handle cannot be restored to work. This is explained by the fact that it is difficult to find this part on the market. In such situations, a complete replacement of the entire structure will be required.
Features of repairing a Chinese door
Chinese-made handles are often made from low-quality materials, as a result of which individual parts of the structure break during the first years after purchase. Repair of such mechanisms is carried out according to the previously described algorithm. The only difference is that when working with Chinese products, do not overtighten the bolts.
What to do if loosened up
Loose door handles do not require repair. With such a problem, it is enough to tighten the fixing bolts more. This also applies to internal details. But in some cases, when the bolts are not attached to the door, a complete replacement of the structure will be required.
If it creaks
If the door squeaks, it is necessary to lubricate the hardware with engine oil. This problem occurs due to accumulated dust and dirt. Metal, in contact with these particles, makes unpleasant sounds.
Gaps between door leaf and floor
If the installation is carried out before the floor is covered with laminate, parquet, linoleum and any other material, then it is necessary to accurately calculate the width of the coating, plus an adhesive or other base that will be used when laying it.
If the door is placed at a stage when the floor is already ready, then for a wooden door it is enough to leave a 5mm gap between the door leaf and the floor, for a plastic one 3 mm is enough.
During installation, it is necessary to take into account whether there will be carpets on the floor, along the entire opening circle. If so, then you need to take into account their thickness and increase the gap.
Several important rules:
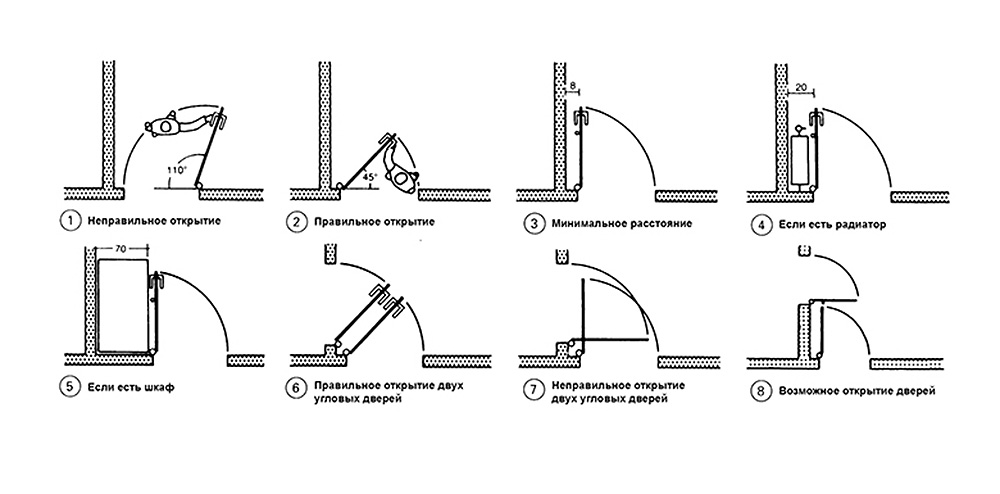
- A correctly installed door should be strictly parallel to the wall, not bulging or falling in.
Opened and left in any position, the door should not close and open on its own.
When opening and closing, the canvas should not touch the floor.
So, it is better to install interior doors at the last moment, so that they do not lose their appearance and functionality, but to plan and calculate everything in advance, so that later you do not have to redo or endure inconvenience due to inaccuracies and mistakes. And in any case, before installation, it is necessary that the doors "live" a little in their new home. Let them climb up and take on their natural state.
Preparatory stage: removing paint and accessories
The first step is to remove the door from the hinges. The canvas is laid on a plane, which can be either the floor or four stools.

The first step is to remove the door from its hinges.
Pay attention to the hinges. Here are their options
- Card - removable and non-removable. Fixed ones perform the function of opening the canvas in the direction of its opening. And removable ones are suitable for right and left sashes, they are universal. The door leaf, mounted on such hinges, can be easily removed and fitted.
- Mortise.
- Invisible.
- Screw-in.

Mortise hidden hinges
The entire door leaf is subject to restoration, so the hinges will need to be temporarily dismantled. A screwdriver is used, caps and bolts are unscrewed. Scrap is inserted from the bottom of the canvas, then this part of the door structure is raised. It is advisable to have someone support the plane until it comes off the hinges. The removed canvas is set aside.
Following the hinges, all other accessories are removed.
Removing paint by sanding
Removing paint with a sander
Let's say the door leaf is flat. For decades, paint has been applied to it in many layers. It is advisable to use a sander to remove the coating. But such work is dusty, so it is better to take the door outside.
Removal of paint with chemicals
Now sellers offer all kinds of:
- old paint removers;
- dye solvents.

Door paint removal with chemical solvent B52
For example, B52. Here's how to get rid of old paint coats with this chemistry.
- The surface is wetted with the indicated preparation.
- You should wait.
- The detached coating is removed with a spatula.
In addition, this chemistry is unlikely to cope with all the layers of the old coating if there are too many of them. So this technique is suitable for removing old paint from certain areas of the door leaf. Moreover, the old paint should be applied in a thin layer.
Homemade mixture
You can make the composition yourself if you mix:
- oat flour;
- caustic soda;
- water.
The consistency should be thick enough. The resulting slurry is spread over the canvas. It should take at least 30 minutes (it is better to wait 50 minutes). Further, the applied composition is cleaned off together with a layer of swollen paint or peeling varnish. A metal spatula is used.
Removing paint by using a drill with suitable attachments

Removing paint with a drill with a nozzle
The correct abrasive brush heads are available from your hardware store. This attachment is put on the drill. Old paint is evenly ripped off by metal fibers, but this can damage the wooden base itself.
You may need to purchase several replaceable attachments at once, each of which will cost 120-170 rubles.
Removing paint with a building hairdryer

Removing paint with a construction hairdryer
This method is recognized as the safest and most effective. A door that has served for decades can be covered with many layers of paint. All the same, the coating will peel off easily, while evaporation of chemically active substances will not harm health and the corrosive smell of burning will not spread.
With the help of a building hair dryer, it is possible to heat the paint so much that it can be easily cleaned off with a sharp spatula
But work should be done carefully, otherwise the wood will deteriorate.
Removing paint with soft blasting

Soft blasting
This technique is recognized as sparing. Old paint and varnish coatings, as well as complex stains, can be removed by soft blasting from almost any canvas:
- from metal;
- from glass;
- from the tree.
The door leaf will not be damaged. During the execution of the work process, a jet of compressed air enters the surface, and with it the Armex agent. It is a biodegradable cleaning agent.
But this method also has disadvantages. The main drawback is the inability to organize the workflow at home. The door leaf will need to be delivered to the workshop, and this is an extra cost.

Removing paint with a gas torch
Observing fire safety, the processed fabric should be taken out of the room. When the burner heats up the surface of the door leaf, the paint comes off easily. Along the way, she begins to smoke, exuding pungent odors.
Installation of racks and hinges - step by step instructions
It is very important to install the stands correctly. A door frame is attached to them
If you install it on crooked racks, the operational functionality of such a door will be minimal. The preparation of the racks is carried out as follows:
A door frame is attached to them. If you install it on crooked racks, the operational functionality of such a door will be minimal. The preparation of the racks is carried out as follows:
The upper parts of the racks must be cut with a hacksaw (it is better to take a saw with small teeth) and a miter box. This operation is easier if you have a miter saw.On the inside of the rack, measure the required length (it consists of the lower gap, the height of the door leaf and the upper gap).

The lower gap is usually taken about 1 cm, the upper one - no more than 0.4 cm. Prepare the second rack in the same way. Now start processing the lintel. Measure the desired length on the inside.
The required length will include the width of the canvas, a small (about 0.4 cm) gap on the side where you will put the lock on the door, and another gap on the side of the hinges. You get the length (inner) of the lintel. Note - absolutely accurate.
Installation of interior door pillars
Now you can saw off the ends of the lintel with your own hands (again, with a miter saw or miter box). This procedure is done at an angle of 45 °. Next, we deal with the door hinges.
Their installation should be done as carefully as possible.
It is important to determine the exact value of their depth and the distance between the lower and upper edges of the door leaf. The work scheme is as follows:
You have coped with a difficult task on your own. Now you can deal with the box and trims.
Dismantling an interior door
Often the installation of an interior door is preceded by dismantling. Disassembly is carried out in the reverse order of assembly.
-
Decor elements are detached - platbands and extensions. In this case, use a pry bar or a large screwdriver. The decorative elements can be reused, so do not break them during dismantling. If these parts are kept intact, they can be painted, covered with laminated film and used when installing a new door.
- The hardware is removed from the door leaf - locks and handles. The lock is unscrewed from the end of the door leaf. The swing handle mount is located on one side of the door (at the bottom of the lever).
-
The door leaf is removed. To do this, the sash is opened at an angle of 90o in relation to the frame and lifted by the lower edge using a crowbar, pry bar or other lever. Once the canvas is removed from the hinges, the awnings can be detached and reused.
-
The door frame is removed. To disassemble the frame with the least effort, it is necessary to determine the places of its fixation to the wall. Sometimes it is difficult to do this in old doors, especially if slopes made of cement mortar are installed on the opening. Then an ordinary electric jigsaw will come to the rescue. If the frame is not planned to be used in the future, it can be cut in cross-section and separated from the wall in parts. This greatly speeds up the dismantling process. The upper bar is released in the same way.
If there is no firm self-confidence, of course, it is better to turn to professional installers, because the correct assembly and installation is not the only, but a necessary condition for the long-term operation of interior doors. But if you have at least a little experience in carpentry work, and the operations described in this article do not cause you to doubt the possibility of their repetition, feel free to start installing the door with your own hands. You can save money and be absolutely sure of the quality of each action.
Installation steps
Plastering the wall
Preparing the doorway
If the old hinged interior door is replaced with a new hinged one, then plaster the walls in the opening from the side of the door canopy. Also, you may have to widen or narrow the opening.
We expand it with a perforator and a spatula nozzle, and narrow it with plaster build-up. At the same time, do not forget that oversized furniture can sweep through it. Do not place narrow doors between living rooms.
Too wide an opening will weaken the stability of the entire door structure. Since the polyurethane foam does not have the required fastening characteristics.
We adjust to size and connect door elements
Replacing doors: video
Option for assembling boxes and accessories for a swing door:
- We make measurements and saw off the box beam on them. It is more convenient to make the top of the box first. Its width should be 6mm more than the door width + the thickness of two vertical beams.
- We measure and saw off the vertical parts of the box. Their length should be 3-5 cm more than the height of the door leaf.
- We connect all parts of the box with three wood screws on each side.
- We take measurements for completing. To do this, we measure the length of a special additional groove in the box. The horizontal extension bar should lie on the vertical flush with their outer sides.
-
We fasten the extension to the box with self-tapping screws at an angle of 45o.
Option for assembling door elements for a hinged door:
- We finish the doorway with an extension (see Installation of interior doors with an extension) to match the color of the canvas. If the width of the extension is not enough, then we increase it. To do this, we fasten two parts of the additional strip. Saw off the second with a circular to the desired width.
- We fix the hinged system. We set the guide bar itself according to the level. Next, we mark the points of attachment to the wall. We drill holes for dowels and insert them.
- We fasten the guide to the wall with self-tapping screws.
- We attach rollers to the door leaf, make a test canopy and move the door along the main guide.
- We close the guide and door rollers with a bar with a decorative strip.
- We install rubberized stops for the door.
We mark and fix hardware accessories
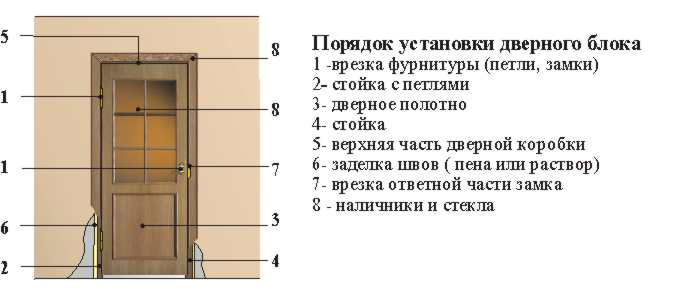
Now we need to fix the hinges (see Hinges for doors: their types and selection rules) to the door leaf and frame. The optimum height from the edge of the leaf on each side for fastening the hinge parts is 200mm.
 Cover the resulting recess with nitro varnish
The sequence of work is as follows:
- We attach the loop to the place of its attachment and mark the borders with a pencil.
- Using a stationery knife, cut through the decorative layer along the marks.
- With an electric milling cutter or a sharp chisel, we make a recess for the hinges.
- We cover the resulting recess with nitro varnish in 2-3 layers.
- We fasten the hinges with wood screws, pre-drill holes for them.
We strengthen the assembled box in the opening
We insert the box into the doorway. We adjust it so that it does not protrude beyond the edges of the opening. Next, we make holes in the box for further fixing it to the wall: in 3 places on each side.
We expose the vertical parts in level through the holes made and drill into the wall. Thus, we make holes for the plugs.
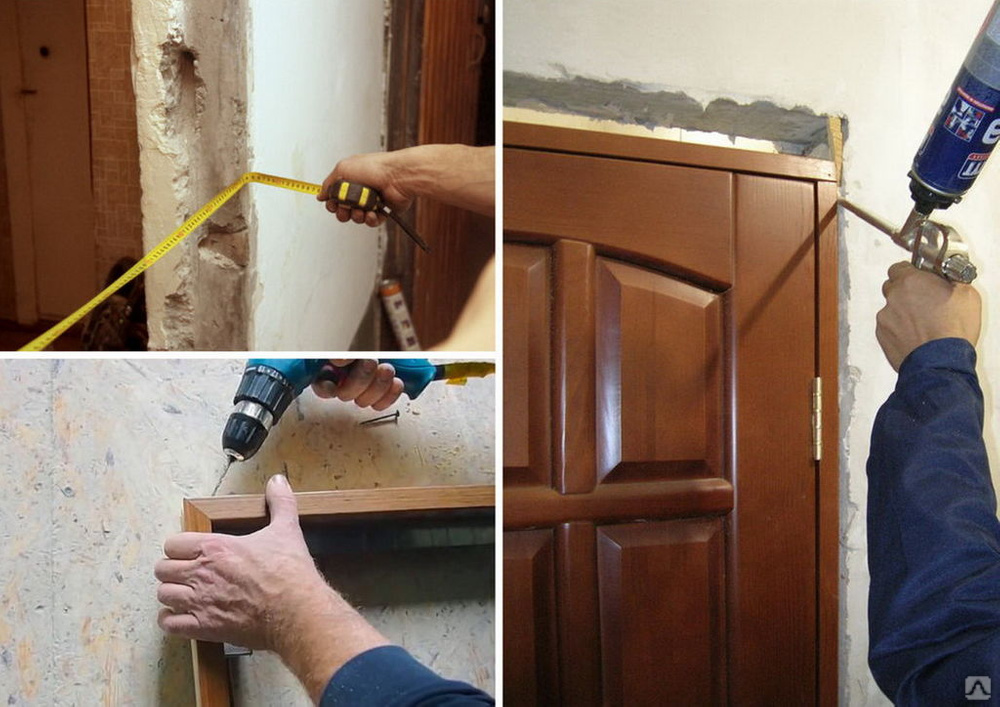
We wrap the screws in corks. In this case, we control the width of the resulting opening with a tape measure. It should be the same at the top and bottom. The last step is to insert plastic plugs into the caps of the screws.
We hang the door and foam the cracks
After installing the door frame, you can hang the door on the hinges. After that, you need to seal up the remaining gaps between the box and the wall with professional polyurethane foam.
To prevent the door from being jammed by the box when the foam expands, it is advisable to insert a long and narrow piece of plywood between the leaf and the vertical part of the box. After the foam hardens, you need to cut it off. A clerical knife is suitable for this.
We insert the lock into the interior door
To do this, we do the following operations:
- We apply the lock case to the door at its location - 90-100 cm from the floor level. With a pencil we outline the shape of the mechanism and mark the attachment points of the handle.
- With a feather drill or a ring drill bit, we make holes for the handles.
- Next, with an electric milling cutter or chisel, we punch a recess for the lock case.
- We insert the lock into the recess and fix it with wood screws.
- We do the same for the opposite part of the lock on the box.


