Varieties and features of the device of single-lever cranes
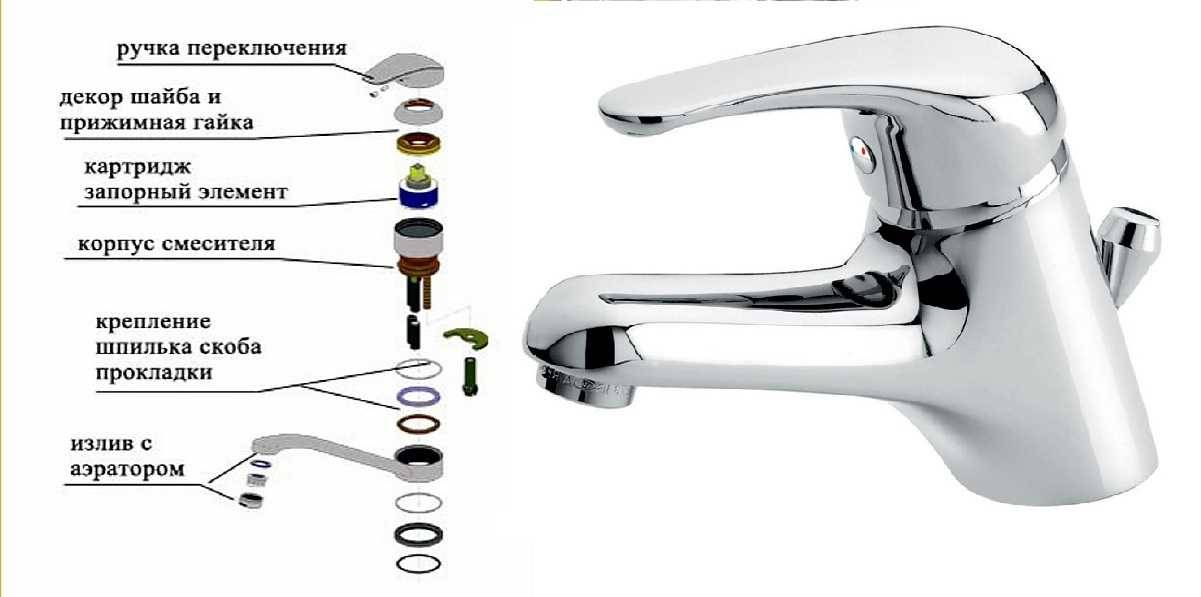
Before proceeding with the disassembly of the mixer, you need to understand the principle of its design and the varieties of popular single-lever taps. By its design, such a plumbing fixture resembles a faucet with one handle for adjusting hot and cold water, fixed with a screw under a decorative cover. Thanks to this structure, the homeowner should have no problems disassembling such a device. However, it is necessary to distinguish between different types of mixers, since the sequence of their disassembly will depend on this:
- ball valve;
- faucet with a cartridge as a mixer.
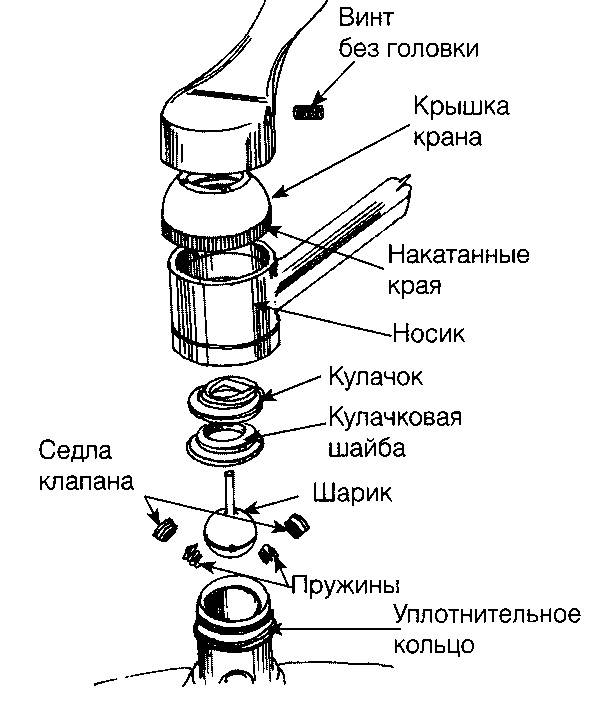
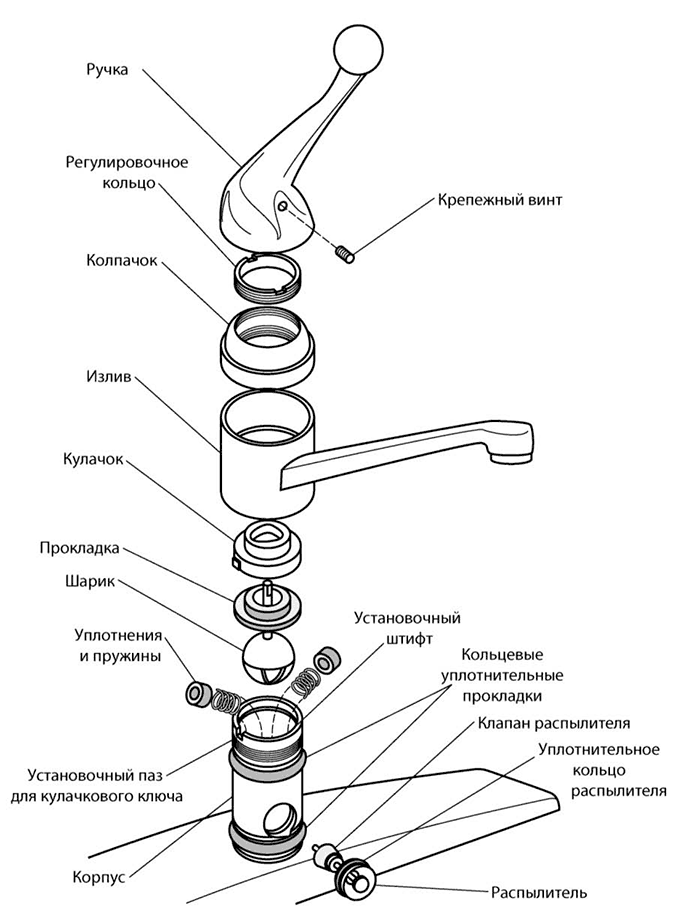
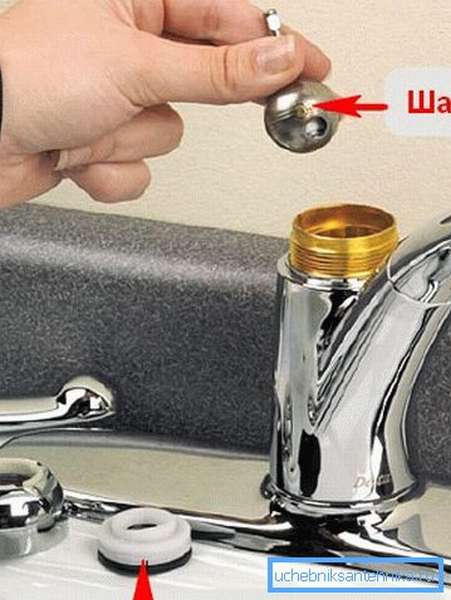
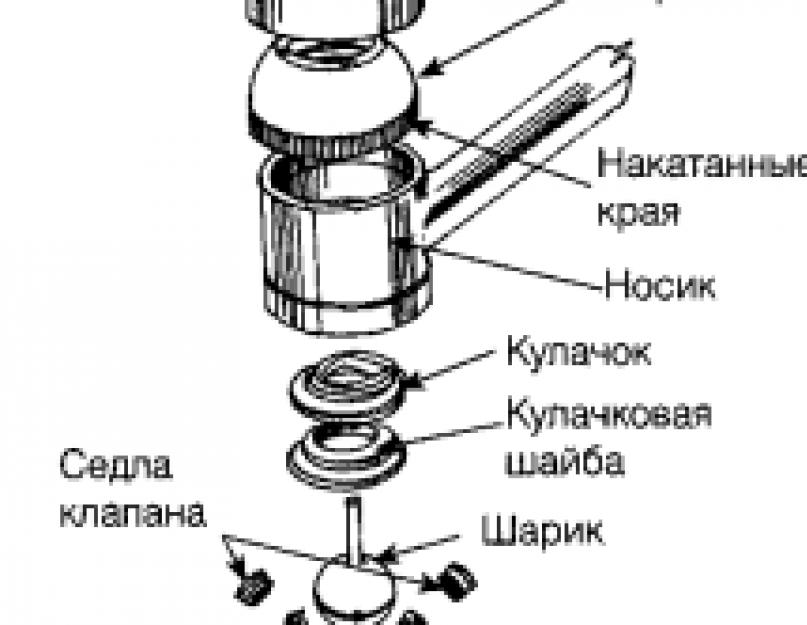
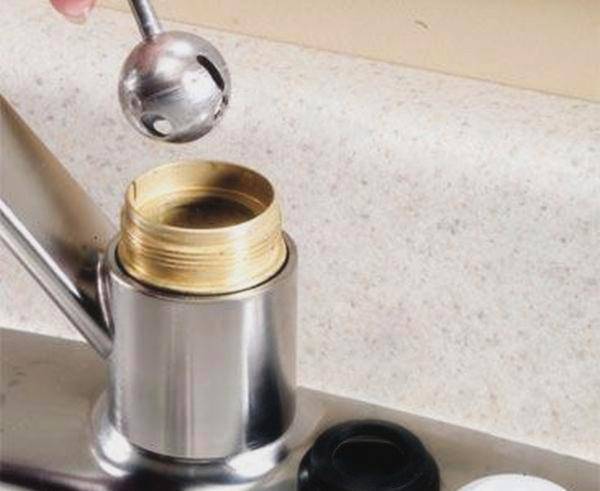
The main element on which the principle of operation of the ball mixer is based is a small ball made of metal, which is placed in the valve body. The ball has three holes, which are designed to provide hot, cold and mixed water supply. Thanks to this device, the crane is called a ball mixer.
The metal ball is in constant contact with rubber gaskets to prevent spontaneous passage of water. Such a device is actuated by means of an adjusting rod. In this case, to change the pressure of the water flow, the position of the holes on the ball is changed. With an increase in the area of contact of the holes with the rubber seals, the level of the flow of the supplied water decreases and vice versa. Due to their well thought-out design, such cranes rarely break down and therefore rarely need to be disassembled.
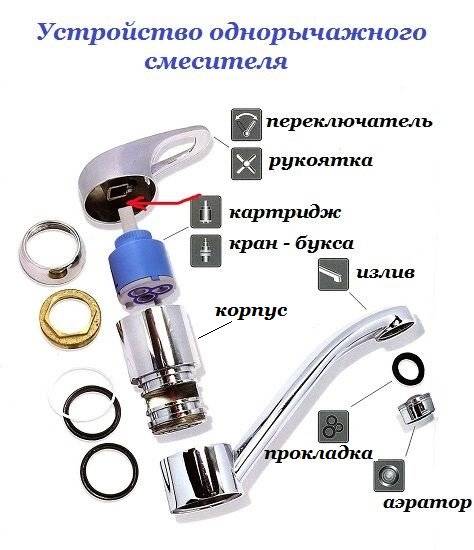
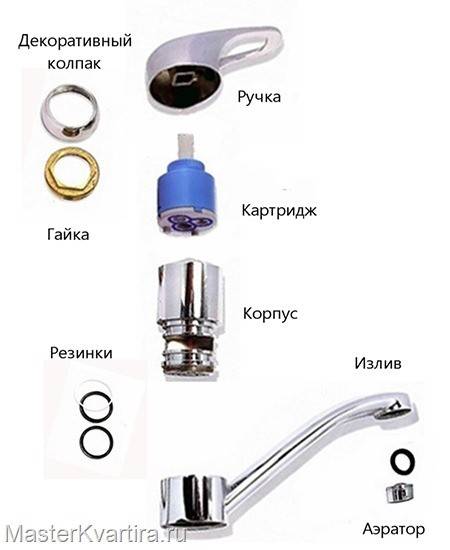
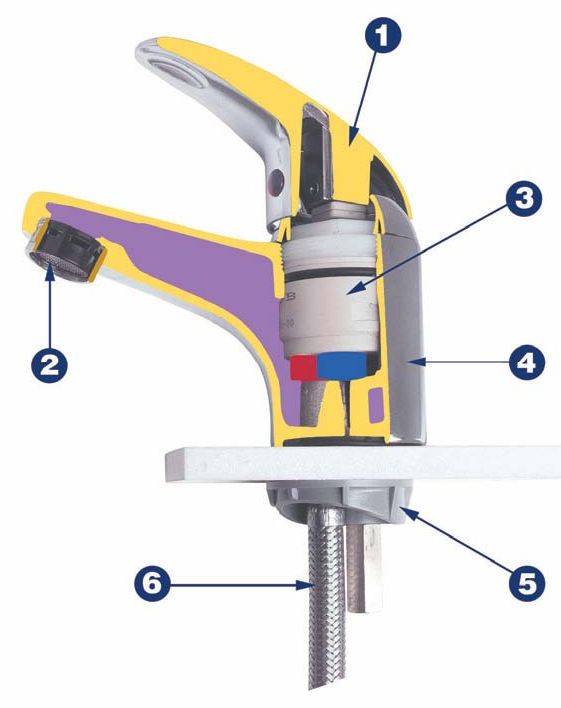
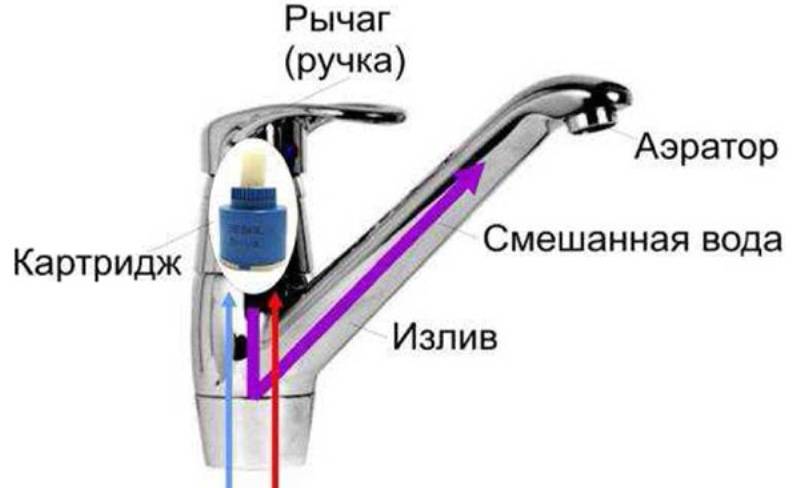
The cartridge faucet, as its name implies, is equipped with a special cartridge for mixing water, which is based on a ceramic plate. At the bottom of the disc there are 3 holes, respectively, for hot, cold and mixed water. In turn, the top plate acts as the mixer itself.
The essence of the operation of such a system is that when the location of the joystick changes, the hole, depending on which water needs to be supplied, hot or cold, is combined with the mixing chamber of the upper plate. The smooth movement of the linkage is achieved thanks to a special silicone-based lubricant. Manufacturers of lever taps are recommended to supply the water supply system with filters, which will avoid debris getting into the cartridge and, as a result, increase the service life of the mixer.
Single-lever mixers: what's what
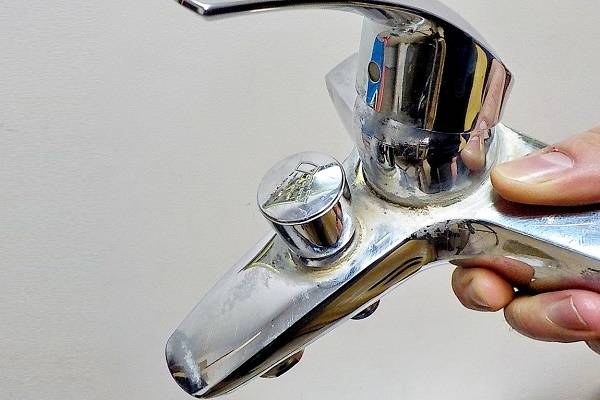
In order to understand how to disassemble a single-lever mixer installed in your bathroom or kitchen, you should find out how it works and how it works. In appearance, it is a faucet that has a single lever instead of two water regulators. This lever handle is fixed with a screw that is hidden under a special decorative cover plate. In the event of a failure of such a device, and this is possible with leaks, blockages or jamming, problems with disassembly should not arise, due to the simplicity and clarity of the design.
Need to know
Before figuring out how to disassemble a single-lever mixer for a kitchen or bathroom, you need to understand that the water flowing through two pipes is mixed to the desired temperature with a single light movement of one hand. The regulation of the pressure, as well as the issued water temperature, occurs by moving the ball or cartridge, which is located inside the device body. That is why all mixers of this type are divided into two subspecies - ball and cartridge.
Types and features of devices
When problems arise with plumbing, the easiest way is to turn to a real professional, because he knows exactly how to disassemble a single-lever mixer, which is perfectly visible in the video posted at the end of our article. But not everyone has such an opportunity, therefore it does not hurt to get acquainted with the main types of mixers and the features of their device in order to carry out preventive or repair work on their own.
The main feature of the ball valve is the possibility of wear of the rubber seals that hold the ball in the desired position. But in cartridge models, elements that constantly rub against each other are practically absent, therefore, with correct connection and good water quality, they last much longer. It is a little easier to disassemble a single-lever kitchen mixer with a cartridge, but any handy home craftsman can handle the ball one.
Fixing a single-lever ball-type mixer
There are four reasons why a crane needs to be repaired:
- Cracks, chips caused by mechanical damage to the body;
- Clogged cartridge between seats and ball;
- Gasket wear;
- Clogged or rusty aerator.
What to do if a defect appears on the case? You can try to repair it with cold welding - a sealant (putty). But this is, nevertheless, a temporary measure, and soon you will still have to change the mixer.
If the problem is a weak water pressure, then most likely the cause is a clogged aerator. Then you need to get it out, clean the mesh, for example, with a toothbrush, and then install it back.
Let's deal with the malfunctions more seriously.
When the valve leaks without visible damage, then the matter is most likely in violation of the integrity of the gasket or in the breakdown of the cartridge. In this case, a complete disassembly of the single-lever kitchen mixer is required.
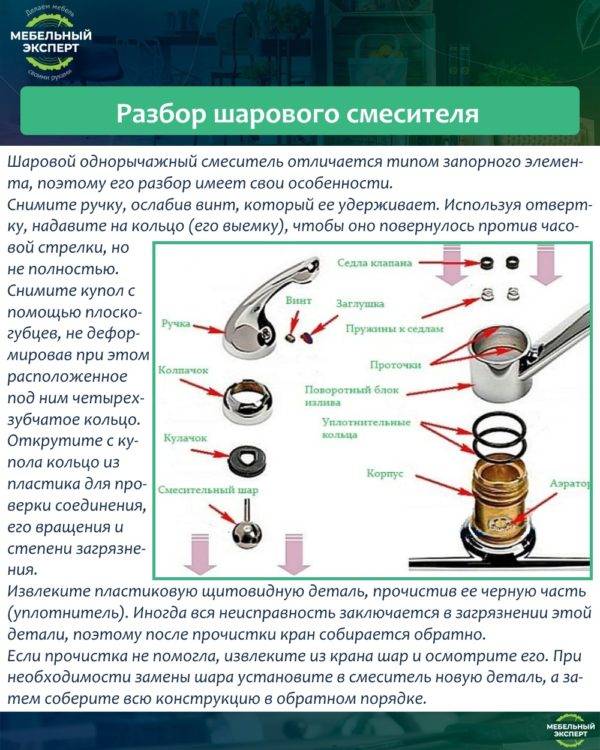
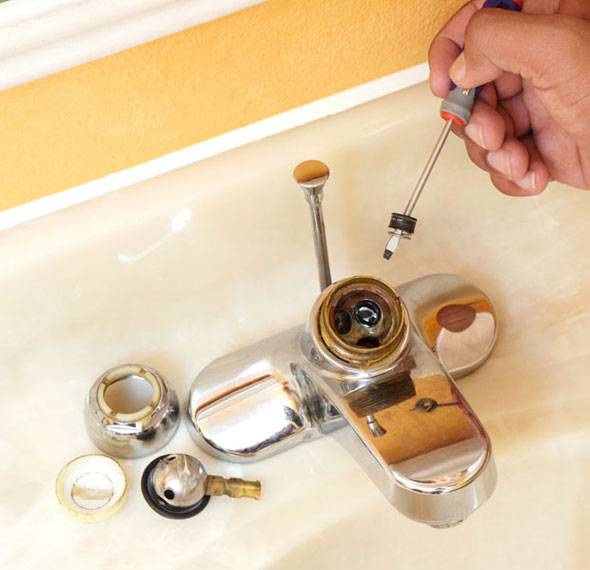
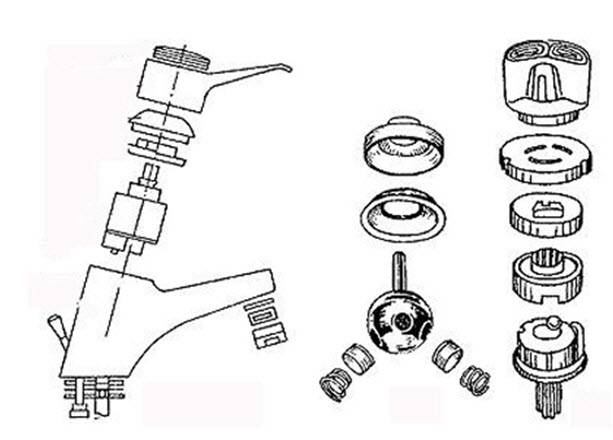
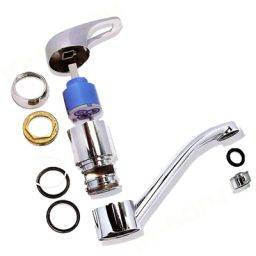
How to disassemble a tap? First, turn off the water and let the rest of it out of the tap. Then examine the device of the single-lever kitchen faucet in the photo.
Now let's start the repair step by step:
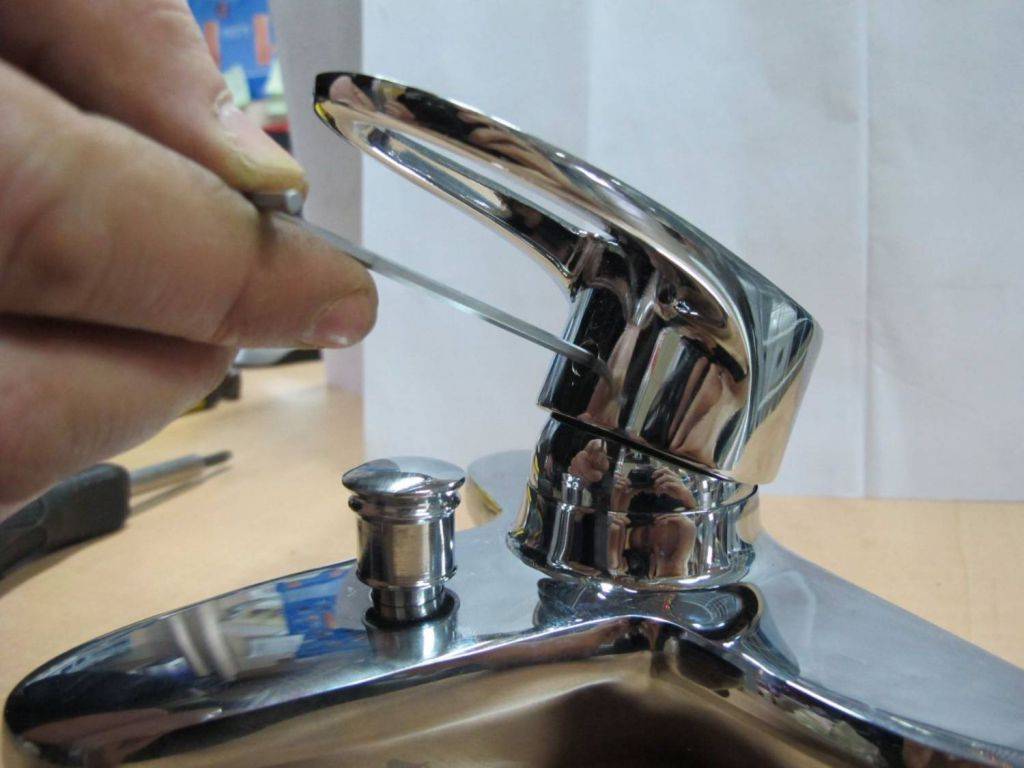
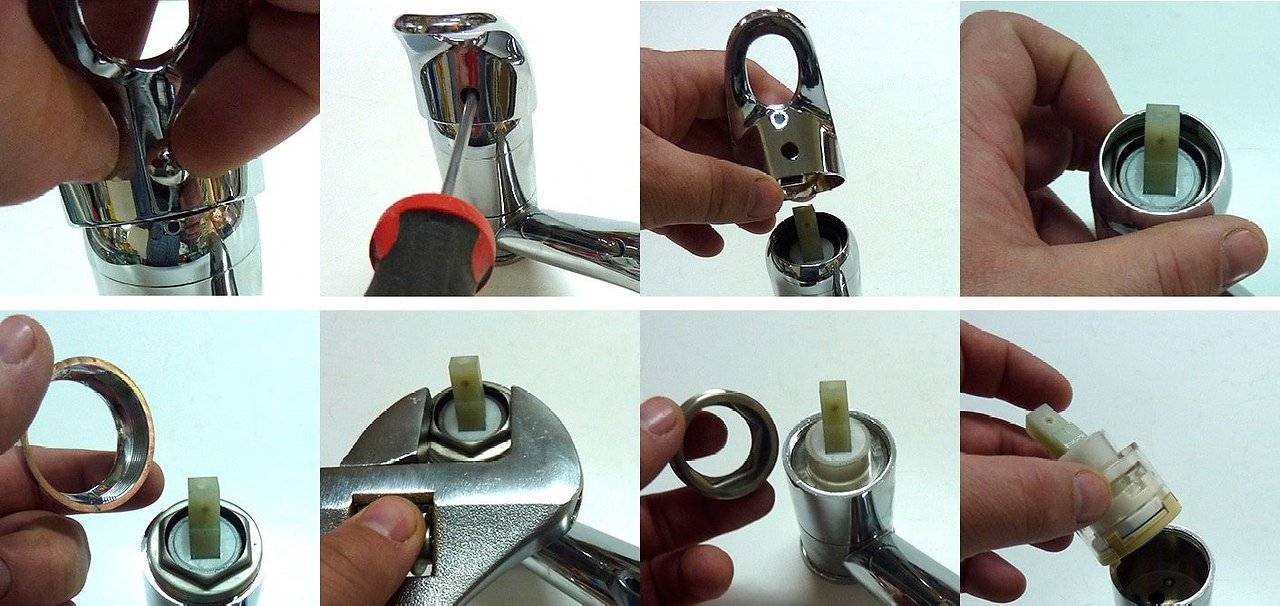
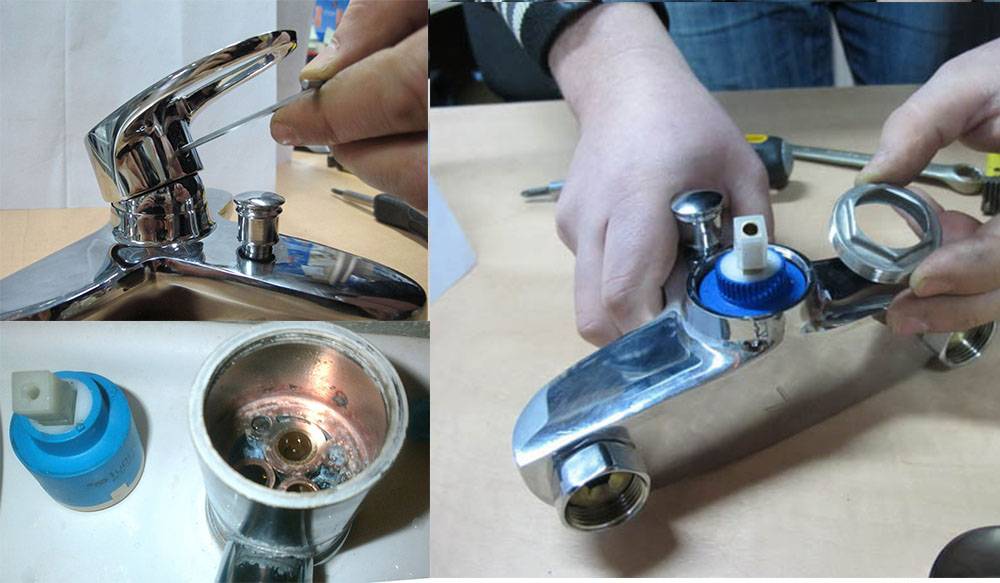
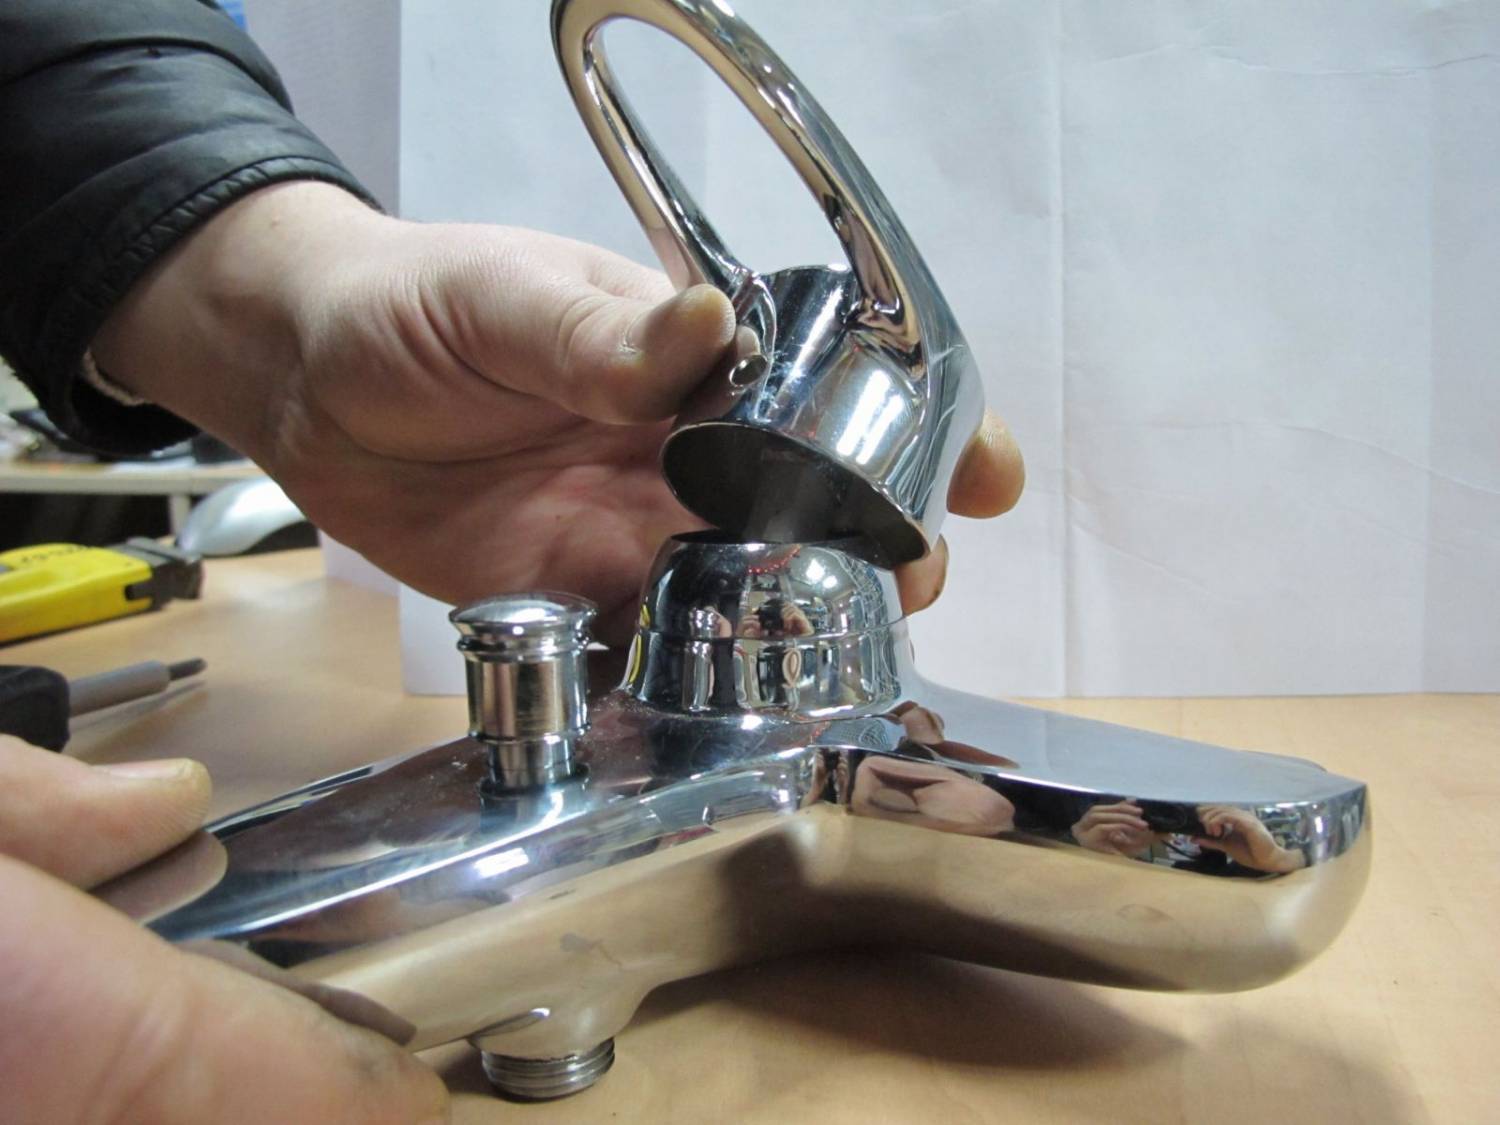
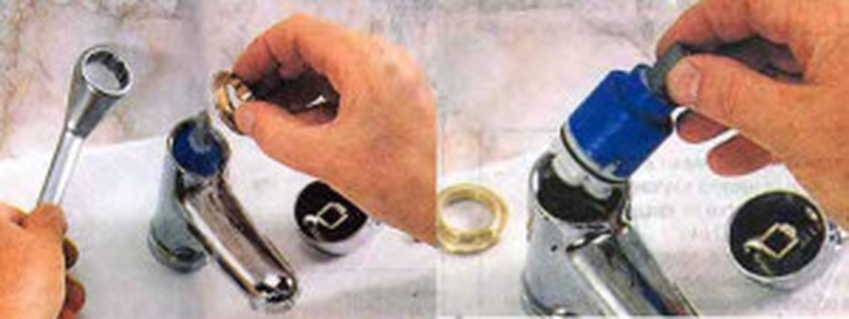
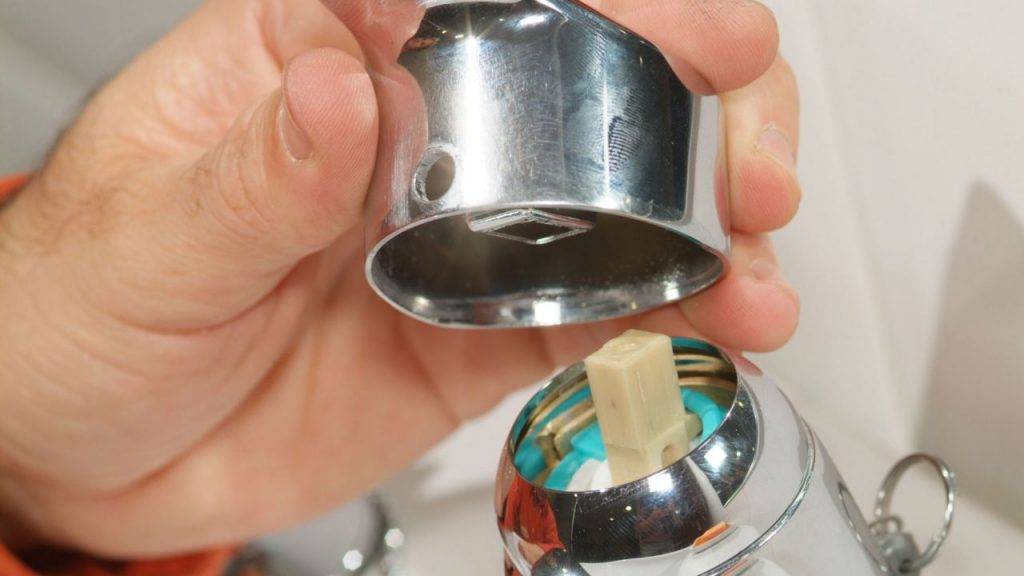
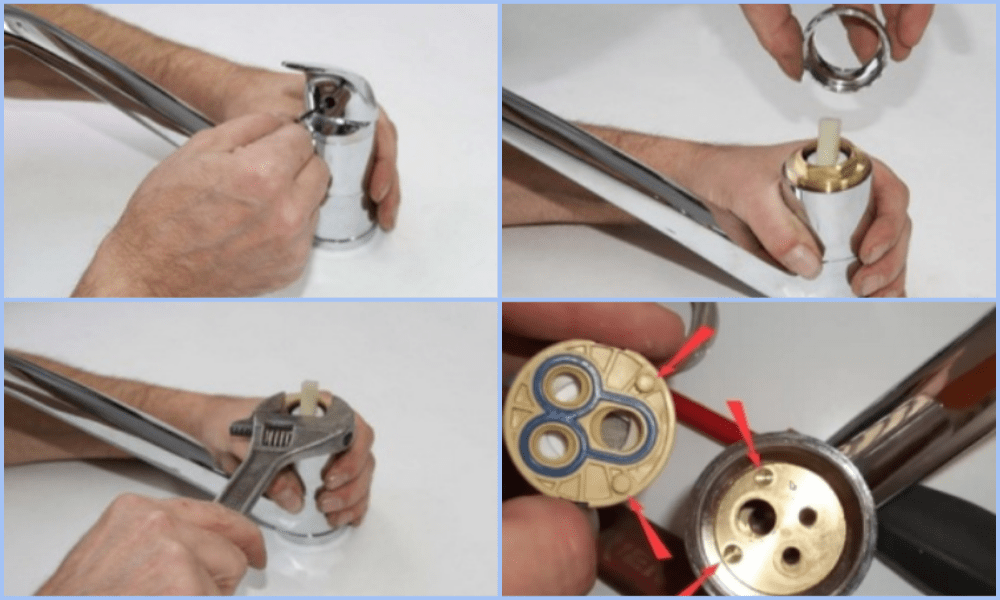
- The screw on the main body is unscrewed. It is usually hidden behind a decorative plug, which must be removed with a screwdriver, as shown in the photo.
Advice! You can disassemble and repair the device even if you don't have a hex wrench at hand
To do this, carefully tap the fastening nut with a hammer on the screwdriver.
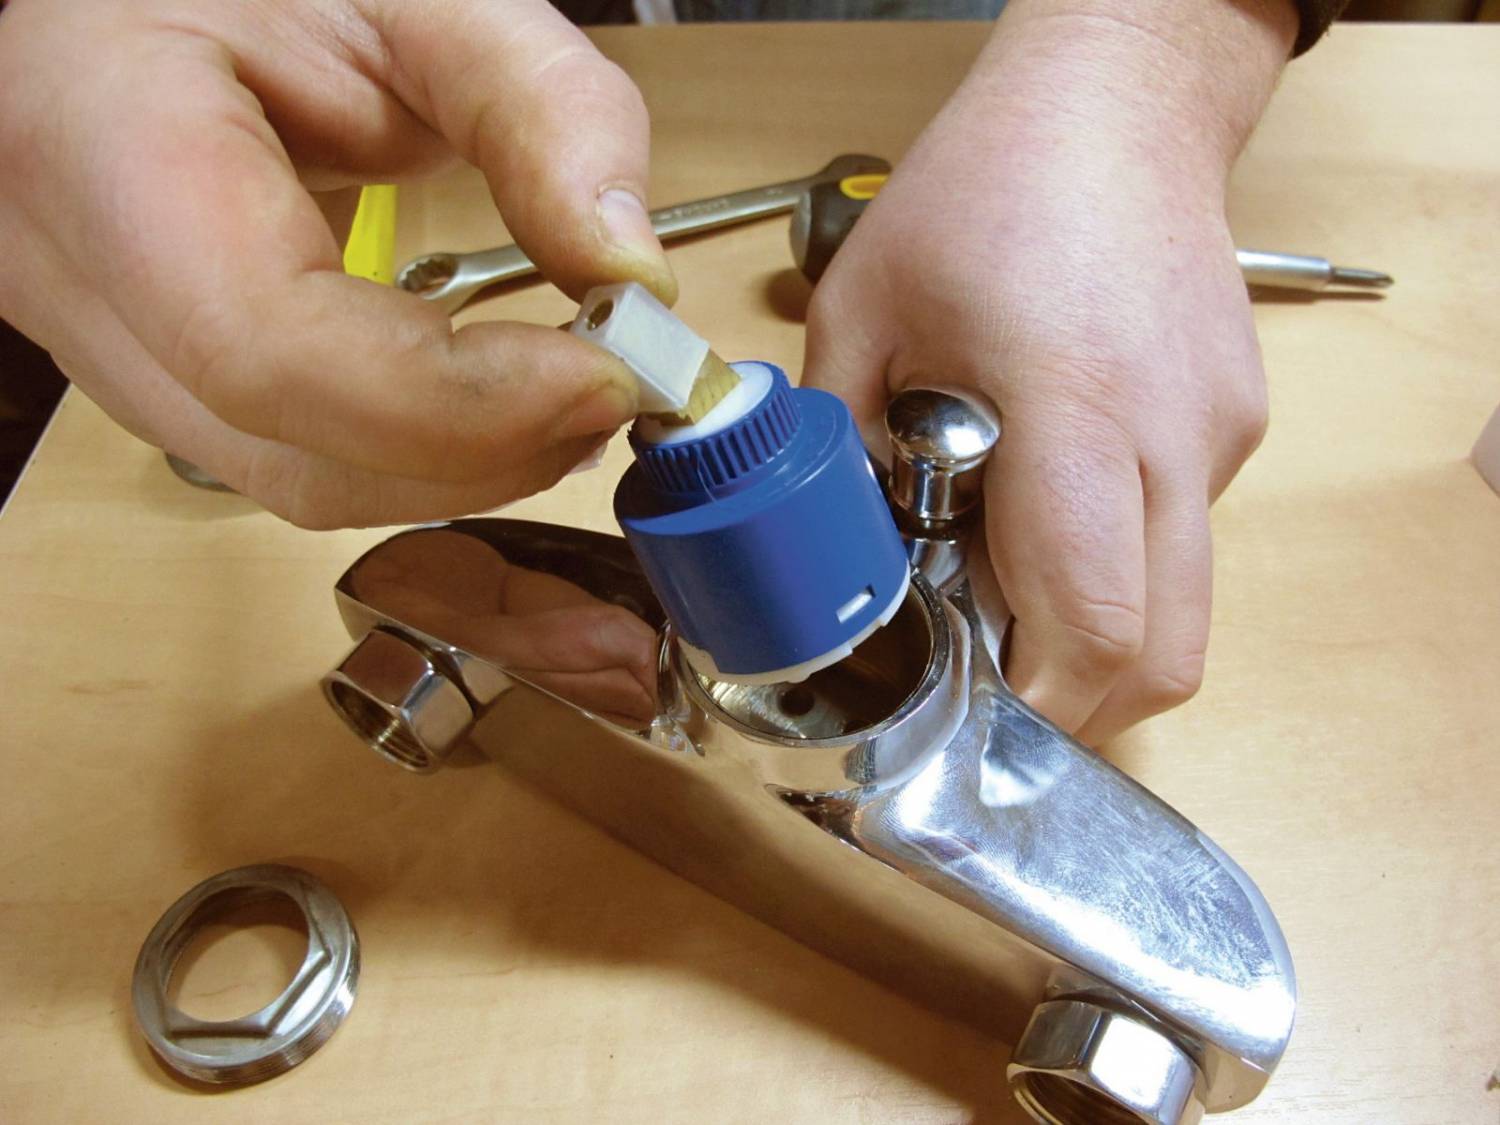
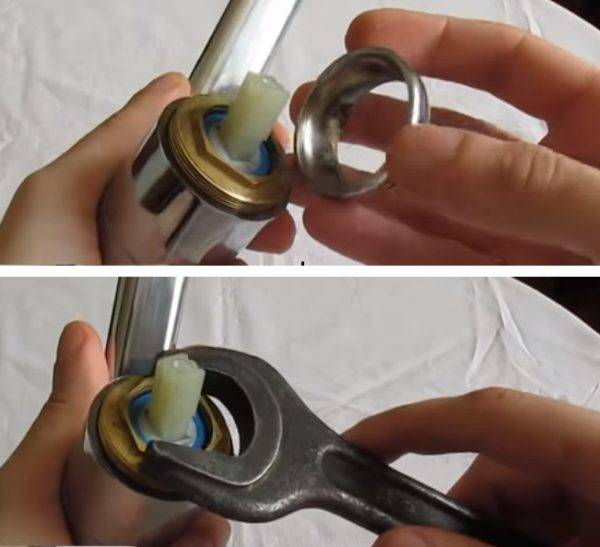
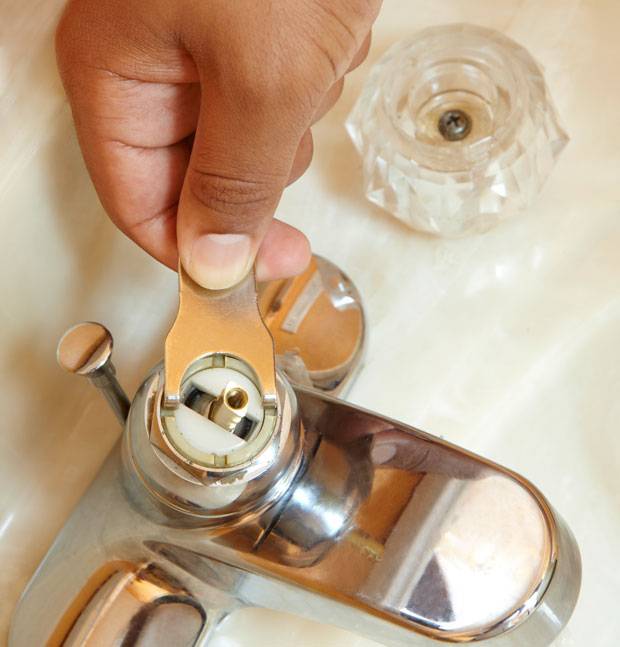
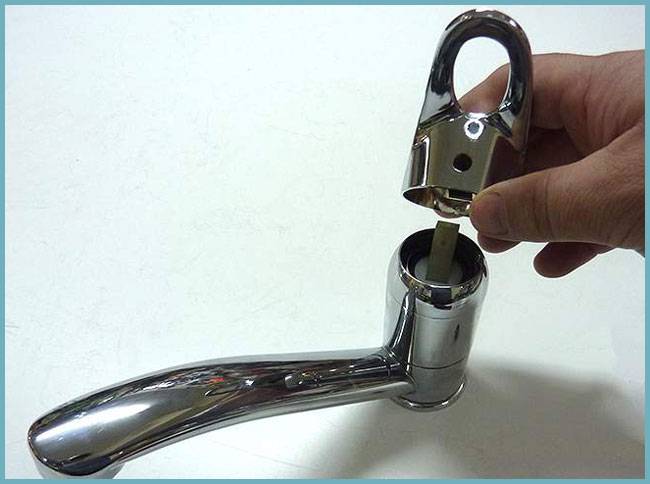
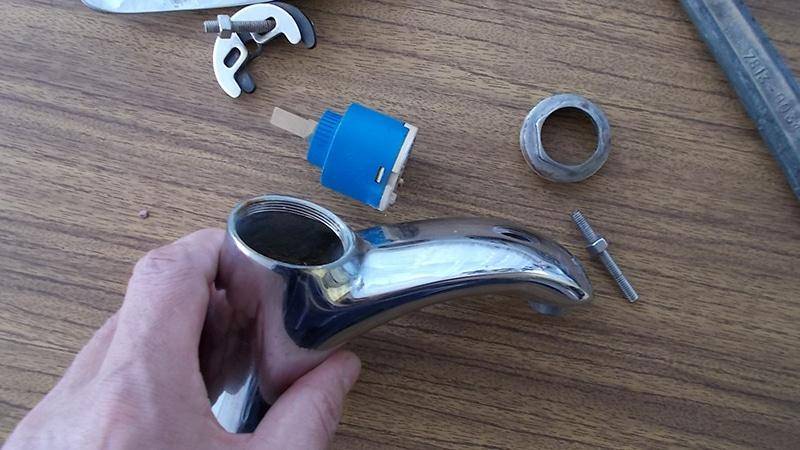
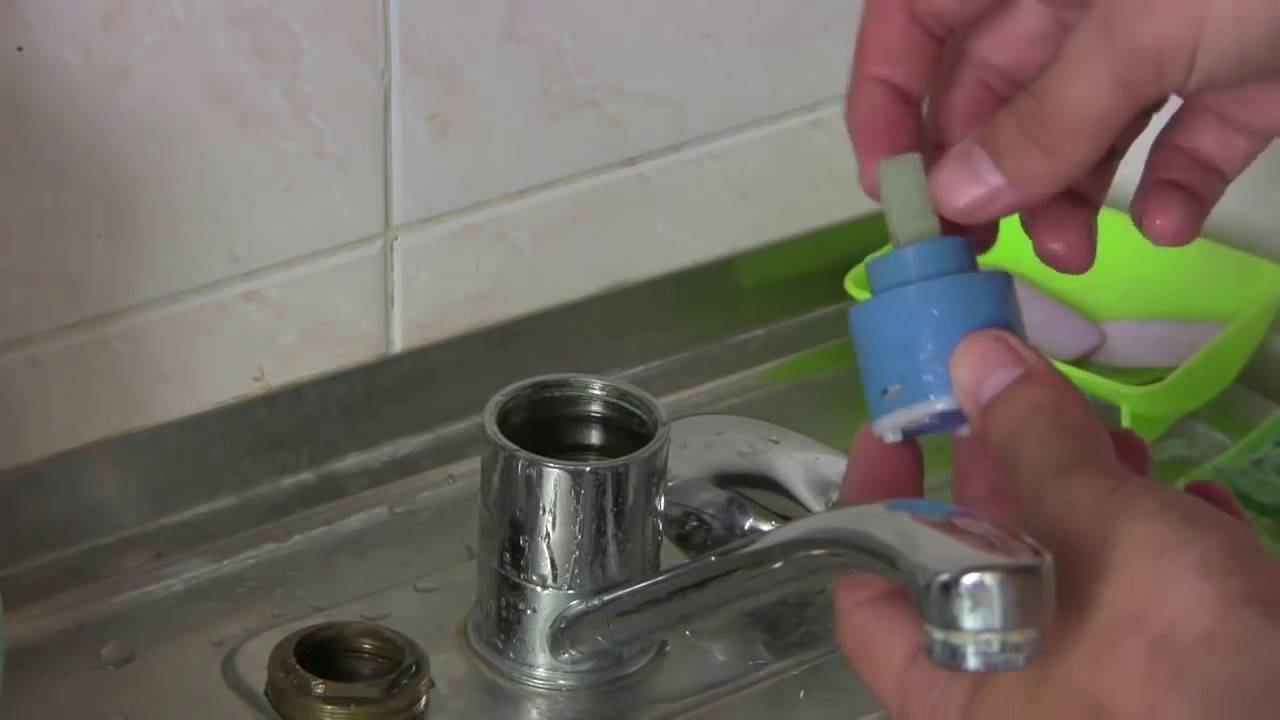
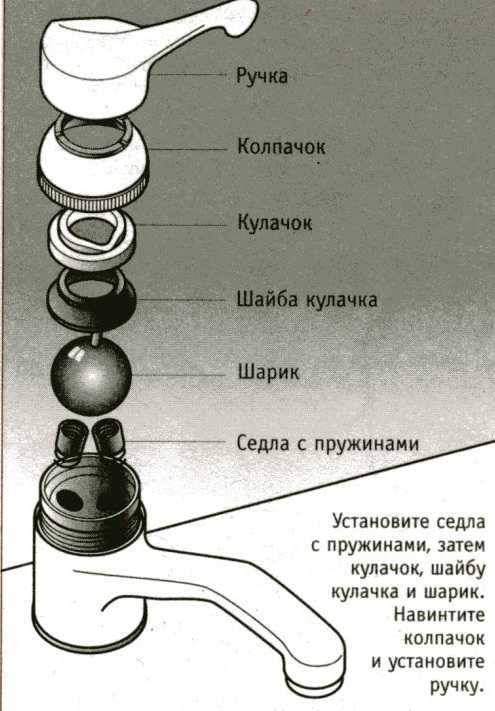
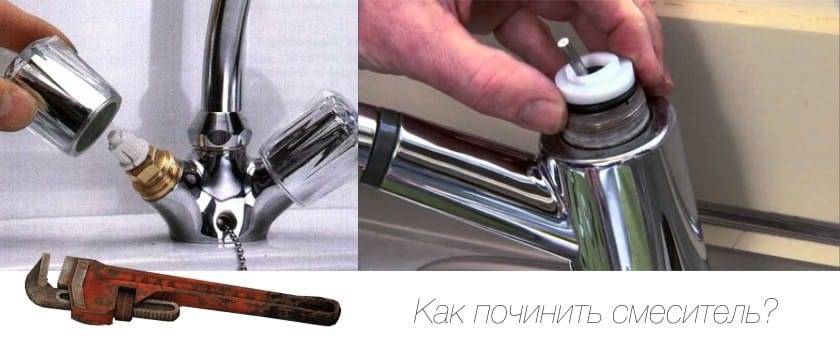
- The lever and cap are removed, and now we need to get out the cartridge and inspect the entire device for defects. For this, the cam washer is unscrewed with an adjustable wrench.
- The disassembled valve is inspected for defects: the gasket, the surface of the ball and the springs that support the rubber seals in the holes are inspected. Settled springs and worn-out faucet are replaced if necessary. At this stage, all parts need to be cleaned from accumulated water deposits.
- Most often, leakage from the valve occurs due to the resulting blockage between the ball and valve seats in the cartridge. In this case, you just need to change it. The whole difficulty of this task is actually in the correct choice of the cartridge, and the repair of the mixer with your own hands is not difficult at all.
Advice! When heading to a plumbing store for a new cartridge, take the old one with you, so as not to miscalculate with the size, because the cartridges are not standardized - they are produced in a wide variety of diameters and materials.
Also see our other materials:
Install the new cartridge in such a way that its holes align with the holes inside the mixer body. Then we screw the washer back (first with our hands, then tightly, but not too tight with a wrench).
- We check the quality of our work by running water. If it does not leak, then we proceed to install the cap, and then the lever - we tighten the screw in it and attach the plug.
How to change the gasket in the mixer? It's easy enough too.It is necessary to remove the old O-rings and change to new ones, on which we first apply a little plumbing grease.
Advice! For all rubbing parts of the product, use a non-toxic silicone-based lubricant. This will double the service life of structural elements.
Repair of a two-valve mixer
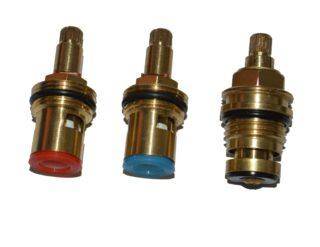 Mixer valve box
The repair can affect both the crane axle boxes and the spool valve.
How to repair crane axle boxes
The axle box with a rubber gasket is a screw with a disk rubber gasket attached to its end. Rotating the valve changes the position of the gasket relative to the seat. When it approaches the saddle, the water pressure decreases, and when it moves away, it increases. A crane box of this type is undemanding to water quality.
In ceramic structures, the locking mechanism consists of two ceramic parts with holes. They are polished, so they match perfectly, which ensures tightness. When the holes match, the tap is fully open. Solid impurities that get between the discs are capable of disabling ceramics.
If valve-axle boxes with a rubber gasket are installed and water flows from under the flywheel, you need to disassemble the structure: remove the retaining ring, unscrew the valve-axle box to the end and remove the inner part on which two thin rubber rings are installed. It was because of their wear that a leak appeared. These elements replace.
If the gasket breaks or is pushed through, it is necessary to replace the part with a similar one. You can find the right one by purchasing a repair kit. If this is not possible, it is cut independently from a piece of rubber.
The procedure for making a homemade gasket:
- A square piece is cut out of the rubber, approximately equal in size to the gasket, but not less than it.
- A hole is made in the center with scissors. The main thing is to make it not too big. It is necessary that the pad fits tightly.
- Then, with a knife or scissors, the protruding areas are trimmed in place.
If the parts of the ceramic crane-axle box fail, then it cannot be repaired. It is simply changed to a new one, since the discs on sale are not found separately, and their repair (polishing) is too painstaking, although possible.
In addition, you need to inspect cavities and rubbing surfaces, remove blockages, beige or red plaque, indicating rust, lime deposits. The use of special agents that dissolve rust and limescale will greatly facilitate the procedure.
Spool valve repair and disassembly
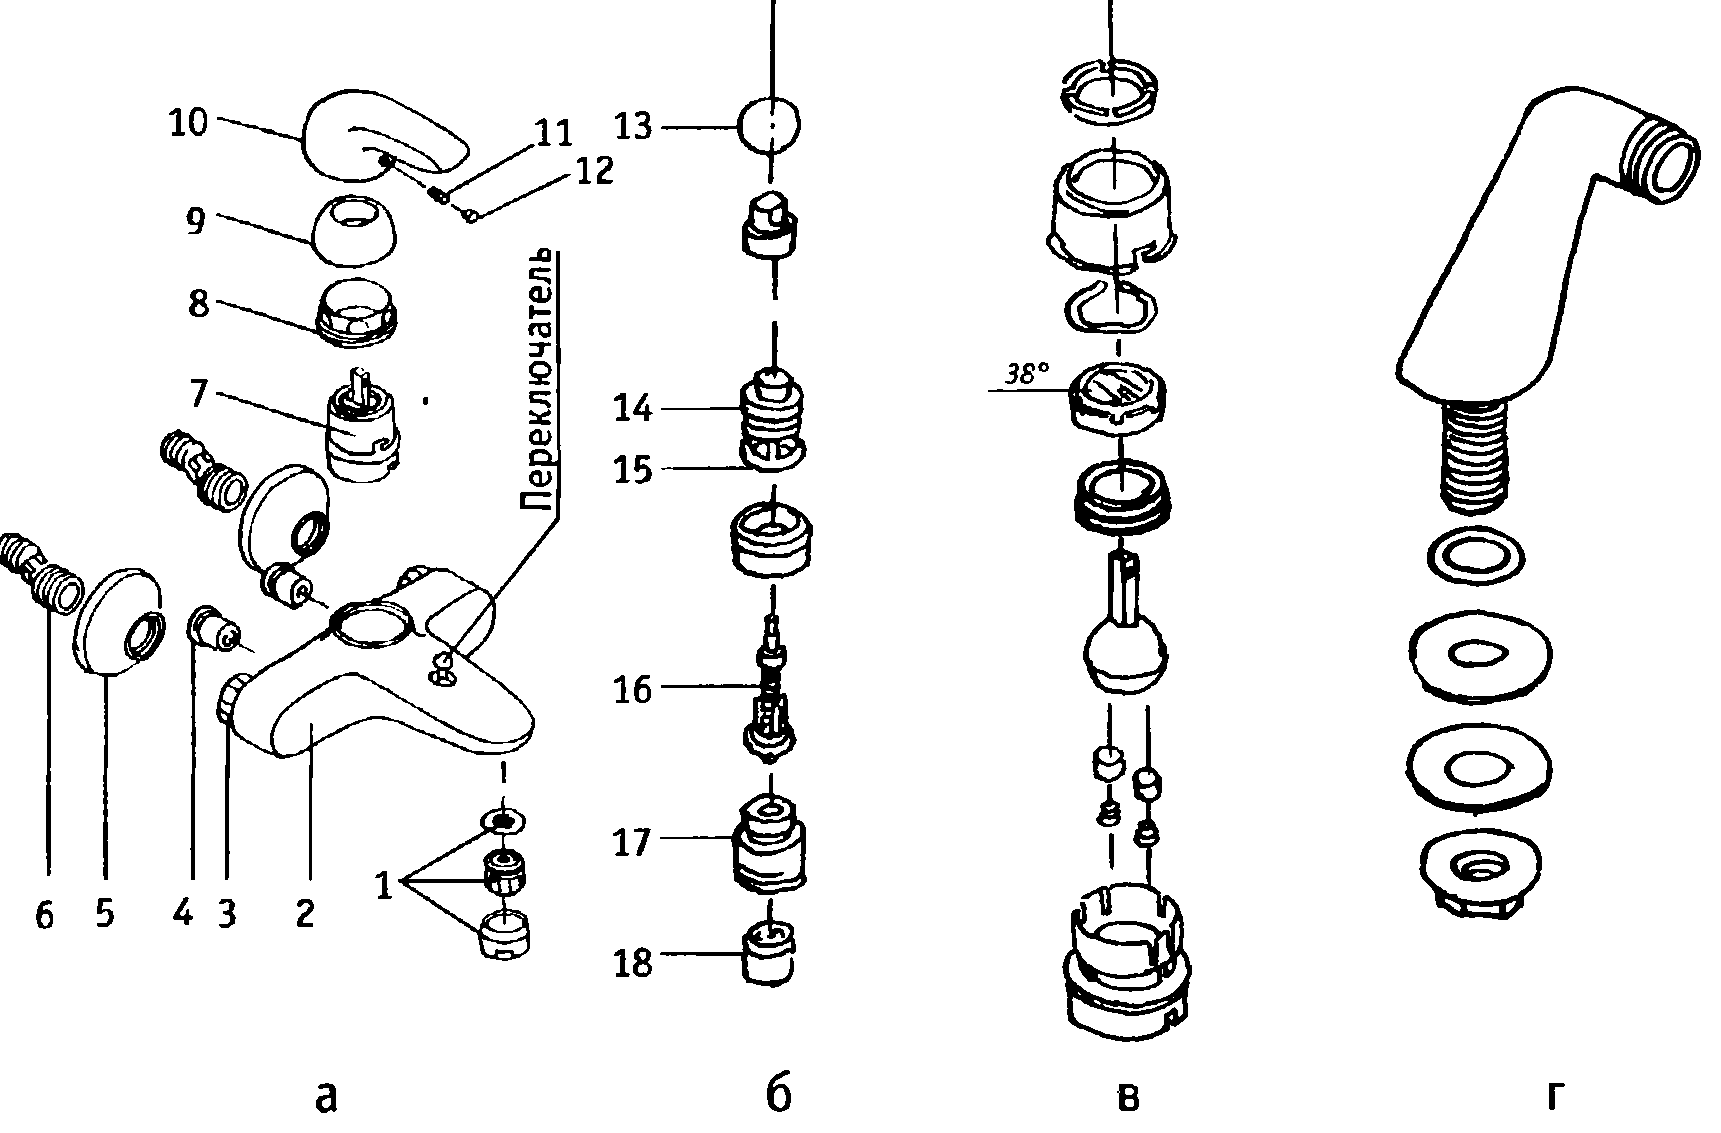
If water flows from the tap and from the shower head at the same time, then the changeover spool valve is faulty. It breaks down due to wear or foreign objects. To get to it, you need:
- Remove the decorative cover and unscrew the mount.
- Remove the valve.
- Take a spanner wrench and put it on the mount. Unscrew while holding the upper stem with a wrench.
- Remove the upper part. Inside there is a valve that can be removed towards the spout.
- At the bottom, unscrew the adapter for the spout.
The valve is then freely removed. On it, the gaskets are changed to similar ones.
If this does not help, remove the lock washer from the top part and pull out the stem. There are two rubber pads in there. They can also be changed.
The best manufacturers on the market
Modern single-lever models are very popular, therefore they are presented in the collections of leading companies engaged in the production of plumbing accessories. Among the most famous brands belonging to different price categories are the following.
GROHE - wide functionality and high quality
None of the faucet ratings are complete without models of the German brand "Grohe"
Despite the rather high cost, they have earned the attention of consumers with a modern design solution, durability and reliability.
Accessories of this brand are often equipped with many additional options, which ensure comfortable operation. Among the wide range of single-lever kitchen appliances, users most often note the Concetto 32663001 model with a 45 cm pull-out spout, which practically replaces the pull-out watering can.
The mixer uses a virtually silent aerator and a durable SilkMove ceramic cartridge. A popular model for the bathtub is the Euroeco 32743000 faucet with an aerator and a special water saving regulator.
Grohe faucets and other accessories are classic in design, making them easy to blend into any room design
LEMARK - original solutions
The Czech company Lemark mainly produces single-lever products with a high spout, which are convenient to use in the kitchen. Sometimes they also have a cut-in dispenser, where liquid detergents are poured. Models are available in a wide range of shades, which allows you to match the faucet to the color of the sink.
At the same time, the catalog also contains traditional chrome-plated products that serve as a universal option. According to users, the top of the best models includes the Comfort LM3061C kitchen faucet, as well as the Pramen LM3318C shower device.
The owners of these devices note the impressive design of the devices, thoughtful construction and high quality. Some claim that they have been using Lemark accessories for several years without any repairs.
Lemark single-lever mixers are often equipped with additional accessories and attachments, such as a pull-out shower head, for added ease of use.
OMOIKIRI - Japanese technology
Sanitary accessories of the Japanese brand "Omoikiri" impress with their unique design, as well as the highest quality and long service life. The manufacturer gives a five-year warranty for all products. Many models are equipped with a double spout, which means that tap water is supplied separately from drinking water.
The list of the best models for the kitchen includes the Tonami-C single-lever mixer, made of lead-free chrome-plated brass. The accessory has a 360 ° double spout and a built-in aerator. At the same time, users note the reliability and durability of the crane.
Although the cost of Omoikiri products is quite high, users find it justified. The models are distinguished by reliability, long-term operation, as well as original appearance.
IDDIS is the best Russian manufacturer
The products of the Russian company are very popular due to their diverse assortment and affordable prices. They are also of acceptable quality and, with proper care, can do without repairs for up to 5-7 years.
Among the accessories that have earned high user reviews, it is possible to note the IDDIS Vane VANSBL0i10 universal single-lever faucet with a swivel spout, a pull-out shower head with a square shower, and an aerator nozzle.
The reliable and simple kitchen mixer Alborg K56001C is also popular. Due to the low spout, this model is best used in shallow sinks.
IDDIS models are usually classic in design and have a chrome finish, making them perfect for common stainless steel sinks
KAISER - German quality at an affordable price
A wide range of mixers is produced under the Kaiser brand, which have various types of spouts - pull-out, stationary, swivel, flexible. The products are distinguished by their excellent appearance, while their cost is quite budgetary.
Among the models presented, users especially noted the Kaiser 13044 kitchen faucet with a body made of high-quality brass.
In addition to its great looks, this sanitary accessory has two built-in aerators and a water filter.The high spout can be rotated 360 degrees for easy access to all corners of the sink.
Kaiser catalogs include not only traditional chrome options, but also stylish accessories made in bronze or granite
Disassembly and minor repairs of a two-valve mixer
They resort to complete disassembly if they find a defect, constantly dripping water or leaks. If none of the reasons are suitable and there are no visible faults, and the mixer still does not work correctly, then, most likely, it will have to be replaced. First, it is disassembled and examined.
In case of minor problems with one or both valves, it will be enough to disconnect them, check and screw them again.

First of all, remove the plugs from the handles. Use a Phillips screwdriver to remove the screws in the places where the decorative parts were. We take out the valve and unscrew the core from it. After that, we move on to checking the threaded connections and seals. It is possible that these elements have misalignment or a violation of integrity. A little sanding and cleaning may be enough to make the mixer work again. To remove the spout from the two-valve device, it will be enough to unscrew the nut. Spout problems usually occur on the side of the body, sometimes in the aerator. For a complete disassembly, you will have to unhook the mixer from the wall or washbasin and take out the cartridges.
Water faucet
As always, the first step is to shut off the supply of cold and hot liquids. These activities can be performed using valves focused on pipes. When the valves are closed, you can open the lambs and release all the liquid accumulated in the mixer.
To repair a water faucet, you will need the following tools:
- screwdriver;
- adjustable wrench;
- rubber gaskets;
- tow.
The procedure is as follows:
- Remove the valve wing. This is done very simply with a screwdriver.
- After removing the lamb, take the adjustable wrench and unscrew the crane-axle box. After that, you should be able to locate the stem with a rubber gasket. It is this part that is most often the cause of the breakdown.
- you need to remove the old gasket using a screwdriver. If the gasket is attached with a screw, then unscrew it.
- When you have replaced the old gasket with a new one, take a clean cloth and clean the threads on the letter and in the hole where it will be mounted.
- Wind several threads of tow on the crane-axle boxes, set the axle-box in place. In this case, it should be noted that the tow should be wound counterclockwise, but the axle box should be twisted in the direction.
- If the cause of the breakdown is the wear of the valve seat, then even a new gasket quickly becomes unusable over time. To eliminate the problem that has arisen, it is necessary to use a special cutter. It can be scrolled using a drill. Thus, all the roughness present on the “saddle” can be eliminated.
The video shows how to disassemble a kitchen faucet:
Features of parsing the faucet in the kitchen and bathroom
Today you can find modern models of mixers installed in the bathroom or in the kitchen. They can be equipped with a timer or sensitive parts. To disassemble such a crane, you should adhere to the following action plan:
Dismantle the cover that serves to secure the batteries
After that, you can proceed to further disassembly of the tap, but only before that it is important to turn off the water and electricity.
Disconnect the sensor wire from the test control.
Now remove the gasket that is located between the control box and the mixing tube.
Disconnect the nipples that lead from the heating and cold water pipes.
Remove the springs and clips that hold the body to the base of the sink.Similar measures are taken when disassembling models with a thermostat and timer.
When the disassembly has been done correctly, you can proceed to repair. When the problem of breakdown is in the control unit, then it is not recommended to carry out repair work on your own, since fragile elements are located there. Only an experienced specialist will help to solve the problem.
The video shows how to disassemble the mixer in the bathroom and kitchen, dismantling features:
The mixer, like any plumbing fixture, can become unusable over time. But this does not mean that you should immediately throw it away. First, you need to disassemble the device and see what caused the breakdown. If this is a damaged gasket, then it is necessary to replace it and reinstall the mixer in its place.
Problem prevention and care
It is always better to prevent breakage than to eliminate it. Oddly enough, it is water itself that creates the greatest number of problems. Most of the nodes fail because of it. The service life is directly proportional to the quality of the water and the cleaner and softer it is, the longer the sanitary ware will last.
The easiest way to extend the life of a faucet is to purify the water. For these purposes, filters are installed in the water supply system that do not allow small particles to pass through, which is often the reason for repairs, tearing rubber gaskets and leaving scratches on the adjacent planes of parts.
Scale that forms when water is heated is also a common cause of breakdown, but it is quite difficult to deal with it on your own. A special filter softener can be installed, but it requires additional space and financial resources. Modern manufacturers create high-quality mixers using quality materials that, even in conditions of high intensity and poor water quality, can last for many years. That is why it is best to take a closer look at quality manufacturers.
Mixer maintenance
Breakdowns, repairs and replacements can be avoided if the mixer is not defective and if the equipment is used correctly. You need to open and close the water without sudden movements. Do not twist the handles with all your might and hit them with internal rotating elements. Among the gaskets, you should choose modern models, while giving preference to silicone ones. The mixer must not be disassembled several times a month. Otherwise, sooner or later the threaded connections will deteriorate. In turn, the timely scheduled cleaning of the parts will extend the service life of the entire crane by 5 years. Moreover, any malfunction in the parts of the mixers will lead to more serious consequences if you do not inspect it in time. You should also not keep an old worn-out cartridge in new plumbing, select disproportionate parts that will put pressure on the structure.

Types of mixers
It is strongly not recommended to start disassembling any mechanism without first studying its structure. You must understand not only the sequence of dismantling certain parts, but also their purpose, strengths and weaknesses, principles of operation, etc. In the implementation, there are two fundamentally different types of single-lever mixers.
Table. Types of single-lever mixers
Construction type
Brief description of the device and performance characteristics
With ball mechanism
A movable ball with holes is placed inside the body. During the rotation, the openings with cold and hot water are closed / opened, due to which the proportions and volume of the supplied water and, accordingly, the outlet temperature change. Such designs are currently used very rarely due to technological shortcomings. The crane has many sliding elements, the functionality and durability of the device depend on their tightness.There is an axiom in mechanics that the more parts a mechanism has, the lower its reliability. The explanation is simple - each of these parts can break, as a result, the mechanism due to any of them requires repair.
It is important to know that many types of ball mixers do not provide for the possibility of replacing the ball, there is no point in disassembling them, you need to buy a new valve.
With cartridge
The most common types of single-lever mixers today. All cartridges are replaceable, in case of failure they can be easily changed
But they also have one problem. Manufacturers are interested in increasing the number of sales of assembled products, rather than spare parts for them, so their profitability is much increased. In order to complicate the repair work in various ways, very original measures are taken - each crane model has its own individual cartridge, and they are not interchangeable. There are a lot of models, they can differ only in the length of the spout or handle, but the cartridges are installed differently. Finding exactly the same one is a great success. After a long search, consumers lose patience and buy a completely new crane.
Crane disassembly stages
First of all, you should turn off the water supply, regardless of where the mixer is located: in the kitchen, in the bathroom, or elsewhere. When installing plumbing, it is equipped with water filters. The filter must be carefully checked for all kinds of contamination. In the event that this part is in good working order, we can conclude that the breakdown is in the mixer.
At first glance, it may seem that it will be difficult to disassemble a single-lever kitchen mixer, because outwardly it does not have any clues. The secret is that a bolt is hidden under the plugs indicating the water supply. It is sometimes found under the emblem. The next step is to remove the cartridge. With him, the situation is more complicated, due to the fact that during his service he "got used to it." In no case should you knock on it with a metal hammer; if necessary, this can be done through a block, easily tapping on the circumference. We remove the used cartridge, wipe the surface of the valve body with a soft cloth and install a new one in its place.
Most consumers are wondering: how to disassemble a faucet in the kitchen? Before starting to disassemble, it is necessary to soak the threaded connection, since in the kitchen, with frequent use of tap water, the faucet usually stuck. Thoroughly moisten threaded connections with vinegar or kerosene, but WD-40 automotive lubricant can also be used. After waiting 10 minutes, you can begin to unscrew the parts of the mixer.

Ball mixers have recently appeared on the plumbing market. The demand for these mixers is growing due to the fact that they are economical due to their infrequent leakage. However, consumers are faced with the same question: how to disassemble the ball mixer in the kitchen for the purpose of overhaul. Owners of single-lever mixers with a metal or ceramic valve need to remove the lever - the handle, which performs the function of supplying water. In most cases, it is secured with a screw that is hidden under the decorative strip. You are required to unscrew the screw, which will provide access to the internal parts.
Pay attention to the mounting method, as each mixer model has its own. In the event that you are dealing with a ball mixer that has a stem, you need to lift it up and carefully remove it, since there are no screws in this design.
Once you have removed the lever, you need to remove the housing cover. connecting to the body by means of a threaded fastener. In some cases, the cover is secured with a screw. In this case, it is on the side. A clamping nut is located under the cover. You can untwist it with a gas wrench or an adjustable wrench. Only then can you remove the cartridge to be replaced.At the same time, remember that the old gasket underneath can stick to and compact. To determine the exact cause of the breakdown, you need to open the water and trace where it will flow from and then proceed to replace the cartridge or simply replace the gasket.
For bathrooms, mixers of 2 types are usually used: two-valve taps-axle boxes and single-lever taps with a cartridge. Many apartments still use two-valve taps in their bathrooms. Since these faucets have been used since the old days, many consumers have an idea of how to disassemble a ball faucet in a bathroom. There is a screw under the decorative cover of these mixers, which is the first to be unscrewed. After unscrewing it, we unscrew the body of the crane-axle box with an adjustable wrench. Next, you can determine why it failed. In the models of such mixers, the gasket usually fails, which is located on the stem of the crane-axle box, or the fastening simply weakens. After eliminating the problem, we install the crane-axle box in place.
In modern construction markets in our time, there is a fairly large selection of sanitary ware, including mixers. Consumers are faced with the question: "Which mixer is better?"
- For cleaning the body of the mixer, it is recommended to select a cleaning agent in the form of a cream, gel or powder, which is intended specifically for the metal from which this product is made.
- Do not use metal brushes and strong agents that corrode the coating, alkaline and vinegar based products.
- To prevent chrome from darkening, traces of shampoo or soap must be washed off immediately with clean water.
- For prophylaxis purposes, you should change gaskets or cartridges more often.
- If desired, it is recommended to install a hard water filter.
Here are some simple recommendations, if followed, the operation of the faucets for a long time will not bring you any trouble.
Conclusion
There are single and double lever mixers, non-contact and thermostatic mixers. They are installed on bathrooms, washbasins, walls in shower cabins. The designs differ primarily in the way they work and in their purpose. The shower switch alone has up to one hundred configuration options. Cartridges in water taps are disc and ball, up to two. Recently, when the word mixer comes to mind, a single-lever design with one valve and an overhead handle placement. These devices have filled toilets in public places and toilets in modern-style apartments. For the house, they buy either technological options, or those that are not difficult to repair manually. The mixer is, in principle, not a complex design. To disassemble and replace parts, an intuitive understanding of the mechanism and a small set of tools in the form of adjustable wrenches, screwdrivers and pliers are enough.

