DIY wallpapering.
Calculation of the required number of rolls. Take a tape measure, set aside the width of the wallpaper on it and walk around the entire perimeter of the room, applying the tape measure to the walls. Count how many deferred distances you have left (you can not take into account the window and door). Next, measure the height of the walls in order to determine the height of the wallpaper (whole cuts). Now count the number of whole cuts that can be in one roll. When doing this, take into account the height of the room, the length of the roll (usually 10.5 m), the presence of the pattern and the size of the fit, which is on the label of the roll. If the drawing is large, then you have to adjust it by about 30 - 60 cm. On average, from one roll, three whole cuts and remnants are obtained, suitable for pasting the space above the door and near the window. Divide the number of desired whole cuts by the number of cuts that one roll can give, and get the required number of rolls. Everything that is not divisible is rounded up. Always purchase the necessary wallpaper with a margin, because if something is missing, you run the risk of facing a situation when the necessary wallpaper simply will not be in stock. Remember the color tones and the production batch number.
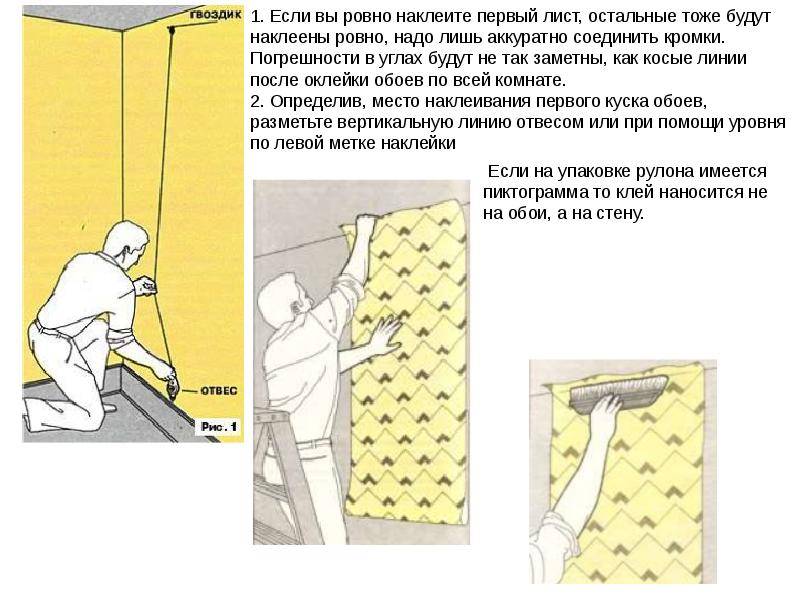
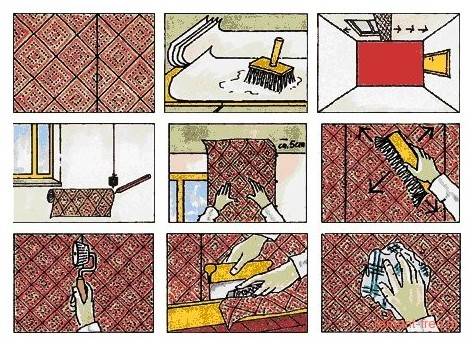
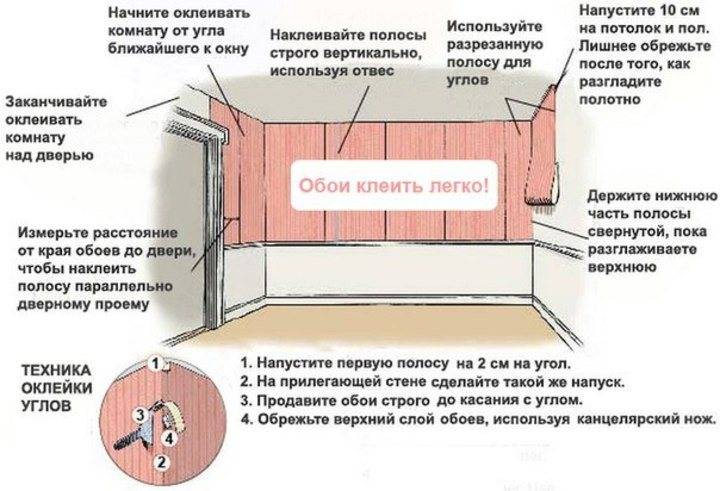
Where to begin. Regardless of the type of wallpaper, gluing always begins with the preparation of the walls: first leveling, then plastering and finally a primer. It should be mentioned that it is not recommended to glue the wallpaper alone, it is better to do it together. Do not forget to also de-energize the room, remove all sockets and switches. The skirting boards should also be removed, but if this is not possible, then when gluing, carefully tuck the edge of the wallpaper behind the skirting board with a spatula, and cut off the excess wallpaper. Doors and windows must be closed and not opened for the entire time of wallpapering and for the next day after the end of work. First, using a long plumb line, a straight vertical line is drawn with chalk on the prepared wall, to which they are guided when gluing the first wallpaper canvas. Next, you need to correctly measure and cut the required amount of wallpaper.
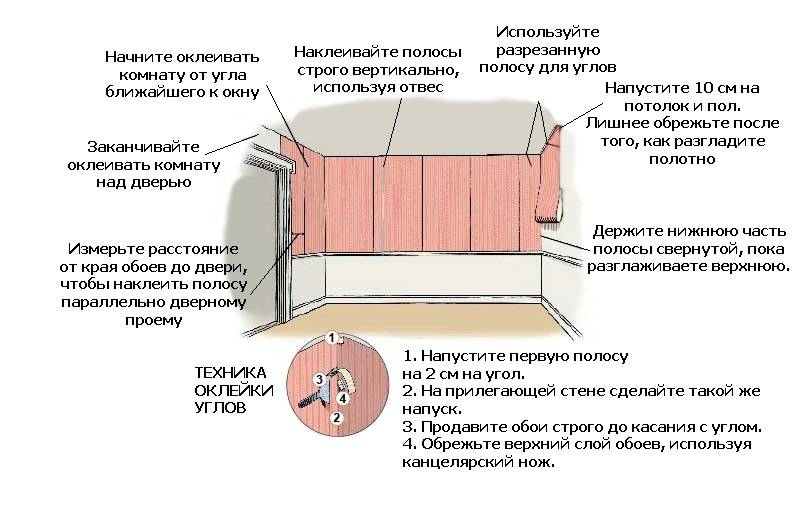
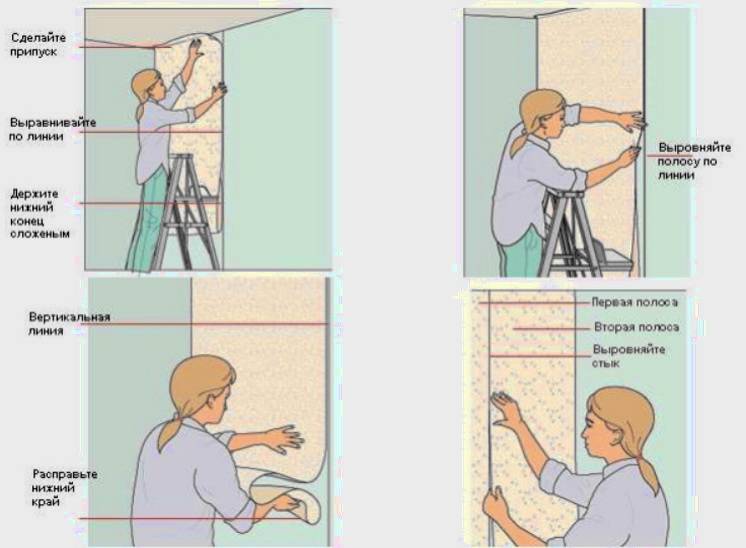
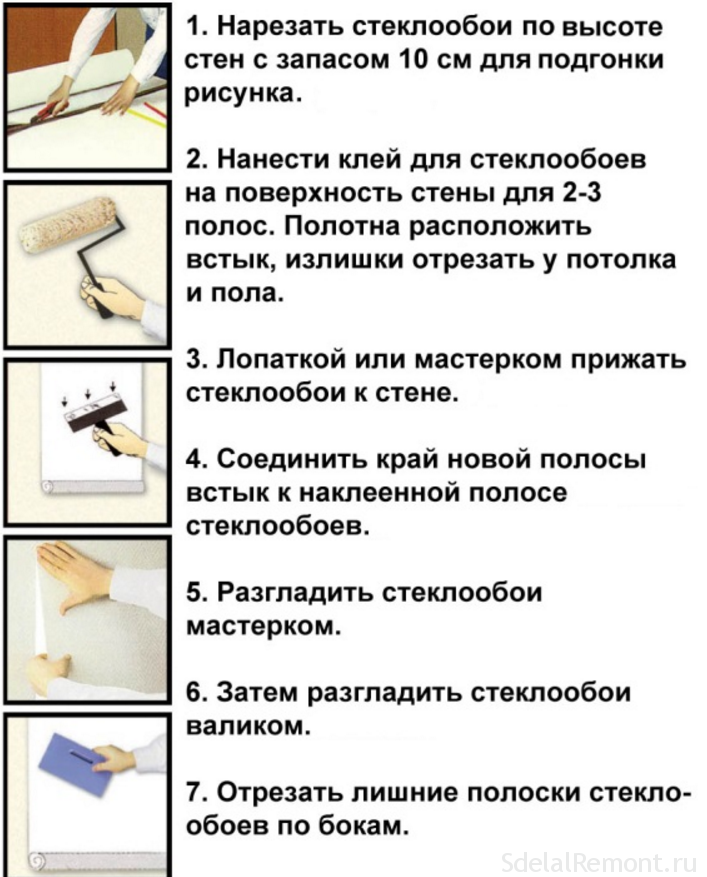
Important: do not forget to add 10 cm at the top and bottom to the wallpaper strips for overlap. Cut off excess after smoothing out the entire canvas
Any excess wallpaper should be cut off with a very sharp clerical knife.
Wallpaper glue is prepared according to the instructions
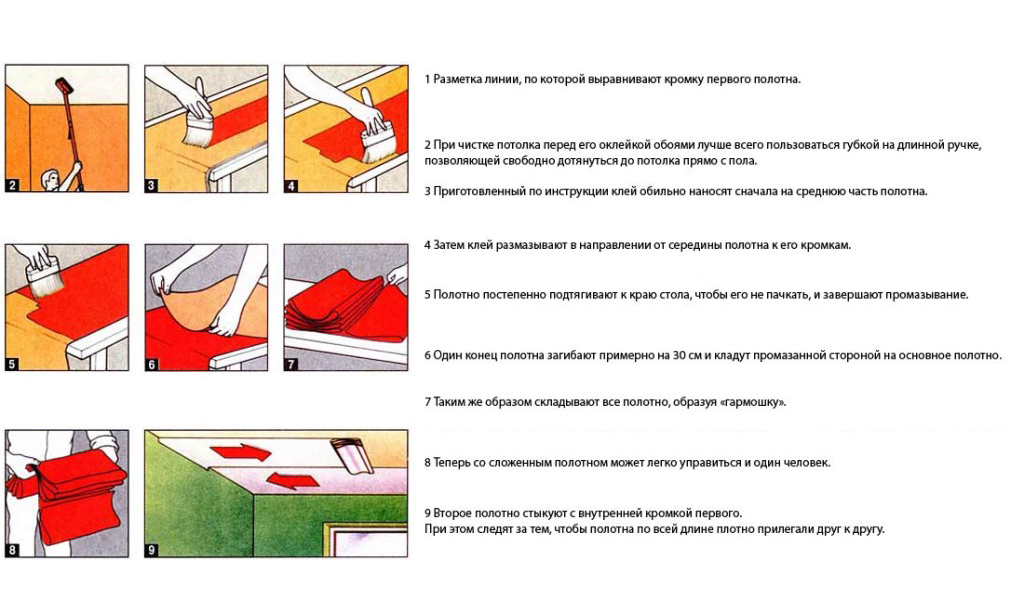
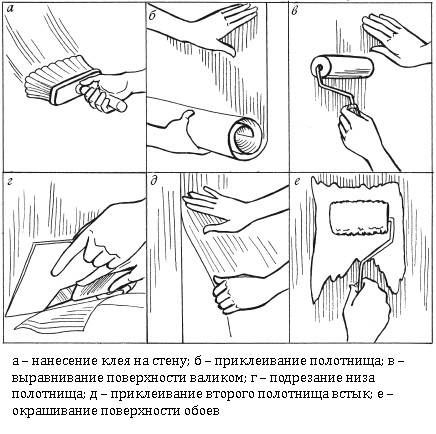
Then, very carefully, using a roller or brush, the glue is applied to the wallpaper from the wrong side or to the wall. It is better to take modern high-quality glue that does not leave marks.
Note for non-woven and glass wallpaper: in this case, the adhesive should only be applied to the wall. By the way, when glue is applied to the wall, the accuracy of the fit of the wallpaper canvases to each other increases.
Note for liquid wallpaper: in this case, the composition of the liquid wallpaper itself already contains an adhesive composition and the use of additional glue is not necessary. Just let the whole mixture stand in water and apply it to the walls, like plaster, with a spatula or other suitable tools, 1-10 mm thick. Liquid wallpaper fills fine gaps well. The drying process of such wallpaper is from 12 to 72 hours.
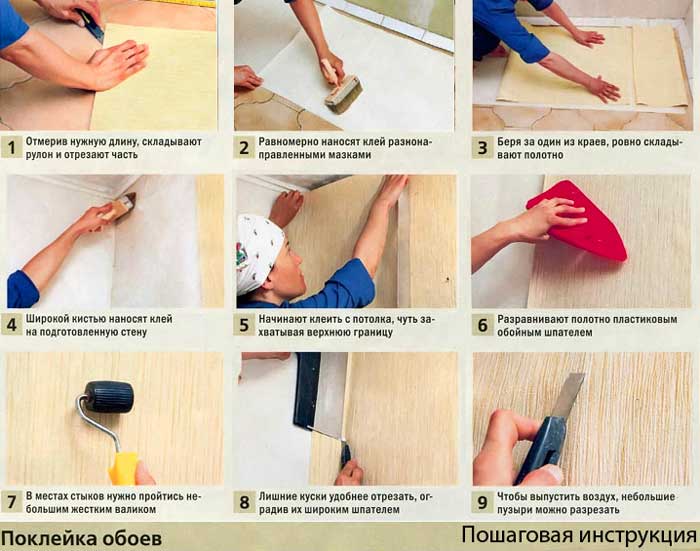
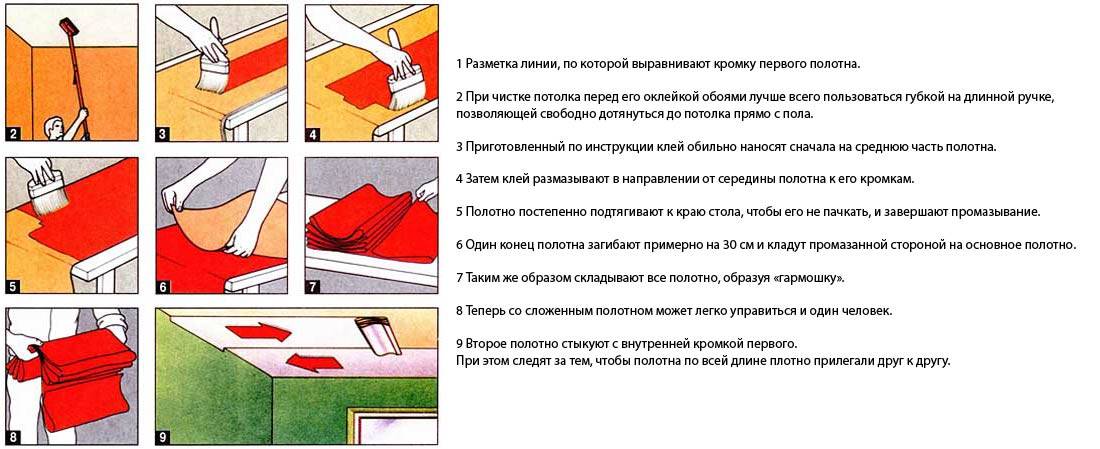
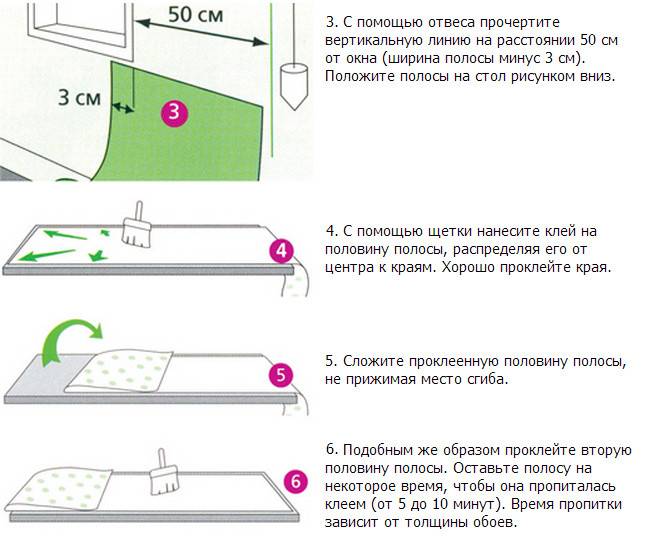
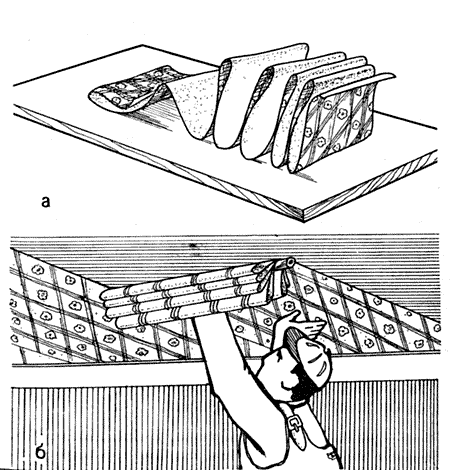
If you apply glue to the wallpaper, then this should be done from the middle of the canvas. Thoroughly coat the entire area. Then fold the wallpaper with the glue surface inward for 1-2 minutes to improve its impregnation. While gluing to the wall, hold the bottom with the rolled adhesive side inward while gluing the top, then open and press the bottom. If you are dealing with ordinary paper wallpaper, then do not let it sag from the glue, do not grease it too thickly, and do not saturate it for too long.Now you can proceed directly to pasting wallpaper on the wall.
Important: make sure that the surface on which the wallpaper lies, where you grease it with glue, is clean. Wipe the glue off each time (table, clean floor)
Where to start gluing wallpaper on the walls?
In this case, there are also several possible ways. The choice of one or another of them depends on the specific situation, while the type of wallpaper used must be taken into account. Almost all modern wallpaper needs to be glued end-to-end using one of the following methods:
- from the corner;
- from the door;
- from the window;
- from the center of the wall.
There are several options for pasting walls with wallpaper: from the middle of the wall, window, door, corner
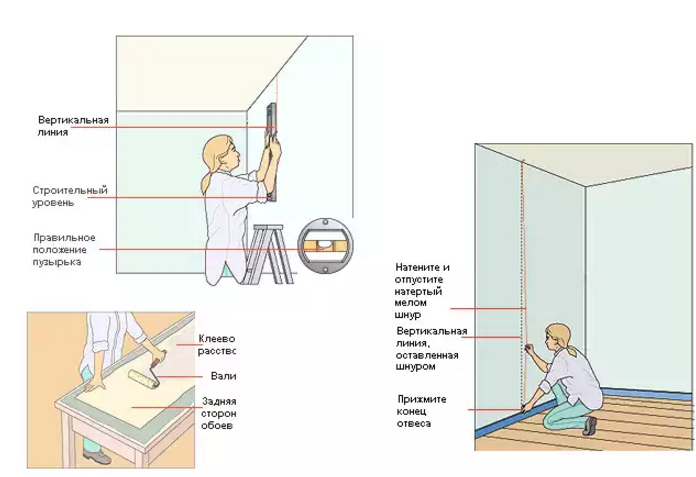
First you need to make marks perpendicular to the floor surface using a plumb line or level. You can also glue the wallpaper diagonally - in this case, a thread is pulled from the bottom corner to the diagonally opposite corner, a line is drawn along it. Wallpaper strips are glued obliquely, moving along the drawn line. For beginners, it is better not to use this method - it is designed more for experienced craftsmen.
DIY wallpaper on the wall
When using wallpaper with a pattern, difficulties may appear in any version of perpendicular gluing. The most inconspicuous place is selected (for example, above the door) and gluing begins from there, if there are difficulties when joining the patterns.
It is quite simple to glue wallpaper from the window. The height of the room is measured, another 10 cm of stock is added to the resulting figure (for allowances), then the canvases are cut to match the pattern. The first strip is glued in accordance with the perpendicular reference, and the rest - sequentially (in most cases - counterclockwise).
The technique of decorating with wallpaper from the window involves pasting counterclockwise
A few more important points
It is better to glue the wallpaper of a combined type from the middle of the wall, the same applies to the wall panel, when creating which you need to maintain a clear symmetry of the picture.
It is recommended to glue combined wallpapers from the middle of the wall.
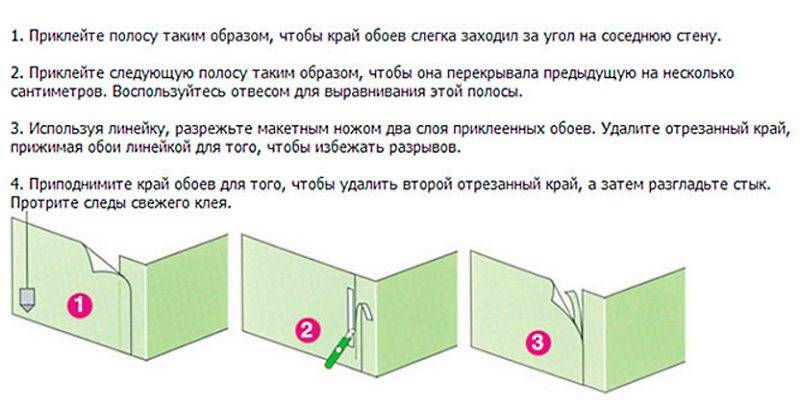
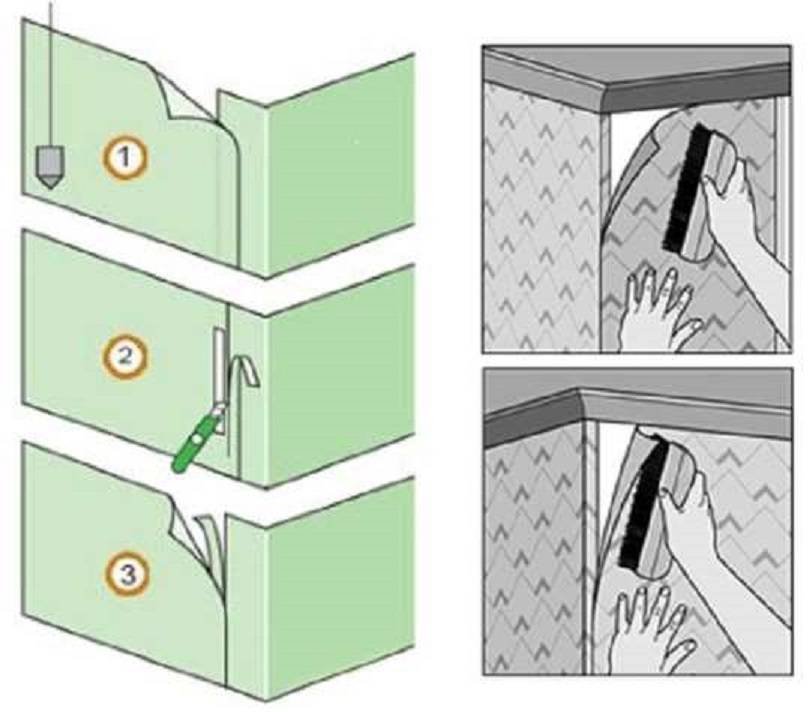
When gluing wallpaper from the corner, there are a few more important points to consider. So, the corners are almost never perfectly even. To check for evenness, use a building level or a plumb line. You can draw a straight line in the corner along the perpendicular, and then start pasting from it.
In addition, it is not worth glueing a solid strip in the corner, because when the glue dries, folds or distortions may appear on the material, due to which the pattern will mismatch in the future. To correctly shape the corner, follow the guidelines below.
- Choose the most inconspicuous corner and start gluing from it.
- Thoroughly coat the corners, since it is in them that the wallpaper peels off most often.
- Also treat the corners with a fungicide, because mold "likes" to develop in them.
It should be noted that there is no single algorithm for decorating walls with wallpaper in different rooms.
Wallpaper gluing technology
First of all, the wallpaper is cut into pieces with a length equal to the height of the wall, as follows. First, measure and cut the first piece. Then a sheet of wallpaper is applied to it, the drawing is docked (picked up) and the second piece is cut off (Fig. 84, a). If the drawing is not precisely aligned, the wallpaper will look like in Figure 84, b. The third piece is measured according to the second, etc.
Rice. 84. Alignment of the wallpaper pattern: a - correct; b - wrong
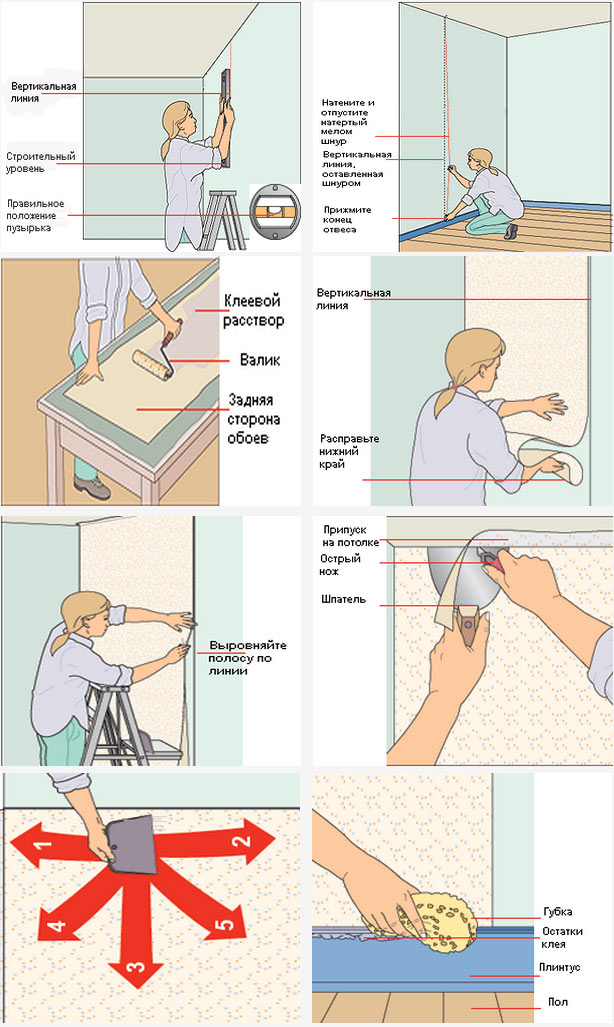
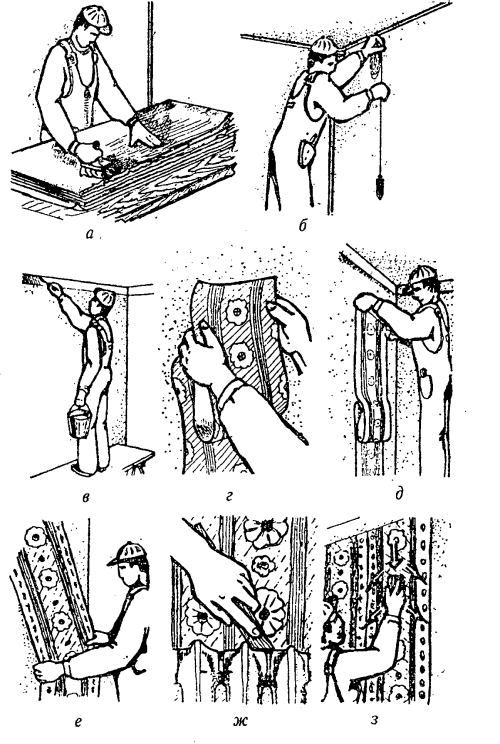
Further, from one corner of the room, measure the width of the wallpaper (for example, 530 mm). At this distance, a vertical line is marked with a plumb line, along which the first wallpaper will be glued. To do this, rub the plumb line with chalk, pull it tight (pressing it with your hands against the wall near the ceiling and floor), pull it slightly away from the wall and release it. Striking a wall, he leaves his mark on it.
The vertical line can also be marked using the level ruler.It has a glass cone filled with liquid. With the help of an air bubble in the liquid, you can position the level ruler strictly vertically or horizontally.
Webs of wallpaper are stacked face down on the floor and coated with glue.
Especially carefully you should smear the edges of the wallpaper.
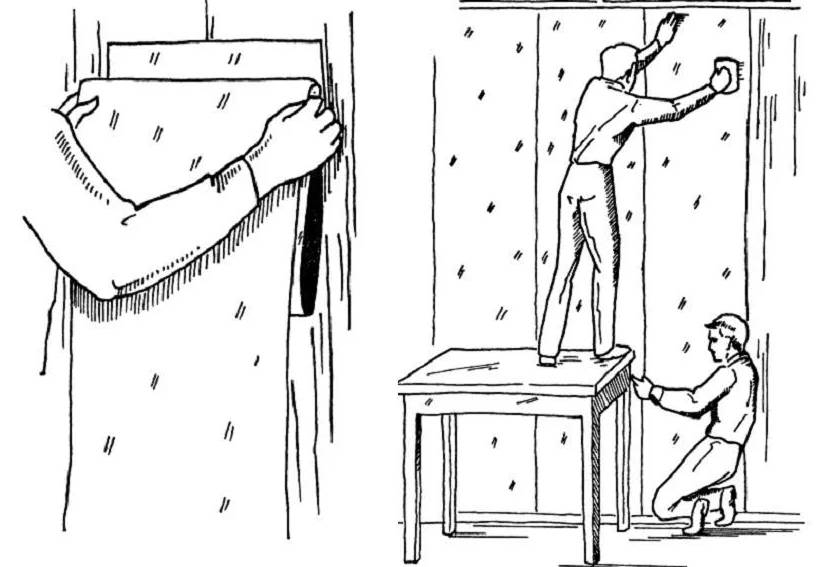
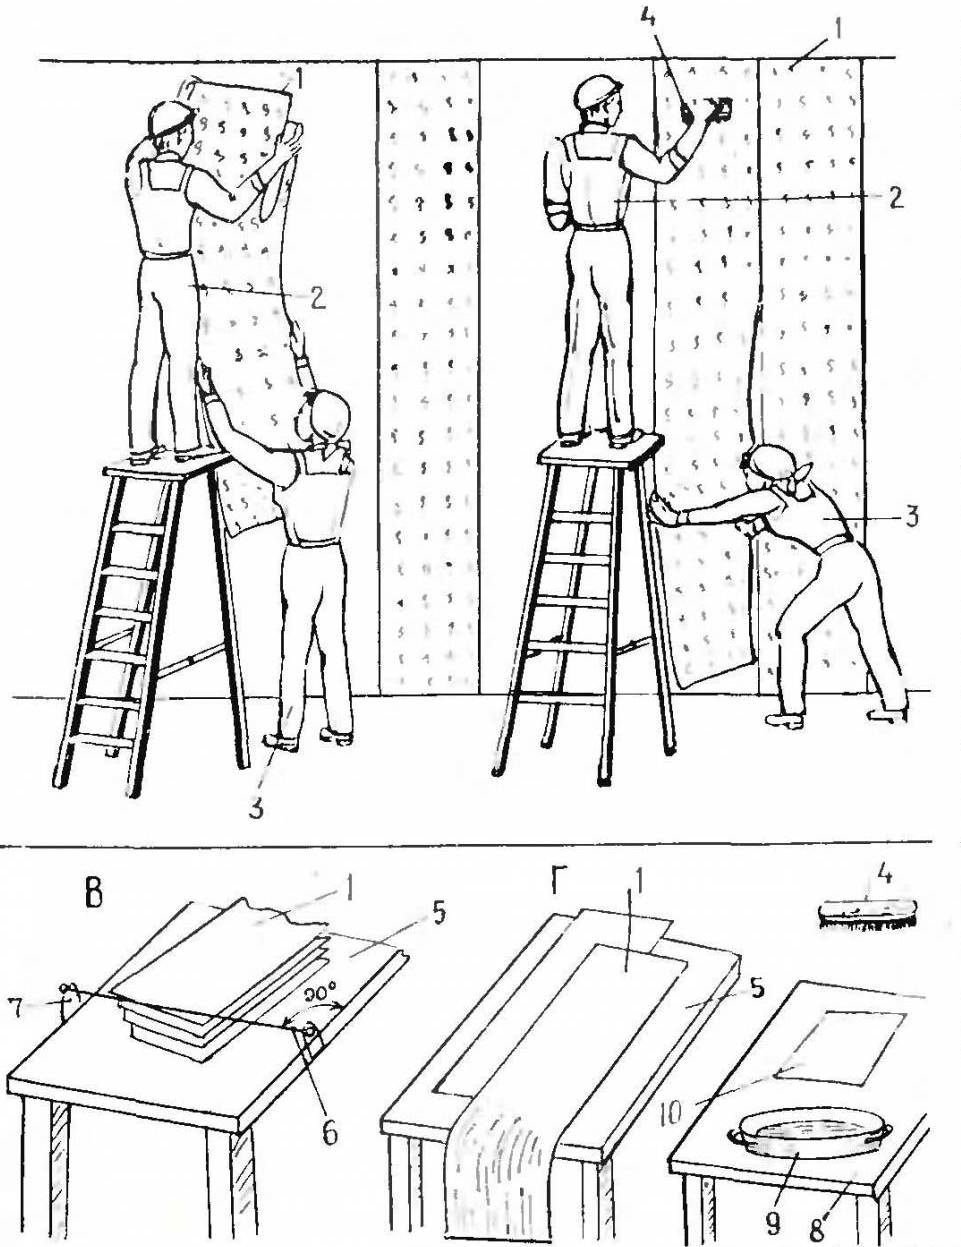
It is best to paste over the walls with wallpaper together: one is on a table, ladder or chair, and the other is on the floor (Fig. 85).
Rice. 85. Pasting walls with wallpaper
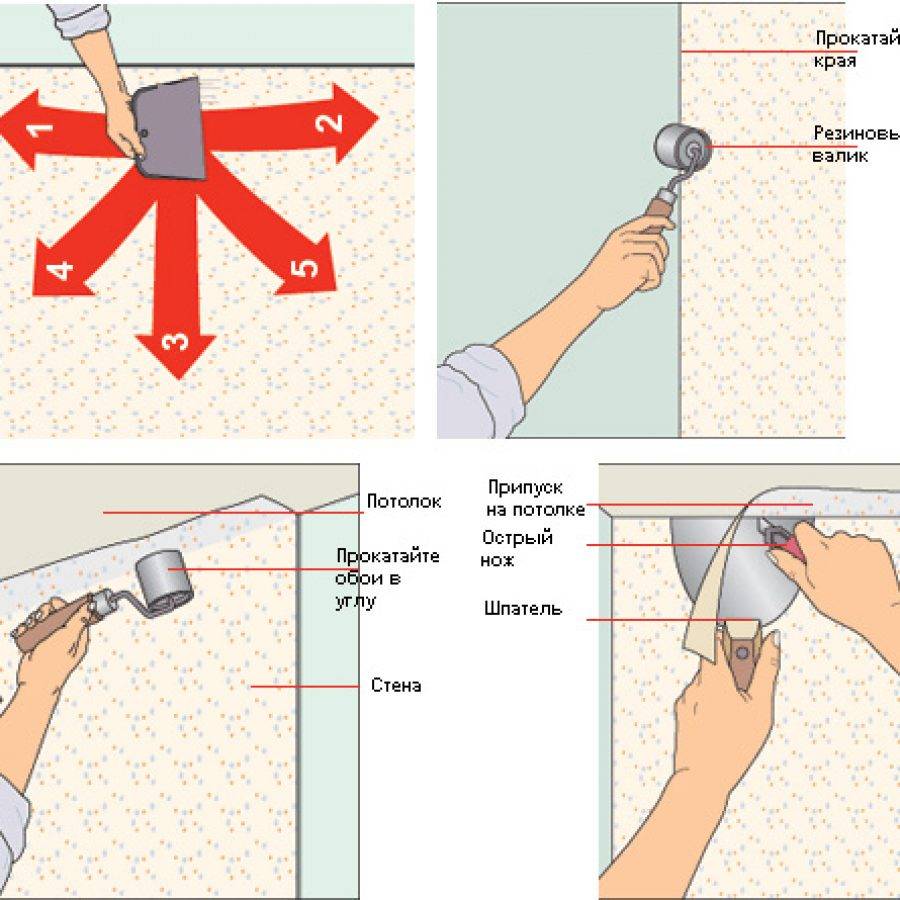
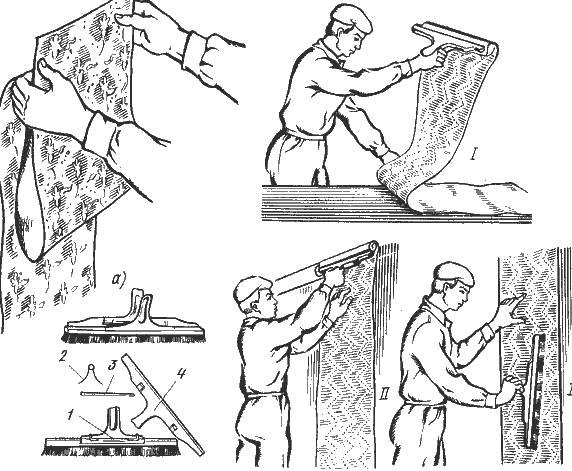
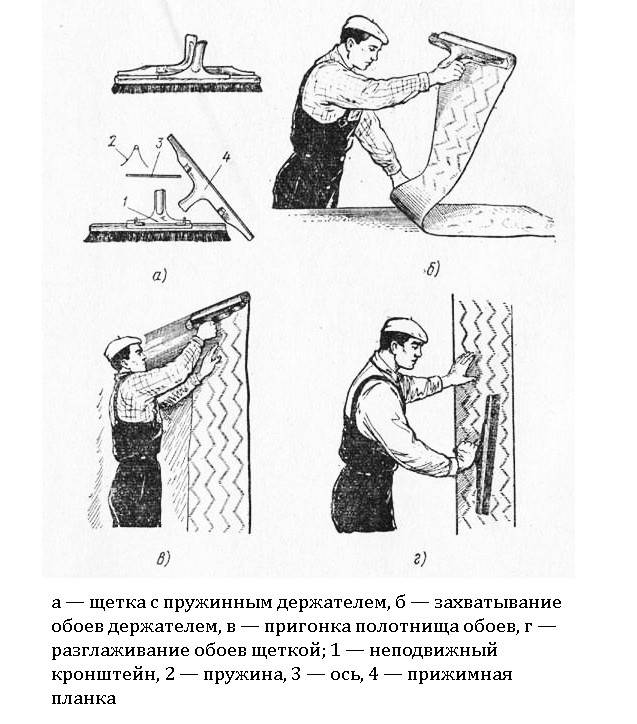
The fabric coated with glue is aligned in a vertical line, pressed against the wall and smoothed with a dry cloth, roller and spatulas from top to bottom, from the middle to the edge. At the same time, make sure that there are no folds, wrinkles, bubbles and poorly glued edges on the canvas. Behind the first canvas, the second is glued, etc.
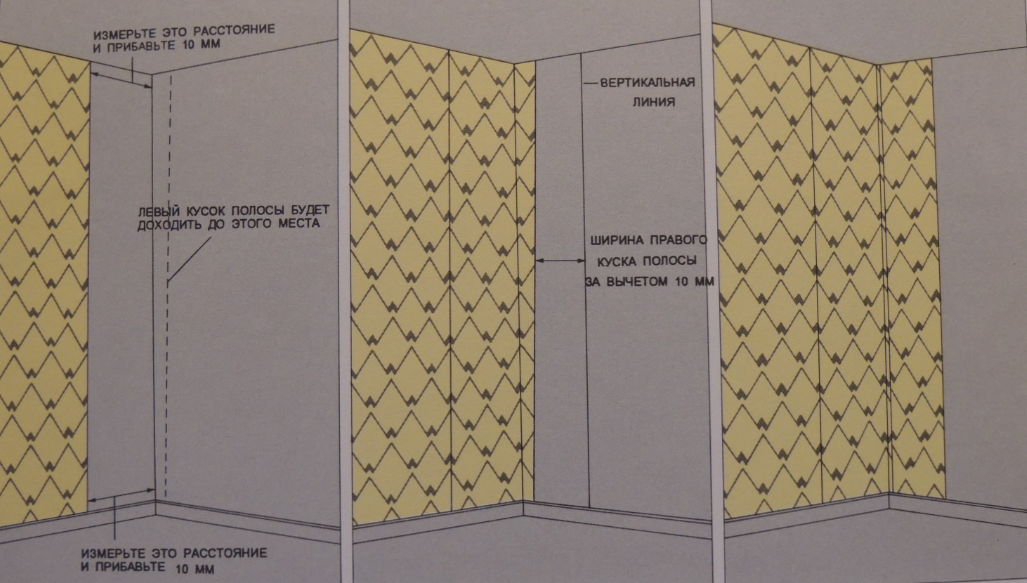
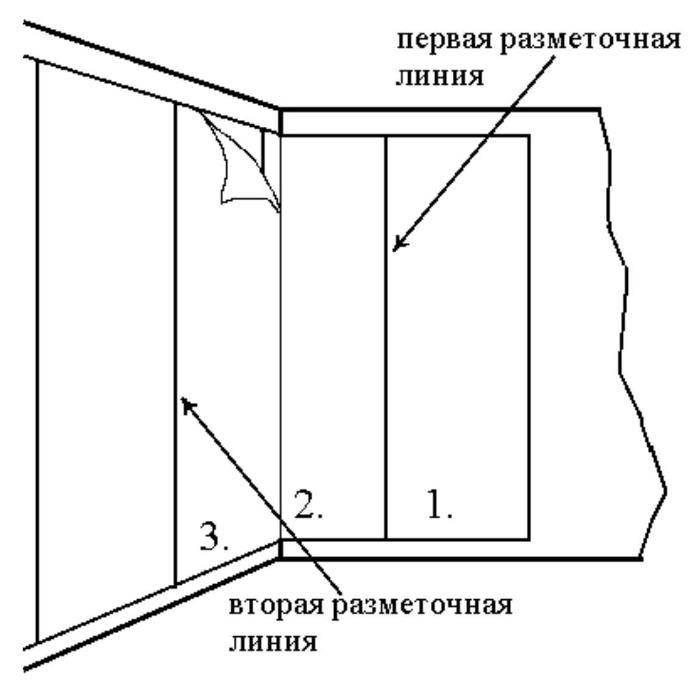
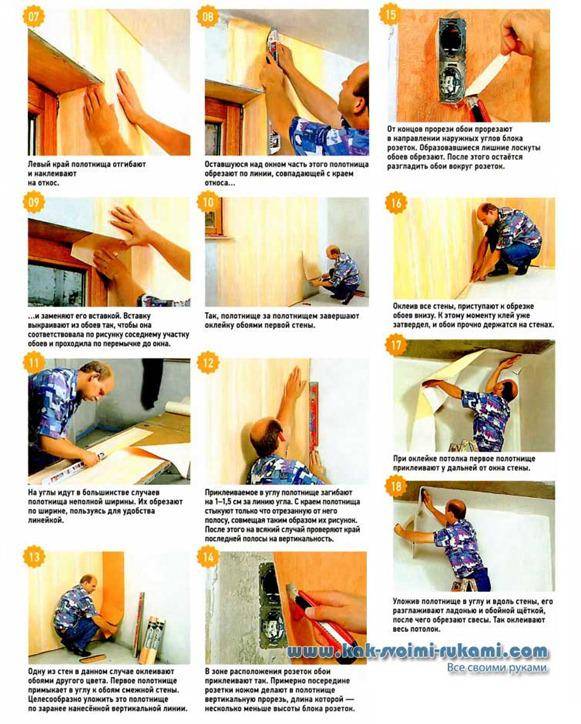
You should not glue the whole canvas into the corner, since the corner is rarely strictly vertical. Therefore, the last sheet for the corner of the wall should be of such a width that it covers the rest of the non-glued wall and overlaps the corner only by 15 ... 30 mm.
The first canvas on the second wall is also glued along the marked vertical line and in such a way that it is close to the corner.
It is advisable to remove switches and sockets, and after pasting, put them in place. Pasting is carried out with the apartment power off.
When pasting walls with wallpaper with a border or frieze, mark a horizontal line parallel to the ceiling.
Safe work rules
-
When working with adhesives, it is necessary to follow the instructions on the packaging, avoid getting the glue in the eyes.
-
It is forbidden to work on a ladder. When pasting walls with wallpaper, you need to use a stepladder, chair, table.
-
Pasting walls with sockets and switches should be done when the apartment power supply is turned off.
- After finishing wallpapering the room, wash your hands thoroughly with soap and water.
Practical work number 25
Study of types of wallpaper and technology for pasting them into premises
-
Consider different wallpaper samples and determine what type they are (paper-based, non-woven, self-adhesive, etc.). Choose from samples of wallpaper for the living room or children's room.
-
Look at some examples of wallpaper adhesives. Choose the appropriate wallpaper glue.
-
Practice using a plumb line to mark a vertical line on the wall.
- Paste wallpaper samples (on a laboratory bench).
Develop a sketch of the wall decoration with decorative elements. What room will it be designed for?
New words and concepts
Wallpaper on a paper basis, non-woven wallpaper, textile, self-adhesive wallpaper, glass wallpaper; panel, border, frieze, tapestry.
We test our knowledge
-
What types of wallpaper do you know?
- What is the difference between finishing a room in one color scheme and finishing in two colors?
-
What is a panel?
-
What is the difference between a border from a frieze, from a tapestry?
-
How to prepare walls for wallpapering?
- Name the sequence of wallpapering the walls.
Features of pasting wallpaper of different types
If you are not confident in your own abilities, it is better to consult a specialist.
Due to the wide variety of types of this finishing material, there are some subtleties of finishing.
Paper wallpaper
The work in this case is carried out according to the general principles:
- After coating with glue, the fabric is folded inside out and left for 5 minutes to soak.
- At this time, the adhesive is applied to the wall.
- If the paper is thin, then only the wallpaper is coated.
The glue will completely dry in 1-3 days.
Vinyl
We need a special high-quality glue.
It is bred and applied to the canvas strictly according to the instructions.
Stick vinyl sheets only on dried walls
At the same time, it is important to carefully close all windows and doors in order to prevent drafts.
The strips are glued only end-to-end so that the seams are not noticeable.
The joints are gently ironed with a soft spatula so as not to damage the decorative layer .. Such wallpaper dries out after 2 days
Such wallpaper dries up after 2 days.
Non-woven wallpaper
They are quite thick and are capable of masking some irregularities on the wall. But it is better to apply them only on perfectly flat surfaces.
- Work begins from the corner.
- Only the wall is coated with special high-quality glue, and the wallpaper is left dry.
- Non-woven sheets do not stretch or deform, so they are very convenient to work with.
Separately, it is worth noting the nuances with large width wallpaper. Such canvases are very convenient in that they reduce the working time. At the same time, it is better to stick them on perfectly flat walls using a building level or a plumb line. With large strip widths, even a small error during gluing results in a large skew. Therefore, it is better to do the work together.
Frequent mistakes when gluing wallpaper incorrectly
It will take a long time to dry, and it depends on the type of coating. Paper wallpapers dry for about 12-15 hours, depending on the thickness. Non-woven ones are left for at least a day, and vinyl ones for two. However, the manufacturer determines these time frames for normal conditions, if the room humidity is up to 60%, and the temperature is + 24..25 degrees Celsius. If the room is too damp, you will have to wait a little longer. The main thing is not to rush, and to withstand enough time until the glue dries completely under the wallpaper layer.
Those who open windows and doors immediately after wallpapering the walls, turn on the heaters or air conditioner, often watch the stripes fall off the next day. And it's not about glue and wallpaper. Too much haste and lack of skills are to blame. But all you need to do is touch the surface with the back of your hand to determine if it is pulling from the wall with dampness. But problems can also be associated with unjustified savings. There is a special adhesive for each type of wallpaper.
Replacing, even if it is cheaper, will cause the canvas to not hold tightly. Some use the old-fashioned method and stick to Bustilat. Here the problem is reversed. When the time comes to do the next renovation, it will be extremely difficult to tear off the wallpaper. Therefore, read the recommendations and use products from trusted manufacturers.
Other common mistakes are:
- Incorrect wall preparation. Some people forget to apply a primer. The fact that the wall looks clean does not mean that the spores of vermin will not get under the wallpaper. Poor quality putty will work even worse. It will fall off along with the wallpaper strips, and the situation can be corrected only by re-pasting the room.
- Rejection of primary markup. If you do not take a plumb line, and do not draw a vertical line for the first strip, the skew will become more noticeable with each row. It is in vain to think that if you start from the corner, but this is not necessary. The result is a skewed pattern, gaps between the stripes. An ordinary thread with a sinker at the end and a pencil or marker will solve the problem.
- Incorrect fit and processing of joints. The canvas dries faster from the edges. If, after leveling, it becomes noticeable that there is not enough glue, move the strip back and apply an additional portion of the compound with a brush, and then press and smooth the joint with a roller, and remove the excess adhesive with a dry, clean cloth. Wallpaper intended for overlapping pasting must not be joined in the usual way. If the manufacturer requires adhesion of the canvases, then shrinkage is planned after drying. The result is the gap between the stripes.
- Improper planning. To speed up the process, some try to act in the following way. They prepare a large amount of glue, and immediately harvest the entire volume of strips, which are immediately covered with a product. The result is a complete soaking of the paper base, deformation, but the glue itself stops working. Pour everything so that the sticky mass lasts for 10-15 minutes. And coat no more than two canvases, and each must be folded.
Now you just have to watch the video again, save the page in your browser bookmarks, and start preparing everything you need. And as needed, you can always get information to do everything right.
Removing paint
Most likely, it will take a lot of time and effort to remove old paint. This can be done using the following methods:
- mechanical;
- chemical;
- thermal.
Removing paint with power tools
Let's consider each of the methods in more detail. So, manual (mechanical) removal is considered the cheapest. For work, use a chisel with a hammer or an ax. You can make notches on the walls with an ax, and then sprinkle with water. After it is absorbed, all that remains is to knock down the paint at any convenient angle. As for mechanical removal with the help of special tools, it involves the use of a grinder or an electric drill with a special attachment. The work will be much easier than in the first method, but there will be more dust.
The mechanical method of removing paint is the most budgetary
With the chemical method, there will also be no difficulties. The disadvantages include perhaps the additional costs of purchasing funds. The bottom line is this: wearing protective clothing, you need to apply the product to the walls, wait three to six hours, and then, when the paint has softened, remove it with a metal brush. The end of the wall needs to be washed several times.
Paint remover
And the last method - thermal - involves processing the paint with hot air. The occupation is troublesome, since, first of all, you will need a gas lamp or a building hair dryer, and when burning, the paint releases substances harmful to the body. Finally, paint does not always fade after this treatment.
Removing paint with a construction hairdryer
Wallpaper gluing process: step by step instructions
Step one: first you need to prepare the walls. If they have fresh plaster on them, then the surface should dry out.
It is necessary to press a piece of film against the wall, and if drops appear on it in a few hours, then it is necessary to wait with gluing
Step two: apply a primer to dry floors. It can be either a special composition or wallpaper glue.
The primer allows you to hide cracks and scratches on the surface
Step three: dilute the glue in the container according to the instructions on the package.
Stir the glue for at least ten minutes, otherwise lumps will form
Step four: now, with the help of a building level and a pencil, you need to put marks on the wall where the first canvas will be located.
The marks will allow you to quickly navigate the gluing process
Step five: the room should be de-energized.
It is necessary to unscrew all sockets and switches so that you can make openings for them
Step six: now you need to cut the rolls into strips of the desired length.
It is recommended to leave an allowance of 8 centimeters
Step seven: it is necessary to apply the adhesive composition on the prepared canvas in any way.
Each area must be thoroughly impregnated.
Step eight: then the glue is applied to the wall (if you use rolls 100 centimeters wide, skip this step), and then the canvas is applied to it.
It is necessary to glue the canvases to the wall end-to-end to the previous
Step nine: after gluing, you need to cut off the remaining pieces.
This can be done with a clerical knife.
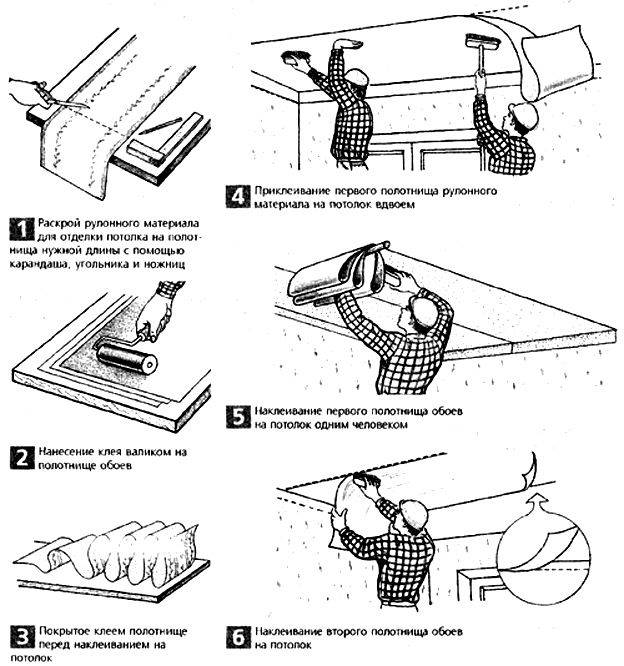
The subtleties of gluing wallpaper on the ceiling
It is necessary to glue the wallpaper on the ceiling before you move on to the floors. In this case, it is recommended to opt for light vinyl options, because heavy material can fall off.
Otherwise, the process is the same. Only fit the stripes end-to-end, it will be more difficult to smooth out irregularities, therefore it is better to involve an assistant in the work. In addition, when pasting the ceiling, it is better to remove the furniture from the room, otherwise the surface will get dirty with drops of glue.
Pasting wallpaper on the ceiling
Rules for gluing canvases in the corners
It doesn't matter from what angle you start gluing the wallpaper, the main thing is that the corners are even. If there are defects, it is better to pre-align them using the methods discussed above.
In this case, the strip is cut through at the joints. This means that if there is less space left to the corner than the width of the canvas, then it is necessary to measure this distance and make a cut with an allowance of 3.5 centimeters. Then another strip is glued with an overlap. Then both strips are notched at the joint. In this way, you can get an even joint.
The easiest way to paste over is even, geometric corners.
Pasting technology
To know how to properly glue the wallpaper, you should first study the technology of the process. The following sequence must be observed here:
- First, you need to measure the surface to be pasted over and calculate how many rolls of wallpaper you will need to buy.
- Roll materials and glue are purchased.
- Determine where to start gluing the wallpaper in the room, and mark the vertical line for gluing the first sheet using a plumb line or laser level.
- Trellis are cut to size.
- An adhesive composition is prepared.
- Individual sheets are glued.
Determination of the required number of rolls of wallpaper.
Materials and tools
Before you can glue the wallpaper yourself, you will need to purchase the necessary materials and tools.
The following materials will be required:
- roll materials suitable in terms of their qualities for the room in which it is planned to carry out repairs;
- glue suitable for the selected type of wallpaper.
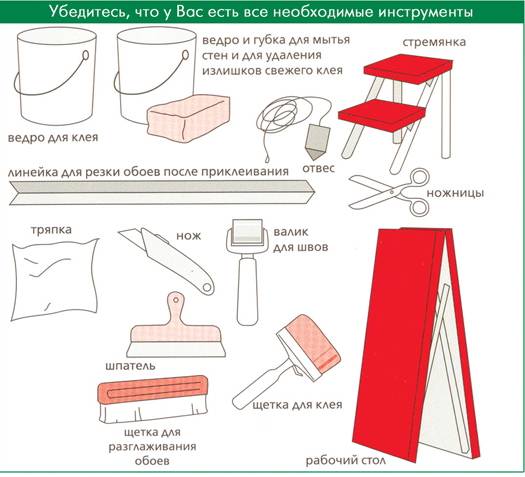
The following tools are required:
- goats or stepladder;
- capacity for diluting the adhesive;
- water tank;
- cuvette;
- roller and brush;
- wide spatula;
- stationery knife;
- a special spatula for smoothing wallpaper;
- roulette;
- plumb line or laser level;
- pencil;
- scissors;
- rubber rollers of different sizes for smoothing the trellis on the wall surface;
- napkins.
Where to start gluing
There is no categorically correct order of pasting - it is selected based on the characteristics of the room and the type of wallpaper.
When gluing end-to-end, it does not matter where to start the movement, but, traditionally, experienced finishers begin to glue from the window. This option allows you to avoid the appearance of shadows at the joints of the sheets if the overlapping method is used, but it is also perfect for the butt seam technique.
When working with photowall-paper, the canvas is marked in such a way that the overall picture is in the center of the surface. In accordance with this requirement, the place of the first sheet and the order of pasting are determined.
Room gluing scheme
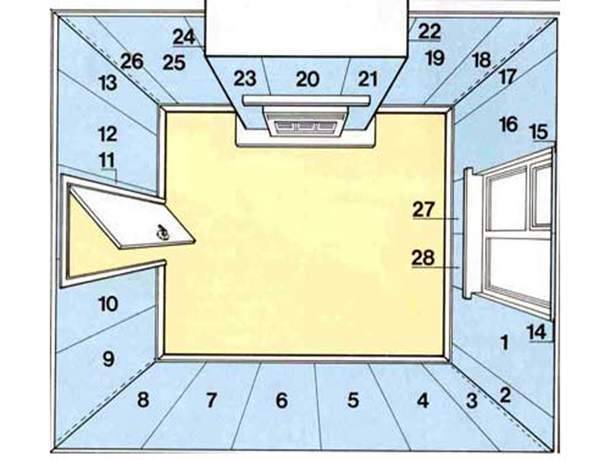
When you start placing the trellises from the window, the first sheet is glued from the edge of the window and moved to the right or left side. In parallel, they begin to move from the other side of the window and lead in both directions until the intersection of the trellises in the center of the opposite wall.
When pasting from the corner, you will need to measure the vertical line for the first sheet along a plumb line, then the tapestries are glued in order to the opposite wall. Do the same when the movement starts from the doorway.
Step-by-step instructions for pasting
Pasting the walls with wallpaper is not a matter that requires high qualifications - most owners are able to cope with this work on their own, but to avoid trivial mistakes, it is enough to adhere to the following step-by-step instructions, which will be relevant both for the old "Khrushchev" and for modern new buildings:
- Having decided on the place to start work, you need to draw a vertical line using a plumb line or a laser level, which will serve as a guide for sticking the first sheet.
- Using a tape measure, the height from floor to ceiling is measured and the material is cut according to this size. To adjust the trellis to the pattern, it is usually sufficient to make an allowance of 100 mm.
- It is better to combine a complex pattern on a free floor area, and only after that cut the canvas.
- An adhesive solution is prepared in a separate container.
- To apply glue to walls and trellises, use a roller and a brush (you will need a brush for high-quality smearing of corners). In cases where non-woven wallpaper is used, the glue is applied with a roller only on the wall.
- It is recommended to fold the wallpaper impregnated with glue in half on both sides with the adhesive side inward.
The upper part of the trellis is opened and placed in its place on the wall, the material is ironed with a wallpaper roller or a special plastic spatula, after which the lower half of the trellis is opened and glued in the same way.
Excess wallpaper is cut off from above using a wide metal spatula, which serves as a base and limiter, and a clerical knife. From below, the wallpaper can be trimmed with scissors if the skirting boards have been removed, or, as well as from above, if the skirting boards remain.
Smoothing the trellis is done with a plastic spatula or an ordinary napkin, it is advisable to roll the joints between individual sheets with a rubber roller.
According to this scheme, pasting is performed sequentially sheet by sheet.
This scheme is universal, but for some types of roll materials there are features in the pasting technology, and therefore, before starting work, you should carefully study the instructions attached to the wallpaper and wallpaper glue.

