Dismantling of bimetallic and aluminum sectional products
To disconnect the radiator from the system and remove it from the mounting location, proceed as follows:
- Stop water circulation and relieve pressure.
- If the radiator is hot, you need to wait until it cools down and then disconnect from the system. To do this, unscrew the inlet and outlet couplings.
- Move the coupling away from the radiator along the pipe and remove the device from the brackets.
- Drain off remaining water and place the product face up in the disassembly area.
- Pull out and rinse the filter immediately so that dirt does not dry on it.
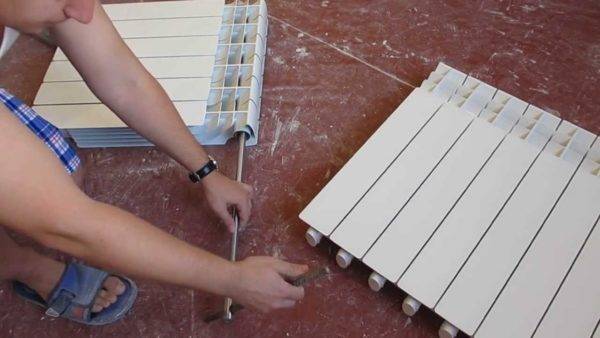
Disassembly bimetallic and aluminum sectional products
In the next step, the radiator is disassembled into separate sections. To avoid damage during operation, you need to figure out which direction you need to turn the nipple-nut. This element is a ring nut with an external thread and grooves inside on both sides. In this case, one nut has both a right-hand and a left-hand thread. If you unscrew it, then the adjacent sections of the battery will move apart evenly, and when twisted, they will contract.
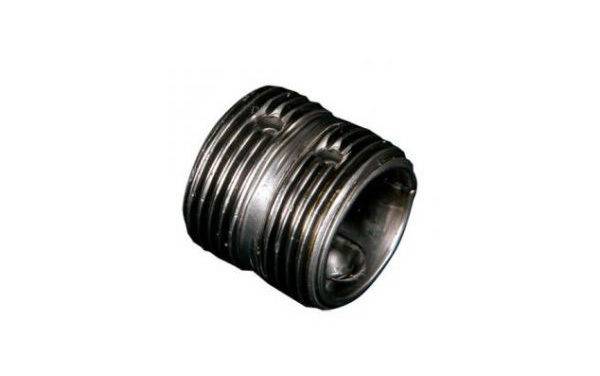
Nipple nut
Manufacturers usually make marks on the face of plugs and butts that indicate the direction of the threads. The “D” mark indicates the right-hand thread, “S” the left-hand thread. To accurately determine the direction of movement, it is recommended to take a loose nipple-nut and try to thread it onto the thread in the radiator. Having decided in which direction it is twisted, it will become clear where to turn the key in order to disconnect the sections.
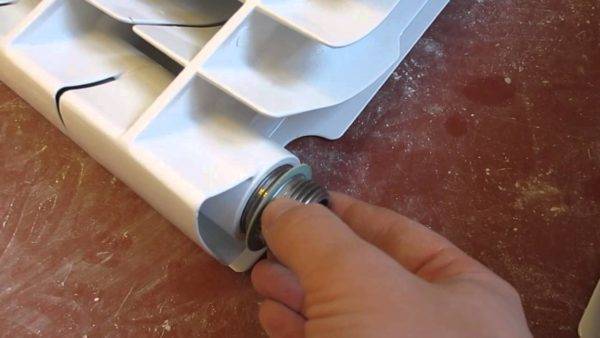
Installing the nipple nut
Having decided on the direction of the thread, insert the nipple wrench into the radiator and slide it to the desired nut. The notches on the tool will help to do this. When it is in the grooves, insert the lever into the hole on the other side of it. Force is required to move the nut. Call an assistant to fix the radiator in one place.

Repair of bimetallic radiators
When the nut has advanced half a turn, go to the other side to unscrew the other, and follow the same procedure. After making sure that both nuts rotate without applying great physical force, gradually unscrew one or the other side, moving 5-7 mm.

Gasket between radiator sections
After disconnecting, take away the metal spacers that were between the sections. If they are in good condition, then they can be installed back during assembly, if in poor condition, then use them as a sample for buying new ones. Silicone gaskets must be replaced.
How to disassemble cast iron batteries with your own hands
Most often, old-style houses and apartments are equipped with MS-140 cast iron batteries. Nipple nuts and gaskets are also used to assemble their sections. It is especially difficult to disassemble an old battery. in the course of its long-term operation, the gaps between the sections boiled with rust. As a rule, in such cases, the key niches are eaten away by the coolant.
It is also important to keep in mind a significant mass of cast iron. For example, the weight of one battery for 12 sections is 90 kg: it will be difficult to cope with such a product alone.

To implement the procedure, the following tools are required:
- Nipple radiator wrench.
- Plumbing fixtures for unscrewing sleeves and plugs.
- Small sledgehammer and chisel.
- Blowtorch (it can be replaced with a building hair dryer).
- Steel brush.
- Wooden blocks for installing the battery on the floor.
In the role of a radiator key, a round metal rod with a diameter of 18-20 mm flattened at one end is used. The dimensions of the flattened part are 28 × 40 mm, with a thickness of 6 mm.A ring is welded to the opposite edge of the rod, through which the lever is threaded. The length of the radiator wrench should be as long as half of the largest 12-section battery, plus 30 cm.
DIY battery installation recommendations
- Before starting work, you need to shut off the flow of coolant in the heating system at the inlet and outlet, or make sure that there is no liquid in the pipeline.
- Before starting the installation, you need to check the completeness of the radiator. It must be assembled. If this is not the case, take the radiator wrench and assemble the battery according to the manufacturer's instructions.
The structure must be absolutely sealed, therefore, during assembly, abrasive materials must not be used, since they destroy the material of the device.
When tightening the fasteners, one should not forget that both left-hand and right-hand threads are used in bimetallic devices.
When connecting sanitary fittings, it is extremely important to select the right material. Typically, flax is used together with a heat-resistant sealant, FUM tape (fluoroplastic sealing material) or Tangit threads.
Before starting installation work, you need to carefully plan the connection diagram
Batteries can be connected diagonally, sideways or bottom. It is rational to install a bypass in a one-pipe system, that is, a pipe that will allow the system to function normally when the batteries are connected in series.
After the installation is completed, the system is turned on. This must be done by smoothly opening all the valves that previously blocked the path of the coolant. Opening the taps too abruptly leads to clogging of the inner pipe section or hydrodynamic shocks.
After opening the valves, it is necessary to release excess air through an air vent (for example, a Mayevsky valve).
Note! Do not cover batteries with screens or place them in wall niches. This will drastically reduce the heat dissipation of the equipment.
Correctly installed bimetallic heating radiators - the guarantee of their long and trouble-free operation. If you have doubts about the ability to install them yourself, it is better to contact a specialist.
Connecting sections
First you need to determine the number of sections. The generally accepted rule: one section heats 2 square meters. m. floor with a wall height of 2.7 m. Similarly, it can be calculated at a different height of the room. In addition, the properties of the radiator can be checked with the seller. The calculation is rounded up. It is worth considering the insulation of the room.
The sections are connected with nipples in the upper and lower parts using special nipple keys. These tools have a flat end on one side and a hole on the other that a crowbar or iron bar can be inserted into for easier work.

Cast iron nipple
Nipple - a piece of pipe with a recess for a sealing rubber ring and a thread applied on both sides.
Docking windows must have multidirectional threads so that when the nipple is screwed in, it connects the sections. The process must take place simultaneously from two sides, so two people are needed. On the side of the section with a left-hand thread, the key must be turned to the right, and with a right-hand thread - to the left.
For tightness, you can use sanitary flax, but it is better to purchase special paronite gaskets. They are more durable and can withstand high temperatures. Additionally, sealant can be applied to the nipple threads.

Paronite gaskets for cast iron radiator
If antifreeze will be used in the heating system, it is impossible to apply drying oil on the linen roll. It is quickly corroded by antifreeze. As a result, the tightness will be broken and the sections will have to be unwound and reassembled.It is better to treat the threads with a chemical-resistant sealant and install paronite gaskets.

Cast iron radiator connection
Installation procedure
Work on the installation of bimetallic batteries must be carried out in a specific sequence:
- mark the places for installing the brackets on the wall;
- we fix the brackets with dowels and cement mortar (if we are talking about a reinforced concrete or brick wall) or double-sided fastening (if it is a plasterboard partition);
- we put the battery strictly horizontally on the brackets already installed;
- we connect the radiator to the pipes, install a faucet or thermostatic valve;
- we put the air valve at the top of the radiator.
Note! An air valve (preferably an automatic device) is mandatory for installation, since a small formation of gases occurs inside the device
Calculation of the required number of sections
Determination of the required power of heating devices is carried out in accordance with the recommendations of SP 60.13330.2010 (old SNiP 41-01-2003). The calculation involves:
- room characteristics - area, ceiling height;
- the location of the room relative to the total building volume of the house and cardinal points;
- outdoor and indoor air parameters;
- the degree of thermal insulation of walls, attic;
- type and number of installed windows;
- glazing area;
- features of heating systems - tie-in diagram, degree of openness;
- power of one section depending on the type of radiator.
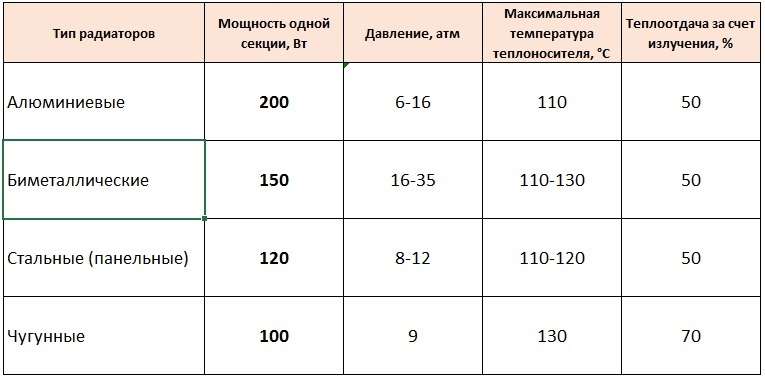
This is a rather complicated technique with the use of many coefficients, which in practice is replaced by simpler methods.
One of them is to determine the required heat transfer based on an approximate rate of 100 W per square meter of area.

Example:
- For heating a room of 30 sq.m. you need to spend 30x100 = 3000 watts.
- If it is planned to install a bimetallic radiator with an inter-axle size of 350 mm, the heat transfer of 1 section is determined according to the technical passport or table - 136 W.
- To find the number of sections, the required power is divided by the unit 3000/136 = 22.

According to this calculation, 22 sections will be required to heat a room with bimetallic radiators. A more accurate result can be obtained using an online calculator. In the fields you need to enter your data, select the radiator model. The answer will be calculated in a few seconds.
In this example, the online program gave 3 different answers at different outdoor temperatures:
- if on average it is -10 ° outside in winter, 16 sections are required;
- at -20 ° - 25;
- at -30 ° - 34.
The conclusion suggests itself - the calculation must be carried out as carefully as possible, since the difference in the results is significant. If the excess of radiators is compensated by thermostats, then if there is a shortage, it will be necessary to use the boiler at maximum power. Perhaps the room will be cold even at a high temperature of the coolant.
How to disassemble a cast-iron heating battery in sections
Before disassembling a cast-iron heating radiator, you need to prepare a set of tools:
- A wrench for disassembling cast iron batteries (5/4 inches for old devices and an inch for new ones);
- Adjustable wrench for the second or third number;
- Chalk;
- Inch pipe 50-100 cm long.
You also need to find a convenient platform where you can disassemble the radiator. A sturdy wooden board placed on a level surface is a good option. The battery is laid horizontally on this shield, and you can start disassembling.

The technology for disassembling the radiator is as follows:
First of all, you need to understand in which direction the blind plugs are unscrewed, after which they need to be unscrewed. Before disassembling the radiator, it is necessary to mark on the key the length to the unscrewed nipple.To do this, the key is placed on the battery and the edge is brought up to the point where the sleeve is.
A mark is made on the key with the help of chalk in a circle, up to which the key is inserted into the battery.
Next, you need to figure out in which direction the key for cast iron batteries should rotate - they can have both left and right threads. Accordingly, when rotating in different directions, the battery sections will diverge or converge. The direction of rotation is determined by means of a socket, which is screwed on the same side where the key will subsequently be inserted.
With a right-hand thread, the foot is screwed in clockwise, so the direction of rotation of the key during unwinding will be the opposite.
With a left-hand thread, the situation changes exactly the opposite.
The direct promotion of the radiator begins from the first section. The first step is to rip off the thread alternately on both nipples (as a rule, only half a turn of the key is enough)
Then the battery is gradually unwound on each side so that the distance between the sections is about 0.5 cm.
When untwisting, it is very important to observe the specified gap between the sections - if you unscrew the battery on one side more strongly, that is, there is a considerable chance that the thread will jam. In the process of untwisting, it is worth putting on the pipe on the key in order to reduce the required efforts.
Any modern radiator can be disassembled using this technology. Often, such heaters have plugs with a marked thread direction.
Dismantling the old radiator
In the case of old batteries, some problems may arise - for example, the threads in such devices can stick together, so it will need to be warmed up with a blowtorch or autogen before disassembly. When the joints are hot, you need to quickly rip off the nipples on both sides of the battery. Using the same technique, any elements that have stuck to the battery are unscrewed.
The nipple after long-term use of the battery can completely rust. In this case, it will be impossible to hook it with a key, therefore, a hacksaw or a grinder is required to disassemble the battery. The rest of the nipples are unscrewed from their places, and the thread is cleaned with a brush.
If none of the described methods helps, there remains a last resort - to break the battery with a sledgehammer. Before breaking the cast-iron battery, it must be placed on a horizontal surface and hit along the centerline with a sledgehammer until part of the section falls off. After that, the battery must be turned over and the operation repeated to break the entire section.
All that remains is to put the radiator vertically, strike a few blows on the surviving sections and unwind them. Of course, about the integrity of the entire radiator in such the case is not necessary to speak - in most cases half of the sections are lost.
Conclusion
It is not easy to disassemble a cast-iron radiator, despite the quite understandable technology of this process. Nevertheless, sometimes the need for disassembly still arises, and knowledge of how to perform it will not be superfluous.
Installation of radiators includes
- Departure of a specialist to the customer to provide technical advice and draw up an installation diagram.
- Installation of radiators by level
- Layout of pipes in insulation to radiators
- Without gouging
- Installation of shut-off valves on radiators
- Connecting radiators to pipelines using a special tool
You can purchase radiators in one of our stores.
Our advantages
- The work is performed by qualified specialists who are citizens of the Russian Federation;
- We treat each order with great responsibility;
- We take on even very complex orders;
- We use only modern equipment and technologies;
- We are ready to repair the old boiler system, restoring its performance;
- We give a good guarantee and provide technical support.
By contacting our company, you will receive a high-quality installation of a boiler room in accordance with the agreed terms and on favorable terms.
- Radiator Henrad 500x800 22V
- Bottom connection headset
- Sanha MultiFit-Pex PE-Xc p-ethylene pipe 16x2mm 20m
- Fitting
- Installation of a radiator (route layout, installation of a radiator by level, laying pipes in thermal insulation, without grooving)
Total: ≈ 11,000 ₽.
Types of radiator piping
Connecting devices to the pipeline can be performed according to one of the following schemes:
- lateral (top or bottom);
- bottom;
- diagonal.

Side top and bottom
In the first case, the coolant enters the upper collector and goes down through the vertical channels.
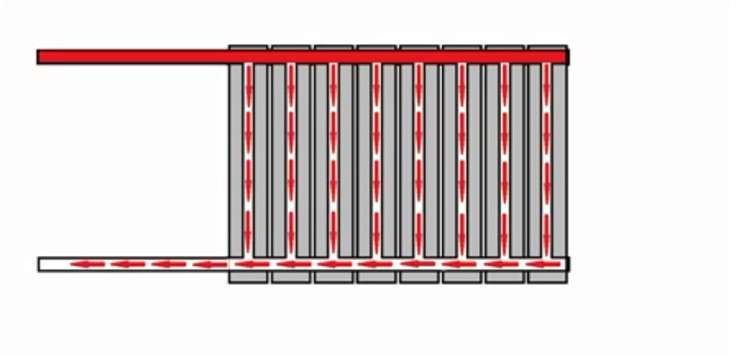
The heat dissipation of the radiator is uneven, the most heated area is located closer to the connection point.
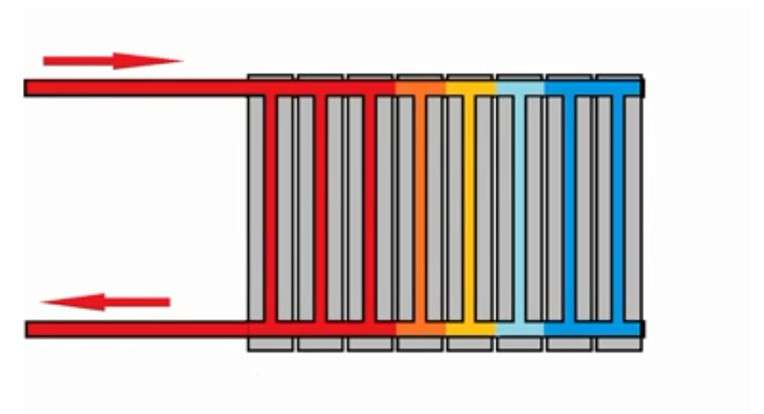
The same situation is observed when tying in the lower lateral position. The first section heats up better, the last one worse.
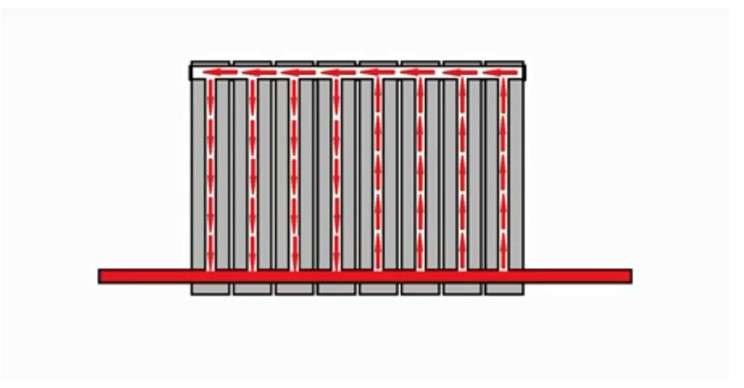
Bottom connection
The coolant enters from below. According to the law of physics, it moves upward, then, cooling down, descends. Heat transfer with such a strapping is better than with a side strapping, but there are still losses. They are 10-20% depending on the radiator model.
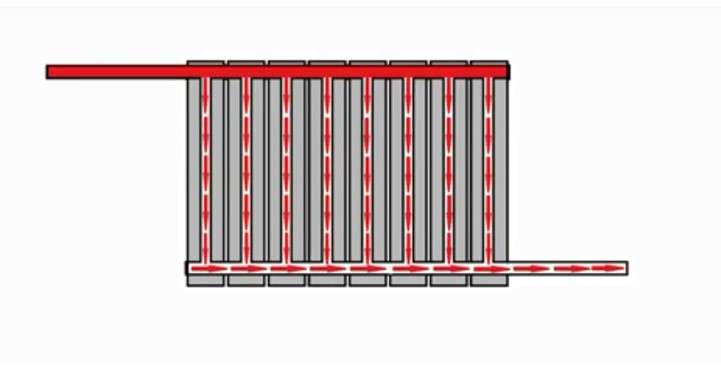
Diagonal connection
The coolant coming from above heats the radiator completely. All sections heat up equally well. Heat transfer with such a strapping is maximum. Inspection with a thermal imager confirms this, therefore the diagonal scheme is the most effective and economical.
Upper
This is an unconventional type of connection that is used with radiators of high heights. For this method, a plug is installed in the upper collector, due to which the coolant moves down and heats the heater evenly.

If the model is standard, without structural changes, then such a connection does not work. The heated liquid flows through the upper manifold, while the lower part remains cold.
Directly the installation process
Before starting work it is necessary to completely shut off the heating circuit, drain the water from the system, the pump will help to remove the residues of it. Let us carefully check with a level the battery hung on the supports vertically and horizontally.
- Unscrew all plugs from the device.
- Connect a valve-equipped bypass, required only for the one-pipe circuit. For connection to a two-pipe circuit, a bypass is not needed; for connection, only a squeegee with a valve connected to it is used.
With the help of threaded squeegees, we connect the battery to the system, to seal the joints using tow or another sealant (if you have experience in welding, the joints of the squeegees and the pipeline can be welded).

A bypass is required for connection to a single-pipe circuit - connection diagram: 1 - tee for metal-plastic pipes; 2 - direct control valve; 3 - direct shut-off valve; 4 - adapter for metal-plastic pipes; 5 - rotary valve for air release
It is important to note that until the end of the installation, it is not necessary to remove the packaging shell from aluminum, bimetallic and steel devices. Installation is complete, but more pressure testing is required
To implement it, you will need to call a plumber. Both his experience and a device will come in handy, which does not make sense to buy for the sake of installing several batteries.
Installation is complete, but more pressure testing is required. To implement it, you will need to call a plumber. His experience will be useful, and the device, which does not make sense to buy for the sake of installing several batteries.
Disassembly procedure
It is very difficult to separate stuck intersection joints. In some cases, they stick to it so much that even significant physical effort turns out to be powerless. In such situations, the joints are warmed up before disassembly with a blowtorch or hair dryer.
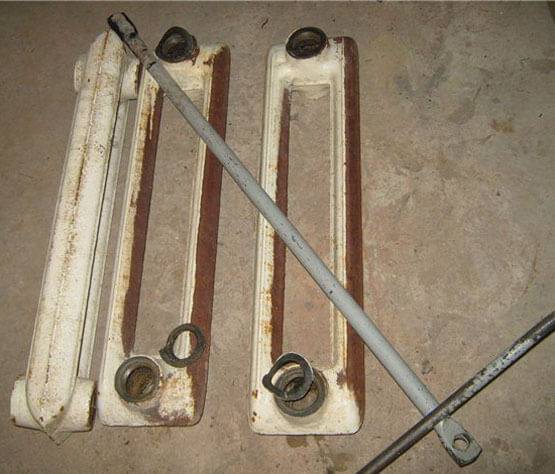
How to disassemble a cast iron heating radiator:
- Cast iron is heated with a blowtorch until it starts to emit a crimson glow.After that, you can start the disassembly procedure.
- The first step is to unscrew the plugs.
- The radiator wrench is brought to the top of the battery: its head should fall on the area of unscrewing the nipple-nut. At the end of the section, you need to use chalk to mark the circle where the tool rod is located.
- The flattened part is inserted into the lower inner groove. Further, moving the tool in the desired direction, bring it to the marked circle.
Before starting the operation, it is important to find out in which direction it is necessary to twist the sections. If there is a nipple nut, it is screwed in turn on the right and left ends of the battery: this makes it possible to determine the direction of rotation of the nipple
If the thread moves, do not completely loosen it. To avoid misalignment, the top and bottom nipples must be unscrewed one full turn in turn.
How to assemble an aluminum radiator
Putting it up in reverse order. We place the sections on a flat surface (a table of a suitable size or simply place them on the floor). If the radiator is not new, we unscrew the end cap and the Mayevsky tap.
Before installation, the threads and grooves should be well examined, they must be of high quality, without chips and drops. On the section to be mounted for the sample, we "drive" the thread by screwing in-unscrewing the nipple
Here you need to pay attention to the fact that a gasket may be located in front of the thread under a layer of factory paint. Rub lightly the end with fine sandpaper, if it is found there, then it must be carefully cut off with a knife with a sharp blade

This is how an aluminum radiator looks like a cutaway.
Before adding sections of the heating radiator, be sure to clean the ends to a smooth surface. We even remove the factory paint. At the ends of the radiators, it is not needed, but will only contribute to the early manifestation of leaks. Sooner or later, coolant will begin to seep under the paint. In the case of non-freezing liquids, this will happen very soon, if water is used in the system, then not very much, but it will certainly happen. And then the coolant will begin to leak between the sections, although the gaskets are still in perfect condition. And the whole point is that the paint at the ends has exfoliated or corroded, microcracks have appeared. So be sure to clean the ends to a clean metal, but use fine sandpaper to make the metal surface smooth and scratch-free. This ensures that the system operates without leaks in the radiators.
For better tightness, the ends then need to be degreased (you can use gasoline). The gaskets are also degreased, but they must be washed with ordinary soapy water. For a system that will be filled with water, degreasing is an optional procedure, and for systems that will operate on antifreezes, it must be carried out. Antifreeze is very fluid and seeps into the smallest pores. After everything is dry, we begin to collect aluminum radiators.
Then we bait both nipple-nuts by half a turn. On top of the nipple, heat-resistant paronite (silicone) gaskets are put on to seal the joints. Now we take the section that needs to be screwed and put it tightly on the nuts, checking the tightness of their fit. Next, insert the key into the upper hole and twist it 1-2 turns. In this case, we do not use the lever yet. We twist our hands. Then we do the same operation in the lower hole. We repeat several times, alternately tightening both nuts for several turns.
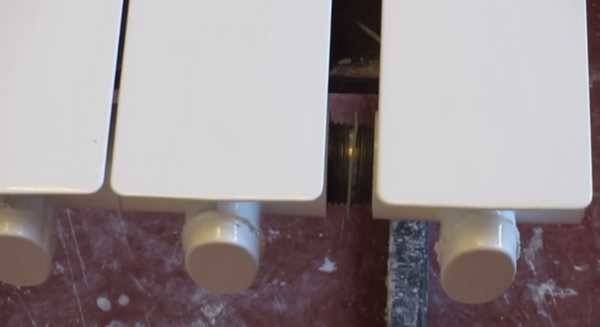
Unscrew the sections gradually, one or two turns of the nut, then from the bottom, then from the top
We twist as much as we have enough strength. Only after hand tightening can the lever be used. This must be done in two steps on each nipple.It is better not to apply excessive efforts during the final tightening of the nipples, since you can easily break the thread: aluminum is a soft metal, do not forget.
If the section is completely assembled, we screw the plug onto the unused holes on one side, and on the other - the Mayevsky valve (to release air from the system). Now you know how to assemble sections of a heating radiator and, if necessary, you can expand several sections.
Mounting
Before installation, you need to drain the water from the heating system. It is better to use a pump if necessary. If central heating is working, then replacing the radiator with your own hands must be coordinated with the utilities. Remove old batteries and mountings.
Radiator location
For proper circulation of warm air when installing a radiator, the following conditions must be observed:
- The center of the battery should be aligned with the center of the sill. Deviation to the side is allowed no more than 2 cm.
- The width of the battery is half to 2/3 of the width of the window.
- The distance from the radiator to the floor should be within 6-12 cm.
- The upper edge of the radiator should be located 5-10 cm from the windowsill.
- The distance between the wall and the battery is 2 to 5 cm.
- There is an opinion that the heating system should be hung with a slope of approximately 1 cm so that air accumulates on the side of the air exhaust valve. According to SNIP standards, the radiator must hang straight. This will prevent air build-up.
- If there are several radiators in the room, they should be located at the same level.

Correct location of the cast iron battery
Installation. Professionals recommend
Attaching a cast iron radiator to the heating system is a little harder than installing aluminum radiators with your own hands. This process includes the following steps:
Determination of the place of screwing in the brackets for subsequent fastening. If there is more than one radiator, you need to use a thin plywood template. Drill the points of the brackets in it and make outlines through them in the places of the future location of the radiators. The number of brackets is determined as follows: one per meter of radiator width area. Two are held at the top, and the third at the bottom, in the center. The radiator must be well fixed and not wobbly, otherwise cracks may form in the joints with the pipes over time. If the battery is heavy and the wall is not very strong, it is better to use stands.
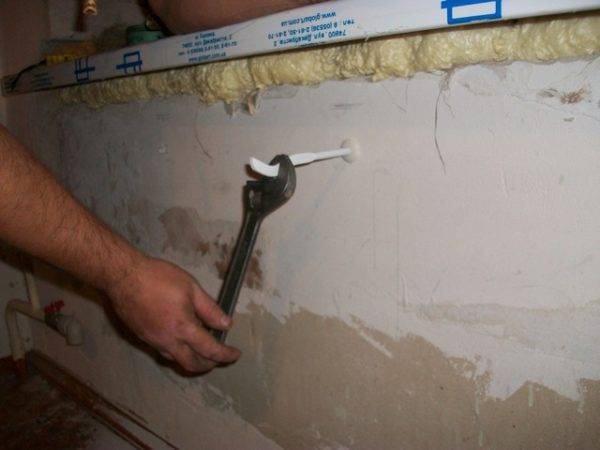
Installing the brackets
- Drill holes at least 12 cm deep and cement the brackets in them. The ends of the brackets should be rounded for better grip on the pipe.
- Screw the thermostat to the radiator from the side of the pipe connection. On the other side, connect the air outlet valve,

Installing a thermostat on a cast iron battery
If in the heating system has no taps for overlapping water, you need to screw them to both pipes. For a one-pipe system, a bypass is required.
Place the radiator on the brackets, check the positioning accuracy with the level.
Attach the structure to the heating system using squeegees
It is important to observe the sealing. For reliability, it is better to use welding.
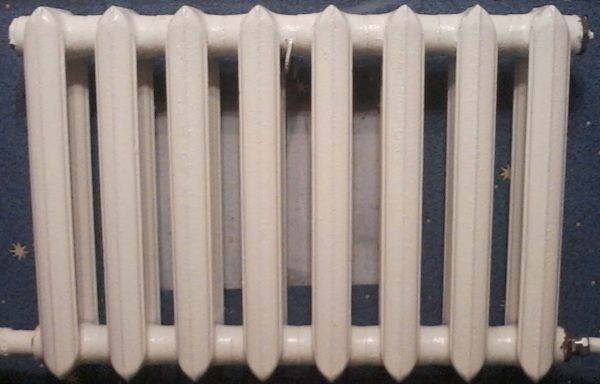
We connect the battery to the heating system
To check the quality of the connection, a pressure test of the entire system is required. It is better to find and invite a specialist to be sure of the quality of the work done.
Cast iron radiators are rather bulky. To improve their appearance, you can install decorative screens of the desired color.
First stage of installation
Considering the fact that radiators are presented in a huge variety today, the installation of heating batteries in a private house begins with its choice. There is no ideal heating system - each type of radiator has its own pros and cons, and you should choose exactly the option, whose disadvantages will allow the system to function as efficiently as possible.
Cast iron
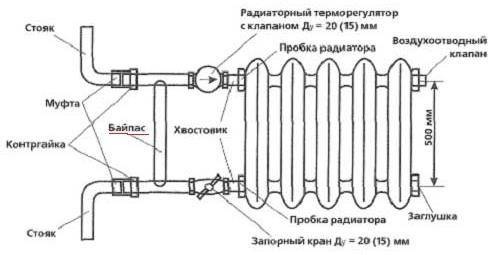
Photo 1 Scheme of a cast-iron battery
The main advantage of such radiators is their durability and long service life; they can be operated for up to 50 years.Also, this metal can withstand aggressive conditions without damage, including a coolant with various impurities.
Among the disadvantages of cast iron are the weight of the battery and the lack of aesthetics.
Aluminum
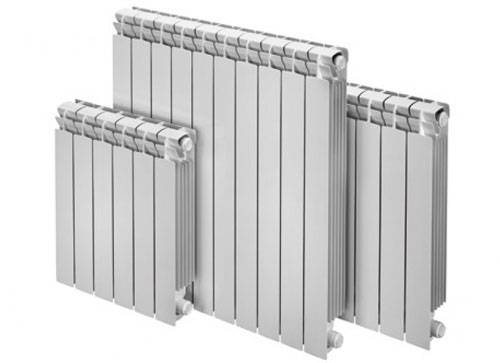
Photo 2 Aluminum radiators
Such batteries are distinguished by their light weight, external design, and high power ratings of about 190 watts. They are clearly not suitable for apartments in high-rise buildings due to the low quality of the coolant, because aluminum is rapidly oxidized due to constant exposure to dirty water, while for a private house such a radiator is the best option due to its high thermal conductivity and low inertia.
Bimetallic
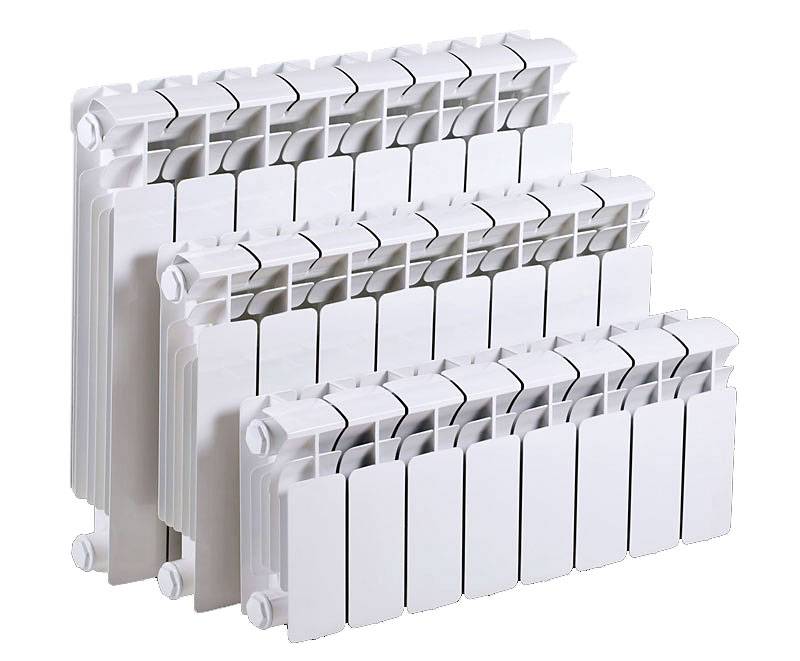
Photo 3 Bimetallic batteries
This type of radiator is the most reliable. Among the main advantages are the following:
- resistance to sudden pressure drops in the system.
- high heat transfer.
- resistance to mechanical damage.
Steel
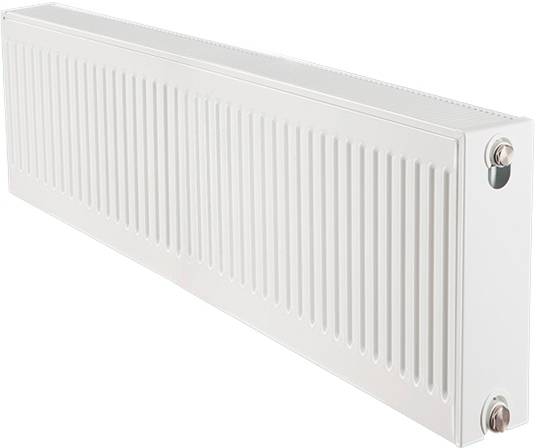
Photo 4 Steel radiator
These are new radiators for heating, which are still rarely used, they did not have time to gain great popularity, but nevertheless they are sometimes found. The heat transfer area is high, the size and weight are small, the maximum resistance to rust, provided that they are always filled.
What kind of heating batteries to install in a private house can be decided based on the area of the building and its features.
Videos and helpful tips
Having chosen a radiator, you should proceed to such a stage as installing heating batteries in a private house, the video of which can be watched below, and right now - read useful tips.
The initial stage is the calculation of the battery power. To heat 1 cubic meter of a room in a modern house, built in compliance with building codes and regulations, you will need 20 watts.
Calculate the volume of the house, multiply the figure by the above indicator, then divide the resulting figure by the capacity of the section. The resulting figure will be the number of sections.
Video 1 Installing batteries (radiators) heating in a private house with your own hands
Installation tool
To do everything yourself, you should stock up on the following tools:
- building level;
- drill;
- screwdriver and tape measure;
- a wrench for twisting the pipes and a pencil;
- key for installing sections;
- bypass - when installing radiators in one-pipe heating;
- shut-off valves.
Installation instructions
The first thing that needs to be done is to shut off the heating system, drain the water, up to using the pump. Next, fix the radiator on the supports and, applying a level, check how accurately this was done, after which you perform the following procedure:
- remove all plugs from the device.
- if you use a one-pipe circuit, then you need to connect a bypass with a valve. Provided that the circuit is two-pipe, the connection is carried out only with the help of a squeegee, a valve is also fixed to it.
- connect the structure to the system using threaded squeegees, use special seals to seal the joints, ideally welding.
The rules for installing radiators provide for such a process as crimping, for which it is advisable to invite a professional craftsman with the appropriate equipment.
During the installation process, remember that the distance from the radiator to various objects must be observed in this way:
- from the wall - 5 centimeters or more.
- from the floor - at least 10 centimeters.
- from the bottom of the window sill to the top of the battery - 5-10 cm.
