The advantages of choosing a Russian stove
Despite the complexity of construction work, the characteristics of the Russian stove make it a profitable choice for a country house. Undoubted pluses:
- high efficiency - subject to all location rules, the stove heats the whole house;
- high-quality and uniform heat transfer;
- multifunctionality;
- the healing effect of heat exposure;
- simple convenient operation, safety of use;
- reliability, long service life;
- availability and low cost of fuel.
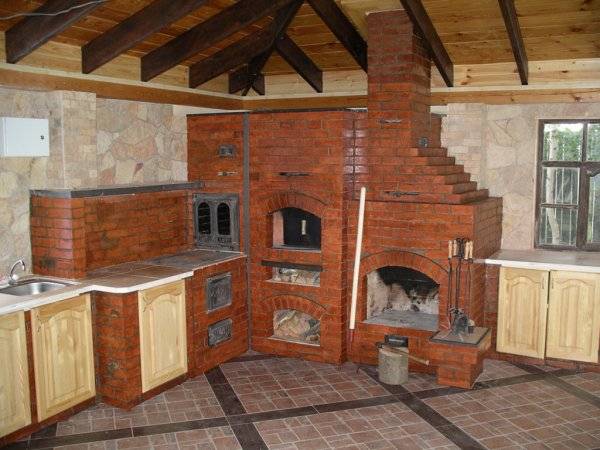
Photo 9. Finished brick oven. In addition to the hearth, there is a place for cooking, drying and storing firewood.
Particularly unusual are the ancient methods of treating the respiratory system with the help of a stove: a sick person was put to sleep in a cooling furnace, due to which his body and lungs were warmed up. The combustion chamber was also used as a washing room - the cooling stove created the effect of a steam room, so there was no need to heat the bath every time.
Minor disadvantages (cumbersomeness or the need for regular ash cleaning) cannot overcome the numerous advantages. The Russian stove was not only not consigned to oblivion, but is becoming more and more popular with modern lovers of life outside the city.
Possible difficulties and how to avoid them
Problems often arise with waterproofing and, consequently, the moisture content of the raw materials for the furnace. Therefore, during the construction of the foundation, do not forget to put 2-3 layers of roofing material so that moisture does not penetrate into the place for storing firewood.
When building a hearth, it is important to take into account its slope towards the base and level the surface. If this is not done, then there will be unnecessary problems with rearranging and moving heavy pots, cast iron pans.
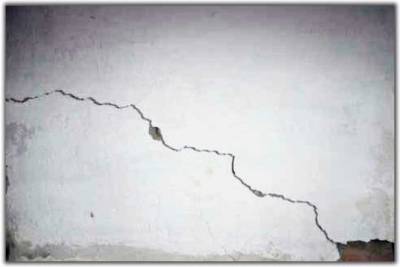
Any distortions or cracks that appear over time are the result of improper laying of the first row. Therefore, when building, constantly use a level and a plumb line to avoid further problems.
The start of operation is an important stage for the correct use of the structure. Therefore, after the completion of construction, dry the cottage oven for a week under the sun in a weather with a temperature of +20 ° C without precipitation.
If the forecasts promise rain, then in the absence of a gazebo, cover your new structure with a film so that moisture does not get on the stove. Then make a test fire without food. And when you see that everything is functioning without interruption, then you can start preparing your favorite dishes.
How to fold the stove: stage-by-stage laying, photo
Step-by-step instructions for laying oven elements:
- Podpechie. The compartment for drying firewood is not laid out in all types of ovens. For it, you can use overheated brick. An arch is installed above the furnace with the help of a special arcuate formwork (which is better to be made collapsible).
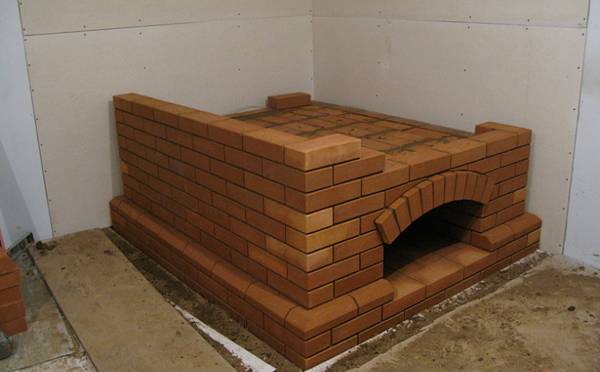
Photo 6. Ready brick oven. It is used for storing firewood and other materials.
- The firebox. Installed on the ceiling (arch), fireclay bricks are used for its layout.
- Under. The bottom of the combustion chamber is often made inclined towards the pole. For this, a backfill made of clay with sand is used.
- Crucible. This element is the most difficult when laying a stove. Its walls should be as flat as possible. They are erected at a slight slope from hewn fireclay bricks. The crucible ends with an arch - the mouth, where a damper is later installed.
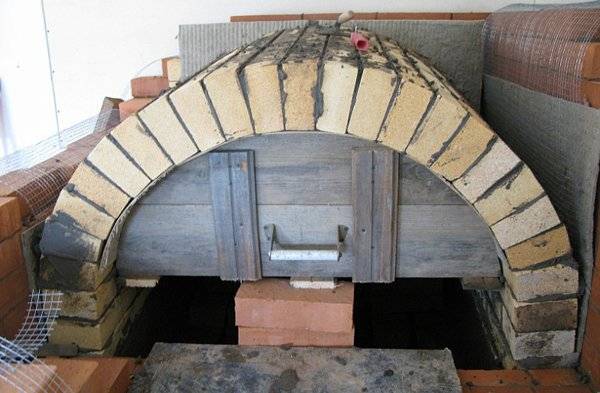
Photo 7. The process of building a crucible, it is the most difficult to build. It is used directly for starting a fire.
- Firebox vault. Like the arch of the underfire, it is carried out using a special formwork. Half brick width. The surface of the firebox arch should be as flat as possible. For the strength of the arch, each middle brick of the row is cut in the form of a wedge.
- Six. The compartment in front of the cooking chamber consists of a base, a wall with an arch and side walls, as well as a vault with a chimney opening.It is laid out from ceramic bricks at the same time as the furnace.
- Overlap. The upper part of the oven. The masonry is made of bricks in 3 rows. To comply with fire safety rules, the distance from the ceiling to the ceiling of the room must be at least 35 cm.
- Chimney. It is laid out especially carefully, its inner walls should not have protrusions in order to avoid the danger of soot accumulation. The seams must be tight and free of cracks.
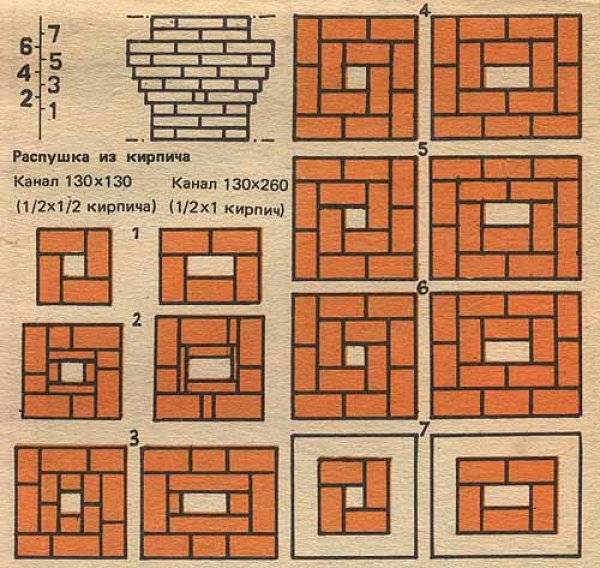
Photo 8. Sequential diagram of the ordering of the chimney for the stove. Contains seven stages.
As the furnace is being built, dampers and doors are installed, which are purchased in advance. After completing the masonry, the stove is usually treated with a special heat-resistant putty or plaster to better seal the joints.
Chimney arrangement
The chimney required for the operation of the Russian stove is absolutely no different from the chimney of any stationary solid-fuel unit, be it a Dutch woman, a Swede or some new-fashioned bell-type stove calculated using computer simulation. The design and order of the chimney can be taken from the drawing below.
Chimney device for a Russian stove with orders
In the process of work, we recommend that you follow a few simple rules:
- The device and place of installation of the pipe for the removal of combustion products must comply with the norms of the current SNiP.
- At the point of transition from the ceiling to the attic, the pipe should thicken.
- The lower part of the chimney is placed in the same mortar as the stove.
- The internal section of the flue duct must correspond to the power of the heater.
- Above the roof, the chimney is built on a mortar with the addition of cement.
- The places where the pipe passes through the ceilings are insulated using non-combustible and waterproofing materials.
In the process of work, the geometry of the structure and the deviation from the vertical are constantly monitored using a level or plumb line.
Features of the Russian stove
It is relatively easy to build a Russian stove with your own hands, unlike other similar structures. But before you start, you need to familiarize yourself with its structure and how it works.
Since ancient times, Russian stoves were built using different technologies and could have completely different shapes from each other. Some models can even be attributed to the masterpieces of art. The sizes of such structures also vary, but the traditional stove had the following characteristics:
- In length - about 213 cm or 3 arshins
- In width - about 142 cm or 2 arshins
- Height - about 180 cm or 2.5 arshins
If you build a classic stove of the specified size, it can easily heat a room with an area of 35-40 square meters. have a similar structure in the corner of the room near the doorway.

Click to enlarge
It is recommended to start laying on a base that is erected from broken bricks or rubble stones. In old Russian times, oak or coniferous piles were placed under the bottom. It is recommended to equip each model with a sub-stove, in which dry firewood or various equipment will be folded.
We prepare everything you need
To build a Russian stove with your own hands, you need to prepare all the necessary building material for work:
- Refractory and fireclay bricks
- Sand and clay for masonry mix
- Doors, grate, latch and other metal products
- Asbestos cord
- Soft wire
If you have a task to make heating in a private, country house, we advise you to get acquainted with alternative methods
The set of tools can be called absolutely standard for any stove-maker:
- Master OK
- Level and tape measure
- Plumb lines
- Solution container
- Hammer and mallet
- Bulgarian
For a Russian stove, the masonry mortar must have special indicators of heat resistance. The composition recommended by the masters is as follows:
- 1 volume part of pure water
- 3 to 5 parts by volume of river sown calcined sand
- 3 parts by volume of the fattest clay kept in water for 24 hours
If the greasy solution begins to crack, it should be covered with a more rare clay solution. It is not recommended to use cement or lime.
Next, we will consider a Russian stove with your own hands with a stove bench. It will differ from the classic one in shape and appearance, but its characteristics are in no way inferior. In addition, its laying is much lighter.
If you need a heating stove with high efficiency, we advise you to pay attention to Buleryan, it will not be difficult to make it yourself
Making an outdoor Russian stove with your own hands
After you have decided on the project of a street Russian stove, found a place and purchased materials, tools and everything that is needed during construction, you can start building the foundation. When the base for the stove is ready, start laying - strictly in accordance with the diagrams and drawings. First, the bricks are laid on dry - without mortar. This will help determine the correctness of the structure and take into account all the nuances before the final construction of the furnace.
Important! Using horizontal and vertical levels and plumb lines when laying on dry, check the correctness of the laid out orders. If the dry masonry complies with all the diagrams and drawings, then prepare the mortar and start making ordinal masonry, without missing the necessary holes for the chimney and other technological spaces corresponding to the diagram
If the dry masonry complies with all the diagrams and drawings, then prepare the mortar and begin to make the ordinal masonry, without missing the necessary holes for the chimney and other technological spaces corresponding to the diagram.
Preparing a place in the country
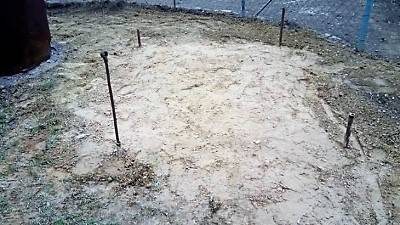
The space should be sufficient in size and preferably flat. If necessary, the area should be leveled with a shovel and rake.
For the oven, it is better to choose the most comfortable place for you:
- from the sunny side;
- with remoteness from wooden buildings and a fence;
- no shading of landings on the site;
- preferably in a gazebo.
It is advisable to build a stove together with a gazebo, in the same color scheme, from homogeneous materials. It is desirable to reflect this in the scheme and project.
How to make a foundation
After choosing a place on your local area, start building the foundation. Its main criteria should be:
- evenness;
- smoothness;
- a certain area;
- reliability;
- durability.
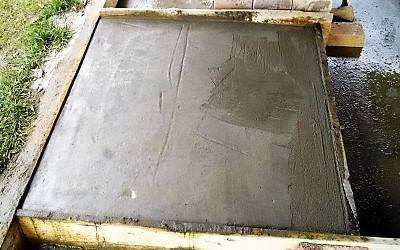
For the foundation:
- dig a hole corresponding to the pattern of width and length to a depth of 30-50 cm;
- add sand - make a 20 cm sand pillow;
- pour crushed stone on top to ground level;
- choose a base - a monolithic concrete slab of the appropriate size or do-it-yourself concreting;
- for concreting, we put the formwork, install the reinforcement, fill it with mortar.
If the stove is built in a finished wooden gazebo, all fire safety rules must be observed. For this, basalt cardboard or asbestos cardboard and a sheet of roofing iron, a clay layer and again a layer of basalt cardboard are laid on the boards. Laying begins after the mortar has dried.
Important! Avoid distortions or unexpected voids in the masonry. This will lead to deformation of the entire structure.
Furnace ordering
We carry out dry laying of the furnace project. If everything is built correctly, taking into account the size, shape and components, you can start building a furnace with mortar.
In accordance with the photo, diagrams and drawings, they begin to lay the order of the furnace. A typical project involves 13-20 rows.
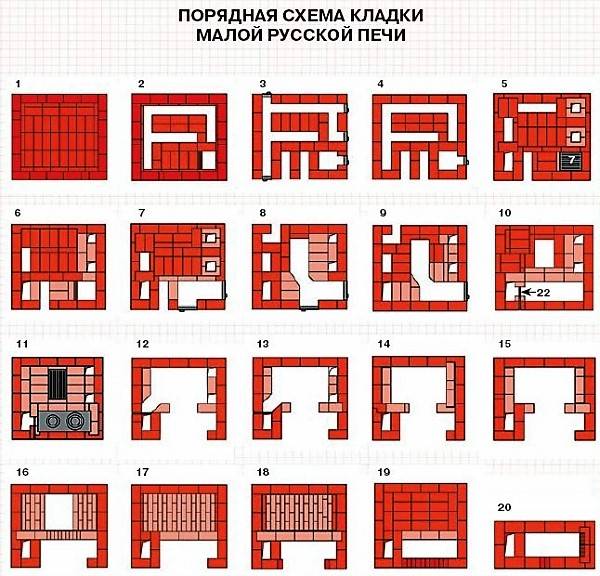
Photo 3. Scheme of the ordinal masonry of an ordinary small Russian stove with a hob, without additional elements.
From the second to the third row, we lay the masonry taking into account the space for fuel: coal and firewood. Then we take into account the chimney and ash pan. On the back wall of the furnace, approximately on the eighth row, we mount brackets and pins for grates and nets for making a barbecue or installing a barbecue (according to the project). More brackets can be made to reposition the grates depending on the heating of the oven and the cooking method.
Important! When laying, it is necessary to remove all excess mortar with a trowel. In no case should a clay solution be applied to the inner surface, this will impair thermal conductivity and lead to increased soot deposition on the walls.
When laying orderly, do not forget the holes for the view, the strangler, the damper. We mount the doors according to the size.
The procedure for starting the heater into operation
Having built a stove, in no case should you rush to try its heating capabilities at full strength. It must be handled carefully and carefully, because with intensive heating, the walls located closer to the hearth will dry out much faster than the remote surfaces. The difference in thermal expansion between wet and dry materials is quite significant, so there is a danger of cracking at the boundaries of the seams. To avoid trouble, all oven openings are opened and allowed to dry naturally for two weeks.
To speed up the process of removing moisture or when drying a structure in adverse weather conditions, a fan heater or a powerful electric lamp can be placed in the crucible and firebox. In this case, the oven doors are closed, and the channels are left open.

The hearth is kindled only after the walls are completely dry.
The furnace starts firing only after the end of the pre-drying period. To do this, during the first two days, no more than 3-4 kg of firewood is put into the unit, adding 1 kg of fuel every day for a decade. The readiness of the furnace for full operation is judged by the absence of condensation on the inner surfaces of the metal parts. The heater is tested several times at half power, after which the operation of the unit is checked at maximum mode. During the "run-in", be sure to inspect the surfaces of the walls for the appearance of cracks and their possible increase. The flaws that appear are closed only after the oven has been heated several times at full strength.
Preparatory activities
At the stage of preparation for construction, a place is chosen for the construction of a furnace, a reliable foundation is mounted and a working solution is prepared.
Seat selection
The place of installation of the Russian stove primarily depends on the characteristics of the room. In a wooden house, an air gap of at least 40 cm wide must be maintained between the heater and the walls of the building.In addition, areas with an increased heating temperature must be additionally protected with non-combustible materials, for example, basalt cardboard slabs
It is also important that at the same time access to the side surfaces of the heating unit remains, which is necessary for their periodic revision. If the stove is planned to be installed in a wall between two rooms, then the opening is protected with brickwork, separating it from the tree with a gasket made of non-combustible material
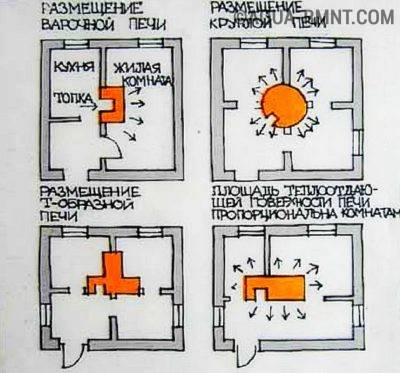
Options for the possible location of the stove in the house
Foundation construction
Since the Russian stove is an overall massive structure, its base must ensure the stability and reliability of the entire structure. To arrange the foundation, it is required to dig a pit with a depth of 0.5 to 0.7 m. Naturally, in loose and unstable soils, this parameter will need to be increased.
At the bottom of the pit, a pillow is made of drainage materials.For this, the pit is filled with a 150-200 mm layer of sand, which is carefully tamped and filled with water for better compaction. From above, the sand is covered with crushed stone, small rubble or broken brick, raising the bottom of the pit by another 100–150 mm. The surface is additionally treated with a rammer, after which it is leveled with a thin sand layer, which is also spilled.
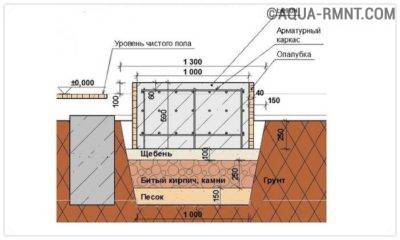
Foundation design for the Russian stove
A cushion of sand and crushed stone is covered with a moisture-proof material, on top of which a formwork made of edged boards is installed. To avoid leakage of cement through the cracks of the box, its walls are covered with polyethylene.
The concrete for the foundation should have the following composition: 1 part of M-400 cement, 3 parts of sand and 5 parts of crushed stone or other aggregate. The solution is brought to the state of thick sour cream, after which it is poured to half the height of the formwork. After that, the concrete is subjected to bayonetting and a reinforcing mesh is laid on its surface. Next, the frame is filled to the edge with concrete and the surface is leveled using a long rule.
The concrete base is left to stand for several days until the concrete is firmly set, after which it is covered with roofing material.
How to prepare a solution
In order for the work to be enjoyable, the masonry mortar must be soft and elastic. This will make it possible to completely fill the joints and not to apply excessive force when laying bricks. In addition, the mixture should not crack when dry, which is actually not so easy to achieve. The fact is that there is only one way to avoid surface cracking - by equalizing the parameters of the thermal expansion of the masonry mortar and brick. Of course, you can buy a special mixture for laying stoves in a hardware store, but a real Russian stove should be made from environmentally friendly materials, right? And an inexpensive traditional composition of clay and sand is perfect for this role.
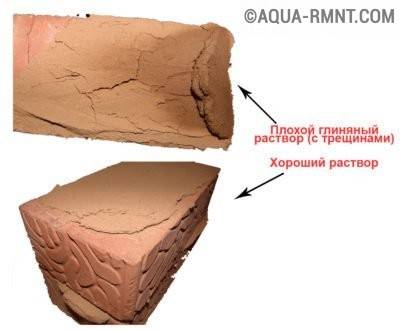
The quality of the clay mortar has a decisive influence on the strength of the masonry joints.
A certain difficulty arises in the selection of the correct proportions, which is associated with the different fat content of the clay. Want to know the secret of a non-cracking mortar? It is quite simple - you need to take the most greasy clay, adding up to 3 parts of sand to it.
To prepare the solution the clay is cleaned of foreign components, the lumps are kneaded and soaked in cold water for 24 hours. After that, mix it thoroughly with sand, bringing it to a semi-liquid consistency.
Too much solution should not be prepared. The fact is that when it stands, it will be divided into components: the sand will settle to the bottom. Re-mixing the clay composition cannot be avoided, and this is all an unnecessary waste of time and effort.
Why are Russian stoves so popular
The incredible "vitality" of the Russian stove lies in its functionality - it is used both as a cooking unit and as a heating unit, and the latter, contrary to popular belief, is by no means a primary function. In its simplest form, the structure is a very deep fireplace, in fact, an overall firebox with a pipe.
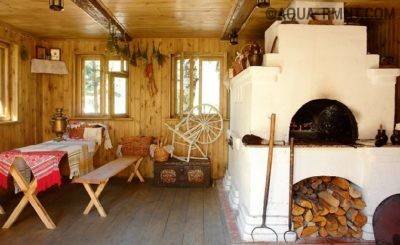
Traditional Russian stove
Thanks to the thick walls and massive vault, the heat storage capacity of the Russian stove can be the envy of any other solid fuel unit. The same factor also plays in favor of economy. The structure can stay warm throughout the day, so it doesn't take a lot of firewood to keep the temperature within a comfortable range. Here it is impossible not to mention the extremely comfortable design with a couch or beds.
The design of the Russian stove is also unique in terms of creating culinary masterpieces. The wide temperature gradient of the firebox is very convenient to use during cooking. If it is necessary to get a quick heating, the cast iron with the contents is pushed closer to the hearth. If it is required to reduce the intensity of boiling, then it is moved to the periphery, closer to the sides. By the way, the Russian stove has a unique ability that no other heating and cooking unit has.The walls and roof of the furnace, heated to a high temperature, are able to maintain a very high temperature even after the fuel has completely burned out. Infrared rays emitted by the surface allow you to bake or simmer products for a long time, getting an incomparable taste and a ruddy appetizing crust. The advantage of this method of cooking lies in the fact that it does not come into contact with either fire or a gas environment, therefore, there can be no talk of any carcinogens.
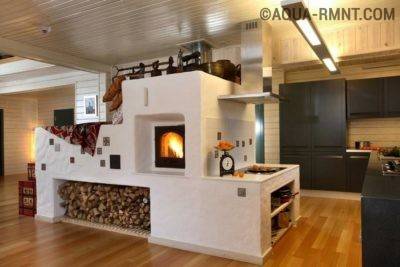
Today the Russian stove is an extremely functional heating appliance with a hob, water heater and a place to rest
Modern heating devices can be classified according to the presence of one of the following characteristics:
- The presence of a slab and underflooding. The hob is built directly into the body of the stove, receiving the so-called pole, which was performed deaf in the canonical model.
- Placement on the back of the stove is a fireplace that opens into an adjacent room. The practicality of this method is extremely high, since with the existence of two heating devices, it is not necessary to build separate chimneys and foundation slabs.
- A rough or trestle bed attached to the stove. They all, as before, increase the comfort and convenience of the heater, although the dimensions of modern beds cannot be compared with the dimensions of traditional stoves, which were designed for 3-4 people.
The integration of the stove into the massif of the Russian stove not only expanded its cooking capabilities, but also made it possible to heat the side heating shield and the lower part of the structure. For this factor, units with side heating are distinguished, which are used to heat the adjacent room, as well as heat generators with bottom heating. The presence of underflooding in the latter allows heating the walls that are below the level of the hearth. Due to the increase in heat transfer, it becomes possible to heat a room with an increased area without the need to expand the dimensions of the device.
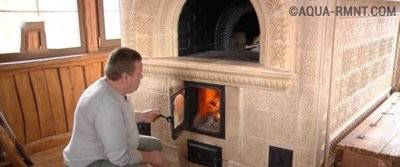
Bottom heating significantly increases thermal performance
Advantages and disadvantages (table)
| pros | Minuses |
| High efficiency - from 50 to 70%. | The ability to operate only on fuels that do not require increased air flow. It will not work to convert it to gas or fuel oil. |
| Safe design. | The bulkiness of the design. Additional load on the floor - it can be installed only on the first floor. |
| Undemanding to materials - when building a furnace, you can do only with brick, sand and clay. | After chilling, the unit requires a long warm-up. |
| Uniform heat dissipation. | Ineffective smoke circulation - in case of miscalculations in construction, the heater can smoke. |
| Durability. | Inconvenience when cleaning the firebox from ash. |
| Possibility of heating an adjacent room. | |
| Convenience and comfort of the bed. | |
| The surface of the bed can emit infrared energy for a long time, which has an excellent therapeutic effect. |
In addition, the Russian stove will require the hostess to be able to handle a grapple, a frying pan, pots and cast iron, and not every modern woman will like this. If you are ready to put up with minor inconveniences, then this literally fabulous unit will be able to thank the owner not only with warm and tasty food, but also with a healthy sleep, as well as wonderful healing procedures.
Choosing a place in the house for a Russian stove
It is important to decide on a suitable location. Usually, stove heating is thought out even before the construction of a house, therefore everything is foreseen in advance
If the building is brick, stone or cinder block, then the hearth can be erected anywhere, even in the corner.
If the house is wooden, then at least 1.2 m should remain between its walls and the stove.To reduce the fire hazard, asbestos boards are used.
In a wooden house, a hearth can be erected in a corner under the following conditions:
- the window of the pole is directed to the center of the room;
- Between the structure and the walls of wood, fill thermal insulation is made - fired clay and vermiculite, masonry height, thickness from 15 cm.
If a hearth is being erected next to the walls of houses, then it is important to leave an air gap of at least 5-10 cm.This is necessary for air circulation and uniform cooling of the furnace body
The heat source is often placed between rooms. If the wall is wooden, then the opening in it must be covered with brick. The thickness is at least 20 cm. In addition, it is worth making an asbestos gasket.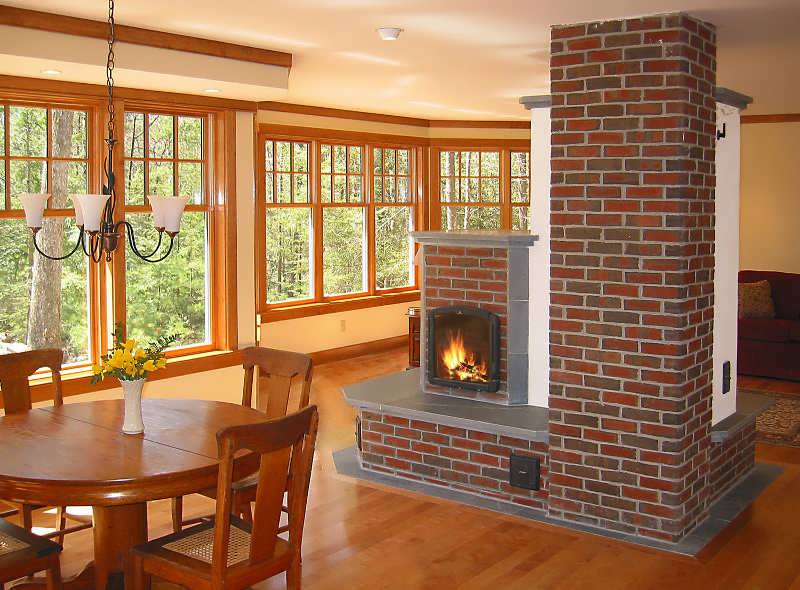
To understand how best to place the structure, you can make a layout out of the boxes with your own hands. This allows you to clearly see the convenience of the structure in different places.

Methods for finishing Russian stoves
Decorating the Russian stove is done in several ways:
- jointing brickwork;
- plastering;
- finishing with ceramic tiles or tiles.
Brickwork is the simplest way, and it is quite good for modern interiors. The main thing is that such a method of decoration should be planned from the very beginning, since the aesthetics of the structure directly depends on the quality of the material and the accuracy of the masonry. As a rule, facing bricks with smooth side walls are used for masonry of external walls.
If the goal is to build a Russian stove according to the old canons, then it must be plastered with a special clay mortar with the addition of chaff. After drying, the outer surfaces are covered with a solution of white clay in water. Such whitewashing is an environmentally friendly coating that is safe for others. In addition, thanks to her, the basis for the final decoration is being prepared - painting. The patterns that cover the walls of the stove can repeat the national ornament or scenes from fairy tales, represent floral curls, stylization like Gzhel, Khokhloma, etc. - it all depends on the mood and preferences of the owner. A wide range of plaster mixes allows replacing the old composition with a more modern "bark beetle" or "lamb".
For finishing with ceramic tiles, only heat-resistant types of tiles are used - terracotta, majolica, heat-resistant clinker or porcelain stoneware. In addition, Russian stoves are often laid out with tiles. Note that although decorating with ceramic tiles is one of the most beautiful and practical ways of finishing, after it the arrogance and luxury of “Dutch women” begins to appear in the design, and not everyone will like this.
Types of Russian street stoves. Construction diagram

When choosing your project, consider what functions the structure should perform: fry, steam, boil, smoke. In accordance with this, and make a choice of a street Russian stove:
- with barbecue;
- with barbecue;
- with a place for a cauldron;
- only with a hob;
- with a smokehouse;
- with a couch.
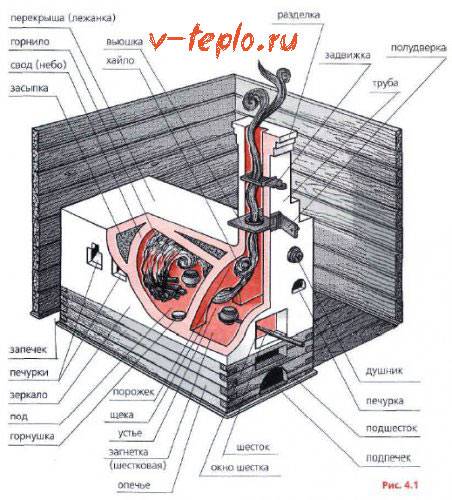
The scheme of the stove can be both the simplest and the most complex, it can provide elements traditional for the Russian stove:
- a place for drying firewood - baking;
- a place for storing dishes and other utensils - a stove;
- place for hot pots taken out of the oven - six;
- the chamber under the pole is an overtube;
- the surface in the cooking chamber, where the cooking utensils are placed - under;
- the chamber itself is a crucible;
- blocking the chimney to preserve heat - a view;
- a window leading to the chimney - a strangler;
- draft regulator - damper.

Photo 1. Diagram of the device of an ordinary Russian wood-burning stove, all the main structural elements are indicated.
A design with a stove bench is also possible, but in the street version it is not very appropriate or serves for other purposes.
Important! The scheme and drawings of the stove should include everything that you plan to build.
An ordinary Russian stove for the street
The simplest outdoor stove consists of a frame, one- or two-burner stove, a tunnel firebox, which is divided by a smoke tooth into a flame and smoke chambers.The scheme of such masonry is relatively simple and does not require special knowledge and application of technologies. It is suitable specifically for the street version, since:
- thanks to the smoke tooth, there is no dependence on the strength and direction of the wind;
- cooking becomes possible at any temperature;
- you can cook even on the most low-quality fuel.
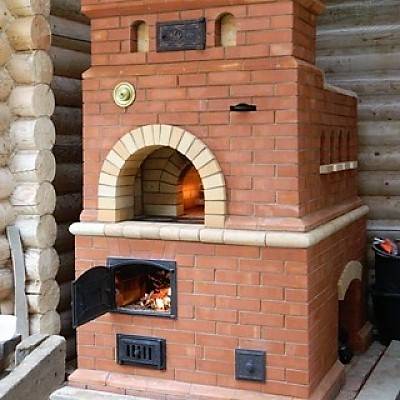
The hob can vary from one to two square meters. m and more - depending on the chosen scheme. The height of the crucible, according to the standard version, can be 70 cm.
The mini-oven in the Russian style has dimensions of 100 cm by 130 cm.But it is multifunctional and allows you to cook any dishes, bake bread and has a number of advantages:
- low cost financially;
- convenient and easy to operate;
- builds quickly;
- prepares meals quickly;
- does not require a lot of fuel;
- environmentally friendly.
You can build an outdoor mini-oven in one day.
Advice. Do not start the construction of a mini-oven if there is no drawing, project, developed design. Get expert advice from specialists.
Outdoor device with barbecue
The structure of a hand-made barbecue includes a pallet with fuel and a grate with meat at a height of 10-15 cm.
The hot air will act as an open flame after heating the stove. Food is not cooked on an open fire, but inside the furnace. The firebox can be located either away from the inserted grills for cooking meat, or under them. Different schemes of a barbecue oven imply different construction options. When choosing a project, be guided by your culinary preferences.
Note! Meat cooked in a Russian street oven has more useful properties. In the oven, cooking takes place in a niche fenced with partitions
Due to less draft and no wind and temperature drops, the meat is cooked in its own juice
In the oven, cooking takes place in a niche fenced with partitions. Thanks to less draft and the absence of wind and temperature drops, the meat is cooked in its own juice.
Russian stove in a gazebo under a canopy
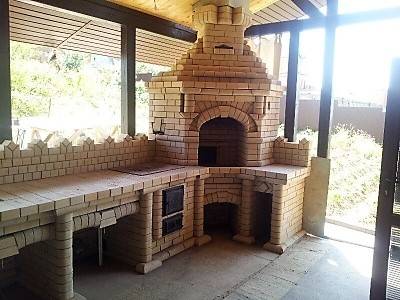
Such a project implies the development of a specific design, which should harmoniously fit into the overall interior of the site, and go well with the architecture of the house.
When choosing a scheme for such a street Russian stove, a gazebo is immediately thought out, in which the new structure will be located. The project must comply with:
- the size of the area allocated for construction;
- fireproof materials from which it is planned to build both a gazebo and a stove;
- other characteristics of the gazebo, allowing you to place a structure with a firebox and a flame under its arches.
The gazebo should be spacious and beautiful. If desired, it can be designed with closing windows or retractable blinds.
Important! Before building a gazebo, check out all the interesting and modern projects
Tools and materials
To build a Russian stove with your own hands, you don't have to buy any special tools. However, prepare everything you need in advance - this will save time and help to organize the work correctly. Here's what you need first:
- A pair of stainless steel trowels of different sizes.
- Joints for seams, if this type of finish is planned.
- Mason's hammer-pick.
- Rubber mallet.
- Angle grinder (grinder) with cut-off wheel.
- Electric drill with a set of drills.
- Tool for checking the accuracy of masonry (level, plumb line, square and mooring cord).
- Scissors for metal work.
- Containers for mixing the solution.
- Mesh for sifting clay and sand.
- Roulette.
- Pliers.
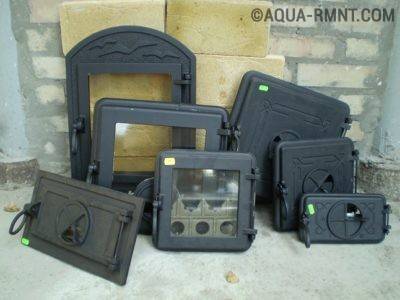
Today on sale you can find furnace casting of any type and functionality.
List of materials:
- Red brick (grade not lower than M-150) - 1900 pcs.
- Sand - 300 kg.
- Clay (as oily as possible) - 250 kg.
- Basalt cardboard or other non-combustible sealant.
- Roofing material for moisture insulation of the foundation.
- Two-burner hob with dimensions 400x700 mm.
- Furnace doors with dimensions of 250x210 mm and 250x180 mm.
- Grate grate 200x280 mm - 2 pcs.
- Grate grate 250x380 mm.
- Smoke damper 180x260 mm.
- Cleaning doors 130x130 mm - 2 pcs. and 130x200 mm - 1 pc.
- Blowing door - 250x150 mm.
- Crucible damper - 380x450 mm.
- Hot water tank 120x280x500 mm.
- Steel corner with a shelf 60 mm - 1.5 m.
- Metal sheet 5 mm thick.
In addition, it is necessary to attend to the materials for the construction of the foundation - crushed stone, sand, cement and boards for arranging the formwork.
