Waka planks: secure fit
So, to protect the abutment seams:
- Step 1. Install the planks and fill the top flange with sealant. In traditional knots, a brick overlap is usually used, but here it is just the plank that performs this function.
- Step 2. Cut the bottom plank to the desired length - so that the plank length is the width of the pipe and 5 cm on the sides.
- Step 3. Cut the top of the strip and bend along the line of the pipe itself.
- Step 4. Now cut the lower part of the pipe and bend it along a line that will be 1 cm farther from the corner of the pipe.
- Step 5. Cut the strips 1 cm and bend the top flange with a hammer towards the pipe.
- Step 6. At the bottom, cut a corner parallel to the ramp line.
- Step 7. On the top, drill holes in increments of 20 cm, for dowels 6 mm. Holes for them need to be drilled 6x40 mm.
- Step 8. Attach the strip directly to the chimney with heat-resistant dowels.
The finished chimney bypass should look like this from all sides: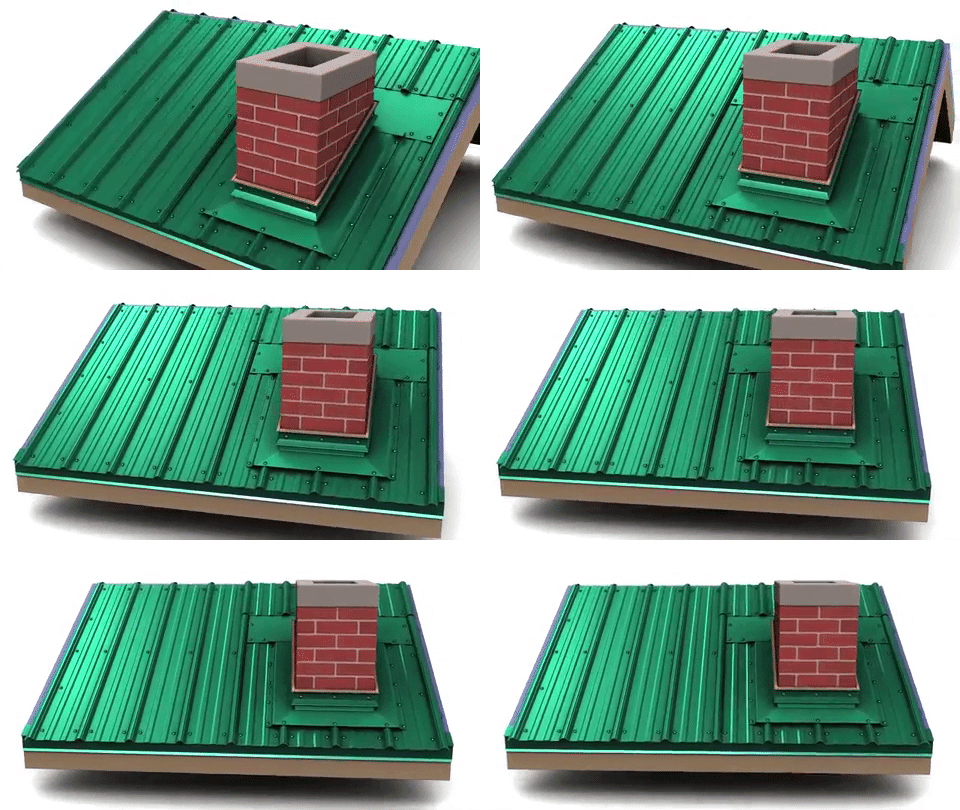
Next, attach the side bar so that it is parallel to the ramp line, and follow this instruction:
- Step 1. Mark on the inner surface of the plank the outline of the lower plank.
- Step 2. Cut the top of the plank along the line of the pipe, and the bottom of the plank along the line that retreats from the corner of the chimney by 1 cm.
- Step 3. Cut the side plank along the outline of the lower plank already attached.
- Step 4. Fix the plank with screws in increments of 20 cm, and do the same with the second plank.
- Step 5. Now cut the top strip to the width of the pipe with a 2 cm outlet on both sides.
- Step 6. On the inside of the top plank, mark the outlines of the already installed side planks.
- Step 7. Cut off the top bar, bend along the pipe line. Make the necessary cuts, drill holes in the pipe for dowels, 6x40 mm. Secure the bar.
Finally, apply sealant to the strip flange around the entire pipe. For convenience, take a construction syringe, and to make the seam neat, stretch it with a piece of cardboard.
Roof pipe installation rules
To install the chimney through the roof surface, you must follow a few simple rules that will allow you to do this work correctly:

For the chimney, it is necessary to provide a foundation or a so-called concrete cushion, since the chimney is a very massive structure.
since the chimney is a rather massive and heavy structure, like the stove itself, when building a house, it is necessary to provide for the presence of a separate foundation, the so-called concrete cushion; It is believed that a long pipe provides the best draft, but there is also one "but" - the efficiency of the furnace in this case greatly decreases. Therefore, it is necessary to find a middle ground. Therefore, when installing a pipe, you do not need to look for long paths, it is best to lay it directly; it is recommended to exit the pipe near the ridge if the roof is pitched. It is quite simple to calculate the place: you need to draw an angle of 10 degrees from the line, the horizontal ridge, going down. The top of the pipe should be 30-50 cm above this line
Many believe that the location of the chimney is optimal on the very ridge of the roof; it is important to install a special spark arrester at the top of the pipe, which will prevent the ignition of roofing materials and other elements. The design of such an extinguisher can be very different, it is often made from ordinary steel mesh, which does not allow burning sparks to escape from the pipe.
Why do you need a chimney box
The chimney goes through several overlaps until the site is brought out into the street. It crosses the ceiling, the attic and out through the hole in the roof.
At each segment of the path, the pipe experiences a temperature difference and comes into contact with combustible materials. The key to installing the pipe is its thermal and waterproofing. It is these functions that the chimney box is designed to provide.
The tasks that the construction of the chimney box solves:
- Provide insulation from external temperature fluctuations.
- Insulate the hot pipe from combustible materials in the ceiling, roof, rafters.
- Ensure tight sealing of the opening between the flue gas vent body and the roof.
- Protect the area above the roof from the weather.
- Decorate the chimney, creating the visual integrity of the roof and chimney.
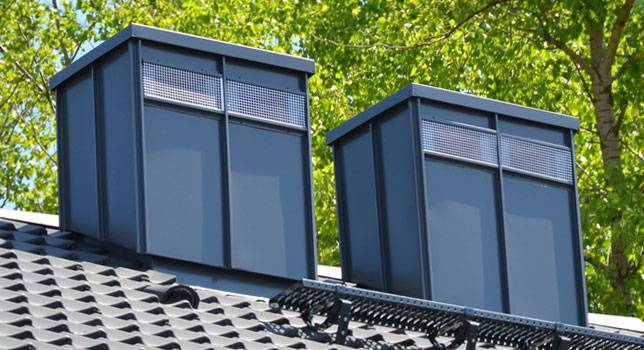
The chimney box is installed at the final stage of the heating system installation. The outer casing can be made by yourself or purchased ready-made.
The design of the joints of the roof covering to the pipe
When a reliable basis for arranging the abutment of the roofing material to the chimney is ready, you can proceed to the installation of the elements for sealing the coating.
The design of the system of abutting the coating to the pipe can be different, depending on the selected roofing material. The functions that are assigned to the elements included in the construction of the junction are the sealing and waterproofing of the joints of the roof covering and ventilation or chimney pipes, as well as the diversion and redirection of water flows flowing from the roof ridge to the pipe from above.
The scheme for arranging such a junction should ideally be determined even when drafting a rafter system and a roofing "pie". The fact is that some options involve the installation of individual structural parts before laying the roofing.
In addition to the type of roof selected for roofing, when drawing up a project, the location of the chimney, its shape, as well as the material from which it is made should be taken into account.
Construction professionals usually recommend using only ready-made structures that are produced by roofing manufacturers for the arrangement of abutments. Nevertheless, many craftsmen prefer to make these parts on their own.
One of the options for a home-made construction of the junction of the roof to a brick pipe of rectangular cross-section. Such a "kit" is easy to make yourself from galvanized sheet
It should be noted that the easiest way to seal the chimney passing through the roof directly on the ridge line of the roof. With this arrangement, water during rain, as well as snow drifts in winter, do not have the ability to accumulate above the rear wall of the pipe, which minimizes the risk of roof leaks in this, perhaps, the most vulnerable junction.
It will not be difficult to equip a reliable abutment of the roofing material to the chimney, which is also located in the immediate vicinity of the ridge line, that is, almost immediately after the ridge element. There is also a very small space above the pipe, which prevents the accumulation of snow and water.
An additional fracture of the roof above the pipe - a groove, will not allow rain or melt water to accumulate in this space - will redirect its flows to the sides
But it is much more difficult to perform high-quality sealing of a chimney located in the middle or lower part of the roof slope. In this case, the waterproofing must be particularly reliable. Therefore, quite often, and especially, for example, when the roof is covered with a soft bituminous roof, it is necessary to equip an additional pitched structure - as shown in the illustration above. Such a special break in the roof will distribute water flows, directing them along the side walls of the pipe. Such protective extensions to the pipe are usually called gutters.
Perhaps the most unfortunate location of the pipe is on the valley line.It is advisable, even at the design stage of the chimney and ventilation ducts and the roof structure, not to allow a detailed passage of the pipe through the roof
And, of course, the most difficult thing is to qualitatively equip the junction around the chimney, which falls on the middle or lower part of the valley. In this case, the pipe will be in the path of clearly directed streams of water, which, during rain or melting snow, will drain into the gutter of the slope joint.
In this case, it is extremely important to reliably seal not only the back of the pipe, but also its lateral lines. Therefore, even at the design stage, it is necessary to try very hard to avoid such a location of the pipe.
Now, in order to answer the most popular questions that arise in the process of arranging this roof assembly, it is necessary to consider several options for sealing the pipe passages through the roof.
Rectangular or square tube
The brick chimney of a classic stove usually has a rectangular or square section, since this is the simplest form for installation. The outer casing of the ceramic stove chimney looks similar.
In the standard version, the chimney is located strictly vertically, but on the ceiling of the attic, you can equip a horizontal section of a small length in order to adjust the place where the chimney exits to the roof.
A hole is cut in the roofing pie and the wooden structure mentioned above is mounted. After the laying of the pipeline passing through the roof is completed, it is necessary to provide reliable protection of the passage unit from atmospheric precipitation. From the inside, from the side of the attic, a steel sheet is attached to decorate the penetration site (a hole in it is cut to fit the size of the pipe, the sheet is put on the chimney in advance). The protective and decorative plate is attached to the edges of the support box using self-tapping screws, the joint along the pipe perimeter is filled with a fire-resistant sealant. The box is lined with asbestos sheets from the inside, or the gap between it and the pipe is filled with basalt wool.
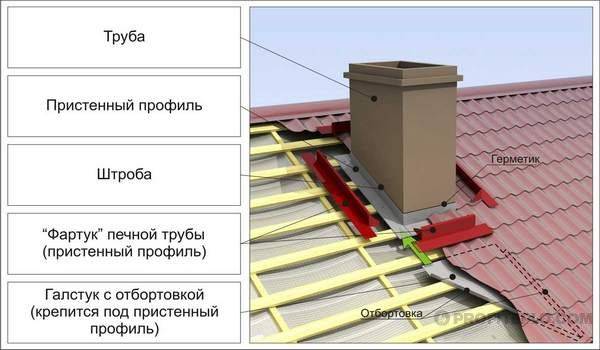 Rectangular pipe
From the outside, the edges of the waterproofing are brought onto the brick pipe, in which a cruciform incision was previously made. Each of the resulting triangles is cut so that the overlap on the chimney wall is 10–12 cm. Waterproofing is glued to the brick using a special material - an elastic metallized tape with an adhesive layer.
Then the inner apron is mounted. The structure consists of four galvanized steel strips. The upper folded edge of each plank is inserted into a brickwork, and not into a masonry seam. In the corners, the strips are joined with a 15 mm overlap. All joints are treated with a heat-resistant sealant. The side strips should be provided with bumpers that direct the flow of water downward. A metal sheet with sides is put under the lower bar - a tie, which provides water drainage to the lower edge of the roof or to the nearest valley.
To decorate the chimney through the roof, an external apron made of galvanized sheet metal is installed. The material can be painted in the color of the roof. The method of fastening is the same as for the internal structure, but you can do without the punishment by treating the joint with a heat-resistant sealant for external work. The edges of the apron, laid on top of the roofing, are fastened with galvanized self-tapping screws.
Features of arranging the passage of the chimney through the roof
A high-quality abutment of the roofing material to the pipe can be done only if the roof has a reliable rigid crate corresponding to the type of roof and the steepness of the slopes, on which the load will be evenly distributed both from the mass of the roof system itself and from external influences.
- The best option is when the chimney is installed even before the lathing is arranged. That is, in the very structure of the rafter system, a passage is provided for it, reinforced with additional details.In such cases, the abutment of the sheet or piece of roofing material to the pipe will be much easier than in those when in the finished crate it is necessary to organize a passage for the newly erected pipe.
- If the pipe is installed later, then in order to make room for the passage of the chimney, it will be necessary to dismantle some elements of the crate, which may well weaken the overall structure.
- It is also necessary to provide in advance that the pipe does not fall on the rafter leg, since its partial or complete dismantling is an extremely undesirable operation. If the pipe still falls on one of the rafters, and part of it has to be removed, then before carrying out this process, it is necessary to immediately install retaining posts under the remaining parts, which are fixed to the floor beams. In addition, most often you also have to connect parts of this leg with whole rafters, horizontal jumpers.
- Whichever option is considered, it is imperative to equip an additional reliable frame around the chimney, which must be firmly connected to other elements of the rafter system and roof sheathing.
Chimney prices
chimney
The gap between the pipe and the wooden parts of the rafter system and the lathing is often filled with non-combustible thermal insulation materials. In this capacity, it is good to use basalt mineral wool.
The clearance between the chimney and the elements of the rafter system is governed by the rules of SNiP 41—01-2003, paragraph 6.6.22. It says that the distance from the surfaces of concrete and brick chimneys to any parts of the truss system and the roofing "pie" made of combustible material must be no less than 130 mm. From ceramic pipes without insulation, this clearance should be at least 250 mm, and in the presence of thermal insulation - also at least 130 mm.
The remaining unclosed space between the pipe and flammable or even low-flammable roofing should be covered only with completely non-flammable materials (usually sheet metal is used for this purpose).
Traditional galvanized steel: a strong tie
To ensure a tight abutment of the roof to the chimneys, make an inner apron from strips:
- Step 1. Attach the strip itself to the walls of the pipe and mark the level of the upper edge on the wall.
- Step 2. Then carefully remove the dust after strobing and rinse the strobe with water.
- Step 3. To install the inner apron, start at the bottom of the pipe. Here, the abutment bar needs to be cut.
- Step 4. In the same way, install the apron in other places and do not forget about an overlap of 150 mm to protect against leaks.
- Step 5. Next, the edge of the strip, which is inserted into the groove, must be sealed with a special roofing tape.
- Step 6. Now put a tie (flat sheet with flanges) under the lower element of the inner apron.
- Step 7. Point the tie into the valley or down, right up to the eaves.
- Step 8. Now you can proceed to the installation of the roofing.
The main requirement here is to maintain a sufficient distance for ventilation of the space under the roof. At the same time, so that during the rain the wet brick does not crack when overheated, it is wrapped in a steel sheet with a polymer coating. The ventilation gap is 20 mm.
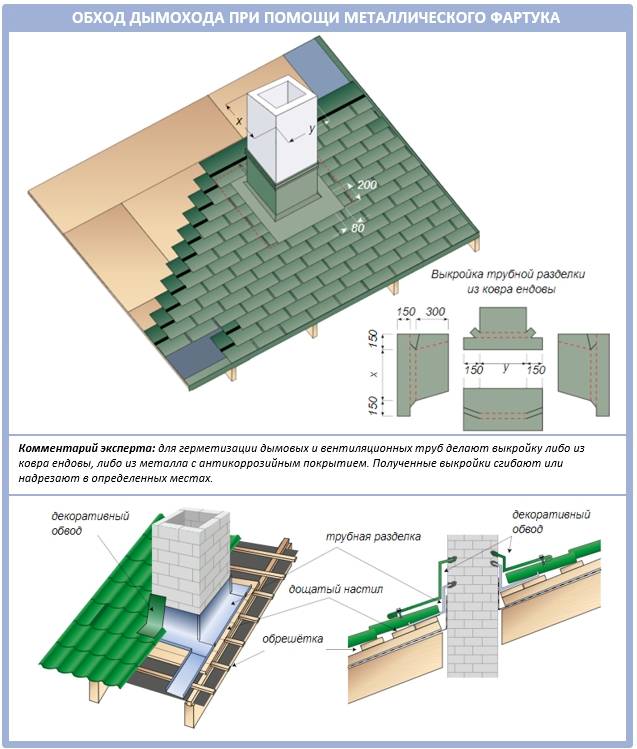
Here is the most popular pipe bypass option:
- Step 1. We put the waterproofing 50 mm directly onto the pipe, if the membrane itself or the film itself is heat-resistant. Glue the slice of the waterproofing to the pipe with duct tape.
- Step 2. Make a protective loop around the pipe using protective strips.
- Step 3. In the pipe itself, make a strobe (only in no case in the seams of the masonry). The depth of the strobe should have a slight slope and be at least 15 mm.
- Step 4. If there is a valley on the roof, it is better to drain the water there using a "tie", if not, then to the cornice.
Bypassing the chimney on the roof made of metal tiles should be started only after laying the metal tiles.
For this, external abutment strips are placed on the pipe, in which part goes into the groove and is sealed with a special heat-resistant roofing sealant. And the lower part of the plank must be fixed with roofing screws directly to the crate.

When it comes to a roof with composite shingles, the technology is slightly different for it:
- Step 1. We need a flat sheet with sprinkles, which will consist of 4 parts: front, back and two sides. Such a sheet is always made individually, according to the dimensions of the chimney.
- Step 2. The sheet must be bent upwards by 5 cm.
- Step 3. Now take a 5 cm high bar to support the back and front of the sheet in front of the chimney.
- Step 4. Place the front of the abutment on the closest row of shingles in front of the chimney.
- Step 5. Fasten the side pieces of the abutment with the front and rear single pieces and secure them to the metal lock using bending.
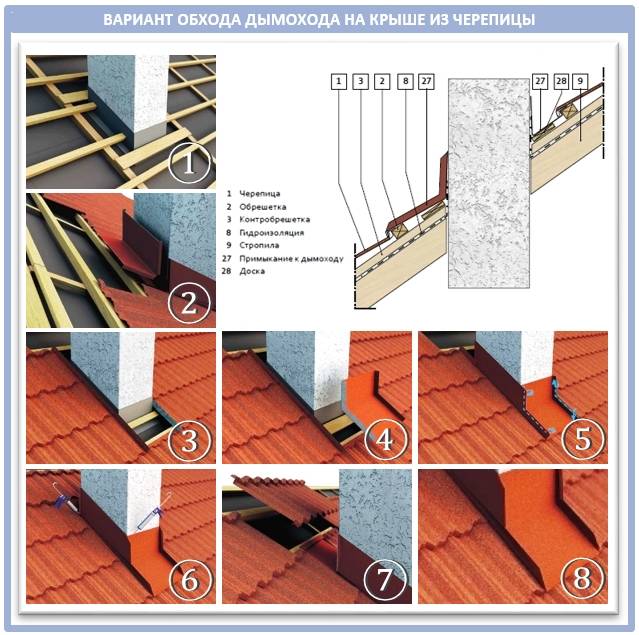
How to arrange a pipe outlet
Consider how the pipe should be led out through the metal tile so that the risk of leaks at the junctions is minimized as much as possible.
Rectangular exit
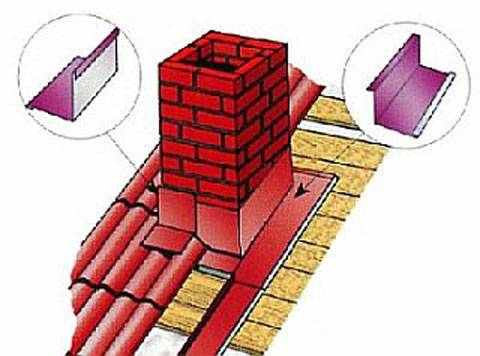
The organization of a rectangular, in particular, and a square exit is performed in two stages:
- installation of an internal apron before starting the installation of the coating;
- the device of an external decorative and protective element after the completion of the laying of the roof covering.
The schematic of the output wiring can be reduced to the sequential execution of the following steps.
- Find out the location of the upper edge of the inner abutment strip by attaching it to the chimney wall.
- Along the marked line of the marking, for example, a groove is made with a grinder with a depth of at least 150 mm. The strobe should have a slight upward slope. At the end, it is well cleaned, preferably even rinsed with water.
Attention It is imperative to inspect the rafter system, since due to a leak, the wood may begin to rot or a fungus will form on it, but, say, a new roofing material will weigh a lot
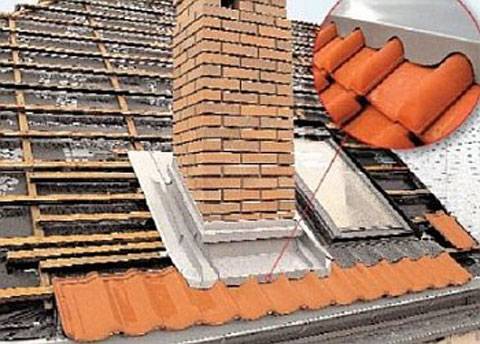
- The abutment bar is first installed on the side of the chimney, from the side of the cornice, then the other three are mounted: on the sides and at the top.
- The planks are laid with an overlap of 150 mm and the edges are filled with silicone sealant. Fix them using roofing screws.
- To form a "tie" through which water will drain, a metal sheet is brought under the bottom of the apron. It is directed either directly into the gutter or into the valley.
- Take out the waterproofing and, raising it by about 50 mm to the chimney wall, fix it with a special heat-resistant tape. In this way, additional reliability of the abutment unit is provided.
- After installing the coating, an external apron is equipped, which is more necessary for decorativeness than protection.
- Install it in the same way as the inner one, only to fix the outer strips, the pipe walls are not grooved. In fact, the lower apron, bypassing the pipe with metal tiles, is squeezed between its layers, excluding the ingress of moisture under the roof.
Round (oval) exit
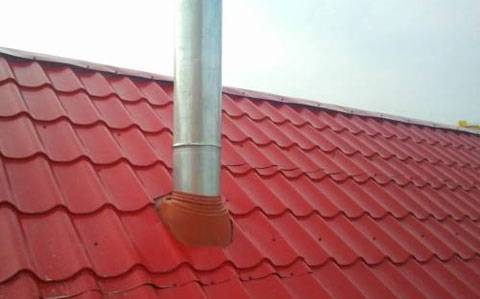
Providing reliable abutment protection for a circular exit is more challenging. Therefore, a special element was developed - the chimney passage - a combined element, which includes a flat steel base and an elastic cap on the chimney pipe. The transition diameters are marked on it. The components of the passage are hermetically interconnected.
In addition, we recommend to study: Passage of the chimney through the wall.
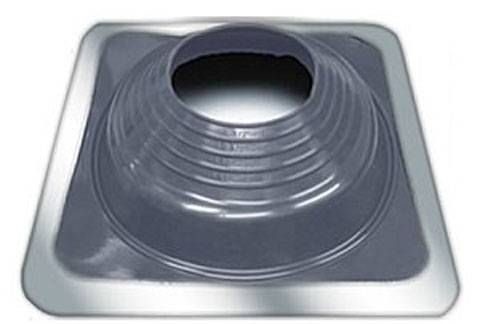
Advice Passage elements are also suitable for arranging any piece of circular cross-section that is displayed on the roof, for example, ventilation.
The process of installing the passage is performed in the following order:
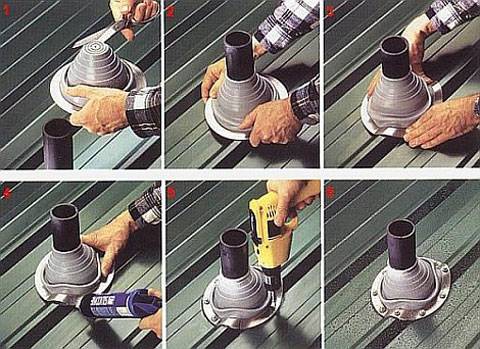
- A hole of the appropriate diameter must be cut on the roof covering.
- After moistening the element with liquid soap, it is pulled over the pipe.
- The sealing element is formed into a metal tile by pressing against the base.
- Self-tapping screws are used to fix the element, having previously applied a sealant under its edges. The screws are spaced 35 cm apart.
Advice
If desired, the passage element for the metal tile can be made by yourself. However, it must be borne in mind that a roof cut made in this way must comply with all building codes and regulations.
What can a poor-quality installation lead to?
Often, work on the arrangement of the chimney is not included in the list of works of a master stove operator or installer of a gas or electric heating boiler. It is understood that the passage of the chimney through the roof is laid during the construction phase, or the homeowner will install the chimney on his own. The apparent simplicity of such work provokes the owners to refuse to use professional roofing masters. They do not think about what serious negative consequences a poor-quality chimney outlet to the roof can lead to. Frequent problems:
- through a poorly sealed pipe passage, dampness can enter the masonry, eventually destroying bricks and cement joints;
- the increased humidity of the chimney pipe itself or of the elements in contact with it provokes an increased spread of various microorganisms, mold, fungus. Disputes of some of them can pose a danger to health, and even human life. If traces of contamination are visible on the pipe, it is not recommended to use it, and in special cases it is necessary to completely replace the entire smoke exhaust system;
- water seepage in the places where the chimney passes through the roofing elements, leads to a decrease in the thermal insulation properties of the insulation by half. It must be understood that after drying of such a layer, the insulating characteristics cannot return to their previous level;
- a poorly installed chimney affects the durability of the materials of the roofing elements and the rafter system. Penetrating moisture accelerates the decay process of the tree, which will lead to the destruction of the power frame;
- large gaps near the pipe passage stop the normal circulation of warm and cold air in the room under the roof. This leads to additional energy losses, and therefore to unnecessary heating costs;
- poor-quality lining of the chimney significantly spoils the appearance of the entire building.
Not only chimneys from stoves, fireplaces and other solid fuel devices are raised above the roof. Exhaust pipes from gas heaters, as well as ventilation pipes, are brought out there. When installing them, exactly the same methods are used as for chimneys.
The final stage of chimney installation
When all the nodes from the optimal materials are installed, you need to check the functionality of the chimney.
Testing is best done in the evening or at night.
It is important that the ambient temperature is lower than that of the room.
Otherwise, the smoke will enter the room during kindling even with a working chimney. Wind is a desirable but optional condition for better traction.
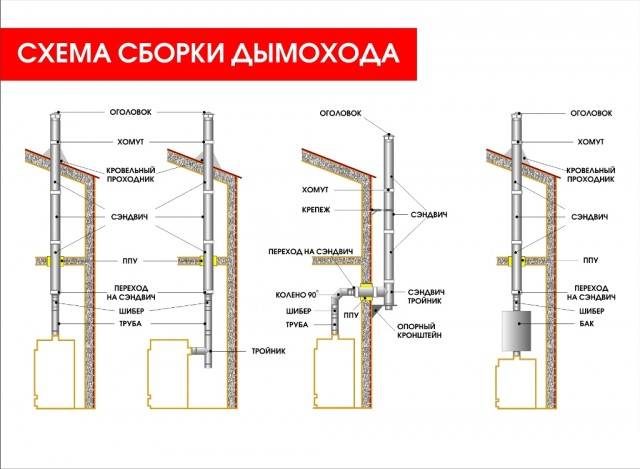
The oven must be fired up carefully. A competent stove-maker uses a minimum of fuel when carrying out such a procedure. This allows appropriate measures to be taken if the operation of the flue duct is unsatisfactory.
If the ignition was successful, there is no smell of smoke in the room, then you should add fuel, choosing damp wood, which gives more smoke. Smoke does not enter the room from well-insulated chimneys. The opposite situation is a direct indication for a thorough check of the channels for installation inaccuracies and damage.
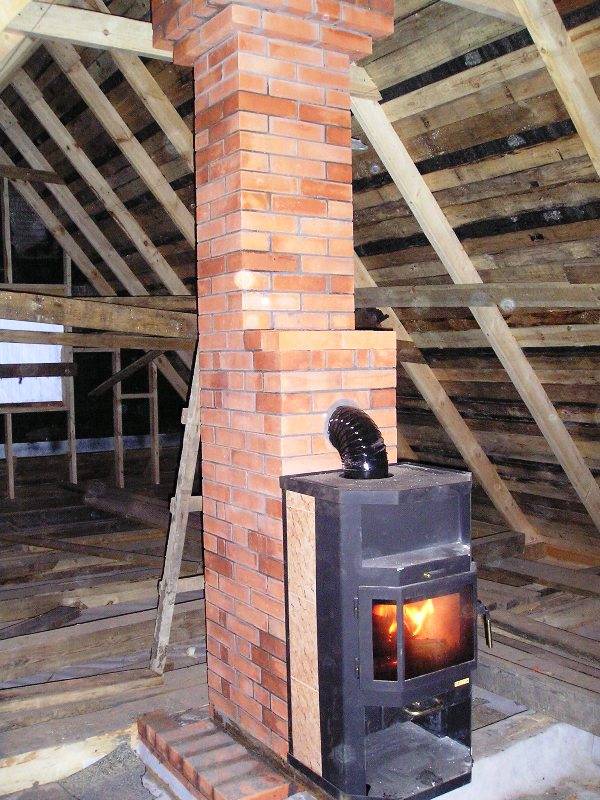
When firing up for the first time, it is necessary to follow the roof as well. Smoke should not come from the groove that we install at the last stage of installation.
At the last stage of the test, you need to properly warm up the system. If you have an iron stove, then you need to properly heat it up in order to check the stability of the chimney in advance. This also applies to a brick firebox.
If the smoke is removed successfully, sparks do not fly anywhere, then you have managed to build an excellent chimney. It is necessary to maintain it in working order, that is, to clean it in a timely manner. The procedures for cleaning the chimneys of stoves that use solid fuels are done 2 times a year.
Rules for removing the heating element to the outside
According to section SNiP 6.6 on "Stove heating", the developer must adhere to the following generalized rules:
If the rules for the location of a brick chimney are observed, contact of the chimney with any combustible surfaces and materials is excluded. For their implementation, as a rule, a pass-through unit is installed in the ceiling made of non-combustible materials.
Here, the strictest observance of fire safety standards is necessary, in particular, an indent of 130 mm in size when passing through difficult-to-combustible surfaces and up to 500 mm for a wooden floor (or any other, consisting of flammable substances).
It is important to keep the distance between walls, partitions and the heating element. Depending on the type of brick, the thickness of the walls of the chimney, the fastening mortar, the distance varies from 20 to 50 centimeters.
The clearance between the upper surface of the stove and the ceiling must be at least 350 mm if thermal protection is present and 1000 mm if not
The numbers vary depending on the material of the heating element, the frequency of using the stove, and the roof.
Through the roof

It is recommended to locate the chimney closer to the highest point of the house and erect 0.5 meters above it. The size of the seams, the filling of the gaps, the insulation of the pipe itself depends entirely on the selected material. Installation of the heating element, as a rule, takes place through a professional coating. However, most cases of leaks through the roof, for all its reliability, are precisely in the places where the heating pipe passes through the corrugated board. To avoid this, you can resort to the methods of the times when most houses used just stove heating. The method involves a thickening of a unique shape at the base of the chimney, preventing drainage along the walls
However, now this technique is not popular, and most often attention is paid to the correct insulation of the roof around the base of the pipe.
Adjacent to rectangular pipes
To insulate a brick chimney, a special metal belt, called an apron, is installed at the junction of the profiled sheet. Separate components of the heat-insulating element are brought under the corrugated board by 1.5-2 centimeters. In the places where the pipe passes through the ceiling, a special hermetic substance is poured. This prevents excessive moisture build-up.
Through the ceiling of wood
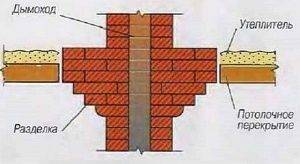
The passage of the chimney through the wooden floor is carried out with the help of a deliberate thickening of the outer walls of the chimney, called "fluff". The thickness is determined by how often and how intensively the heating will be. Laying ranging from one brick to one and a half. If the fire regulations are observed, a gap of 3 centimeters is made between the edge of the opening and the chimney. The ends are upholstered with several layers of felt or asbestos cardboard 10 mm thick. Then they are plastered. The surface can be protected with 40 mm thick asbestos-cement slabs, which are fixed with reinforced mesh or wire to the cement mortar.
The simplified version involves the purchase of a special ceiling unit with a reinforced box, filler and insulation. The structure is covered with an asbestos sheet on the outside and foil-clad mineral wool on the inside. The layers are about 3-5 cm thick. The gaps are filled with heat-resistant sealant.
When an ordinary ceiling
In this case, the passage of the pipe is made in the same way as through the wooden one.However, it is not always possible to exit the pipe through a normal ceiling. The way out of the situation is as follows:
- Cover the edges of the ceiling with heat-resistant insulating material.
- Cover them with metal strips or minerite.
- Sew up with a metal sheet from the side of the dwelling.
- Fill the voids on the upper side with heat-resistant material.
Output through the metal tile of a round pipe
Roofing passages with a circular cross-section are equipped with roof penetrations, which makes it possible to achieve good sealing of the chimney on the roof made of metal tiles. Roof penetrations can also lead out antennas, masts, ventilation ducts and electrical communications. They are used on various roofing materials. The foundation of the roof penetration is a steel sheet, hermetically connected to the hood. A special hole in the hood allows you to bring out a sandwich pipe through the metal tile, you just have to learn how to assemble the chimney with your own hands ..
For the manufacture of penetration, silicone or EPDM rubber is used: both of these materials can comfortably tolerate temperature fluctuations from -74 to +260 degrees. Before installing the pipe, the penetration is equipped with a hole, the diameter of which should be 20% lower than the pipe diameter. The process of pulling the adapter onto the pipe can be facilitated by using a soapy solution. After joining the sealant and the roofing surface, it completely repeats the texture of the roofing material. The area under the flange is covered with roofing sealant. Roofing screws are used as fasteners (installation pitch - 35 mm).
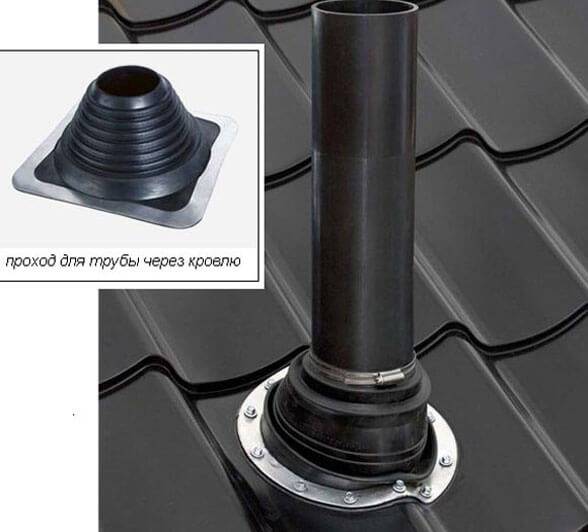
In most cases, it is recommended to use a sandwich pipe instead of a brick chimney. It contains two liners with different diameters, separated by a layer of thermal insulation (usually basalt wool). Due to its good performance, ease of installation and long service life, the sandwich chimney is far superior to brick or concrete elements. Such a flue duct does not overheat and does not accumulate condensate.
When independently equipping a chimney and cutting a pipe on a roof made of metal tiles, all existing building codes and rules must be strictly observed: they can be found in the relevant documentation. It is best to do this kind of work while building a house. However, sometimes this has to be done on an already constructed building.
This usually happens in such cases:
- Overhaul of the roof is in progress.
- The truss structure is being replaced.
- The home heating system is being installed or replaced.
If you are not confident in your abilities, it is better to invite professional roofers to carry out the work.
