Construction instruction
It is advisable to draw up a detailed scheme for laying a Dutch oven with a stove before starting work. It will be convenient to navigate along it during the installation of the entire structure.
First, you need to dig a hole about 50 × 50 cm to 75-80 cm depth under the stove. At the bottom of the pit, we fill in a layer of sand 10 cm thick and the same layer of rubble. Further, a reinforced mesh is placed over the entire height to the top of the pit. We mix a solution of concrete from sand and cement in a ratio of 1: 3. Next, we assemble the formwork from plywood or boards and fill everything with mortar, after which we leave the structure to dry for a week.
When the foundation is completely solidified, waterproofing from roofing material laid in two layers is laid on it. Next, we take clay (8 liters) pre-soaked for 2 days, 900 g of heat-resistant oven glue and 2 buckets of sand, mix everything thoroughly. The resulting mixture, similar in consistency to thick sour cream, is applied over the roofing material.
Steps guide
Before starting work, it is worth making a diagram and a detailed drawing in order to avoid gross mistakes. For the construction of the Holland, technology necessarily requires a solid foundation and it should not come into contact with the foundation of the house. In terms of dimensions, it is 20 cm larger than the stove. They are mounted with their own hands either from bricks, or in the same way as the base for the building - by pouring concrete mortar with reinforcement. The second option is preferable for the Dutchwoman, as it is more reliable and is able to withstand heavy loads. In any case, before laying a brick oven, you must wait until it dries completely.
After that, the foundation is covered with a layer of waterproofing (roofing paper, glassine, roofing material, mastic, bitumen). Next, a mortar is prepared for laying bricks. Clay, sand and water are mixed in a ratio of 1: 1: 4, the consistency should be similar to thick sour cream. Then sand up to 5 cm thick is poured and poured with water. For the construction of the stove, solid ceramic and fireclay (refractory) bricks are used. The latter is necessarily used to form a firebox and places subject to significant heating and fire, since the usual one is not able to withstand high temperatures.
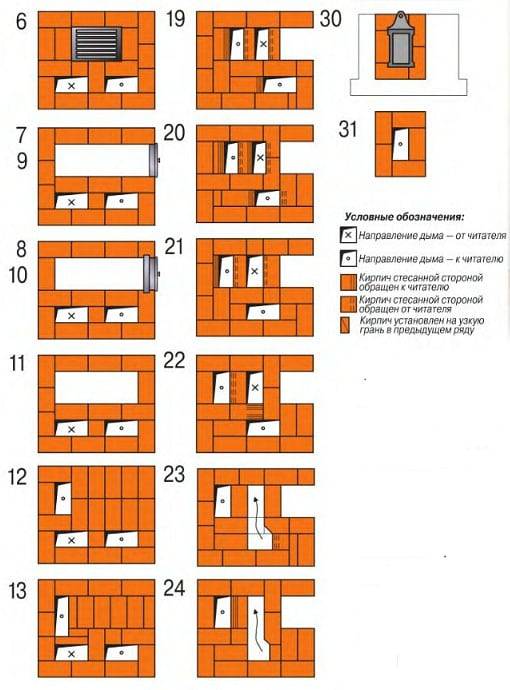
Detailed step-by-step instructions for ordering a Dutch woman with a hob and oven located on the side:
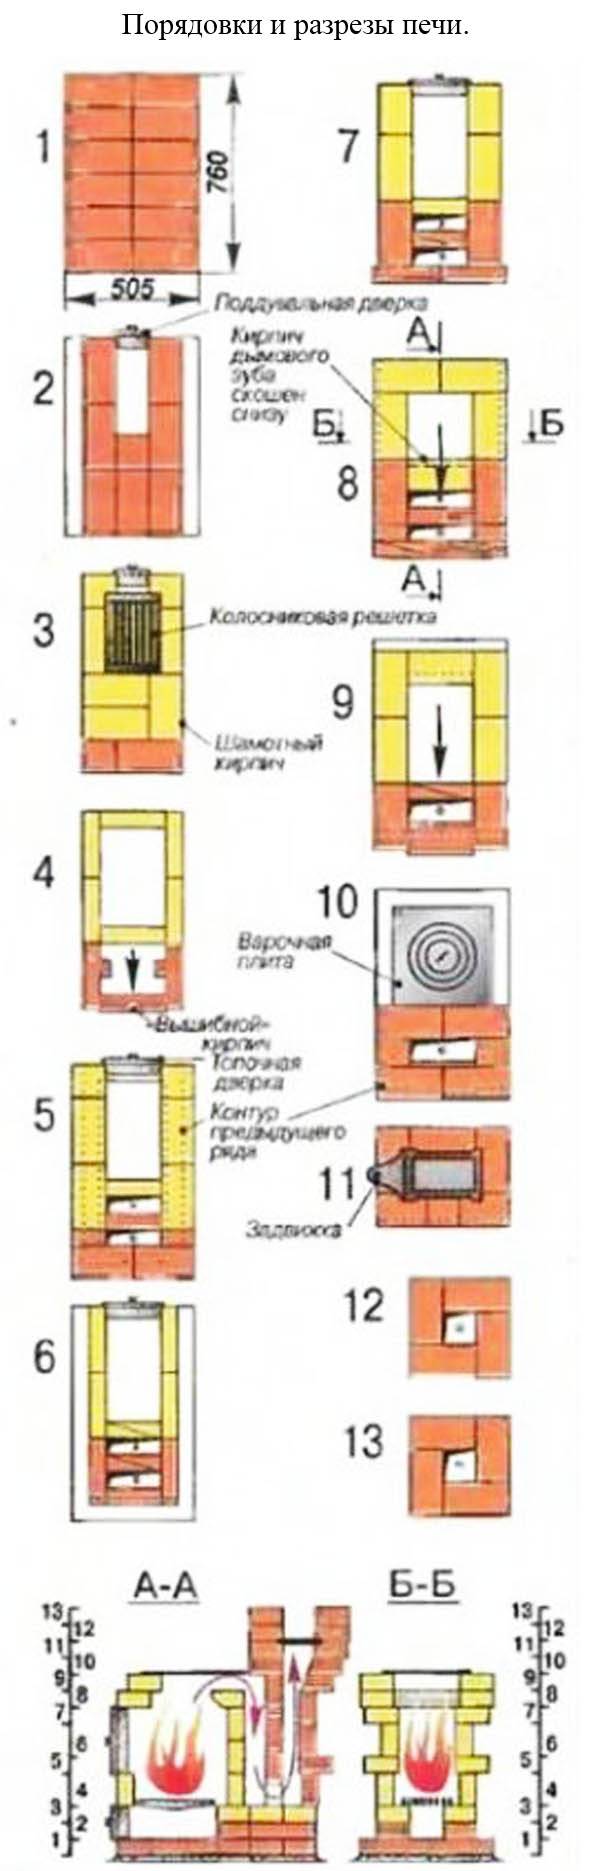
1. The 1st, 2nd and 3rd rows of the stove from ordinary bricks are laid in a continuous layer. All the time, you should check the evenness of the order and the verticality of the corners. For this, according to the technology of installing a heating furnace, it is recommended to use a building level and a plumb line together.
2. In the 4th and 5th rows, the door for the blower is placed, in the 6th it is laid, moreover, with a brick, sawn lengthwise. At the same stage of the ordering of the Dutchwoman, a place for the grate is being prepared. For this, a recess is cut in the blocks 5 mm longer than the grate, so that there is space for the thermal expansion of the metal.
3. In the 7th row, the Hollandka firebox door with a stove is being installed. On the 8th and 9th, they continue to lay everything in the same way as before.
4. In the 10th, the furnace door of the Dutch oven is blocked and recesses are made in the bricks for the stove. After installing its edges, it is imperative to close it with a metal corner. Thanks to him, the blocks will not be damaged.
5. From the 11th to the 14th stage of the ordering, the Dutch women form a zone above the hob. Moreover, in the latter, the second corner is mounted in the same way as the first. The following rows will be placed on it.
6. On the 16th and 17th, a door is being installed for cleaning the Dutch chimney channels, and bricks for the oven are also being installed. On the 18th it overlaps.
7. In the 21st it is recommended to put metal strips to make it easier to lay bricks over the oven. At the 22nd stage of the ordering, it overlaps.
eight.In the 23rd, a gate valve for the Dutch chimney is mounted; for this, bricks should be sawed, depending on its size.
9.The 24th row of a heating stove with a hob is made larger than the rest (should protrude at least 3 cm). The next stage is kept within the standard.
10. From the 26th row, the construction of the chimney begins.
Brick laying order
Dutch device
- The thickness of the walls of the "Dutch" is equal to one brick.
- Having laid the waterproofing material on the frozen foundation, a thin layer of sand should be poured on top of it, and the first row of bricks pre-soaked in water should be laid flat, keeping a small distance between them. When laying the furnace itself, a clay-based mortar is used: on top, on the laid bricks, a mortar is applied, which gradually sinks into the space left between the bricks. All subsequent rows are bonded with the solution as usual.
- Dutch masonry Immediately after laying out the first row, it is necessary to pull the ropes strictly vertically from the corners and the middle of each of the 4 walls in order to keep the dimensions of the "Dutch" and lay it out evenly.
- The second row is required to be laid out entirely, with a shift to the floor of the brick relative to the bricks laid along the perimeter of the first row. In the third row, you need to equip the blower door. Since a ready-made metal door is used, it is necessary to leave space both in the horizontal row and in the vertical ones for mounting the door. Between the fourth and fifth rows, you need to lay the grate with the possibility of its subsequent replacement, and starting from the 6th row, you need to start laying out the fuel chamber, including its door.
- The walls of the fuel chamber must continue to be laid out up to row 13 inclusive.
- In the 14th and 15th rows, you need to equip the overlap of the firebox, laying out the bricks on the edge. Further, with the help of bricks placed on the ribs, an elongated chimney is formed, along which smoke will rise as wood or coal burns in the fuel chamber.
- If you need to build a compact "Dutch woman", then its chimneys with the help of a special layout technology seem to be rolled into a ring. When installing a large stove, the long chimney is positioned without folding, and thus, the classic "Dutch" takes up quite a lot of space.
- Finally, the long chimney is reduced to a chimney, exiting through the roof. In the area of \ u200b \ u200bthe roof, you need to lay out the bricks again flat, thus reaching a greater thickness. In addition, insulating materials should be used to prevent the floors from heating up too much.
- The operation of the "Dutch" is possible already 2-3 weeks after it was laid out.
After laying
Drying
Drying a brick heater is one of the mandatory measures that are carried out before the start of active operation of the device. The oven is dried in two stages:
- in vivo. The period of this type of oven drying after the completion of the masonry work is approximately 6 - 8 days. At this time, all doors and dampers must be open, ensuring the natural circulation of the air flow, which, passing through the channels of the device, removes wet vapors through the chimney to the street. Thus, only drying of the surface of the masonry layers is ensured;
- forced drying. It is carried out using dry small firewood every day for a week during the warm season. In the autumn-winter season, the time for forced drying should be extended by 1 - 2 weeks.
The end of drying can be signaled by the absence of condensation products on the doors and valves of a closed appliance.
Finishing and cladding
The device for finishing the Dutch oven can be done in different ways: cover with a layer of decorative plaster and whitewash, revet with tiles, tiles or flat stone.
Expert opinion
Pavel Kruglov
Stove operator with 25 years of experience
In order to increase fire safety, a heat-insulating material must be placed on the floor covering in front of the blower door, and covered with sheet steel on top, the width of which must be at least 0.6 m.
First test furnace
When all parts of the stove and the chimney are completely dry, you need to carry out a test firebox of the stove.
Basic moments:
- Short-term lighting is best done in the late evening, when the temperature outside is lower than indoors. Fuel loading at the first fire must be minimal. If the ignition was successful, you need to add a little damp firewood, which smokes more.
- If the chimney is of sufficient height, well insulated, then the smoke will not penetrate into the room. If the opposite situation arises, then you need to check the channels for inaccurate installation and damage.
- The last stage of the first furnace is the maximum heating of the unit for several hours. During this period, check whether cracks have appeared in the seams on the front plane of the device.
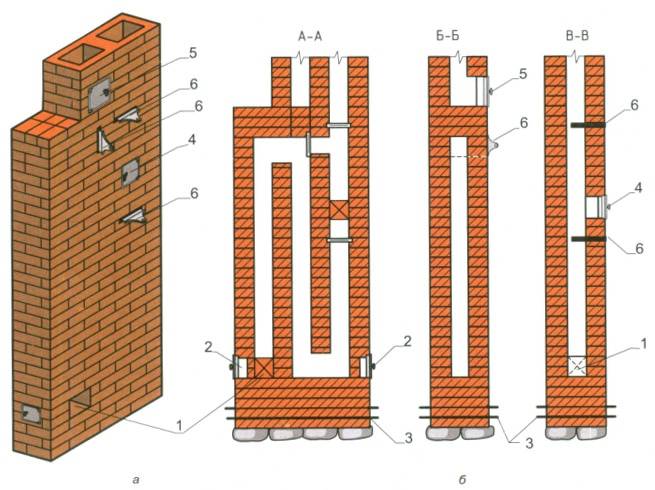
Features of the masonry of the Dutch oven
Galanka: main characteristics and materials Galanka oven (gulanka, Dutch) can be used for any purpose, except for baking bread. The ovens can be laid out with your own hands, following certain instructions.
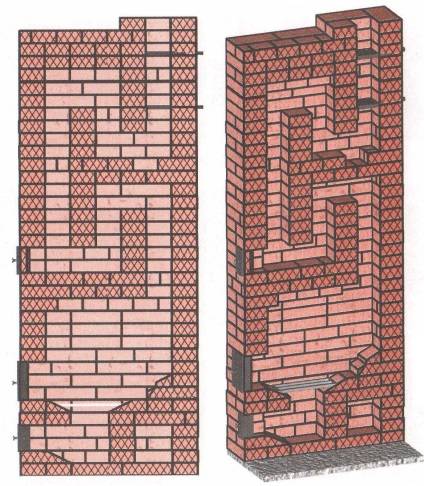
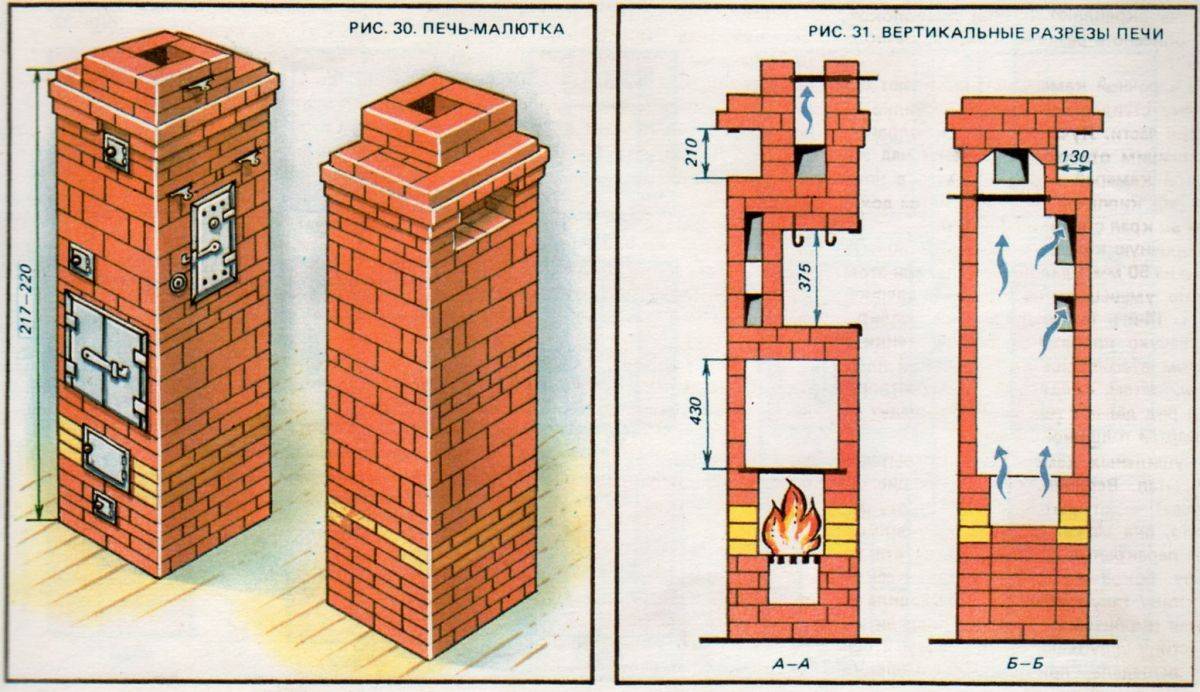
Scheme of the Dutch oven.
Galankas are quite effective, as they evenly and quickly warm up an average-sized room.
Thanks to the vertically positioned meandering passages # 8212; smoke circulation, the stove is able to keep, depending on the outside temperature, heat from 12 to 24 hours.
Width can be from 70 cm to 1 m, depth # 8212; 1-2 m, and height # 8212; 2-2.5 m.
The Dutch stove is not large in size, so it is possible to build it yourself. To do this, you need to purchase materials:
- red brick # 8212; 382 pcs;
- refractory brick # 8212; 43 pieces;
- cast iron tiles (additional) # 8212; 2 pcs.;
- pre-ceiling sheet # 8212; 1 PC.;
- steel corners # 8212; 3 pcs.;
- steel strips.
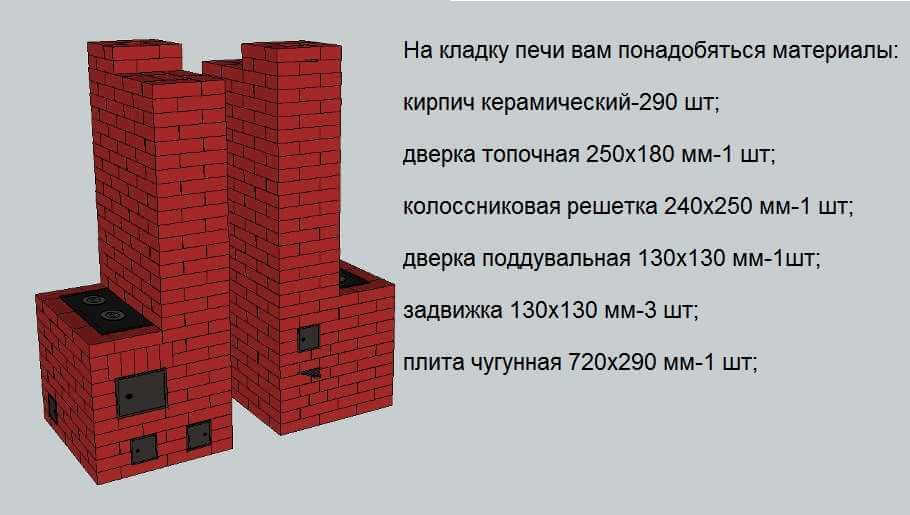
Some of the metal and cast iron items are sold in kits. They include stove, grate, latches, doors, oven, hot water box.
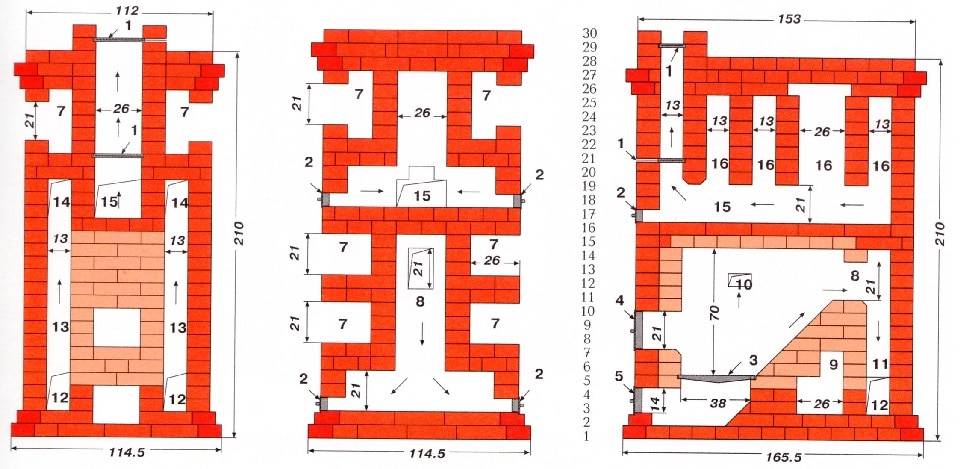
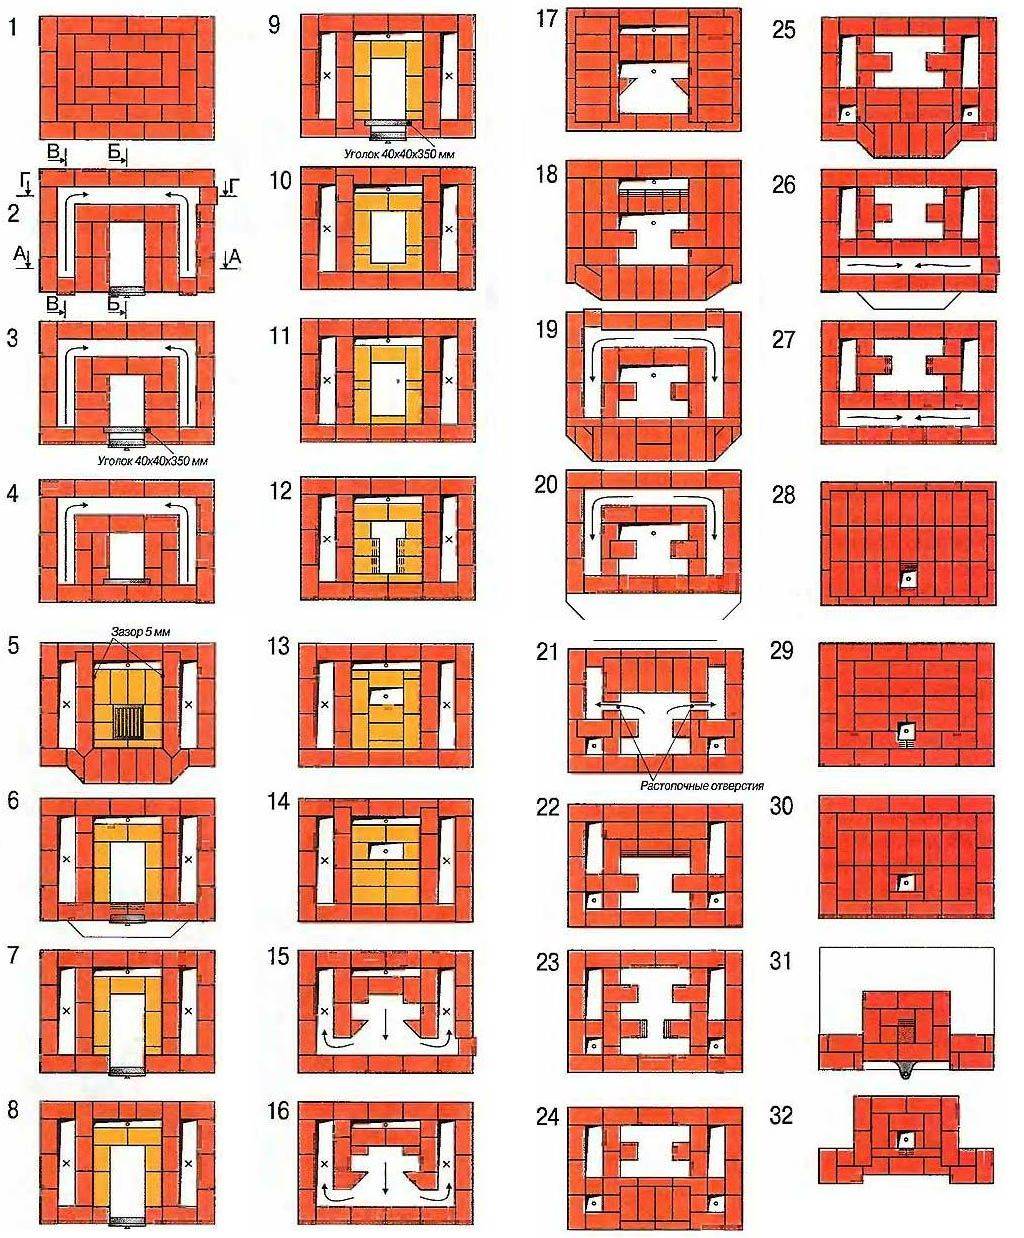
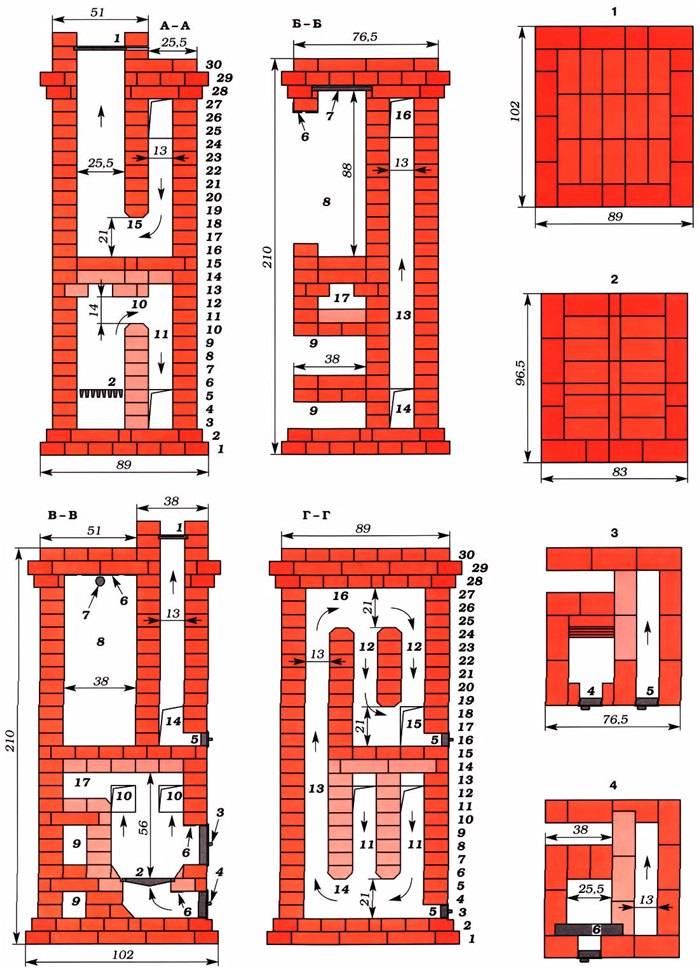
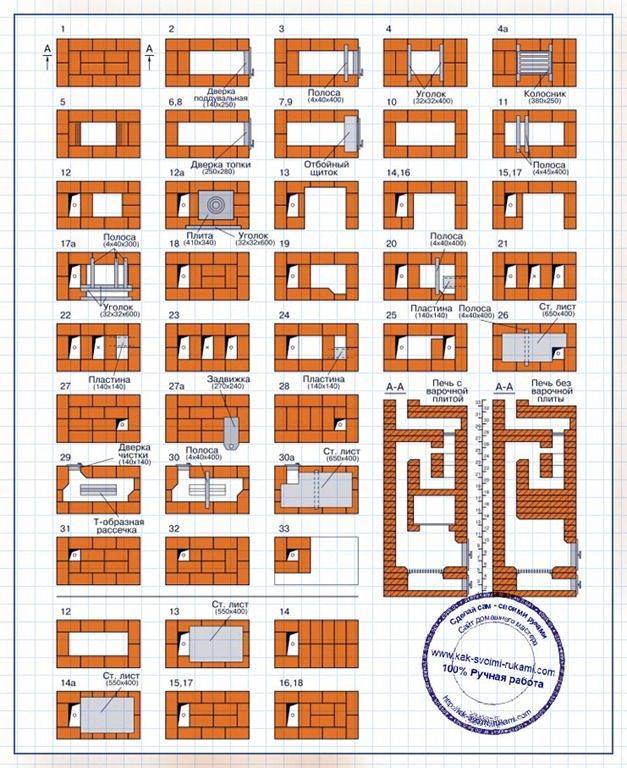
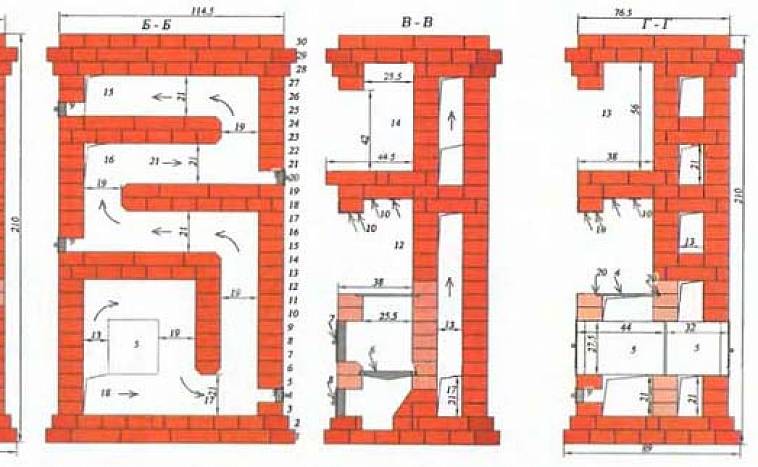
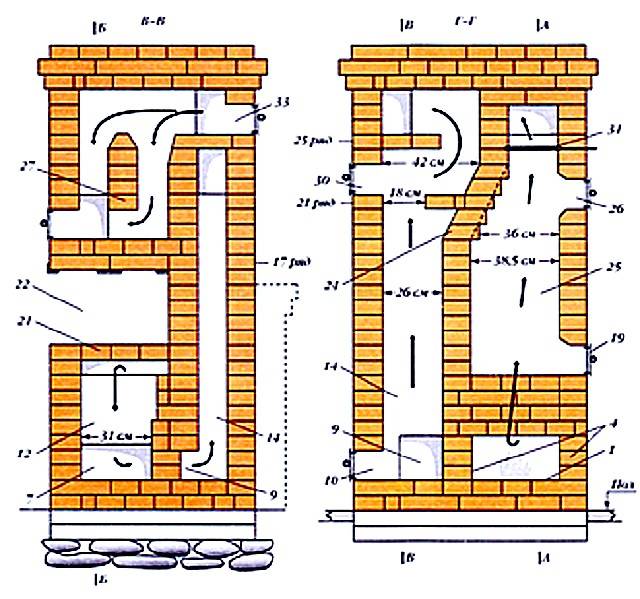
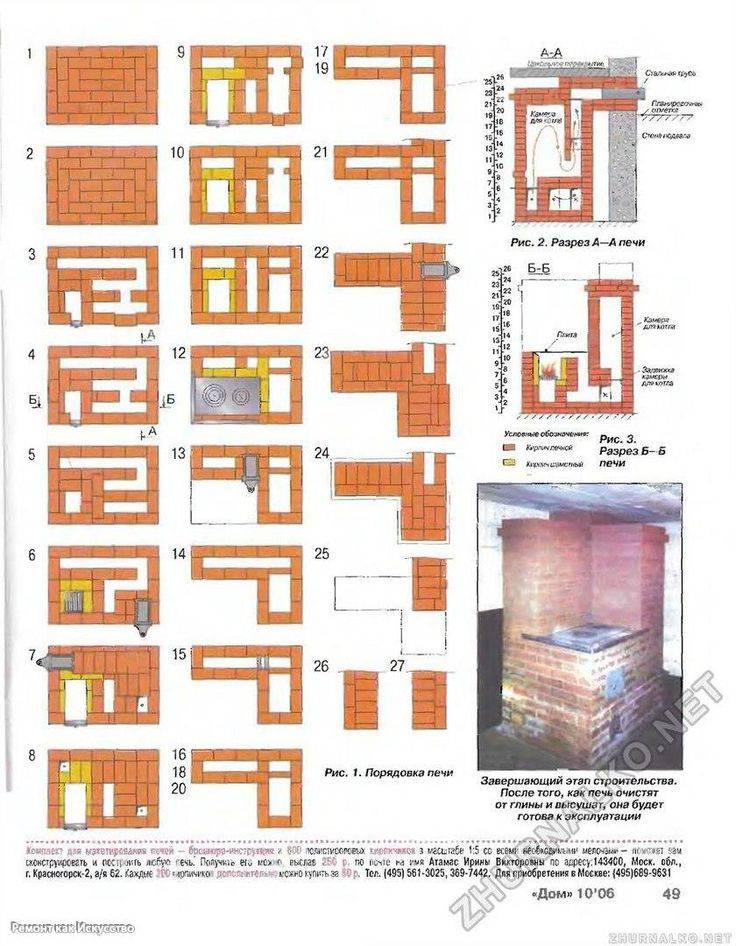
The order of laying the stove-galanka
Furnace diagram # 171; Galanka # 187;.
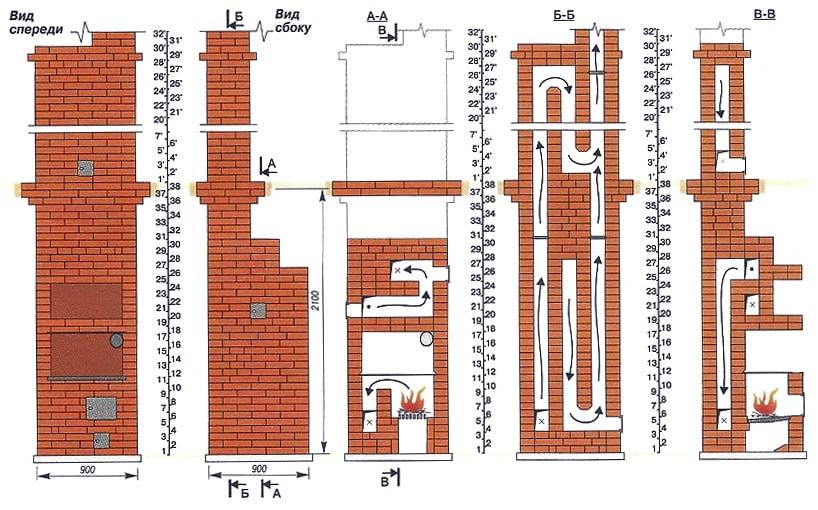
For marking rows of masonry, order # 8212 is used; slat with serifs corresponding to the height of the masonry row. When laying with your own hands, proceed according to step-by-step instructions and drawings (drawing 1).
The first 2 rows are laid, observing the dressing. A blower door is installed on top of the 2nd row, which is covered with bricks in the 3rd line. A gap is left for the cleaning window (under the oven).
The oven, inserted in the 4th row, is reinforced with roofing iron from 3 sides. On the sides, the oven is lined with refractory bricks placed on the edge. A combustion door is installed at the same level.
The laid 5th line is fixed with a blower door and a cleaning window located under the oven.
A cast-iron grate is installed, lined with refractory bricks under the firebox. The oven and the furnace door are fixed with masonry of the 6th row.
For the walls of the oven in the 7th row, refractory bricks are used, laid out on the edge. When laying the 8th row, the furnace door is strengthened, a steel strip is attached to it from above. The 9th line is laid on top, the slab is installed using 10 mm steel plates using bricks laid on the edge.
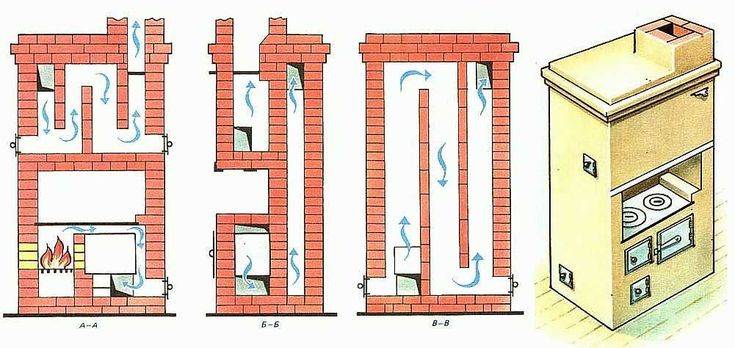
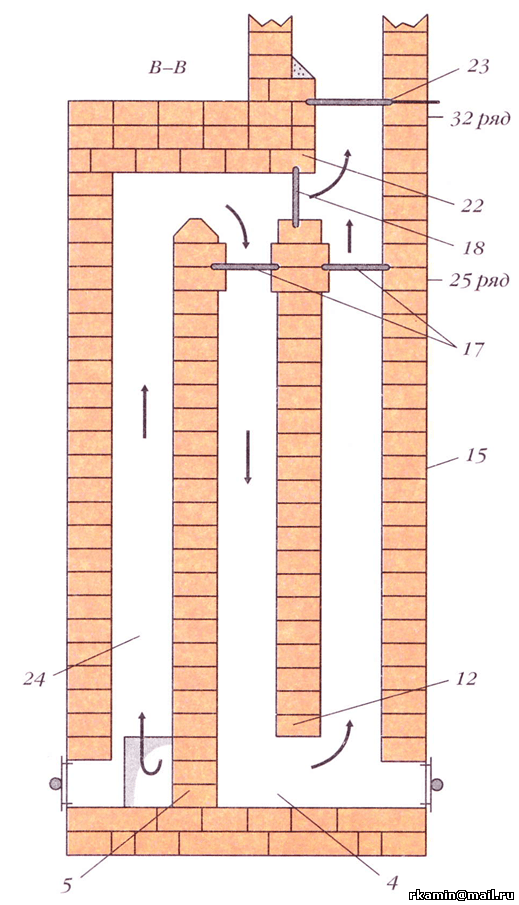
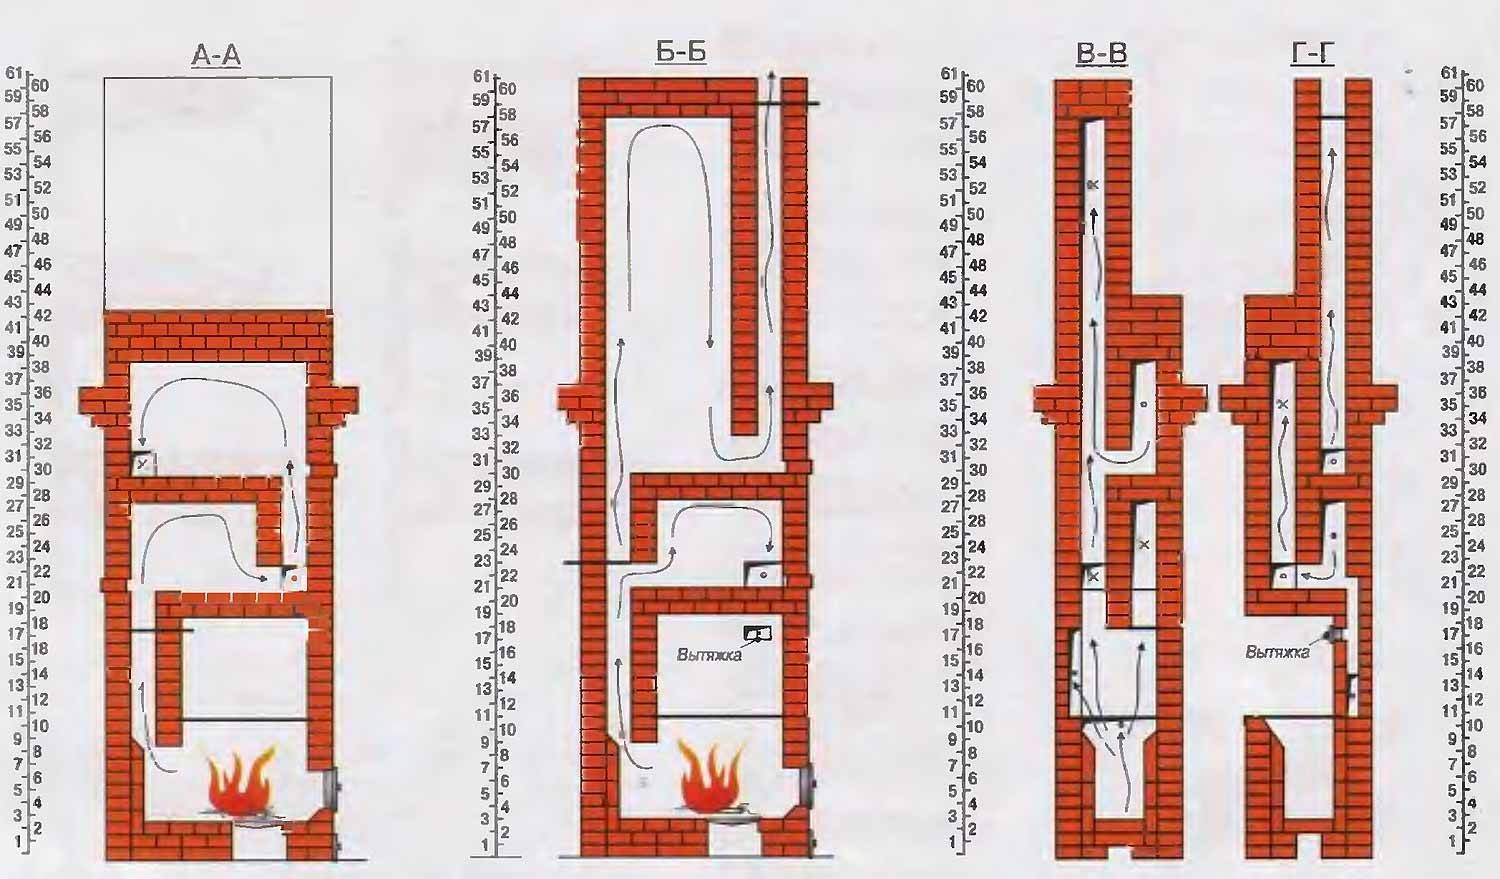
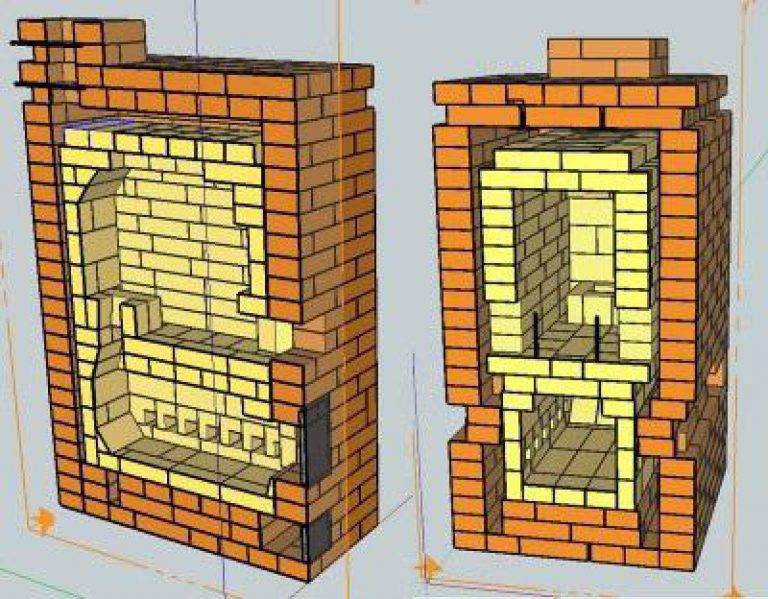
Smoke system of the galanka stove
The scheme of the furnace is clearly shown in sections A-A and B-B.
In the 10th tier of the galanka, a cleaning window is left, which is overlapped by the 11th row. 2 more windows are left in it (for cleaning the lowering channels and removing soot). Overlaid on top of 3 strips of steel # 8212; the hanging inner walls will rest on them.
The canal cleaning windows are overlapped by the 12th row.
A cooking chamber is installed. A wire is passed under it, with its help the frame of the chamber door is fixed.
The bricks, placed on the edge in the 13th row, form the walls of the steam collector on both sides.
A steel strip and a corner are laid on top. In the 14th tier, a box of side walls and a shield is laid out. The ceiling of the cooking chamber is covered with bricks in 2 rows. A hole is left in it for extracting steam from the oven.
In the 15th and 16th rows, the basis of 2 ovens is laid. The lower, small ceiling is formed by a sheet of roofing steel placed in the 16th row. Covering the steam hood, you should reduce its cross-section to 21 rows.
The 17th and 19th tiers are laid in accordance with the order. At the same time, in the 18th row, a cleaning window is formed in the walls of both channels.
The chimney is blocked by the 20th row. The large stove is covered in the middle with a strip of steel and on the edge # 8212; steel corner. Its ceiling is formed when laying the 21st row when the smoke circulation is blocked. Steam and smoke dampers are installed at the same time.
From the next row, the furnace neck is laid out, turning into horizontal cutting in the last 2-3 rows. The cross-section of the chimney to the chimney masonry (a second valve is installed in front of it) should be halved for draft.
Furnace varieties
Since the development of the Dutch oven, a large number of modifications have appeared. It is constantly being improved and certain changes are made. Therefore, almost all heating structures began to be called Dutch. It should be noted that the name of this oven was invented in Russia.
Russian Dutch
Many craftsmen began to change the appearance of an ordinary Russian stove and began to call them Dutch designs, but from the technical point of view, they have nothing in common. They began to build such stoves after Peter I pointed out that all heating structures should be built on the basis of Dutch devices. Domestic craftsmen thought of adding both options and developing a completely new device. Then the new version returned back to Europe and began to be widely used among the population.
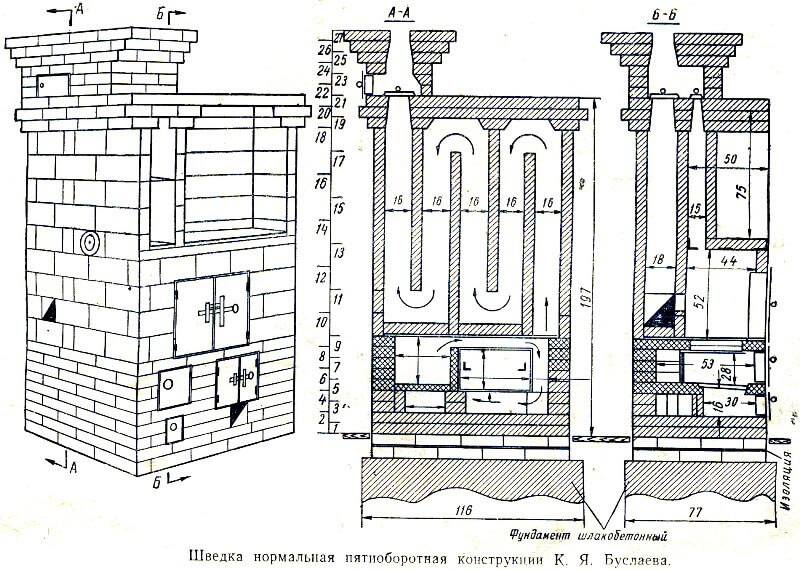
Swedish ovens
Unlike the Dutch version, the Swedes are equipped with a cooking chamber and stove. Therefore, they can be used not only for heating the room, but also for cooking. If necessary, an oven, a heat generator or a hot water box can be installed in such a structure. Ordering will help to accurately lay out all the ranks of the Swede.
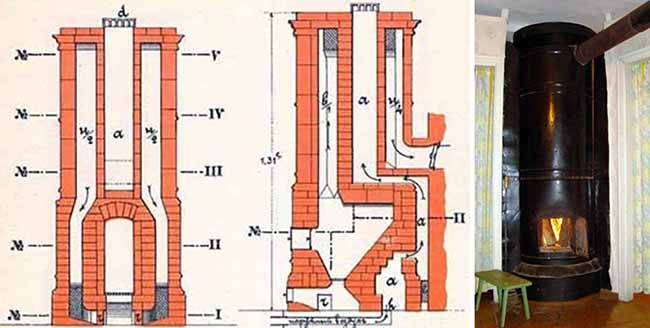
Round dutch
This option was also developed in Russia. although it is of German origin. The scheme of the device is quite simple: smoke circulation, three channels. The stove works by smoldering wood fuel. It is built on an iron casing, which reduces its cost. At the same time, the heating structure has good heat transfer. However, a large amount of heat is escaped through the pipe. Despite its low cost, the device is fire hazardous, soot appears on the casing. requires regular maintenance, which is not easy to give.
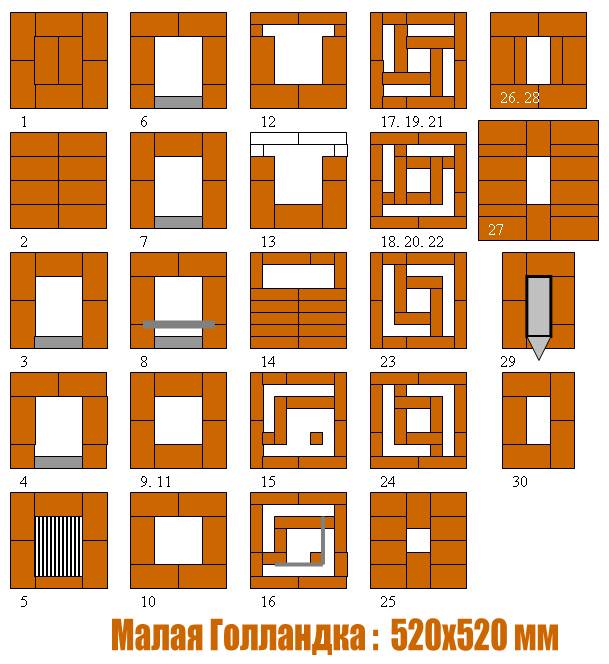
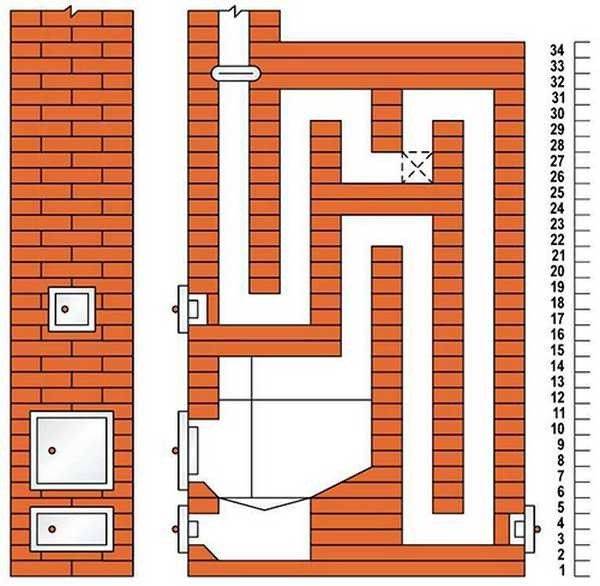
Small dacha
This design option is a small stove, which is designed to heat a small area, up to 20m2. Coal or wood is used as fuel. The prepared scheme and ordering will make it possible to manufacture a structure of appropriate dimensions. Small dimensions are achieved by folding the smoke pipes into a small ring. The dimensions of the structure are 520X520 millimeters.
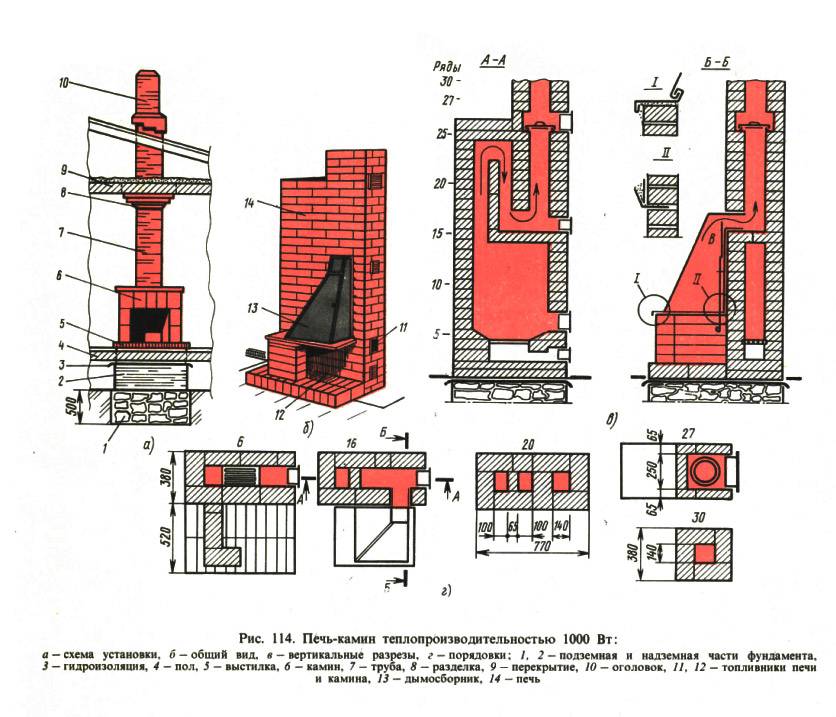
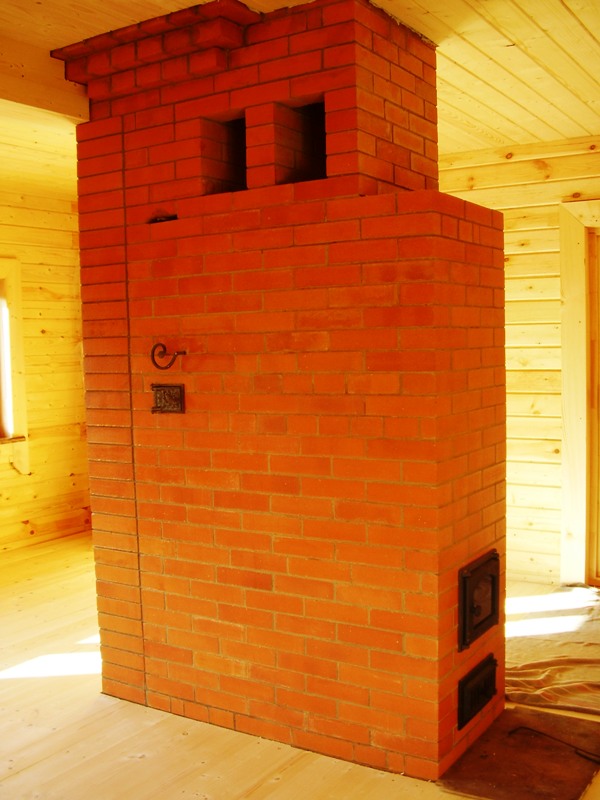
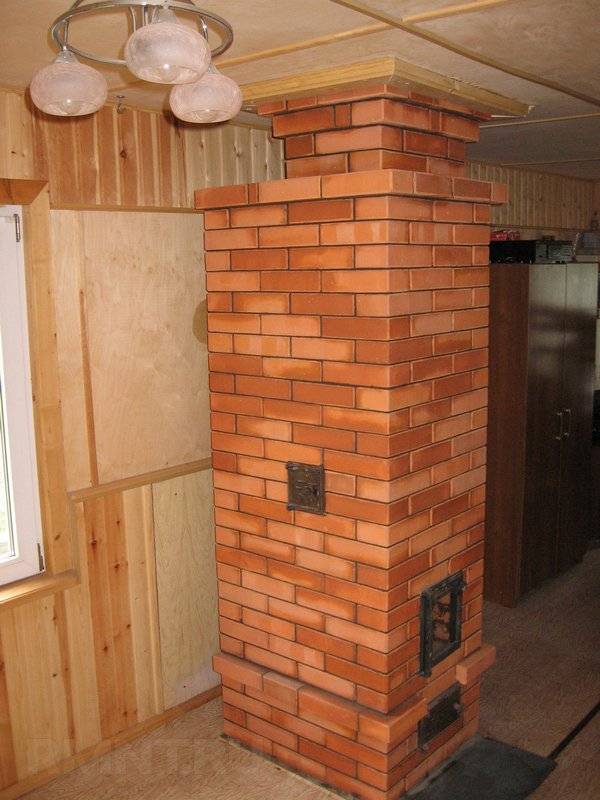
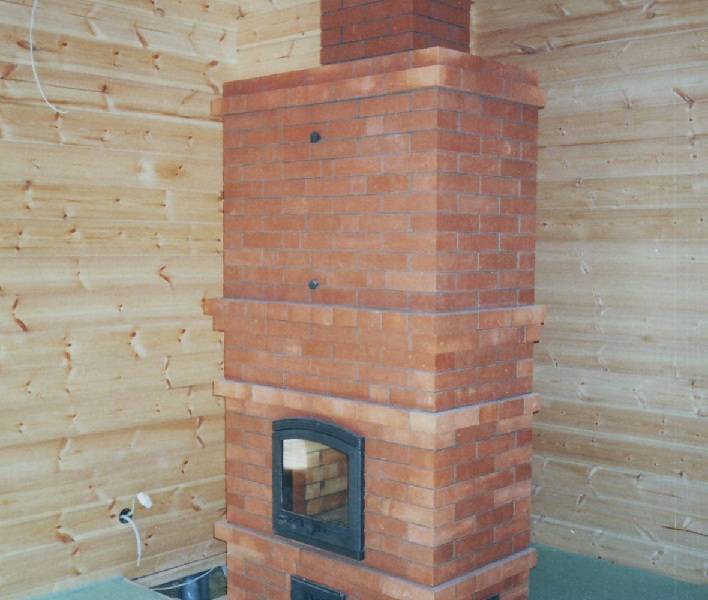
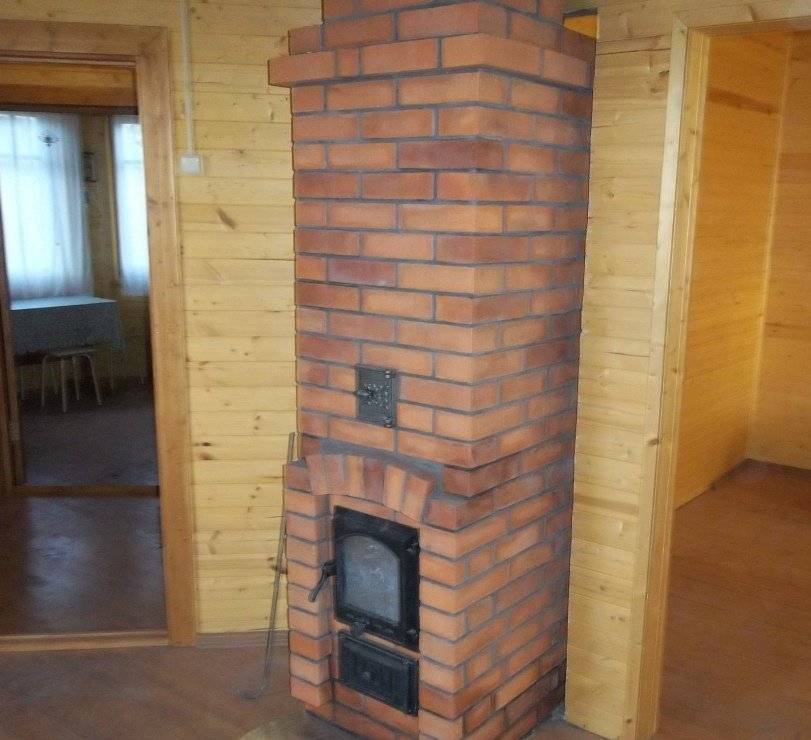
What does a Dutch oven look like and why is it so popular
Dutch woman's appearance
An uncomplicated, at first glance, structure has many advantages:
- "Dutch" is able to quickly warm up from the smallest portion of fuel. At the same time, its excessive consumption during heating after a long idle period is very small.
- The design of this furnace requires the use of a relatively small amount of material, therefore it is relatively lightweight. For comparison: a large Dutch oven is built from 650 bricks, while a large Russian one is from 2500.In this case, the heated area for the "Dutch" is 60 m2, while for the Russian - only 45 m2. In addition, the principle of the "Dutch" device allows you to significantly reduce the original dimensions - down to 0.5x0.5 m in plan. This advantage allows you to safely place a "Dutch woman" on the floor.
- The duct labyrinth in the body of the stove has great resistance to reverse thrust, therefore, smoke almost never occurs when the wind blows into the chimney.
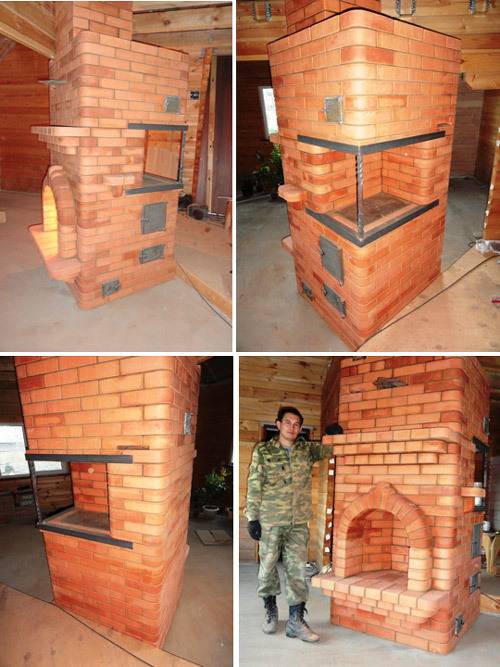
- Although the Dutch stove was originally created as a purely heating stove, it can be easily equipped with a hob - the combustion mode will not be disturbed.
- The channel part of the furnace can be pulled up by 2 floors (and some of them extend up to 4), while its efficiency remains the same.
- The design features in combination with a small wall thickness exclude the development of significant thermal deformations in the masonry, therefore the Dutch woman is undemanding to the quality of materials. A good brick (refractory) is required only for the construction of the firebox. The rest is sometimes even laid out from burnt or hollow bricks.
- In the duct part, you can easily find an area with the optimal temperature for installing an oven or a water heat exchanger.
- Irregular use does absolutely no harm to the oven. At the same time, you can drown it, bypassing the accelerating phase - the masonry will not crack from this.
As you can see, the list of advantages of this stove is very impressive. But, despite this, it cannot be called ideal. This is the price at which these advantages were achieved:
- "Hollanda" has a very low efficiency - within 40%. For comparison: the Russian stove assimilates more than 80% of the thermal energy stored in the fuel.
- It is necessary to hesitate at least a little with the overlap of the view after heating, as the oven will immediately be chilled with cold air. It is drawn in through the chimney by a duct labyrinth that acts like a siphon.
- "Dutch" is not designed for the use of waste fuel that completely burns out in a short time. It should not be heated, for example, with reeds, straw, brushwood and similar materials: the lion's share of the heat produced will escape through the chimney. With the maximum effect, the stove runs on long-lasting fuel (wood, coal, peat), and in the smoldering mode.
- When using inexpensive fuels with high ash content, the chimney quickly becomes overgrown with soot.
With an overly intense firebox, a Dutch oven can emit carbon monoxide into the room.
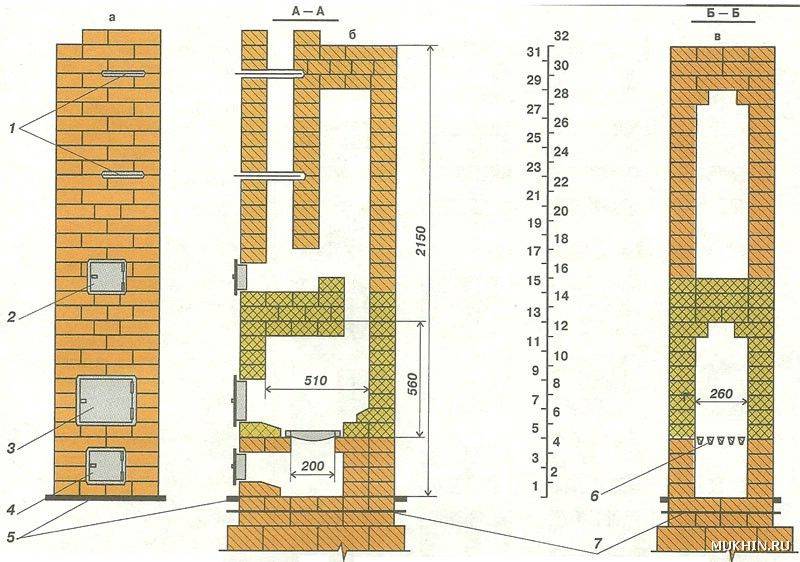
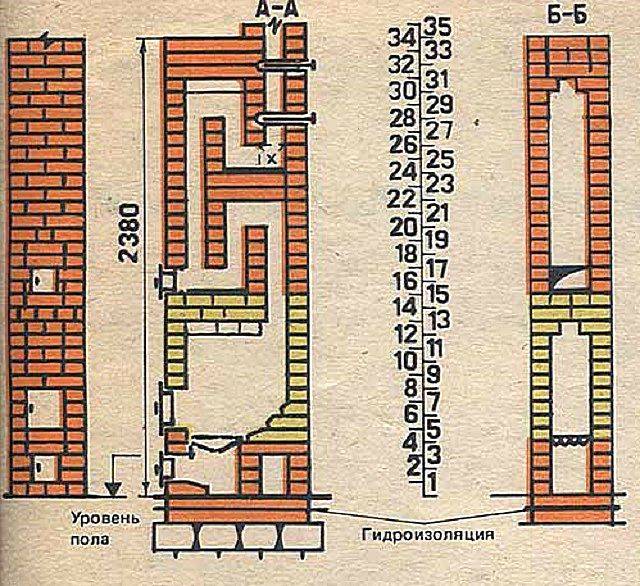
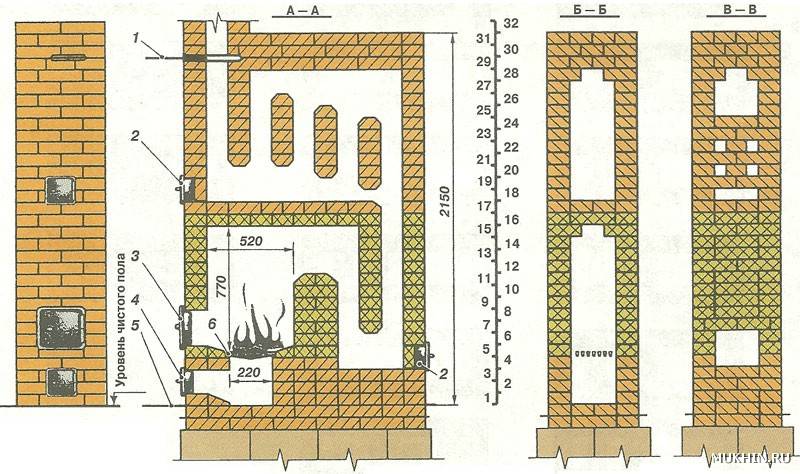
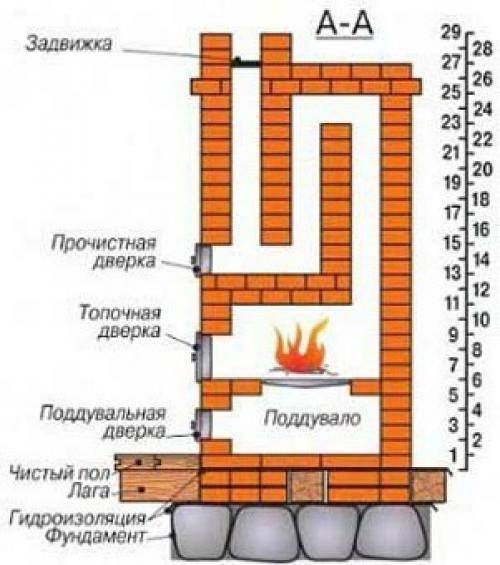
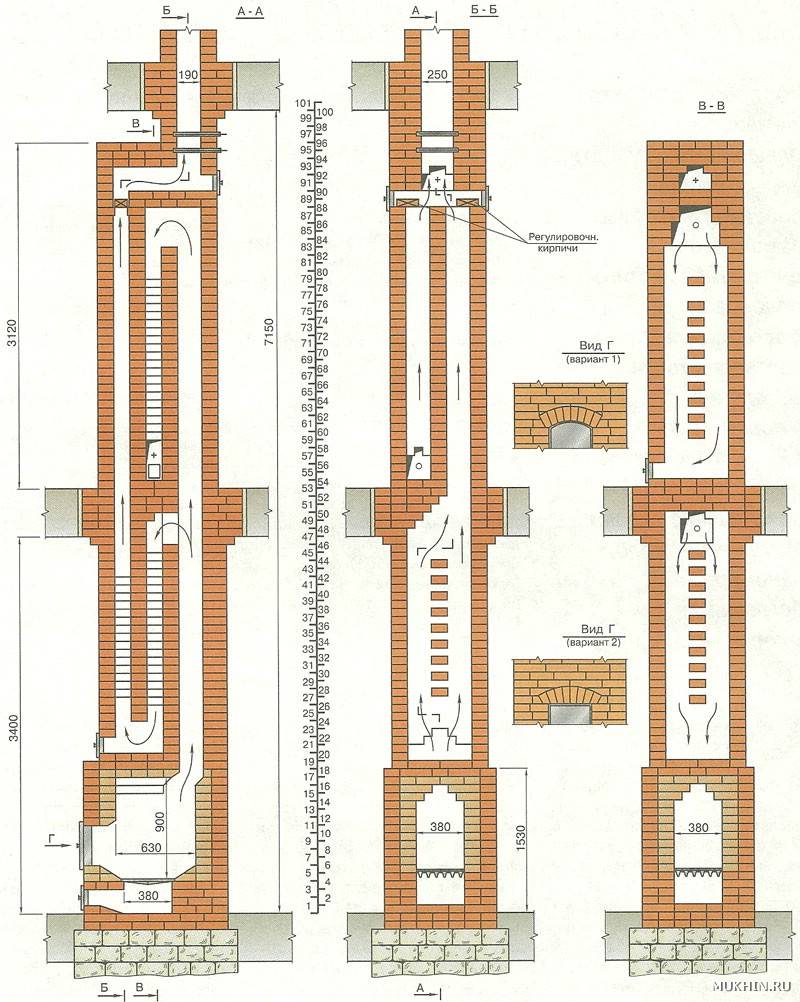
Stage 4. Laying
Attention! When laying, each brick should be placed in water for ten seconds. This is to prevent the bricks from absorbing moisture from the clay.
First, the base of the structure is covered with two layers of roofing material. Next, a 5-centimeter layer of river sand is filled up. The sand is leveled, checked for horizontalness. after which it is sprayed with a small amount of water.
Upon completion of the preparatory work, you can proceed directly to the masonry.
Row number 1. The first row is put "dry", without mortar. This will require twelve bricks - they are placed, checked by the mounting level and only after that they are covered with a slight layer of mortar.
Row №№2,3. The bricks are laid flat, this time on the mortar (then they need to be laid out "on the edge" up to the top of the firebox).
Row №№4,5. Fireclay bricks are used, often yellow in color. In parallel, a lining is formed for the partition of the chimney channel. The back wall is laid out of "knock-out" bricks, laid "dry".
Attention! The solution is not needed, because
this brick will be removed all the time to clean the chimney from soot.Of course, the back wall can be equipped with an additional door instead, but in this case the heat will quickly escape from the structure.
Also at this stage you need to install the door for the firebox. It is advisable to wrap it with asbestos, although recently this material has been quite difficult to find. Alternatively, any other non-combustible material can be used. To fix the door, steel wire is used, which is inserted into the masonry seams.
Row number 6.7. Here everything is done in the same way as in the fourth row. The order may change somewhat even before the top of the door, but in this case it all depends on the height of the future structure. Upon completion of the door strapping (this often happens when laying the seventh row), the bricks are laid flat again. The dressing is monitored all the time, and the horizontalness and location of each corner of the oven are periodically checked.
Attention! In the seventh row, the brick is laid flat, and the back wall remains "on the edge". The method of laying bricks changes only starting from the eighth row
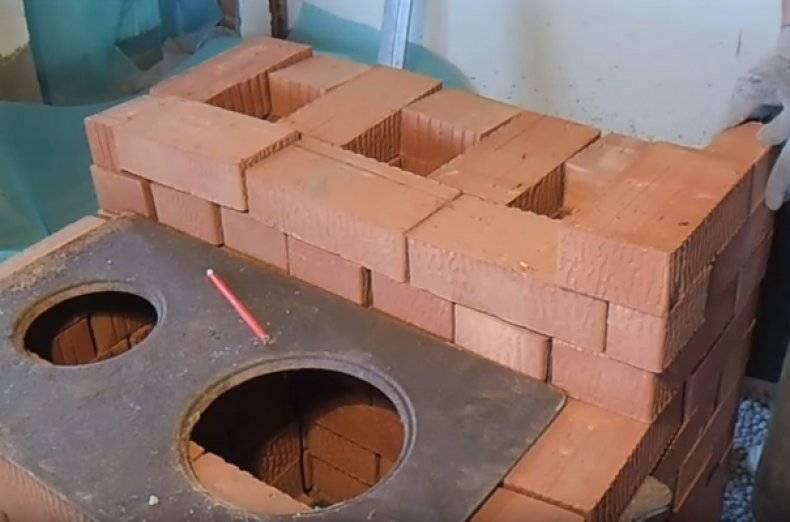
Row number 8. It differs in that a beveled brick is installed above the combustion chamber. A similar trick will allow you to use the stove as a fireplace after opening the firebox. This row completely covers the furnace.
Row number 9. The brick moves back (about 1/2 of the width). On top of the ninth row, some kind of non-combustible material (for example, asbestos cord) is laid, on which the hob is installed (if it is provided by the design).
Laying the hob seal
Row number 10. Next, a base is erected under the chimney. If a Dutch woman of light modification is being built, then it is better to use a metal pipe as a chimney, since the brick structure will be too heavy.
Row number 11. At this stage, a valve is inserted, pre-sealed with asbestos. In parallel, a joint is formed between the structure and the chimney. It is characteristic that the laying here should be done in ¼ bricks.
Attention! In order to avoid typical mistakes, beginners are advised to first fold the oven out of bricks without using mortar and only then, if everything is fine, re-shift it
Preparatory stages
Before proceeding directly with laying the stove, you need to fill in the foundation and prepare a bonding solution.
Arrangement of the foundation
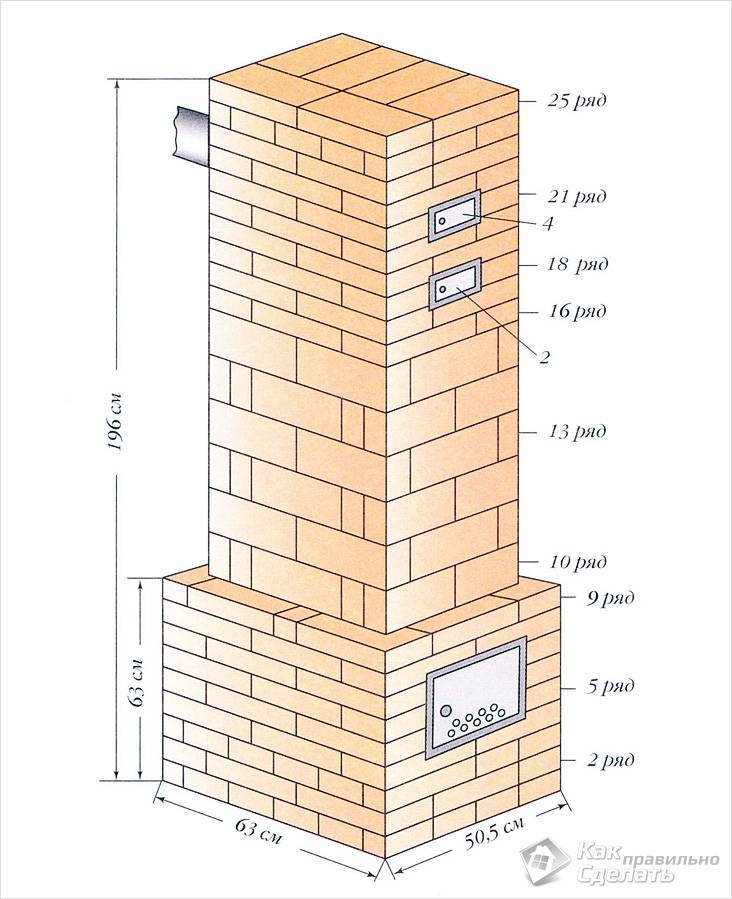
If the room already has a floor covering, it must be removed. Ideally, the space for the Dutch oven is calculated even during the construction stages of the house. The furnace is separated from the main foundation by a sand cushion. A diagram of a standard foundation for a brick oven is shown in Figure 7.
Foundation diagram for a brick oven
A pit of a suitable size is being prepared. Its dimensions are determined simply: each side of the oven + 15-25 centimeters. The pit must be at least 50 centimeters deep. The bottom is covered with a layer of sand of 15 centimeters, then a slab or brick is laid. Everything is poured with a thick solution of cement and sand, mixed in proportions of 3: 1.
↓ Be sure to study the recommended material on the topic ↓
How to order a sauna stove - design and implementation
Until the solution has hardened, the surface is reinforced with rods. Reinforcement mesh is laid out. The recommended mesh size is 10 × 10 cm. At the intersections, reinforcement rods are also vertically installed. The joints are fixed with steel wire.
A 10 cm layer of crushed stone is poured onto the reinforcement. Then the foundation formwork is prepared. Each side of the formwork is wrapped with roofing felt or waterproofing. The surface of the crushed stone is poured with a layer of concrete and leveled.The wet surface of the foundation is sprinkled with dry cement and left to dry completely.
Ideally, the foundation should be infused for a month. The minimum period for solidification of the foundation is a week. When the foundation is completely frozen, the surface is covered with a layer of sand of 3-5 centimeters and covered with a layer of roofing material for complete waterproofing.
Mixing clay mortar
As mentioned earlier, clay mortar is used as a binder when laying the stove. Cement is not highly heat resistant, so it will not work. For the solution, the clay, broken into small pieces, is poured with water, the excess of which must be drained. Within a few hours, the clay will absorb water, and sieved sand can be added at a rate of 2: 1. 1/8 of the total volume of water is added to a well-mixed mixture. It is necessary to prepare the solution two to three days before the start of installation.
Interesting: It is easy to check the quality of the solution. With a trowel, the solution is shifted to the side. If the trail is torn, the solution is too thick. If the mixture "floats" behind the trowel, then you need to add a little more clay. If the print is smooth and the collar holds its shape well, the solution is perfectly mixed.
Advantages and disadvantages
Positive features
What gives a large number of chimneys in a Dutch woman:
- The surface area increases, and hence the heat transfer;
- t of the outer surface - 60 - 70 ° C;
- Smoke is difficult to blow back: the stove does not smoke when the wind blows into the chimney;
Other pluses:
- With proper use, its service life is 25 years or more.
- The good fire safety of the Dutch woman has become one of the reasons for its popularization in Russia.
- The stove is durable and reliable. Allows making many changes without losing properties.
- Small dimensions (can be brought up to half a meter2 in plan).
- A large Dutch woman will take only 650 bricks - this is relatively small.
- The stove can be pulled up - two, three or even four floors!
disadvantages
The disadvantages or difficulties with the Dutch woman include:
- Sometimes you have to clean it 1-2 times during the heating season;
- In terms of heat capacity, the Dutch woman outperforms cast-iron stoves, but cools down much faster than the Russians;
- If you do not close the view in time, it freezes instantly, and if you close it early, you can get poisoned by carbon monoxide;
- The appearance of cracks when overheated;
- Two fires are required per day.
Possible difficulties
Despite the simplicity of the device, the construction of a Dutch oven requires theoretical and practical skills in this area. An inexperienced master can make a mistake at any stage - from choosing a suitable scheme to purchasing materials and directly laying. The price of a mistake can be both minor external defects and the malfunctioning of the finished Dutch woman.
Stoves are sources of increased danger. Any mistakes made during the construction are fraught with risk to the health and life of household members. The guarantee of high efficiency and safety of operation of the Dutch women is the calculation and installation work performed by qualified specialists.
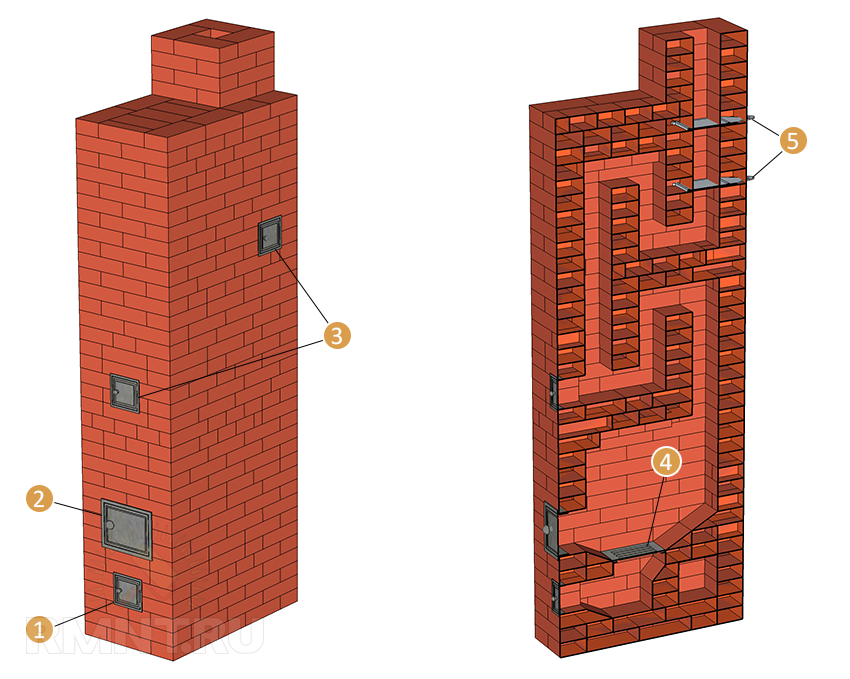
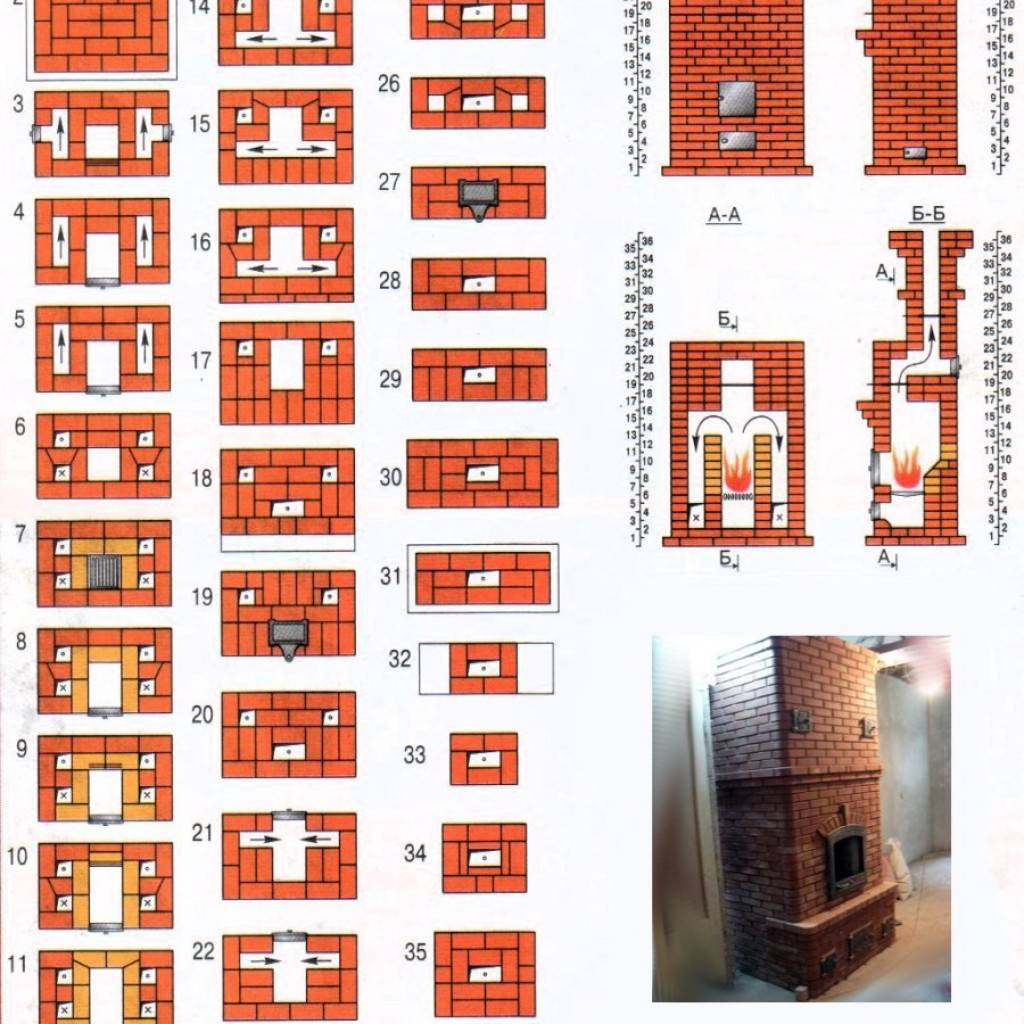
Hull masonry, cladding
A Dutch stove with her own hands is made of bricks easier than a classic Russian stove. Drawings of Dutch stoves for every taste and size have been developed.
If you are going to build a Dutch woman yourself, then make sure that you have a good order - you will not be able to fold the stove “out of your head”.
How to fold the Dutch oven in order? The order can be compared to the notes in music. It is not for nothing that they say about a good stove-maker that he “lays the bricks like clockwork”.
The ordering diagram consists of special characters, the meaning of which is indicated on the drawing itself.
The correct layout will ensure that you can build a stove that functions as expected.
When laying bricks, follow the general rules:
- the first row is laid out without solution;
- the firebox is laid out with refractory bricks and do not connect them with the bricks of which the body is composed;
- bricks are held together with clay or industrial heat-resistant mixtures specially designed for laying ovens;
- refractory bricks are laid with a 4 mm seam, for a normal seam it should be 7 mm.
After construction, the structure should dry out with the doors open for at least two weeks.
In the first heating season, finishing of the stove has not yet begun - you need to wait for the structure to settle.
You can decorate the stove with tiles, tiles, or just plaster. Recently, due to the trend towards minimalism, Dutch women are often left without finishing if they are made of high-quality bricks.
You can plaster the stove with clay or special refractory plaster. For strength, layers of mortar are applied to a frame made of galvanized mesh.
The first layer is made from a more liquid mixture, the thickness is no more than 5 mm. After application, the second layer is carefully leveled and trowelled.
Do not heat the oven to speed up the drying of the solution. If cracks appear on the surface of the plaster during the drying process, then they need to be embroidered, moistened with water and wiped again.
By covering the Dutch woman with tiles with your own hands, you can get rid of the need to whitewash the stove every year.
For finishing, you need to use special clinker tiles. Ordinary tiles will not work, as it will reduce the efficiency of the oven and quickly fall off.
The tiles can be laid out in two ways:
- make an independent frame from a metal corner;
- fix with glue.
Special glue is also required for furnace structures.
Of course, the best "outfit" for a Dutch woman will be finishing in the Dutch manner - tiles, but not everyone can afford them.
The stove is finished with tiles at the construction stage. They are placed on special fasteners embedded in the masonry.
Instead of tiles, you can use artificial stone. This is not ideal as it does not transfer heat better than ceramics.
However, artificial stone can be used if a bright and inexpensive finish is desired.