Diy solid fuel boiler for long burning - drawings, diagram, design options
There are many types of such heat generators. We will focus on several main types:
Classic direct fired boiler
The design of this boiler can be called artless. It is arranged in the same way as a traditional Russian stove.
The firebox is just a chamber, and the fuel is ignited and burned in the usual way, such as in a fire.
The classic boiler is easy to manufacture, but it has a significant drawback: the fuel burns out too quickly - every 4 hours you have to add a new portion. There are several ways to improve the situation:
This option is extremely irrational:
- Fuel oxidation becomes incomplete, as a result of which the smoke contains a large amount of soot, carbon monoxide (refers to harmful emissions) and various toxic substances.
- Due to the low exhaust temperature, a large amount of condensate is formed, saturated with the aforementioned toxins.
- The boiler efficiency is significantly reduced.
Equip the heating system with a heat accumulator
This is a voluminous reservoir that stores a stock of superheated coolant. The firewood in the boiler will burn quickly, but the heat produced by this will not fly out into the chimney, but will remain in the heat accumulator, just as it remains in the brick walls of the Russian stove. Consequently, the boiler will need to be fired less often.
Equip the boiler with a forced air control system
The idea is as follows:
- after a sufficient amount of heat has been generated (monitored by the temperature of the coolant), the automation completely closes the damper;
- the flame goes out and the boiler, one might say, turns off;
- when the coolant cools, the automation opens the damper and starts the fan, which fanns the fire in the firebox.
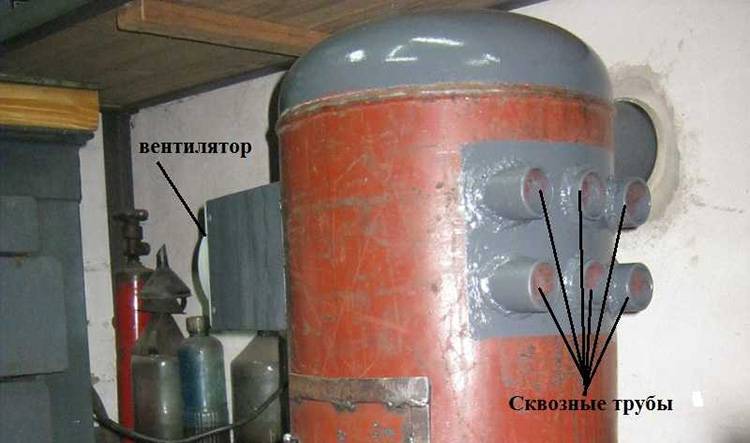
Supercharged boiler
An automation unit with a fan can be purchased at the store. The only drawback of this solution is its dependence on the power supply.
Top fired boiler
In such a heater, the fuel is stacked in the form of a column and ignited from above. In the direction from top to bottom, the flame moves much less willingly than from bottom to top, so the bookmark burns longer. In addition, to prevent the rapid spread of fire, air is supplied precisely to the combustion zone.
A top-combustion heat generator is rather complicated in the device, but there is a simplified version of it available for self-production. This is the so-called Bubafonya oven, the design of which was developed by Afanasy Bubyakin.
The problem is that in the presence of a water jacket, the characteristics of this unit greatly decrease (low efficiency, the stove smokes heavily), therefore it is irrational to use it as a boiler.
Gas generator (pyrolysis) boiler
When exposed to high temperatures, fossil fuel molecules (biopolymers) partially decompose into various gaseous substances (wood gas), many of which can burn. This decomposition is called pyrolysis. In normal combustion, this gas mixture is mostly discharged into the chimney. In a gas generator boiler, it is discharged into a separate chamber (afterburner), where it burns.
Such a boiler has a number of advantages (high efficiency, long-term operation on one tab, etc.), but it is difficult to manufacture, requires the use of special catalysts and requires forced air supply.
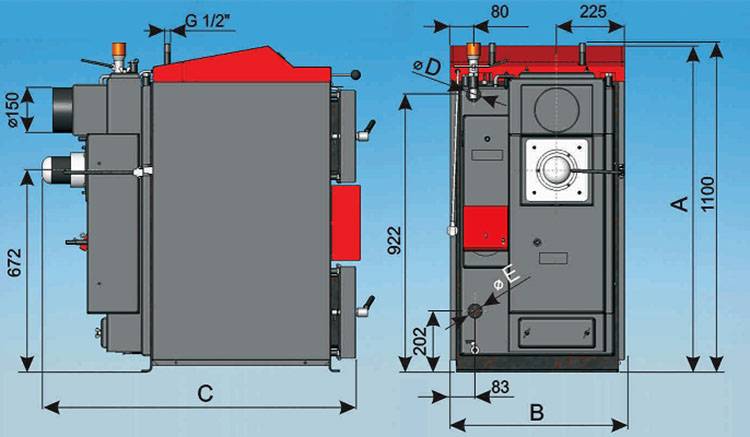
Gas generator boiler diagram
You can make a simplified version of the type of furnaces "Professor Butakov", "Breneran" and "Bullerjan", which in the upper part of the furnace has a kind of afterburner.
But such units, firstly, are designed for operation in the smoldering mode, the shortcomings of which we spoke about above, and secondly, like Bubafonya, they greatly lose in performance when taking heat with water, that is, when used as a boiler.
So, the most suitable for self-production is a classic boiler, which, if there is a power supply in the house, can be equipped with automatic equipment with a pressurized fan.
Gas boilers Baksi with automatics are often purchased in our country. Equipment reliability and price are the main components of customer success. Baksi boiler - instructions for use and the device of the unit.
We will analyze the principle of operation of a thermostat for a heating boiler here.
Think wood heating is outdated? Long-burning boilers for wood-fired homes are an economical and effective solution in the absence of communications. Here
Types of heating boilers
The choice of the type of homemade heating boiler depends on what kind of fuel it will operate on. Hence the classification:
- Electric heating boilers do not have high safety requirements. The design consists of a container, which is easy to make from a piece of pipe with a diameter larger than that of the supply pipes of the heating system. Heating elements are installed inside. Despite the simplicity of manufacturing, such a boiler for heating is not economically viable, since the price of electricity is high. Therefore, this option is chosen for periodic heating of small country houses.
- Gas boilers have high efficiency and low fuel prices. However, due to the explosive nature of the gas, the requirements even for factory models are very high. Therefore, it is almost impossible to obtain permission to install and operate a home-made heating boiler, and theoretically when installed in a basement.
- There is nothing complicated in making a liquid fuel boiler with your own hands. But for normal operation, you will have to install a tank for storing fuel oil or diesel fuel and lay an insulated pipeline from it. The price of the burner and the difficulties in setting it up can discourage the desire to make such a boiler. Moreover, you will have to negotiate with the fire inspectorate to obtain a permit for the installation.
- Most often, a solid fuel heating boiler is installed for heating a private house. It is heated with wood, coal, peat, oil shale. For homemade boilers of this type, the outlet temperature reaches 120 - 150 ⁰C.
Popular schemes of solid fuel boilers and their features
TT boiler projects are mainly distinguished by:
- the direction of fuel combustion;
- material;
- additional functions.
Drawings of boilers with upper or lower combustion are more often used. Boilers are built from bricks and / or metal. If necessary, the system is equipped with a hob.
Top burning
Standard boiler models have a vertical cylindrical design with a water jacket heat exchanger.
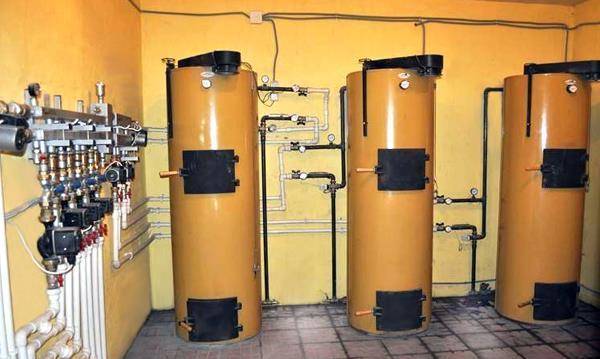
Photo 1. Three solid fuel boilers of the upper combustion. The devices are cylindrical in shape.
Oxygen is fed into the boiler from top to bottom through a telescopic tube. Fuel combustion occurs in the same direction in the boiler.
As the wood burns, the movable distributor gradually lowers under the influence of its own weight. Under pressure, the next part of the wood pulp in the bookmark begins to smolder. The fuel is burned in stages and produces a large volume of gas.
Bottom burning
In the design of the boiler, two chambers are often used:
- Furnace with vertical or horizontal filling. It burns firewood.
- Afterburner section. Here, the carbon dioxide emitted by the wood burns out completely, heating the air and the coolant.
The staged combustion of fuel in traditional schemes of solid fuel boilers provides reverse draft. The flame covers only the bottom layer. As it burns out, the upper volume of the bookmark sinks into the place of the coals, and the latter are poured into the ash pan. In cast iron boilers, a "jacket" is installed around the backfill chamber; in steel boilers, a "coil" is used.
Reference. To eliminate the loss of energy in solid fuel boilers, the afterburner section is finished with fireclay bricks. It is not necessary to install a forced draft fan during assembly.
With hob
Technically, the appliances resemble a conventional wood-burning stove. Boilers perform several functions at once:
- heat the room by convection or heat carrier;
- heat water in a flow-through way if there is an appropriate circuit and connection to the hot water supply network;
- perform the function of a plate.

Photo 2. Solid fuel boiler with a hob. The burners of the device are made of cast iron.
Given the tendency of steel to deformation, cast iron is used under the hob in the boiler. Any metal of sufficient strength is suitable for the manufacture of a boiler heat exchanger. The register is designed according to the coil or "water jacket" scheme. The panel under the stove is equipped directly above the fuel combustion chamber.
Brick, its dimensions
Devices of this type of boiler are a conventional stove with a heat exchanger inside. There are two options for setting the register in the boiler:
- In the afterburner system. Due to the lower temperature of water heating, this method is more often used in utility and utility rooms of a small area.
- In the burning zone of the bookmark. In this case, it is necessary to increase the dimensions of the camera. The basis for the register is heat-resistant steel with a thickness of 3 millimeters or more.
The boilers work on the pyrolysis principle. Combustion products are removed by natural draft through the chimney.
Typical boiler design includes:
- bunker - a chamber for storing fuel;
- grates for supplying air to the firebox;
- heat exchanger in the form of a tubular coil or storage tank;
- chimney for removing gases;
- mechanical draft regulator.
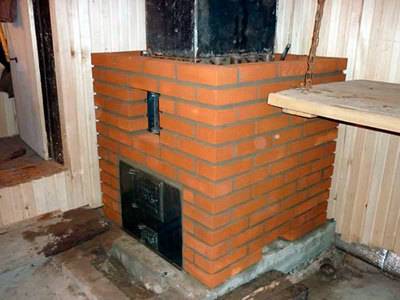
In domestic boilers for 25 kW, parts of the following sizes are used:
- loop controller - 1039 mm;
- loading hatch - 1190 mm;
- ash pan door - 430 mm;
- smoke exhauster - 618 mm;
- coupling - 1289 mm;
- emergency branch pipe - 1101 mm;
- supply line of the circuit - 1126;
- cold water supply - 765;
- network outlet - 880 mm;
- return flow - 41 mm;
- expansion tank - 990 mm.
The size of the boiler elements directly depends on the power of the equipment.
Reference. Brick is a weak conductor of heat. It saves energy with minimal losses, heats air and water well in the register.
6 Cheap brick and metal construction
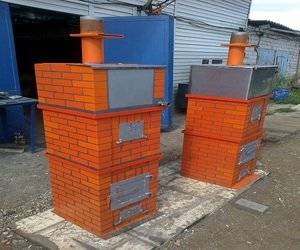
It is manufactured using:
- metal sheets;
- sheet metal with tie-in pipes;
- only from pipes.
A blowing chamber with a grate is installed on a solid concrete foundation. Then a heat exchanger is placed and lined with high-quality bricks around it. During the masonry process, two doors are built in. The lower one is mounted at a level convenient for laying and setting firewood, as well as for cleaning the firebox and blower from ash. Firewood, coal or pellets are loaded through the upper door, which can be placed on the front surface of the device or from above in the form of a hatch.
The heat exchanger must be positioned so that the outlet of the hot coolant is located at the highest point. This prevents air pockets from forming in the system, thereby improving water circulation. Brickwork should be done with bandaging the joints for greater strength of the walls, which should protrude 3 cm above the heat exchanger. The chimney can be laid out of bricks or installed in metal.
Manufacturing a long-burning boiler
Boiler
It is not difficult to make such a structure at home, but this will require skills in working with a welding machine and clear instructions.
Stage 1. Prepare everything you need
To make a boiler you will need:
-
metal pipe ø30 cm and more with a wall thickness of 4-5 mm;
- welding machine;
- sheet steel 5 mm thick (for the distributor);
- Bulgarian;
- pipe ø6 cm for oxygen supply;
- pipe ø10 cm for flue gas outlet from the structure.
After preparing the equipment and consumables, you can start working.
Stage 2. Assembly of the structure
The assembly sequence is as follows.
Step 1. The pipe, which will serve as the body of the structure, is cut in accordance with the selected length (from 0.8 to 1 m). If the length is longer, it will be difficult to load the fuel during operation. The bottom is welded from sheet steel and (if required) legs made of channel.
Pipe
Step 2. The air distributor is formed. To do this, a circle is cut out of a sheet of steel, the diameter of which is 2 cm less than the diameter of the structure.A hole ø2 cm is made in the center of the circle.
An impeller is welded to the distributor with 5-cm blades fixed on it, made of the same steel. A ø6 cm pipe is welded on top so that the hole made earlier is in the middle.
Boiler drum and air distributor Air distributor Air distributor Double boiler walls Double boiler walls Boiler
From above, the pipe is equipped with a flap to regulate the oxygen supply.
Step 3. A door is installed at the bottom of the boiler to remove combustion products. A rectangle is cut out of a steel sheet with a grinder, hinges with a locking handle are fixed. The rectangle will serve as a door.
Ash pan
Step 4. A ø10 cm chimney is attached to the top of the boiler. For the first 40-45 cm, the pipe should run strictly horizontally, after which it is passed through a heat exchanger (the latter is made in the form of a metal container with water).
Chimney pipe
Step 5. Cut out the cover for the boiler, make a hole in it for the air distributor
It is important that the lid adheres to the body as tightly as possible, otherwise smoke will come out through the slots.
Boiler lid Boiler lid (another option)
That's it, the long-burning heat generator is ready to use.
How to make a long-burning solid fuel boiler with your own hands: drawings and diagrams
Before starting to manufacture the boiler, need to decide on its design. Its choice depends on the purpose of the unit. If it is intended for heating a small utility room, garage or country house, then it is not necessary to make a water circuit in it. Heating of such a room will occur directly from the surface of the boiler, by convection of air masses in the room, as from a stove. For greater efficiency, it is possible to arrange forced air blowing of the unit using a fan. If there is a liquid heating system in the room, it is necessary to provide a device in the boiler circuit in the form of a coil from a pipe or other similar design.
Diagram of connecting a solid fuel boiler to the heating system
The choice of option also depends on the type of solid fuel to be used. For heating with ordinary wood, an increased volume of the furnace is required, and for the use of small fuel pellets, a special container can be arranged, from which the granular fuel is automatically fed into the boiler. For the manufacture of a solid fuel long-burning boiler with your own hands, you can take a universal drawing. It is suitable for any type of solid fuel used.
Drawing of a solid fuel boiler for long burning with a capacity of 25/30/40 kW
We will tell you step by step how and from what parts you can make a solid fuel heating boiler for long burning according to the proposed scheme:
- we will prepare the place where the future unit will be installed.The base on which it will stand must be level, strong, rigid and fireproof. A concrete foundation or a thick cast iron or steel plate is best suited for this. Walls must also be upholstered with fireproof material if they are wooden;
- we collect all the necessary material and tools: of which we need an electric arc welding machine, a grinder and a tape measure. From materials: sheet 4 mm steel; 300 - mm steel pipe with 3 mm walls, as well as other pipes 60 and 100 mm in diameter;
- in order to make a solid fuel boiler for long burning, it is necessary to cut a piece 1 m long from a large 300 mm pipe. It is possible and a little less, if necessary;
- cut out the bottom from the steel sheet according to the diameter of the pipe and weld it, equipping it with legs from a channel up to 10 cm long;
- the air distributor is made in the form of a circle made of steel sheet with a diameter 20 mm smaller than the pipe. An impeller from a corner with a shelf size of 50 mm is welded into the lower part of the circle. For this, you can use a channel of the same size;
- from above in the middle of the distributor we weld a 60 mm pipe, which should be higher than the boiler. In the middle of the distributor disk, cut a hole along the pipe, so that there is a through tunnel. It is needed to supply air. A damper is cut into the upper part of the pipe, which will allow for adjusting the air supply;
Schematic representation of a solid fuel boiler device
- at the very bottom of the boiler, we make a small door, equipped with a latch and hinges, leading to the ash pan for easy ash removal. Cut a hole for the chimney from above in the boiler and weld a 100 mm pipe into this place. At first, it goes at a slight angle to the side and up 40 cm, and then strictly vertically up. The passage of the chimney through the ceiling of the room must be protected according to fire safety rules;
- we are finishing the construction of a solid fuel heating boiler for long burning by making the top cover. In its center there should be a hole for the air flow distributor pipe. The contact with the boiler walls must be very tight, excluding the ingress of air.
Dimensional drawing for creating a solid fuel boiler with your own hands
Useful advice! To ignite a self-made solid fuel boiler for long burning, the drawing of which was presented above, it is necessary: remove the lid and raise the regulator, fill the boiler with fuel to the top and pour it with flammable liquid, put everything in place and throw the burning torch into the regulator pipe ... When the fuel ignites, reduce the air flow to a minimum so that it only smolders. After that, the pyrolysis gas will ignite and the boiler will start up.
Principle of operation
The principle of operation of this equipment is based on heating water in the system using heat from fuel combustion. The work process is presented in detail by the following stages:
- fuel is loaded into the combustion chamber. By the way, peat briquettes, coal, firewood, pellets, sawdust, etc. can be used in the form of it;
- heated air rises up and is discharged through the chimney;
- in the process of movement, this air heats the heat exchanger, and it heats the water;
- heated water displaces cold water from the system - circulation occurs and cooled water returns to the heat exchanger area.
The volume of the combustion chamber must correspond to the rated power of the equipment or the maximum heated area. This is a direct relationship.
In practice, you still have to take into account the seasonality, peaks in hot water consumption, the functional complexity of the heating or hot water supply system. The hot gas evacuation chamber acts as an outlet manifold that removes combustion products through the chimney.
Video: do-it-yourself long-burning boiler
SHARE ON SOCIAL MEDIA
Bath and sauna Ponds Garage Waterproofing Country toilet Decor Interior design Tool Sewerage Boilers Roof Laminate Stairs Pumps Stretch ceilings Wallpaper Fences Lighting Decorating Stoves and fireplaces Tile Extensions to the house Designing Work with plasterboard Heating radiators Garden and vegetable garden Plumbing Do-it-yourself Septics Well floor and wells
Balcony and loggia
Bathroom and toilet
Living room and bedroom
Hallway and corridor
Popular articles
Do-it-yourself gazebo drawings and dimensions - step-by-step instructions for a home craftsman
Do-it-yourself pond in the country step by step
What is the best inverter welding machine for houses and cottages?
Laser level self-leveling 360 degrees
Heating a country house: options and prices, comparison of methods
Cellar made of plastic for summer cottages
Gas tanks for a country house: types and prices
Self-assembly of a wood-fired boiler
To understand the process of how to make a wood-burning boiler, instructions for its assembly will help.
You should start with the manufacture of an element designed for air supply, for which you need:
- Take a pipe with thick walls, the length of which is equal to the height of the combustion chamber, weld a bolt to it.
- Cut a circle from a sheet of metal with a diameter slightly larger than the cross-section of the pipe.
- Drill a bolt hole in it.
- Connect the pipe and bolt together, and then tighten the nut. In this case, the air duct should be freely covered with a sheet of metal so that it is possible to change the size of the clearance and thereby adjust the intensity of fuel combustion.
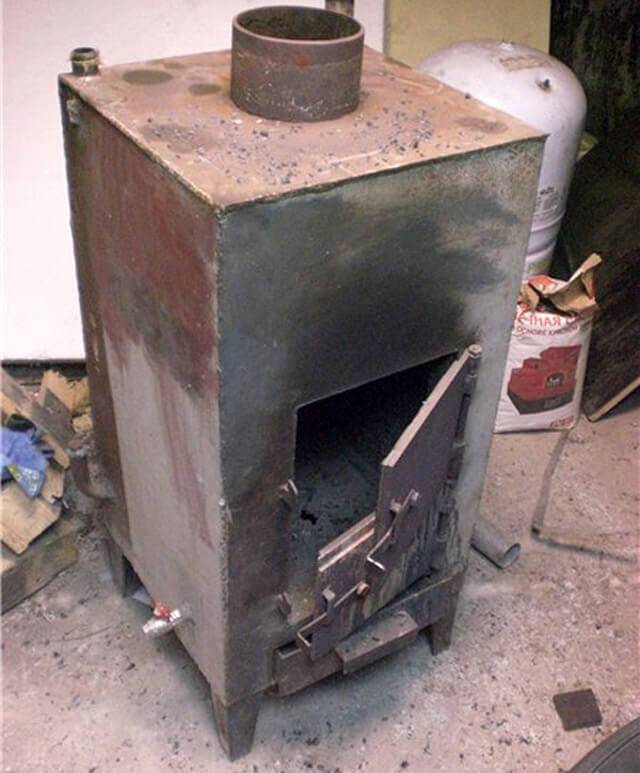
Further, making a wood-fired boiler with your own hands, you should do the following:
- Using a grinder in the air pipe, make vertical cuts 1 cm wide through which air will penetrate into the combustion chamber.
- Cut out a circle from a sheet of metal that has a slightly smaller diameter than the same parameter for the firebox.
- Create a hole inside the circle for mounting the air duct.
- Insert the air pipe into it, having previously stepped back from its edge 20-30 centimeters, and then welded.
Then you need to make the body of a homemade wood-fired boiler:
- when using an old gas cylinder, you need to cut off the top of it;
- if sheets of metal are selected, they must be twisted in the form of a cylinder, fastened and welded on the bottom.
The chimney is performed as follows: a hole is made in the side of the cylinder and a pipe with a minimum diameter of 10 centimeters is welded to it.

Then, the air supply pipe must be inserted into the body of the unit, for which a hole must be made in the bottom of the furnace. It is necessary that the blower protrudes outside the unit. The air supply pipe should be located below the location of the chimney.
At the next stage, when a wood-burning boiler is made with your own hands for heating a house, you need to make a heat-dissipating disk. To do this, a pancake with a diameter slightly smaller than the body is cut from a sheet of metal 10 millimeters thick. Using steel wire or reinforcement, a handle is made, which is attached to the disk.
Types and materials
A household device for autonomous water heating can be of several types (depending on the material of the body):
- cast iron;
- steel.
Solid fuel boilers made of cast iron are more durable. Naturally, the prices for them will be higher than for steel ones. At the same time, cast iron is a rather heavy material, which reduces the degree of convenience in transporting the device. However, its resistance to temperatures and strength make it indispensable even in the manufacture of certain parts of steel boilers. For example, a heat exchanger is often made of this particular metal. In such boilers, a special piping is used, which increases the temperature indicator of the return line coolant.
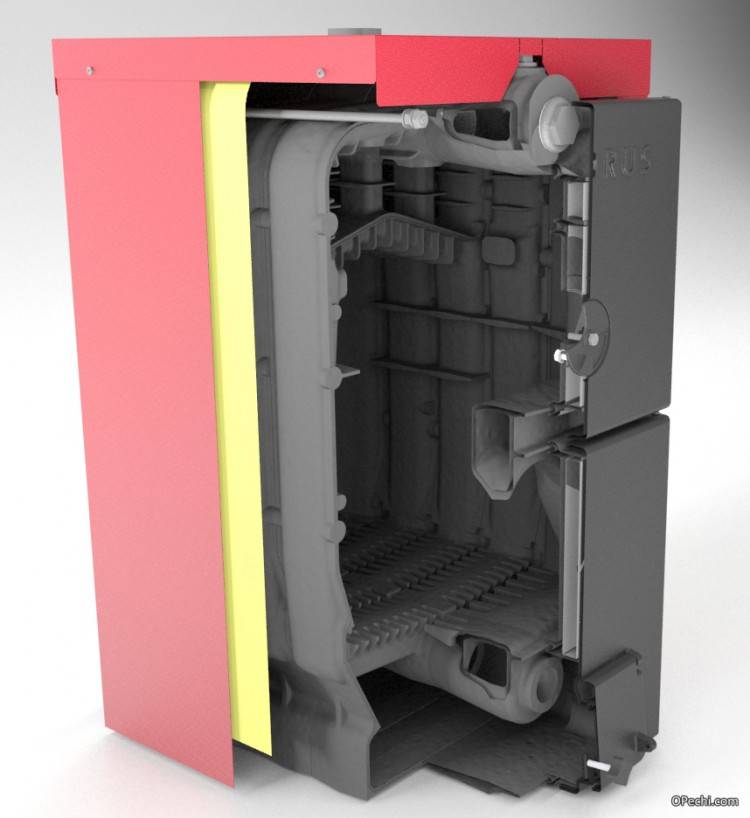 Cast iron solid fuel boiler
Steel boilers are a good alternative to hot water heating. If your home uses primary heating from electricity or gas, steel products are a good fallback. Their prices are lower, they themselves are compact and easy to use. And the installation of a solid fuel boiler can be done by hand.
 Steel solid fuel boiler
There are also double-circuit and single-circuit solid fuel boilers for the home. They are distinguished by the presence of an additional circuit (coolant). And if their body is similar, then diagrams and drawings will help to distinguish them from each other.
The cost of double-circuit units will depend on such factors
- solid fuel type;
- device power;
- control and management systems.
Also, boilers are classified according to the method of fuel combustion. Distinguish on this basis the following types:
1. Apparatus with natural draft - solid fuel boilers in which air is taken from the room. The combustion process in them is controlled by a special thermostatic traction regulator.
 Natural draft solid fuel boiler
2. Pyrolysis - boilers with several chambers. In the first, the fuel is burned, and in the second, the already combustible gas, which is obtained during the combustion of the fuel, is ignited. This is an effective way of working.
 Solid fuel boiler of pyrolysis action
3. With additional draft - industrial and household devices with a built-in fan, which provides additional air intake.
Boiler assembly
The unit must be assembled in the following sequence:
- First, the body is made by grabbing the side walls and framing of the openings with short seams to its bottom. The bottom frame of the ash pan opening is the bottom of the body itself.
- From the inside, corners are welded to the body, on which the grate firebox pan (grate) will be laid.
- Now you need to weld the grate itself. The corners of which it consists must be welded with the outer corner downward, so that the air entering from below is evenly distributed by the two inclined surfaces of each corner.
- Further, a firebox with a heat exchanger is welded to the corners on which the grate is laid.
- The firebox and ash pan doors are cut from sheet steel. From the inside, they are framed by a steel strip, laid in two rows, between which you need to lay an asbestos cord.
Next, a flue pipe and an air duct with a flange for installing a fan are welded. The air duct is led into the boiler through a hole in the middle of the rear wall just below the grate.
Now it is necessary to weld to the boiler body the counterparts of the door hinges and several brackets 20 mm wide, to which the casing will be attached.
The heat exchanger must be lined on three sides and on top with basalt wool, which is pulled together with a cord.
Since the insulation will come into contact with hot surfaces, it should not contain phenol-formaldehyde binder and other substances that emit toxic volatile substances when heated.
With the help of screws, the casing is screwed to the brackets.
The temperature sensor must be placed under the basalt wool so that it is in contact with the back wall of the heat exchanger.
If desired, the boiler can be equipped with a second circuit, allowing it to be used as a water heater.
The contour has the form of a copper tube with a diameter of about 12 mm and a length of 10 m, wound inside the heat exchanger on flame tubes and led out through the rear wall.
Body parts
To create a solid fuel boiler with your own hands, you need to start with the body. The basis of any heating device is a firebox, in which the temperature can reach a record 1000 degrees. Therefore, to assemble the body for a homemade solid fuel boiler, it is worth using materials with the appropriate characteristics.
 Boiler dimensions
If there is no heat-resistant steel at hand, you will have to use ordinary steel, but for this it is worth making double walls. You can use a grinder to cut out parts. But first you need to make a diagram. On its basis, the dimensions of the parts are transferred to the rolled metal. In addition to the walls of the chamber, stiffeners should also be cut, for which a profile pipe can be used. Amplifiers for joints are made from a steel corner.
A hole for the door is cut in the front wall. The procedure can be done by hand. You will need a drill and a grinder.Holes are created in the corners with a drill, and then the grinder cuts the material along the previously marked line. As a result, you can get a good result with your own hands.
DIY heating boiler assembly guide
Outwardly, the simplest sawdust boiler looks like the famous potbelly stove. However, the design of the unit, as well as the efficiency of its operation, differs in many respects from the aforementioned furnace.
Boiler assembly kit
- Prepare all the necessary accessories before starting work. You will need:
- container for loading raw materials (metal tank);
- sheet steel with a thickness of 3 mm and 5 mm;
- welding machine;
- bricks;
- cement-based masonry mortar;
- Bulgarian;
- round pipes with a diameter of 4 and 5 cm;
- rectangular pipes measuring 6x4 cm.
Boiler manufacturing
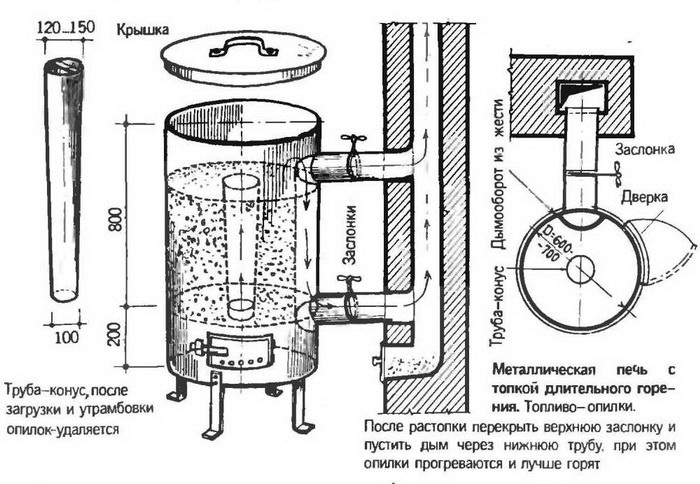
Furnace diagram
There is nothing difficult in making a boiler on sawdust yourself. It is enough to follow each step of the following guide in sequence.
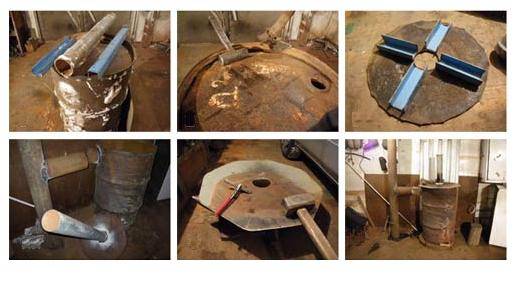
Boiler assembly
First step. Make two cylinders from sheet steel. The diameter of one piece should be slightly smaller than the other. You insert the smaller cylinder into a large container and fasten the lid on top.
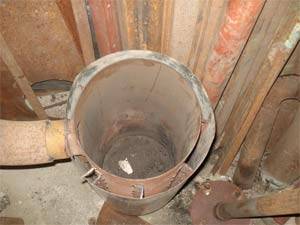
Double walls
Use sheet steel to make the cover. Make a hole in the cover and weld the blower pipe to it. Weld the bottom of the structure. Make the lid and bottom of a thicker material than the cylinders.
Second step. Prepare the pipes for installation in the boiler drum. Select pipes of such dimensions that the products fit easily and at the same time tightly into each other - this way it will be easier for you to assemble the structure.
Rectangular pipes are installed vertically, round ones are included in rectangular ones. Pre-make holes in rectangular pipes according to the diameter of the round pipes.
The boiler will be supplied with pipes for water supply and discharge. Therefore, at the same stage, you need to cut 2 holes 20 mm in diameter in the walls of the boiler.
Third step. Start welding the pipes according to the boiler diagram. Be careful, try to weld all elements without gaps. Weld the water pipes last. Weld the open ends of the pipes tightly with small steel plates.
Fourth step. Check the boiler for leaks. To do this, pour water into the pipes. If leaks are found, seal the leaks immediately.
Fifth step. Mount the assembled boiler into the previously prepared frame. The frame can be an ordinary brick box. It is better to lay out such a frame in advance in a place chosen for this.
After installation, place the blower cover in its proper place and connect the flue pipe to the boiler.
Boiler connection
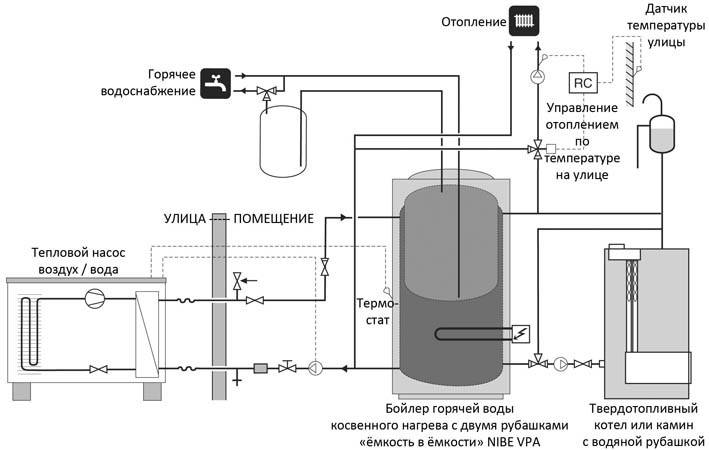
Solid fuel boiler connection diagram
Connect the finished unit to the heating system. Install a device called a register on the chimney outlet of the boiler. Through it, the boiler is connected to the central heating. You can connect the return and supply to the register. This is just one of the more popular connection methods. If you wish, you can connect the boiler according to other schemes. The main thing is that the finished system works as efficiently and safely as possible.

How to make the right chimney
The highly efficient register allows to further increase the efficiency of the boiler. The smaller the distance between the register and the boiler, the more efficiently the system will work.
Important points
The efficiency of a solid fuel boiler is always influenced by two factors:
- Heat exchanger design features
The larger the area of thermal contact, the more energy per unit time will be transferred from the burning fuel to the thermal agent - water.
Options for the homemade heat exchanger in the photo
Horizontal heat exchanger made of shaped pipes Horizontal heat exchanger made of sheet steel and shaped pipes Homemade horizontal heat exchanger Steel vertical heat exchanger for a boiler with your own hands
If the fuel burns ineffectively - it loses the pyrolysis gas or does not have time to heat the coolant to the required temperature, flaws in the design are evident. Therefore, the calculation and manufacturing process of the latter should be treated with maximum responsibility - after assembly it will be impossible to change it.
Homemade wood-burning boiler: firebox door
The design of the boiler must be reliable and safe, and nothing else but the body is responsible for this. It is made of thick (at least 5 mm) steel, preferably heat-resistant. However, the latter is much more expensive than usual, so you should remember that the thicker the metal, the slower it will heat up. This means that in order for a medium-power boiler not to burn hands and make a sauna out of the boiler room, the boiler body should have about 8 mm in thickness.
Solid fuel boiler-furnace with built-in heat exchanger
The exceptions are designs with a cast iron top cover, which serves as a furnace. The thickness and dimensions of the cast iron sheet will depend on the design parameters of the body and the performance of the boiler (but not less than 8 mm).
To organize the internal piping system of the boiler, it is necessary to use pipes with a wall thickness of 3-4 mm and a diameter of 50 mm. To ensure the flow of the coolant, it is necessary to provide for the narrowing (from 50 to 25 mm) of the pipelines in the direction from hot to cold, for example from the boiler to the radiators) and expand them on the return path of the coolant.
How to use such a boiler?
There is absolutely nothing complicated in using a ready-made sawdust boiler, as well as in assembling it. Follow the next step by step guide.
First step. Load fuel up to the level of the chimney and compact the load carefully. As already noted, the better you tamp the sawdust, the more efficient the unit will work and the longer it will be able to heat on one load.
Swing the blower slightly in different directions while loading and ramming fuel. Thanks to this, a small gap remained between the rammed fuel and the blower. Such processing will allow the fuel to be ignited much faster in the future.
Second step. Ignite the fuel. To do this, install the lid and throw 50 grams of kerosene or gasoline into the blower pipe, and then throw a lit piece of paper or rags into the same pipe.
It is better to pre-equip the blower with a damper - it will allow you to adjust the level of traction.
Third step. Allow the fuel to ignite and close the damper about 75%. After a couple of minutes, slightly open the damper and set the optimum draft level.
You will understand that the boiler has entered the operating mode by the appearance of a smooth humming sound. Adjust the operating mode of the unit using the damper on the blower.
It is impossible to add fuel to such a heating structure during its operation. Therefore, immediately load the required amount of compacted sawdust into the boiler and do not open the unit until the load has completely burned out. The sawdust layer will gradually sink down as it burns.
Advantages of a sawdust boiler
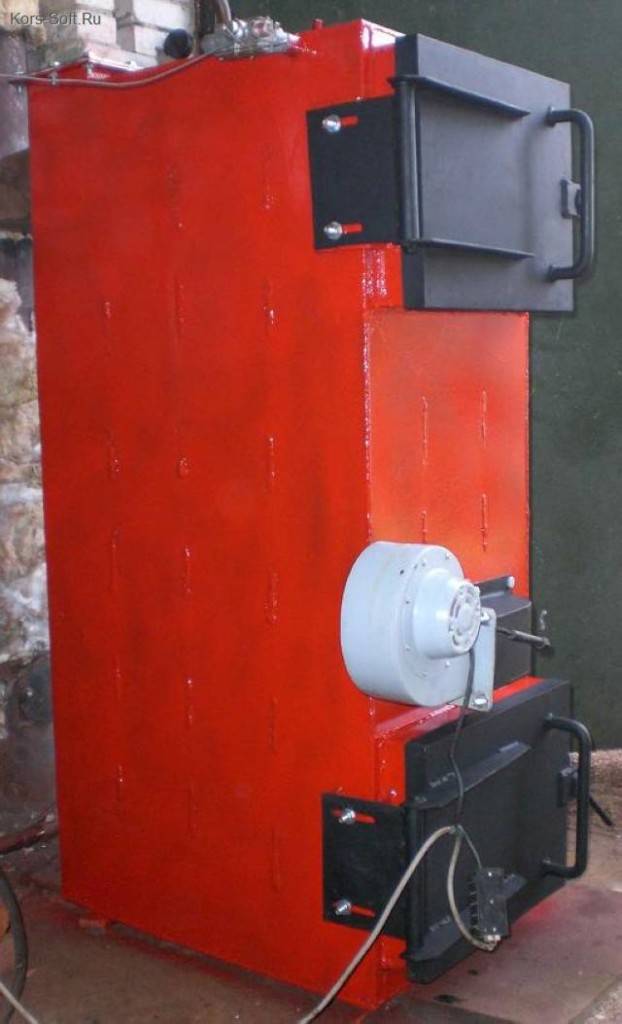
Advantages of a sawdust boiler
Among the main advantages of sawdust boilers, the following points should be highlighted:
- the possibility of using a wide variety of materials as fuel, even the peel from sunflower seeds and other household waste;
- high performance indicators;
- the ability to independently regulate the rate of consumption of the loaded fuel and all related parameters;
- fast heating;
- security. The equipment does not generate any substances that can harm others;
- stability of work;
- the possibility of using the boiler as a unit for cooking, smoking food and waste disposal;
-
the most economical fuel consumption.
