Types of foundations for a stove in a bath
The base for the sauna stove is a must. This is due to the fact that a metal or brick stove exerts a significant load on the floor in the bath. Lack of a solid base will deform and destroy the floor structure and the oven itself. Therefore, in parallel with the main foundation for the bath, it is necessary to think over the arrangement of the base for the stove.
In most cases, the following types of foundations for a bath stove are used:
- The monolithic concrete base is considered the most popular, it is poured simultaneously with the main foundation or as a separate structure. The depth of laying such a base for a bath stove should not be large, therefore, in most cases, a bedding is made of sand, crushed stone or rubble.
- The brick base is also a monolithic slab, lined with several rows of bricks. The strength characteristics of such a foundation are at a high level, like that of a concrete foundation, but with some advantage. In particular, we are talking about the possibility of dismantling if necessary. However, it should be borne in mind that on problem soil prone to seasonal movements, the integrity of such a foundation may be violated.
- The columnar foundation can be called a rarity, it is erected in the case when the above options are not suitable.
The foundation for the oven - warnings, advice on choosing, instructions for work Video
Zero cycle works traditionally “eat up” 25-30% of the total construction budget. A lot, right? But saving is not appropriate here, since a healthy "root" is the key to the integrity of the whole "plant".
The foundation for the furnace is made in the form of a solid base plate, and it should not be connected to the base of the building itself. But its depth depends on three main factors:
- the height of the aquifer;
- type of soil;
- the level of soil freezing.
All these data are obtained during geological exploration of the site, when specialists, by drilling control wells, obtain soil and water samples and make appropriate analyzes. The procedure is paid (from $ 50), so many homemade products risk building "by eye" or are guided by folk methods (for example, a willow frame). It is not always possible to guess, therefore, a weak foundation for the stove shows its "dissatisfaction" with such symptoms:
- Through cracks in the body.
- Partial destruction of individual parts of the masonry.
- Violation of the integrity of the chimney.
The main feature of the listed defects is that the breakdown cannot be repaired. After the restoration of the furnace, cracks and collapses are repeated, which directly indicates an incorrectly laid foundation. Here you remember with a "kind" word about your pseudo-economy - but it's too late. It is impossible to carry out "sparing" repair of brick stoves with a weak foundation. We'll have to completely demolish the unit and redo it again.
For those who are afraid of the complexity of zero-cycle work, it is useful to remember how hard our ancestors worked on this stage: they prepared massive logs and manually adjusted them to each other in order to achieve the correct support for their “wet nurse”.
Now in the homemade arsenal there are two available ways to get a strong foundation for a brick oven:
- Assembly of the slab. Small reinforced concrete blocks or ceramic bricks are used as building materials.
- Pouring the slab. The base is formed from concrete mortar, into which a rigid frame made of river rubble or iron reinforcement is introduced.
The monolith also has disadvantages: the slab must stand at rest for at least three weeks. In principle, such a delay in construction is not a problem. For example, if the foundation for a sauna stove is being set up, then during a technical pause, the builders are engaged in finishing work in the steam room.
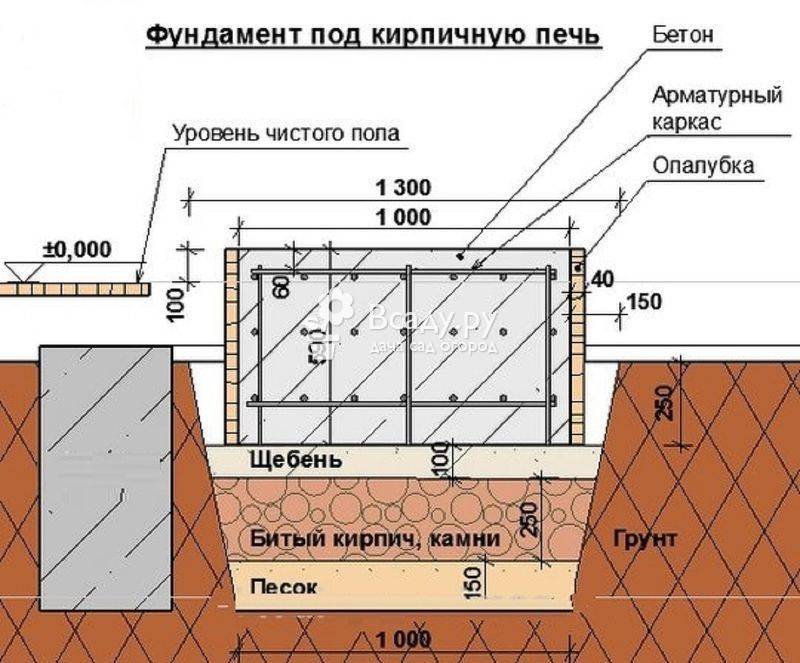
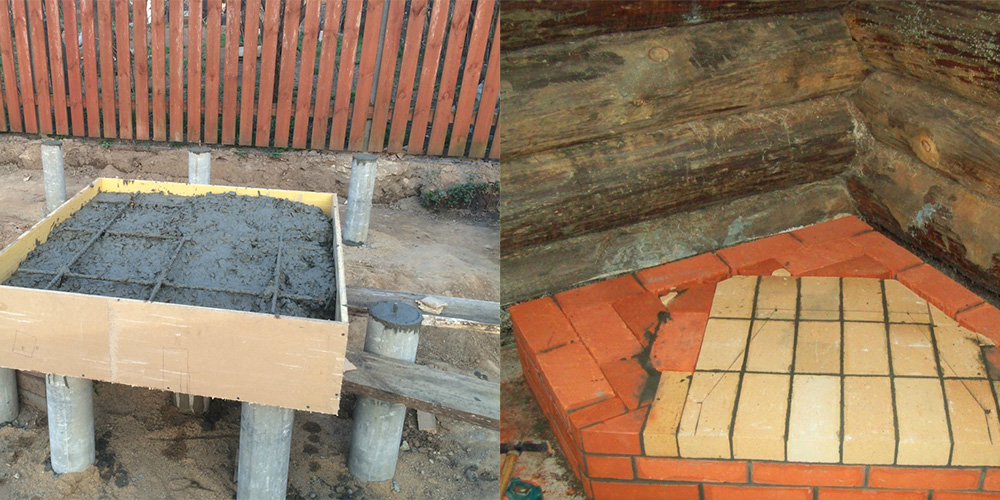
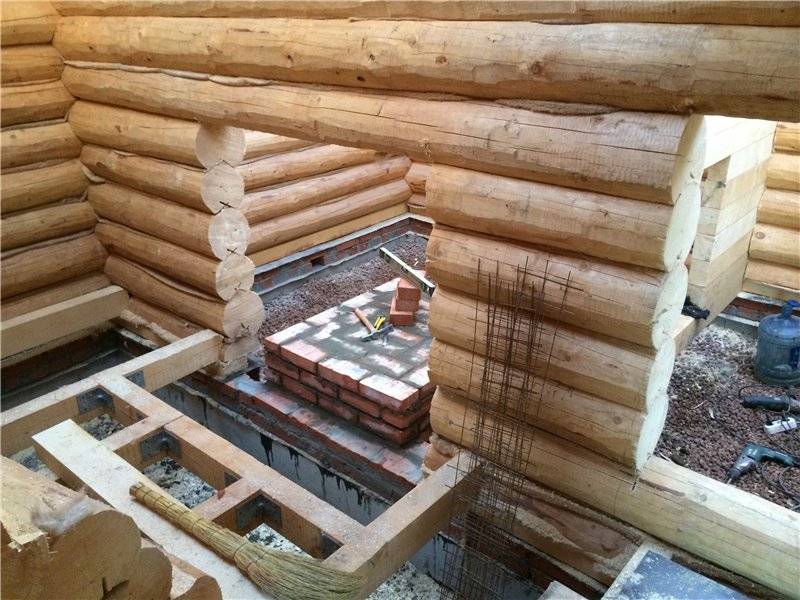
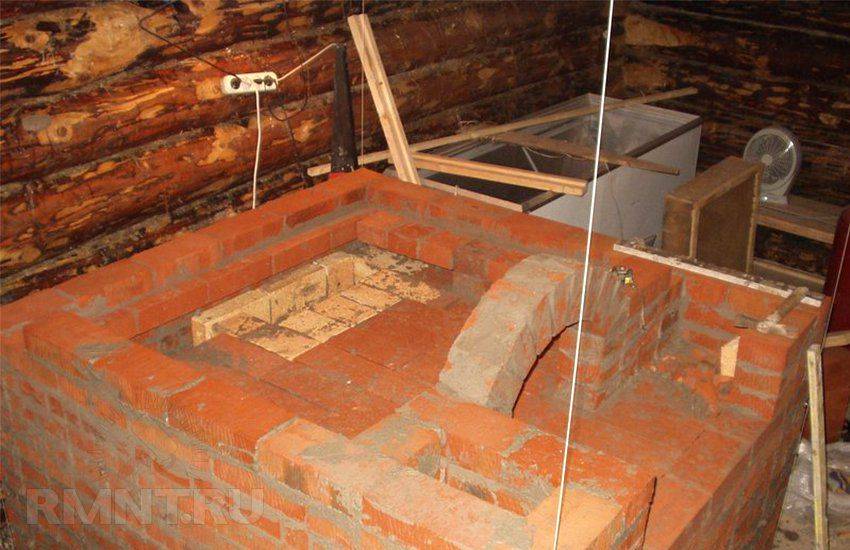
To describe the progress of the work, we chose a monolithic furnace foundation, reinforced with reinforcing rods, since this type of base is the most popular among homemade people. Remember, the base plate should be 5 cm wider than the stove body.
- We are preparing a pit for the foundation. The dimensions of the pit are additionally increased by another 15-20 cm. This margin is needed for the correct laying of the formwork and the filtering side layer of crushed stone, bricks and sand. The depth of the pit is calculated according to geo-prospecting (an allowance for filtering "cushions" is added).
- We lay the sand "pillow" under the foundation. A 15-centimeter layer of sand is poured into the bottom of the pit, which is carefully tamped. To prevent shrinkage, it is spilled with water until the level of the backfill stops dropping. In the process of tamping, sand should be poured to the desired level.
- We lay the crushed stone filter for the foundation. A 20-centimeter layer of crushed stone is poured onto the compacted sand, mixed with brick fighting and medium-sized stones. The stone "carpet" is lightly sprinkled with a sand mixture to fill the voids formed in it. For better penetration of sand inside, water is also needed. Then lay out a 10-cm layer of finer gravel and cover the resulting filtering "pillow" with a double layer of roofing material.
- Formwork installation. A solid plywood (or plank) "fence" is installed along the perimeter of the pit, which is reinforced with a support every 50 cm. There must be at least 10 cm of free space between the edge of the pit and the formwork.
- Reinforcement mesh tab. The bottom of the pit is poured with concrete (starting layer 4-5 cm), which will serve as a support for the "skeleton" of the foundation. As soon as it grabs, pre-connected reinforcement meshes are placed in the pit (there are ready-made sets on sale).
- Pouring solution. Concrete is prepared according to the following proven proportion: cement - 1, sand - 3, crushed stone - 5 and water. Before pouring the solution, the formwork is thoroughly moistened in order to prevent the absorption of water from the concrete by the tree. The working mixture is poured in layers (20 cm each), gradually reaching the zero mark of the plate. Each layer is carefully knocked out with a hoe to expel air bubbles from the solution. The top of the slab is carefully leveled and, after the first setting, is covered with a tarpaulin (roofing felt).
During all three weeks, the stove foundation should be hidden from the sun and periodically moistened.
Concrete foundation
- Coarse sand without inclusions. The ideal option would be to use mountain sand, but sea and river sand are also suitable. We have already considered the methods of cleaning sand from impurities on the pages of our Internet resource.
- Formwork material.
- Crushed stone.
- Roofing material or dense polyethylene.
Instruments:
- Solution trough
- Shovels: bayonet, shovel
- Building level
- Hammer, nails, hacksaw for formwork construction
- Construction stapler
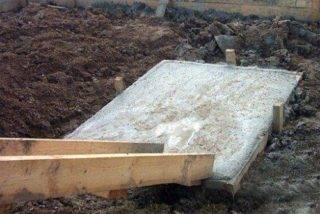
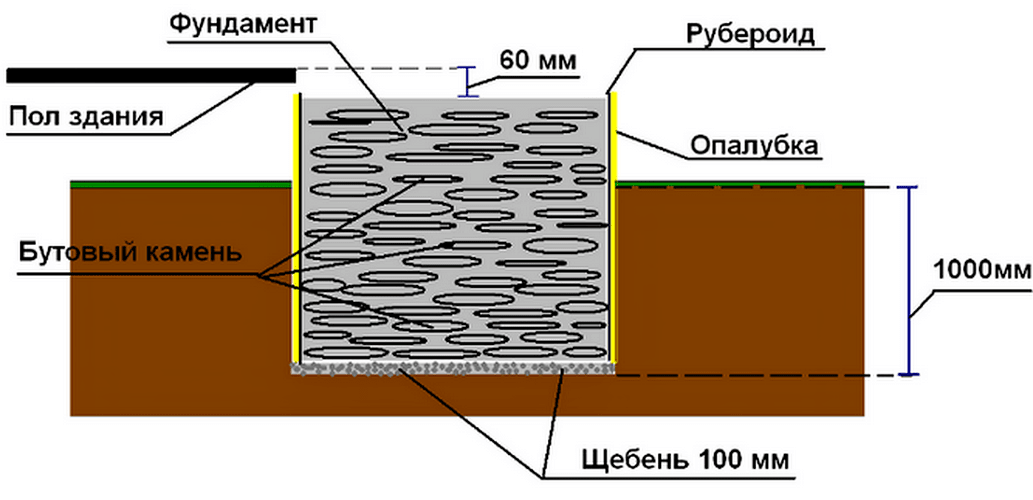
You can start building the foundation for the stove. Many people may wonder whether it is necessary to go deep into the ground when the foundation is being built with their own hands under the stove. Our answer is obligatory. Sometimes there is an option in which the foundation is arranged with a shallow depth. Only the upper vegetation layer is removed and after the installation of the formwork, the foundation is poured.
Digging a pit
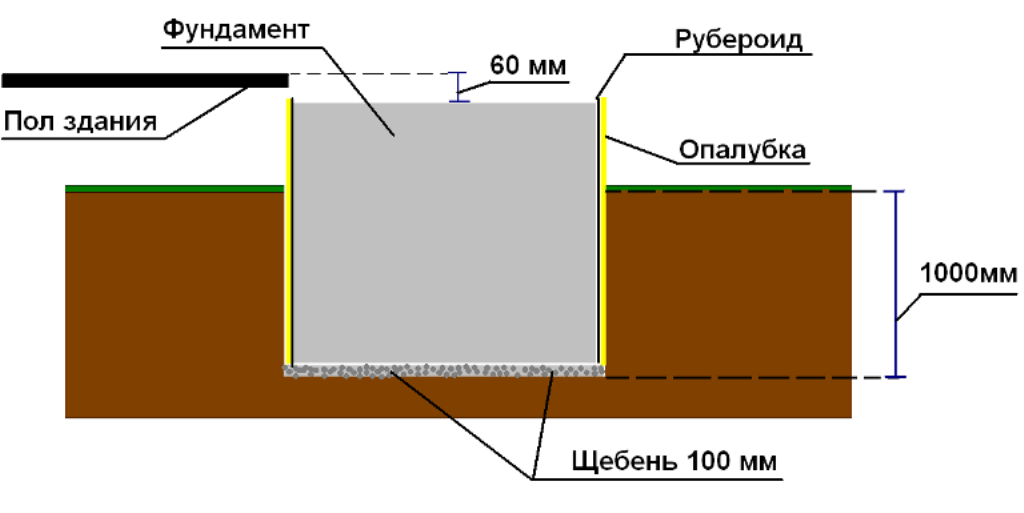
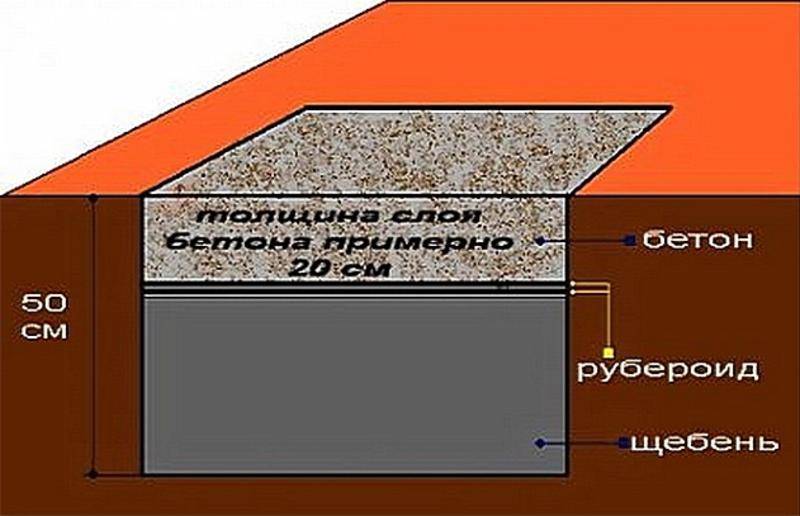
For dry, sandy soils, 500 - 600 mm is enough. But on heaving soils, this depth should not be less than 1000 mm. We repeat - this is the correct foundation.
Correct laying of the foundation
We dig a foundation pit according to the markings. The size of the pit must allow the installation of the formwork. But if the soil on your site is dense enough and the edges do not crumble, you can do without it. In any case, it all depends on the specific location and soil. When the formwork is installed, a layer of crushed stone 100 mm thick is poured onto the bottom of the pit. Crushed stone must be leveled. After that, it is necessary to compact the crushed stone with a manual rammer.
For waterproofing the foundation, a layer of roofing material is attached to the inner side of the formwork using a construction stapler. You can start pouring
It is important to know that the upper level of the foundation should be 60 - 70 mm lower than the main floor of the building. We prepare the solution in the following proportions:
- Cement 1 part
- Sand 3 parts
- Crushed stone 5 parts
Solution
- First, a dry mixture of cement, sand and crushed stone is prepared. You can use mortar for laying the stove.
- After shoveling and obtaining a homogeneous mass, water is gradually added until a solution of the consistency of thick sour cream is formed. The solution can be poured.
The use of a concrete foundation can significantly save on mortar. Consider a variant of such a foundation.
Concrete foundation
Preparation of the pit is performed in the same way as in the first case. After the crushed stone is filled up and rammed, the first layer of rubble is laid on the bottom. Mortar for rubble concrete mix:
- Cement 1 part
- Sand 3 parts
- In this way, the entire filling is performed.
- It is not allowed to pour several layers of rubble stone at the same time. In this case, voids are formed inside the foundation, which reduce the characteristics of the foundation.
The foundation is poured. It is necessary to carefully level its surface and check with a building level.
- The foundation will dry out for ten days. In the first week, it is necessary to spray its surface with water.
- If you do not have the opportunity to be on the site all the time, proceed as follows: after pouring the foundation, cover the foundation with plastic wrap and leave it in this position for a week.
- After seven days, the film must be removed and the foundation left for another 5 - 6 days.
Reinforced concrete slab as a foundation
To make a concrete base, such as in the photo, for a fireplace you will need:
- sand;
- crushed stone;
- Portland cement;
- waterproofing materials;
- formwork panels;
- reinforcement bars
The sequence of work is as follows:
- They dig a pit, into which a reinforcing mesh with a mesh size of 10-15 centimeters is laid.
- The pit is filled with a solution, for the manufacture of which they take 1 part of cement and 4 parts of gravel. It is advisable to divide the filling into 2 stages. It will take about two days for the concrete to harden.
- In order to avoid the harmful effects of the sun's rays in hot weather, the concrete is covered with roofing material.
- To improve the quality indicators of concrete, after dismantling the formwork, its surface is moistened with water. Formwork sheets are removed in the summer after 5-7 days, and in the winter after 10-14 days.
- If the finished concrete base has defects, special waterproofing measures are taken. For such work, special compositions are used, the components of which depend on the indicator of the amount of groundwater. If they are completely absent in the soil, waterproofing is done using sand and cement in a ratio of 1: 1 or 2: 1.
- At the end of the work, the pit is covered with non-porous soil.
Construction errors and their consequences
When erecting the furnace foundation on your own, you can expect the appearance of various errors. The most common errors include those listed below:
- The main mistake is that, quite often, there is no working documentation on the foundation. It is unacceptable to skip or ignore the design stage. Otherwise, all the work and the costs associated with them may turn out to be meaningless.
- The work should only be carried out by a qualified builder who already has experience in performing such work. A worker without any qualifications, most likely, will not be able to perform work in strict accordance with the set technical requirements.
- Another miscalculation that developers make is the start of construction, without a detailed analysis of the soils located at the construction site.Without this information, it is impossible to calculate the area of the foundation, choose the right place for the supports and choose the optimal type of furnace base.
- The construction of the foundation cannot be carried out without an accurate knowledge of the depth of the foundation. Often, this parameter is calculated based on past experience. In order to avoid such unpleasant situations, it is necessary to study the characteristics of the soil and constantly check the data with the design documentation. It should be remembered that any foundation should be based on soil, which has not destroyed the structure.
- Sometimes, when constructing foundations, the developer retains the topsoil. It is unacceptable. It must be removed, and it must be deepened by 150 mm.
- A wrong choice of the foundation foundation will certainly lead to unpleasant consequences. Up to the complete destruction of the structure.
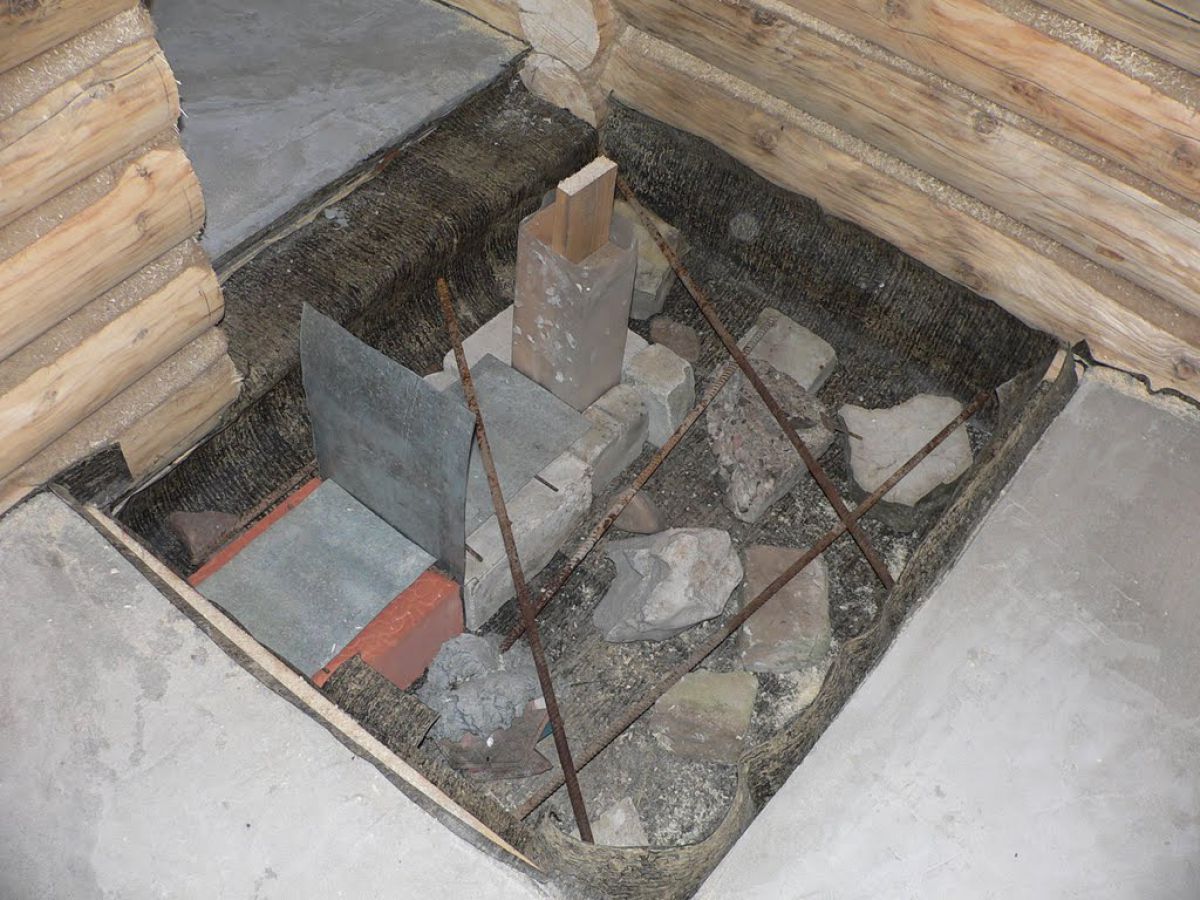
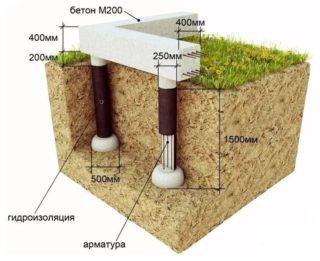
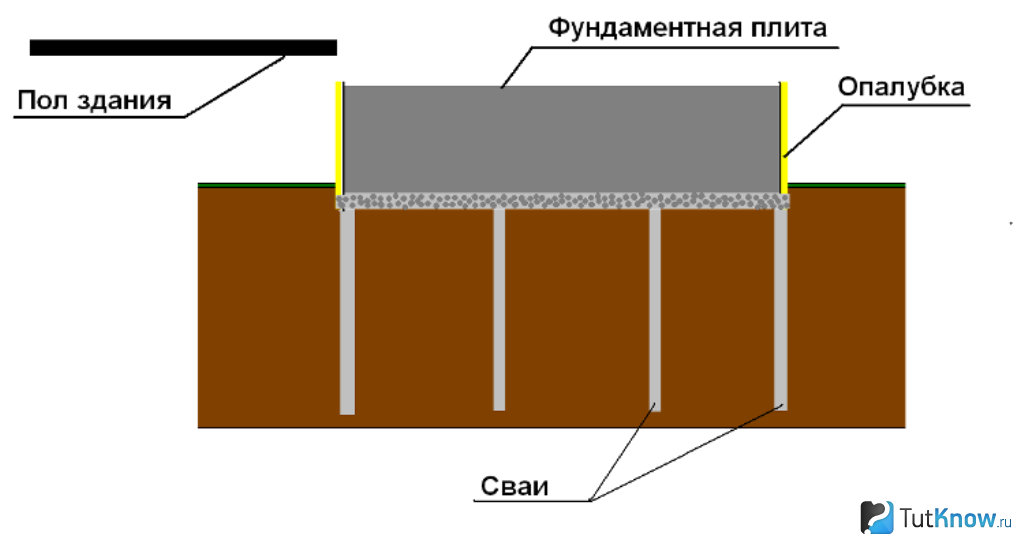
Support-pile foundation for the furnace
This is one of the most modern and effective ways to build foundations. This option is great for both a bathhouse and a wooden house.
The essence of the method lies in the fact that a reinforced concrete slab 15-20 cm thick is installed on piles or columnar supports - this depends on the depth of soil freezing.
Installation of such a foundation is extremely simple:
Holes with a diameter of about 20 cm are drilled to the required depth in the ground. At the bottom, crushed stone is poured with a layer of 10-15 cm thick. The layer is well rammed. Further, pipes made of roofing material are inserted into the pits, they serve as formwork. Concrete mix is poured into them. All this is left to dry for a period of 14 days.
As soon as the pillars fully gain strength, a reinforced concrete slab is installed. On the upper edge, waterproofing is carried out using roofing material. The surface is lubricated with hot bitumen or cold mastic, roofing material heated by a burner is laid on top.
Materials and tools
 Tools for arranging the foundation of the stove
Before starting construction work, first of all, you will need to stock up on tools that are selected individually for each stage. For excavation and carpentry operations you will need:
- shovel-bayonet for preparation of the pit;
- shovel-scoop for mixing the solution;
- two sample sieve: for sifting cement and sand;
- hammer.
It is necessary to prepare a metal trough or other container for the solution, as well as a tape measure, a pencil, a building level and a mounting stapler. From a set of building materials you need:
- boards going to the arrangement of the formwork;
- polyethylene for waterproofing;
- sand, dry cement and selected gravel.
To strengthen the foundation, you will need reinforcing mesh or iron bars.
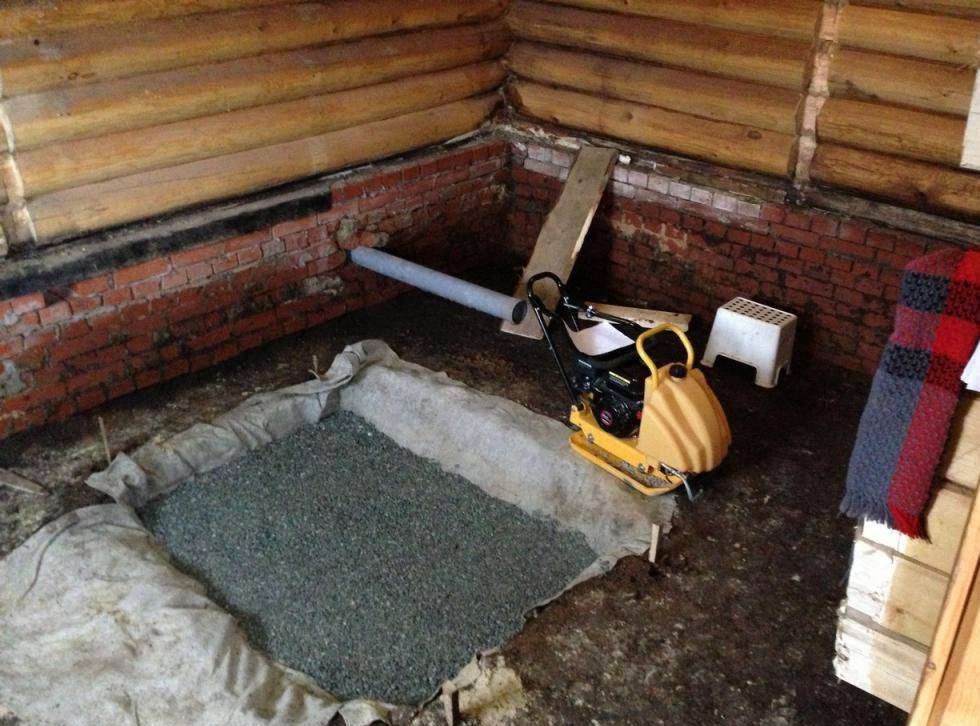
Construction stages
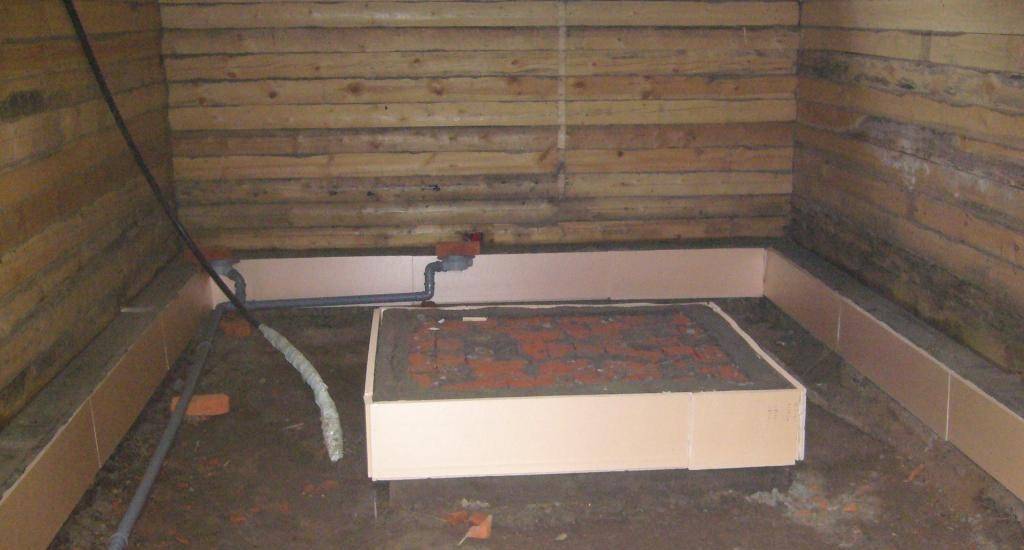
 Pit for a sauna stove
The procedure for arranging a monolithic foundation for a stove in a bath does not differ from the general sequence of actions for the construction of a typical base. It includes the following steps:
- pit preparation;
- arrangement of formwork;
- pouring concrete mixture.
The construction works of various foundations differ in some details.
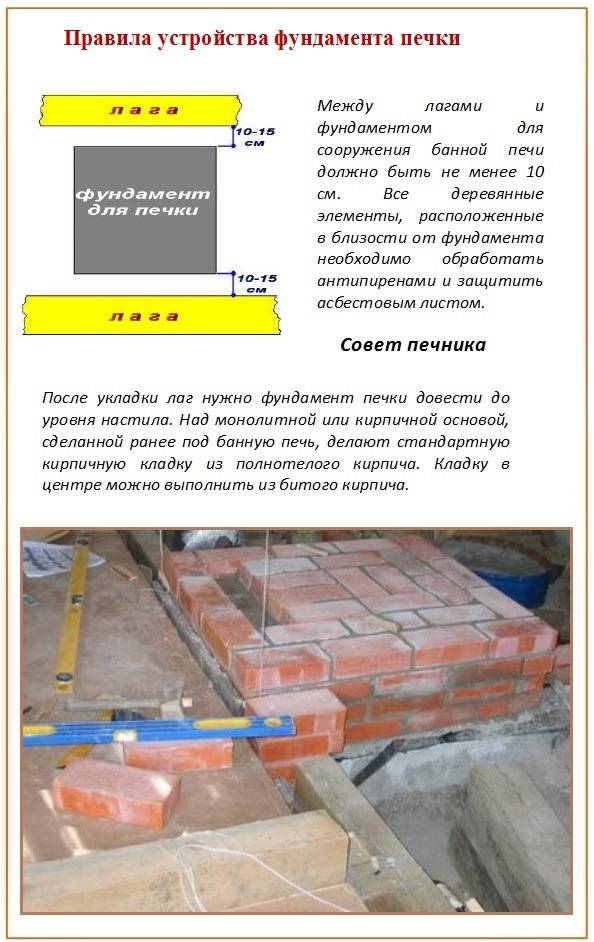
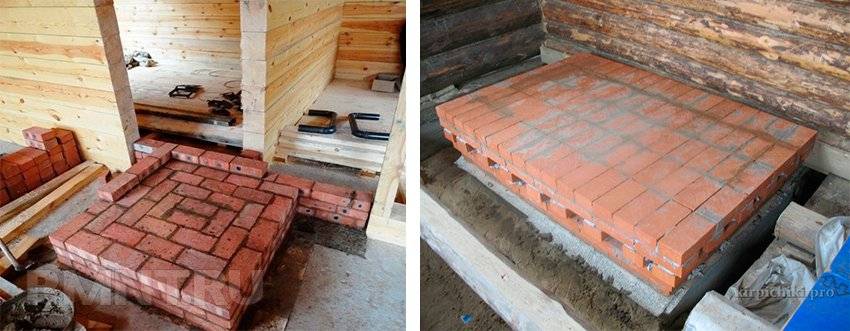
Under a brick oven
Step-by-step instructions for building a foundation for a brick oven:
- The trench is marked and the soil is selected to a depth of at least one meter.
- Crushed stone is poured into it, which is then carefully rammed.
- The bulk layer of the pillow is calculated for a thickness of 30 cm.
- A pre-prepared concrete mixture is poured.
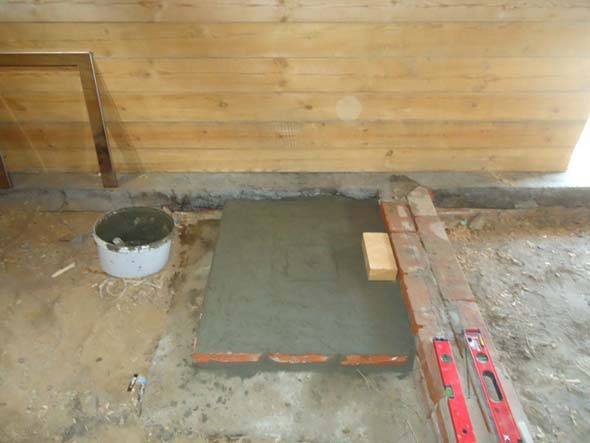
Under a metal oven
 The concrete slab must be installed strictly horizontally
A foundation for a metal stove in a bath is required only in cases where the weight of the structure exceeds 150 kg. Its use allows the oven to be installed strictly horizontally and to guarantee its constant position. The slightest deviations lead to deformation of structural elements and deterioration of its characteristics.
The order of operations for the construction of the foundation for the stove:
- Marking is made and a small trench is pulled out (no more than 0.5 meters deep).
- Crushed stone is poured in a thin layer, which is immediately compacted.
- A concrete mixture is poured in the same proportions.
Similar to the first case, waterproofing is done, the finishing layer of which is leveled.
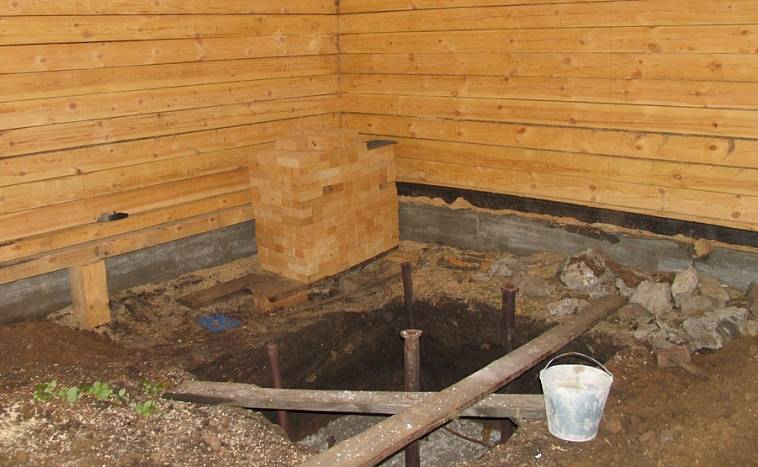
Pile foundation
 Arrangement of the pile foundation takes time, but the structure is durable
The procedure for arranging a support-pile foundation for brick ovens is somewhat different, since in this case a different technology is used. It consists in the construction of a series of pillars or pile supports, on which a frame is subsequently placed under the furnace structure.
Sequence of working steps:
- On the prepared site, markings are made corresponding to the dimensions of the furnace with an overlap of 10 cm on each side.
- With a bayonet shovel, about 20 cm of soil is removed, after which pegs are driven along the perimeter with a certain step, between which the string is pulled.
- At the intersection of individual threads, marks are made, along which holes are then drilled about 50 cm deep and 20 cm in diameter.
- Formwork is made from wooden planks in the form of pits, and then installed in them.
- The bottom is closed with a 15 cm thick layer of sand, which is then carefully compacted.
Upon completion of these procedures, gravel is poured on top and filled with clean water, after which a reinforcing frame is knitted from a reinforcing wire with a diameter of 0.8 mm. Piles are installed in its center, the function of which is performed by asbestos pipes of appropriate length.
At the final stage of work, the entire structure placed in the pit is poured with concrete, the shrinkage and drying of which takes about 2 weeks. After that, they proceed to pouring the platform for the furnace, resting on the finished piles. It also takes about 2-3 weeks to dry.
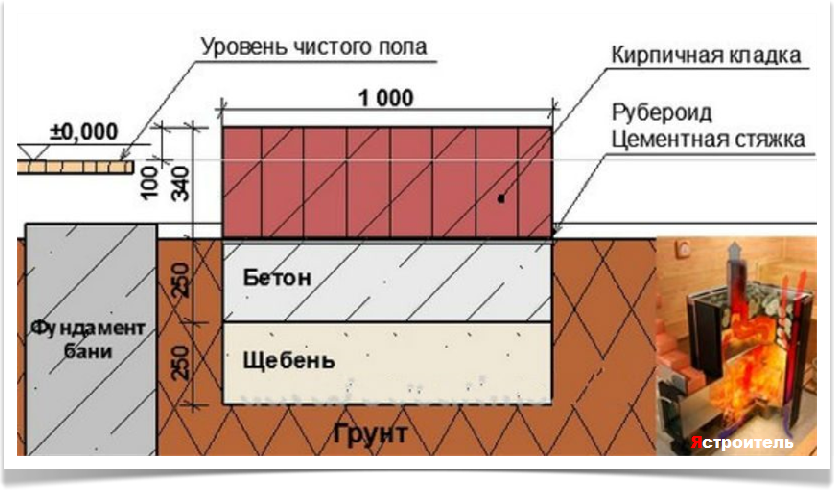
Concrete foundation
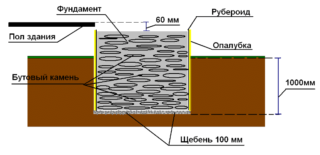 Natural stone with cement mortar is the most durable foundation material
Step-by-step instructions for building a rubble foundation for a stove:
- A trench is marked for pouring the base, the size of which is chosen 10 cm larger than the dimensions of the furnace, taking into account a small margin for formwork.
- A pit is pulled out along the markings, at the bottom of which a pillow is made of selected rubble 15 cm thick.
- The formed layer is carefully rammed, after which several large rubble stones are placed on the very bottom (their diameter should not exceed 15 cm).
- Crushed stone is poured on top, filling the voids between the stones.
- A cement-sand mortar is poured into the trench to the depth of the layer, in the manufacture of which the classic ratio of 1 to 3 is used. For its preparation, cement of the M400 grade or higher is best suited.
After a day, another layer of stones is laid on top of the frozen mass, which are also filled with the same concrete composition. This procedure is repeated until the entire trench is filled with the rubble. After that, a building level is taken and with its help the resulting surface is checked for evenness. The detected irregularities are eliminated with the help of a liquid cement-sand composition. Then the base is covered with plastic wrap and left to dry completely (at least 2 weeks).
Basic rules for laying the foundation
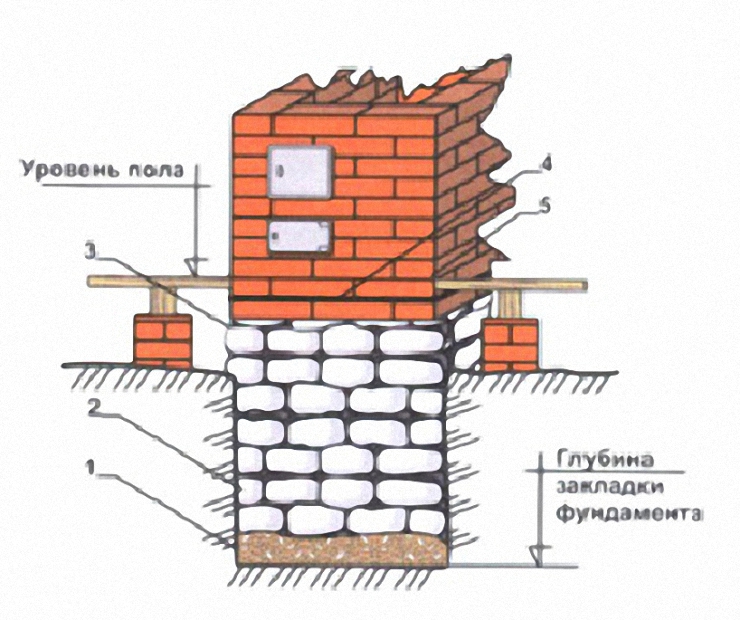
Whatever version of the foundation for the furnace you choose, and whatever size you decide to implement, there are a number of basic rules that you should not ignore:
The foundation for the stove must be made independent, in no way connected with the foundation of the whole house. Why? The fact is that during operation, the house may shrink slightly. When lowering, he should not pull the stove with him, as this can lead to its deformation, deterioration of traction and violation of technical properties.

The foundation for the furnace is separated from the general
In some cases, you can partially combine two bases by connecting them with one wall.
- If both foundations (for the house and for the stove) are located close to each other, sand backfill with a thickness of 50 mm must be made between them.
- If the foundation for the common house is tape, then the base for the furnace should in no case come into contact with this foundation with the walls.
- When choosing a place for a stove and, accordingly, a foundation, one should not only rely on wishes, but also on factors such as: the location of doors, windows and roof beams. The location of the chimney should be taken into account so that the pipe does not fall into the ceilings and beams during the construction of the stove.
- When calculating the size and depth of the foundation, be sure to take into account the severity of the floors and the weight of the stove together with the chimney.
The dimensions of the foundation are influenced not only by the dimensions of the furnace, but also by the density of the soil on which it is being erected. The main load in the furnace is usually created by the chimney, therefore, when designing the furnace, it is necessary to carry it closer to the center of the base. This will help to avoid asymmetric loading and premature, improper shrinkage of the oven.
Sometimes, when designing a very large and massive stove with a stone chimney, stove-makers make a separate base for the chimney.
Also, the choice of foundation depends on the material of the furnace. For a metal structure and a stone one, it will be different in depth, the entire mass of a brick oven is at least 400-500 kg, while a metal oven weighs about 150 kg.

How to calculate the weight of a stone oven
In principle, for a small metal stove, you can separately and not equip the foundation, especially if it is being built in a house that stands on a tiled monolithic base.
The density of the soil and the degree of its freezing play an important role in determining the size of the foundation. The climate in Russia is accompanied by rather severe winters practically throughout its entire territory. Therefore, the foundation for the furnace should be laid to the entire depth of soil freezing.
The type of soil is also of great importance.
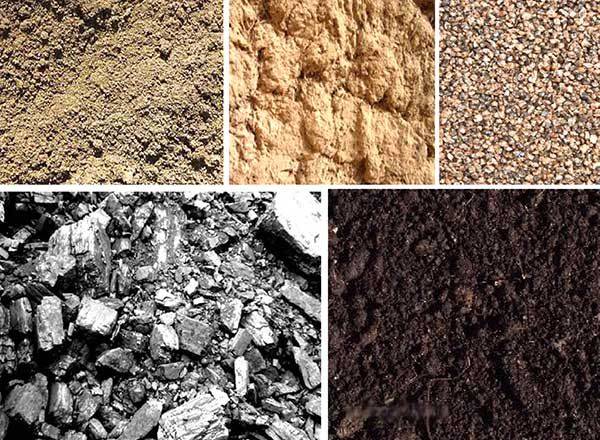
Soil types
It is of three types:
- clay;
- sandy loam;
- loam.
In places where a large number of rivers, reservoirs, lakes prevail, as a rule, sedimentary types of soil are found. Here, it is better to entrust the construction of the foundation for the furnace and the house to professionals, so the calculations of the point of passage of the waters should be carried out.
In Central Russia, a very common type of soil is loam, which is a mixture of sand and clay. It is clay that predominates in it, therefore such soil is less plastic.
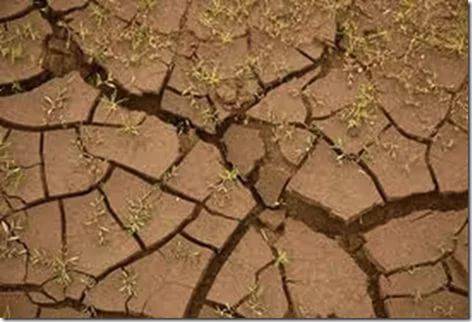
Loam
Erection of a foundation on such soil is usually associated with hassle and additional problems, since in a dry state the loam is crumbly, with the onset of frost it begins to "heave", and with a large amount of sediment it becomes viscous.
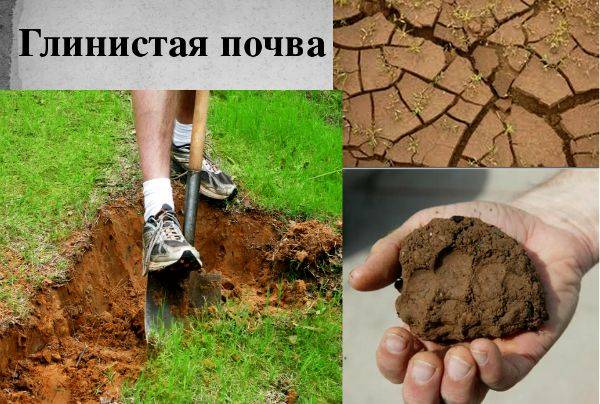
Clay soil
Therefore, in this case, the depth of laying the foundation for the furnace must be made above the freezing point.
But in forest areas, on the contrary, it is necessary to lay the foundation for the stove below the freezing point of the soil and equip the base on a sand cushion 60-90 cm thick.
One of the most reliable types of soil for building a foundation is gravel and rocky, but, unfortunately, sometimes you have to build a house and a stove on an unstable one. Competent construction of a reliable foundation will help neutralize this fact.
For a light oven
For a furnace assembled with sheet steel, which weighs no more than 150 kg, a separate foundation is also required. To do this, a pit is dug to a depth of 0.5 meters. Its length and width will directly depend on the size of the oven. After that, crushed stone is poured onto the bottom with a layer of 30 cm and compacted well.
Then a solution of cement of medium density is prepared. For this, 4 parts of sand, 1 part of cement and water are taken. This mixture is poured into crushed stone in the pit and left in this form for a day to solidify.In this way, the sole of the foundation is created.
After this time, in order to create waterproofing, roofing material is laid on the surface of the dried cement in two layers.
Next, concrete is prepared for pouring. Take 2.5 parts of sand, 4 parts of fine gravel, 1 part of cement and water. The pit is poured with the ready-made mortar to the required foundation height. And finally, using a level, the foundation surface is leveled to a horizontal state.
The kiln foundation is the most important structure in the entire structure. If it is made using high-quality materials and in compliance with all the rules, then it can last long enough on any soil, without creating unnecessary trouble for any design of heating equipment
New house
At the planning stage, an oven is included in the house.
This means that the project will be calculated together with the loads from its device.
It goes without saying that the stove in this case will be the easiest to arrange on the same basis as the house.
As a result, we should get a monolithic ideally flat surface in area larger than the future structure.
If the foundation of the house is built with a pile or pillar method, then it is not enough to bring additional supports under the furnace, it is necessary to tie them into a single structure and fill it with a monolith slab of the required size.
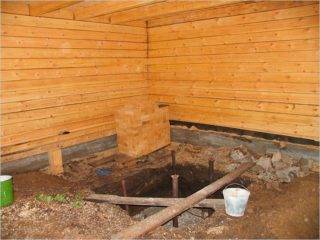
To install a new stove in an old house, you need to remove the floor
When installing a stove or fireplace in an already built and inhabited house, you will have to remove the floor. In fact, you need to get to the ground
In such a situation, at the design stage, it is very important to correctly calculate the weight of the future structure. If the body weight does not exceed 0.8 t, then you can stop at shallow concrete pouring
If a large-scale oven is planned, then a solid foundation is needed.
Concrete foundation
To build the foundation for the furnace you will need:
Cement.
- Coarse sand without inclusions. The ideal option would be to use mountain sand, but sea and river sand are also suitable. We have already considered the methods of cleaning sand from impurities on the pages of our Internet resource.
- Formwork material.
- Crushed stone.
- Roofing material or dense polyethylene.
Instruments:
- Solution trough
- Shovels: bayonet, shovel
- Building level
- Hammer, nails, hacksaw for formwork construction
- Construction stapler
Do I need to go deeper
You can start building the foundation for the stove. Many people may wonder whether it is necessary to go deep into the ground when the foundation is being built with their own hands under the stove. Our answer is obligatory. Sometimes there is an option in which the foundation is arranged with a shallow depth. Only the upper vegetation layer is removed and after the installation of the formwork, the foundation is poured. This is completely wrong way. The slab of the foundation, arranged in this way, will constantly experience loads, especially in the winter. The motivation for the economical consumption of building materials when constructing such a foundation is not justified by anything. The deepening must be carried out to a depth below the freezing level in your area. You can use a shallow foundation in a bathhouse under the oven, but with the obligatory installation of piles under the main foundation slab.
Pit construction - basic parameters
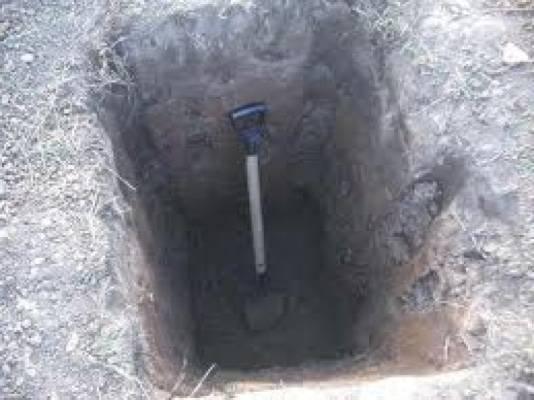
Digging a pit
For dry, sandy soils, 500 - 600 mm is enough. But on heaving soils, this depth should not be less than 1000 mm. We repeat - this is the correct foundation.

Correct laying of the foundation
We dig a foundation pit according to the markings. The size of the pit must allow the installation of the formwork. But if the soil on your site is dense enough and the edges do not crumble, you can do without it. In any case, it all depends on the specific location and soil. When the formwork is installed, a layer of crushed stone 100 mm thick is poured onto the bottom of the pit. Crushed stone must be leveled.After that, it is necessary to compact the crushed stone with a manual rammer.
Waterproofing and filling
For waterproofing the foundation, a layer of roofing material is attached to the inner side of the formwork using a construction stapler. You can start pouring
It is important to know that the upper level of the foundation should be 60 - 70 mm lower than the main floor of the building. We prepare the solution in the following proportions:
- Cement 1 part
- Sand 3 parts
- Crushed stone 5 parts

Solution
- First, a dry mixture of cement, sand and crushed stone is prepared. You can use mortar for laying the stove.
- After shoveling and obtaining a homogeneous mass, water is gradually added until a solution of the consistency of thick sour cream is formed. The solution can be poured.
Furnace foundation design: general recommendations
There are several requirements for the base for the oven. And two of them can be distinguished as the most important:
- It must be durable and reliable.
- Even seasonal movements of the soil should not affect its structure in any way.
In this case, it is very important to take into account what kind of soil on the site where the bathhouse is being built: black soil, sandy, clayey soil, or we are talking about a wetland

The following readings indicate how deep the foundation should be for a brick oven in a bath. The type of soil is taken:
- sandy - 50 cm;
- rocky - 25-30 cm;
- clayey - 70-80 cm;
- wet soil - 100 cm
Separately, it is worth considering this option if there is bulk soil on the site. In this case, the foundation must be built taking into account both the depth of its freezing and the level of dense intact soil.
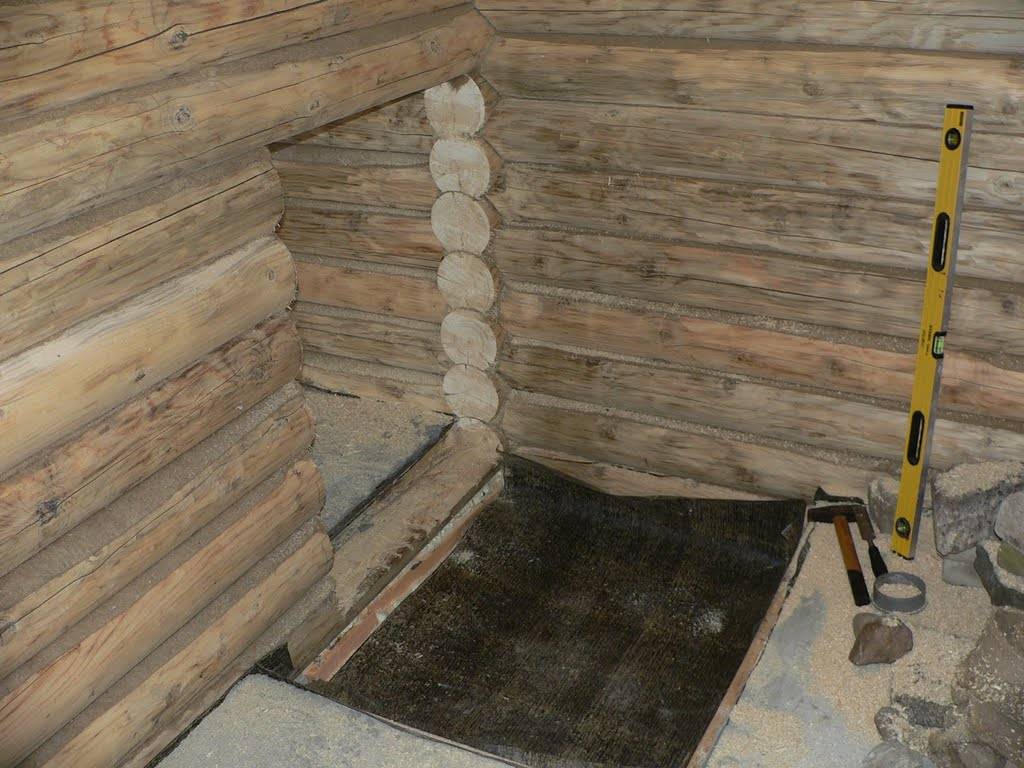
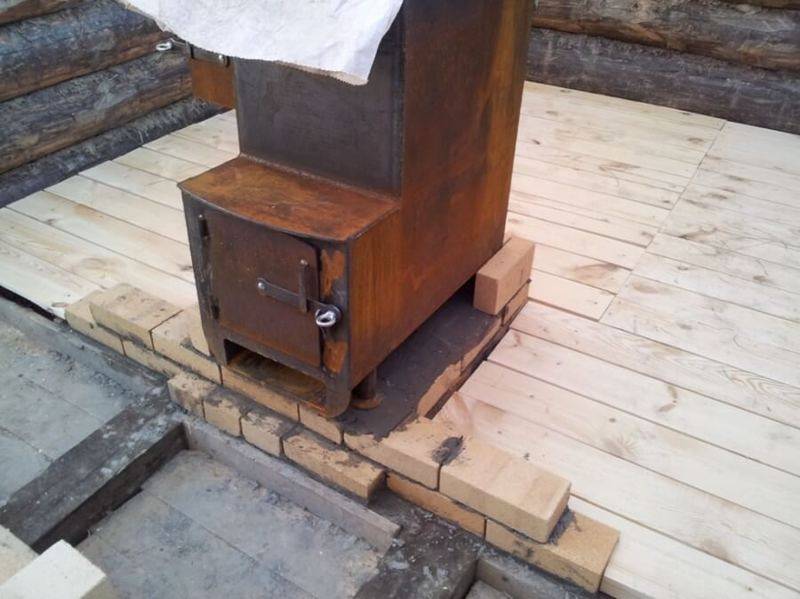
What can be the basis if the stove in the bath is no more than 700 kg? In this case, you can proceed as follows:
- on top of the finished floor, you need to lay out a clay solution;
- then the asbestos sheet is laid;
- then you need to put a sheet of metal (you can use roofing iron);
- only now can the oven be installed.
In this case, it will be possible to achieve a double goal. Firstly, all fire safety standards will be observed. And secondly, the thermal insulation readings of the floor will increase, i.e. the heat from the stove will not go under the floor.
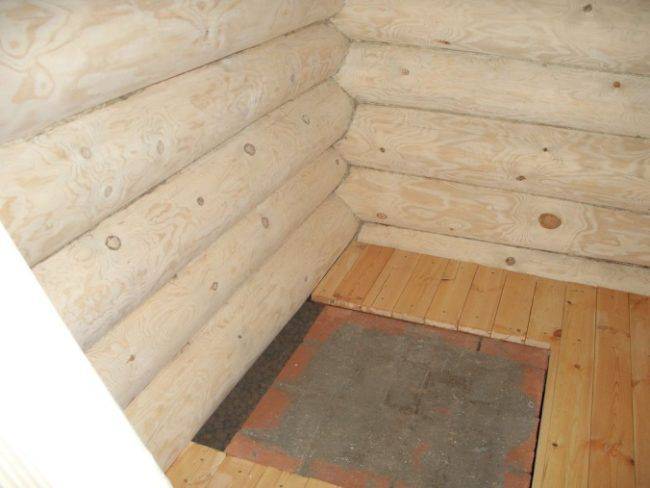
The base for any oven can be the same, even if its weight does not exceed 200 kg. But nevertheless, experienced builders note that such an arrangement cannot be called 100% reliable, therefore it is advised not to do this if the floor in the bath is wooden. It is better to remove the wood flooring at the place where the stove will be installed and make the brickwork. But in any case, a pillow of sand and gravel is required under the bottom.
