DIY chimney weather vane

A weather vane is an element that is mounted on top of the chimney. It is not only a decorative element, although its presence gives the roof a finishing touch. Its main purpose is to prevent back draft in the chimney. From this article you will learn how to make a weather vane for a chimney with your own hands.
Weather vane or weather vane - what is it for?
In fact, a weather vane or weather vane is a simple cap.
A well-made weather vane is an integral part of the chimney, which, in addition to everything, makes the appearance of the roof aesthetic and complete.
Its main purpose is to prevent the appearance of reverse thrust or wind blowing. As a result, if it is present, the safe operation of the chimney is ensured. It also protects against precipitation in the form of rain, snow and the like from entering the chimney system. Installation of a weather vane in some cases is necessary for another reason. Often, it is not possible to raise the chimney pipe to the wind support zone, so installing a weather vane is a good solution.
Note! An unprotected chimney will not last long. Temperature changes, the effects of precipitation, wind destroy the chimney, which is caused by dampness in the upper part of the chimney
A high-quality weather vane will additionally strengthen the upper part of the pipe and make it strong.
Types of weather vane
Weather vane can differ not only in the material of manufacture, but also in some design features. Among the wide variety of types and models of weather vane, today you can find:
- pipe umbrella,
- pipe cap,
- chimney with a weather vane installed.
For example, you can find original weather vane in the art style. In this case, a large number of forging elements, carved and other details prevail on the weather vane. In most cases, a metal profile, forged metal or 4 mm metal sheet, galvanized steel is used for their manufacture.
As for the manufacture of this item, this process must be carried out in accordance with existing fire safety requirements. For this reason, weather vane is equipped with a special screen, which is made of steel, with a thickness exceeding half a centimeter. This screen is installed from chimney roofs on distance of 40 mm and serves as protection against moisture and overheating. Such an element is placed on the last row of bricks, due to which the brickwork of the chimney is preserved for a long time.
Note! Subject to the manufacturing technology of the weather vane, it will protect the chimney from slanting rain / snow. You can find more complex designs that are also more practical.
For example, you can mark a chimney with a special hole. It promotes better elimination of combustion products, and also prevents smoke from entering the ventilation shaft. Protection against small birds that may fall into the chimney is equally important. Let's see how easy it is to make a weather vane with your own hands.
You can find more complex designs that are also more practical. For example, you can mark a chimney with a special hole. It promotes better elimination of combustion products and also prevents smoke from entering the ventilation shaft. Protection against small birds that may fall into the chimney is equally important. Let's see how easy it is to make a weather vane with your own hands.
Manufacturing and installation
Of course, in each case, the technology for installing a weather vane will be different. This will depend on the material used to make the chimney. For example, it can be an asbestos-cement pipe. So, the manufacturing process consists of the following sequential steps. The deflector vane must be made of corrosion-resistant materials.In our case, the chimney diameter is 120 mm. Therefore, the first step is to fix the rack (4) with the M6 nut (8) and M6 bolts (7) to the lower cylinder (9). Then use the clamp (5) and attach the upper cylinder (3). Further, the reverse cone (2) is assembled on the rebate. The cone-shaped cap is assembled and installed using special rivets (6).
The design of the weather vane is made using a simple technology, so this work is within the power of everyone.
What is a weather vane and where is it used?
For chimneys - galvanized steel. For outlets with high temperatures - made of copper.
- The angle of inclination of the cover is more than 40˚. This is a prerequisite so that a large amount of snow does not form on the cover of the weather vane, deforming its structure. The angle of inclination should not be too large, otherwise problems may arise with the passage of air and smoke through the pipe.
- The accuracy of the calculation of the light opening. This is one of the determining factors affecting the escape of smoke from the chimney and protection from atmospheric precipitation.
It should be noted that the use of a weather vane is zero if mistakes are made in the calculation and design of the chimney!
Installation rules
There are 2 main ways to mount the weather vane on the pipe body:
1. Holes are drilled half a meter from the edge of the "skirt", while there should be 2 or more of them on each side. The recommended diameter of the dowel and drill is 5 mm. You can drill with a weather vane, which is worn on the pipe. In this case, there will be no problems with the alignment of the holes. After that, you need to insert the dowels and tighten the screws on each side. This method is used when the pipe is made of hollow bricks.
2. Holes are drilled from above in the body of the brick. After that, the anchors are inserted and screwed in. When installing a massive and heavy weather vane, it is additionally fixed with a metal strip, the thickness of which is from 3 to 5 mm. This method is used when the pipe is made of solid bricks.

Scheme of a tent weather vane, where A is the length and B is the width
Installing a "header" requires a responsible approach, because in the event of a fall, it can cause irreparable damage not only to the upper covering of the roof and the drainage system, but also to the entire roofing cake (its weight can reach 100 kg.). In the case of a combustible roof, the vane must be equipped with a metal mesh spark arrester. Due to untimely installation of the "cap" or over time, the pipe masonry may crack and be damaged.
In this case, a casing is used that improves the protection of the pipe and performs an aesthetic function when the brickwork does not match the style of the roof or house.
For every taste and color
The construction market offers the buyer an extensive range of weather vane models. They can vary in size, shape, color and material from which they are made. The most common are copper, pural, polyester and stainless steel. The price range is from one to several tens and even hundreds of thousands of rubles when it comes to a premium design project. In this regard, it is not difficult to choose the best option for both country houses and luxury mansions.
Typically, the standard warranty for such products is 2 years. The approximate service life of a properly installed and operated wind vane is on average 10 years. It should be remembered that the weather vane is not only useful, but also a beautiful element of the pipe and the entire roof. If you wish, you can install a stylish weather vane on it and cheer up those around you.
Based on the materials of the magazine "Roofs. Facades. Insulation"
Roofing works in New Moscow and Moscow region >>
Installing the deflector on the chimney
Before installing the deflector, carefully inspect the chimney and the surrounding area. If there is access to the upper cut of the chimney, then the traction amplifier can be fixed in several ways:
- pull off the lower part of the reflector with a clamp;
- use threaded connections.
In the first case, longitudinal grooves are cut on the inlet pipe - they will allow it to shrink, covering the chimney as tightly as possible. If bolts and nuts are used for fastening, then the structure is pushed onto the chimney and through holes are made from three sides. After installing the fasteners and tightening the nuts, any protective compound is applied to the open threaded part - the connection will need to be disassembled periodically.
For reliable fastening of the deflector, you can use additional brackets - the main thing is that the structure cannot be ripped off during strong gusts of wind
For high chimneys, as well as in the event that it is difficult or unsafe to get to the chimney, the reflector is attached to an adapter, which allows you to tightly fit the device without additional fasteners. In this case, the order of work looks like this:
- A piece 20–25 cm long is cut from a suitable pipe. If it was not possible to find a workpiece into which the chimney would fit tightly, then a cylinder of the required size is obtained by folding a strip of sheet metal followed by butt welding.
- Using threaded connections, the deflector is attached to the edge of the adapter sleeve.
- Using a long pole, the structure is lifted up and pushed onto the chimney.
Since in the latter case it becomes possible for air to be sucked into the gap between the coupling and the chimney, the gap should be caulked with any refractory material.
Considering the latter option not reliable enough, the author of these lines fixed the reflector with wire braces. For this, I had to use longer bolts at the point of attachment of the deflector with the coupling - I attached pieces of wire to the threaded part protruding outward. By the way, this method made it possible to use the most dense coupling and to do without additional sealing - the braces made it possible to install the structure on the chimney with a slight interference.
What is a cap on a chimney pipe for?
The tradition of installing hoods on chimneys came to us from the past. Back in the 19th century, they were only forged, because there were simply no other ways to make an iron product. Since the work of a blacksmith was not cheap, not everyone could afford such a decoration on the roof. But on rich houses and castles, chimney caps were decorated with whole metal compositions. Most often, figures of people, animals and birds were depicted. Sometimes the owners of any business ordered an image of an object as a weather vane, which symbolized the owner's occupation. Such a visual advertisement.

Chimney vane
In fact, there are several functions of an umbrella installed on a chimney:
- Protects the pipe from water and snow ingress. In case of heavy precipitation, there may be enough moisture in the pipe to "lock" the draft. The hood, which is put on top, but does not interfere with the exit of smoke, significantly reduces its amount. Therefore, the shape of the cap should be selected based not only on aesthetic considerations: if a lot of snow falls in your region, then the best option is a cap in the form of a small roll roof with a sufficiently large angle. Snow comes off well from such umbrellas.
- The cap on the brick chimney protects the brick from destruction. Most of modern products have special grooves for draining condensate, which inevitably forms on a cold metal surface, in contact with heated smoke (or air, if this is a ventilation duct outlet).
- Prevents insects, animals, birds, leaves and other objects from entering the chimney that can be carried by the wind.
- Improves traction. Deflectors of various modifications have been developed specifically to improve traction, but any fungus on the pipe also copes well with this task: it rises by about 20%.
Why you need an umbrella over the chimney is now clear. It remains to understand what to make it from and which shape is better to choose.
The value of the weather vane
In the process of stove heating, a reverse draft of carbon monoxide gases occurs in the chimney. This could be due to:
- improper design of the heating system;
- irregularities on the inner surface of the pipe due to soot deposits;
- violation of the ventilation system;
- drafts in the house.

It is easy to eliminate back draft using a weather vane - deflector. The principle of its operation lies in the fact that the driving element of the chimney is set in motion under the influence of the wind and deflects air masses from the surface of the pipe, thereby providing a reduced pressure at the outlet from it.
The gases formed as a result of fuel combustion tend to compensate for the vacuum, rise to the top of the chimney, increasing draft. The weather vane, rotating, closes the chimney opening from the windy side, which contributes to the unhindered exit of carbon monoxide gases from the other side.
Every owner of a house with stove heating should remember that when operating a chimney without additional protection, the pipe's performance may be lost under the influence of unfavorable factors in the form of:
- wind;
- rain;
- temperature differences.
The chimney, which looks like a small canopy over the chimney, eliminates the adverse natural effect on its protruding part and prevents the destruction of the materials of the ventilation system component.
Operating principles and functions
The hood for the chimney not only protects against the ingress of debris and water into the smoke exhaust duct, it affects the draft force. The air flow, moving horizontally or at an angle, splits and goes down, this causes a "suction" effect. Thanks to this, a zone with a reduced pressure is created, into which the smoke from the furnace rushes. The protective deflector has the following functions:
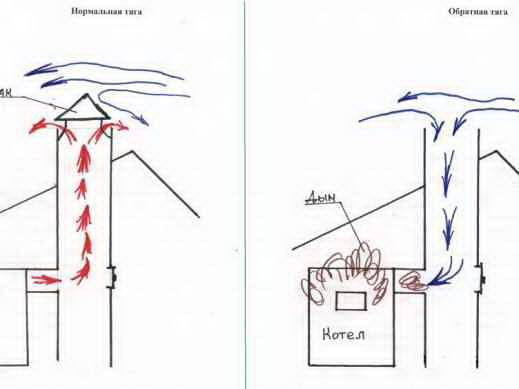 Optimizing draft with a deflector
- Prevents moisture penetration into the chimney. Dampness in the chimney increases fuel consumption and creates favorable conditions for the spread of fungus.
- Closes the pipe opening from branches, leaves, debris, and bird nesting. The umbrella reduces the risk of fire, blockages. Thanks to him, the chimney is less likely to clog up and functions more efficiently.
- Optimizes chimney performance. Correctly selected visor increases the efficiency of the chimney by 10-15%. And with the help of special aerodynamic deflectors with turbines, they solve the problem of lack of thrust.

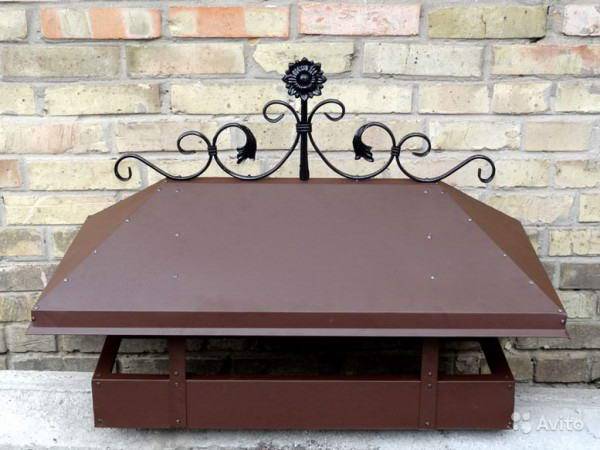

How to make a weather vane for a chimney?
Today a pipe vane is made of a wide variety of materials: tin, aluminum, stainless steel and copper. Manufacturing companies are used to make parts of the weather vane, as a rule, high-quality steel or copper, especially for the manufacture of snow holders. Understand that any other material simply cannot withstand constant temperature fluctuations and sunlight.
So, caps and heads of stove and chimney pipes are usually made of thin sheet steel, which is also called roofing iron. Its thickness ranges from 0.8 millimeters to 0.35 millimeters. Roofing metal contains little carbon, and therefore has a pleasant ductility, bends easily and is cut with scissors. It is easy to pull it into the desired shape with a hammer or chasing, steel or ordinary chisels. And the cover of the weather vane body is made of a steel billet, which already has an internal thread.
Here is a great example of making such a weather vane:
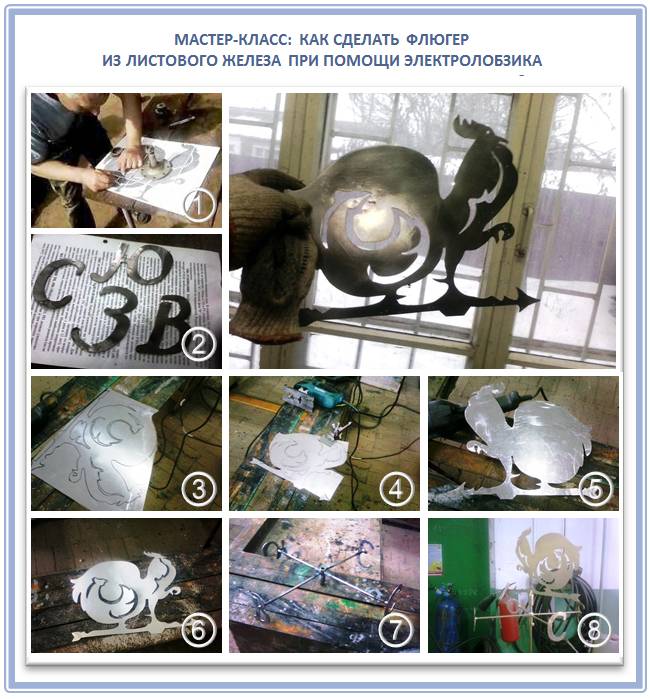
Also, for the manufacture of a weather vane on a pipe, high anti-corrosion steel is used, with a galvanized coating, and, finally, in extreme cases, the remains of a can and old buckets can also be used as sheet material.
The main thing is to come up with a good design. For example, in Europe it was fashionable to put figurines and visible cats as a weather vane, which supposedly drove away misfortune, and a rooster on the roof of a house will always warn the owners of an impending disaster. Interestingly, in English, a weather vane is literally called a "weather rooster." You can make such a weather vane, or its more fashionable counterpart:

The tools you will need are roofing pliers, a hammer, metal scissors, pliers, and a mallet. It is clear that you hardly have the opportunity to get professional tools for this business, but with a certain ingenuity, you will completely manage with a special roofing hammer, and even an ordinary tetrahedral locksmith. And a mallet can be made of hard wood - beech or birch, and instead of roofing pliers, you can even do with simple pliers for the time of making a weather vane. And in order to apply the necessary markings on the future weather vane, use risks and scribes, which are made of steel spokes. A ruler and compasses can also be used.
So, first, a so-called collar is made for the chimney. It is he who will prevent rainwater from falling into the pipe and into the attic. This consists of two parts of the lower and upper. And each of the aprons can also, in turn, consist of three parts, which are connected to each other.
You can make the weather vane itself out of stainless steel in the shape of a person, a figure, an object or a whole plot, which is especially fashionable. To work at height, you will need a metal bracket, a drill with a metal drill, washers with a nut, a wrench, a riveter and a purlin.
An approximate algorithm for making a rooster weather vane (as in the pictures above):
- Step 1. Fix the pipe cap diagonally onto a metal strip 1-2 millimeters thick. The cover of the weather vane must be made of a steel billet, with an internal thread.
- Step 2. Now fix the bracket with a riveter with combined rivets.
- Step 3. With a drill, drill a hole with a diameter equal to the diameter of the vane rod. And at the end of the rod, cut the thread onto the thread.
- Step 4. The strip is bent at each end by a few centimeters. After that, the bracket is attached, and a hole is drilled with a riveter.
- Step 5. Next, insert the axle of the weather vane into the hole in the cap and put on the washer on top. We screw the nut onto it. Twist, after which you can start orienting the wind rose relative to the cardinal points.
- Step 6. In order to correctly direct the weather vane, use a compass. And so that the figure rotates freely in the wind downwind, insert a bearing at the base. Better yet, a metallographic plain bearing, which is more sensitive to wind.
- Step 7. Then fasten the resulting figure with bolts or weld to the very top of the rack.
- Step 8. Another washer is screwed onto the other end of the weather vane to ensure its tight fastening. Only then will the weather vane be fully installed.
By the way, a weather vane for a chimney does not have to be flat at all:
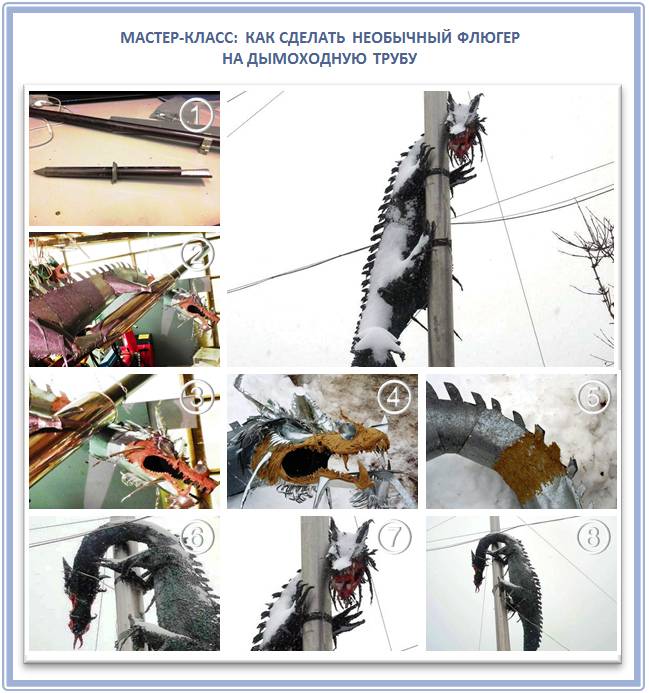
What is a wind vane deflector?
A separate type of chimney vane is called a deflector. The deflector vane itself means "deflection", and the main purpose of this device is to deflect the air currents from the pipe.
Such a deflector usually consists of two cylinders and tapered umbrellas fixed above them. It functions like this: the air jets hit the wall of the upper glass, bend around it on the sides and wrap up. As a result, the air movement in the pipe itself becomes stronger, and the thrust in the furnace increases.

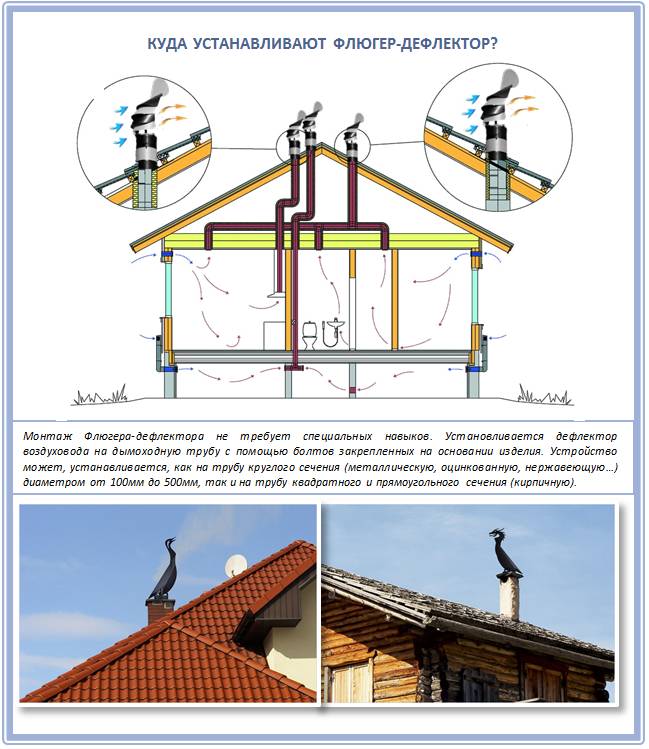
The principle of operation of a vane-deflector on the chimney is that the air flow, no matter what force or direction, bumps into the cone-shaped upper hood and no longer enters the chimney. And by means of a special selection of the design of the wind vane-deflector, you can also ensure that the thrust will not disappear, but will also increase - all thanks to special elements
The secret of such a weather vane lies in the fact that it turns in a cone and creates swirls, while rotating freely. It is important only in winter to get rid of ice on the device, which blocks its operation. Therefore, when installing a vane-deflector, it is necessary to use bearings with special protection against moisture ingress and lubricate them about once a year.
And by means of a special selection of the design of the wind vane-deflector, you can also ensure that the thrust will not disappear, but will also increase - all thanks to special elements. The secret of such a weather vane lies in the fact that it turns in a cone and creates vortices, while rotating freely
It is important only in winter to get rid of ice on the device, which blocks its operation. Therefore, when installing a vane-deflector, it is necessary to use bearings with special protection against moisture ingress and lubricate them about once a year.
Most often, wind vane-deflectors are found in the form of crowns or crowns, with which the pipe heads are decorated, and serve as a decorative element. Their expressiveness and attractiveness depends on the skill of the performer, namely, how much he masters the art.
How to make a fungus on a pipe with your own hands
Making a chimney cap yourself is not easy. If you do not have much experience in this area, you can first transfer the drawing to a sheet of cardboard, cut it out and think about ways of connecting and fastening. After the picture becomes more or less clear, you can cut out parts of the metal and start assembling
It is very important to measure the chimney accurately and strictly adhere to the measured values during manufacture
Here is one of the drawings of a chimney in the form of a small pitched roof. The angle is determined by the formula shown on the first sheet.
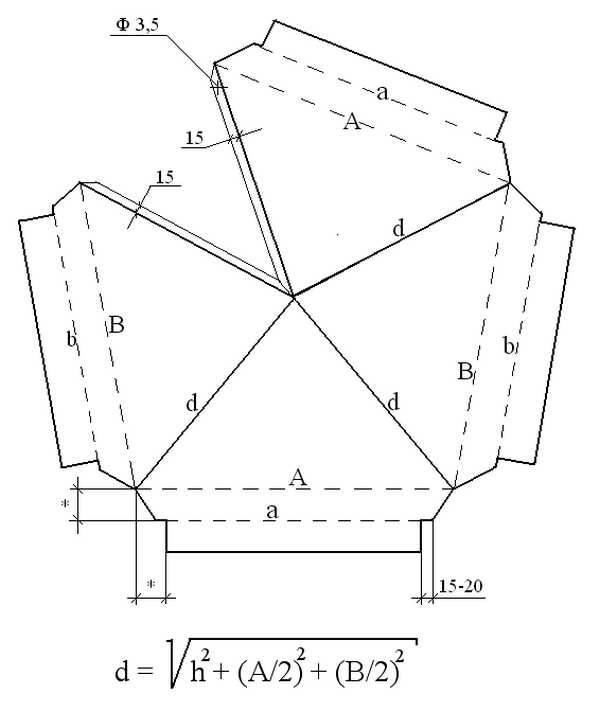
Chimney cap drawing

Chimney cap drawing
The procedure is as follows:
- Put the metal blank on the table face up, in the place indicated in the drawing, drill a hole with a diameter of 3.5 mm.
- Bend the part by 90 ° along all the dotted lines. For this, it is better to use a listogib. Then the lines will turn out clear, without dents. If there is no such device, you will have to use improvised means: fix a piece of the corner on the workbench with the shelf up. So that you can bend the entire (or almost all) line at once, you can use a bar.
- Bend the part along the lines "d". The angle is determined experimentally: a one-piece cap should be obtained. The structure should be flat, without distortions (place it on a table to check). If everything has come together, mark a point on the lower stiffener with a marker through the drilled hole, screw on the future hole, then drill.
- Connect the cap and fix it with a 3.2mm rivet.
- Along lines "a" and "b", bend everything so that you can install the legs.
- Along the outer perimeter of the pipe, make the base of the cap from the corners. Place the corners so that one edge rests against the masonry, and the other is on the side. Prepare the “legs” for the hood. All are connected by welding.
- The finished base must be cleaned, covered with an anti-corrosion compound, then painted in several layers with paint for outdoor use.
- Connect the hood to the base.
If making a square chimney seems difficult to you, this option may be easier. Its implementation will be quite simple if you have a piece of curved sheet metal of the right size. If you have a regular sheet, you can bend it on a special device (usually available from tinsmiths).
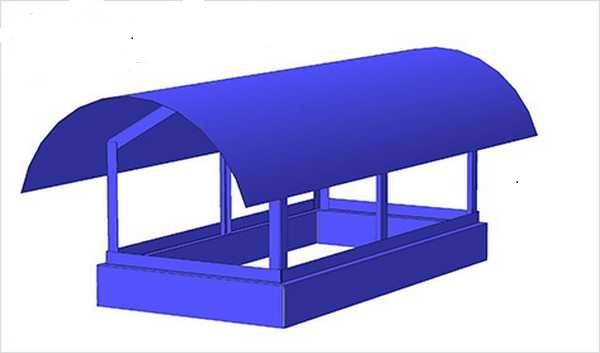
Do-it-yourself chimney
The order of work is as follows: prepare the base of the hood from the corner according to the results of measurements of your chimney. Position the corner so that the structure holds well: one edge rests on the edge of the chimney, the other covers it from the outside. Make legs that will support the hood and connect it to the base. Make them strong enough to withstand wind loads and snow mass. Treat all parts with an anti-corrosion compound and paint. Assemble the structure into a single whole. The collection method depends on the material.
Here is an example of how to make a deflector on a metal pipe.The author of this video has it installed on the basement ventilation pipe, although a similar design can be used on a metal pipe from a solid fuel boiler.
In this video, making a regular umbrella for a pipe.
Materials and shapes
In the 19th century, wind vans were only forged, and there were simply no other ways to make a device out of metal. Currently for the manufacture of the weather vane, various materials are used, on which the performance of the mechanism will depend in the future. Materials of manufacture include:
- Copper. Copper structures will last for a long time (about 50 years). The mechanisms for securing the copper vane should also be made of copper, because a chemical reaction can occur with other materials, which will further lead to a modification of the design. The color of copper structures under the influence of UV rays can change from brown to green.
- Galvanized iron and steel. These materials of manufacture are not inferior to copper structures in terms of reliability and strength. These materials can be painted in any color.

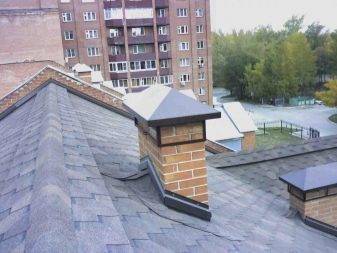
- Stainless steel. The stainless steel construction will last about 20 years. These fixtures are resistant to strong heat. The only drawback of using stainless steel is that such products lose their original appearance over time.
- Zinc-titanium is a modern building material that does not differ in its performance from copper structures. Service life is not less than 50 years.

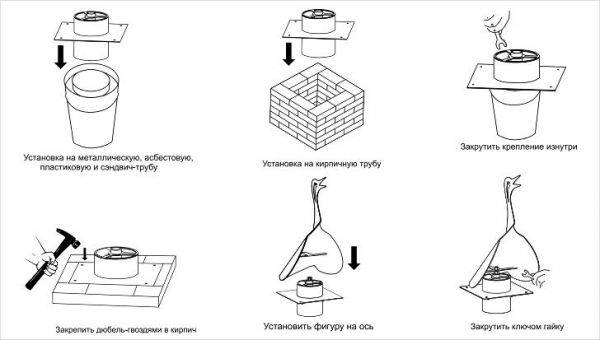
How to install
An important point is how well this element is installed on the chimney.
For self-installation, you will need to do the following manipulations:
- Initially, the required number of holes is drilled in the skirt of the element, which depends on the size of the device.
- Next, parallel points are drilled in the chimney and inserted into each of them with a self-tapping screw.
- After that, the weather vane itself is attached using a screwdriver.
The process of attaching the chimney is very simple, but it is very important to make sure that the element is securely fastened and that a strong gust of wind will not rip it off the roof. This cannot be neglected, because the weather vane has a fairly large weight and if it is detached from the chimney, it can cause damage to both the roofing and everything that it falls on.
NOTE!
In addition to weather vans, in some cases, they install covers for protection.
In addition, with their help, it is possible to hide defects in the chimney and create a complete look of the structure. Also, the casing protects the pipe walls from various external influences.
Installing a weather vane
What is a weather vane and its types?
The weather vane is considered the most ancient decorative element, which, among other things, also performed protective functions. From itself, it is a metal form on which a flag is fixed, a counterweight.
 Wind vane functioning diagram
The principle of operation is quite simple, for work it is necessary that the counterweight turns in the direction from which the wind is blowing, and the flag thereby shows this direction. This is a decorative element, which, by the way, was first used in Russia with the arrival of Peter 1. Our image on a metal form was often in the form of folk pets, as a rule, a rooster. In the beliefs it was said that this animal helps to protect the house from all kinds of demons and evil forces.
In addition to such functions of a weather vane, it should be recalled that it is not uncommon for a weather vane for a chimney to be used as protection from precipitation. A metal or wooden "visor" was fixed to the counterweight on the same side, which, when turned in a certain direction, closed the leeward part of the chimney from precipitation, debris and other things.
Main types:
- Shows the direction of the winds. Despite the huge amount of modern instruments, weather vane can still be seen at the stations. Their greater distribution was revealed in the coastal environs, because the weather at sea always depended on the strength and direction.
- Wilda. This is a modern special weather vane that allows you to know not only the direction, but also the strength of the wind flow. To determine the force, a vertical plate is fixed on it, how much it is turned and will mean the strength of the wind.
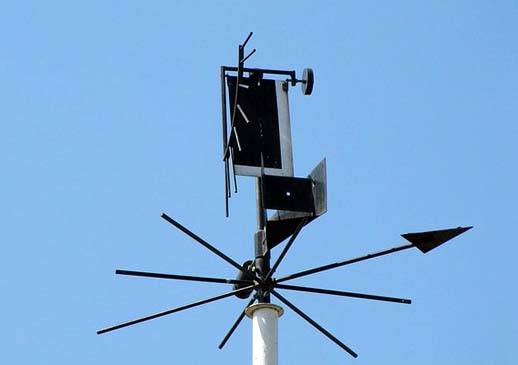 Weathervane Wild
The need to install a chimney deflector
The functioning of heating equipment is reflected in how air circulates in the system and smoke is eliminated. If these mechanisms are not debugged, then the fuel combustion process is disrupted, carbon monoxide penetrates into the room and causes serious damage to health.
 Each part of the chimney must be installed correctly, otherwise craving will be bad
It happens that the correct parameters of the chimney, that is, the section, height and configuration, are not able to normalize the operation of the stove or fireplace. In such a situation, they resort to a deflector installed on the upper section of the chimney.
An important mission is assigned to the deflector - to equalize or enhance the draft in the heating equipment. The assistant of the device in this matter is the wind, which creates a space with rarefied air and pushes combustion products into it that could not leave the smoke channel.
 The deflector often saves the situation if traction cannot be improved by any other means.
The deflector has been entrusted with some other tasks that contribute to improving the operation of the chimney as a whole. The device blocks the access of rainwater and snow to the heating equipment. Thanks to the deflector, the oven functions without interruption, even on a rainy day.
How to choose a cap
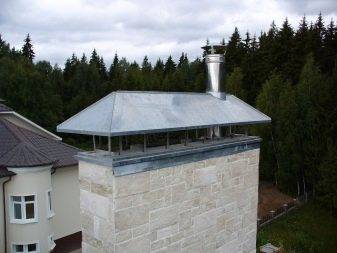
Most often, for brick pipes, heads with a hipped roof are used, and for pipes of a circular cross-section - chimneys with cone-shaped umbrellas
However, there are other options worth paying attention to. For example, a gabled top provides better protection from snow.
IMPORTANT!
IMPORTANT!
The shape of the chimney cap is not that important. In order for it to fully fulfill its functions, the main thing is to choose the right size for it. The overhangs of the umbrella should protrude several centimeters from all sides beyond the outer perimeter of the pipe.
If you want to be guaranteed to avoid falling leaves and other debris, as well as birds, into the pipe, you must opt for a cap with a net located under the umbrella. The role of the net can be performed by artistic openwork forging, such heads not only cope with the tasks assigned to them, but also have an excellent appearance.
- Painted chimneys are not suitable for wood-burning stove pipes, as the paint from them quickly fades.
- Caps with a sealed double cover resist hot air better, and double-deck models allow for better airflow.
- The hood with a deflector will provide the best possible draft and thus increase the heating efficiency.
- If you install a head with a hinged lid on the pipe, it will be easy to clean.
When choosing a hood, you need to find a model that not only looks good, but also harmoniously combines with the rest of the roof and the house in general and fits well into the exterior of the building.

Types of different caps
Heads with a flat roof are suitable for buildings that have a pronounced modern look, and for most standard "classic" brick houses, a hat with a four-slope, gable or semicircular tops will be the best choice.
To correctly select the size of the hood umbrella for a brick pipe, you need to measure its length and width.If there is an expansion in the upper part of the chimney, the umbrella must cover it too, which means that it is necessary to focus precisely on the dimensions of the outer perimeter of such an expansion. The base of the hood should be easily put on the chimney, but at the same time it should sit tightly, in order to find the required dimensions of its long and short sides, add 4-5 mm to the length and width of the chimney.
How to choose a weather vane?
When choosing a weather vane for a chimney, it is better to be guided by the following points:
- Type of fuel. The type of fuel to which the heating equipment is adapted determines the temperature level of the outgoing smoke, as well as its composition. In addition, the gas service has certain requirements for each type of fuel, this also applies to weather vans. A prerequisite is the presence of a through channel, which can closely attach to the chimney pipe, becoming its continuation.
- The impact of external factors. There are also some requirements for this criterion. Precipitation and sun rays should be well reflected by the device. In some cases, wind vans are installed, equipped with a special reflective screen, due to which the service life is increased. Such a screen is able to protect not only the vane from overheating, but also the chimney pipe itself. If the house is heated with wood or coal, then it is not recommended to purchase a painted steel vane, it will be soiled with soot after a short period of time.
You should not treat the weather vane as an element for decorating the exterior of the house. Such a seemingly simple device is capable of providing protection to the chimney, which will increase its service life and allow the heating system to always work properly.
