Advantages and disadvantages of using stoves
Despite the primitive design, the potbelly stove is a fairly popular heating unit, its use has many advantages:
- simplicity in making a do-it-yourself stove stove;
- the ability to quickly install anywhere in the room;
- homemade potbelly stove in the manufacture does not require expensive materials and special tools;
- runs on any available fuel;
- has an increased heat transfer, as a result of which it warms up the air in a matter of minutes.
At the same time, it would be correct to mention the disadvantages of this type of heating, inherent in almost all models:
- low heat capacity (heating lasts exactly as long as the fuel burns);
- frequent fuel filling (this statement refers to simple models, since at present there are several more complex designs that can work for days);
- very low efficiency;
- the need for maintenance of the chimney;
- high fire hazard of this type of heating devices.
Still, a potbelly stove in a garage is the cheapest solution, so this one advantage more than covers some of the disadvantages and inconvenience in maintenance.
What is a potbelly stove
A potbelly stove, like a brazier and a smokehouse, is considered optimal for heating, since it has a large combustion chamber. A chimney is installed in the back of the stove. In the front part there is a door for closing the combustion chamber and a small door for the ash pan, which must be periodically cleaned from the collected ash.
 Diagram of rectangular stoves
If a potbelly stove in a wood-fired garage is designed with your own hands, then it is worth noting that the lower door will perform several functions at once. The first function is to open the space for cleaning, and the second is the ability to adjust the intensity of combustion and the temperature in the room. That is, if the door is opened for the whole, the stove will burn much more powerfully than during the slightly open position of the door. Based on this, the temperature in the heated room will rise.
As for the sizes, they can be very diverse, but the efficiency and efficiency of the unit depend on them.
This is especially important if a potbelly stove is being made for a summer residence.
To facilitate the manufacture of a potbelly stove, choose a gas cylinder with a volume of 50 liters. A potbelly stove of this size will be able to warm up a garage or a small outbuilding. If a more efficient oven is needed, then a metal barrel of 200 liters is taken as the basis. You can also make a sheet metal oven. Well, naturally, the cost will go up at the expense of the material.
Potbelly stove operation: pros and cons
Considering heating units for a garage, it is important to evaluate the advantages and disadvantages of each option, compare technical parameters and ease of use. Homemade potbelly stove has a number of advantages over other types of heat generators, but we must not forget about some of the disadvantages
Homemade potbelly stove has a number of advantages over other types of heat generators, but we must not forget about some of the disadvantages.
 Homemade potbelly stove for heating the garage
Dignity
Among the characteristics that ensure the competitiveness of the potbelly stove among other heaters for the garage, one can single out:
- Fast ignition. If you correctly mount the chimney and ensure good traction, the fuel in the stove quickly ignites and the unit reaches full operating power 10-15 minutes after ignition. Even a small brick oven takes at least an hour to do this.
- High efficiency. Even without special modifications, a home-made stove is able to warm up the garage with high quality.The efficiency of the unit can be improved by welding metal fins or pipes to the body to provide convection, or by installing a brick screen or heat storage cover. Also, a potbelly stove can be turned into a boiler for radiator heating.
- Versatility. A variety of solid fuels can be used, including wood waste, crop waste, household paper and wood waste.
- Heating uniformity. Regardless of which part of the room there is a stove-stove, it will warm up the air evenly.
- Multifunctionality. Potbelly stove of almost any design can be equipped with a hob. Such a unit is used not only for heating, but also for cooking, heating water.
- Low cost. Used pipes, gas cylinders, rims, black sheet metal are used for the manufacture of the heating unit. A self-made stove requires minimal cash costs.
- Profitability. A properly made potbelly stove uses fuel efficiently, due to the use of various types of waste as fuel, the cost of heating a garage is several times lower than when using electrical equipment.
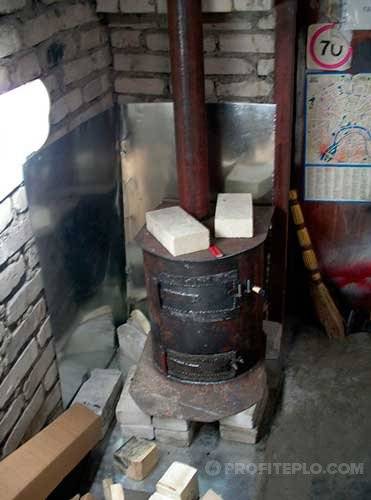 Own-made potbelly stove
disadvantages
The disadvantages of the heating unit include:
- No heat accumulation. The metal stove heats up quickly, but also cools down just as quickly. Heating of air in the room is provided only in the process of fuel combustion. A brick box erected around the stove will help to compensate for this shortcoming.
- Strict requirements for the chimney. In order for the thrust force to effectively burn fuel, the height of the chimney must be at least 4 m, while restrictions on the angle of inclination of the pipe links should be observed if the chimney is not mounted strictly vertically.
- The need for regular maintenance. The chimney of the stove must be regularly cleaned of soot. With daily use of the stove, a small diameter pipe (10-12 cm) is cleaned once a week, a large one - once every one and a half to two months. The accumulated soot not only impairs traction, but can also catch fire.
 Stepped arrangement of the stove chimney
Assembling a potbelly stove
The installation of a stove begins with its purchase or self-assembly
When choosing a purchased option, pay attention to the cast-iron model of the Soviet model
They began to be produced in 1955 and are still stored in army warehouses. We will not delve into where they came from for sale. But let's say that these are excellent ovens. Judge for yourself:
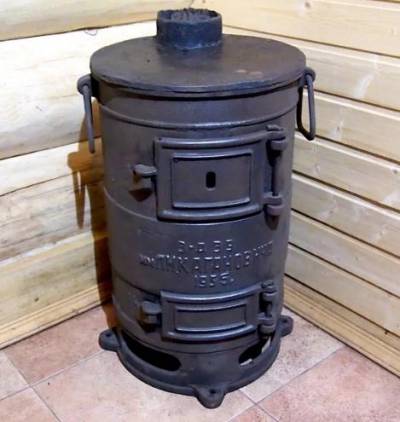
The cast-iron potbelly stove has a very impressive appearance and, due to its thickness, can serve for more than a dozen years.
- Thermal power - about 4-5 kW, which is enough to heat a garage up to 40 sq. m;
- Reliable cast iron - its thickness is 10 mm;
- Soviet assembly - comments are unnecessary here, then they knew how to do quality things;
- Omnivorous - works on coal, wood, sawdust;
- Suitable for installing a cauldron instead of the top cover.
The cost of the unit is in the range of 4-5 thousand rubles. The thing is really cool, but hellishly heavy, its weight is about 60 kg.
You can also assemble a potbelly stove for the garage yourself. For example, according to this scheme:

The assembly diagram of one of the simplest and nevertheless quite effective and reliable stoves.
It is assembled from sheet steel. The recommended thickness is 4-5 mm. This is enough to keep the steel from burning out in the next few years. The statement is most relevant when using coal that burns at a higher temperature. For assembly, you need to cut the metal on a machine or using a powerful grinder.Legs can be made, or you can not do it - in this case, the stove is installed on a stone base.
To assemble the furnace, additional materials will be needed - this is a metal pipe, doors and fittings for assembling the grate. The pipe is necessary to create a chimney - the chimney is connected to it. You need two doors - one large, the second small. The large one is welded in front of the combustion chamber (firebox), the small one is welded between the bottom and the grate. If you are making feet for floor installation, use sturdy metal corners or fittings with a thickness of at least 15 mm.
The chimney diameter according to this scheme is 100 mm - this is quite enough (for this drawing). Potbelly stove is assembled using a welding machine
Special attention is paid to the welds so that they can withstand heating and do not let smoke into the garage itself. When assembling the body, do not forget to install the grate and smoke chimneys.
Smoke turnovers improve heat transfer and are a backlog for pyrolysis combustion - in this case, a tube for supplying secondary air is welded into the rear wall above the level of the first turnover.
Potbelly stove making guide
Putting a potbelly stove in the garage, made by hand, if you wish, you can improve the heating of the room. For this, a water jacket is mounted on the chimney or casing of a rectangular stove, connected to a heating circuit with heating devices. This option is practiced if the garage has a large area and is electrified - voltage is required for the operation of the circulation pump.
Let's take a closer look at how to make simple options for a stove - a box oven and a heating unit from a can.
Box model
To make a stove-box, you will need sheet steel with a thickness of at least 4-5 mm, a pipe for a chimney pipe, reinforcing bars for making a grate or a sheet of heat-resistant steel. A corner with a suitable shelf size is used for the legs. You will also need hinges for hanging doors and a cast iron burner if you want to equip a practical hob.
At the preliminary stage, it is necessary to prepare drawings indicating all dimensions. The dimensions of the box-stove are selected depending on the size of the garage - a more powerful unit is required for a spacious room.
On sheet metal, you need to mark up in accordance with the drawings and cut out parts. Then the stove body is welded in the form of a box without a bottom.
In the upper part of the body, plates are attached, forming a labyrinth through which hot gases will pass on their way to the smoke pipe. This increases the heat dissipation of the heating unit and increases the efficiency of the hob.
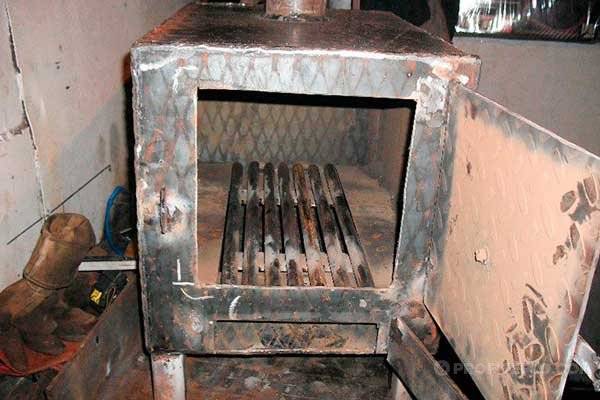 Potbelly stove in the form of a box made of sheet steel
Next, a grate is inserted from rods or perforated sheet of heat-resistant steel. The diameter of the holes (and the pitch between the grate rods) should not exceed 2 cm so that fragments of burning fuel do not fall into the ash pan. The grates can be welded to the walls or installed on channel sections welded from the inside of the body. Then the bottom is sealed by welding.
At the next stage, according to the marking, holes are cut for the firebox and ash pan. Doors can be bought and installed ready-made, made of cast iron, or they can be cut from sheet metal and welded to the hinges. After hinging the doors, latches and handles are mounted.
In the upper part of the body, two holes are cut out - for the burner and the smoke pipe, after which these elements are installed. Be sure to check the tightness of all connections, otherwise carbon monoxide will penetrate into the room. Legs are welded to the bottom of the body, after which everything is ready for installing the stove in the garage and connecting to the chimney.
Model from a can
The easiest to install is a stove made of a standard 45 or 60 liter can. Its advantages include a minimum of hassle in manufacturing, the disadvantage is fragility due to thin walls that burn out after 1-2 years of intensive use.
Manufacturing steps:
- A support structure is welded to the bottom of the horizontally located can. At the same time, the can is positioned in such a way that the lid can be conveniently used as a door.
- Several holes with a diameter of 15-20 mm are drilled in the lower part of the door to allow air to enter the firebox.
- In the upper part of the body, on the opposite side from the door, a hole is cut out and a chimney pipe is welded in from a pipe with a diameter of 100-120 mm.
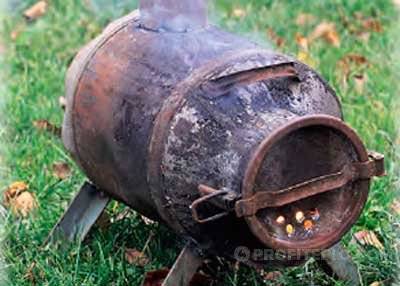 Potbelly stove from a can
The simplest stove is ready, it is not even necessary to install a grate in it. To remove ash, the stove is disconnected from the chimney and turned upside down, taking it by the handles.
How to make a wood stove
When making a potbelly stove in a wood-fired garage with your own hands, it is recommended to install a door on it for regular cleaning of ash. Also, opening it to a certain width allows you to adjust the intensity with which the wood burns by changing the amount of air supplied to the chamber.
Features of the production of a classic stove
The classic oven is made of sheet metal. You also need fittings, pipes, corners, welding equipment and for cutting metal.
How to cook such a potbelly stove:
- Cut out metal parts: the future bottom, side walls (the long side is equal to the length of the bottom, the short side is equal to the height of the product), back, front walls (one side of which is equal to the width of the bottom, the other - the height of the product). Pre-create do-it-yourself drawings of the stove stove:

Photo 1. Drawing of a potbelly stove for a garage.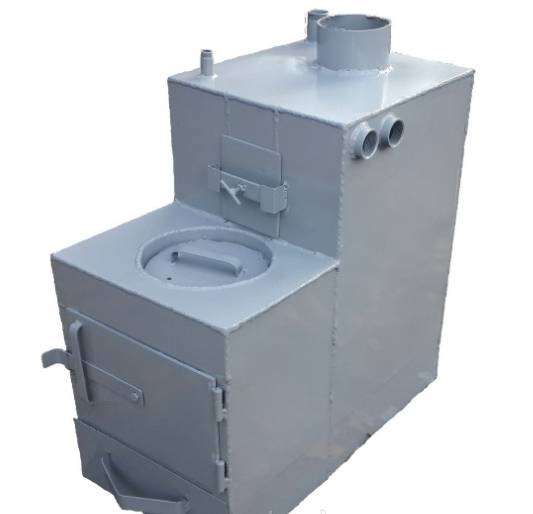
- To the walls: back, side weld the corners (for installing the future grate).
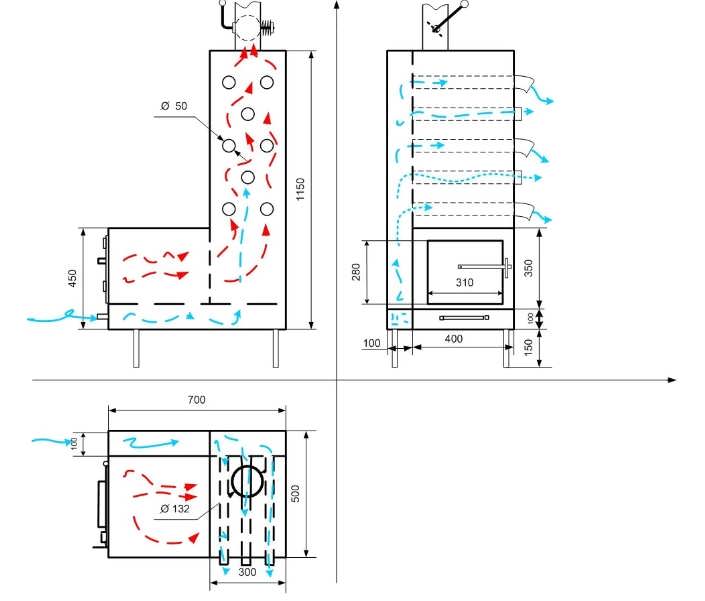
Photo 2. Do-it-yourself drawings of the most efficient potbelly stove.
- It is necessary to create a pair of doors (for the ash pan, firebox) with hinges.
- Cut a hole in the upper part of the pipe diameter. Install it and the sleeve.
Determine the diameter of the chimney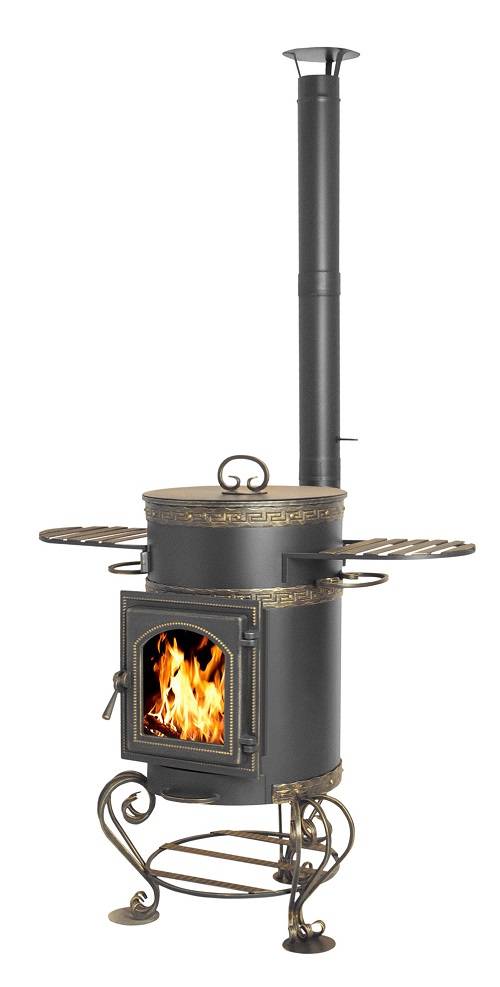
This parameter is important for determining thrust. When installing a purchased product, this parameter can be found in the unit's passport. It can also be found out by studying the regulatory documents on the compliance of the minimum cross-sections and furnace capacities.
There are 2 calculation methods:
- Accurate. It takes into account the average speed (usually 2 m / s) and temperature (about 160 degrees) of moving gases; humidity and mass of firewood burning in the firebox per hour B (usually equal to 5kg / h).
Calculation formula:
V ref. = (B * V * (1 + t / 273)) / 3600, units of measure - m3 / sec.
The humidity and temperature of gases can be found in the table:
| Fuel | V burnt food, at normal atmospheric pressure and a temperature of 0 degrees Celsius. | Waste gas temperature, degrees Celsius. |
| Coal. | 17 | 120 |
| Firewood, damp by a quarter. | 10 | 160 |
| Briquettes. | 11 | 160 |
| Brown coal. | 12 | 140 |
| Lump peat. | 10 | 150 |
- V of the combustion chamber (unit of measurement - liter) / pipe hole diameter (millimeters) = 1 / 2.7
Suppose V is 50 liters, then the value of the chimney pipe diameter will be 2.7 x 50 = 135 mm.
Potbelly stove from a can
Raw materials and tools:
- Milk can.
- Wire or reinforcement.
- Welding, tools.
- Pipe.
The milk can is initially airtight, so a potbelly stove can be made in a couple of hours, which explains the second place in popularity of this technique among the methods of making potbelly stoves.
Did you have to make a potbelly stove with your own hands?
Not really
The procedure for creating a stove for giving a stove:
- To form a blower: to do this, use a chisel to punch a workpiece or create a gap at the neck of a crescent-shaped can.
- Cut a hole in the branch pipe in the bottom area, then insert the chimney and sleeve into it.
- Weld the grate from the reinforcement, try to place it into the workpiece without additional cutting holes. To do this, the reinforcement is bent (if possible), placed inside the structure, and then unbent.
- Make a potbelly stove according to the drawing.
- Install the finished potbelly stove on the legs or on a brick base.
- Outside, you can attach a reflector for heat and a handle, as a result, the stove will be with high efficiency.
Making a potbelly stove from a gas cylinder
The gas cylinder is hermetically sealed and thus is able to ensure the safe operation of the finished product.
What you need to take:
- Cylinder without gas.
- Metal sheet 4 mm.
- Pipe (diameter suitable for the volume of the cylinder).
- Armature.
- Doors, corners.
- Welding equipment, grinder.
The procedure for cutting and cooking a potbelly stove with your own hands:
- Knock down the upper rim of the cylinder and the valve.
- Make a gap under the blower at the bottom of the cylinder.
- Weld the pipe to the bottom, insert the sleeve, put on the pipe.
- Make a grate using reinforcement.
- Weld the support or place it on a brick base.
Furnaces with a design of increased heat capacity and heat transfer
In potbelly stoves of increased heat capacity, the combustion chamber is lined with refractory from the inside or the outer walls of the furnace are lined with bricks. Heated brick cools down much longer than metal surfaces. When building a stove in a bathhouse, a metal box with stones or bricks is installed in its upper part.
Furnaces with increased heat transfer (so-called bullers) are round in shape. Metal pipes are welded around the body. When the pipes are heated, cold air is drawn from the bottom, warmed up inside the pipe and the hot coolant escapes from the pipe upwards. Thus, the heating of the room is much faster and more efficient.
The first launch of a potbelly stove
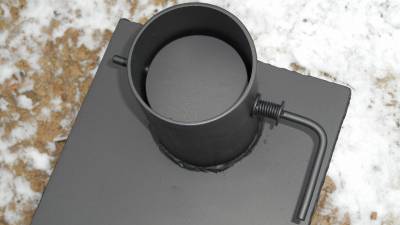
The gate valve allows you to control the draft in the stove, thereby affecting the fuel consumption and temperature.
Installation is complete - you can perform the first launch. To do this, put a small amount of wood chips and paper inside, light a fire. Next, we put a small amount of firewood and wait for the stove to warm up. The firewood must be dry (no more than 15-20% moisture), otherwise the soot from them will quickly contaminate the entire stove and chimney. We make sure that the smoke regularly goes into the chimney, add more firewood, close the firebox door and open the ash pan door (it works like a blower).
After 20-30 minutes, the temperature will rise to a comfortable level. To save fuel, close the blower - the flame will go out. This achieves temperature control. You can also retrofit the chimney with a gate damper.
Potbelly stove as a decor item in the interior
Despite the fact that potbelly stoves are considered in cities where there are all modern conveniences, relics of the past, they are still used even in modern houses with European-quality repairs and designer interiors. Some craftsmen install such units even in apartments. After all, a do-it-yourself potbelly stove can have a decorative look and become a functional decoration of any room. She will be able to fill the room not only with warmth, but also with an atmosphere of comfort, when firewood crackles in the fireplace, and a blizzard outside the window. Now designers have begun to design various types of bourgeois, so today it is not just a tool that helps to survive the cold winter, but an even more beautiful accessory.

It does not matter whether the potbelly stove is made by hand or bought in a store, you should always remember about safety precautions. There must be a metal sheet near the stove in case an ember falls out when throwing firewood
Also, do not keep flammable objects or plastic nearby.
Making a potbelly stove from a gas cylinder
The most common home-made potbelly stoves from gas cylinders. They have thick walls, so a durable and mobile stove will come out. First you need some markup. In the center of the cylinder, a door for the combustion chamber is drawn. We retreat 10 cm down from it and draw the contour of the second door (for the blower).
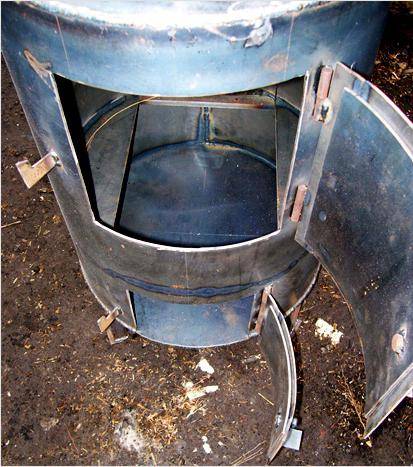
Then, using a grinder or an autogenous gun, cut out the doors along the contour. You need to draw a closed line between them.On it, the balloon is sawn into two fragments. This is necessary in order to weld the grate in the area of the saw cut to the lower part - the blower. Firewood will lie on it, and the ash, which they turn into during the combustion process, will fall through the rods, making room for new solid fuel. After the grill is installed, you need to reconnect the two parts by welding them together.
After that, you need to make a hole with a radius of about 10 cm where the valve was. Then we weld a pipe into this place, which will serve as an exhaust hood. Well, the simplest do-it-yourself potbelly stove from a cylinder ready, you can put it anywhere and use it.
However, this option is only suitable for space heating. If you also plan to cook on such an oven, then you need a slightly different upper design. The top must be cut off, and the rods must be welded inside so that you can put the pan. The pipe hole should be cut at the top but from the side. Thus, it will be possible to cook food if necessary, and when you just need to heat the room, you should cover the top with a lid that came from the top of the cylinder. It is only necessary to first weld the hole where the valve is screwed in, and make a comfortable handle.
Potbelly stoves - proven and simple designs
Potbelly stoves are a hit of the 20s of the last century. Then these stoves competed with brick ones and stood everywhere, even in apartments. Later, with the advent of centralized heating, they lost their relevance, but are used in garages, in summer cottages, for heating auxiliary or outbuildings.
Sheet metal
Potbelly stoves from a cylinder, barrel or pipe
The most suitable material for making a potbelly stove for a garage is propane cylinders or a pipe with a thick wall. Barrels are also suitable, but you need to look for a not very large volume and with a thick wall. In any case, the minimum wall thickness is 2-3 mm, the optimal one is 5 mm. Such a stove will serve for more than one year.
By design, they are vertical and horizontal. It is more convenient to heat a horizontal one with firewood - longer logs fit. It is easier to make it stretched upwards, but the firebox is small in size, you will have to cut the firewood finely.
A potbelly stove for a garage can be made from a cylinder or a pipe with a thick wall
Vertical
First, about how to make a vertical oven for a garage from a cylinder or pipe. Divide the selected segment into two unequal parts. Below is a smaller one - for collecting ash, above - the main one for laying firewood. Further, the order of work is as follows:
- We cut out the doors. At the bottom it is small, at the top it is of solid size. We use the cut pieces as doors, so we don't throw them away.
- We weld the grates in the selected place. Usually it is steel reinforcement with a thickness of 12-16 mm, cut into pieces of the required length. The step of installing the reinforcement is about 2 cm.
How to make grates
We weld the bottom if it is not there.
Cut a hole in the lid for the chimney, weld on a strip of metal about 7-10 cm high. It is better to make the outer diameter of the resulting pipe for standard chimneys. Then there will be no problems with the chimney device.
We weld the cover with the welded pipe in place.
We attach locks, hinges to the cut-out door pieces by welding and put all this in place. As a rule, potbelly stoves are leaking, so that seals can be omitted. But if desired, a strip of metal 1.5-2 cm wide can be welded along the perimeter of the doors. Its protruding part will close a small gap around the perimeter.
All in all, that's it. It remains to assemble the chimney and you can test a new stove for the garage.
Horizontal
If the body is horizontal, the ash drawer is usually welded from the bottom.It can be welded to the required dimensions from sheet steel or use a piece of channel of a suitable size. Holes are made in the part of the body that will be directed downward. Better to cut something like a grate.
How to make a potbelly stove in a garage from a gas cylinder
Then, in the upper part of the body, we make a pipe for the chimney. To do this, you can weld a cut piece from a pipe of a suitable diameter. After a piece of pipe has been installed and the seam has been checked, the metal inside the ring is cut out.
Next, you can make the legs. The best fit are pieces of a corner, to which small pieces of metal are attached from below to stand firmly.
The next step is to install the doors. You can cut a piece of metal on the blower, attach hinges and constipation. Here without any problems. The gaps at the edges do not interfere - through them the combustion air will flow.
There will be no difficulties even if you make a door made of metal - welding the hinges is not a problem. Only here, in order to be able to at least slightly regulate the combustion, the door must be made a little larger - so that the perimeter of the opening is closed.
How to Install Furnace Casting on a Metal Stove
It is problematic to install furnace casting. Suddenly someone wants to have not a steel door, but a cast iron one. Then it is necessary to weld a frame from a steel corner, attach the casting to it with bolts, and weld this entire structure to the body.
From two barrels
Everyone who has used a potbelly stove knows that very hard radiation comes from its body. Often the walls are heated to a red glow. Then it is impossible to be near her. The problem is solved by an interesting design: two barrels of different diameters, inserted one into the other. The gaps between the walls are covered with pebbles mixed with sand with clay (ignite on fire, cover only when cooled). The inner barrel acts as a firebox, and the outer one is only the body.
Such a stove will take longer to warm up. It will not immediately begin to give off heat, but it will be more comfortable in the garage and after the fuel burns out, it will warm the room for a couple of hours by giving off the heat accumulated in the bookmark.
Design features for better heating
If you need to heat a large building, then it is advisable that the exhaust pipe runs horizontally in the room. After all, if it comes out of the stove immediately up and out, then with the smoke all the heat will also quickly find itself on the street. Therefore, the temperature in the room will drop quickly. And if the chimney comes out of the stove horizontally throughout the room, the smoke remains in it much longer: the hood is like a battery with a rather high temperature. And in this case, a potbelly stove made with your own hands becomes like a boiler.
So that the surface of the potbelly stove cannot burn, a box is attached to it. These are additional plates that are installed on three sides of the oven at a distance of 5–10 cm. The surfaces of the stove and the box should not touch. The air gap between them does not allow the box to get very hot. This, firstly, protects the room from fire, and secondly, it allows you to feel more comfortable near the stove. It is more convenient to make such protection for a rectangular structure, but you can also make it for a potbelly stove made from a cylinder. Moreover, the box can be built from an ordinary piece of tin, because it does not heat up enough to burn out.
Waste oil oven
The simplest used oil garage stove is well known to everyone. And, although its drawing is not difficult to find in Runet, we will present it again, just in case:

As you can see, such a heater is simple to manufacture, but there are nuances during operation. The main enemy of such stoves is water, which, due to various circumstances, got into the used oil. A very small amount causes strong popping in the perforated afterburner (vertical pipe with holes), which can cause a fire. It turns out that before use, the fuel must be defended in order to separate the water.
Important. Any furnace for mining, as well as for wood, requires a chimney with good draft for stable operation, therefore it is recommended to raise it to a height not less than 4 m
The second drawback of the heater is a pungent smell at the stage of ignition and heating. For the rest, the use of the miracle oven, as it is called in specialized forums, does not cause any particular complaints. It warms pretty well. But on the same forums, craftsmen have long proposed a more reliable and efficient design. And not so fire hazardous. The principle by which such an oil stove functions is shown in the figure:

The fuel burns in a metal bowl located at the bottom of a vertical pipe (or gas cylinder). It is fed into the bowl by drops from the dosing device. Thanks to such a scheme, if necessary, a liquid fuel stove can also burn diesel fuel, you just need to adjust the air supply and dosage. Part of the oil vapor burns out inside the vertical perforated pipe - the afterburner when secondary air is supplied. The furnace device is shown in the drawing:

As a body, you can use a thick-walled steel pipe or a propane cylinder. The assortment of the rest of the metal is indicated in the drawing, we will not list it again
Instead, let's focus on the air supply method, it can be of two types:
- natural, due to the draft of the chimney;
- forced blowing by a fan.
A homemade drip stove from a pipe can also work at low thrust, if there is no way to raise the chimney higher. This is facilitated by the installation of a fan that blows air into the afterburner. Then, looking into the working oven from above, we can observe the following picture:

The method is considered more effective and completely reliable, tested by more than one garage owner. If desired, such a diesel stove is enclosed in a water jacket, turning into a hot water boiler. This will allow you to arrange a radiator heating in the garage and significantly increase the comfort during a long stay in the room in winter. The warning for oil heaters is the same as for wood-burning ones: if there is a high-rise residential building in the immediate vicinity, then you will have to return to the idea of heating with electricity.


