Potbelly stove from a cylinder
Do-it-yourself potbelly stove from a gas cylinder is the best way to make it at home. It is ideal for heating the garage, and small utility rooms.
Getting started:
We take as a basis a gas cylinder with a volume of fifty liters. To start cutting it with a grinder, you need to clamp the cylinder in a vice, this is done for the lower part. Then we take the gas key, put it on the valve. Now, we put on a long pipe on the key handles, which will act as a lever for us. Gradually and slowly we begin to unscrew the valve
Attention! Even if the cylinder is empty, there will always be residual gas in it. You have to be extremely careful with him.
Unscrewing the valve, pour water into the middle, to the very top
When the container is full of water, you can start cutting. This is necessary to avoid an explosion from a spark, even if the cylinder is empty, there is residual gas in the micropores.
We arm ourselves with a grinder with a disc for metal. The first step is to cut off the aluminum label.
We take the selected chimney pipe. We install it in place of the valve, draw a circle around the pipe with a marker or pencil. We cut out this section with a grinder.
We retreat three centimeters down from the first top seam, draw a straight line in a circle. Now we cut off the top of the balloon along the line. It is undesirable to cut the seams with a grinder, there is a very thick metal.
We mark the location of the furnace and ash doors. Our combustion chamber door measures 25 by 20 centimeters, and the ash pan door is 25 by 10 centimeters. We made the body of the future potbelly stove from a gas cylinder with our own hands.
We cut out our door markings with a grinder. To make it convenient to weld the hinges, and they were evenly located, it is advisable not to make the cuts completely, it is better to leave half a centimeter. After the cuts, we place the canopies on the surface, weld them with a welding machine.
We clean the welding seams with a grinder. Then, we cut through the remnants of the metal on the doors. Now, we make a strip along the perimeter of the doors. We drill a hole closer to the edge. We make a handle latch. We drill a hole in the handle. We fix it to the door with a bolt. The nut can be gripped by welding.
We make a hook on the stove body, weld it. We weld a metal bracket above the handle. Making a potbelly stove in the garage with your own hands is almost complete.
We make the ash pan door in an identical way. Now, we need to weld the grates that will separate the ash pan and the firebox. It is desirable to make them from the 16th or 18th reinforcement.
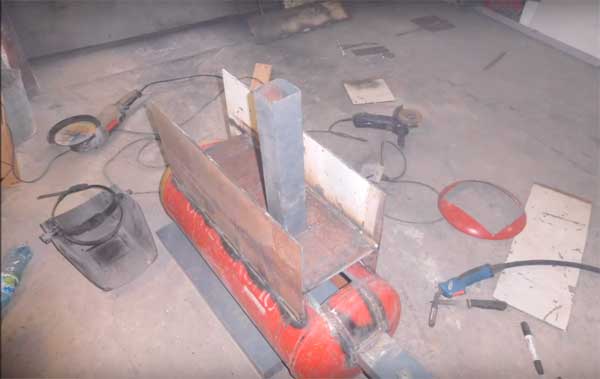
In the upper part, it is necessary to weld in segments that will partially block the smoke from the firebox. And it will not immediately go outside, but first pass between these elements, due to which the unit will retain more heat.
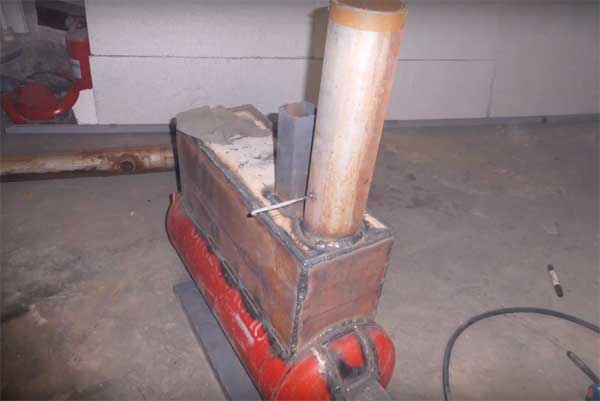
On the upper part, which we cut off, we weld a piece of pipe. After that, we bring the top of the cylinder to its place and weld it with a continuous seam.
At this stage, the stove can be tested and, if everything is fine, you can install it indoors and warm up. It takes about a day to construct a potbelly stove from a cylinder. But the design itself is so simple that even a beginner can make it.
Do-it-yourself potbelly stove from a barrel
The simplest option is a potbelly stove from a large barrel (150-200 liters). It needs to be supplemented with grate bars, doors and a chimney. We start the manufacture of the stove with the construction of a reliable non-combustible base. The best option is to lay out a small brickwork on which the barrel itself will stand. It will take several days to make it. After that, we proceed to further work.
In the front wall of our potbelly stove, cut a rectangular hole for the loading door - use a metal jigsaw for this. The resulting piece of metal will act as a door for us - we attach a rotating lock, handle and hinges to it.After that, we weld the second part of the hinges to the barrel. On the opposite side, we weld a metal loop into which the constipation will fit.
In the lower part, you need to make an ash pan with another door. We allocate 10-15% of the total volume for it. We make the door as described above, but it should be narrower - ash is scooped out through it, it also serves as a blower. The optimum height is 40-50 mm. Next, we start making grates:
- Cut off the top cover at the barrel;
- We make a grate from pieces of metal pipes (you should get a circle with long slots);
- We weld the grate on the inside of the barrel, between the loading door and the ash pan door.
An old can or flask is also a great option. By using it, you free yourself from the need to weld the loading door.
We make a hole in the lid with a diameter of 100 mm, weld a small piece of pipe of the same diameter here - this will be a chimney hole. Next, we weld the lid into place. Our potbelly stove is ready, it remains only to attach a chimney to it and you can start testing - we load firewood and try to light the flame.
We made with you a long-burning stove with our own hands - it has an unusually large combustion chamber
Please note that you can make a brewing hole in the top lid - its diameter is 100-150 mm. Instead of a barrel, you can easily use a gas cylinder or a piece of pipe of a suitable diameter
Remember that a potbelly stove from a pipe and a cylinder must have a sufficiently large diameter (at least 350-400 mm).
If necessary, you can make a similar potbelly stove in a horizontal design - you just need to slightly change its design. The rest of the assembly principle does not change.
User manual
The most important prerequisite for operation is good welding quality. Use chalk and kerosene to check for fistulas and defects. To treat the seams of the chimney especially scrupulously. Load the wood into the combustion chamber, light the fire, close the door and regulate the process with a blower. To reduce the intensity of combustion, you need to screw on the blower; to put out the fire, it is enough to turn it completely.
Heat radiating from metal at a temperature higher than from brick or stone
Always use a thick potholder to adjust the blower, do it carefully and quickly. Clean the oven after cooling completely
In the presence of welding defects, operation is stopped and the defects are corrected. Carbon monoxide can be fatal.
According to some reviews, this stove can smoke when the firebox door is opened. This is due to a decrease in thrust. The defect can be eliminated by increasing the diameter of the chimney pipe to 150 mm and reducing its length.
Slow-burning stoves are popular with fishermen and tourists. Replacing a thick sheet of metal with light and thin stainless chimney pipes, they successfully use Loginov's scheme for winter fishing and tourism
For such furnaces, welding is rarely used.
Advantages and disadvantages
Let's see what are good homemade stoves made by folk craftsmen:
- Cheap - most of the materials can be found for free or given a mere penny for them;
- Omnivorous - in fact, any solid fuel can burn in a stove;
- Simple construction - if we look at the drawings, we will not find anything complicated in them;
- Possibility of cooking - for this, stove stoves are equipped with cooking holes with lids;
- Ease of operation - provided that there is a good chimney, the stove will work properly and without fumes in the whole room.
Unfortunately, heating with a potbelly stove has its drawbacks:
- Low efficiency of the stove - without proper modernization, most of the heat will fly into the pipe;
- Not the most solid appearance - although some craftsmen make real works of art out of bourgeois;
- High temperature of the case - fraught with burns;
- Large fuel consumption - in order for the stove to retain heat for a long time, without requiring the burning of tons of firewood, you will have to go to tricks.
Despite some shortcomings, simple wood-fired stoves are still in demand among those who need heat in the absence of a gas main.
Long burning potbelly stoves
And now we will consider the question of how to make a potbelly stove with our own hands, so that it gives off heat even longer without the need for recharge. All wood-fired stoves are hot and burn out quickly. Because of this, they need to be frequently topped up with fuel. However, if the stove is not allowed to burn so strongly, but to make its fuel smolder little by little, then the heating time from one firewood bookmark can be significantly increased.
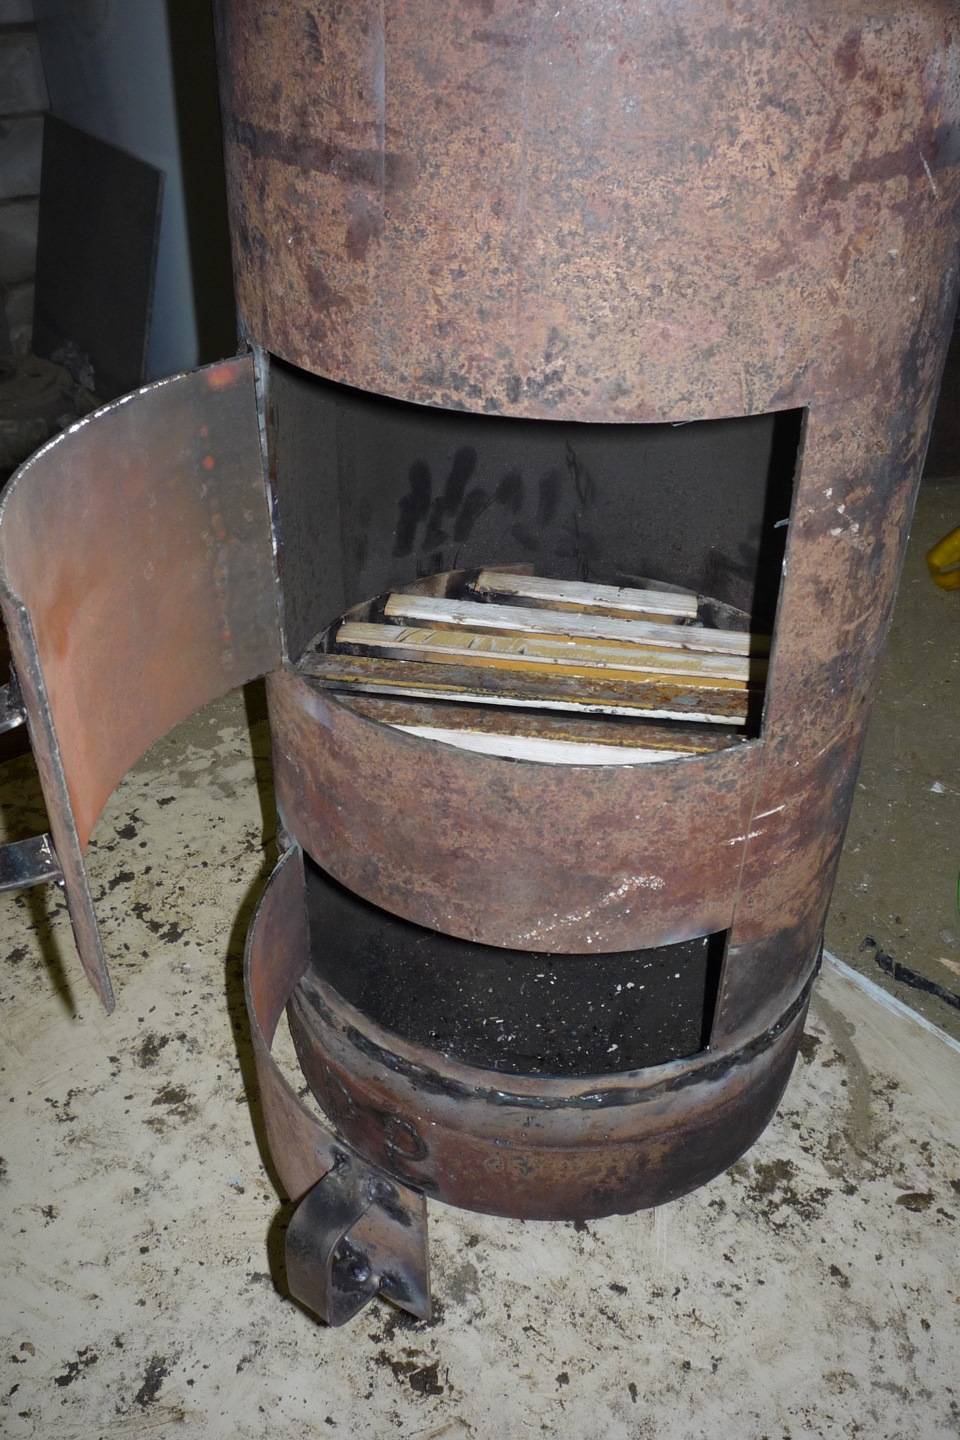
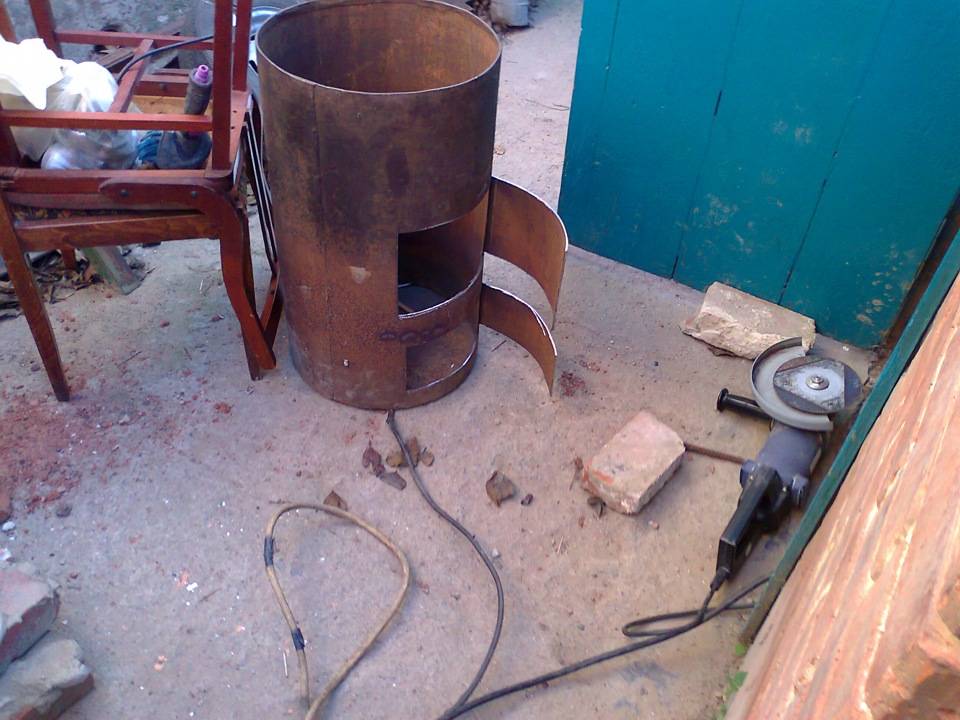
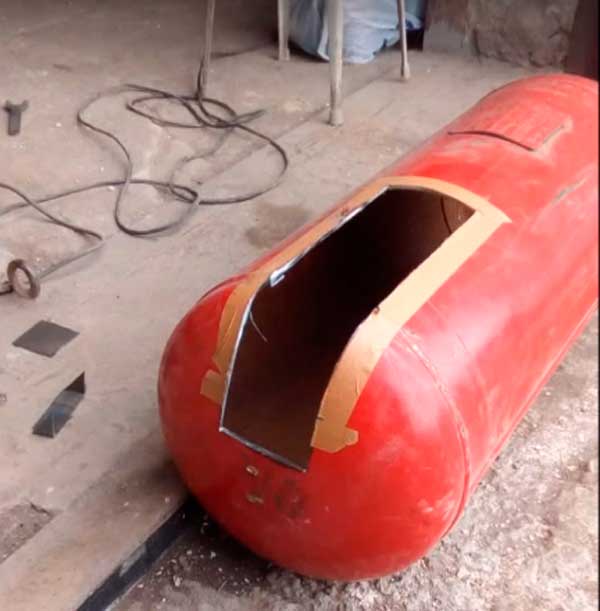
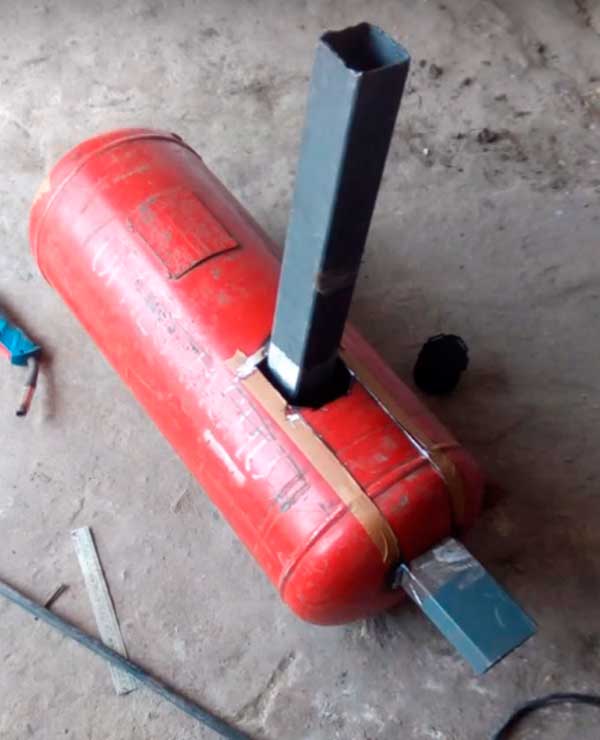
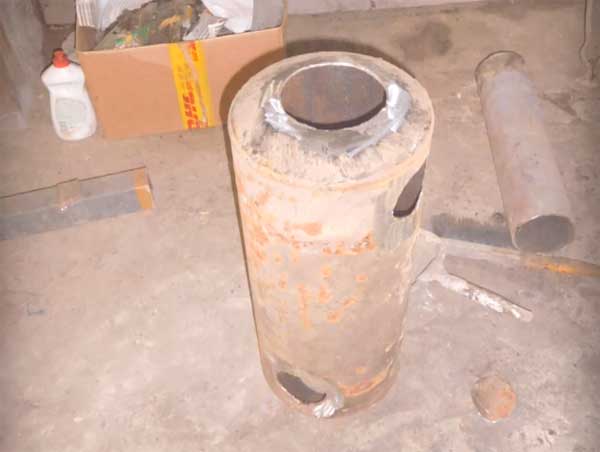
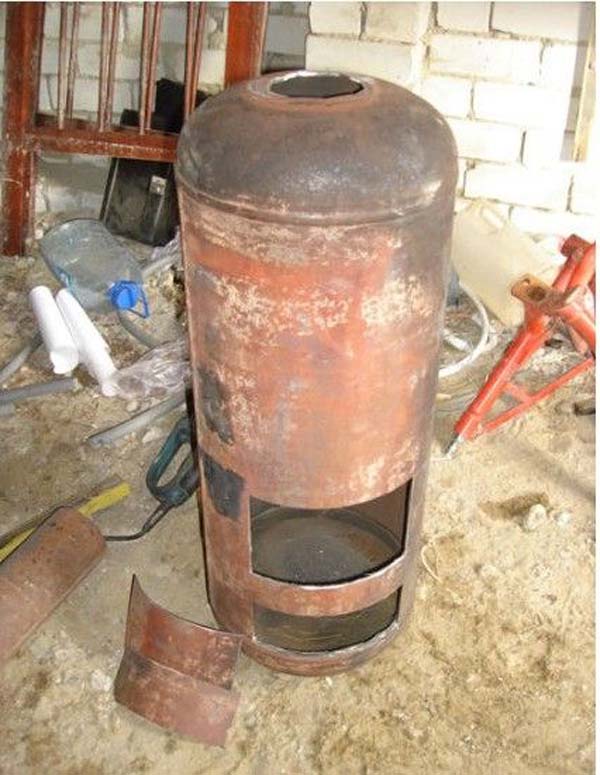
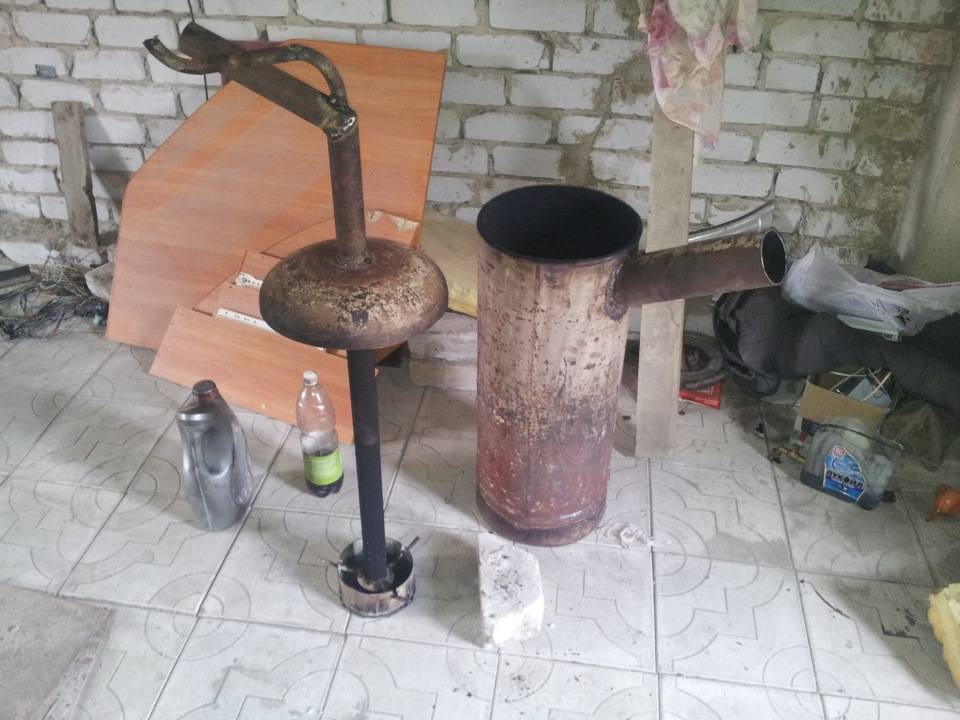
Do-it-yourself stove stoves of long burning are made a little differently than ordinary ones. They are for heating purposes only. The easiest way is to make it from a balloon. Only the upper part is cut off, which will then become the cover for the oven. After that, a hole is made for the hood on the side of the upper part of the stove. Firewood is placed on top, and not through the doors as in conventional models. Then a metal circle is made with a hole in the center. It should fit easily inside the cylinder. A pipe is welded to the hole in such a metal pancake, which should be longer than the height of the cylinder. It will act as a blower, delivering oxygen to the inside of the furnace to keep the fuel smoldering. And the final touch is the cut off part of the cylinder, in the center of which you need to make a hole, where the blower pipe should pass tightly, but freely.
How to make a device with your own hands
Before starting the construction, they choose the design of the furnace, determine the materials available, and those that should be purchased, prepare the tool. In the country house, a place is allocated for installing a heater. After preliminary work, they begin to manufacture.
Project selection, drawings
Factors affecting the selection of a stove-stove scheme:
- region of residence;
- the area and height of the ceilings of the country house;
- tastes and preferences of the owner of the dacha.
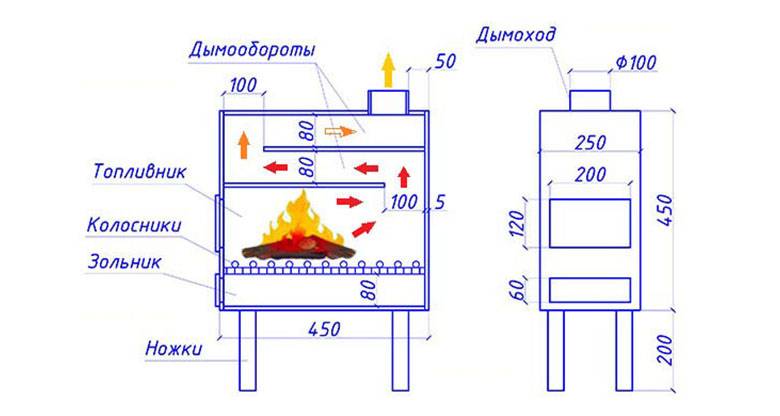
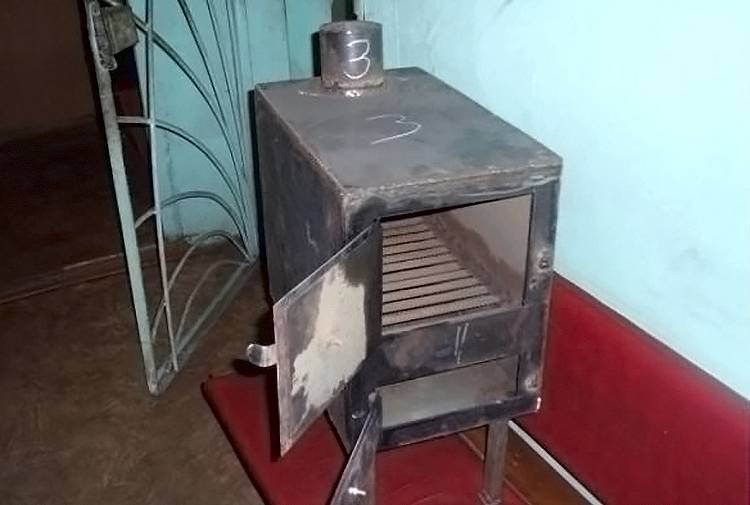
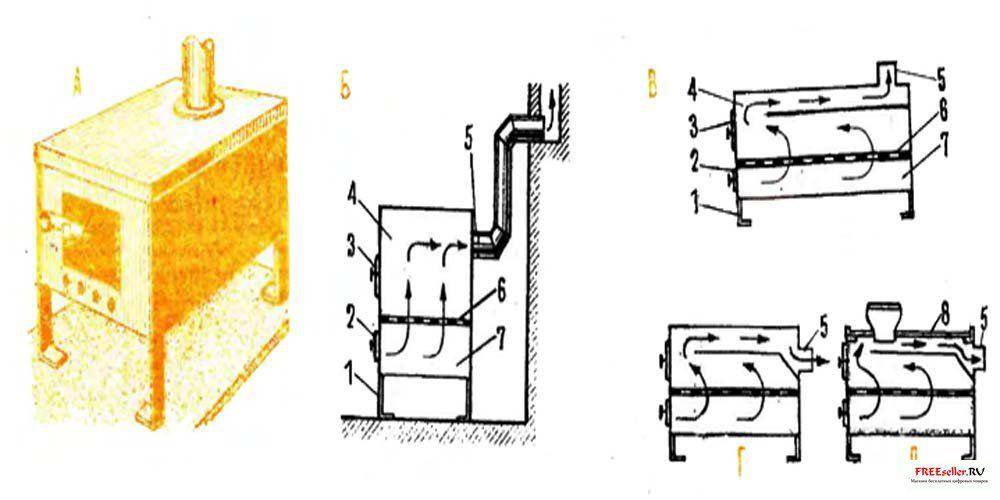
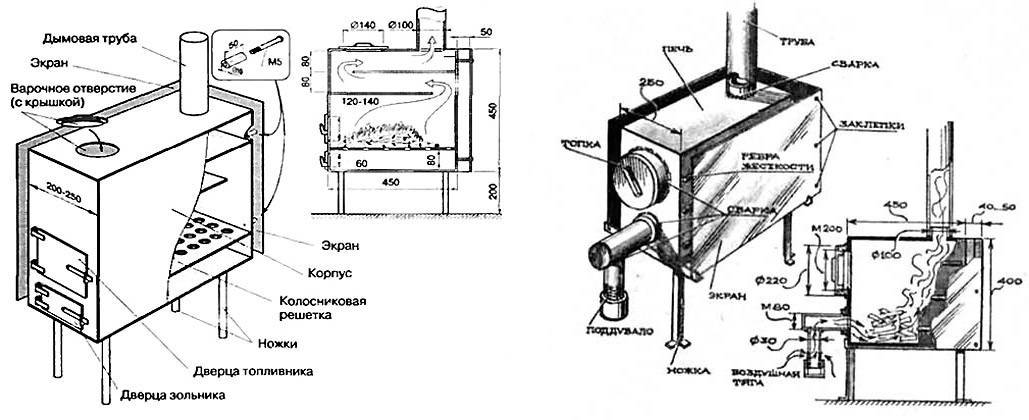
Photo 2. Drawing of a single-chamber stove-potbelly stove, arrows show parts of the stove. The device is additionally equipped with a hob.
In regions with low winter temperatures, stove stoves with a large furnace volume are chosen. In such areas, craftsmen also build long-burning iron stoves. If the winter temperature does not drop below minus 10-15 degrees, a small house can be heated with a small potbelly stove.
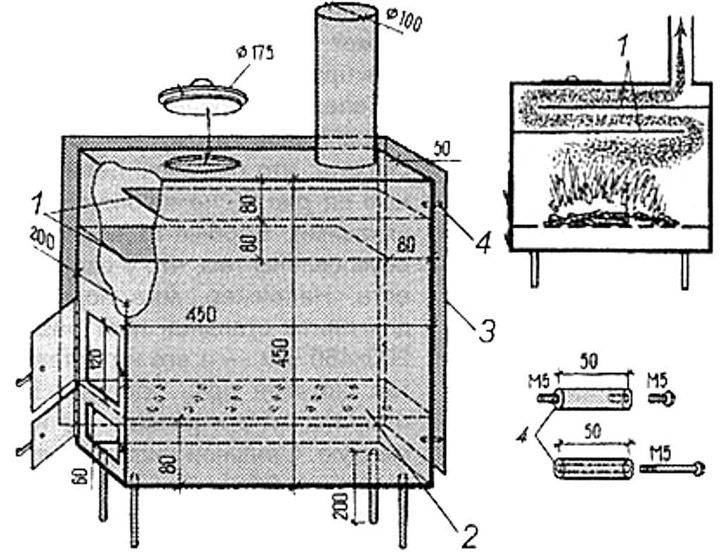
Photo 3. Drawing of a stove with an indication of the dimensions of the device and its components.
Craftsmen often produce neat, interesting iron stoves, which become an interior decoration. The stove is painted, polished, blued on its surface, drawings and ornament are applied.
In this example, a project of a single-chamber home-made stove was selected, the body of which is made of a propane gas cylinder. The potbelly stove is designed to heat a house with an area of 40 square meters.
Choice of materials
Materials for making a potbelly stove from a cylinder are available and inexpensive. Most of it is reused. The list includes:
- old gas cylinder;
- sheet (roofing) steel with a thickness of 3 mm or more;
- steel reinforcement (bar) with a diameter of 8-10 mm;
- corner rental;
- the door for the furnace is cast iron;
- cast iron blower door;
- steel pipe (diameter 110 mm).
Furnace doors are often cut from the cylinder body.
For work, you will need special equipment - a welding machine for arc welding and electrodes, a plasma cutter, a grinder and a set of discs for cutting steel, a gas wrench for unscrewing the valve. To mark the contours of parts and holes, you need a ruler, metal pencil, chalk, square, tape measure.
Preparing the installation site
It is not recommended to place the stove directly on the wooden floor. The heating of the floorboards from the incandescent body and the embers falling out of the firebox create a fire hazard. A non-combustible material is laid under the oven: sheets of flat slate, ceramic tiles, fastened with heat-resistant glue.
The most reliable base for the oven is single-layer brickwork. The bricks are placed on the mortar, leaving no gaps. The wall with the stove is protected with a brick screen, a sheet of flat slate, and natural stone tiles.
Step-by-step manufacturing instructions
Before starting work, prepare all the necessary materials, equipment, tools. Construction plan:
- Unscrew the valve from the gas cylinder using a key.
- To displace the remaining gas, the cylinder is filled to the brim with water and allowed to stand for several hours.
- The water is drained.
- On the body of the cylinder, holes are marked for the firebox, ash pan, chimney, burner.
- Ash pan details are cut out on a steel sheet.
- All parts are cut out with a grinder.
- The ash box is welded.
- In the slot of the pallet, a grate is built: a thick steel wire is welded to the edge of the hole, to it, parallel to each other, several bars of reinforcement.
- The ash box is welded directly to the body.
- A frame made of steel corners is welded into the pallet and a blower door is bolted to it.
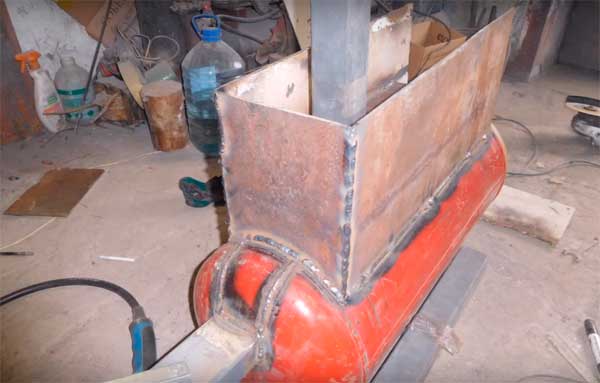
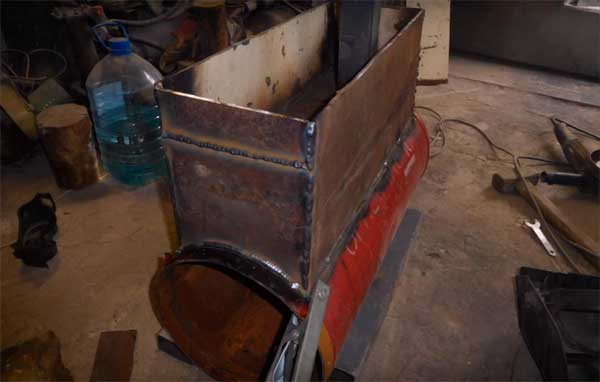
- Pieces of sheet steel are welded to the end of the cylinder so that they form a portal for the furnace door.
- A frame made of steel corners is welded into the portal.
- A factory furnace door is inserted into the resulting opening and bolted to the corners.
- Legs from a steel angle or reinforcement are welded to the bottom of the furnace.
- The chimney itself is welded to the marking of the place for the chimney, and a short pipe 5-6 cm high with a diameter of 11-16 cm is welded into the hole located nearby. This will be a burner.
- A round cover for the burner is cut out of the steel sheet, and a steel strip is welded along the length of its circumference (for a tighter closure).
- The stove-stove is cleaned of frozen metal splashes, scale, polished and painted with heat-resistant paint.
Improvement of stove stoves
In the future, the stove stove was improved so that it can operate on any types of solid fuel, use sawdust, liquid and gaseous fuels. For this, improvements were made:
- grate bars installed;
- blowing completed;
- horizontal guides are arranged.
Equipped with a grate, the furnace coped well with burning coal. Arranged grates and horizontal screens in the firebox itself allowed hot gases to be directed so that by opening the upper burners, it was possible to cook food.
With the removal of the pipe upward, the draft increased vertically, and the stove turned from a heating one into a cooking stove. In this case, the grate and the blower played an important role. The do-it-yourself stove stoves made with their own hands had a different design. Often, grates are made removable and this allows you to transfer the stove from one combustion mode to another. So, the same device without grates and with top loading can serve as a long-burning sawdust furnace.
The possibility of using one apparatus with different heat carriers made the round blower universal, if it is made with a removable branch pipe for supplying liquid fuel. The universal blower allows the use of different types of fuel:
- the blower was open - solid fuel combustion;
- with Loginov choke without grate - slow burning on sawdust;
- with installed grate and gasifier - operation on liquid fuel.
Simple constructions
A stove stove for a summer residence is, as a rule, a kind of elementary fireplace stove. The simplest do-it-yourself stove stove is obtained from a metal barrel. To do this, you need to use some locksmith skills.
- On the side surface of the barrel, just below the middle, we cut it out with a grinder or cut a rectangular hole with a chisel. This will be a firebox. We weld the cut-out sheet of metal onto the sheds and add the simplest locking mechanism - the firebox door is not at all difficult to manufacture.
- Cut out a smaller window below the furnace hole. This opening is a blower. We carry out the same operations as for the fire door to obtain a closing structure. Subsequently, by opening or closing the blower door, it will be possible to adjust the draft.
- Inside the barrel, above the upper opening of the blower, we construct grate bars. For this, you can use metal fittings. To make a grate out of it, drill a barrel from opposite sides and thread a bar of reinforcement through the hole so as to leave about 1 cm outside on each side. Welding is used to weld the bar. This process is repeated to form a grate inside the barrel. The grates can be made removable by welding the stops inside the barrel for their installation. Prefabricated cast iron grates are the best.
- A hole is cut out on the upper edge of the container and a chimney is welded in (a pipe of 4-5 inches is needed), and pipe cuttings are installed on the lower edge as legs.
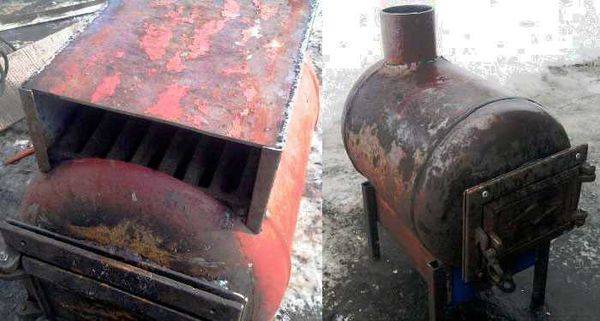
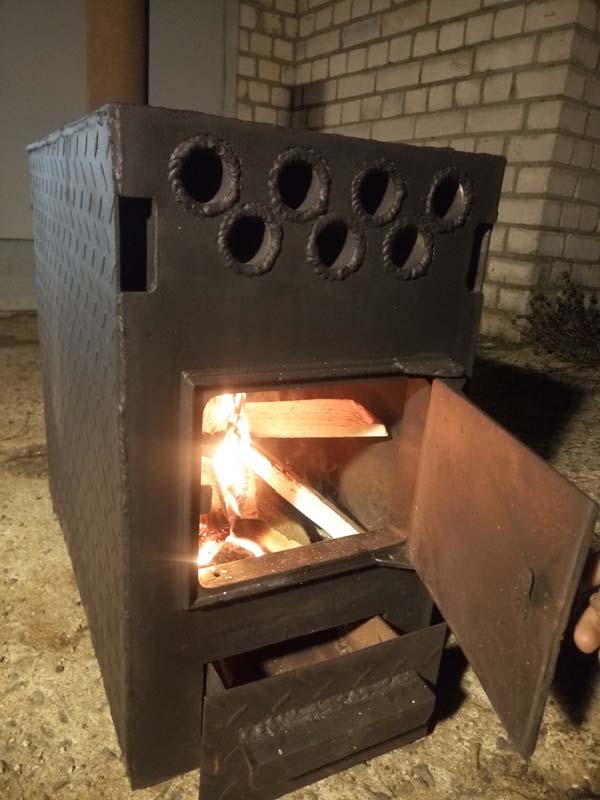
It is possible to increase the efficiency of such a potbelly stove by installing an obstacle in the path of hot gases in the form of sheet metal sections welded onto the walls. The sections are installed in such a way that the heated gases pass through a serpentine path, giving off heat to the walls of the device more fully.
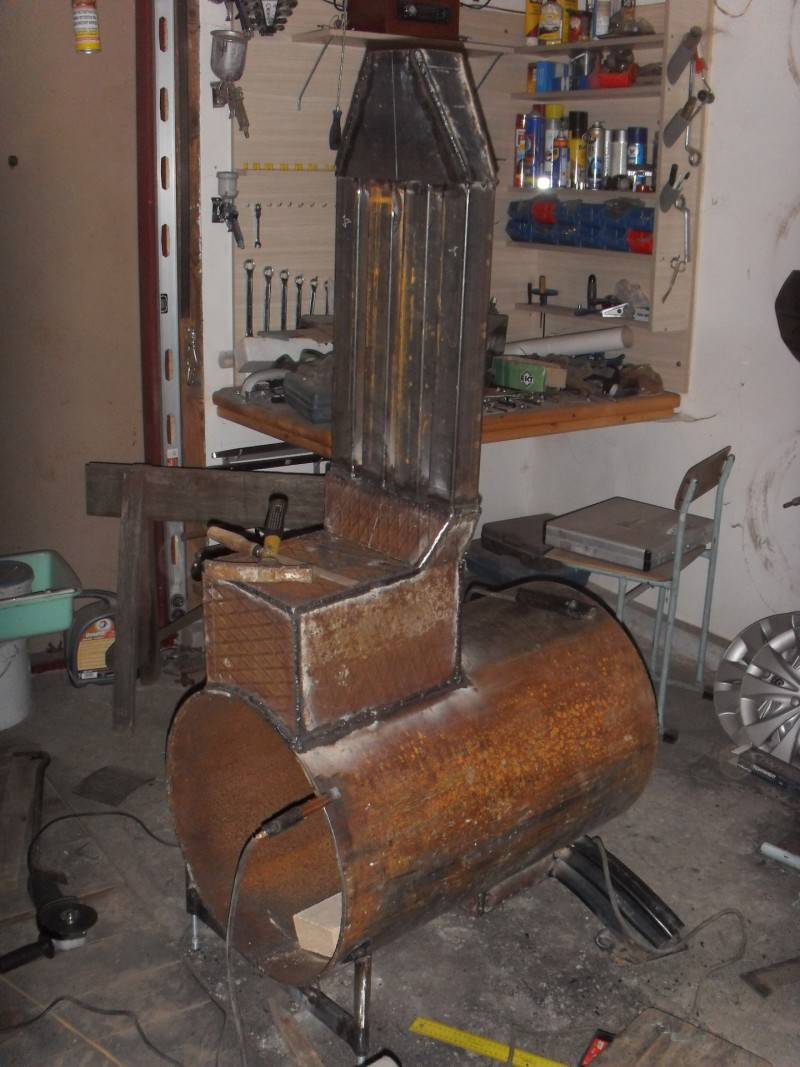
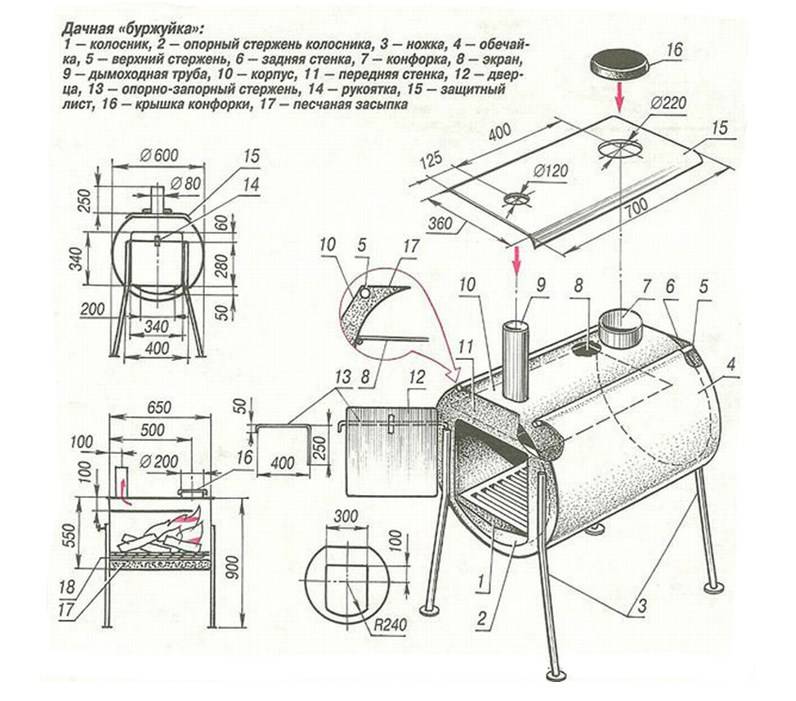
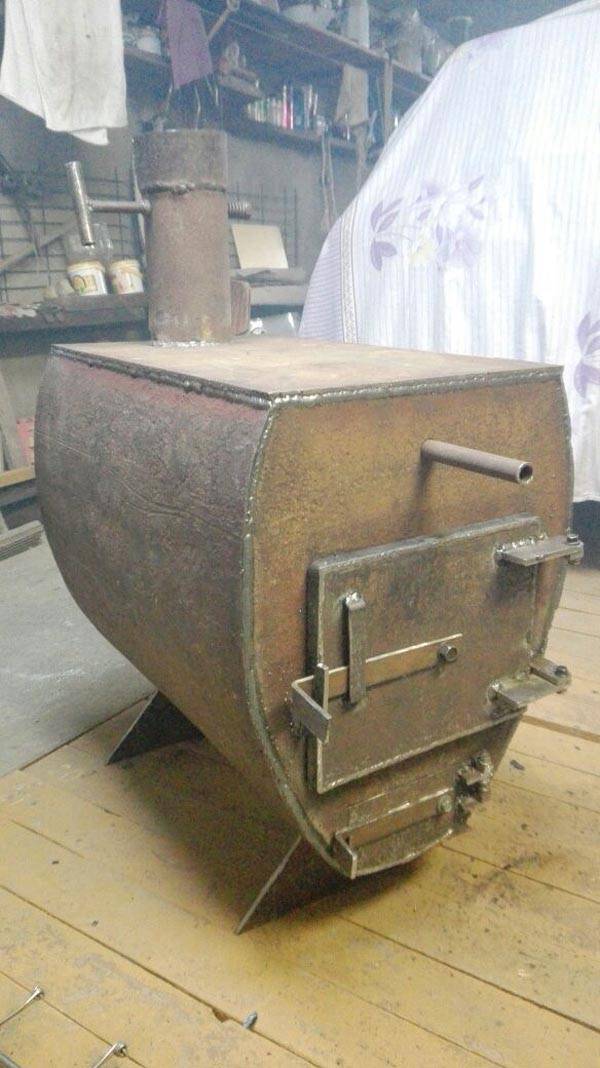
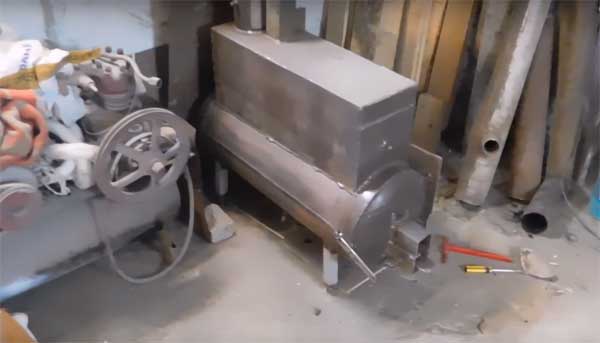
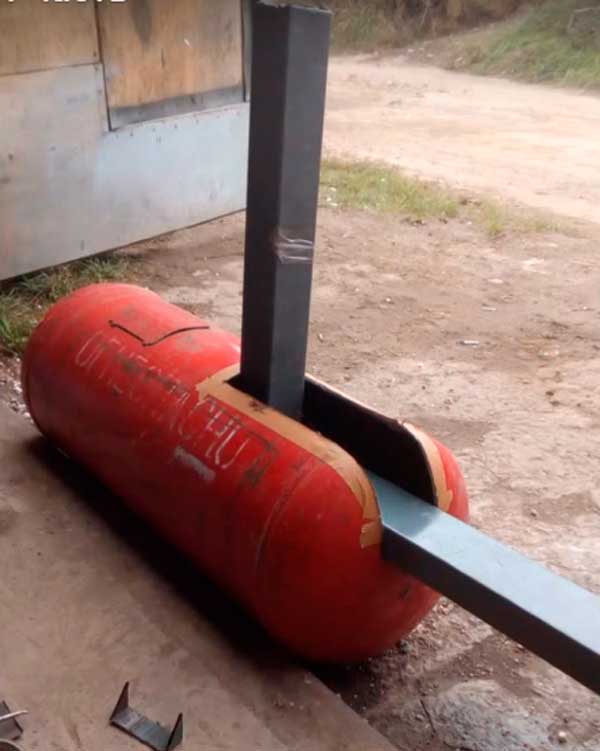
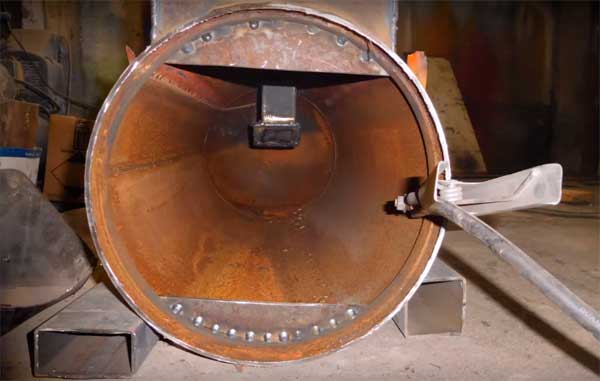
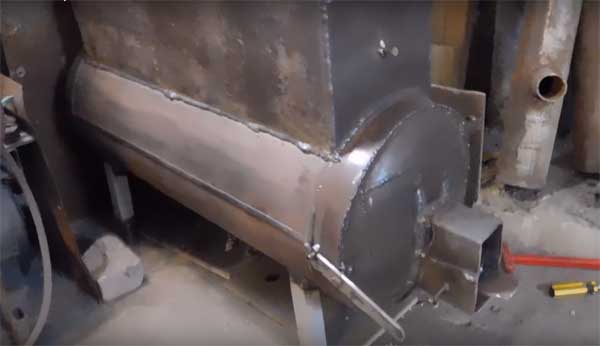
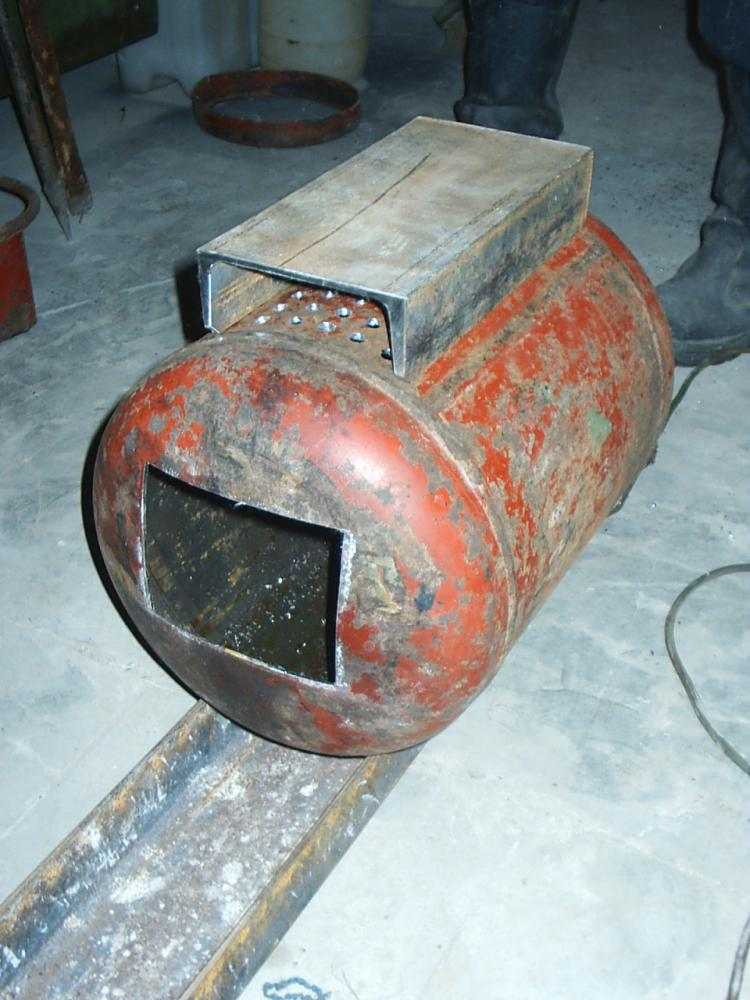
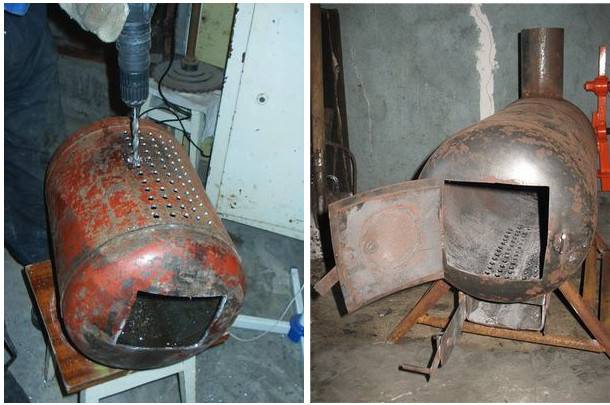
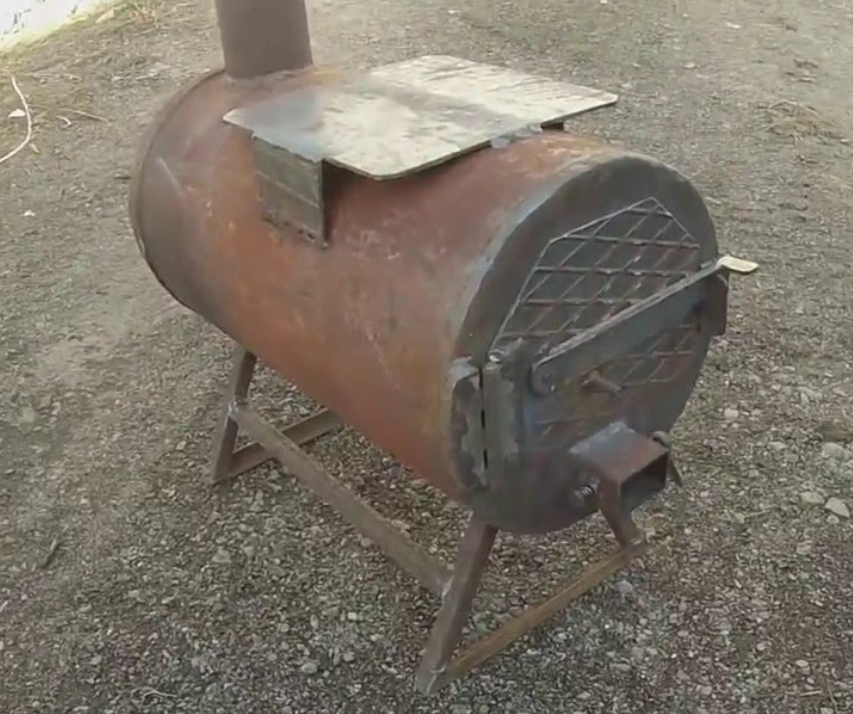
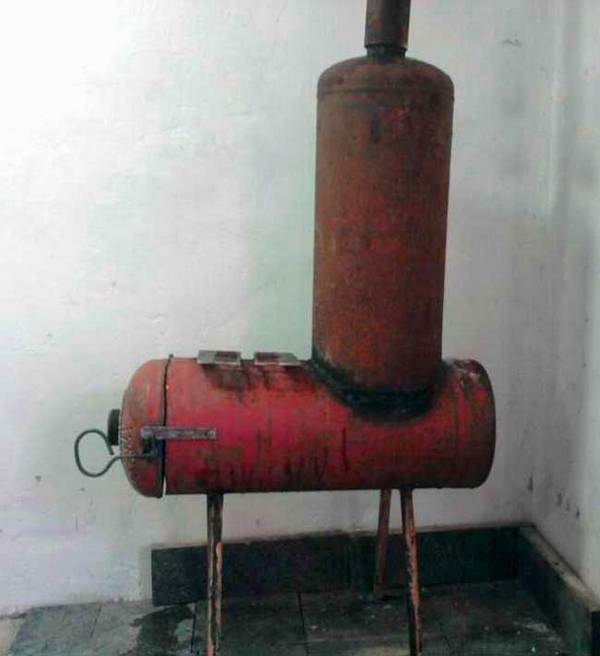
A good wood-burning stove is obtained from an old gas cylinder. The wall thickness allows such a stove to work for a long time. When positioned vertically, the construction is the same as in the case of a barrel. However, by placing the cylinder horizontally, you can slightly increase the efficiency, creating a more difficult path for the exit of combustion products and increasing heat transfer.
Potbelly stove from an old gas cylinder - Photo 05
Potbelly stove from an old gas cylinder - Photo 06
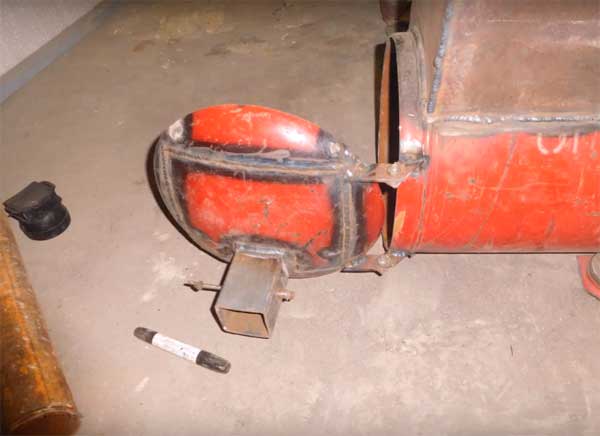
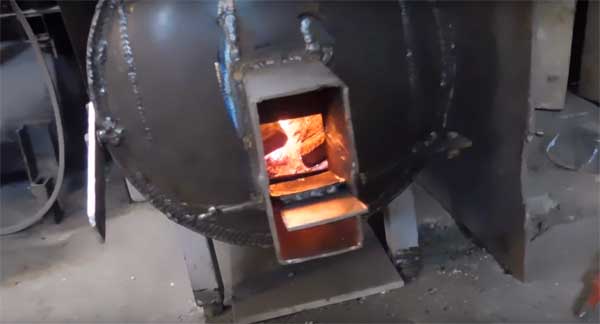
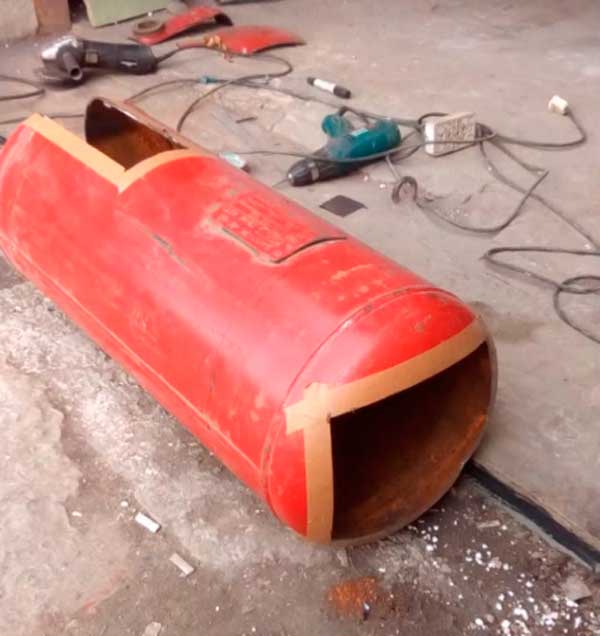
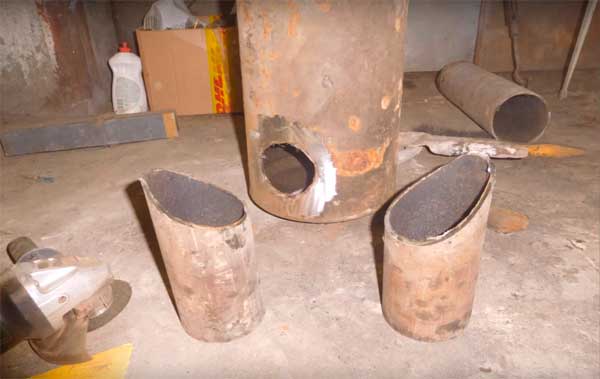
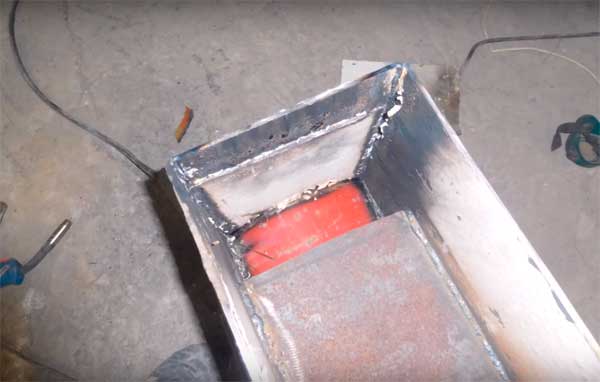
With a horizontal arrangement, several rows of holes with a diameter of 10-12 mm are drilled at the bottom of the cylinder. They will act as a grate. These holes are covered with a metal box with a blower door. The box will act as an ash pan. The end of the cylinder is carefully cut off with a grinder, getting an original round door. On the other edge of the container, a hole is cut perpendicular to the surface and the chimney is welded in. A potbelly stove from a cylinder with your own hands can be built in a few hours, and it will serve for many years.
Simple potbelly stove from a can
The simplest do-it-yourself potbelly stove is made from an ordinary can. There is no need to talk about the durability of such a structure, but it is quickly built, easily assembled and gives enough heat.
All work consists in the installation of the legs, the arrangement of the outlet pipe and some cosmetic operations. For work you need:
- Can
- Chimney pipe
- Grate wire
- Welding machine
- Tools
Getting started
- We set the can horizontally and mark where the blower will be, which has the shape of a rectangle or a sickle. Place it under the lid
- A hole is cut in the wall or bottom of the can, equal to the diameter of the chimney pipe
- To make a grate, you need to stock up on steel wire. It is bent, carried through the lid into the inside and gently unbent so that the zigzag is in the desired position, while it remains convenient to lay chips, firewood, etc.
- The can must be fixed on legs that are cut from tubes or corners and welded
- The chimney is welded
A reflector can be mounted on the outside of the tank, thanks to which less heat generated will escape. Having welded the handles from the sides, the structure can be transferred to any other place.
Pros and cons of homemade bourgeois
Among the many advantages of such a nondescript, but useful installation, there are:
- Full autonomy and energy independence
- Work on any solid fuel, including plant residues - this saves a lot of money
- Versatility of the design, which can not only be installed in various rooms, but also used for cooking
- A simple design that you can build yourself from the materials available in the garage
- There is no need to erect a monolithic foundation and install a capital chimney
But despite the significant and numerous advantages, there are a number of disadvantages of bourgeois:
- The high thermal conductivity of the metal leads to rapid fuel burnout and cooling of the furnace
- If the wall thickness is insufficient, they will soon begin to burn out and the furnace will fail.
- You need to watch the combustion process and throw up firewood in time, control the traction
- Tarry and damp logs cause stubborn soot in the chimney
Video - another option for making a furnace
A homemade potbelly stove is a reliable and effective assistant in a cold workroom or your own garage. Its production is not difficult, and there is no need for large material investments to start work.
Good material has been collected in your article. I thought for a long time to buy a finished one or to make it myself, nevertheless I made up my mind, I did it myself. I used a 200-liter barrel of fuels and lubricants as a raw material. I was guided by a detailed drawing that I found on
Advantages and disadvantages of bourgeois stoves
A person in extreme conditions needs heating and hot food. It is no coincidence that the design was appreciated by the northern countries. Therefore, the oven should be considered for use where no other heat source is available. And then the advantages include:
- simplicity of design;
- mobility;
- fast heating of the room;
- cheapness.
- rapid cooling when burning stops;
- strong heating of the outer parts;
- local use.
However, the stoves served their purpose. They saved many people from death during the hard years, and are in demand at the present time. They are even used in modern design of country houses.
Zabarykin Sergey Nikolaevich
Varieties of bourgeois
The use of heat from the walls of the potbelly stove will be more complete if flat containers of water are hung on its lateral vertical surfaces or pockets on the sides are welded with your own hands. Such stoves are used in baths and for heating water for household needs in the country. In addition, water holds and gives off heat longer than metal.
Cast iron stoves
The cast iron construction does not need a screen and keeps the heat longer. Therefore, heavy cast thick-walled stoves are used in army camp life. They are reliable heaters and never burn out, there is nothing to burn. In addition, the military modified the design to an economical omnivorous consumer of fuel with a high degree of combustion. But boiling tea on such an oven will not work. This stove is indispensable for heating utility rooms.
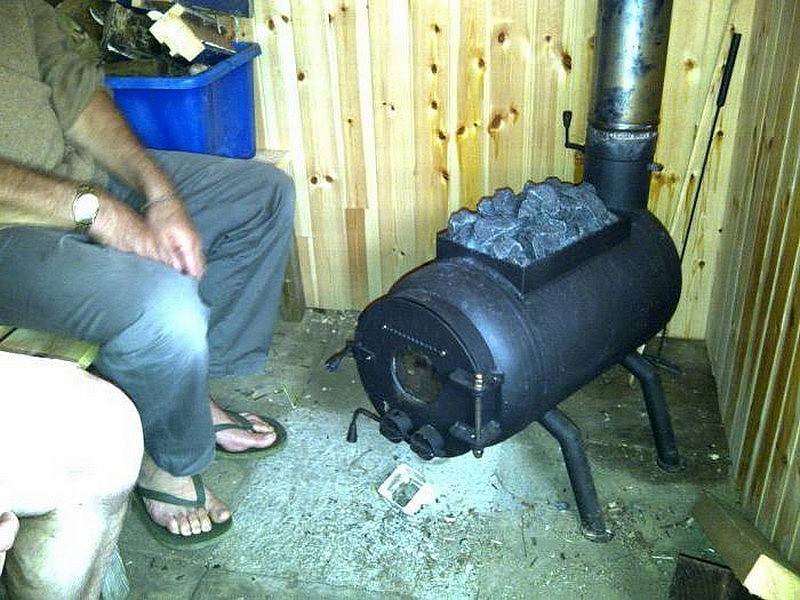
Sawdust ovens
The sawdust stove, designed by engineer Bystrov, has a top loading and no grates. Burning continues for 19 hours until the contents are completely burned out. Such an oven is used to dry the clothes of workers in change houses, to dry the walls. It is also used in artisanal smokehouses.
The design of a homemade sawdust oven is simpler. It consists of a perforated cylinder filled with sawdust, lowered into a cylindrical shell - a body. The mass of sawdust or waste smoldering in the core uses heat efficiently with an efficiency of up to 60%.First, the potbelly stove must be kindled from below with puppies.
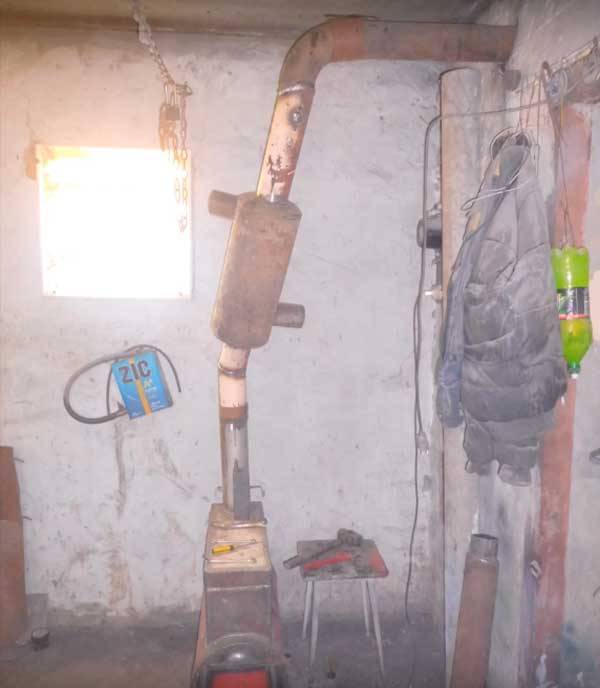
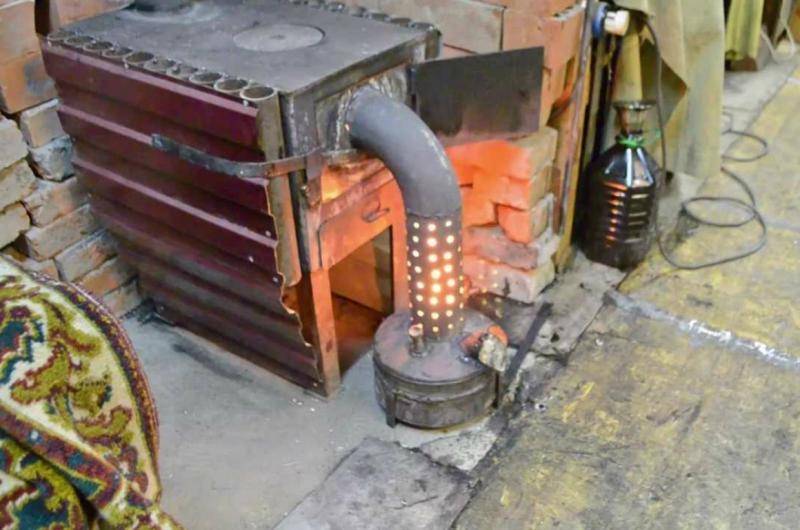
This is a kind of potbelly stove with unusual screens. They are arcuate pipes passing inside the combustion chamber. Hollow pipes on both sides, air pipes. In the firebox, the air in the chimney heats up and rushes upward. A vacuum is created and a new portion of cold air enters. Air circulation allows the room to be heated very quickly. The convection of air masses is accelerated and the temperature in the room is quickly equalized. After that, you can switch to another operating mode of the installation. Such an installation can be done by hand using the developed drawings.
Features of the operation of the stove with a water jacket
- It is advisable to install a temperature and pressure sensor in the hydraulic system.
- It is necessary to regulate the draft in the grate and in the chimney.
- The water circuit in both types of heat exchangers must be equipped with an expansion tank.
- The main-type water system needs a circulation pump installed on the return line, that is, on the lower pipe.
- A device with a storage tank requires a circulation pump if the diameter of the outlets is less than 75 mm.
- It is necessary to provide a place for draining the water.
- Do not heat the stove without water - the heat exchanger may burn out.
- After use, the water must be drained.
The temperature change in the heat exchanger occurs due to the burning speed of the furnace. The heat turns into radiation, the water heats up in the chimney, and after another half an hour in the pipes. The system is inertial due to the high heat capacity of water, so a large supply of fuel is needed.
A potbelly stove is a flammable design, it is necessary to start and place a fire extinguisher and a hook nearby.
Furnace cleaning and repair
With regular use, the chimney must be cleaned. The appearance of a 2-3 mm layer of soot reduces traction and reduces heat transfer.
You can disassemble the chimney and clean it with a brush, but this is time consuming and not always possible. If the potbelly stove is operated daily, then the chimney should be cleaned with fire:
- heat the stove with aspen wood once a week. Aspen has a high combustion temperature, which burns soot in the chimney. Apply a little after the main ignition;
-
after lighting the fire, add well-dried potato peels along with the wood. One backfill requires about half a bucket. It is enough to do this once or twice a week and the chimney will be free of soot. This method will not work if the chimney is already overgrown with a layer of soot of 1–2 cm, in which case the cleaning will only soften the soot, and you will have to clean it off the pipe walls with a brush or a metal scraper;
-
use special firewood or pellets that are added to the furnace during combustion. The most famous tool is "Chimney sweep log". It is burned with firewood about once every six months. It is best to put it on the hot coals left over from the furnace. A distinctive feature of this product is that it continues to act for two weeks after use, gradually softening the soot on the pipe walls.
The main activities for the repair of the furnace are:
- Pipe repair. The chimney pipe is the weakest point in a potbelly stove. If it burns out, it needs to be changed.
- Heat exchanger repair. The main heat exchanger can be removed by unsoldering it from the furnace body. But the capacitive circuit will have to be welded again after a few years.
- Elimination of defects in the furnace body. If the wall or back surface burns out, usually a metal patch is welded onto this area. The slots can be welded with scraps of metal rods.
All operations are quite simple and straightforward, so maintenance of the stove-stove will not cause big problems.
Video: stove-stove for a garage and cleaning a chimney
For the third hundred years, the oven invented by Benjamin Franklin has been serving us. It is still easy to manufacture and unpretentious to work with. A potbelly stove with a water jacket is not only about heating and cooking. This is hot water in the house, in the garden, in the garage, in a warehouse or on a construction site. New technologists have made this stove topical even today.
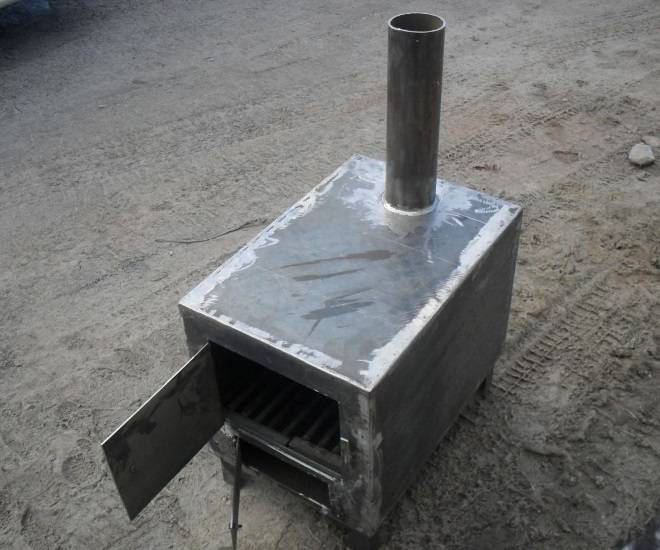
Rectangular potbelly stove from a profile pipe
This version of a potbelly stove made by hand according to a drawing is the most effective. The potbelly stove of this option is like the previous model of rectangular shape, but its walls consist of a welded rectangular shaped pipe. The air will pass between the pipes and heat up more, thereby increasing the efficiency of the furnace.
Getting started:
- We cut the profile pipe into pieces forty centimeters long. It takes so many pieces to weld them and get the selected length of the bottom and top. We put the pieces of pipe to each other. On the one hand, we go through a continuous seam, and on the other, we only make tacks in three places.
- We make the second wall and the back wall by similar actions. Upon completion of work on the manufacture of walls from a shaped pipe, we collect the shape of a stove. In this case, continuous seams should be placed in the middle of the device.
- On the upper part, using a chimney pipe, mark its location. Cut out the circle. We weld a corner to the lower and upper parts of the front side. Slightly above the bottom corner, we weld a piece of a profile pipe of the same section as the walls.
- We measure the front part, according to the obtained dimensions, we cut it out of sheet metal. In the place where the pipe is welded, we cut the workpiece into two parts. We put the upper part in its place, fix two loops.
- Leave the bottom piece of small thickness in its place. Approximately in the middle of the bottom, we fix a piece of the corner, as shown in the image. We weld a small handle to the same part. We also fix the handle on the door of the combustion chamber.
- We drill a through hole in the pipe with a diameter suitable for any thread. We prepare a circle that will fit the diameter of the pipe and weld it in the middle of the pipe to the thread.
- We measure the length of the firebox. We cut off the rectangular pipe to size, weld on the surface of the reinforcement not less than 14mm. We weld on small legs and set them in the middle. We attach a pipe to the upper part of the cut-out hole and weld it in a circle with a continuous seam. If necessary, the oven can be painted with heat-resistant enamel.
The potbelly stove is ready to use. As our testing showed at a temperature of minus one degree, a garage of 24 squares heats up to 19 degrees in half an hour.
Classic steel stove
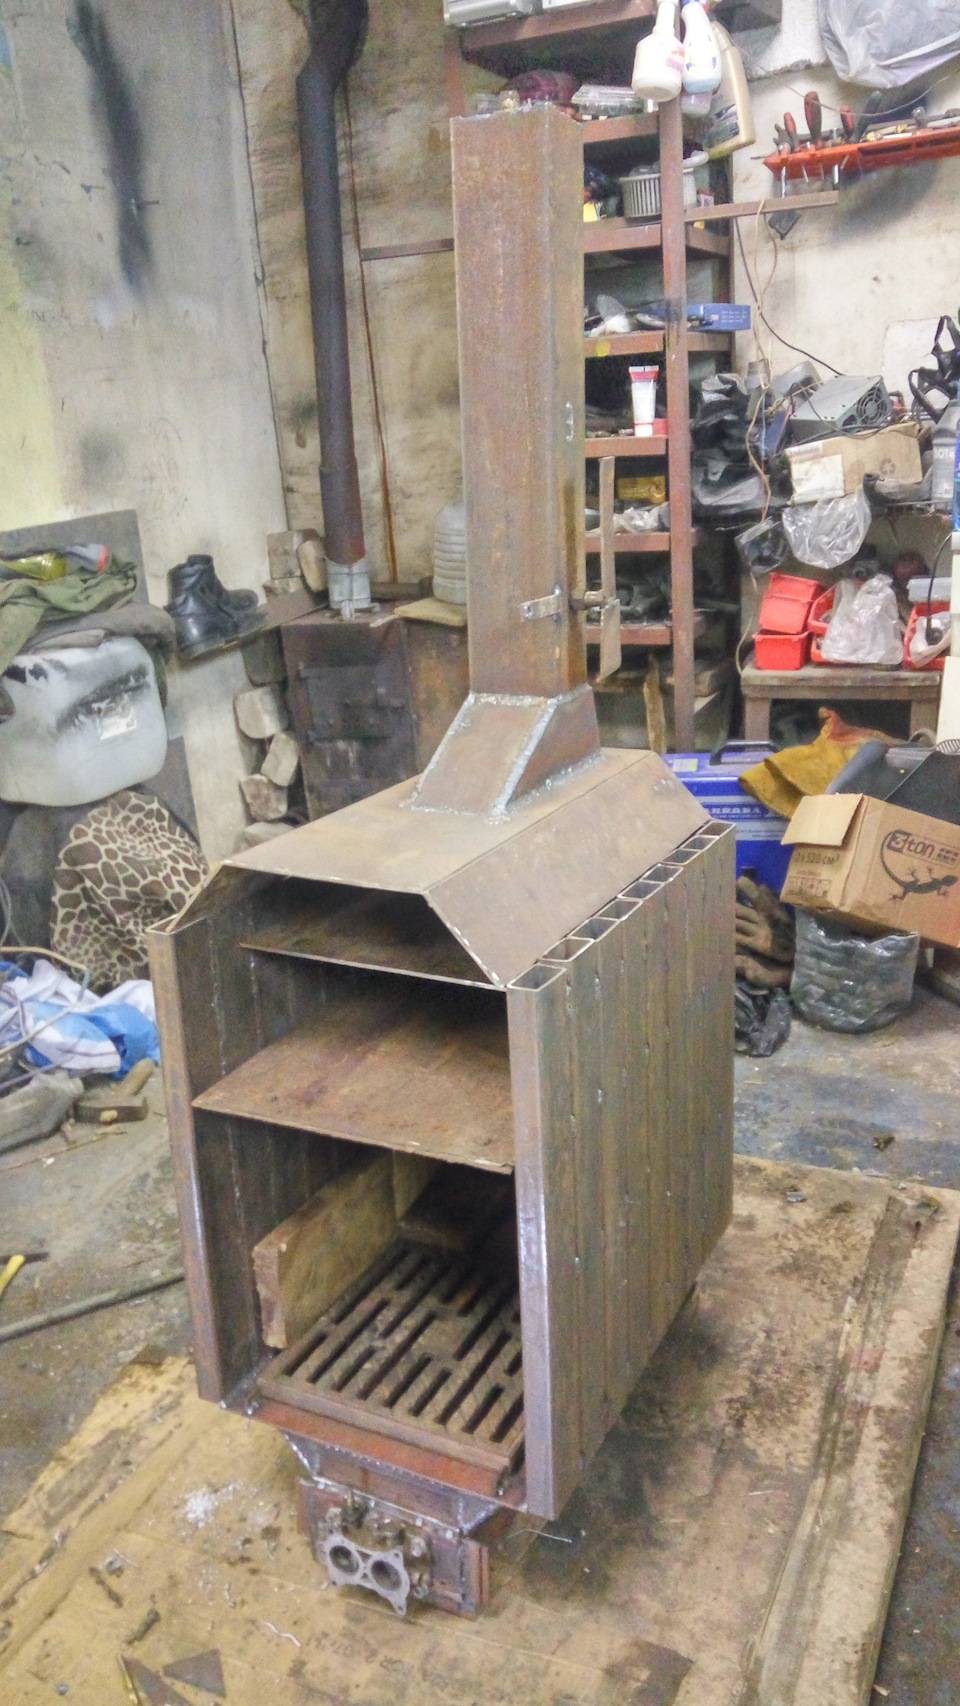
We propose to weld a wood-burning stove from iron sheets 3-4 mm thick, shown in the photo. Outwardly, it looks like a classic rectangular potbelly stove with low efficiency (up to 40%), but inside the structure has undergone modernization. To make it more economical, two smoke teeth are arranged above the combustion chamber, like in brick fireplaces.
The partitions inside the body, shown in the drawing, overlap the section of the firebox in the horizontal plane and leave a small passage 10 cm wide for the combustion products. The flow of heated gases through two smoke turns gives an increase in heat transfer by 5-10%, which is much better than factory cast iron stoves.
The manufacturing procedure is as follows:
- Weld the potbelly body, starting with the hearth sheet. The primary assembly of parts is carried out with tacks.
- Cut and install 2 partitions. For the lower one, located above the flame, it is worth taking a thicker iron - 5-6 mm.
- Make a grate and place it on supports from the corners welded from the inside to the side walls of the firebox.
- Attach a cover and a chimney pipe, mount simple doors with locks.
- Finally weld all seams.
If you expect to heat a potbelly stove with small fractions of coal or sawdust, make a grate from steel corners, unfolded with a profile downward. Make the distance between them as small as 5 mm.
Assembling a stove-stove from a pipe
In this case, you cannot do without a welding machine. The function of the base of the structure will be performed by a segment of an ordinary metal pipe. Even an old barrel will do. The assembly will be carried out according to the scheme you are already familiar with. Make a grate from the bars and fasten it to the body. The connection is made by welding... This potbelly stove will have 2 dampers at once: a blower and a firebox. The model can be successfully used both for heating various rooms and for preparing a variety of food.
Assembling a stove-stove from a pipe
Potbelly stoves are appreciated precisely because they are able to warm up the room in the shortest possible time. But at the same time, there is also the main disadvantage of such stoves is that after stopping burning, they cool down as quickly as they heat up... Metal practically does not accumulate heat.
To eliminate the above disadvantage, it is enough to impose a home-made potbelly stove with refractory bricks
To eliminate the above disadvantage, it is enough to impose a home-made potbelly stove with refractory bricks. It accumulates heat well and continues to give it away to the surrounding space for a long time after the stove is finished. However, in order for the room to warm up, the stove will have to be heated longer than without such a brick fence. But this disadvantage can be easily eliminated. It is enough just to make a few ventilation holes in the brick screen. Such systems are often used in saunas.
The brick screen is laid out at some distance from the walls of the unit. This is a very important point. When choosing a suitable distance, one should be guided by the area of the heated room and the dimensions of the furnace itself.