A staircase is an indispensable element of a multi-storey building, without which it is difficult to imagine moving between floors. Like most interior elements, it can be assembled with your own hands, however, it must be borne in mind that even a simple staircase with your own hands must be assembled taking into account all building standards, since it will carry a significant load.
This article will contain detailed information on how to assemble a ladder with your own hands. This instruction has a step-by-step structure and contains all the most important points that must be taken into account during the assembly process. With its help, you will save yourself from the most common mistakes and shortcomings.
Note!
A DIY brick staircase to the second floor is quite difficult to assemble, since it requires the involvement of a large amount of labor and the participation of special equipment, and therefore, this technology will not be considered.
Assembling a wooden ladder
Selection of sizes
Before proceeding directly to the assembly process, it is necessary to draw up a detailed plan in which the dimensions and location of the key elements of the staircase will be marked. First of all, the dimensions of the steps, the slope and width of the future staircase are determined - the convenience of movement between floors will directly depend on these parameters.
Dimensions of steps
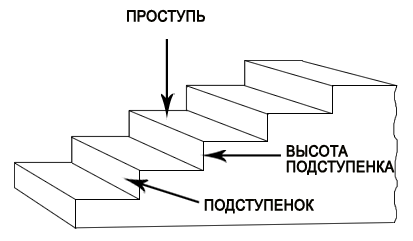
The geometry of the steps is determined by the width of the tread and the height of the riser - the easiest way to determine both parameters is by means of the formula: 2a + b = 600 - 640 mm, in which:
- “A” - the height of the riser is indicated;
- “B” is the width of the tread.
With its help, you will get the maximum value corresponding to the biomechanics of the average human body.
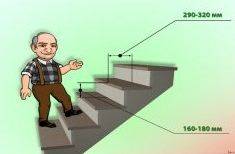
When making steps for stairs with your own hands, you can shift the average value of the width and height in one direction or another, thereby making the project more individual, but you must rely on the maximum allowable parameters:
- The width of the tread should accommodate the foot of a person climbing the stairs, that is, its value should not be less than 25 cm - only in this case, safe ascent and descent can be guaranteed... But at the same time, the tread should not be wider than 40 cm, since it is inconvenient to climb such a staircase - each step will have to be overcome in two steps;
- The height of the riser determines the number of steps on the stairs - the optimal value is 15 cm... This parameter can vary from 12 to 20 cm. If the height is less than the extreme threshold, then you will have to step over two steps, and climbing too high steps will be extremely inconvenient and take a lot of energy;
Tilt angle
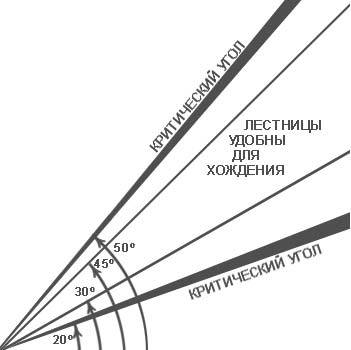
The angle of inclination of a comfortable staircase is between 25 and 35 degrees - this value best suits the needs of the human body. A higher angle will make it too steep, which will make it difficult to climb, and a ladder with a slope of less than 30 degrees will take up a lot of space.
When making a stepladder ladder with your own hands, an angle of inclination of 40 degrees or more is quite acceptable, however, for daily use, this value is completely inappropriate, since you will have to go down the flight backwards, holding onto the handrails.
Span width
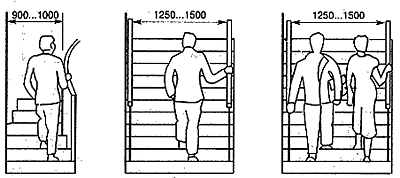
The width of the stairs determines the ease of movement along it - the narrower it is, the less freedom of action you will have.The minimum width for a single staircase is 0.9m - this value is dictated not only by human needs, but also by the further need to carry furniture or other large items along it. A flight of stairs for two persons must be at least 1.5m wide.
Note!
Ideally, the span is limited only downward, but it should be noted that if you go beyond the recommended limits by more than 10%, additional reinforcement may be needed.
Ladder material
Planks made of solid wood with a thickness of about 7 cm and a width of at least 30 cm are used as material for kosour, on which there should be no knots or other structural defects. For this purpose, metal elements can also be used - a ladder from a channel with your own hands looks quite interesting, however, to assemble it, you will need the services of a professional welder or the appropriate skills.
The thickness of the tread boards depends on the width of the flight of stairs. For steps, the length of which is 0.9, 1 and 1.2 m, boards with a thickness of 4, 5 and 6 cm are used, respectively. These parameters can only be moved in the direction of increasing thickness. There are no special requirements for the material for the riser.
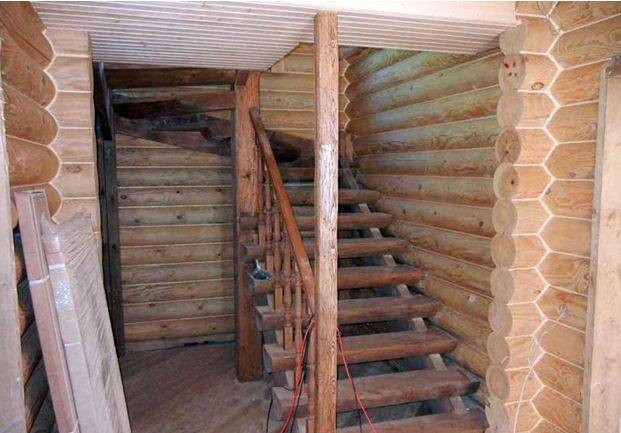
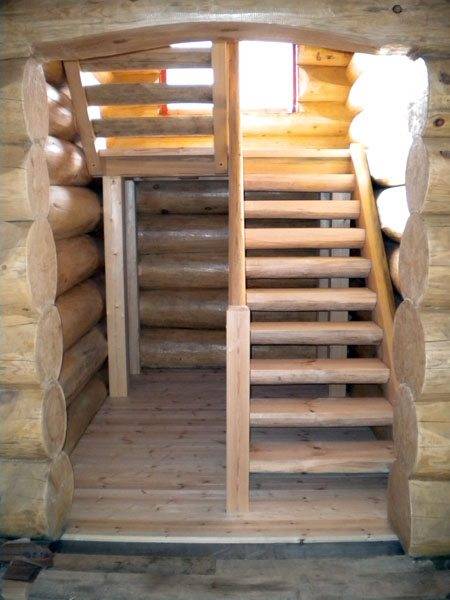
The use of non-planed logs as a material for creating stairs is quite popular - they can be used both as kosour and for making stair steps. The dimensions of the elements in this case are selected, as in the above example, with the difference that their thickness may have a slightly greater value.
Note!
If you give your preference to logs, select materials identical in thickness and shape, so you do not have to spend time on individual fitting of each element.
Preparation of kosour
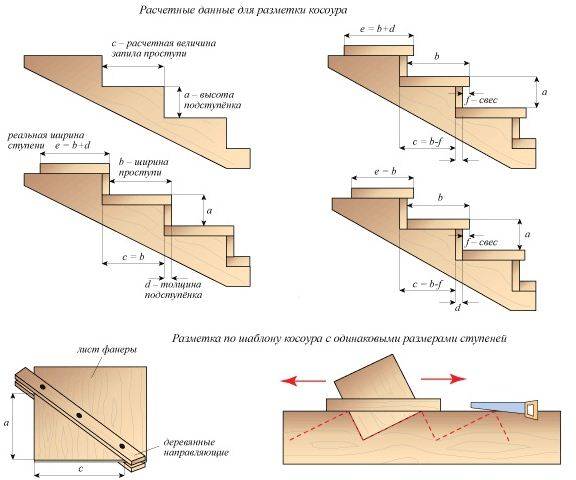
Kosour is a straight, even board that acts as a supporting element for the entire structure. Most often there are two kosour - they are located at the edges of the staircase, but their number can be increased if there is a need to strengthen the structure being created.
To mark the cutouts for the steps, it is necessary to make a stencil consisting of two slats and a rectangular sheet of plywood.
- To make a stencil, distances are measured from the top of the corner of the plywood sheet, which correspond to the height of the riser and the width of the tread, after which the ends of the segments are connected by a straight line.
- The base of the resulting triangle is fixed by means of rails. If rounded logs are used as the material for the steps, the stencil is fitted to the appropriate shape.
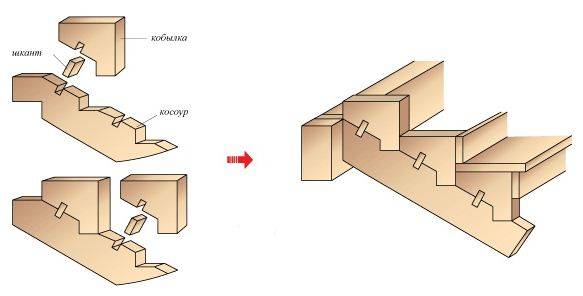
If the cuts on the stringer are too deep, this will lead to a weakening of the staircase structure - in this case, it is necessary to increase the number of load-bearing beams or use an alternative method of fastening through building. To do this, “filly” - wooden triangles that cut into the edge of the beam, thereby forming a groove for the future step - are built up on the stringer of the staircase.
The easiest way to fix the filly is by means of wooden dowels, which are inserted into pre-formed grooves and fixed with wood glue. For a more reliable fastening, an additional cutout and filly of complex shape are used - wooden dowels and carpentry glue are also used to fix them.
Fastening load-bearing beams
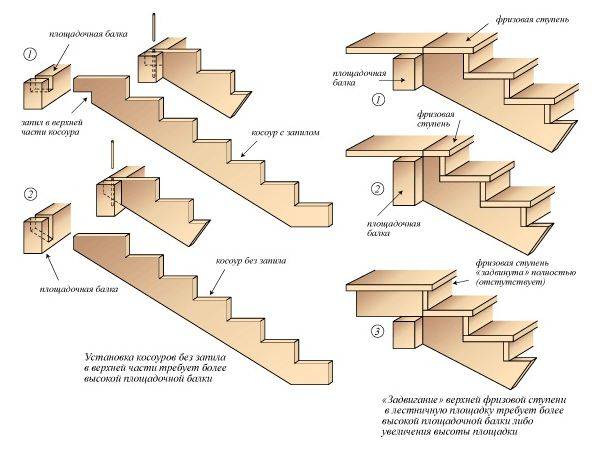
The upper part of the stringers is fixed to the platform beam of the second floor - for high-quality fixation, a thorn-groove connection is formed. It should be noted that washing down the load-bearing elements weakens the staircase structure, as this can lead to wood chipping at the junction - if the load-bearing beam is of sufficient thickness, then it is better to do without it.
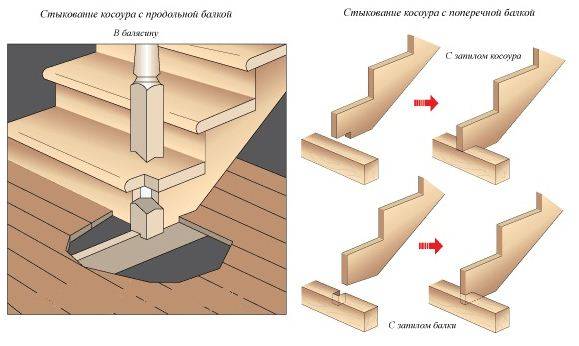
The lower part of the stringers should rest on the supporting floor beams, regardless of the direction in which they are located in relation to the flight of stairs. If the stringers fall on the cross beam, then the fastening is carried out in the same way as in the case of the upper part of the structure.
In the case of hitting the longitudinal beams, the fastening is carried out point-blank to the pre-sawn and fixed balusters or by means of a transverse bar against which the lower part of the stringers is abutted.
If you assemble a step-ladder with your own hands, there is a possibility of simple fastening of the stringers, since it plays an auxiliary function and most often has a steep slope. In this case, the lower part is simply attached to the floor, and the upper part is fixed to the supporting beam with dowels and bolts - the main thing is to protect the top of the stairs from falling to the side, and the bottom from sliding.
Stairs of this type most often lead to the attic or mezzanine. The same type of attachment is carried out when assembling a ladder for cats with your own hands.
This technology is most applicable to stairs on one massive stringer - thus, you will save a lot of space and simplify the installation process as much as possible. The only drawback of this design is the inability to install shelves under the stairs with your own hands, since its design most often implies an open structure.
Formation of steps
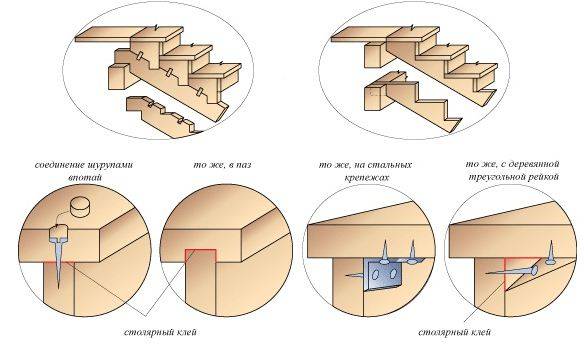
There are several options for assembling steps, among which the most common are three options:
- The riser and tread are connected by means of self-tapping screws, which are installed in a recessed position, while additional fixation is carried out with carpentry glue.
- By means of a groove fastening a tongue-groove, which is also fixed with an adhesive composition.
- It is also possible to assemble steps by means of metal or wooden corners.
A secret fastening will allow you to do without the need to mask the attachment point and it will be much easier to decorate the stairs with your own hands in the future.
Outcome
The presence of initial skills and strict adherence to the instructions will help to create a reliable and beautiful design without the involvement of third-party specialists. Thus, you can save a lot, given that the price of professional services is at least 40% of the cost of the finished material.
For a visual introduction to this topic, you can use the video in this article. Among the videos provided on our website, you can also find information on how to assemble a coordination ladder with your own hands.

