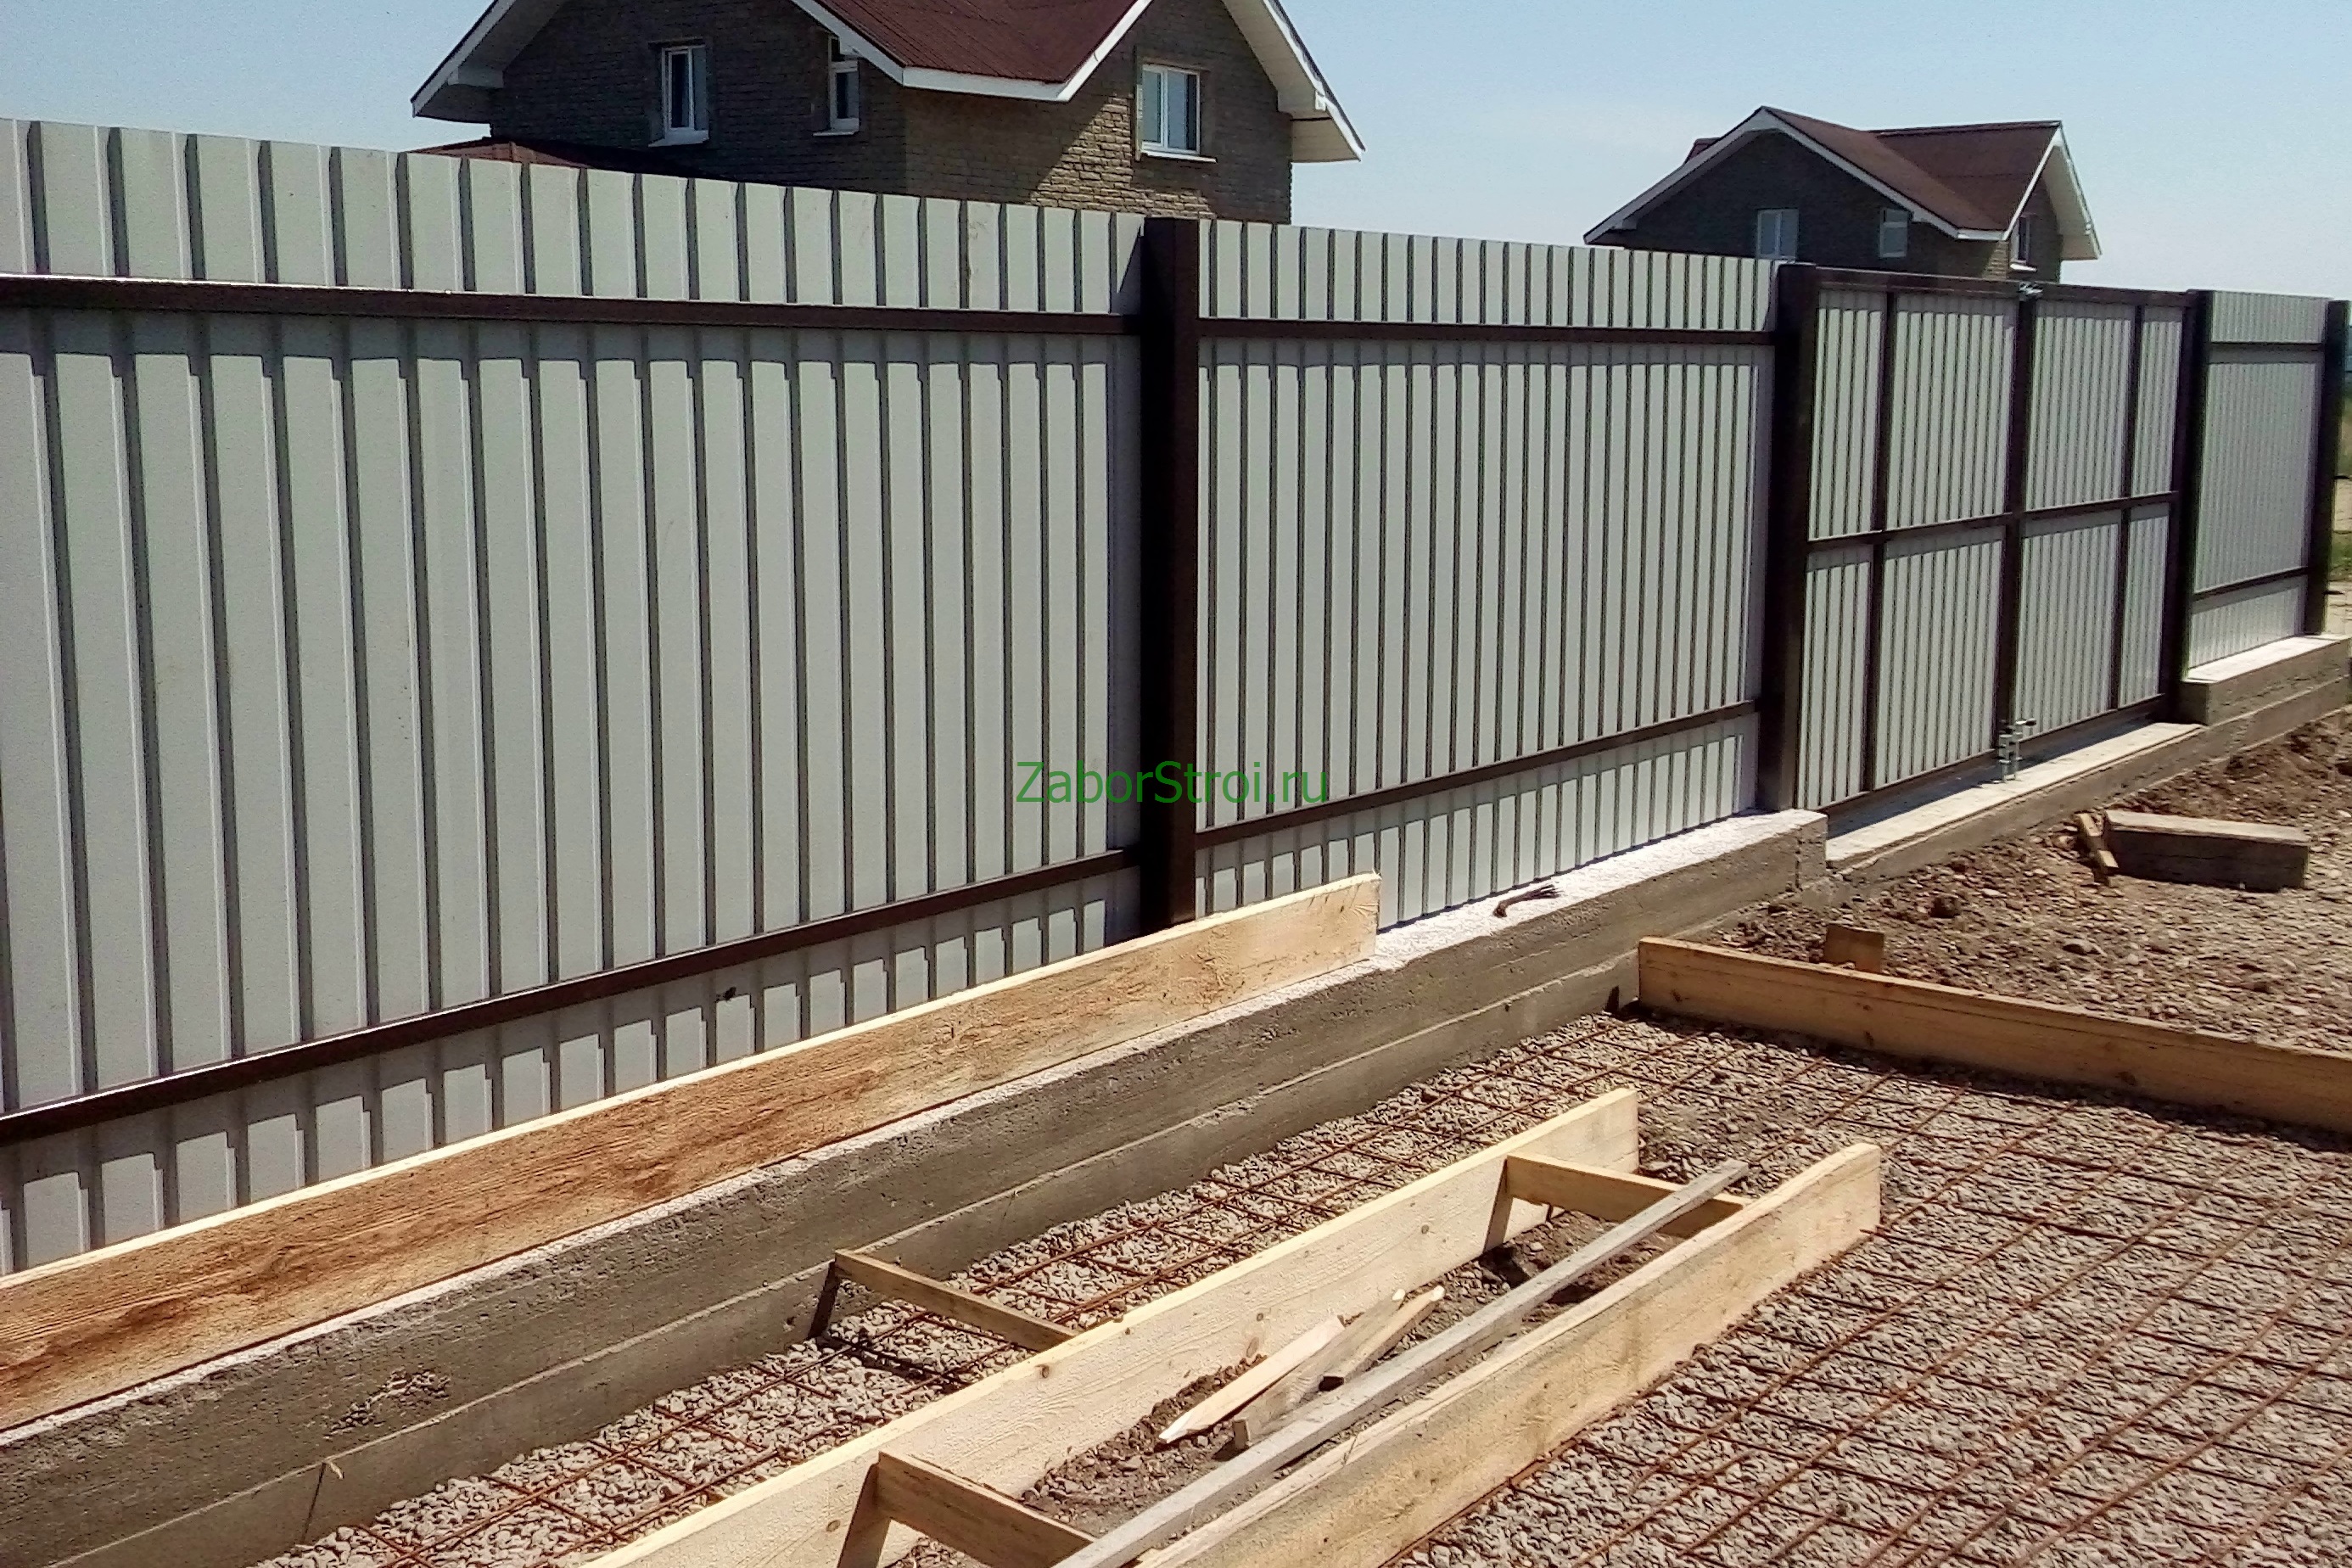
Instructions for making a foundation for a fence
Almost any base for a fence can be made with your own hands, if you carefully study the technology and follow all its instructions.
Strip foundation
The process of creating this type of fence base consists of certain sequential stages. With the consistent and careful execution of each of them, in the end you will get a solid foundation for your fence. So, you need:
- Carry out the marking of the territory. To do this, along the perimeter of the site, which will be surrounded by a fence, you need to drive in pegs, between which to pull the string. Separately, it is necessary to designate the location of the wicket and gates.
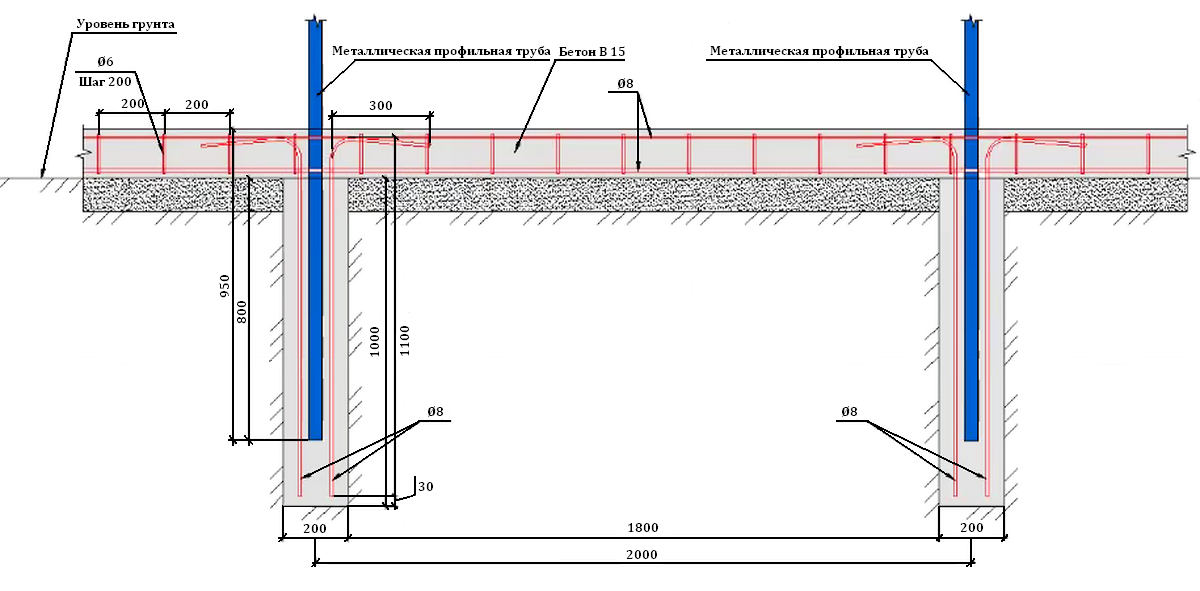
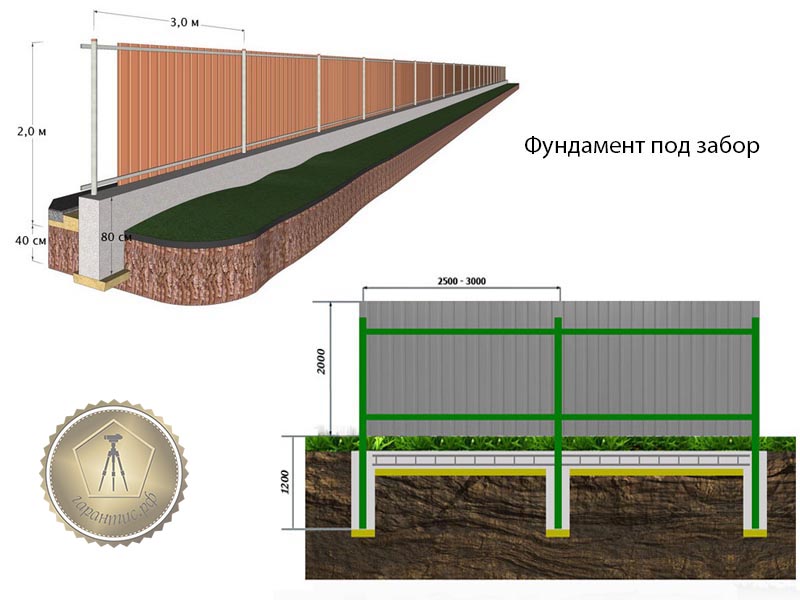
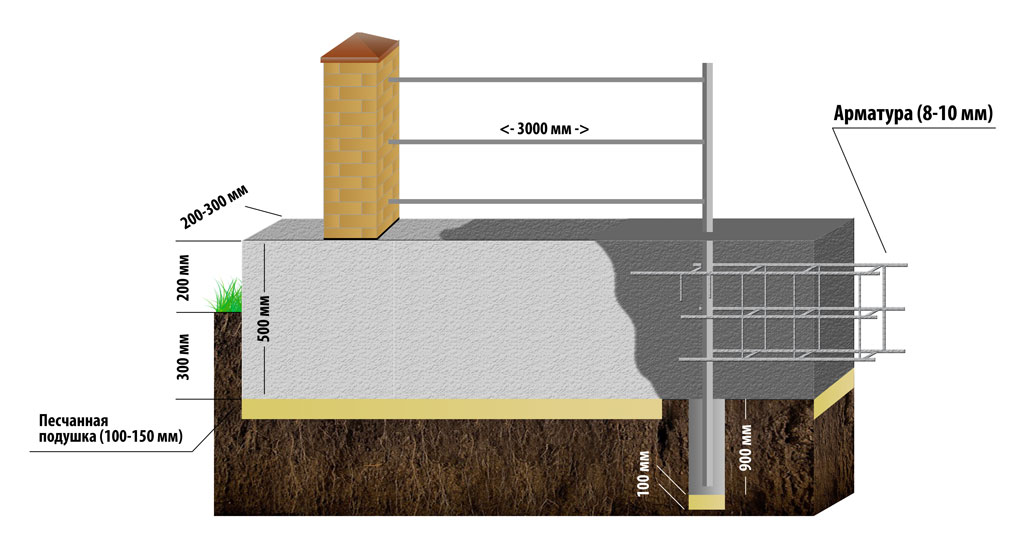
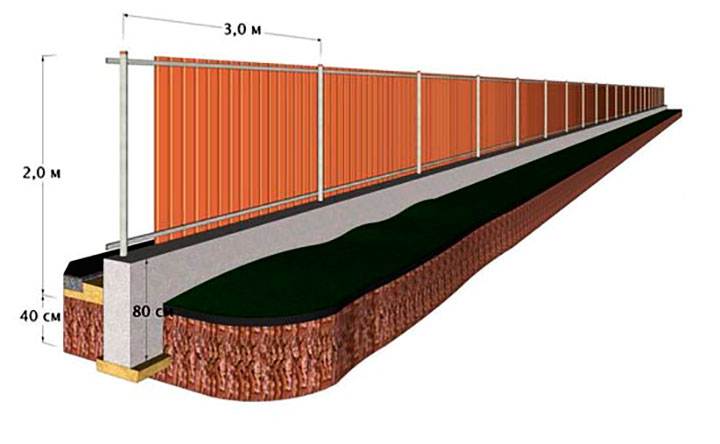
- Dig a trench. The depth of the ditch is not less than 35 cm, in the places where the supports are installed - 60–90 cm. The width is about 40 cm.
- Install the support posts. Any material can be used in their capacity. Usually these are pipes with a diameter of about 80 mm. Their height should be such that when digging into the ground, it will be enough for the entire height of the future fence. They need to be installed in prepared holes, covered with broken brick, gravel or stone.
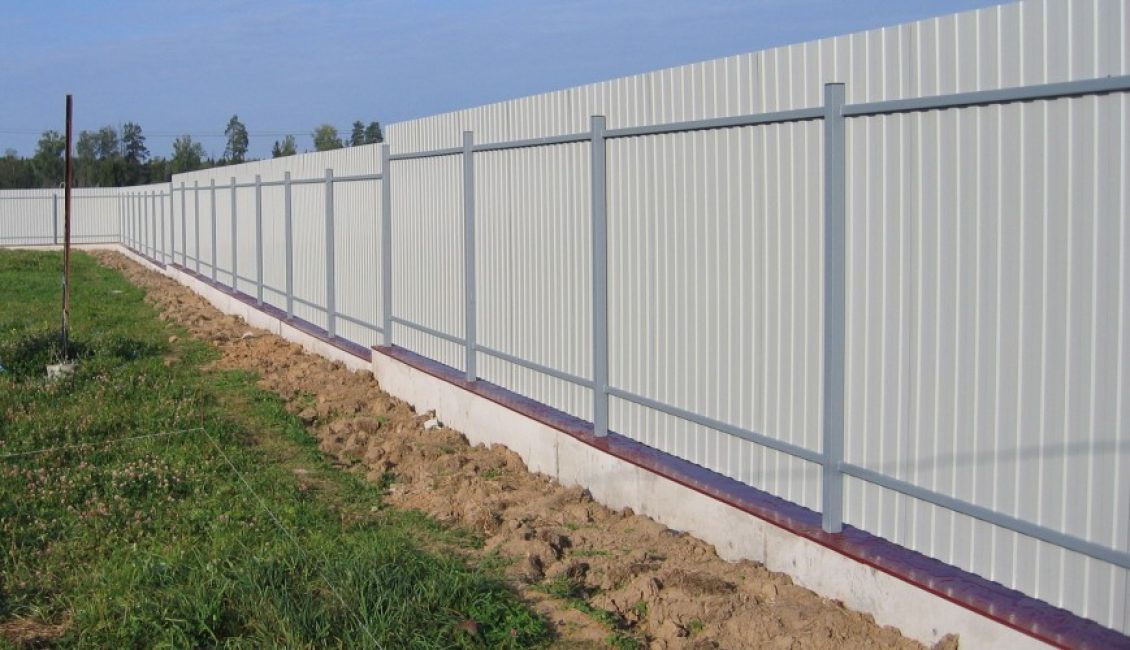
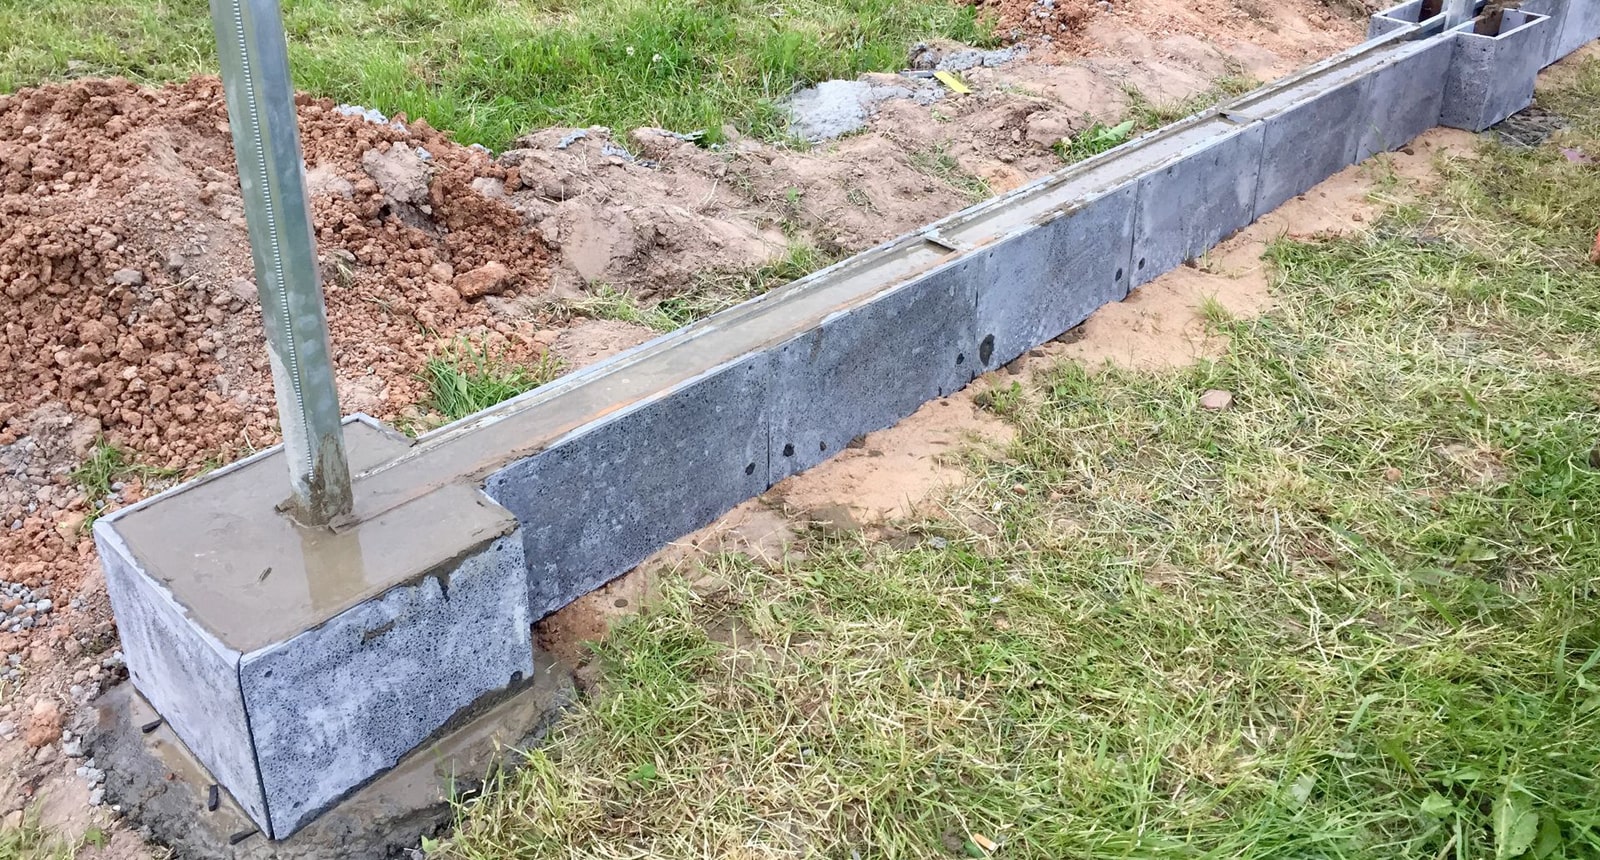
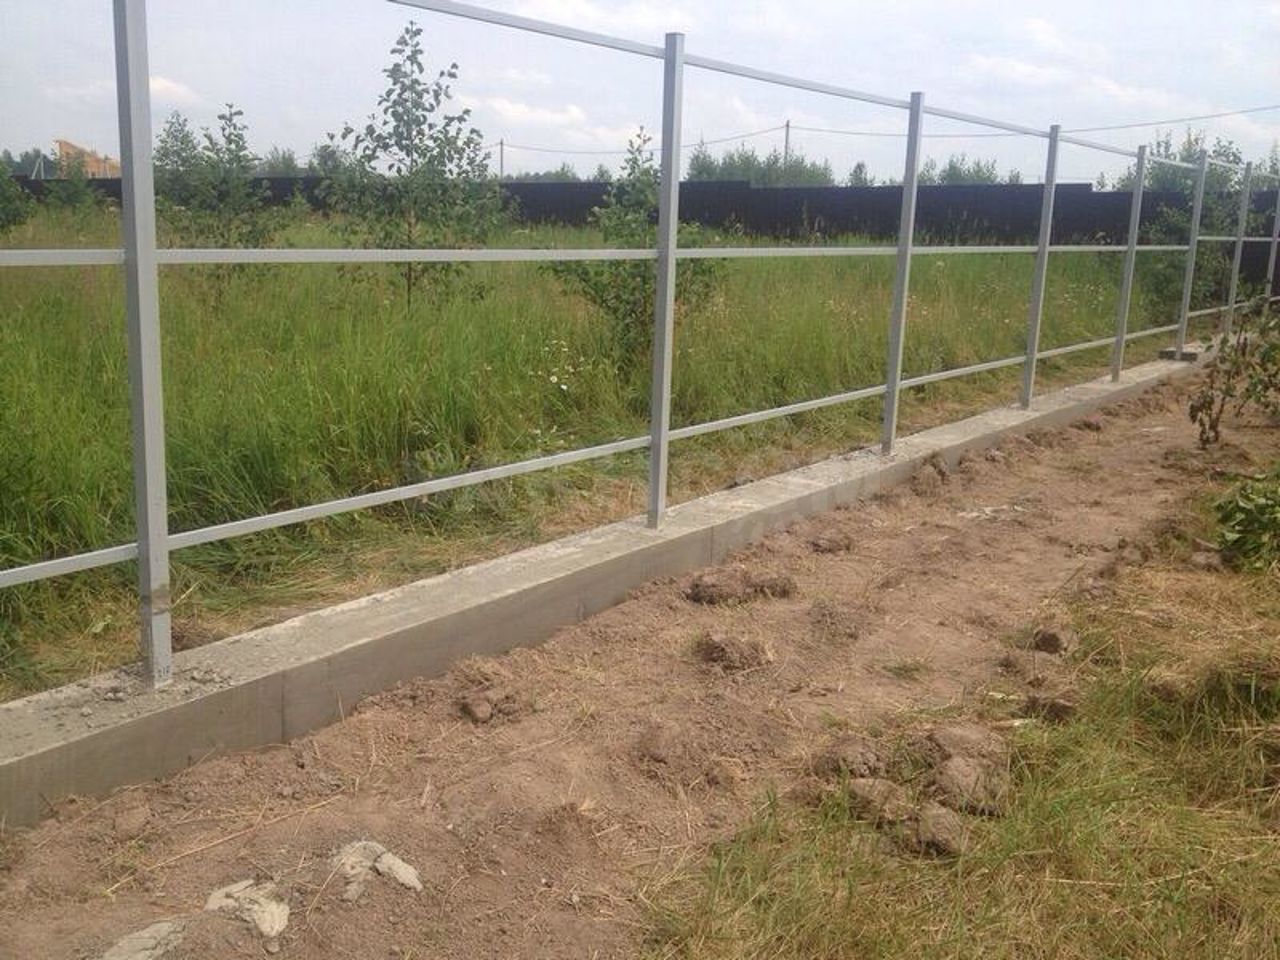
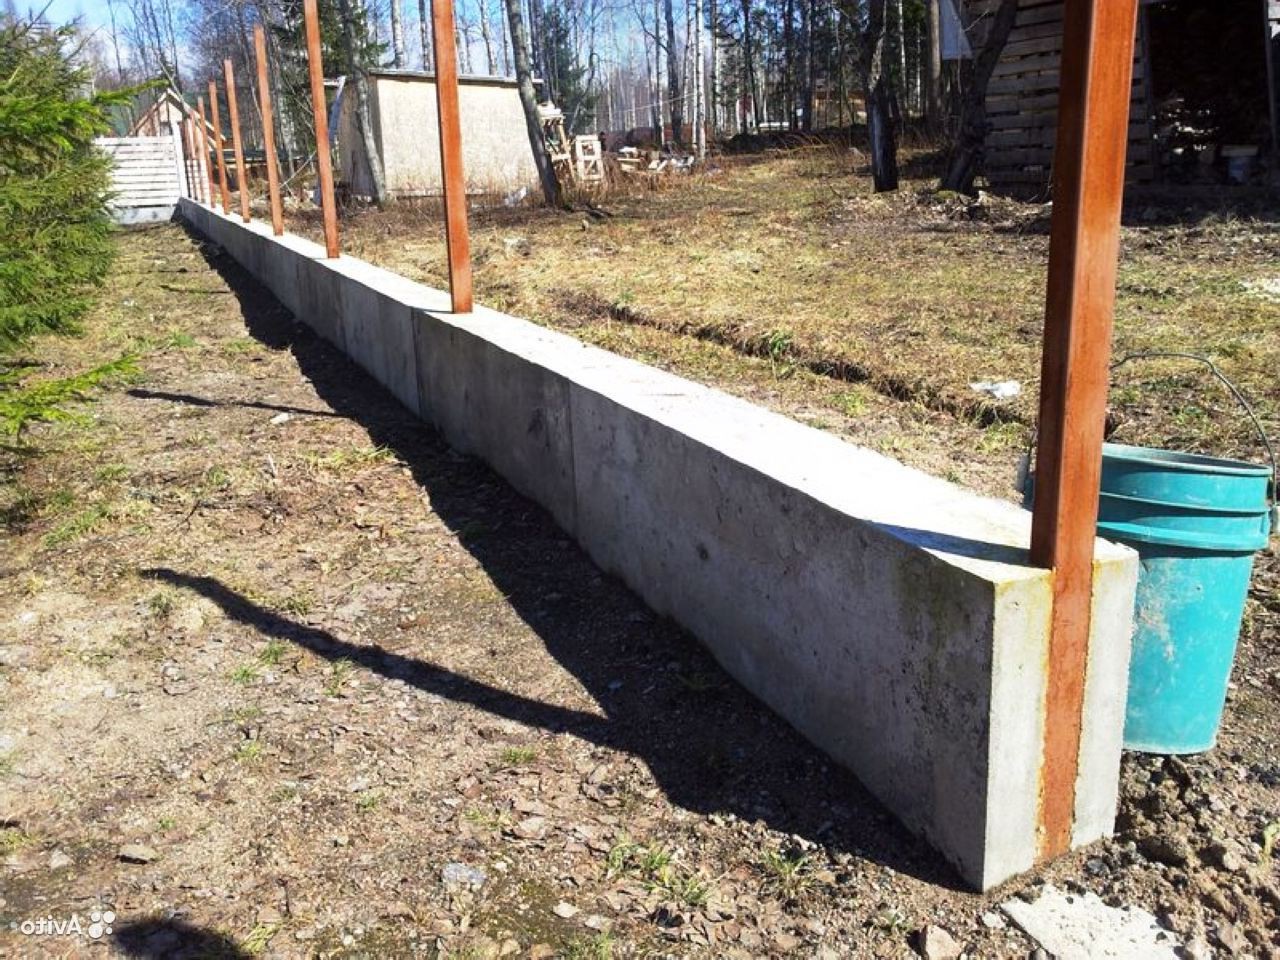
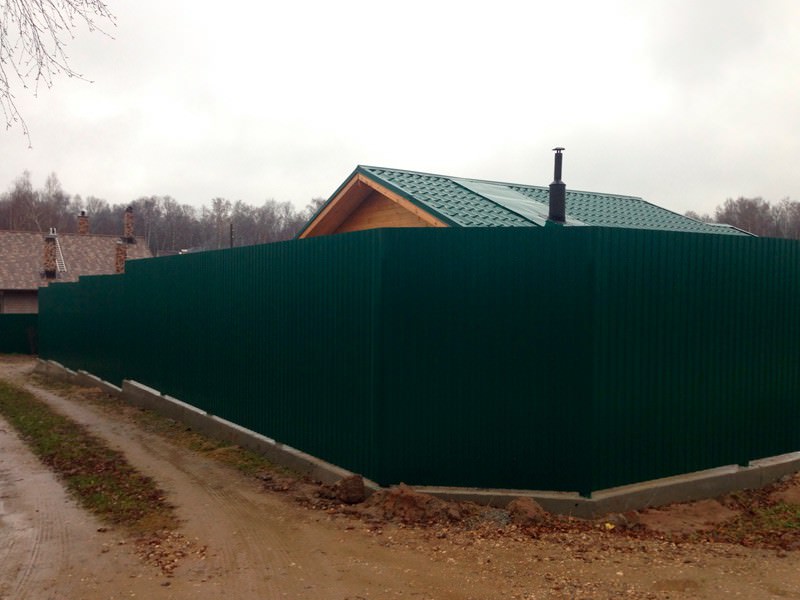
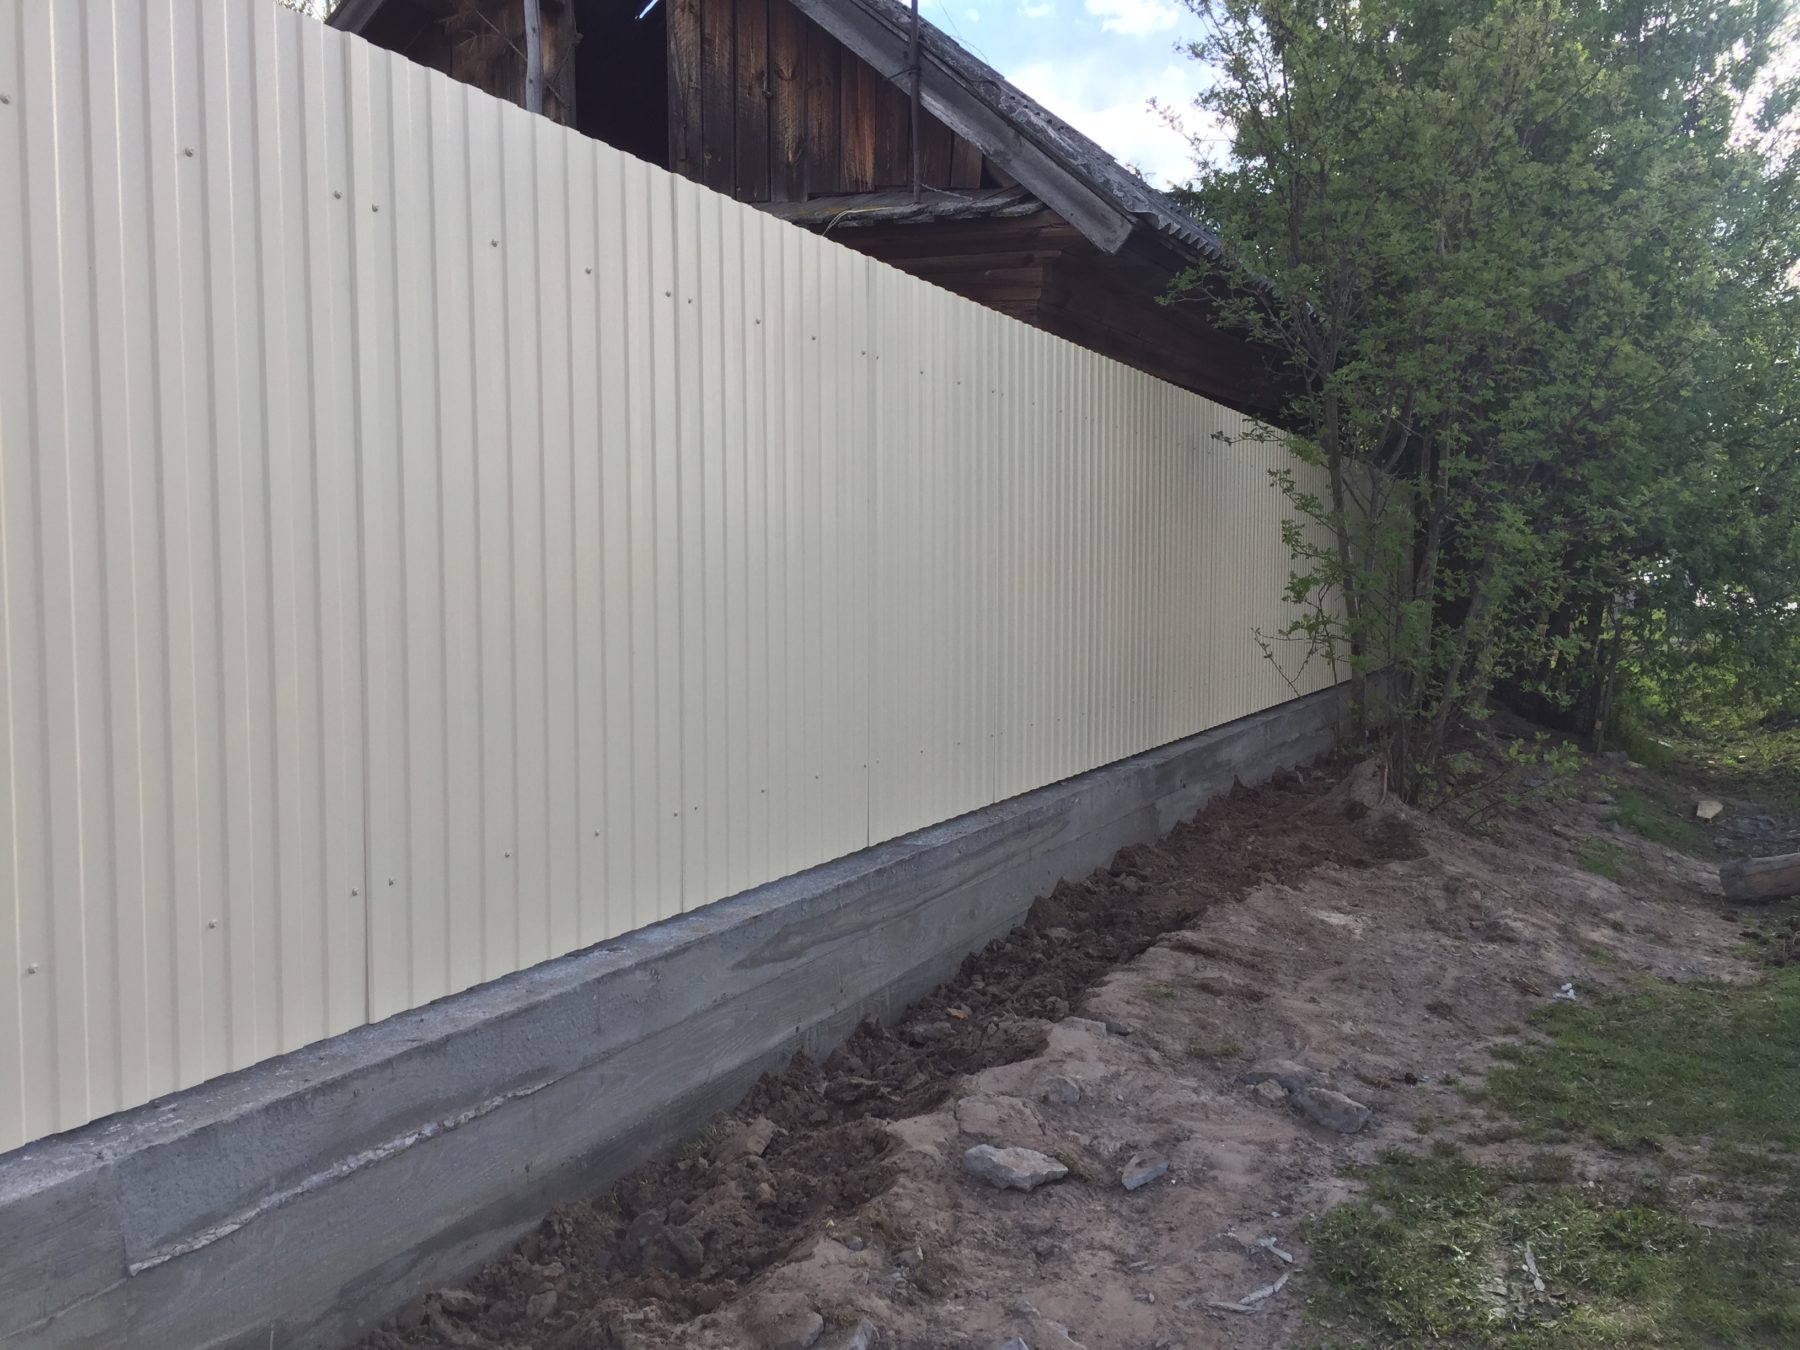
The strip foundation can be considered the optimal solution for the fence
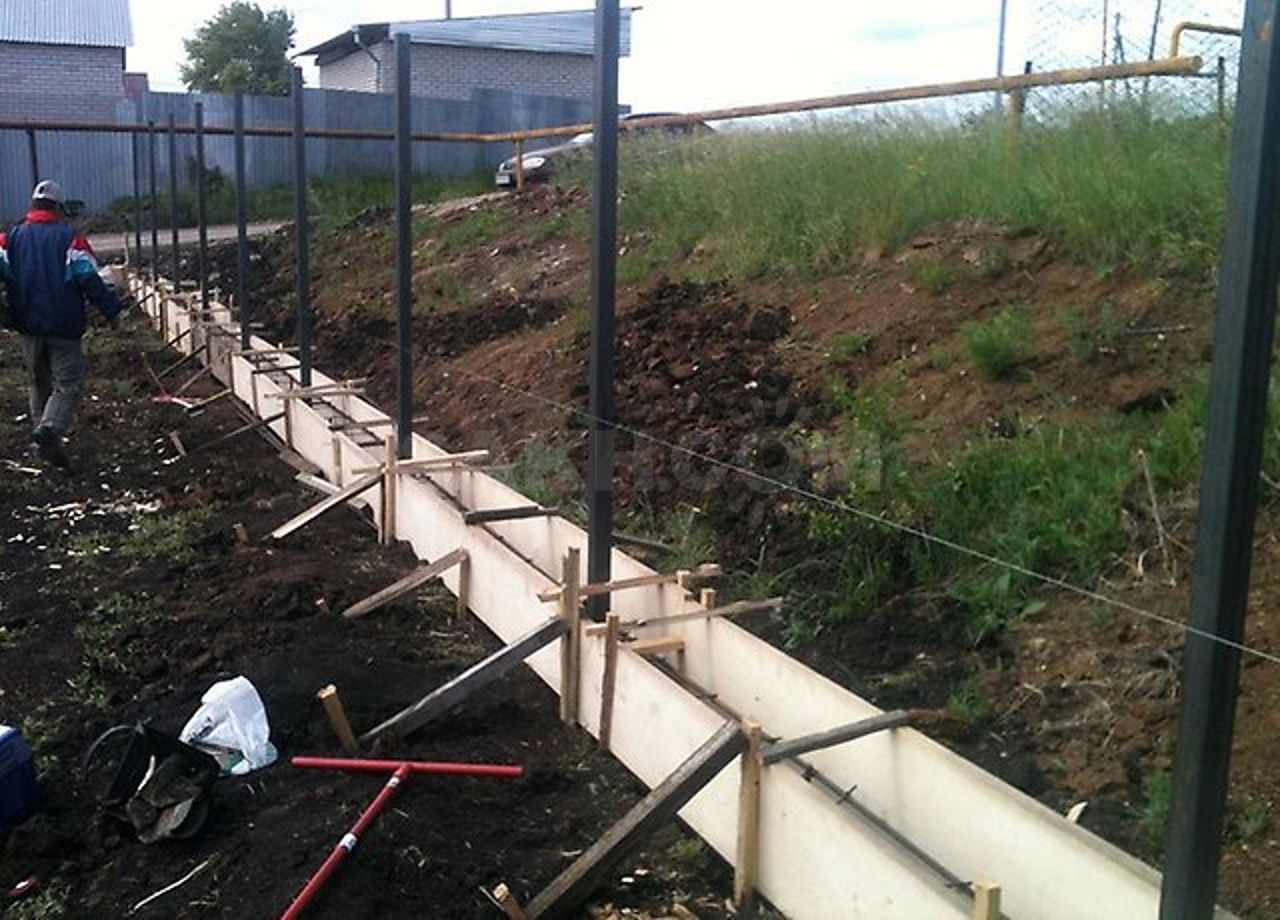
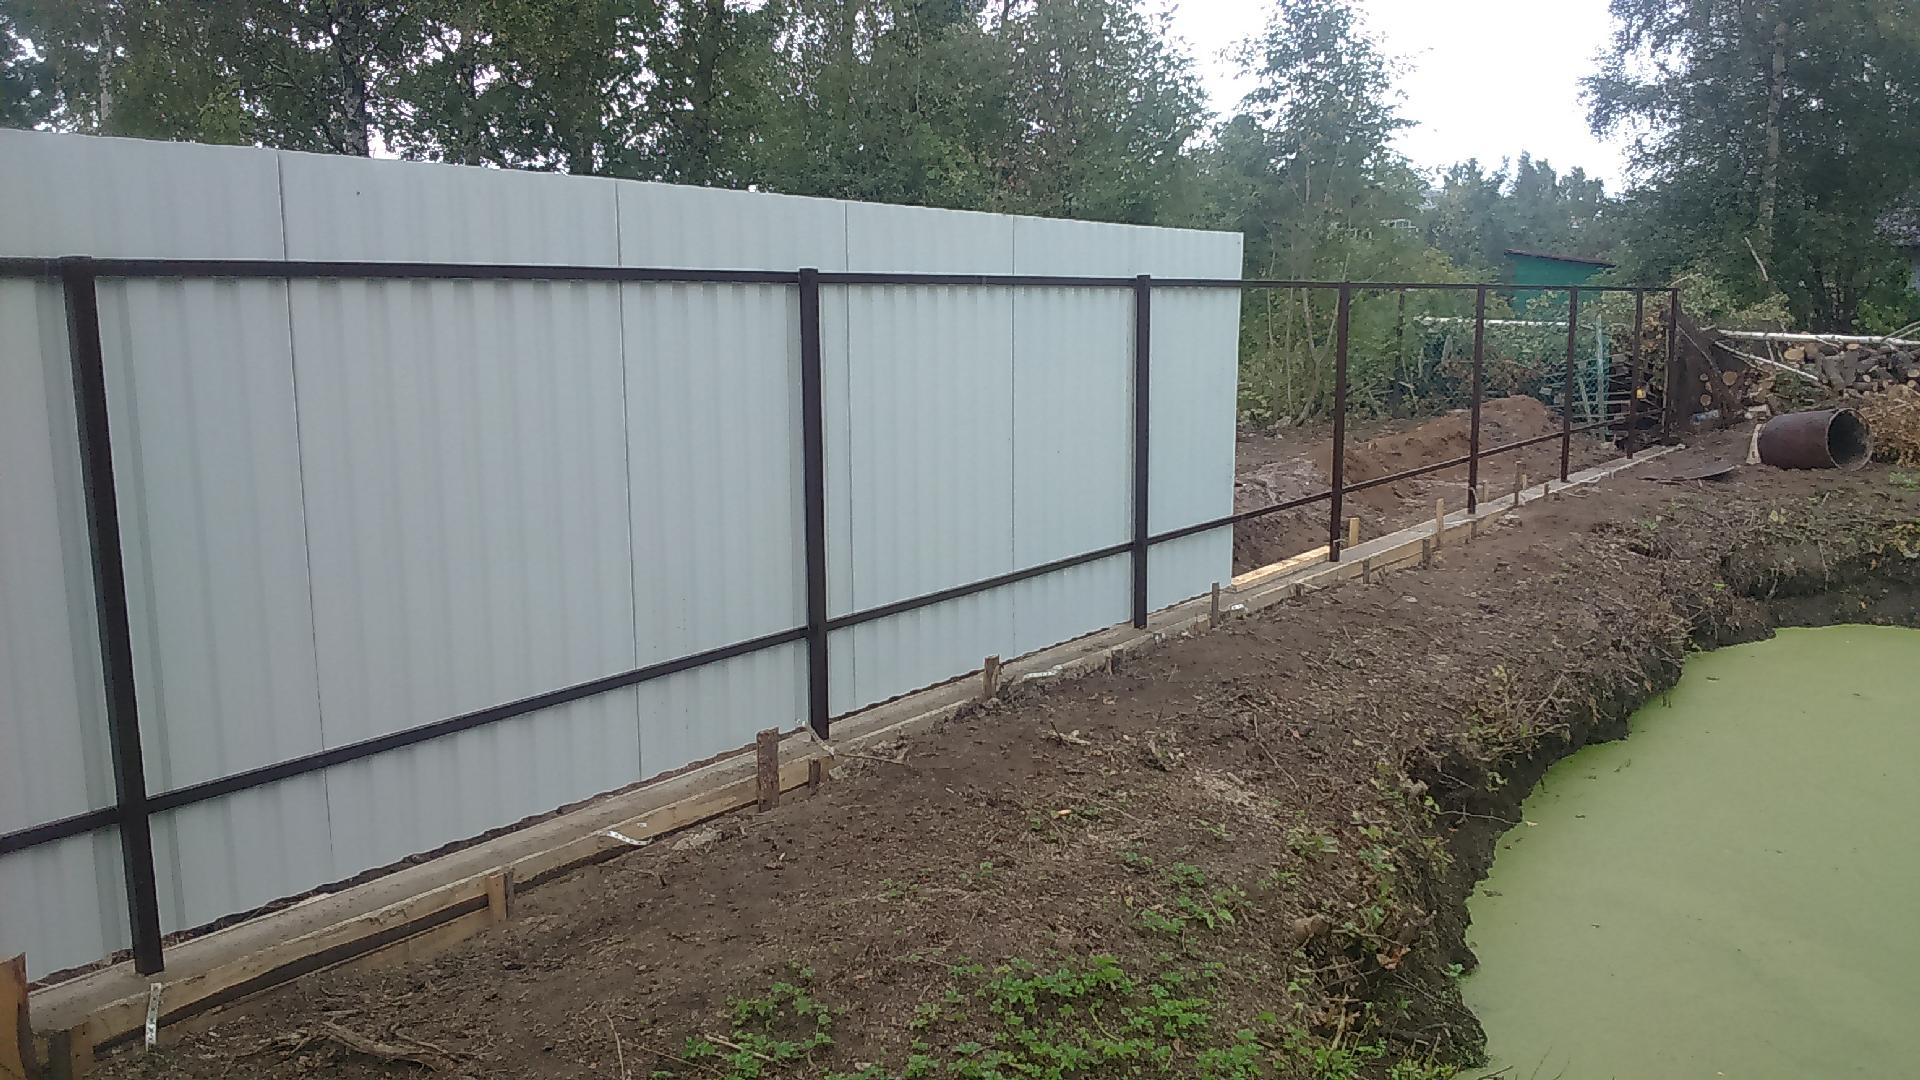
Formwork is usually made from planks
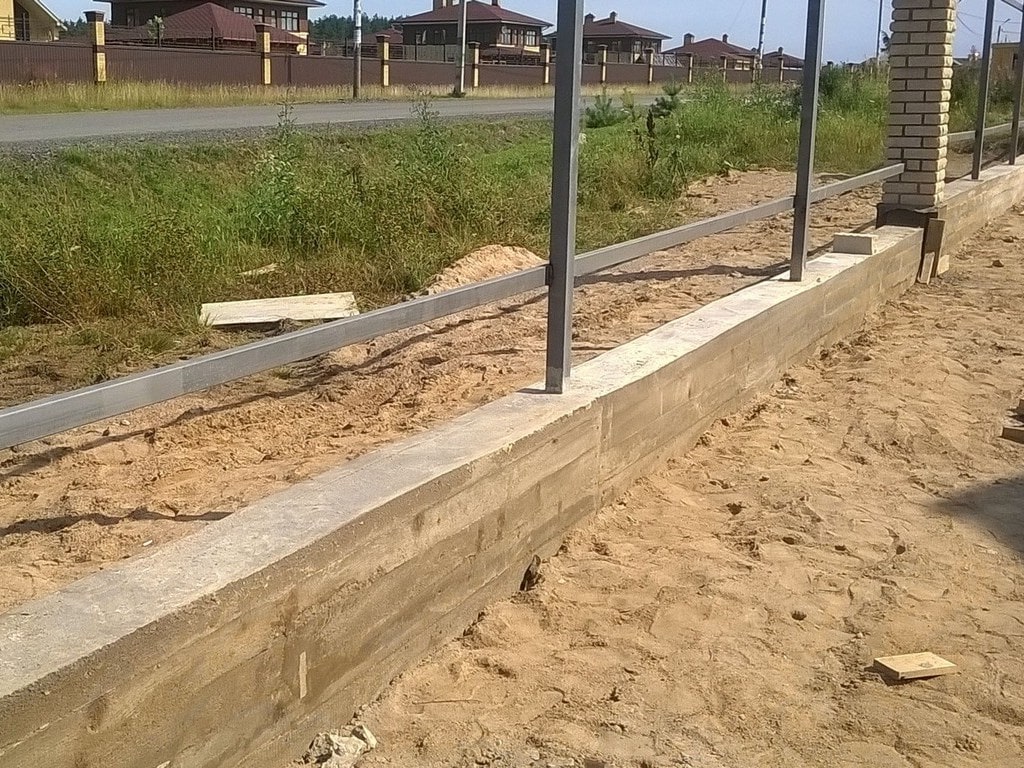
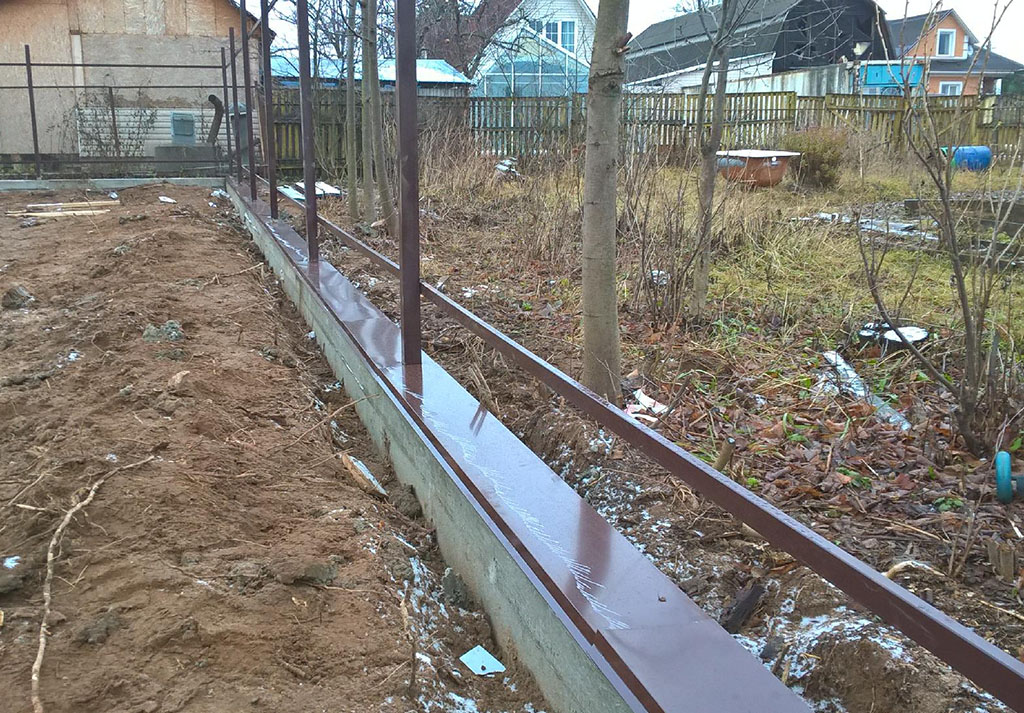
The tape should protrude slightly above ground level
Video: strip foundation for a fence with your own hands
Base for a light fence made of corrugated board
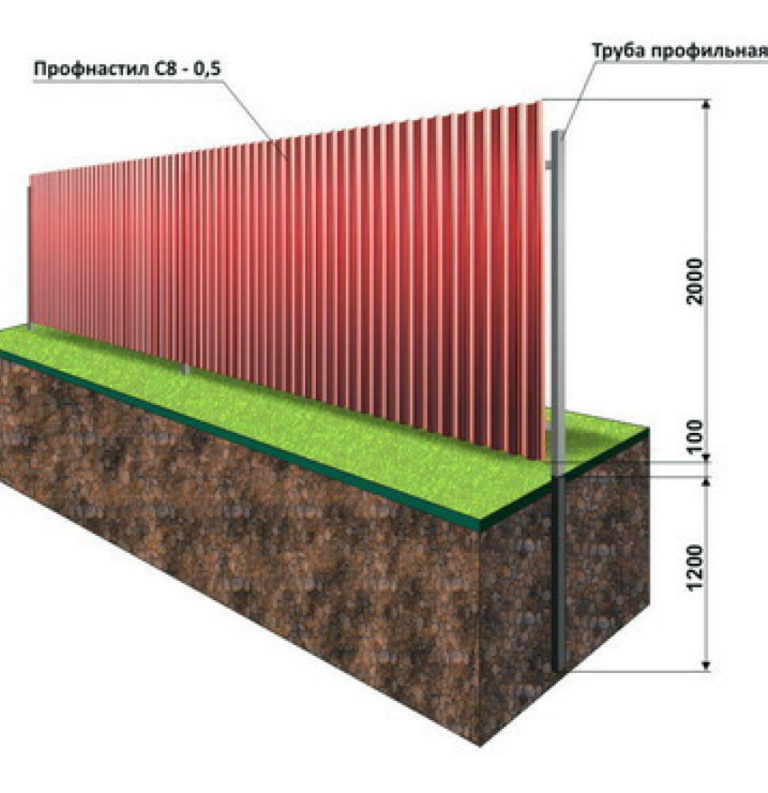
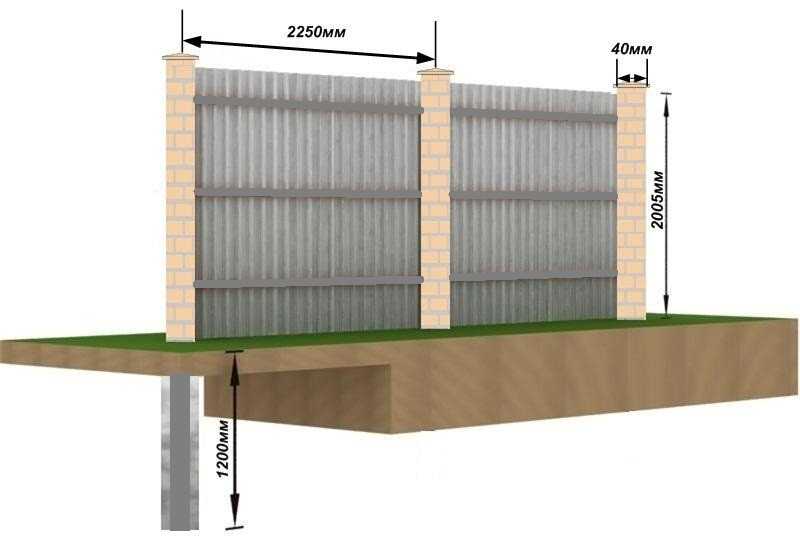
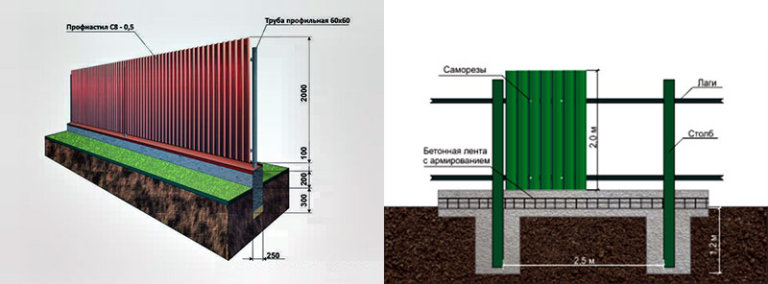
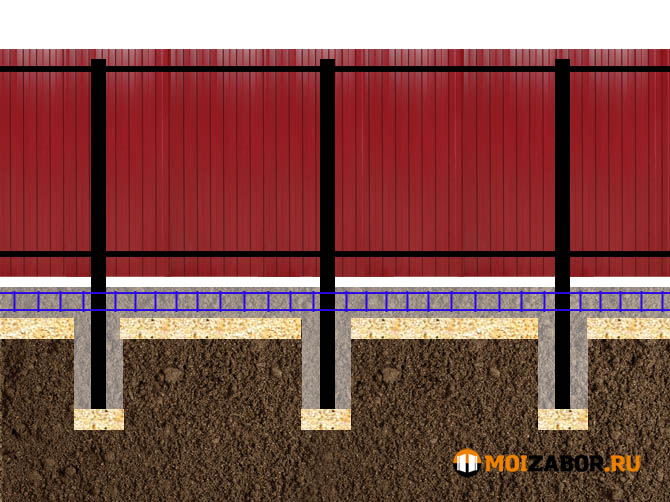
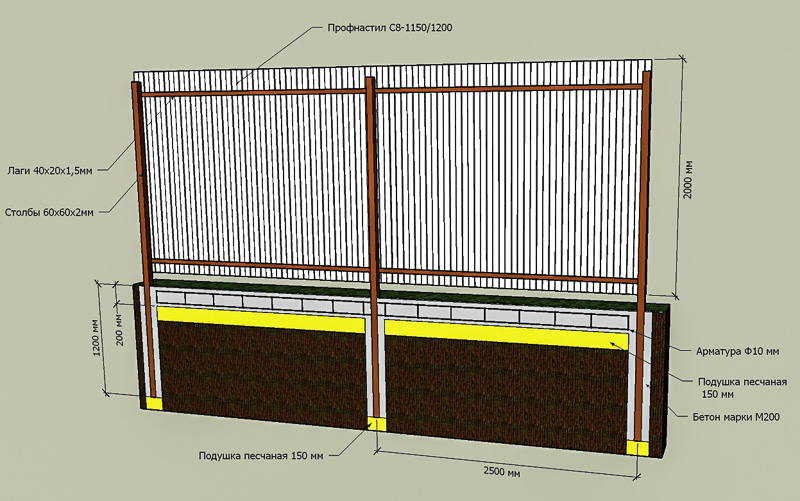
For a fence made of profiled sheet, the foundation may not be so solid. Such a fence can be installed on a columnar foundation:
- First, the marking is carried out, while it is necessary to indicate the location of the pillars. The distance between them should be about 2 m.
The posts must be treated with an anti-corrosion solution.
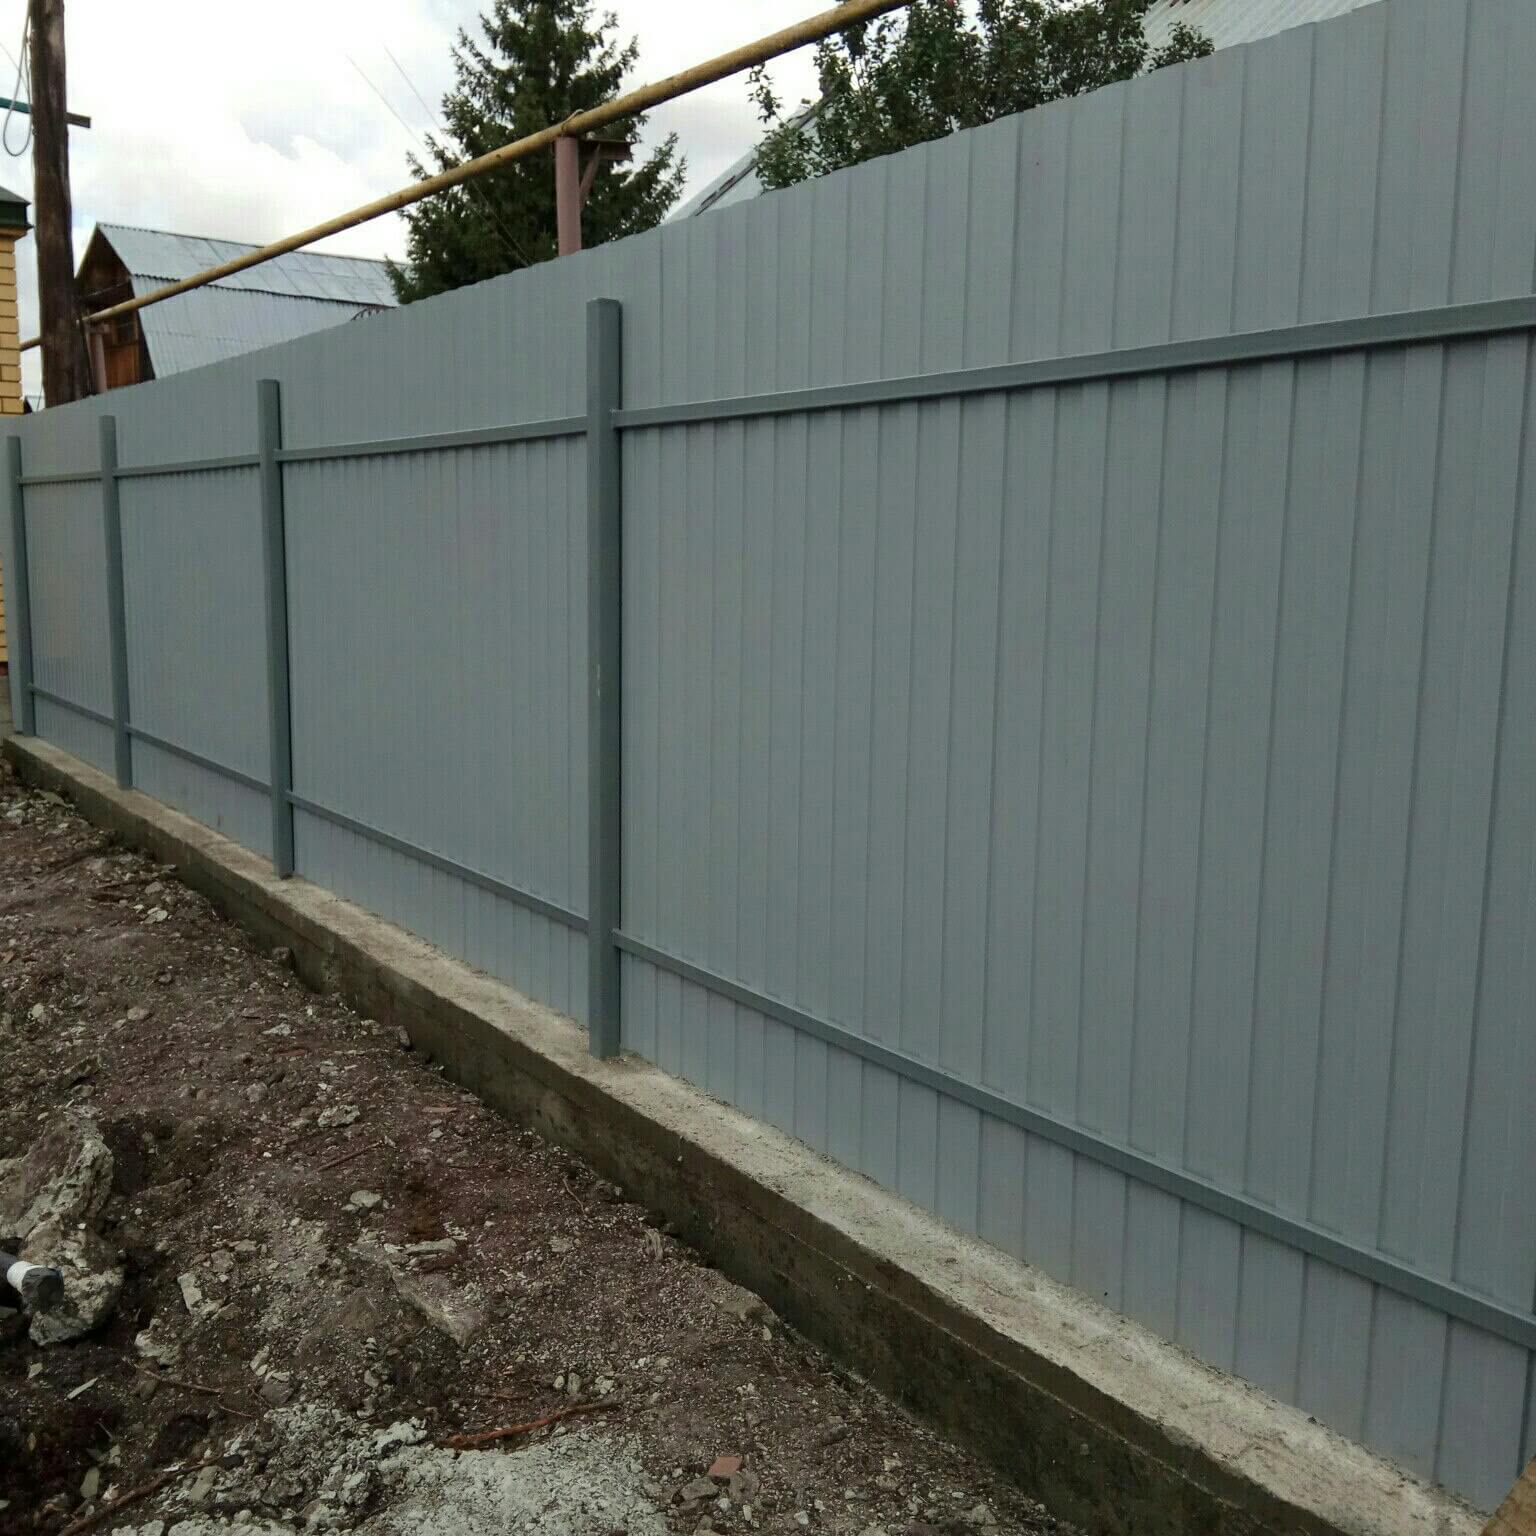
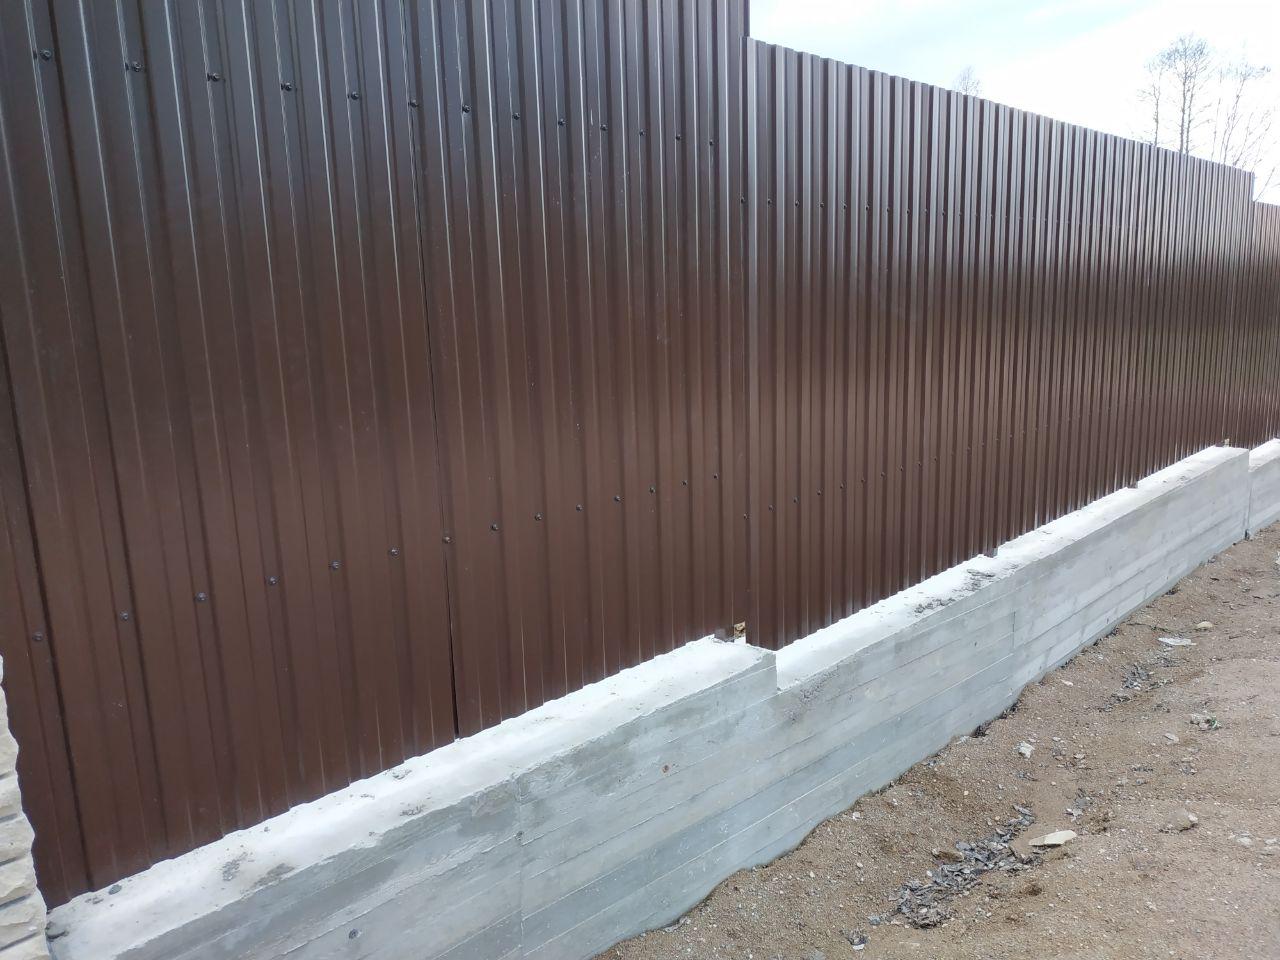
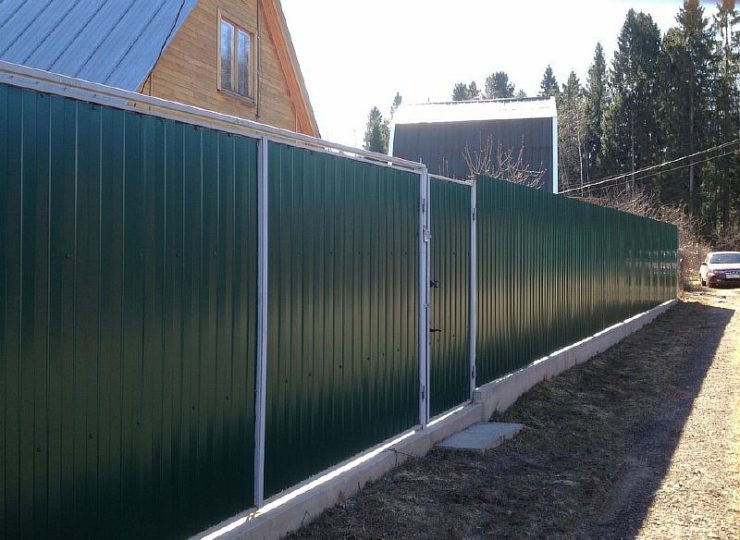
It won't take a lot of time to build a fence from corrugated board
To increase the strength of the foundation, you can additionally dig a shallow trench, the bottom of which is covered with geotextile, covered with rubble and covered with a film. Next, install the formwork, reinforce the bottom, then fill it with a cement mixture.
Video: post base for the fence
Brick fence foundation
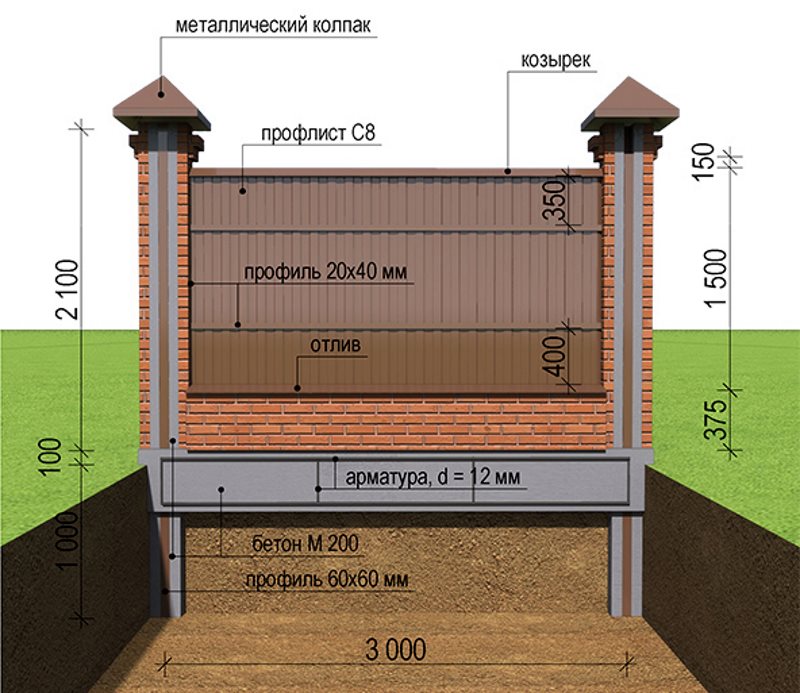
A brick fence needs a solid and solid foundation, because the mass of such a structure is impressive. The consequences of not following the technology or choosing the wrong type of base can manifest itself in the form of cracks on the fence itself. There are two options for arranging the foundation for a brick fence, which are equally suitable for both a three-meter structure and a small fence:
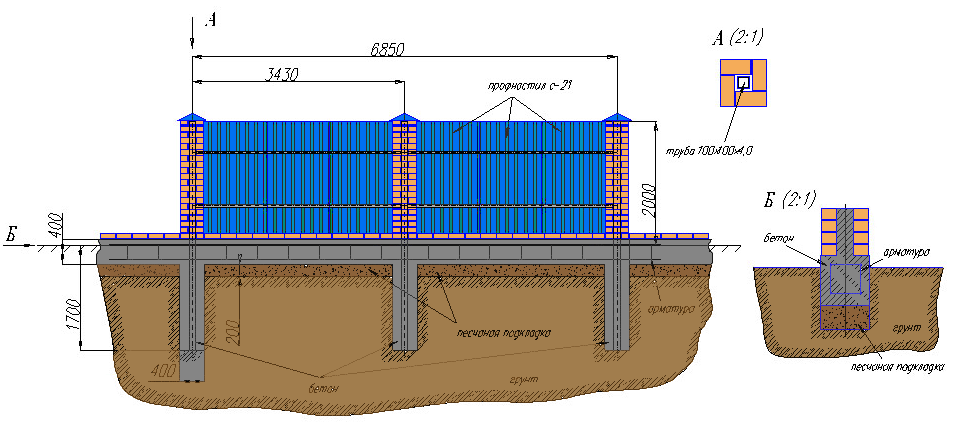
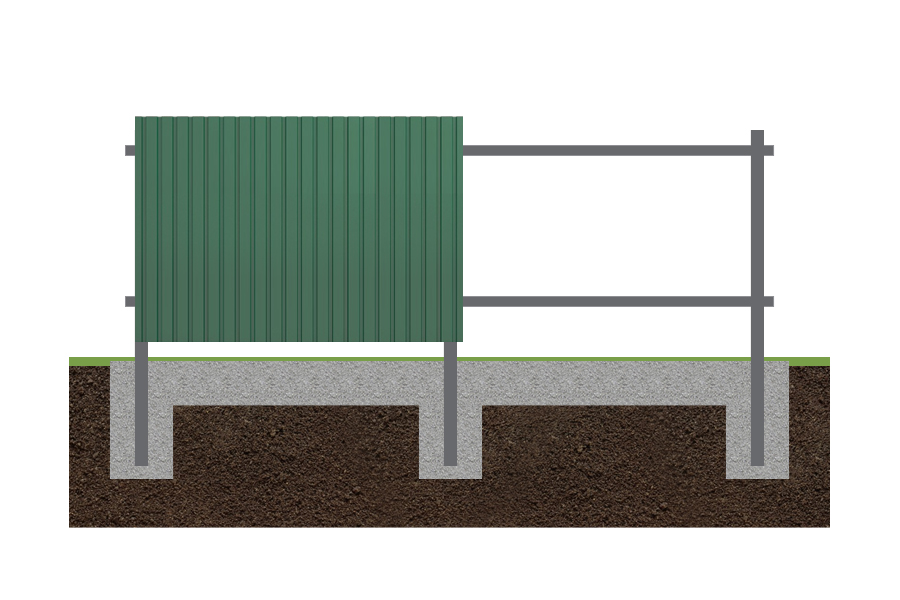
- strip foundation (depth 40-50 cm, width 40 cm), part of which is located above the ground (it must be reinforced with reinforcement 12-14, two at the top and bottom);
- the grillage is set up in the locations of the pillars to the depth of freezing, that is, 120–1250 cm deep into the soil, and between them is the usual reinforced tape.
The second option for arranging the foundation is more reliable in the case of building a brick fence.
Brick fence requires a solid foundation
There are secrets, knowing which you can significantly increase the life of the foundation:
- under the tape, you can equip a sand cushion, which is additionally moistened with water, which will significantly reduce the risk of displacement of the base;
- use cement not lower than M-200 grade;
- pour concrete in one go;
- if you do not make the solution yourself, but ordered from a specialized company, then you need to order 10% more, since part of the water will necessarily be absorbed into the soil;
- there must be a waterproofing layer between the foundation and the brickwork.
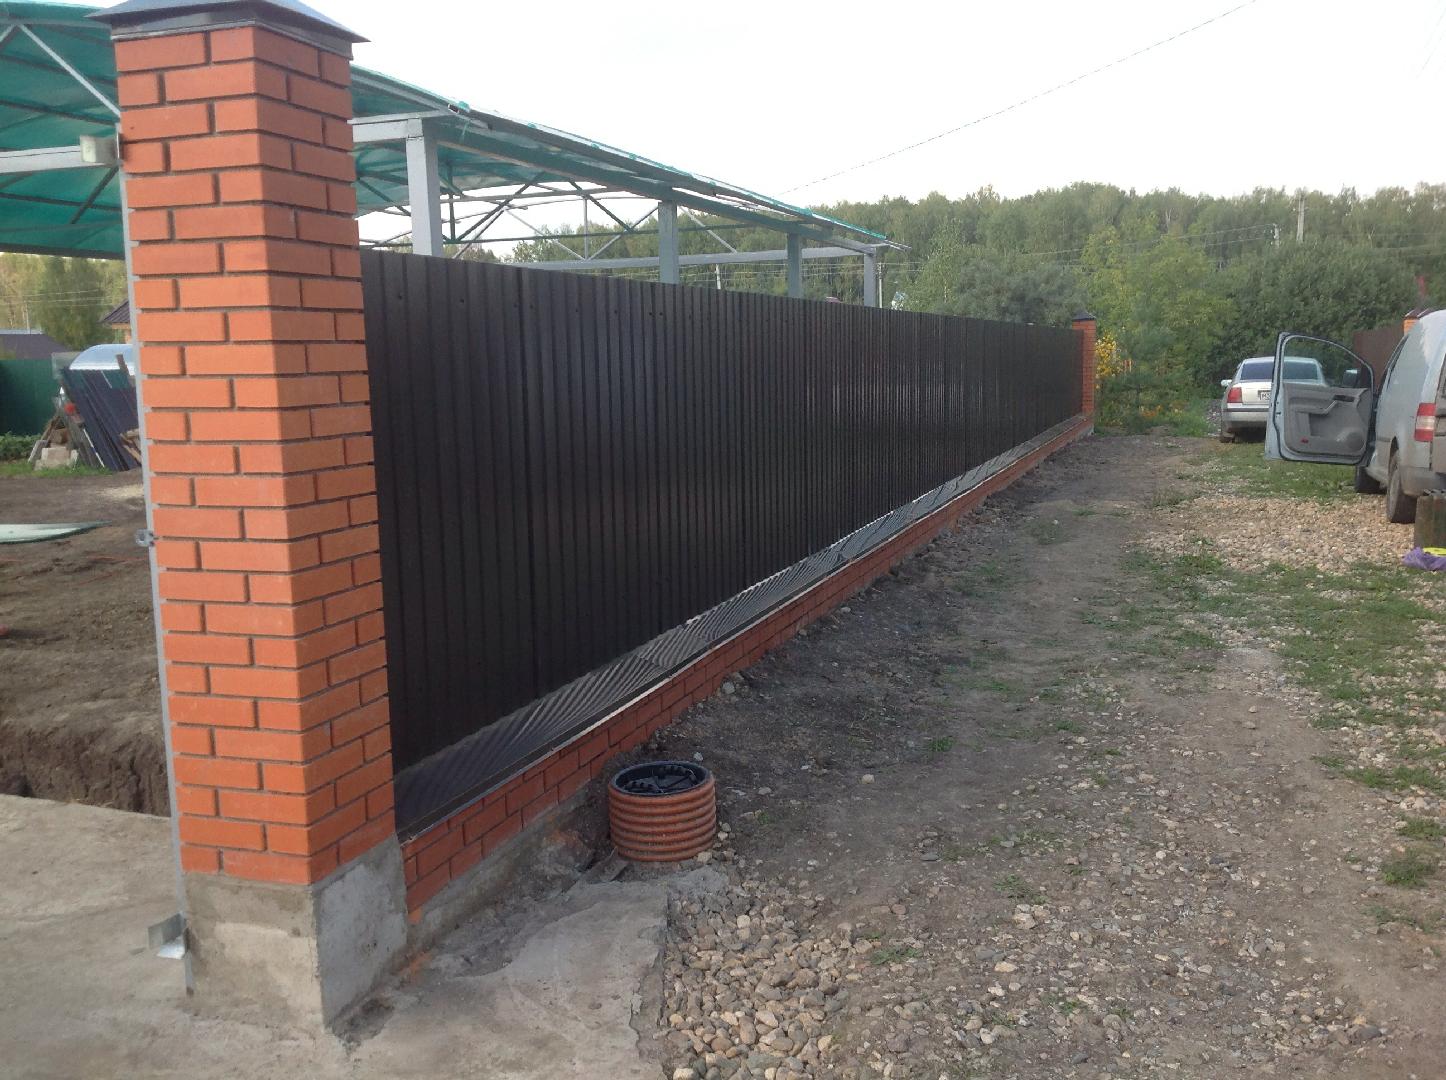
The basement part of the fence is integral with the foundation
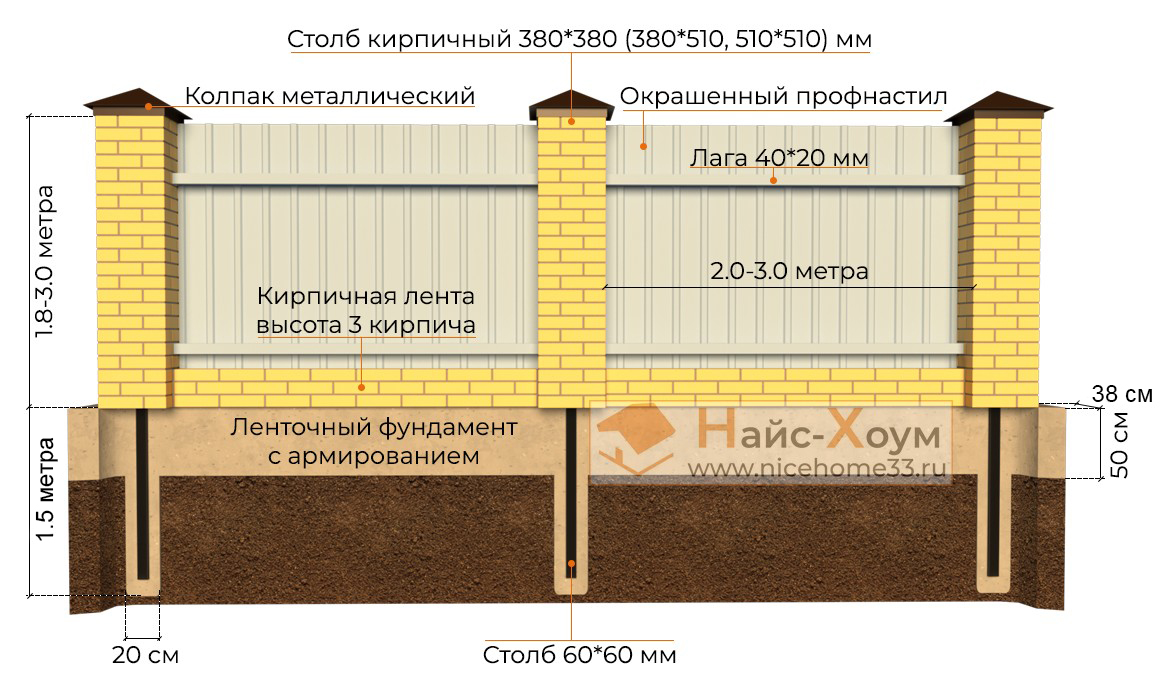
Fence foundation with brick pillars
Brick pillars perform rather a decorative function than a practical one. However, such a fence can be installed in those areas when it is necessary to slightly equalize the height difference in the area.
A pile foundation can be used under brick pillars.
The process of creating the foundation takes place according to the following plan:
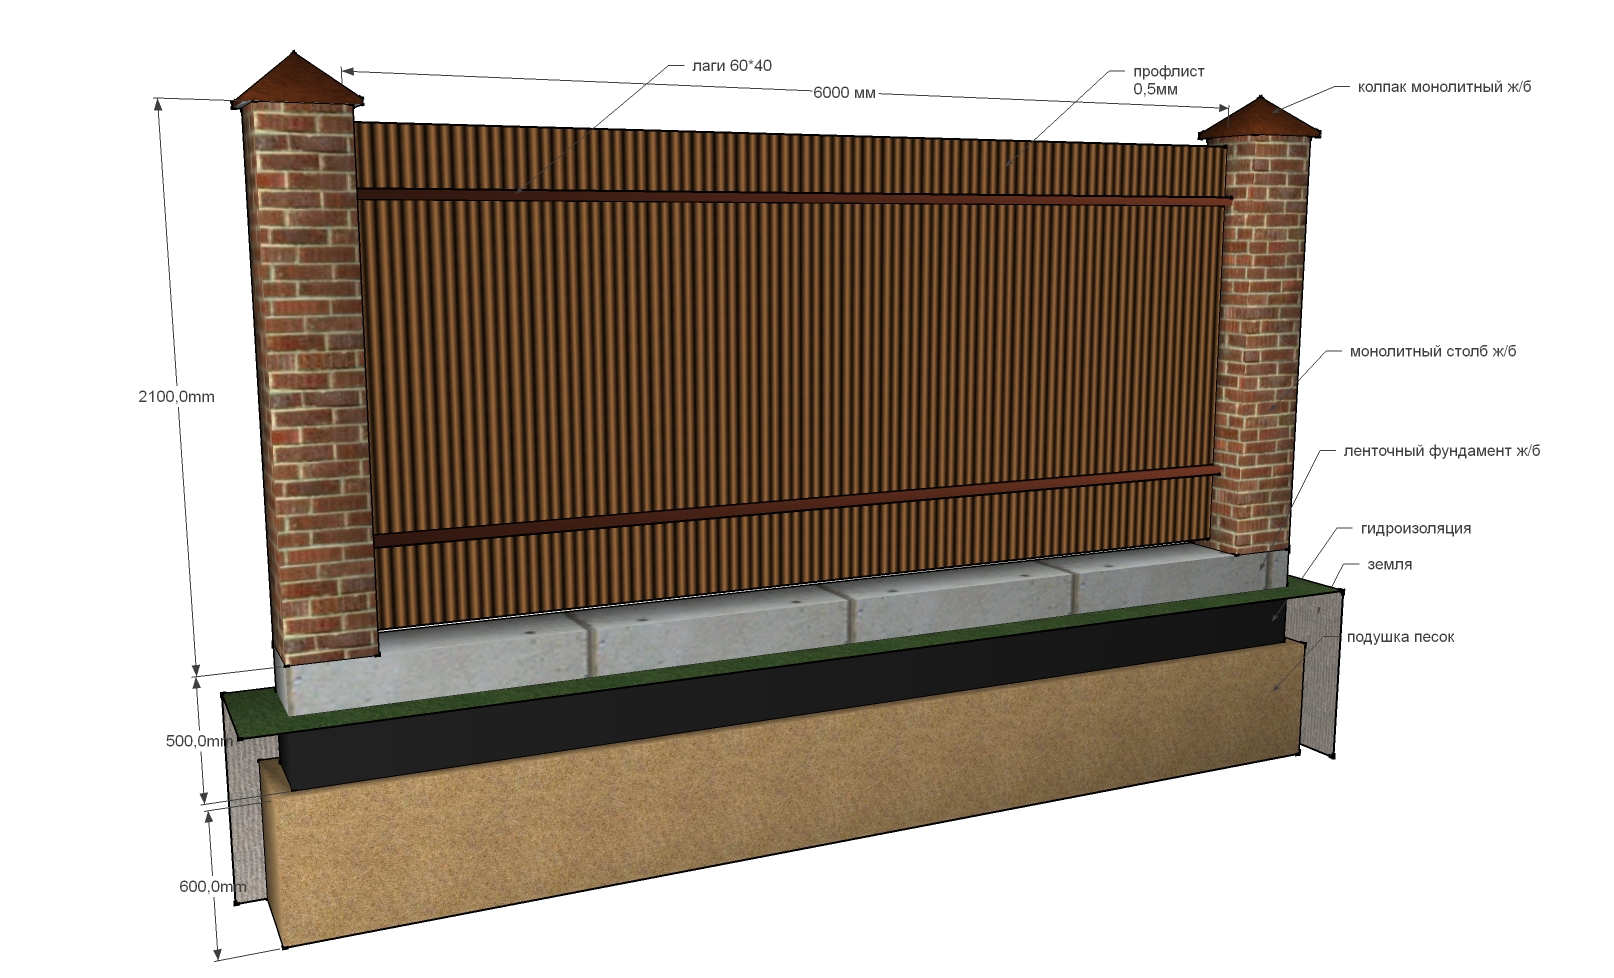
- Dig a ditch around the perimeter of the future fence up to 70 cm deep and at least 80 cm wide.
- Place a drainage pad on the bottom. You need to use sand and coarse gravel for this.
- Lay roofing material.
- Pour a 20 cm layer of cement mortar. In this layer, lay the reinforcement mesh. Use a rebar with a diameter of 6 mm.
- After the concrete has completely hardened, cover it with roofing felt.
- Now you can equip the tape with two bricks. It will have to be raised to ground level.
- Now you need to reinforce the locations of the pillars. A wire with a diameter of 3 mm will suffice.
- Lay out a brick base, and both the base and the pillars are laid out as a whole. Further, the pillars are laid out in monolithic masonry.
The strip foundation looks original under the fence with brick pillars
Expert advice
When installing the fence on heaving soil, the fact that the base turns into plasticine is taken into account. The phenomenon is observed during the frost period against the background of the manifestation of the heaving effect characteristic of the earth, which retains moisture. Installation tips:
- Removal of soil to the level of freezing. The soil is replaced with sand.
- Installation of the base below the freezing level. Such a moderate technique has a minus - the subsequent pressure of the soil on the walls of the foundation.
- If a light fence is installed, then the foundation is insulated.
- Drainage arrangement: digging a trench to the depth of the foundation arrangement. A perforated pipe is installed, pre-wrapped in filter material. Drainage construction is carried out at a distance of 50 cm from the foundation. The finished structure is covered with rubble.
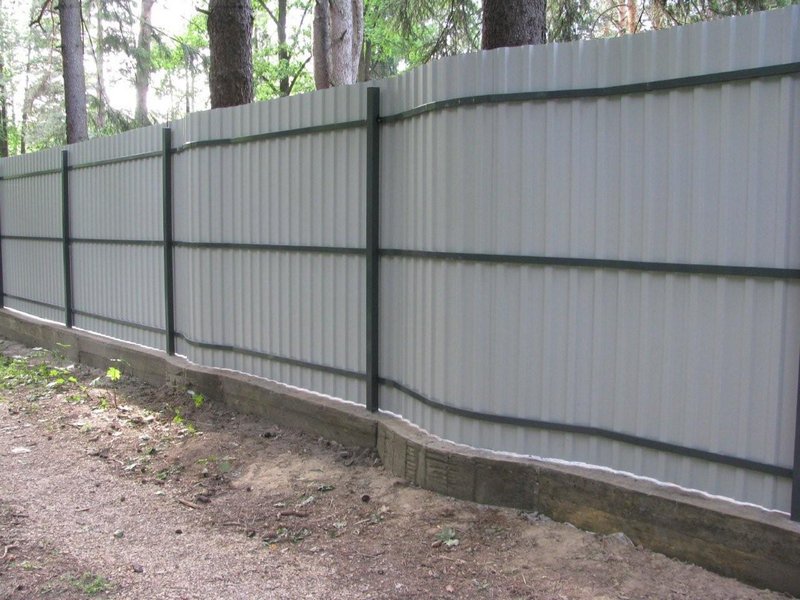
If construction work is carried out on uneven ground, a sectional or combined fence is installed. The height and width of the spans are preliminarily calculated. To make the fence aesthetically pleasing, a stepped foundation is set up. All work is carried out after measuring the slope. If the indicator does not exceed 35 degrees, then the minimum span width is 2.5 m.
When the slope fluctuates along the site, sections with different widths are formed. If the slope is greater than 35 degrees, the span spacing decreases. The configuration of the upper edge should be stepped, reflecting the shape of the base, or linear (one line is formed).
Other tips from specialists for installing a fence made of corrugated board with their own hands on any soil:
- Closing the joints of sheets with special strips. Their production is carried out using special bending equipment.
- Installation work is carried out in gloves.
- To cut the sheets, metal scissors are used. The edges of the sections are tinted with paint. It is forbidden to use a grinder, as the protective layer is broken during cutting.
Fencing made of profiled anti-corrosion sheets requires minimal maintenance. If the site is located near the roadway, the fence is constantly exposed to mechanical damage by gravel. Such places are tinted with paint. When arranging a fence, long sheets can be mounted horizontally, but the design is considered unsafe.
If the installation work is carried out without welding, then special preparation of the pillars is required. Perforation is performed at the fixation points. The structure is not considered strong, as it loosens during operation under the influence of loads. It is more reliable to fix the frame pipes by welding. It is necessary to adhere to safety rules using protective equipment (gloves, mask).
Subject to technical methods, an even and neat fence is set up.Self-assembly, strength and resistance to aggressive environments, a high degree of reliability, long-term operation are the main advantages of a corrugated board fence. With its help, the suburban area becomes attractive and concise. Decking goes well with natural stone, brick, forging elements. The choice of the scheme and appearance of the fence depends on the personal preference of the homeowner.
Why is it necessary to install a foundation for a fence made of corrugated board
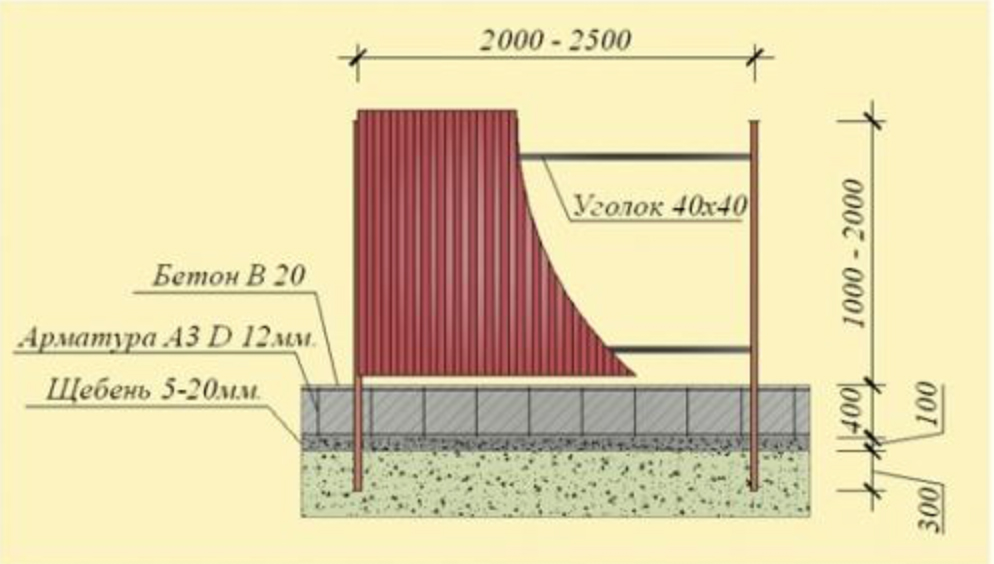
It is always recommended to install a high fence with the installation of a foundation, since high fences made of profilast also have a lot of weight and affect the base of the structure. The stability of the fence is influenced by such factors as:
- Frost and other seasonal impacts on the soil.
- Subsidence of soil under the influence of groundwater.
- Ground vibrations that are caused by the movement of vehicles or railways near the fence.
- Strong winds.
But all external influences can be compensated by a reliable foundation. Since the corrugated board is quite light, it requires a less massive foundation than for stone or metal, but at the same time its depth should be greater.
Choosing the wrong foundation for a fence made of corrugated board, you run the risk of facing the appearance of premature cracks on the fence.
The type of foundation for such a fence depends on many factors, in particular:
- The type and complexity of the soil.
- Height of the fence.
- Soil condition.
- The presence or absence of groundwater at the site.
- Distance from the fence to the road.
The best option for the foundation for such a fence is a strip one. You can also erect a columnar foundation, however, a strip foundation has a number of advantages, in particular:
- Simple construction technology.
- Protection against soil destruction.
- The strip foundation has a high bearing capacity.
- Durability.
Such foundations resemble cement tape that runs along the perimeter of the fence. It is quite possible to install them with your own hands with the minimum amount of necessary knowledge, and in addition, the cost of materials is quite low.
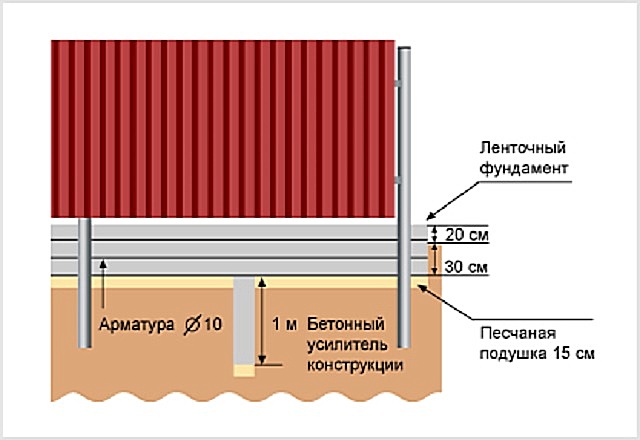
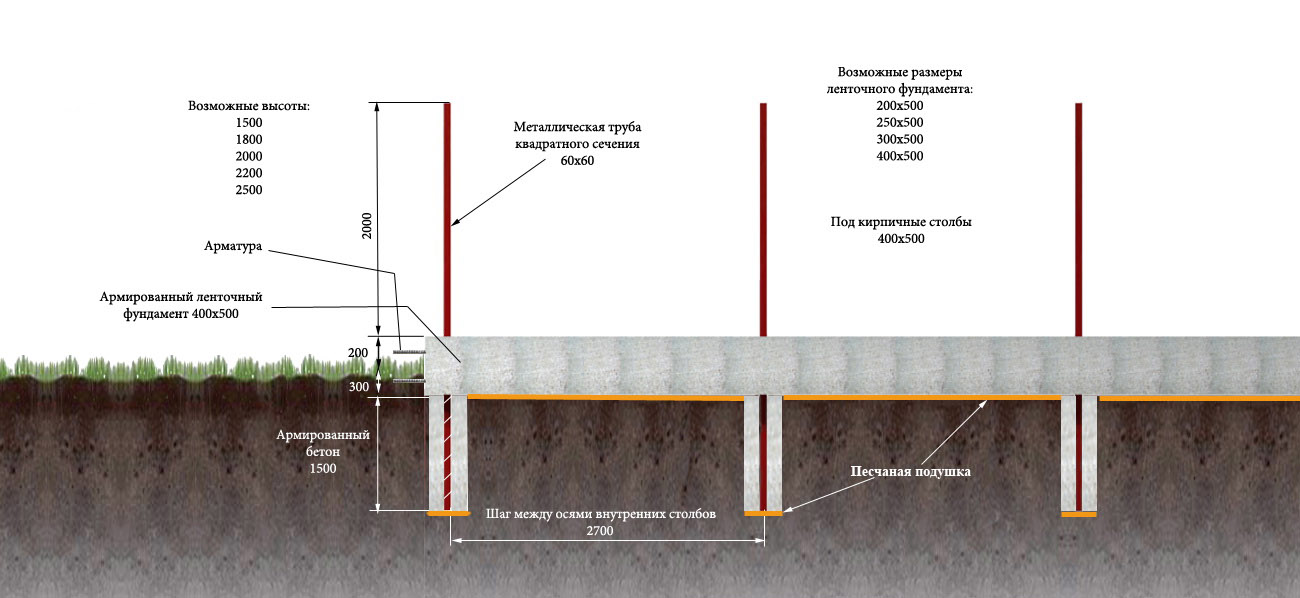
Usually, the width of the strip foundation ranges from 20-30 cm, and the depth of the foundation is 30-50 cm, but these parameters are individual. They are laid for each individual fence and depend on the type of soil, its purity and many other parameters. In order to create a single structure from a concrete strip, metal reinforcement is laid inside.
Experts say that in the conditions of domestic soils and the climate of central Russia, a foundation with a width of 20 cm and a depth of 50 cm is well suited. But in places where supports are installed, 10 cm of the foundation should be added in depth.
There are 2 more important notes for construction: the strip foundation should rise above the ground level by at least 8-10 cm, and if the pillars are made of bricks, then the width of the foundation should be greater than the width of the support.
Advantages of a fence made of corrugated board
Modern building material is steel profiled sheets with galvanized coating and polymer enamels. The main advantages of a metal profile fence are:
- long-term operation;
- various colors;
- ordering sheets of different lengths;
- ease of care;
- resistance to temperature extremes;
- easy operation;
- acceptable cost of the material;
- easy assembly, the ability to change individual segments;
- quick and easy do-it-yourself installation;
- the installation of such a fence is an excellent opportunity to protect your site from prying eyes, excess noise and road dust.
What to look for when choosing a base?
Currently, several basic types of foundations are successfully used for the installation of fences. When choosing a specific type of foundation, it is necessary to take into account a number of factors, the most important of which are the following points:
-
the type of soil at the place of installation of the fence;
- possible level of soil subsidence during seasonal temperature and humidity changes;
- the likelihood of undermining the foundation by underground, waste and atmospheric waters;
-
the weight of the future fence. Even under the weight of such a relatively light structure as a profiled sheet fence, weak soil can easily sag by an unacceptable amount. Therefore, before you engage in the arrangement of the foundation and the fence itself, it is strongly recommended to consult with specialists or at least the owners of neighboring plots;
- in the case of arranging a fence made of any kind of metal sheets at the stage of designing the foundation and the fence itself, it is necessary to remember about the risk of the appearance of the so-called. the effect of windage - under the influence of the wind, a too high fence can bend and twist;
- if the site is located next to a highway, a railway or just a busy road, in the process of designing the foundation, be sure to take into account that the finished structure must normally withstand the vibration loads created by nearby objects.
Choosing the foundation for the fence - important points
When planning to fill the foundation under the fence with your own hands, it is important to choose the best base design option. It must meet the following criteria:
It must meet the following criteria:
- ensure the stability of a massive fence;
- evenly distribute the weight of the fence on the ground;
- keep the enclosing structure from deformations and distortions;
- prevent collapse under the influence of wind or ground movements.
The strength characteristics of the base are directly proportional to the weight of the enclosing structure.
The service life of the fence and its main characteristics largely depend on the quality of the foundation.
Thinking about how to make a foundation for a fence, you should choose the best base design option by analyzing the following factors:
- the type and main characteristics of the soil located at the site of the installation of the future fencing;
- the possible amount of soil subsidence with seasonal fluctuations in humidity and temperature;
- the possibility of washing the base with groundwater, as well as atmospheric precipitation;
- the mass of the future fence, which can cause subsidence of the base;
- area and material of the fence, which can be deformed under the influence of wind load;
- the total amount of upcoming costs, which are advisable to calculate before the start of construction work;
- features of the terrain that affect the design features of the foundation being erected;
- the need for building materials that will need to be purchased in a timely manner and delivered to the place of work.
For the construction of fences, various types of bases are used:
- tape and columnar. It is made in the form of a concrete tape, which has thickenings at the locations of the columns. The reinforcement rods are laid along the length of the tape, increasing its strength. The tape-and-columnar structure has positively proved itself in cold climatic conditions with freezing soils. The base of the combined type is used for wooden and metal fences with brick or block posts;
- columnar. This is an inexpensive base option. Pouring the foundation under the fence with your own hands is quite simple. It provides for concreting of supports in pits prepared in the soil. After pouring, the concrete mix must be rammed. The columnar version of the base is used for wooden fences, as well as structures made of profiled sheet and netting. With an increase in the weight of the fence, it is necessary to make pillars with an increased depth of immersion in the soil;
Currently, several basic types of foundations are successfully used for the installation of fences.
- tape. Due to the increased safety factor, it is able to bear the weight of heavy fences and brick fences. It is carried out by pouring a reinforced concrete tape, deepened into the soil by 60–70 cm.The tape base carries the weight of the fence evenly along its entire length. You can arrange it yourself. To do this, it is necessary to dig a pit, fill it with gravel, lay a reinforcing cage, assemble a panel formwork and make concreting;
- gravel. A gravel bed is a type of belt structure. It is used for the installation of massive fences with an increased height of the enclosing part. The algorithm for the formation of a gravel base provides for the implementation of work on the preparation of a trench, and then the creation of a crushed stone-sand cushion. Further, the massif is compacted, layer-by-layer pouring with concrete solution and installation of support pillars in liquid concrete;
- stone. This type of foundation has a centuries-old history, because the stone was traditionally used for the construction of foundations. The construction work algorithm is similar to the construction of a strip base. The difference is that instead of pouring concrete, stones are laid on the crushed stone base. In this case, the reinforcement is not installed, and the stones are combined into a single mass by the hardened cement mortar.
Depending on the design features of the fences, various types of foundation bases are used. One of the most common options is tape and columnar. Due to its design features, it is able to withstand significant loads that are created by most of the fences being erected. Let's dwell on the features and technology for the construction of each type of foundation.
The most optimal design option for self-erection is a tape-and-column base
Installation of a fence made of corrugated board
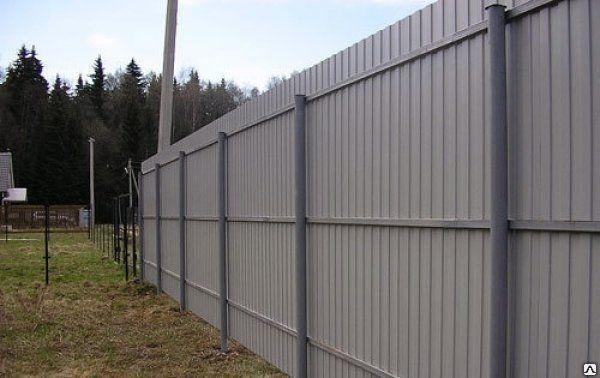
The installation of the enclosing structure begins with the purchase of the necessary building materials. Would need:
- Support pillars;
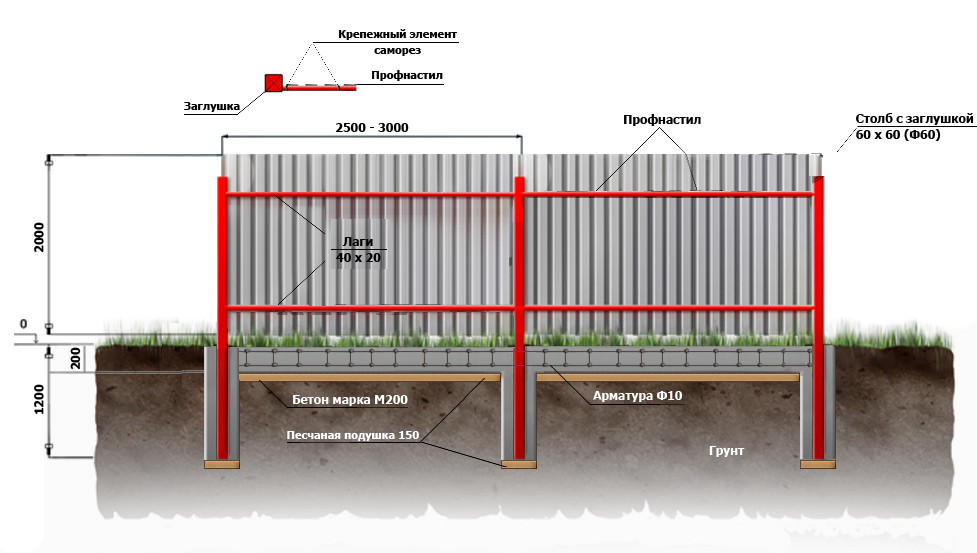
- Beams, or lags. Profile pipe 40 × 20 × 2 mm (the best option). The length of the lag should be equal to the distance between the support posts;
- Professional sheets;
- Caps for support posts;
- Holders. Elements that will save on welding;
- Roofing screws and bolts.
To give the fence a complete look, you can install the end U-shaped strip along the upper edge of the profiled sheet. But this is not necessary with a modest budget. The bar does not have an essential functional feature. It is also worth taking care of the purchase of sand, gravel and cement in advance. These building materials will be useful even if the foundation will not be organized.
Fence foundation
If it is difficult to decide on the need to fill the base under the fence, carefully read the photo in the article. Fencing structures with and without a foundation look different.
It is easier, faster and cheaper to fill the strip foundation. It is versatile and suitable for all types of soils. At the initial stage, the territory is marked - they mark the border of the site, mark the location of the support pillars and functional elements of the fence, for example, a wicket or a gate. It will not be possible to make a high-quality fence from corrugated board with your own hands without earthwork. Therefore, after marking the territory, they begin to dig a trench along the line of installing the fence. The depth of the ditch is 45-50 cm. In the places where the support pillars are to be installed, they are deepened to a depth of 90 cm. The following instructions follow:
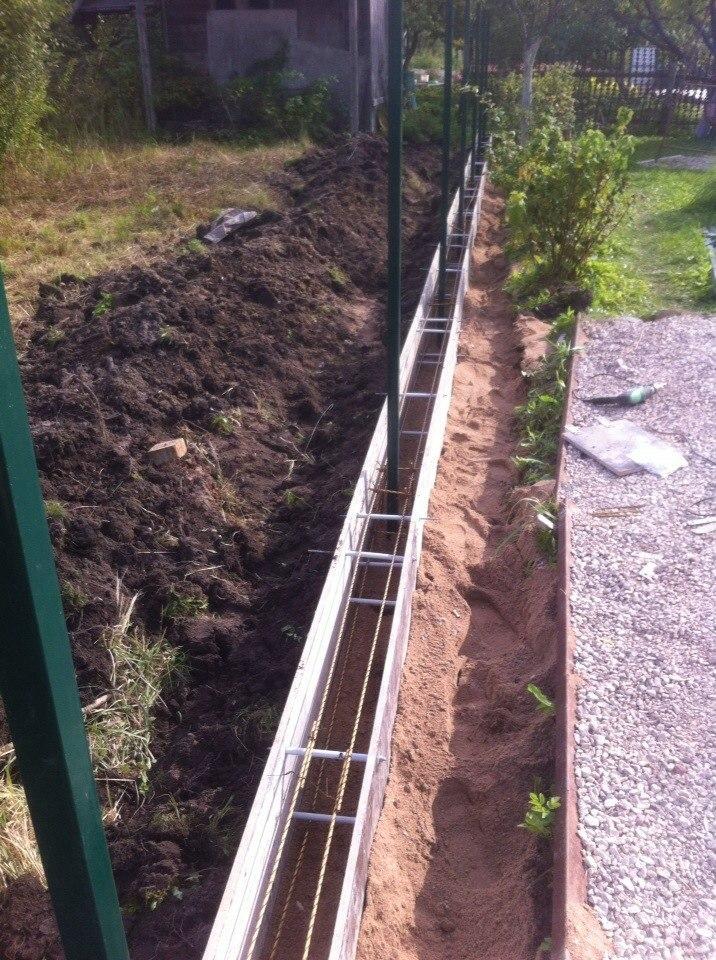
- Installation of formwork inside the trench. It can be made from scrap materials. The formwork is installed so that the foundation protrudes 40 cm above the ground level;
- Rebar laying;
- Posting of pillars;
- Pouring with concrete.
After completing the pouring, the foundation is left for 17-21 days. The formwork is not removed until the concrete has reached 55% strength. But it is better to withstand the entire 24-day period.
Installation of pillars and lags
Column fill will help you complete your work faster. Would need:
- Dig holes up to 1.5 m deep at a distance of 1.5-3 m from each other. The diameter of the ditch is 3 times the diameter of the pipe;
- At the bottom of the pits, make pillows of rubble and sand;
- Block pipes;
- Fill the pits with the pipes placed in them with cement mortar with gravel;
- Wait for the concrete to harden.
When marking the territory, do not forget about the sand pillow. If you do not want to carry out additional excavation work or there is no time, you need to raise the profiled sheets of the fence above ground level by 10-15 cm. With an uneven relief, this parameter must be increased so that the flooring installation line is even.
The lags are attached after the concrete has completely hardened. Their number depends on the height of the fence. For fences up to 1.5 m, a single crossbar is sufficient. Up to 1.7 m, two crossbars are required. And the reliability of the fence with a height of 1.8-2.1 m will be provided by three logs. They are installed along the upper and lower edges of the profiled sheet, stepping back 4-7 cm from the edges, as well as in the center.
We fix a fence from a profiled sheet
To correctly make a fence from a profiled sheet with your own hands, you need to seriously approach the choice of fasteners. The easiest way is to fix the flooring with self-tapping screws. You will need 35mm flat head metal fasteners. The wall material will hold securely if the screws are placed at a distance of 50 cm from each other on each crossbar. Installation of sheets at the joints is overlapped.
The final stage of work is the fastening of the U-shaped bar. When installing profiled sheets, there is a high probability of damage to the galvanized surface. If this happens, the defect must be eliminated immediately by painting the fence. Self-installation of the enclosing structure will take about 1.5-4 weeks. The timing depends on the size of the fence and the skill of the builder.
Mounting
During the installation process, a site is prepared for the base tape, the level of the surface of the site is leveled, if necessary, and the trench is marked. If you are planning a fence with brick pillars on a strip foundation, you can calculate a wider base and a base made of natural stone for the pillars.
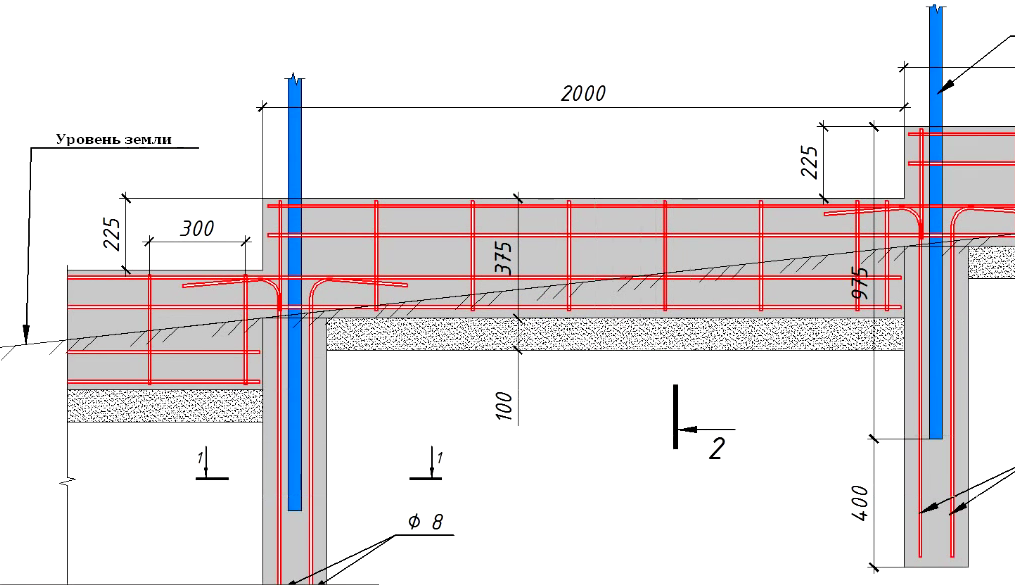
Scheme of reinforcement of a strip base with a height difference
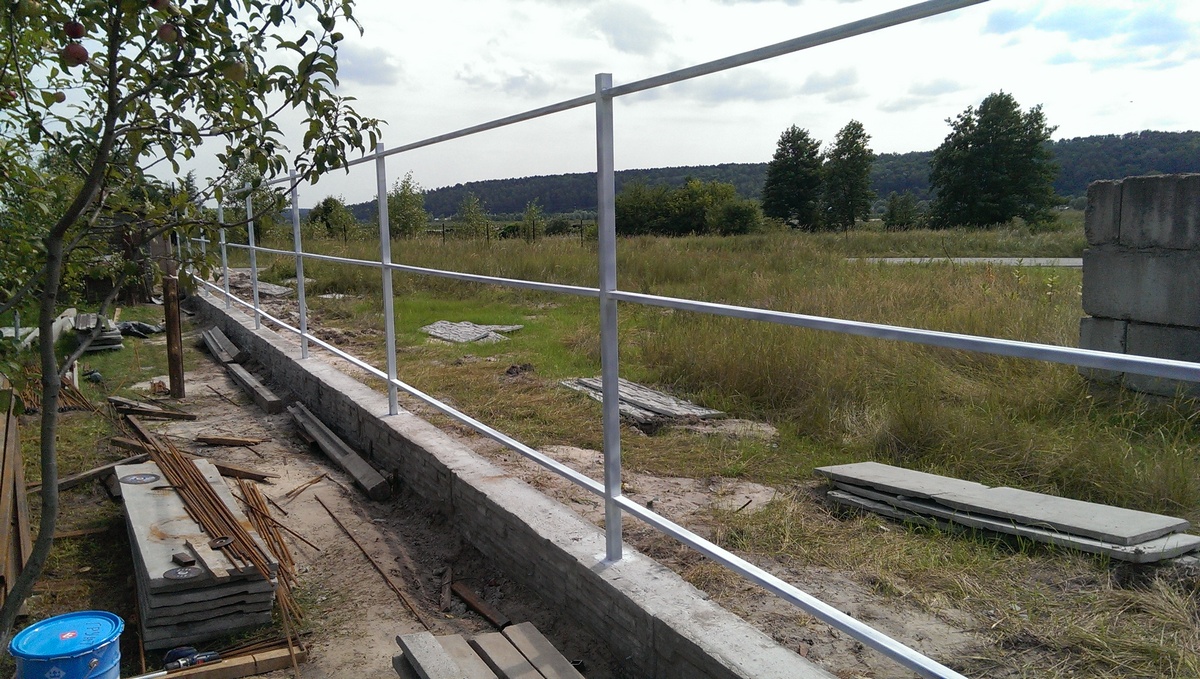
Formwork for a strip foundation under a fence made of corrugated board with pillars from a profile pipe can be of small height. The only thing that needs to be taken into account here is the increase in the depth of the pit for the pillars.
Finished fence with brick pillars
Markup
Marking along the route of the fence is done using a marking twine and pegs. Before making a markup, it is recommended to watch a training video on dividing a plot for the base of a house. There is practically no difference between the strip foundations of the house and the hedge.
After marking the base of the strip foundation, the marking of the installation of the pillars is made. Further, a trench of the required depth and width comes off.
Reinforcement and installation of pillars
The installation of a reinforced frame is used mainly on difficult heaving soils or when a strip foundation is poured under a brick fence.
Ribbon reinforcement scheme
For fencing made of corrugated board and netting
Reinforcement is carried out with metal reinforcement in 2 grids with a step of 200x200 mm with a reinforcement diameter of 10-12 mm.
Before installing the formwork
Under heavy fences
The foundation for a brick fence requires reinforcement. Here, as well as on clay bases, the use of TISE technology is recommended. On such soils, a columnar-tape type of foundation is arranged. The required diameter of the base pillars can be provided with a special drill.
Reinforcement of the frame for pillars and tape using TISE technology
After drilling pits under the pillars, a sand and gravel pad with a thickness of 10-12 cm is laid, followed by ramming. The reinforcement cage of the base pillars is installed and connected to the reinforcement of the tape. The tape is reinforced in the same way as for conventional fences. Reinforcement with a diameter of 10-12 mm is used, and double reinforcement is performed with a step of 200x200 mm.
The video tells how to make piles using TISE technology.
Metal pillars for such a fence are installed after the foundation has been reinforced. As a rule, a profile pipe with a cross section of 50x50 mm is used.It acts as a frame for brick pillars and is attached to the reinforcement cage of the foundation by welding.
TISE tape scheme
Formwork device
Formwork for pouring the foundation for a fence made of profiled sheet, mesh or wooden picket fence is usually made with a height of 1/2 of the pouring depth. For building brick or stone formwork chosen depending on the project. It can reach a height of 50 or even 70 cm, provided that the foundation pit itself is opened to the point of freezing of the soil.
For complex elements such as main pillars or brick pillars where the foundation expands, the formwork is knocked down separately. But for spans, construction can be put on stream due to the use of the panel assembly method or the use of plywood, OSB boards or other materials at hand.
When pouring several identical sections of the base with gaps for gates or wickets, it is recommended to make the formwork removable. This will simplify the process of assembling the shields at the new site.
Diagram of the tape device with brick pillars
For light projects with a shallow pit depth, for example, 250x400 mm, the formwork can be made from a board with a thickness of 20-25 mm. Reinforcement of the structure is done with external stops and with the help of ordinary planks 20x45 mm thick, which are simply nailed to the opposite walls of the formwork with nails.
Fill
The bottom of the pit is covered with a layer of sand up to 5 cm thick and a layer of gravel up to 10 cm, if the pit is torn off to a depth of 1 meter. For a smaller pit, the cushion layer can be reduced.
To avoid unnecessary consumption of concrete, it is recommended to sheathe the bottom of the pit, the inner walls and the formwork with plastic wrap before concreting.
Filling is done at a time along the entire length of the strip foundation for the fence. Initially, concrete is poured into the places where the posts are installed, and then into the areas between the posts. During pouring, the concrete must be constantly compacted.
The pouring should be completed in one day. The maximum that can be allowed is to fill in two stages with a difference of no more than 1 day. But at the same time, the quality of concrete will be 30-40% lower than usual.
How to calculate a fence made of corrugated board
Work on creating a fence from a professional sheet should start with determining the costs and the exact amount of materials used in the construction process. Before calculating, it is required to measure the lengths of individual sections of the future fence and mark it on the territory of the location of the supports. It is also worth deciding on the height of the fence and the depth to which the pillars will be buried.
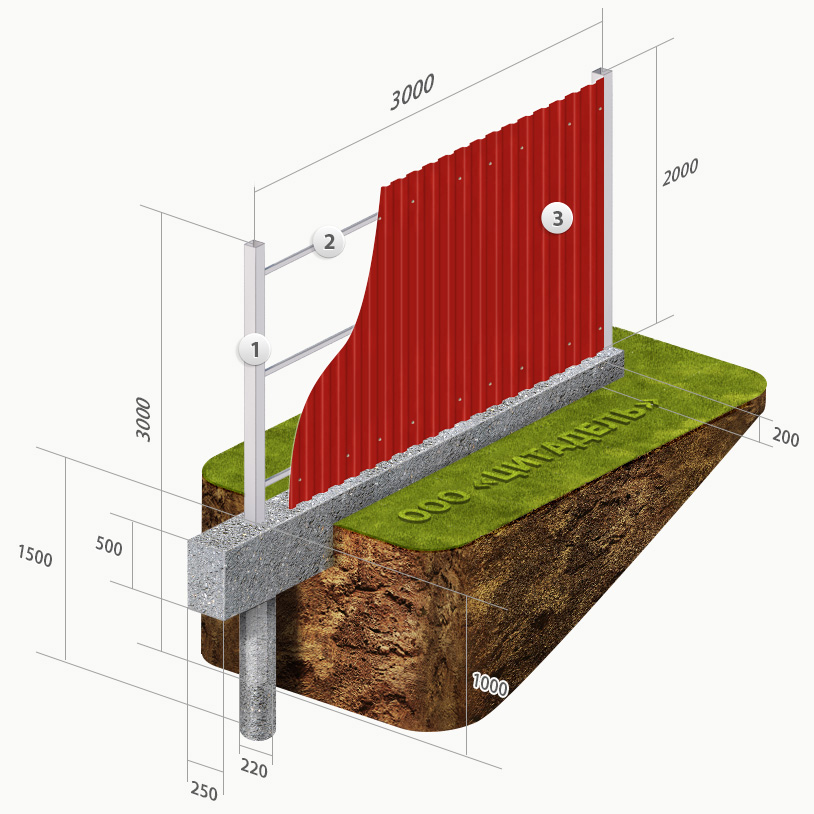
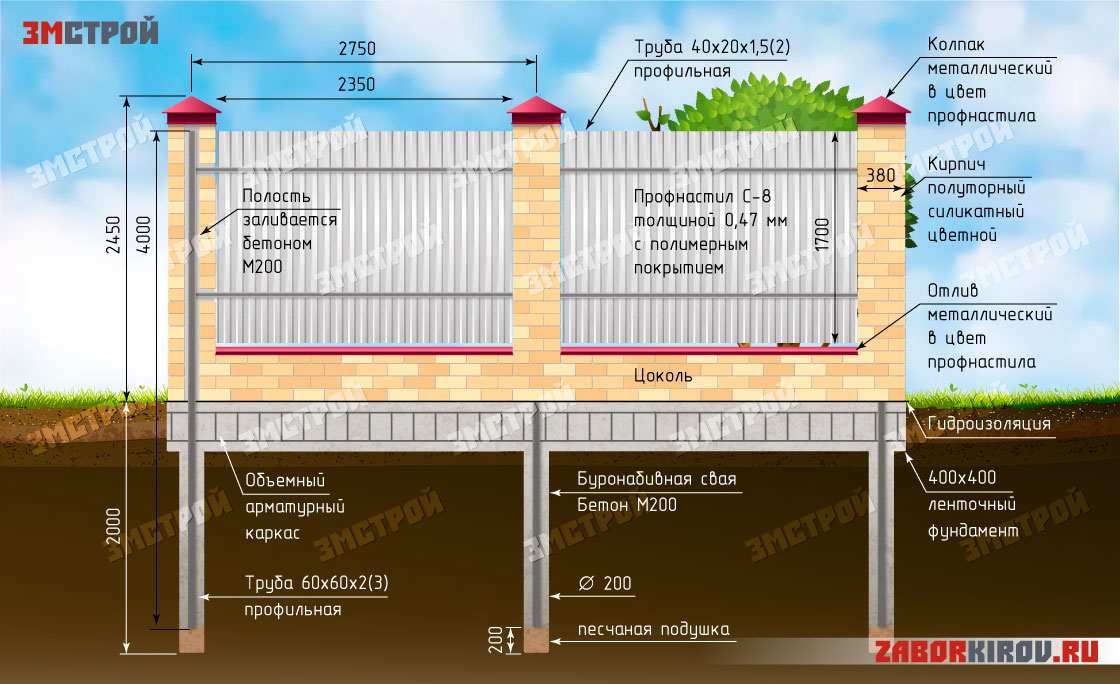
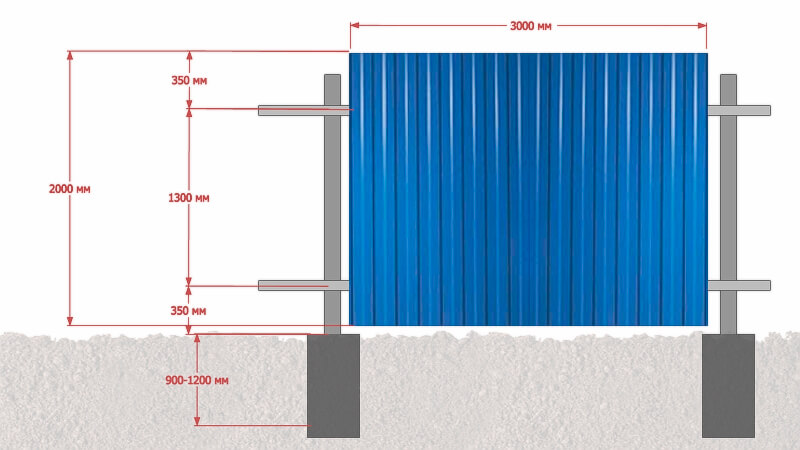 Fence from corrugated board diagram with dimensions
The main calculation consists of determining the number of such elements:
1. Sheets of corrugated board. To obtain the calculated value, the length of the fence is divided by the useful (taking into account the overlap for the connection) width of the profiled sheet.
2. Supports, the number of which depends on the distance between them. Supports are usually installed no further than 2.5-3 m from each other. The distance should be approximately the same for the entire fence.
3. Transverse lags. Experts advise to determine the number of these elements by the height of the fence made of corrugated board. For 2 m, it is enough to place the logs in 2 strips. At a height of more than 2 m, it is advisable to choose 3 logs. The total length is obtained by multiplying the perimeter by the number of stripes.
There will be as many plugs as there are supports, and the holder plates will be 2-3 times larger (depending on the number of lag strips that must be attached to the posts). The volume of paint is determined by the surface area - per 1 sq. m takes 50-70 g. When calculating the number of self-tapping screws for metal for a fence from corrugated board, the number of strips is taken into account - if there are 2 of them, 6 screws are needed for each sheet, for a three-strip structure they take 9. If they are used as fasteners for a fence from corrugated board without welding rivets, they should be purchased twice as many as the estimated number of screws.
DIY fence made of corrugated board: photo report
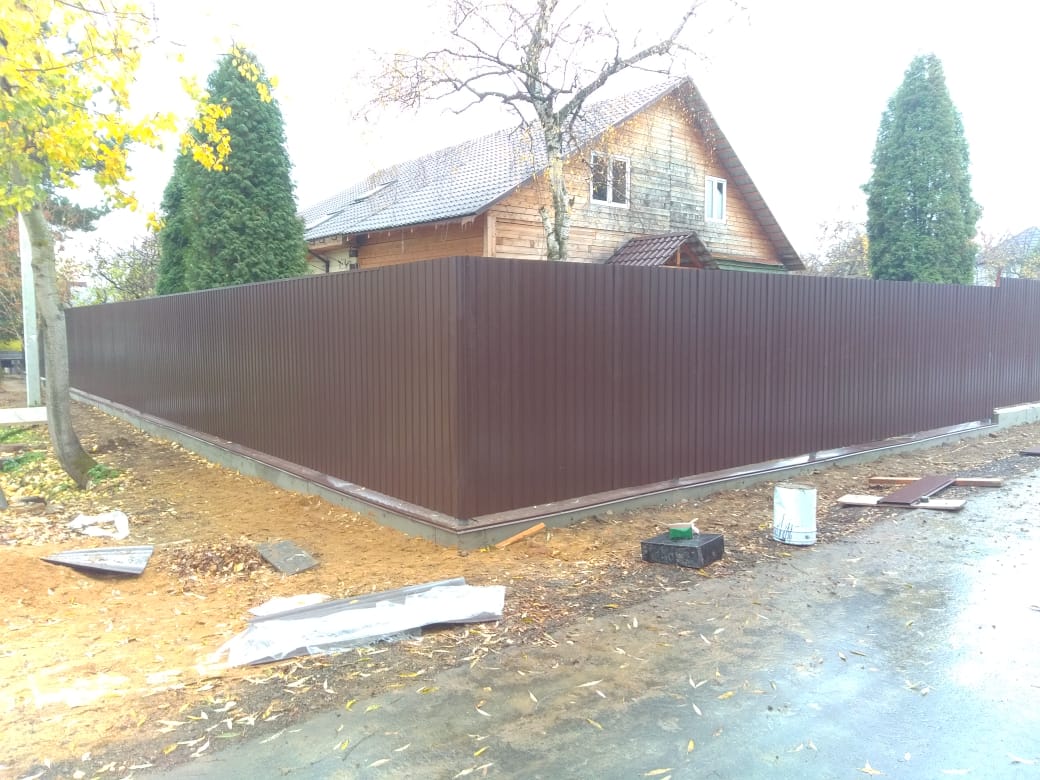
A fence was built from neighbors and a frontal one. The total length is 50 meters, the height is 2.5 m. On the front one is used a brown profiled sheet, on the border - galvanized, thickness 0.5 mm, grade C8.
In addition, the following materials were sent:
- on the posts a profiled pipe 60 * 60 mm, wall thickness 2 mm, pipes 3 m long;
- 80 * 80 mm with a wall of 3 mm were placed on the pillars of gates and wickets;
- lags 30 * 30 mm;
- gate and wicket frame 40 * 40 mm;
A ready-made fence made of corrugated board with his own hands was built by one person
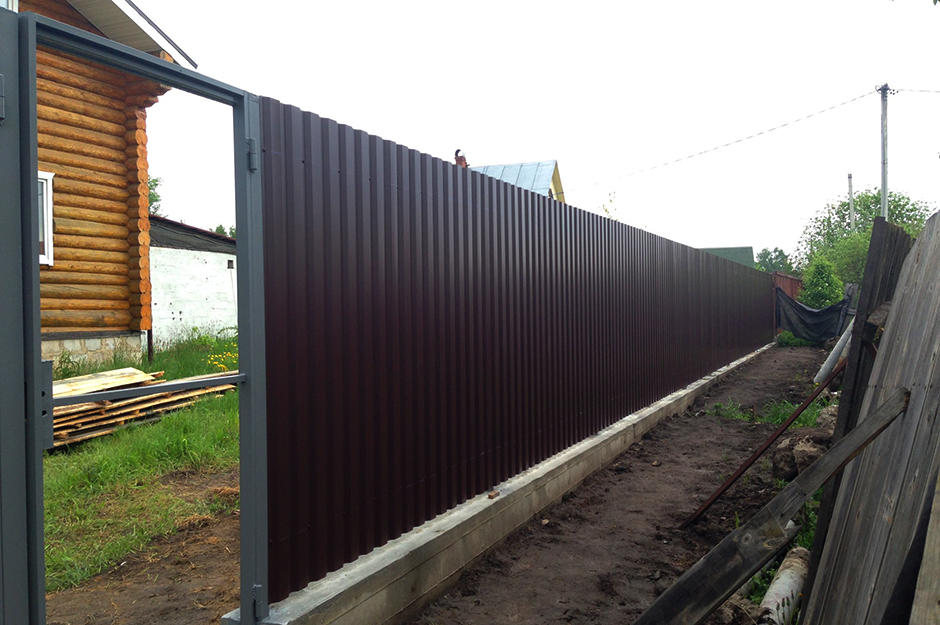
The fence is installed on metal pillars, between which the basement is then poured. It is necessary for the owners, since it is planned to set up a flower garden in front of the fence (you can see the fence made under it). It is also needed so that water does not flood the yard during heavy downpours. Metal sheets are not attached immediately from the ground, but retreating a little. This gap is closed by a die cut - a tape that remains in some industries. This is done on purpose so as not to block the air supply, so that the earth dries out faster.
Inside view of the finished fence
Metal preparation
The first stage is the preparation of the pipes. The pipe comes from the warehouse rusty, so that it will serve for a long time, you have to clean it off, then treat it with "Anti-rust" and then paint. It is more convenient to first prepare all the pipes, prime and paint, then just start installation. The rust was cleaned off with a metal brush mounted on a grinder.
Pipes need to be cleaned of rust
The pipes in the warehouse were only 6 meters long. Since the height of the fence is 2.5 meters, you need to bury another 1.3 meters, the total length of the post should be 3.8 meters. To save money, they cut it in half into 3-meter pieces, and the missing piece was made up with various scrap metal available on the farm: cut corners, fittings, pieces of different pipes. Then everything was cleaned, primed and painted.
Installation of pillars
The first were two corner posts. The holes were drilled with a store-bought drill. The soil is normal, it took about 20 minutes for one hole 1.3 meters deep.
Drill hole for pillars
The first pillar was placed horizontally and so that it rose to a height of 2.5 meters above the ground. To set the second one, it was necessary to recapture the height. Used a water level. You need to fill it in so that there are no bubbles - from a bucket, not from the tap, otherwise it will lie.
They put up the second post along the broken mark (they put it on the bar, which was placed next to the hole) and concreted. When the cement seized, twine was pulled between the posts, along which all the others were aligned.
The filling technology was standard: a double folded roofing material was installed in the hole. A pipe was placed inside, poured with concrete (M250) and placed vertically. The level was controlled by a plumb line
Correctly placing the pillars is very important, otherwise the entire fence will skew
In the process of work, it turned out several times that the concrete was poured not inside the rolled roofing material, but between it and the walls of the pit. Raking it out of there is a small pleasure, because the protruding part was cut into petals, nailed to the ground with large nails. Problem solved.
So the roofing material was fixed
After the concrete had set, a portable formwork was made from boards covered with dense film. With their help, the basement was poured. To make it stronger, reinforcement rods are welded to the pillars on both sides along the bottom. Formwork was placed around them.
Plinth formwork
Installation of jumpers
The cleaned, primed and painted crossbeam pipes were cut and welded. Cooked between the pillars. They are also tedious to put in a level to make it easier to fix.
Cook jumpers
After the welding is over, all welds are cleaned with a wire brush, treated with "Anti-rust" and then painted.
Installation of a profiled sheet
Since the upper lintel runs along the very top of the fence, and it is welded exactly to the level, there were no problems with alignment and installation of the sheets. They were fastened first along the edges, then intermediate screws were installed.To make it easier to place them evenly, a thread was pulled between the extreme ones.
Smoothly installed fasteners are also beautiful
Then the gate was welded and attached. As a final touch, additional elements are installed on top - a U-shaped profile that covers the top of the fence and plugs on the pipes.
The final view of the fence made of profiled sheet, made by yourself
As you understand, there is nothing particularly difficult
It is important to set the pillars straight and weld the frame. This is the main task.
A lot of time - about 60% is spent on preparing pipes - cleaning, priming, painting.

