Cons of a foam block foundation
Despite the sufficient strength of foam concrete as a building material, it has significant drawbacks. The fact is that this material already very abundantly absorbs moisture and is capable of collapsing in layers over time. A foam block supporting structure, even if it is carefully created with your own hands, will not be able to withstand unstable climatic conditions. Watch a video on how to properly build a foundation from foam blocks.
Of course, the problem can be reduced by high-quality waterproofing and a small load on such a foundation. But this can be a big problem for inexperienced builders who decide to build a home with their own hands. Another important disadvantage of using foam concrete for foundations is its low frost resistance.
Column foundation
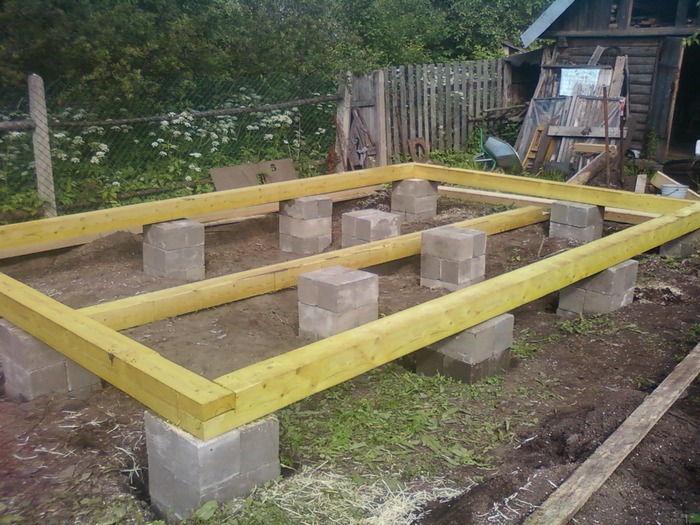 Such a base is not a solid structure, but is a free-standing recessed support
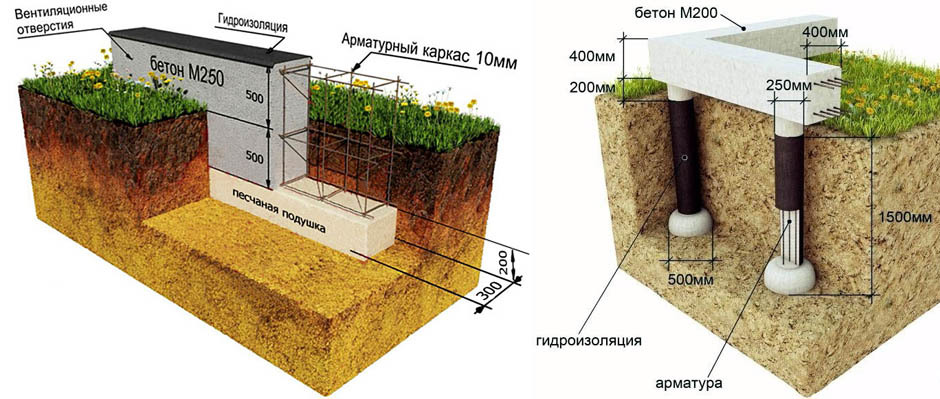
Such a base is not a solid structure, but is a free-standing, recessed support. Pillar-type foundations are created for buildings made with lightweight building materials. The foam block superstructure is also lightweight, so the columnar base is relevant here. However, as a foundation for a house from foam blocks, a combination of buried pillars (piles) is made with a superficially poured tape reinforced grillage. The explanation for such a constructive combination is simple - you need a solid surface for laying foam blocks.
For the installation of pillars carrying the main load, concrete is poured into pre-prepared recesses or masonry with a suitable building material (concrete blocks, some types of bricks). To create a columnar-grillage base with your own hands for laying foam concrete blocks, they usually use the method of pouring concrete into finished pipes (asbestos cement, PVC). This is the least time-consuming process, allowing you to quickly create a reliable foundation for laying aerated concrete building blocks.
The advantage of columnar foundation structures is that they can be created on almost any type of soil. The surface concrete tape only rests on pillars, which are deepened as far as is required to reach stable soil layers. In fact, the supports made in this way are piles, the only difference is in the method of installation.
DIY columnar-grillage foundation
Here we will consider the simplest, but no less effective way of making buried pillars, when plastic pipes (PVC sewer pipes) are used to fill them. The step-by-step process is performed in the following sequence.
- The construction site is marked and the required number of pillars is calculated. Bearing pillars must be installed at the corners of the building, in places where they are adjacent to the outer walls of the main walls. The rest of the supports are distributed evenly between the required posts with a step of about 1.5 m (the step may vary depending on the calculations performed or the characteristics of the soil).
- A trench is being dug along the perimeter and under the walls for pouring a binding concrete tape. At the bottom of the prepared recess, the filling points of the pillars are marked, where wells of the required depth are made with a hand drill.
- At the bottom of the recess, sand and gravel bedding is made, after which it is compacted. Pipes are placed in the wells so that their heads are located in the same horizontal line, slightly (5-10 cm) protruding above the bottom of the trench.
- The next important step is reinforcement.For this, a structure is made of 2-4 ribbed steel rods, connected with a knitting wire. The length of the rods is 20-25 cm longer than the length of the pipes. The reinforcing structure is placed in the pipe, slightly deepening into the backfill. The upper edges of the reinforcement, which will subsequently be tied with horizontal rods that reinforce the grillage, should rise above the pipe head.
- It remains to fill the pipes with liquid concrete and leave for several days for the mortar to set. During this time, do-it-yourself formwork is being built around the perimeter of the trench, filling is done at the bottom, a waterproofing barrier made of polyethylene film is created. A horizontal reinforcing structure is created inside the formwork, which is rigidly connected to the reinforcement of the poured pillars.
- The last step will be to pour concrete into the prepared formwork, after which the cement-containing material must be allowed to fully mature for curing (on average 26-28 days). After the expiration of the indicated period, the formwork is removed and after laying the waterproofing material, the construction of the walls with foam concrete blocks begins.
Pile foundation
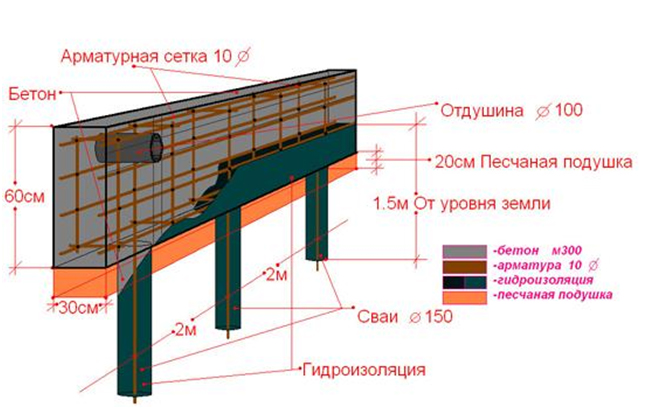 Pile foundation scheme
The pile foundation is different from the columnar bases are only a kind of supports. It will not work to install the piles on your own. You will have to use the services of hired specialists, which affects the increase in costs. However, the installation of piles is the only correct solution if the construction of the house is carried out in a swampy area.
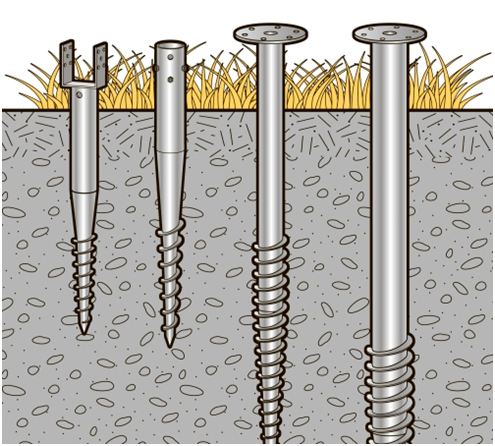 Varieties of piles
In the construction of private houses, it is customary to use bored and screw piles. Supports 108 mm thick are able to withstand a one-story building weighing up to 6 tons. For a two-story house use piles of a larger diameter, which makes it possible to increase the step between them. Supports are usually buried to 2–3 m. The load from the building is applied to the sides and support end of the pile.
Features of a foam concrete base
 Foam blocks for laying the base
When deciding to build a house from foam concrete with their own hands, they think about whether it is possible to make a foundation from the same material. After all, work with foam concrete is done much faster than with brick. A foam block foundation is warmer and lighter than concrete or brick
And, importantly, it is much more economical. Let's try to answer this question
When deciding to make such a foundation, a number of factors must be taken into account. First of all - the features of the soil and climatic conditions.
For foam blocks, weakly porous or non-porous soils with a freezing depth of no more than one meter are suitable.
It is best to use blocks D1000, D1100, D1200 for the construction of the supporting structure. These are blocks with increased density. When laying them, reinforcement should be carried out in parallel
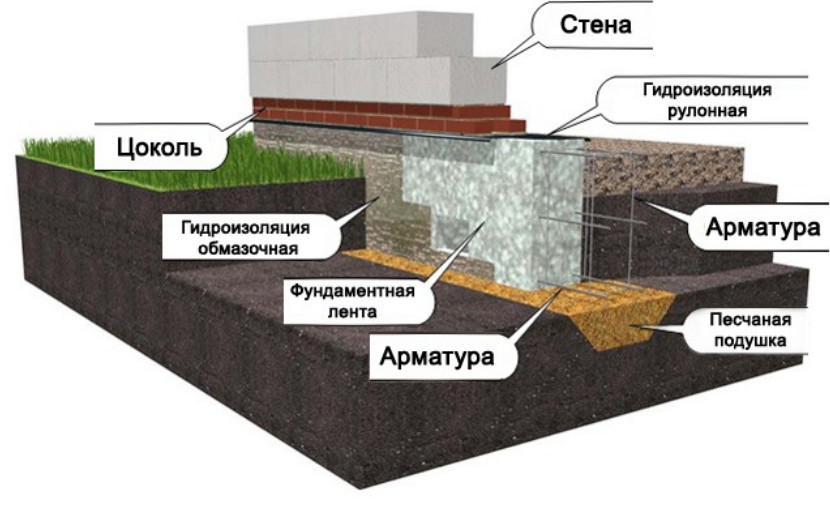
Particular attention must be paid to waterproofing. This is a very important process, since aerated concrete absorbs moisture very easily.
Only this approach can guarantee the durability and strength of the structure.
Concrete tape
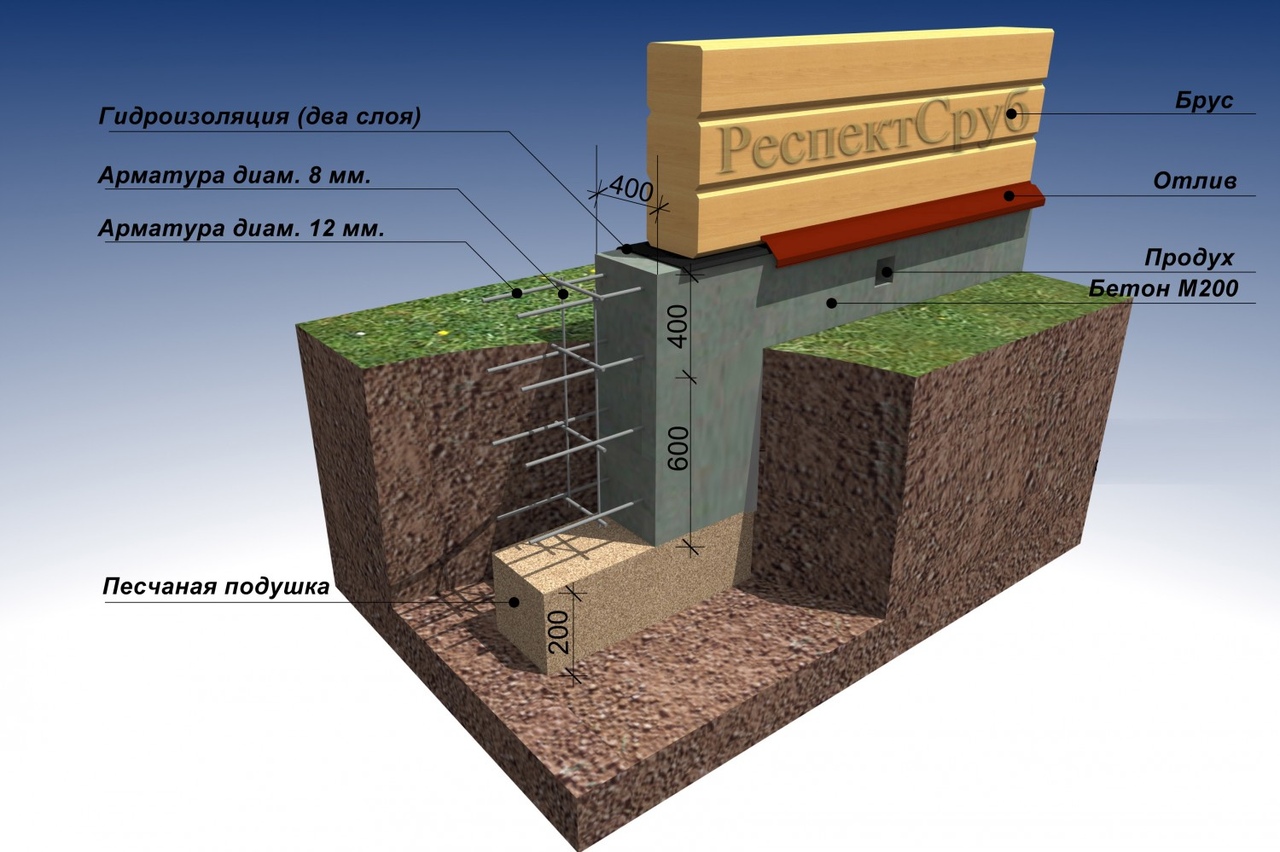
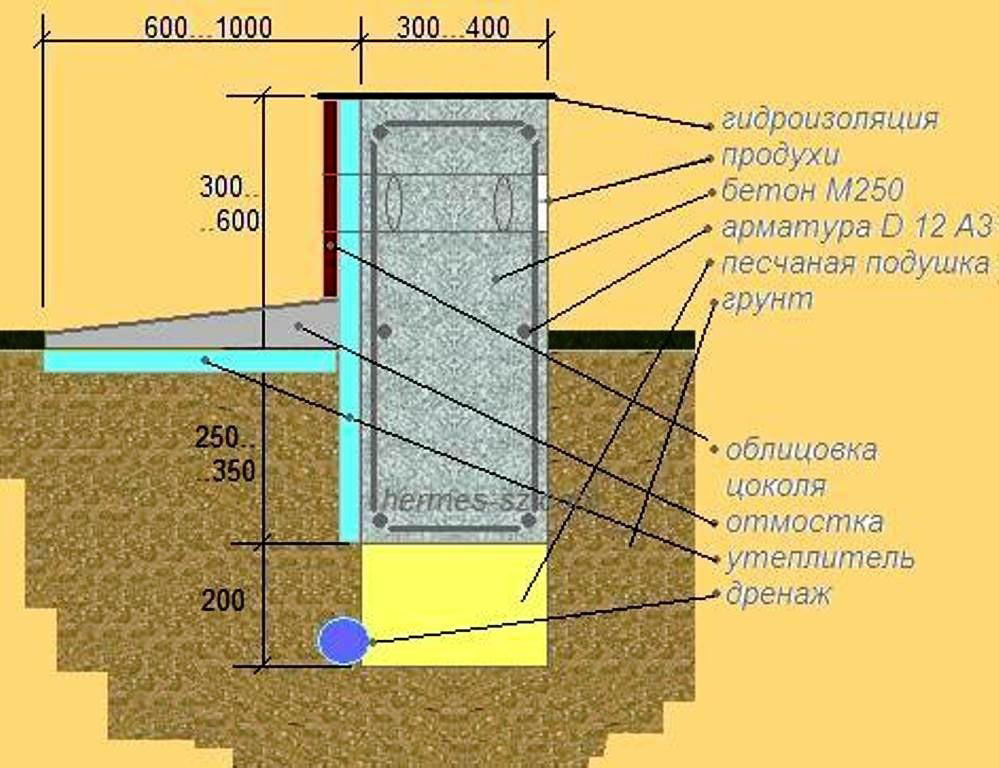
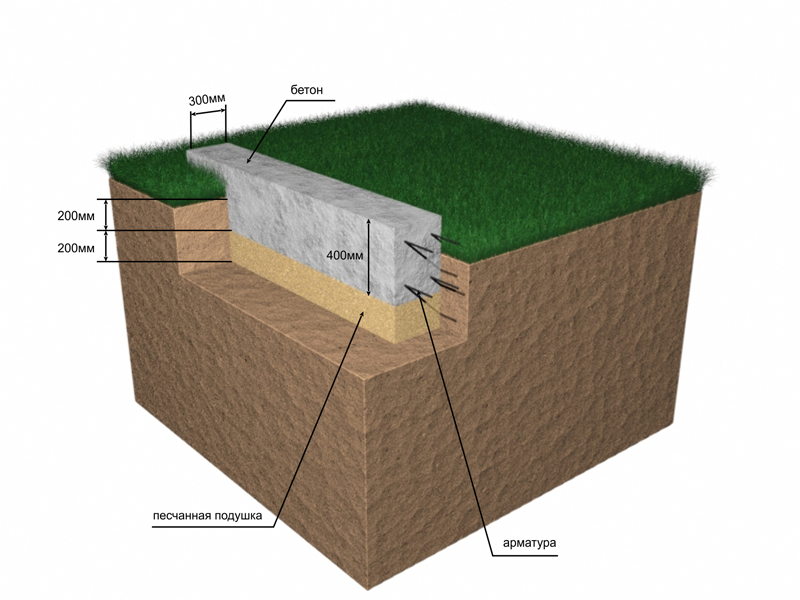
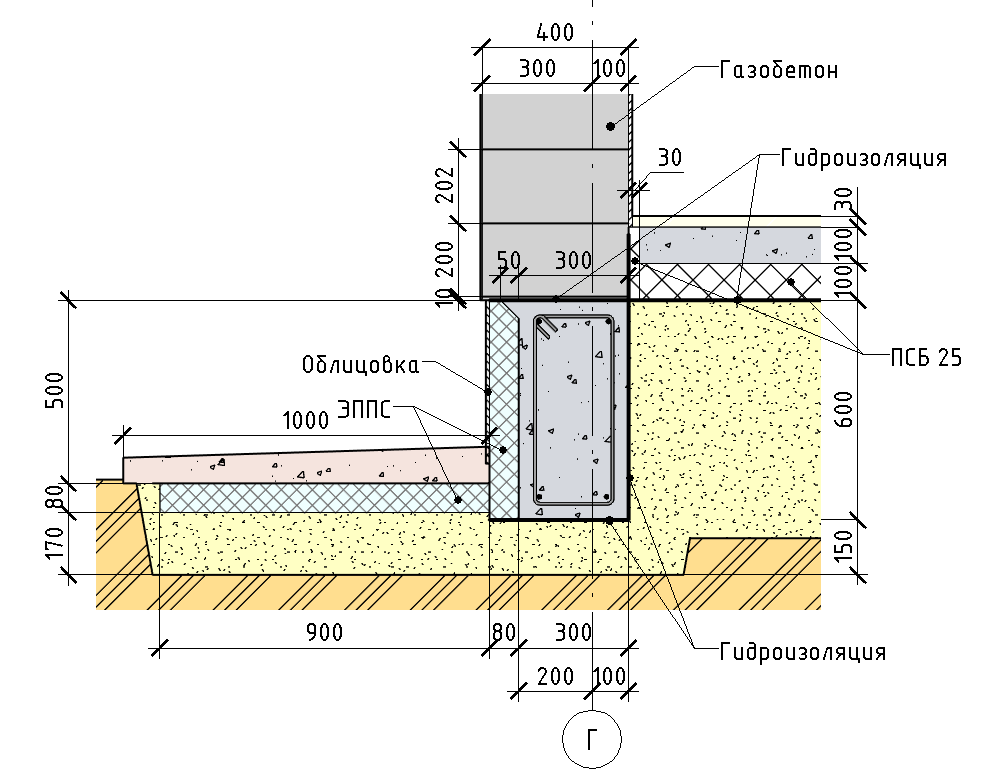
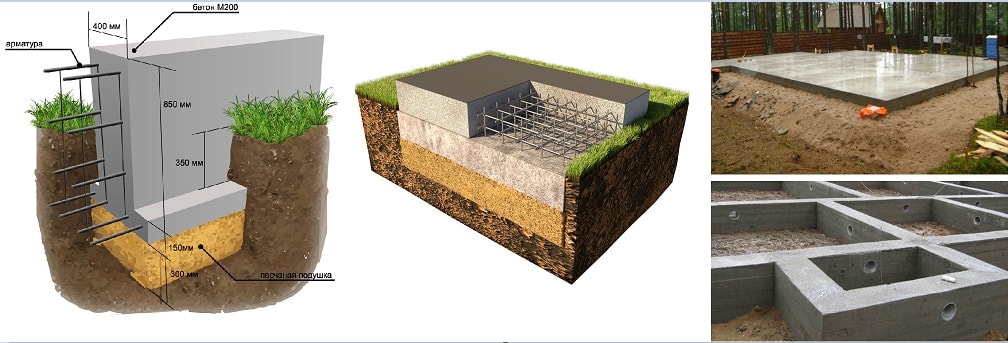
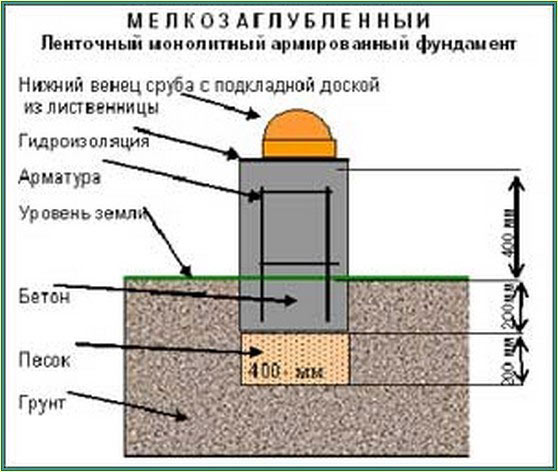
The strip foundation is considered the most common in the construction of any house. It is laid below the depth of soil freezing. The width of the tape is made at least 10 cm more wall thickness... The minimum plinth height is 40 cm.
Varieties of tape
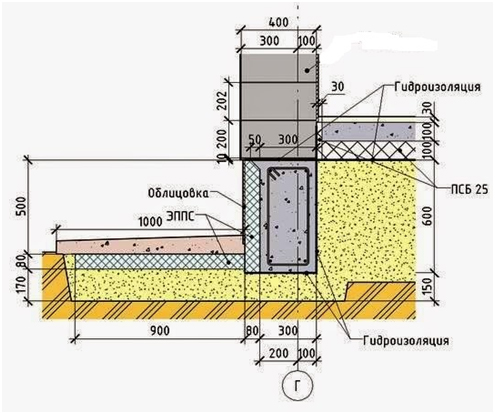 Non-buried tape scheme
An unburied concrete tape is located on the surface of the ground. For the construction of a house, such a structure will not work.
 Shallow tape scheme
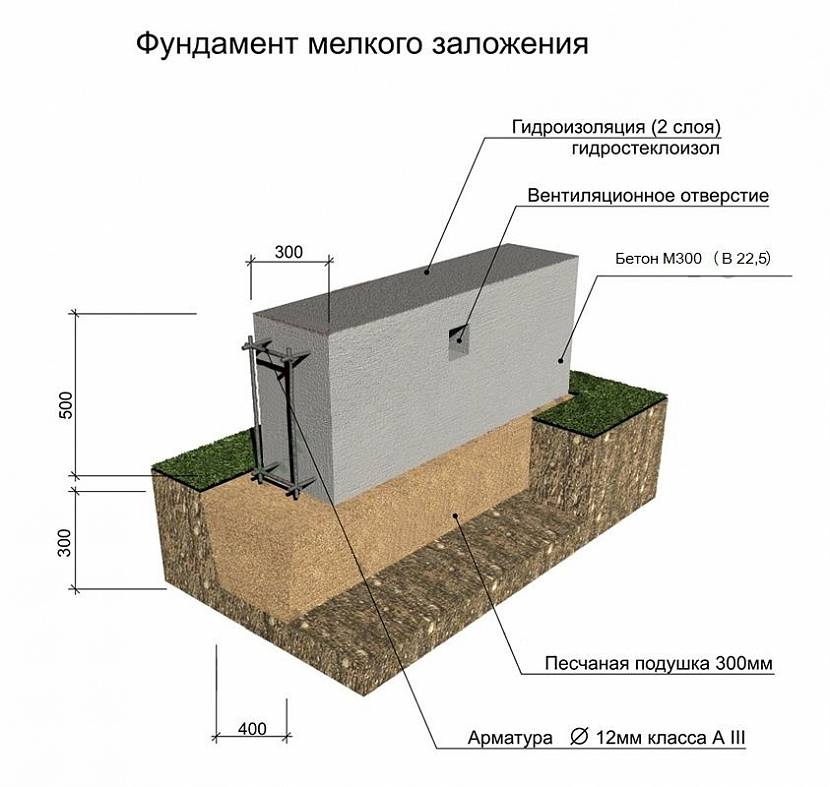
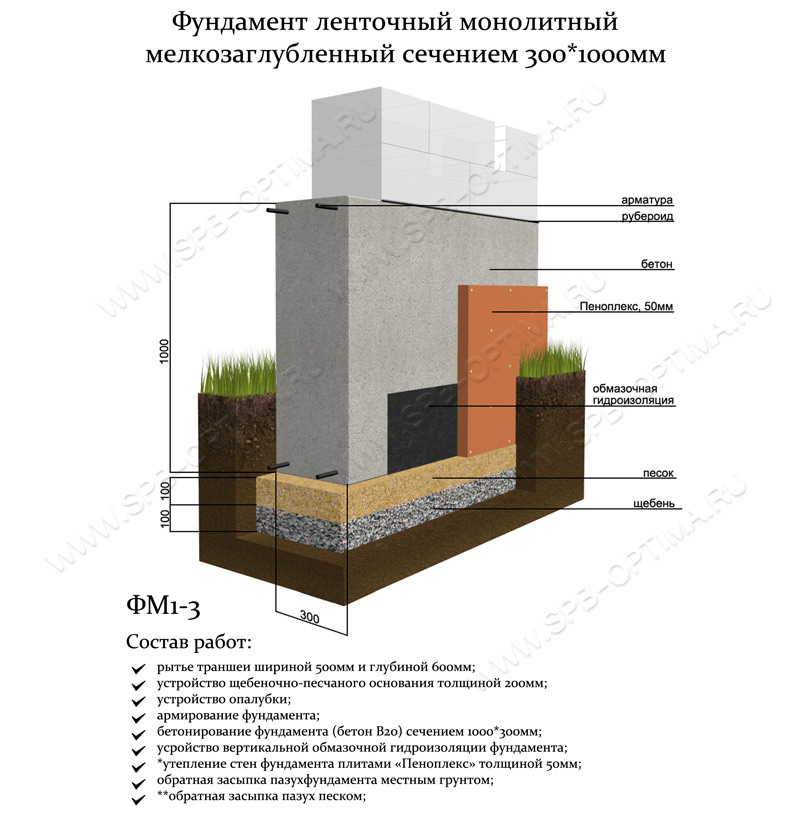
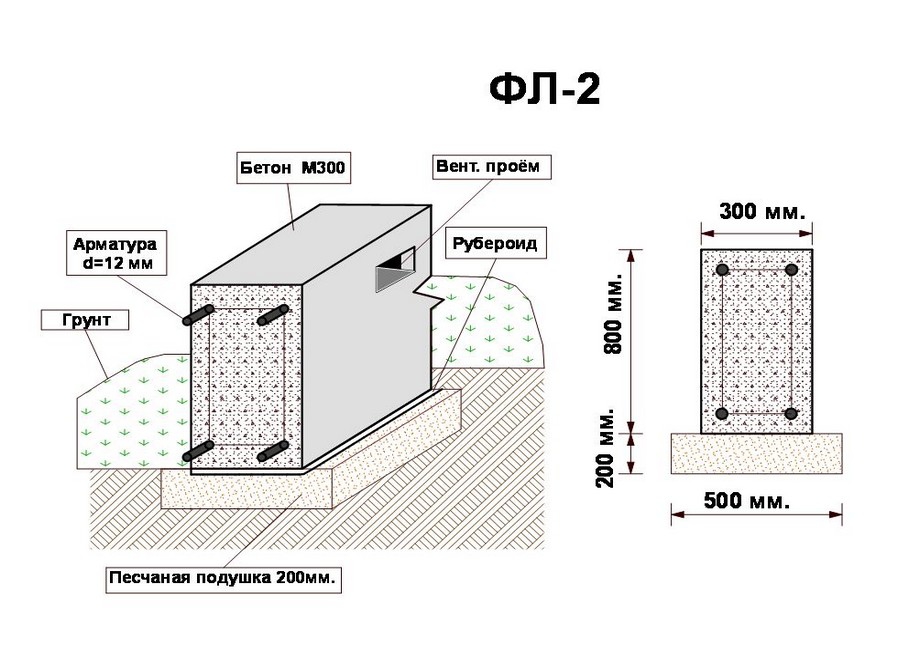
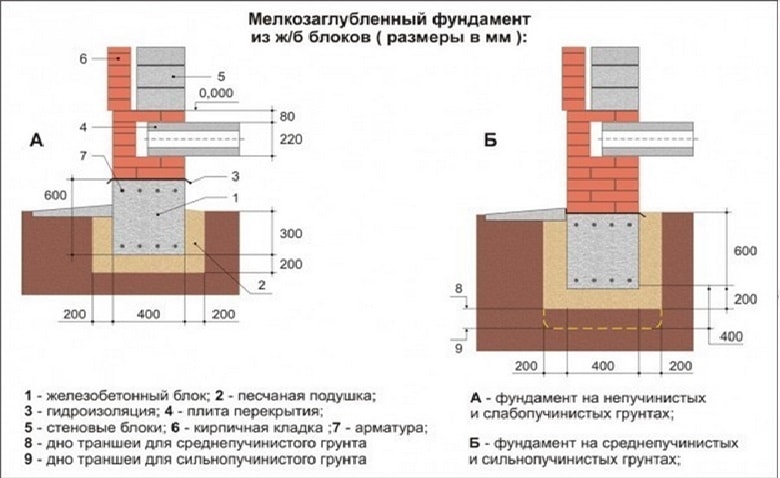
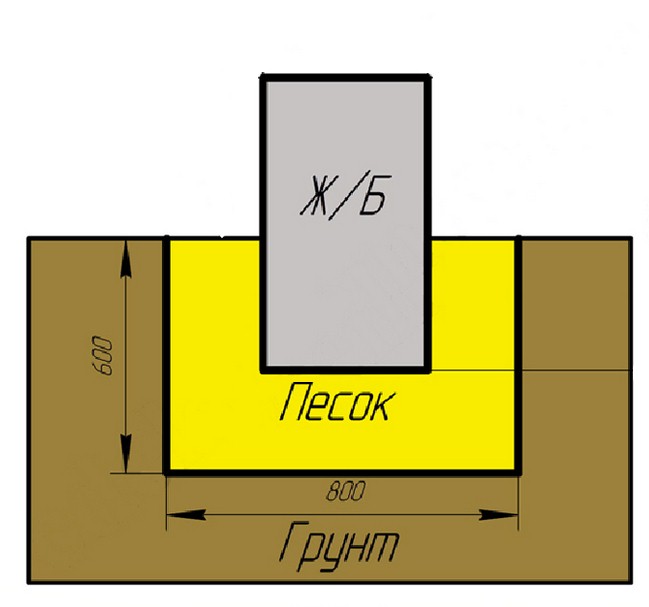
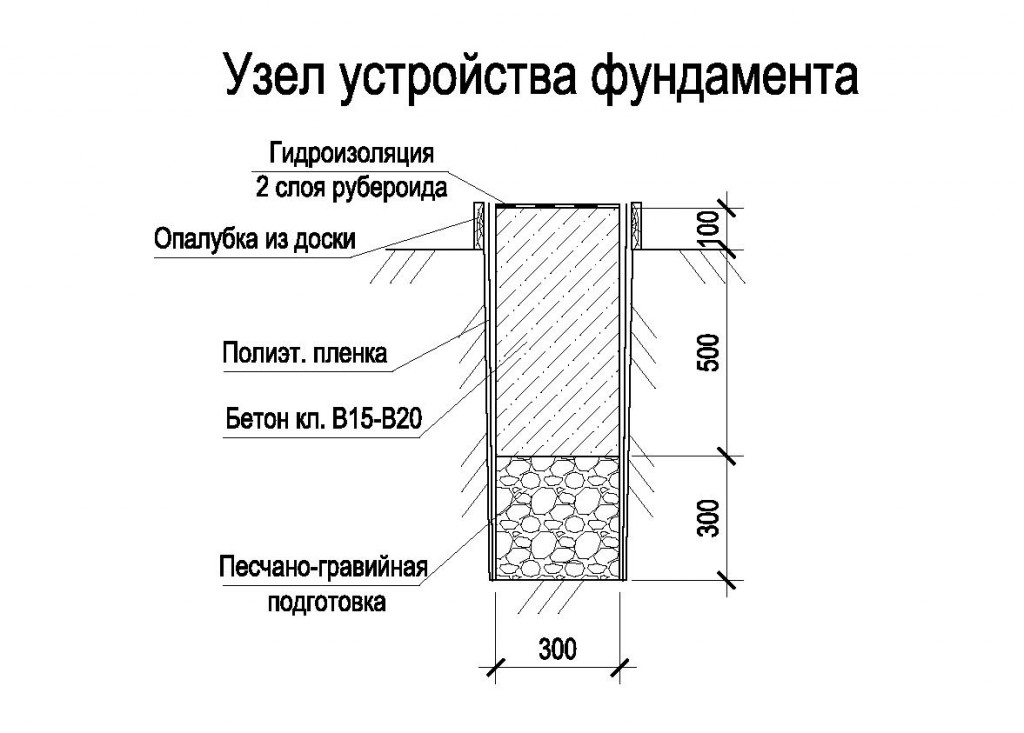
A shallow concrete tape is laid to a depth of 60 cm. The type of foundation is suitable if there is no heaving soil on the site. In case of deep freezing of the soil, the concrete structure will have to be insulated. The tape is distinguished by two types of cross-section:
 Rectangular ribbon pattern
The rectangular shape of the concrete tape is suitable for small single-storey buildings.
 T-strip diagram
A feature of the T-shaped band design is the increased width of the sole. On this basis, two-storey massive buildings can be erected.
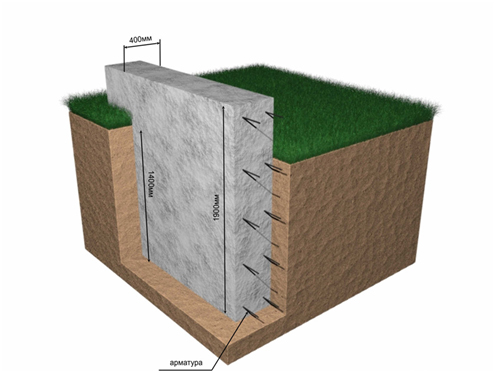 Recessed tape scheme
If it is planned to build a basement, then preference is given to a recessed rectangular tape. The T-shaped structure with a sole is erected only for multi-storey buildings. During construction, the depth of the groundwater must be taken into account. If the layers are located above 3 m, drainage is arranged around the tape, plus measures are taken to waterproof the base.
Shallow tape base device
In modern construction, this type of foundation is an economically sound and reliable technological solution.
Materials and tools for work:
- concrete grade 200;
- metal fittings D 12 or D16;
- wooden pegs and construction twine;
- shovels for digging trenches;
- geotextile;
- coarse river sand;
- boards or plywood for formwork - thickness 20 mm;
- building level;
- rule;
- vibrator for concrete;
- wire for tying reinforcement;
- nails and hammer.
Strip foundation construction technology
-
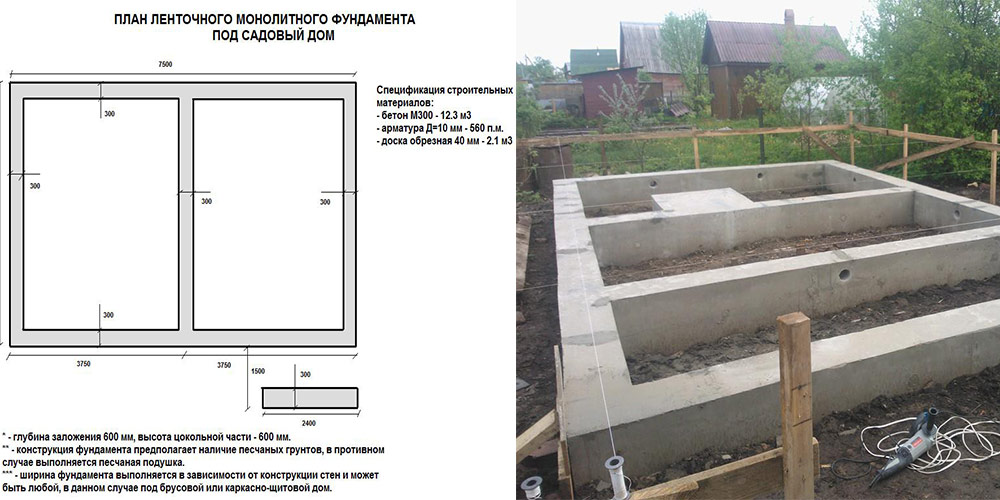
We remove the top layer of the earth and mark the site by installing wooden or metal pegs around the entire perimeter of the future structure and pulling the construction rope. We measure the corners precisely and check the distance between the load-bearing walls with the approved house project.
-
Using a shovel, we dig a shallow trench 50x70 cm in size according to the markings. We start to dig from the lowest point of the terrain and then level out the "horizon" of the entire trench. We make the walls strictly at 45 °. If there is mainly a loose type of soil on the site, then wooden supports can be installed.
-
At the bottom of the trench we lay out geotextile fabric, which will not allow soil particles to enter the sandy "pillow". We lay it in such a way that it goes over the edges of the finished trench.
- Pour sand at the bottom. We carry out the filling in several layers, each of which is watered abundantly with water and well tamped. The height of the pillow should be about 20 cm.
-
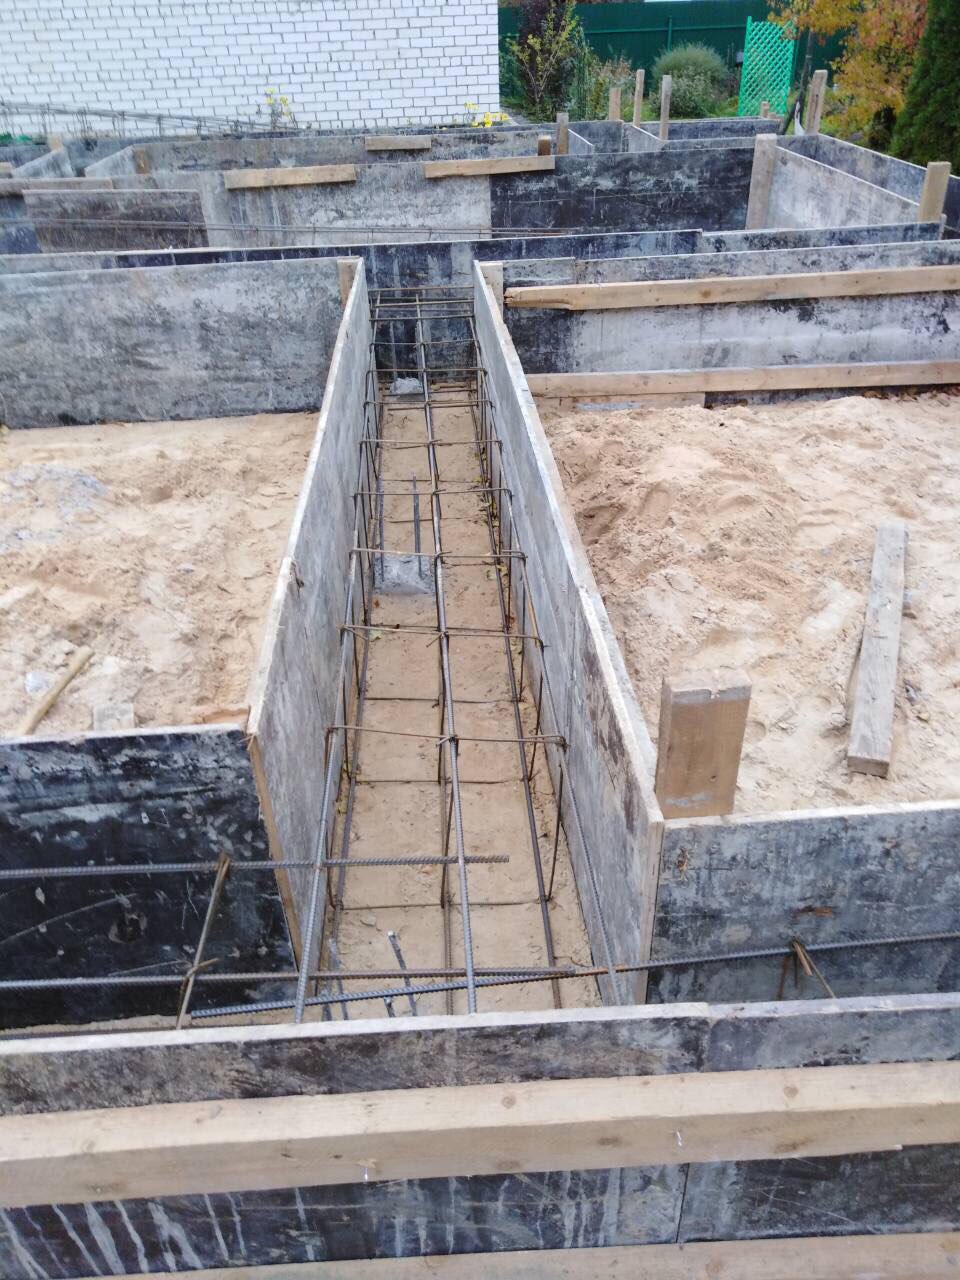
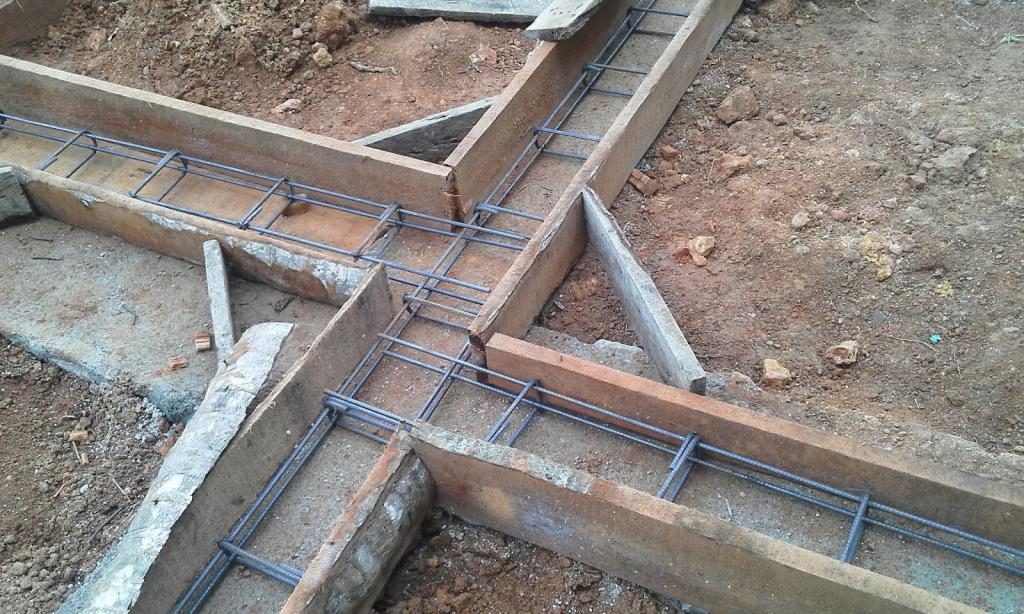
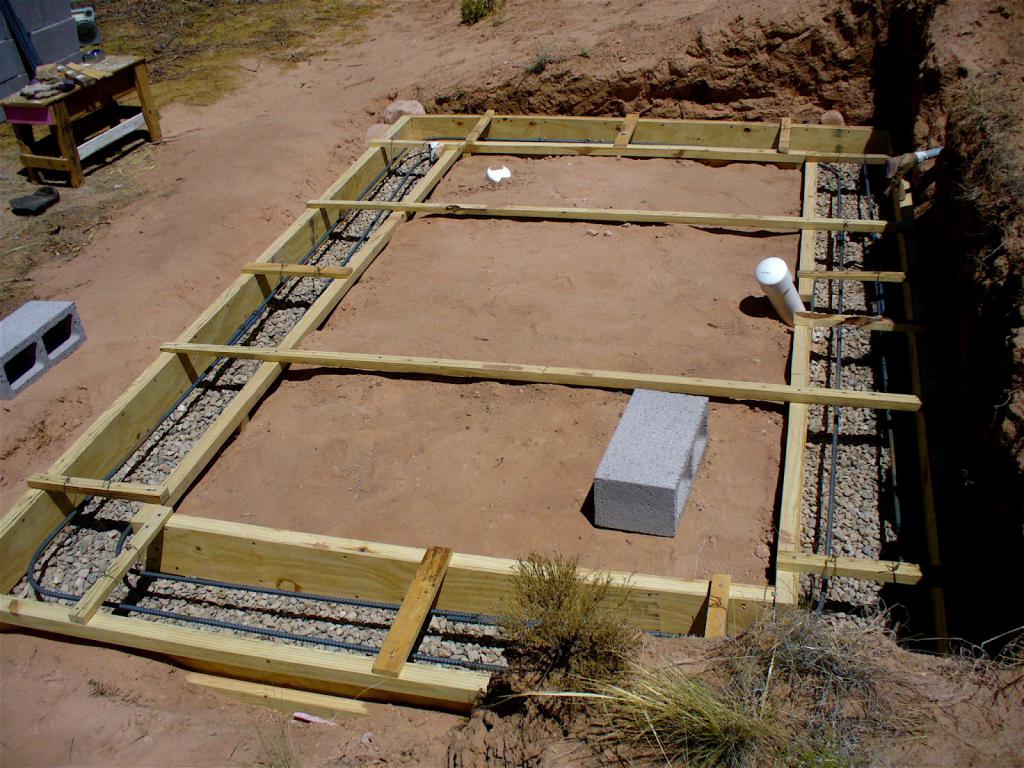
We mount formwork from plywood or unnecessary wooden planks. We knock them down with nails or twist them with self-tapping screws, so that they do not go out into the boards, otherwise it will be difficult to disassemble it later. On the boards inside the formwork, we make precise markings for the subsequent pouring of concrete.
-
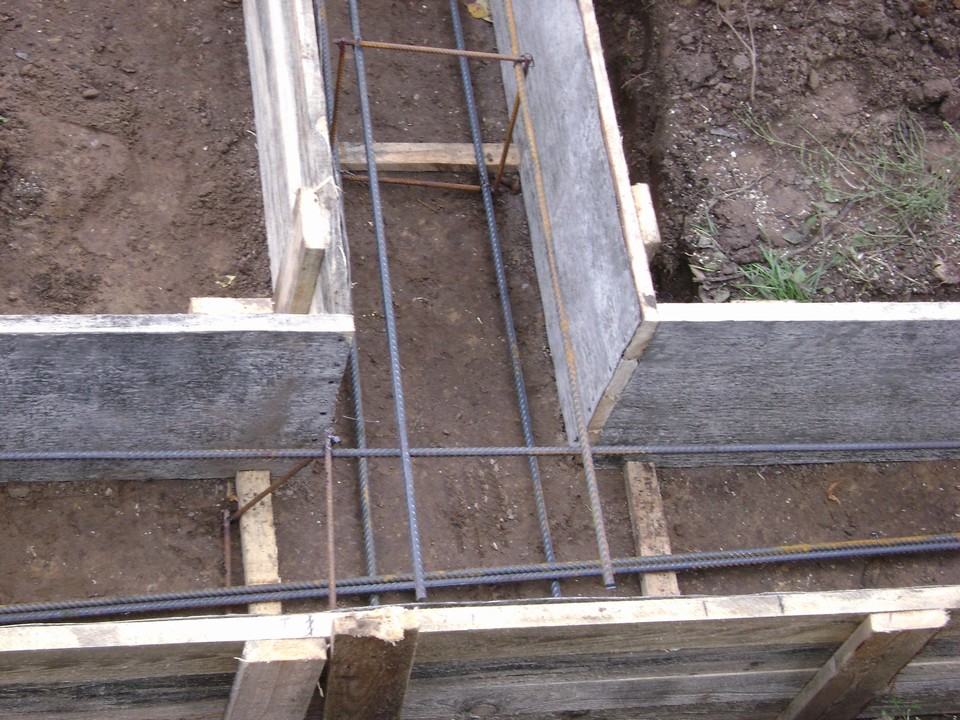
We put reinforcement inside. We saw off the rods according to the size of the formwork walls and put them in a lattice made of reinforcement. We tie it with a special wire. We tie up all the corners and joints of the walls with the help of reinforcement rods to maintain their strength during the movement of the soil layers. If the height of the foundation structure is more than 30 cm, 2-3 rows of iron reinforcement should be laid. It is impossible to weld the rods, since a section that is unstable to rust will appear at the welding site, and the hardened metal will lose its strength.
-
We fill the bottom layer of concrete and carefully distribute it around the entire perimeter of the formwork, using a concrete vibrator, or simply pierce the mortar with a rod to eliminate air. Fill the next layer after setting the previous one. We level the top layer of concrete according to the markings, smooth the surface with a flat board and sprinkle with dry cement. This is necessary for high-quality solidification of the solution and to prevent the occurrence of cracks during its drying.
- Depending on the weather, concrete can take up to 28 days to mature. After the mortar has completely dried, you can start laying foam concrete blocks.
Foundation Tips
To make the foundation strong and of high quality, the following recommendations must be followed:
- after pouring the concrete solution into the formwork, it is necessary to cover it with polyethylene to prevent drying and cracking;
-
in cold weather, it is recommended to use special antifreeze additives, since at subzero temperatures the water freezes and the concrete stops gaining its strength. Even after thawing, it loses this ability;
- at high temperatures, it is necessary to regularly water the foundation with water, since with a large evaporation of moisture, it also stops hardening and simply turns into dust.
Instructions
Dear users! Please pay attention to the units of measurement in the fields of the calculator. A universal calculator for calculating foam blocks for building a house allows you to get the most accurate, but approximate amount of materials
Remember, the more fields you fill in the calculator, the more accurate the result will be.
A universal calculator for calculating foam blocks for building a house allows you to get the most accurate, but approximate amount of materials. Remember, the more fields you fill in the calculator, the more accurate the result will be.
Block characteristics
- The size. Select the size of the foam block you want to use.
- Density. Depending on the function to be performed (load-bearing wall, partition), it is necessary to select the correct block density.
- Price. You can immediately select the cost of the product in order to understand how much the building frame will cost (optional item).
- Stock. In order to avoid unforeseen situations, it is better to protect yourself and purchase a small supply - 5% will be more than enough.
Wall parameters
- Length. The cumulative length of all walls, or the length of one wall.
- Height. Estimated ceiling height.
- Solution type. Polyurethane foam (1 mm) or glue (2 mm).
- Masonry mesh. Many manufacturers advise against using a masonry mesh, as they claim that the material is strong enough and does not need additional reinforcement. However, experienced specialists have a different opinion and suggest reinforcing the masonry every 3-4 rows.
Additional options
If you need an approximate calculation of the foam block only for the "box" of the building, you can skip the paragraph and immediately click on the "Calculate" button. For more accurate results, it is necessary to continue filling in the interface blocks.
- Window. Specify the width and height of the hole for the window, then add their number. If you have many different windows, then for each individual type you need to add a separate field.
- Doors. Similarly, specify the parameters of the openings.
- Gables. Three types of construction for different types of roofs.
- Jumpers. Fill in the characteristics of the jumpers and their number.
- Armopoyas. A monolithic closed belt that is laid on top of the blocks.
Result
If you have filled in all the fields of the foam block calculator, then the following results will be available to you at the output:
Blocks:
- The volume of one block.
- The price of one block.
- The number of blocks is 1 m3.
- Price for 1 m3 of blocks.
- The total volume of blocks.
- The total number of blocks.
- The total mass of the blocks.
- Total price for all blocks.
Solution:
- Solution volume.
- The mass of the solution.
- Container equivalent.
A number of other similar parameters will be presented for all structural elements that were used by the user.
Recessed tape foundation

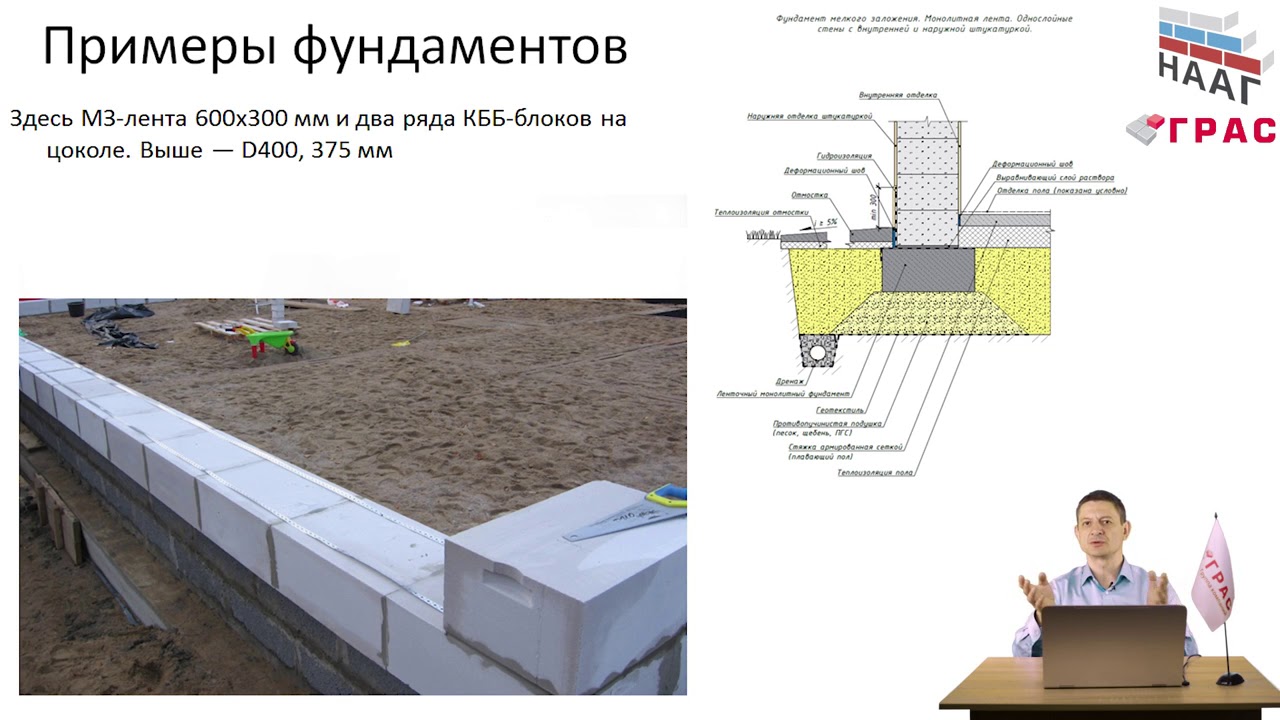
Turning to the use of a buried strip foundation, in the case of an aerated concrete house, you must adhere to the basic rules:
By correct calculations of the reinforcement, it is necessary to achieve a high stiffness of the tape, as well as to make the walls of the foundation as smooth as possible.
If you plan to build a brick basement, then it is advisable to tie it from above with a reinforced concrete reinforced belt, which will also increase the rigidity of the building structure.
No matter how strong the foundation is, the reinforcement of aerated concrete walls will still remain a mandatory procedure.
The strength of a monolithic tape can be increased by expanding it at the very base, thus increasing the area of support on the ground.
The use of foundation blocks for the main support of an aerated concrete building cannot provide optimal wall stiffness, so special care is required.
An example of building a strip foundation with your own hands
Work should begin with the preparation of the trench, and the laying of a gravel-sand cushion in it. It should be noted that the width of the base should exceed the width of the wall to be erected by 10 cm. The next step is to make a preparatory layer of concrete 200 mm thick, which must be left to dry for a week, that is, not until completely dry.
Then you need to lay out the reinforcing structure. It is not recommended to weld the reinforcement, it is best to knit it, since the welded places lose their reinforcing mechanical properties and are more susceptible to corrosion.
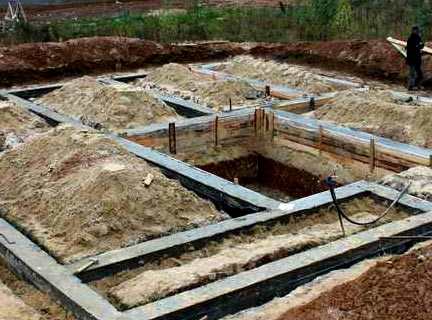
The process of self-construction of a strip foundation
A small tip - it is best to choose fittings with a special anti-corrosion coating.
After the frame is ready, formwork should be made from boards or removable structures, the width of which will correspond to the structure to be poured. Before pouring, a concrete solution is prepared in the following proportions: 3 sand parts to 5 parts of gravel and one cement. All this is diluted with water with the expectation that one part of water is taken for 2 parts of cement.
The mortar should be poured into the formwork with periodic compaction, for which it is best to use a vibrator. If such a tool is not available, you can get by with an available tool: a wooden hammer. When the mortar has completely hardened, you can remove the formwork and start building the walls.
We plan to use a foam block for the house - characteristics of the building material
Foam concrete blocks are produced using a special technology that ensures uniform distribution of air cells in the concrete mass.
The technology provides for mixing the specified ingredients with water:
- blowing agent;
- sand;
- cement.
The concentration of air inclusions in ready-made foam concrete blocks exceeds half of their volume.
 Foam blocks are great for building a house
The main operational characteristics of foam concrete:
- resistance to the influence of compressive loads. The strength of the foam block is marked with a capital letter B and a digital index in the range of 0.75–12.5;
- density. It changes depending on the level of porosity of the material, which determines the purpose of the blocks. Amounts D 200 – D 1200;
- integrity in deep freezing. Foam concrete blocks are marked F15 – F500 in terms of frost resistance;
- reduced thermal conductivity. The walls of a foam block building reliably retain heat, helping to maintain a comfortable temperature;
- the ability to pass steam. Due to the porous structure of the blocks, a comfortable level of humidity is maintained in the room due to the release of excess moisture.
Cellular building material, depending on the density, is classified into the following types:
- products for structural purposes. They have a maximum density of more than 1.2 kg / m³, are used for loaded structures;
- thermal insulation products. Has increased porosity, causing a decrease in density to 0.5 kg / m³, is used for insulation;
- constructional and heat-insulating blocks. With a specific weight of up to 0.9 kg / m³, they optimally combine strength with thermal insulation characteristics.
 Building a house from foam blocks
The rounded dimensions of the foam blocks are:
- length - 30-60 cm;
- width - 20-30 cm;
- height - 10-30 cm.
A foam concrete house can be built quickly using products with increased dimensions.
Calculation of the foundation tape for a house made of aerated concrete
Let's note an important point! If you want to make the width of the foundation less than the width of the aerated concrete blocks, then it is allowed to hang up to 1/3 of the width of the block.
But in order to make such a maximum overhang of gas blocks, it is necessary to fill the foundation with the highest accuracy, that is, the width of the tape in all places must be ideal, + the diagonals themselves must be observed with an accuracy of a centimeter.
In any case, we do not advise you to do everything end-to-end, you need a margin of safety. It is definitely not worth saving on the foundation!
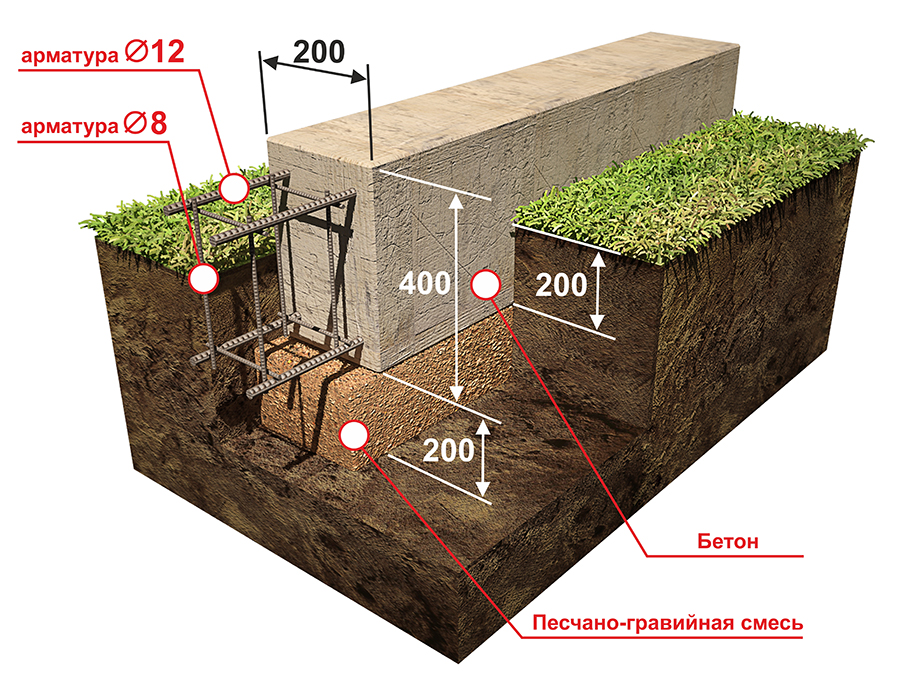
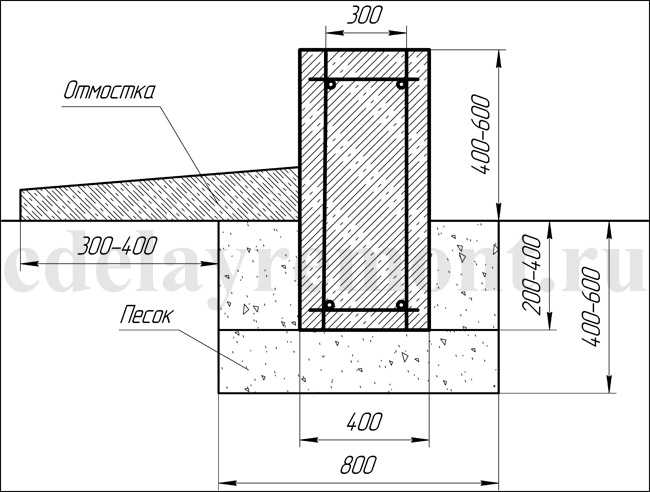
Most often, buried and shallow strip foundations are made 400 mm wide. Concrete is used grades M200-M250.
Reinforce with steel reinforcement, in several rows.
The depth of the tape depends on the depth of soil freezing.
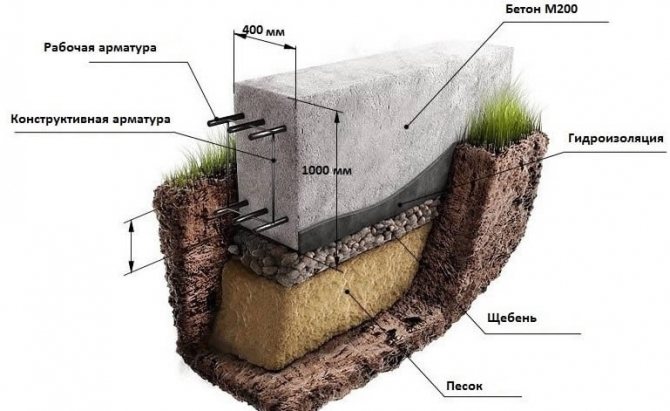
A 40 cm wide strip foundation will be more than enough for an aerated concrete house with several floors.
Shallow foundation tape
 A device of this type of foundation is widely used in regions with stable, not very moist and not prone to heaving soils.
A device of this type of foundation is widely used in regions with stable, not very moist and not prone to heaving soils. Pouring a shallow (40-60 cm) reinforced concrete tape under the described conditions is suitable for the subsequent laying of foam concrete blocks and heavier building materials (cinder block, brick). The only difference is in the width of the sole, which is determined by special calculations. The greater the load per unit area of the foundation sole, the wider the base for the building is made.
If the quality of the soil allows, the shallow tape is a universal type of foundation for buildings of any functional purpose. The only drawback of a shallow tape structure is the impossibility of arranging a full-fledged basement floor when it comes to building a residential building.
Types of foam block foundations and technology for their installation
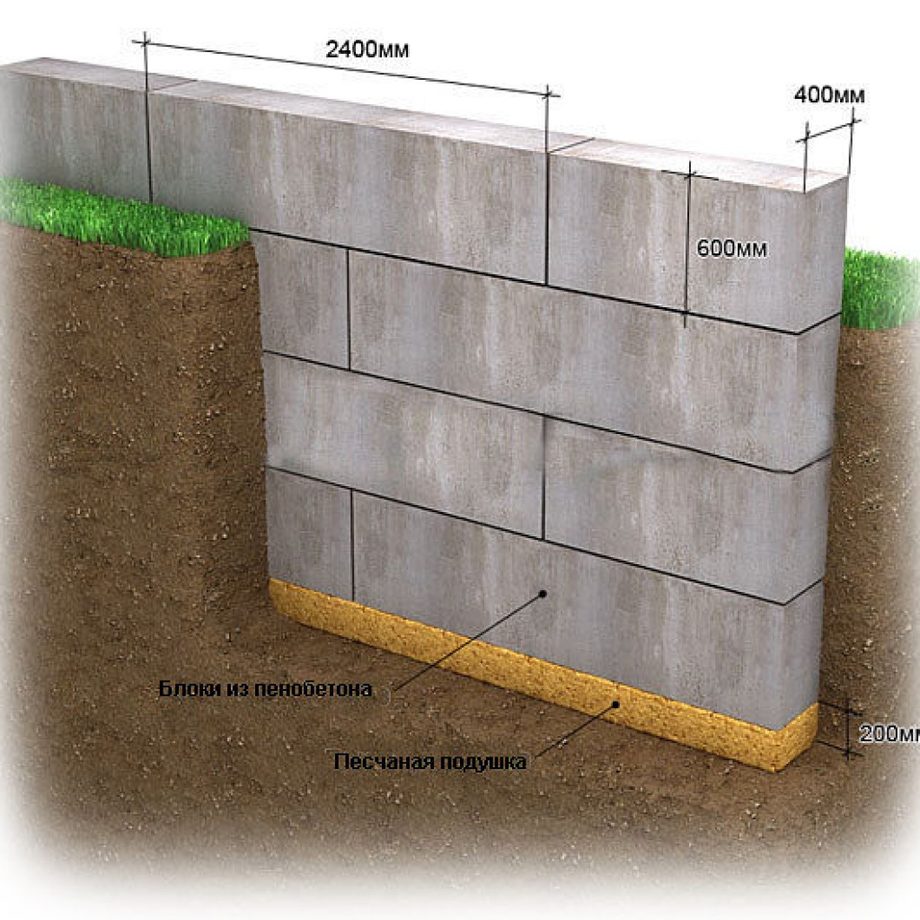
When choosing the type of foundation, novice builders have big doubts whether foam blocks can be used when laying the foundation for a house. In principle, if you plan to make a small house from lightweight material, then there is nothing to fear. Consider the technology of laying several types of foundations made of foam block materials.
Base made of foam block and cement
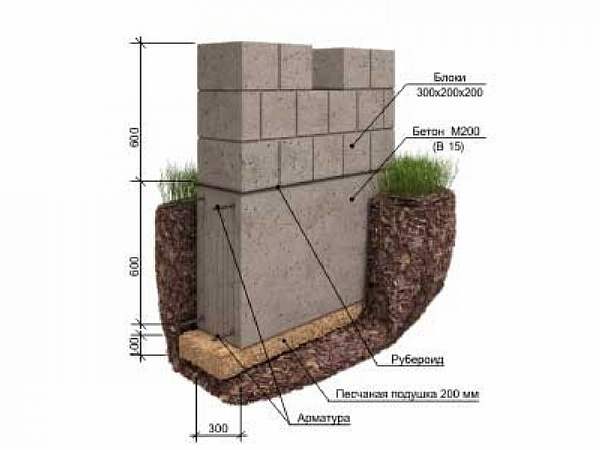
After breaking the foundation for the house on the site, they dig trenches under the load-bearing walls to the depth provided for by the project. A sand and gravel cushion is poured into the bottom of the trench. A pillow should be made with a thickness of about 25 cm. To strengthen the bearing capacity of the base, a frame must be assembled from reinforcement with a diametrical section of 12 mm.
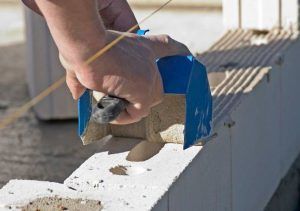 Laying of foam blocks
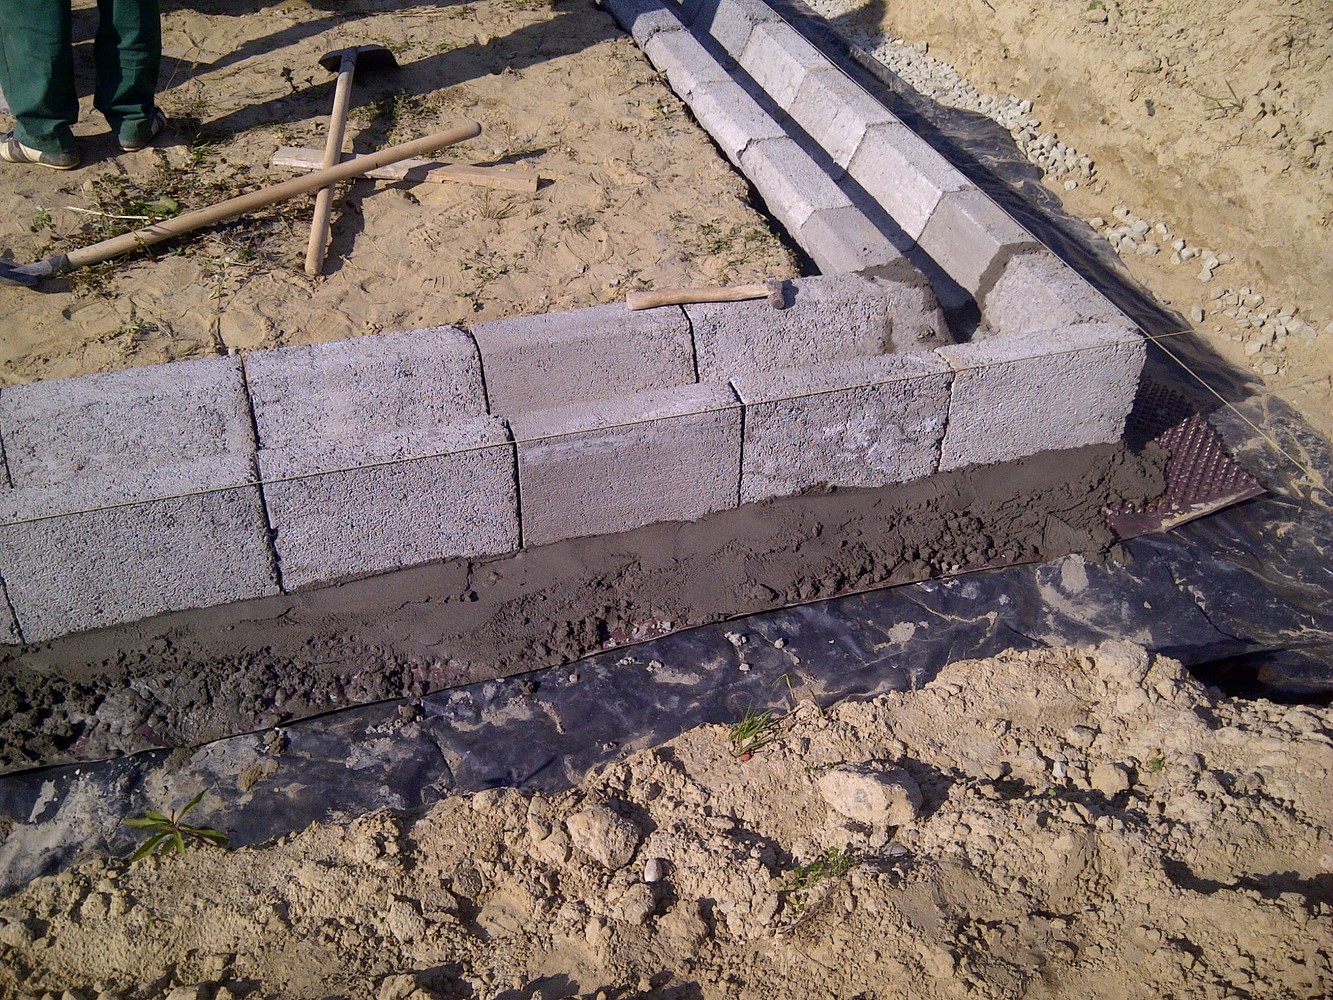
After the reinforcing belt is ready, we construct the formwork, the height of which is 60-80 cm above ground level. We begin to pour cement mortar into the trench to a height of 10 cm. When the mortar has set a little, foam blocks can be laid on the cement tape. They are placed so that they are at a distance of five centimeters from each other. Once the blocks have been laid, you can continue to grout the base with cement mortar.
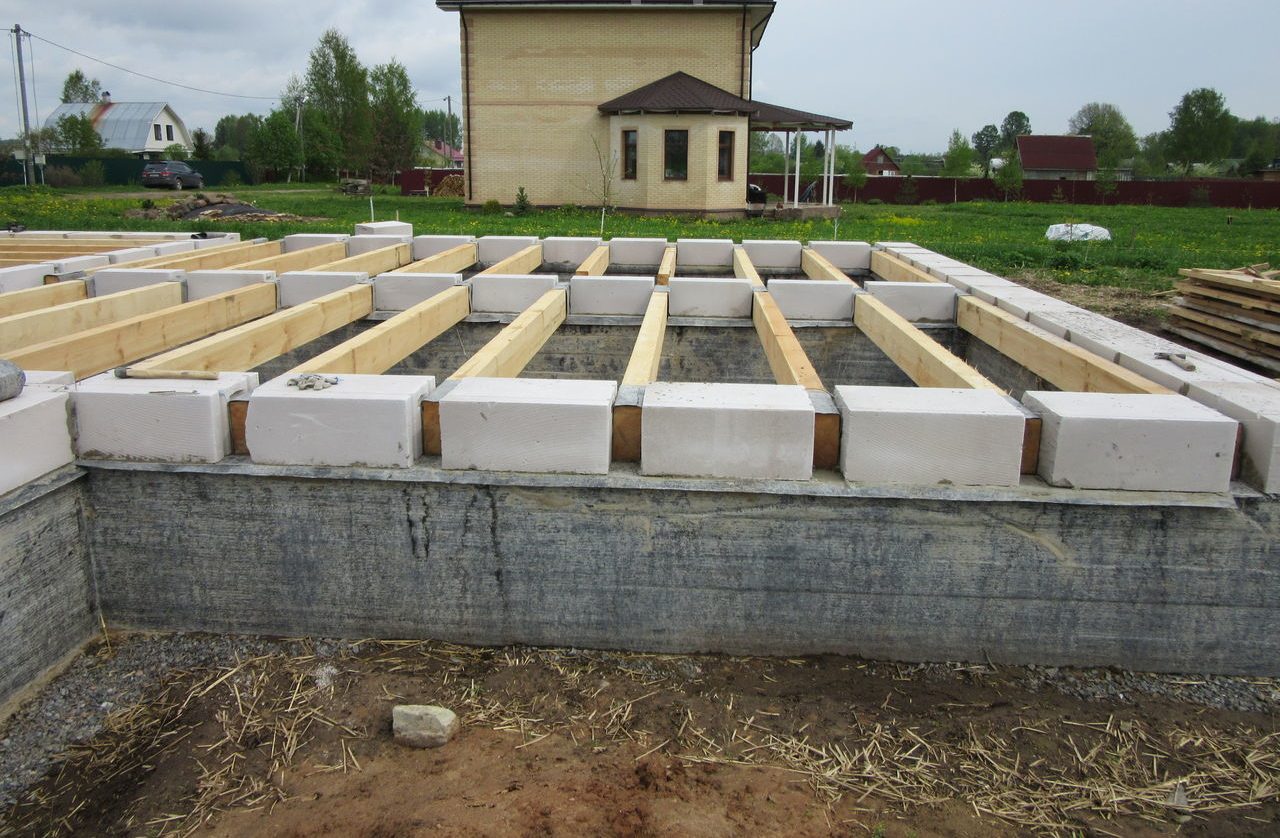
The process of laying foam blocks and pouring them is repeated until the height of the foundation and the height of the formwork are equal. After that, the base should be kept for a week and only after that you can start building the walls.
Monolithic tape base made of foam concrete
 Pouring foam concrete
The process of installing a strip foundation made of foam concrete with your own hands is similar to laying a monolithic foundation made of concrete. But there are some peculiarities:
- The formwork can be made of plastic, which will greatly facilitate the work. For its installation, it is not necessary to resort to the use of lifting devices. With the help of plastic, it is easy to build foundations of the most complex geometric structures.
- For pouring foam concrete, a special mobile mobile complex is used. A special device is installed on it, which controls the density of foam concrete with an accuracy of 99%. The density of foam concrete must be at least 700 kg / m2.
The rest of the bookmarking process is identical. First, preparatory work is carried out: trenching, laying a sand cushion, tamping it. Next, a plastic formwork is constructed, and work is carried out to reinforce the supporting structure. When everything is ready, start pouring foam concrete. This type of foundation is often called a mobile foundation.
Construction of houses from foam blocks - selection and construction of the foundation
For foam block buildings, various foundations are used. The choice of the best option is determined by the following factors:
- the depth of the location of aquifers;
- freezing level;
- soil characteristics;
- load on the base.
Thinking about how to make a house from foam concrete, many prefer a tape-type foundation. This proven foundation type is best suited for foam block buildings.
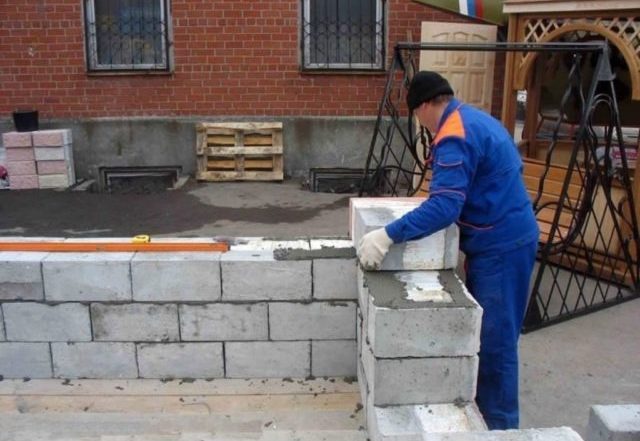 Among the advantages of building a house from foam concrete are the following qualities: environmental safety of the material
The construction of the foundation for the foam block structure is carried out according to the following algorithm:
- Mark the outline of the building on the construction site.
- Remove vegetation, remove fertile soil, and plan the area.
- Dig a pit 60–80 cm deep to follow the contour of the building.
- Fill the base of the trench with 20 cm thick sand and gravel mixture.
- Assemble the formwork from boards or boards, fix the structure.
- Seal the slots through which the solution may flow out.
- Attach waterproofing roofing material to the inside of the formwork.
- Cut the rods to make the rebar.
- Assemble the reinforcement cage and position it inside the formwork.
- Prepare concrete grade M400 and higher, pour it into the panel structure.
- Tamp the concrete with a vibrator to release air bubbles.
- Lay polyethylene on the surface to prevent moisture evaporation.
- Do not load the concrete for four weeks.
- Disassemble the formwork after the final hardness set.
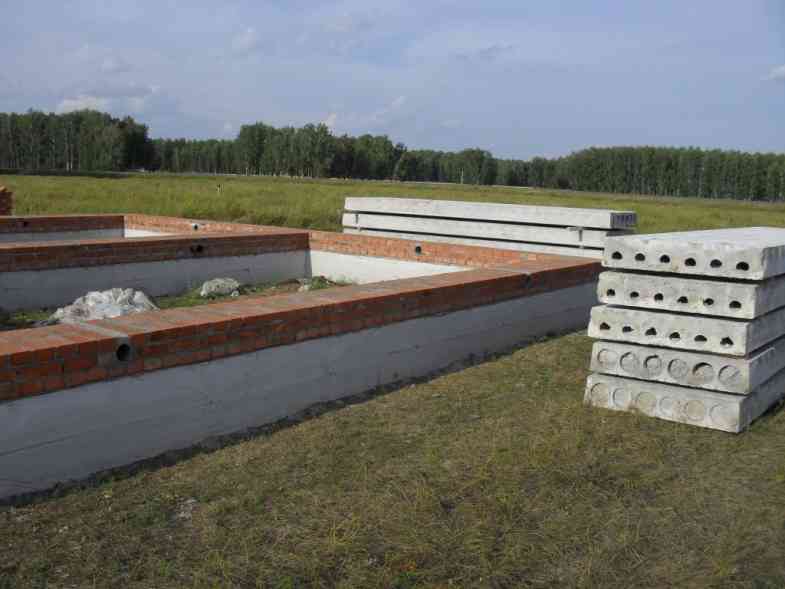
- Place two rows of bricks with ventilation openings.
- Place steel mesh to reinforce the basement masonry.
- Apply the grout evenly.
- Lay the second two rows of brickwork, check for horizontal alignment.
- Waterproof the base of the house with bituminous mastic or roofing felt.
You can do the work with your own hands, performing the indicated operations step by step.
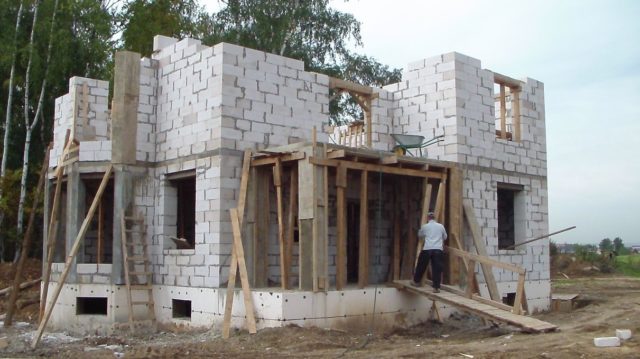 Due to the fact that foam concrete is not heavy and voluminous, it is possible to build a building much faster than using other building materials


