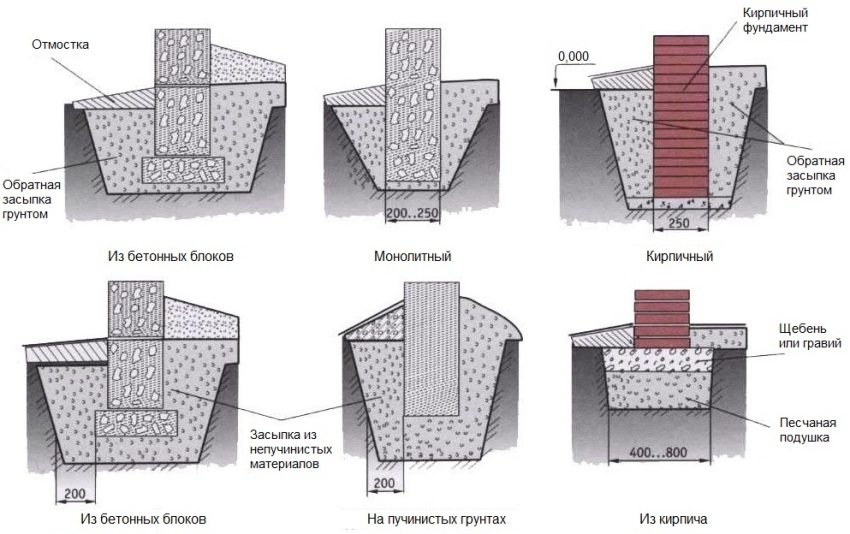
Types of building materials for foundations
It is a mixture of sand, cement and various fillers: gravel, crushed stone, expanded clay, and others.
Binders for the production of concrete:
- Polymeric substances (resins, carboxyls, mineral components);
- Cement (a versatile material, there is an established production, it can have mineral fillers to improve various physical and chemical indicators);
- Silicate concrete (mixture of lime and silica). Not used for erecting foundations on wet and cold soils prone to deep freezing.
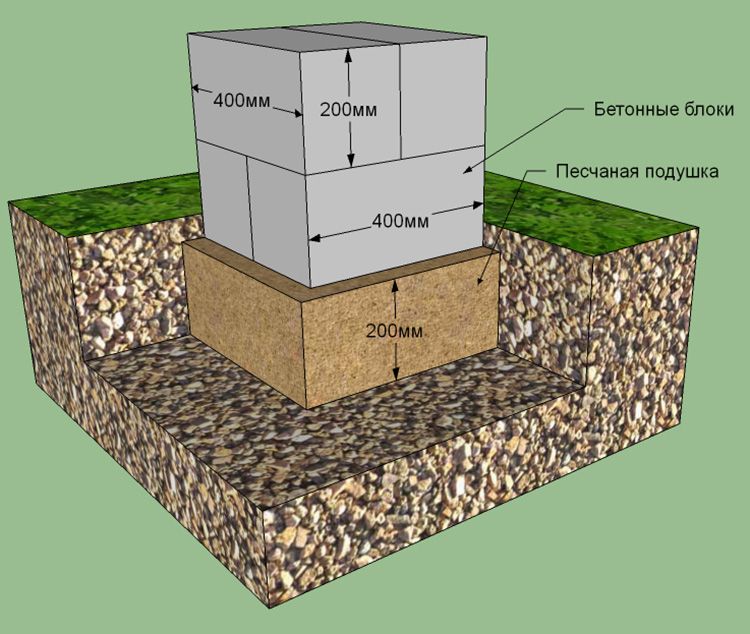
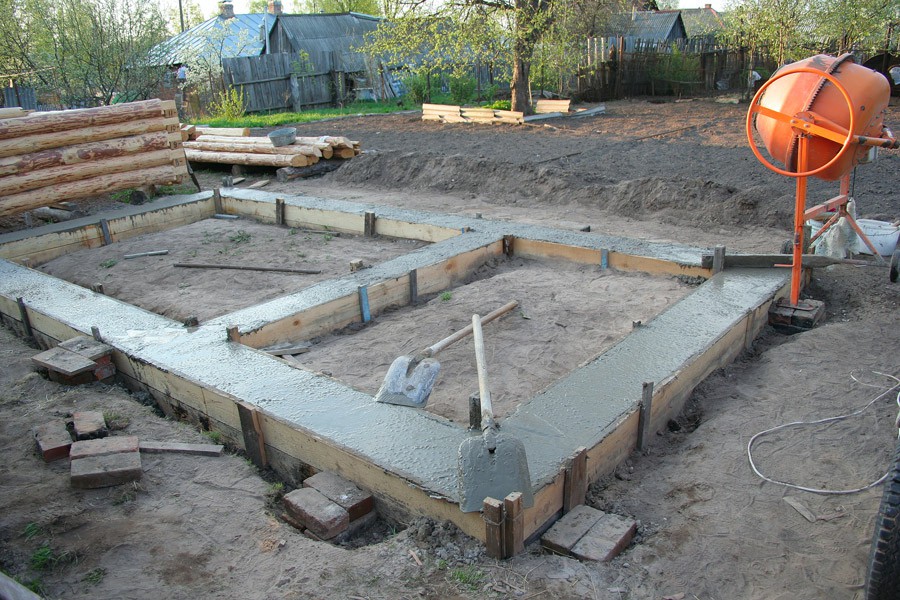
Already hardened concrete is characterized by such parameters as strength, water resistance, frost resistance. It is poured directly on the construction site with your own hands, you can use mechanical concrete mixers or do it manually. When building monolithic foundations, ready-made concrete mortar is poured into a prepared trench, and ready-made factory blocks are used for prefabricated columnar or strip foundations.
Sand.
Coarse river sand for foundation
It is the main constituent of all types of concrete and is also used for laying sand cushion. The pillow should be made in cases where the soil is loose and cannot withstand the load from the building itself. For a pillow, it is better to use medium-grained or coarse-grained sand. There are also several types of sand, each differing in its mechanical characteristics, purity and fraction. As a rule, river sand is used for plastering, it has a small fraction, it is supplied already clean and free of impurities. The maximum it contains is river pebbles, but sifting it is not a problem. But quarry sand contains a lot of stony impurities and has a large fraction. It is used in the production of concrete as well as for the construction of a sand bed.
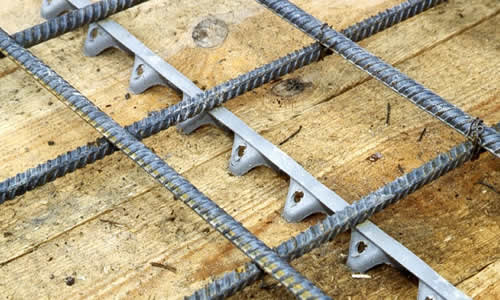
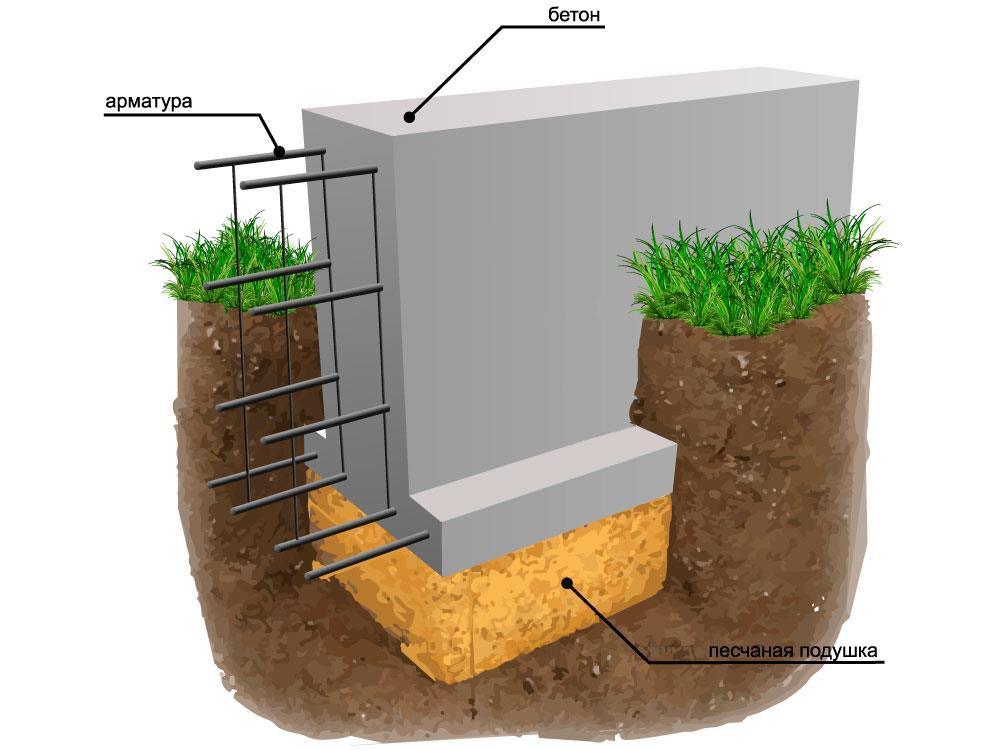
Reinforcing steel.
It is used to increase the strength and reliability of the foundation, as well as to ensure the connection between individual concrete blocks. If you build a foundation with your own hands, then it is better to use a mesh or rods, you can also lay ready-made reinforcing rods, but it is difficult to connect them. All rods are already produced in ribbed shape to provide better adhesion to concrete.
Wood.
Wood is used as a building material for the erection of supports, formwork, strengthening of load-bearing structures, as insulation. It is a cheap material, but does not have a long lifespan.
Foundation types
To decide which foundation is best to make, you need to know their main characteristics.
In the construction of a private house, the laying of several types of foundations is used, the choice of which depends on such factors as:
- the weight of the planned structure;
- the quality of the underlying surface;
- terrain relief;
- depth of soil freezing.
The available types of foundations for private houses are:
- tape;
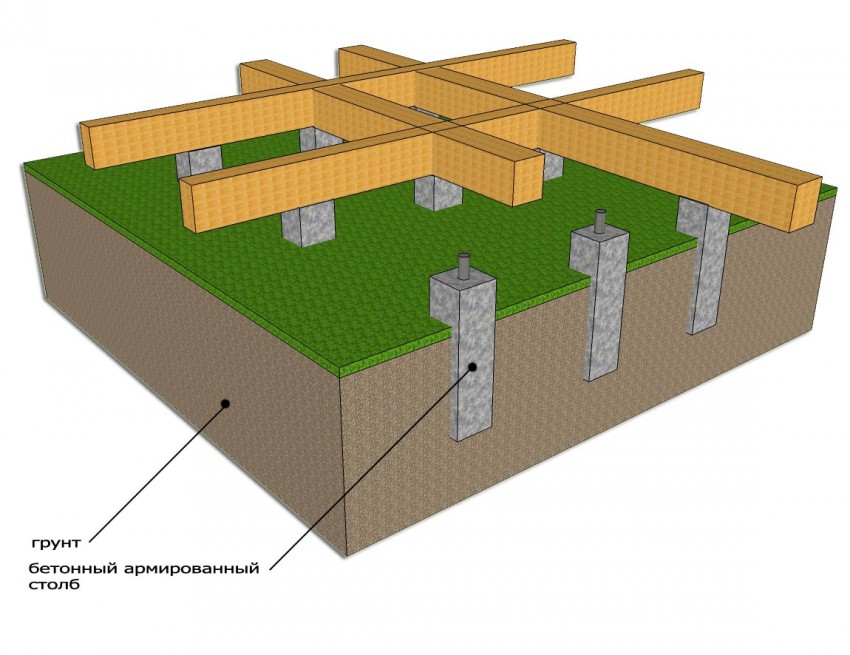
- columnar;
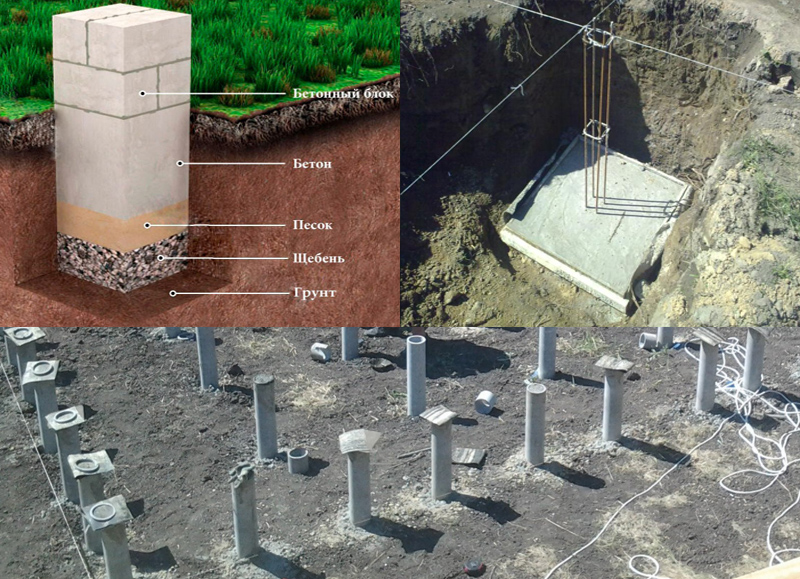
- pile;
- slab.
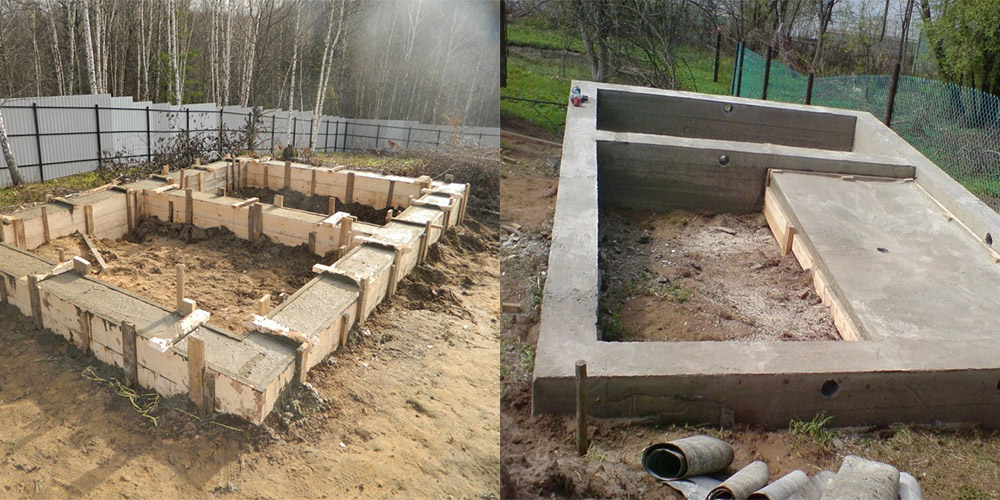
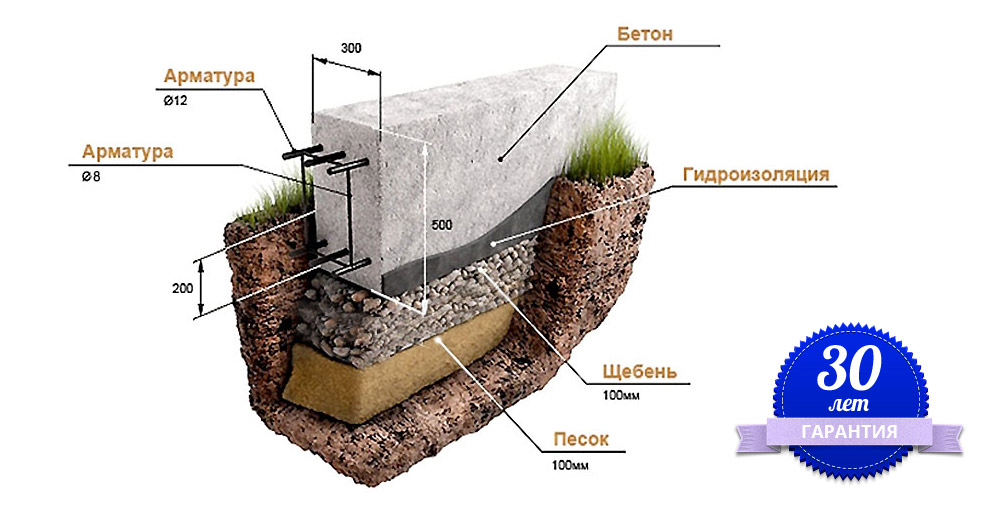
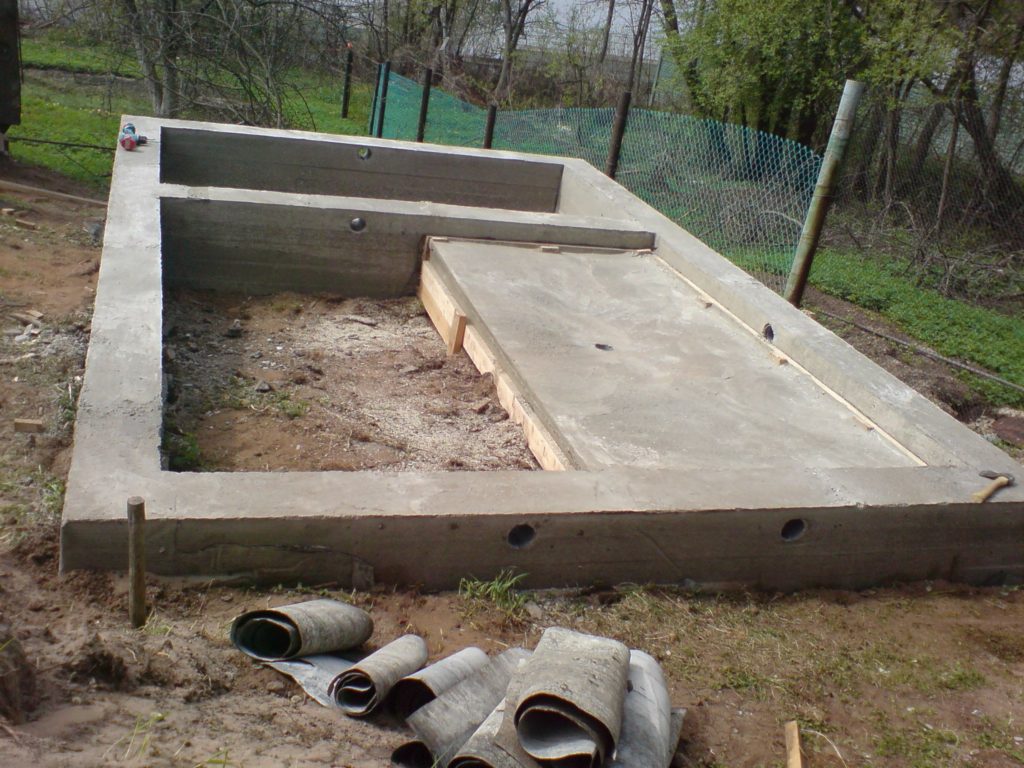
Tape is the most demanded type of foundation. Its arrangement is recommended for the construction of heavy structures (from bricks, slabs, blocks) in conditions of stable soil, not subject to erosion and landslides, on a leveled surface and in a temperate climate.
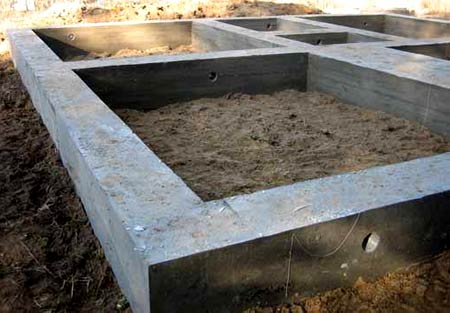
This is what the strip base of the future house looks like.
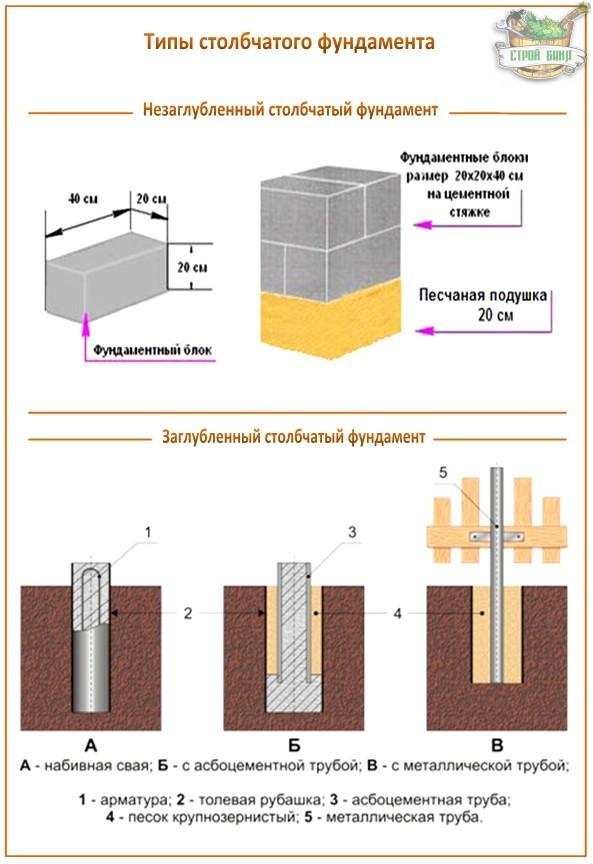
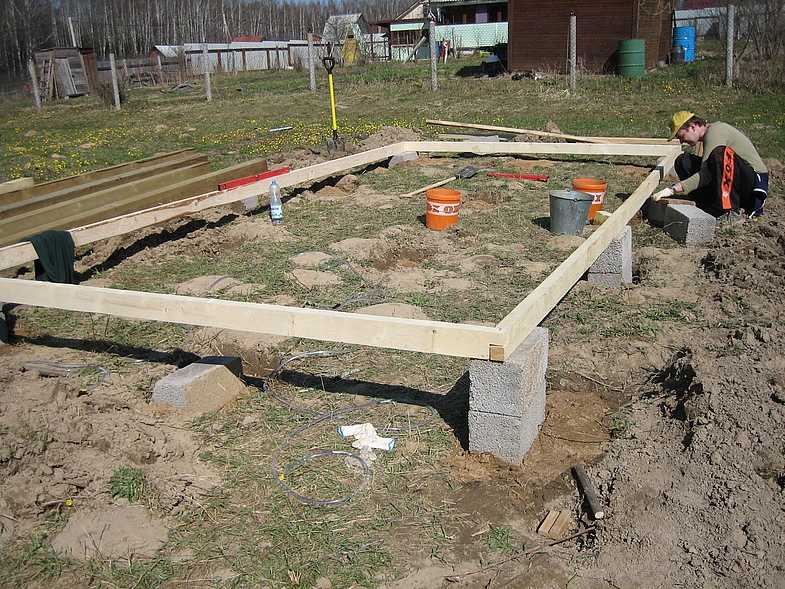
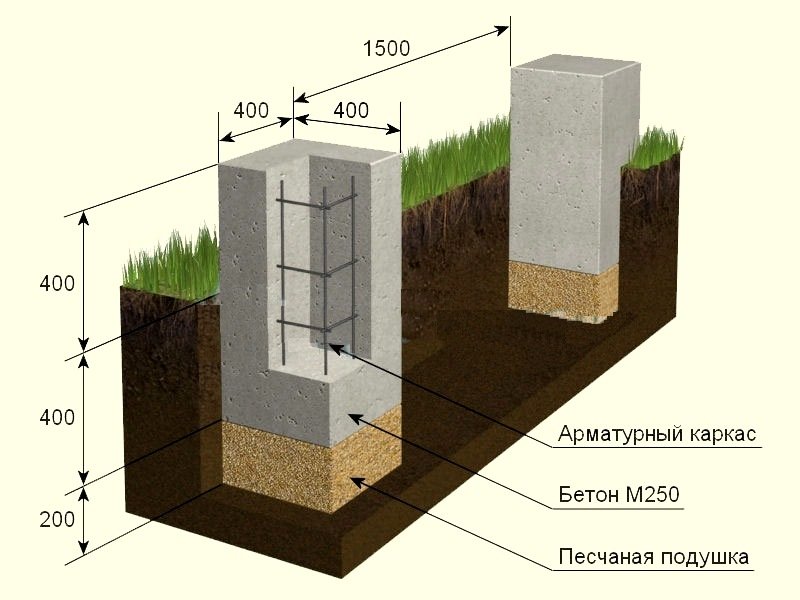
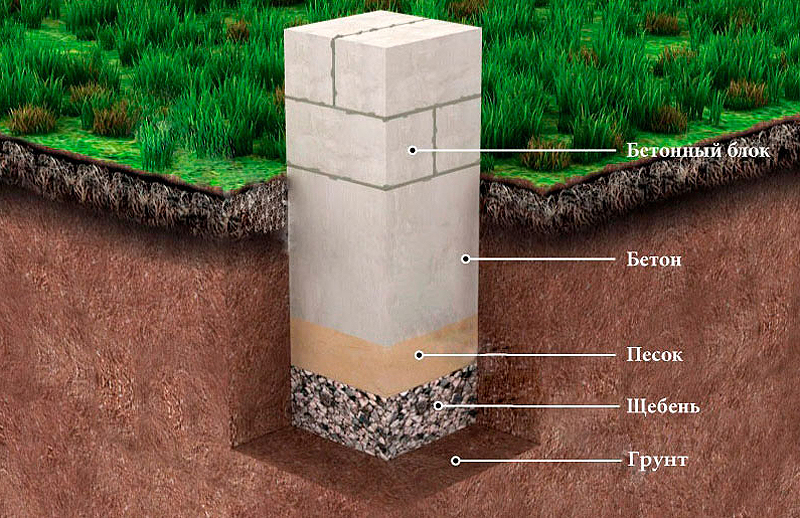
The columnar foundation is laid in unstable soil conditions, as well as on relief terrain. The depth of its laying reaches up to 3 meters. It is very expensive to lay a strip base at such a depth.
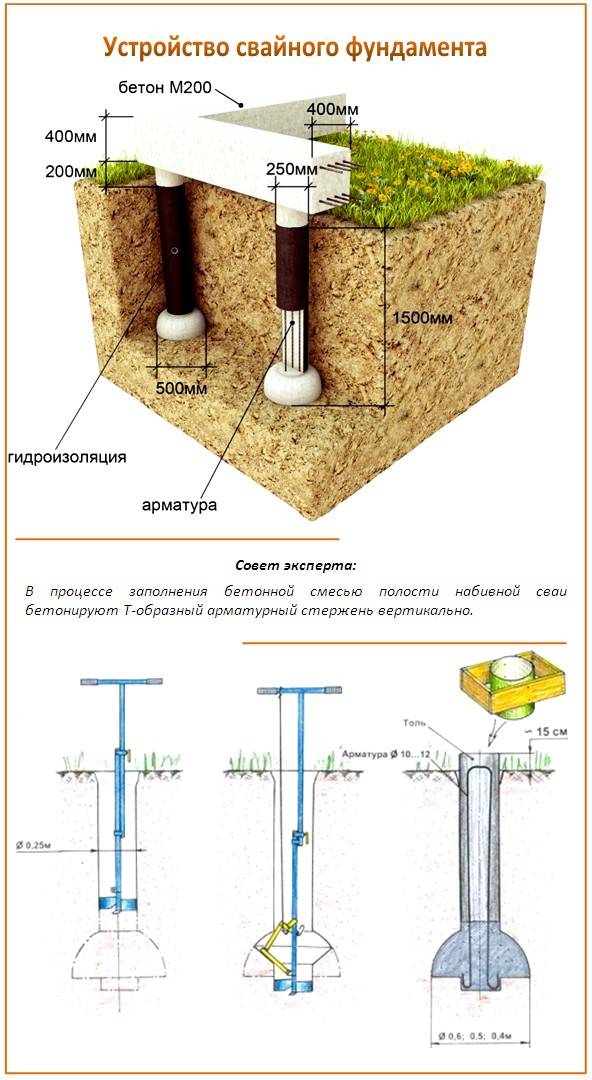
A pile foundation is recommended for wetland areas, as well as for northern conditions, where deep soil freezing occurs. The pile foundation is used for capital structures only in case of emergency, because after a short time, it loosens due to various reasons, which can lead to deformation of the walls and base of the building.


A slab foundation is an ideal solution if there is a mobile unstable soil, as well as in areas where there is a pronounced heaving of the soil during freezing.
An example of a finished slab foundation for a cottage
The slab foundation withstands the most heavy structures and allows you to maintain the integrity of the base and walls of the building when soil moves. However, its price exceeds the cost of all the above types of foundations, which is associated with a large amount of building material expended.
So, let's look at how to make a foundation for a house with your own hands. Let us dwell on the strip base, as the most common in private construction.
Consider the stages of earthwork, learn how to make formwork for the foundation and how to fill it under the house.
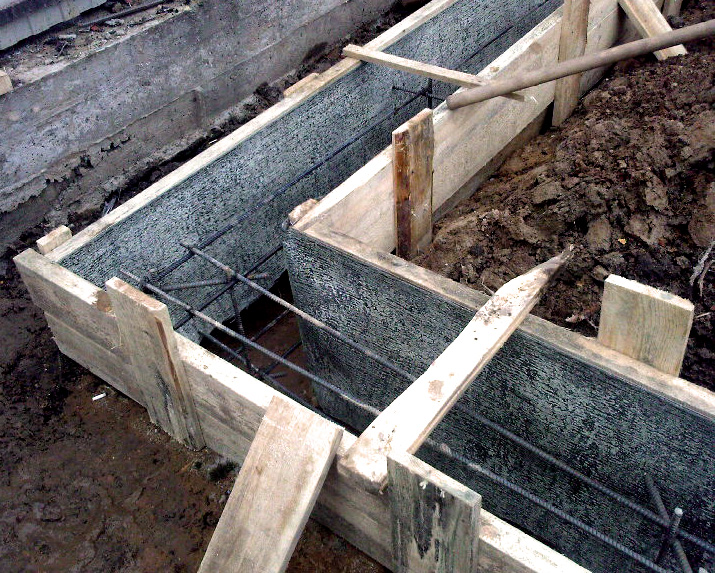
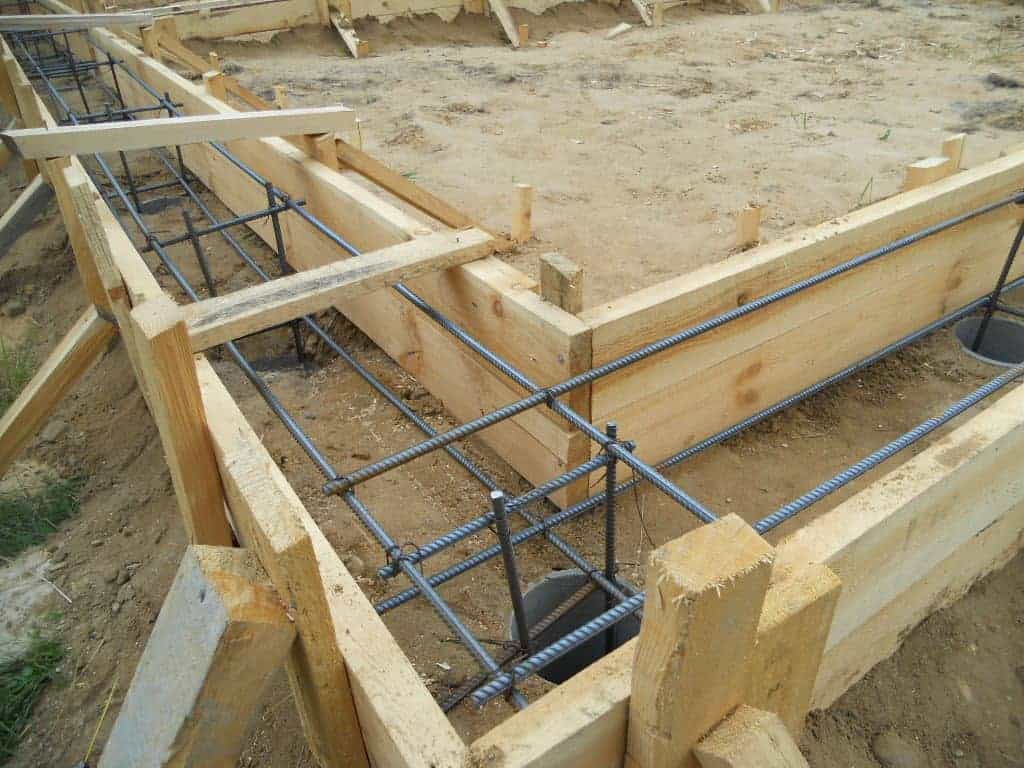
Reinforcing frame installation
Reinforcing frame installation
The presence of a reinforcing frame in the thickness of the foundation allows you to strengthen the base and extend its service life several times. For the manufacture of the frame, steel reinforcement with a section of 10-16 mm is usually used.
It is very important to tie the rods correctly in order to distribute the load evenly over the entire area.
Reinforcement of the strip foundation
For work, you will additionally need:
- knitting wire;
- building level;
- Bulgarian;
- trimming a plastic pipe;
- roulette.
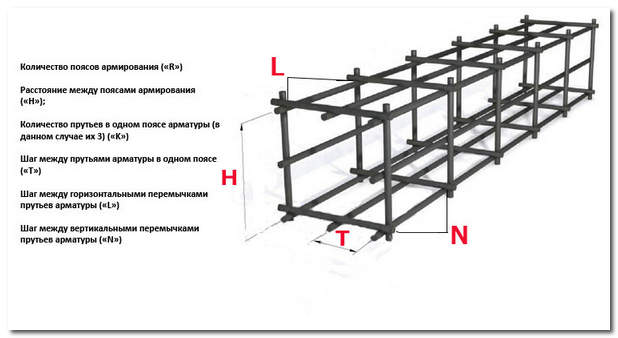
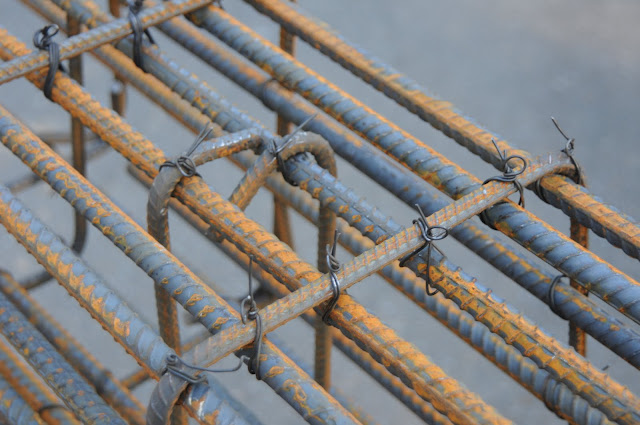
The armature is cut with a grinder along the length and width of the trenches, after which a lattice with cells from 30 cm is knitted from it.To do this, 4-5 longitudinal rods are fastened with transverse sections every 30 cm.

Reinforcement of the foundation
It is categorically not recommended to use welding for the connection, since it weakens the attachment points and promotes corrosion of the rods. The frame should be voluminous, therefore horizontal gratings are placed at 3-4 levels, tying up with vertical rods.


Frame
Additional fastenings should be made at each corner of the foundation and at the intersections of the load-bearing internal walls. You can lower the frame into the trenches in parts, and already inside, tie them together. To avoid corrosion as much as possible, the reinforcement should not be laid directly on the sand: they take an old plastic pipe, cut it into rings 4-5 cm wide and put it under the grating in the corners and every 50-60 cm along the trenches. About 5 cm should be left between the side walls and the edges of the frame, the same applies to the upper edge of the reinforcement.

Reinforcing frame installation
When the grating is fixed inside the formwork, the concrete pouring level is indicated on the inside of the panels. You can do this with the help of a fishing line: small nails are stuffed at the ends of the formwork and a fishing line stretched strictly horizontally is fixed on them. It should be located 5 cm above the edges of the reinforcement mesh and run along the entire perimeter at the same horizontal level.
Foundation selection
In modern construction, three main technologies are used for the construction of the foundation:
- Pouring the slab, a thick concrete base is poured under the entire area of the house, or a prepared reinforced concrete slab is laid.
- Strip foundation, concrete is poured along the perimeter of the structure and along the supporting structures.
- Pile foundation, piles are installed in the ground in the form of a lattice over the entire area of the base.
Each of the three methods has its own advantages and limitations. But if we are talking about a way to make the foundation for a house with our own hands, then the tape option looks more preferable. The specific choice depends primarily on whether you are going to build a temporary shed or a three-story mansion.
Which is better than a slab or strip foundation?
The reinforced concrete slab at the base of the house appears to be a solid and reliable base option.
But still there are a number of factors that make you choose a foundation in the form of a ribbon:
- in terms of material costs, it is significantly lower than pouring a slab, and accordingly, labor costs and financial investments are reduced;
- the stove will not allow the space under the floor to be used either for storage or for thermal insulation of the house.
Why is a strip foundation better than a pile foundation?
But in comparison with the strip foundation, there are several global disadvantages here:
- pile technology is practically inaccessible in its full version to a non-professional without special equipment, and screw piles are not suitable for every soil, require decorative finishing and, if the technology is violated by an inexperienced installer, they can eventually lose stability;
- the appearance of a house on a pile foundation makes you remember about a hut on chicken legs, almost always the owners sew up the pile foundation with one or another type of cladding, while the aesthetics of the house irreparably suffers, and additional costs of time and money appear;
- when even one of the piles is displaced, due to the fact that they are not tied to each other, a distortion may occur in the internal floors of the building.
Geodetic works
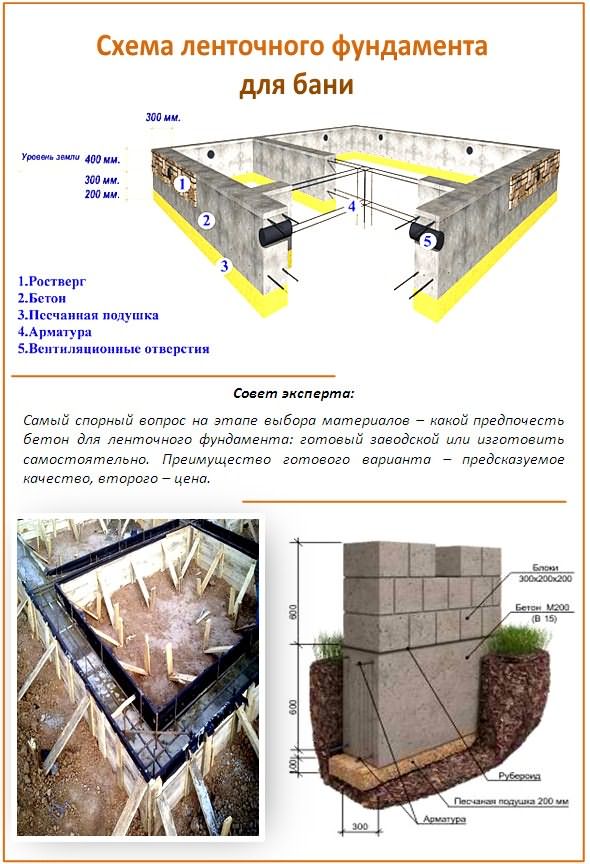
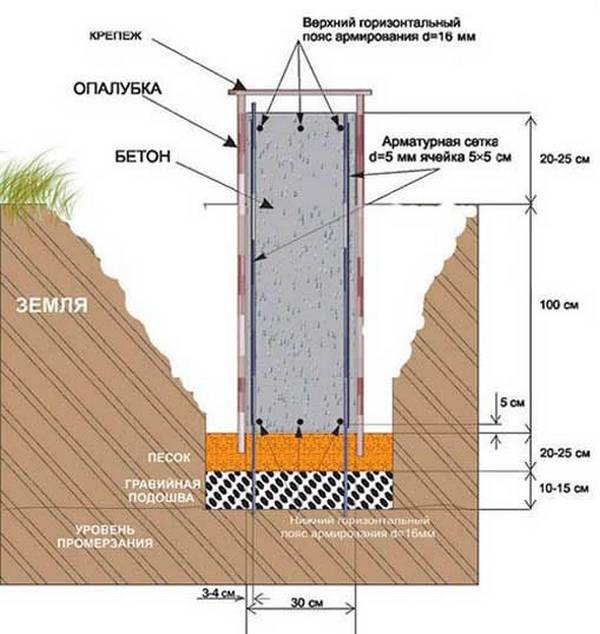
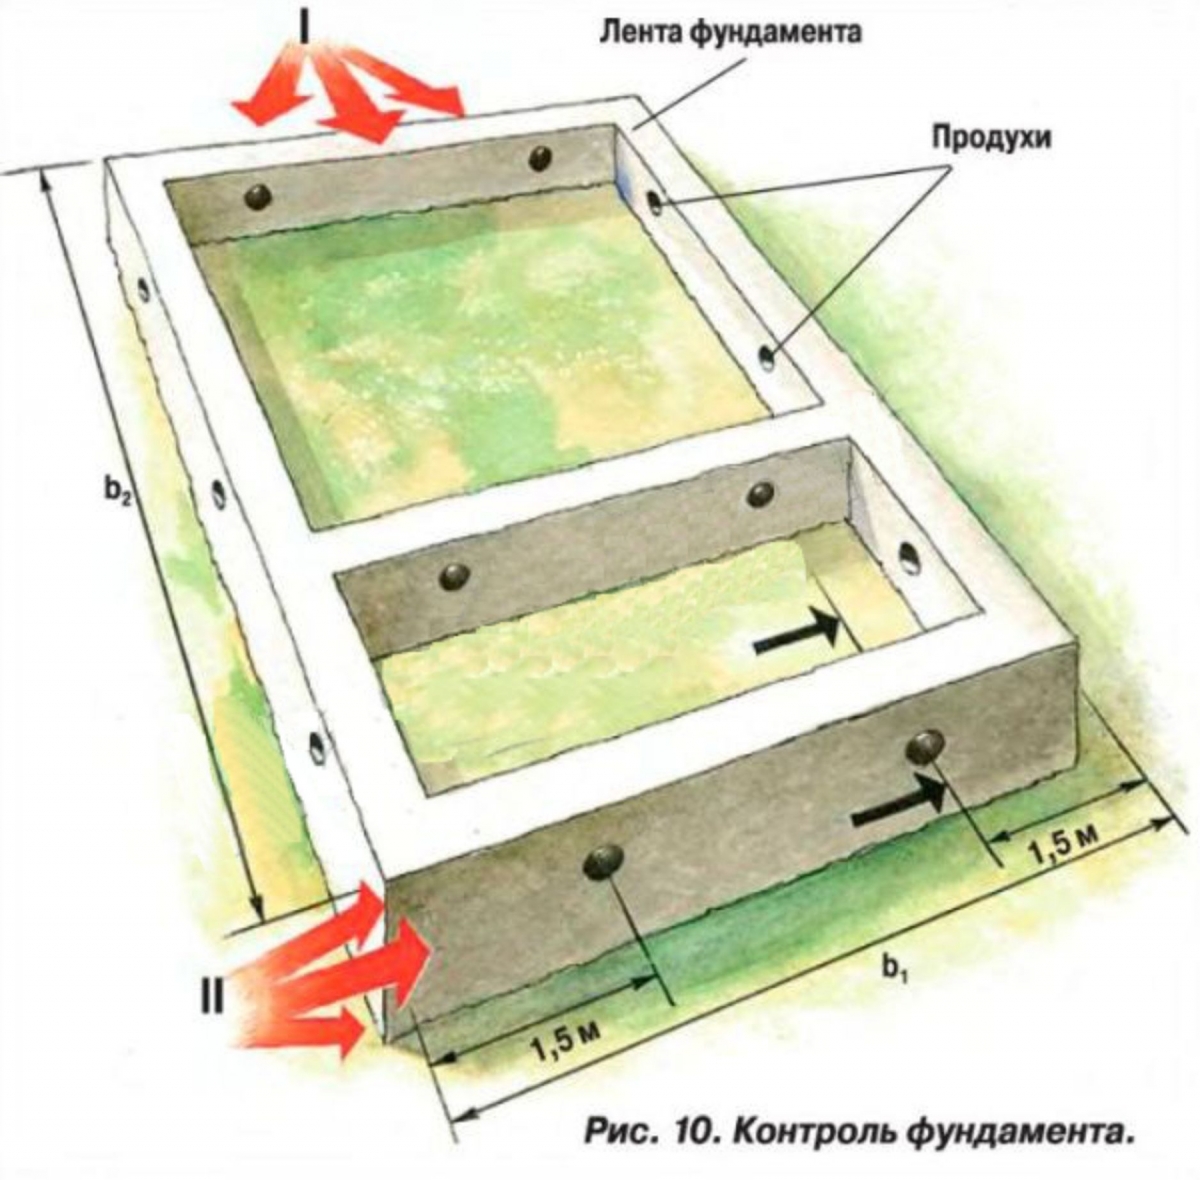
Diagram of the device of the strip monolithic foundation.
To get reliable, it is necessary to correctly carry out a number of preliminary measures for the preparation of the territory. These actions are called geodetic stakeouts. Within the framework of this procedure, it is necessary to take a number of steps in a specific order.

The first step is preparatory. First, you need to clear the area of unnecessary vegetation and other natural formations (trees, stumps, stones, etc.). In addition to natural objects, there may be artifacts of human activity on the site, for example, old buildings and their ruins, various engineering objects (sewers, power lines, trenches, roads, etc.)
It doesn't matter what hinders further construction: natural or man-made obstacles, everything must be removed and cleaned
But it must be remembered that for the demolition of buildings and some other objects, permission from special municipal authorities (technical inspection) is required. Of course, this activity implies both the presence of a plan for the future structure, and the project of the strip foundation and the house as a whole. You can do them both with the help of specialists and on your own, if you feel enough knowledge and confidence in yourself.
The second step is to find the main axes. In geodesy, the main and main axes are the lines along which the structures being built are oriented. The basis of any plan is two perpendicularly intersecting main lines. Based on them, the builder orients all the main points of the future strip foundation and other objects. Correctly correlating the plan of a house with such lines means taking the first step towards building your dream home. Precise orientation of buildings relative to the street, site boundaries, communication lines, cardinal points, etc. will make the future cottage comfortable for living and using.
Layout scheme for a site for a foundation.
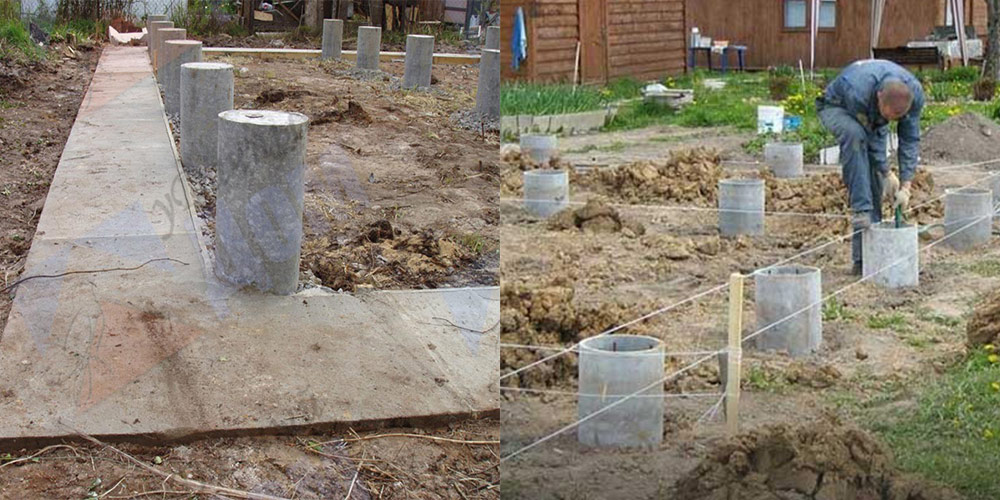
The third step in surveying is to calculate the angles correctly. It is a continuation of the previous stage and consists in determining the corners of the house on the territory of the site, which must be marked with pegs and very carefully calculate all the necessary distances
It is extremely important to make an accurate calculation in order to avoid distortion of the building and reduce its performance
End of geodetic works. In the last step, after calculating the distances accurately, you need to make the perfect angle. To do this, use not only measuring instruments, but also pegs with construction cords. Find out the aspect ratio for the correct calculation.Whatever the builder's experience, even they do not strive to calculate the correct location of each peg the first time, so do not drive them in after the first calculations, but only slightly press them into the ground. Calculating all geodetic parameters is a rather troublesome business that requires care and patience.
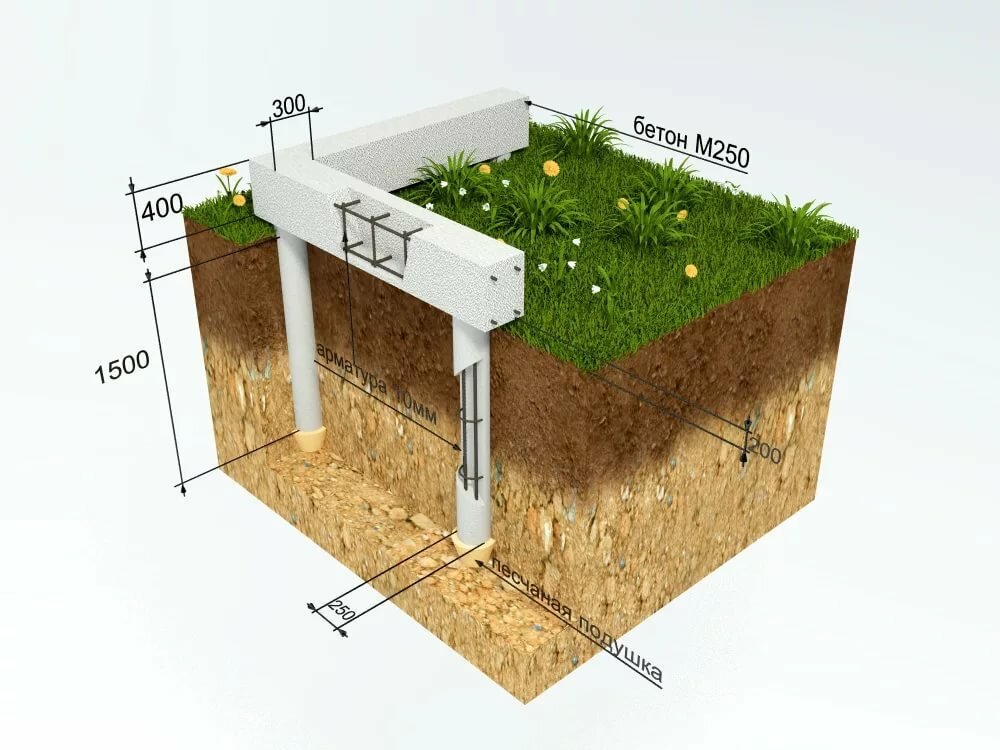
Step-by-step instructions - DIY foundation
The thickness and height of the tape of the base under consideration, as well as the depth of its laying, are selected based on the analysis of the soil, climatic conditions of the area and the number of storeys of the house being built. Without knowledge in this area, it is better to entrust this design stage to a professional. There are many nuances and requirements of GOSTs that must be observed.
But it is quite possible to create a support for your house according to a ready-made project on your own. But in order to avoid mistakes, it is best to make the strip foundation yourself with step-by-step instructions, which are given below. It describes all the subtleties of building a similar design for a typical one-story cottage.
Stages of work
The first stage is marking and earthwork. Regardless of the depth, the sole must rest on solid layers of soil. It can be clay, sandy loam, stony layers or loam. They are usually hidden under turf and layers of ordinary earth. All this will have to be torn down and removed before starting to build the foundation of the house.
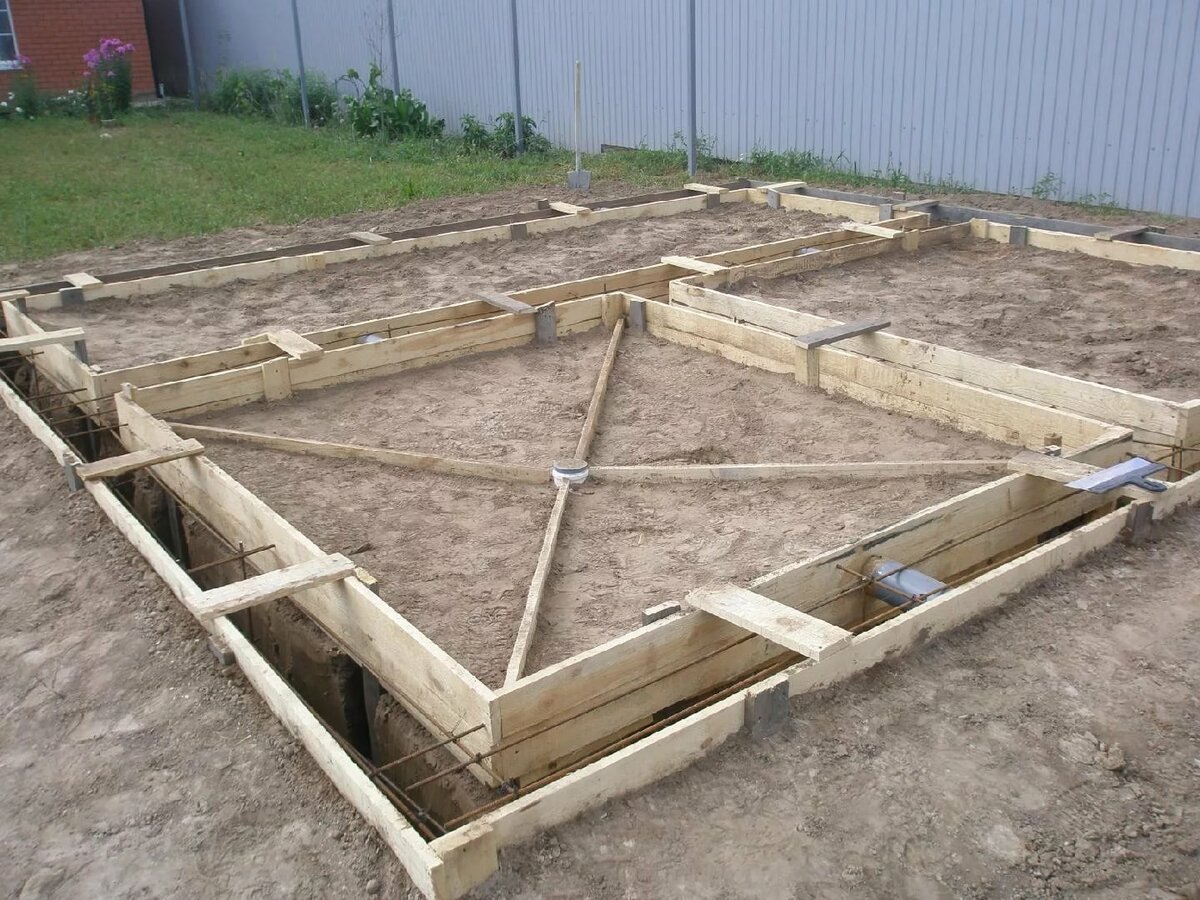
To mark the site, you will need pegs, a tape measure and twine. If the soil is dense, then an excellent formwork will be obtained from the walls of the dug trench. It will only be necessary to build it up later from above. If the soil is loose and constantly crumbling, then the trench will have to be dug a little wider in width so that the formwork boards can be placed inside the pit.
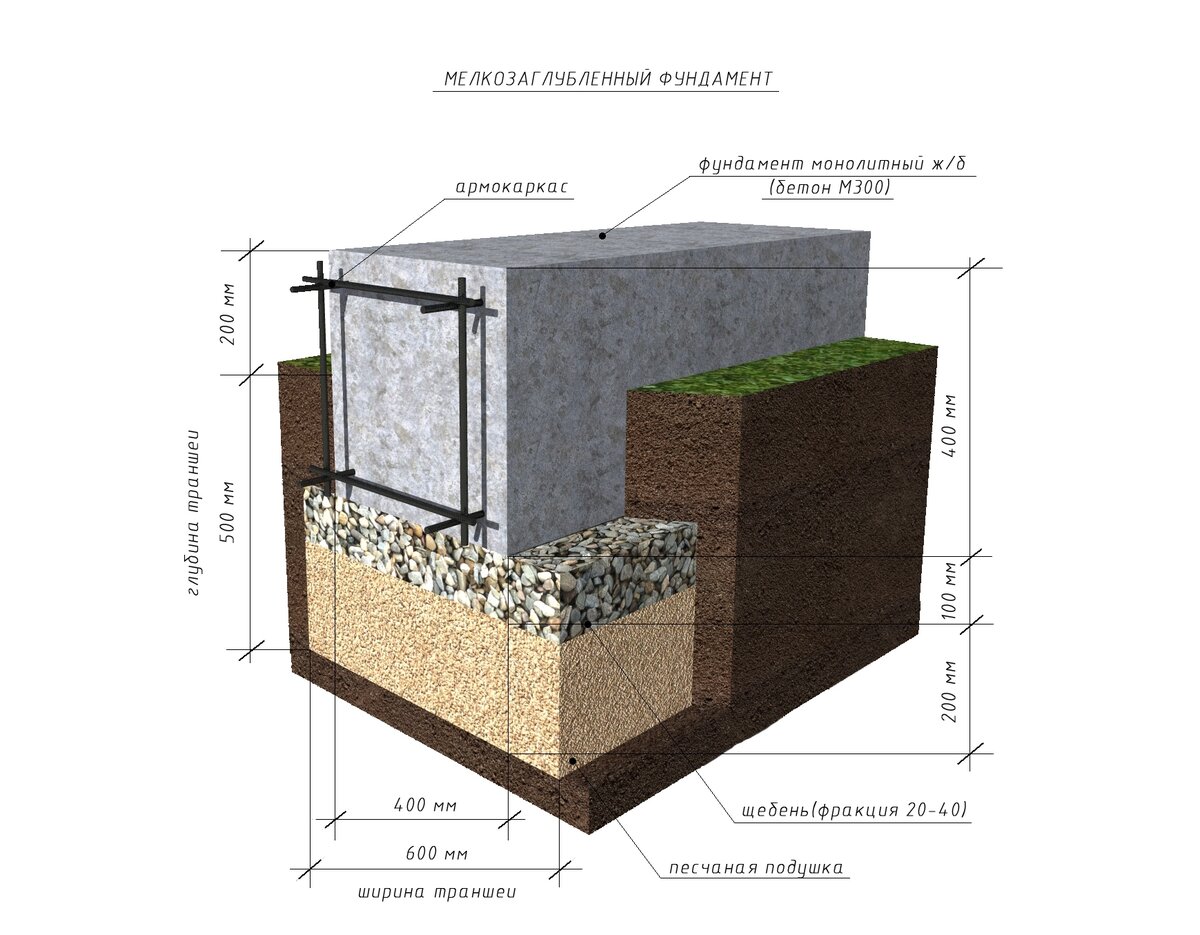
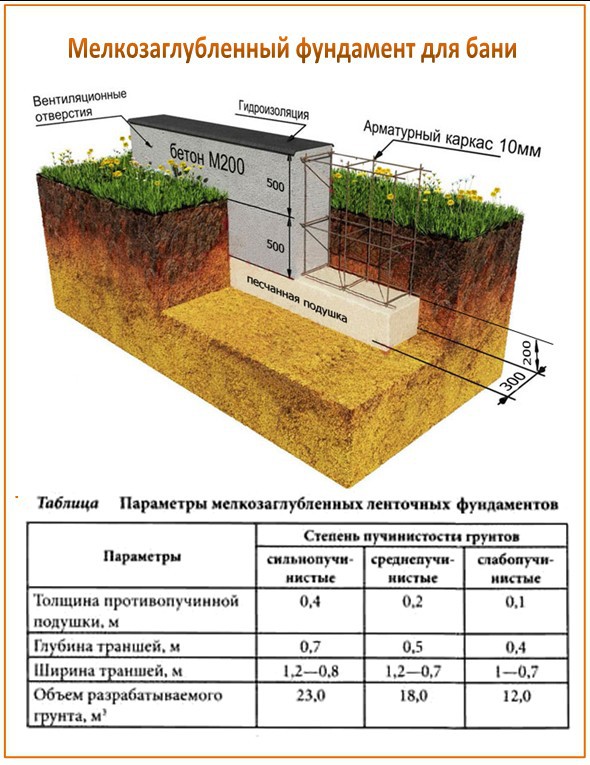
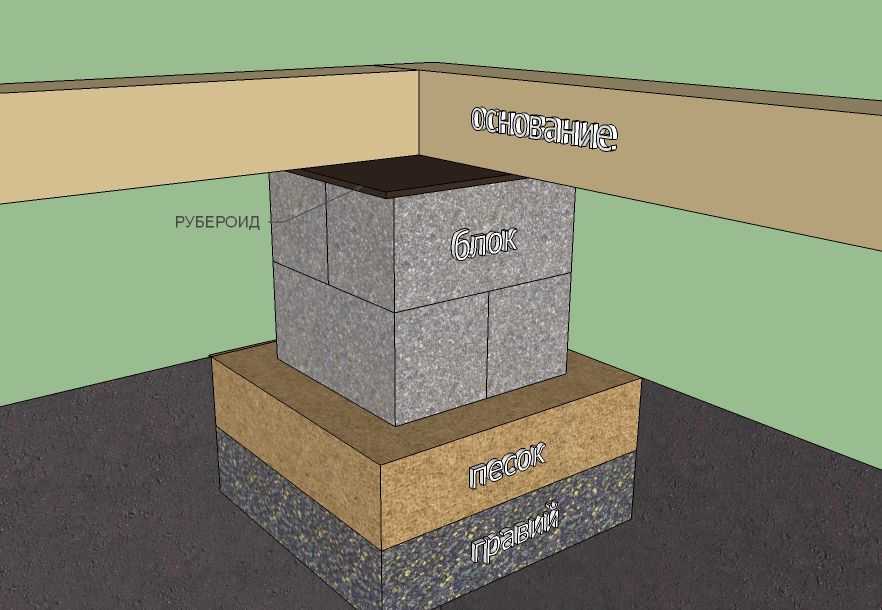
The second stage is the preparation of the pillow. The bottom of the excavated trench is leveled with sand and fine gravel. This sand and gravel layer should be carefully tamped, sprinkling with water as it is poured. In height, it should be in the range of 10-30 cm. This pillow serves to redistribute and reduce point loads on the strip foundation from below during seasonal swelling of the soil.
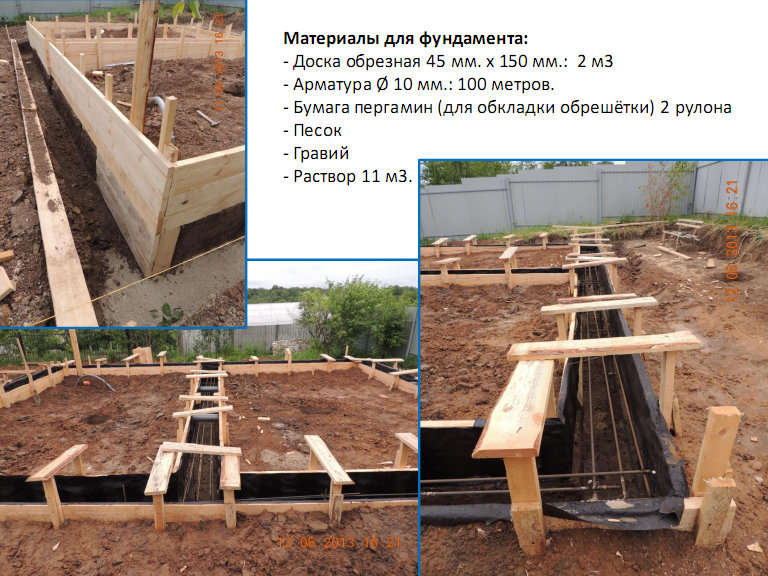
The third stage is the placement of the formwork. Here you will need bars with a cross section of 30 to 40 mm and boards 15–20 mm thick or laminated chipboard. The formwork created for the concrete base of the house will subsequently have to withstand a considerable mass of concrete poured into it. It should be made strong and reliable. If, after filling with concrete mixture, it collapses, then everything will have to start over.
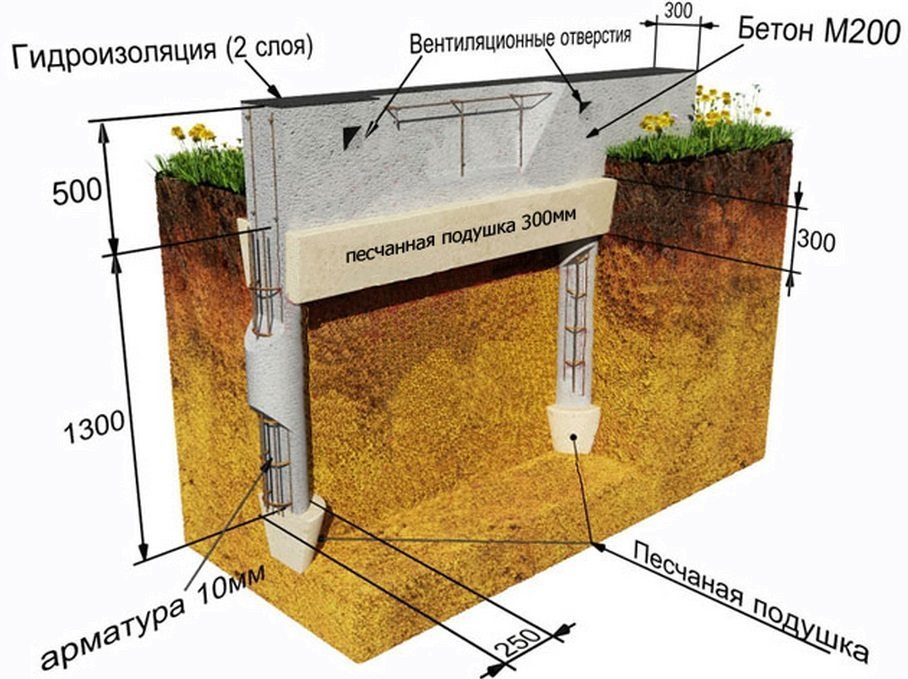
If the groundwater at the construction site is high, then the reinforced concrete will need waterproofing. From above, at the level of the basement of the house, it is usually done with a coating. And to protect that part of the base that remains in the ground, roofing material should be laid in the trench on the sides and on the bottom. It will reliably protect concrete from excess moisture in the soil at the stage of hardening and after.
The fourth stage is the laying of reinforcement. For reinforcement, steel rods of 14-16 mm cross-section and a thin binding wire are usually used. You can also fasten the fittings with electric welding. But in this case, experience with the welding machine and he himself is required. Plus, when performing welding, one must be prepared for the appearance of metal corrosion in the future.
As a result, a frame of reinforcement with cells of 25-30 cm should be formed inside the trench. Moreover, it is laid so that the steel is covered with concrete poured on all sides. Otherwise, the metal will inevitably begin to rust, then the house will definitely not stand for a long time.
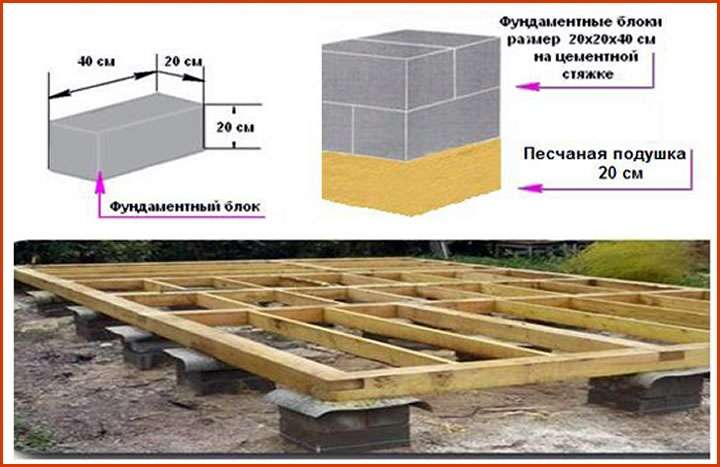
The fifth stage is concrete pouring or FBS laying. If it is decided to equip the foundation for the house being built using block technology, then this greatly speeds up the process of its construction. Here you do not have to do the formwork and wait almost a month before the completion of the concrete setting.
However, support on foundation blocks will cost more than a monolithic counterpart. Plus, they will have to dig a trench of a larger size in width.To distribute loads for the lower row of masonry, FBS are made with an expanding base.
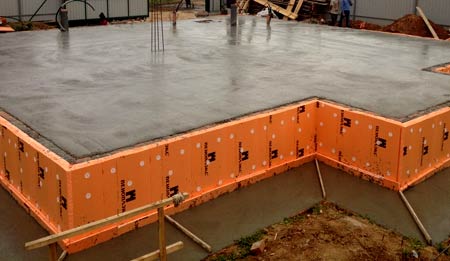
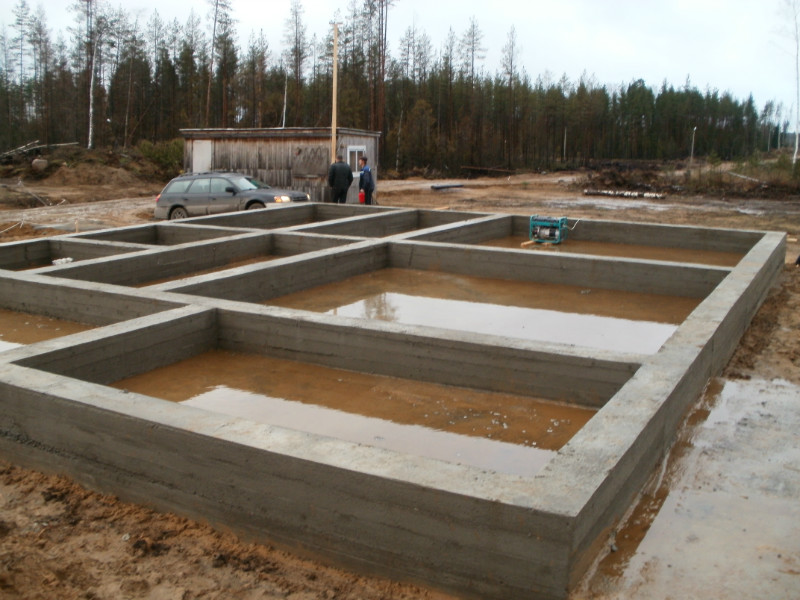
If a monolithic option is chosen for the support device, concrete should be poured immediately over the entire surface. No gaps in length and no layers in height. A monolith is a monolith. The house must be on a solid foundation.
When self-preparation of the concrete mixture, it is necessary to mix cement, sand and crushed stone in proportions of 1: 3: 3
But it is better to initially order a ready-made solution with the M300 brand and above.
When pouring concrete, it is extremely important to ensure that no voids form inside it. There are special vibrators for compaction.
However, you can also use a piece of reinforcement to pierce the filled mass and release air from it.
The sixth stage is waterproofing and blind area. It is allowed to start waterproofing works 3-4 days after the concrete is poured. It takes about three weeks to fully set. But you can already start to process the mastic, even if not completely frozen strip foundation for the house.
Also, around the entire perimeter of the structure, you will need to make a blind area to drain rainwater away from its walls.
What type of foundation should you choose?
The choice of the type of foundation depends on the mass of the building, the type of soil and the depth of its freezing.

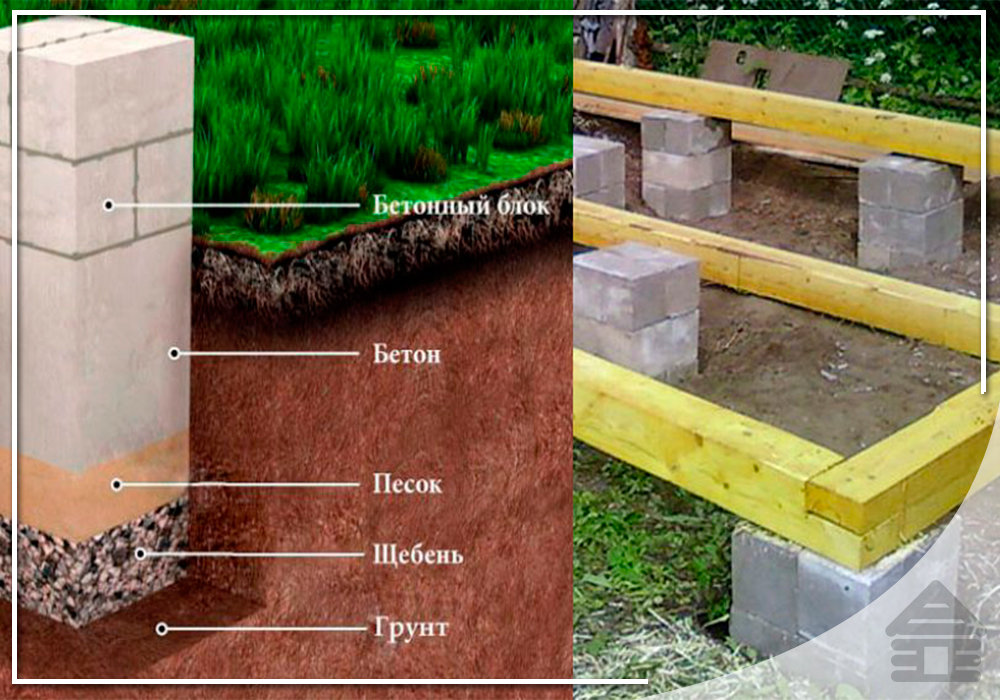
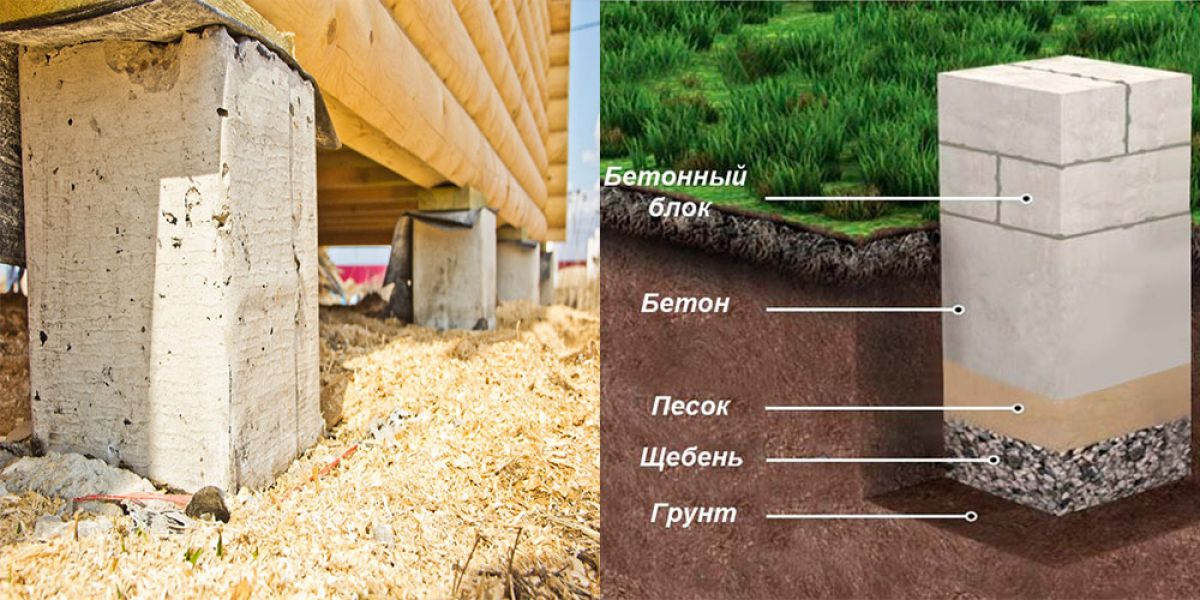
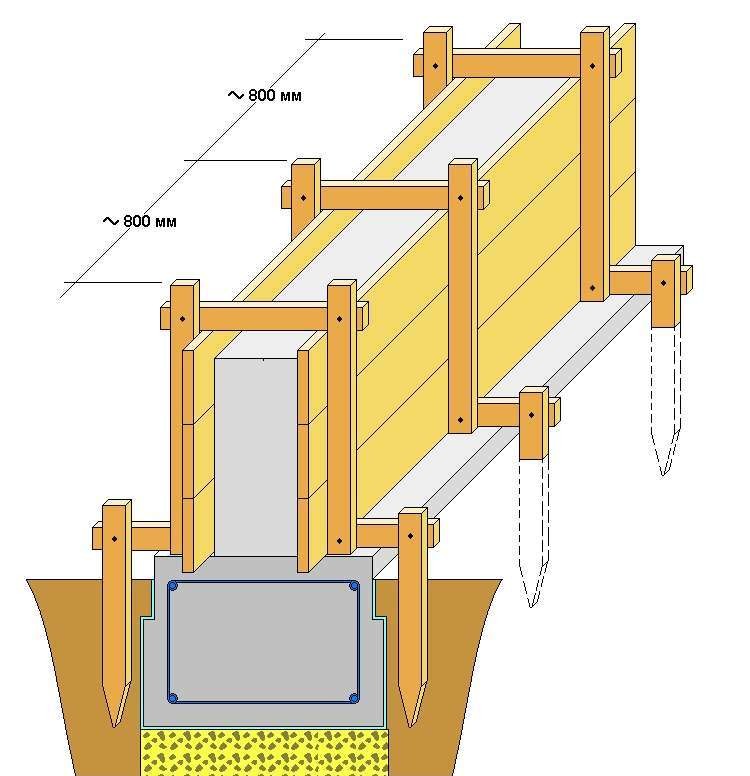
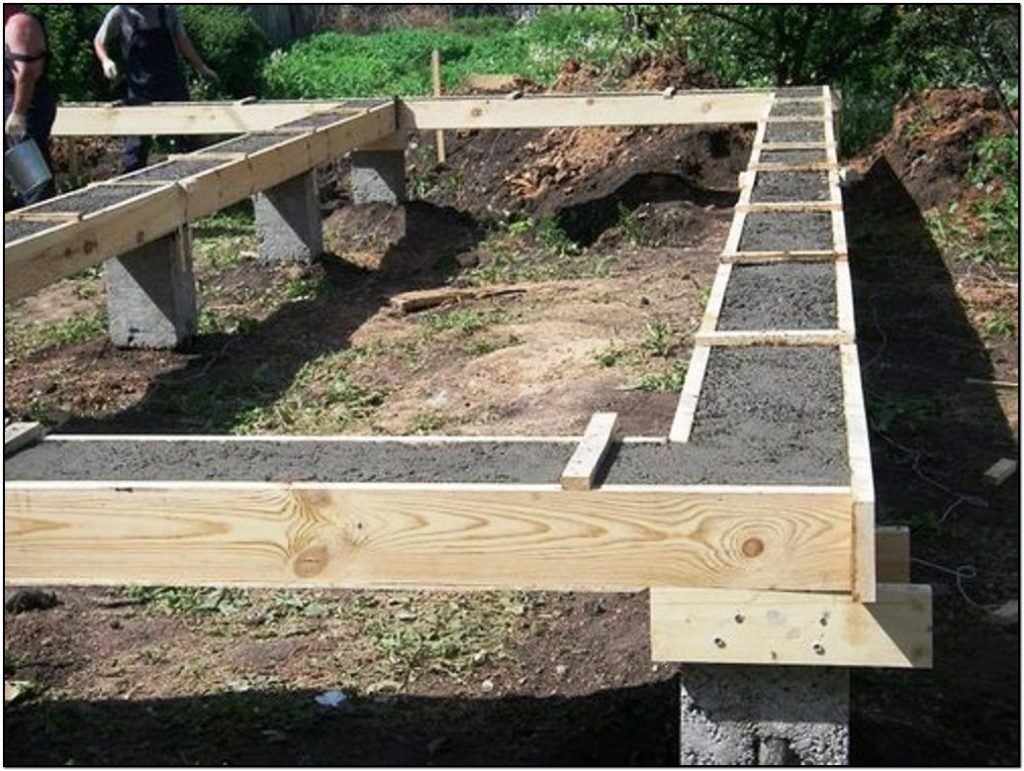
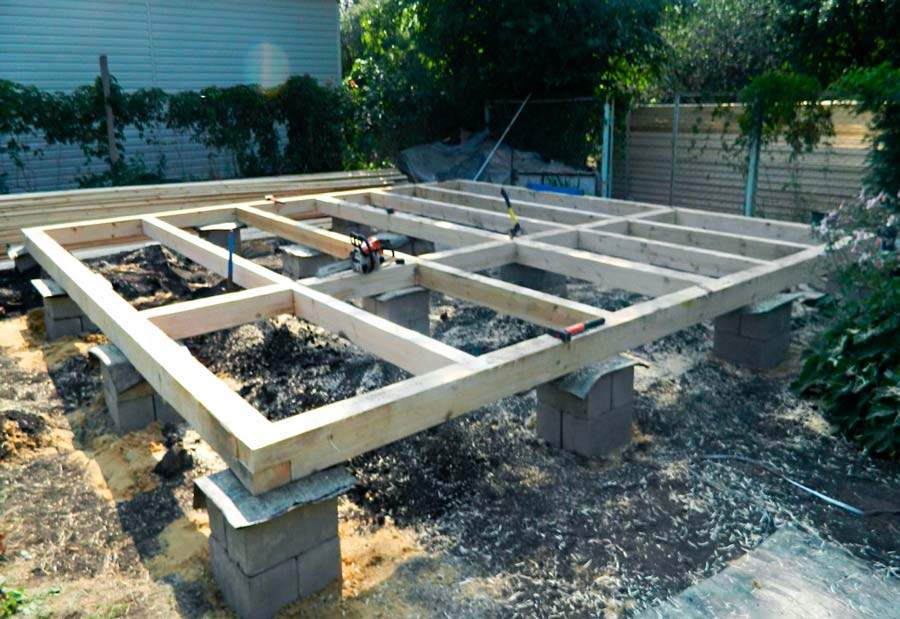
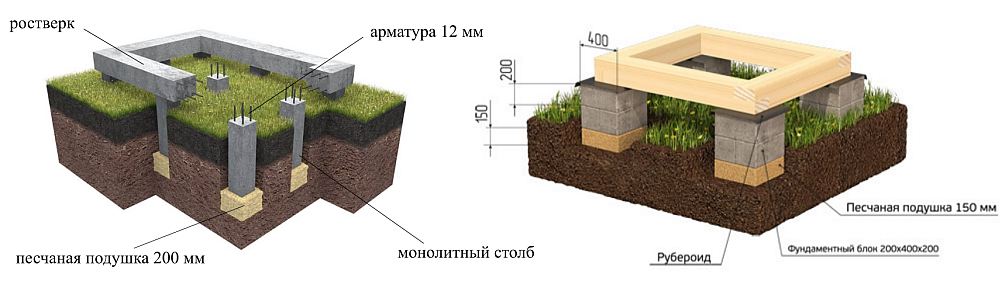
Column supports
By type of construction, all bases are subdivided into:
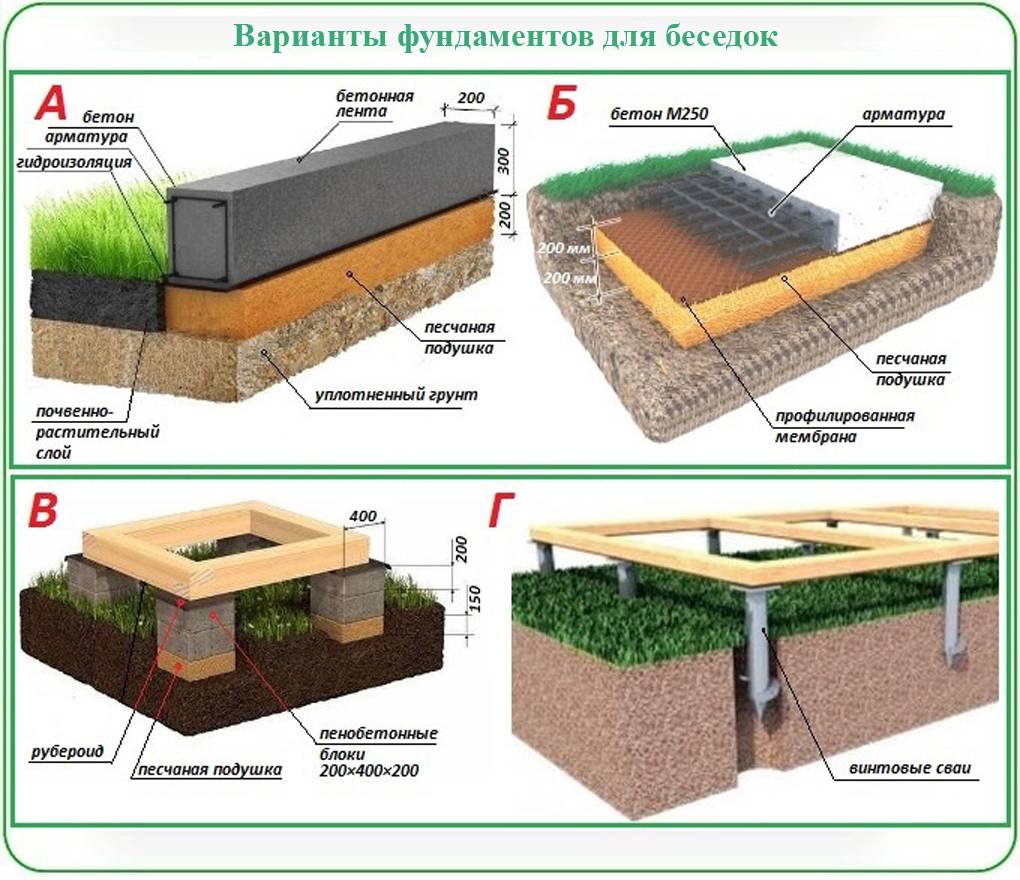
- tape: the most common, made in the form of a closed loop, due to which the load on the ground from the structure is transmitted evenly; it is laid not only under the walls, but also under the partitions of the building; such bases, in turn, are divided into shallow and deep
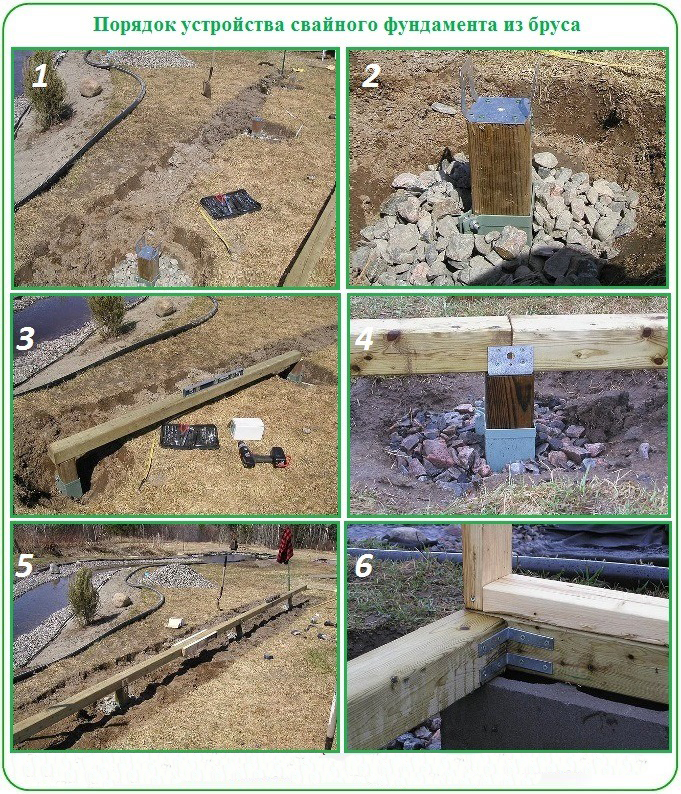
- piled: the building is installed on vertical rods (piles) with a depth of 3-20 m; used in difficult terrain, deep soil freezing and in swampy areas; disadvantages include the need to use special equipment for driving piles into the ground and the absence of basements; with horizontal movements, the soil is unacceptable
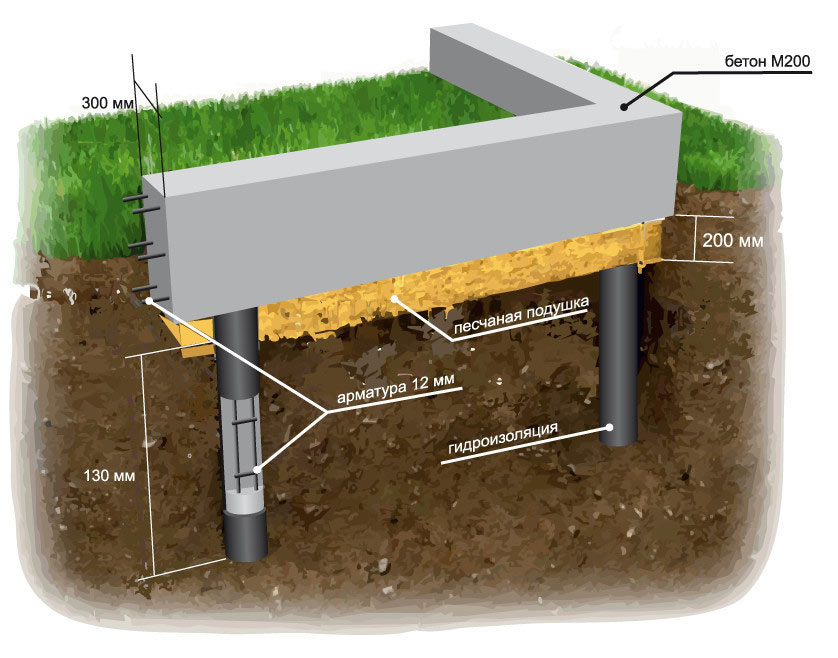
- pile-grillage: with bearing horizontally located beams (grillage) connecting the piles in the upper part; to protect it from frost heaving, it is never buried in the ground
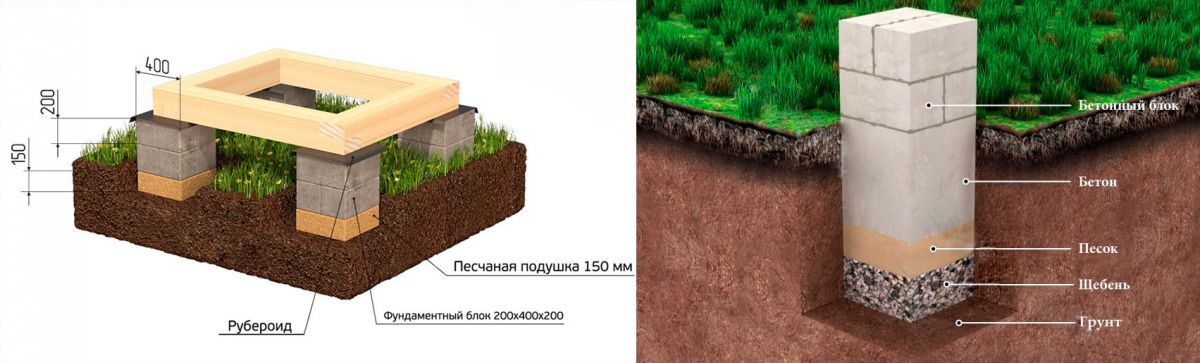
- columnar: on pillars with an extension in the form of a "sole"; erection on soils with deep freezing is allowed; supports connected by jumpers (random beams) are placed every 3 m
- slab: a rather expensive structure in the form of a monolithic slab 20-30 cm thick, lying on the surface of the ground, which also serves as the floor of the building
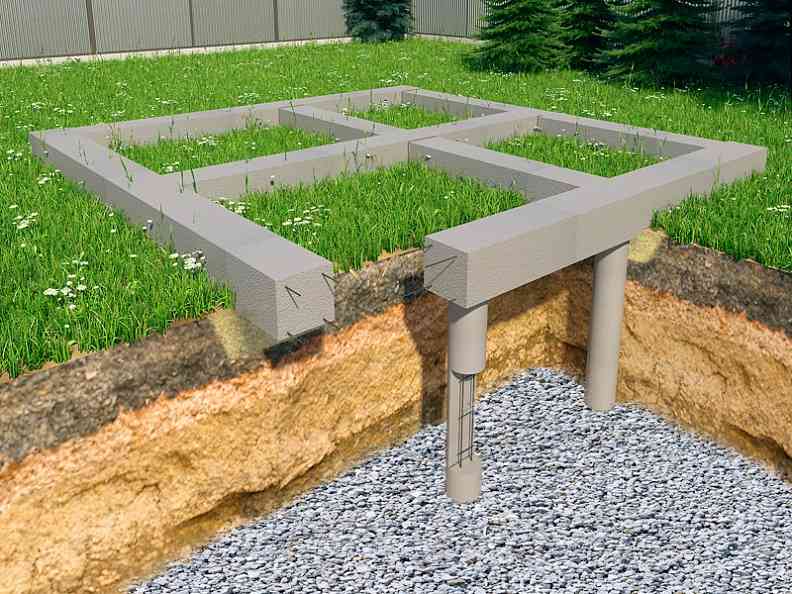
Pile-grillage foundation
Heavy buildings and multi-storey structures are usually erected using strip foundations. Columnar foundations are economically more profitable, and it is allowed to build light frame or wooden houses on them, but only if the soil is not peaty and not heaving clay.

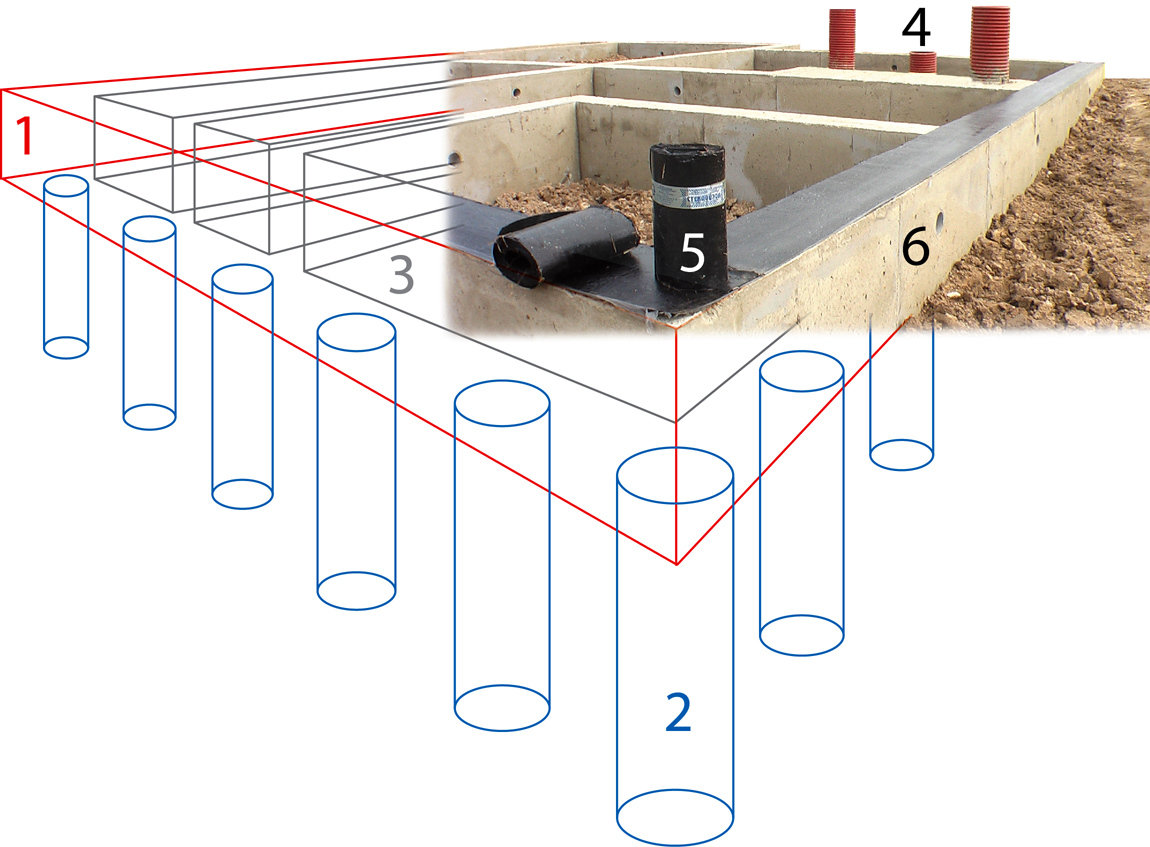

Pile structures can be used even with a significant mass of the structure. But they are used mainly on land plots with weak sandy or peaty soil, as well as in regions of the Far North with a great depth of soil freezing. To avoid movement, the piles are not installed in pits, but driven in or screwed into the ground.

Slab base
It is more reasonable to use slab shallow foundations in problem areas with high soil mobility. Such a "floating" base is able to withstand even significant soil movements without damage to the building.
Pouring of the foundation is allowed at a temperature of +5 C. Work at low temperatures in order to avoid cracking of concrete is unacceptable.
VIDEO: Choosing a foundation for a house
Foundation: types, device, step-by-step instructions for laying a strip foundation with your own hands | Photo & Video + Reviews

How to make garden paths in the country with your own hands? (80+ Photo options for great ideas) + Reviews
The order of work on the site
What to pay special attention to or the main stages of the construction of foundations and a description of the necessary work:
- Where will the house be located in the depths of the site, what will be in front of it, etc.
- Remove the top layer of soil so that nothing interferes with the marking of the trenches for the foundation.

Will you dig the trench yourself or hire an excavator, it's up to you. We make the width of the trench 30-60 cm, the depth from the region ranges between 80 cm to 1.6 meters. Everything is very individual, a lot depends on the height difference on the site. A pillow under the base of 10-15 cm of sand, then 15-20 cm of small crushed stone, be sure to tamp well.
When making the formwork, some first pour the mortar to ground level, then make the formwork. Someone does it right away, it doesn't matter if you fill the foundation with your own hands, you will have to wind less circles around the formwork.
The reinforcement is placed every 20-40 cm horizontally and 60-80 cm vertically between each other along the perimeter. The easiest way to fasten the rods is with a knitting wire. It is convenient to use a road mesh with a cell of 20 * 20 cm. Cut off a 20 * 20 strip and to the resulting lattice, horizontal reinforcement is attached, greatly simplifying and speeding up the process.


It is necessary to fill in layers. When pouring, concrete must be tamped by removing voids. In hot weather, after each working day, it is necessary to cover the foundation with a film for even drying.


Do not forget the foundation - the house begins with it. Do not try to save money on it, it can have negative consequences for the house in the foreseeable future.

Finally
The erection of the walls can begin no earlier than in 4-5 days, but it will be better if the finished foundation is sustained before starting for 4-5 weeks. This time can show possible subsidence of structures and their behavior under their own weight.
During the execution of work, it is very important to comply with construction technology and the use of high-quality materials for reinforcement and concrete preparation. It is also especially important to apply and fix waterproofing
Therefore, one should not forget about the obligatory priming of the surface with a deeply penetrating bituminous primer 2-3 times.