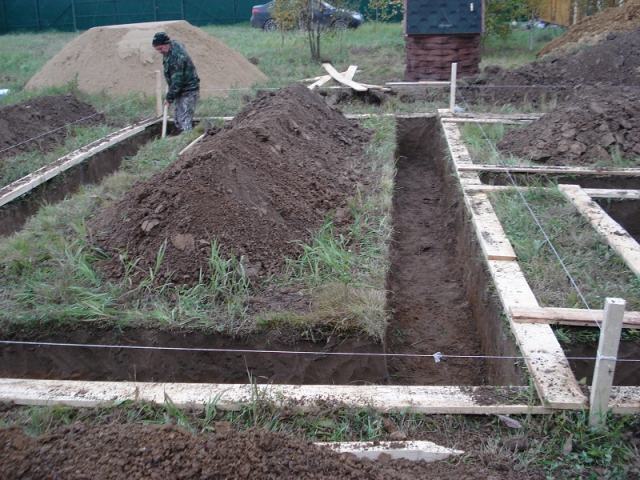
What tools do you need?
Do-it-yourself foundation marking is done using tools:
- Roulette;
- Cord;
- Hydro level and plumb bob;
- You will also need wooden pegs.
Where to start markup?
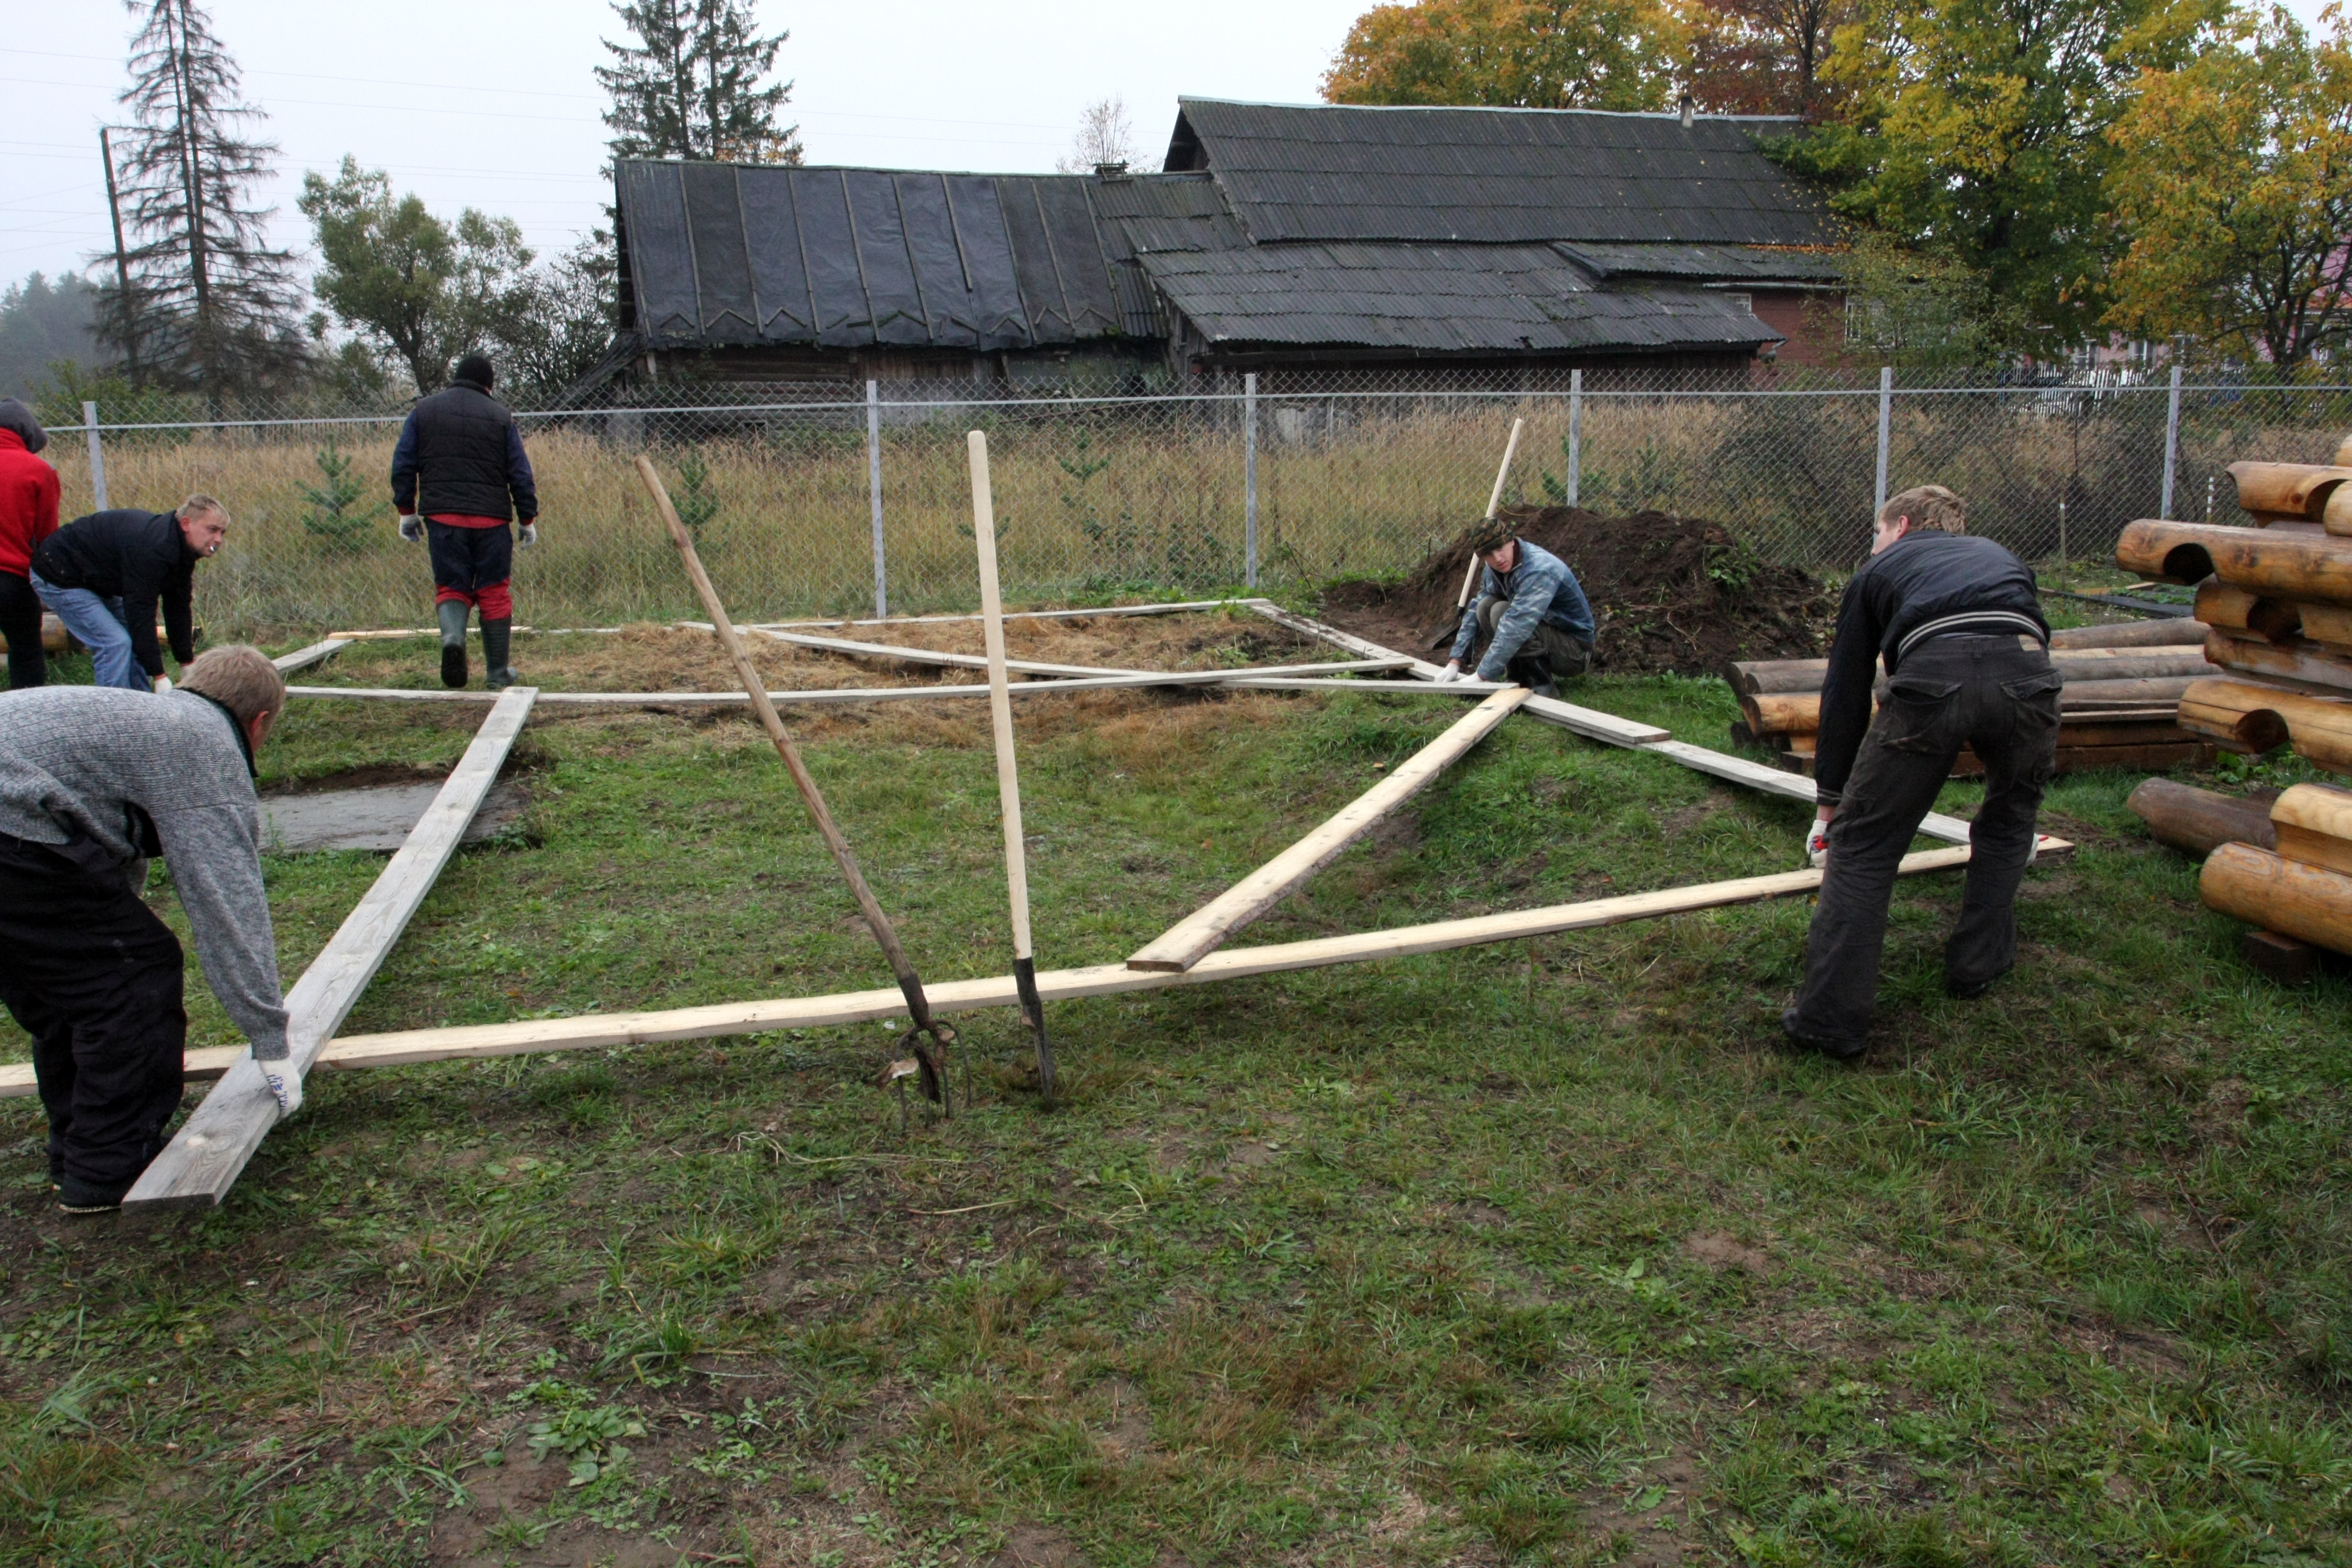
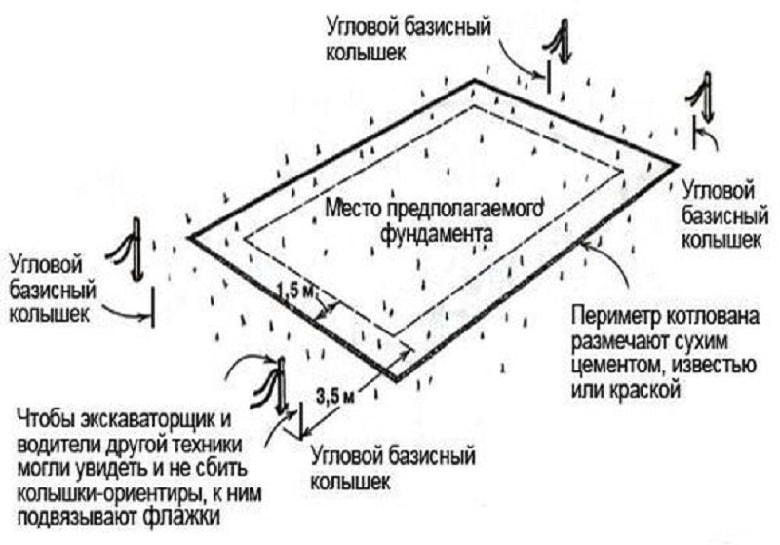
So, how to mark the foundation? To begin with, you need to determine two starting points by driving in pegs at the corners of the future building, which are on one straight line from the side of its longest wall. Further, it will be necessary to draw perpendiculars from them, thus marking the outer contour of the adjacent walls.
"Egyptian Triangle". The easiest method
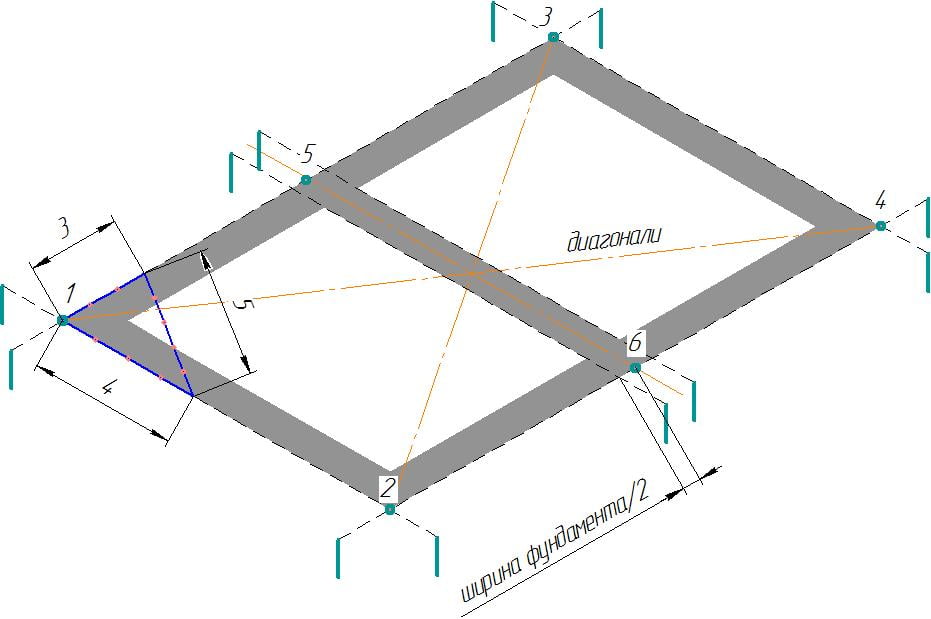
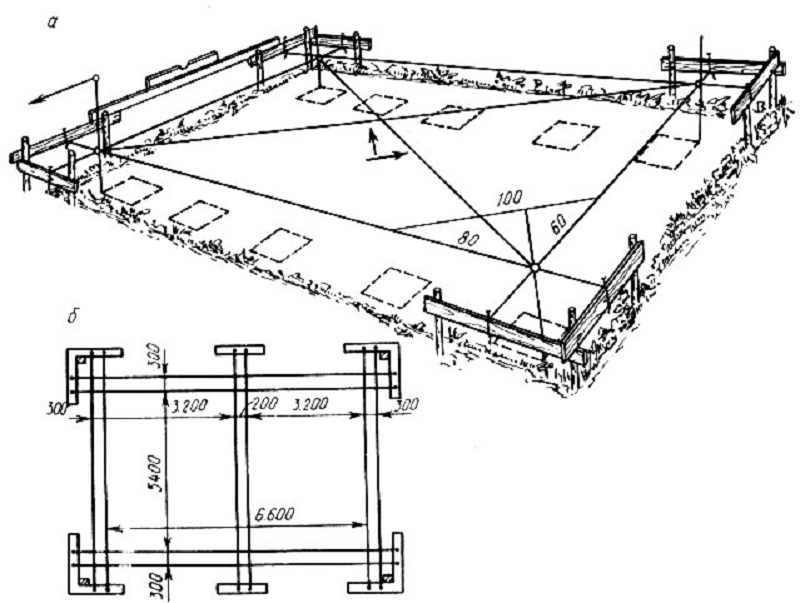
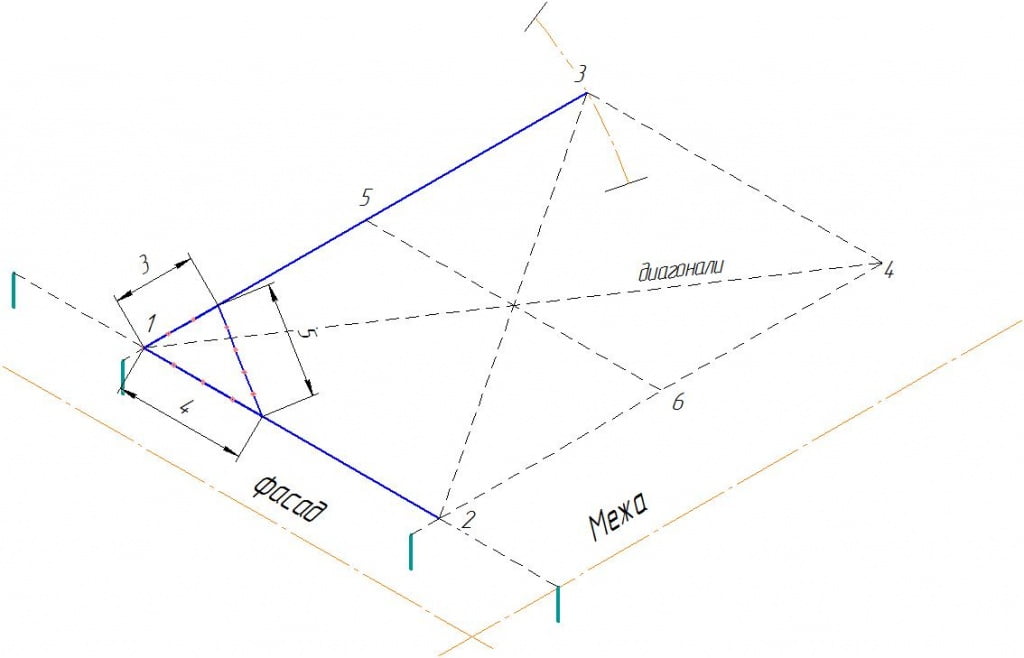
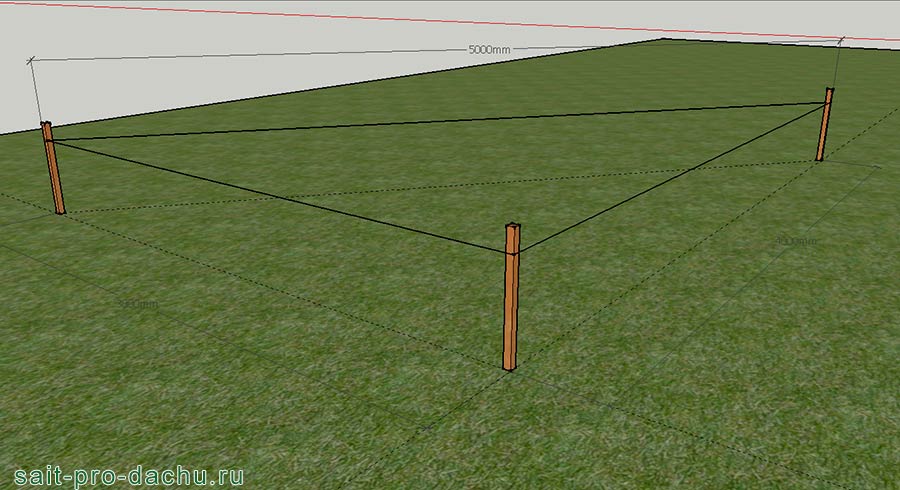
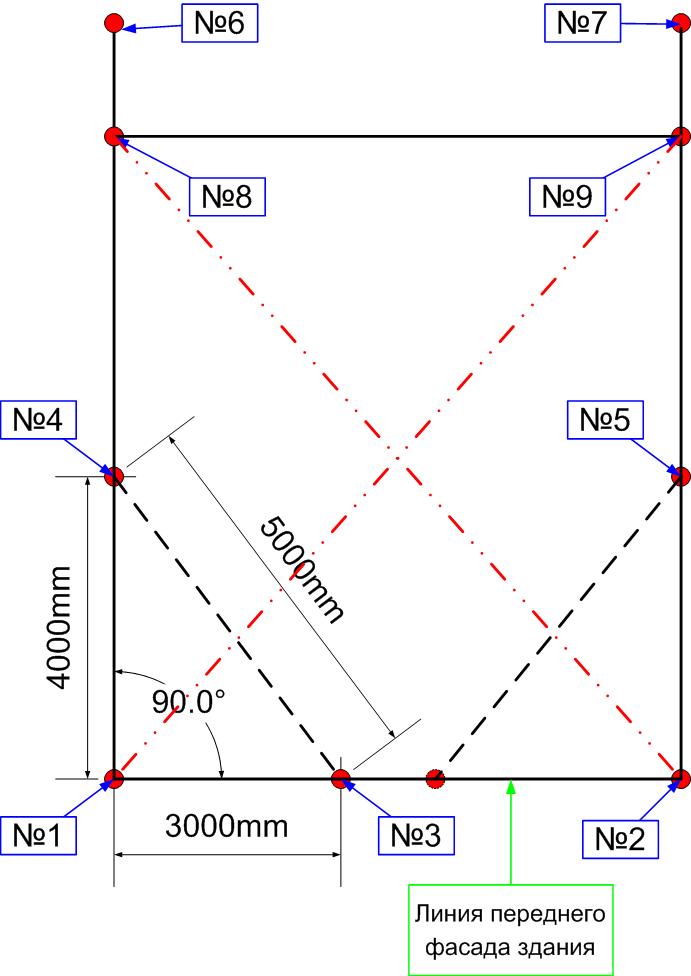
Do-it-yourself foundation marking can be done most quickly by the "golden" triangle method, which has a aspect ratio of 5 * 3 * 4. In this case, the event is carried out in several stages:
1. First you need to find a long rope and tie four knots on it. The first is at the end, the second is at a distance of 3m, the third is four meters from the second and the last is five meters from the third; 2. After that, the very first and very last knots are connected with a nail. A nail should also be driven into each of the intermediate nodes; 3. In this case, the long side of the resulting triangle must be placed along the line between the two already driven pegs; 4. Along the short side, draw the required perpendicular; 5. On the resulting straight line, drive in the third peg at a distance equal to the width of the building.
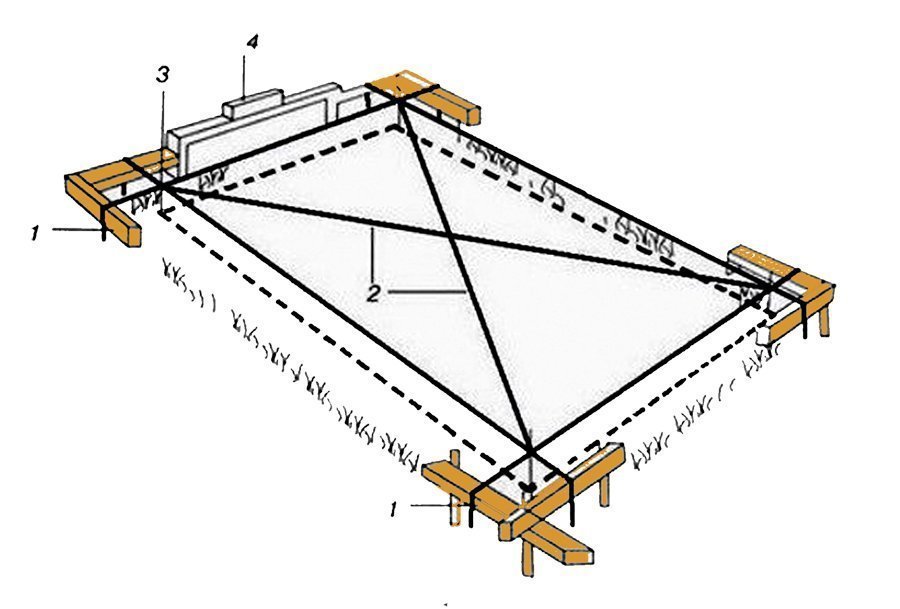
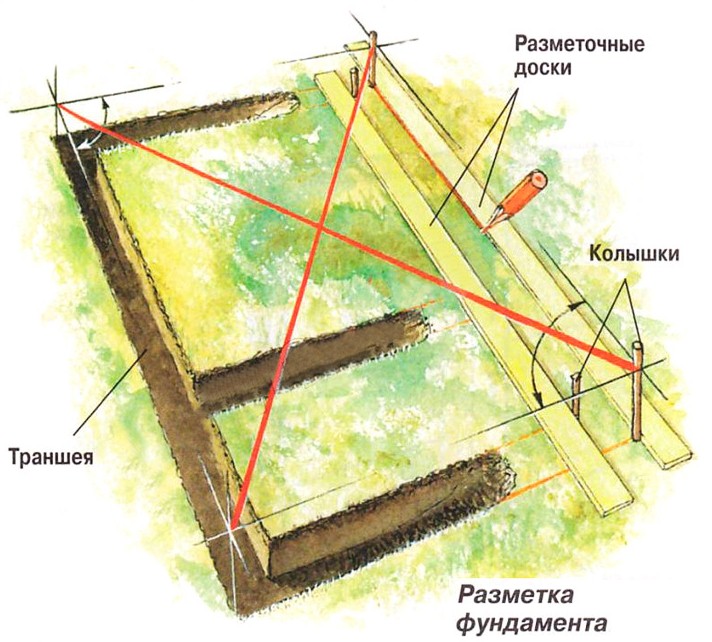
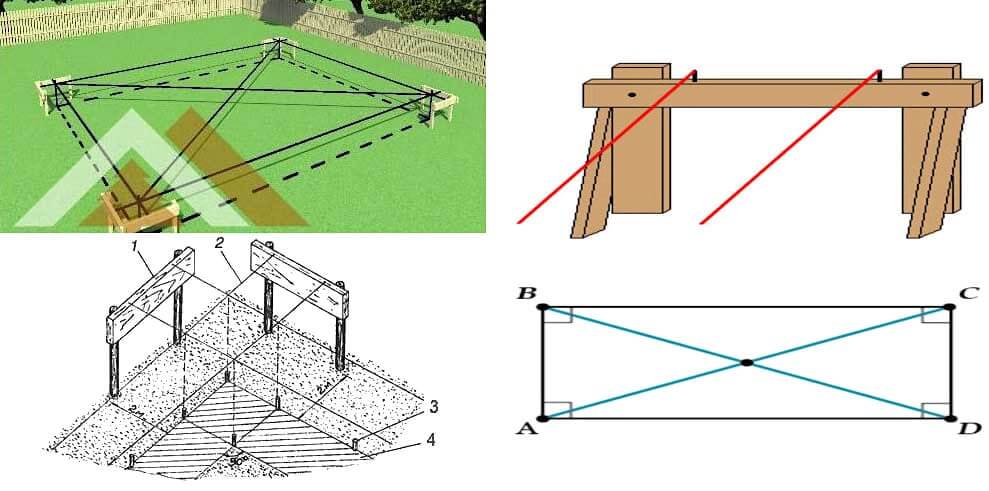
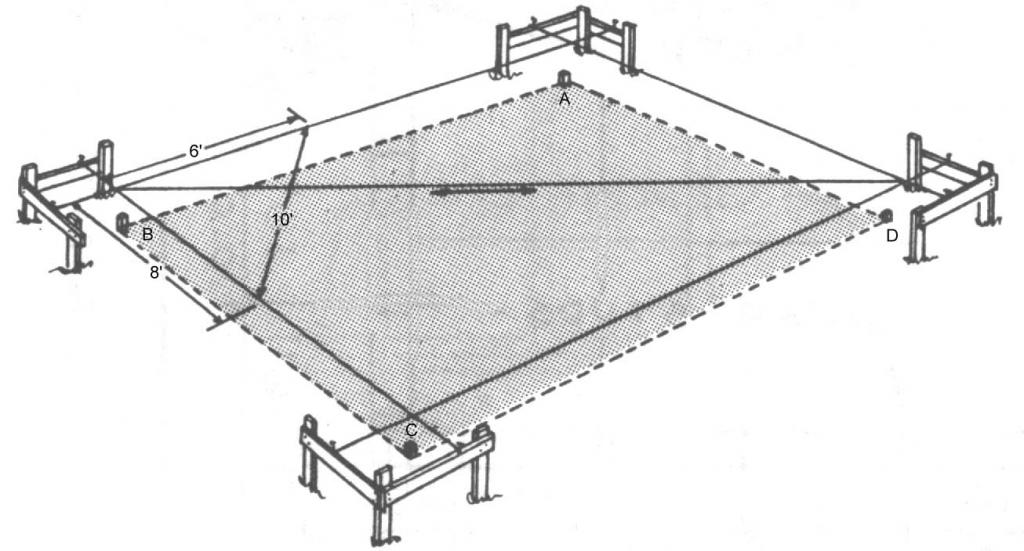
Important: The correctness of all measurements must be checked. To do this, two cords are pulled diagonally between the hammered stakes and tied at the intersection
Two arcs method
The marking of the foundation on their own using this method is also performed using a rope. Previously, equal distances are measured from one of the pegs in both directions along the existing line and the places found are marked. Next, a rope is attached to one of the points obtained with a nail tied at the opposite end. Having pulled it, they draw an arc opposite the peg from which the distances were measured. Then the rope is attached to the second marked place and another arc is drawn. From the point where the arcs intersect, draw a line to the peg. The result is a right angle between it and the existing line.
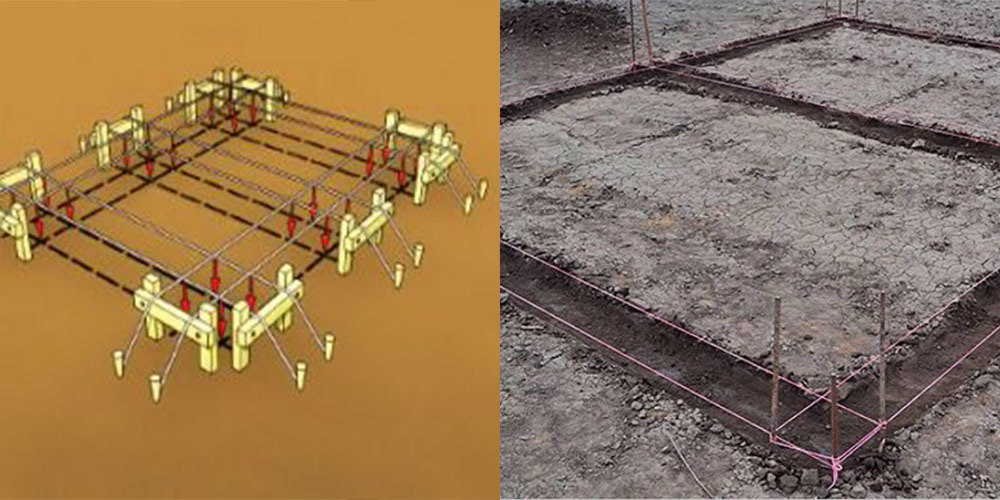
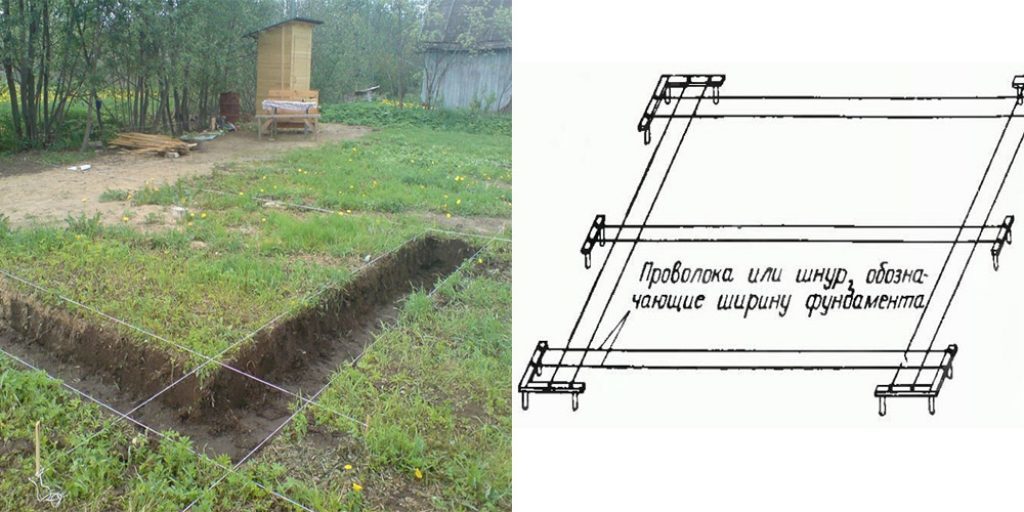
At the final stage, a cord is tied to the stakes at the height of the future foundation, checking the horizontal position of its position from all four sides, using the building level. For the strip foundation, draw an inner contour parallel to the outer one found and also pull the cord.
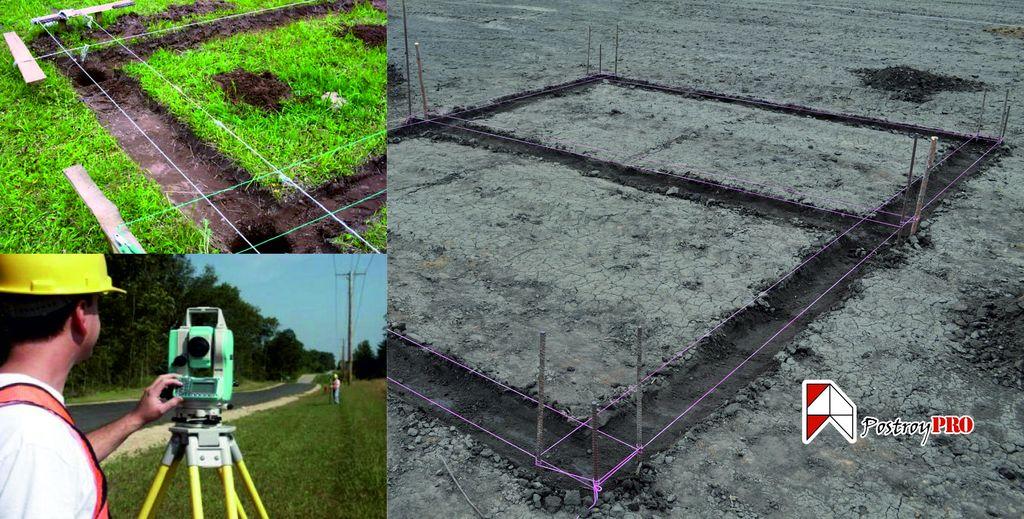
Tip: In the event that the trench is supposed to be dug with the assistance of equipment, it is better not to use the cords. In the process, they can break. In this case, the lines between the found points should be drawn with sand. To find the centers of the pillars of the columnar foundation, the necessary distances are measured from the found corners along the drawn lines and marks are put. Next, check the rectangularity of the corners obtained at the intersection of the lines (connecting the obtained points on opposite sides and the perimeter line on which the marks are located).
Do-it-yourself foundation marking, as you can see, the procedure is not so complicated. The most important thing is to do everything carefully, to pull the rope well and be sure to check the result obtained by the method of diagonals.
Related videos:
How to mark a strip foundation
The name "strip", the foundation received because of its shape. It is laid in the form of a continuous tape across the entire perimeter of the building. It is used for light buildings, for example, frame houses or single-storey log buildings.
The first peg is used to determine the direction of the load-bearing wall. The required distance is measured and the second peg is installed.To obtain a second axis, the second cord is pulled at a right angle relative to the first axis.
The corners of the foundation are marked with special devices:
- goniometer;
- level;
- theodolite.
In their absence, the so-called "golden triangle" method is used. One side is taken 3.4 m, the other 5 meters.
The corner peg will be the apex of the triangle. From it, it is necessary to calculate, along the laid axis, exactly 3 meters.
The hypotenuse of the triangle will be up to 5 meters. The column on which the main axis is fixed moves in any direction until the distance separating the axes reaches the required value. Then a stake is driven into this point on the site. Two found points are obtained. The required length is measured from them to the location of the third peg.
Other angles are set in the same way. After finishing the marking of the external axes, the location of the diagonals of the foundation under the house is determined.
A measurement is made of the resulting length of the diagonal connecting the corners located in opposite sides. The resulting value should have the same indicators.
Starting from the obtained angles, in each direction, strictly along the axes, it is necessary to measure the width of the base. The pegs are driven into each point obtained. After every two marks, cast-off boards are mounted.
To maintain dimensional accuracy, axial threads are fixed to the rags. They must be at a height equal to the upper mark of the foundation surface.
Anyone can do the marking of the foundation with their own hands, regardless of its type. You just need to approach this work with all responsibility and follow all the rules. Carefulness in such work will always lead to a positive result.
- Tools required for the job
- Preparatory activities
- Outer contour marking
- To mark the inner contour and load-bearing walls
Before starting construction work, be sure to figure out how to correctly mark the foundation. Prepare a plan for the future foundation on paper or electronically.
The quality, durability and reliability of the finished base directly depend on the correctness of the preliminary marking, so approach this work with all responsibility. The corners of the foundation must be absolutely straight, and the dimensions of the walls must be respected almost to a centimeter.
Marking depending on the type of foundation
Each foundation has its own characteristics in connection with which there are peculiarities in the markup.
Strip foundation
Pegs are placed at the corners of the foundation, between which it is necessary to pull a string or colored tape. The pegs are driven in at the corners of the outer edges, while the trench is dripped from the inside of the marking. It is difficult to find a perfectly flat area, so the depth of the trench is usually measured at the lowest point of the foundation marking.
For a small building, a trench half a meter deep will be enough
It is imperative that the bottom of the trench is as flat as possible. Also, the trench must have strictly vertical walls.
Column foundation
Laying out a columnar, pile, or slab foundation is very similar to conventional layout, but the process is somewhat complicated. On the edges of the foundation marking, it is necessary to mark the points for placing the supports. The distance between them should be no more than 2 meters.
Basic calculation parameters

When creating a drawing of the base of a house, it is necessary to use the results of calculations made when designing the foundations. In particular, it is necessary to consider:
- the total mass of the house under construction;
- an increase in the load on a house during its operation, for example, the construction of a second floor;
- groundwater level;
- type of soil on the land.
These data take into account not only the geometric dimensions of the foundation, but the materials that will be used in its construction (concrete grade, reinforcement size, etc.).In addition, the designer will determine the type of hydraulic and thermal insulation. When building a foundation on land with a high groundwater level, it is necessary to design a drainage system that will drain excess water from the foundation structure, and thereby extend its service life.
Ideally, the design of the foundations of buildings and structures should be carried out by a company that has experience in such work in the design of foundations. When self-designing the foundations of buildings, it is advisable to use the current guidelines and instructions for the design of foundations.
Conditions and nuances of the process
In order for the marking for the strip foundation to be adequate, it is necessary to use the following tools for its implementation:
- 20-meter metal tape measure;
- reliable thick rope;
- strong pegs made of wood and reliable clothespins, which are applicable for marking the local points of the future structure.
Before starting work, the point that plays the role of the corner of the building must be determined. Through that zone, it is necessary to draw a special long line, which became the basis for the first wall (it will be frontal or facade type does not really matter). The peg itself should be installed somewhere at a distance of 50 cm from the original corner, but we mark the last one with a clothespin.

With the participation of a measuring tape, we set aside the required length from the wall itself, after which we drive in another peg at the same distance as the first one, we also fix the localization of the second corner with a clothespin.
It is not recommended to place the marker in the corner itself: it can either suffer during the work process, or simply interfere with the excavation procedure.
Through the mark - the point should be carefully drawn an even line of the second wall, just as it happened in the first case, to begin with, the required angle is measured:
- we set aside four meters from the first wall and mark this point;
- on the second and third - and do the same;
- measure the resulting distance using a tape measure;
- if the result is 5m - excellent, you can also drive in the next peg of the next wall, measure the next angle;
- other geometric indicators are measured.
Attention should be concentrated - the cord, with the help of which you can qualitatively mark the foundation yourself, must be located at the same height at all points. It is more than impractical to carry out measurements on the soil itself, since there is a potentially large error in calculations due to the nuances of the relief
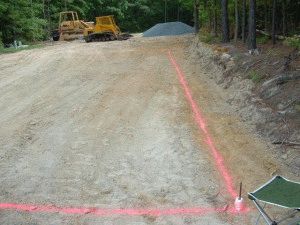
In itself, such work, in principle, is not particularly difficult. But sometimes its implementation requires an experienced and skillful assistant. You can complete the marking procedure by monitoring whether the diagonals of the resulting rectangle are the same. If a deviation is found within three centimeters, then such an indicator is quite acceptable.
The inner contour is marked in a similar way. The corners are controlled in the same way. In the event that it is only supposed to fill the trench using the foundation, the procedure can be performed immediately, always allowing the formwork. In general, marking the site for the foundation is a rather simple procedure, it is much more problematic to comply with all the geometric parameters of the installation of the formwork itself and the optimal installation of the mandatory upper level, adhering to the correct height. For this purpose, a thorough clearing of the construction site and its leveling are carried out even before the markings have been carried out.
The foundation project itself can be measured by applying the measurements of the technological reference to the cultivated area, which are indicated within it. Then any of the potentially erected corners of the structure is usually fixed, taking into account the selected distances from all control points. This will be the first corner of the structure.
All these facts are very important for the construction process.It is at this stage that we have the opportunity to make changes to the already approved building plan, which arose the need. It is worth considering only the fact of maintaining the parameters for residential buildings, for example, such as the minimum distance from the boundary limits of the site, as well as trunk-type pipelines.
How the strip foundation works, its advantages
It is called tape because it looks like reinforced concrete belts laid in a trench dug along the contour of the building. If the soil is crumbling, the depth is large, and there are many intermediate walls inside the building perimeter, for which a foundation must also be built, then a foundation pit comes off, in which all foundation work is carried out.
Structurally, the strip foundation can be monolithic or precast-monolithic. In the latter case, its upper part will look like a monolithic reinforced concrete belt located along all the walls of the foundation, assembled from separate blocks.
In private construction, strip foundation trenches can be dug manually in order to save money. In this case, the soil is either taken out or scattered around the site, raising its level.
The depth of the strip foundation is usually determined by the level of soil freezing. For the southern regions of Russia it is slightly more than a meter, in the northern regions and in Siberia - 1.5 - 2 and even more.
Advantages of strip foundations:
- simple construction technology;
- it is possible to lay a basement or basement floor;
- are built on solid soils - stone-sand and clay;
- they are quite economical;
- parameters - width, depth of laying, number of reinforcement, etc. indicators affecting strength are easily adjustable.
You can build such a foundation under the house with your own hands.
Marking the outer contour and forming the corner of the foundation
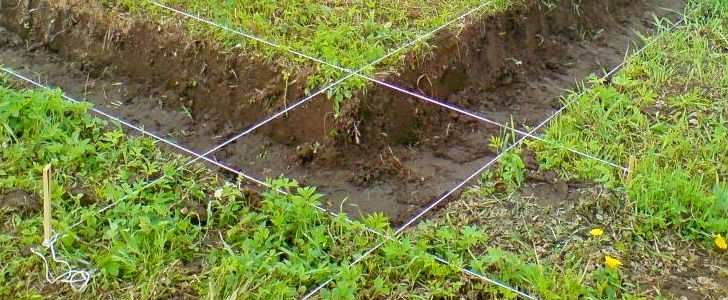
For example, a 6 x 8 house will be built. After marking the side that will serve as its length, mark the second side. To do this, another peg is hammered, a cord is tied to it and pulled perpendicular to the first. The point of intersection of the cords is held together. This will be the corner of the foundation. On the second cord, you need to make a mark, which should be 6 m wide.
The Pythagorean theorem is used to form the angle. In order not to engage in deep geometric calculations, they take two segments of 3 m and 4 m.On the first cord, which indicates the length of the foundation, 4 m are measured from the corner and a mark is put.
On the second cord, a mark is made at a distance of 3 m.Then, using a tape measure, connect one mark to another so that 5 m is separated on the tape measure.If the distance between the marks is 5 m, everything is fine. If not, move the end of the second cord with a 3 m mark until the tape is set at the desired distance.
Brief description of the laser level
A laser level is one of the devices that belong to a large group of measuring instruments.
The main purpose of the level is to determine the difference in heights of one place on the surface relative to another place and to build planes: vertical, horizontal and any intermediate ones in the form of a line - a trace of a laser beam. In addition, such a device can build point projections - to give a point on the surface.
Most often, self-leveling cross-levels are used, which build two perpendicular planes - horizontal and vertical. They can be rotated and installed in any direction. The horizontal plane is constantly being adjusted by the self-leveling elements.
The main characteristics of laser leveling are:
- measurement accuracy, professional devices give an error of up to 3 mm at 10 m, and household devices up to 0.5 mm at a distance of 1 meter;
- measurement range: in household up to 10 m, professional - 30 m and more;
- the number of projected planes - usually two or more, etc.
But a level is, first of all, a measuring tool.
It will only help you well if you know how to use it correctly.
Having taken it for temporary use, that is, for rent, do not expect that it will work by itself.
If you do not know what adjustment is, do not rent the device.
Starting to work with him, check the accuracy of measurements, whether the settings are out of order, that is, check all the characteristics described in his passport. All verification operations are in the description of the device.
There is no work on the breakdown of the foundation that cannot be carried out without a level. Therefore, an ordinary water level, correctly used, can easily replace it. Although the laser level makes it quicker and easier to work on the construction site.
Castoff device
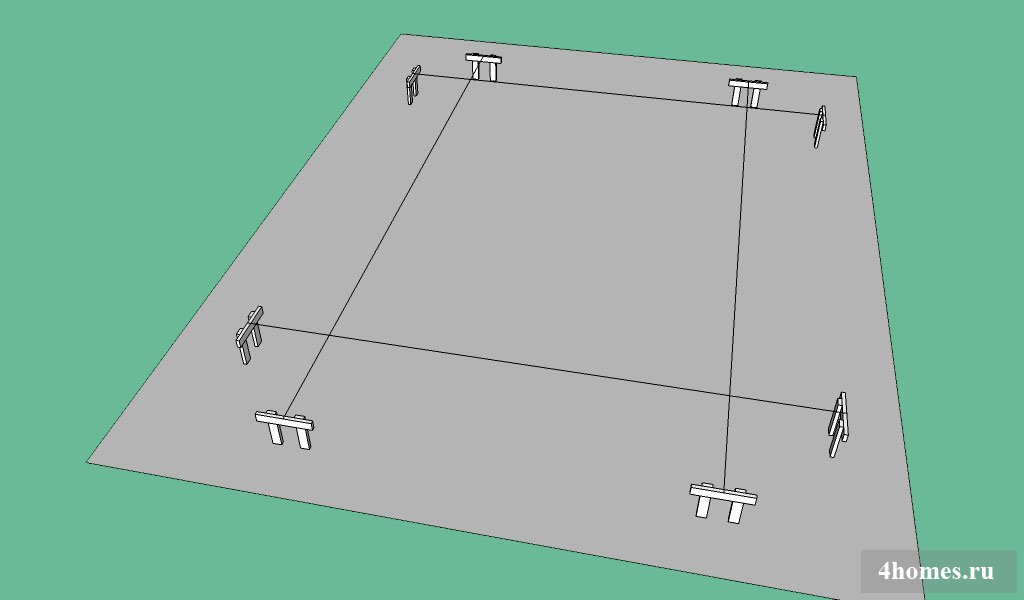
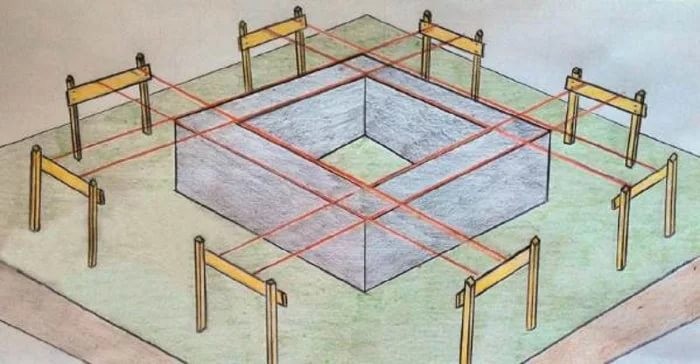
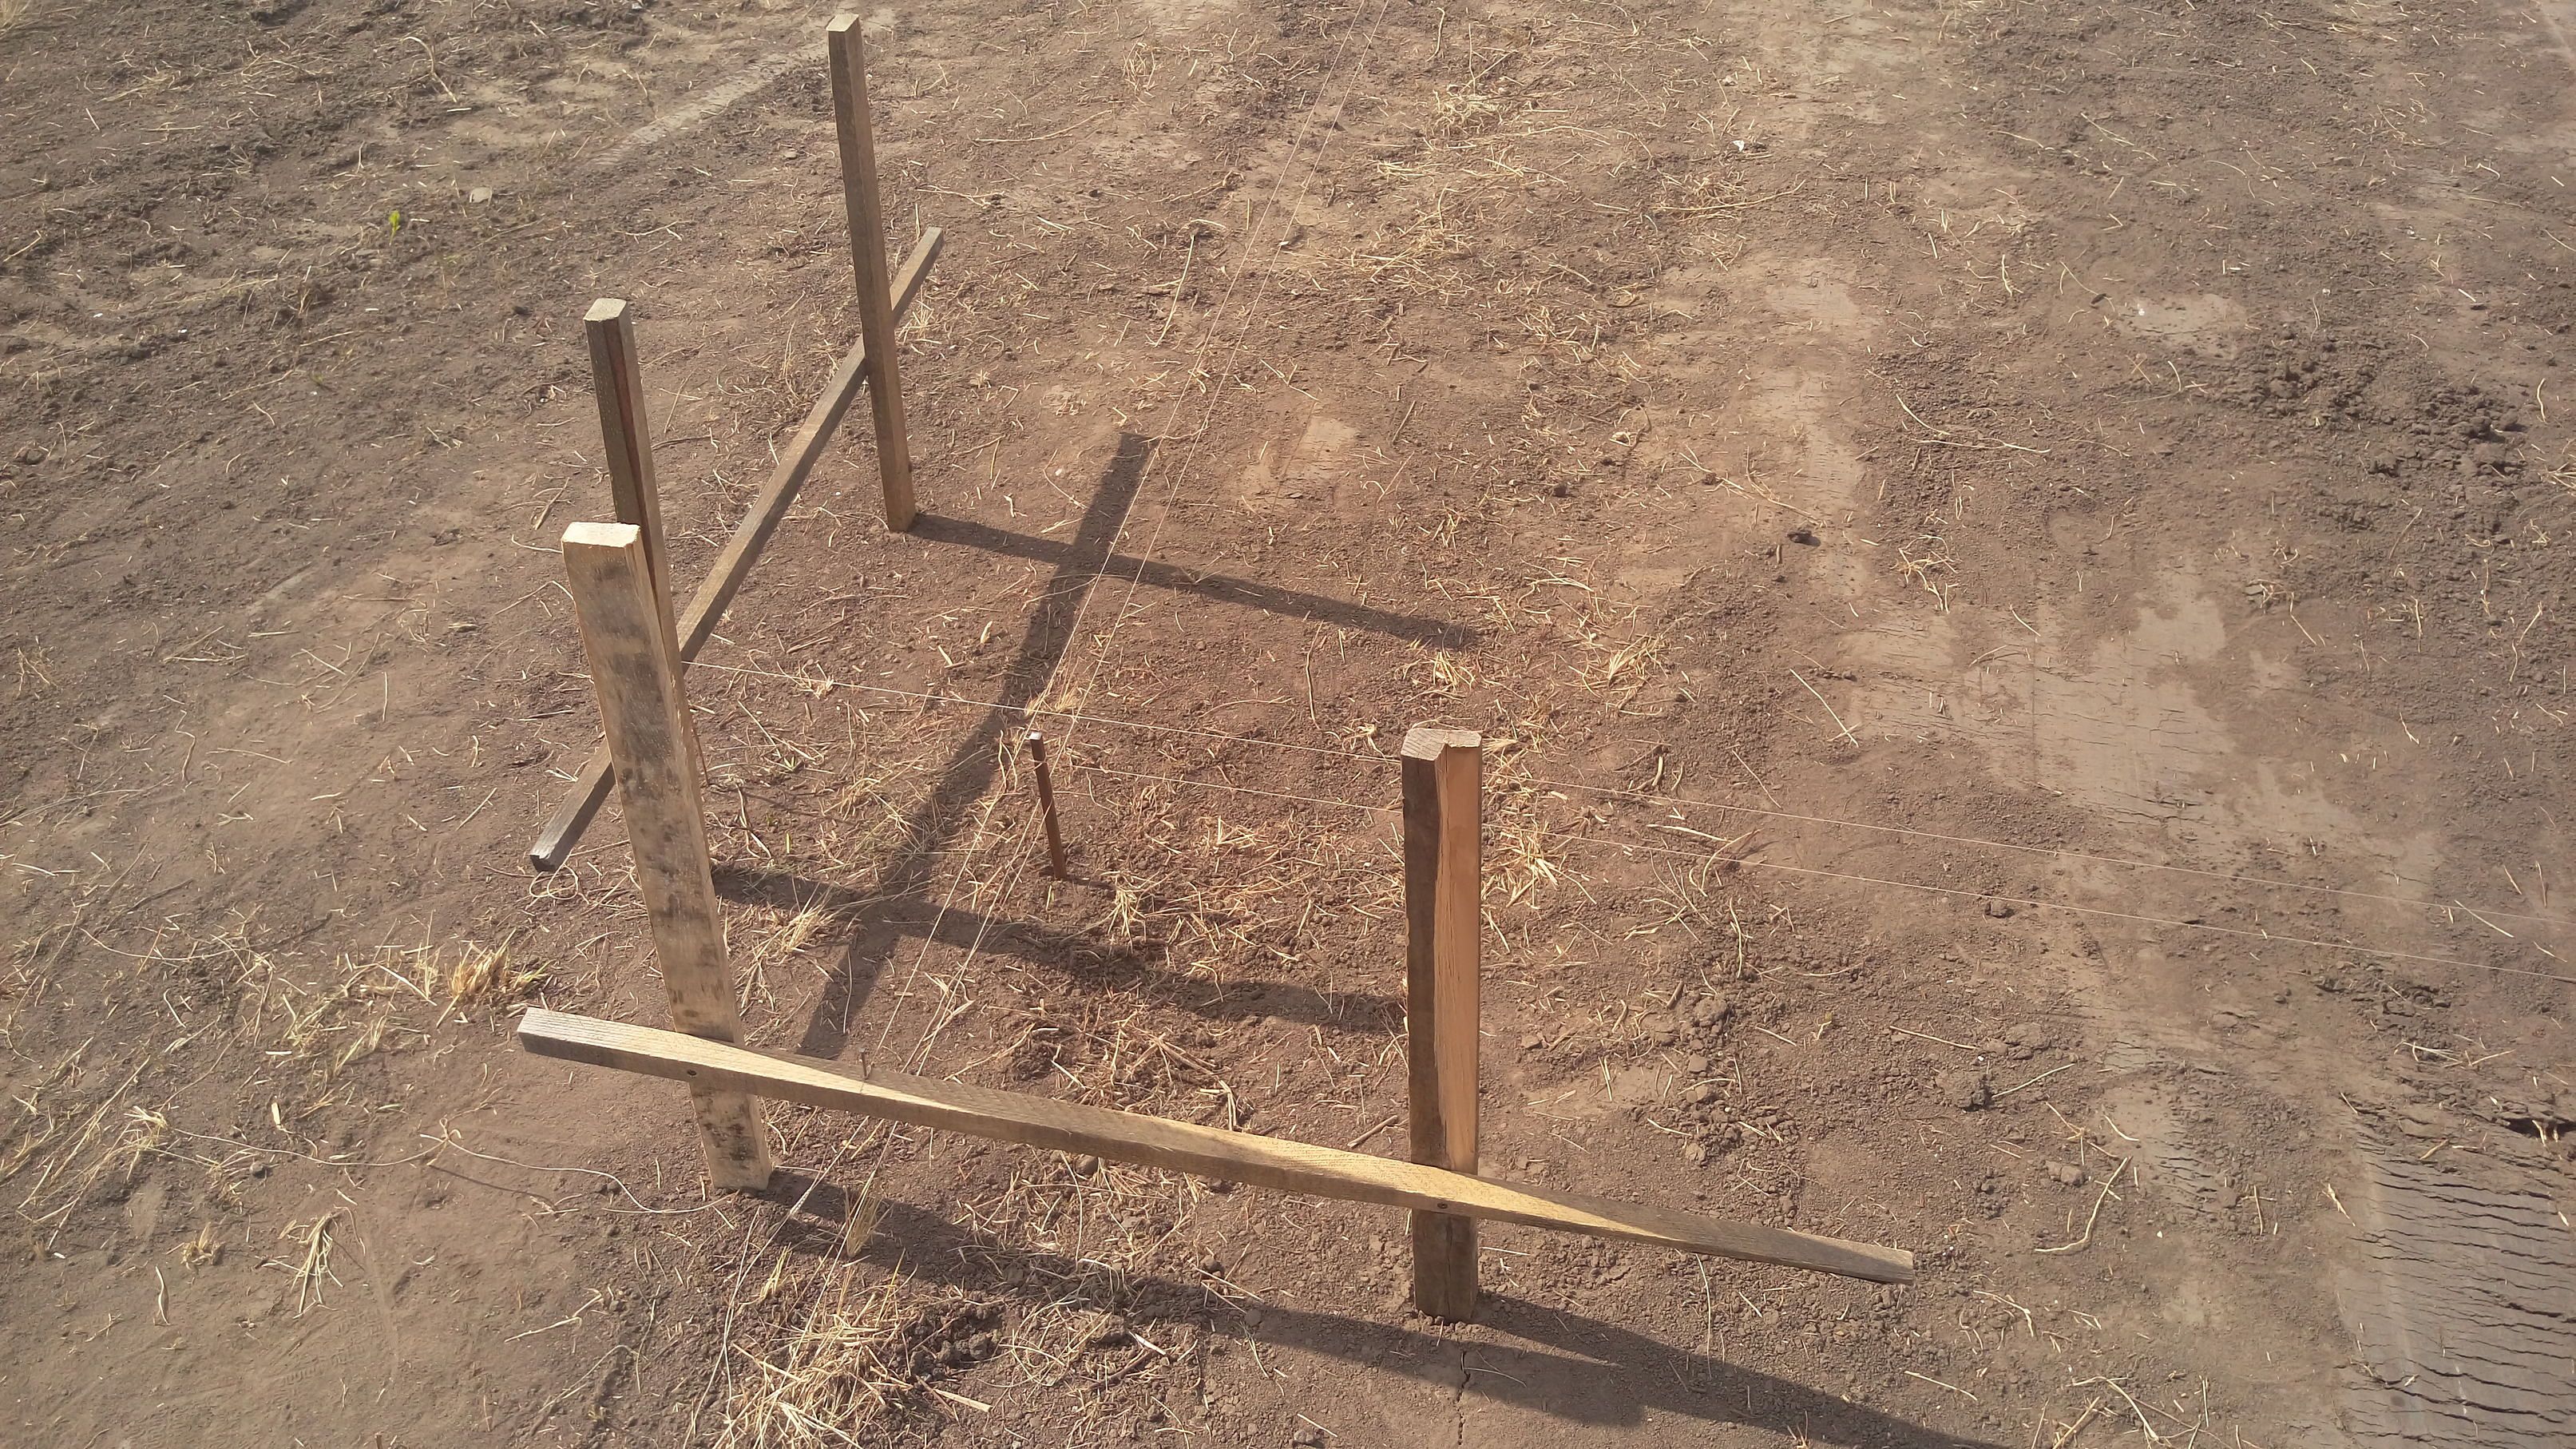
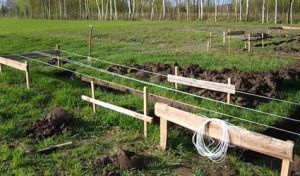 A batten is a wooden fence that is installed at the site of future construction. A cord is attached to it when breaking with studs. And on it, risks are applied that determine the position of the axes. Classic cast-off is a fence made of a row of pegs that stand every 60-70 cm around the entire perimeter of the leveled platform. An edged board is nailed to them from above. The pegs are also tied with a board from below.
The castoff may not be solid. For example, if your future house has only four axes, then you can put the cast-off only in the corners. At the same time, the thickness of the walls of the future house must be guaranteed to fall into the cast-off. In principle, the cast-off is placed perpendicular to each axis and must grab it in both directions at a distance of at least one meter, that is, a piece of cast-off from three pegs is placed. In this case, it is necessary to take into account the distance to the trench - if this is an angle, extend it approximately beyond the edge of the trench by a meter, so that during excavation it does not slide anywhere into the trench along with the ground.
It is advisable to install the rags pegs at the usual building level or plumb line. The top board is attached from the outside from the middle of the construction to the side pegs using self-tapping screws and a screwdriver. The top board should be installed at the same level around the entire perimeter.
If the cast is solid, make passes in it where possible. You will need to take out the ground and deliver concrete in a wheelbarrow to the building site, perform other work - it will be inconvenient to step over the cast-off.
Installation of skirting
 This part of the work should be taken out in a separate section, since the rags are installed depending on the type of foundation. They are necessary so that during the preparation of the pit, the markings are not disturbed. The castoffs are pegs with pieces of the board nailed to them, about 60-80 centimeters long. Nails are driven into the end of them so that you can fix the string for marking.
From the corners, the rags are dug in at a distance of half a meter. The ropes are stretched so that their intersections are exactly at the corners. All lines laid by cords must intersect with each other at an angle of 90 degrees.
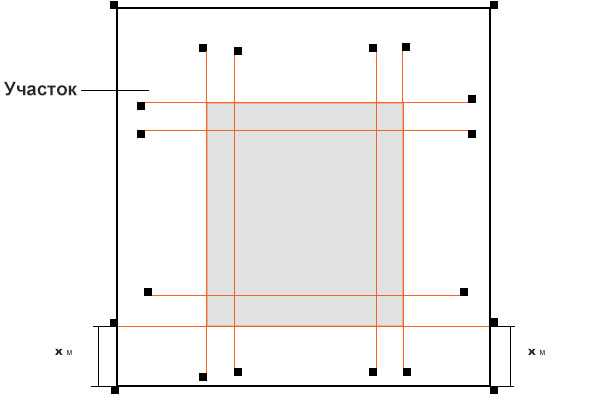
The strip foundation requires the installation of additional rails, with the help of which it will be possible to lay the internal boundaries. They are parallel to the main one, and the distance between the perimeter lines and the additional ones is equal to the thickness of the future walls. If the foundation is columnar, then with the help of ropes and slinging it is necessary to outline the squares for the future piles. The intersection points of the cords should indicate the places of the future supports.
Strip foundation marking
For the correct transfer of a project with a strip base to a site, there are 2 ways
There are 2 ways to transfer a project with a strip base to a site correctly.
Method number 1. According to the plan of the future house or extension, determine the position of the main point of the right corner, drive in a peg. Observing the level, measure the length of one of the sides with a tape measure, drive in 2 pegs and pull the cord tight. So you should get one side of the structure, measure the other side using the same principle. The result should be a rectangle. A level will help you set a right angle, and a tape measure will help you measure the exact length.
Method number 2. Drive in the peg in the right corner according to the principle of method # 1.Using a tape measure and a level, measure the length of the front wall, fix with a second peg. On the string of the second peg, mark the length of the left wall. Mark the points of the remaining walls in a square and add their values, and from the resulting value, calculate the root. Secure the length to the cord and secure it to the right peg. Pull 2 ropes in these places, connect them at the marked points, drive in a peg at the point of contact, which will be the 3rd corner. Calculate the 4th angle in the same way.
The strip base is made in the form of underground and continuous walls, crossed reinforced concrete beams. Its width is calculated from the quality of the soil, as a rule, it is 50 cm, i.e. equal to the average width of the walls.
How to do it?
The markup is made for different types of foundations. It is necessary to bind the markup to the type, since it can have its own characteristics in each specific case. All of them must be considered. However, first it is necessary to consider the general specific features.
Two methods for constructing a rectangular foundation
In fact, everyone who studied geometry at school can build a right angle. This does not require any special knowledge. So, in one of the cases, you can apply the Pythagorean theorem:
C = √ (A² + B²)
Without delving into the jungle of geometry, it is worth considering the use of the Pythagorean theorem with an example. If there are two sides already built. One is located along the fence. It is not planned to change it. The second is built side by side, but I am not sure that it is located at a right angle and I want to check it out. Then from the corner on each side you need to measure along a segment. For example, many take the entire length for a segment.
For example, let's take sides 9 and 12 m. Then √ (9² + 12²) = √ (81 + 144) = 15 m. This means that the diagonal between them should be equal to 15 m.
The second method is called the "web"
It is important here to prepare a string that does not have the property of stretching.
Be sure to pay attention to this fact, otherwise nothing will work. First, you need to cut the twine exactly to the dimensions of the future foundation
Let's take the same 9 and 12 m. It is necessary to cut off a piece in order to measure the diagonals in the future. You will need two segments of 9, 12 and 15 m, as well as a small amount for fastening.
Now the twine needs to be fastened at the corners, and also attached to the diagonals. After that, you can start pulling. First, pull on one side, preferably long or along the fence. After that, you need to pull on one of the short sides.
Under the columnar foundation
It should be cast in two tiers. In this case, the lower tier should be located at the same level as the pillars. Then you can pull on the string. Make sure the strings cross at right angles. Where the points of intersection of the twine are located, using a plumb line, you need to mark the places for the piles and fix the wedges. The twine should be removed so as not to interfere.
Now you need to drill holes under the pillars and install the pillars. Re-tighten the strings. Now you need to bring all the pillars out of the ground in the same way so that they touch the string.
Under the strip foundation
In this case, you will need to make a double marking, since the strip foundation is a strip. First you need to position the strip, then you need to pull the string at right angles. First, the outer contour is made. It should be remembered that the height of the location of the twine must be equal to the top level of the foundation. After that, you need to make an inner contour. To do this, a piece equal to the width of the tape is laid on the cast-off from the existing twine, after which an inner contour is made.
In the future, using a plumb line, angular places are determined. Pegs are attached to the corners on the ground. A string is stretched between them, denoting the boundaries of the trench under the strip foundation. After that, they dig a trench.When forming the lathing, it is not necessary to re-tension the upper strings if the height of the foundation will be determined by the lathing.
Under the slab foundation
In this case, it is much easier to make the markup than for a columnar or strip foundation. All you need to do is draw a rectangle with twine.
Particular attention must be paid to drawing right angles. Basically, this is where it all ends
In the future, just as in previous cases, using plumb lines, you need to find corner places on the ground and mark them with pegs.
Complex markup
When you need to make a markup of an extraordinary rectangular foundation, and structures with many protruding corners, you will have to sweat. However, this is still possible.
The step-by-step instructions are as follows:
- for a start, the general outline of the future structure is outlined. The plan should mark the distances from the extreme protruding points to each other. Based on this data, a large rectangle is built into which the house will be inscribed;
- after that it is necessary to correct all the corners, re-measure the diagonals and side lengths;
- further, they move on to the most difficult thing - marking the breaks of the walls. It should be borne in mind that in almost a hundred percent of cases, each of these kinks is another rectangle, so all you need to do is draw several rectangles inside. In the future, it is necessary to set and recheck the corners;
- using plumb lines, it is necessary to calculate the intersections that are on the plan and form the general outline of the house.
Preparation for marking the foundation

Before starting work, it is necessary to clear the future construction site of debris, remove grass, eliminate irregularities, it may be necessary to fill up low areas of the land. In other words, remove from the territory everything that may interfere with construction work. By the way, tall grass can create certain errors when marking.
The marking of the foundation does not in any way affect the strength parameters of the foundation under the house. But the quality of its execution depends on the corners, the length of the walls, and sometimes even the interior layout. Marking the foundation with your own hands allows you not only to save a certain amount, but, if necessary, make any adjustments.
As an example of markup, consider the very option when the house and land plot are rectangular. The sequence of actions will be as follows.
The first step is to establish the place where the house will be located. It is necessary to choose the closest boundaries of the site. Having retreated from the boundaries of the site at a certain distance, you can pull the cords. They will show the first corner of the house. The cords are pulled over pre-prepared pegs. Using a construction tape, you can mark the walls of the house. After completing all measurements, you can pull the cords between the marked points. This will be the outline of the future house. The last step is to check the marked corners.
Marking axes and angles - placing benchmarks outside the perimeter of the foundation
The starting point for all marking should be a point on the terrain, which is exactly "tied" to the site plan. Most often this is a corner point, usually associated with the so-called "red line" - the border of your site and public territory, on which neither you nor anyone else is allowed to build up. Crossing the border of your and the neighboring plot with the "red line" will give such a point. Your site fence should be inward from the red line.
Usually the house is located from this fence and from the neighbor's fence at distances:
- according to sanitary and household standards, determined by SNiP 30-02-97, clause 6.7: not less than 3 m;
- according to the fire safety standards of SP 42.13330.2011p.7.1: at least 6 m from windows to the walls of a neighboring house or garage, bathhouse, shed, etc., at least 3 m - from a residential building to the border of a neighboring plot.
Therefore, you need to retreat to the specified distance or further and you can start marking the foundation with your own hands.
A. Installed on the ground "red line". If the owner is going to build a house exactly at the normalized distance from the "red line", then it is better to invite a professional land surveyor to mark the future corners of the house. But most often they retreat 1 - 1.5 m from these restrictions.
Precise orientation to the cardinal points. It is possible at a great distance from the "red line". But usually they are guided by the center line of a street or road.
If you mark the corners of the foundation with pegs, hammering them exactly at the points of the future corners of the house, then when digging a trench, the marking pegs will definitely fall into the trench.
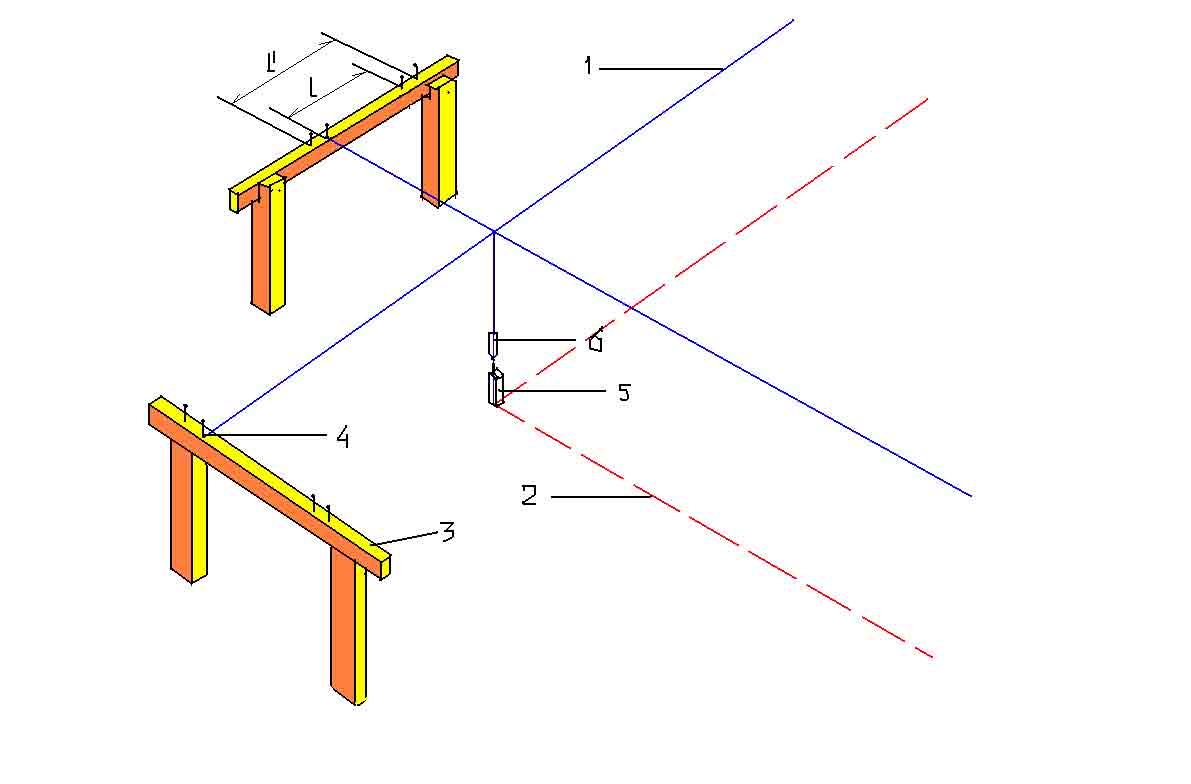
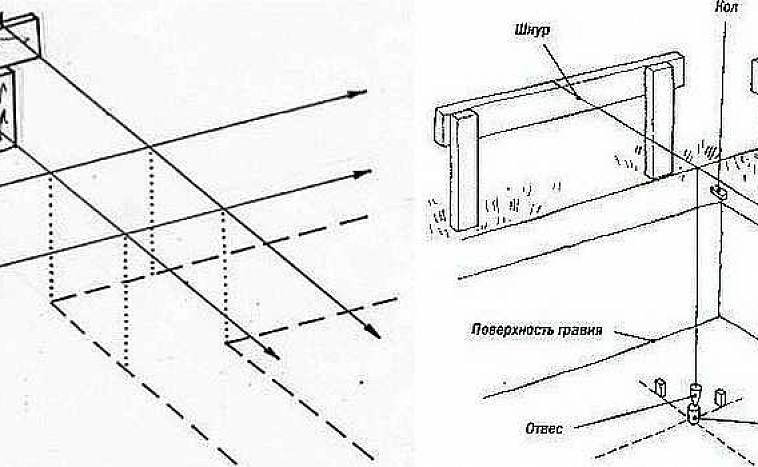
Therefore, the marking of the site for the foundation begins with the fact that outside the trench or foundation pit, or rather, outside the excavator's working area, wooden support frames are installed. They are called skirting boards or beams, or simply rags. Some "experts" call them "benches". Cords or wire are pulled over them. The intersections of the cords will give the necessary marking points, but not on the ground, but "hanging" in the air. These "points" are later transferred to the ground or to the formwork.
Three or five studs are hammered on the top bar of the cast-offs:
- in the center - an axial mark, for the axis of the foundation wall;
- to the right and left of the centerline - marks the width of the foundation wall;
- even further - the width of the cushion under the foundation.
Step 1. Marking the starting side.
We start from the side that is closer to the "red line".
We hammer two castoffs 1 - 1.5 m outward from any corner. We pull on the axial cord. Using the water level, set the upper part of the cut-off bars at a height of "0". Having retreated 1 - 1.5 m, we hammer the first peg into the ground - we make the starting point. From it we "lift" the point onto the cord with a plumb line. We measure the length of the wall along the axes on the cord and make a mark on it. We lower the point to the ground and hammer in the second peg. Between the pegs is the axis of the first wall.
Step 2. Marking the side perpendicular to the starting one.
Using the Pythagorean theorem and knowing the lengths of the sides of the foundation, we calculate the length of its diagonal (along the axes). On the strip of the perpendicular side, on the axial nail we attach the end of the cord and pull it over the opposite strip. From the intersection with the axial cord, measure the length along the axes of the second side and make a mark on the cord of the axis of the second side. On a free piece of cord we tie knots along the length of the diagonal along the axes. We fix one knot on the third side axis mark and pull the second knot towards the opposite strip of the second side. By aligning the second knot with the mark on the second side cord and pulling on the cords, we get the first right angle.
Another way of constructing a right angle is the "Egyptian triangle" method. On the cord of the first axis from its intersection with the second axis, we measure 4 meters or a distance that is a multiple of this value. On the cord of the second axis we measure 3 m or, to the same extent, a multiple distance. We make marks on the cords and measure the distance between them with a tape measure. It should be 5 m. Moving the second cord relative to the point of intersection with the first, we achieve the exact value - 5 m. The angle in this case will be straight.
Step 3. We carry out these operations two more times and get two more right angles.
The last actions should take place in the zone of one point - the virtual corner of the foundation, opposite to the first corner. If all measurements were made accurately, and the calculations were accurate, then the last two nodes should coincide.
Step 4. Checking the rectangularity of the marking.
It is known from school geometry that both diagonals of a square or rectangle are equal. Therefore, the check is done by measuring the length of both diagonals and comparing them.
A difference of a few centimeters is acceptable. The foundation axes are now marked.

