Pros and cons of a screw foundation
The use of screw piles in the construction of the foundation of a building has many advantages. The main advantages of this design:
- This type of foundation is much stronger than reinforced concrete structures.
- The price of a screw foundation is much lower than many other types of foundation. Thus, the savings can be distributed to other types of work.
- The piles of the screw foundation are mounted quickly enough. It takes only 2-3 days to install them, which cannot be compared with the hardening time of concrete bases.
- Loose soil will not budge a deeply screwed pile, making installation easier on different soils.
- Great for building in hilly areas. Piles are also irreplaceable when building houses on slopes.
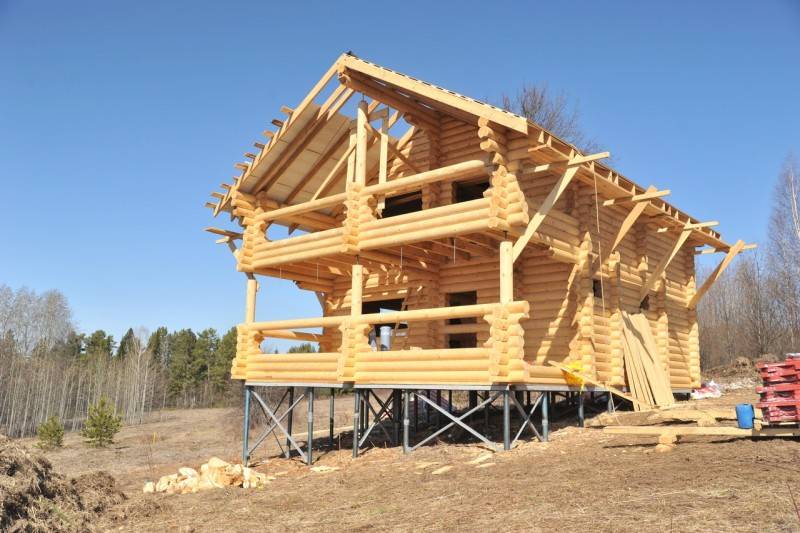
The installation of piles is considered quite simple for these and some other reasons. For example, when self-erecting such a foundation, 2-3 people are enough to screw in piles. Digging pits or holes is not required, and there is no need to use technology.

But, in addition to the advantages, the pile foundation also has its disadvantages. The most serious drawback is the corrosion that piles are susceptible to.
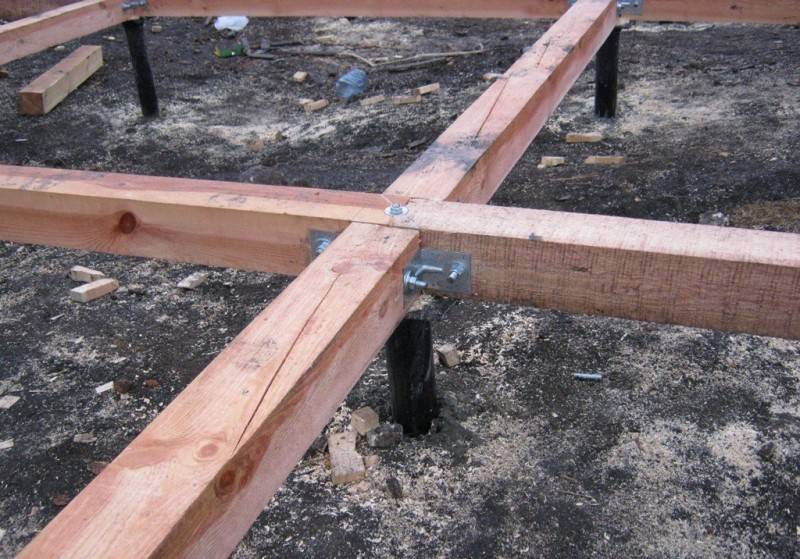
In addition, there are some areas in which the use of piles is not possible. And they cannot be screwed in near an already built building, since the walls will interfere.
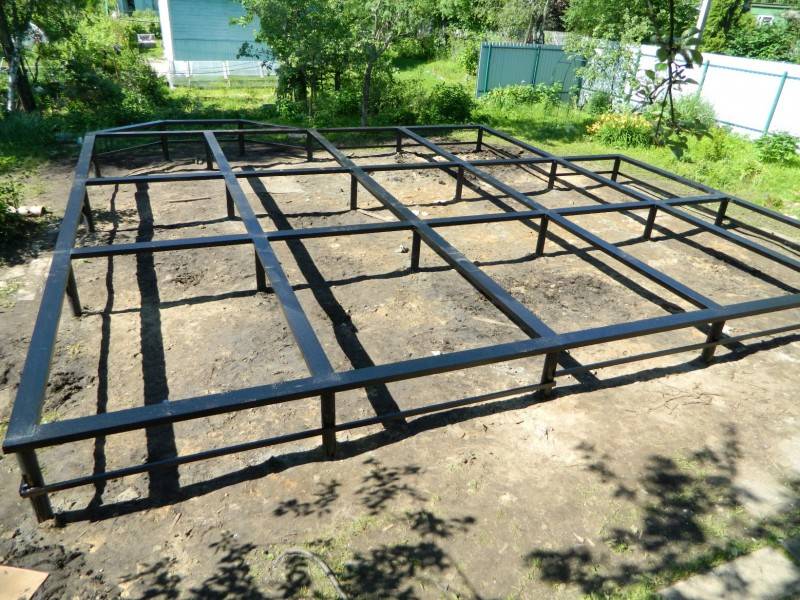
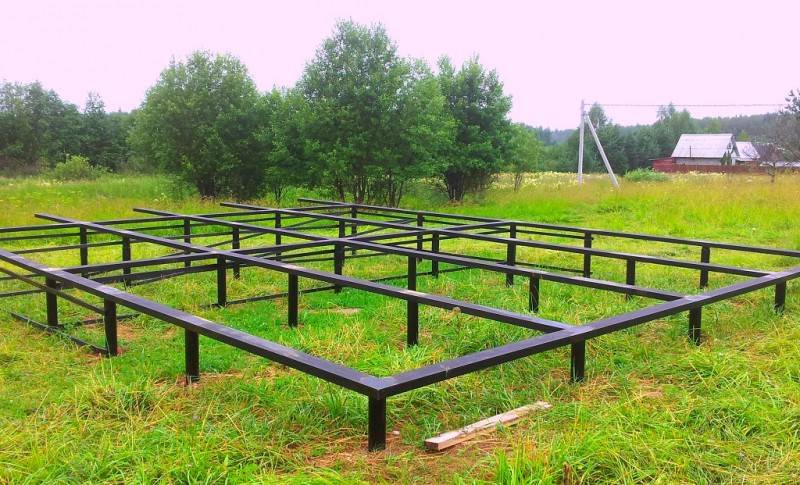
And also there are restrictions on the parameters of the building under construction due to the size. This is due to the low bearing capacity of the structure. But it is still worth remembering that the cost of the screw foundation is low and corresponds to the quality.
Features of the designs of screw piles
There are several methods for making these elements yourself, but not all of them are of equal quality. In order not to make fatal mistakes, one should very well understand not only the structure, but also the purpose of each element, the loads acting on it, the possible consequences of deviations from the calculated dimensions.
We must always remember that screw piles play the role of a foundation, and the duration and safety of building operation depends on this architectural element.
Pile element
Brief description and purpose
Head
Installed in the upper part of the pile after it has been twisted and aligned horizontally. Connects the trunk to a metal or wooden grillage. The grillage connects all freestanding piles into a single rigid structure; facade walls and interior partitions, including load-bearing ones, are placed on it. The thickness of the sheet steel for the manufacture of caps must be at least 4 mm, the linear dimensions depend on the material of manufacture and the technical parameters of the grillage.
Trunk
Holds the vertical load of the entire structure, while twisting forces are additionally influenced. It is made of thick-walled pipe, the diameter is selected individually, taking into account the maximum design loads. Wall thickness is not less than 5 mm. For private construction, the diameter can be in the range of 50–100 mm. To increase vertical stability and reduce corrosion processes, the pipe is filled with M-300 cement-sand mixture. This technology increases the mechanical strength of the element by about 20%. The lower part of the shaft is cone-shaped, thereby facilitating the installation of piles. Cone length approx. 1.5-2.0 pipe dia.
The calculation is carried out to reduce the coefficient of friction and reduce the efforts during the screwing in of the pile.
Blade
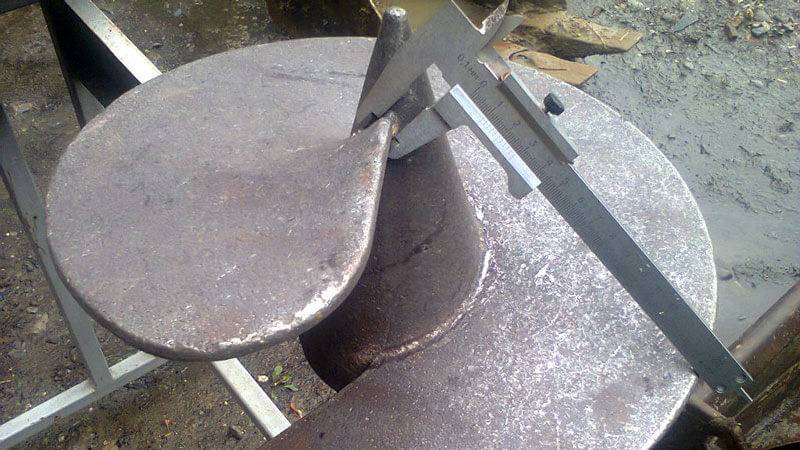
The main element of the pile, its operational properties must be given great attention, it is the blade that holds the building. It is recommended to make it at least 4 mm thick. The blade has two important parameters - the outer diameter and the thread pitch (the distance between the turns).How these values affect should be discussed in more detail, if the requirements are not met, the screw pile completely loses its bearing properties.
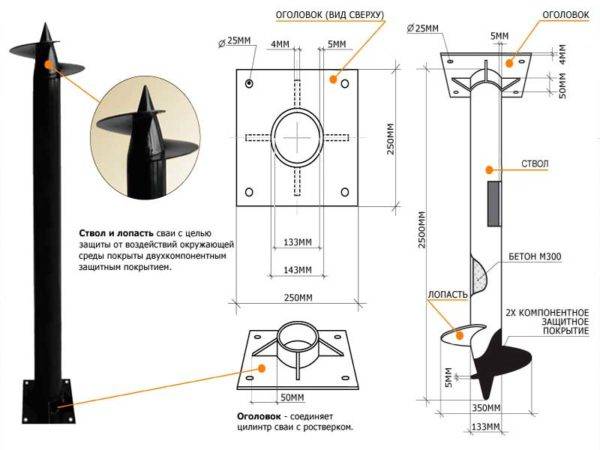 Screw pile elements
To reduce corrosion processes, external surfaces are covered with a protective layer of durable modern paints or traditional bituminous mastics.
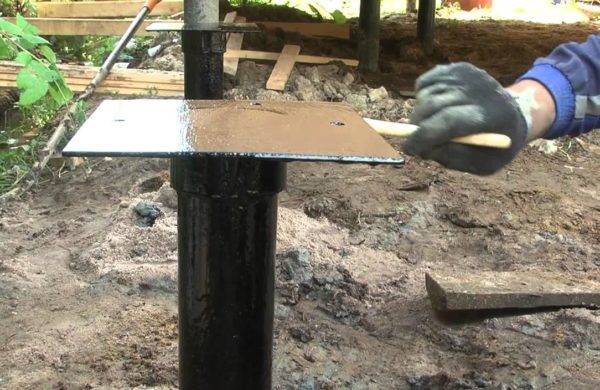 Pile corrosion protection
Main works
Arrangement of leader holes
Before starting the main work, it is necessary to prepare the mounting places for screw piles, which are called leader holes. For these purposes, at the points marked by means of pegs, the top layer of soil, together with grass, should be removed to a depth of about 10-15 cm.

The width of the holes to be prepared should exceed the diametral size of the blades of the piles used by about 2-3 cm. In principle, you can do without such preparation; however, in this case, additional effort will be required to screw the supports into the ground during manual operations.
Pay attention to the following preparation details:
When using special screwing mechanisms in the process of work, the need for arranging the leader holes, as a rule, does not arise.
It is not allowed to deliberately dig pits under the screw supports and simply set their point in the ground (even at a shallow depth).
The latter requirement is explained by the fact that one of the conditions for a high-quality installation of screw piles is the intactness of the surrounding layers of bearing soil, which makes it possible to effectively distribute the loads from the house.
Preparation and installation of piles
In order to reduce the cost of purchased building materials, full-fledged screw piles can be made independently.
To implement this solution, you will need to stock up on pipes of the appropriate diameter, the choice of which depends on the calculated load on the pile-strip foundation of the house.
Such self-made piles are made of pipes of sufficient thickness, the surface of which must first be thoroughly cleaned of rust, and then covered with a special protective compound.
Video: Homemade screw piles
After that, homemade blades from metal plates of the required size and shape are welded onto the part of the pipe blanks that are sharpened from one end, screwed into the ground.
To simplify the work with a homemade pile, two holes are drilled in its upper part in the walls, in which a special lever in the form of a powerful rod is placed when screwing in. Before arranging the tape grillage, this part of the screw support is cut off by means of a conventional "grinder".
The installation procedure for finished metal supports is as follows:
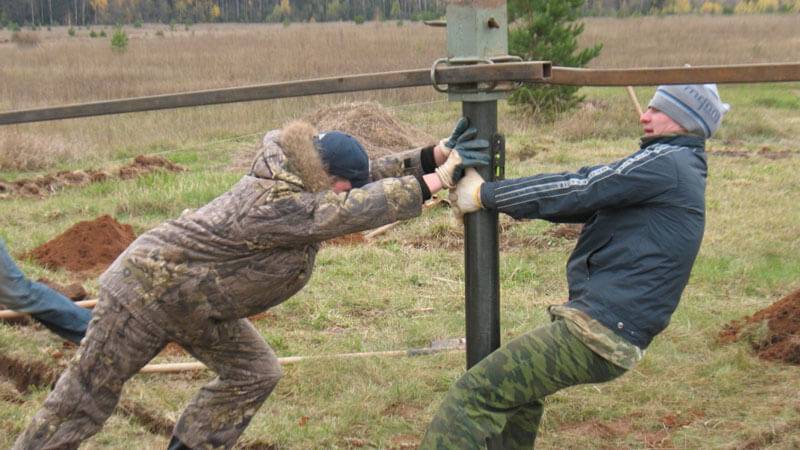
Before screwing in, the tip of the pile is placed in a previously prepared hole, after which, using a special lever, its screw part is screwed into the ground.
Video: Installation of the pile screw foundation
After all the piles are in place, their upper cuts are aligned with the level, and the protruding parts are simply cut off with a grinder.
Then, liquid concrete is poured into the cavity of the pipes, which increases the strength of the supporting base and provides additional anti-corrosion protection of the metal.
In the upper part of each of the self-made supports, rectangular metal plates are welded, which are subsequently used to bond with the grillage.
When screwing in the next support, you should constantly monitor the vertical line of its position.
Description of screw piles.
The main element of the foundation is a metal screw pile. It is an ordinary steel pipe. In this case, the thickness of the metal must be at least 4 mm.
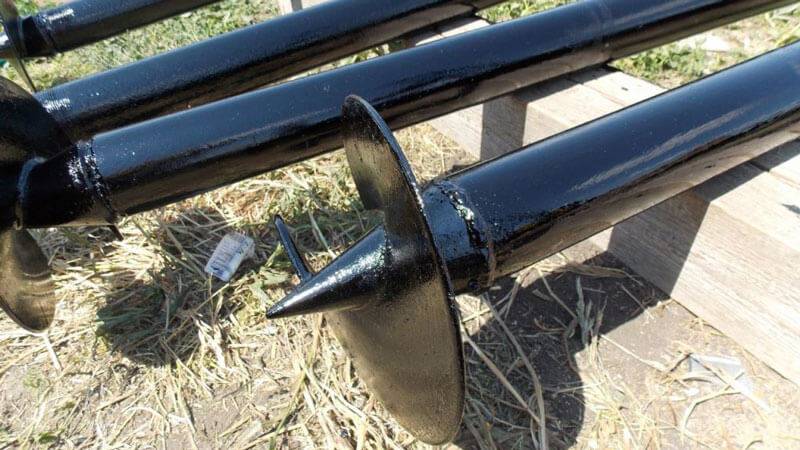
There is a cutting blade at the sharp end of the screw pile. Thanks to her, screwing into the ground occurs.Due to the ideal shape of the blades, they can be simply screwed in to the desired depth thanks to the strength of 3-4 builders.
For objects with differences in height or in the presence of other lateral loads, piles are used, at the sharp end of which there are two blades. This gives additional reliability to almost any structure.
The diameter of the blades ranges from 200 to 850 mm. In appearance, the pile resembles a huge self-tapping screw. It has a diameter of 50 to 350 mm. Its length is 2–11 m. The smallest piles are used to install fences, billboards, awnings. Hollow and solid piles are on sale.
Installation of screw piles, video:
Due to the perpendicular arrangement of the blades, the propeller does not loosen the soil. The bearing capacity of these piles ranges from 5-25 tons. There are different options for foundation projects. They depend on the type of future structure and soil. The most popular ones are:
- single piles (supporting individual elements) are often used when it is necessary to attach something to an existing building;
- standard foundation - used for columns and basic building elements;
- pile tapes - located under the walls of the building;
- pile field - used for heavy structures.
For a wooden house, strong and durable piles with cast tips are chosen.
Particular attention must be paid to the protective coating of this building material. To check its quality, you can ask the seller to make a test tightening
If the metal is severely exposed, then the screw piles are covered with poor protection.
The best coating is made on the basis of high quality polyurethane resin. No less reliable and galvanized piles. They are hot-dip galvanized. They are covered with protection both outside and inside.
Advantages of these piles:
- The possibility of their reuse. This is due to the fact that they are dismantled without any damage.
- There is no need to perform a large amount of earthwork. The construction of a pile-screw foundation is possible on flooded and moving areas.
- Installation of this foundation is carried out in 1-3 days. The work done by hand is more time-consuming than with the use of special equipment.
- The construction of the house begins immediately after the installation of the head.
- They are ideal for the construction of various outbuildings.
- The service life of the pile-screw foundation is 150 years. After additional processing, screw piles can last more than 200 years without replacement.
- The cost of erecting this foundation is almost three times lower than that of a strip one.
- After the construction of the foundation, construction waste does not accumulate on the site.
Disadvantages of screw piles are few:
- they cannot be used on coarse and rocky soils;
- subsidence of the soil, with a poorly conducted site survey;
- deformation of the foundation that occurs when the technology is violated (it is possible if, when screwing in the piles, their position was not fixed, they were installed in pre-dug holes or hammered, they made the wrong pile strapping);
- pile corrosion due to lack of or poor anti-corrosion treatment;
- restriction of construction to light and small houses, for example, from wood concrete or polystyrene concrete.
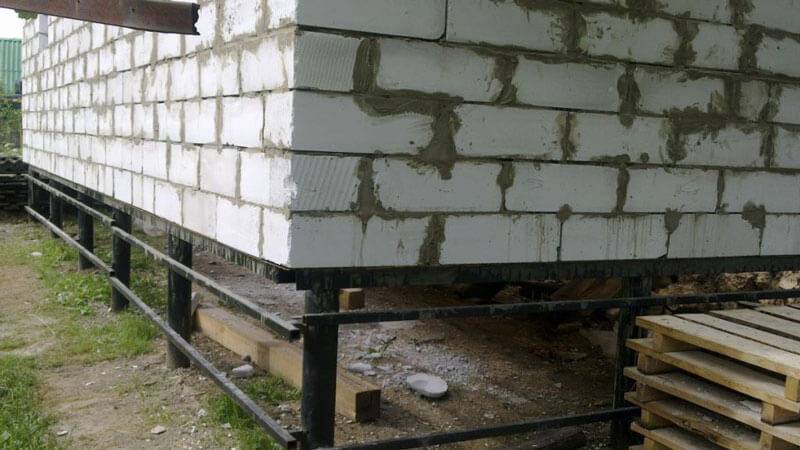
Pile foundation - advantages and disadvantages
The advantages of such grounds include the following aspects:
- The possibility of erecting a building in difficult areas when it is not possible to apply other types of foundations.
- Relatively low labor intensity and high installation speed.
- Minimization of construction costs, since a pile foundation is considered one of the cheapest options.
- The absence of earthworks allows preserving the natural landscape on the construction site.
Of the disadvantages of this type of foundation, the following factors are noted:
- The need for calculations, since the piles have a bearing capacity limitation.
- Lack of basement.
- This type of foundation is suitable for the construction of relatively light structures.
- The need to perform the strapping of piles, as well as their high-quality waterproofing.
- The complexity of the arrangement of the floors of the first floor: the use of effective materials for thermal insulation is required in order to exclude freezing.
Selection of building materials
Currently, piles for the foundation can be purchased both assembled and disassembled. The price for ready-made screw piles for foundation is slightly higher than for prefabricated ones.
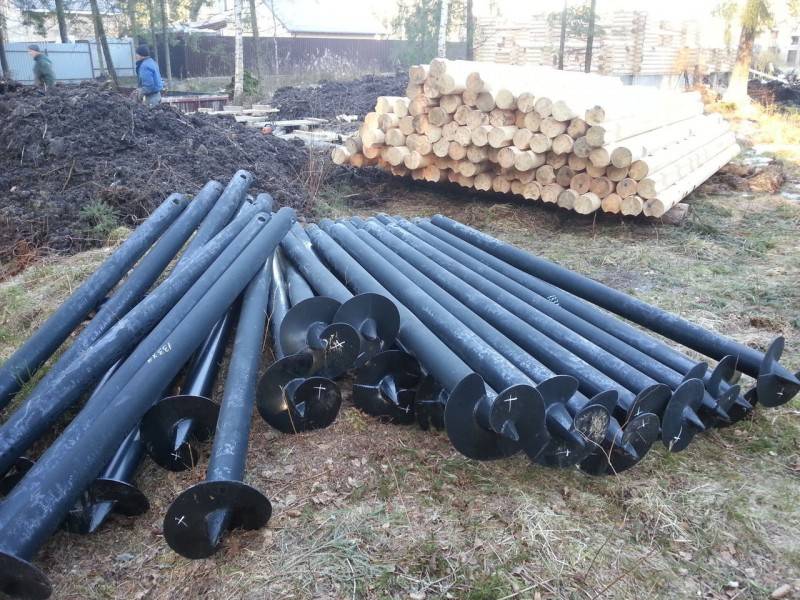
When choosing any of the two options, the most important point is that the seller provides the necessary product quality certificate. In such a responsible business, the first thing is always safety.
Standard piles for a screw foundation are fixed at 2.5 meters in length. Of this size, only 1 meter is left on the surface of the earth. There are situations when this length is not enough. In this case, you can purchase longer piles.
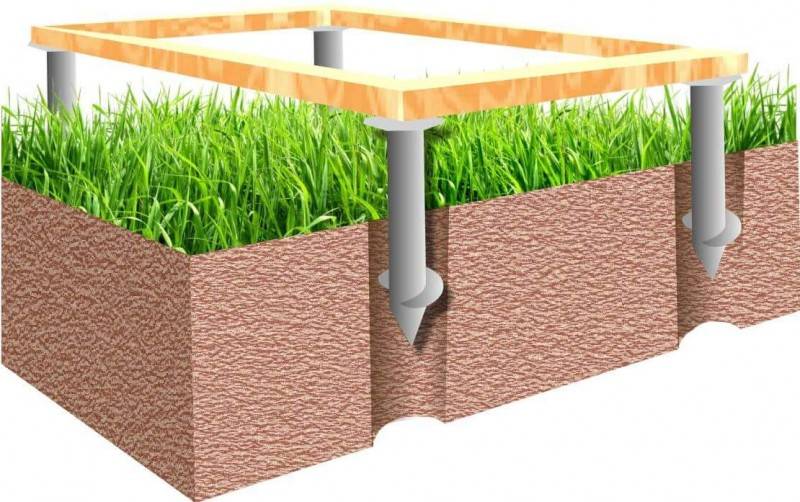
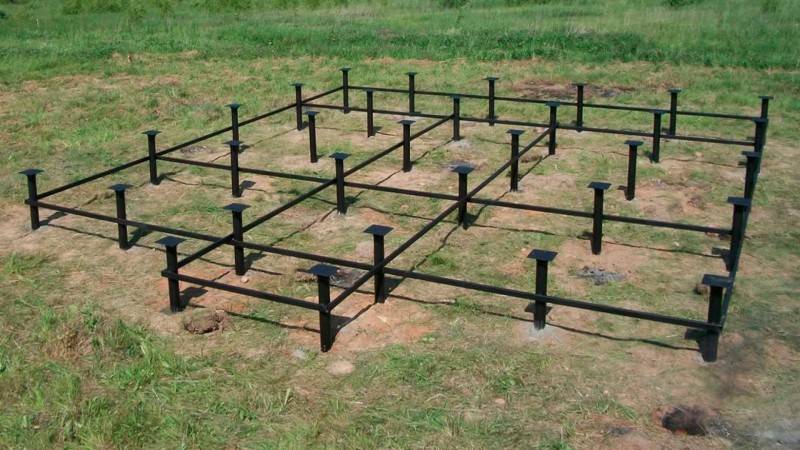
Remember that piles may be required in different lengths. This option is possible with fragile soil. In addition, piles of different lengths may be needed when erecting a foundation on an uneven surface.
Scope of application
The main provisions and requirements for the design and conditions for the use of pile foundations are regulated by SP 24.13330.2011 and SP 50-102-2003. In accordance with these regulatory documents, the foundations are designed on the basis of the conducted engineering surveys. The main areas of application (the basis for the arrangement) are considered to be the presence of soils with a weak bearing capacity on the building site. Such soils include:
- Loams.
- Peat bogs.
- Sandstone.
- Quicksands.
- Abundant, vegetative, loess-like soils.
- Other soil types with unstable or weak structural bonds.
Also, the following factors are considered the basis for the use of pile foundations:
- High GW level.
- Swampy area.
- Seasonal flooding of the site during floods.
- Seismic activity in the development region.
- A significant difference in the surface of the site in height.
In addition, the foundation for a building on piles is organized in cases where the construction of other types of foundations is not rational from an economic point of view. For example, a large amount of excavation work for the arrangement of a monolithic or slab foundation.
Another area of application of pile foundations is the construction of pre-fabricated buildings, since the speed of their arrangement allows maintaining high rates of construction.
The main types of piles
Basically, a screw pile is a metal pipe pretreated with an anti-corrosion agent, with or without a welded blade. It enters the ground like a self-tapping screw. Piles are:
- With different diameters. The thicker the pipe, the more weight it can support. But it should be understood that it will be very difficult to manually screw in piles with a diameter of more than 108 mm.
- With different screw rib sizes. With a widened heel - for soils with low bearing capacity, with imitation of carving - for hard frozen soil, which is better not to disturb.
- With blades of different diameters. For wet and unstable soils, the pile blades should be larger than for dry and dense ones.
There are also on sale special piles with multi-turn or multi-start screws, built-in drainage, made of special, chemically resistant materials, with additional blades, with welded-on heads.

Depending on the type of soil, a screw pile with a suitable pillar diameter and blade size should be chosen.
DIY installation. Step-by-step instruction
When creating a pile-screw foundation for a house, the sequence of work has a strict sequence.
Pile foundation for the house, preparation
A pile-screw foundation can be created on uneven terrain that does not require preliminary leveling.It can be used for construction on slopes. Preparatory work is reduced to cleaning the site from shrubs, plants and other interfering objects.
We make markings, marking the installation sites of the piles with pegs. Depressions up to 30 cm are made at the installation points to facilitate the entry of the blades into the ground.
I recommend removing the fertile layer, as it creates strong resistance due to the presence of roots and other obstacles.
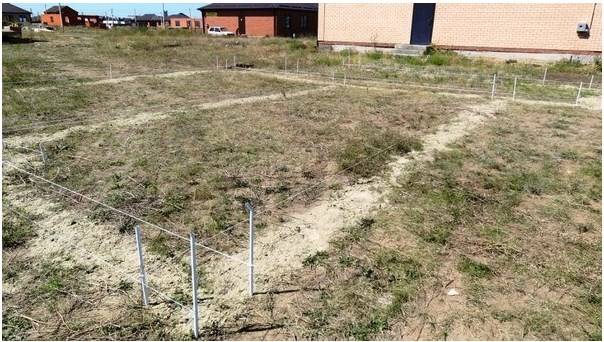 Preparation of land for a pile foundation
Driving piles
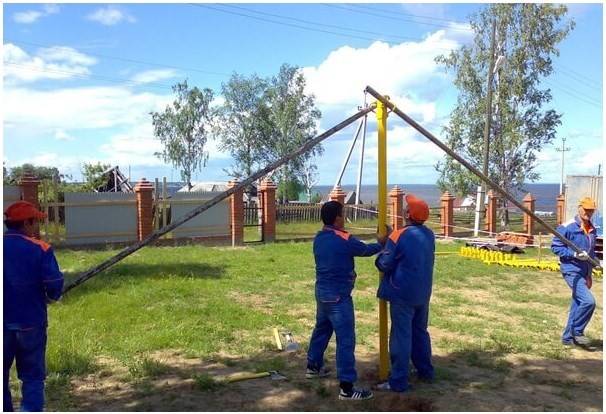
In the presence of soft soil, manual installation is possible, otherwise mechanically. With manual immersion, the maximum diameter of the trunks is 8.7 cm. The most commonly used piles are with a diameter of 10.8 cm. With the machine method, a better installation of piles is obtained, while maintaining a certain angle, screwing force and depth. The mechanical method allows you to work with piles up to 15.9 cm. This size is enough to build a house of a sufficiently large size.
The piles are driven to the specified depth. When the required value of adhesion to the ground is reached, the pile begins to rotate with great effort, or stops rotating altogether. In this case, we stop the rotation, otherwise the welding may fail, the blades will fall off, and the pile will not fulfill its task.
Attention!!!
When working with screw piles, it is forbidden to reverse (unscrew the trunk back). This will lead to a weakening of the adhesion of the blades to the ground and exclude the possibility of re-immersion of the pile in the same place.
Pile foundation for the house, strapping
So, we installed all the piles, what next? Now we start the pruning process. We adjust the height of the protruding piles to one level, forming a flat horizontal surface. To do this, we use a laser level with the function of constructing planes at the desired height and cut off the pipes.
After the cutting process, the piles are filled with concrete, thereby increasing their strength.
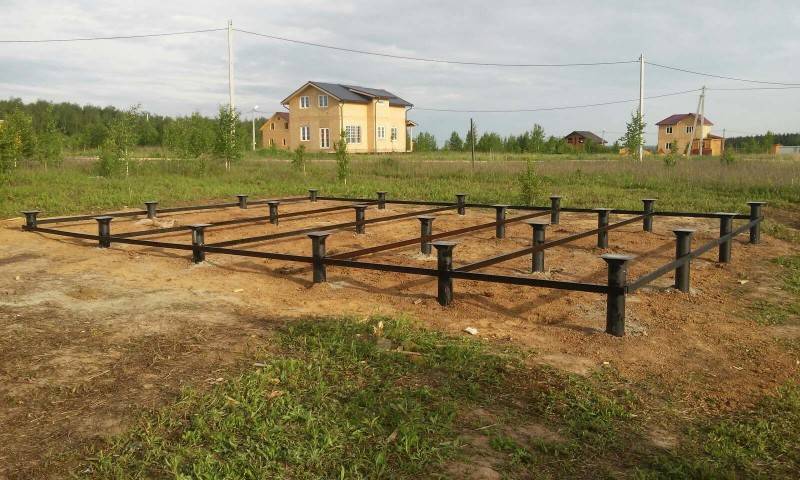
Then we install the grillage (strapping) - a belt that connects all the piles into one system. We cover the cut piles with heads with horizontal platforms on which wooden or metal beams are installed.
Important!
There are times when the grillage and the strapping are not the same thing. We carry out the strapping below the installation level of the grillage and connect all the piles to each other, resulting in a system similar to a lattice. We use metal sections of the channel welded to the walls of the barrels.
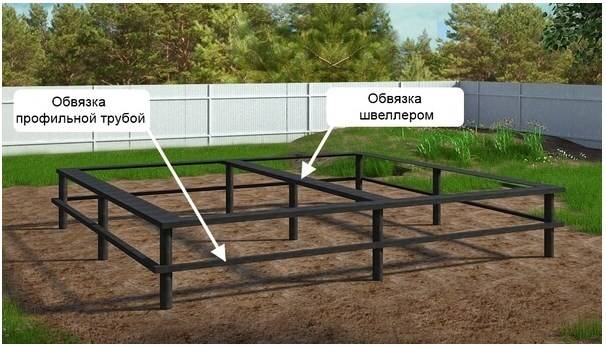 Strapping
Strengthening the pile foundation
This term means a whole range of measures aimed at strengthening one or more elements of the pile foundation:
- To strengthen the supports at the stage of their installation, reinforced concrete soles are used, which are arranged under the lower part of the pile. To strengthen the already operated support and to repair it in the event of cracks or partial destruction, so-called reinforced concrete clips are used. To do this, the wellbore is expanded and a concrete mixture is poured, which, after solidification, reliably fixes and supports the product.
- To strengthen the grillage at the construction stage, metal linings from corners or channels installed at the corners of the foundation are used. Strengthening of the concrete grillage is made by the gunning method: applying a mortar mixture under high pressure. The repair compound is applied in layers, with each layer being reinforced with a mesh of thin galvanized wire.
- Strengthening the entire pile foundation in cases of insufficient bearing capacity, subsidence or partial destruction is a complex technological task that only specialists can do. The reinforcement of an incorrectly calculated or erected pile foundation depends on the type of soil. One of the methods of soil compaction around the piles is used: cementation, silicatization, resinization, firing.
The same technologies are used to strengthen the soil around the ground part of the pile foundation. If a simple subsidence or erosion of the soil is observed around the grillage, they are poured with denser materials (fine gravel or gravel).
We lay the foundation on screw piles with our own hands
When all the calculations and flowchart of processes are in hand, you can start construction.
Foundation laying on screw piles is divided into stages.
1. Layout of the site for the installation of the screw foundation. In fact, this is the transfer of the drawing to the terrain. We mark the places where the piles will be mounted. This can be done by hammering in the pegs or using standard rope lines.
2. We mount piles. With the help of a pipe, we twist the piles into the markings. You can also use scrap. We check the verticality of the entry of the piles into the soil with a magnetic level every 2 - 3 turns. The piles are twisted with a margin of 10 - 15 cm for subsequent alignment, because in no case should they be twisted back.
3. Check the horizontal level. After all the piles are installed, you need to check their horizontal position. It is best to do this with a horizontal level. We cut off the excess with a grinder.
4. Fixation with concrete. When the pile is twisted, a cavity is formed around the pipe. To strengthen the structure, you need to fill the cavities with concrete (for the mortar, we take cement of the M 500 brand). It is possible to reinforce the piles to give additional strength. To do this, place reinforcement rods in the cavities before pouring concrete or wrap the pipes with reinforcing mesh.
5. Installation of heads. To close the cavity of the pipes, you need to weld the heads. Check the horizontal piles again and weld the heads. To protect against corrosion, apply a special anti-corrosion compound for metal to the seams.
6. We mount the grillage. After the piles are secured, you need to strap the structure. We install jumpers. They can be welded or bolted. Previously, to protect against corrosion, treat them with a special solution or paint 2 times.
Foundation cladding on screw piles
When the foundation is ready, you need to perform its facing, because in its original form, the screw foundation does not have an aesthetic appearance. Choosing the type of cladding, you can not only improve the appearance of the foundation, but also give it additional strength. This is already the stage of work that can be done independently, without the help of specialists.
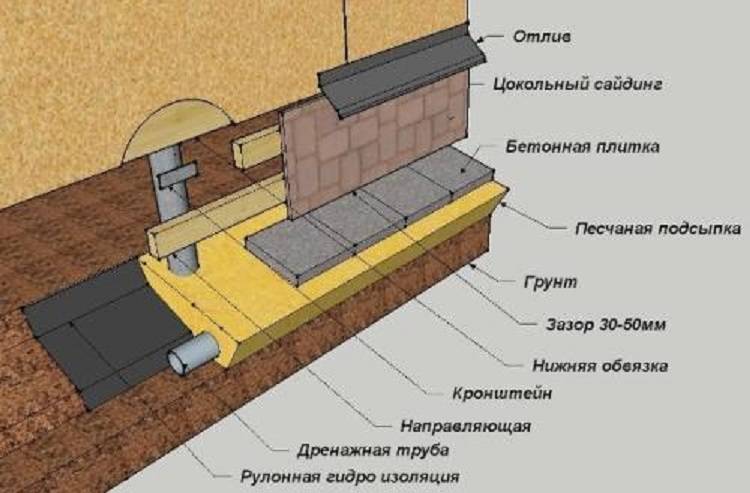
But let's turn to the experience of the builders. Despite the fact that the finished foundation already has excellent supporting and protective qualities, it does not hurt to strengthen them. Moreover, weather anomalies, as well as disturbances of the soil in excess of the calculated ones, have not been canceled. Screw piles are intended for a wooden house, so the foundation should look harmonious and further strengthen the foundation. For this role, artificial or natural stone is perfect, which we use for decoration.

Finishing from these materials is designed not only to create aesthetics in the overall ensemble, but also to give the structure additional strength. Separately, we note that the stone foundation will also protect the tree from snow and water.
If there is heavy rainfall in your area, pay attention to such a property of the finishing material as hydroponicity.

The cladding serves not only as a decoration. According to experts, the stone also performs additional reinforcing functions. If a stone is used for cladding, additional reinforcement of the screw foundation is not necessary, the cladding is capable of performing this function.

Pay attention to the solution. It is part of a fortification
It will be good to add plasticizers to it so that the solution acquires plastic properties.
This is important, because the foundation on piles, due to its design, is dynamic and can be displaced under seasonal soil disturbances.So that the cladding strengthens the structure, and does not provide unnecessary resistance, give it plasticity with the help of a solution with plasticizers
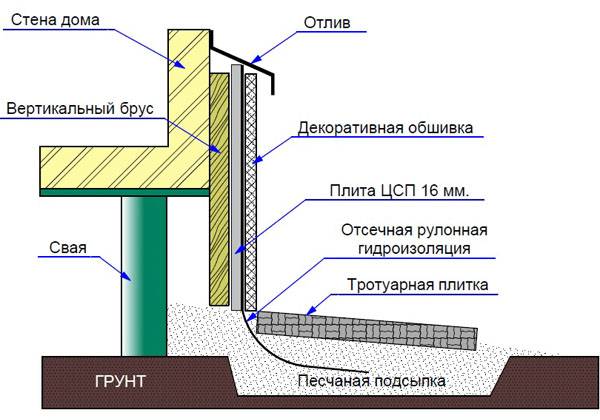
After choosing the cladding material, the question arises about the height of the finish. Here the opinions of experts differ. Some recommend laying out only the foundation, while others recommend finishing up to window openings. The truth is, as always, in the middle. The height of finishing depends on the specifics of the weather conditions of the region - the greater the temperature difference, precipitation, soil fluctuations, the higher the finishing (reinforcement) should end.
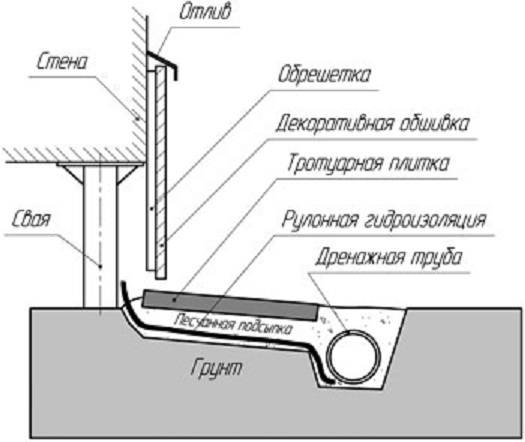
The stone is fastened with a special solution based on concrete and plasticizers. The mixture is prepared immediately before starting work. Each element is carefully lubricated with a solution and laid out on the surface. After finishing work on finishing, you should thoroughly coat all seams with a fixing solution. Once dry, they can be painted over with regular paint.
Recommendations from the pros!
Bath accessories
DIY gazebo
Concrete fence
Diy potbelly stove
Do-it-yourself veranda
Screw foundation
Country toilet do it yourself
Decorative brick
Stone fence
Pouring the foundation
How to make a fence
Wicket from corrugated board
DIY fireplace
Brick fence
DIY flower beds
Forged gates
Do-it-yourself porch
Bath tub
DIY chicken coop
DIY ladder
Metal gates
Installation of lining
Installation of polycarbonate
Pump for giving
Garage arrangement
Fences for flower beds
Do-it-yourself blind area
Steam room in the bath
Railing for stairs
DIY cellar
Painting the walls
DIY press
Lattices on windows
Rolling gates
Do-it-yourself shed
Alarm for summer cottages
Benches for giving
Fence posts
Floor screed
Solid fuel boilers
DIY greenhouse
Fence installation
House insulation
Attic insulation
Insulation of the foundation
