Ladder calculations
If you decide to build a wooden staircase with your own hands, think over the nuances of construction: Determine its dimensions, calculate the number of steps and supports
It is important to first imagine the function of the staircase: connecting floors or accessing the attic. (Information on self-isolating attic can be found here)
It is also not difficult to draw the diagram yourself. They usually take a straight staircase. It connects the first floor with the second floor and reaches a height of several meters. For reasons of comfort, the angle of inclination of the structure should be equal to 30-40 degrees.
So, for your convenience, we present the basic calculations of staircase elements (using the example of a wooden structure):
The base length is 3.5-4 m; the span of the stairs is 2.5 m; stair width 30 cm; ladder height 15-20 cm.

Necessary calculations
Determining the height of the stairs. The average value from ceiling to floor is 250 cm. To this is added the thickness of the floor between the floors. The average is 35 cm.We understand this: 250 + 35 = 285 cm

to calculate the number of levels: The height of the stairs is divided by the height of the step. The last value (for example, the height of the steps) is best taken as an average value of 17 cm.We understood this: 285 cm / 17 cm = 16.76 cm = 16.76 cm = 16.76 cm
The value is rounded up. There are 17 steps in total.

Determine the width of the step. The permissible step width (flat fit) can be in the range of 22-40 cm. In Russian practice, the following formula is used to calculate the step width and rise (step): a + b = 47 cm, where a is the step height, b is the step width. We figured it out: 47-16.67 = 30.3 cm.
The value is rounded up to 30 cm. - This is the step size.

The width of the ladder must be a multiple of the width of the ladder. In our case, this value can be 60 cm, 90 cm, 120 cm, etc. Calculate the length of the stairs. The length of the staircase corresponds to the product of the number of steps and the width of the staircase. We figured it out: 17 * 30 = 480 cm

calculates the length of the longitudinal beam. The calculations are based on the Pythagorean theorem: the sum of the fields of the legs corresponds to the square of the hypotenuse. This is A² + B² = C². In this formula: A is the stringer height, B is the length of the ladder, C is the length of the longitudinal beam. We figured it out:
230400 + 81225 = 311625 The root of this number is 558.23 cm. You can round up to 560 cm.

Tip: If the geometric calculation is difficult, you can draw a ladder for paper of the appropriate size and measure the angle and length of the base.
Wooden porch stairs
 Owners of private houses that have a beautiful wooden terrace know all the advantages and disadvantages of this design.
Professionals:
- Ecological cleanliness of wood;
- Huge opportunities for decorating a wooden terrace;
- Decorative;
- Originality.
Minus points:
- High price;
- Harmful consequences of decay processes;
- If a wooden staircase is used for a long period of time, the steps may accumulate and darken;
- Sometimes the railings themselves (railings) and wooden stair railings need to be loosened, repaired or replaced.
I must say that all the shortcomings completely depend on the quality of the wood. If you choose the right material, a wooden deck will last a very long time.
Installation of a wooden staircase: video and explanations
Let's consider in more detail the process of installing a wooden staircase. The ladder on prefabricated bowstrings has a simple and at the same time solid construction. It is perfect for installation, both on the porch and on the embossed area.
For a flight of stairs having the same dimensions as in the previous version, for a bowstring you will need:
- 2 boards with a section of 50x300 mm (board 1);
- 2 boards 50x250 mm (board 2) of the corresponding length;
- 10 boards 1200x50x100 mm for risers;
- 10 boards 1200x50x350 mm.
The required width of the lumber is achieved by connecting the grooved board.
Board 1 is leaned against any support at an angle of inclination of the flight of stairs and a vertical line is drawn along a plumb line. Parallel to it, in the middle part from the edge of the board, lay the height of the step (15 cm), and then perpendicular to the width of the step (30 cm). This continues until the entire contour of the staircase is marked. Along the line obtained, a zigzag is cut out with a jigsaw, then the halves are attached to the board 2. The fasteners are made along the entire contour with screws - two for steps and two for risers. You can also use nails, in this case the boards are pierced through, and the ends of the nails are bent tightly. Boards are hammered together in the form of a tray. Then, steps are put on the grooves made and they are fixed from the ends to the screws - two for the riser and two for the step.
The staircase can be installed on separate supports or tied to the frame of the upper platform. The fence posts are attached from the outside of the bowstring to a bolted connection under the step and above it.
Assembling a spiral staircase
Before proceeding with the installation of the structure, it is necessary to determine its location and whether it will come into contact with the wall. Having coped with this task, you can proceed with the step-by-step instructions:
- Mark the ceiling with the center of the circle.
- Using a plumb line, project the center of the circle drawn on the ceiling onto the floor. This will be the place where the support post will be installed.
The center of the circle drawn on the ceiling is where the support post will be installed
Cut out a circle of the desired shape in the overlap and make a decorative frame for the edges.
 Cutting and framing the opening
Further actions depend on the features of the support:
- If you purchase a ready-made set of a spiral staircase, then the support consisting of separate parts is assembled simultaneously with the steps.
- If a monolithic concrete or brick support is used, then marks are applied to it, where the brackets will be attached in the future. They serve for laying and fixing the steps.
- On a wooden support post of a large diameter, the steps are attached using bars, the height of which is equal to the distance between the steps. Bars with a section of 3 × 5 cm or 5 × 5 cm are attached to the places marked on the post with self-tapping screws.
- When laying the first step, you can put a large wooden block on its wide side.
- The top step is attached to the second floor floor.
- After setting all the steps, it is necessary to install the balusters. They can be fixed only after their tops have been cut off at an angle depending on the slope and turns of the stairs.
- Railings are installed and fixed with self-tapping screws. In order not to damage the racks, it is recommended to pre-make channels for self-tapping screws.
- Then the plinth is attached, if provided by the project.
Having clearly followed the installation instructions for the spiral staircase, proceed with the final finishing. Choose a suitable paint, stain or ordinary clear varnish for the construction.
Screw structures are an excellent design solution for your home or summer cottage. And regardless of whether you have chosen the expensive option or the economy class, the result will please you in any case.
Installation steps
Materials:

hacksaw; level; rod 100 x 200 mm; Handrail 70 x 70 mm for handrail production; Slabs for the construction of stairs (thickness - 30 mm); Nails and hammer.
- Before starting work, treat the wood with antiseptics and dry it completely (within 48-72 hours);
- Even a small porch needs a foundation. This increases the stability of the ladder and reduces decay processes. Usually the foundation of the column is installed under a wooden veranda. As support pillars, metal pipes or structures made of asbestos, logs, concrete blocks or bricks are used. Holes up to 80 mm were drilled under the supports, at the bottom of which a sand and gravel mixture is filled. It should be noted that metal supports before immersion in the ground must be treated with special anti-corrosion inhibitors;
- Then you need to prepare bowstrings or stringers - these are the main supporting elements of the ladder to which the steps are attached.The grooves are made in bowstrings (or longitudinal beams), the steps are cut out. The beams are attached to the walls of the building (taking into account the width of the future steps) and nailed. The lower edges of the beams must be attached to the support posts;
- Then the panels are cut according to the parameters of the future stages and processed by a planer or grinder. Secure the steps from bottom to top. Seams must be secured with self-tapping screws or nails;
- After installation, the structure is covered with boards and only after that it can be used for the manufacture of handrails;
- Railing posts are mounted on all steps. This element is attached with self-tapping screws. You can use a regular square beam as a railing, but it is best to use shaped balustrades. In the upper part of the balustrade, the balustrades are “hidden” under the balustrades and are also fixed with screws;
- Then the conductor is treated with an antiseptic primer (2-3 coats). It is recommended to install a canopy on the veranda, the surface of which should cover the entire area of the veranda.

Recommendation! Wooden stairs to the veranda may be stained or painted, but a surface (colorless) must be applied to fix the result.
The surface of the stairs should be well sanded and then glazed. After stain treatment, the coating must be thoroughly dried. Only then can the clear varnish be applied. You can paint the stairs if you want (this article explains how and how to do this).
Watch a video on how to make a staircase to a porch from logs:
Page 2
Modern cabins and private houses assume the presence of 2 or more floors, and the highest of them can be residential and non-residential premises. Either way, you need a ladder.
It is already quite difficult to build a reliable intermediate or attic staircase from concrete or metal structures, which cannot be said about a wooden staircase.
In this article, you will find out what types of wooden stairs exist, what is the difference between them, what material is used to make spans. In addition, each of you can build a wooden staircase to the second floor - the article contains examples of calculations and photographs.
Attaching the handrail to a welded or forged stair rail
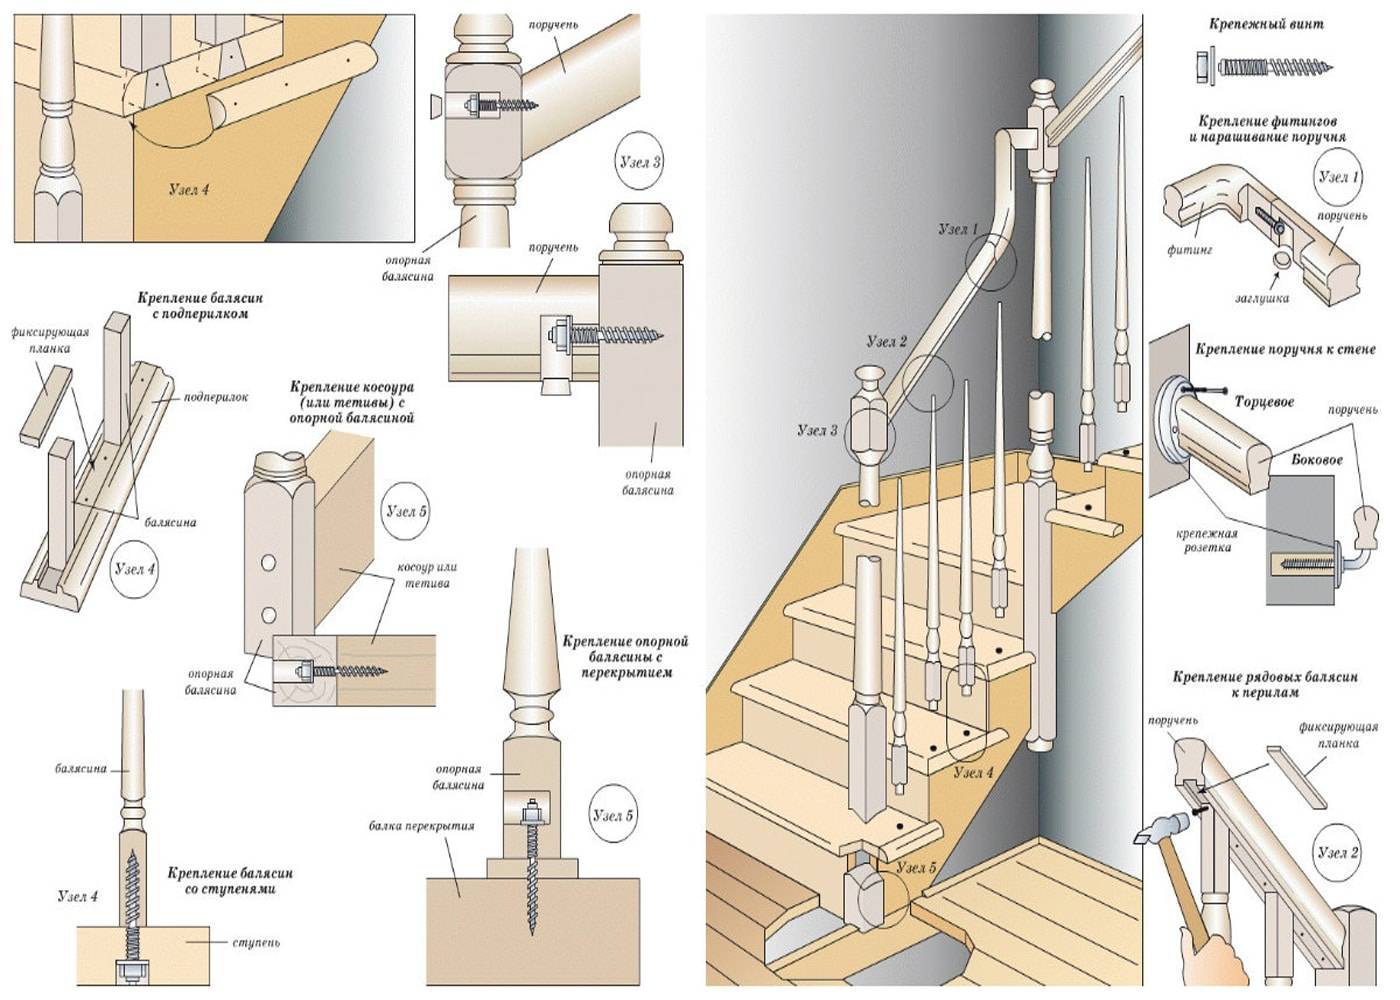
A wooden handrail is usually placed on a forged or welded fence. In its lower part, a cut is made according to the dimensions of the upper lintel of the finished fence. The depth of the handrail is about 2 cm. It is possible more or less - it depends on the desire. Connect the handrail to the handrail with self-tapping screws, which are twisted through the holes in the upper lintel
It is important to choose the length of the fastener: it should be slightly (at least 5 mm) less than the height of the handrail so that the screw does not stick out on the surface

Make holes in the upper lintel and fix the railing with screws through them
In this case, installing the handrail on the stairs is simple:
- In the upper jumper, holes are made that are slightly larger than the diameter of the selected self-tapping screws, but less than the diameter of the head. Step - from 50 cm to 1 meter.
- The handrails are trimmed where necessary, the joints are adjusted to an ideal state.
- The handrails are installed in place, having achieved a perfect coincidence of the joints, fix them in this position with clamps.
- Fasteners are installed through the holes in the lintel.
-
Remove the clamps. The railing is now complete and the railing is ready for use.
It is also possible to glue a wooden handrail to a metal welded or forged handrail. When choosing an adhesive, you need to look so that it can connect wood and metal
For outdoor stairs (on the porch, for example), you also need to pay attention to the operating temperature range. Otherwise, there are no difficulties:
- spread glue according to the instructions;
- press the parts, fix with clamps;
- leave until the glue dries;
- remove the clamps.
Both methods can be used to securely attach the handrail to a steel ladder. One does not interfere with the other.
Ladder requirements and calculation
The wooden staircase to the second floor is an engineering structure that must ensure the safe movement of people. Standards governing the rules for the design of structures - SNiP 2.08.01-89, 2.08.02-89.

Requirements that must be met when making a wooden staircase with your own hands:
- span width not less than 90 cm for free movement of a person;
- the length of the march is 3-17 steps, with a larger number, they arrange an intermediate platform measuring 130 cm;
- the height of the steps is 15-20 cm;
- width 25-30 cm, the leg should stand on the tread entirely;
- the optimal angle of ascent is 26 ° -33 °, the maximum is 45 °, with a greater steepness, the ladder is dangerous for children and the elderly;
- the height of the fences is at least 90 cm, and in a house with children - 120 cm;
- the interval between the balusters is 10-15 cm for reasons of stability of fences and safety for small children;
- the railing is designed for a side load of 100 kg;
- from the first or last step to the nearest door at least 1 m.

In a flight of stairs, it is advisable to design an odd number of treads, since it is more convenient to start and end the movement with a step with the same foot.
To calculate the structure, you need to perform the algorithm:

Diagram of a wooden staircase
- Draw up a drawing of the plan and section of the room with exact dimensions, taking into account the thickness of the floor.
- Find the required number of steps. For this, the total height is divided by 15-20 cm.
- Determine the length of the stairs as the product of the number of steps and the tread width of 25-30 cm.
- If the number of steps is more than 18, you need to provide a platform with a length of 130 cm.
- If the height is insufficient, it is possible to arrange a turn of the march by 90 ° or provide for winder steps.
- Calculate the length of the stringer or bowstring according to the Pythagorean theorem as the root of the sum of the squares of the height and length of the stairs.

Drawing of a sweep of a staircase on the wall
The ceiling opening is designed with the expectation that a person walking up the stairs will not touch their head on the upper structure. The minimum height from the step is 2 m.
You can use an online calculator to calculate the stairs. The program outputs the result in the form of a drawing with detailed dimensions of all elements.
Manufacturing steps
 To build a wooden staircase, you will need the necessary tools:
Triangle; Pencil; Roulette; Hammer; Saw; Nails; To hell. First, they create a ladder frame, i.e. side walls. Use the triangle and pencil on the board selected for the frame to mark the size of each step from bottom to top. The same should be done with the second board;

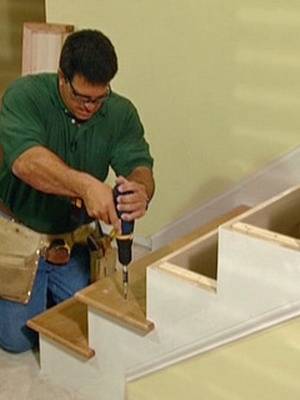
Cut the frame with a hand saw and place it on the prepared spot and secure with screws. The cuts must be carefully cleaned and smoothed to ensure a better fit of the steps; After fixing the base, the steps can be started and locked. The steps can consist of one solid plate or two narrower plates. It depends on the availability of the material. The most important thing is that all steps are carried out tightly and evenly. Screws and nails are used to fasten the steps;

If you wish, you can make a handrail, only in this case it is important to pay special attention to the selection and installation of handrails (stair railings). At the end of the work, the staircase is painted and varnished according to the owner's taste

Recommendation! Prepare the landing carefully, careless inspections and preparations can lead to squeaks and vibrations of the stairs.
Features of fastening steps
In order to make use of the space under the stairs and not worry about safety, the steps are fixed, as are the steps. They are also made of wood. They mostly use a board that is three centimeters thick. The height of the step corresponds to the picture. 
For the staircase itself, it is better to take a massive board four centimeters thick, which increases its strength. When attaching steps and steps to the foot of the stairs, in addition to nails and screws, it is necessary to additionally lubricate the seams with a special glue for wood or plain wood. PVA. This not only makes the entire structure more durable, but also protects the ladder from squeaking.
After the installation of the entire structure, it is recommended to cover the nails and screw plugs with plugs specially designed for this purpose. This should be done before you decide to paint the wooden staircase, so that the picture finally covers all the details of the installation.
In this video, you will learn how to build a simple wooden staircase and how to assemble its steps:
Page 4
Modern cabins and private houses assume the presence of 2 or more floors, and the highest of them can be residential and non-residential premises. Anyway……
A spiral staircase is a versatile structure that connects floors. The main advantage of this type of construction is its compactness and ... ..
Securing the railing to the balusters
A feature of the installation of the railing is the need for the presence of the same bevel at the ends of the balusters, corresponding to the angle of inclination of the stairs. It is best to do it in advance, immediately after the installation of the staircase.

To do this, take one column, put it to the side of the stairs and draw a line on it parallel to the string or even rail laid on the steps. All other posts will be trimmed to this pattern.
Railing can be secured using:
- wooden dowels;
- self-tapping screws screwed in at an angle;
- flat longitudinal wooden slats.
The length of the self-tapping screws should be such that, after screwing in, the sharp edge of the hardware does not come out onto the surface of the railing. You can install the handrail using a rail in the same way as using a baluster when mounting the poles on a bowstring.
How to install a wooden ladder
In areas with a slight slope, first level the site horizontally, then install the porch. Before installing the wooden ladder, prepare the support base.

Installation of ladders on retaining posts along the slope of the relief in the photo.
If the slope is rather steep, the construction of the upper platform and the staircase begins in the reverse order: first, the stakes are driven in along the height of the platform and the sidewalls are sheathed, then the stakes for the uppermost step and again planking is performed - and so downward, until it is, the level of the lower one is reached steps. After that, similarly to the above option, the steps themselves, risers and the floor of the platform are laid, and the elements of the fence are installed.
Do-it-yourself wooden staircase installation


Do-it-yourself installation of a wooden staircase begins. The prepared parts should be combined into a one-piece structure. First, the back sides of the shields are assembled together on crossbars and jibs, and the front sides are connected to the first riser. Then the first assembled step is installed, aligning the groove with the outlet of the first riser. The edges of the risers are attached to the outlets of the posts, and the edges of the step to the support boards using screws. The rest of the steps are collected in the same way. After installing the latter, the floor is laid on the upper platform with a tongue-and-groove board. If the flight of stairs runs parallel to the wall, the back of the upper platform is sheathed with a board and equipped with an additional railing post. For steps against the wall, racks and railings are optional.

Installation of handrails in the photo.
In conclusion, the railing is screwed to the released racks. First, the ends of the racks of the staircase are cut at an angle corresponding to the march.To do this, pull a string from the top of the first rack to the top of the last one, mark the cut points and cut off the excess parts. Then the railing is screwed to the racks. In the places where the railing passes from the inclined plane to the horizontal, an overlap is provided. If the distance between the racks is more than 15 cm, they must be sewn up with decorative details or a false rack.
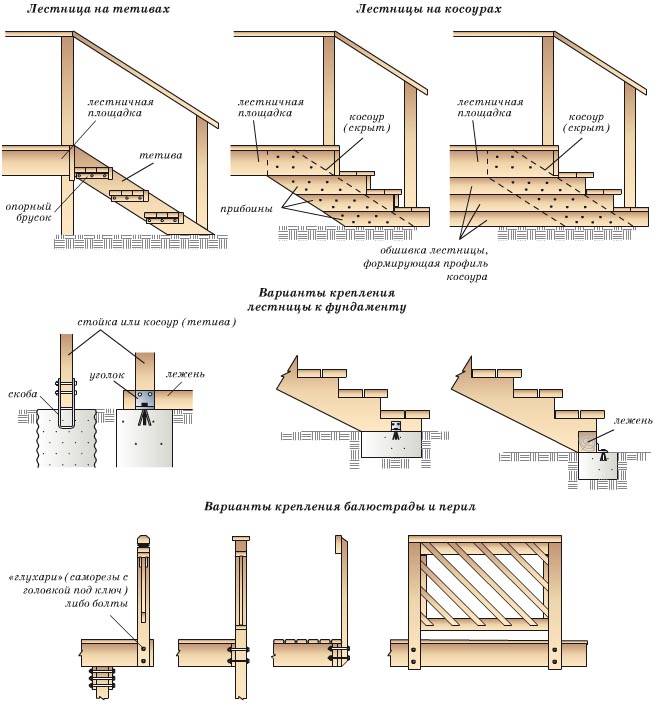
In swampy areas, all the racks of the upper platform, as well as the racks of the staircase with a step of 0.9-1.2 m, must be tied to the piles. On soft and sandy soils, the upper platform is equipped with additional racks with a pitch of 30-60 cm. Under each of them, including all racks of the staircase, a "shoe" is placed with 20-40 cm outlets on both sides of the porch walls. "Shoe" is a cut of logs divided in half, the length of which is 40-80 cm longer than the width of the flight of stairs. On clay and loamy soils, the ends of the racks can be released and grinded off under a stake in increments of 0.6-1.2 m.
In all cases, the lower parts of the racks are covered with waterproofing, antiseptic and anti-rotting compounds, and the outer parts with weather-resistant varnishes or paints.
Features of fastening wooden balusters to surfaces
The fastening of the stair railings must be reliable and as strong as possible. The safety of people who will use the stairs depends on this. At the bottom, balusters can be attached to the floor, steps or bowstring.
Anchoring to the floor
Floor-mounted posts are provided for the lower and upper support elements, on which the rail of the handrail subsequently rests. To fix their position, a hole is drilled in the floor and the following can be installed:
- Expansion anchors for concrete slabs and monoliths with reverse tapered thread;
- embedded elements for reinforced concrete monoliths;
- steel studs with metric thread on one side and tapered, as on screws, on the other for wooden floors.
In the first case, before attaching the balusters to the floor, a hole is drilled in the concrete corresponding to the diameter of the anchor. When screwing in the metric thread, the stud expands and the fastener is firmly fixed. After that, the wooden support post is screwed onto a tapered thread protruding from the floor, previously lubricated with glue.
In the second version, a recess of at least 80 mm is knocked out in the concrete monolith and a mortgage element with a tapered or metric thread in the upper part is installed in it. The embedded part is poured with cement mortar and, after it has hardened, a baluster is screwed onto the vertical hairpin.
Both options are equally reliable. It is not recommended to use self-tapping screws in this case, since they will not be able to provide a sufficient level of reliability for the extreme support pillars.
Installation on the plane of the steps
Installation on horizontal wooden surfaces can be done using pins, dowels or self-tapping screws. The technology describing how to fix the balusters on a wooden staircase along the steps has been discussed in sufficient detail above.
When installing the posts, it is recommended to cover the end surface with glue. This will increase the strength of the connection, although it will eventually make it completely non-separable.
 Installation with dowels.
Mounting on an inclined bowstring
The presence of an inclined plane does not allow the balusters to rotate during installation. Therefore, wooden dowels or self-tapping screws are used to fix them. The bottom of the balusters should be trimmed to match the existing angle of inclination of the installation support.
Installation can be greatly simplified if you use a sub-baluster - a longitudinal rail of a certain section.It is temporarily fixed on the surface of the bowstring, the marking of the installation locations of the elements is made and removed.

After that, the balusters are screwed on and the already assembled structure is returned to the surface of the string. Further, the baluster itself is fixed with self-tapping screws in the open areas between the posts.
Staircase on kosoura
It is characterized by a fairly high strength, long service life and ease of installation at the lowest cost of building material. The only tricky part is preparing the support beams.
Support beams can be prepared in two ways. In the first case, beams of appropriate length with a section of 100x250 mm are used, on one side of which ridges are cut along the height and width of the steps. After installation in the right place, boards cut to the size of the steps are fixed on the ridges - this can be considered complete installation.
Sometimes it is difficult to find a beam with the desired section. In this case, it is necessary to pair two beams (100 × 100 and 100 × 150 mm): the first one goes to the level of the ridge, and the second one goes to the supporting part. You can also use four boards (two 50 × 100 and two 50 × 150 mm), fastening them together in a checkerboard pattern in the shape of a beam.
For the second method, with the same dimensions, less material will be needed, moreover, such a structure is characterized by increased strength. First, a template is prepared in the form of a rectangle, one of the sides of which corresponds to the height of the step, and the other to the width. In the lower corner of the riser, a rectangle is drawn with sides of 50-100 mm (the lower the steepness, the greater the value) and from its (rectangle) inner corner a line is laid along the steepness of the stairs - this will be the cut line. According to a ready-made template from a board with a thickness of 70-100 mm, kosoura are cut along the width or height of the step. Then the same template is applied to the support beams at the location of the steps, the darts are outlined and all unnecessary is removed. After that, steps and risers are stuffed onto the kosoura, and the resulting structure is combined with the cutouts of the beams and reinforced with plates.
Watch the installation of a wooden staircase in the video:
This article is an overview of the most popular types of stairs, and also contains practical advice on how to make and calculate stairs to the second floor in a private house with your own hands. Scheme, calculations, dimensions and drawings are attached. At the end of each chapter, there is a video showing the process of building a structure.
For ease of reading, the article is divided into several chapters:
- the first chapter contains general recommendations;
- the second chapter introduces methods for creating a spiral staircase project that can be applied during work;
- the third, fourth and fifth chapters have examples for creating common structures from wood, concrete and metal;
- the latter offers 10 construction projects and answers the question about the optimal width.
For convenience, the article has a navigation bar with which you can go to any item and start reading from the required chapter.

Stair railing installation
To give the porch an aesthetic look, especially if the house has carved elements, the fence can be made of turned products - balusters. The installation of the stair railings also has a practical purpose - to ensure safety.
Despite the fact that the baluster assembly scheme requires care, accuracy and some carpentry skills, it is quite simple.
How to install a handrail on a staircase
Now let's look at how to install a railing on a staircase. First, prepare the installation site and the mounting system for the "bulls" - support balusters. At the foot of the stairs, along the centerline of the railing, a tie anchor is fixed with the foundation pouring into concrete. The same bolted anchors are also installed at the top of the staircase, at the corners of the site in front of the entrance, as well as in the intervals where the distance is more than 2.5 m.Further, on each step and along the edge of the site, focusing on the center line of the railing, holes are drilled under the spike connection with ordinary balusters so that the gap between them is no more than 15 cm.Under these holes, spikes are grinded on the bases of the balusters. The spikes on the tops of the balusters for a flight of stairs are made taking into account the slope of the railing, and for the upper landing, taking into account the height of the railing. In addition, they prepare under-runners with corresponding holes for the spikes of the balusters, railings along the length of the fence and a system for tightening the tops of the "bulls". The tightening system consists of front and ordinary clamps and a tightening head. The groove in the rail and the slots in the hold-downs must match the width of the rail.
Fixing the railing of wooden stairs

The sequence of assembling balusters in the photo.
When all the details are ready, proceed to the assembly of the porch railing. You can start attaching the railing of the wooden staircase. First, "bulls" and ordinary balusters are installed in the appropriate places. On top of them, the underruns are attached, and then the clamps and the entire structure are pulled together with a head. At the end, the railing is installed, fixing them to the screws on the back of the under-rail. The assembly process on the front and intermediate "bulls" with horizontal or inclined railings is the same.
How to make a screw structure yourself
The spiral staircase has its own special appearance, due to which it becomes possible to create a completely different design. In addition, the spiral design saves a lot of space on both floors, making the room more ergonomic.

Calculation of a spiral staircase to the second floor
In the case of creating a spiral staircase to the second floor, the calculation must begin with the number of steps and the height of their location. Based on what was said in the last chapter, the optimal height between the steps is 200mm, and the depth is 200-300mm. But it must be taken into account that the steps of spiral staircases have the form of expanding cones, therefore, their depth must be calculated in a special way.

It is better to use mathematical formulas for the calculation. First, you need to know the circumference of the structure. The most convenient way to do this is using the formula 2 * 3.14 * r, where r is the span width. For example, with a span of 1000mm, the circumference will be 6280mm. To get the width of the step from the outside, it is enough to divide this distance by the number of steps in one span. For example, with 10 steps, the distance will be 628mm, which will allow you to create a flat staircase without voids.

The height of the structure is determined by the height of the room, just like when creating a regular staircase. The height between the steps should be equal to the optimal one - for example, usually 150-250mm is enough. The optimal height is best calculated from the height of the room. For example, for the height of the ceilings in the room - 2700mm. The steps will be 20mm thick, the floor thickness will be 150mm.

At this stage, it is best to create a project on paper. It is not necessary to make it as accurate as possible in the drawing plan, but even a simple sketch will help you better understand the project.
Dimensions of spiral staircases to the second floor
When calculating the size, it is necessary to build on the most comfortable staircase width of 800-1000mm. This is enough to pass even with a large load on your hands, while not constraining yourself in movements (unfortunately, large-sized furniture will still have to be lifted through the windows).

The spiral staircase is a circle, because the diameter is equal to the addition of the width of the aisles and, if the staircase is built with a central support, the size of the support. On average, the diameter of such a structure is 1600-2000mm, which is enough for its convenient use, regardless of its features. More details in the table below
| 210 | 235 | 9 | 10 | 270° | 202,5° |
| 235 | 260 | 10 | 11 | 300° | 225° |
| 260 | 285 | 11 | 12 | 330° | 247,5° |
| 285 | 310 | 12 | 13 | 360° | 270° |
| 335 | 13 | 14 | 390° | 292,5° | |
| 335 | 360 | 14 | 15 | 420° | 315° |
Video project of a spiral staircase
This video shows how to make your own stairs to the second floor in a private house with your own hands (diagram and project dimensions are attached). The main points of installation are shown, as well as all the features of working with this type of structures.
Methods for attaching the handrail of the stairs to the wall
A handrail is attached to the wall if the width of the steps on the stairs exceeds 120 cm. The second handrail is made of the same material and the same shape as on the balusters, but it is attached to the wall.
To mount the handrail on the wall, there are a number of fasteners - brackets - for different profiles (round, oval, curly). On one side of the fastener there is a round or square fragment with a flat surface and holes made in it. We install this part on the wall. We select fasteners depending on the material from which the wall is made. We use self-tapping screws if the walls are wooden, dowels for walls made of concrete and bricks, and special dowels for fastening to lightweight concrete.

Several types of brackets for attaching the handrail to the wall
We select the number and size of fasteners for installing a stair rail on the wall based on reliability considerations. Manufacturers make at least four holes on each bracket. Here are four screws / dowels / nails for each and put. When choosing a length, it is better to proceed from considerations "the longer the better." Still, a solid load can be placed on the wall handrail, so it's better to play it safe than fly down ...
The second part for wall mounting of stair railings - where the rail itself is attached - may be different. For round pipes there can be a ring of a certain diameter, for rectangular or square handrails there is usually a flat platform. There are also holes in this part of the stair rail bracket so that the rail can be secured. And in this case, the number of fasteners should be equal to the number of holes (for the same reasons).

There are still such options
There are brackets for wall mounting of handrails with different angles. They are chosen based on their own ideas about the convenience and the planned height of the support. There are also telescopic models that allow you to set the distance to the wall and / or the angle of inclination. There are also end wall brackets, which, simultaneously with fixing the edges of the handrail, also decorate them.

Something like this is all set
The number of brackets depends on the length of the handrail. Usually one element is placed at the edges, and between them the calculated number, with a distance of 40-60 cm. The lower the bearing capacity of the wall, the more often we install wall holders for the railing.