Final work
Natural pathways in an irregular garden are often laid without a border, using a hidden fringe. After the end of paving, the seams and especially wide gaps are filled with fertile soil and sown with low-growing varieties of lawn grass (bluegrass bulbous, creeping tenacious, knotweed, etc.). If a lawn is located around the paved surface, it will harmoniously fit into the general landscape without a sharp transition from grassy cover to stone.
In regular gardens of the classic type, paved surfaces are separated by borders, and at the end of the paving they are finished in another way:
- fine sand is poured onto the surface of the paved area;
- with a stiff brush or a broom, it is driven into the seams between the stones;
- watering the path, compacting the sand;
- repeat the process until the gaps are filled.
When finishing a paved path on a concrete foundation, grouting with a slurry of cement and sand can also be used. It is gently rubbed with a spatula between the plates, as when laying tiles. After drying, you will have to repeat the processing of the plates with a stiff brush to remove the remaining solution. In conclusion, the surface of the paved area is washed with water from a hose.
Laying sandstone with your own hands
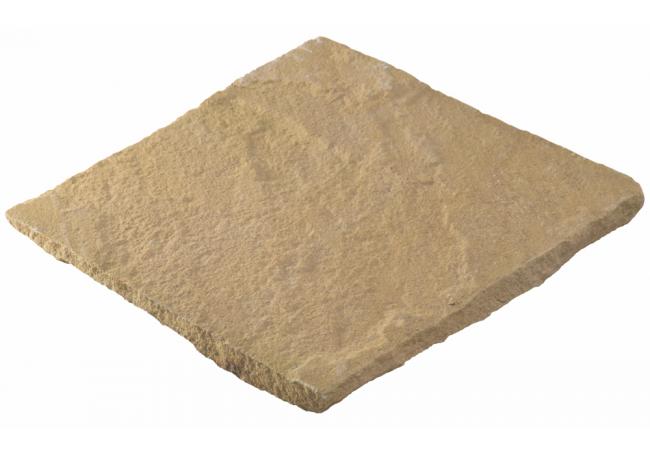
First of all, you need to wash the sandstone - do-it-yourself laying is done only with clean stones.
Use a brush for best results. After, spread the plates to dry.
Drying can be combined with a preparatory stone layout to present the final result.
Cutting with a grinder to give the desired shape is easy, but do not overdo it.
All the beauty of natural material in its minimal processing.
Stones with different thicknesses, hit with a hammer to the same level.
The final touches in the styling - cleaning from drops of solution.
Such paths are rarely framed by a curb, more often they level the ground levels and paths.
Laying natural stone paths for screening
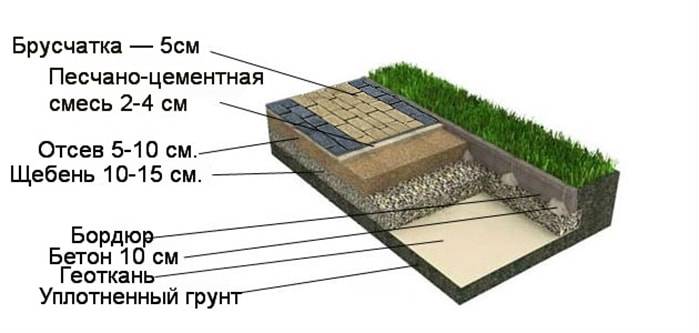
To correctly lay natural stone with your own hands using technology, follow the main steps:
- Plan the surface of the site. This will save energy and money in the future.
- Remove the top layer of soil, level the surface and compact it. For a wild stone, 15-20 cm is enough; when paving paving stones, 25-30 cm will need to be removed.
- Make a cushion of rubble 10-15 cm thick and be sure to compact it (you can use improvised means: handles are nailed to a 1.2-1.3 m long log for convenience and this tool sequentially compacts the surface with shock movements). Then spill everything thoroughly with water.
- The wild stone is placed on the solution directly on a moistened cushion of crushed stone (for the sake of economy, the solution is prepared from screening with cement grade 500 in a ratio of 1: 6-1: 5). Such laying of natural stone on the paths is applicable both for a personal plot and in city squares.
- Granite paving stones require an additional preparatory layer: we fill up with screenings 5-10 cm thick, pull off the excess with an even rule and press the surface again, after which we pour a layer of dry mixture of sand with cement (1: 3) with a thickness of 2-4 cm and make direct installation using a special hammer. At the end of the work, the surface is cleaned with brushes and gently moistened to set the mixture.
- The seams are covered with a sand-cement mixture (paving stones) or rubbed with a wet mortar (wild stone).
When the budget allows, you can purchase geotextile that improves the characteristics of our "pillow" and spread it with the very first layer on compacted soil. This technology of laying natural stone protects against uneven subsidence of our "pillow" under the influence of moisture and prevents the growth of weeds.
If the design provides for a border, we install it first, at the joints, be sure to construct a concrete lock to secure it.

As you can see, laying natural stone with your own hands requires only careful and accurate implementation of the technology, then your paths will remain smooth and beautiful even after several years!
It should be noted that, contrary to popular belief, stone paving stones are affordable at their cost and are a serious competitor to our usual "plastushka". The service life of the coating is over a hundred years (subject to the laying technology up to 300 years), and the noble appearance is an order of magnitude different from the even beautiful, but rustic wild stone.
Garden paths from wild natural flagstone
Slab - layers of natural stone with strength and natural pattern.
The ideal building material for the construction of garden paths is a torn unedged stone, in other words, flagstone. It is easy to process, relatively inexpensive, and resistant to environmental influences. This is an absolutely environmentally friendly material. Not only garden paths can be made of this natural stone, but entire grounds can also be laid out. To make a garden path correctly, you need to know the laying technology, which, by and large, is not difficult at all.
Preparing the substrate for installation
Preparation of the base for laying flagstone consists in the fact that the entire contour of the previously marked garden path is poured with concrete, i.e. a concrete screed is made. While the concrete hardens, you can proceed directly to the preparation of the stones themselves, in our case the limestone.
Preparing the limestone for laying
After the concrete has set and hardened, work must be carried out directly on the track. Using a stiff brush and a strong jet of water, the stones are thoroughly washed from clay and sand. Then they are dried and laid out next to the path so that each flagstone, its configuration, is visible.
When laying the elements of the garden path, the marking of the limestone will allow you not to waste time on matching them to each other.
Then proceed to the "dry" laying of limestone on the path. Having determined the place that will be visible on the path, not covered by trees and bushes, they put the thickest, most beautiful and regular stone on it. Thick - because with the help of glue, all other elements that will make up the future garden path can be brought to its height. The number "1" is written on this stone with chalk. This will be a kind of starting element. Then, as in a mosaic, the next stone is selected, which ideally matches the number “1”. It is placed to the first number with a gap and is written on it with chalk “2”. Then, perpendicular to the line of the junction of the stones, they draw a line with chalk and write “2” on the number “1”, and, conversely, write “1” on the number “2”. This is done in order to then, at this risk, understand that the stone "1" borders on the stone "2".
Further, according to the same principle, they select the numbers “3”, “4”, “5”, etc. And on each they put its number and draw risks on the stones with which it borders. Then, when laying the elements of the garden path, time will not be wasted on matching them to each other. If necessary, the workpieces can be corrected using a grinder and special cutting wheels.
Correct laying of limestone
To properly lay out the stone, a special glue is used. It must be admitted that this glue is quite expensive. When all the blanks have been received, they are carefully removed in the reverse order. The reverse side is greased with glue. To do this, use a hard brush. Then the concrete path is thoroughly swept, vacuumed and washed. The glue is mixed with sifted sand and cement, approximately in a ratio of 1: 2, mixed and a mixture is obtained in a state of thick sour cream.
A mixture of glue and cement is applied to the track with a special trowel, leaving no cavities. If water gets into this cavity, it can crack the stone when it freezes.You need to lay the first workpiece on the solution and press down as hard as possible so that there are no cavities left and all the excess glue is squeezed out, after which it must be collected with a trowel and sent back to the bucket. Then the same procedure is performed with the number “2”. Here risks help us, we do not waste time, because the glue sets within a few hours. It is imperative to ensure that the surface of neighboring stones is at the same level. So gradually, stone by stone, you will get a very beautiful and lively path.
The next day, with a brush and a lot of water, you need to clear the path. For several days, it is advisable to spray the track with water until the glue has completely hardened.
By and large, such a path made of natural, natural stone can be laid out on your own. The main thing is to do everything right, observing the technology, and have a desire. And then everything will work out!
AuthorIvan Andreevich Borodin
.
- Arrangement of beds in the country
- Do-it-yourself slab
- Paving paths in the garden
- Laying limestone with your own hands
- Limestone garden paths
- DIY limestone path
- Do-it-yourself garden path slabs
- Arrangement of paths in the garden
- Arrangement of garden paths in the country
- Warm bed device
- How to make paths in greenhouses
- Plastic tracks
- DIY stone paths in the garden
- Do-it-yourself paths in the country
- Do-it-yourself paths in the greenhouse
- Garden path material
Laying sandstone on walls

For vertical surfaces, the preparation of the base consists in cleaning it from the old coating.
If the plaster is sturdy, prime it with deep penetration mortar.
This is a must, natural stone is heavy, and sandstone is still characterized by low moisture absorption.
The base absorbs water for it, which can lead to situations with the slab falling out of the masonry.
But one should not assume that only thin slabs are suitable for walls.
Sandstone with a thickness of more than 10 mm will be well supported due to the support on the end.
The finish is suitable for concrete buildings, white brick walls, but red is not the best option, its strength decreases over time.
When choosing sandstone, the laying technology of which requires surface reinforcement, be prepared to fill in the metal mesh in advance.
It is mounted on 6-8 dowel-nails per square meter. The surface is leveled with a sand-cement mixture.
There is no need to regret the glue for installation, but it can and even be diluted. The introduction of sand and cement into the mortar will give strength to the masonry.
The mixture should not be too liquid in texture, on the contrary, a slightly dryish version is better.
After drying, such a solution continues to breathe, reducing the possibility of the plate falling out.
For larger stones, anchoring can be added to the wire through the back of the piece and the reinforcement mesh.
Complete drying of the masonry lasts about one month, so work with natural stone can be considered seasonal.
The air temperature, for proper solidification of the adhesive layer, should not be less than 5 ° C.
Laying methods depending on the type of substrate
Owners who plan to equip paths in their summer cottage with their own hands need to choose the material of the future foundation correctly. It can be sand, concrete or rubble.
In addition, it is worth knowing about two types of masonry:
- Suture. The tile is selected so that in a day after paving the gaps between the elements are no more than 1 cm.
- Seamless. Each stone is closely fitted to the other by cutting off excess parts with a grinder. The pattern of the track turns out to be more natural and beautiful than in the first version. However, the process is laborious and time consuming.
Having a plan of paths on the site, it is necessary to fix it on the ground. Straight paths are marked with rope and pegs.Winding can be marked with a watering hose, laying it along the edge of the intended path. Pegs are also driven along the hose.
Excavation should be done to a depth slightly less than the required pavement thickness. This is done in order to seal the surface of the base of the track after the excavation. The width takes into account the size of the border, if any.
Natural stone paths can be laid in several ways.
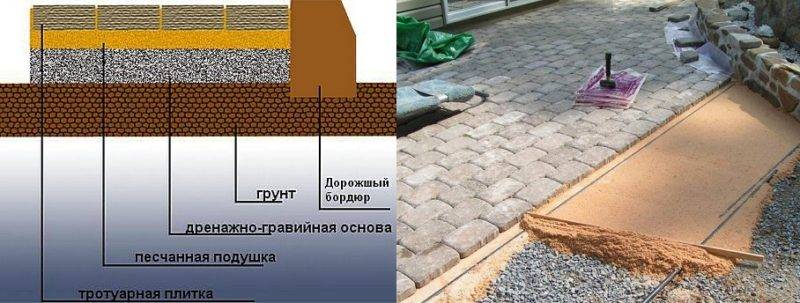
Geotextiles are laid on the compacted soil to prevent gravel from entering the ground. A gravel pad (10-15 cm) is poured onto it, which is carefully compacted. The next layer is sand of medium coarseness (5–10 cm), which is also rammed or spilled with water for compaction.
1 - compacted soil; 2 - geotextile; 3 - gravel 10-15 cm; 4 - sand pillow 5-10 cm; 5 - natural stone 4-6 cm; 6 - stone or concrete curb
When laying the stones, it is necessary to press down a little and knock them out with a rubber mallet. The path must be at least 4–5 cm higher than the planning mark of the land plot. A slope must be made, and it is better to make a slope on both sides of the path to drain the water.
To prevent the stones from spreading to the sides, a solid border is made. In addition, it is advisable to fill the joints between the stones with a cement-sand mixture. To do this, you can make a cone from a dense bag. A small hole is made in the corner in it and the solution is carefully poured out so as not to stain the stones.
Such a path can be done without a cement-sand mortar. The joints between the stones are filled with sand using an ordinary mop. The sand is simply swept from the stone into the seam and neatly compacted.
The sequence of arranging the foundation for a stone in this embodiment is fully consistent with the first. A layer of cement-sand mortar with the composition 1 (C): 3 (P) is laid on a sandy tamped base.
1 - compacted soil; 2 - geotextile; 3 - gravel 10-15 cm; 4 - sand pillow 5-10 cm; 5 - masonry mesh; 6 - cement-sand mixture 2-4 cm
When laying road stone, it is also necessary to squeeze it a little into the solution and touch up with a rubber mallet. Such a path will withstand the winter heaving of the soil if the groundwater is close to the surface of the site. But in this case, it is good to provide for drainage.
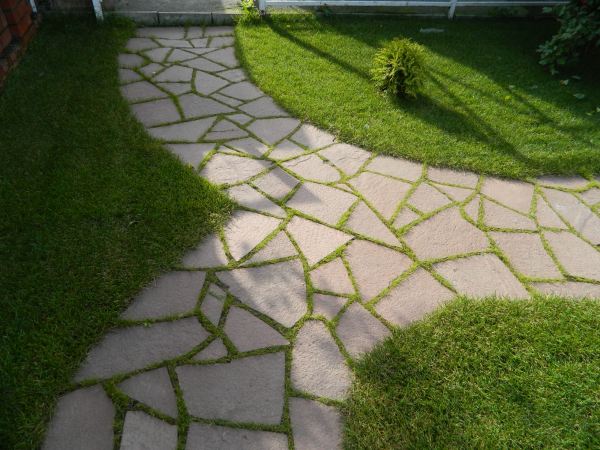
The stone can be laid on a sandy base according to the principle of the first option, but with a wider seam. Further, the seam is filled with fertile soil. It is used for sowing lawn grass, which is subsequently very beautifully combined with natural stone.
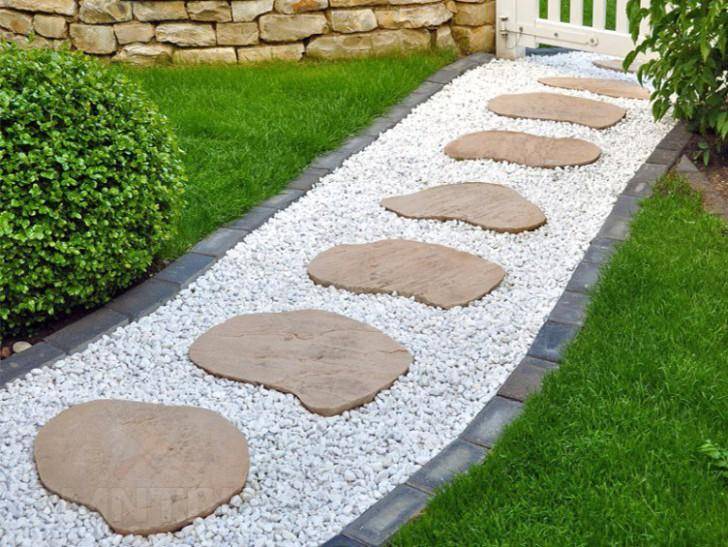
The base for the road surface remains practically the same as in the above options. It is advisable to lay another layer of geotextile on the compacted sand layer so that the gravel does not mix and does not go into the sand.
Laying methods
According to their purpose, the paths can be of different types, for example, a small path in the corner of a vegetable garden, or a large road along which a car will drive. In order for the track to serve for a long time and correctly, it is necessary to correctly calculate the load on its bearing parts. Depending on the purpose, the type of laying is chosen, because the paths experience different loads that must be provided.
Laying the track on a sandy base
This method is considered the most elementary, however, it can be used only for small paths, along which people will walk at most. It is definitely not suitable for the roadway or for places that are under load.

Laying a limestone track on a sandy base
In order to make a track, you must first mark the estimated location of its running. To do this, you can drive the pegs into the ground or stretch the cord along the contour. Then a trench is dug.In order for the path to look natural, sharp corners must be avoided. The trench should be several centimeters deeper than the stone itself. The base of the trench is leveled and covered with sand. The sand layer should be several centimeters long. In order for the sand to lie more densely, you can pour water over it. Slabs of stone are laid on top of the sand. There should be a distance between the plates, it is necessary in order to make the seams. A couple of centimeters are enough for this purpose. When the stone is laid, you need to fill in the rest of your sand. You can fill these voids with grass, for this you need to pour soil and seeds of the desired vegetation instead of sand.
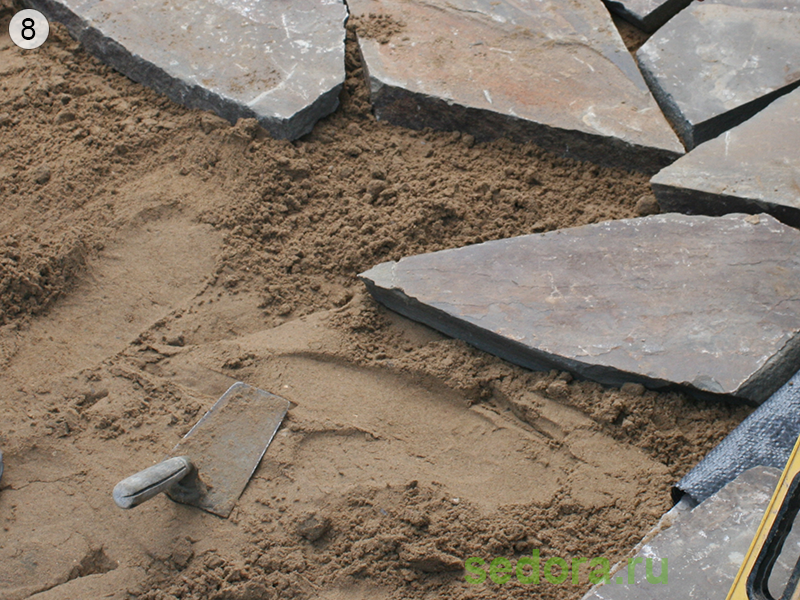
Laying a limestone track on a sandy base
Laying stone with a sand and gravel pad
This method has proven itself well when applied on clay soils. The trench should be deeper than for sand, and curb blocks or boards should be installed along its sides. Untreated boards cannot be used; be sure to prime them. The sign indicates it is laid in the same way as the base is written, the distance for the seams.
Laying of a limestone path of a sand and gravel bed
Paving tiles on a concrete base
This method is universal because it is suitable for tracks of any thickness, it can withstand almost any load and is suitable for any type of soil. The disadvantage of this type of base is the laboriousness of its manufacture. The trench should be at least four tens of centimeters deep, and to make the base, you need to strengthen the edges with formwork. Soil and gravel are poured at the bottom, then a reinforcing mesh is placed. Only then can concrete be poured. The thickness of the concrete layer is three tens of centimeters. If you do not make expansion joints, the base will crack.
Therefore, it is important to remember about them. After pouring the concrete, you need to leave it to harden.
This will take several days. Once the concrete has hardened, you can lay flagstone on top of it. For masonry, you can use a special construction adhesive.
Method 1. Stone garden path on a sand or gravel-sand base
Laying natural stone on a sandy or gravel-sand substrate is perhaps one of the most popular, relatively simple and reliable ways of arranging a garden path that will look very picturesque anywhere in the summer cottage area.
Track mark
First of all, clean the area well for the future path, remove a variety of debris, growing plants, roots, etc.
Mark out the contours of the future path, which can be winding or straight. To do this, use a tape measure, a level, wooden pegs and twine to mark two opposite sides of the alley. Tie the rope low, while aligning the cord under a single level, focusing on the height of the future masonry.
Driving in stakes every 0.5-1.0 m, mark up to the end of the site. Make sure that the sections between opposite wedges along the width of the path are the same throughout the path.
If you are planning a curb, do not forget to take into account the space for the edging when marking.
Preparation of the base
Depending on the planned load, you can make a preliminary gravel-sand or sand cushion. In principle, ordinary sand under a stone is quite enough for a pedestrian summer cottage path, but if the soil is "fragile" or loads are expected, it is recommended to make a gravel substrate as well.
So, in the first case, along the marked lines, dig a flat ditch 5-10 cm for a sand cushion - this is quite enough for a flat stone, which is much easier to lay.But for a rubble stone, when choosing a substrate thickness, be guided by the depth of the largest stones.
Then fill the trench with sand. Wet the sand with water and lay it in an even layer, pressing everything thoroughly. Try to keep the backfill as even as possible.
In the second case, the ditch digs deeper - 15-25 cm.At its bottom, lay any large bulk material with a layer of about 7-12 cm.It can be crushed stone, gravel, slag, brick fragments, etc. tamp. Lay a layer of sand evenly on top of the gravel as described above.
Stone laying
Now carefully begin to lay the stones in the sand, as if pressing them into the surface. Press the stone into the sand harder, and for leveling the material can be tapped with a mallet.
Constantly check the horizontal line of the masonry with a nylon thread or level. If necessary, add sand under the natural stone or remove excess. It is recommended that the top of your stone path be above the "horizon" of the earth so that rainwater does not accumulate on the surface.
If the stones are relatively small or medium-sized, it is better to lay them back to back or with a small distance of 1-3 cm. But for large stones or stone slabs it will be more beautiful if you leave gaps of 5-8 cm or even more between them.
Sealing of seams
In the segments left between the stones, you can fill in plant soil and sow a special decorative lawn in the cracks.
Another alternative is to fill the space between the slabs with fine material like decorative pebbles. Sand is also used for seams, only the distance between the stones in this case should be small, up to 3 cm.
For greater reliability, the gaps can be repaired with a liquid cement mortar (this is especially recommended for a rubble stone or for a flat stone of small size). Mix 3 to 1 sand and cement in water and gently trowel the sections between the stones. Narrow gaps are easier to sew with a plastic bag or bag with a hole. Before placing the mortar in large slots, you can fill in a small hewn stone, leaving gaps of no more than 3 cm. If the mixture gets on the stones, remove it with a rag.
The jointing should be either convex, slightly above the level of the path, or flat, under the level of the stones. "Recessed" seams are not allowed, as water will accumulate in them, and cracks will appear in winter.
After laying the natural stone, it is recommended to pour water on top. Finally, install curbs, if necessary.
VARIETIES OF STONE
Outwardly, the stone looks like a kind of raw tile of irregular geometric shape.
They are usually the same thickness but different sizes. This stone is one of the cheapest in its segment. It is easy to look after him. In addition, everyone will be able to lay out paths for them in the yard, since it is very easy to put the plastic.
Plastushka can be of different shades, the most common stones are gray, red, yellow, green, black.
When moisture gets on the tiles, they can turn dark green. Less often, stones of red or yellow shades come across.
How to put the plastic correctly?
Both sanded tiles and wild stones can be used. Another advantage of this material is that it is more durable than its counterparts. However, the technology of laying the "savage" is a little more complicated than that of paving stones or concrete, but this does not prevent the slab from taking a leading position.
Garden paths made of flat natural stone
To measure the garden path, take four wooden pegs and mark the two sides with them. Pull the rope and every one and a half meters hammer in the wooden pegs necessary for further fastening of the guides.
The construction of the track in this case includes two stages. The first stage is the designation of the contour of the future track. Its tortuosity and shape are determined only by the taste and imagination of the owners of the suburban area. Then, with the help of shovels, a ditch is torn off exactly along the contour. Its depth should not be less than the length equal to the metal part of the bayonet shovel. After removing the sod, a layer of coarse material is poured along the entire length of the ditch. This can be crushed stone, pebbles, slag or brick breakage. Any material used must be compacted. Then, along the entire length of the ditch, a layer of sand is poured, which, in turn, is also compacted with the obligatory use of water.
The second stage is the direct laying of the garden path, which can consist of two options. First, a flat natural stone is laid out on the sand. This option is much easier, both in terms of financial and time costs, and in terms of the complexity of the process. The second option - natural stone is laid on a concrete solution. This option is more expensive and more difficult, but it is much more reliable.
The construction of paths, covered with natural stones, the seams between which are filled with mortar (a), vegetable soil with sown grass (b) and roads for vehicles (c): 1 - natural stone; 2 - solution; 3 - sand; 4 - vegetable soil; 5 - monolithic concrete; 6 - crushed stone; 7 - rubble stone.
If the developers decide to use the first option, then when laying on the sand it is necessary to press it harder, sometimes a rubber mallet is used for this. Then, in order to fix the laid material, you need to dilute the sand and cement slurry in a ratio of 3: 1 and fill the gaps between the stones.
If the second option is used, then the prepared concrete solution, on a small area of the prepared base, is distributed around the entire perimeter in a layer of 10-12 cm. The material, as in the first case, must be laid evenly over the area, while slightly pressing down. After the stone has adhered to concrete, as in the above case, the gaps should be filled with cement mortar.
Laying natural stone is a fairly simple process, but it still has its own tricks that you need to pay attention to. First, the path must be properly edged with a curb so that it does not part in width
Secondly, so that rainwater does not accumulate, the path should protrude slightly above the ground level.
