Stages of construction of an extension from foam blocks to a country house
Before carrying out construction work, it is necessary to clearly determine the location, overall dimensions of the future structure, and its functional purpose.
They will be able to carry out all the necessary calculations, investigate the soil conditions on the ground, and also take into account the many nuances of construction, calculating the optimal amount of building material and additional elements. The project also necessarily indicates the areas of installation of communications (power supply, water supply, sewerage, ventilation system, etc.), if required, as well as the location of window and door openings.
The work is carried out in the following sequence:
Foundation
As noted, foam concrete blocks are relatively lightweight, so they will not require a powerful and thick concrete base. At the same time, the foundation must have the same structure as the base of a country house, the same depth, and also completely coincide in all characteristics if it is planned to connect them.
If the terrain is non-porous soils, then a rigid bundle of foundations using metal reinforcement is carried out with your own hands. In the event that the soil conditions are difficult, then it is erected with your own hands as an independent structure, therefore it is not connected in any way with the main building.
As soon as the foundation is ready, it must be treated with bituminous mastic and covered with a suitable waterproofing material and additionally insulated. The upper part of the foundation of the extension to the wooden house is covered with rolled roofing material in 2-3 layers to ensure the proper level of waterproofing.
Wall arrangement
The first row of foam blocks is laid out on the waterproofing base with your own hands. For their fastening, ordinary cement mortar is used. There is nothing tricky about laying foam blocks - it is much easier than doing brickwork with your own hands.
At the same time, the second and subsequent rows of foam blocks must be placed on a special adhesive, which is selected depending on weather conditions. The top of each stacked layer of blocks must be moistened with water, applying adhesive to the bottom of each block. In this case, the seam thickness of 2-3 mm must be observed. If it is necessary to make a more durable and rigid structure, then every 3-4 rows it is necessary to install reinforcing belts.
Installation of jumpers
The installation of jumpers is carried out by hand directly on the foam concrete blocks, if the width of the opening is no more than 175 cm.
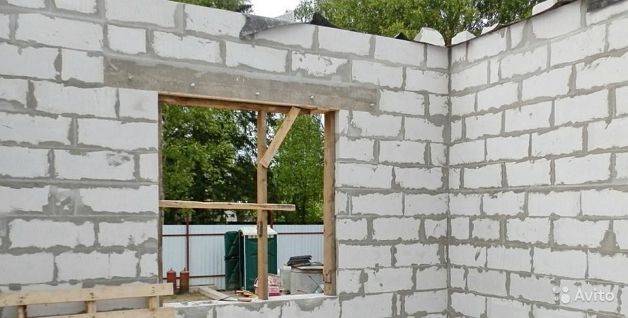
Window lintel.
In the event that the opening is larger, then it is best to use silicate brick in such cases. Lintels can be made with your own hands in two ways: with non-separable formwork, for which U-shaped blocks are used, or with removable wooden formwork.
Overlapping
An extension from foam blocks to a wooden house is usually covered with hollow or aerated concrete slabs. Along with this, ordinary pine timber is often used. If the choice was made in favor of wood, then you need to make sure that the timber is dry, planed, and has been treated with antiseptic compounds. Do-it-yourself filing using plywood, chipboard or ordinary boards.
Roof rafter system
The most popular is the commonly found roof structure, which turns out to be the most convenient in most cases.
3 We build the foundation and erect the walls - the work of the master is afraid!
The question of erecting the base of the extension should be approached really responsibly. The reliability of the structure under construction depends on the quality of the foundation. In addition, you need to correctly pair the new base with the existing one under the house. For an extension made of foam concrete blocks, columnar, linear, pile-screw foundations are suitable. The latter are the most difficult to implement. It is often beyond the power of an ordinary home craftsman to equip them with his own hands. Linear bases are suitable for small and light structures, for example, for a car garage, a bathhouse. An extension to a wooden house made of foam blocks is most often installed on such a foundation. In other cases, it is advisable to make the same foundation as under the main structure.

The foundation of the extension
The scheme of its arrangement is simple:
- Dig a pit, a meter deep, fill it with sand or a fine-stone mixture (layer height - up to 20 cm).
- Lay roofing material on the made pillow. Other waterproofing materials can be used.
- You mount reinforcing bars, fill them with stones, pour concrete solution.
The posts, which play the role of the base of the extension, can be connected to each other with wooden logs. But it is better to build an elementary formwork and fill it with a concrete mixture. As a result, you will get a wrap-around high-strength foundation. Remember to cover it with another layer of waterproofing.
Important! All subsequent rows are laid on a special glue (sold in building stores), with which the sides and bottom sides of the installed foam concrete products are processed. To reduce the risk of cold bridges, the seam should be made with a maximum thickness of 1 mm.
The first row of masonry must be perfectly flat. The laser level allows you to achieve this.
In every fourth row, experts advise cutting a small groove and placing reinforcement in it.
Such a precaution will protect the walls of the foam concrete extension from cracking.
Note! The rows of blocks are assembled according to the standard banding principle. The joints of individual products in touching lines should not coincide
When the building approaches the wall surface of the house, the foam blocks protruding along the length should be cut with a hacksaw. This process is straightforward. Foam concrete is cut with minimal physical effort.
Features of the construction of a veranda

A special place in the construction of the wall box of the additional extension is the arrangement of jumpers. For the veranda, special ones are more applicable - U-shaped, they are quite light. By using them, critical loads are not applied to the foundation. Thanks to such jumpers, you can make openings more than 1.5 m long, in order to make them you will need reliable U-shaped foam concrete, metal and wooden formwork, commercial heavy concrete mortar and, of course, reinforcement with a diameter of 10 mm.

First, blocks of a special shape are installed, then the formwork, after which the reinforcement is laid in the previously prepared foam block, the final stage of making the lintel is pouring the resulting structure with concrete, which is carefully rammed and leveled.

As for any building made of lightweight concrete, an armored belt is needed for a foam block veranda, it will give rigidity to the entire structure and protect its walls from cracking and destruction. For its device, you will need the same materials as for creating a specific jumper. The technology of pouring an armored belt is similar to driving the same jumper.
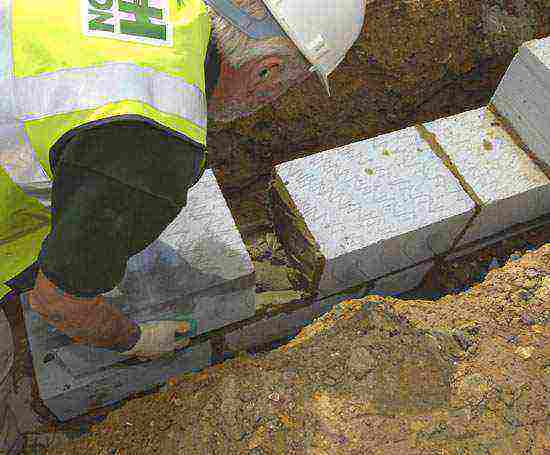
Another significant feature of the extension is its attachment to the main structure; for these purposes, reinforcement is used.To make such a rigid connection, it is necessary to cut out in every third row of the foam concrete wall small grooves measuring 3 * 3 cm and a depth of 5 cm, reinforcement is inserted into them and poured with concrete or a special adhesive. A hole is also drilled in the load-bearing wall of the house, the second end of the reinforcing bar is inserted and concreted. With the help of such a connection, the subsidence of the porch made of aerated concrete will be reduced to almost zero.
Stages of the construction of the extension
The construction of a veranda or terrace is considered a full-fledged construction process. Therefore, the development of such a project and its approval in the appropriate structures are mandatory conditions for everyone. Before starting this process, it is advisable to first get additional advice from a specialist in soil quality, on the degree of subsidence of the house being operated and the possibility of erecting a veranda.
The main danger when laying the foundation for an extension to a capital house is the likelihood of subsidence of the new structure. Therefore, it is necessary to try to ensure that the quality of the material used for pouring the base, as well as the depth of the old and new foundations, coincide as much as possible.
Such precautions will help hedge against unwanted results at the end of the work.
Features of laying the foundation for the extension of the old house
If the house was purchased and was in operation for several years, then perhaps the new owner does not know what the foundation laid for the structure is. Therefore, some questions will need to be clarified.
The depth of the foundation of the house and the extension should coincide as much as possible.
- First of all, you should find out the type of foundation and the depth of its filling. To do this, it is necessary to dig a 1 × 1 m square pit near one wall until the foot of the foundation is found.
- If the thickness of the base is more than 30 cm, then the house stands on a slab, usually the strip foundation is laid deeper. To find out the exact depth of the foundation, you need to dig more.
- Simultaneously with the development of the pit, the nature of the soil is determined, conclusions are drawn about the bearing capacity of the foundation and the calculation of the base for the extension is carried out.
- Next, you need to dig a pit, the depth of which will not exceed the depth of the foundation of the capital house. After that, you can start building the foundation for the extension.
Features of laying the foundation for an extension for a do-it-yourself house
In this case, the owner erected the house with his own hands or participated in the construction process. Consequently, he knows what type of foundation was laid under the house, and has certain data about the soil, so it will take much less time for preliminary preparation.
How to make and arrange an extension to the house with your own hands, stages of construction
Like any building, ours requires the construction of a foundation for an extension. Depending on the selected material, we choose the type of base. For a wooden structure, a support-column foundation is suitable. For a construction of foam blocks, and especially bricks, only a solid tape deepened foundation will fit, since the load on it will be much higher.
In most cases, verandas have to be attached to middle-aged wooden houses. Consider some of the features of construction in the presence of the main building made of wood. The most correct solution would be to build a veranda from materials of the same nature as the house. In this case, wooden extensions made of boards or beams will be optimal.
If we are building an extension to a residential building made of bricks or foam blocks, then minor problems may arise. The bottom line is that dissimilar materials manifest themselves differently under the same climatic conditions and with the onset of cold weather. In addition, due to the different load of the material on the foundation, it is very difficult to imagine how the building will behave when the soil freezes.
A consequence of the same problem is the inconvenience of joining different materials.For example, how do you join a brick to a wooden wall? There can be only one option here - an elastic expansion joint, and it will have to be updated periodically. Therefore, if you have a wooden house, then annex to a wooden house should be made of wood.
It is better to fill the foundation for an extension to a private house in the fall so that it shrinks after winter, thus we will not allow it to settle after construction. After waterproofing works, a frame is mounted on the base, which is sheathed with material. If we need an extension of a terrace to a house from a bar, we lay a bar. In the course of construction, we provide for the presence of window and door openings. After the preliminary erection of the walls, we mount the rafter system under the future roof, we produce external finishing, as well as internal insulation.
This completes the construction of an extension to the wooden house. All that remains is to lay the floor, hem the ceiling, arrange the interior space and celebrate the housewarming with your family and friends.
5 Warming and upgrading of a building made of foam blocks
The best option is when the extension will only adjoin the main structure (a house made of wood, brick, stone) using an expansion joint. But it can also be rigidly fastened to it by attaching the steel rods inserted into the masonry to the old reinforcing frame. The gaps between the structures are filled with polyurethane foam. An important point. If an extension is being made to a wooden house, it is better not to use foam. Instead, stuff small beams on both sides of the auxiliary structure. They will qualitatively close all the cracks.
The walls of the extension must be thermally insulated and give them an attractive appearance. For this, decorative foam panels are suitable, which, after installation, are covered with a thin plaster layer. Outside, an extension of foam concrete products is usually ennobled with artificial stone or decorative plaster.
Construction of an extension
The main material for construction is foam blocks, which are beneficial to use due to their large size, low cost and low weight. Thanks to the large dimensions, construction is accelerated, and the small mass of the blocks allows you to reduce the cost of the foundation and work with just one assistant.
Building walls
The main issue is the connection of the walls of the auxiliary and main structures. Fastening with metal brackets or fittings.
Wall construction starts from the corners. To connect the foam blocks, use a regular solution or special glue. In order for the mixture to adhere better to the blocks, they are moistened with water.
- seam thickness - no more than 3 cm;
- leveling the level vertically by increasing / decreasing the thickness of the seam;
- block irregularities are removed with a grinder.
Roofs and lintels for windows and doors
U-shaped blocks are used for jumpers. Their advantages:
- a light weight;
- the possibility of creating an opening with a width of more than 1.75 m.
U-shaped blocks are placed together with formwork or metal profiles. You can use a bar made of wood. Reinforcement is mounted into the groove of the block and concrete is poured.

The roof design depends on the project:
- Shed is a logical continuation of the roof of the house above the veranda.
- Gable - requires more rafters and finances. In addition, with such a roof, it will be colder in the veranda in winter. Only insulation will help to save the situation. The rafters are used durable, made of high-quality wood or metal profiles. Tiles are laid on top.
Foundation
After choosing a project, it's time to pour the foundation. But first you need to find out - what is the foundation under the main structure. This will be required for the owners of old houses or those who purchased the building. For study, a shufr (digging) is made 1 by 1 m. The depth is to the base.The main rule is to fill in the same type of foundation that is under the main structure. If this is neglected, then an expansion joint will be needed. If you have any doubts about the foundation, it is better to consult with a specialist by showing a photo.
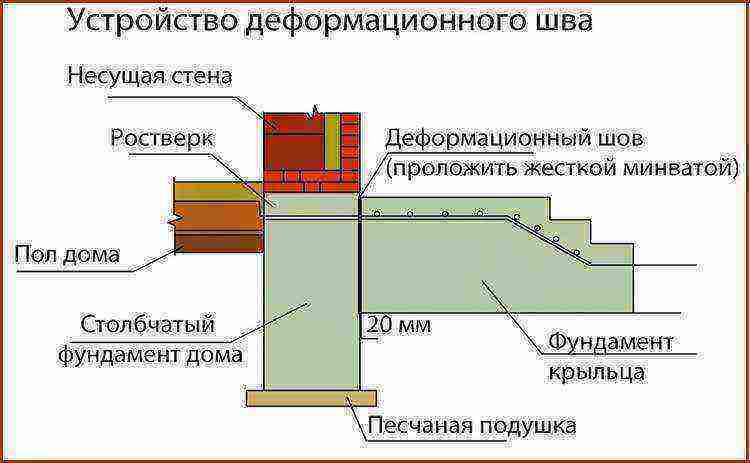
Recommended types of annex foundations:
- tape;
- columnar.
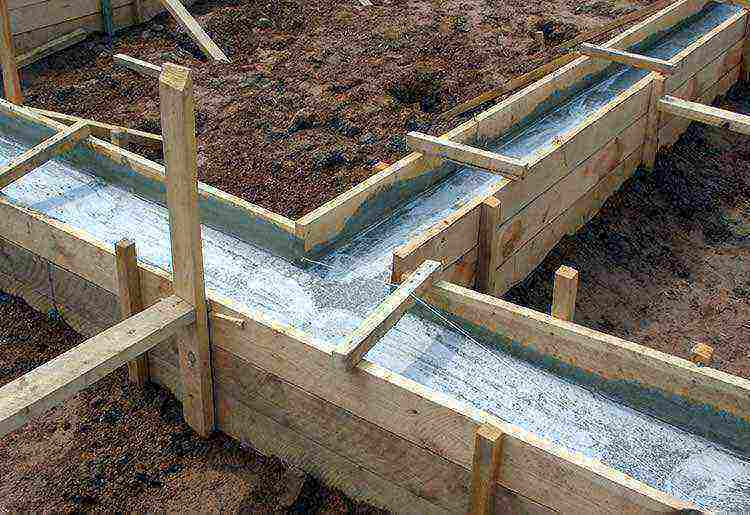
The first one is created by the solid fill method. The second - with the help of bricks, on its separate pillars. It is cheaper than tape. The depth of the pit is no deeper than the foundation of the house. After pouring, the foundation is covered with a waterproofing material.
The attached terrace is a separate issue. If there is a foundation under it of sufficient strength, you can build a veranda on the terrace. In the absence of a foundation or its insufficient strength, you will have to fill it up again.
Pros and cons of aerated concrete construction
When building a veranda made of aerated concrete, you should pay attention to the following advantages of this material:
homogeneity of the material and its stability over the entire surface;
high indicators of strength and sound insulation of the structure, since the blocks are produced in autoclaves;
low rates of material shrinkage under the influence of external factors;
refractoriness
- As for the disadvantages of aerated concrete structure, these include the following characteristics:
- the need to waterproof the walls by plastering and painting them due to the strong absorbency of moisture.
- low level of thermal insulation compared to foam block structures.

If you carry out all construction work in a strict order and in accordance with the project, as a result you will get a strong extension of aerated concrete, connected to the house. If you feel that the individual steps cannot be completed alone, you can use the services of a professional team, for example, at the stage of pouring the foundation or erecting the walls.
Features of the construction of an extension to a brick building
If you plan to lay the same type of base for an extension at the same depth as the main one, then it is best to connect them with reinforcement in the same way as mentioned above. If the foundations are located at different depths, then cracks cannot be avoided. But they can be repaired with cement plaster.
Sometimes a masonry mesh is laid under it. It is very important that the plaster is of good quality. It will require M400 Portland cement, fine sand and lime milk
The components are taken in the following proportions 1: 9: 2. Everything is thoroughly mixed. If the solution partially remains on the shovel, then you have correctly prepared the plaster.
Foam concrete walls are connected with a brick masonry mesh every four brick rows. To do this, holes are drilled in advance and the ends of the mesh are embedded in there and filled with mortar.
If you are making an extension to a building to a height of more than one floor, then the connection can be omitted. Cracks will still appear due to increased stress and deformation shrinkage.
The place where the roof of the veranda adjoins the house
As a rule, when covering the roof of the veranda, the same roofing materials are used as when building a house, so as not to disrupt the overall design of the building as a whole. The adjoining of the roof of the extension to the house can be done in different ways, depending on which of the walls the veranda is attached to. If the roof of the veranda is ultimately an extension of the roof of the house, then the task is greatly simplified, since it is enough to merge two rafter systems. It turns out that the roof of the veranda is adjacent to the roof of the house.
In this case, proceed as follows:
- The upper veranda harness with the fastening of the racks is being formed.
- Ceiling beams are attached to the harness, to which the veranda ceiling will subsequently be hemmed.
- The rafter legs of the house are shortened so that they do not go beyond the wall.
- Elements of the extension's rafter system are attached to the house's rafter system as shown in the image below. The mounting method is selected depending on the complexity of the design. For greater reliability, metal pads are used.
- In order for the structure to be reliable and able to withstand the loads, special reinforcing struts are attached, the purpose of which is described in the image below.
If the width of the veranda is more than 2 meters, and also if heavy roofing material is used, additional spacers are installed. As a rule, they are not attached to the sides of the rafters, but inserted between the upper and lower beams, after which it is better to secure them.
In order to eliminate the sagging of the roof, spacers are installed between the ceiling beams and the rafters.
Sometimes it turns out that the roof of the veranda is adjacent to the wall of the house. To solve this problem, it is necessary to make a groove in the wall and lay a special profile in it, carefully sealing up all the cracks. The second side of the profile enters the surface of the roofing material, which excludes the ingress of precipitation into the space, which is due to the abutment of the structure to the wall.
How to attach the roof of the veranda to the wall of the house
Such a profile can be made by hand by bending the galvanized section accordingly. The design differs in that it is necessary to strengthen a special beam, which moves this apron from the wall to the required distance. The apron is also attached not to the wall itself, but to the timber embedded in the strobe. In fact, if the construction of the extension is simple and primitive, then such an apron can also be fixed to the wall, bending the edge accordingly. After that, it is better to cover the strobe with a sealant.
The second option for joining the roof of the extension to the wall of the house
The rafters are attached to the outer upper harness using metal corners, as shown in the photo below, since the dimensions of the elements do not allow for special cuttings, as in the presence of a Mauerlat.
The method of attaching the rafter legs of the veranda to the upper harness
The solution is simple and reliable, although it does not look very good, but in fact, no one will see it after the roofing material lies on the roof, and the ceiling is lined with any finishing materials.
Benefits of foam concrete for construction
Why is it worth choosing foam concrete for construction? This is a material made on the basis of natural components: cement, sand and water, in addition, the mixture acquires special properties due to special foam. Due to its porous structure, the foam concrete block has some very important advantages:

- Good thermal and noise insulation qualities. Foam concrete will allow you to create a quiet and cozy room, which will be comfortable both in winter and in summer.
- Correct geometric dimensions. The foam block is larger than a brick in size, in addition, it has a completely flat surface. This speeds up and simplifies masonry, and even people far from the construction industry can cope with it.
- Strength combined with relatively low weight. Foam blocks have been used in low-rise construction for a long time, they have proven their effectiveness. With their help, you can build a reliable structure that will last for many years.
Designing a foam block veranda and building a foundation
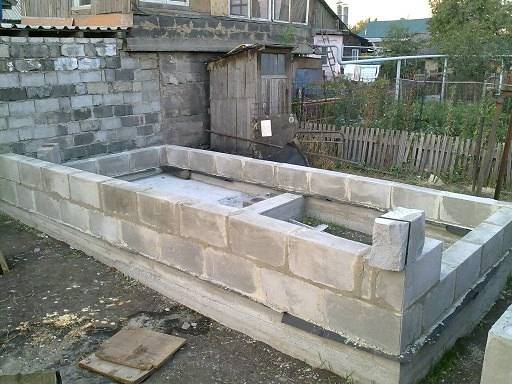
A do-it-yourself veranda of foam blocks is most often built on a strip foundation, which must be correctly attached to an existing base. The choice of connection depends on whether the extension was originally planned and when the main building was built. If the construction of the veranda was included in the project, both the house and the extension are erected on a common monolithic foundation, which is a single concrete tape around the perimeter of the structures. It is possible to build a veranda on a strip foundation made of foam blocks, for example, brand D1200.
If the house was first built, and then the question arose about creating a veranda, two options for fixing the foundations are possible:
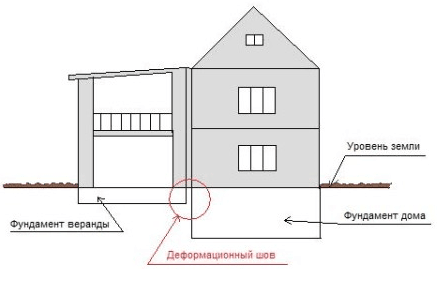
If the house was built a long time ago, and the basic shrinkage processes have been completed, then a rigid mount can be used. It is created from metal pins that are inserted into drilled holes in an existing base.
They are then bonded to a new reinforcement cage and concrete is poured over it. As a result, the new foundation will become a full-fledged part of the common foundation of the house.
If the house itself was recently completed, a rigid coupling is not acceptable. The processes of settling of the building and the veranda will continue, and they may go unevenly, which will lead to the appearance of cracks. In this case, an expansion joint is laid between them: in this capacity, you can use a wooden shield, which is laid between the foundations and poured with concrete.
The foundation is built in the same way as a regular strip base. A trench is dug along the perimeter of the building, into which special reinforcement with a minimum diameter of 10 mm is installed, formwork is placed, and the trench is poured with concrete.
Finally
An extension near the house, in the form of a veranda, is not just a tribute to fashion, but an important architectural element. Due to the presence of a veranda, construction takes on the appearance of completeness, and also has a positive effect on the design of the building as a whole. In addition, the veranda has protective functions. This is especially true in relation to a closed, glazed structure. As for the open veranda, you can get by with an ordinary visor, which performs a purely protective function, and a place for rest can be organized on the territory of the site, by building, for example, a gazebo, moreover, multifunctional.
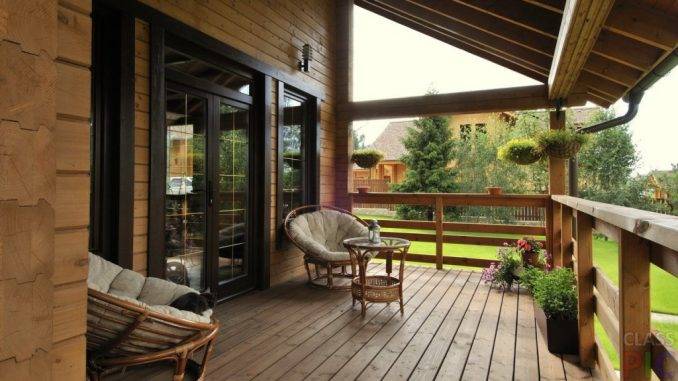
As for the materials of manufacture, in our time it is better to use profiled pipes, metal corners, profiles in the form of channels, etc. Of course, in this case, you need a special tool - electric welding. If there are no such skills, then the task becomes much more complicated, and the whole structure turns out to be more expensive, since the services of an electric welder are not cheap.
The structure of profiled pipes turns out to be more modern, more airy, more durable and more durable than a frame made of wood, which is not cheap nowadays, moreover, it is less durable. As for care, it will be required, both for a metal structure and for a wood structure.
It is better to glaze the veranda on the basis of double-glazed windows, if it is necessary to keep maximum heat in the room, especially since you can order PVC profile windows even with one glass. Systems based on PVC profiles are distinguished not only by their reliability, but also by their durability, as well as by the quality that ensures the tightness of the entire system, ensuring protection from atmospheric precipitation. By the way, such systems fit well into the metal frame, emphasizing the airiness of the entire structure. Maintenance of such an extension is practically minimal, and its service life is tens of years and depends on the service life of the window frames.
As for the frame made of wood, it is less practical, since it requires constant and high-quality care. In addition, it is not very easy to fit PVC windows into a wooden structure, and the entire structure can become unusable much earlier than the end of the life of the PVC systems.
Veranda / terrace / to the house made of polycarbonate.
