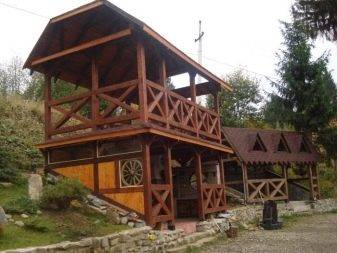
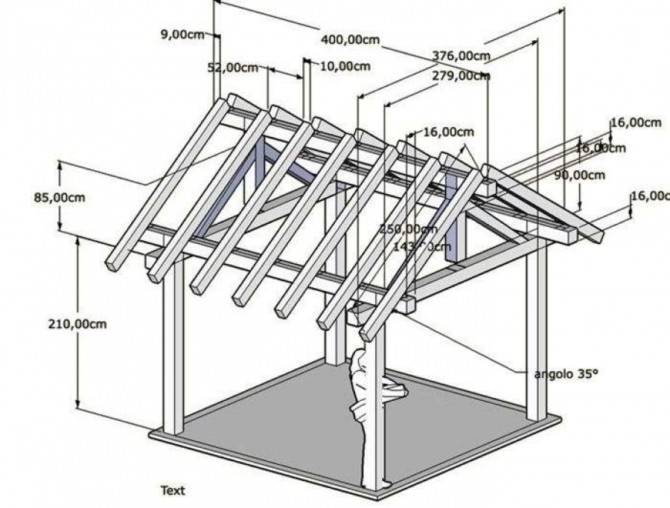
Sketches of gazebos with drawings and dimensions
Available sizes can be increased or decreased proportionally
It is important that you understand that as the size increases significantly, the frame requires a more powerful one. Do not forget about this, and everything will work out for you: a self-made gazebo will be beautiful and reliable
Simple gazebo made of wood
Almost the same project, but with different dimensions: the top point of the roof is raised higher, which makes it visually seem lighter. The gazebo is also quadrangular, the roof is hipped.
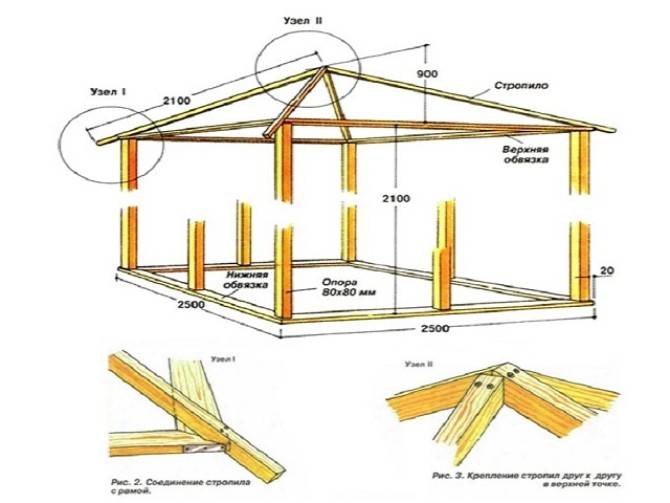
Square gazebo made of wood for a summer residence or garden
When installing such a roof, the most problematic are two places (nodes), indicated by circles. How to do them, see the photo below.
Problematic nodes when installing a hipped roof on a gazebo
Something like this you can mark it in height and fill the crate under the roofing material
Large gazebo on the foundation
Before you build this gazebo, you need to make a strip foundation. Its parameters depend on the soil, on the material that you are going to use for the frame: metal or wood, and what you are going to glaze with. In general, the width of the tape is about 20 cm, the depth is 20-30 cm deeper than the level of the fertile layer. On heaving soils, it is better to make a pile foundation.
Large gazebo for glazing
Drawing of a swing gazebo
The swing gazebo requires special attention: it is fastened very firmly so that the arising variable loads do not loosen or overturn the structure. To do this, you can extend the legs down, dig a hole under them, fill them with rubble, tamp, and then fill everything with liquid concrete. If the frame is made from a pipe, there are no questions; for a tree, you can use "P" -shaped mounts with a pin mounted in the lower part. Here it can be bent and filled with concrete.
For even greater reliability, crossbars are attached to the legs, which turn out to be slightly recessed in the ground. They are hammered in with U-brackets.
According to this drawing, you can build a swing gazebo with your own hands.
You can read about the manufacture of ordinary swings of different types here.
Additional work
A two-story gazebo requires more operations than a one-story gazebo.
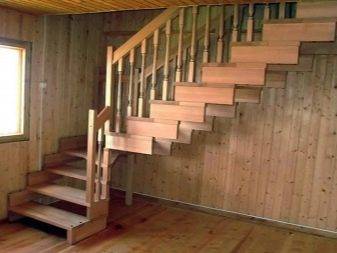
- To go to the second floor, you need to build a staircase. You can order a ready-made ladder structure, or assemble it from the boards yourself. The staircase is fixed in the prepared opening between the floors of the building.
- To make climbing the stairs safer, it is advisable to equip it with a handrail. For their manufacture, ordinary polished beams are well suited.
- Painting works of the finished building are carried out in dry weather. The most suitable is an alkyd resin paint. It is resistant to external influences and temperature changes.

Making a brick gazebo on your own
Next, we will deal in all the details with the technology of making a gazebo with our own hands from bricks.
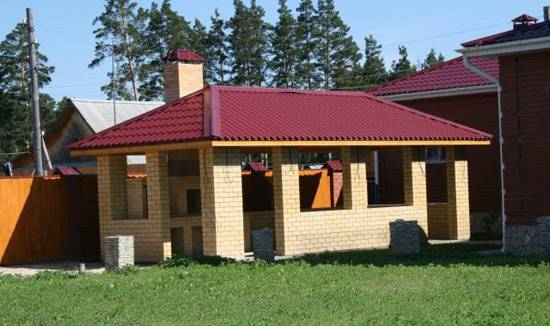
It is quite difficult to make a brick courtyard building on your own, but it is quite possible
Drafting a project
Before proceeding with the manufacture of a courtyard "house", you should draw up its project. It will be easier to make a gazebo with your own hands according to the drawings. The project must include drawings in frontal and profile projections, as well as a sketch or 3D model. It is also advisable to make a plan of the yard itself and mark the location of the gazebo on it. This will make it possible to determine the methods of supplying communications. Next, you need to calculate all the building materials necessary for the manufacture of the building.
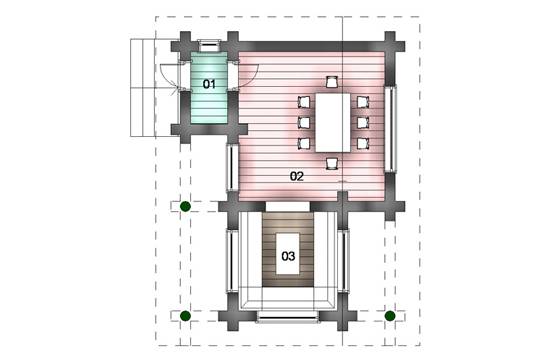
The set of drawings should include, among other things, a construction plan
Foundation making
Making garden gazebos from bricks is a procedure that involves the construction of a reliable foundation. For a simple construction of four pillars and a roof, you can make a columnar one.In the event that it is planned to manufacture a structure with massive parapets, tape should be poured.
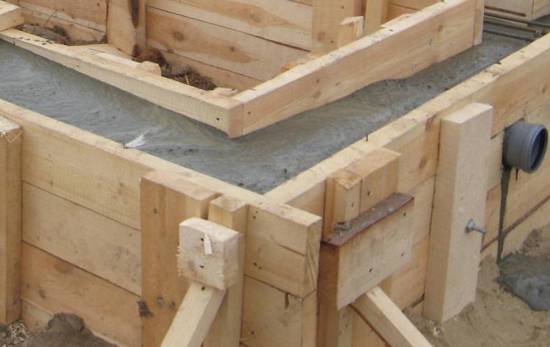
How to make a gazebo with your own hands. Photo of the manufacturing process of the strip foundation
The foundation of both the first type and the second is being built from a cement-sand mixture with the addition of crushed stone. The markings are preliminarily done, then a trench is dug, the formwork is installed, a sand cushion is poured, reinforcement is installed and everything is poured with concrete.
Wall masonry
Solid walls and parapets are usually laid out using the half-brick method. However, if it is planned to manufacture a winter structure, it is better to lay the brickwork in a brick manner.
Sometimes the brick is placed not parallel to the plane of the wall, but at an angle of 45g. In this way, a very original corrugated surface can be made.
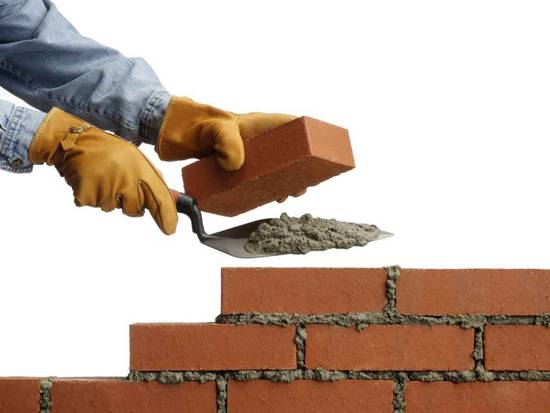
Making walls using the half-brick method
Column pillars can be made using the same method by which the supports of brick fences are erected. That is, before pouring the foundation column into the pit, you need to insert a pipe up to the very future roof. Next, the column is poured and the laying around it is carried out using the method of one and a half bricks. The space between the pipe and the brick is laid with concrete.
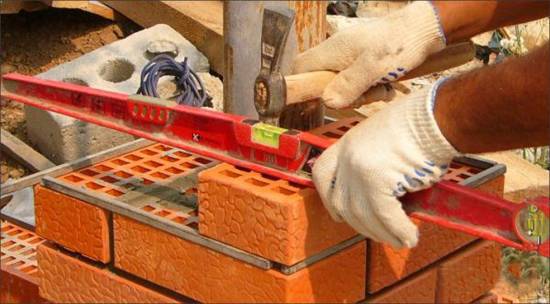
Column post manufacturing process
It will not be too difficult to make a gazebo with your own hands using the video below. This video will surely help you visualize the manufacturing process.
Roof installation
In order to make the roof, floor beams are pre-laid on the walls, and then Mauerlat.
Next, the rafters are cut out and the columns are installed on the floor beams in the middle of the span, on which the girder is mounted. The rafter legs are knocked down in the form of the letter A, installed above the girder and attached to the Mauerlat with corners.
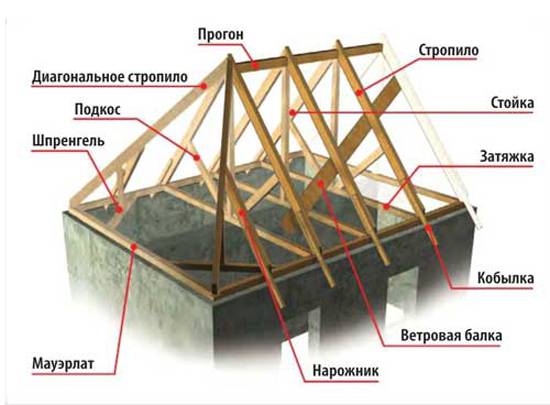
How to make a gazebo roof. The scheme of manufacturing a rafter system
At the next stage, the crate is stuffed across the rafters. Next, a waterproofing carpet is laid and the selected material is fixed. As the latter, metal or bituminous tiles are usually used. On this, the device of a brick building can basically be considered complete.
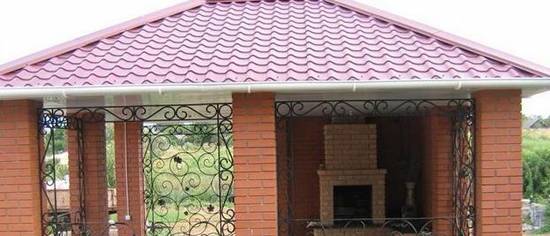
At the last stage, a metal tile is mounted on the roof
Below we suggest you see how to make a gazebo. The video clearly demonstrates the process of laying brick pillars-columns:
Civilized hospitals
The most suitable choice is a gazebo with a barbecue among trees for relaxation and summer meals, combined with a stationary brazier (barbecue).
Before building a gazebo on your own, you need to decide on the size (maximum of those gathered at the table), materials and construction site so that the smoke does not interfere with the rest of the neighbors.
The shape of the gazebo is already established, they are either multifaceted (six or eight corners) or classic - square or rectangular. Type - closed by windows and doors or open, but covered with canopies in case of rain or wind
Barbecue has become so commonplace that there is already such an architectural designation - a free-standing stationary building for cooking meat. Outdoor fireplace type. But first, about the construction of a barbecue-brazier-fireplace in the future gazebo.
Video - Hexagonal gazebo
The gazebo will consist of six identical elements, and therefore you can only draw the roof and one of the wall elements. Do this with utmost precision, because any inaccuracy can cause the structure to not fold.
Next, calculate the amount of materials required and the costs in general. As for wood, it is better to use pine or spruce - they are very durable and inexpensive. We also note that the construction process will not be particularly difficult, since the gazebo itself will consist of:
- grounds;
- six supports;
- railings;
- a roof that includes six triangles.
Important stages of construction
The construction of the foundation is really a difficult process in terms of physical activity, but with the abandonment of the project and the sequence of work, problems usually do not arise (this applies primarily to the strip and monolithic base, since difficulties may arise with the columnar one due to savings).
Markup
After choosing the site and the type of foundation, it is necessary to mark the site. For the columnar, you need to mark the pits, and for the tape, the width of the trench.
Strip foundation marking
Digging holes, trenches or platforms
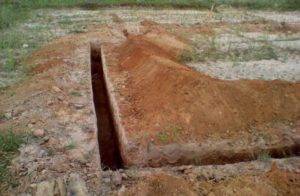 Dug trench
Depending on the type of base, it is necessary to prepare a flat area for it with a certain depth. I will tell you a little experience that I got in the manufacture of strip foundations.
Formwork manufacturing
The process is quite exhausting, requiring the installation of the formwork strictly according to the level. For its construction, sheets of chipboard or OSB, boards, slats, self-tapping screws, a screwdriver and a level are needed.
Strip base formwork
All work consists in leveling in all projections of the walls, which, in addition, will have to withstand the concrete solution and not fall apart. To do this, they are fastened with self-tapping screws. The connections should be as tight as possible.
Rebar tying
Metal rods held together with knitting wire make the foundation really strong and reliable. Without going into technological features, I will say: there should be at least some kind of reinforcement, you should never abandon it, otherwise your concrete solution may fail.
Metal reinforcement inside the strip foundation
For each foundation, its own reinforcement is used; for bored piles and a monolithic foundation, it will be fundamentally different. I suggest you watch a video that clearly shows the process of tying a reinforcing cage.
Preparation of concrete mortar
There are three possibilities here, each with advantages and disadvantages.
- Purchase of ready-made concrete solution in a "mixer" (from 3,500 rubles per cubic meter plus delivery to the site). In addition to being expensive, you will need to quickly implement the grout as it hardens quickly. In the case of self-mixing, the rush will be noticeably lower.
- Mixing the mortar in a concrete mixer. Physical activity associated with manual mixing of sand, crushed stone, cement and water is excluded, besides, the solution turns out to be really mixed (it is more difficult to achieve such a result manually). A serious disadvantage is that the speed of pouring the foundation will not be able to move faster than mixing the solution in a concrete mixer. If we are talking about a large number, then this is very noticeable.
- Mixing the solution in a trough or film. The most labor-consuming method that does not require special equipment. You will need shovels, buckets and a great desire to interfere, interfere and interfere again.
How to make a roof on a gazebo
Installing the roof is the next stage in the construction of an octagonal gazebo with your own hands. The step-by-step construction diagrams presented will give you a better understanding of the process. If you plan each aspect in as much detail as possible, you can, firstly, prevent possible mistakes, and secondly, make a roof even with minimal experience. You already know how to install pillars and cover the flooring; building a roof, of course, requires more skills, so if possible, contact your friends who may have more experience in this matter.
At first glance, the construction of a roof for an octagonal gazebo seems difficult, but everything is not so scary, the main thing is attention and accurate calculation
- Start with the rafters and cut both ends 63.5 degrees with a miter saw. Attach one end to the posts, and the other should be fixed in the center of the rafters. Make sure you line up everything perfectly, otherwise the roof won't be symmetrical.
- In general, fastening rafters and fastening roof rails, but do not forget that it is better to fix everything with galvanized screws. Alternatively, you can cut the triangles out of plywood and nail them in place.
- Regardless of the choice, accurate measurements and making appropriate cuts with a circular saw are essential.
- Then cover the entire roof surface with tar paper, starting from the bottom to the top. Make sure the roofing strips overlap by at least 5 cm to create a waterproof cover for the roof framing.
- After covering the entire surface, close the edges with strips of roofing felt and fix them with staples.
- One of the last steps is the installation of the shingles. To do this, it is better to read the instructions if there is no experience in this area.
Choosing a brazier
Where without it! How can you arrange garden or country gatherings with family and friends without a barbecue ?! Let's consider the possible options.
Collapsible
This option is more suitable for hiking than for installation around the house. A significant disadvantage of this choice is that it will dry out your meat. Therefore, it is not suitable for gourmets and connoisseurs. It is made of thin steel sheets. The brazier does not keep warm well. The firewood and coal in it burn out too quickly. For this reason, a sheet of cardboard is always waving over him. Its installation requires a flat, horizontal surface. It is not very convenient to disassemble after use. Not only is it hot and dirty, but also the mount often seizes from high temperatures.
Collapsible brazier
Cast iron
This grill is for true connoisseurs and gourmets. It makes excellent kebabs. In such a temperature and heat are maintained for a long time, and the cooking process in it is more uniform. True, its cost starts from eight hundred dollars (about 50,000 rubles). Expensive pleasure. But if you decide that you need it, then remember: the thickness of the walls in it should start from 8 millimeters, and the depth is not less than 15 centimeters.
Cast iron grill
Desktop
It is somewhat similar to a barbecue and was created especially for small companies. The grate on it is heated with gas. Cooking on such a grill is quick and easy. Sometimes it has several compartments, which makes it possible to prepare not one dish, but several at once. Nuance - make sure that the connection of gas equipment and barbecue is compatible. This model is not of our production and is brought to us from the USA, so its installation is not always problem-free.
Table grill
Stone oven
This building cannot be called a brazier. But it will be an ideal alternative for someone who spends a lot of time in the country and loves to eat a barbecue. You can build it separately from the gazebo: this way you can distinguish between the recreation area and the cooking area. It is made from refractory (oven) bricks. It is convenient to cook on such an oven, it keeps heat well. True, its cost is quite high. The smallest stove will start at $ 800.
Stone oven in the yard
Grill oven or cast iron roaster
Most of these models use gas to cook food. Often they have built-in stoves and an oven. Perfect for a large company. The surface of such slabs is stone, heated with volcanic coal. Equipped with a temperature indicator. Most models come with pull-out trays and a folding table. The cost of such a pleasure starts at $ 200.
Grill oven
Disposable grill
Such a device was invented in Russia. It does not need to be disassembled after use, folded, or dragged home. You can throw it away. This is perhaps his only positive moment. A! And, of course, its cost is also very low - from 85 rubles. This is an extreme version of a camping barbecue.
Disposable grill
Mini barbecue oven
Barbecue differs from barbecue in that it is cooked on a wire rack, and not on a skewer or skewer. Barbecuing is cleaner, more practical, more aesthetic and safer. The cost of such a furnace starts at $ 50.
A gazebo with barbecue or barbecue is an integral part of a summer cottage. The variety of buildings for the recreation area is huge. You just need to show your imagination and not be lazy to create your own miracle in the yard. We wish you good luck!
Do-it-yourself open gazebo
It shows how to build an open gazebo with your own hands from wood. The design, as you can see, is solid. The main building material will be wooden beams, the volume, and the quantity will depend on the size of the structure, the author does not give figures, so you will have to select it yourself. The second required material is metal rods of two types, T-shaped and L-shaped. And you also need screws, very large screws, twice the thickness of the beams. Do not forget about the ladder, preferably a sturdy one, in this project it is the main tool. Concrete is another essential material for building your gazebo, it will be used as a base and anchor for the entire structure. Once you have drawn the drawing, you will be able to see what dimensions are needed for all the wooden parts. If you have tools, you can cut all the components yourself. This is the cheapest option. If you don't have the skills or tools, you need to find someone to do it ..
The first step is to build the base.
- Prepare the area and fill the slab of the desired size. If you want more strength, add metal reinforcement concrete.
- Next, install the wooden beams and metal supports into the concrete at a 90 degree angle.
- If there are gaps between the metal and wood parts of the supports, use tar and silicone to fill in and create a waterproof seal.
- Repeat this step for all supports. Typically four pillars are installed, but if you choose a different design, more pillars may be required.
- The next step is to place the wooden rungs on the supports, remember to measure all sides and make sure they are equal. Then secure them in place with the screws.
- The next step is to attach the side rails to the ones you installed on the posts.
- Then you need to make a triangular structure that will support the roof. The triangular shape of this part of the structure is designed to distribute weight down to the supports, which will be especially useful if you live in an area with high rainfall, especially snow.
- Use metal rods to hold the diagonal pieces securely in place. Pass the metal bar through the two pieces of wood to make sure they hold firmly in place.
- Now install the top bar where the roof will be attached. This may require the use of a rope or extra help to keep the pieces together.
- Now it's time to put in the roof supports to help support the weight. Place the support approximately every 55 cm. Fasten the supports securely with screws.
- Cover the roof with sheets of plywood, this layer must withstand a lot of weight, it must be fixed very securely.
- Then attach the waterproof layer. There are different types of roofs, you can choose whichever you prefer, but laminated tiles are a popular and effective choice.
Construction of a gazebo
There are a lot of options for building a gazebo and they depend on the chosen material. For example, if a brick gazebo requires an obligatory foundation, then a wooden structure, as we said earlier, can be installed on ordinary cinder blocks or bricks.
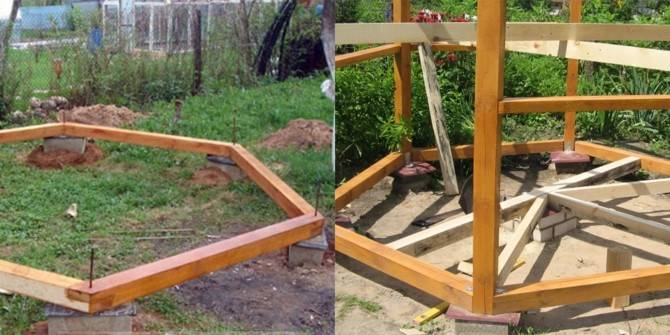
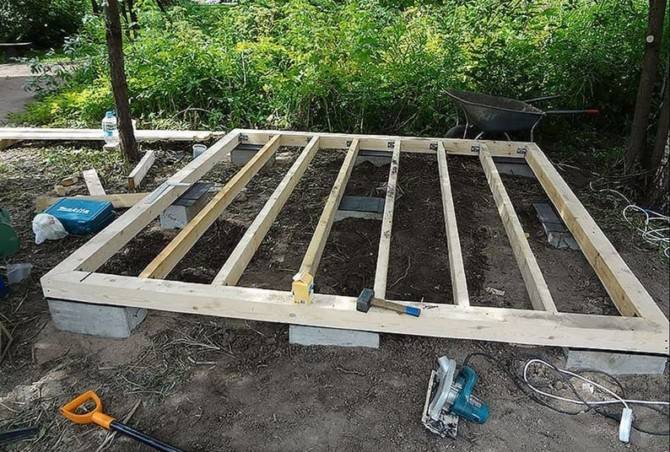

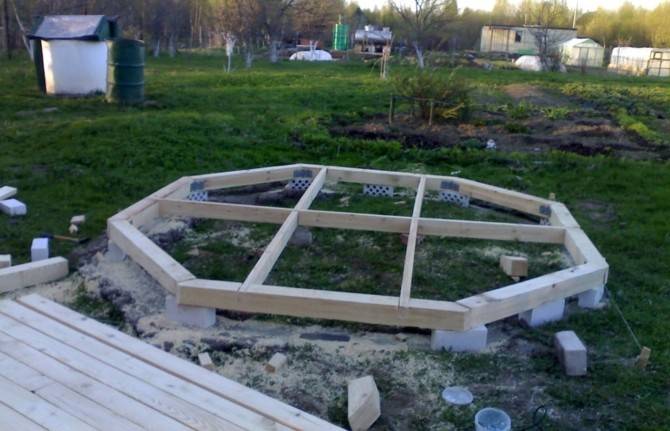
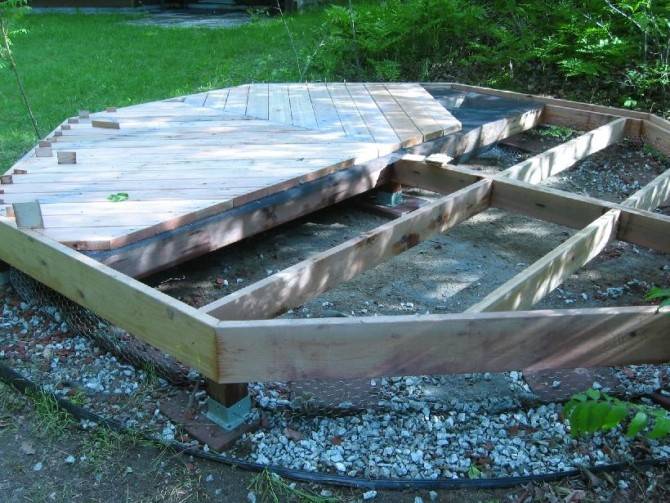

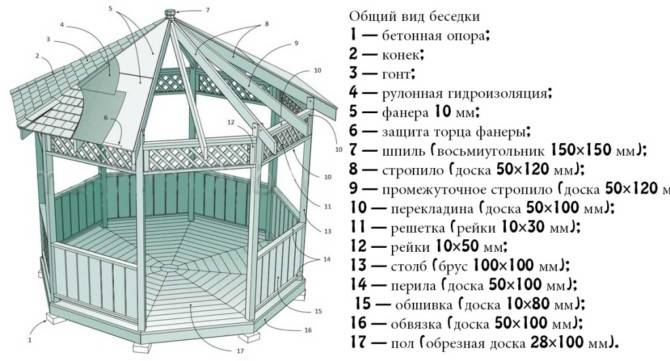
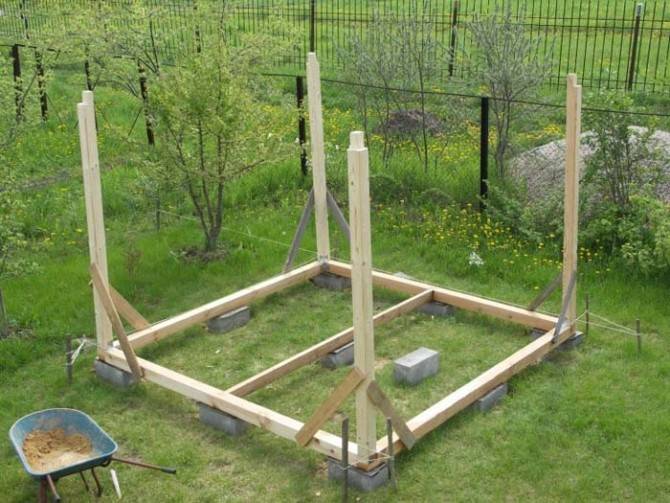
Metal arbors, as a rule, are based on corner posts concreted into the ground made of strong pipes of a relatively large diameter: the exception is light frame structures sheathed with lightweight materials like polycarbonate or USB.
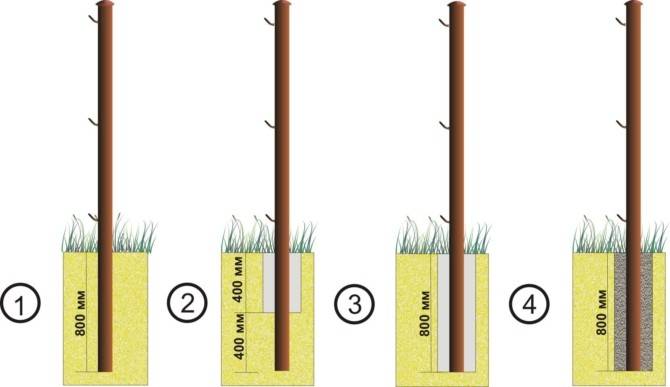
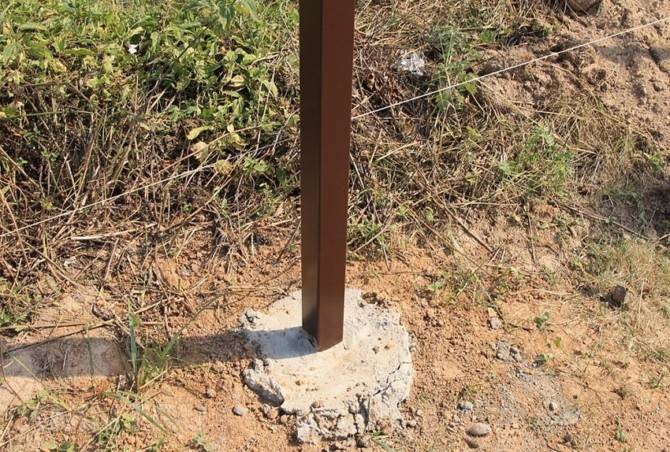
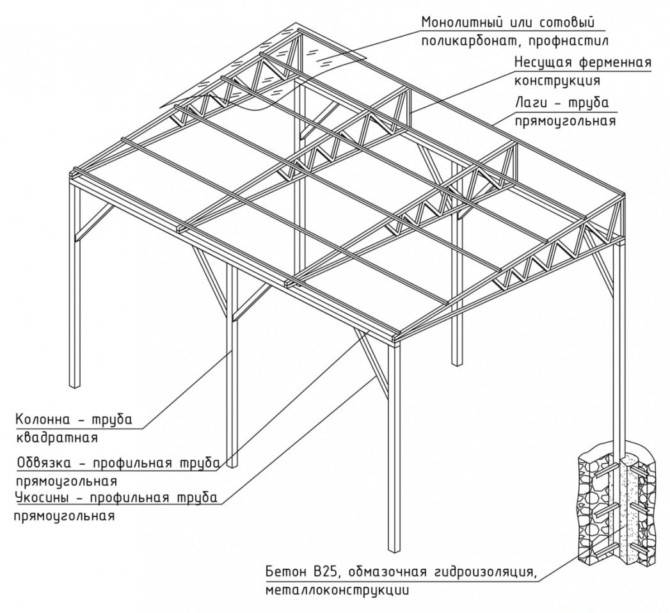
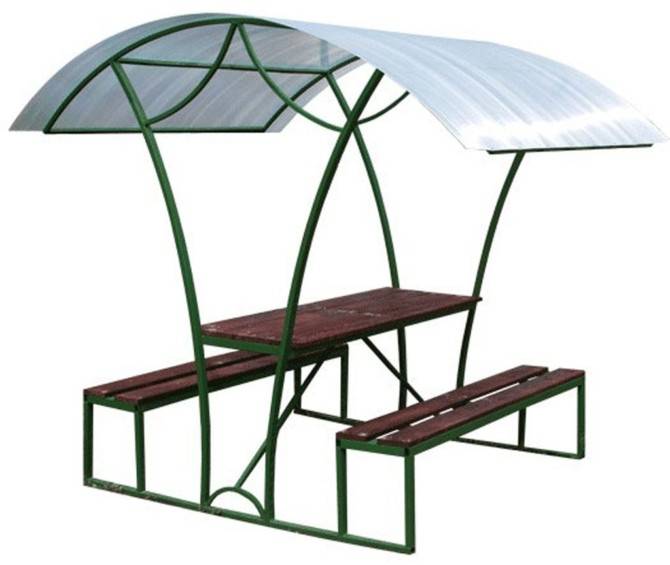
From the presented photos and drawings, it is easy to understand the design of arbors of different types and the stages of their construction. As for wooden structures, it all starts with a rectangular, square or hexagonal base, which is sewn up with boards on top of the floor logs. In the corners, support beams are installed, which are fastened in the upper part with a strapping of boards and a rafter system is mounted, which can then be sheathed with plywood as a basis for installing roofing material, or the latter attaches directly to the sheathing boards.
Any work begins with planning and building a gazebo is no exception. To do this, you should carefully measure the area where the gazebo will be located, draw a sketch of the future building and a drawing, as far as your knowledge of this matter allows - the main thing is that you understand everything at any stage of construction. Of course, the finished diagram with dimensions can be simply printed on a printer, but it is better to work out the design and individual units with a notebook and a pencil in hand: as experience shows, the very process of planning and calculations will add you confidence and greatly simplify the construction of a structure on the ground.

Construction stages
As for the terrain: the area allocated for construction should be thoroughly cleaned of debris, stones, stumps, etc. and align. This is an important step, regardless of whether you will be concreting the site or laying a strip-type foundation, or simply installing supports under the wooden structure - the site must be level.
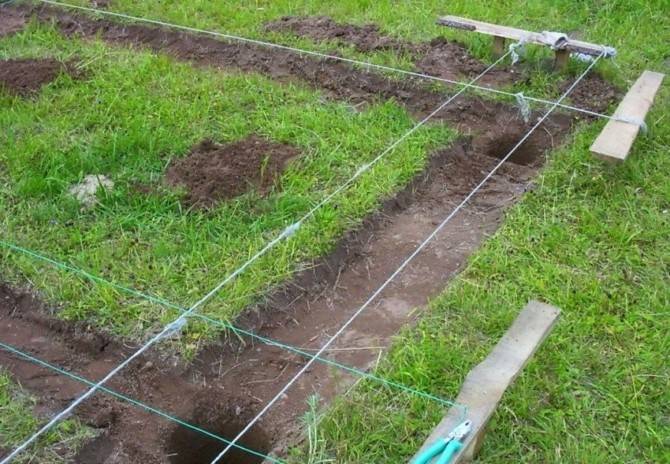
Then, using pegs and twine, mark the exact location of the gazebo, mark key points. One of the successful and repeatedly implemented projects offers concreting wooden beams (the main material of the gazebo is wood) into the ground. Let's briefly dwell on the main stages of construction.
First: drill holes one meter deep in the ground according to the number of support pillars (4 - for a square and rectangular arbor, 6 - for a hexagonal), then asbestos-cement pipes are inserted into these holes and concreted. Pipe ends at ground level. In these pipes, after the concrete has hardened, post beams are inserted, pre-lubricated with bitumen for their entire underground part and a little higher. Aligning vertically along a plumb line and fixing the beams, fill the free space in the pipes with cement mortar.

Second stage: using boards and galvanized screws, complete the bottom strapping around the perimeter, keeping an eye on the horizontal level. Fix the intermediate beams using the fastening elements and install the floor joists in increments of about 40 cm. The floorboard is laid on these joists, for which fastening use galvanized nails. It is recommended to leave small gaps between the boards.
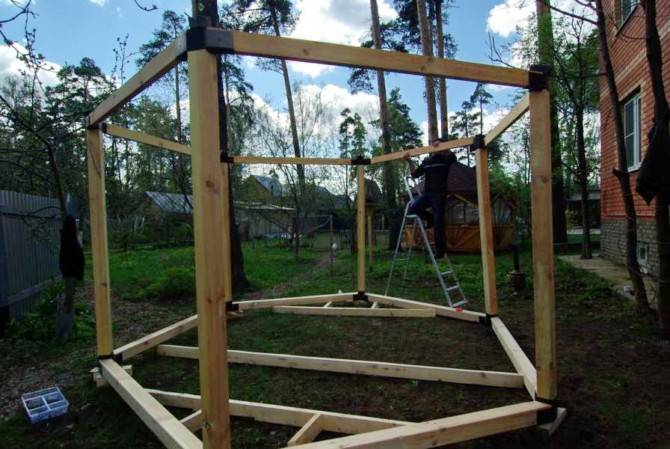
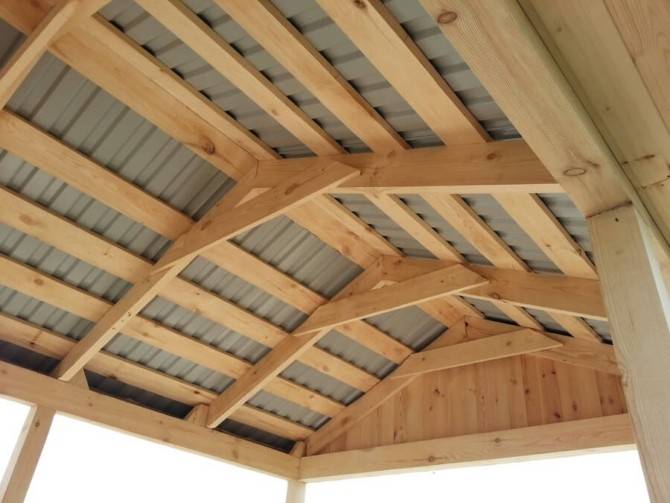
The third step is the upper strapping of the racks along their outer side using galvanized self-tapping screws. Then it's up to the installation of the roof, more precisely, the rafter system, consisting of middle and diagonal rafters and a ridge beam. On the outside of the rafters, as mentioned above, sheathing with plywood is made, on which the elements of the roofing are then attached. Since this is just a gazebo, it is often done by attaching lightweight roofing material to the sheathing boards.
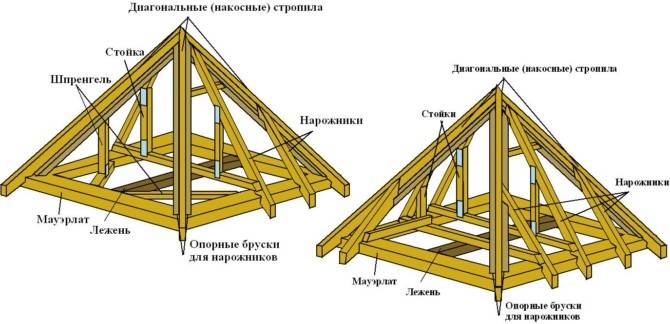
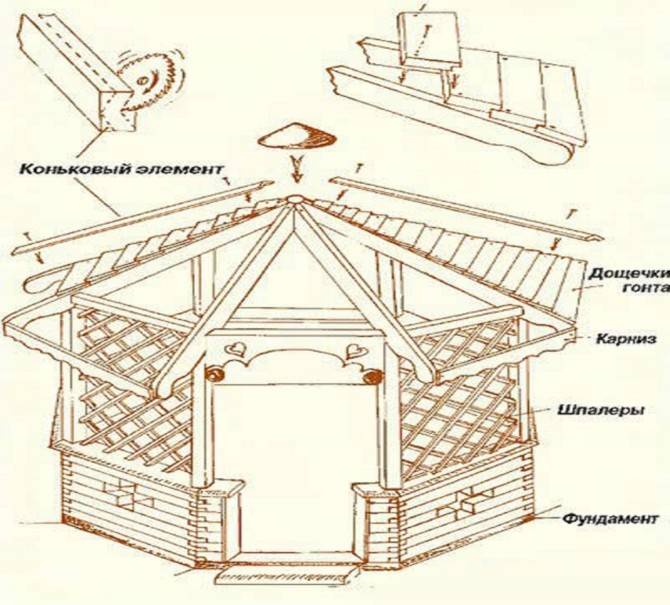

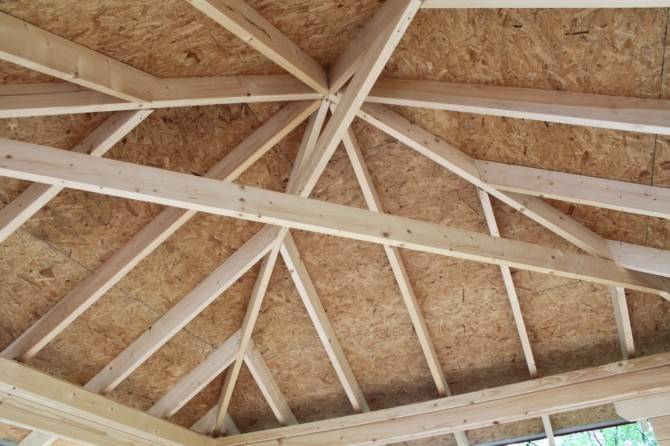
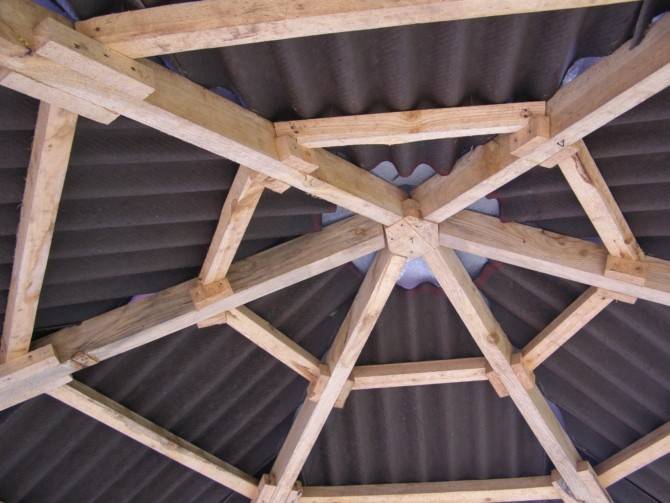
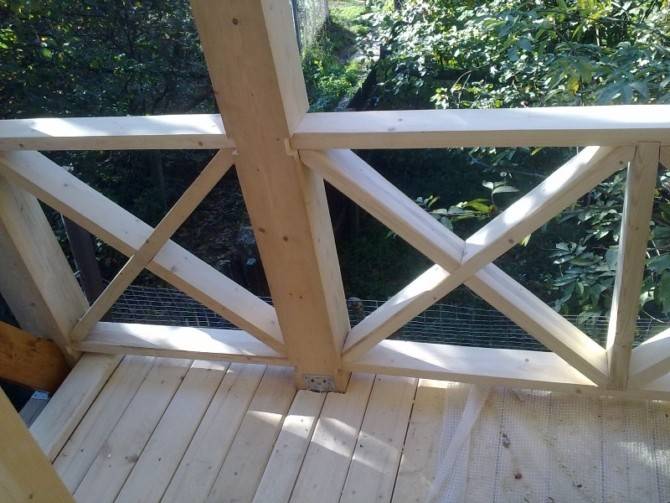
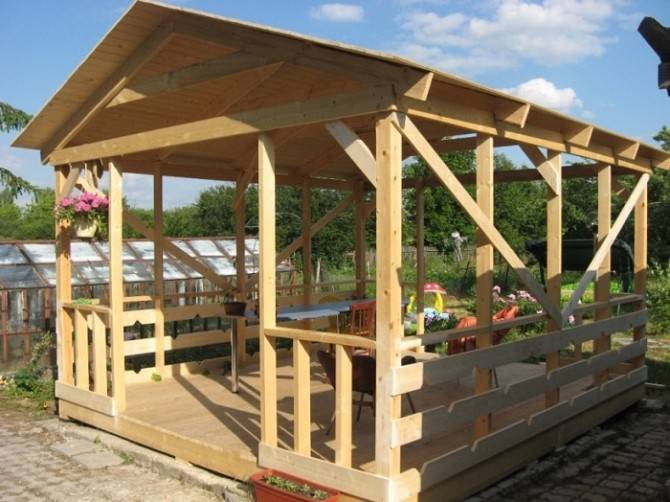
The fourth stage: when the roof is ready, we complete the construction by installing the fence.To do this, at the desired height along the perimeter, horizontal beams are attached, which are attached to the racks from the inside using metal corners and screws (other methods are also possible). The second row of crossbars is attached directly to the floor. Between these crossbars, the sheathing is being installed, one of the options for which is vertical slats with a step that you yourself determine, based on personal preferences and how open the gazebo is planned.

Projects: materials, shapes, sizes
Gazebos with barbecue are very different. It can be large structures that are equipped not only with a barbecue, but also a whole complex for cooking, and small gazebos equipped with a small barbecue. But it all depends on the choice of the owner.
When choosing materials for a garden gazebo with a barbecue or barbecue, it is necessary to take into account the presence of an open fire. Therefore, the materials must be appropriate, that is, they must be resistant to fire and high temperatures.
Pergolas made of wood
Wooden structures are very beautiful and environmentally friendly. Besides wood is one of the most inexpensive materials, easily amenable to any kind of processing. Everyone, even a completely inexperienced person, can install such a building equipped with a barbecue with their own hands.
This design has many advantages:
- beautiful appearance;
- fairly low price;
- the design is easy to install;
- installed on a very lightweight foundation.
The only drawback is flammability. Therefore, it is worth taking care of some safety measures of the selected stove, as well as treating the wood with special impregnations. Arbors made of wood are most often half-open or open. This is done so that the smoke can freely come out of the gazebo.
But there are also Finnish gazebos of a closed type, in the center of which there is a grill. It installs directly on the stone countertop.
Brick gazebo
If a wooden gazebo is considered temporary, then a building with a barbecue made of brick can be used at any time of the year. After all, they are not afraid of either rain or fire. Such material is non-flammable and can serve for more than a dozen years, while not requiring special attention. In addition, the brick gazebos are very warm.
But even such gazebos have drawbacks. Since brick is a rather heavy material, the foundation for such a building must be made solid, and this is a very time-consuming work. In addition, the materials used for the construction are too expensive.
Wrought iron gazebo
Such gazebos are most often bought ready-made. They are made to order. The price is directly related to the size and complexity of the construction of the model.
Forged gazebos with barbecue have many advantages:
- if you use primers and paints, then such structures will stand for many years;
- they are quite fire-resistant, so by placing a brazier and barbecue in them, you can not worry about your safety;
- such gazebos set up a romantic mood.
Separately, it is worth considering the materials that are often used for laying stoves and barbecues, as well as some facing work.
Basalt. It is a material that has a wide range of colors from light green to dark. It is the best option for laying any stoves in a garden gazebo. Basalt is often used for cladding a building. It has excellent performance. This is a rather high hardness of the material, and its low melting point, and resistance to chemical attack.
Having decided to build a garden gazebo with barbecue and barbecue, one should not forget about the correspondence of the size of the building to the size of the "culinary corner". For example, if there is a brick brazier in the building, then it must be at least three meters.
Required materials and tools
The garden gazebo, in which the installation of the stove is planned, needs a solid foundation. Before starting work on the formation of any type of foundation, you need to take care of the materials with which it will be carried out.
Here you can learn how to build a summer cottage with your own hands.
When building a foundation, you will need the following materials:
- concrete;
- rubble stone or crushed stone;
- pipes made of metal or asbestos cement;
- boards;
- waterproofing material;
- roofing material;
- car tires;
- fittings;
- boards (in rare cases);
- sand;
- blocks of concrete or stone;
- sometimes bitumen.
Pouring the foundation is not complete without the use of tools such as:
- roulette;
- threads;
- level;
- a shovel with which they dig trenches and pits;
- drill or screwdriver;
- welding machine;
- wood material in the form of spacers, boards, blocks, stakes;
- jigsaw or grinder;
- a large number of screws and nails;
- metal materials for creating reinforcement;
- hammer.

Gazebo pavilion for summer cottages
This, of course, is not the easiest project, but the pavilion gazebo for a summer residence is an ideal place for a summer dining room. You can always change the size and design of the pavilion to suit your needs and budget, but it is better to use the instructions and advice provided in the diagrams. A gable roof will improve the appearance of the structure, but it will require a large investment and a lot of materials. If you're looking to build a simple pavilion to enjoy with family and friends, there are several options you can choose from. On the one hand, you can build a gazebo or a simpler structure like this wooden pavilion. You can do it yourself, but you have to plan every step of the construction from the very beginning. It is recommended that you buy the very best materials you can afford. They should be weather resistant such as pressed wood, pine or cedar. Take accurate measurements carefully before adjusting sizes. Pre-drill holes in the parts before driving in the screws to prevent the wood from splitting. All stages of construction are shown in step-by-step diagrams, detailed instructions are on the site.
Features and Benefits
The main difference of this design is its increased total area. In addition, the second floor can perform an additional function. For example, you can equip a children's area there, make an open terrace for admiring the surroundings, or build a sunbathing area in the summer months.
It is possible to build a structure for year-round use. For this, one of the levels remains open, designed for relaxation in warm weather. And the other floor is insulated and equipped to relax by the fireplace in the cold season.
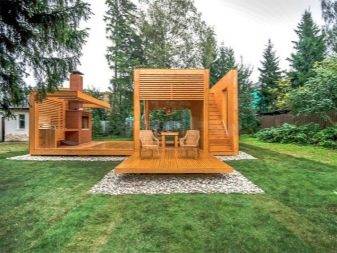
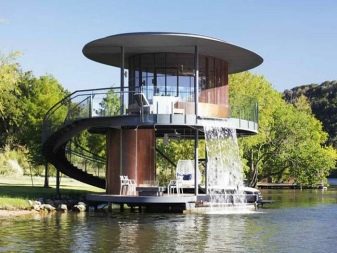
There are several positive differences and advantages of a two-story recreation building.
- The design is capable of combining several functions. The increased area and the presence of two floors make it possible to divide the gazebo into several zones, equipping their interior in accordance with the purpose and features of use.
- A large 2-storey gazebo will allow a much larger number of people to gather for rest. All guests will be able to comfortably stay and will not be constrained by the small space.
- In the case when the area of the site is not large enough, and space saving is required, a two-level structure is a good solution.
- The two-story gazebo looks aesthetically pleasing and solid. She will be able to decorate an area of any size. It is only necessary to select the optimal design and suitable parameters for the construction.

