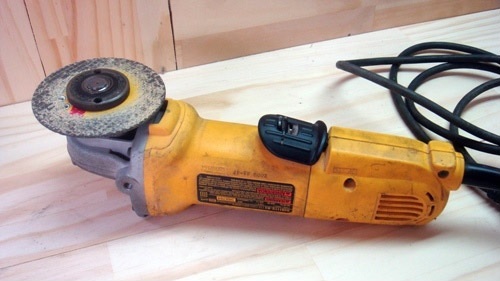
Manual device from angle grinder
If the farm has a "grinder", then there is no better device for a hand-held circular saw. Not sure how to make a saw at home from such a popular tool? Do not despair, because its manufacture means only providing a sliding stop and an axial handle to an existing unit. The sliding stop includes in its design two pieces of a metal corner of a small section, located on both sides of the saw blade. With the help of bolts and nuts, the corners are connected from the front and rear sides with a transverse bundle, and the technological gap between the sidewalls of the thrust structure and the working element will be provided with washers.
It is necessary to put on a metal band clamp on the grinder so that its screw tie is located at the bottom, and a strip of galvanized metal with a hole for a sliding stop, folded in half, is already fixed to it. In principle, a special clamp with a stand can be made as a whole, but in this case, the thickness of the metal strip, ideally, will be at least one and a half millimeters. Further, in the gear case of the future circular, you will have to make a couple of holes for the bolts, for which it is disassembled, and the drilling points are determined. Through the holes made, an axial handle for a circular saw assembled from a grinder is attached, since the existing handle will not allow a high-quality cut, even if the master has remarkable physical strength.
The axial handle, which will be supplied with a circular from the grinder, is made of a metal rod or tube. The design can be in the form of a transverse bracket or a kind of horn. The ends of the metal part, with which the handle is attached to the gearbox, are provided with holes for fasteners. There is one important point here: the ends cannot be riveted in order to exclude the deflection of the handle during the operation of the circular, assembled by hand. It is also necessary to make an adjusting rod from a piece of metal rod (4 - 6 mm), for which we bend one end into a loop, rivet a little and form a hole for the front bolt of the stop. The uniformity of the gap, as usual, is adjusted with washers.
A thread is cut at the other end of the rod to connect it to the handle. First, one nut is screwed onto the thread, and after the assembly of the structure, the second. By tightening and lowering the nuts of this device for a homemade hand-held circular saw, the depth of cut is adjusted. This is how at home you can convert the grinder into a full-fledged disk tool designed for cutting various materials. By the way, redoing a circular from a drill, you can achieve a similar result.
Using a hand-held thread router
You can significantly facilitate the process of woodcarving with a hand router. This special electric machine allows you to make almost all types of artistic carving much faster. The only exception is sculptural and notched carvings. The manual woodcarving router is a specialized tool for woodworking. The main parts of the tool are cutters, heads with cutting parts of various shapes, each of which has its own purpose:
- profiling the edges of wooden parts;
- milling of decorative and technological grooves of various configurations;
- manufacturing of unusual details;
- creation of artistic carvings by a manual router.
With the help of a router, it is easy to make various elements of wood carving: wooden platbands, carved plinths, carved cornices and a wide variety of moldings.
A hand mill with great efficiency can produce exclusive carved furniture to order. Artistic carving with a hand router is most often made with fillet and V-shaped cutters, which allow you to engrave the desired length. Disc types of cutters are designed for sawing rectangular grooves.
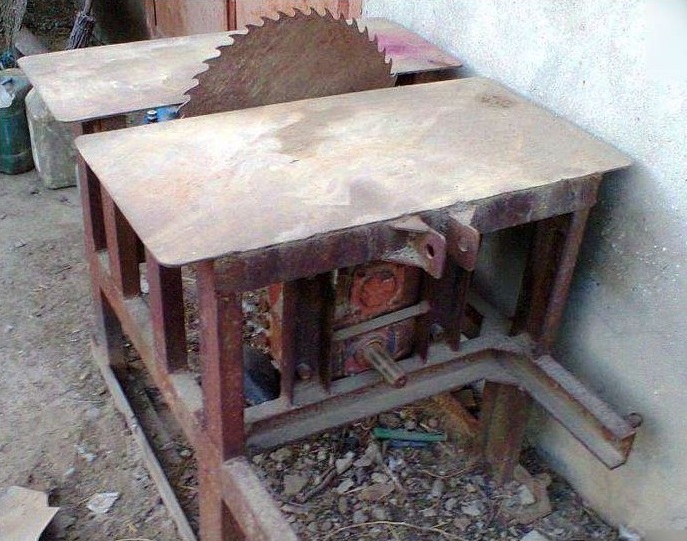
Block house machine
One of the varieties of lining (by the way, in enormous demand) is a block house. The material imitates rounded logs and is widely used for interior and exterior decoration of premises. It is reasonable to sheathe houses with a block house, because such a lining has a solid appearance, is durable and environmentally friendly, as it is made of natural wood. The panels are characterized by a complex shape, therefore the connection of the elements is carried out according to the "groove-thorn" principle. Making them by hand is difficult and fraught with "inconsistency" of individual "logs" in the future, so it is advisable to use specialized equipment:
- band sawmill;
- drying chamber;
- lining making machine.
When processing workpieces on machines, you can perform a number of operations:
- trimming the prepared raw material to the required size;
- surface milling;
- the formation of grooves (grooves and spikes).
Production of euro lining on a milling machine
This is more complex work, you will need solid experience with woodworking machines. We will tell you about the technology, and choose the dimensions of the lining and the profiles of the front surfaces yourself, taking into account the availability of tools and personal preferences.
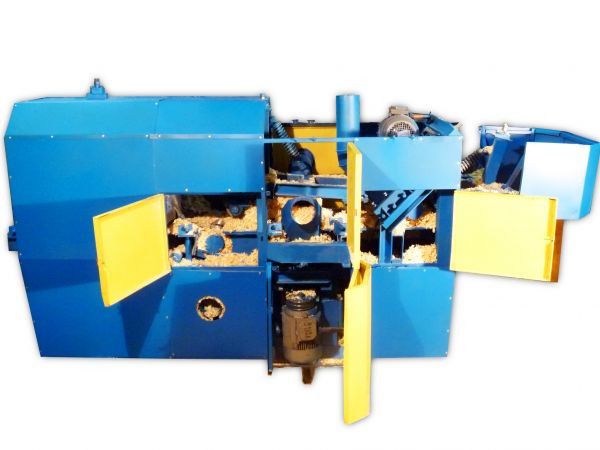
The design of the machine is quite complex. Without fail, a complete instruction must be attached to such equipment.
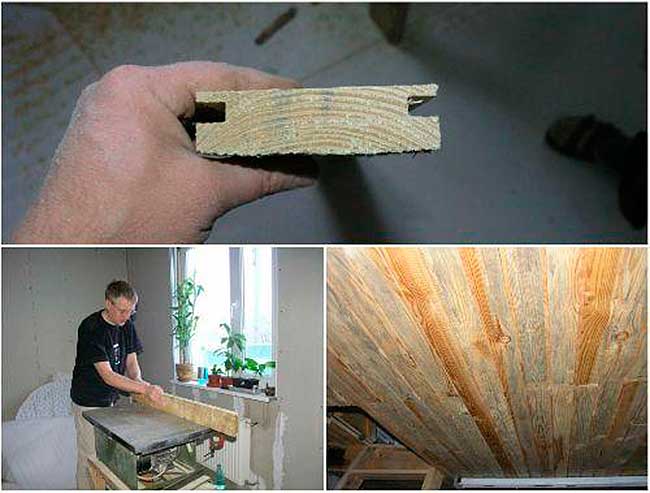
We see an example of a homemade lining machine, its components and details.
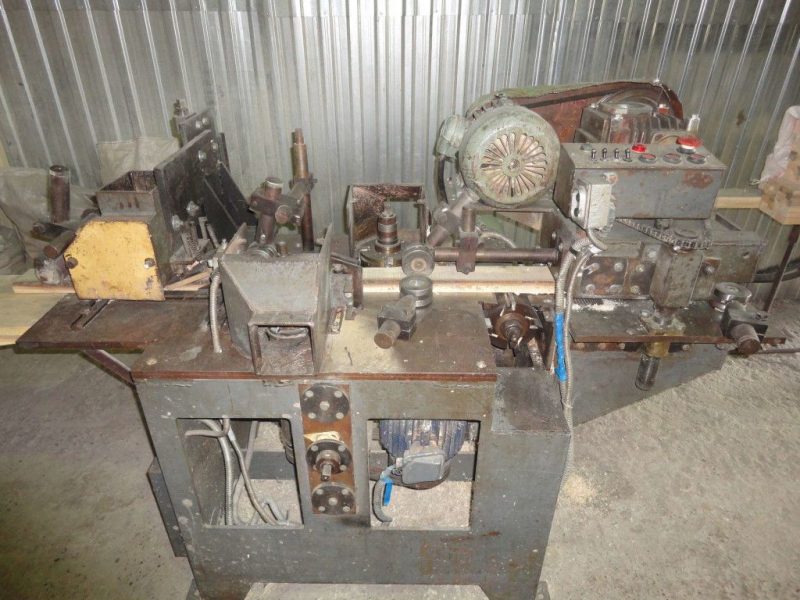
We see another example of a homemade machine for the production of wall paneling at home.
What is the difference between the euro lining and the usual one?
- The tongue / groove connection is deeper. Due to this, the risks of translucent seams are eliminated during a significant reduction in the width of the boards, and the installation of the cladding is simplified. It is easier to insert hardware for fastening into a deep groove.
- The reverse side has one or two slots - the surface of the walls can breathe, static forces are reduced during the change in the linear dimensions of the lining. It is as a result of strong static forces that the cladding of the house can warp.
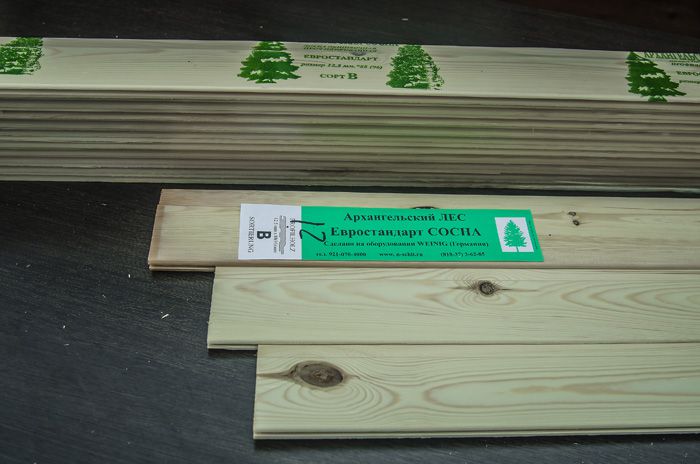
Photo - Euro lining category B
For the initial data, we assume that the boards of the required dimensions have already been prepared, the material has been sorted and folded in the right place.
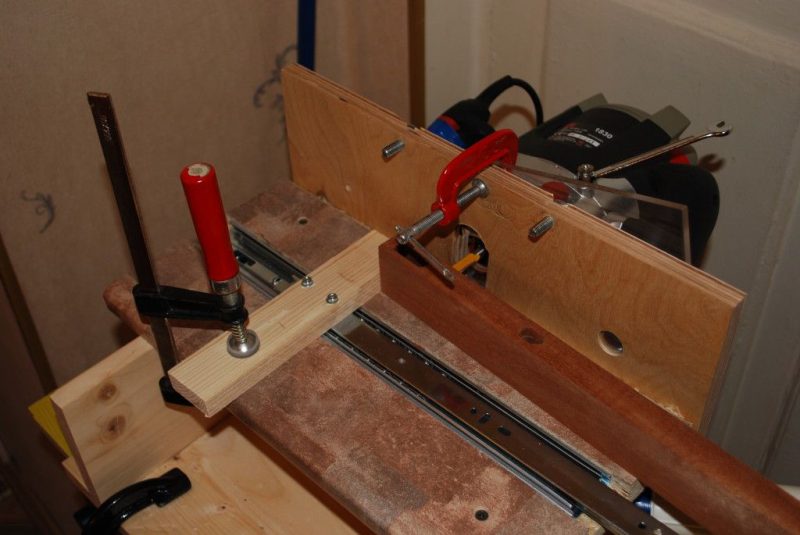
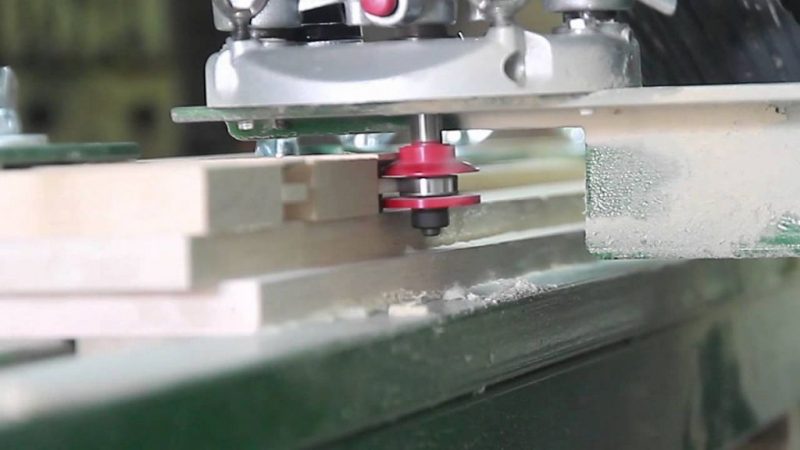
Step 1. Install a cutter for making a groove and a side decorative chamfer on the machine, adjust the depth. To do this, release the ruler, put the end of the board to the knife and, moving the ruler closer or further, find the desired position. Firmly secure the milling head and ruler.

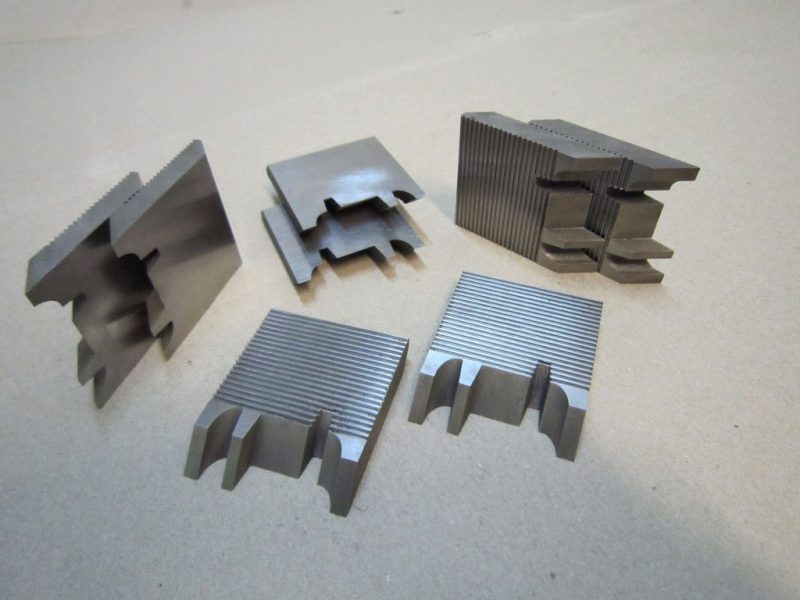
Cutters used in the manufacture of lumber
In order to correctly set all the knives on the head, you need to stitch a piece of board for a test. Then again put it on the cutter and, slowly rotating the head in the opposite direction, check if all the knives are working. You can find out by sound, if everything is fine, then the number of minor touches on the board should correspond to the number of cutters. For example, if the head has four knives, and you only feel three touches, then this means that one knife is not working. Find which one, adjust its position. It is quite difficult to do this, it will take several attempts. Make sure that the knife spacers are firmly pressed against the head.
Knives
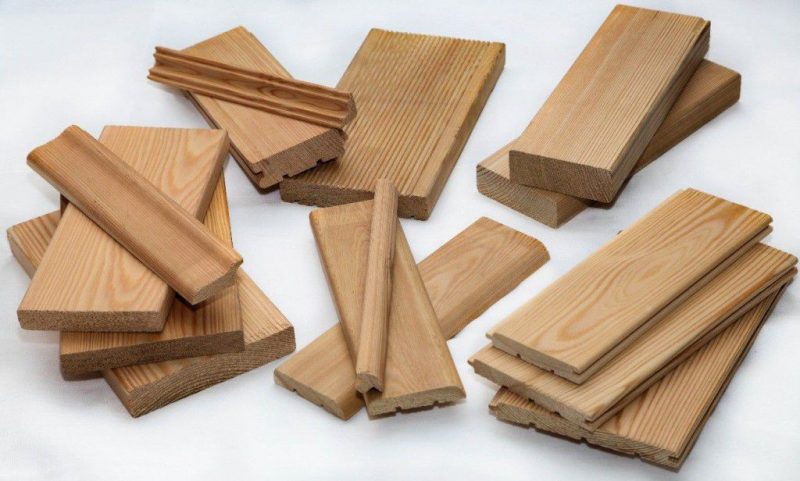
Several different knives-attachments on a homemade lining machine will allow you to create various wood products
Step 2. Attach the top and side pressure stops, set the desired distance.Such stops make the milling process much easier, improve quality and increase work safety. Skip all the boards on one side.
Step 3. Change the cutter to a new one, it should cut the groove and remove the decorative chamfer. The clamps do not need to be adjusted again, the width of all boards is the same and did not change during the first pass.
Step 4. Remove the side cutter, release the ruler and clamps. Install a cutter for making grooves on the inside of the lining. The dimensions and number of grooves do not matter, select them at your discretion.
Production of euro lining on a milling machine
Stages of manufacturing lining
The process itself begins with drawing straight lines along which the sides of the boards will be sawn later. It is recommended to use pencils of green or blue color, this is necessary so that the lines are clearly visible, in case the wood is damp and starts to turn blue. To cut the board, we lay it on the table top of the machine so that the lines marked earlier are even.
To cut the other side of the board, the machine must be reconfigured. To do this, set the ruler to the required width. It is common practice to use two clamps to hold it in place during processing. Then the second side of the board is cut along the adjusted ruler, when the side is cut without using the ruler, the sawn under the ruler will appear at the exit. Put them in a separate place, they will come in handy for the slats.
For those who are interested in how to determine the width of the slats, the answer is simple; for this, a sawn-off lining is placed, which will be used instead of a ruler.
Now we turn directly to the production itself. It should be noted right away that the process of making a lining with your own hands is a rather painstaking work. In order for everything to work out correctly and subsequently please you (or your customers), you need to be patient. Otherwise, the finished products will turn out to be of different thicknesses and widths, which means that the appearance of the surface finished with clapboard will be spoiled.
The very process of making a lining with your own hands will consist of the following stages:
- first of all, we cut the boards into pieces of the required length;
- further, the workpieces need to be sawn lengthwise to get the planks of the required width;
- the next step will be jointing;
- in conclusion, we make grooves.
To perform the second stage on the workpiece, draw a straight line from one edge. To do this, it is better to use a blue or green pencil, it will be better visible on the surface. Next, using a circular saw, saw off one edge. It is better to immediately process more boards in this way, so all the work will be done faster.
The following steps will require your attention. It is necessary to rearrange the saw along the ruler so that the second sawn off, accurately measured the width we need. After setting up the machine, we proceed to sawing off the second side of the future lining.
Next, we proceed to jointing. This process will allow you to give the workpiece a flat surface, and will also make all products the same thickness. To do this, remember how many times you put each side through the planer. Then you process all other workpieces the same number of times.
Milling lining grooves
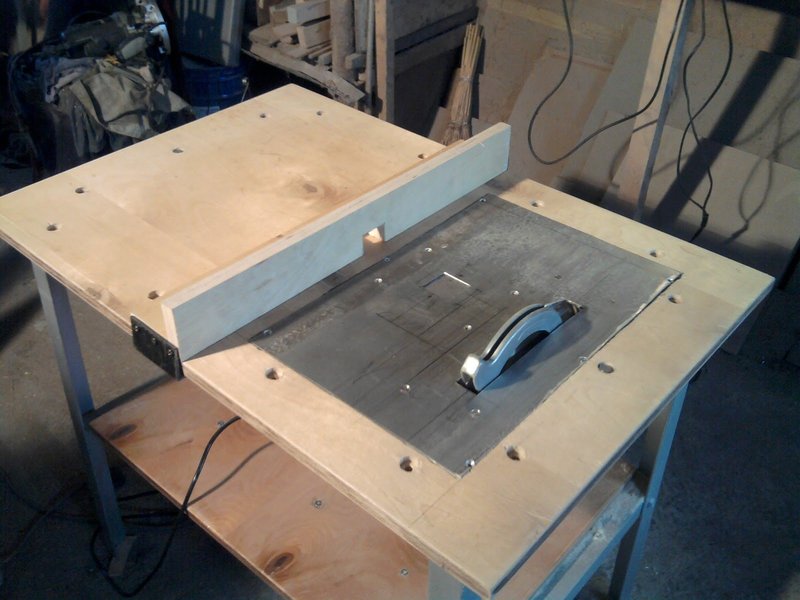
For such work, it is desirable to have a universal woodworking machine. Such a device is equipped with all the necessary devices for processing wooden blanks. As a rule, such a machine is equipped with a planer and a circular saw. At the same time, it has a work surface convenient for wood processing. With such a machine, it will not be difficult to make a clapboard with your own hands.
From the video you will learn how to make and apply special clamps for more efficient milling of the lining grooves.
While working, it is worth using some tips and tricks from experts:
- first of all, you need to work correctly with the woodworking machine itself. When cutting blanks for lining along, it is necessary to lay the board on the work surface. Further, its movement to the circular saw is carried out with the help of the body. It is they, and not with their hands, who need to push the workpiece. In this case, the risk of injury is significantly reduced;
- so that the lining is of the same width, you can use the finished product as a ruler when reinstalling the saw to cut the second side of the workpiece;
- after completing all the work, you will have a lot of wood waste. Don't get rid of them right away. When cutting blanks, many thin planks are obtained, they can be used as slats to create lathing. In this case, you will be able to significantly save on material.
After all the manipulations, you will have a finished, beautiful and practical lining. It remains only to process it with impregnations, and you can proceed with the installation. Antiseptic treatment must be carried out from all sides, and not only from the front, this will allow you to maintain the strength of the material for a long time.
What determines the quality of homemade lining
Homemade lining
At home, all cutting parameters must be observed independently and quickly changed depending on the characteristics of the board and the capabilities of the machine. What should you keep in mind?
Pay attention to grain placement, never cut against the grain. Monitor the condition of the bearings
The slightest runout will certainly affect the roughness of the surfaces. As soon as it is found that the machine shaft is wobbling a little, the bearing needs to be urgently changed or, if possible, adjusted. Tenths of a millimeter of vibration will noticeably degrade the final quality. The serviceability of cutting tools is one of the important components of surface cleanliness. Saws and cutters must be sharp. If you make your own milling cutters, use only strong grades of tool steel. The geometry of all cutters must be the same. Otherwise, some of them will not work, and this is a very undesirable phenomenon. Position the cutters accurately, take your time. It is very difficult for an inexperienced master to set all the cutters at once, do not be discouraged. Waste more time, but achieve the desired result. The lost time will pay off in excess in the future.
Milling cutters form a tenon and a groove, and also define the geometry of the lining
The more cutters the better. If the head allows you to install four, then do so, do not work with two. Four cutters slightly increase the installation time, but then the machine works longer - they are less blunt.
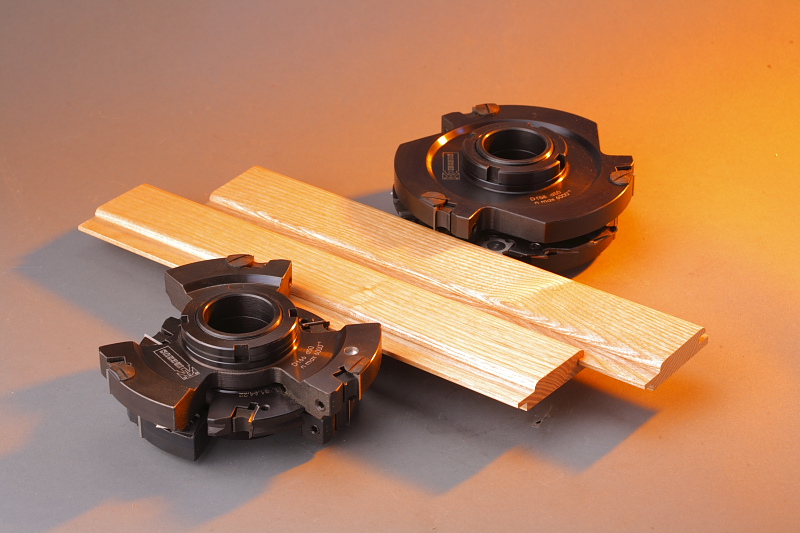
Set of cutters
Always use exactly the same wedge to secure the knives. Even small differences in weight will cause the head to vibrate. Vibration not only degrades the quality of processing, but also causes rapid bearing wear and increases the risk of injury. Observe the cutting conditions for sawn timber
You can talk on this topic for a very long time, cutting modes have a huge number of options. Novice craftsmen need to get acquainted with the theory at least a little, and in the future it all depends on the ability to practically learn and the desire to work with woodworking machines. Before feeding the board to the machine, inspect it, select the optimal cutting direction, taking into account the features of the surfaces, the presence and type of knots and other defects. Fold the finished lining in even piles, do not put it vertically, do not scatter it throughout the workshop. Cleanliness and order are evidence of the professionalism of the master.
The lining is folded in straight piles
If there is little experience, then the entrance / exit of the board may be defective due to a slight change in the direction of movement and non-parallelism with the ruler.Keep this in mind when determining the length of the lining, make a margin in length.
Features and power
The functionality of the use of equipment will depend on the correct choice of parameters, including indicators of revolutions and drive power. The power rating is influenced by the maximum permissible diameter of the serrated saw. It is believed that to process sawn timber with a thickness of about 10 millimeters, an electric motor with a power of 1 kW is required. Based on the thickness of the processed and sawn timber, the power of the electric motor should be chosen.
The transmission from the drive in a self-made circular is best done with a V-belt. This allows you to ensure the necessary safety in the use of technology. V-belt transmission, when foreign objects hit the saw, will slip on the pulleys, which eliminates injury and jamming of the working disc.
Types of cutters for wood
In most cases, not all cutters are needed, but only groove cutters. But for applying decorative notches, others can also come in handy. When buying a cutter for wood for the manufacture of lining, you need to take into account the diameter of the shank. To do this, you should find out what collets the existing manual milling cutter or machine is equipped with. Most often there are cutters with shank diameters: 6.8 and 12 mm.
Inch and conventional cutters (with mm shanks) are not interchangeable. That is, they cannot be inserted into a "millimeter" collet, although it seems that the difference is only tenths of a millimeter.
By design features, cutters are:
- Monolithic - The cutting edges and shank are one piece. This is the cheapest and most common type. When the working edges become dull, the cutters are thrown away.
- With replaceable cutting edges, reversible knives are removable and can be turned upside down.
- Prefabricated - cutting elements are welded (soldered) to the main rod.
- For soft woods, high-speed alloys are used, denoted by the letters HM.
- If the surface to be treated is hard, then use carbide types of steels - HSS.
- Grooved straight cutters - with their help you can get a rectangular groove, the working part of the cutter itself looks like a cylinder with cutting lower edges.
- Slotted fillet - similar to slotted straight lines with a rounded working edge, as a result, the shape of the slot is obtained in the form of the letter "U".
- Groove fillet V-shaped - the tool is used to obtain various V-shaped grooves, they differ in the size of the groove and the size of the corners.
- Structural groove - after milling, the groove has the shape of the letter "T", turned upside down. Or "dovetail" - a groove in the form of an isosceles trapezoid, which tapers towards the top.
- Grooved shaped - are needed to create curly carvings, work with edges, the groove resembles a funnel and other symmetrical elements.
- Edging - differ in that they are intended for processing ends and edges, often there is a bearing in the design for working according to a template.
- Edge straight lines are needed to obtain a right angle between the upper plane of the workpiece and the end part.
- Edge molding - to obtain a semicircular edge in the form of a wave, and of different shapes (depending on which part of the cutting plane is used), in double milling cutters, there may be an adjustment of the gaps between the blades of the cutter.
- Edge seamed - allow you to select a rectangular groove, a quarter on a flat or curved workpiece. The working depth is adjusted using the position of the router or the diameter of the thrust bearing.
- Tapered edge - needed to create all kinds of decorative chamfers, to work with edges before joining them with other products, and so on.
- Edge fillet - with their help, semicircular grooves are obtained, In order to avoid distortions during operation, 2 bearings are provided in the design of the tool.
- Edging curly (multi-profile) - to create complex-profile side edges, the length of such cutters is longer than that of conventional cutters, a powerful router is required for normal operation.
- Edge semi-rod - needed to obtain a semicircular protrusion at the end.
- Combination cutters are used to create tenon joints of several boards, both for corner and panel structures.
Most of all, you will need groove-and-tenon cutters for the lining for work. It is with this tool that a groove-tenon system is created to connect the panels during assembly. They come in a set of two. And for work, you no longer have to calculate the dimensions of the groove and spike.
There are varieties of groove-tenon conventional paired cutters and those that are designed specifically to create lining panels. The latter are distinguished by the fact that they allow you to simultaneously grind the groove / lock and round off the edges from the front side. Using conventional cutters, you can make flat panels from boards, for example, for a garage, where decorative bevels are not needed.
Combined frame - these are typesetting kits, the blades can be positioned on the main axis, depending on what kind of work is supposed to be done. Includes: one or more thrust bearings, lock washer-grover and clamping nut.
Figures - needed for decorative processing of edges when creating panels. Since there is a bearing, both straight and semicircular surfaces can be processed. The diameter of the working edge of such tools is large enough, therefore, powerful electrical equipment is needed to work.
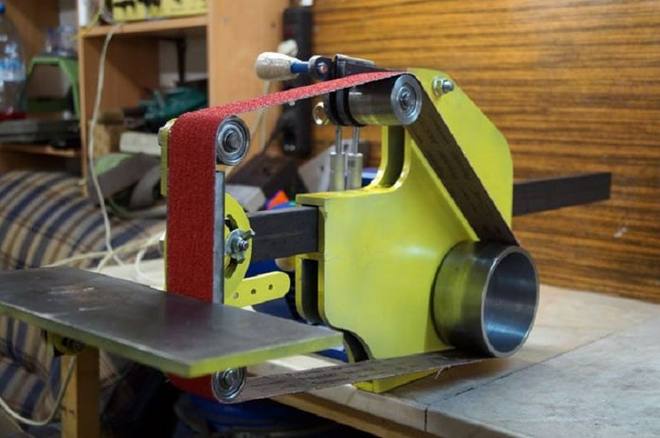
How to make a grinder at home
To describe the design of a grinder quite simply, it is a motor, 2-4 rotating rollers, one of which is adjustable, and a sanding belt. A grinder is usually distinguished from a manual grinder by a fixing stand, with the ability to change the angle of inclination.
The stand is essential for precision work. We decided to make descents - fix, set the desired angle of inclination of the rack and start the grinder.
As for the adjustable roller, it is a must. After all, the sanding belt stretches over time, and subsidence is formed. The video is pulled up and the work continues. There is also an important point: the emery tape will only work on an elastic base. Otherwise, it will break from the load.
To assemble the machine at home, you will need:
- Think over the design of the device and make drawings.
- Prepare all the necessary tools: jigsaw, drill, SHMU.
- Prepare the parts required during the assembly process or arrange with a turner for their grooving.
First you need to decide on the tape, more precisely, with its length. For domestic use, the best option is 915 mm, it is with this length that the majority of Chapaevsky machines work.
The base for the bed must be more than 12 mm thick. Bolted connections in this situation are unreliable. Welding is desirable.
When grinding rollers, the roughness index is important, which should be at least 1.25. Otherwise, the tape will wear out quickly.
If the machine is planned to be made with four rollers, then it is customary to use the following dimensions: 150 mm for the leader, 100 mm for the adjustable one, and 70 mm for the remaining one. At the same time, it is important to arrange them without distortions in order to avoid slipping of the tape.
The cost of the finished pulley starts at 2,000 rubles. Somewhat cheaper can be ordered from private turners.
DIY grinder.
Particular attention should be paid to the grinder drive. If it is not possible to acquire a specialized engine, you can use the alternative
It is advisable to use the engine with a power of 0.75 kW or higher, and a speed of 1200 or more.
Homemade grinder with a washing machine engine
When the size of the drive pulley is 70 ÷ 100 mm, the grinder motor must spin up to at least 3000 rpm. The motor, dismantled from an old automatic type washing machine, has a low power (below 300 W). It is distinguished by good reliability and unpretentious operation.
The popularity of using just such a drive is due to its widespread use.
The drive from the washing machine must be included in the preliminary drawing. A do-it-yourself grinder at home needs an engine with an output shaft. In this case, the shaft has a threaded connection, the design of which makes it easy to do the docking with the pulley.
From a drill
A drill grinder is a special attachment that can be made in several steps. There are hundreds of different fabrication options. Consider one of the simplest and most reliable, step-by-step instructions:
- Everything necessary for work is prepared: shaft with gears, bearings and sheet metal.
- Two plates of 110 × 250 mm are cut out.
- The necessary holes are drilled on each of the plates. In this part, the bearings will be fed for adjustment.
- Further, the "hairpin" is taken and cut into 120 mm. Self-made rollers are installed on studs and bolted. The tape is pulled and fixed on the other side.
- The basis for attaching the grinder is being made. The machine is attached to the bed, and the drill is fixed with clamps.
- A corner is ground and fastened for convenient fixation of the knife during sharpening.
From the grinder
The main structural difference of the grinder from other types of power tools is that its output shaft is rotated at an angle of 90º to the axis of the electric motor and, accordingly, to the body. For this reason, it is called angle grinder - angle grinder.
This feature is perfect for longitudinal fastening of the drive roller and the "electric file" blade. It turns out that the tool is elongated in a line and very comfortable to use. The same drill bit is located at right angles to the body, which is quite inconvenient for work.
To make a device, it is enough to make a metal base for the rollers, stretch the tape, and adjust the dimensions of the driving roller to fit the SHMU guide, and the machine is ready.
Necessary equipment
First you need to select and prepare for work a large and powerful machine. The second machine will be a practical purchase. Due to the fact that even the most powerful machine after a certain period of time will begin to overheat, allowing it to rest and cool down will be a mandatory working moment. The required characteristic of the machine is a power not lower than one kilowatt. He is required to perform two main functions - this is sawing and jointing, that is, leveling the wooden surface.
Giving preference to any model, focus on the presence of backlash - a gap in the places where the parts are being adjusted. A high-quality woodworking machine, for example, an American, does not exceed a width of fifteen to twenty centimeters
But also the rulers and the cooling system should be of high quality.
Aluminum tends to leave black marks on wood. It is possible to apply stripes to the finished product with a jigsaw. As a result, defects adversely affect the appearance of the material after processing, and the finished lining must be painted when colorless varnish could be dispensed with. For the operation of the saw, a specialized cover is designed, which is put on the base of the saw in order not to stain the wood, when both the table and the ruler do not have protective devices.
You can make alder lining by hand, for example, with a milling cutter or on a circular. The milling method is of higher quality.
Peculiarities
Before proceeding with the description of the manufacturing process, you need to figure out what this product is.
Lining is a type of facing material that is a product of natural wood processing. It is used to design both simple (straight-line) and complex structures. Depending on the technical characteristics, the products are used for exterior or interior decoration. Outwardly, these are flat panels with special joints at the edges.
In the field of lining production, various types of wood are used, both deciduous and coniferous: alder, cedar, ash, pine, beech and much more.
The wood finish combines excellent performance and aesthetic qualities. Due to these characteristics, the finish has become widespread. The lining is used for external and internal cladding.
Lining advantages:
- aesthetic appearance;
- a rich assortment of products, differing in color, texture and performance;
- it is an environmentally friendly product, safe for health and the environment;
- high-quality material has excellent practicality and durability;
- wood finishing material is a classic that is always relevant and in demand;
- simple installation process;
- natural finishing creates a comfortable atmosphere in the room.
Disadvantages:
- high price;
- requires careful care.
This is interesting: Features of polyurethane sealants for external joints: consider from all sides
Ceiling frame for lining
The panels are installed on the ceiling with a slight difference from the same installation on the walls. This implies the creation of a lathing for the lining, on which decorative panels will be installed. A correctly installed frame is constructed as follows:
- Straight rails are installed around the perimeter, the cross-section of the bar varies from the expected load on the structure, but, on average, is 40x40 mm;
- The use of a level is a requirement;
- To ensure correct installation, it is necessary to use plates specially designed for adjusting the surface; they are attached at the place of fixing the supporting panels and timber;
- As a result, we get a durable coating, limited by bars and fixed with self-tapping screws.
If your ceiling is made of concrete, then installation is carried out in the following order:
- Dowels are driven into the ceiling. To install them, it is necessary to drill holes using a winder drill, 50 mm deep. An 8x40 mm dowel is hammered into the holes formed;
- Further, markings are applied to the ceiling (using a cord), boards for mounting the frame are fixed along the perimeter of the surface. The step between the slats should be about 600mm;
- It is recommended to use a line to control the correct and even installation. Since the frame is more difficult to mount inside the perimeter, there is a need for an assistant;
- The rail is fixed to the surface in accordance with the previously stretched line. Plates are used to level the base horizontally. Use self-tapping screws and a screwdriver to fix the board.
If the use of additional insulation is required, then an additional heat-insulating layer is laid in the gaps between the slats.
The lining is mounted on the ceiling in two ways. In the first case, the lathing for the lining is installed directly on the ceiling wall. In the second case, a wooden frame is created. If the master chooses the first installation option, then the surface must first be properly prepared and leveled. The second option is not so difficult, but it requires the construction of a base made of wood under the lining.
Based on what your ceiling is made of, the fixing method and fastening material are determined; for mounting the timber to the ceiling, either self-tapping screws or dowels are used. The frame rail is installed perpendicular to how the lining will be mounted.
Lathing for lining, as a rule, is made of pine or larch.The first option is not suitable for installation in saunas and baths, since under the influence of high temperatures this type of wood begins to release resin
In rare cases, when installing the base for the lining, some use an aluminum profile. If the steam room is finished, then it is strongly recommended to use a galvanized version of the profile, since such a material is better resistant to corrosion and moisture.
It so happens that under the future clapboard there is a ventilation system, in this case a counter-lattice is required. In this situation, the layers of the structure are installed perpendicular to each other.
Only after thorough processing of the material with antiseptics and fire retardants can the slats be fixed to the ceiling. Before starting work, the material must lie in the room for at least two days, in this case the wood adapts to the internal climate of the room and the frame will not subsequently sag.