Beautiful examples
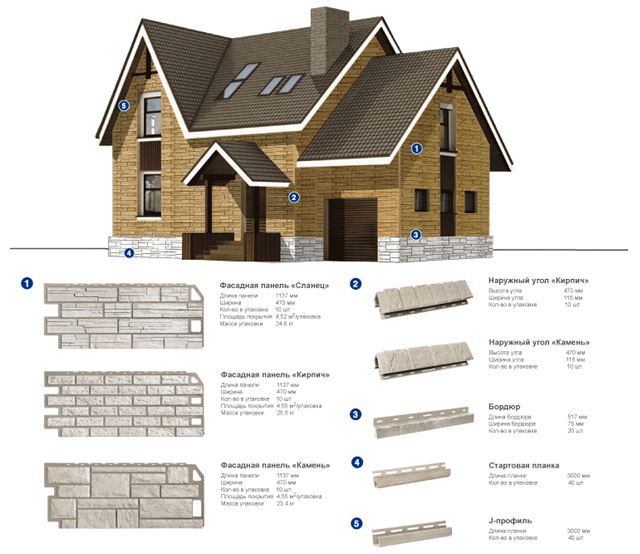
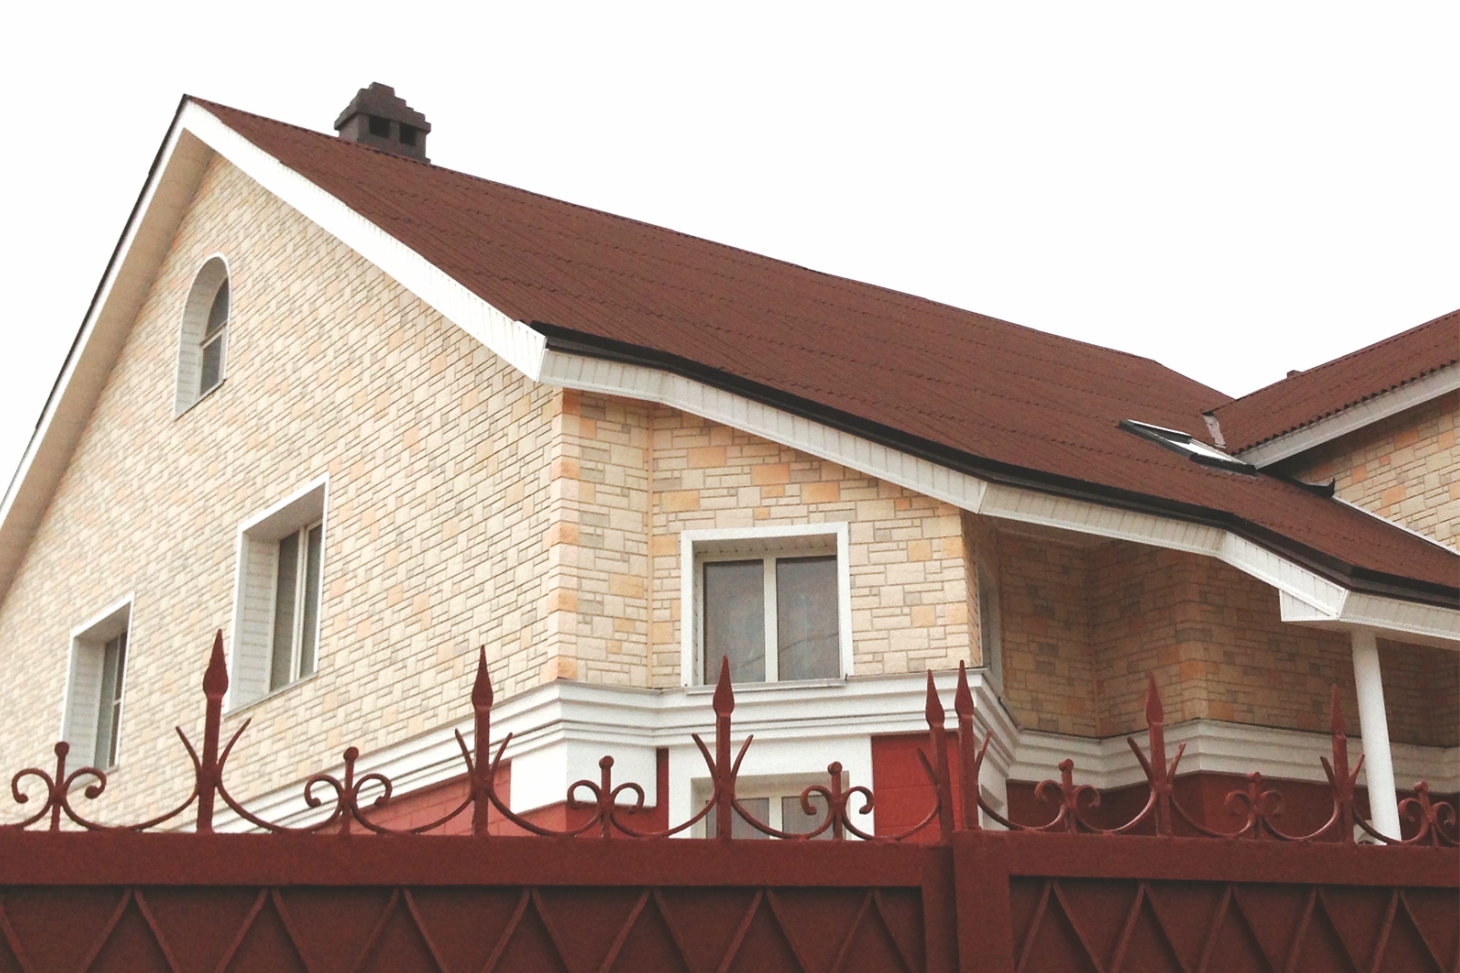
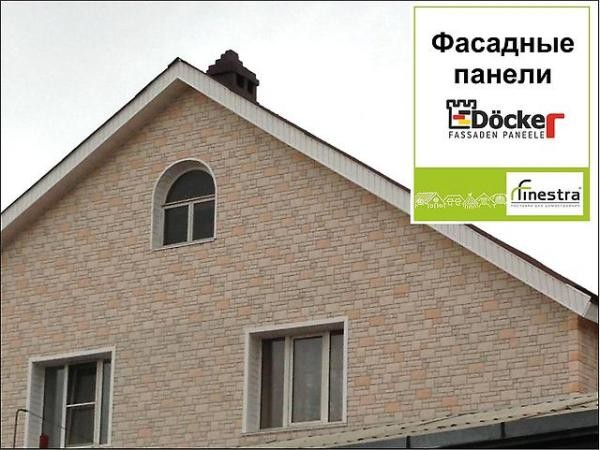
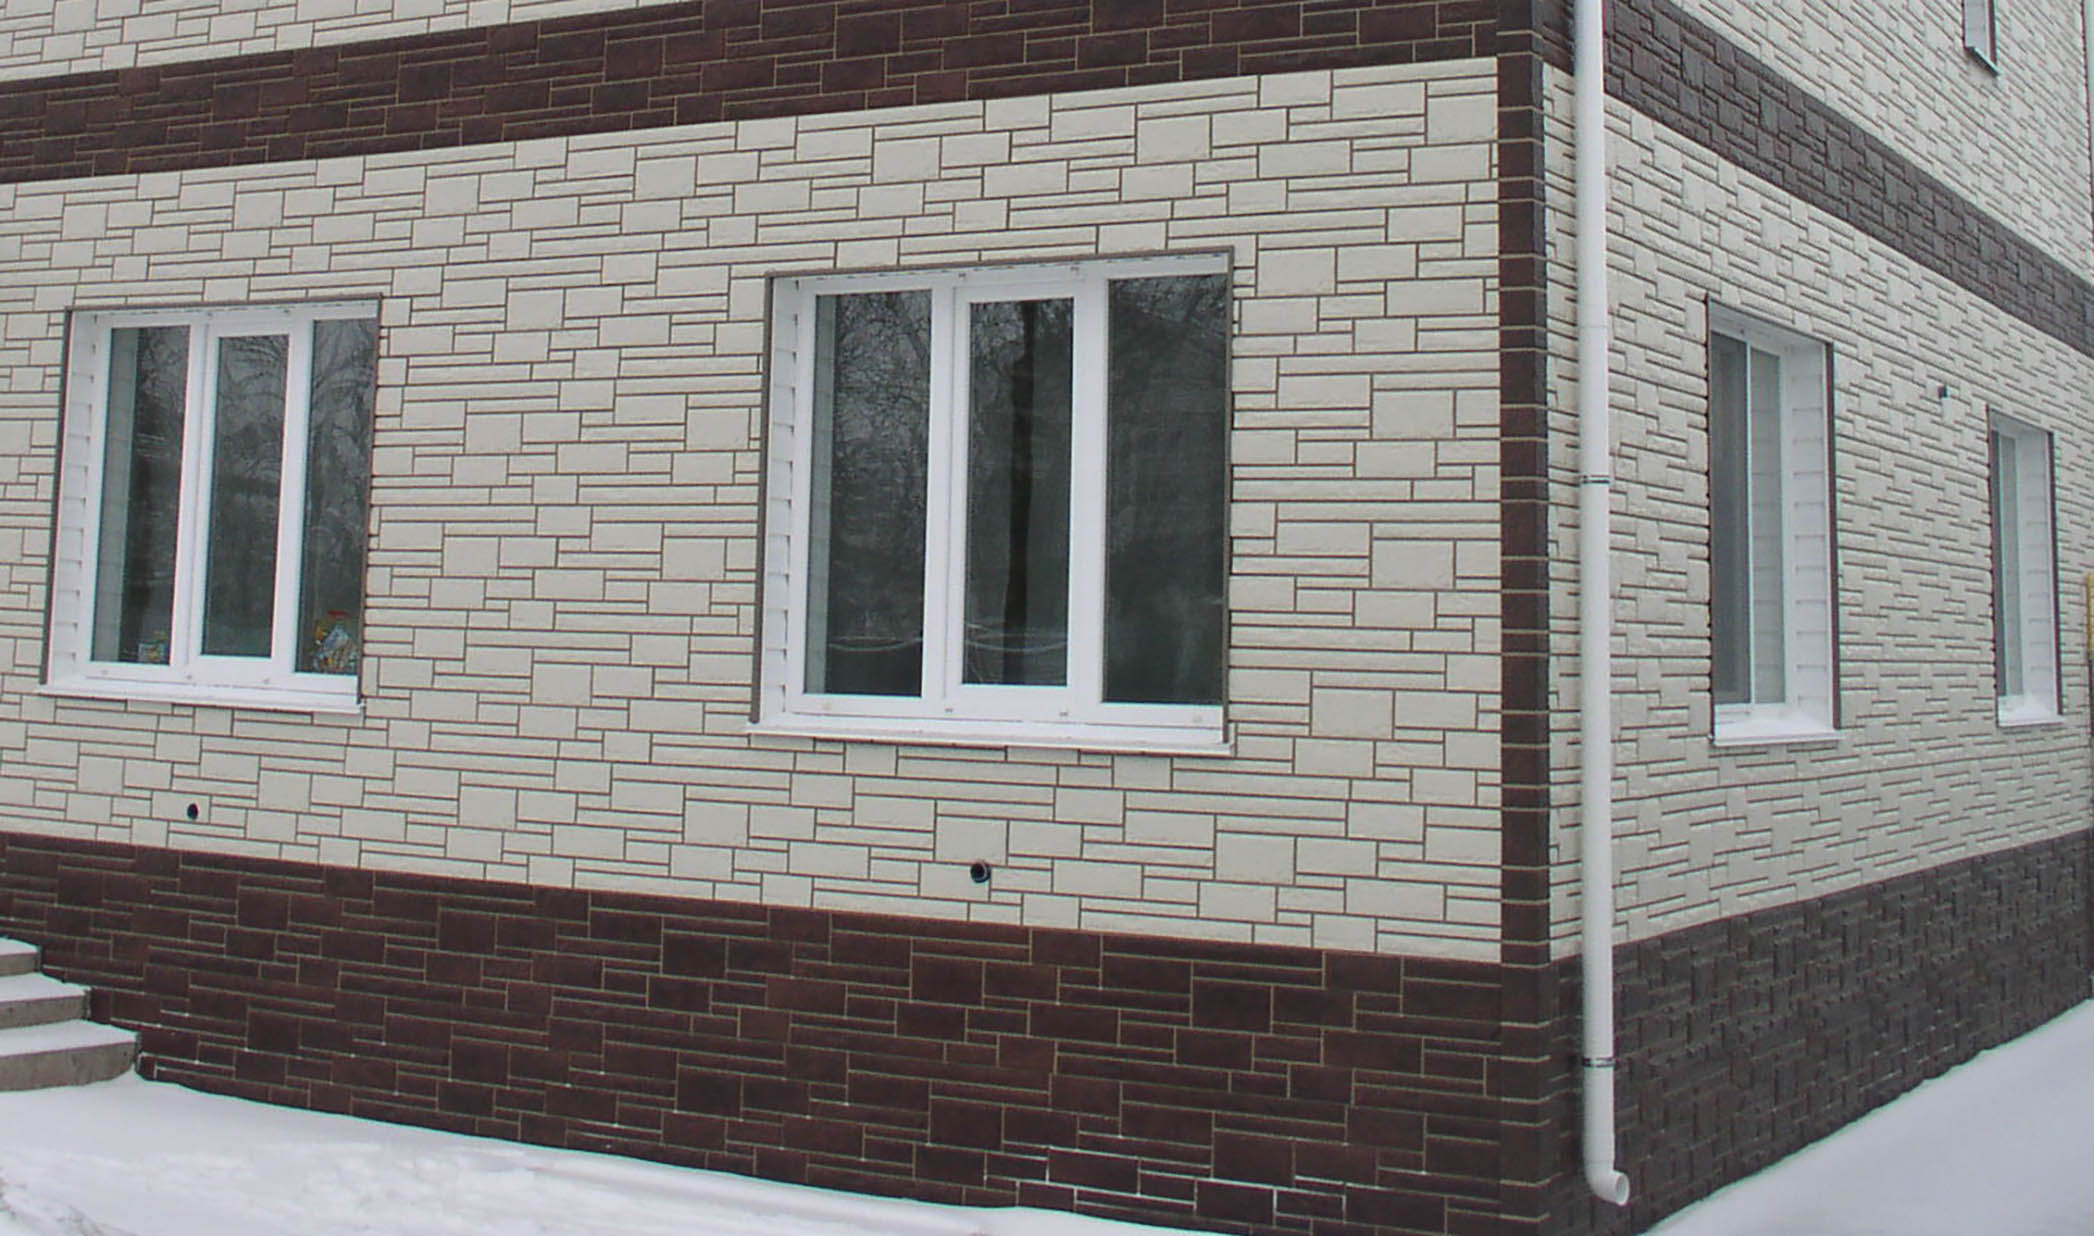
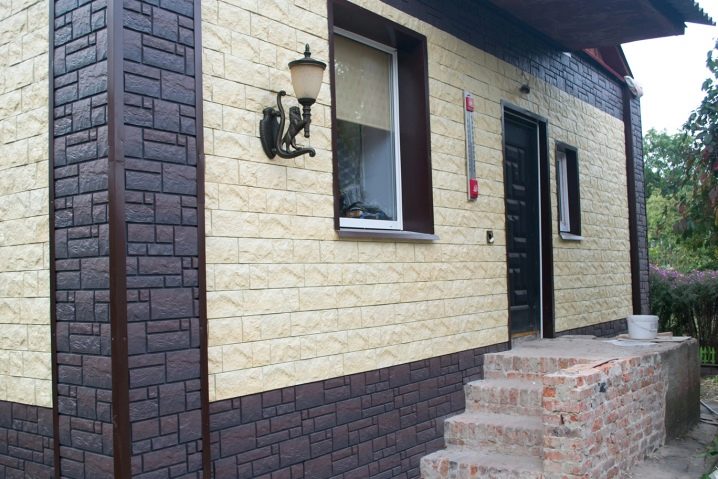
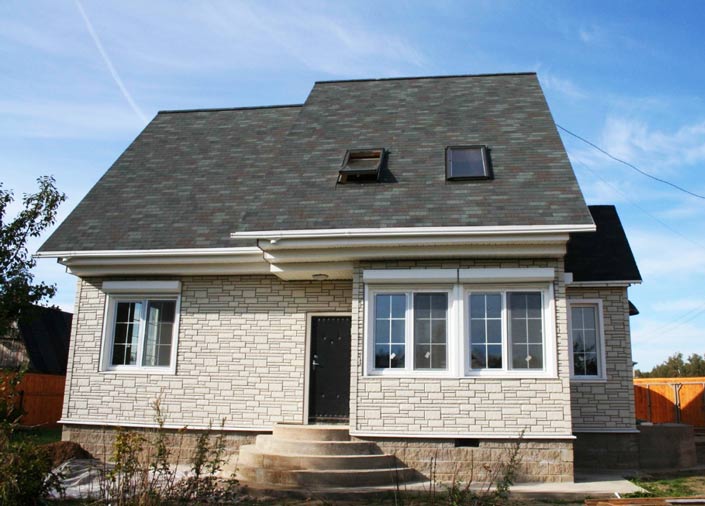
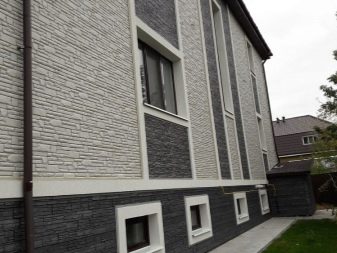
It is worth paying attention to several samples of finished facade cladding works. This is a classic example of siding cladding.
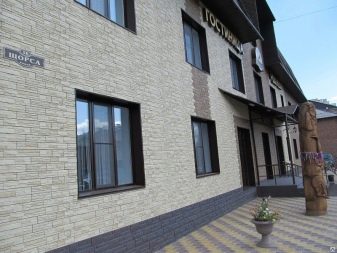
The austere architecture of the building is highlighted by elegant panels in the form of rough stone masonry, which are successfully combined with the rest of the elements
This is a classic example of siding cladding. The austere architecture of the building is accentuated by elegant panels in the form of rough stonework, which are successfully combined with the rest of the elements.

Panels with imitation of sandstone look good on country houses, country cottages. If you wish, you can choose a different siding color and create your own individual facade design.
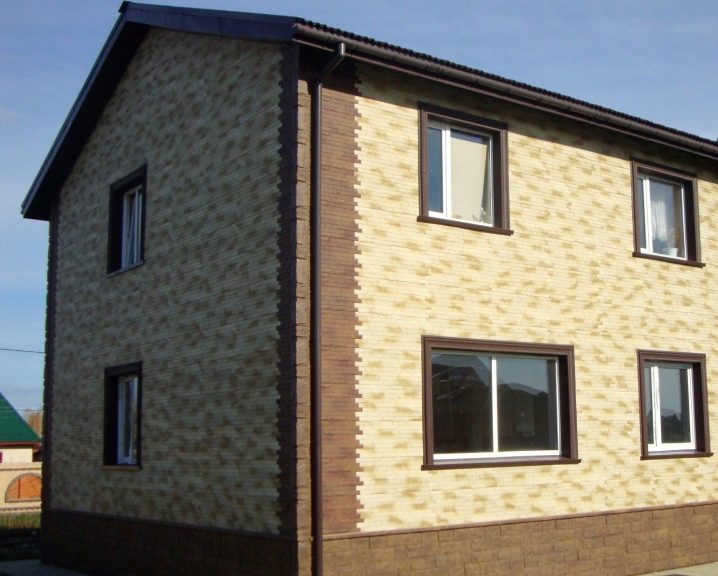
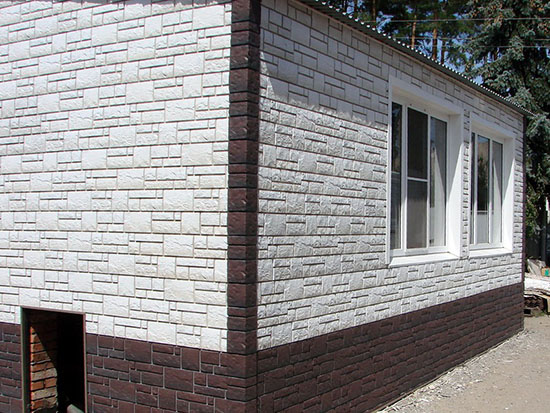
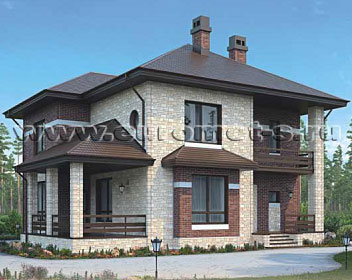
Another option for using siding of different colors. As a rule, dark colors are used to finish the basement, but the walls can be of any shade.

This finishing option will appeal to connoisseurs of harsh exteriors. Rock imitation is always a safe bet.
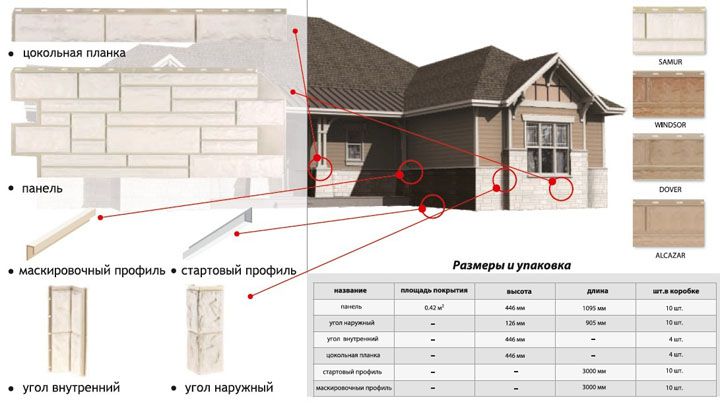
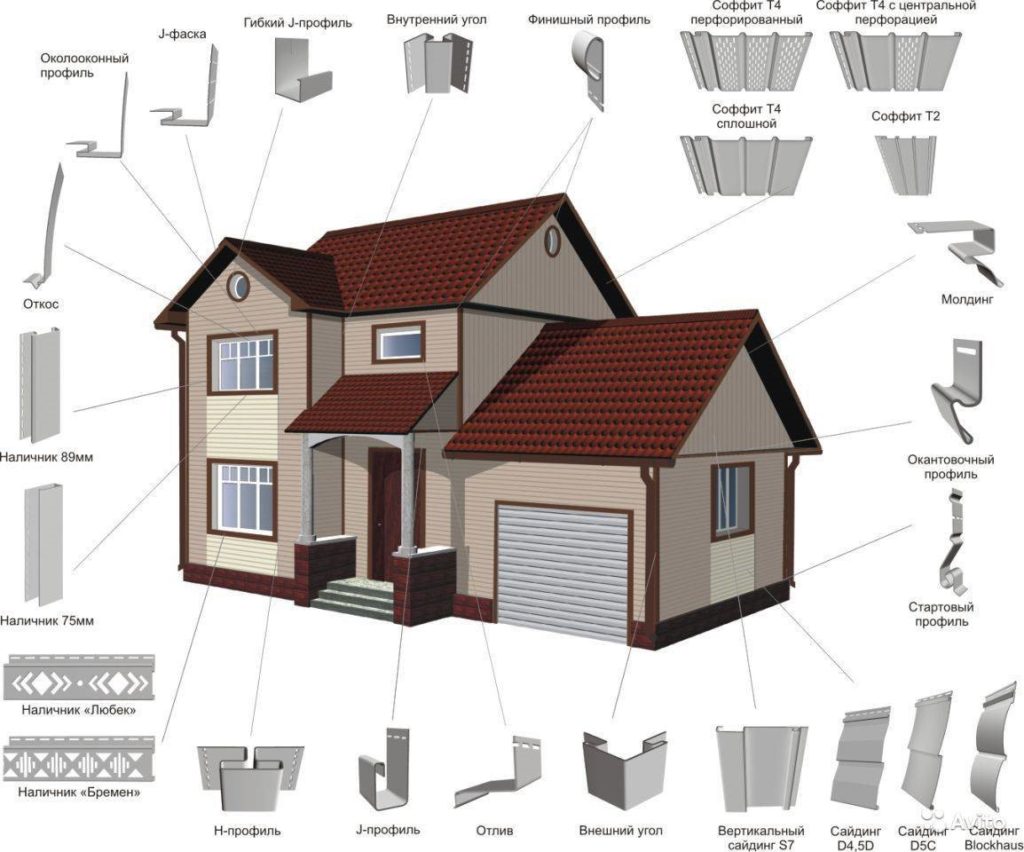
Decorating the facade of a building with Docke panels is no longer a problem. The main thing is to choose harmonious colors and entrust the installation to competent specialists. The set of panels, as a rule, also includes additional elements, such as lathing, corners, molding.

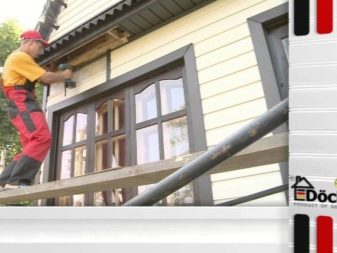
The process of assembling Docke R panels awaits you in the video below.
Basic requirements for the installation of Deke-R basement siding
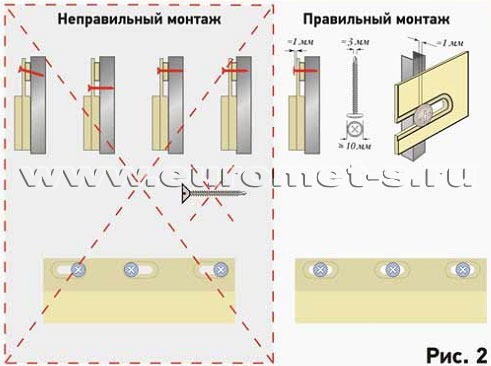 |
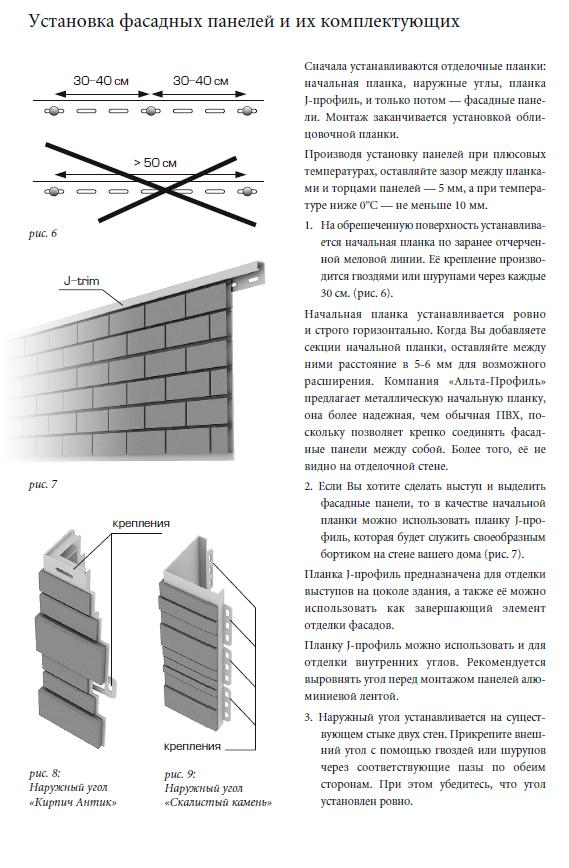
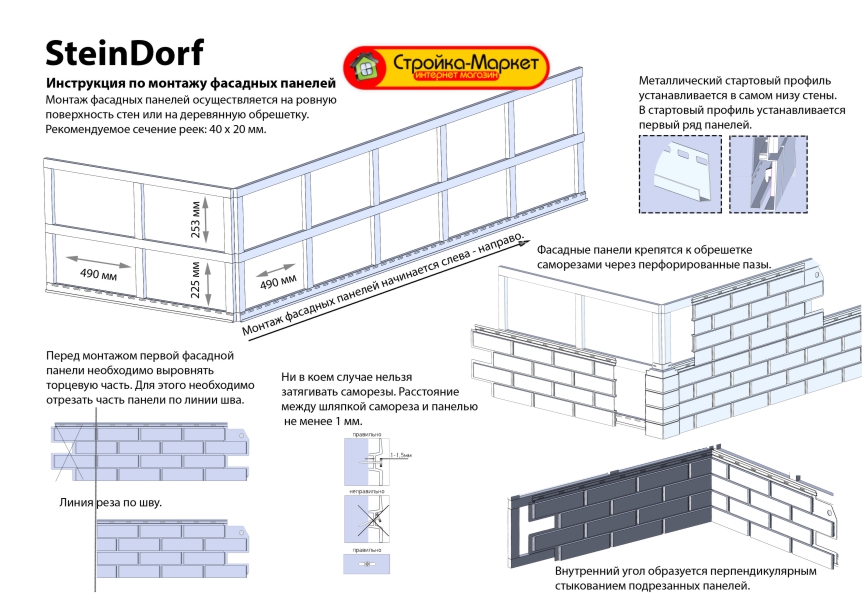
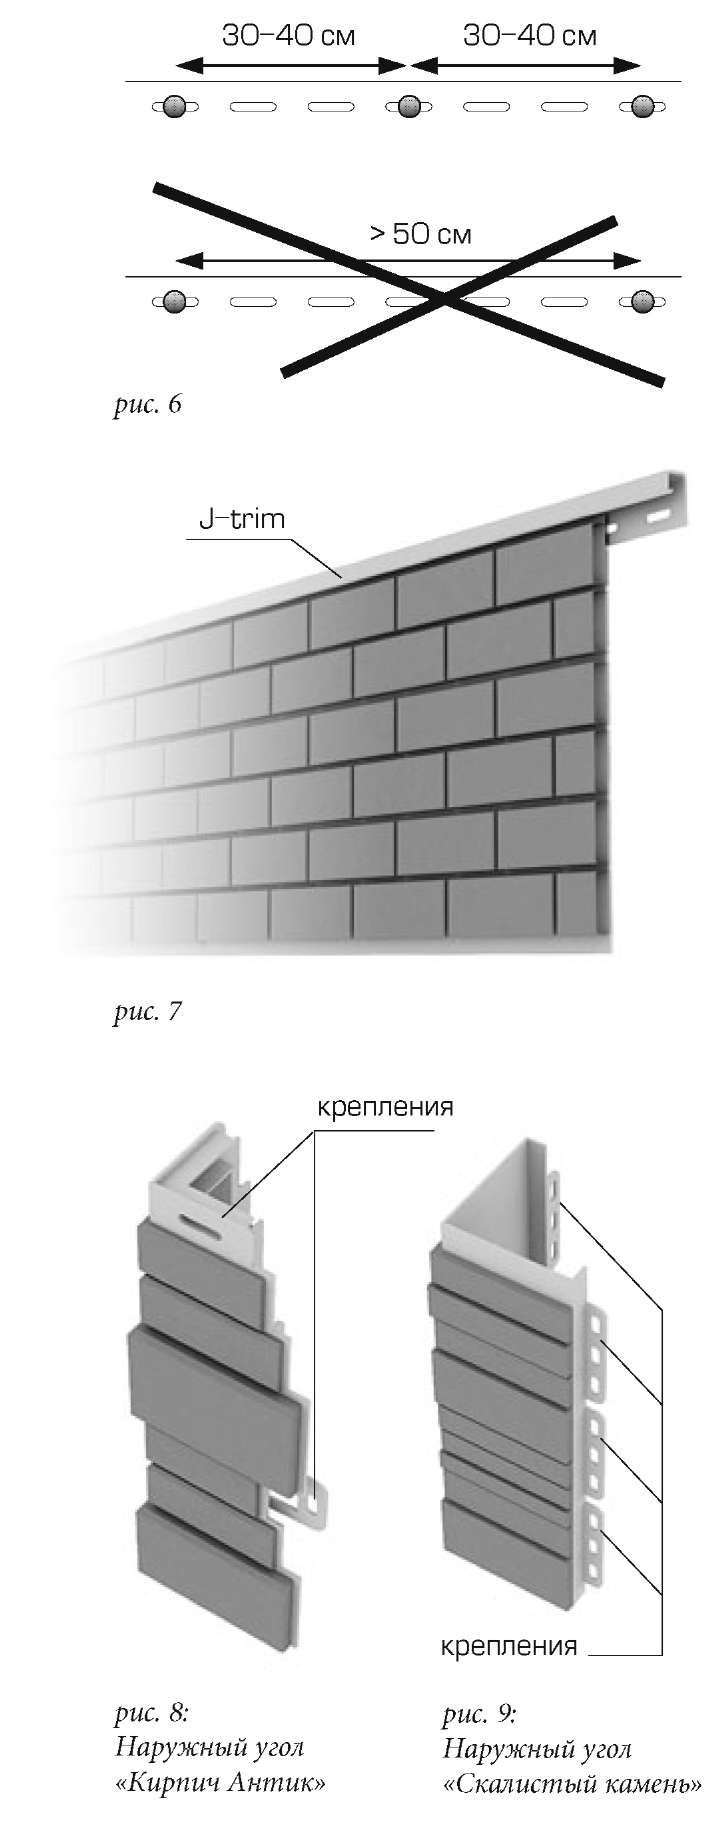
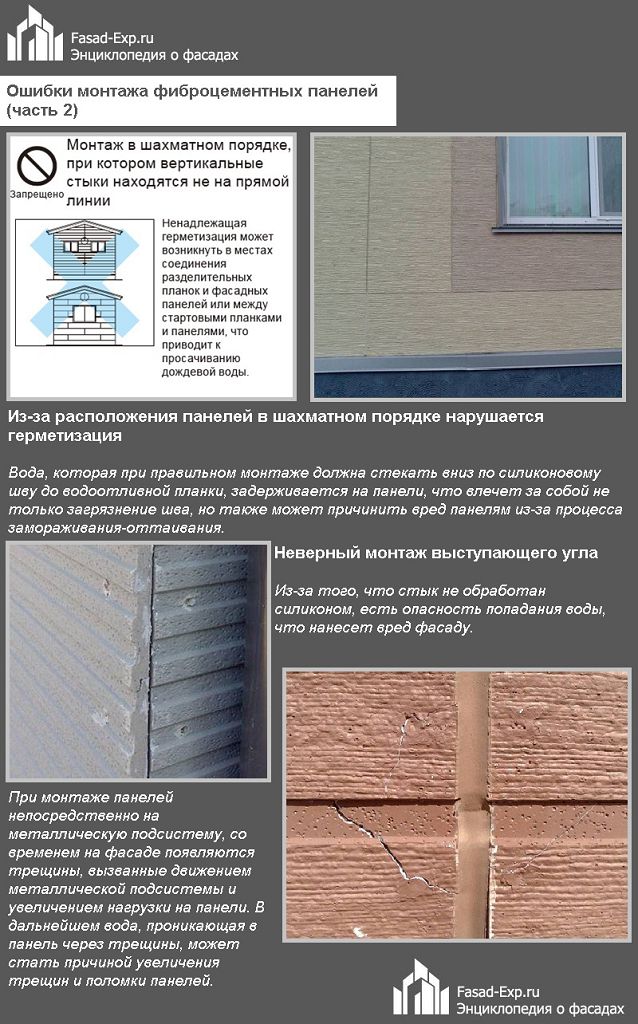
The material changes size when heated and cooled. This must be taken into account during installation. To compensate for deformations, follow these guidelines. Self-tapping screws or nails are fixed strictly in the center of the nail hole. The rod of a nail or self-tapping screw is placed horizontally. A gap of up to 1 mm is left between the surface of the siding and the head of the hardware. It is impossible to firmly press the cladding to the base with a self-tapping screw or a nail. When connecting the panels, each subsequent one is inserted into the previous one until it stops. This ensures that the correct temperature gap is maintained. Facade cladding can be performed at temperatures above -15 ° C. |
Starting bars
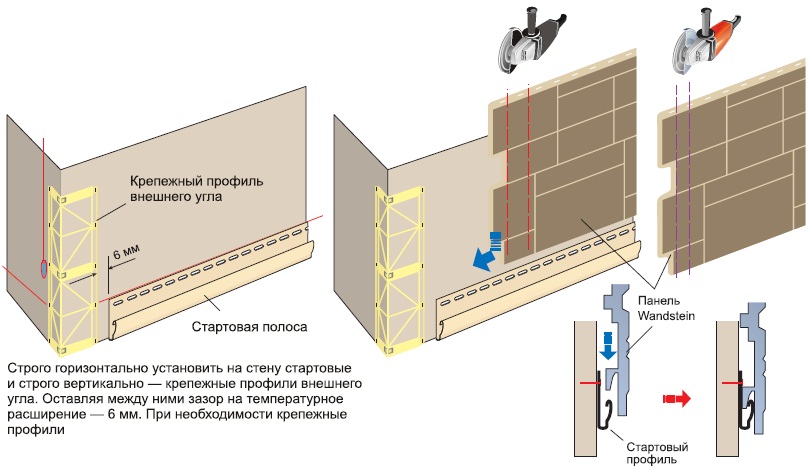
Before the start of cladding work, the basement of the house is measured by fixing the lower and upper points of the walls. To do this, use the hydro level, putting appropriate marks on the walls. Measurements are performed at all corners around the perimeter of the house. If the horizontal level is maintained, you will come to the starting point. Next, measure the distance from the applied marks to the actual bottom of the walls.
The distance is the same for all marks. This means that the foundation is level. Corner starter bars are installed using a hydro level. They are connected to each other by wall starting profiles.
The distance for different marks is different. This means that the foundation is not leveled. If the slope is small, to compensate for irregularities, a blind area is equipped, observing the applied markings. Installation of starter planks is carried out in the same way as for a flat foundation. If the blind area cannot be made, you need to abandon the use of starting elements.
If starting profiles are not used, mark the height at which the second row of basement siding will be located. The required distance is set aside from this height and the lower panels are cut along it. The trimmed elements are installed by fastening them with hardware through the nail holes. If necessary, drill additional holes for nails at the bottom of the part. This is done on the “seam” section so that the head of the nail or screw is invisible.
Important! Euromet engineers do not recommend fastening the material by screwing in self-tapping screws without first preparing the holes for them. Over time, due to such an attachment, the siding is deformed, warped
Installation instructions
Process
installation of panels is divided into several stages. First implemented
preparatory stages, after which the crate is fixed, and the elements of the future are attached
cover.
Preparing the walls
Correct installation instructions involve first preparing the base. To do this, you do not need to use complex equipment, since simple actions are implemented:
- walls are cleaned of dirt or mold;
- attachments and debris are removed;
- the past cover is removed, which
can be represented by paint, old panels or other materials; - all cavities and other problems are putty;
- the surface is sanded, for which
a laser level is used to determine the evenness of the wall.
Only
after preparation, the immediate procedure for creating a new coating begins
using Deck panels.
Installation of lathing
Fastened
elements to the crate, which is created from battens or a metal profile. If
wooden parts are used, they are treated with antiseptics and
fire retardants, which helps to protect them from the negative effects of insects
or mold.
Lathing
formed by means of guides attached to the plinth vertically and
horizontally. The base / plinth height must not exceed 45 cm. Distance
between the slats depends on the length and width of the selected panels. During profile fixing
a level is used to align all the elements. Installation begins in
15 cm from the ground. It is advisable to leave a gap between the guides, not
exceeding 91 cm.
Fastening panels
Installation of Deck basement panels is a simple procedure, so any owner of a private house can handle it. For this, the following stages are implemented:
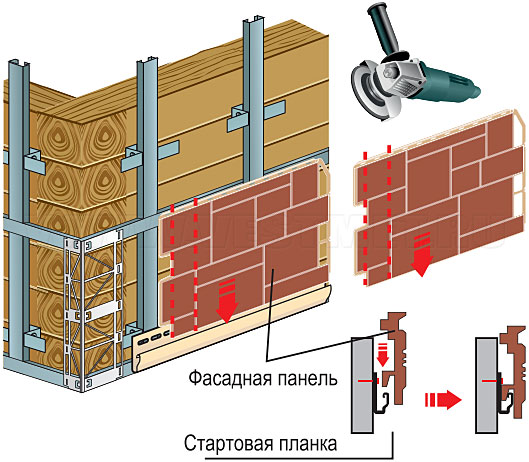
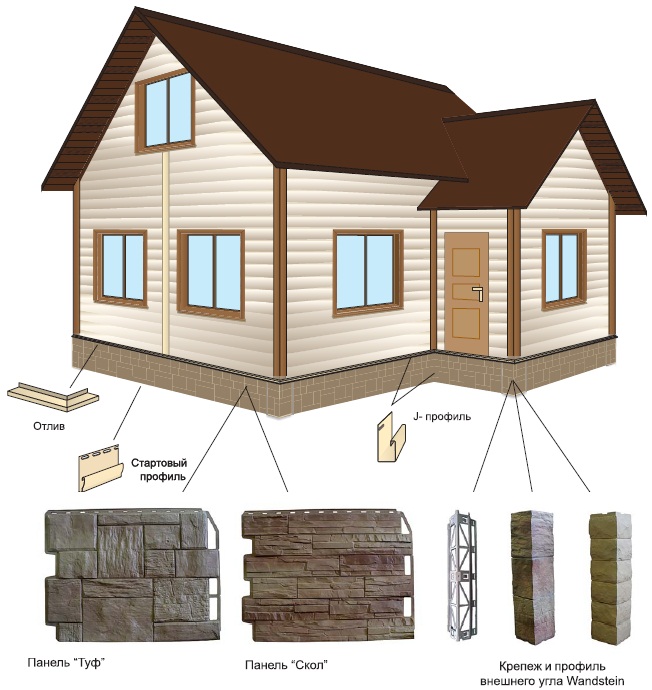
- a start profile is installed, for
what is the indentation from the corner of the house by about 10 cm; - the corner of the first panel is mounted by 3 mm
lower than the edge of the starting strip; - after the panel moves all the way to the left;
- the edge of the panel is treated with a sealant,
after which it joins the corner of the structure; - not recommended during work
over-compress the pins in the corners, as a small gap is required to protect
coating against destruction when the temperature changes; - when creating the next rows of the panel
fit on the starting line, after which they move to the first element; - if products are used that imitate
brickwork, then the rows are shifted by about 20 cm, which allows you to get
a coating that perfectly matches the masonry; - one panel contains from 4 to 5 locks
for fastening; - internal corners are fixed by corner
profiles or J-profiles; - at the end of the work, a profile is installed
to the last line, and holes are certainly drilled in it for
institutions of the edge of the plate.
If
observe the correct installation technology, then you get a coating that has
beautiful view, high reliability and tightness. With his help
long-term protection of the facade from various negative influences is provided.
Required installation tool
 Tool necessary for sawing Docke-R facade panels
To carry out the self-assembly of the Docke-R cladding panels, you will need a certain construction tool at each separate stage.
Sawing:
- hacksaw for metal;
- Bulgarian;
- electric jigsaw;
- scissors for metal and a construction knife.
Markup:
- roulette;
- level;
- plumb line;
- pencil;
- square;
- coated cord.
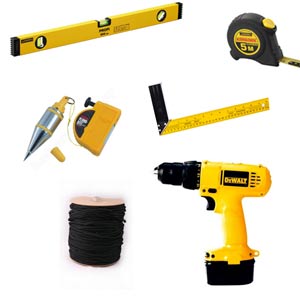 The tool required for marking and installing facade panels
Mounting:
- screwdriver;
- screwdriver.
Docke-R siding tends to shrink and expand when the temperature changes, therefore, during installation work, it is imperative to take this factor into account and adhere to a number of rules, the observance of which will ensure the reliability of the structure. So, self-tapping screws are screwed into the center of the hole horizontally, without sinking them to the end by 1 mm. The panels are fixed to each other closely to provide a thermal gap.
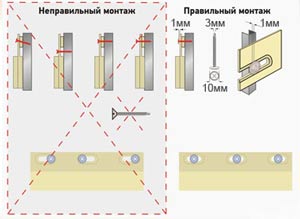 Panel fastening scheme with self-tapping screws
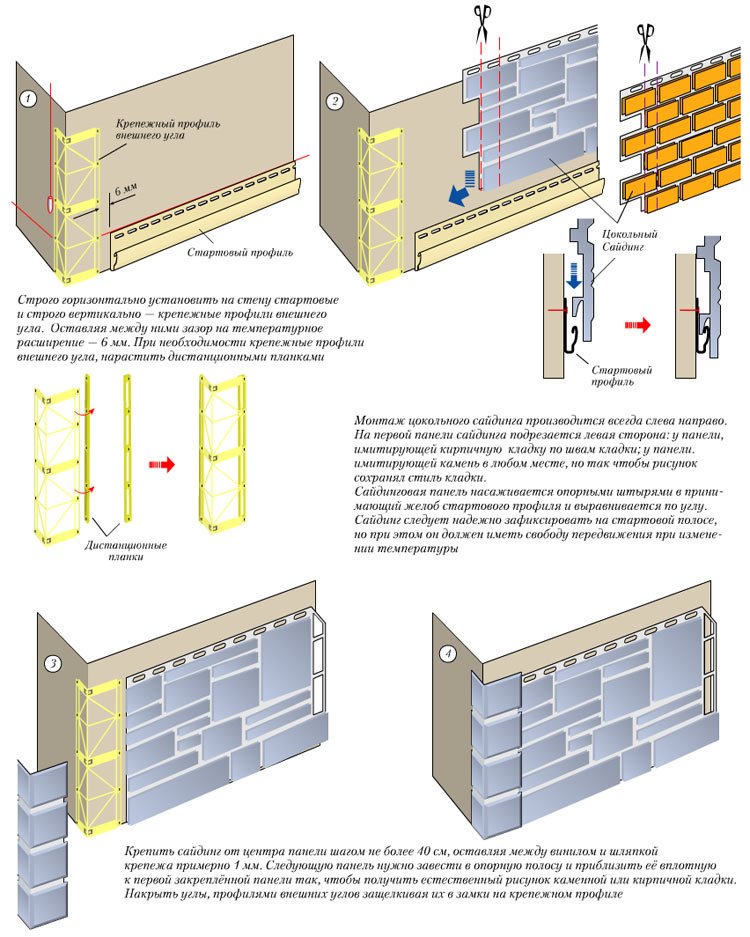
Before installing the starting strips of the material, the basement of the building around the perimeter is measured by the water level. If the foundation is even, you can fix the corner starting strips, between which the main profile will be fixed horizontally.
Earlier, we already wrote about the installation of front panels with our own hands and recommended adding the article to bookmarks.
If the foundation is poured unevenly, it is necessary to make a horizontal blind area with a slight slope, and only then fix the starting profile (with a significant slope, it is not mounted).
With a large slope of the blind area, you need to calculate the height at which the next row of siding will be attached. The cladding for the first row is trimmed to the required size. The cladding is fixed in the upper (horizontally) and lateral (vertically) technical holes. The seam can be additionally fixed.
| To avoid deformation of the material, the self-tapping screws are attached only through special holes in the panels. |
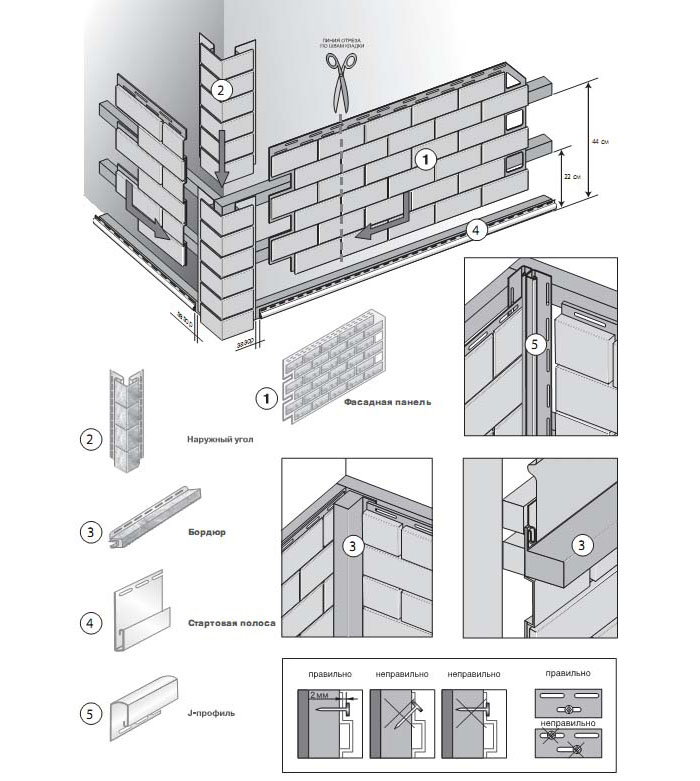
 Installation diagram of J-profiles
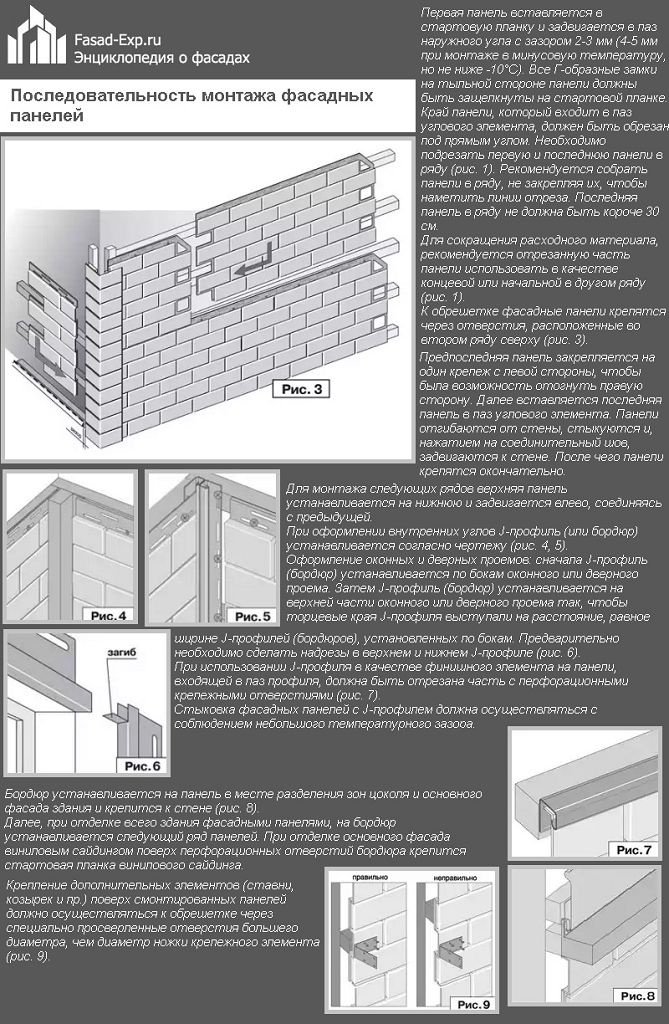
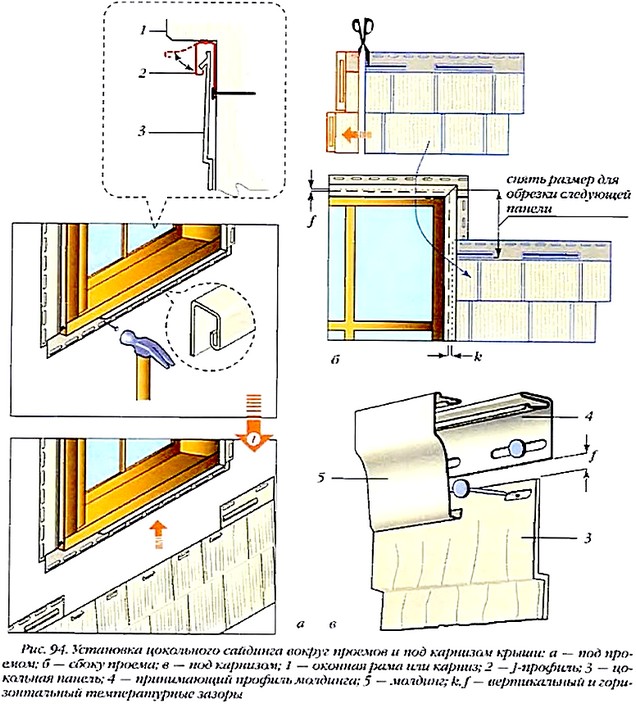
When facing the inner corners, a special J-profile is used. It is fastened with self-tapping screws, the pitch between which is approximately 20 centimeters.
Also, the J-profile solves the problem of finishing the top edge of the siding. To this end, it is necessary to fix it in the above way at the very top of the supporting frame or under the roof, and bring a neatly bent panel under it.
Tips for installing Docke-R panels
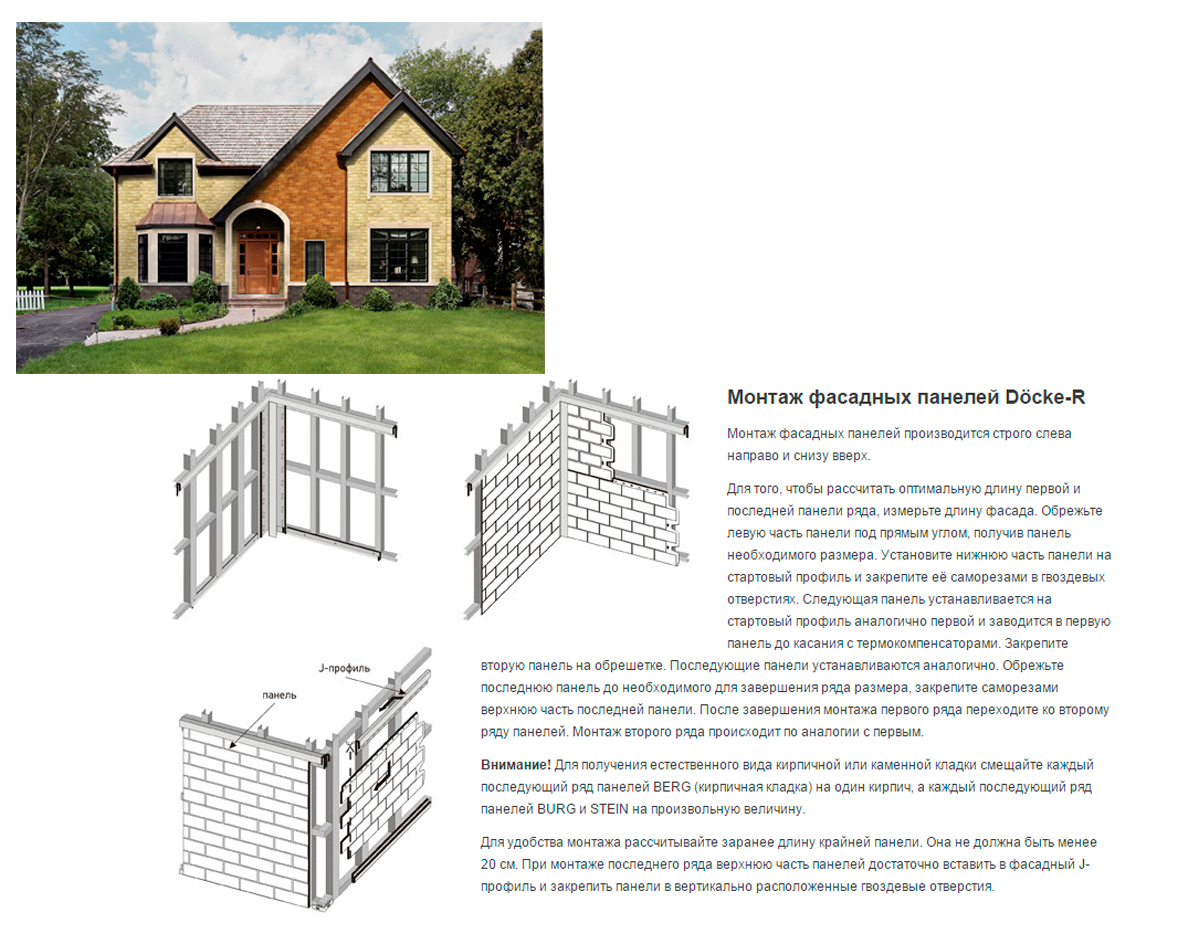
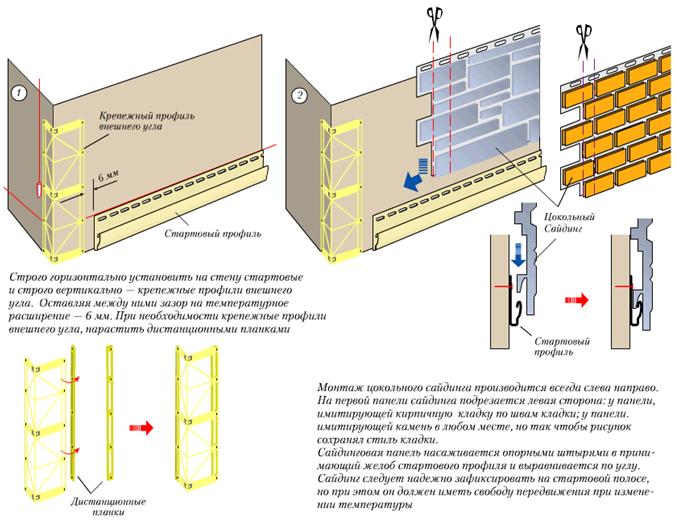
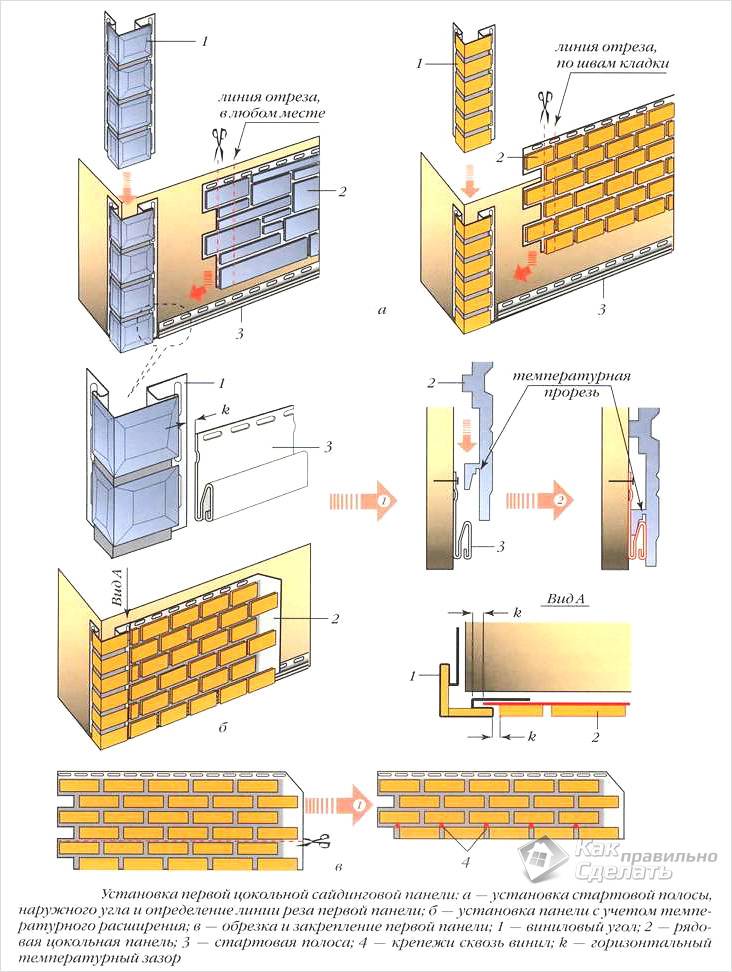
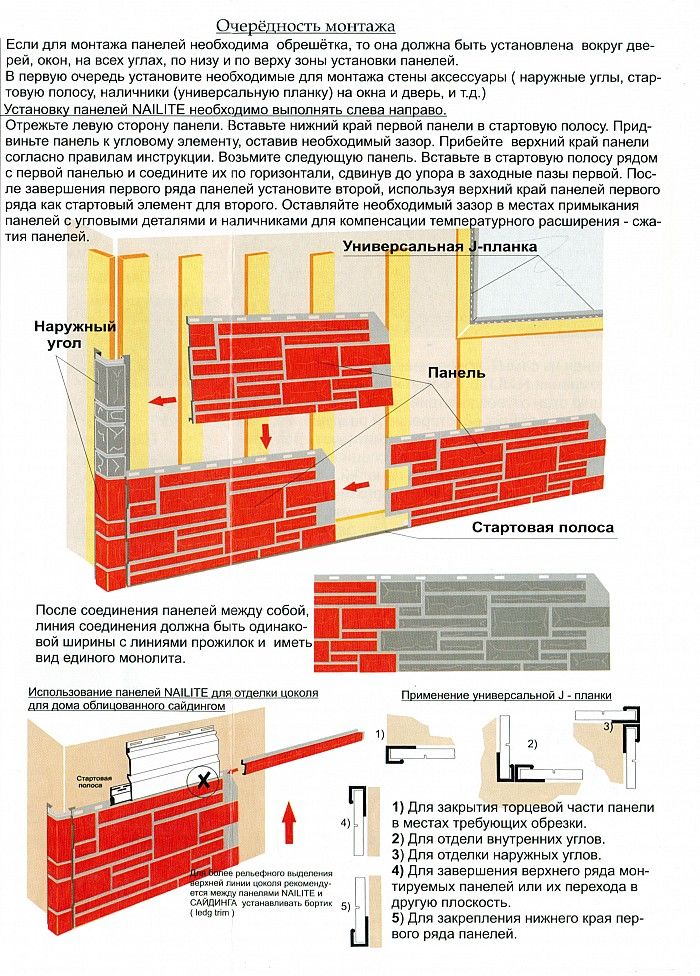
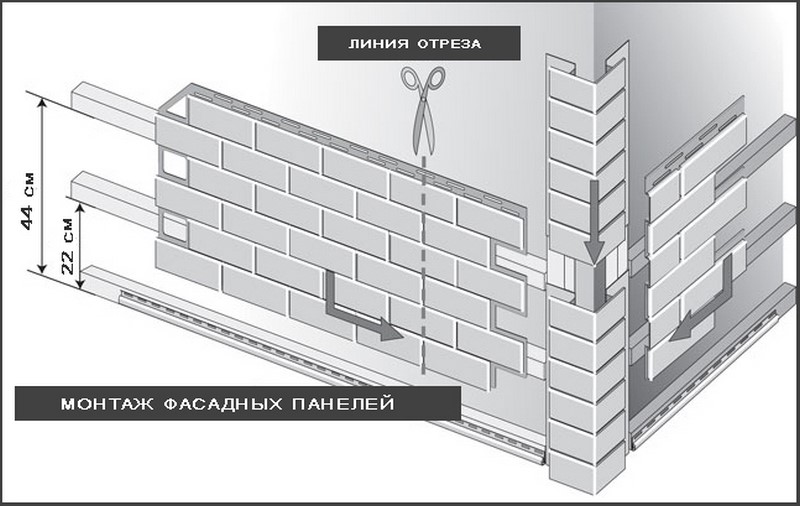
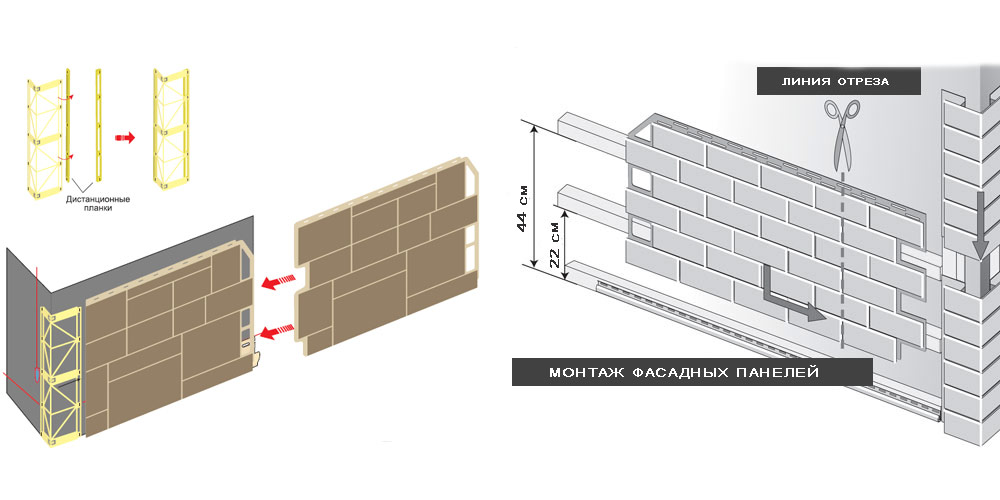
All work related to the installation of this type of cladding is carried out only from the bottom up. The length of the first and last slabs is calculated according to the length of the facade. If necessary, the left side of the profile is cut at right angles. Its lower part is attached to the starting profile according to the instructions. Each next slab is inserted into the previous one and fixed on the crate.
| If, when facing the facade, it is necessary to create an imitation of brickwork, all subsequent rows of panels are shifted by one brick. |
Finishing corners
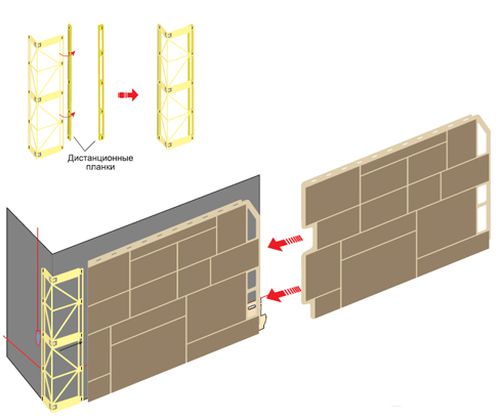
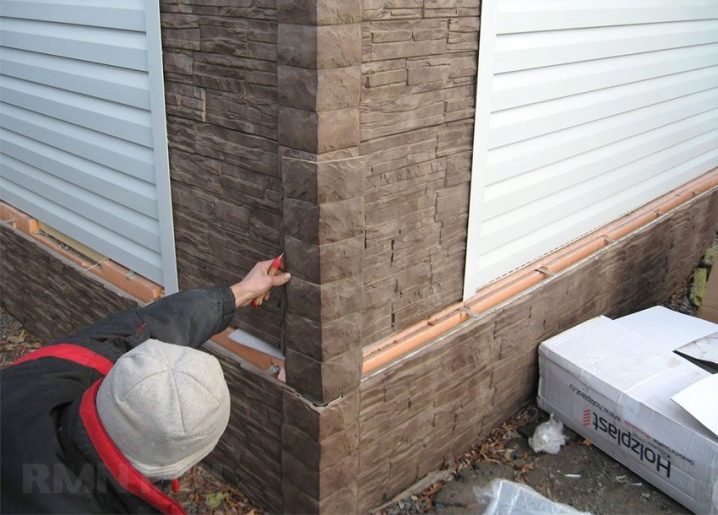
Corner sections of the profile are installed on the starting strips and fixed with self-tapping screws, while closing the facing profile by 15 mm. The distance to the inner edge of the corner should be about 12 mm. Corner strips are installed following the installation of each row of cladding material.
Earlier, we have already written about the benefits of Block House cladding panels and recommended bookmarking the article.
In conclusion, let's summarize
Docke-R external facing material meets all the requirements of modern construction. It has a flawless appearance and has all the quality indicators.
With proper installation, the facade of the house will not only attract attention, but also keep the load-bearing walls in proper condition throughout the entire operational period, which is at least fifty years.
 Docke-R facade panels rightfully occupy a leading position in the market of finishing materials
Rate the material
Rating: 5 out of 5 Votes: 1 Views: 17597
Peculiarities
Docke is a recognized leader in the production of polymer-based finishing materials. The production facilities of the company are located in Russia, thanks to which it was possible to establish fast deliveries to the CIS countries and neighboring countries. Modern equipment and the use of the latest developments allow the company to create a high-quality, but budgetary product that has many advantages. Docke facade panels are an excellent opportunity to insulate a building and give it an aesthetic look. Docke façade siding for walls and foundations of buildings is manufactured using the extrusion method. The prepared plastic mass is pressed through special forming holes, forming future panels.
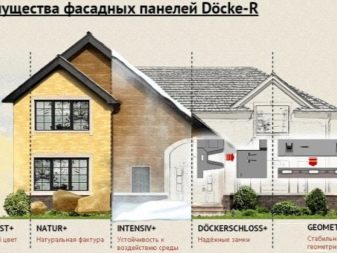
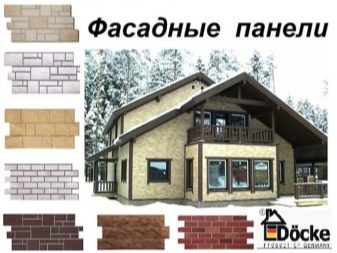
The products of this company are distinguished by two layers. The inner layer of the products has strength, rigidity, and is responsible for the durability of the plates. The function of the outer layer is decorative. With the help of the outer layer, the appearance of the future facade is formed.The outer layer is water-repellent, UV-resistant and resistant to mechanical stress.
The production has a special quality control system, so that the products go on sale without the slightest marriage. Products are manufactured on modern equipment using the latest technologies. The company's products meet European quality standards, so the excellent quality of the panels is guaranteed. Polyvinyl chloride is used as the main material, which is characterized by durability and strength. It is thanks to its strength properties that the panels keep their original shape and color for a long time.
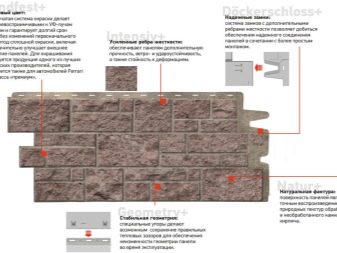
Facade panels Docke-R
|
 |
Advantages and disadvantages
Like any product, Dockes have their pros and cons.
The advantages of this product include such features as:
- the service life of the products of this brand reaches up to 50 years. With proper care and adherence to the rules of operation, they will not need to be repaired throughout the entire shelf life;
- installation of panels can be carried out at any time of the year, regardless of weather conditions;
- panels are able to withstand light mechanical stress;
- resistance to high temperatures and ultraviolet rays;
- Docke products do not burn, but they can smolder with a strong flame;
- do not contain toxins, can be installed even inside buildings;


- not subject to decay and corrosion, resistant to moisture;
- panels are protected from the attention of rodents, so they can be installed even in private houses;
- a special installation system ensures ease and simplicity of installation, thereby speeding up the process;
- no mold or moisture build-up under the Docke wall panels;
- the facade faced with these products is not afraid of the wind, since the panels are securely fixed;
- the siding design is quite realistic.
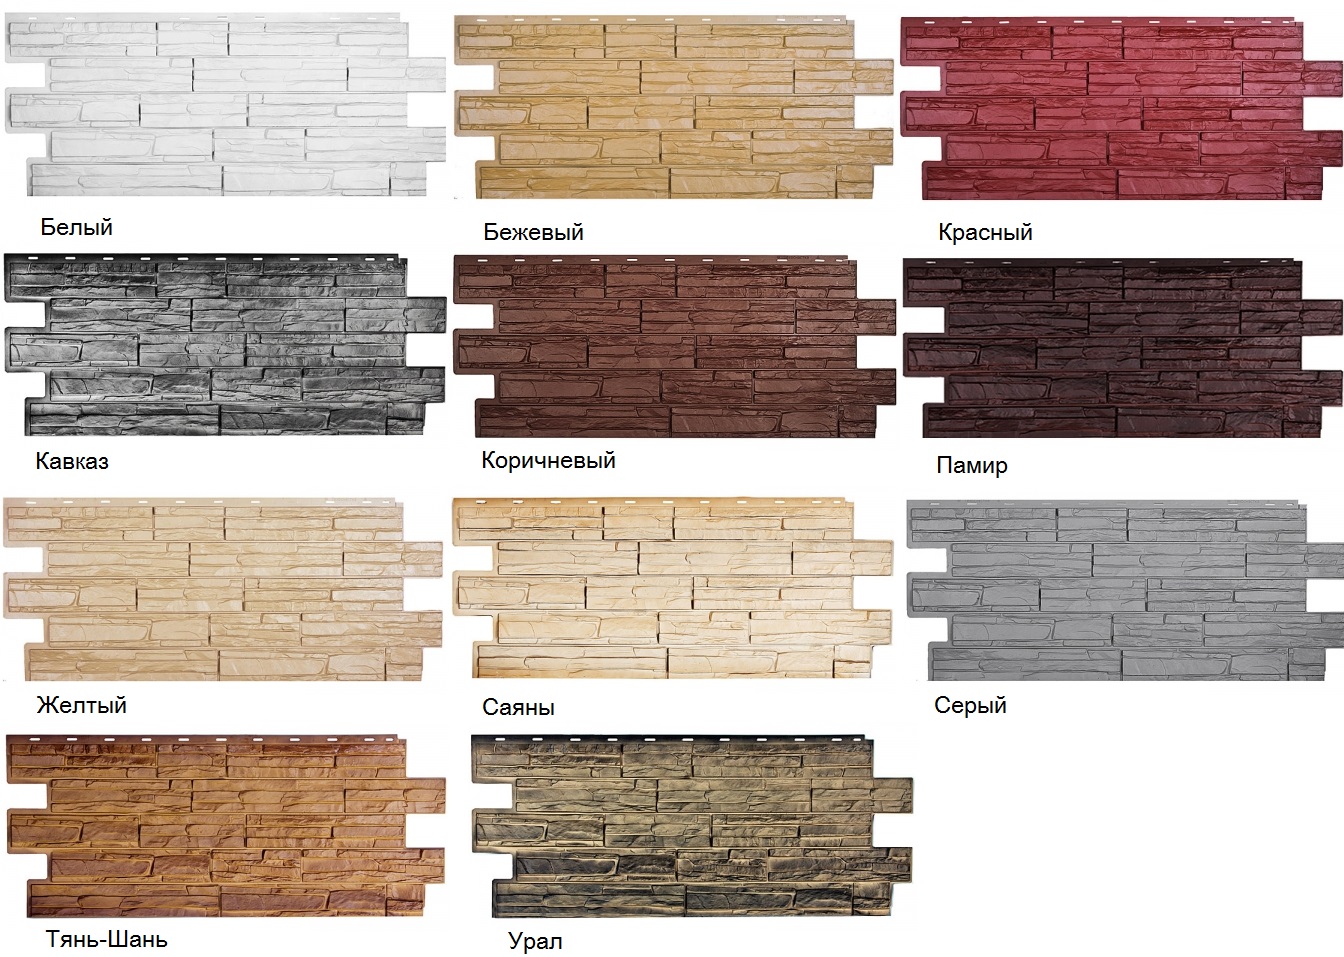
Series, colors and medium colors
Docke
sold in numerous series, differing in color and texture.
A distinctive feature of this material lies in the imitation of expensive and
natural materials.
|
Name series |
Available colors and other parameters |
Average price |
| Klinker |
Panels presented by clinker brick siding. They come in a variety of colors. |
445 rub. |
| Flemish |
This series is a novelty on the market, imitating a brick. The panels are available in beige and yellow tint. |
300 rub. |
| Berg |
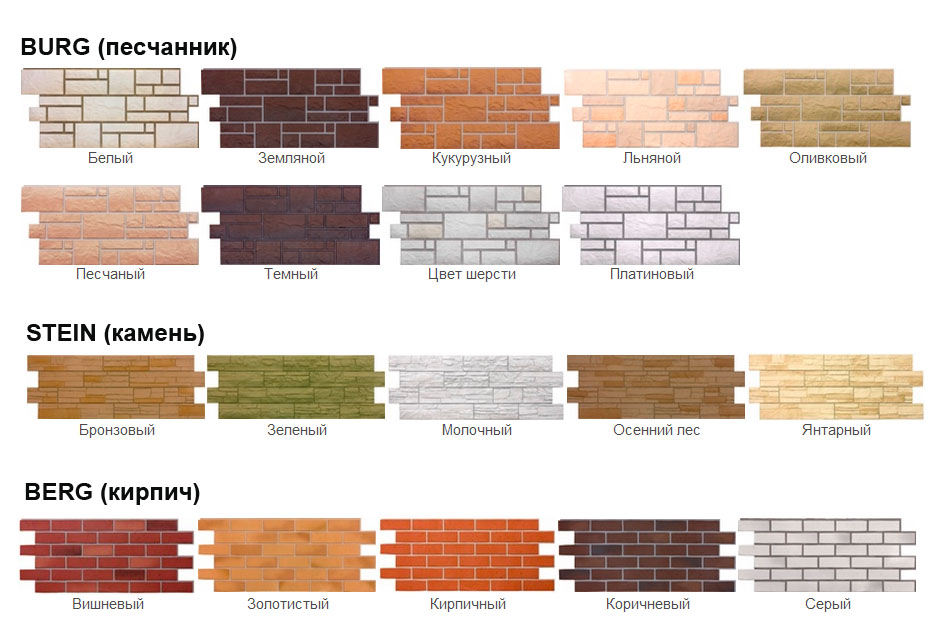
Useful the area is 0.44 sq. m. The texture repeats the appearance of brickwork. You can choose from cherry, gray, brick, brown or bright gold. |
435 RUR |
| Burg |
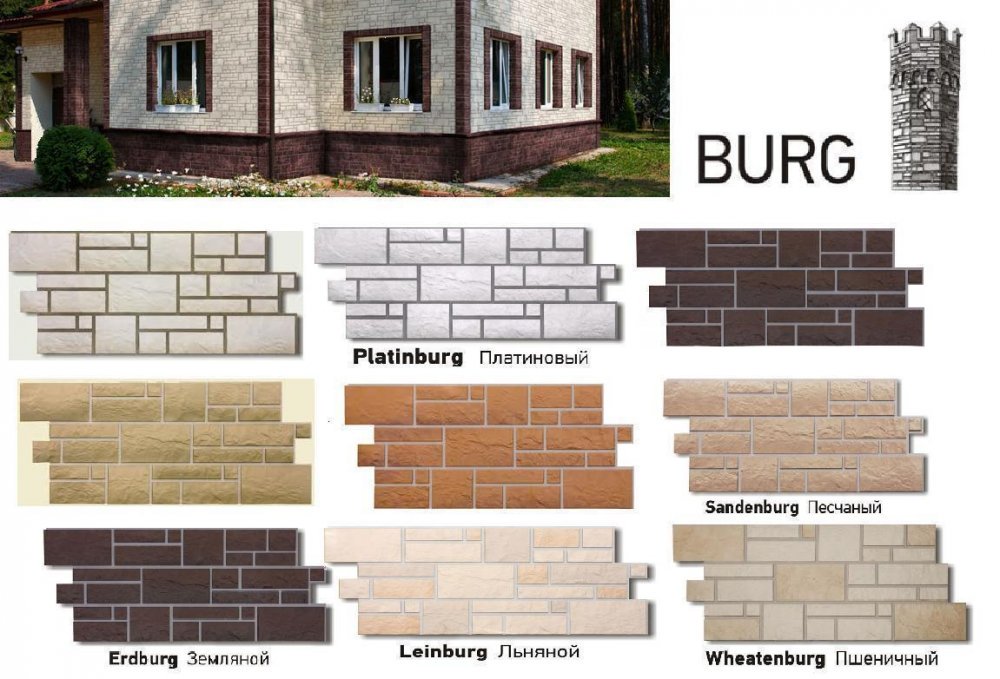
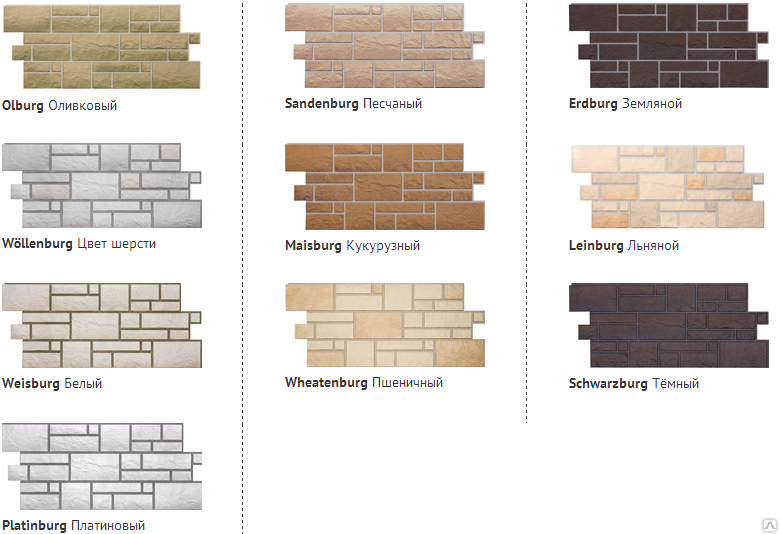
Decor represented by an imitation of processed natural stone. Is selected olive, wheat, sandy, linen or light platinum color. |
457r |
| Edel |
Material suitable for cladding the basement and walls of the house. Available in four colors: beryl, rhodonite, corundum and zircon. |
326 RUR |
| Fels |
Panels imitate the texture of natural stone. They are presented in colors: arctic, rye, mother-of-pearl, ivory and terracotta. |
481r |
| Stein |
Products imitate a simple slate stone, therefore they are suitable for different buildings. The panels have different rich shades, which include colors: dark walnut, amber, anthracite and basalt. |
481r |
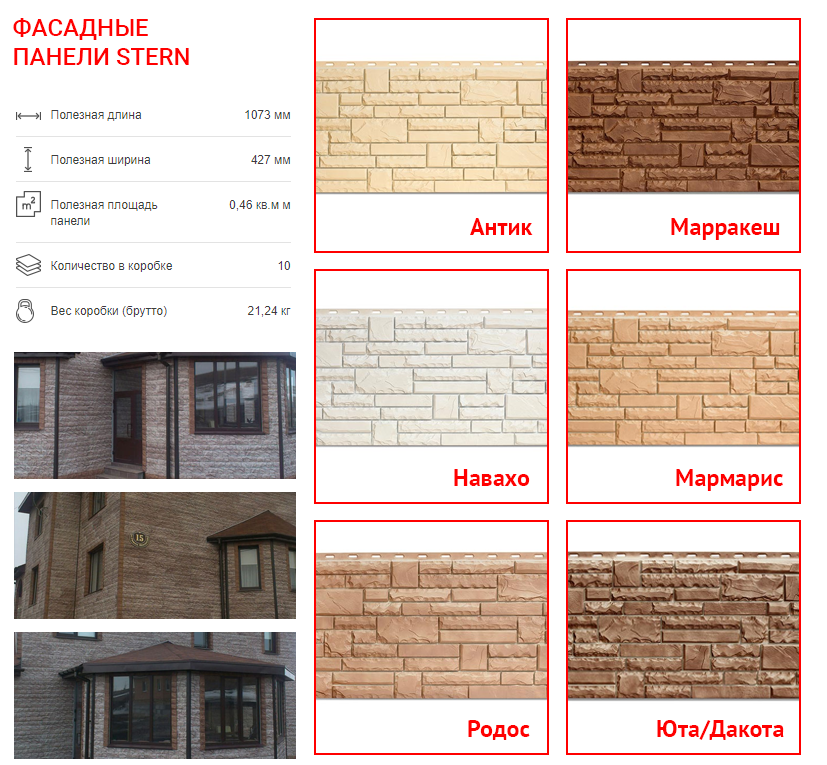
| Stern |
This the ruler imitates a natural gerbil. The panels are presented in amber, milky, bronze or dark nut color. |
456 RUR |
Whatever
from the available colors and textures, all panels are highly reliable and
meet quality standards.
 ?????????????????????????????????????????????????????????
Preparation of the facade and lathing
|
Docke-R plinth siding is performed at temperatures above -15 ° C. The panels can be installed on any kind of wall. They are used for new, under construction, restored buildings. Before the cladding begins, the preparation of the facade must be completed, including:
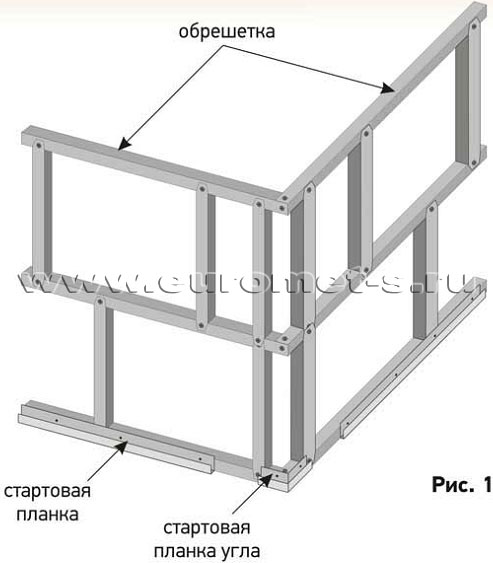
For fastening the front panels, a wooden or metal crate is used. For wooden lathing, the planks are pre-treated with fire-retardant protection. For metal lathing, galvanized steel profiles are used. Euromet engineers remind that the horizontal crate is assembled for vertical installation of panels, fastening of the starting and J-profiles. Corner pieces and upright siding are attached to the horizontal battens. The battens are placed with a step corresponding to the dimensions of the cladding elements. The lathing should form a flat, level surface. |
 |
Installation features
Docke facade panels have the property of expanding and contracting with temperature changes, therefore, when starting installation, this feature should be taken into account.
Following the instructions of specialists, the installation of siding can be done by hand.
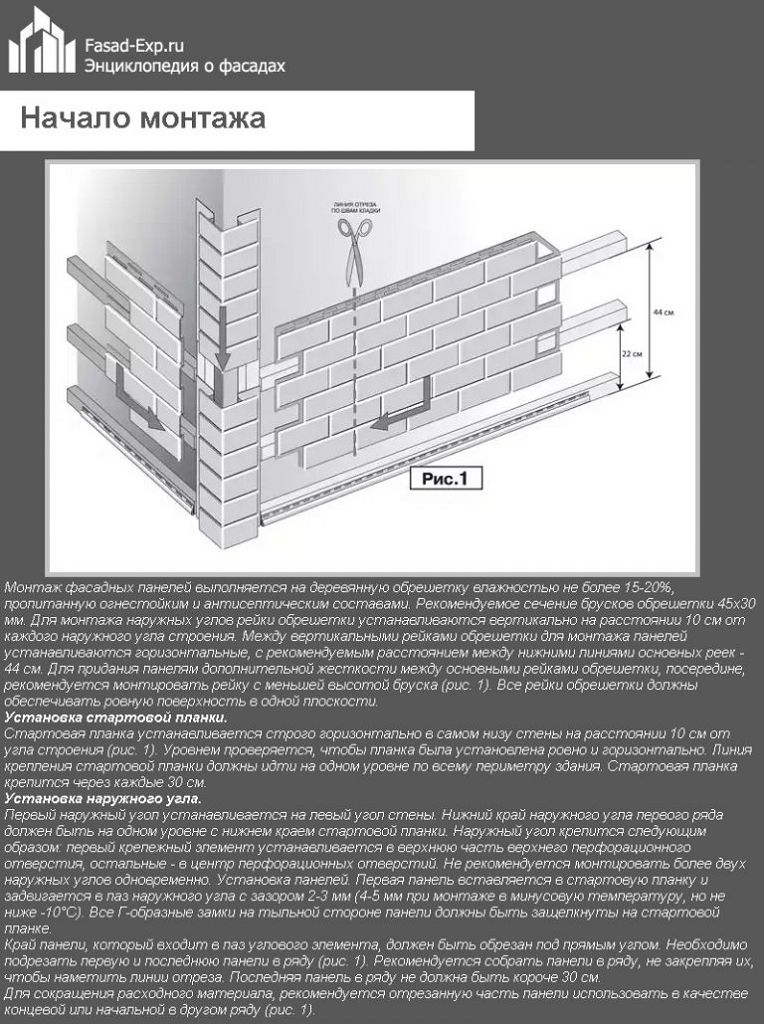
Installation of panels should be carried out strictly from left to right and from bottom to top. The first panel is installed in the starting plate, the next one is attached on the right side, making sure that the locks fit exactly into the groove. They are laid in rows: first the first, then higher and higher, rising to the ceiling. You can proceed to the next wall only after finishing the facing of the first one.
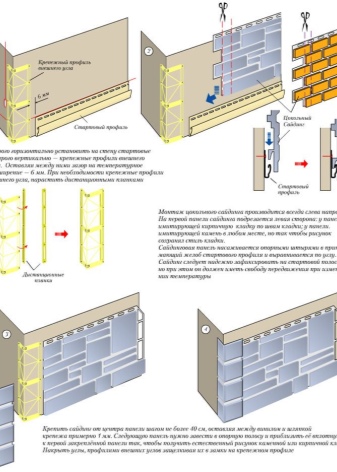
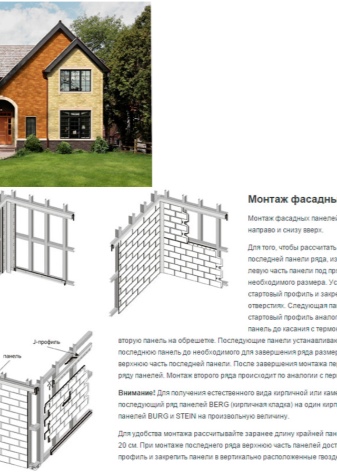
Installation of the starting bar begins with determining the "horizon" - the lowest and highest point on the surface. The starting bar is installed around the perimeter of the entire area
Note that the start and tail of the profile must match perfectly.
Installation of the lathing. It is allowed to use a wooden beam or a galvanized profile
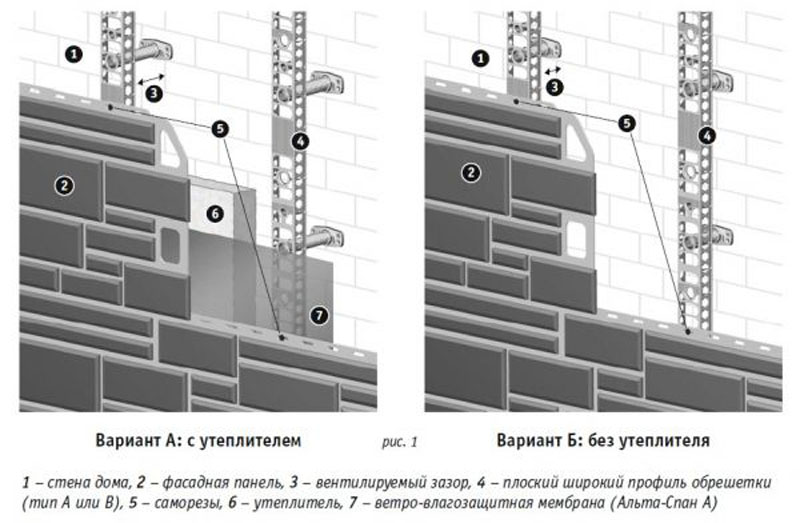
Most experts recommend opting for metal, as it is more durable and reliable. First, the guides are installed, and after the rack-mount profiles. The step between the ribs should not exceed 60 cm. The entire surface must be flat, otherwise there is a risk of curvature of the structure. If necessary, thermal insulation can be installed, securing it with a membrane.
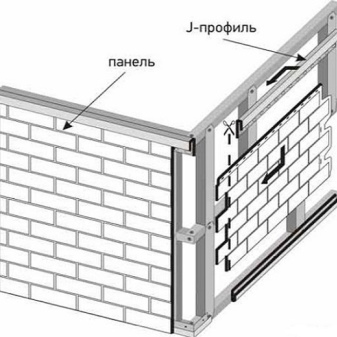
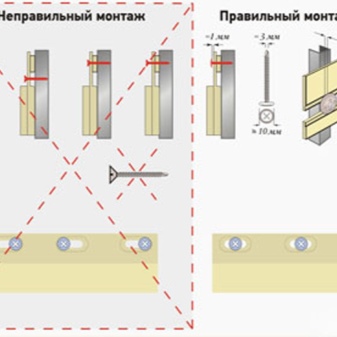
- Installation of the J-profile. It is required for finishing and interior corners. The quality of installation in this case depends on the correct fastening of self-tapping screws, which must be mounted in special holes. The profile should be set clearly to the corner and be perfectly flat. At the end, it is fixed under the roof canopy to the previously installed panels.
- The corners are mounted at the end of each row, attaching them to the top with self-tapping screws.
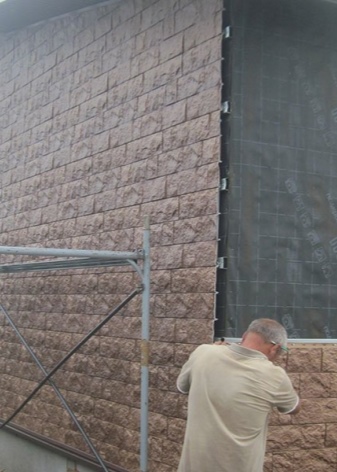
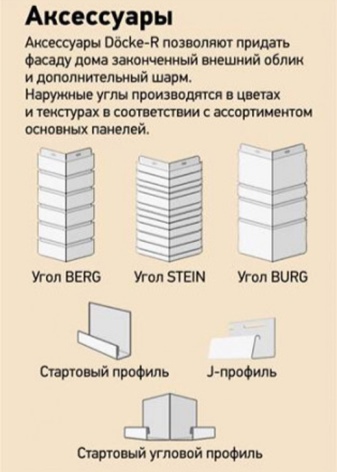
Deck facade cladding assortment
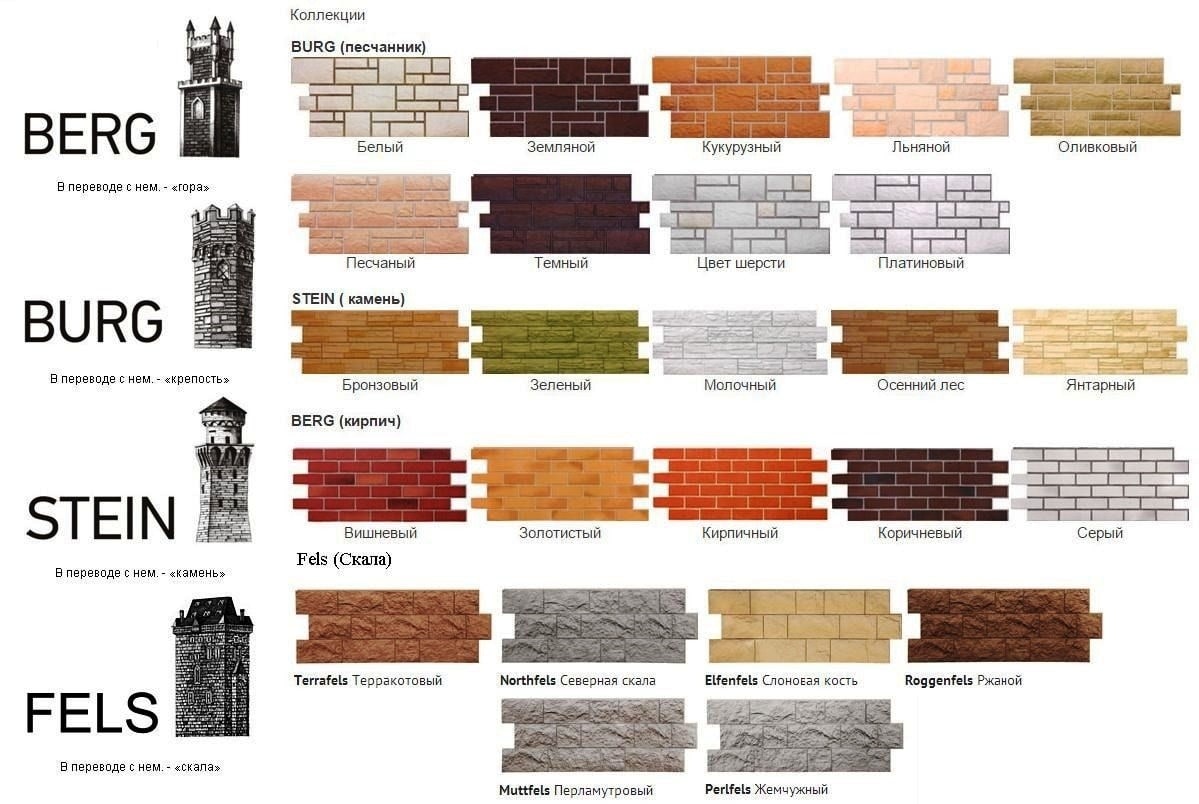
The range of the Döcke-R company includes 4 collections of facade cladding: Berg, Burg, Stein, Fels. The external surfaces of all collections are based on the materials used to build medieval castles.
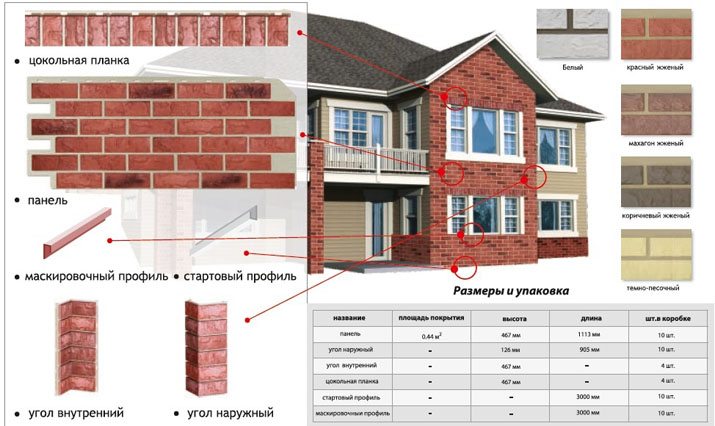
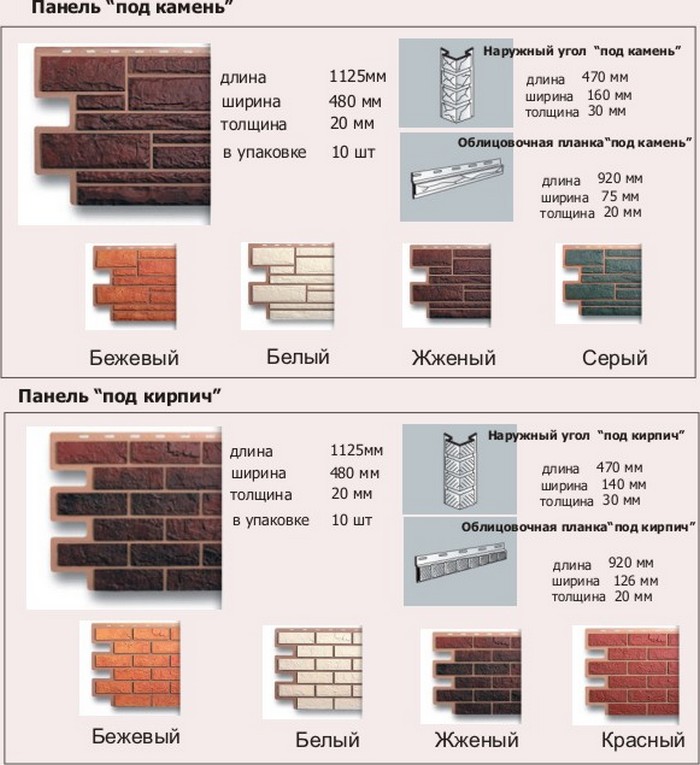
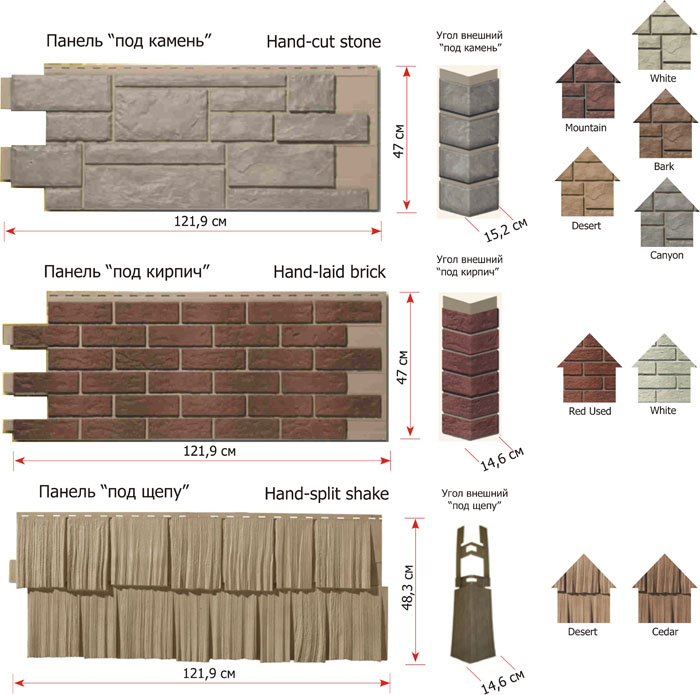
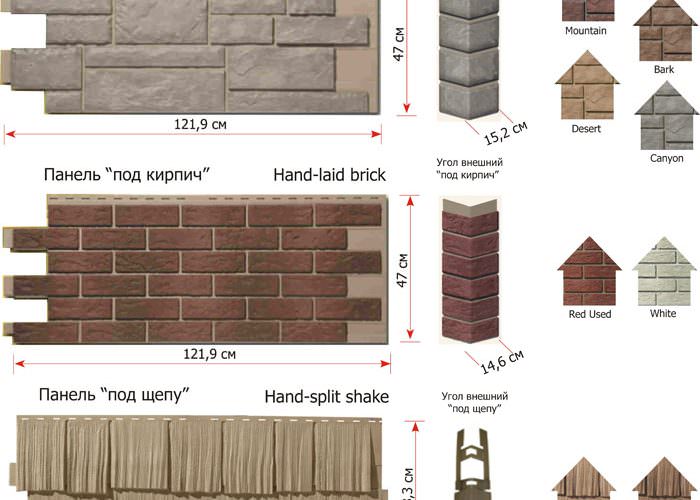
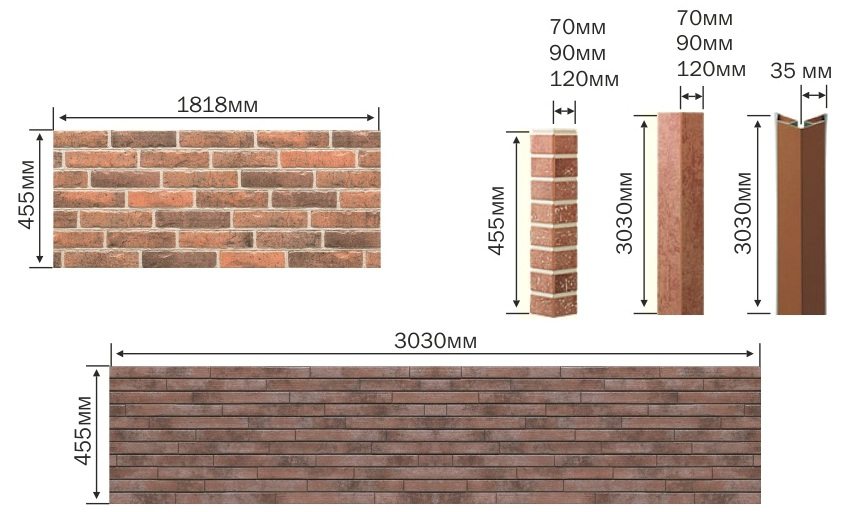
The Berg basement cladding ("mountain") includes 5 types of panels with a design of the external surface like fired brick. The color scheme is represented by colors: cherry, gray, golden, brick, brown. The texture of the siding looks like a natural brick.To obtain this effect, the developers of the Docke-R company have made molds using the method of three-dimensional scanning of natural bricks. The size of Berg panels is 1127 × 461 mm. The collection includes additional elements: starting corner profile, Berg corners, front J-profile 30 mm, universal borders, base strips and internal corners, starting profile.
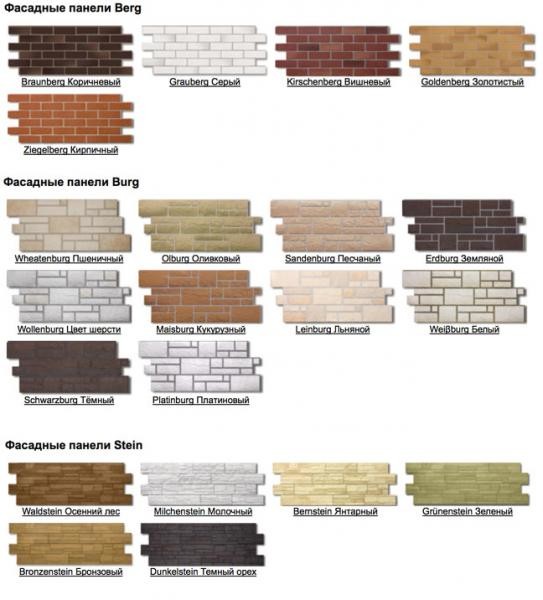 Docke range of facade panels
The plinth facade panels Burg ("castle") have an outer surface that imitates natural hand-cut stone. The collection palette includes 10 colors. Material dimensions - 1072 × 472 mm. The panels are packed in boxes of 10 pcs. To carry out installation work, the collection is completed with additional elements: starting corner profile, B and rg corners, front J-profile 30 mm, universal borders, base planks and internal corners, starting profile.
The outer surface of the Stein polymer panels ("stone") repeats the pattern of sandstone. The collection is presented in 5 colors. The dimensions of the slabs are 1196 × 426 mm. The set includes additional elements: starting corner profile, Stein corners, front J-profile 35 mm, universal borders, base strips and internal corners, starting profile. The material is packaged in boxes of 10 pcs.
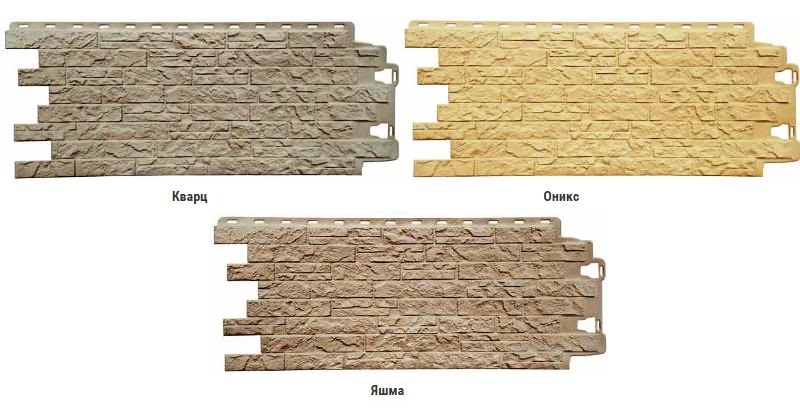
The collection of siding series Fels ("mountain" or "cliff") imitates rock formations. The series is made in 6 colors. Dimensions - 1150 × 450 mm. The set includes accessories: starting corner profile, Fels corners, front J-profile 35 mm, universal curbs, base strips and inner corners, starting profile.
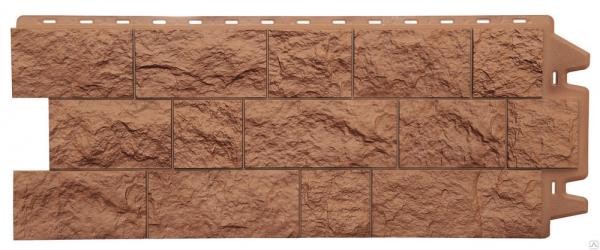 Fels series siding

