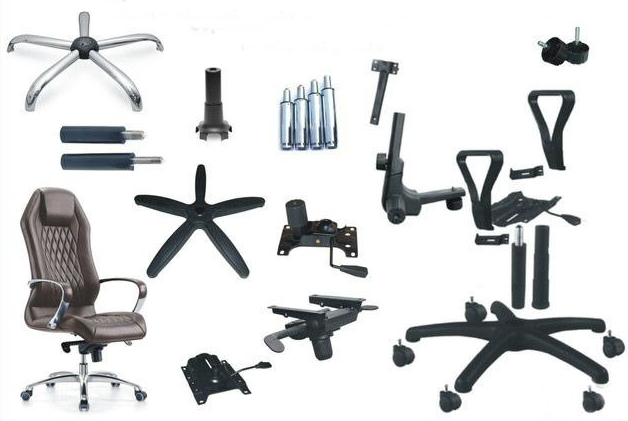
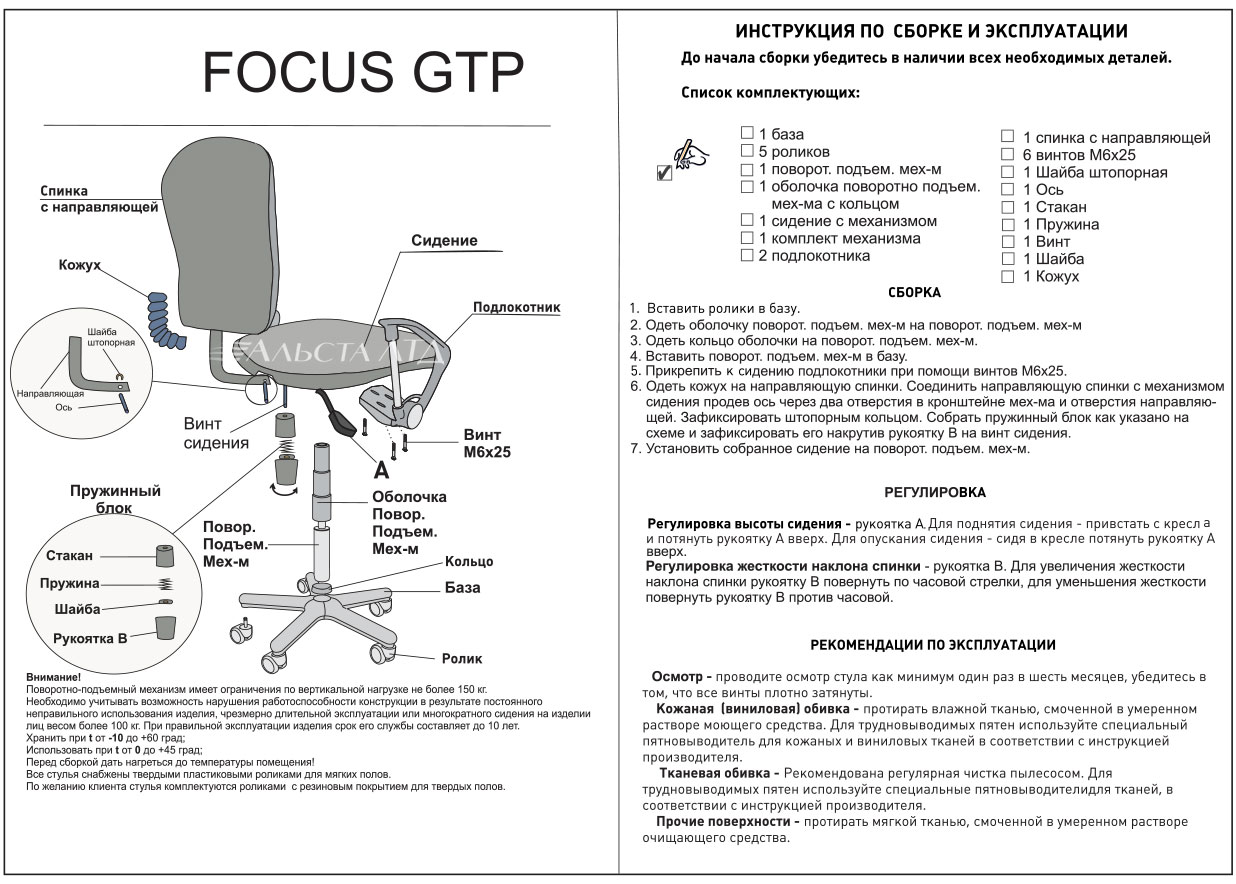
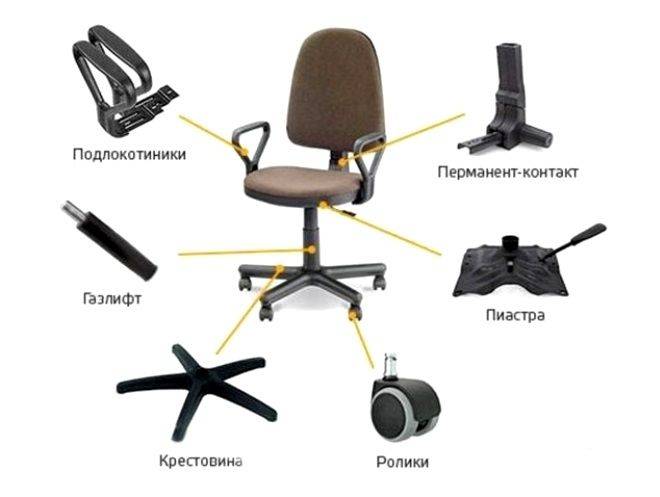
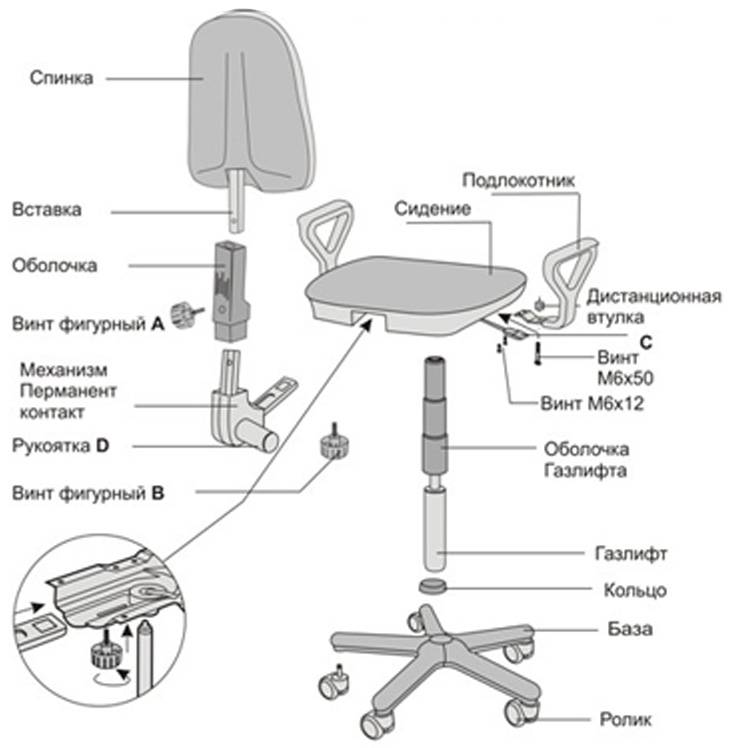
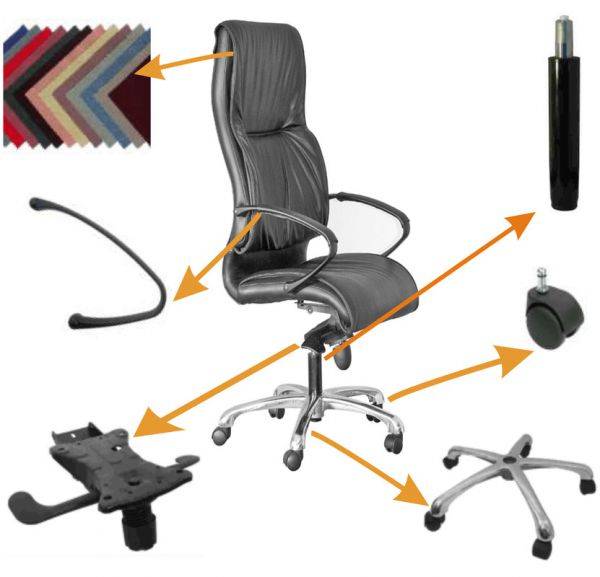
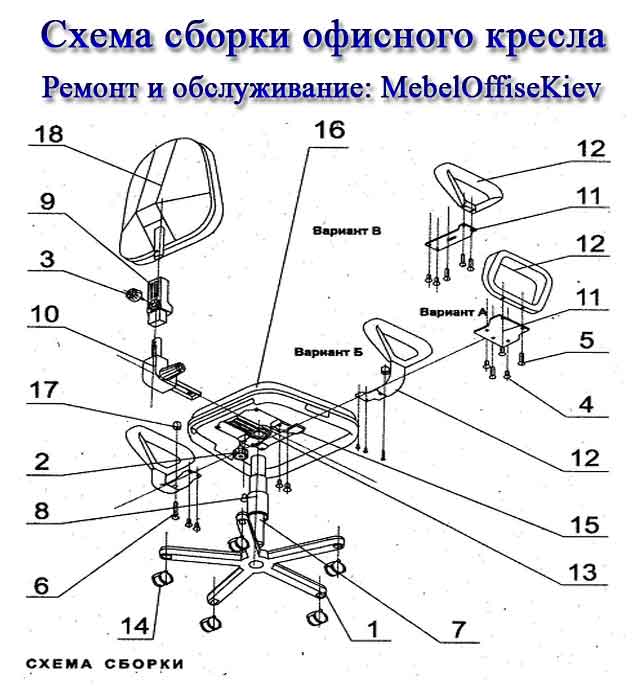
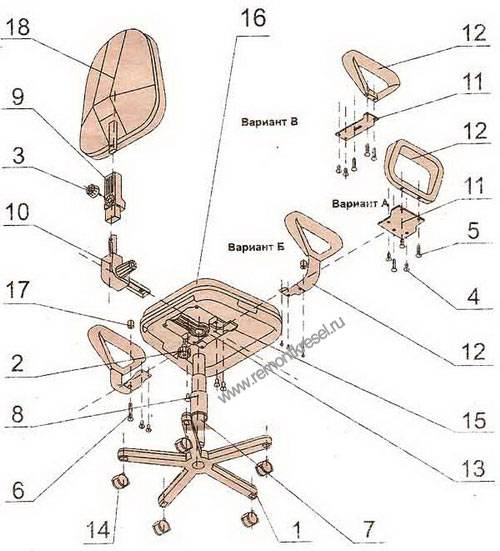
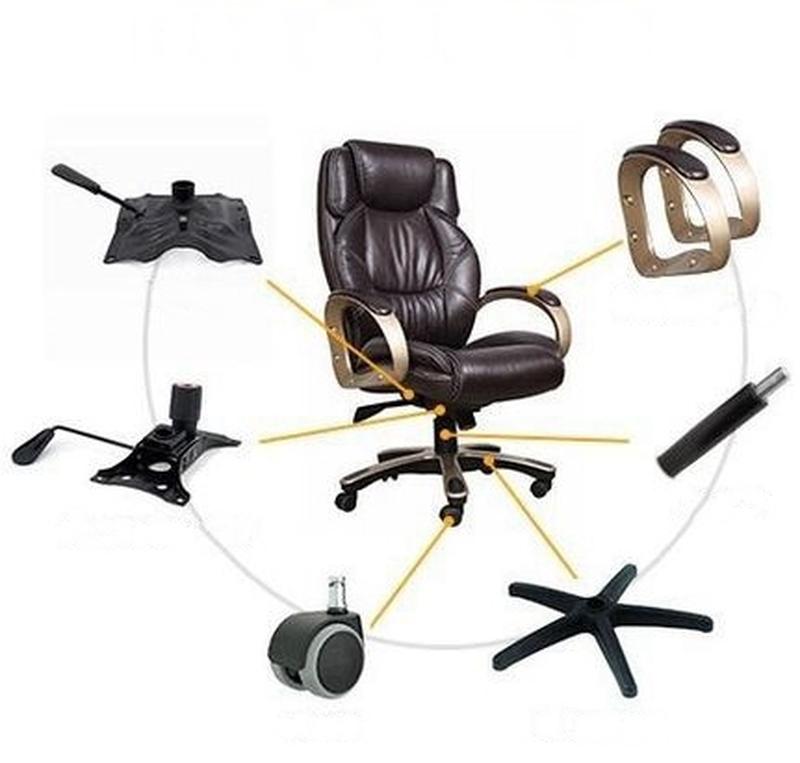
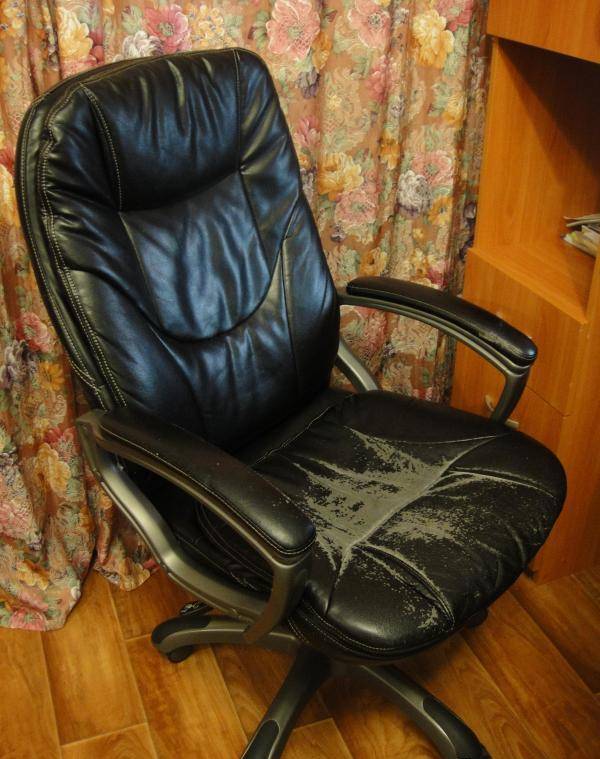
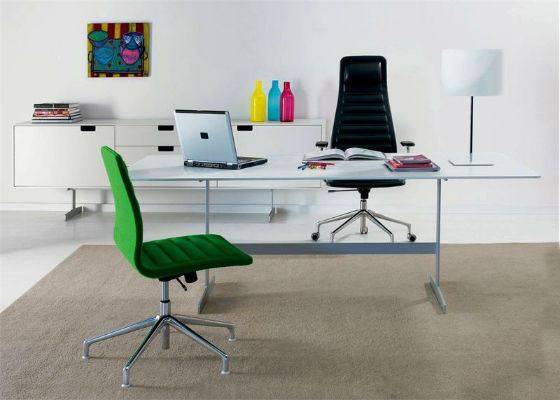
Design features
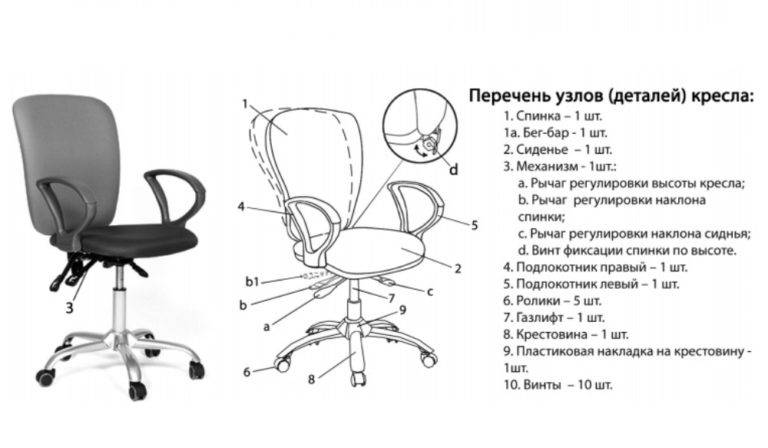
A high-quality office chair is a complex design, in the development of which various specialists took part - engineers, doctors, designers. The main elements are as follows:
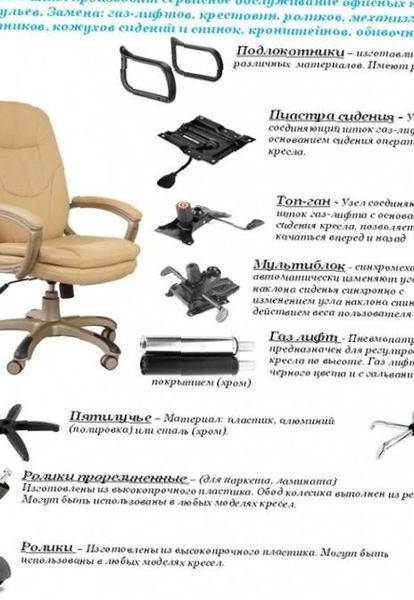
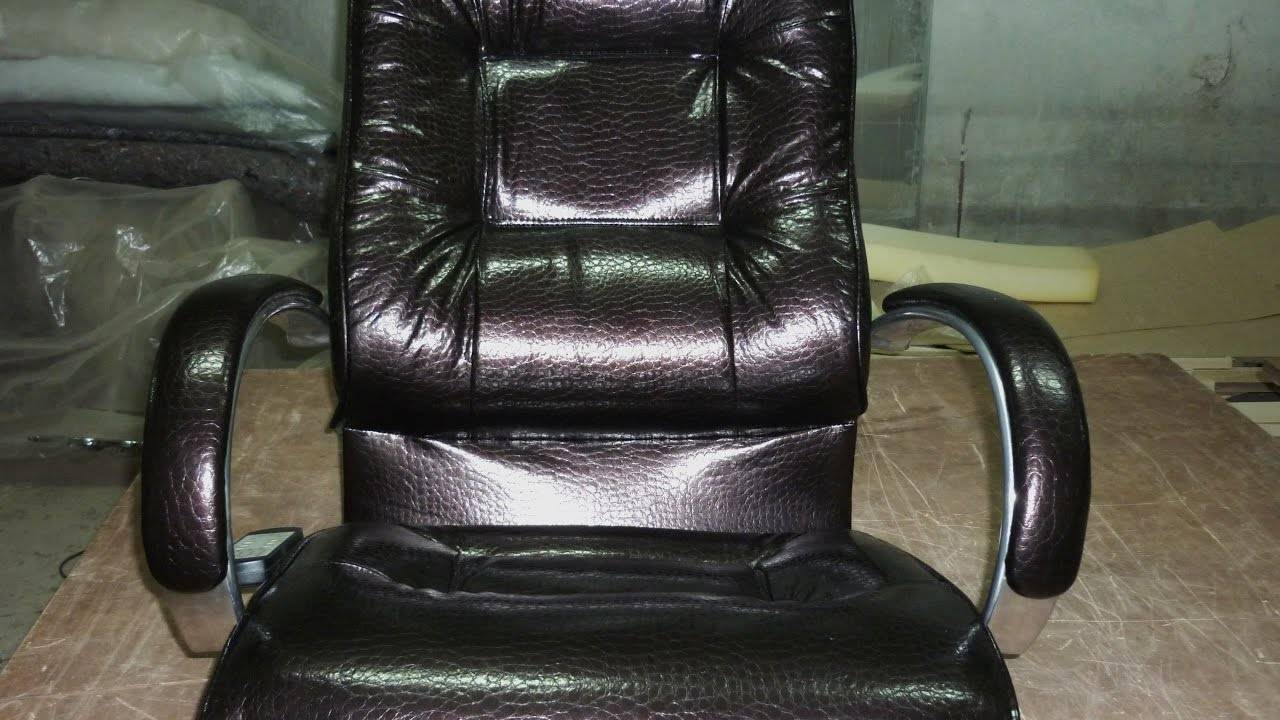
- Back and seat. Provides back support and seating comfort.
- Permanent contact. A component that connects the two previous elements and is responsible for changing the position of the back.
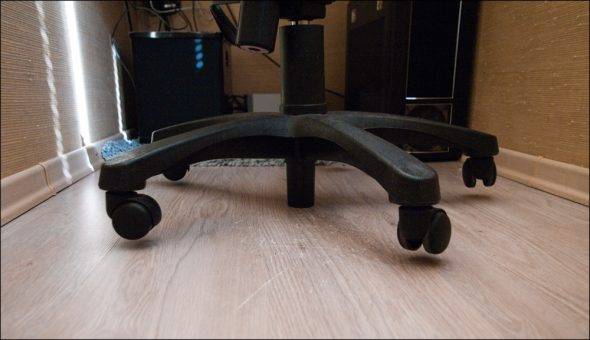
- Five-beam crosspiece. It is the base on which the entire load falls.
- Rollers. Elements at the bottom of the cross, which are responsible for the possibility of easy movement of the chair without damaging the floor covering.
- Gaslift. A shock absorber that guarantees the elasticity of the structure and allows you to adjust the height of the office chair.
- Armrests. They significantly increase the comfort of the seated person, especially if they are supplemented with soft pads, but this element is variable, not all models are equipped with it.
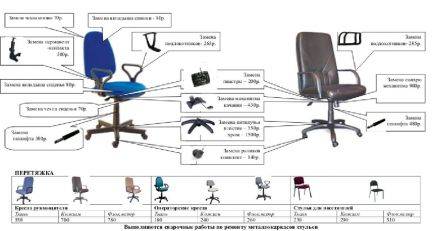
Despite the external similarity of all office chairs, they differ in types and models. The adjusting mechanisms also have their own differences, which are shown in the table.
| Spring-screw, or Freestyle (FDA) | It is characterized by an elastic spring under the seat, reliability and unpretentiousness. Able to change the position of the backrest and the degree of effort when deflected. The distance between the back and the seat can be adjusted. It is used in budget models together with piastra. |
| Piastre | Directions of work - only up and down. Used in tandem with FDA. |
| Top gun | The mechanism allows you to swing, like a rocking chair. Provides a deviation of monolithic seats in the range of 95-130 °. Ensures stability of the chair even at the maximum tilt angle. |
| Synchronizing mechanism | The device is reliable and very durable, with precise positioning of the chair. The set of functions - tilt and fixation of the back, height adjustment, setting the depth of planting. Under the weight of a person's weight, in automatic mode, it changes the angle of inclination of the seat. It is considered the most expensive mechanism. |
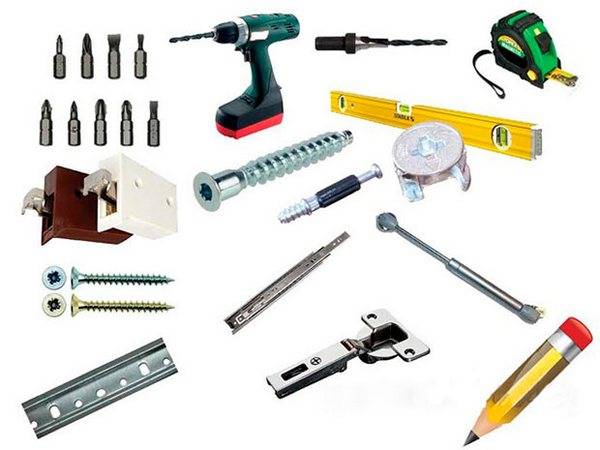
Required tools
Before starting work on disassembling the product, you need to prepare all the necessary tools. They are available from any home master. To dismantle the parts of the chair you will need:
- screwdriver;
- hammer;
- chisel;
- pliers.
If it is necessary to replace the gas lift, technical grease and a bolt with a minimum diameter of 10 mm (or slightly larger) can be added to this list. Instead of a screwdriver, it is more convenient to use a screwdriver. Having unscrewed the fasteners, you need to immediately fold all the fasteners into a box or tin can, since the loss of at least one bolt will deprive the repair of any sense.
Technical lubrication is needed to make parts easier to move away from each other. If the chair has served for many years, and it has never been disassembled, the fastenings gradually become denser, and then it is very difficult to separate them. At the end of the repair, remove greasy traces of oil with a soft cloth (for example, a piece of flannel).
If the crosspiece is made of plastic, in case of occurrence failure, it is recommended to replace it with a new one. New casters are usually installed at the metal base. Experts say that the least susceptible to wear is the crosspieces made of high-strength aircraft-grade aluminum. However, they are found only in expensive models.
 Instruments
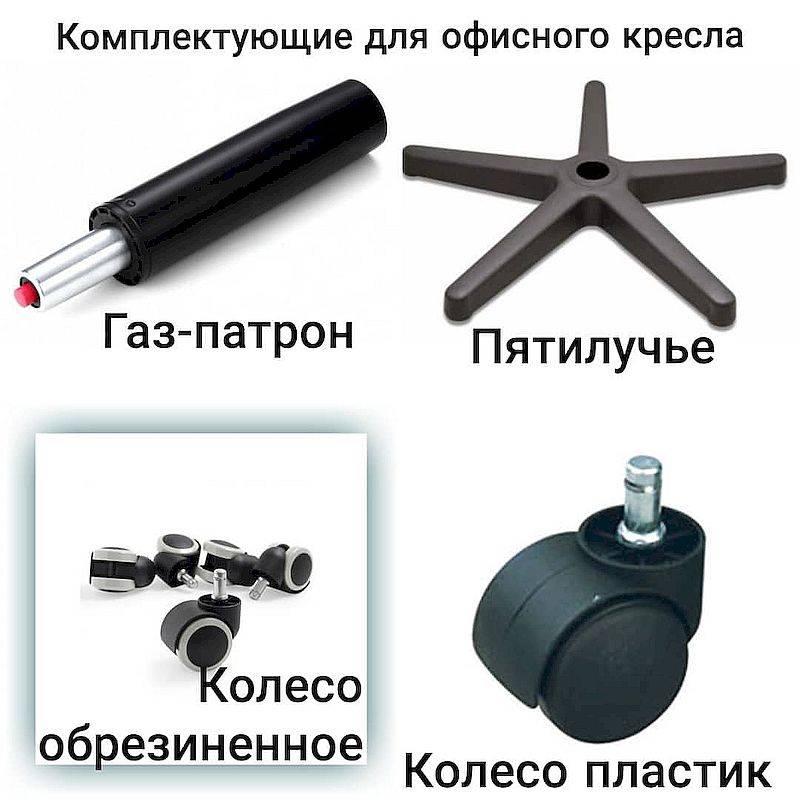
 Components
Tools and materials needed to repair the chair
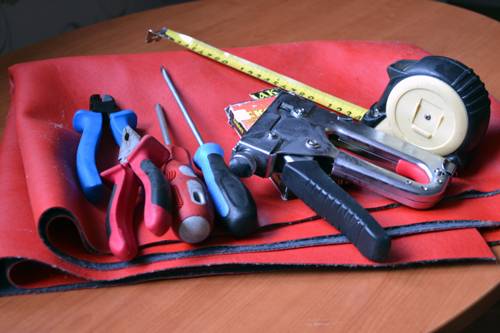
For repairs, upholstery upholstery, you will need, first of all, fabric, and not necessarily the same as that on the chair. If you have a leather armchair, we even recommend using a woven material. For example, upholstery tapestry fabric used to stretch sofas.It is quite dense and drapes well (corners are laid). In addition, the price of such a fabric is quite affordable, especially since the fabric only needs 70 cm, 150 cm wide. At least this chair took just that much fabric. But it should be borne in mind that fabrics with a geometric pattern, a strip needs to be "adjusted", so its consumption will be higher. But in any case, a 1 meter cut is enough for any standard office or computer chair.
From the tools you will need screwdrivers (flat and cross), tape measure, nippers and, without fail, a stapler and staples to it, 6-8mm long.
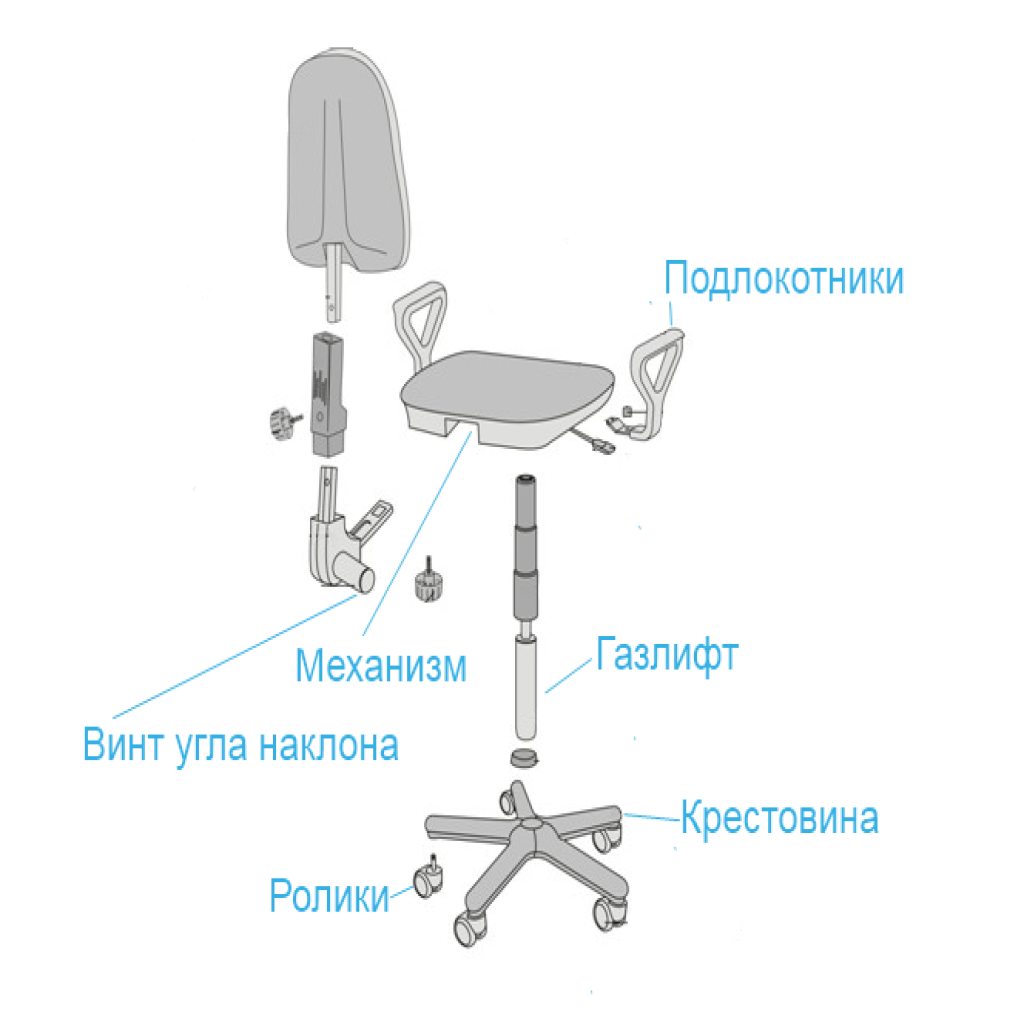
Design features
Despite the variability of designs and functional content, almost all chairs consist of one set of elements:
- Five-beam cross (base). This part is made of metal or plastic. The first option is of higher quality and more expensive
- Rollers. Just like the cross, the castors can be made of metal or plastic. However, the mount and internal hinge of any roller is metal.
- Pneumatic cartridge (gas lift). The part serves as a chair leg and is responsible for its "elasticity"
- The rocking mechanism contributes to the axial deflection of the chair and its fixation in one position. On expensive models, a mechanism with an offset axis is installed, which provides the most smooth swing
- Piastra. This element is a metal platform with a lever. Serves to change the height of the seat relative to the crosspiece
- Permanent contact - an element that connects the backrest with the seat and is responsible for changing its position
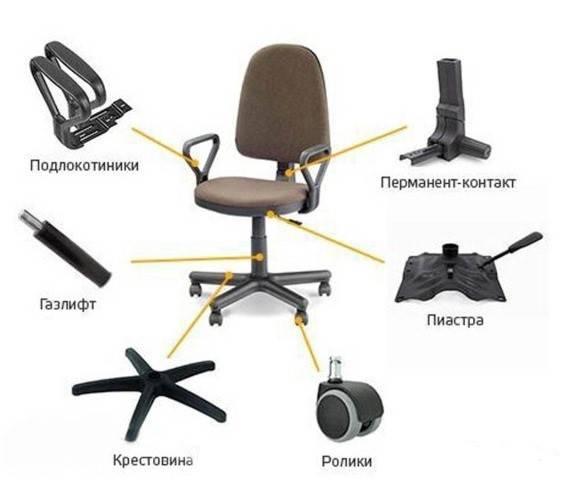
Most office chair models have armrests. In cheap models, these elements are made of plastic; in more expensive ones - from anodized or stainless steel.
Precautionary measures
The repair of the product should be as careful as possible, because some of the expensive parts are protected by a thick layer of grease.
Replacing the crosspiece on an office chair with the observance of precautionary measures will help the master significantly reduce the repair time. Key recommendations:
It is worth putting on rubber-coated fabric gloves on your hands and a protective mask on your face.
The surface of the floor or table where the repair will be carried out must be covered with old newspaper or oilcloth.
It is important to fix broken furniture firmly so that it does not wobble during repairs. A child or a fragile girl can even become an assistant.
Knock out the steel bearing as carefully as possible so as not to damage its complex structure.
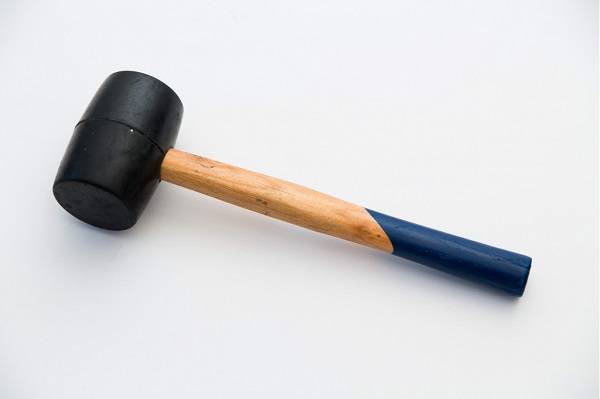
It is safer to remove the cross from the chair with a rubber or wooden mallet
The vapors of the penetrating liquid are quite hazardous to human health. If it is used, the room must be ventilated for 20-30 minutes.
In order for the chair to serve as long as possible after changing parts, it must be regularly looked after.
It is important to check the tightness of the connections every six months, inspect bolts and nuts. It is imperative to take into account the maximum load of the furniture, do not sit on it abruptly in order to avoid breakage of its elements
Summing up, we can say that removing the cross from a computer office chair is quite simple. To carry out the work, only a skilled man and simple improvised tools are needed. Self-repair will not take much time, but it will help to extend the life of the product and avoid large spending on new furniture.

Required tools
Most often, the crosspiece breaks in the area of articulation of the beams. It makes no sense to glue, boil or solder the part, because the base accounts for the bulk of the load, and such repairs will not save the day. It is advisable to replace the crosspiece with a new part. To do this, you will need the simplest tools that any home craftsman has available:


- flat screwdriver;
- hammer (mallet);
- circular drift (desirable);
- adjustable wrench (for gas lift repair);
- hex keys.
If the chair is operated for a long period of time, then the gas lift will sit down firmly enough. A special lubricant for hard-to-remove fasteners will help to facilitate the repair process. If this is not available, it is recommended to use:
- vinegar essence;
- kerosene or VD40;
- soap solution.
Any of the specified agents must be lubricated, wait about 10 minutes. If the crosspiece is plastic, and the repair is carried out in winter, the furniture can be taken out into the street to cool down. As a result, the part will shrink, this should help.
 Kerosene
 Preparing a soap solution
 Circular drift
 A set of keys
 Vinegar essence
 WD-40
WD-40
Dismantling the chair
Before starting work, you need to disassemble the old chair and see what is inside it.
As a rule, this is a wooden frame, foam rubber on the back and a seat. It is held in place by rubber or textile straps.
Also in the composition of the components we see legs, armrests (polished or under the fabric). The back wall of the chair is fixed with plywood. That's probably all.
After parsing:
- We determine what is to be replaced. We carefully knock out all the spike parts with a rubber hammer so as not to damage the edges and keep the polish.
- We clean the grooves with a scalpel or a knife with a thin sting so that there are no glue residues inside.
- We coat the spike parts with PVA glue, after which we wind the bandage directly onto the spike.
- We carefully hammer everything into place and wait for a day to dry completely.
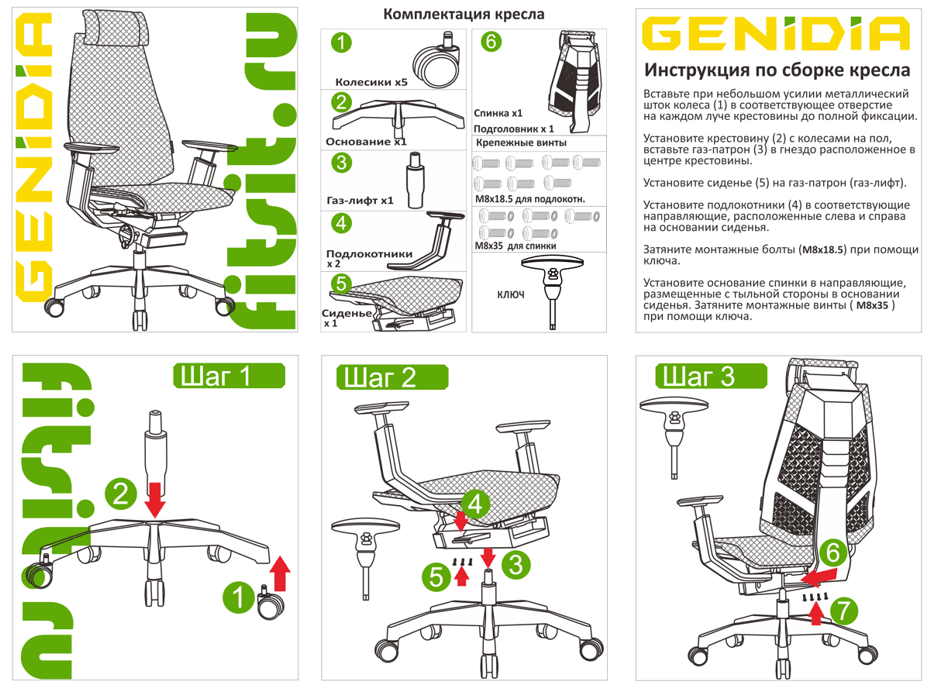
Assembly instructions
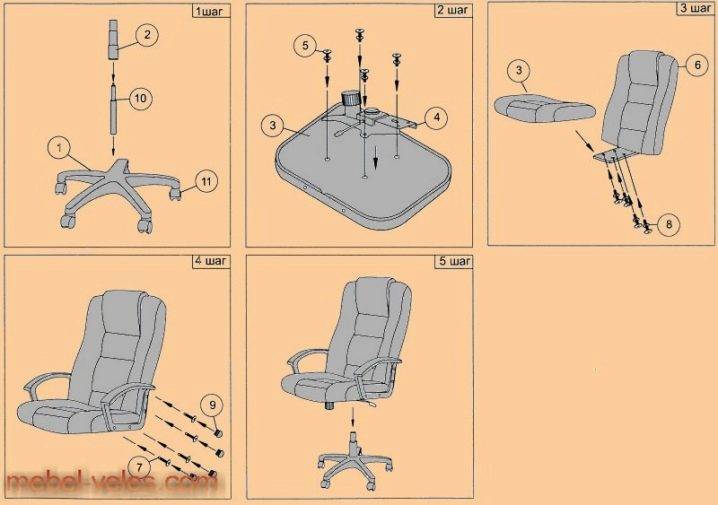
In order for the computer chair to serve for a long time without any breakdowns or extraneous squeaks, during the installation process, all manipulations must be carried out in stages, as prescribed by the assembly instructions. For the independent performance of all work, a minimum set of tools and elementary skills in handling them are sufficient.
Installing rollers into slots
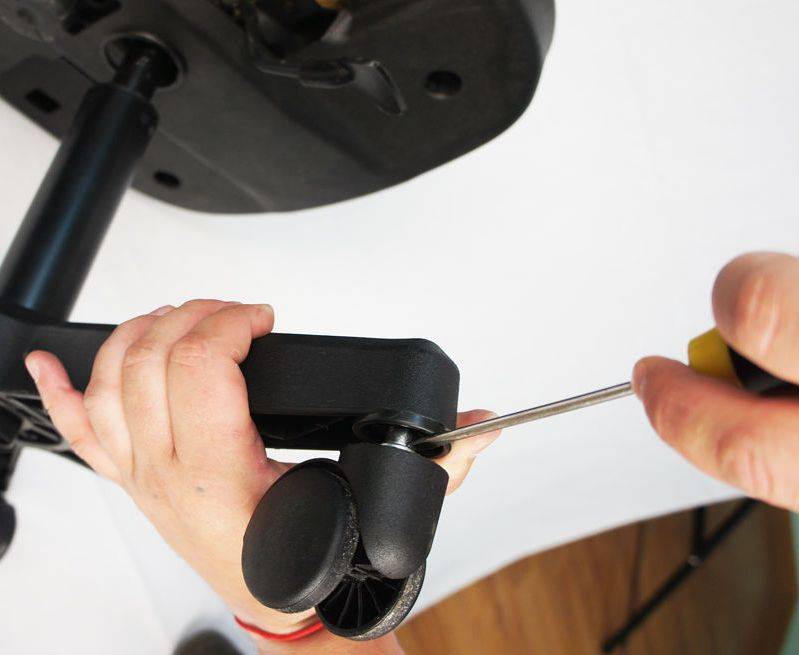
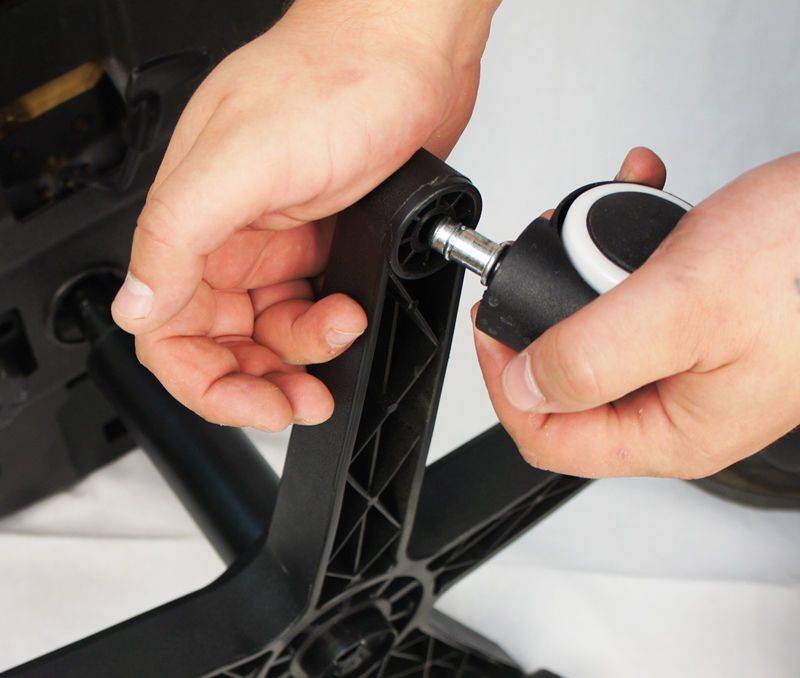
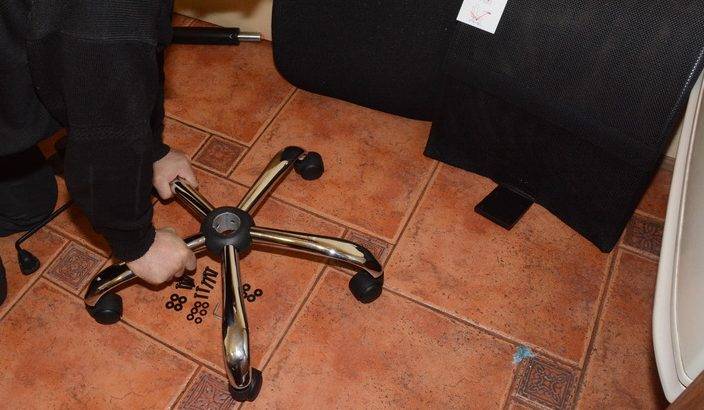
The most convenient way to start assembling an office chair is to mount the castors. Placing them in the sockets of the cross is easy:
- For convenience, the star-shaped part is best placed on a horizontal surface, such as a table or floor, with the holes facing up.
- Then insert the roller rods into the seats and press on each wheel until a characteristic click occurs - in this case, fixation will occur. If the strength of your hands is not enough, you can use a rubber hammer - with this tool it will become easier to complete the task.
- When all the roller supports are finished with, it remains to put the cross on the floor, and then press on it with the whole body of the body, which will help to check the reliability of the wheels fixation. This completes the assembly of the support.
 Turning the crosspiece
 We insert the rollers into the slots
 We check for strength
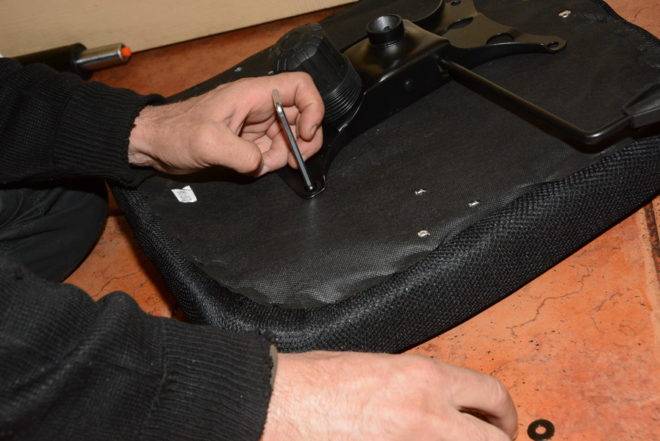
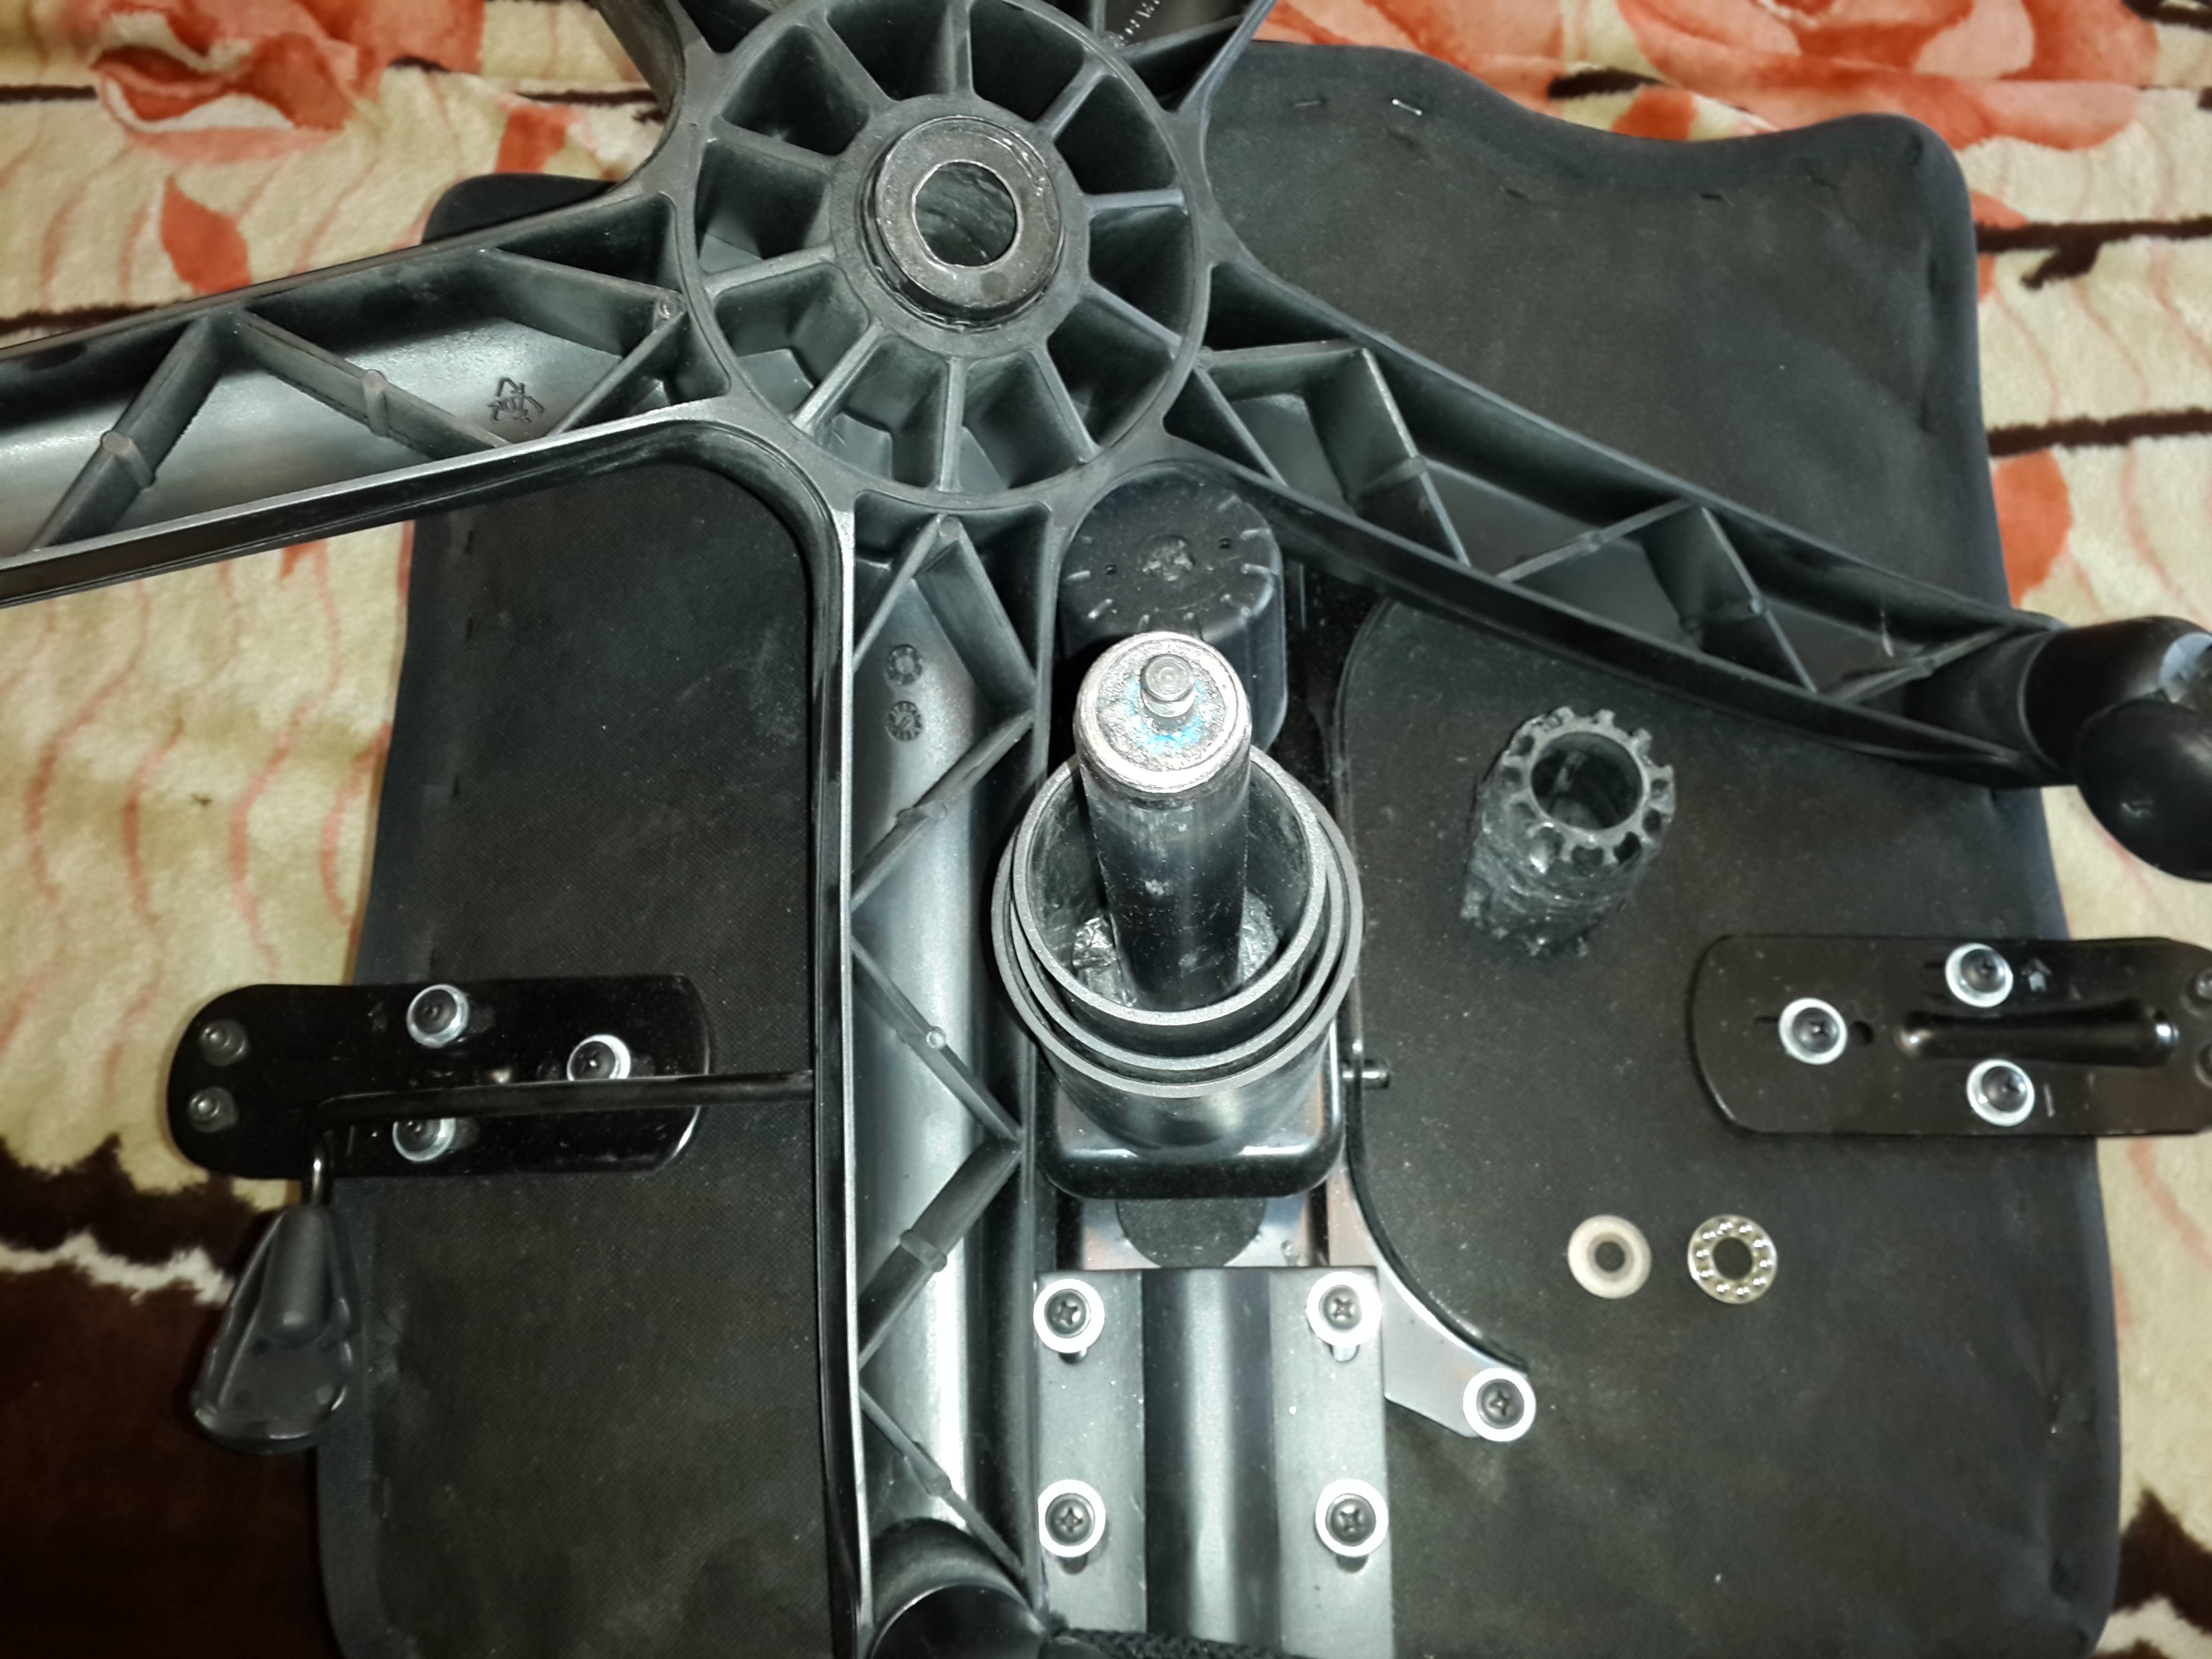
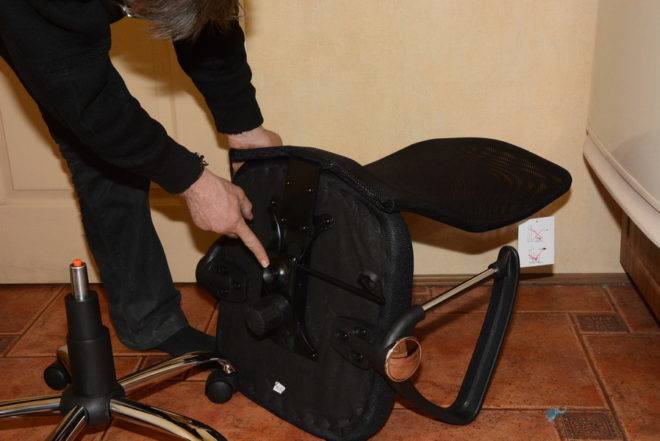
Seat preparation
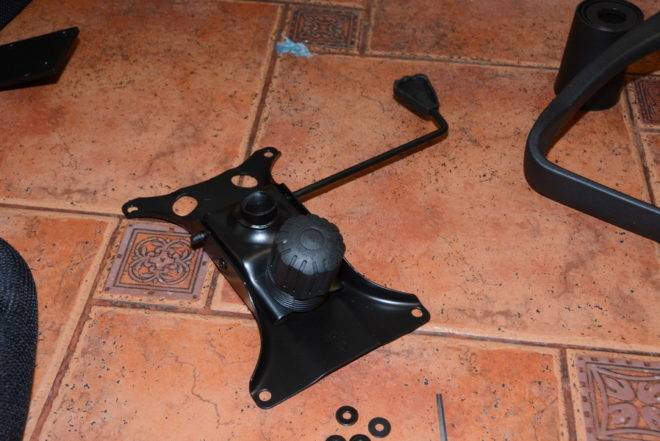
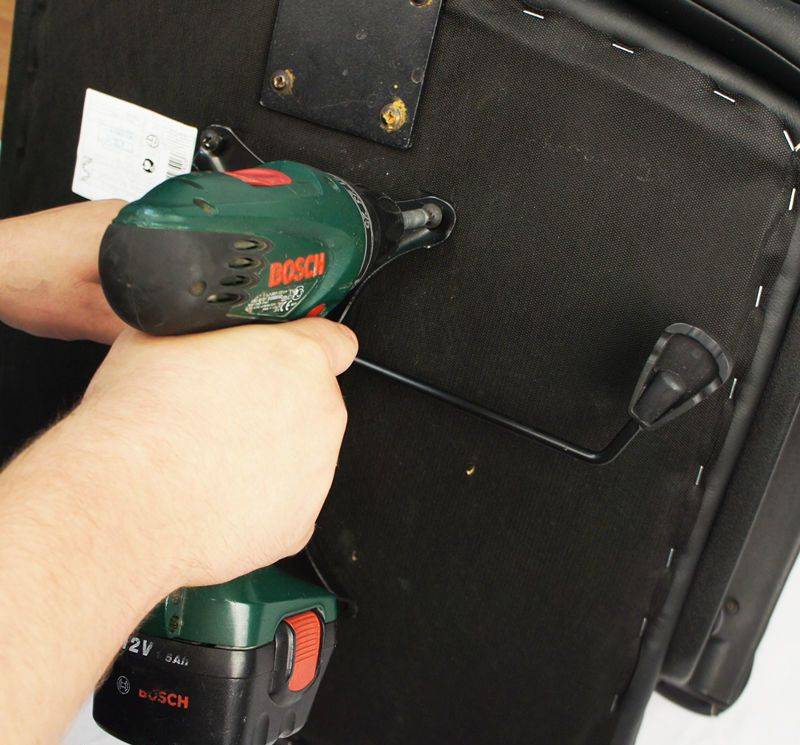
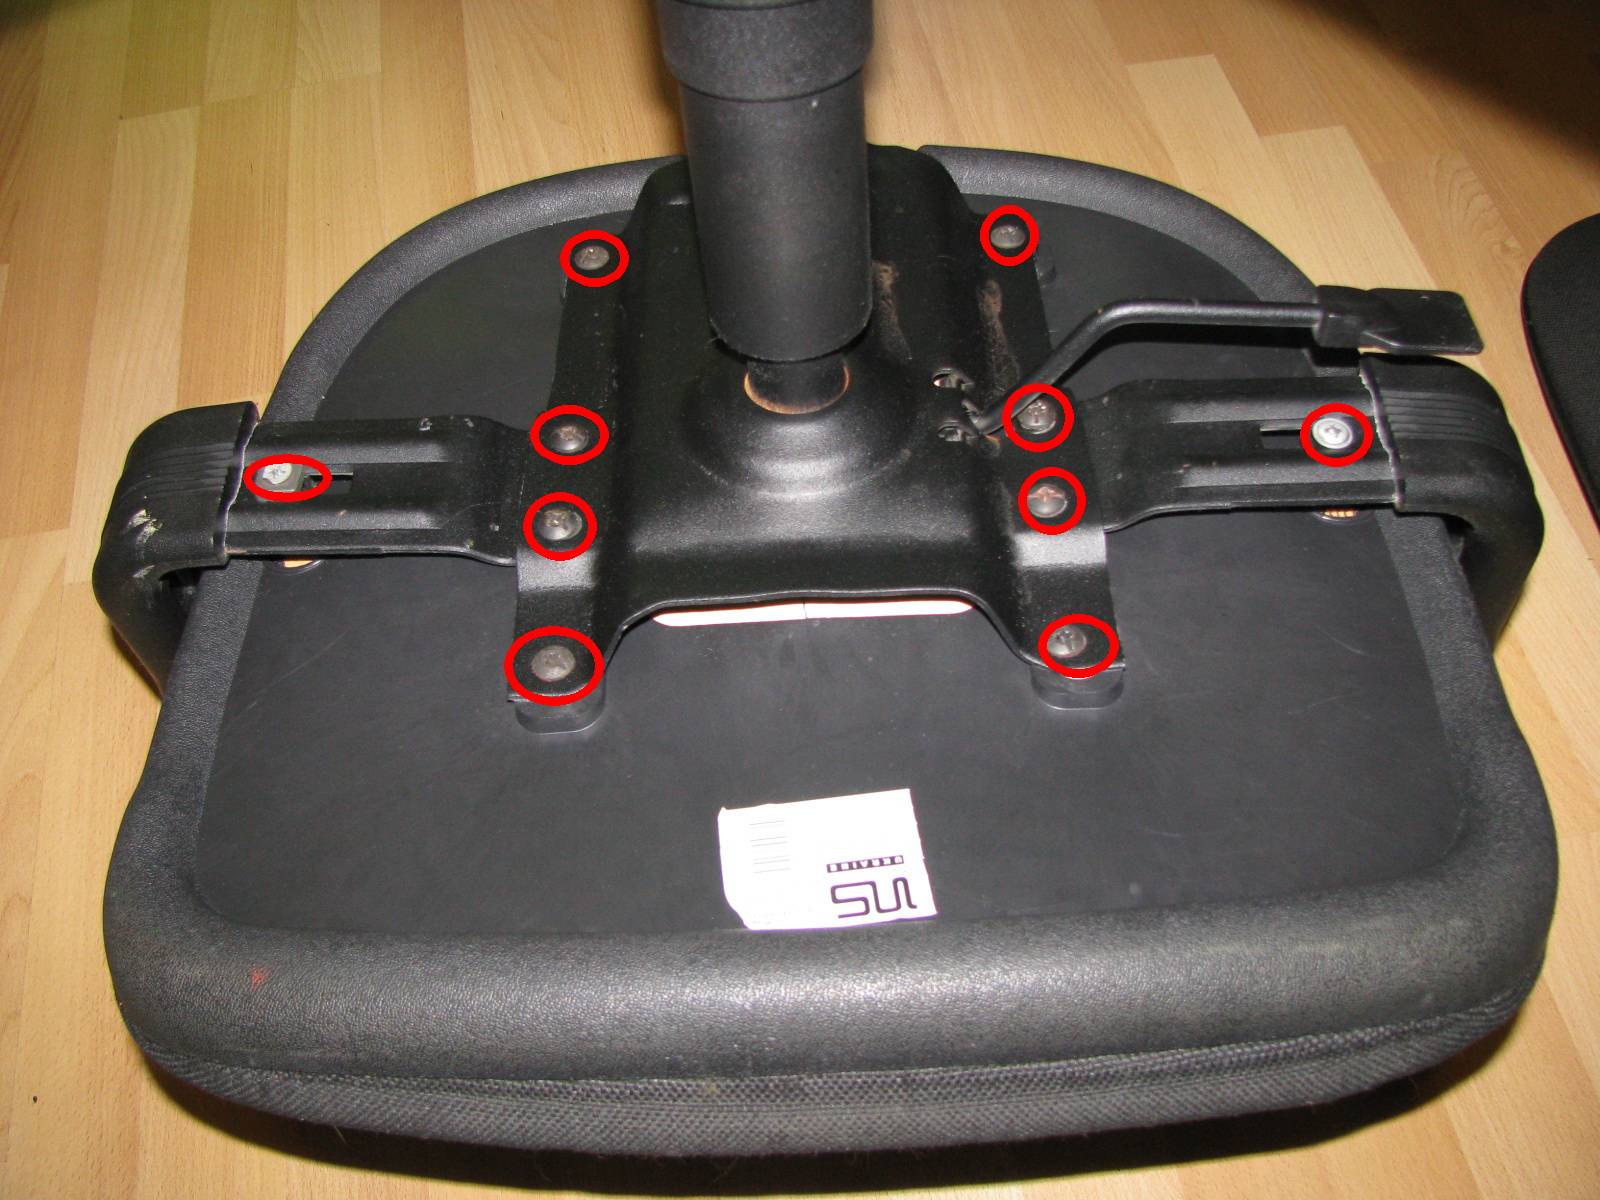
The next step is to install the seat adjuster. The piastre is attached to the underside, the mechanism itself is attached to the back. They are bolted to the seat using a hex wrench. The fasteners should be tightened securely, taking into account the long-term use of this furniture.
In order for the self-assembly of the office chair to be successful, you should check the completeness of the fasteners before starting work. All bolts must be fitted with flat washers and lock washers to prevent premature loosening.
When installing the armrests, it is important to determine the correct location (left, right), otherwise you can confuse the elements during fastening. Attaching the armrests to the seats, they are fixed - each with three bolts
The backrest is screwed in with a large adjustment screw. There are models of computer chairs in which the armrests are mounted using brackets on the metal seat body.
 Putting the base together
 Install piastra
 We fix the base
 We tighten the bolts with a hexagon
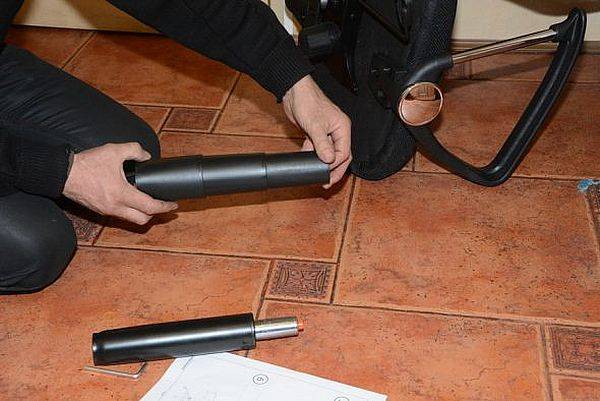
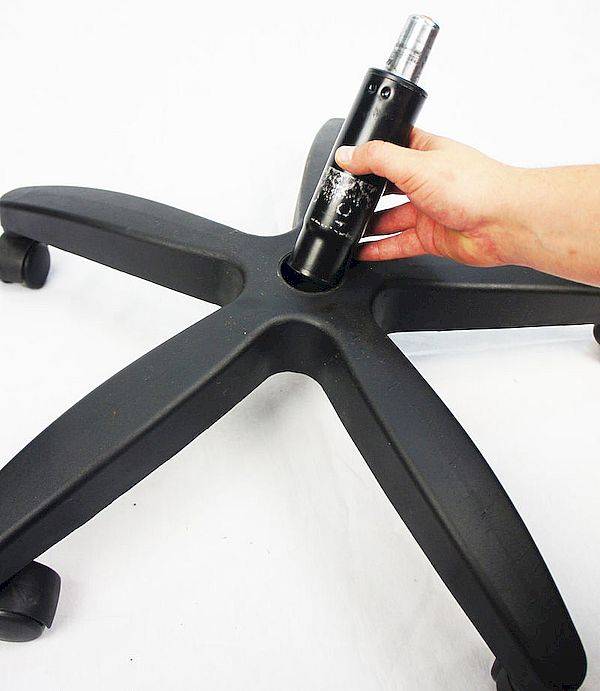
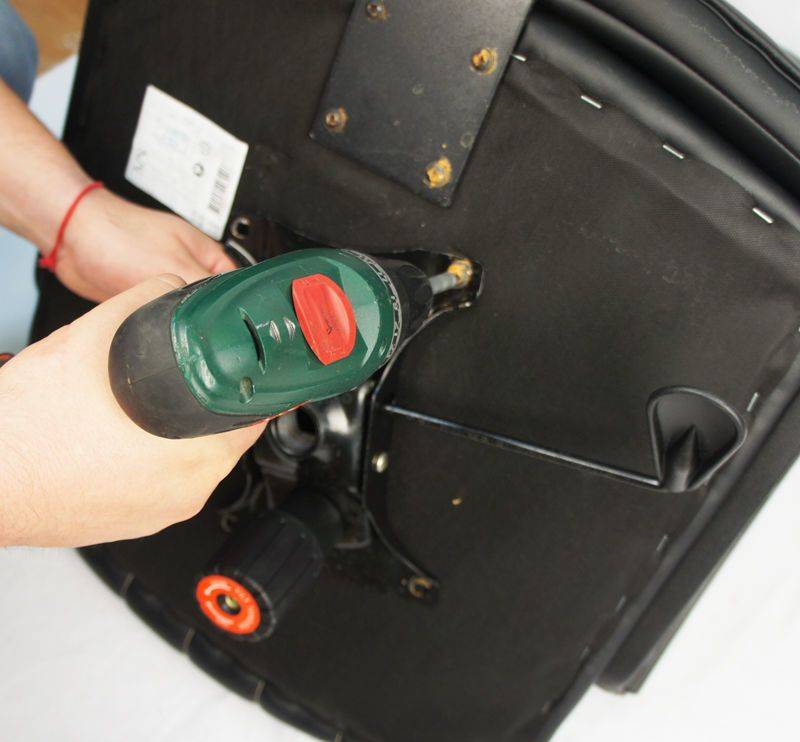
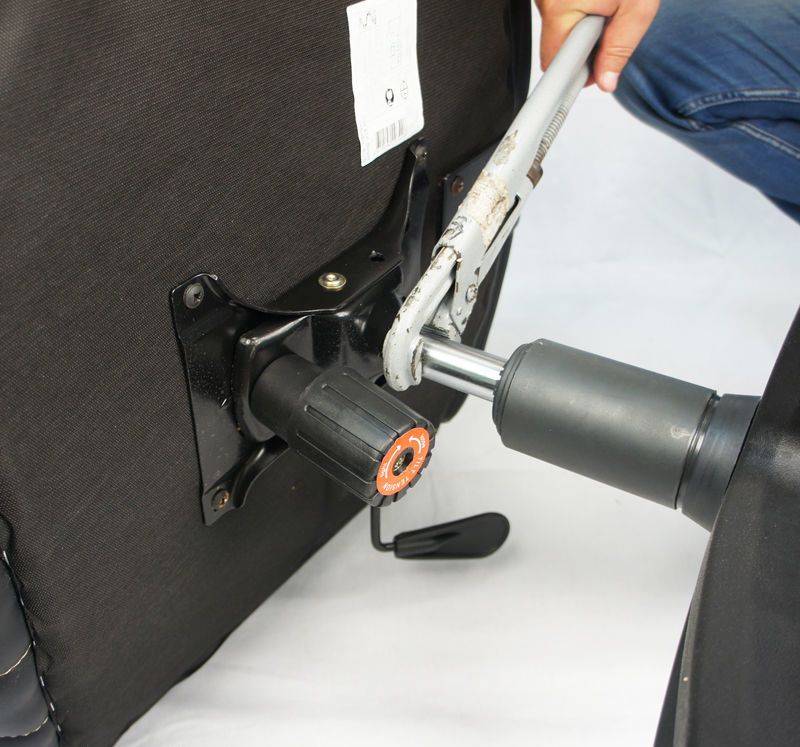
Installing a gas lift in a crosspiece
Before installing the lifting mechanism, the protective caps must be removed from its ends, otherwise they will interfere with the normal operation of the shock absorber. After that, the lower part of the gas lift will need to be aligned with the hole located in the center of the cross. As a result, the base with the rollers will stand on the floor, and the operating mechanism will be in an upright position.
The telescopic plastic cover is designed for belaying, it protects the seated person from falling in the event of a lift failure. In addition, this element serves as a decorative function, masking the shock absorber in an already finished computer chair. Its body consists of several parts, which are more convenient to assemble by stringing directly onto the gas lift from above. When the supporting base is ready for attaching the seat, you can proceed to the final stage.
 Removing the protective caps
 We insert the gas lift into the crosspiece
 Installing the lifting mechanism
 We put on the cover
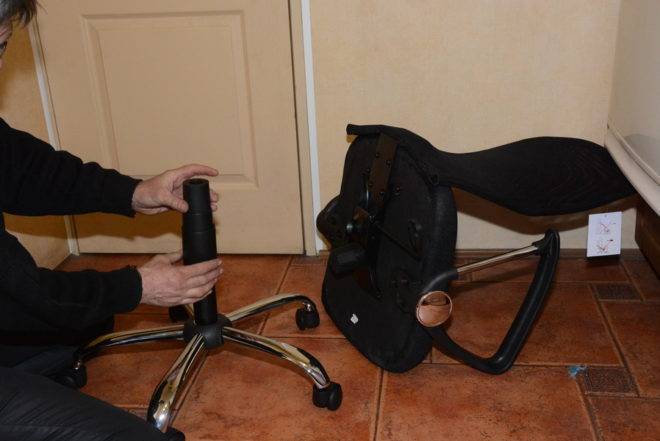
Joining parts of the chair
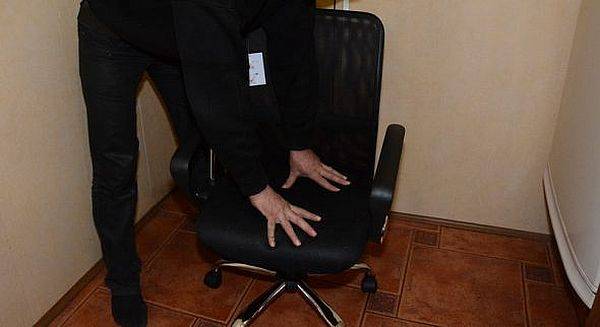
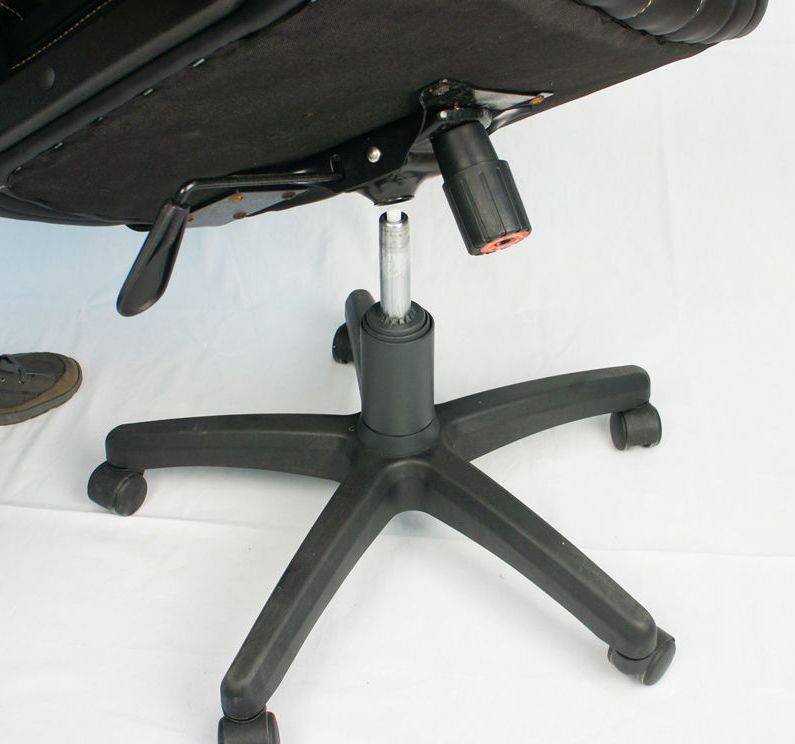
It is worth being extremely careful when fixing the assembled seat on a supporting base - brute force can damage the gas lift, completely disable it. The main task of the assembler is to gently install this element on the lifting mechanism. The procedure does not require special training or special knowledge:
On the shock absorber rod, you need to carefully put the piastre, which is rigidly fixed under the seat.
Then press on him with effort, or even better - sit down. At this moment, a reliable adhesion of the parts will occur .. It is not recommended to assemble the product by any other means.
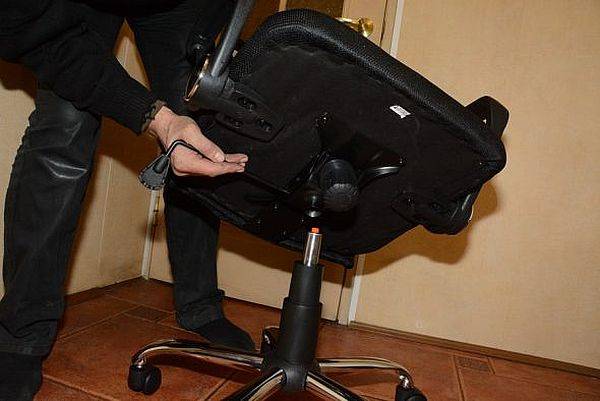
After all the above steps, the computer chair will be ready for use, all that remains is to check the quality of the work performed
It is not recommended to assemble the product by any other means. After all the above steps, the computer chair will be ready for use, all that remains is to check the quality of the work performed.
 We put the seat on the shock absorber
 Press to fix
 Checking the build quality
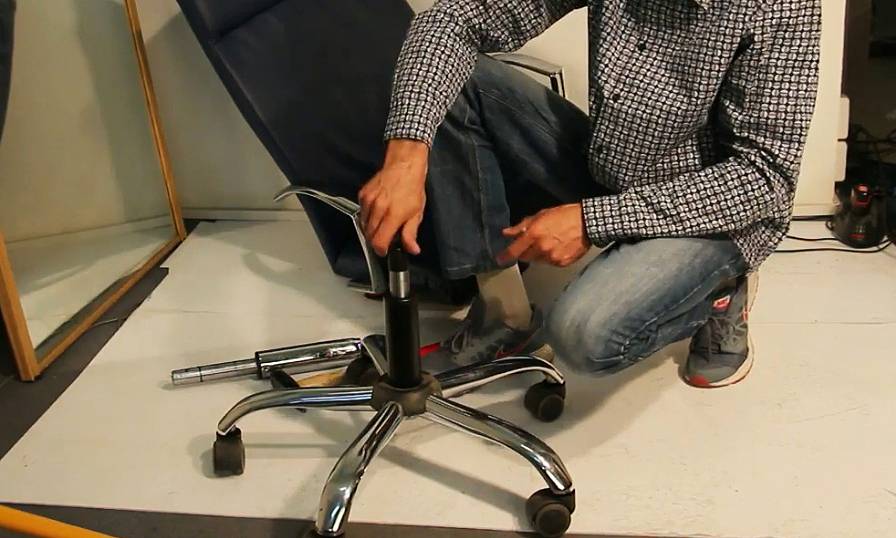
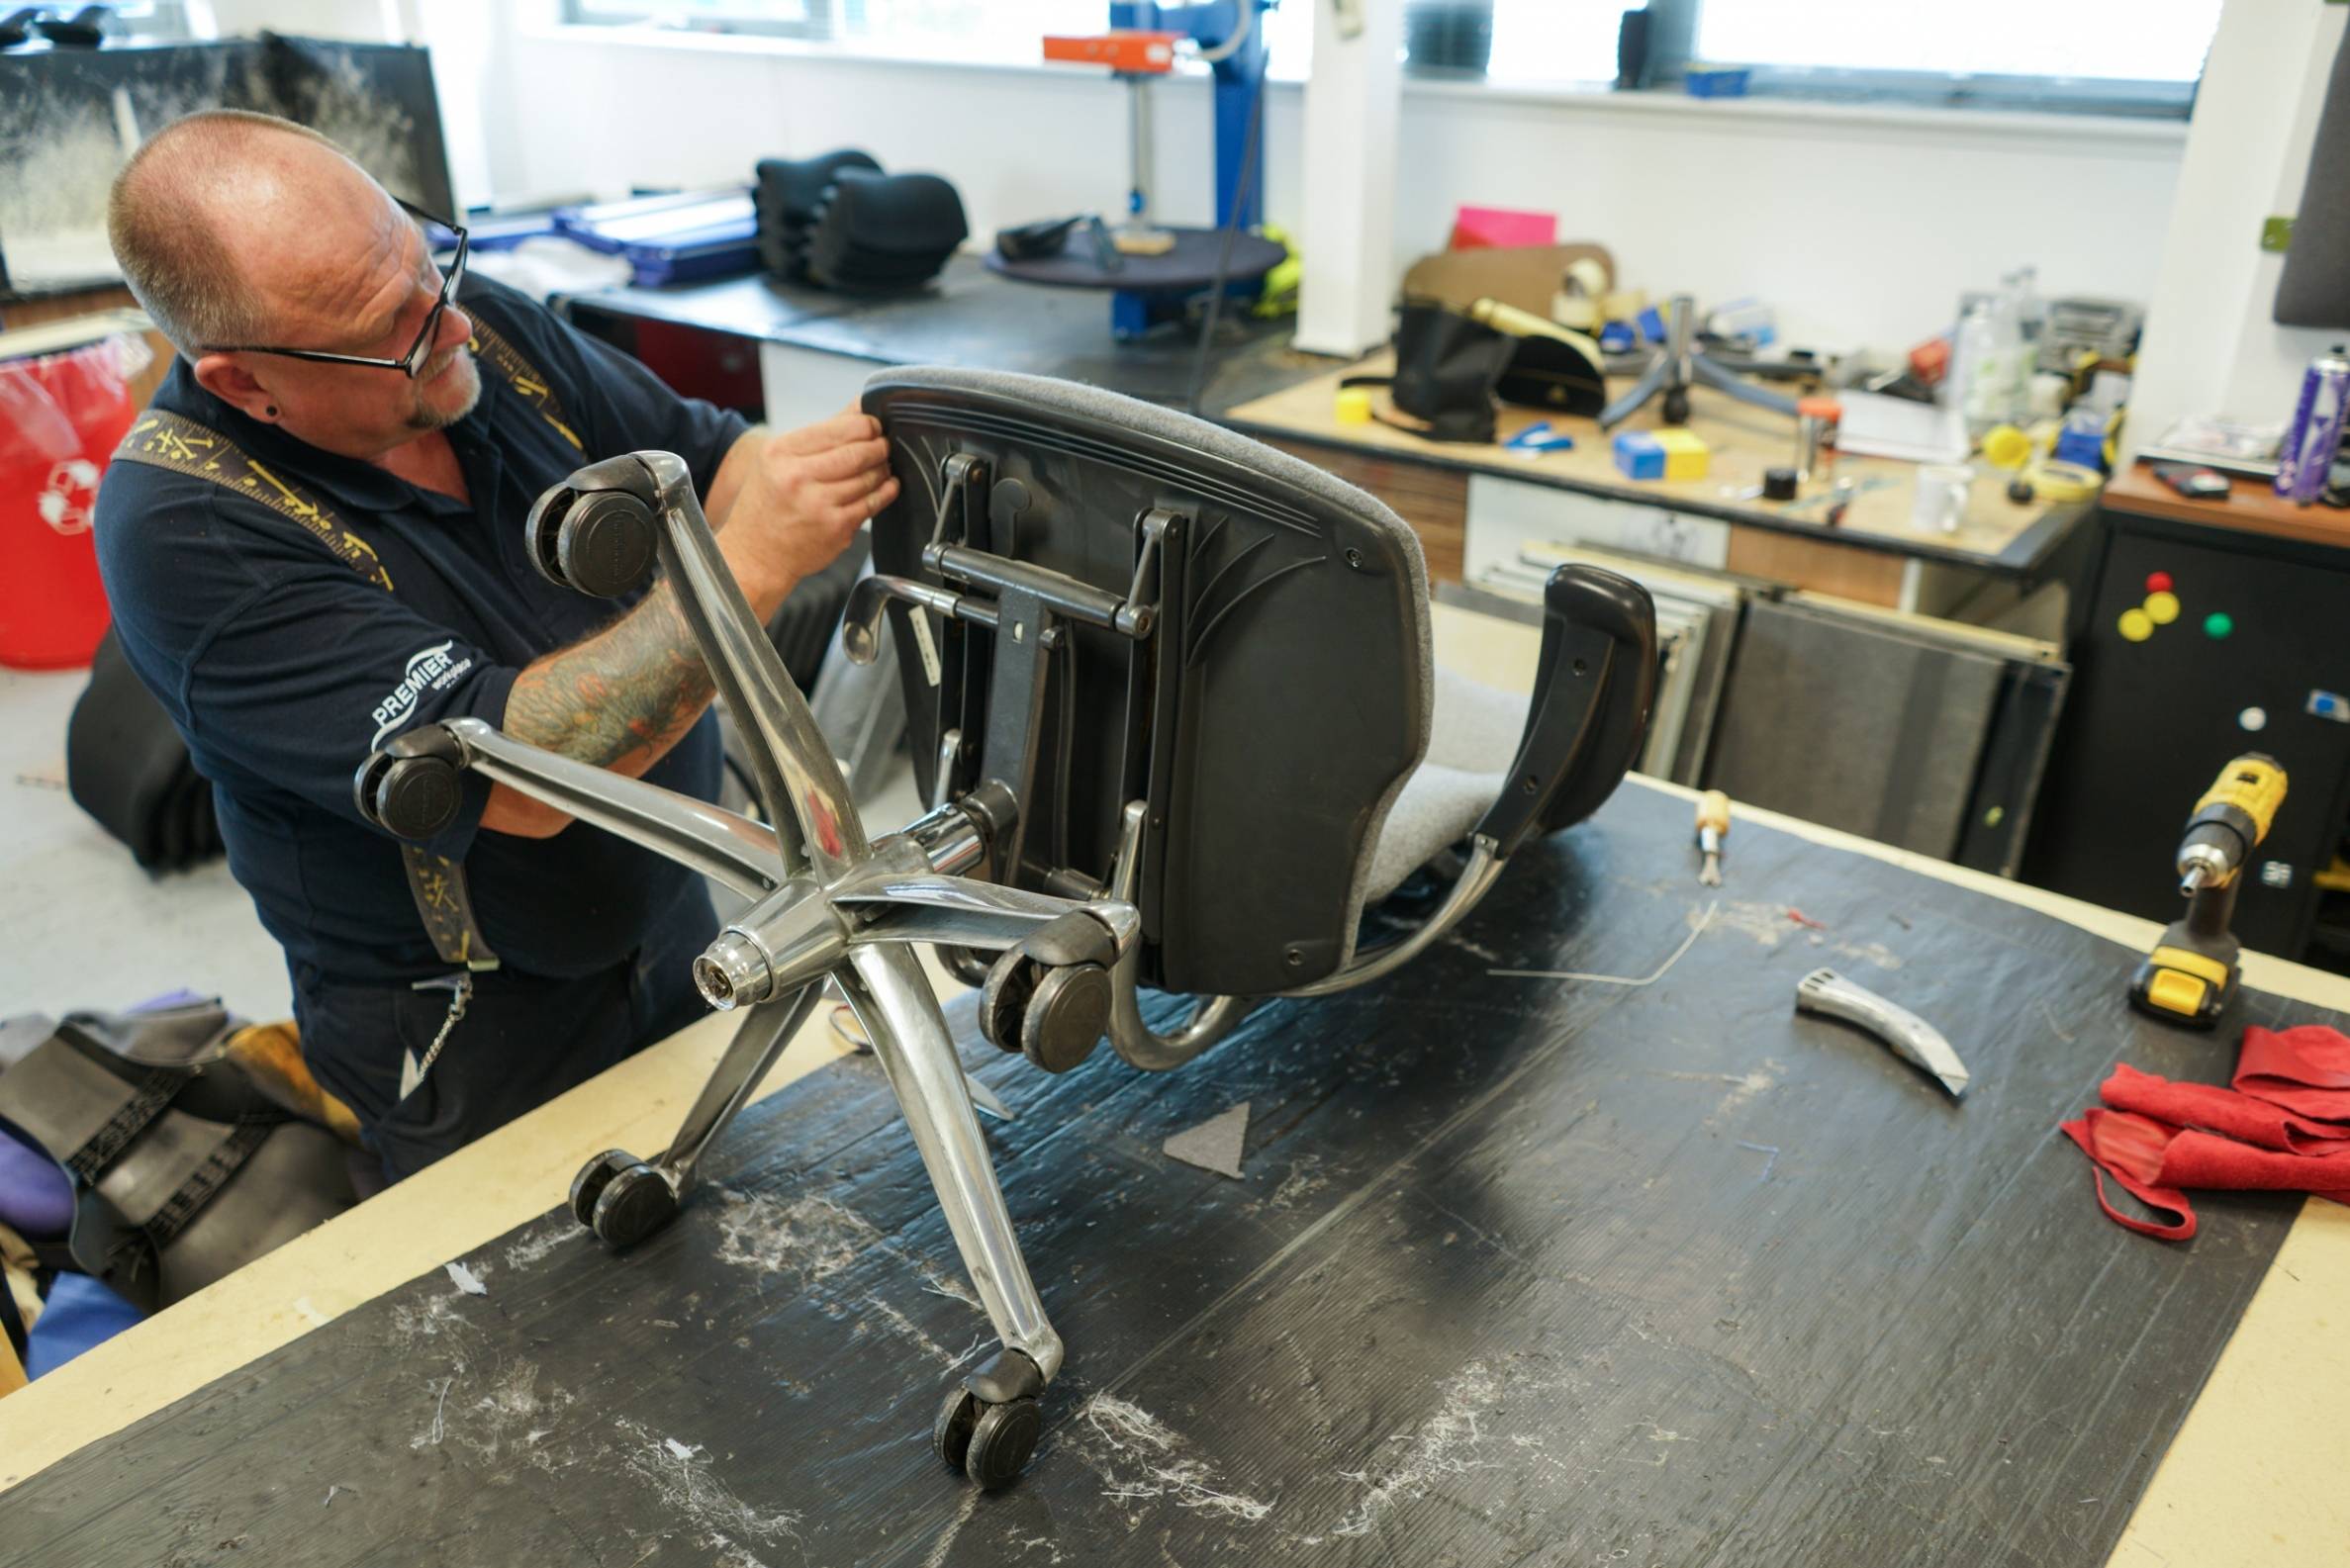
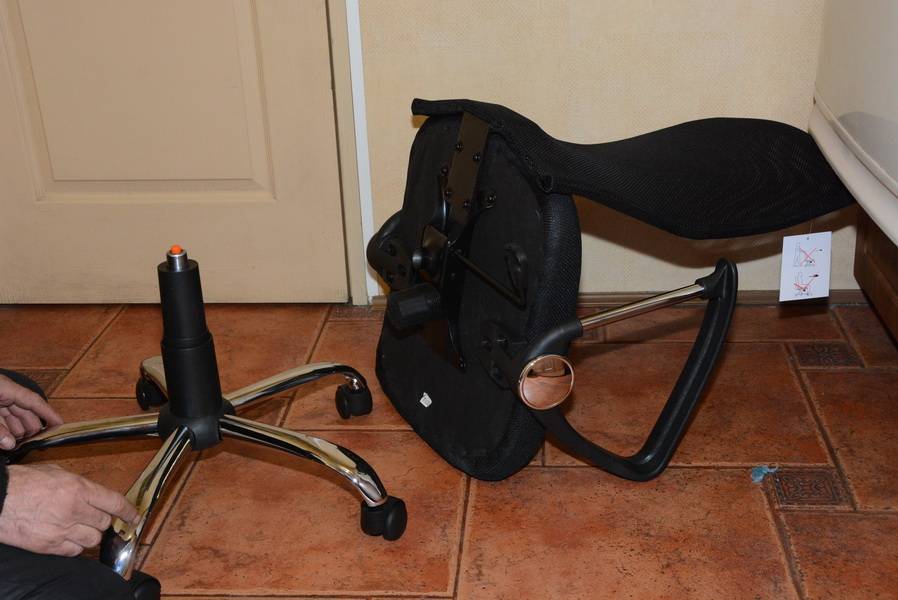
Self disassembly of the product
Every user should know how to fix an office chair. It is not difficult to disassemble the product on your own; for this, basic knowledge of the design is sufficient. Practical dismantling skills may be needed for both repair and transportation of disassembled furniture. In order to prepare the chair for repair, you must:


Turn the furniture with its back to the wall, carefully stand with your feet on the horizontal crossbar, while not pressing on it with force.
Gently pull the backrest up, swinging it to the right and left.
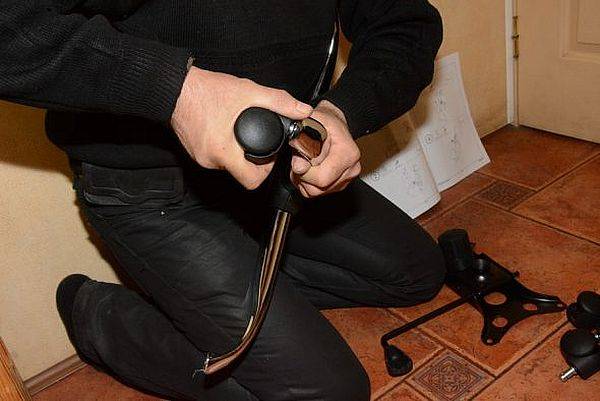
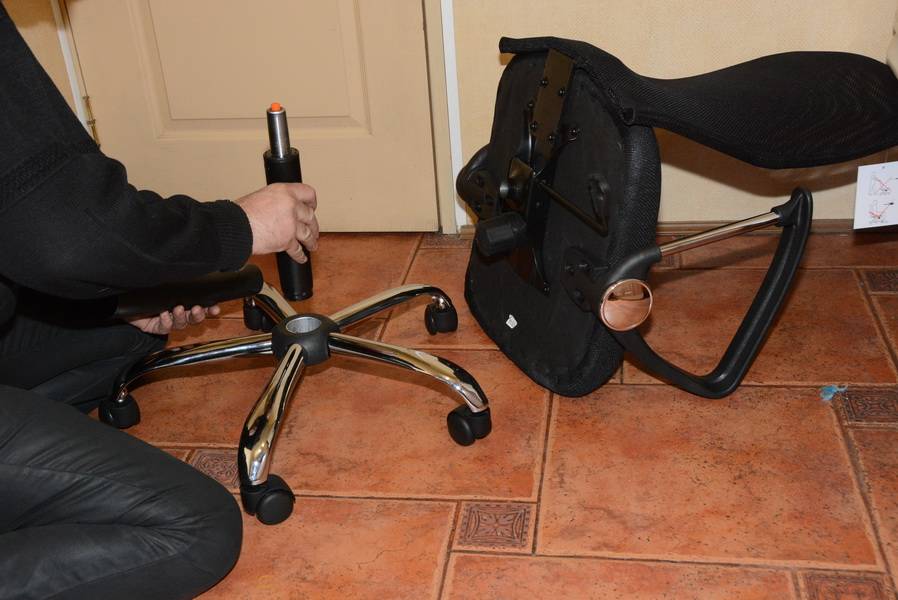
Separate the crosspiece and gas lift.
Unscrew all wheels.
The most crucial stage is the separation of the back and seat. After completing the dismantling, it is necessary to collect all the parts in one place so as not to lose anything
If something does not work out, you cannot use physical effort: plastic parts can easily break from one careless movement
If you want to effortlessly separate the gas lift from the rest of the structure, you can install the seat so that the pneumatic chuck is at the top. After that, you need to take a hammer and gently hit it on the seat where the back is attached. Then you should repeat the same in other places so that the mechanism that raises (lowers) the chair does not jam.
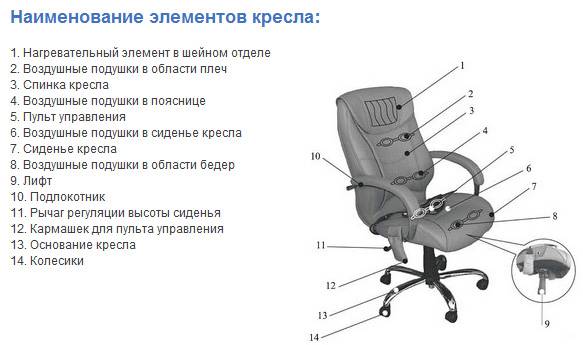
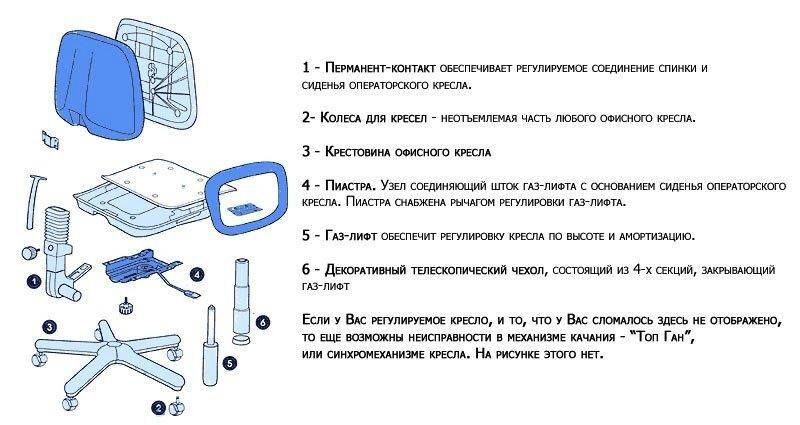
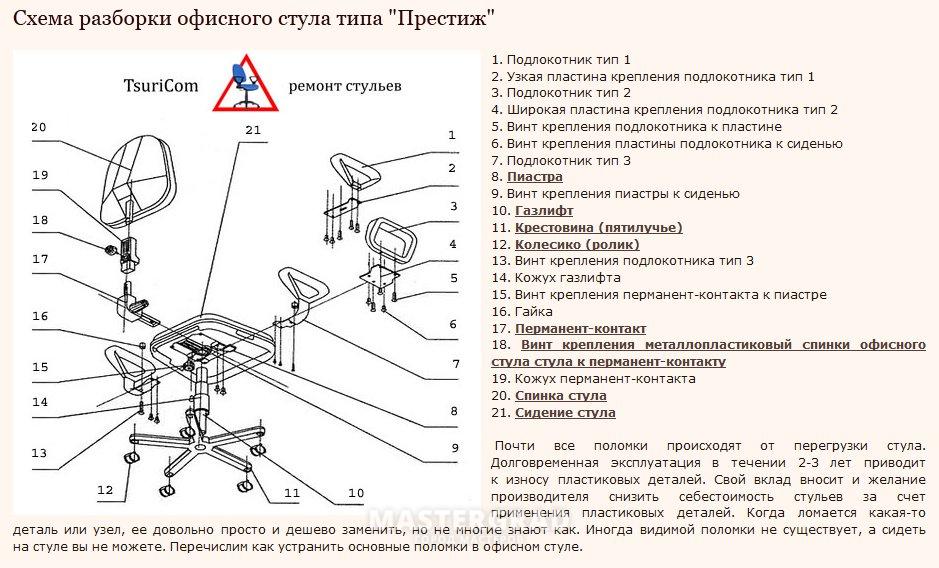
Computer chair repair has a clear algorithm. Any office chair, regardless of cost and appearance, has a standard structure. It can be clearly seen on the diagram in the instruction manual. The following elements can be distinguished in the design:
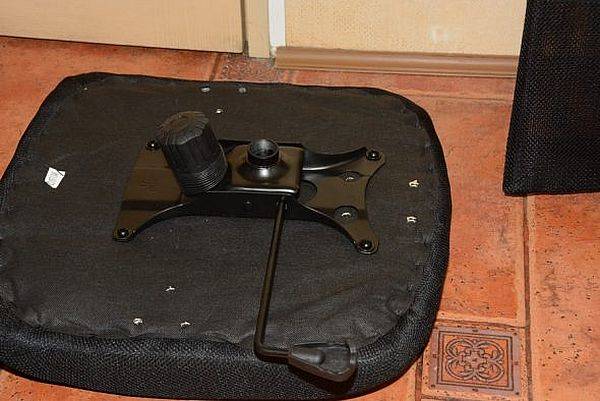
- Metal or plastic base - a cross, or a base of five rays, shaped like a star.
- Plastic rollers with metal hinge inside. More expensive models have iron wheels.
- Pneumatic cartridge. In some operating instructions, this part is also called a gas lift.
- Swing mechanism with straight or slightly offset axle.
- Piastra, or height adjuster. It is a metal platform equipped with an additional lever.
The hardest part is repairing executive furniture. These are the most expensive modifications of chairs with a lot of additional functions. Items for personnel are much simpler. The cheapest furniture is made for office visitors. It usually does not last long and cannot be repaired. Instead of a cross-piece, such chairs have four legs, and the rotating mechanism is not provided.


Common breakdowns
There are several common breakdowns, due to which you have to disassemble an office chair.
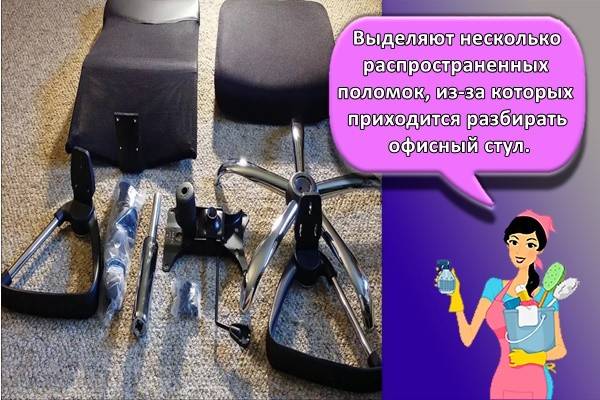
Damage to the crosspiece
Often people are faced with damage to the five-beam cross. To disassemble it, you need to perform several sequential steps.
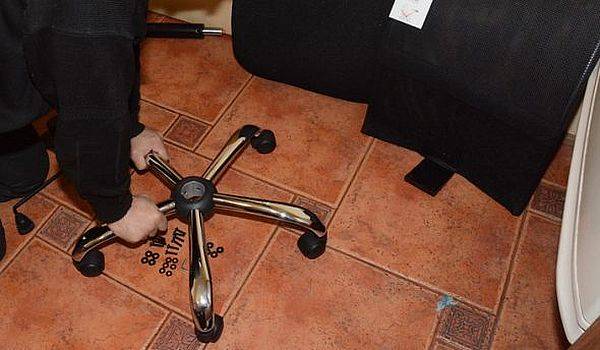
Remove rollers
Dismantling the broken crosspiece begins with the removal of the rollers attached to it. In most models, these casters do not fit too tightly and will therefore be easy to remove.
Dismantle the piastre
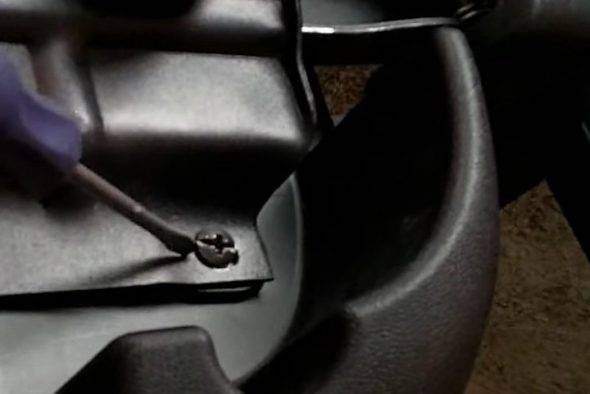
Having finished with the wheels on the cross, they begin to dismantle the piastre, which is screwed to the surface of the seat with screws. You can unscrew them with an ordinary Phillips screwdriver or screwdriver. This must be done carefully so as not to damage the piastre.
Remove the retaining clip
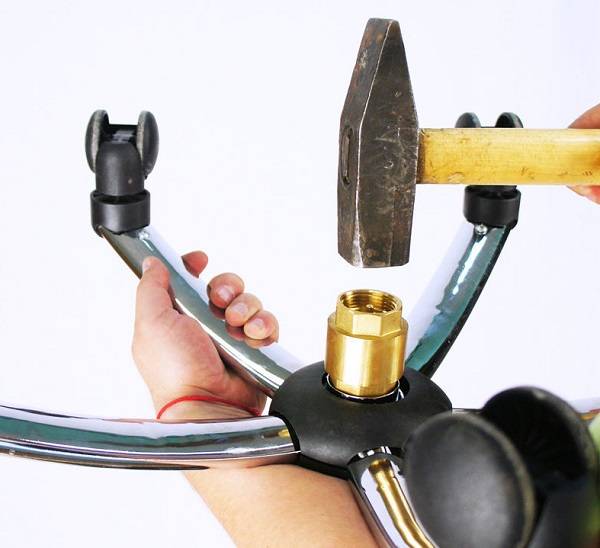
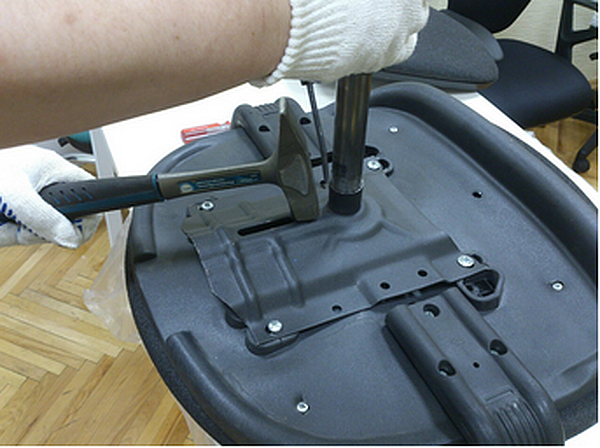
A special locking clip is installed in the upper part of the pneumatic chuck, which must be removed when disassembling the office chair. Various tools can be used to remove this part. Many people use wire cutters, a hammer, a screwdriver, and even scissors. When using a hammer, be careful not to break anything.
Knock out the gas lift
Having got rid of the retaining clip, they are engaged in knocking out the installed gas lift. To do the work, use a hammer with a rubberized head. It is contraindicated to use metal hammers, as they can disrupt the design of the pneumatic cartridge. You need to hit with a hammer in the central part of the gas lift until it breaks out.

Destruction of the swing mechanism
If the back begins to wobble strongly, then there are problems with the rocking mechanism. To disassemble it, the following steps are performed:
- the bolts are unscrewed with which the part was attached to the seat;
- the gas lift installed inside the device is removed and the mechanism is taken out.
Most often, the part cannot be repaired and therefore it is better to immediately replace it with a new one.
Air chuck breakage
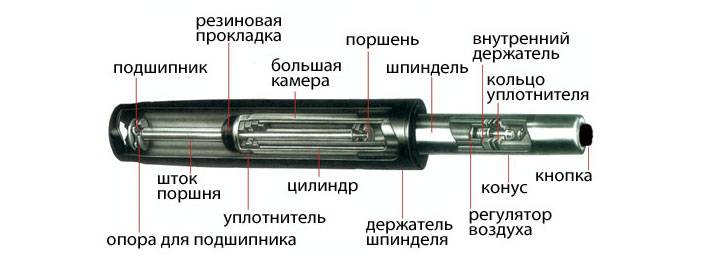
The pneumatic chuck is a complex structure consisting of two chambers with air. When you press a special lever, each of the chambers is filled with air. If no filling occurs, then the air chuck is seriously damaged. Problems can appear due to the broken integrity of the seal and the piston.
How to remove a gas lift for repair
People who decide to repair the gas lift on their own will have to first unscrew it. There are several common methods for removing this part:
stand with your feet on the crosspiece and swing the seat strongly, pulling it with your hands towards you until the mechanism begins to be removed from the rod;
turn the chair over, then carefully knock out the pneumatic cartridge with a hammer;
unscrew the gas lift from the seat and knock it out.
How to repair with your own hands
If the crosspiece and the permanent contact fail, you can repair these parts yourself, without resorting to the services of a service center. If the pneumatic chuck, piastra or rocking mechanism breaks down, they must be replaced. The same goes for rollers. If self-repair seems difficult, you can contact the specialists, they will repair the furniture quickly and efficiently.
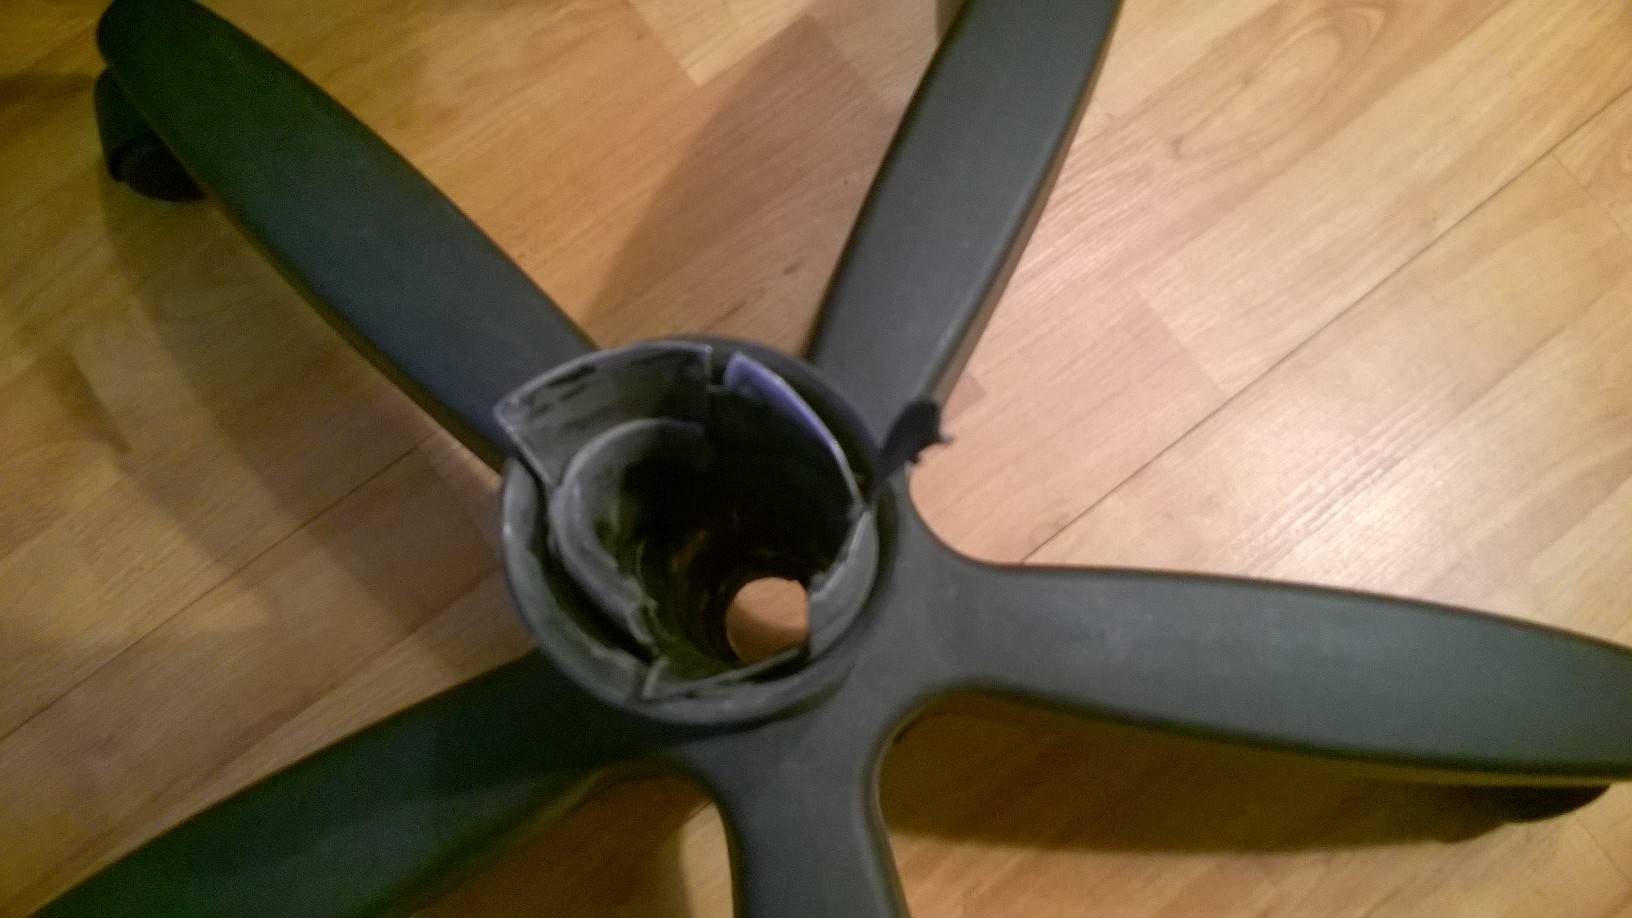


Damage to the cross and replacement of rollers
In the event of such a breakdown, it is very easy to repair an office chair with your own hands. If the beams of the cross are connected loosely, the part begins to wobble and loses its stability.To eliminate the malfunction, you need to insert a hollow plastic tube of a smaller diameter inside the base. It must be firmly fixed in the center of the structure.
The pipe will play the role of a kind of rod on which the base is held
To replace worn-out rollers, you need to carefully remove them from their seats, without exerting physical effort, and put new ones. Anyone who repaired the base knows: it's not difficult at all
 We knock out the gas lift from the cross
 Installing a new crosspiece
 We shoot videos
 Insert new videos
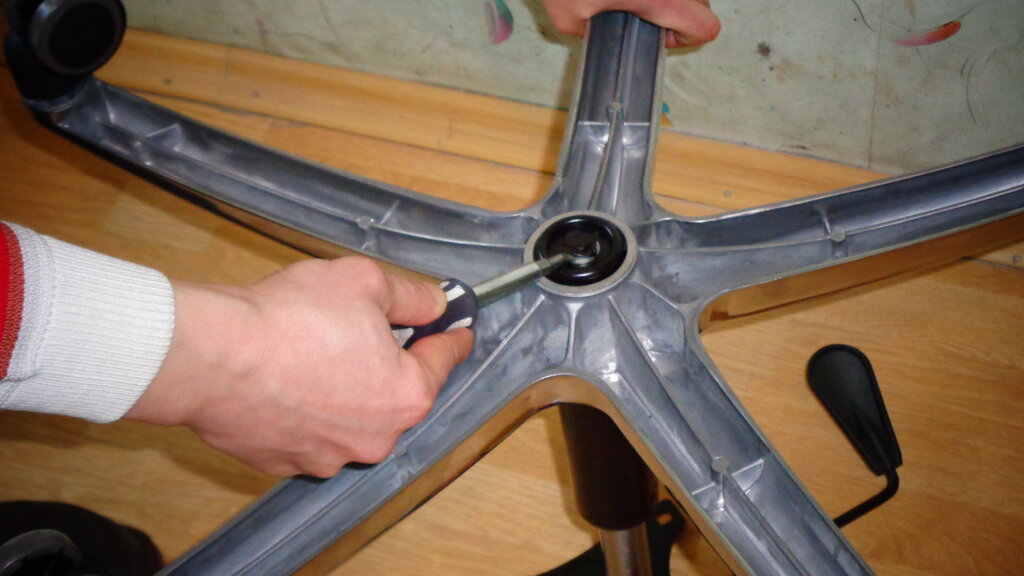
Broken piastre
Such breakdown occurs frequently in office chairs. If the piastre is out of order, it must be carefully removed from the pneumatic cartridge. These two parts are connected using the cone method. There is no thread, so no screwdriver is needed. To disconnect the gas lift and piastra, you should hit them with a mallet with force. As a rule, one hit is enough. Next, you should replace the piastre with a broken foot with a new one.
 Disconnecting the gas lift and piastre
 We attach a new piastre to the seat
Destruction of the swing mechanism
In the event of such a breakdown, the metal structural element must be replaced. However, if you have a welding machine, you can eliminate the malfunction, and the rocking mechanism will last a long time. If a decision is made to replace a part, it must be dismantled. The mechanism connects to the seat with four screws, so you need a curly screwdriver. For disassembly you need:
- unscrew the bolts connecting the mechanism to the seat of the chair;
- knock out the pneumatic cartridge from the mount;
- drill holes in the element and replace it.
If you do not have a drill at hand, you can use the so-called adapter plates. It should be borne in mind that Russian-made swing mechanisms are not suitable for Chinese office furniture. The size difference is approximately 50 mm.

 Unscrew the bolts
 We knock out the pneumatic cartridge
 We drill holes and tighten the bolts
 We connect
Air chuck breakage
The old, worn out gas lift must be replaced. Some craftsmen repair it, but after the repair, the pneumatic cartridge will still not last long. It needs to be dismantled and replaced with a new one. To do this, disconnect the seat and use a hammer to knock out the gas lift from the crosspiece. The main thing is not to damage the base. A new pneumatic cartridge is then inserted. It is attached to old bolts. You can preview a video on the topic "repairing a gas lift" or consult in the service center.
 Removing the seat
 We knock out the gas lift from the cross
 Insert a new pneumatic chuck
Destruction of a permanent contact
Breakage of permanent contact is common. It is not necessary to purchase a new part, you can repair the old one. This type of do-it-yourself office chair repair does not take much time and effort. The main thing is to identify the cause of the malfunction.
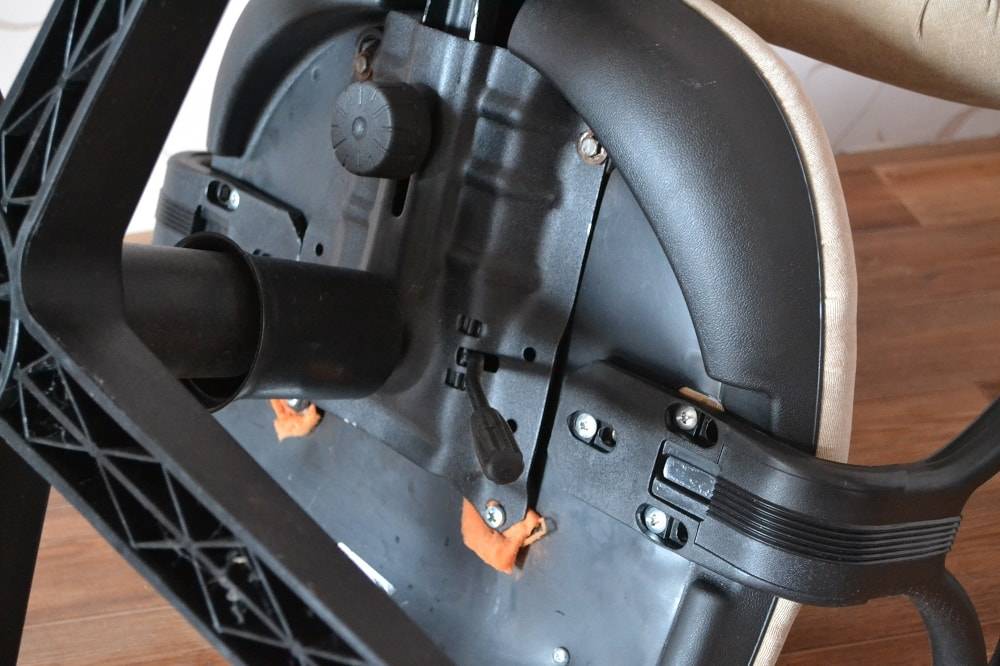
If the thrust spring is deformed, it must be restored to its original shape. The same goes for the brackets. However, if the screw fasteners are worn out, you will have to replace them with new ones. If the back of the chair is wobbling, the permanent contact connections must be tightened - tightened.
 Permanent contact
Assembling a computer chair on wheels
After the chair box is unpacked,
you should carefully examine all the details contained in the package for
cracks, chips or scratches.
The standard kit includes the following parts:
- Seat with backrest or one-piece monoblock.
- Two armrests.
- Rollers (5 pieces).
- Screws.
- Pneumatic cartridge.
- Crosspiece and overlays for it (if necessary).
- Mechanism for connecting the seat to the back.
- Gas lift casing.

First of all, the rollers are inserted into the crosspiece. To
the pin entered the beam of the cross, it is required to press on the wheel with a little effort.
To make it easier to do this, place the cross on the floor. If it fails
insert the roller manually, you can use a rubber hammer, gently
tapping it on the base between the spheres of the wheel.In this case, you should not apply
impacts on the rollers themselves, as they are made of plastic and can
break down.
After mounting the wheels, turn the crosspiece
rollers down and install the pneumatic chuck in its center. Then he puts on
shroud
At this stage, you need to pay attention to the top of the pneumatic chuck: some
manufacturers put a decorative cap on its button, which follows
take off. If this is not done, then the chair during operation may not
to go down or not to go up
Now you need to install the armrests. This requires
turn the seat over and inspect the place where they should be installed. How
As a rule, the armrests are fastened with three screws. After careful
examination of the armrest should determine where its front and back are. Further
the screws are inserted into the holes and tightened. Some models have armrests
are mounted on the metal base of the chair and brackets are used for this.
After the seat is assembled, you should install
onto the pneumatic chuck and push it down from above. You can also sit in a chair to
ensuring that the pneumatic cartridge fits snugly into the seat base.
If the seat is not monolithic, but consists of a separate
seat and backrest, then gently insert the backrest into the seat. Now it should be twisted
large locking screw. Next, the back is put on a corner and twisted
short screw.
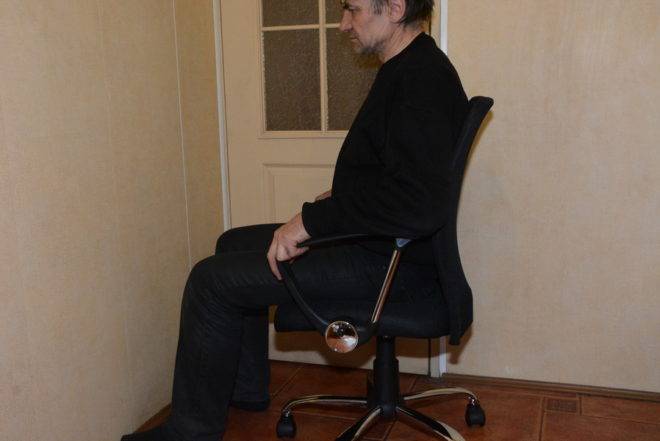
The last step is to check the chair for
working capacity. To do this, you need to sit in it and pull the lever that
located under the seat, down. If the chair is lowered, you can get up and pull
lever up. The chair should rise. The assembly of the computer chair is complete.
Video instruction,
how to assemble a computer chair
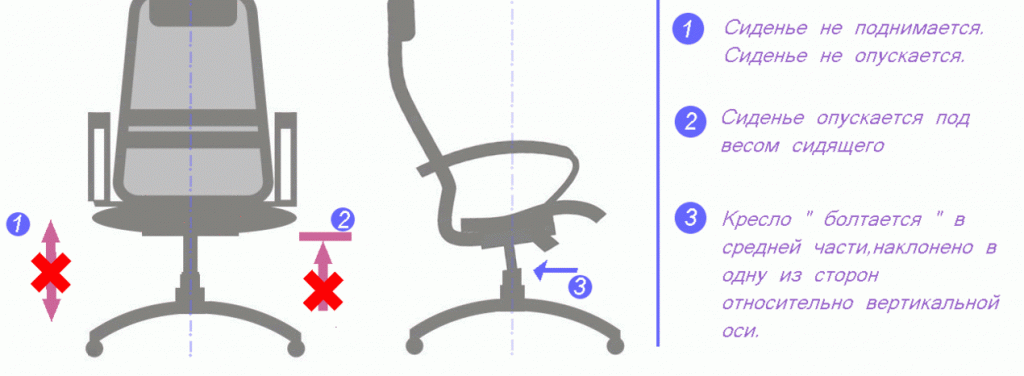
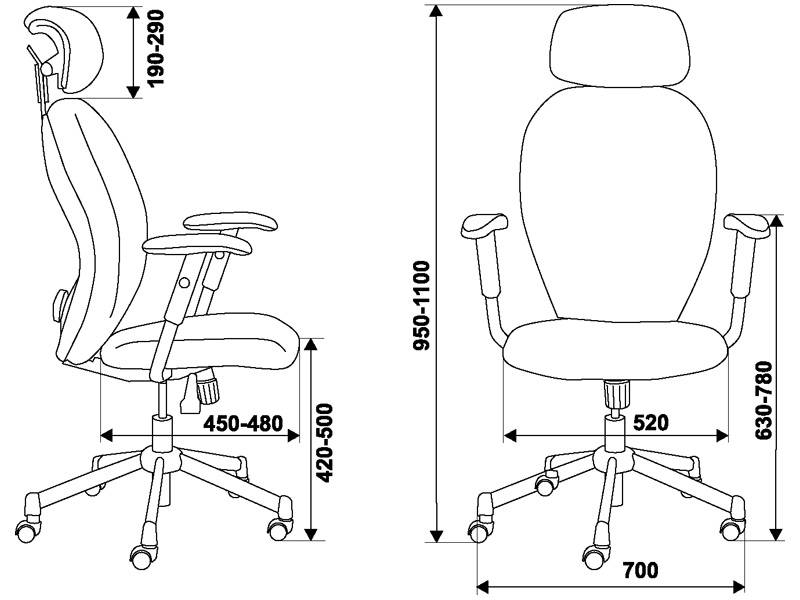
Height adjustment
We figured out how to disassemble a computer chair, but how to determine its height? If the seat height is not adjusted, then problems in the lumbar spine or pinching of nerve endings may soon arise. To avoid this, you need to constantly check the seat height and adjust it correctly.

In order to lower the chair, you must pull the lower lever. After that, the computer seat will smoothly lower or rise. The optimal height is selected taking into account the individual characteristics of the chair and the desktop. It is recommended that the height of the armrests matches the height of the table.

Repair process: step by step instructions
Often in such chairs the gas lift becomes unusable. This mechanism has two chambers, they contain air. He is set in motion by a lever, he presses the valve. Thus, air stops flowing from the first chamber to the second. Therefore, the chair height can be adjusted.
Better to buy a new gas cartridge.

It is unrealistic to do business when it is uncomfortable to sit in a chair.
This is why it is important to keep the chair in order. Before starting work, you must wear protective goggles, particles of the cylinder or grease can get into the eyes
If you are replacing the gas lift during the cold season, do not use it immediately. It is better to leave to warm up at room temperature for a day. You need to put something on the floor, for example, a newspaper, so as not to stain
Before starting work, you must wear protective goggles, particles of the cylinder or grease can get into the eyes. If you are replacing the gas lift during the cold season, do not use it immediately. It is better to leave to warm up at room temperature for a day. You need to put something on the floor, for example, a newspaper, so as not to get dirty.
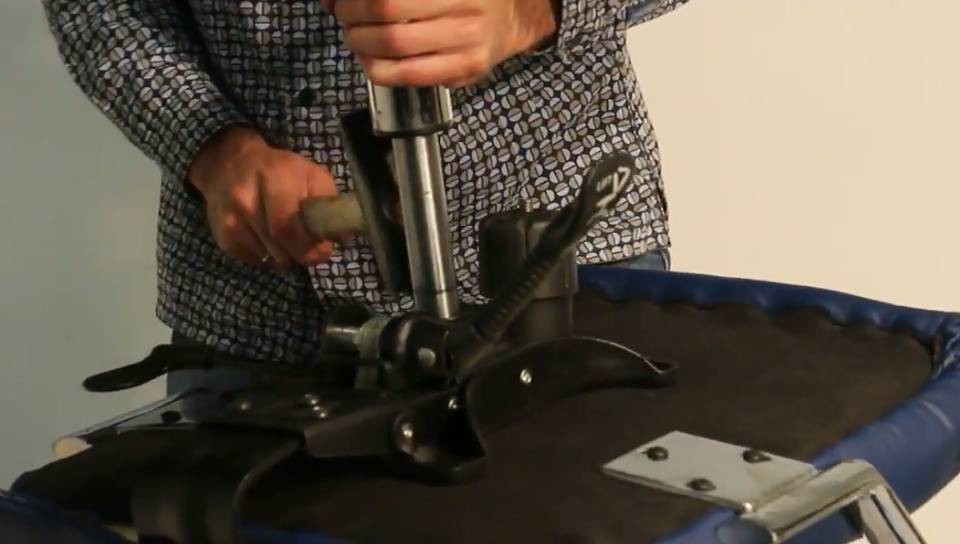
First, using a curly screwdriver, unscrew the harness from the swing mechanism. After you have turned the chair over, you need to mark the front of the mechanism, then remove the four bolts and separate the frame from the seat.
Now you need to disassemble the gas lift.We take a hammer and lightly begin to hit the swing mechanism at the base of the gas lift from the side of the cross
It is important not to bend the mechanism. If it was not possible to knock it down, it is necessary to squeeze the base of the gas lift with a vice and turn the swing mechanism.
Now it is necessary to separate the gas-cartridge from the cross
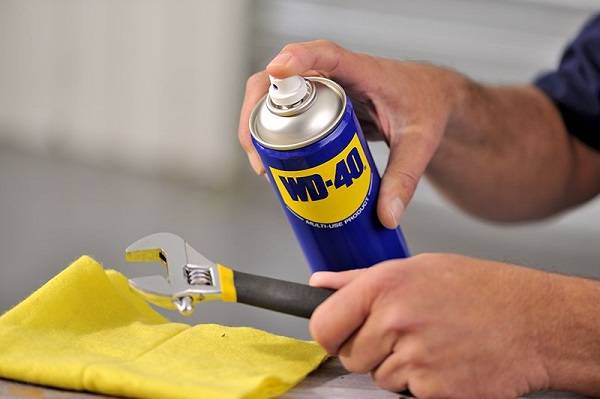
This will require a metal drift. Using it, you will avoid unnecessary damage. To facilitate the work, we spray WD40 grease on the lower and upper side of the cross. It is necessary to unfold the crosspiece with the rollers upwards and with careful movements knock out the gas cartridge from the conical base. It is better to carry out this work with an assistant, it is inconvenient for one person to do it.
We change the worn-out gas cartridge for a new one. We insert it, applying force, into the hole of the cross. Make sure that the gas cartridge fits in diameter to the crosspiece The casing is put on the gas lift before you connect it to the seat.
We attach the rocking mechanism to the seat with four bolts. It is important to ensure that the front sides of the mechanism and seat match. We turn the chair over and put on the gas lift on the swing mechanism. Now we insert the gas lift into the mechanism and press it with an emphasis. We check if we did everything right. We sit on a chair and watch how the gas lift works.

Everything you need for repairs can be purchased at a point of sale where these chairs are sold.
If you are skilled enough, then you can easily carry out the replacement yourself.

If you doubt that you will be able to cope with this work, it is better, of course, to turn to specialists.
Have you finished repairing the chair, assembled it, but you still have difficulties with the gas cartridge? Perhaps it turned out to be of poor quality. Before returning back to the store, it is necessary to check if the lever is holding the gas cartridge button from the swing mechanism. It is necessary to make sure that the piastra and the rocking mechanism are properly fastened so that the lever can bend. If everything is in order, you need to replace the gas lift.
It is not necessary to take the chair to the address where the repair is being carried out, since many specialists go home.
Before starting work, you must wear protective goggles, particles of the cylinder or grease can get into the eyes.

It is important not to bend the mechanism. Actually, it will not be difficult for skilled people to repair the chair on their own.
It is important to do everything carefully and not to rush, then the chair will serve for a long time
Actually, it will not be difficult for skilled people to repair the chair on their own.
It is important to do everything carefully and not to rush, then the chair will serve for a long time
Often in such chairs the gas lift becomes unusable.
To facilitate the work, we spray WD40 grease on the lower and upper sides of the cross.
It is better to carry out this work with an assistant, it is inconvenient for one person to do it.
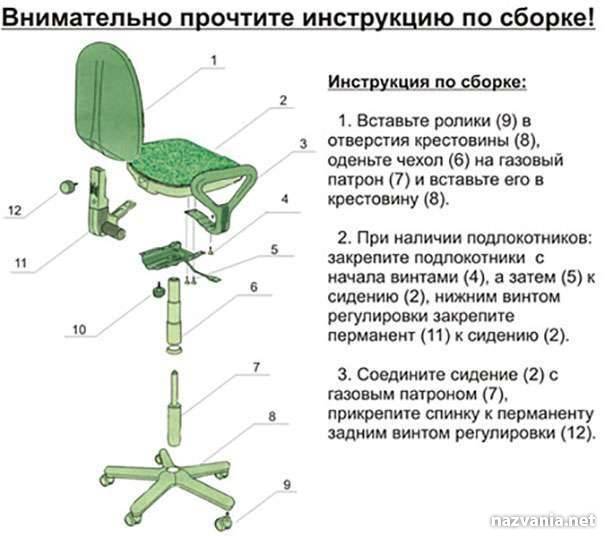
How to assemble a computer chair
The first step is to unpack the box with the chair. All parts should be carefully inspected for cracks, scratches or other defects. The standard set includes the following components:
- Seat and backrest (or one-piece monoblock).
- Armrests.
- Rollers (at least 5 pieces).
- Bolts, nuts and screws.
- Screws and pneumatic chuck.
- Crosspiece.
- Casing.
- Mechanism for attaching the seat and backrest.

The backrest of a computer chair may differ from other models in its upholstery and additional headrest attachment. Further, it will not be difficult to assemble a computer chair. Below are detailed instructions to help you assemble the chair in a short time.
- The first thing to do is install the rollers on the crosspiece. To do this, press the wheel pin into the beam of the cross. If it doesn't work, you can use a rubber mallet.
- After installing the castors on the chair, the cross should be put on the casters and the pneumatic chuck should be connected to its central part.It is worth noting that on some models, manufacturers install a decorative cap that hides the button on the pneumatic chuck. Before installation, you need to disconnect it and only then do the installation. Otherwise, the chair may not be lowered or raised.
- Next, we attach the armrests. Often three screws are used to install them, which need to be screwed into the hole in the seat and tightened firmly. Also, in addition to screw fastening, brackets can be used in some models.
- At the next stage, we install the assembled seat with a backrest on the pneumatic cartridge. To ensure the most tight fit, you can push on the seat of the chair or sit down completely on it.
- After the computer chair is assembled, you need to check it for operability. The back should bend back without unnecessary crunches and return to its original position on its own. If the chair is lowered and raised using the lever, then everything is installed correctly.
On average, assembling a standard computer chair takes no more than 20 minutes.