How to light up and stop the stove?
After a lot of experimentation, I have found the easiest and most effective way to light such a stove. First, I pour oil into the pan. There shouldn't be too much of it. It is enough for the oil to cover the bottom of the sump.
Then I take a piece of foam rubber and thoroughly wet it with gasoline or thinner. I put the impregnated foam rubber in the pallet so that the lower part of the piece is immersed in the oil.
Then I light the foam rubber. It burns steadily even if the thrust gets too strong. As a result, the surface of the pallet is heated to the required temperature.
Then I carefully open the fuel tank valve so that it starts to flow in a very thin trickle. Adjust the flow rate as carefully and slowly as possible.
The stove will gradually enter the operating mode. Periodically monitor the level of waste in the pallet.
To stop such a stove, it is enough to simply close the valve on the oil tank, and then, when the oil stops flowing, close the emergency valve. The oven will go out completely within 3-5 minutes and the body will begin to cool down.
How to use the oven?
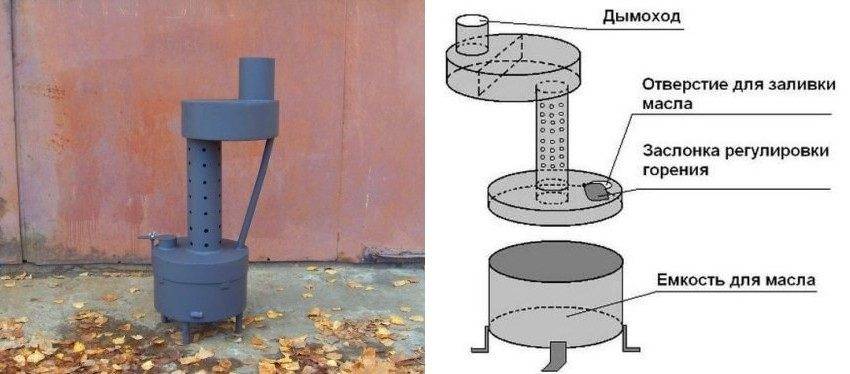
The stove is installed so that the filler hole and combustion controls (if any) are located at the front. The floor should be level and flat.
Before firing up, carefully inspect the equipment. Make sure that there is no water in the lower priming chamber.
If the equipment is in good condition, fill the lower reservoir with 2-3 liters of oil. The container does not need to be turned over completely, as it sometimes contains some water. Top up to 100 ml of kerosene, diesel fuel. They make a wick out of paper or rags, soak it with oil, set it on fire and put it on the bottom of the lower chamber. The hole is not completely covered, leaving a 2 cm passage. Make sure that the liquid ignites. By adjusting the size of the slot, a stable combustion is achieved.
 The design of the ovens can be different
Oil is added in portions only through the filling hole. Before using new fuel, first fill the tank with a small amount and check the reaction.
Stove cleaning
Periodically, the device must be cleaned of combustion products. The work is carried out in the following order:
- Stop the fuel supply and wait until the minimum amount remains in the lower tank.
- Without stopping the combustion, use a poker to clean the inside of the burner from coke.
- When the oil has completely burned out, collect coke from the bottom of the lower chamber.
This cleaning is recommended monthly. This will make the device work more efficiently.
Chimney maintenance
So, it is necessary to prepare several handfuls of gravel and sand, which is pre-sieved. From the outside, stone and sand are alternately thrown into the chimney pipe. Then, the cleaning material is removed from the upper chamber of the stove together with soot.
 Fine rubble will help clean the chimney
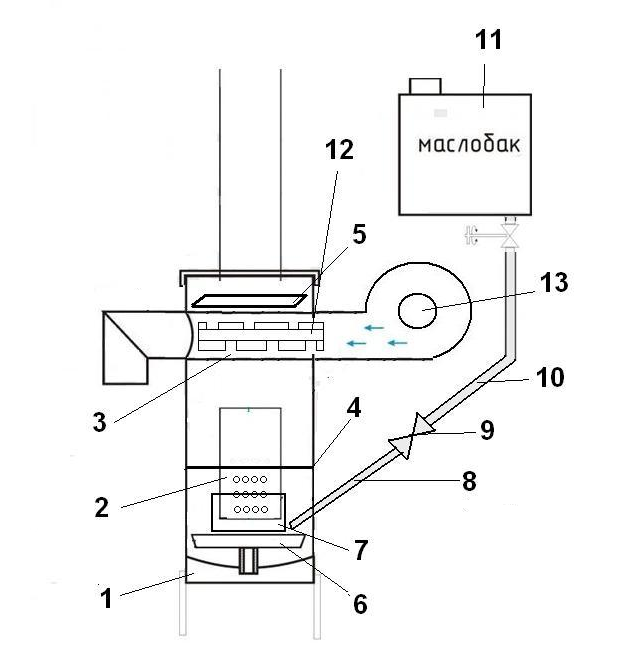
Increasing the efficiency of space heating
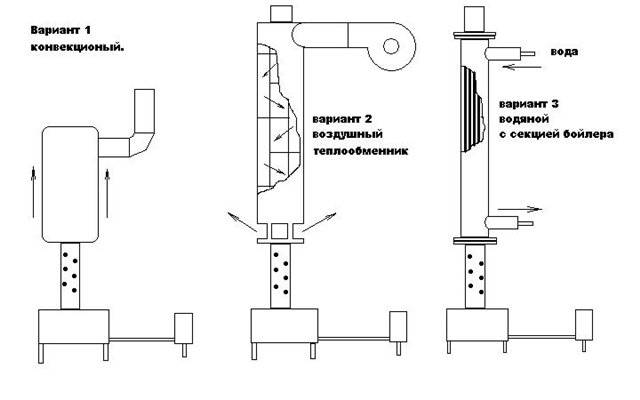
To increase the efficiency of heating the room, it is required to ensure a more intensive selection of excess heat from the stove. This can be done in two ways:
- forced blowing of the hot housing - air heating;
- heating water with its subsequent pumping into the heating system - a radiator heating system.
Heat is removed in the upper zone, where the temperature reaches its maximum. Both options have already been developed and the most successful and simple designs of such stoves are presented below.

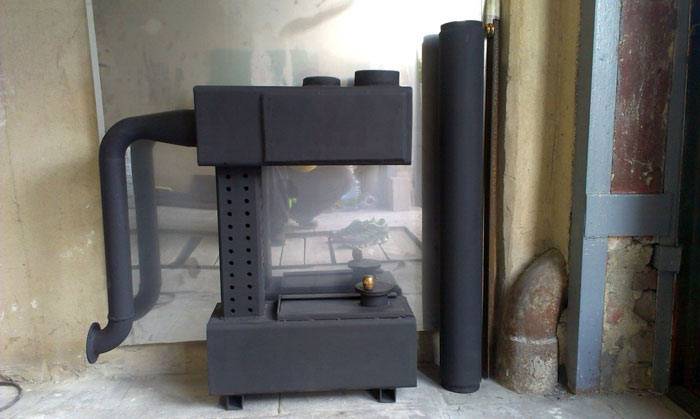
The photo clearly shows how the additional chamber for heating the air is organized. The partitions form a kind of labyrinth and lengthen the path of passage through the heated zone. The air blast chamber is welded on top of the upper combustion chamber. According to the assurances of the developers, the efficiency of heating the room is more than doubled.
Instead of an air maze, you can weld a water boiler.The heated water will have to be pumped into the radiators, but the increase in the efficiency of heating the room is worth it.
Manufacturing of the case
I will make a stove from this balloon
I used a used cylinder. There was no gas in it, but just in case, I opened the valve and left the cylinder on the street overnight.
Then I carefully and slowly drilled a hole in the bottom of the cylinder. To prevent sparks from appearing, I pre-moistened the drill with oil
Hole
Then I filled the bottle with water and drained it - this removed the remaining gas. Work carefully, try not to spill gas condensate, because it stinks very strongly and for a very long time.
Then I cut out a couple of openings. In the upper opening I will make a combustion chamber and put a heat exchanger, in the lower one there will be a burner with a pan. The chamber at the top was specially made so large that, if necessary, it could be heated with wood, pressed briquettes, etc.
It is shown how I cut the balloon It is shown how I cut the balloon It is shown how I cut the balloon It is shown how I cut the balloon In the end this is what happened
Then I once again rinsed the opened gas cylinder from gas condensate.
How to use a homemade unit correctly?
The unit described above should not be located near mixtures or objects that can easily ignite, or in a draft
It is also important that the chimney of the stove is completely sealed, and there is at least 50 centimeters of free space around in each side. It is imperative to ensure that no water gets into the fuel used, otherwise it will splash out of the holes in the pipe.

The "run-off" will heat up very quickly. Fill the container to two-thirds of the height, then, adding 25 grams of gasoline or thinner, ignite the mixture through the fuel filling hole. For ignition, it is preferable to use a burning wick screwed to a piece of wire.
Features of heating structures on "mining"
The devices described in this article are popularly called miracle stoves, because they use waste oils (motor, transmission), which cost very little. Due to this, the operation of such furnaces is cheap. Another miracle stove that interests us will not function on gasoline, diesel fuel, kerosene and other flammable mixtures.

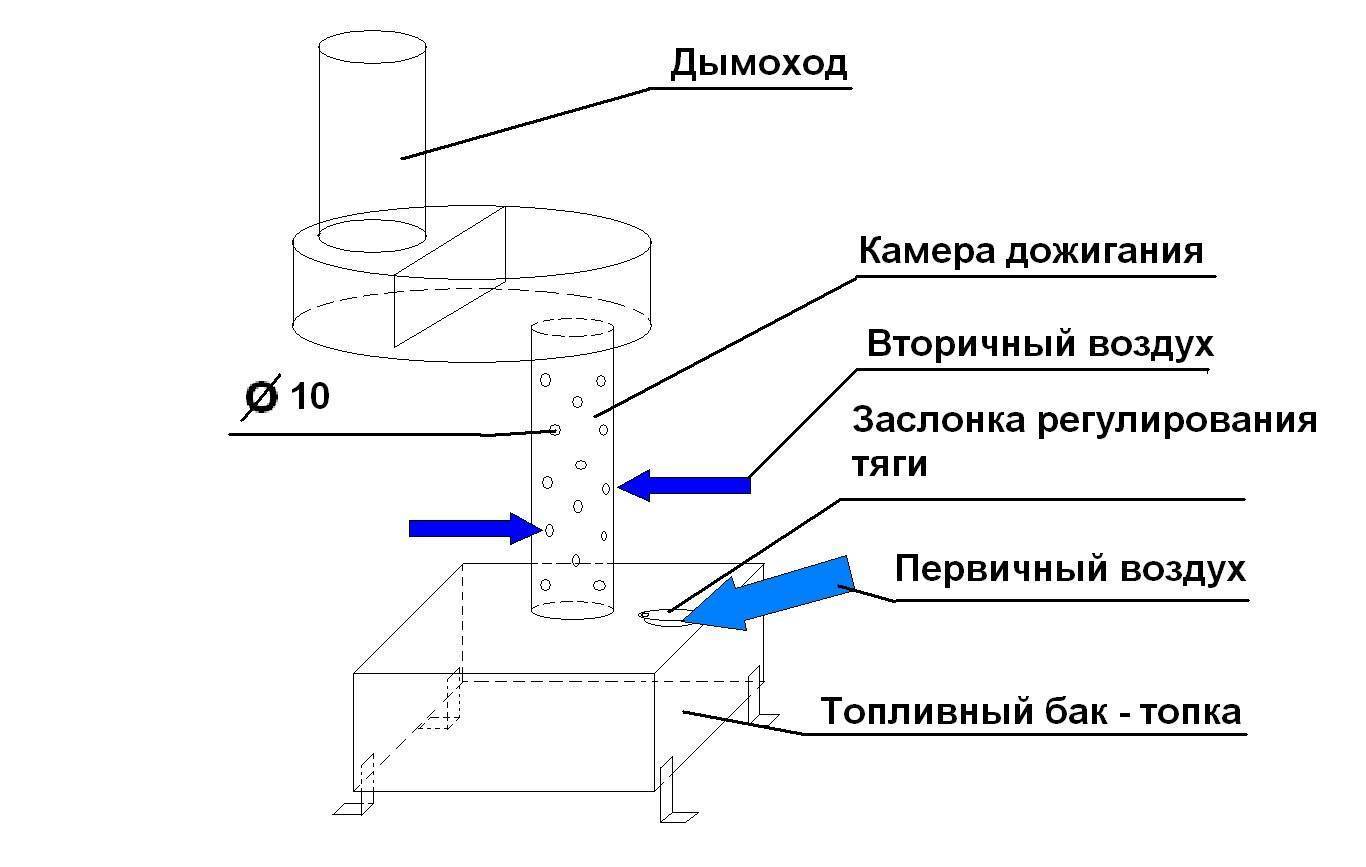
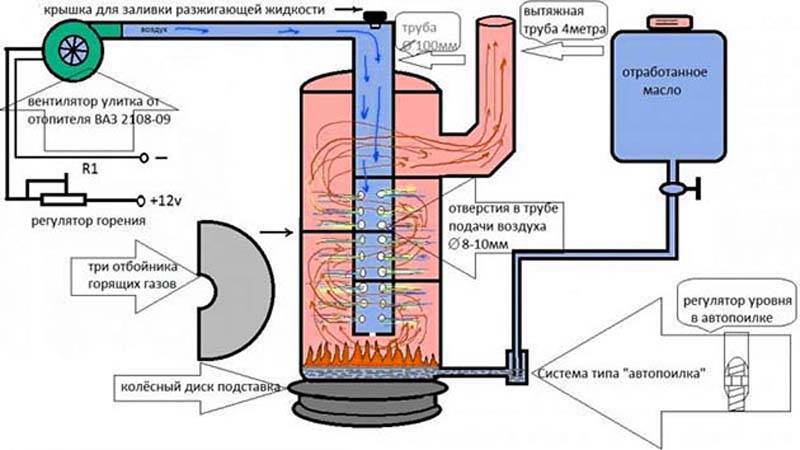
Devices on "testing" heat the premises by directly heating the air that is in them. From a constructive point of view, such a unit is two combustion compartments. In compartment 1, the used oil is burned, as a result of which flammable vapors are formed. After that, the vapors are fed into compartment No. 2, where they mix with air and, having a sufficiently high temperature, quickly burn out, which is why large volumes of thermal energy are released.

In most cases, both compartments will be connected to each other using a pipe.
It is important that holes with a diameter of about 10 millimeters are drilled in the latter - through them air will flow into compartment No. 2 for mixing with combustible vapors

Below are the main advantages of the "mining" units.
- They are quite safe, since in this case the oil vapors burn, and not the used oil itself.
- It is quite possible to make such a stove with your own hands, using cheap and affordable materials for this.
- Finally, such devices are easy to install and use, which is good news.

But there are also some disadvantages that everyone who plans to make a miracle stove on their own should know about.
- Used oil must be stored in an extremely warm room. At sub-zero temperatures, it will simply freeze and lose all its properties.
- In addition, this oil must be specially filtered. It is forbidden to use simple contaminated "working off" from automobile services.It is almost impossible to clean contaminated oil at home.

Scope of use
Using the stove to heat the greenhouse
The stove for testing, according to the principle of its functioning, belongs to the universal devices. In a number of industrial areas, these units are used as heaters and heat guns.
For heating private residential premises, these devices are used very rarely, since they are unsafe in operation. Due to the presence of hot metal surfaces, the air is constantly dry.
For industrial premises, furnaces on waste lubricating and combustible products are just ideal, since their main advantage is the rapid heating of the ambient air due to good heat transfer. These heating devices are traditionally used for operational heating of the following objects:
- garden greenhouses;
- public and private garages;
- construction sites in the winter;
- repair shops and service stations, as well as car washes.
Heat exchanger assembly
He made a stove to heat the garage. I don't have water batteries in my garage, so I decided it was better to immediately warm up and circulate the air. If you have water batteries, you can abandon the air heat exchanger and simply run 4-5 water coils through the upper chamber, connecting them in parallel. In this case, the structure must be supplemented with a circulation pump and a fan. Such equipment will allow you to heat even the whole house with a stove, you just need to allocate a room for installing the stove.
Heat exchanger assembly
Let's go back to my heat exchanger. I installed it between the chimney and the stove burner - there is the most heat here. I welded an iron plate to the heat exchanger. Thanks to it, the flame will be better retained. It will also contribute to the distribution of fire inside the stove body.
An air swirler was installed inside the heat exchanger. There are no engineering delights in such a swirler, but it copes with its task one hundred percent. When operating at maximum power, the metal of the case is reddened to a scarlet color, and the heated outgoing air breaks through even through a glove. The swirler itself can be seen in the photo.
I make a swirler, I make a swirler, I make a swirl, I put a swirl
Then I took a duct fan and put it on one side of the heat exchanger. By the way, a thermal relay can be connected to the fan for automation. This will allow you to set the temperature yourself and save resources. For example, I decided to use a thermal relay from Autonics - I just had it lying around. But you can take some kind of budget model, for example, Vemer KLIMA. I also tried it, it functions perfectly.
Made a boost
Heat is concentrated in the firebox compartment.
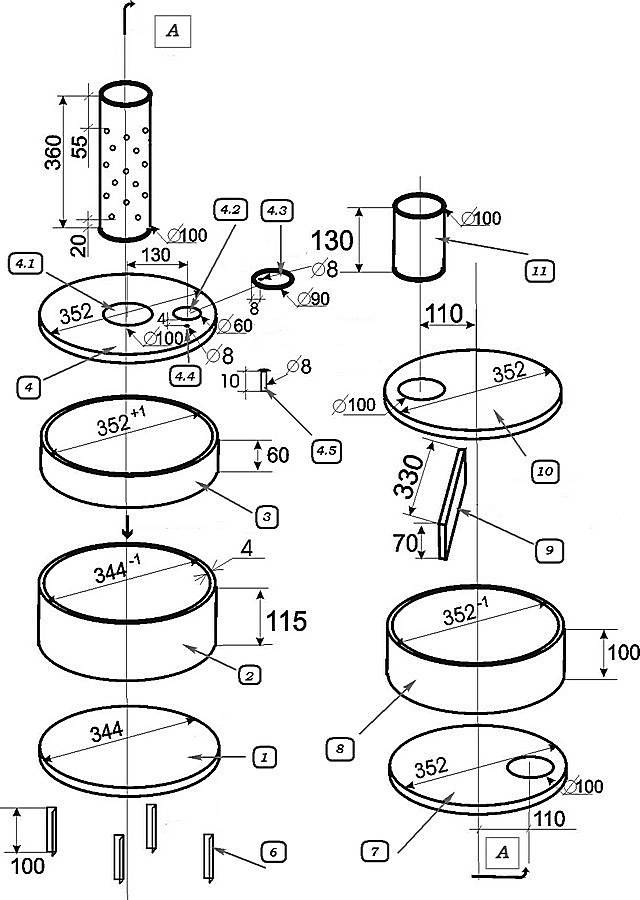
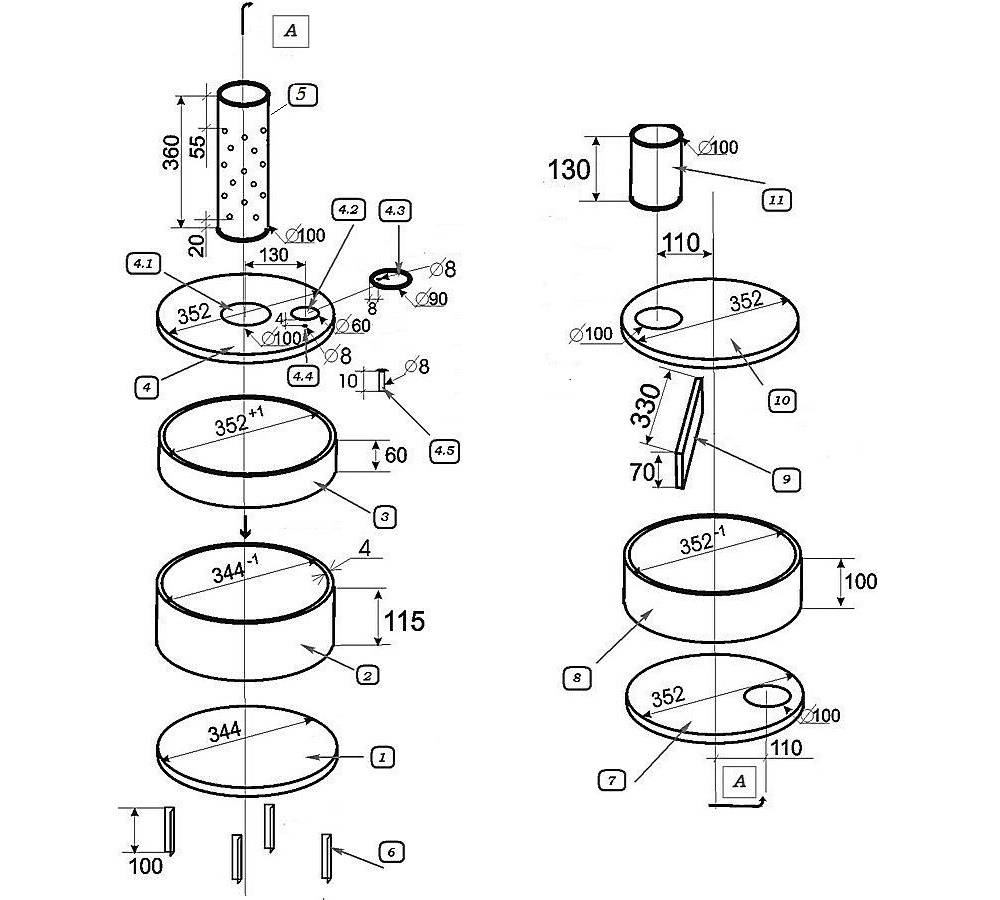
Making a furnace from steel sheets - tips for DIYers
Steel sheet units are very popular among garage and workshop owners. Such an oven will not only heat the room - you can even use it to cook food! Characteristically, the dimensions of the structure are quite compact.

The algorithm for making a furnace from steel sheets is as follows.
Step 1. First, you must find a suitable drawing of the furnace at the "working off".
Step 2. After that, make the bottom of the firebox and the bottom of the body, using sheets of 6 mm thickness for this. Use 4mm steel to make the tank itself. All these blanks are quite easy to make if you arm yourself with a grinder.
Step 3. Take a sheet with a thickness of 4 millimeters, cut a strip from it, the width of which is 11.5 centimeters, fold it into a ring with a diameter of about 34 centimeters (for this it is convenient to use a sheet bending machine), and then weld the strip to it.As a result, you will have a spent fuel tank tube.

Step 4. Taking the same sheet, cut out a 34-centimeter circle that will serve as a lid for the tank made in the previous step. Weld the iron corners to the lid on 4 sides.
Step 5. Now take a sheet 6 millimeters thick, cut a 6-centimeter wide strip out of it, and then - the second circle. The diameter of this circle, as well as of the ring, should slightly exceed 35 centimeters.
Step 6. Cut a 10 cm hole in the center of the circle for the chimney, and next to it - another 5.5 cm hole. Fuel will be supplied through the second hole. Finally, weld the ring and circle together to form a tank for filling the waste oil.
After that, you can start making the bottom of the tank. Take a sheet 6 millimeters thick, cut a circle out of it and, stepping back from the edge of 2 centimeters, make a hole in it (circle) for the chimney pipe. To make the branch pipe itself, cut a 13-centimeter piece of pipe with a cross-section of 10 centimeters. The next stage is the creation of a partition, for which the same 6 mm steel will be used. Cut out a rectangle of 7x33 centimeters from it, and set the finished partition in a circle with a diameter of 35 centimeters and weld it securely. Now you can install the branch pipe itself.
We continue to make a waste oil oven with our own hands. Take the first pipe, make 48 holes in the bottom of it, 0.9 centimeters each (eight per circle, the total number of circles is six, and the distance between them is six centimeters). Now this pipe, after processing, can be installed in the fuel tank cap.
It is important that in the end the pipe is positioned absolutely level. If you notice deviations, process the pipe with a file or grinder
- The two parts of the container are connected, and they also do not need to be welded. O-rings are used to ensure a tight connection.
- To the pipe, on which there are 48 holes, it is necessary to weld a container for filling fuel, while on the other side - a couple of parts connected by rings.
- Then a peephole (a special round plate) is placed on the hole for the oil supply, which can be easily opened and closed.

At the very end, you need to install a chimney. Its length must be at least 4 meters.
It is important that it is located vertically on the outside (there should not be any deviations - use a building level). But in the room itself, a slight slope of the chimney is allowed
What to build a stove from?
To assemble such a stove, I have prepared the following:
- gas cylinder for 50 liters;
- steel pipe. It is best to use a pipe with a diameter of 10 cm. Two meters of the product were enough for the body, burner and chimney;
- steel corner. In total, it took me a little more than a meter of a corner by 5 cm. From it I made a stand for the stove, various internal parts of the heat exchanger and door handles;
- sheet of steel. The plugs and the bottom of the upper chamber took about 50 cm2 of a 4-mm sheet;
- brake disk. I used a cast iron disc from a car. The main thing is that it fits freely into the balloon in size;
- empty container from freon. A standard bottle will do. The main thing is that the needle valve works. I used it to make a fuel tank;
- a piece of fuel supply hose;
- a pair of clamps;
- a piece of half-inch pipe. Oil will be fed into the stove through it;
- half-inch valve;
- loops.
Rules for the safe operation of a waste oil stove
Due to the peculiarities of the operation of the heating device, during its operation, it is necessary to strictly follow the safety rules.
Since such an oven is an additional risk factor, it is necessary to keep a fire extinguisher ready at all times in the room.
When the stove is fired up, a flammable liquid is poured over the oil - gasoline, solvent.
Not allowed:
- pour water over the red-hot stove body to cool it;
- close the perforation of the tube;
- stop the operation of the heater by other means other than the carbon dioxide fire extinguisher.
 The furnace body gets very hot during operation
If malfunctions are detected in the oven, the oil supply is stopped, they wait for the flame to go out and troubleshoot.
During operation, the body of the appliance gets very hot, especially the upper drum and the initial section of the chimney. This must be taken into account when adding oil to a working oven.
 Requirements for the place of installation of the oven
Oil fired stoves
The use of such stoves is typical for garages, utility rooms, country houses and other premises, mostly of a technical and economic nature, which do not require any special cleanliness and aesthetics.
Advantages and disadvantages
In general, stoves operating on liquid fuel perfectly fulfill their purpose, but just like other types of stoves, they have their own characteristics, including advantages and disadvantages.
pros
- Simple and cheap construction.
- Stoves heat well small rooms such as garages, utility rooms and small country houses.
- A stove made according to the rules does not smoke and almost does not burn.
- Compact and mobile due to the lack of installation work.
- Fireproof, subject to the relevant safety regulations. Oil is very difficult to ignite, only vapors are highly flammable.
Minuses
- Used engine oil should only be used filtered, free of impurities, as an explosive situation may arise.
- Presence of oil odor.
- The characteristic hum of the stove.
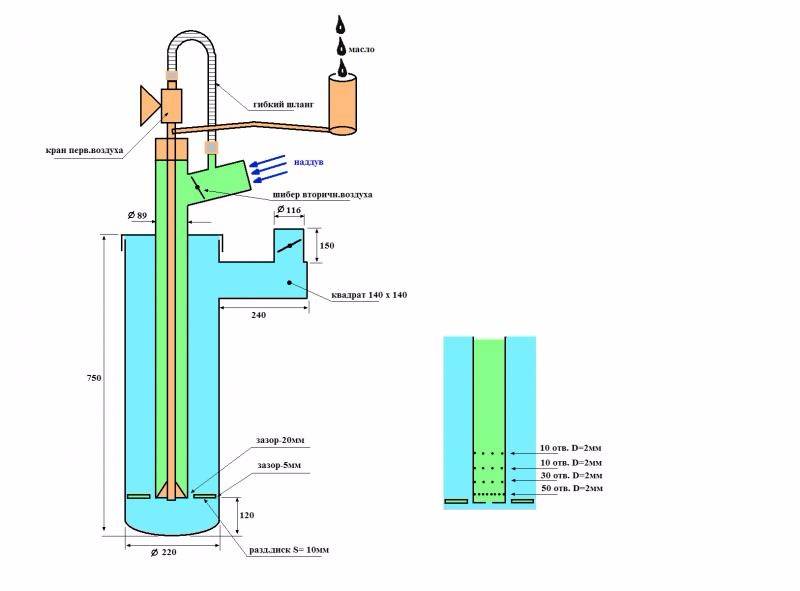
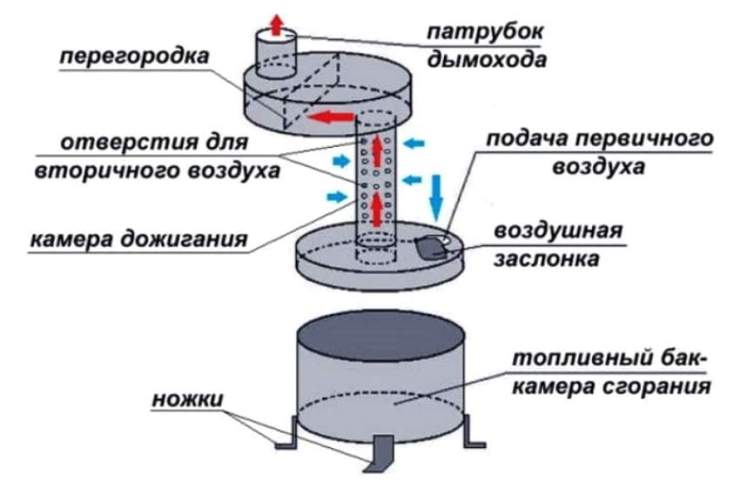
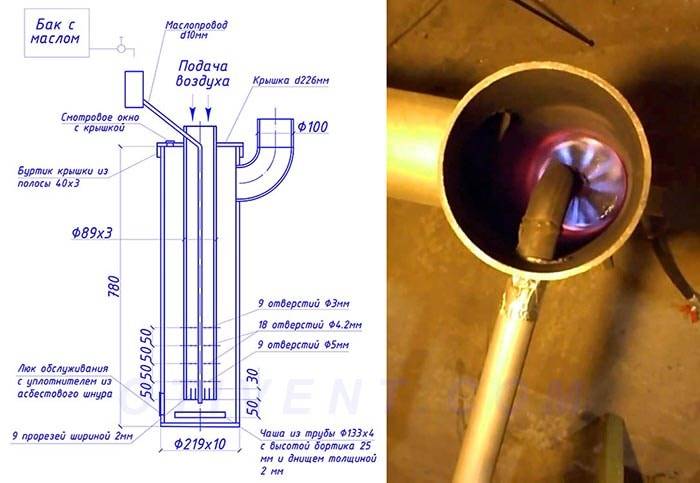
The design and principle of operation of the heating device
It is based on the principle of operation of kerosene gas. This is a heating device that uses kerosene and air vapor to generate thermal energy.
The heater consists of the following blocks:
- Lower compartment. Welded from 4 mm sheet steel. Necessarily has a round shape. Air flows in through the damper, which is needed for the combustion process. If the door is closed completely, the combustion will gradually stop.
- Cover with a hole.
- Middle compartment. This is a perforated pipe. The holes are required for an unrestricted air supply. For the manufacture of this and other parts, they take metal 5.5 mm and thicker.
- Upper compartment.
- Chimney. Serves for the removal of combustion products. Pipe length - from 4 meters, optimally - 5-7 meters. Inclined sections up to 45 ° C are allowed, increasing the efficiency of heating equipment. But the greater the slope, the more soot will settle. There should be no horizontal sections, the upper part is directed only vertically. For the manufacture of this part of the furnace, non-combustible materials are taken - tin, copper, stainless steel. The chimney is installed in the upper part of the body. It is desirable that it separates - this simplifies maintenance.
The parts are welded together with a continuous seam.
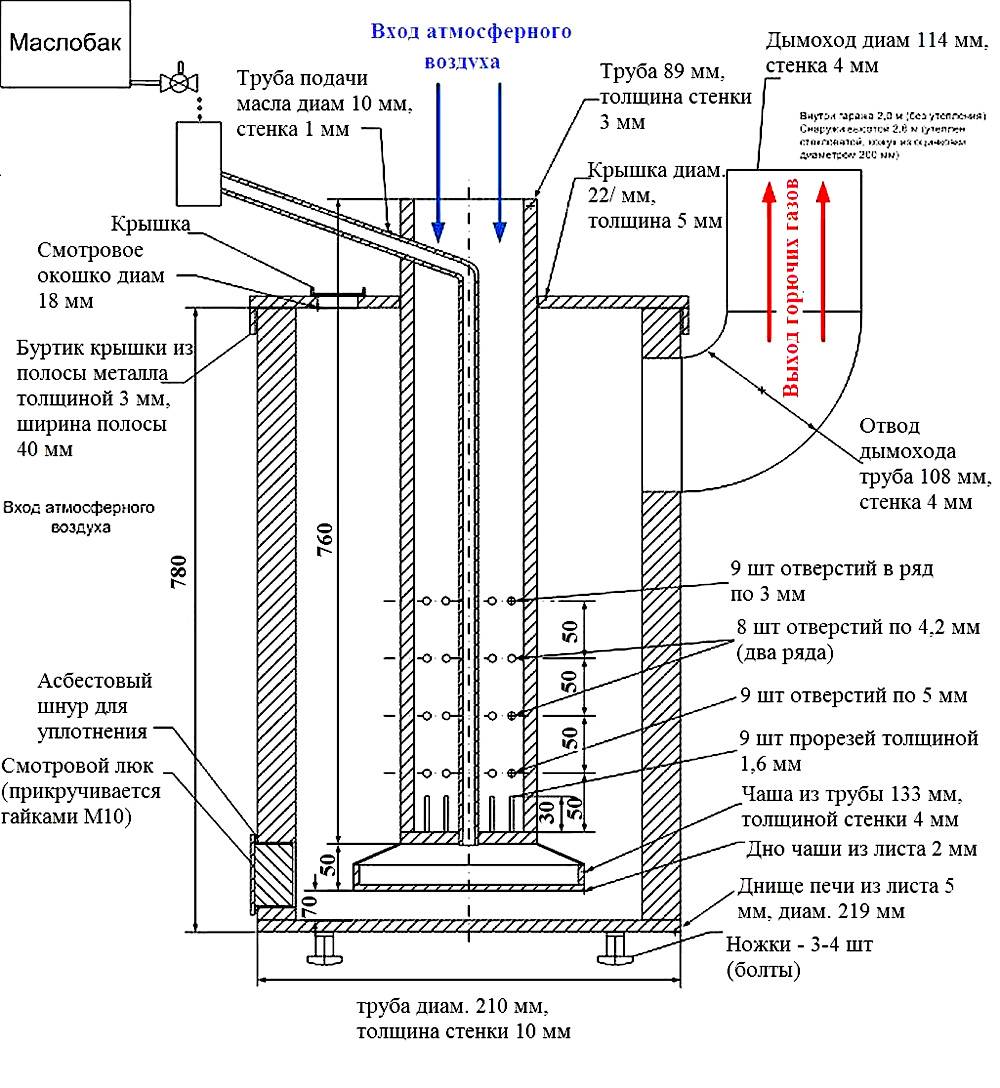
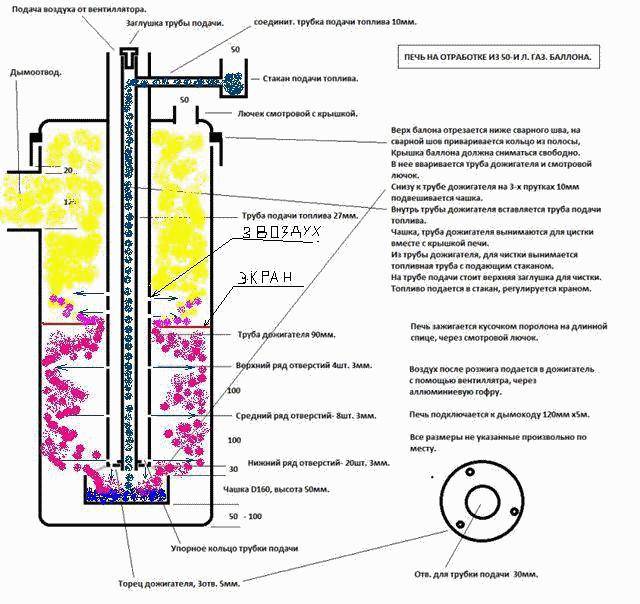
 Furnace diagram
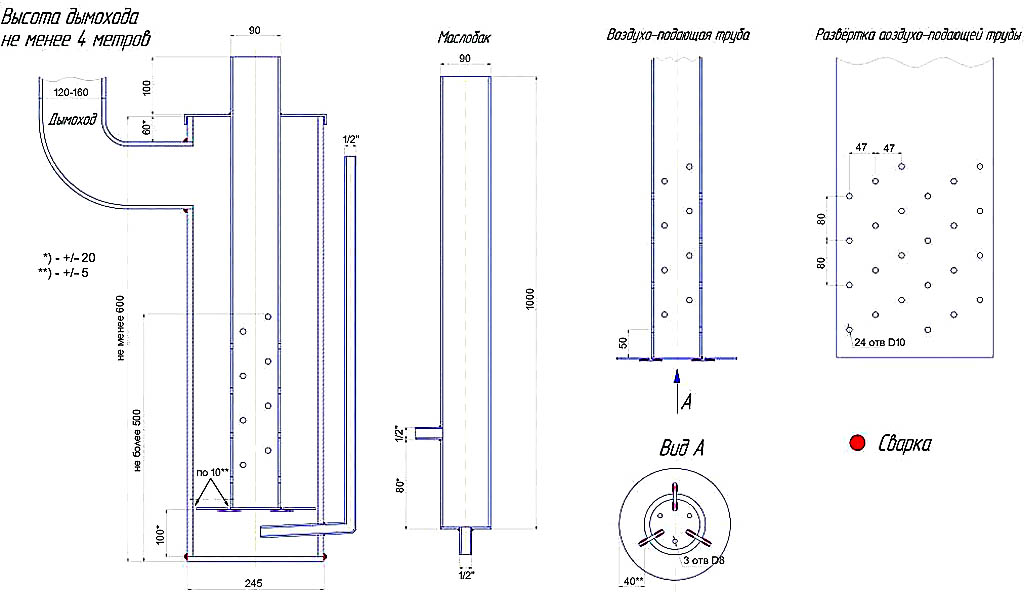
The heating efficiency is increased by the blower system. Small pipes are also welded to the top of the pipe connecting the upper and lower chambers. This increases heat transfer, and the upper chamber heats up less. Also, vertical ribs are sometimes welded onto the upper module.
The installation works like this. Oil is poured into the lower compartment, and set on fire with a wick. After the top layer boils, steam ignites. Turbulence is created, replacing the throttle and swirling the gases. So the burning vapors get into the perforated one, where oxidation takes place under the influence of oxygen. In this chamber, the temperature reaches 800 ° C and more.Nitrogen becomes more active than oxygen, there are many toxic compounds of nitrogen and carbon.
 Standard and Retrofit Furnace with Welded Fins and Tubes
In the upper part, pyrolysis residues are finally burned out. Here, the temperature drops sharply, nitrogen loses its activity and is displaced by oxygen. Therefore, harmless nitrogen gas escapes from the heating device, steam, solid compounds of carbon monoxide partially settle inside the chimney.
Pros and cons of waste oil furnaces
This heating method has become popular because of the cheap fuel. Not furnace oil is used, but already exhausted oil - fuel, transmission, motor, diesel fuel is allowed.
The advantages of such ovens:
- easy equipment manufacturing;
- affordable cost of materials;
- low cost of fuel compared to electricity, gas;
- maintenance does not require any significant costs;
- structural reliability;
- after a little modification, you can cook food on the stove.
Waste oil stoves are often used to heat garages, utility rooms and garden houses.
Table 1. Indicators of furnace operation when using MG-10 engine oil
| Index | Meaning |
|---|---|
| Engine oil consumption | Max - 2 l / h, nom - 500 ml / h |
| Efficiency | 75% |
| Furnace parameters | |
| Chimney height and diameter | 4 m, 102 mm |
| Height / width / depth of the oven | 700/300/500 mm |
Disadvantages of such ovens:
it is necessary to install a chimney without horizontal sections;
the need for thorough cleaning at least once a week, since burnt oil products clog the tube;
strong heating of the case, which requires special care when handling the device;
unpleasant smell when burning waste oil;
the flame goes out only after the fuel has completely burned out;
characteristic noise is heard during operation;
the fuel only ignites when the flash point is reached.
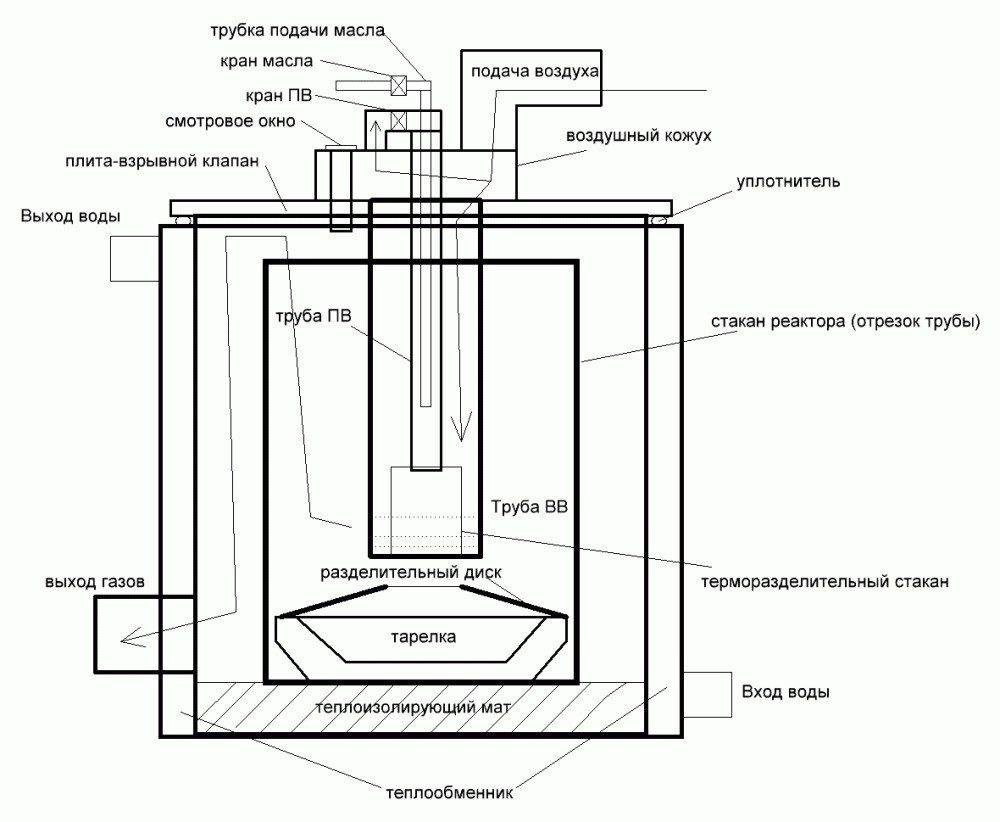
Waste oil furnace device
Manufacturing of a pallet for working off
The pallet was made from a cast iron car brake disc. Cast iron has good heat resistance, so I decided to take it.
From this disk I will make a pallet
At the bottom I welded the bottom.
The steel circle is the bottom, welded the bottom
I welded the lid on top. In it you can see the counterpart of the burner and the opening. Air enters the stove through the opening. I made it wide - it's better this way. With a narrow opening, the air draft may not be strong enough to prevent oil from entering the sump.
Then I made a clutch. She connects the pallet and the burner in my stove. With the clutch, it will be much easier to service the stove. If necessary, I can take out the drip tray and clean the bottom of the burner.
Then I made the coupling
The sleeve was made from a 10-centimeter pipe, simply by cutting it along the longitudinal edge. I did not weld the opening in the coupling - there is no need for this.
The bottom of the firebox chamber and the burner
Then I made the bottom for the top compartment of the stove. For this I used a sheet of steel 4 mm thick.
I cut the bottom out of steel, try on the bottom. Everything is neatly cut and connects with almost no gaps
I decided to make the burner 20 centimeters long - that's enough.
It'll be a burner, drill holes, grind
I made a lot of holes around the circumference so that air can easily get to the fuel. When all the holes were ready, I sanded the inside of the burner. Be sure to do this too, because soot will begin to actively collect on junkets and other defects.
First, I welded the burner into the bottom of the upper chamber and then put them back in place. You can safely lay wood on such a stove shelf. Relevant for cases when there is no way to replenish mining stocks.
First, I welded the burner into the bottom of the upper chamber.