Where to place?
The correct placement of a barbecue is not only a matter of convenience and beauty, but above all safety.
The basic requirements for the location of the barbecue are the same for all models, namely:
- Smooth surface;
- there should be no flammable objects (buildings, plants, cars, etc.) nearby;
- distance from the residential building by 5-15 meters;
- providing protection from rain under a canopy or roof;
- wind rose (the direction of the smoke should be in the opposite direction from the residential building).


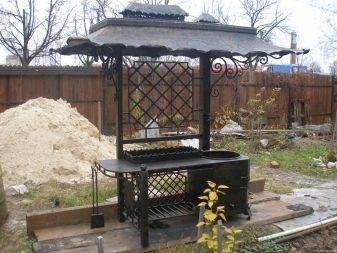
Do not forget that the intense heat from a barbecue can harm any vegetation, so you do not need to place it surrounded by flower beds or garden beds. Not only the appearance of the landscape will suffer, but also the harvest. And also it is better to think in advance about the path to the barbecue from the house and the recreation area.
Making a portable barbecue
For out-of-town picnics, a stationary hearth is unsuitable, therefore, a collapsible or transformable metal brazier is being constructed with your own hands from sheet steel. The main nuances of the mobile hearth are:
- the height and width of the bottom and side walls, all dimensions of the end walls remain unchanged;
- the legs are removable (less often they are mounted on hinges), the length depends on the size of the car trunk;
- on the side and end walls, shelves are bent from below, on which the bottom is laid after assembly;
- the walls are connected by slots opposite to each other, or they can also be folded back on hinges to the working / transport position.
Read more about the manufacture of this type of barbecue here.
Thus, knowing the dimensions for making a barbecue, the approximate number of users, you can make a mobile iron barbecue. For the construction of a stationary, additional welding equipment will be required (although you can do without it), but all the necessary information is above.
Features of the design of the barbecue
When building a barbecue with your own hands, you should take into account the nuances of cooking meat on coals in this way and the convenience of operating the hearth:
- on the one hand, the cylindrical shape of the barrel and pipe is ideal for the brazier, reducing the number of welds;
- on the other hand, the coals will be covered with an uneven layer, the meat in the middle of the grate will dry out / burn, so a removable grate should be placed inside to evenly distribute the heat and clean it from ash;
- the upper part cut from the pipe / barrel automatically becomes a cover that protects from rain and keeps the temperature inside the hearth;
- the stand can be another pipe or barrel installed vertically, rolled metal trestles, arcs with racks or a frame of a used sewing machine.
Attention! Unlike refractory bricks, steel, even thick-walled, burns out on contact with an open fire. Therefore, fires should not be made in metal barbecues; it is better to use ready-made coal to increase the operational resource
How to make a brazier from a 200 liter barrel with your own hands
After preparing the basic tools and materials, you can start creating a barbecue from a barrel with your own hands. The construction manufacturing process consists of the following stages:
- Rinse the inside of the barrel thoroughly and let it dry. It is necessary to remove all the contents from the barrel, since the remaining combustible substances can ignite during the operation of the grinder.
- Using a tape measure, measure the circumference and mark two opposite points on the circle that forms the edge of the bottom of the barrel - a cut line will pass through them. It is necessary to mark the points and and on to the barrel.
- Draw lines along the side of the barrel, connecting points at opposite ends. Along this line, cut with a grinder to divide the barrel into two equal parts. Observe safety precautions and use personal protective equipment.
- Now you can make an edging for attaching the barbecue. To do this, make special fasteners from the corners, you need to weld them together. The entire structure must match the dimensions of the barrel so that it is securely fixed in the mount.
- Saw off the legs from the metal bar with a grinder and weld them to the edging. You can use a straight or cruciform mount type.
- On top of the attachment, you need to make a special grid or points for the location of the skewers. To do this, you can make cuts along the entire length or weld on a special movable belt with a grate.
After completing the work, the surface of the barbecue should be sanded to give it a shine. If necessary, you can paint the brazier from the outside with a special heat-resistant paint.
Brick BBQ
When building a stove in a summer kitchen, it is worth considering the design and its fire hazard. Observe fire safety regulations. It is worth using a special refractory brick that is resistant to high overheating.

An important part of the stove is a properly constructed blower and chimney. You can see the options in the photo of a brick barbecue.

To begin with, it is worth preparing the foundation for the stove in the house or in the gazebo. Consider a smoke extraction and stove exhaust system. Anything can be used as fuel, it can be an electric stove built into a stone base, a gas stove, or use solid fuel.

Self-construction of the oven will cost significant material costs, but cooked meat on brick is much tastier and healthier.

Build a canopy over the stove that will hide you from the rain, and due to the chimney and chimney, smoke will not stream on you. It is better to install the stove separately from the house, it will be safe, and cooking will take place in the fresh air.

Painting
For painting, you must first prepare the surface - clean, degrease, grind it. Some of this work is done before cutting the barrel, others just before painting.
Paint can be applied either by spraying or by hand using a brush.
What kind of paint should I use?
Given the specifics of the barbecue, you will need a black matte paint that is resistant to high temperatures. The best option would be a special paint for car mufflers. A regular coating will not work, as when the case heats up, the paint layer will bubble and flake off.
Do-it-yourself sheet metal brazier
A brazier made of metal with your own hands will serve you faithfully for many years only if the thickness of the sheet is sufficient and the metal can withstand high temperatures without the risk of burning out. In addition, a product with a thickness of 4-5 mm will never lead, which often suffers from structures welded from roofing sheets. Most often, a device with a wall thickness of 1-2 mm is needed for outdoor trips. Its weight is much less, and a self-made brazier of a collapsible design, the drawings of which are on the network, are also more convenient to transport.
Before starting work, you need to stock up on a sufficient amount of sheet metal with a thickness of 2-4 mm, a corner with a shelf width of 40 mm, a welding machine and an angle grinder, an electric drill with drills, a ruler, a marker and a construction square. For the manufacture of legs, you need to prepare a pipe or square with a cross section of 400 mm2. The work on the manufacture of a stationary barbecue with your own hands from sheet metal is performed in the following sequence:
Transfer the drawing to a metal sheet and cut out the blanks with the help of a grinder. In the case of using a material with a thickness of 2 mm, a drawing is applied in the form of a scan, and then the workpiece is bent at right angles along the line of abutment of the side walls to the bottom.
With the help of a square, the side walls are seized by welding perpendicular to the bottom, and then the seams are welded along the entire abutment line.
With a drill with a diameter of at least 12 mm, holes are drilled for air flow in the lower part of the side walls or the bottom, depending on which drawings you use when making a brazier with your own hands.If the air flow will be through the bottom, then an additional bottom ash box should be provided.
In the long walls, slots should be made for skewers. It is best to alternately cut the grooves 3-5 cm and 6-8 cm long. This will allow you to set the required height of the skewers above the coals.
- The next stage will require you to study the photo of braziers on the network or design your own frame in which a brazier assembled by yourself will be installed. Such a frame is mounted from a metal corner and a profile using welded or bolted connections. Its design should provide shelves for dishes, firewood and appliances.
- If you plan to make a brazier with your own hands from metal of small thickness for outdoor trips, the frame drawings can be set aside. You won't need it. It is better to weld short (up to 8 cm) pieces of a metal pipe with a diameter of up to 25 mm in the corners of the bottom, into which pieces of a bar or pipes of a smaller diameter (up to 20 mm) will be inserted as legs. Their length is selected based on their needs.
- Handles from a metal bar should be welded to the top of the short walls of the barbecue for easy portability.
- The roof, installed over the barbecue, will be able to protect the hearth from snow and rain. It is not at all difficult to make it, it is enough to provide side posts and a pair of floors, on which roofing iron of the required size is laid.
- Do not forget to decorate your work with various forged decorative items that can be purchased in the retail network. Next, the product and the frame are cleaned with a metal brush and painted with heat-resistant paint. After it dries, making a barbecue from metal with your own hands is considered complete and they begin to test the barbecue.
In the process of work, you can correct the drawings and make a brazier with your own hands that best meets your technological and aesthetic requirements.
Varieties
All barbecue models are divided into two options.
- Mobile models can be folded, easily carried, they are small in size and light in weight;
- Stationary models are barbecue ovens built of brick or stone. They are large in size and almost all models require installation on a foundation.
Mobile barbecues are made of bricks, laid out without the use of mortar. These street models are easy to assemble by yourself, disassemble and reassemble. Designing in such structures is not very difficult. Stationary barbecues are usually brick or stone. The functionality of such a barbecue is limited only by its design.

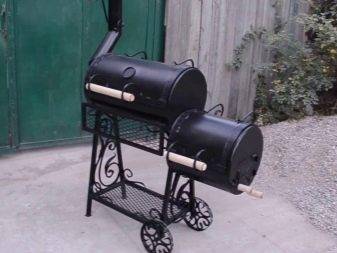
The simplest mobile barbecue is the disposable one. Its structure consists of a coal pan and a thin grate. Since it is made of a thin type of tin, the pallet burns out after the first use. There is a large variety of foldable models that fit in a small plastic suitcase for easy transport. Their design is very simple, consisting of a brazier and a grate.


A more complex model is a BBQ cauldron. This original American version is made from chrome nickel. In appearance, it looks like a cauldron or a deep frying pan, presented on three stable legs and complemented by a dome-shaped lid. At the bottom there is a rounded tray that is suitable for plates and other auxiliary utensils. Thanks to such a device and the presence of a lid, it can be easily used as an oven or smokehouse.
The barbecue trolley has a fixed or folding surface.
The electric barbecue is convenient for indoor use in the kitchen. A gas barbecue is a whole complex that contains the basic functions of a barbecue and grill. Such models are more suitable for use in the catering industry. They are very massive, weighing about 60 kilograms, which refers them to a greater extent to stationary models.


Any model has many additional elements, which makes it more comfortable to use.
These include the following:
- built-in mechanical and automatic spit;
- an enlarged open firebox area, due to which a variation of a garden fireplace is easily created;
- grill designed for frying food;
- a place for installing a cauldron, which allows you to cook a large number of various culinary masterpieces in the fresh air;
- separate area for barbecue;
- a construction for cooking barbecue;
- cooking and working surfaces;
- smoking chamber and more.


Building a fireplace inside the gazebo
A wood-burning fireplace, covered with a gazebo, is a stationary structure that cannot be moved and disassembled for storage during the cold season. Therefore, its construction must be approached with the utmost responsibility.
Particular attention should be paid to the foundation, as it must withstand a heavy hearth. Below is a detailed plan that will help you create a cozy corner where you can cook your favorite meals outdoors at any time of the year.
Here's how to make a 3 × 4 gazebo out of wood.
Laying the foundation
Dig a trench under the base, no more than 0.5 m deep. Fill the recess with gravel approximately halfway. Then compact the gravel thoroughly. As a result, you will end up with a kind of pillow.

Then, along its perimeter, it is necessary to install the formwork. Next, mount the reinforcement, which can be iron rods or steel mesh. Next, concrete must be poured into the formwork. After about three days, as soon as the concrete hardens and dries, you can remove the restrictive elements.
Important! Make sure that the reinforcement never protrudes beyond the upper edges of the formwork.
Woodshed and portal masonry
A stationary fireplace is usually a two-tier structure. The first tier is a woodshed, which is placed directly on the base under the stove. Dry logs should be stored here. Bricks and concrete base should be cleaned from dirt before laying. This measure guarantees reliable bonding of bricks to the concrete plane.
 Moisten the base with water, then apply the fixing agent and lay the initial row of bricks. Lay the masonry using a proven method: on the edge and at a distance, approximately 10-11 tiers.
After completing the construction of a place for storing firewood, isolate its upper border from the second row. A steel corner and an iron lattice can serve as a delimiter. The spacers should be flush with the top bricks.
Important! It is unacceptable to use a sand-cement mixture as a connecting solution. It does not resist high temperatures when in contact with an open flame.
The second building level is a portal
To lay the bottom of the portal, use a fire-resistant material, placing it on a metal grate. Fill the joints between the bricks soundly with fireclay clay. You should get a completely flat, stable surface. Then lay the first tiers of the rear and two side walls of the portal.
We suggest that you familiarize yourself with the information on how to build a gazebo from 4x4 wood.
Fireplace tooth
Having coped with the first two rows, proceed with the laying of the fireplace tooth. This element represents the rear wall of the portal, assembled at a slope of approximately 60 °. Its presence is necessary for the complete removal of volatile carbon monoxide substances.

For this purpose, process the chimney tooth with a grinder. From each building element of the first level, saw off some part at the required slope. The geometry of the sidewalls must correspond to the slope of the tooth and form a single whole with it. Place the top row just above the portal arch. In this position, it will ensure the escape of volatile combustion products into the pipe.
Also find out how to build a gazebo with your own hands in one day.
Chimney installation
Also lay out the channel for the removal of combustion products from refractory bricks. During installation, do not allow cracks and cracks - seal them in time with clay.
Observing this technology, you will provide the stove with excellent traction and protect the surrounding space from the effects of smoke. Another important point is the height of the chimney - it should be enough to prevent corrosive gases from entering the windows of neighboring buildings.

Preparatory procedures
The good news when making a barbecue from a barrel is that the amount of materials required for work is much less than the list of tools:
- metal barrel;
- steel profile: pipe, corner, strip (everything that comes to hand);
- mesh or lattice;
- metal hinges, common door hinges are often used.
From tools:
- welding machine;
- grinder with discs for cutting and grinding;
- measuring tool: tape measure, scribe;
- jigsaw;
- fastening tool;
- electric drill with a set of drills.
When choosing a barrel for a barbecue, its size is not important. It can be 50, 100 or 200 liters. The main thing is that this container is not previously used for fuels and lubricants. The smell of oil products is very persistent and will be present in all dishes cooked on such a grill. For such purposes, packaging that no one needs for a long time is usually used.
Therefore, it is important to make sure that there are no corroded cavities, especially in places close to the bottom and lid of our barrel. After confirming the suitability of the starting material, it is necessary to thoroughly wash the inner surface as much as possible.
Cutting capacity
Before cutting the barrel, you need to clearly understand the purpose of the future structure. Will it be just a brazier, a barbecue woman, or a semblance of a stove with the ability to cook ordinary dishes. Depending on the design chosen, you should make a markup on the barrel and get to work. In the process of cutting, we use a jigsaw or grinder
It is important to follow all safety precautions and direct sparks to a safe location. Work only with protective goggles.
Do-it-yourself metal braziers.
Metal from barrels, washing machine drums, gas cylinders may well become the basis for a barbecue in the country.
Do-it-yourself barbecue grill from a metal barrel.
An old metal barrel is the main contender for a barbecue or barbecue. It even looks like a classic barbecue in shape.

Cut off about a quarter of the side surface of the barrel - this will be our lid. For a barbecue, we need a base - we make it from four metal pipes on wooden struts.

We install grill grates inside the barrel, make a ventilation pipe and air holes.

We attach the barbecue lid to the barrel on two one-piece metal hinges. Install the thermometer and attach the wooden handle.
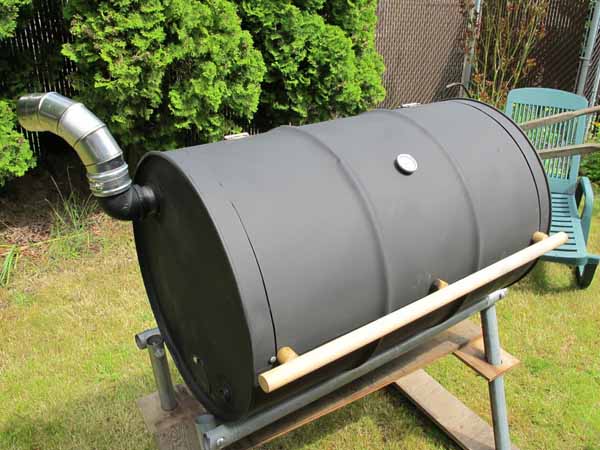
Brazier from the drum of the washing machine.
The drum of the washing machine is made of excellent quality metal and will make an excellent grill.

For better traction, the drum should be cut in half and folded as shown in the bottom photo.

Brazier stove with your own hands from a metal water heater tank.
This original brazier project combines a brazier with a stove.

The tank of the old water heater will serve as the basis for the barbecue, and the metal pipes will serve as a firebox.

In fact, we first make a wood-fired rocket stove: weld pipes, weld on our tank.
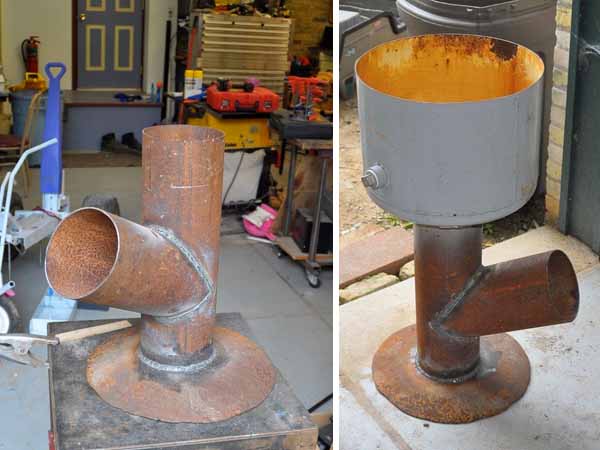
For good traction, we must provide for such an important detail for the barbecue stove as in the lower photo.

Now at the dacha we have a universal barbecue for your favorite kebabs.

So it is for cooking all sorts of goodies.

Such a grill maintains the desired temperature well and the meat turns out to be juicy. Well, and it will be fragrant from the sight of your firewood.

Brazier from a metal sink.
Are you renovating and changing your sink? Fine! We will make a brazier out of the old one with our own hands.

We remove all the details and fittings from the sink, leaving only the metal.

Because we have a sink with a metal countertop and we need to bend it, cut the metal with a grinder and with the help of a metal rail and our own hands, bend it at an angle of 90 degrees.

For the rigidity of the structure, we make wooden struts in the lower part. Here's a quick do-it-yourself grill.

Device and principle of operation
Starting to consider the device from the bottom up, be sure to pay attention to the legs. As a rule, these are four metal corners, pointed downwards so that they can be thrust into the ground.
The height of this element is selected individually if the product is made to order. In construction and gardening stores, you will most likely come across standard universal models with a length of 80 to 120 cm. Metal reinforcing rods are sometimes chosen as this element, some craftsmen resort to forged execution of the base of the barbecue.

There are also unique home-made designs installed on the lower iron part of sewing machines, unsuitable tables, and so on. Almost everything is used that stably adheres to any surface and is able to withstand the mass of a metal box and its contents during cooking on fire.
The steel box, which consists of four sides and a bottom, is the basis of the barbecue structure. Often, the lower part of this box is made reinforced in order to increase the life of the entire structure. The side walls are necessarily perforated so that the heat does not accumulate in one place and air circulation occurs. Thus, a kind of blower is created, like in stoves.


The principle of operation of such barbecues is known to everyone. Coals or logs of firewood are laid at the bottom of the metal box, a fire is kindled. When the fire dies down, and only coals, ash and heat from them remain in the grill, skewers with pre-prepared meat or vegetables are laid out on the structure in orderly rows. The heat in the hearth is supported by improvised means that create a powerful air flow inside the structure, but do not rekindle the fire on the ashes.
How to cut a barrel?
Cut lines are drawn on the surface of the barrel using a marker and a ruler. The barrel can be cut exactly in half, which will allow one part to be used as a lid or to make another brazier out of it. Another option is also possible, when the cut off part is smaller than the main one.

In this case, the cutting line does not reach the ends by about 2-5 cm, so as not to violate the rigidity of the barrel.
Procedure:
- The side surface of the barrel is marked according to the selected size and shape.
- Using a grinder with a cut-off wheel, carefully cut off the desired part.
- The edges of the cut on the barrel and lid are carefully cleaned from burrs, irregularities are leveled.
The cut edges of the lid and the side surface of the barrel must be secured with a corner, which is fastened either with self-tapping screws or by welding. After welding, the edges are again processed with a grinder with a grinding wheel.
If it is decided to cut the barrel in half, similar actions are performed, the only difference will be the passage of the cutting line through the end part of the container.
Frame creation
The frame, or stand, should be of a comfortable height for the wearer. The best option is 0.9-1 m (including the barbecue), but each person has their own preferences. Frame design options can be many:
- Crosspiece made of two rectangular frames connected in the middle part.
- Semicircles with legs, in which the barrel fits.
- Conventional supports, connected by a rectangular horizontal frame, inside which a barbecue (brazier) is installed.
Other options are also possible.
There are no significant advantages of one method over another, the choice is determined by the taste and personal preferences of the owner.
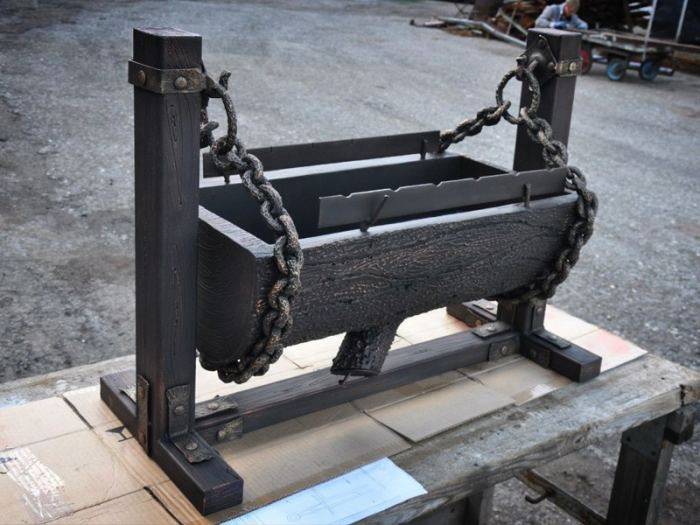
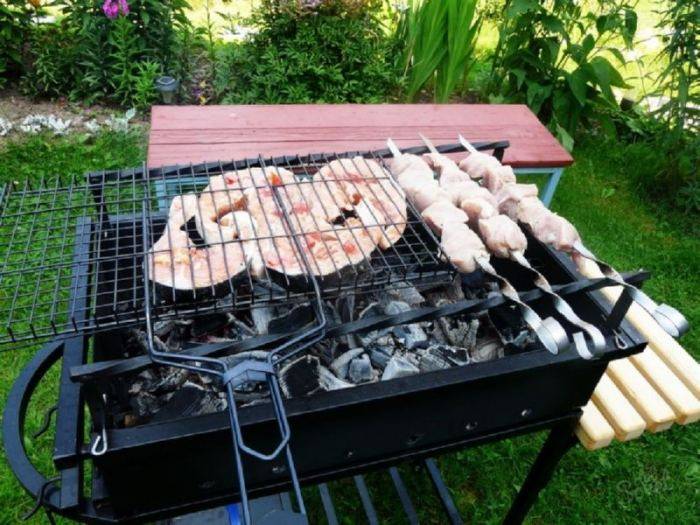
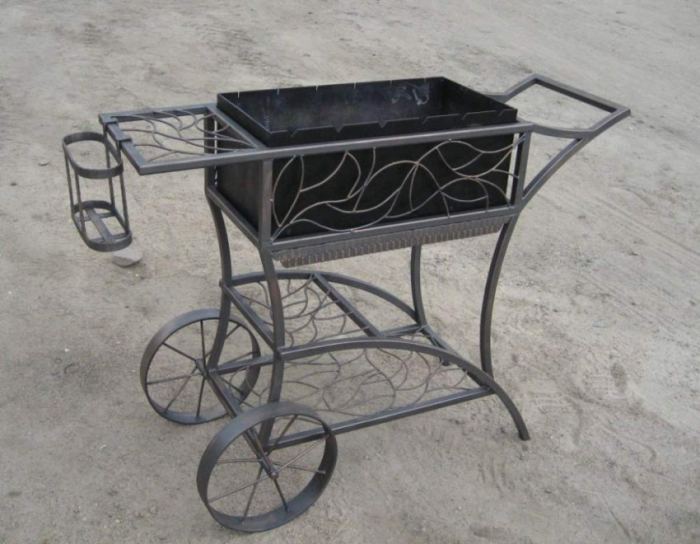
Do-it-yourself photo of the barbecue





We also recommend viewing:
- How to make a cold smoked smokehouse
- DIY smokehouse construction
- How to make a hot smoked smokehouse with your own hands
- How to make a wood splitter with your own hands
- How to make curtains for a gazebo with your own hands
- Efficient collection of rainwater
- We do water supply in the country with our own hands
- Instructions on how to make furniture from pallets
- Do-it-yourself pool cleaning
- Watering options for the site
- Instructions on how to easily remove the stump
- How to make a garage door with your own hands
- How to make a snow blower with your own hands
- Wood preservatives
- Simple drinker for chickens
- How to clean up the soot
- Good dry closet for a summer residence
- Good heating for the greenhouse
- Modern winter greenhouse
- Roof drainage system
- How to make a chicken feeder
- DIY decking
- How to make molds for paving slabs
- Instructions on how to equip a garage
- How to make grounding in a private house
- Gate lock
Barbecue making - the main features
Barbecue grill from a barrel is made by analogy with a barbecue grill. For this, all the same consumables and tools that were discussed above will come in handy.
- The metal barrel is cut in half.
- The drain plug is unscrewed and discarded, and the remaining hole is used to connect the chimney.
- Legs are made for a barbecue, from a metal corner or square, which are cut to the size corresponding to the growth of the owner. Holes are drilled on the legs and in the barrel and then everything is bolted together.
- From metal corners, a frame is made for the edges of the barrel cut, which is fastened by welding or bolts.
- The handle for opening the lid is attached to the corner that frames the edges of the barrel.
- The lid and body of the barbecue are connected with hinges.
- At the final stage, the grill grate is laid, on which meat and other products will be cooked.
- To fix the top of the barrel in the open state, a metal rod is used.
The construction of a barbecue or barbecue from a metal barrel with your own hands does not cause any particular difficulties, the only problem that interferes with work is the presence of electric welding and the skills of a welder. Although from this situation, you can find a rational way out by equipping all connections with bolts. Moreover, after all the work has been completed, the owner of the summer cottage can be proud of the construction of such a wonderful thing as a brazier or barbecue, which will make the life of vacationers more comfortable and convenient.
Manufacturing steps
Barrel rinsing. Before sawing the barrel, it is necessary to remove the remaining solvent from it so that an explosion does not occur. To do this, pour a full barrel of water, and immediately pour it out. It is then recommended to leave the barrel in the sun to allow the remaining solvent vapors to escape.
We measure the circumference of the barrel with a tape measure. The result obtained must be divided by 4. The resulting figure is the distance that must be set aside from the traffic jams in order to find two opposite points on the base of the barrel, equidistant from the traffic jams.
Mark these points with a marker on both sides of the base, draw two straight lines connecting opposite points of the cylinder along the surface of the barrel.
Using a grinder, carefully saw the cylinder in a circle. Don't forget about safety glasses
We saw against the course of the cutting disc so that the grinder does not bite into the metal and does not vomit out of the hands.
We pass on to cutting the edging of our future kebab maker. We will make the edging from the corners. We measure the angle along the length of the sides of the barrel section. It should turn out 2 long and 2 short. Conditionally, we saw the upper part at 45 degrees, the lower at 90 degrees.
We use the welding inverter to weld all 4 corners into the edging, after that we try on half of the barrel to fit.
We cut the legs of the future structure from a square pipe, length 900-950 mm. Saw off one side of the legs at an angle of 15 degrees so that there is a slight spread of the legs for better stability.
We insert the legs into the space between the base of the half-cylinder and the frame from the corners, mark the intersection of the edge of the barrel with a marker.
Using a grinder, we cut out the edging so that the leg stands close to the barrel.
We collect all the elements and weld together.
Steel tape 25 mm. we will need to make guides for a movable support from skewers. We measure the tape along the inner width of the future brazier, and cut it off. Guides need 2 and they should be on the edges of the barbecue on the inside. We put in place, and weld.
We make the movable support for skewers from a corner. To do this, we measure one corner shelf along the outer edges (along with the frame) of our barbecue, and the second along the inner space between the guides. Using a grinder, we cut out a rectangular piece from one corner shelf.
Our next step is to give the future barbecue device a presentation. To do this, insert a grinding disc into the grinder, and remove all irregularities and welds. The entire structure, as a result of the sanding process, should be smooth, glossy and shiny in the sun.
From a ten-millimeter tape, we bend a poker with a length slightly exceeding the width of the future barbecue.
Removing rust and dirt from the surface of the barrel, so we prepare it for the next stage - burning.
Burning is necessary in order to remove the paint from the surface and degrease it before applying the paint. We will burn the diesel fuel prepared in advance for this.
We take a rag, moisten it with diesel fuel, and use it to apply diesel fuel to the surface of the barrel. Then we set fire to the rags. To make it easier for yourself, use a fire-lighter or ethyl alcohol. Just splash some rubbing alcohol from afar onto a burning rag. Next, we wait until all the diesel fuel burns out, and the paint peels off the barrel. Even if paint stains remain in some places - it's not scary, the fire destroyed all harmful substances.
- Our next action will be to flush the barbecue from soot and soot. For this purpose, the machine for washing cars - "Karcher" is perfect.
- Using an electric drill in the bottom of the barbecue, we drill holes for paint drainage.
- Using a spray gun, we apply heat-resistant paint to all structural elements. It is advisable to apply the paint in several layers so that it lies evenly. The paint dries at a temperature of 23-25 degrees during the day.
It is not recommended to make blower holes in a homemade barbecue, as the coals will be hotter and smolder longer.
