Installing a gable roof with your own hands
The installation of the truss system begins with the installation of the Mauerlat.
Mounting the carrier on the wall
Mauerlat is made of high-strength wood - oak, larch, etc. In the absence of such materials, pine can be used.
The beam is of a standard length - 4 or 6 meters. Therefore, the connection of several parts along the length is inevitable. It is made with sawing of the connected ends of the "half-tree", for example, for a bar with a section of 150x150 millimeters, a sample of 75x150 with a length of 300 mm is made. The ends are overlapped. Fastening is done with two or four screws M12 or M14 with the installation of large diameter washers. By the same principle, the bars are connected at the corners. The finished structure is a regular rectangle that is installed on the upper plane of the wall along the perimeter.
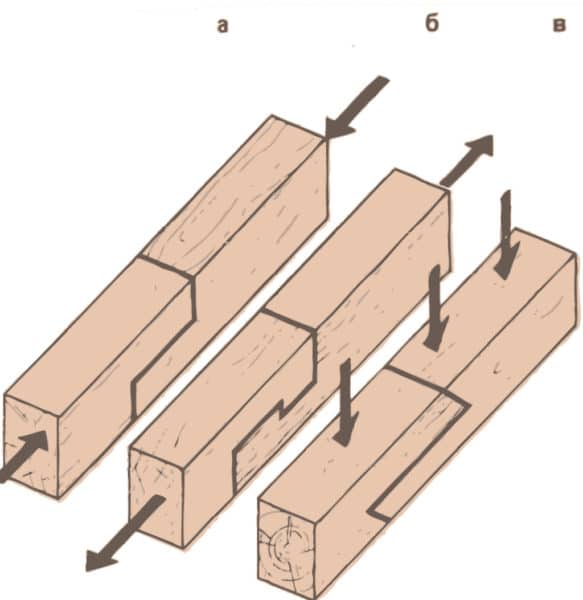 Two beams are spliced by sampling wood on each of them. Then they are bolted together
The Mauerlat installation technology provides for its placement strictly along the axis of the wall or with an offset to either side. In this case, you can not place the support bar closer than 5 centimeters from the edge. To increase the service life, the Mauerlat should be installed with waterproofing on the wall surface. Most often, roofing material is used for this.
Methods for attaching the Mauerlat to the wall
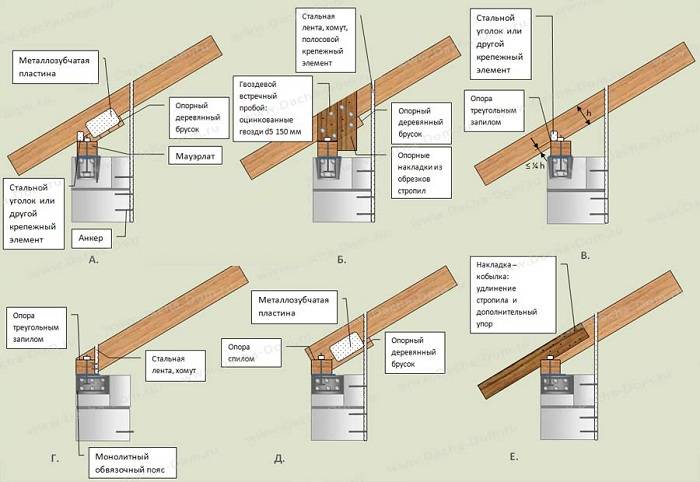
- Installation on anchor bolts. Ideal for monolithic walls. The threaded rods are embedded in the wall when it is cast.
- Wood dowels. They are driven into the drilled hole. With this fixation, additional metal fasteners are used.
- Forged staples. They are used with pre-installed wood embedded parts.
- Hairpin or fittings. The pins are walled up in the process of laying the wall and are removed through the support bar along the drilled holes. The diameter of the fasteners should be 12-14 millimeters, the protrusion above the surface of the timber - 10-14 centimeters.
- Steel wire. A plait of two or four wire strands is installed when laying the wall 2-3 rows before its end. The Mauerlat is tightened using a crowbar. It is often used as an additional attachment to a support bar.
- When installing a reinforcing belt, fastening on studs or anchor bolts is also used.
The mounting locations should be approximately halfway between the rafter legs.
System for houses with two internal load-bearing walls
If the house has two load-bearing walls, two truss beams are installed, which are located above each of the walls. Benches are laid on the intermediate bearing walls, the load from the rafter beams is transferred to the benches through the racks.
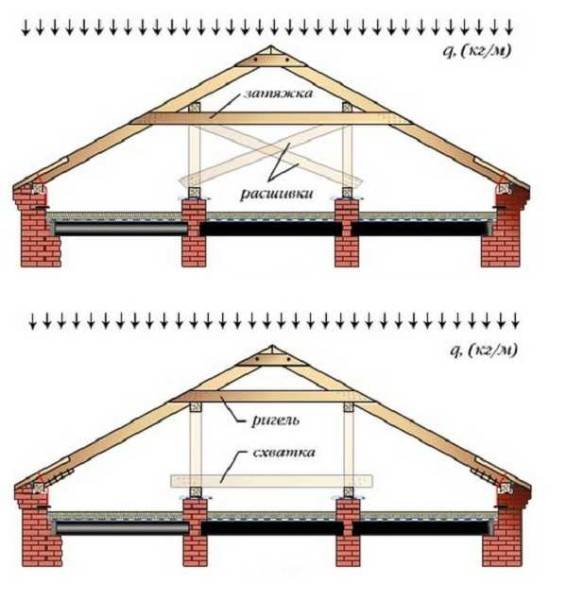
Truss systems
In these systems, the ridge girder is not installed: it provides thrust forces. The rafters in the upper part are connected to one another (cut and docked without gaps), the joints are reinforced with steel or wooden lining, which are nailed.
In the upper non-thrust system, the puffing force is neutralized by the tightening
Please note that the tightening is placed under the purlin. Then it works effectively (top diagram in the figure)
Stability can be provided by uprights, or joists - beams installed obliquely. In the spacer system (in the picture it is below), the cross member is the crossbar. It is installed over the purlin.
There is a variant of the system with racks, but without the rafter beams. Then a stand is nailed to each rafter leg, which rests on the intermediate load-bearing wall with the second end.
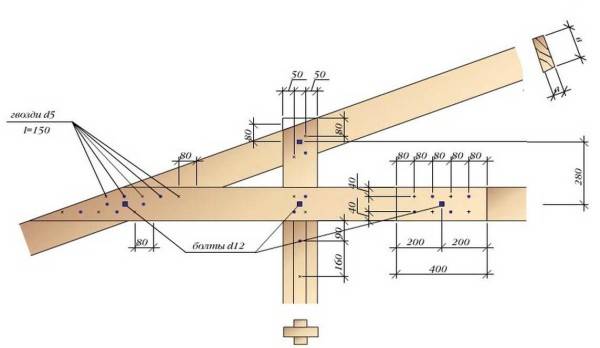
Fastening the rack and tightening in the rafter system without a rafter girder
For fastening the racks, 150 mm nails and 12 mm bolts are used. Dimensions and distances in the figure are in millimeters.
Stage V. Insulation and ventilation
Now let's note this.The fact is that the barn belongs to the category of those buildings that are usually poorly insulated and not heated in winter. Therefore, they always have certain problems with condensation, dampness and mold. That is why we recommend that you build such a roof after all ventilated, or at least partially ventilated. True, then the roof itself will be similar in design to the roof of a real residential building. And in this case, you need to think over both ventilation and insulation, and everything so that the insulation in the roof does not rot.
The overhang of the roof itself is already colder, and the snow, which has melted a little on the main section of the roof, will begin to freeze on it again. The result is long icicles, a destroyed drain, and many other problems. Not to mention the fact that such a phenomenon destroys the roofing itself. And the ventilation of the roof allows you to cool the roofing from the inside, thus preventing the snow from melting.
Roofs by type of ventilation are of three types:
- Ventilated;
- Unventilated;
- Partially ventilated.
For example, in such a construction, the entire under-roof space remains free, the attic floor is not equipped, and therefore the air circulates in it well:

But in this project, a full-fledged attic is being built, which will have dormer windows and natural or forced ventilation:
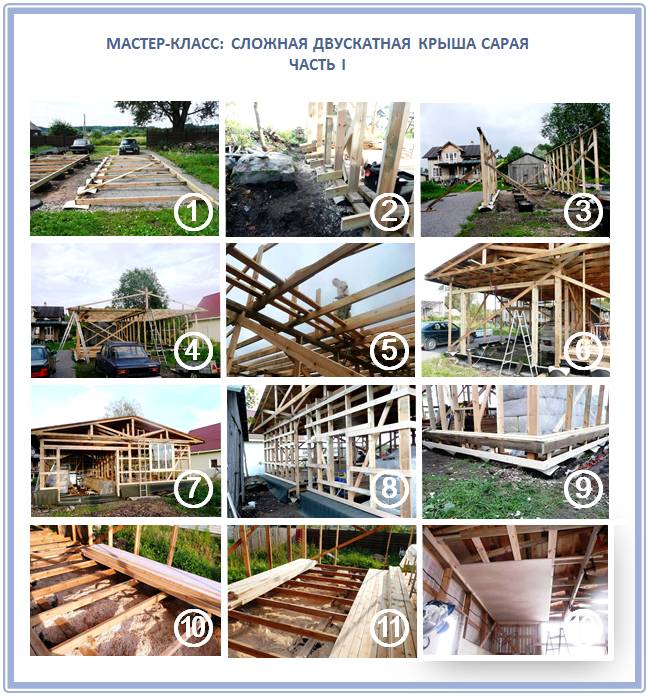
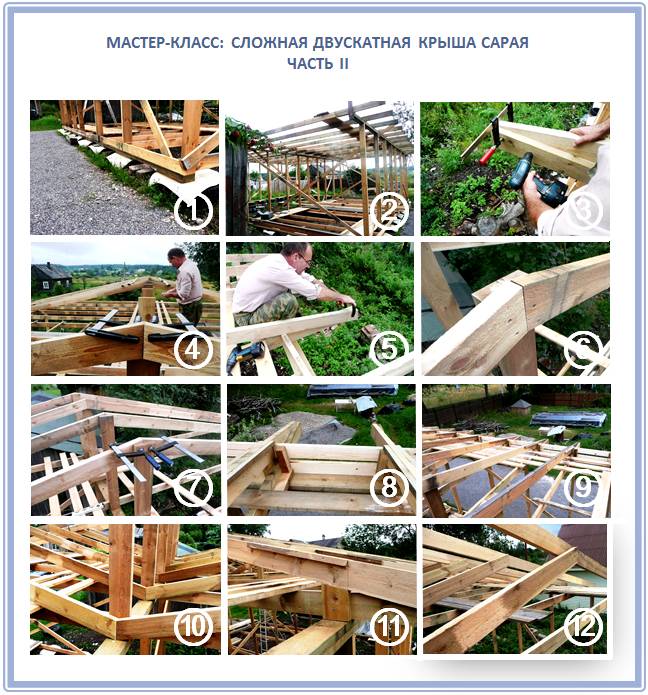
And to protect the walls of the barn from rain, you need the roof to go behind them by at least 20 centimeters. It is advisable to hem this overhang, despite the fact that it is still a shed.
Features of the installation of the truss system of a wooden house
The difference between wooden houses is that the frame shrinks, and this leads to a change in the geometry of the rafter system. If the elements are rigidly fastened, the roof may fall apart. Therefore, the mounts are made floating. There are special sliding fasteners, which in this case attach the rafters to the upper rim and to the girders, if any (see photo).
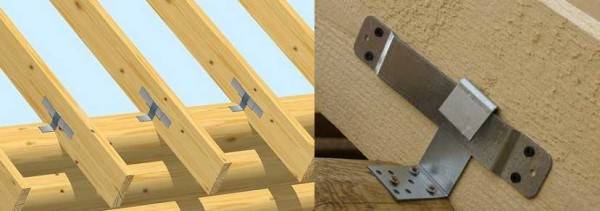
Method of fastening the truss system of a village house
In order for the rafter to move freely during shrinkage, its long part is fixed strictly parallel to its edge, and the support is placed strictly perpendicularly. If necessary, a site is cut out for it. Mark the attachment so that the hook is in the lowest position or near it. Fastened to special self-tapping screws that come with the kit (the usual ones do not fit). If the installation is carried out on a log, so that the rafter leg does not slip along it, a semicircular hole is cut out in the lower part, on which it will rest.
Such fasteners are sold in any construction market, it is called "slippery". See the video for how to attach the slide to the timber.
Lathing and insulation
To make a gable roof with your own hands reliable, be sure to insulate it. In the role of insulation, you can use various materials, for example, the very popular mineral wool or other options based on it. It is imperative to provide for the presence of a vapor and waterproofing layer.
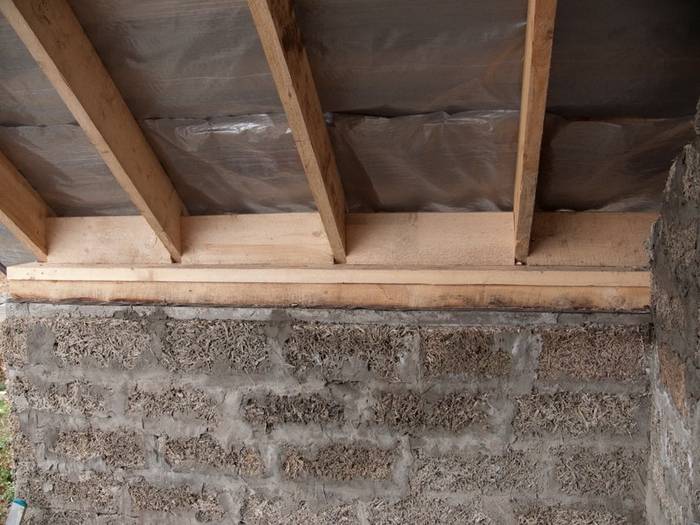
We lay the waterproofing layer directly on the rafters and fix it. Next, we lay mats of heat-insulating material, placing them between the rafters with a secure fixation. Next, we lay a layer of vapor barrier, which we place on the inside of the roof. We fix the connections of the layers with a special adhesive tape. On top of the insulating material, you can immediately mount a finishing layer, or you can postpone this stage for later.
Now let's move on to the crate. Along the existing rafters, we lay a bar - a counter-lattice. The task of this element is to create a gap between the roofing material and the insulation. This helps to remove moisture generated by the convection of warm air from the ceiling and attic.
Next, we mount the direct crate.It all depends on what kind of roofing material you are going to choose. For example, for shingles, the lathing step should be about 50 mm, and for slate or wide tiles - from 100-150 mm. In other words, it is imperative to take into account the size and weight of the future roofing material. In some cases, you can make a solid crate at all. By the way, this option is considered universal, that is, suitable for all types of coverage. But this significantly increases the consumption of building material and the weight of the entire roof itself.
Installing a gable roof
The construction of an individual house with a gable roof is carried out in several stages.
Work at each stage must be carried out efficiently, in accordance with the requirements of SNiP.
When the turn of the construction of the roofing system comes, the work is carried out in the following order:
- the Mauerlat is attached;
- a rafter system is installed;
- the lathing and roofing material is fixed.
After that, cornices and gables, ebbs and drainpipes are made out. The constructed house cannot be used until the walls are brought under the roof.
The pace of roofing works is determined by the state of design documents and the quality of materials.
Video:
Installing Mauerlat
For fastening a gable roof, a bar is used as a Mauerlat. The size of the section of this bar should be close to the thickness of the walls.
For houses built from baked bricks or foam concrete blocks, a section of 15 x 15 cm will be sufficient.
The outer part of the timber is laid flush with the outer surface of the wall. A waterproofing material must be laid between the Mauerlat and the wall.
Most often, roofing material or roofing felt is used for these purposes. The next step is to securely attach the timber to the wall.
Studs are taken as fasteners, one end of which is pre-walled into the wall.
When laying bricks several rows before completion, steel wire is laid in the wall.
Its length should be sufficient for strapping the timber. The number of such tabs should be greater than the number of rafters.
When making devices for secure fixation of the Mauerlat, the brick laying technology must be observed.
In houses built of logs or timber, the final crown performs the function of the Mauerlat.
According to the current rules, the points of attachment of the timber to the wall should not coincide with the points of location of the rafters. They must be spaced at least half a meter.
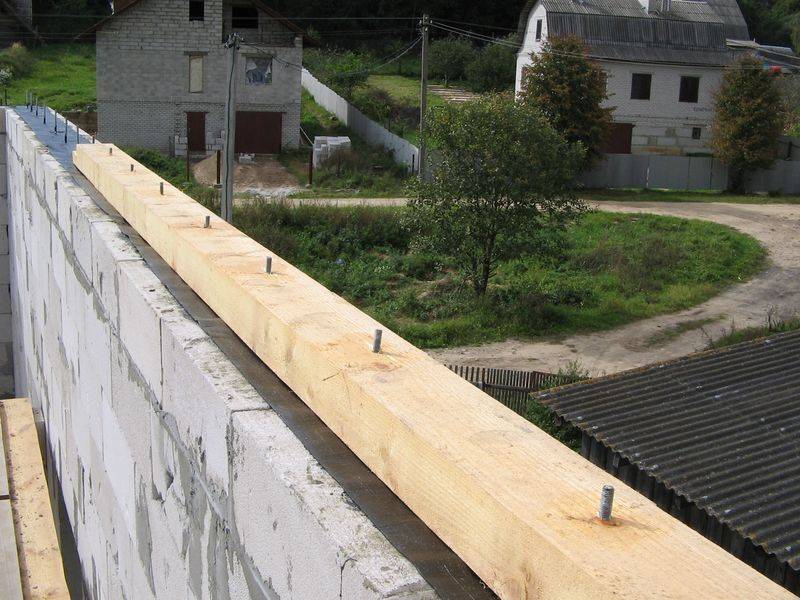
Installation of rafters
Installation and fastening of a rafter structure for a gable roof is a simple but responsible procedure.
During installation, it is very important to maintain the installation distances between the rafters. If a hanging system is chosen for the house, then the manufacture of triangular trusses is performed in advance
The required number of elements is collected on the ground, after which the products are lifted up and fixed at the designated points.
First, structures are installed along the edges of the log house, aligned and fixed. Between them, one cord is pulled along the line of the ridge and two below - along the lower points of the rafter legs.
The stretched cords are necessary in order to withstand the geometric dimensions of the gable roof. The installation procedure is performed step by step in a specific sequence.
The following elements of the truss structure are installed in their marked places and fixed.
How to correctly perform the fastening should be thought out in advance - even at the design stage.
To ensure the rigidity of the structure during installation, the rafters are interconnected with temporary fasteners.
After the spacers and bevels have been installed, the temporary fasteners are removed. At the next stage, a crate is applied to the rafter system.
Fastening roofing material
After the rafter system of the gable roof is fixed, a crate is fixed on it, which is of two types.
Each developer chooses his own option, the choice of which is determined by the type of roofing material.
If the project provides for the use of a soft roof, then the crate is made continuous.
For such a roof, the sheathing is made of plywood, chipboard and OSB. A tight-fitting floor strip can also be used.
The lathing for rigid roofing materials, such as slate or metal tiles, is made lattice.
An experienced carpenter knows how to build a gable roof and will always find the best solution when installing the battens.
During the use of sheet roofing, the step of fastening the beams under the crate is selected taking into account the size of the sheet material.
If the project provides for roof insulation, then additional work is performed on the installation of the vapor barrier and laying the insulation.
Video:
Any type of gable roof will look unfinished until the gables are completed.
In those regions where the weather is often windy, it is recommended to sew up the pediment immediately after installing the rafter system.
If construction work is carried out independently, then this recommendation must be followed.
The danger lies in the fact that in a squally wind, an unfinished roof can simply be demolished.
After the gable is completed, the installation of the gable roof is considered complete.
Roofing device
Having chosen a structure for a gable roof, they proceed to design. You can create a project with drawing documentation on your own, having computer skills and knowing architectural programs (for example, ArchiCAD.) If there are none, it is better to seek professional advice and help. All project work can be delegated to specialized organizations.
It is necessary to know the structural elements and materials for its construction in order to understand how to make a gable roof with your own hands.
A standard gable roof consists of the following elements:
- Mauerlat is a timber laid along the perimeter of the building on the walls from above. Fasten it with steel rods with anchor bolts or threads. The timber should be made of softwood and have a square section of 150 × 150mm or 100 × 100. It takes the load from the rafters and transfers it to the outer walls.
- Rafter legs are long boards that are attached at an angle to each other, giving a triangular shape to the roof. The section of the boards is 100x150 or 50x150. The structure of two rafter legs is called a truss. Depending on the building and the type of roofing, a certain number of trusses are made. The maximum distance between them is 120 cm, the minimum is 60 cm. When calculating the steps of the rafter legs, take into account: the weight of the coating, wind load and the amount of snow in winter.
- The ridge is most often represented by a longitudinal bar located at the highest point of the roof. It connects both stingrays together. In some cases, the ridge consists of two planks nailed on both sides to the top of the rafters and joined at a specific angle. The braces are made from scraps of timber. They are installed between the rafters and uprights, strengthening the side edges of the truss and increasing the load-bearing capacity of the structure.
- Racks - vertical beams with a section of 100 × 100 are located inside each truss. They transfer the load from the ridge run to the load-bearing walls inside the building.
- Tightening is the base of the truss triangle. Beam connecting the lower parts of the rafters. Together with the struts, it increases the resistance to loads.
- Lathing - timber or boards stuffed onto rafters. Depending on the type of roof, it can be solid or with gaps. It is always fastened perpendicular to the direction of the rafters, more often horizontally.
- Lezhen - a long bar (section 100 × 100). It is laid along the load-bearing central wall. Vertical racks rest on it. A bed is used when installing layered rafters, if the girder between the outer walls is more than 10 m.
Hanging truss systems
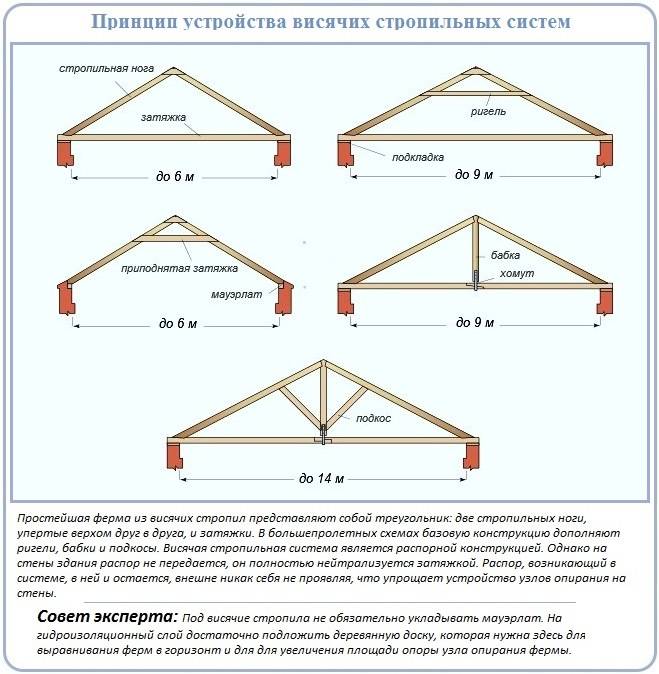
The hanging type of rafter systems is a triangle. The two upper sides of the triangle are folded by a pair of rafters, and the tightening that connects the lower heels serves as the base.
The use of a tightening allows you to neutralize the action of the thrust, therefore, only the weight of the sheathing, the roof, plus the weight of precipitation, depending on the season, acts on the walls with hanging rafter structures.
Characteristic features of hanging rafter structures:
- Mandatory presence of a puff, made most often from wood, less often from metal.
- Ability to refuse to use Mauerlat. A timber frame will be successfully replaced by a board laid on a two-layer waterproofing board.
- Installation on the walls of ready-made closed triangles - roof trusses.
The advantages of the hanging scheme include the space under the roof free of racks, which allows you to organize an attic without pillars and partitions. There are disadvantages.
The first of them is restrictions on the steepness of the slopes: the angle of their slope can be at least 1/6 of the span of a triangular truss, steeper roofs are strongly recommended. The second disadvantage is the need for thorough calculations for the competent device of the cornice nodes.
Among other things, the corner of the truss will have to be set with pinpoint accuracy, because the axes of the connected components of the hanging rafter system must intersect at a point, the projection of which must fall on the central axis of the Mauerlat or the lining board replacing it.

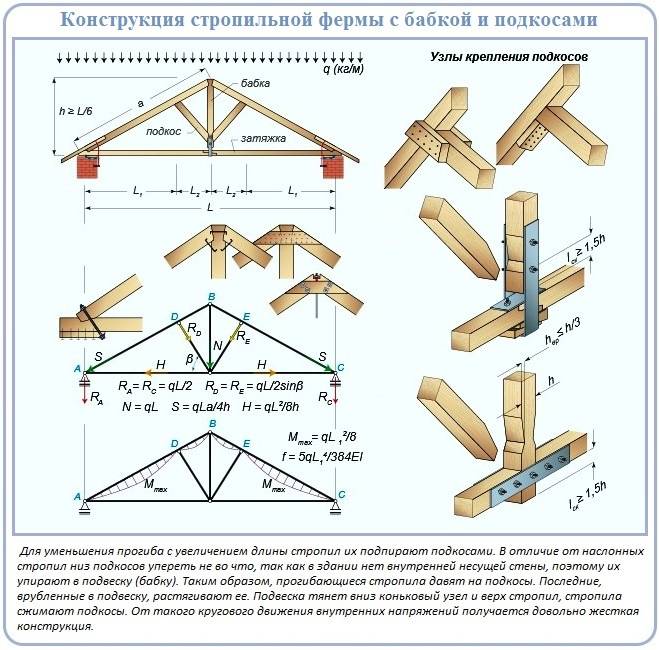
The brace is the longest element of the hanging truss structure. Over time, as is typical for all lumber, it deforms and sags under the influence of its own weight.
Owners of houses with spans of 3-5 m are not too worried about this, but owners of buildings with spans of 6 or more meters should think about installing additional parts that exclude geometric changes in tightening.
There is a very significant component to prevent sagging in the rafter system installation scheme for a large-span gable roof. This is a pendant called a headstock.
Most often, it is a bar attached with wooden beads to the top of a truss. The headstock should not be confused with the racks, because its lower part should not come into contact with the puff at all. And the installation of racks as supports in hanging systems is not used.
The bottom line is that the headstock seems to hang on the ridge knot, and a tightening is already attached to it with the help of bolts or nailed wooden linings. Threaded or collet type clamps are used to correct slack.

Adjustment of the tightening position can be arranged in the area of the ridge assembly, and the headstock is rigidly connected to it with a cut. Instead of a bar in non-residential attics, reinforcement can be used to manufacture the described tightening element. It is recommended to arrange a headstock or suspension also where the tightening is assembled from two bars to support the connection section.
In an improved hanging system of this type, the headstock is supplemented by strut beams. The stress forces in the resulting rhombus are extinguished spontaneously due to the competent arrangement of the vector loads acting on the system.
As a result, the rafter system pleases with stability with minor and not too expensive modernization.
In order to increase the usable space, the tightening of the truss triangles for the attic is moved closer to the ridge.A perfectly reasonable move has additional advantages: it allows puffs to be used as the basis for ceiling filing.
It joins the rafters by cutting with a semi-rotary screw with a duplicating bolt. It is protected from sagging by installing a short headstock.
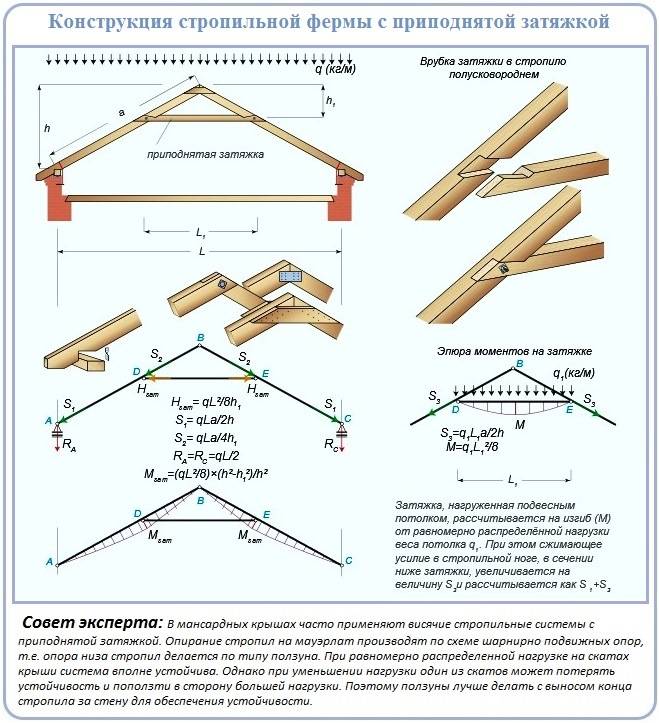
A tangible disadvantage of the attic hanging structure is the need for accurate calculations. It is too difficult to calculate it yourself, it is better to use a ready-made project.
Gable roof device
take into account the climatic characteristics of the place and determine the angle of the roof slope.
For example, shallow roofs are preferable in areas with strong winds, and high roofs resist stagnation of snow on the surface during snowfalls.
Before using wood, it must be treated with insecticidal, antifungal agents and substances that reduce the flammability of the material, and also let it dry in order to avoid bending of the beams.
The work begins with the device of the Mauerlat - the roof support, which takes on the entire weight of the structure. It is a timber applied to the load-bearing walls, on which the entire rafter structure is then laid.
Cut-off waterproofing must be laid on the load-bearing wall under the Mauerlat.
The next step is to lay the bed, a bar that serves as a support for the rafters. It takes all the load from them and distributes it along the supporting walls. It is necessary to carry out double waterproofing under it.
Then comes the turn of the installation of the racks and the run. For convenience, it is advisable to build scaffolding. In the course of work, racks are attached to them in advance, on which the girders are then installed.
After that, the rafter legs are marked and attached to the structure;
At the end, they proceed to the installation of the fillies, which form the eaves overhang.
The assembly can be carried out both on top of the house and on the ground, where the truss is being erected, which is a triangle of rafter legs and puffs and other components, which is then lifted up by a crane, a winch or, in extreme cases, with the help of two inclined boards and a rope and fastened to the Mauerlat.
You can read more about the installation of a gable roof here.
Gable roofs of private houses photo:
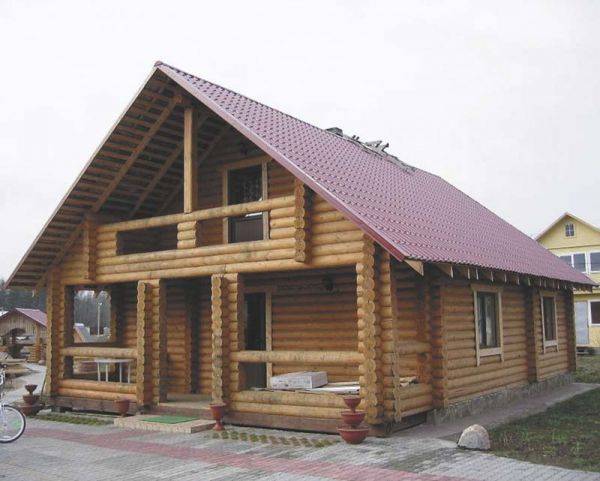
House type with a gable roof
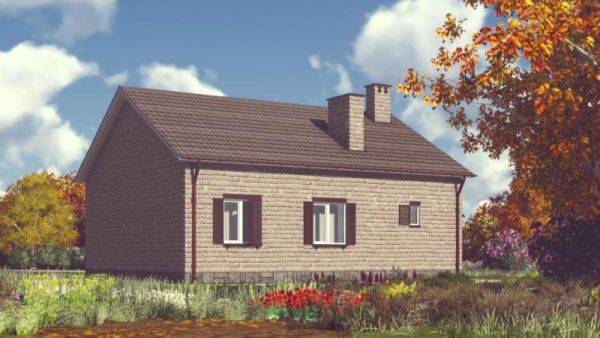
One-storey house with a gable roof
The main components of the gable roof rafter system:
- Mauerlat - a beam applied to load-bearing walls and supporting the entire rafter system;
- The rafter leg is a component that carries the roof;
- Runs - elements located across in the middle of the rafter legs, and under the ridge;
- Tightening - the part that unites the structure at the base;
- The rack is an element of the rafter leg support. Also located under the roof ridge;
- Braces - inclined support beams originating at the base of the rack and going to the middle of the rafter leg;
- Lezhen - serves as a support for the rafters of the rafter legs, additionally strengthening the structure if it is located on two spans.
- Sheathing - boards nailed transversely to the rafter legs and constituting the basis for the roofing material;
- A pediment is a triangular section formed between two slopes. Its shape depends on the design of the rafters, the climate and individual preferences, and the size of its ends depends on the slopes and the height of the rafter structure itself. The main components of the gable are the ridge board running along the very top of the roof, the rafter legs and steel studs. The pediment protects the room from moisture penetration, adverse weather conditions, and also maintains the thermal regime of the room.As a support for the floor beams, it must have sufficient strength in order to give the entire structure the necessary rigidity.
- Calculate the load on the retaining walls and foundation accurately and avoid exceeding it;
- Carry out good thermal insulation to avoid uneven heating of the room;
- Provide a good level of sound insulation by choosing the right roofing material.
- Provide reliable waterproofing;
- Apply light types of materials for the arrangement of the interior of the room and the ceiling;
In conclusion, it is worth noting that a gable roof is one of the simplest options. It is quite possible to try to do it yourself, which will save you money and give you invaluable experience.
