Project and design selection
To begin with, you should think about the project of a common recreation area, then separately about the type and style of the gazebo and barbecue, the whole complex should be beautiful and comfortable.
- Combines harmoniously with the style of the house.
- Fits into landscape design.
- Convenient to operate.
- Corresponds to the number of people who will visit this recreation area.
- Style - in full accordance with the taste of the owner.
- The design is also at your discretion: from red or white bricks, with or without tiles, with plaster, including decorative.
Stylish unity of the house and gazebo
Gazebos prices
alcove
Oven food variety table
If, for example, you like to relax on a hill or a pedestal, then you should think about the stairs, the type of podium. Wooden structures with barbecue and barbecue in the country have long found a wide circle of admirers. But brick ovens are considered stronger and more durable, as well as beautiful and diverse. But in all cases, gazebos must be erected strictly according to the project and drawings. Many dacha dwellers have bar-style structures - either a bar or 4 tall tables in the corners. Such an interior, apparently, for those who like to use their grill on the go or alone. And for lovers of gatherings in kitchens, there are recreation areas in this style, where you can provide a sink and a cutting table. But the most common options are to build a huge wooden table in the middle of a brick gazebo with the same huge benches with your own hands. Here, both grill and barbecue - meat on the grill will disappear unnoticed. This is a vacation at the dacha in Russian! Sit down, feed and drink everyone. In a word - only you can choose
Projects can be very simple - it is important that they match your goals and objectives, and you feel comfortable and convenient
Projects of gazebos with barbecue (photos and drawings)
How to build a barbecue gazebo with your own hands
The simplest is the frame structure on a columnar foundation. You will need:
- Wooden beam with a section of 100x100 mm - 5 pcs. for the base of the gazebo, 50x100 mm - for the walls and the roof frame.
- Silicate brick - for the manufacture of pillars.
- Cement-sand mortar.
- Nails, screws.
- Tools - a hacksaw for wood, a screwdriver, a shovel, an ax.
Preparatory work
It is recommended to choose a place for a gazebo closer to the main house. In this case, it is necessary to take into account the wind rose on the site so that the smoke from the barbecue does not enter the room. It is also recommended to consider the option of location surrounded by trees or near a body of water.
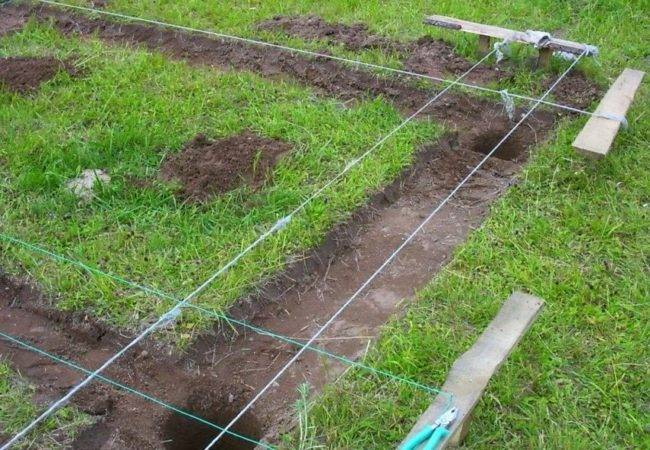
The marking of the site for the columnar foundation must be careful
You need to decide in advance on the size of the building, and then make a drawing. Prepare all the necessary tools and materials with a margin.
The main stages of construction of a wooden lightweight gazebo
There are standard stages of work:
Layout of the site is an important process that needs to be spent a little more time to make sure that the calculations are correct.
Foundation construction - depends on the massiveness of the structure. For a wooden gazebo, even if it has a terrace, a columnar option is suitable. The strip base is used for brick and metal buildings.
Laying the floor of the gazebo - a layer of gravel is enough for such a construction. If you stop on a concrete pavement, it is recommended to cover it with tiles.
Pay attention to the drainage of moisture in the open structure, ensuring the necessary slope of the floor.
Walling. They can be deaf or lattice.
The first ones are suitable even for winter gazebos. The walls are not load-bearing.
Roof installation. There are several options that are suitable for a barbecue gazebo: lattice, inclined single-slope (with an angle of 5-10˚) or ridge. For the latter two, polycarbonate, metal tiles or ondulin are used as a coating.The trellis option is interesting, since you can plant climbing plants next to the structure. But remember that such a roof is useless in rainy weather.
External finishing. It can be minimal. You can simply apply a protective impregnation to the wooden beam, and then varnish.
Video: building a large gazebo with a seating area
Built-in BBQ
This part of the gazebo can be made by hand or purchased ready-made. In the first case, it is necessary to prepare the following materials:
- Heat-resistant stove brick for the construction of a chimney and directly a barbecue.
- Aerated concrete block, which is suitable for the construction of a furnace bottom base, a niche for firewood.
- Cast iron grill. This material is durable, besides, it is resistant to high temperatures.
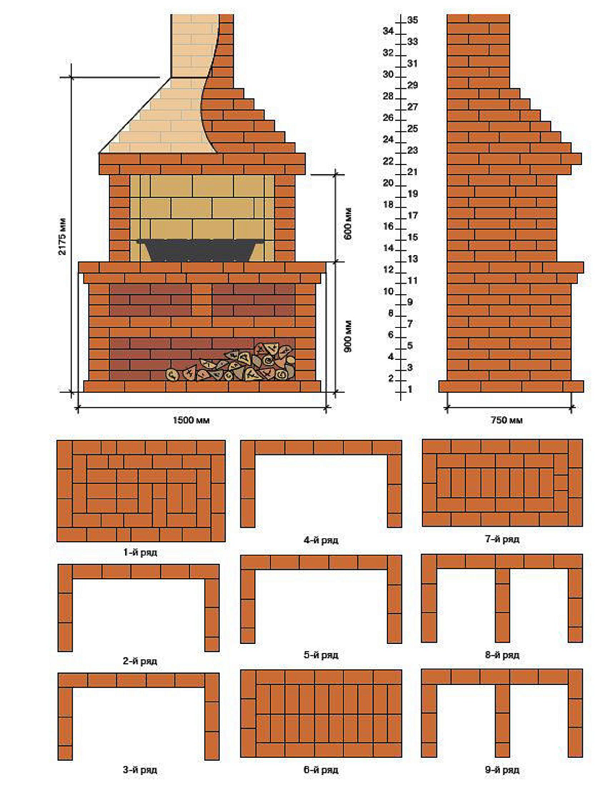
When building a barbecue made of bricks, you need to strictly follow the order
Detailed instructions for building a do-it-yourself grill oven
For self-manufacture of a stove for a barbecue gazebo, you need to perform several stages of work:
-
First you need to build a separate red brick base for the oven, reinforce it with fittings. You can use a cement-sand mortar of a grade not lower than M300. It is necessary to put waterproofing sheets on the frozen foundation.
-
For construction, you will have to use two types of bricks: heat-resistant for arranging the inside of the hearth, facing red clay for decoration outside.
- Now you need to prepare the masonry mixture. To do this, you need to mix clay and sand in a ratio of 1 to 3, dilute with water until a thick sour cream is obtained.
-
After finishing the preparatory work, you can proceed directly to the construction of the walls of the barbecue. There are two ways of laying out: in the form of the letter "P" or "E". The optimal construction height is 1 m. In a simple version, two cast-iron grates must be installed between the sides of the barbecue. On the top you can cook, on the bottom you can keep the fire going (you need to bring out the chimney above it). There should be a distance of 250 mm between them.
-
The complex configuration (in the shape of the letter "E") allows you to make two niches for firewood. In this option, the use of gas silicate blocks for the lower rows is allowed, but for the upper rows it is imperative to use exclusively refractory bricks.
It is not necessary to stop at the construction of only the barbecue. You can always expand its functionality by adding cutting surfaces.
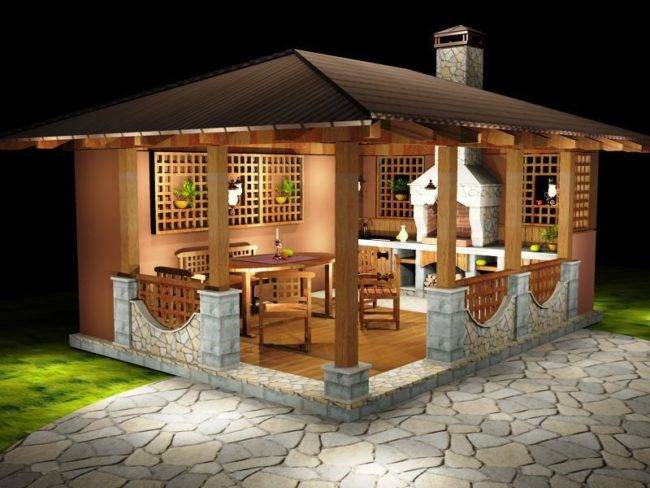
The gazebo can have everything for a good rest, right down to the cutting surface
What is the difference between a grill and a barbecue?
This question is by no means idle, since the choice makes its own adjustments to the project and, accordingly, to the construction. Brazier is a more versatile equipment (roaster) for cooking meat and vegetables. Assumes the use of both a wire rack and skewers. A lid is usually not provided. In contrast, barbecues are designed to be cooked exclusively on a wire rack. At the same time, it has a cover that serves to equalize the temperature (in the barbecue, the temperature is not constant).
Both devices are portable or stationary. The simplest stationary barbecues are bricks laid on the ground. However, for a gazebo, this option is of little use for many reasons. The main one is fire safety. Therefore, projects of gazebos with barbecue or barbecue provide for solid construction of braziers made of brick or metal, which, moreover, are equipped with a chimney.
Creating a gazebo step by step - we save on builders
Most construction crews charge up to 50% of the cost of materials for work - taking into account rising prices, this entails a serious rise in cost.Isn't it better to think about how to build a gazebo with a barbecue without the participation of outsiders? The time is worth it, and the help of friends will not hurt, especially if you decide to build a wooden frame structure. This option will cost less than a stone one, although it requires more careful maintenance in the future. You can stop at the golden mean by combining both materials.
For a wooden gazebo, we recommend a light metal brazier with a hood - in this case, it will be enough to make a standard columnar foundation. If you want to equip a capital brick brazier, a high-quality tape base should be made specially for it, while the gazebo itself can be left on a columnar one. A strip foundation will definitely be required if your area has unstable soils or you decide to build a completely brick building. In all cases, we recommend that you read the article on the foundations for gazebos - everything is described in detail there.
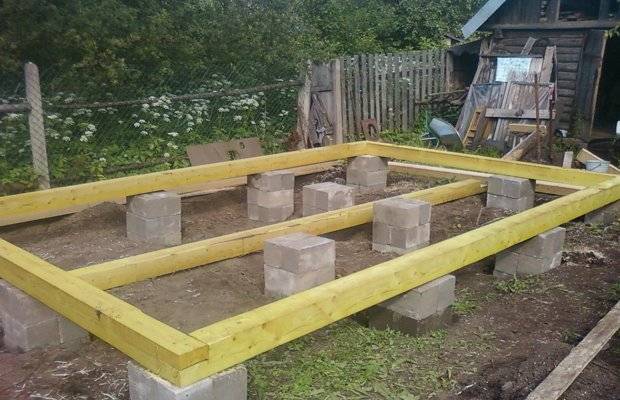
Standard columnar foundation
The construction of wooden gazebos with barbecue does not require a lot of experience and special skills, which cannot be dispensed with when erecting capital stone buildings. This is a definite plus - almost all work can be done independently, except that when it comes to the upper strapping and the construction of the roof, you will have to use someone's help. Everything in order.
Step 1: bottom harness
When the foundation has gained strength (5-7 days in the case of reinforced concrete structures), it's time to start assembling the frame. In all wooden structures, the frame can be divided into 5 main elements: lower harness, risers, logs, upper harness, rafters. This is the skeleton of your future gazebo. The first is the lower strapping - a rectangle or a square made of 100 * 100 mm beams
It is important to isolate the bars from moisture and the development of fungus, for which they are treated with an antiseptic, and roofing material or plastic wrap is placed on the foundation. If the area of the gazebo is large, the harness is strengthened from the inside with a cross from the same bar
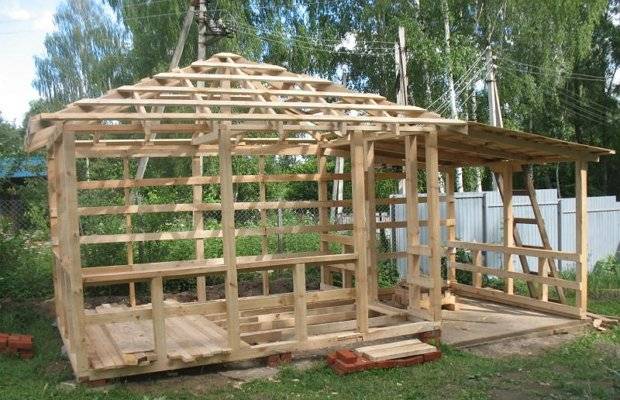
Assembling the frame of the structure
Step 2: risers and logs
When the lower harness is completely ready and fastened, we install corner and intermediate risers, for which we take the same bar. Use temporary braces to secure them in position. After the risers, logs are made - bars of 100 * 50 mm, which are laid on the edge over the lower strapping. They will carry the weight of the floor and people. They are installed at a distance of at least 50 cm from each other. For the convenience of further work, boards are laid on top of the fixed lags - this will make it easier to install the bars of the upper strapping.
Step 3: top harness
In principle, there are no differences between the lower and upper strapping - all the same timber, all the same fastening methods, which are described in detail in the article on the construction of wooden arbors. True, it will be more difficult to work at a height - here you will need the help of a friend, as well as a good ladder or step-ladder.
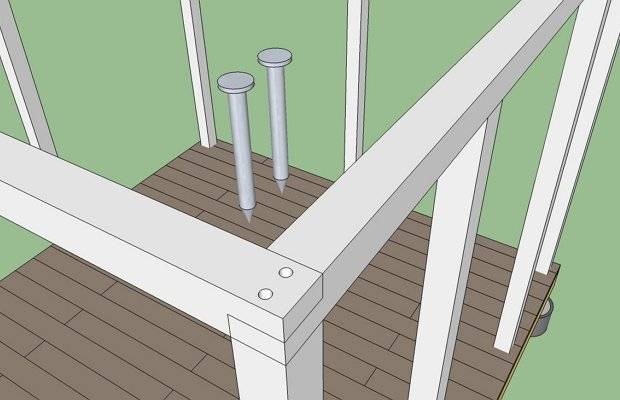
Fastening the top harness bar
Step 4: rafters and roof
In order to avoid troubles with the weather, try to finish the construction of the frame as soon as possible, completing the first stage of construction with the installation of rafters and decking of the roofing material. The roof is made of 100 * 50 mm timber and boards. At first, identical structures are assembled on the ground from prepared rafters, then the finished "cocked hats" are lifted onto the roof and fixed. If you want to make the room warmer, we recommend to fill a solid board crate over the rafters, which is covered with waterproofing and wind protection. On top of these materials, a more rare counter-lattice is stuffed for installing roof sheets.
From this stage, a large number of variations with decoration and wall area begins - you can make both a closed and an open or semi-open structure, insulate it from the inside for a comfortable stay at any time of the year, or leave it as it is. The construction of various gazebos with and without barbecue is detailed on our website, you just have to choose the right direction.
How to build a gazebo with a barbecue with your own hands - a step by step diagram
Step 1: bottom harness
When the foundation has gained strength (5-7 days in the case of reinforced concrete structures), it's time to start assembling the frame. In all wooden structures, the frame can be divided into 5 main elements: lower harness, risers, logs, upper harness, rafters. This is the skeleton of your future gazebo. The first is the lower strapping - a rectangle or a square made of 100 * 100 mm beams
It is important to isolate the bars from moisture and the development of fungus, for which they are treated with an antiseptic, and roofing material or plastic wrap is placed on the foundation. If the area of the gazebo is large, the harness is strengthened from the inside with a cross from the same bar

Assembling the frame of the structure
Step 2: risers and logs
When the lower harness is completely ready and fastened, we install corner and intermediate risers, for which we take the same bar. Use temporary braces to secure them in position. After the risers, logs are made - bars of 100 * 50 mm, which are laid on the edge over the lower strapping. They will carry the weight of the floor and people. They are installed at a distance of at least 50 cm from each other. For the convenience of further work, boards are laid on top of the fixed lags - this will make it easier to install the bars of the upper strapping.
Step 3: top harness
In principle, there are no differences between the lower and upper strapping - all the same timber, all the same fastening methods, which are described in detail in the article on the construction of wooden arbors. True, it will be more difficult to work at a height - here you will need the help of a friend, as well as a good ladder or step-ladder.

Fastening the top harness bar
Step 4: rafters and roof
In order to avoid troubles with the weather, try to finish the construction of the frame as soon as possible, completing the first stage of construction with the installation of rafters and decking of the roofing material. The roof is made of 100 * 50 mm timber and boards. At first, identical structures are assembled on the ground from prepared rafters, then the finished "cocked hats" are lifted onto the roof and fixed. If you want to make the room warmer, we recommend to fill a solid board crate over the rafters, which is covered with waterproofing and wind protection. On top of these materials, a more rare counter-lattice is stuffed for installing roof sheets.
From this stage, a large number of variations with decoration and wall area begins - you can make both a closed and an open or semi-open structure, insulate it from the inside for a comfortable stay at any time of the year, or leave it as it is. The construction of various gazebos with and without barbecue is detailed on our website, you just have to choose the right direction.
Material used
There are various projects of gazebos in which the brazier is installed. For their implementation, the following materials are used:
Wood. Natural wood lends itself well to processing, it is easy to create the desired structure from it. To increase its service life, a special impregnation is used, which protects the tree from rotting and harmful microorganisms.
Brick. A refractory material is used that can withstand exposure to open fire.
Metal. A metal profile or forged rods are used. This material allows you to make a gazebo with the best aesthetic appearance. This will take a lot of time and the necessary skills.
These are the main types of materials used to build gazebos. Each of them has its own advantages and disadvantages.
The main stages of the construction of a gazebo
Regardless of the project, any structure is built step by step. In order for the gazebo to serve for a long time and delight you with wonderful evenings with family and friends, it is necessary to follow the generally accepted construction technology:
- Site selection, cleaning and leveling of the site, removal of the topsoil.
- Foundation construction. If the structure is metal or wood, columnar is recommended. If brick or stone, then tape.
- Foundation strapping.
- Erection of support pillars according to the project.
- Tying pillars from above.
- Construction of a managala barbecue made of stone or refractory clay.
- Installation of a chimney made of brick, tin or other suitable material.
- Roof construction. Practitioners advise to start work on the installation of rafters on the ground, and then raise the structure up and continue construction. Lightweight roofing materials are suitable for the gazebo: corrugated board, boards, flexible tiles.
- Facade cladding. Wall and porch decoration with pre-selected facade materials.
- Interior decoration. Floor installation, wall or wall decoration. Facing the barbecue with tiles or other materials.
- Connection of the carried out communications.
- Furniture arrangement, arrangement, decoration.
A gazebo built in accordance with the indicated stages will last for several decades. In addition, a well-designed building will become a landscaping element and a favorite place for recreation and parties.
The choice of material for the gazebo
A cozy gazebo with a barbecue with your own hands can be built from various materials. The main condition for it is reliability, but it is also required that it be in harmony with the landscape of the site, not look like an inappropriate subject. For self-construction, wood, bricks or metal are more often used.
Wood
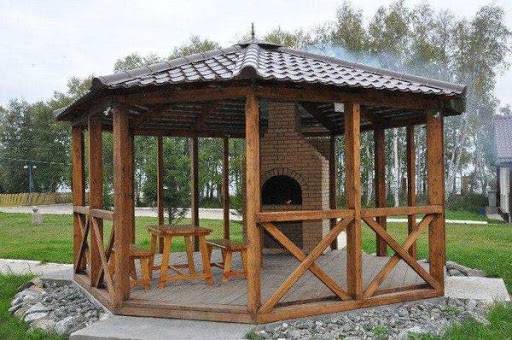
A wooden gazebo with barbecue will fit perfectly on almost any site. The tree can be called a friendly all-rounder: it is almost always appropriate. The material is environmentally friendly, pliable, therefore easy to process, and besides, it has several other advantages over rivals. These include:
- Reasonable price, as well as no need to purchase special tools. These conditions make it possible to carry out the work in the shortest possible time.
- Cost savings. There is no need to build a solid foundation due to the lightness of the wooden structure.
- Lifetime. With proper processing of the material, the gazebo will last quite a long time.
- The ability to make a collapsible design.
- Ease of construction.
- Environmental friendliness.
Bricks
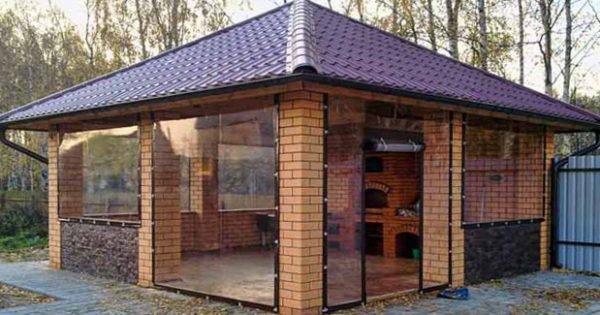
Capital structures made of this artificial stone are famous for their reliability, inviolability, so practical owners often choose this material. Bricks have a lot of advantages. If we talk about a gazebo with a barbecue, then one cannot but cite several proofs:
- A brick structure is not afraid of sparks flying from the hearth, so no real threats from the brazier can be expected.
- Such buildings do not need special care. A small structure will not require any repair work in the near future.
- A capital gazebo will give a chance to arrange "gatherings" not only in the summer season: a warm design is suitable even for celebrating the New Year.
- Maximum possible protection from wind, rain, snow.
Now we need to recall the shortcomings. First of all, this is the need to equip a full-fledged foundation. Together with the walls, such construction will be quite expensive. In this list of cons, you can include masonry, which is also very demanding on the master.
Metal
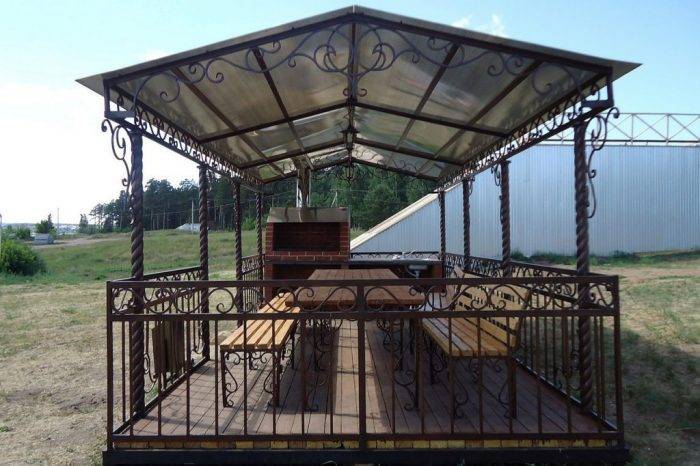
The first, graceful, option is a forged product. However, such a gazebo can only be built by a craftsman who has either a forge at his disposal or is familiar with the art of cold forging. The disadvantages of the forged structure are its air-blowing capacity, the complexity of its creation.
For these reasons, forged structures are usually ordered.More often, a profile, usually aluminum, is practical and lightweight, resistant to corrosion, acts as a building material. Glass, plastic or sandwich panels, any lining, corrugated board, polycarbonate are used as the finishing of such a frame.
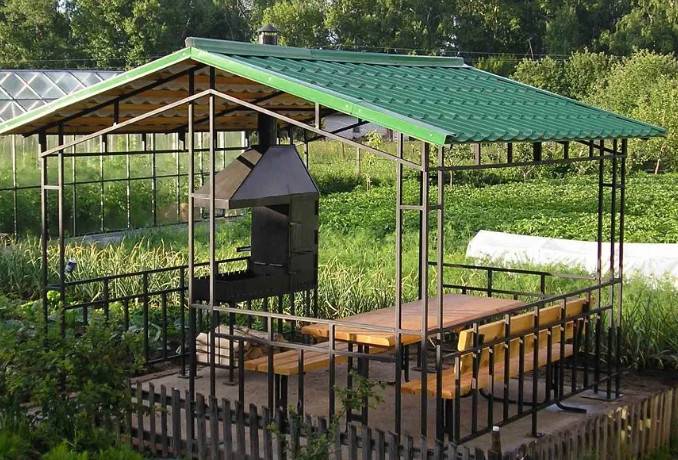
The lightness of aluminum is an advantage that turns into a disadvantage: in order for the gazebo to be securely installed, you need a solid foundation: made of stone or cement mortar. To create a metal frame, shaped pipes are often chosen, but in this case it is better to have the skills of a welder.
Materials are not always used in isolation. Their combinations make it possible to create an original structure, but at the same time perfectly fit it: both in the landscape and in the budget. If we talk about the most suitable option, then this is a brick (stone) gazebo with barbecue. A big plus of such a union is the incombustibility of materials.
Projects
Projects of gazebos for summer cottages can have different sizes, but in any case, it is worthwhile to decide in advance on the area of space where they will be delivered. The traditional (classic) solution is the use of natural wood. To make the building more beautiful, you can introduce openwork carvings and metal parts. When a drawing is prepared (with exact geometry, dimensions), you can choose a site for the construction.
Removal of fertile soil is carried out to a depth of 100-150 mm. Further, the site must be leveled for reliable concreting. Concrete reduces construction costs. Together with concreting, pipes of a round or square section are introduced into the ground, raised above the poured layer by 0.2-0.3 m. Holes must be prepared in the pipes, which are intended for the installation of wooden posts.
Light gazebos 6x4 m are formed without brick fences. Fences of small height, formed from European lining or polycarbonate, are quite enough. In this version, the roofs are often made of a wooden bar with a section of 5x5 cm in the form of a frame of a hipped-roof scheme with two slopes. To increase the reliability of fastening helps the strapping of the same beam horizontally.
The roof is made from:
- slate (corrugated sheets);
- polycarbonate;
- ondulina;
- metal tiles.
Maximum attention should be paid to the size of the roofing blocks; one should not forget about the surge on the sides and ends. Slate layout implies a run of sheets of 100-150 mm, only such an indicator provides real reliability
It is allowed to combine polycarbonate in the roof with a steel profile.
Savings on the foundation are achieved by using pillar foundations. Most often they are made from red ceramic bricks or natural limestone.
When designing a gazebo, you need to use a plan that reflects:
- House;
- auxiliary buildings;
- paths and fences.
It is impossible to bring the building closer to a country house or a country house by 300-500 cm. It is recommended to provide work tables and areas for laying out firewood, a site for rest and a barbecue. The most economical layout of the space involves placing the stove in the corners or under a self-contained canopy. It is advisable to form the building in the most symmetrical design. If you have the necessary funds, you can stretch wires, connect a TV and additional equipment.
To guarantee comfort, it is worth equipping the gazebo with a kitchen with an oven. A heavy hearth is necessarily placed on the foundation, if the gazebo itself is equipped with it by default, it is required to make a separate stand.
The design of the gazebo, which should be used in winter, implies the formation of a gable roof. Especially summer buildings are mainly covered with awnings, this is quite enough for protection from bad weather and is quite cheap. It is advisable to equip closed buildings with windows; large openings extending from the floor to the upper part of the walls are especially well perceived.They allow the most light to pass through. Wood-burning stoves are more economical than other options; provide for fireclay or fire-resistant bricks.
Wooden floors are best suited to the style of a country house or summer cottage. Coating with varnish increases their resistance to negative environmental influences. Ceramic tiles are no less popular; they also work well in the summer kitchen.
A warm gazebo can be either isolated or combined with a guest house or a summer pavilion. A prerequisite is the use of modern insulation materials. Such gazebos are made only in a closed form in order to exclude the penetration of cold air. The oven or barbecue, in parallel with the culinary one, also acquires a heating function. When the structure is attached to the house, you need to stretch heating means there and put radiators; in remote buildings, warm floors are sometimes formed.
The difficulty in designing a winter gazebo is maintaining a balance between intense illumination and keeping warm inside. The choice of geometry and stylistic approach is determined solely by the personal tastes of the owners. But we must not forget that the external form should be convenient for the location of internal furniture and other infrastructure, and correspond to it.
For a summer open gazebo with a 6x4 m pool, it is recommended to dig a pit. Then the floors in the building will be on the same level with the side. Plastic buckets with a capacity of 65 liters can be used as permanent formwork under the posts. You need to collect the pool before the construction of the gazebo begins. The opposite sequence of work is greatly complicated.
A drawing and step-by-step guide for making a brick oven
Everything new is well forgotten old. From time immemorial, Russian stoves were famous in Russia, they were adapted for heating water, preparing various dishes: pies, baked, fried foods, smoked meats - that is, a brazier, a barbecue, a stove and a cauldron in one bottle. Even on six acres, a beautiful Russian stove would be appropriate.
DIY brick oven - drawings
So let's get started.
- For a high stove, you need to put together a "goat" or stock up on a ladder.
- Prepare a brick for laying the furnace (the main condition for quality is not exposure to high temperatures), having previously calculated how much is needed for the project.
- We prepare sheets of iron that are at least 3 mm thick.
- Tools: sieve, trowel, level, hammer, pliers, mortar container, chisel.
- If you plan a brazier in the style of a Russian stove, then we acquire: a panel, corners, latches, metal doors.
- We lay the foundation - for a solid furnace, it is better, after laid with layers of sand and gravel, to install the formwork and pour concrete, seal it from above.
- First, carry out a complete construction without mortar in order to understand the technology and avoid mistakes in a solid masonry.
- For the reliability of the masonry, it is worth stocking up with slats 3-5 mm wide, placed between the bricks and make it possible to grab the mortar well.
-
1st row - solid.
- Further - taking into account the blower door, space for ash, etc.
-
4th - metal grill.
- 6th - laying the chimney channel.
-
From the 8th to the 11th - when laying, brackets for barbecue, brackets for smoking, a place for a cauldron, and so on are mounted in accordance with the project.
- If there is a chimney during laying, we provide for its valve.
- If it is necessary to install the holes, we adjust the bricks using a special rubberized hammer.
- We try to make an even, straight structure, for this we check the level of our structure.
