Do you need mortgages?
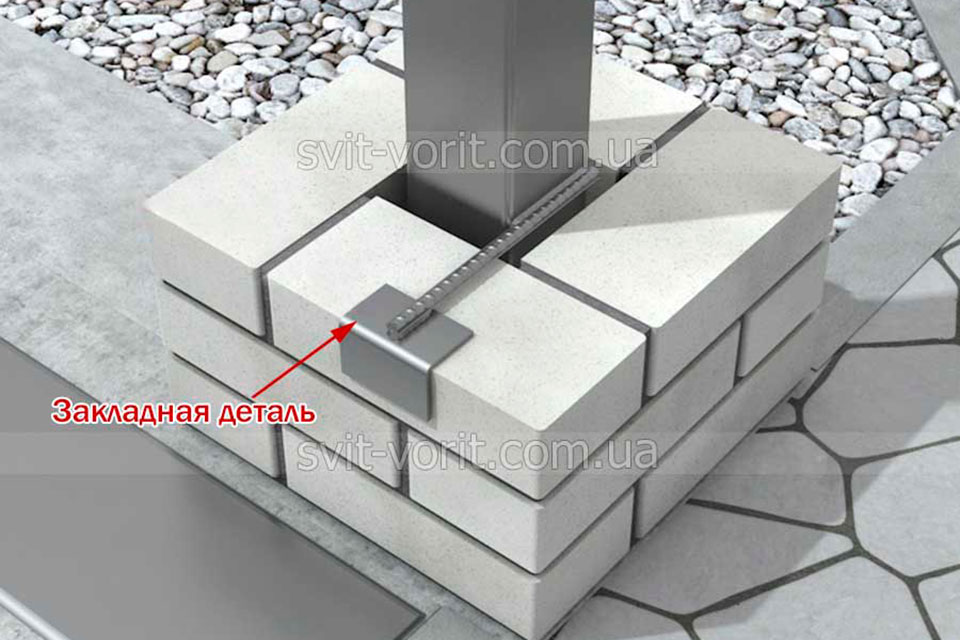
There is no unequivocal answer to this question. If it is decided to weld them in advance, the installation site should be carefully marked. For the wicket I provide two of them, for the gate leaves - three. Brick laying is performed in such a way that the mortgages are located directly in the seam being formed, are symmetrically relative to the top and bottom of the supports. In this case, all work must be done very carefully. Only individual people can cope with such a task.
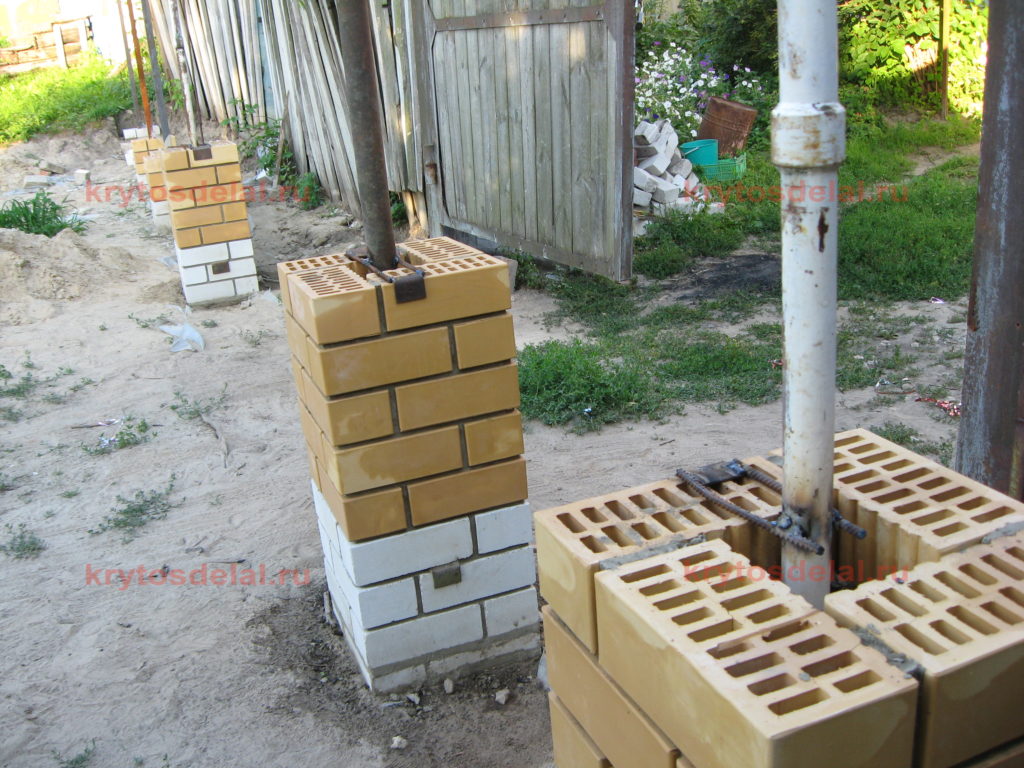
Mortgage in a brick pillar
An alternative option is to weld the elements directly during the masonry process. For this, the bricks are stacked to the desired height, and then the mortgage is attached in any convenient way. This can be done using bots, a clamp, or simply weld the element to the support.
This version of the sash device allows you to do everything not only very accurately, but also very beautifully, which is important for finishing the supports, which many decide to do on their own. Subsequently, it will be possible to paint the protruding elements with paint of the same color as the brick in order to hide the traces of installation work
Attachment option to a ready-made post
If the support is installed and the brick is laid, then the support can be fixed in two ways:
- Through the clamp. In this case, the completely finished post is "encircled" by a clamp frame welded from the corner. Sometimes it is placed in the form of three rings, placed at an equal distance relative to each other along the entire length of the support;
- To reinforcement rods. To do this, using a perforator, sufficiently deep holes are drilled, the diameter of which is slightly larger than the transverse dimensions of the reinforcement. They begin to work from a point located on the seam of the brickwork. Then they move downward, placing the drill at a certain angle. Reinforcement is driven into the holes prepared in this way.
Both options allow you to slightly increase the strength of the mounted structure. However, in this case, the appearance of the structure to be mounted is significantly deteriorated. This can be avoided solely by adhering to the technology for installing supporting elements.
Foundation installation
Since the mass of brick pillars is significant, it is necessary to fill in a solid strip foundation. All work must be carried out using appropriate technology.
First, holes are dug for the installation of two supports. The depth depends on the level of soil freezing. This value will be different in each region. 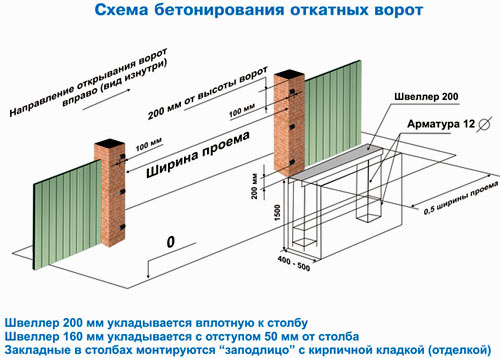 The next step is to make a pillow, which includes sand and crushed stone. First, sand is poured, the layer thickness of which should exceed five centimeters. He is well rammed. A 15 cm layer of crushed stone is poured on top, which is also compacted.
A frame is made, for which reinforcing bars are used. They are stacked horizontally and vertically. They are tied with a knitting wire, maintaining a step of 20 cm. Then the reinforcement cage is inserted into the hole made. After that, the installation of steel pipes is carried out, playing the role of the supporting frame of all brick pillars. Installation work should be carried out at a level, after which the pipes are well fixed.
A concrete solution is being prepared, for which it is necessary to pour into a concrete mixer:
- cement;
- sand;
- crushed stone.
All components are mixed very thoroughly. Add water to the composition and mix until a concrete mixture is obtained.
The process of pouring the foundation for the gate
The resulting solution must be concreted in the pits with pillars and wait several days until the concrete has completely hardened.The installation of pillars can be started after the foundation has completely dried, but not earlier than after half a month.
Installation of pillars for bolted gates or heavy gates
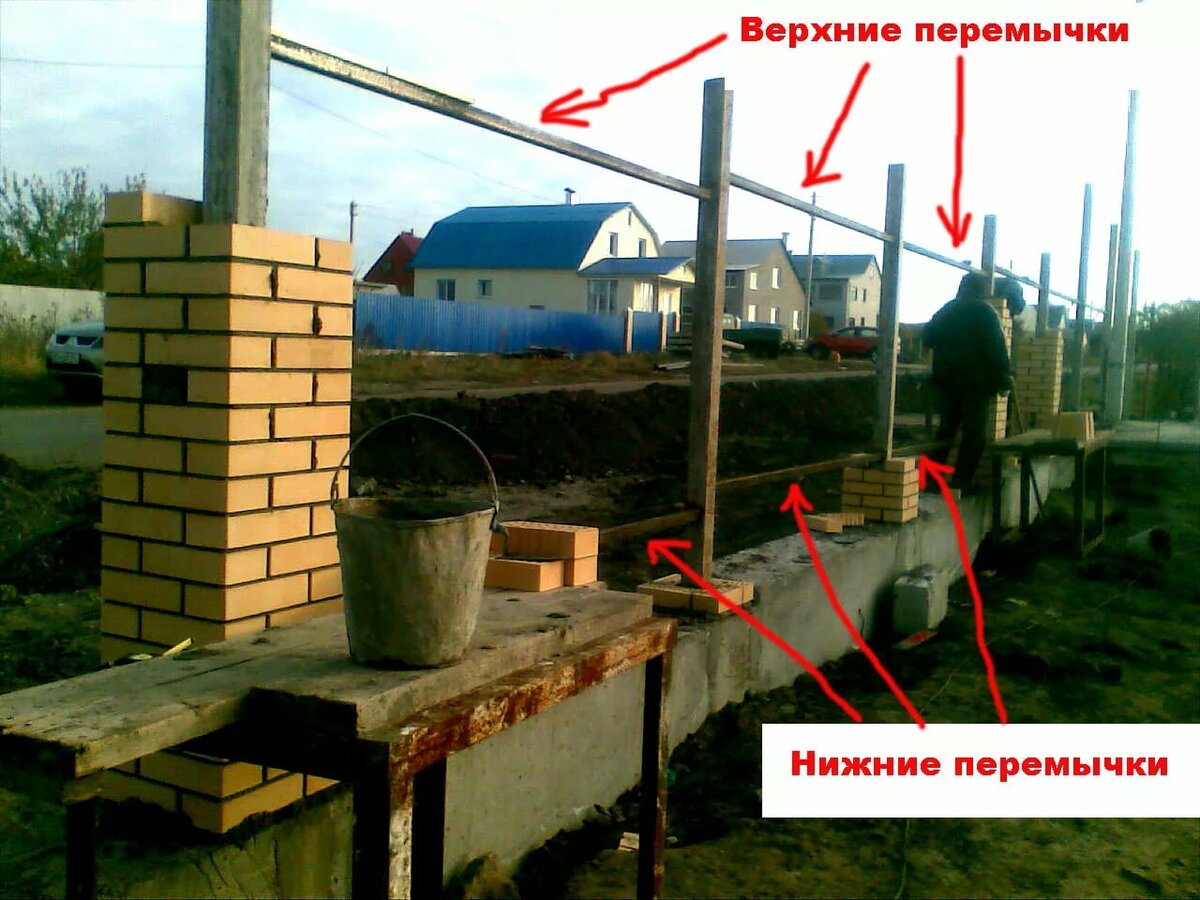
Installing pillars for the gates so that they do not walk is possible only by making a reliable foundation and ensuring their rigid connection with each other. Communication can be carried out at two points - at the bottom of the entrance, at the crossing through the gate and at the top of the pillars. They are usually welded together at these two points, with two I-beams between them.
But for the upper fasteners there is a rather serious limitation - sometimes it may be necessary to pass vehicles that exceed the dimensions of the posts and the upper beam in height. Therefore, the latter is made removable.
When equipping an entrance to your own site, when you plan to drive only your own car, it is quite possible not to make a solid foundation for the gate, but to make separate ones for each post. At the same time, the pillars are simply welded in the lower part with a thick I-beam, and the same beam is made from above, but removable, inserted into the welded sockets and having welded pins for insertion.
However, this does not negate the laying of the foundation for each pillar separately, which must go below the freezing depth for such gates. In the entrance area, a concrete platform is usually made. It will be very good if the I-beam, which is welded between the pillars at the bottom, is thicker. In a layer of concrete, it will be reliably protected from rust, since concrete gives a slightly alkaline reaction of the medium and prevents the oxidation of the metal.
The foundation is usually filled with solid,. Its depth should be below the freezing depth. Everything is done according to the same rules as the construction of a strip foundation for a house. The thickness of the foundation grillage is about 50 cm. Theoretically, 30 will be enough, however, the width of 50 allows you to save on formwork and pour the foundation into a spacer with the walls of the trench.
Extensions-buttresses are made near the pillars in both directions, perpendicular to the entrance. Usually, even for heavy gates, a buttress in the area of a post with a total length of one meter is quite enough. The foundation is reinforced before pouring.
It is advisable to install an I-beam at the top of the pillars. Considering that usually heavy gates require large and heavy posts, the girder must fit.
It will be difficult to remove and put in place - you have to fit the crane every time. Therefore, it is better to immediately lay a significant margin in height in the pillars and simply weld the beam to them tightly, once and for all.
Foundation
At the design stage, you need to think over the structure of the foundation for the fence made of brick pillars. It must be present, in the minimum version - columnar. That is, brick columns should at least rest on separate buried concrete supports and be connected to them. This, firstly, will make it impossible for them to overturn, and secondly, it will provide support on a stable ground. It is clear that the top layer, which is constantly wet and freezing, is not such.
When building on normal soil, bury foundation under the fence posts from bricks it follows 15–20 cm below the soil freezing depth characteristic of the region (you can see it in SNiP on building climatology). If the soil, due to the absence of clay inclusions, has good drainage properties (sandy or stony), a depth of 80 cm will be sufficient.
To make the support more stable, it can be made expanding downward. In this case, the linear size of the sole is doubled in comparison with the size of the upper platform, which is the base of the brick fence posts. This technique will be especially appropriate in the case of columns designed to attach a wicket or gate leaf.
If significant wind loads are expected or the fence sections will have a relatively large weight, it is advisable to lay a shallow strip foundation 20-30 cm deep under them.For the sections attached to it, it will act as a reliable ballast, and in addition, it will tie separate foundations for the pillars into a single structure.
Well, under a heavy stone or brick fence, you need to erect a strip foundation with full depth (below the freezing depth). Pillars for brick fence or stone are erected according to the same rules as for lighter canvases.
Having decided on the structure of the foundation, it will be easy to calculate the volume of concrete required for its manufacture.
Pay attention to the following:
- All elements of the foundation should be located on gravel or crushed stone cushions 10-15 cm thick.
- The strip foundation must necessarily have a reinforcing cage inside.
- The concrete in the ground must be protected from moisture by two layers of roofing material.
The connection between the fence post and the concrete support is provided by a steel core that runs through both elements. For this role, you need to prepare a pipe or an 80th channel, sections of which will be welded in pairs into a box. The core must penetrate almost completely through the foundation - here it also performs the function of reinforcement.
As for the brick pillars, in those of them on which the wicket and gates will be mounted, the core must reach the very top; in all other cases, it may be 40-50 cm lower than the brickwork of the pillars.

Formwork construction and foundation pouring
The foundation is carried out according to the following scheme:
- A hole or trench is dug (for a strip foundation) of sufficient depth.
- Gravel or crushed stone is poured onto the bottom, which is carefully compacted (the layer thickness is 10-15 cm).
- A plank formwork is installed, which from the inside must be sheathed with two layers of roofing material.
- In the formwork for the strip foundation, a knitted reinforcing cage is installed, and for the foundation under the brick posts - a steel pipe or other core, set to a vertical position along a plumb line. For a more reliable fixation in concrete, the core can be equipped with a cross-corner thrust bearing or plate.
- Concrete is poured into the formwork and into the core. If you decide to cook it yourself, try to rent a small concrete mixer - it will be much easier to work. Concrete can also be ordered at the ZhBK plant - it will be delivered by an automatic mixer. It is better to fill the foundation entirely in one go.
Freshly poured concrete is pierced over the entire area with a shovel or reinforcement in order to remove air bubbles. After that, the structure is left to mature for 20–28 days, holding it under polyethylene and periodically pouring water over it. The formwork can be dismantled after 10 days.
In this case, you do not have to fiddle with the formwork: this function will be performed by roofing material rolled into a box and inserted into a recess.
How should bricks be laid?
When laying bricks, the following sequence of actions should be observed:
- We lay out square rods along the future perimeter of the structure;
- We apply the solution inside the surface of the rods, not exceeding their level;
- Using the level, we check if the solution is even. If there are irregularities, it is necessary to remove or add it in the necessary places;
- On top of the mortar, lay 4 bricks around the perimeter, not forgetting about bandaging the seams;
- We take out the rods and clean them from the solution;
- We check the height with a level and, if necessary, level the surface with a trowel or manually;
- We fill all the joints between the bricks with mortar;
- We cover the inside of the column with pebbles, and then fill it with a solution. Care must be taken to ensure that it is not liquid - otherwise it will spill out. Calma or reinforcement should pierce the pebbles, allowing the solution to penetrate deeply;
- Each row of a series of processes should be repeated.
Nuances you need to know when laying
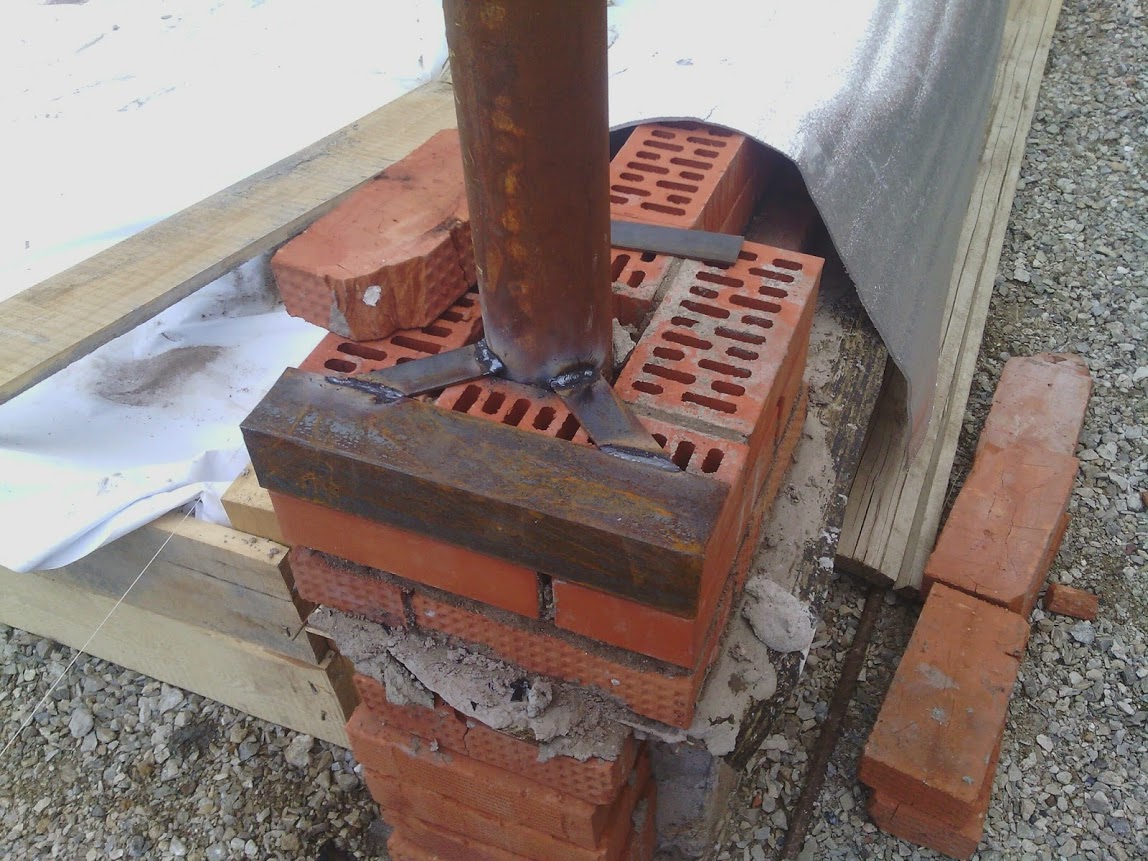
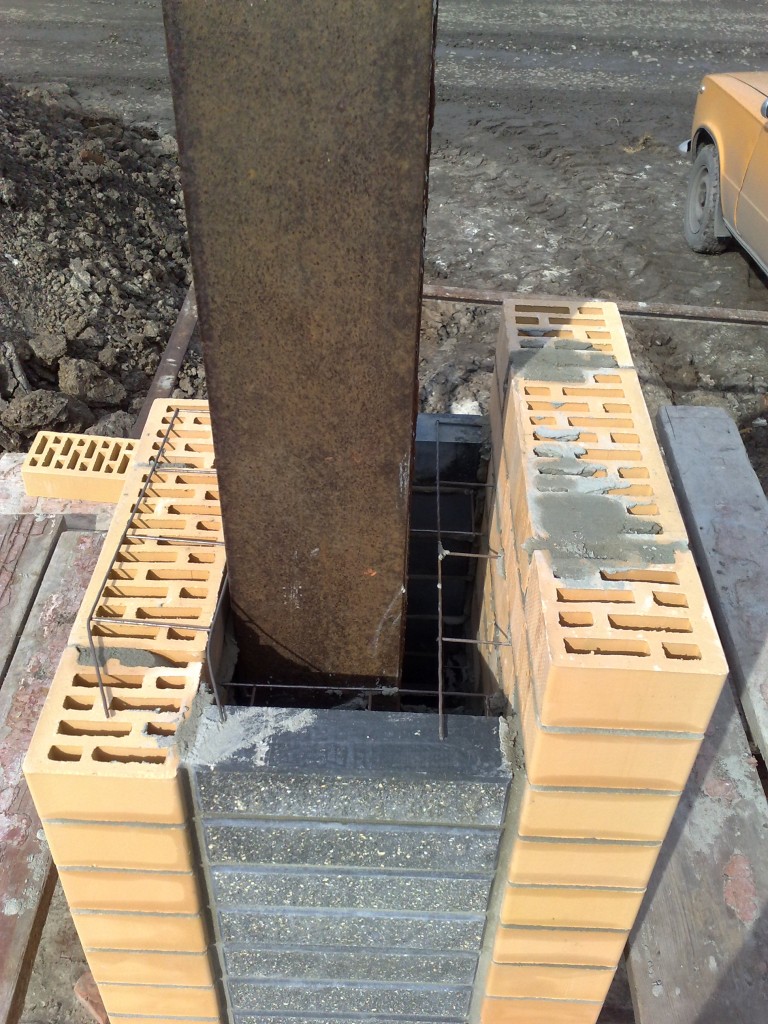
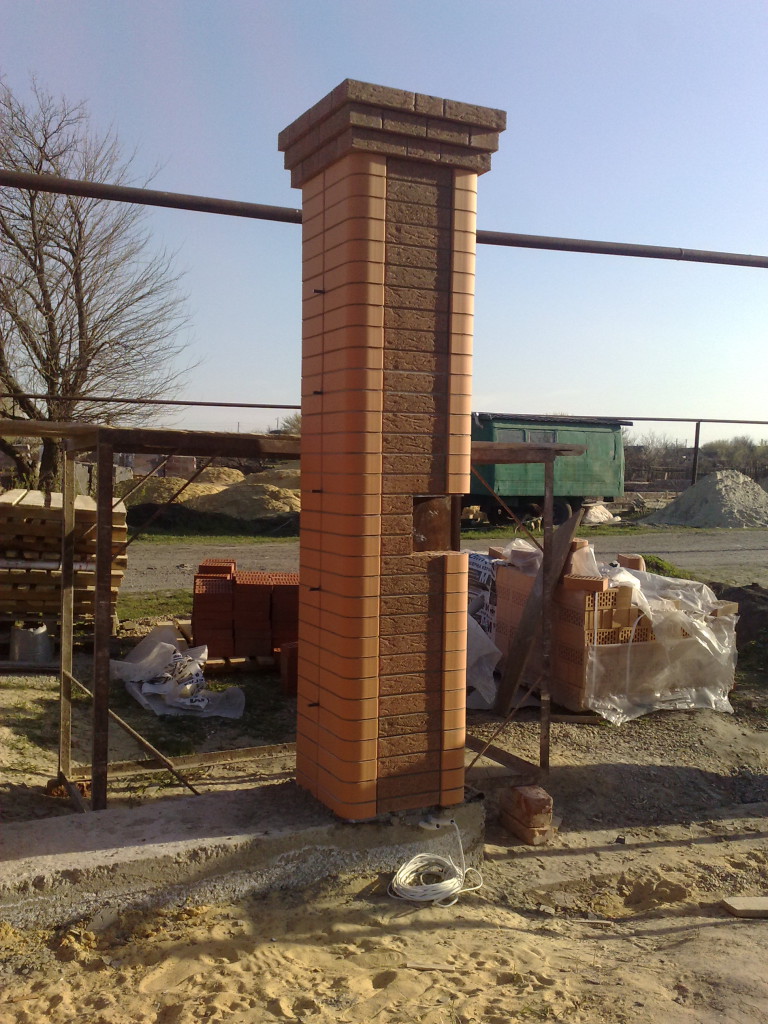
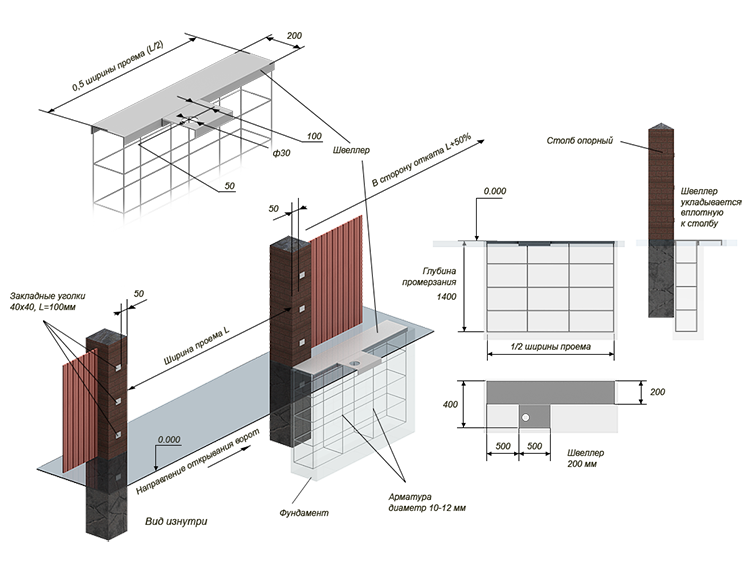
The most effective will be masonry, made around a metal pipe concreted into the foundation.Metal pipes at the full height of the pillar are indispensable if the gates are attached to this pillar. For the rest of the pillars, you can use pipes shorter - they should protrude 30-50 cm above the foundation.Next, you need to weld on a row of rods with a diameter of 1 cm, but the pillar, which will support the swing gates, will have to have a larger diameter.
After, along the entire perimeter of the pillar, bricks are laid out on a cement-sand mortar with periodic bandaging of the seams. Pebbles are poured inside, which is poured with a solution. The core of the post can be concreted, and bricks in such cases play the role of formwork. All these actions must be done when erecting each row of masonry. In the three lower rows of the gate wall, it is better to use a solid brick, while in the remaining rows you can also use a hollow brick, however, with this type of brick, you do not need to take a too liquid solution, since it will penetrate and fall out of the brick cracks. The workflow will be much faster and more convenient if the mortar is placed under all the bricks at once.
As practice shows, the best solution when installing fences is a brick fence, since it practically does not require repair.
But when calculating the amount of material used, it is imperative to take into account the presence of a gate, which will also be attached to brick pillars. First of all, you need to calculate their size, the number of pillars that need to be installed on the site, then start construction
To install the support pillars, you first need to dig holes for them, lay the foundation, make waterproofing, and then build on. Unlike conventional supports, those on which the gate will be hung are built in a slightly different way. They are mounted according to a special scheme.
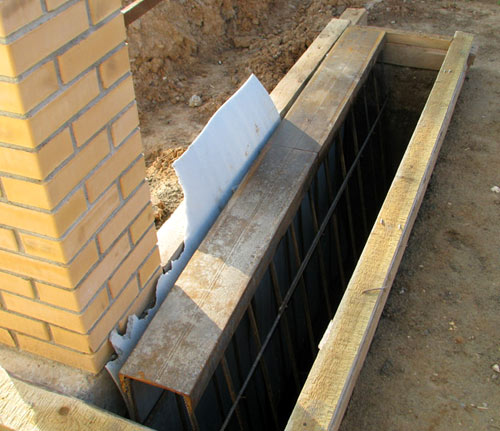
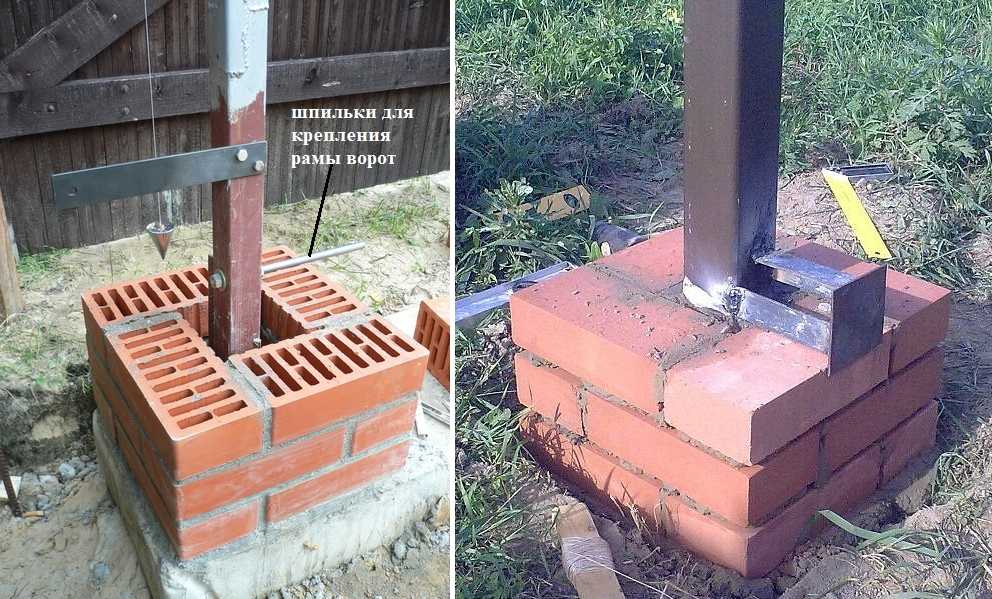
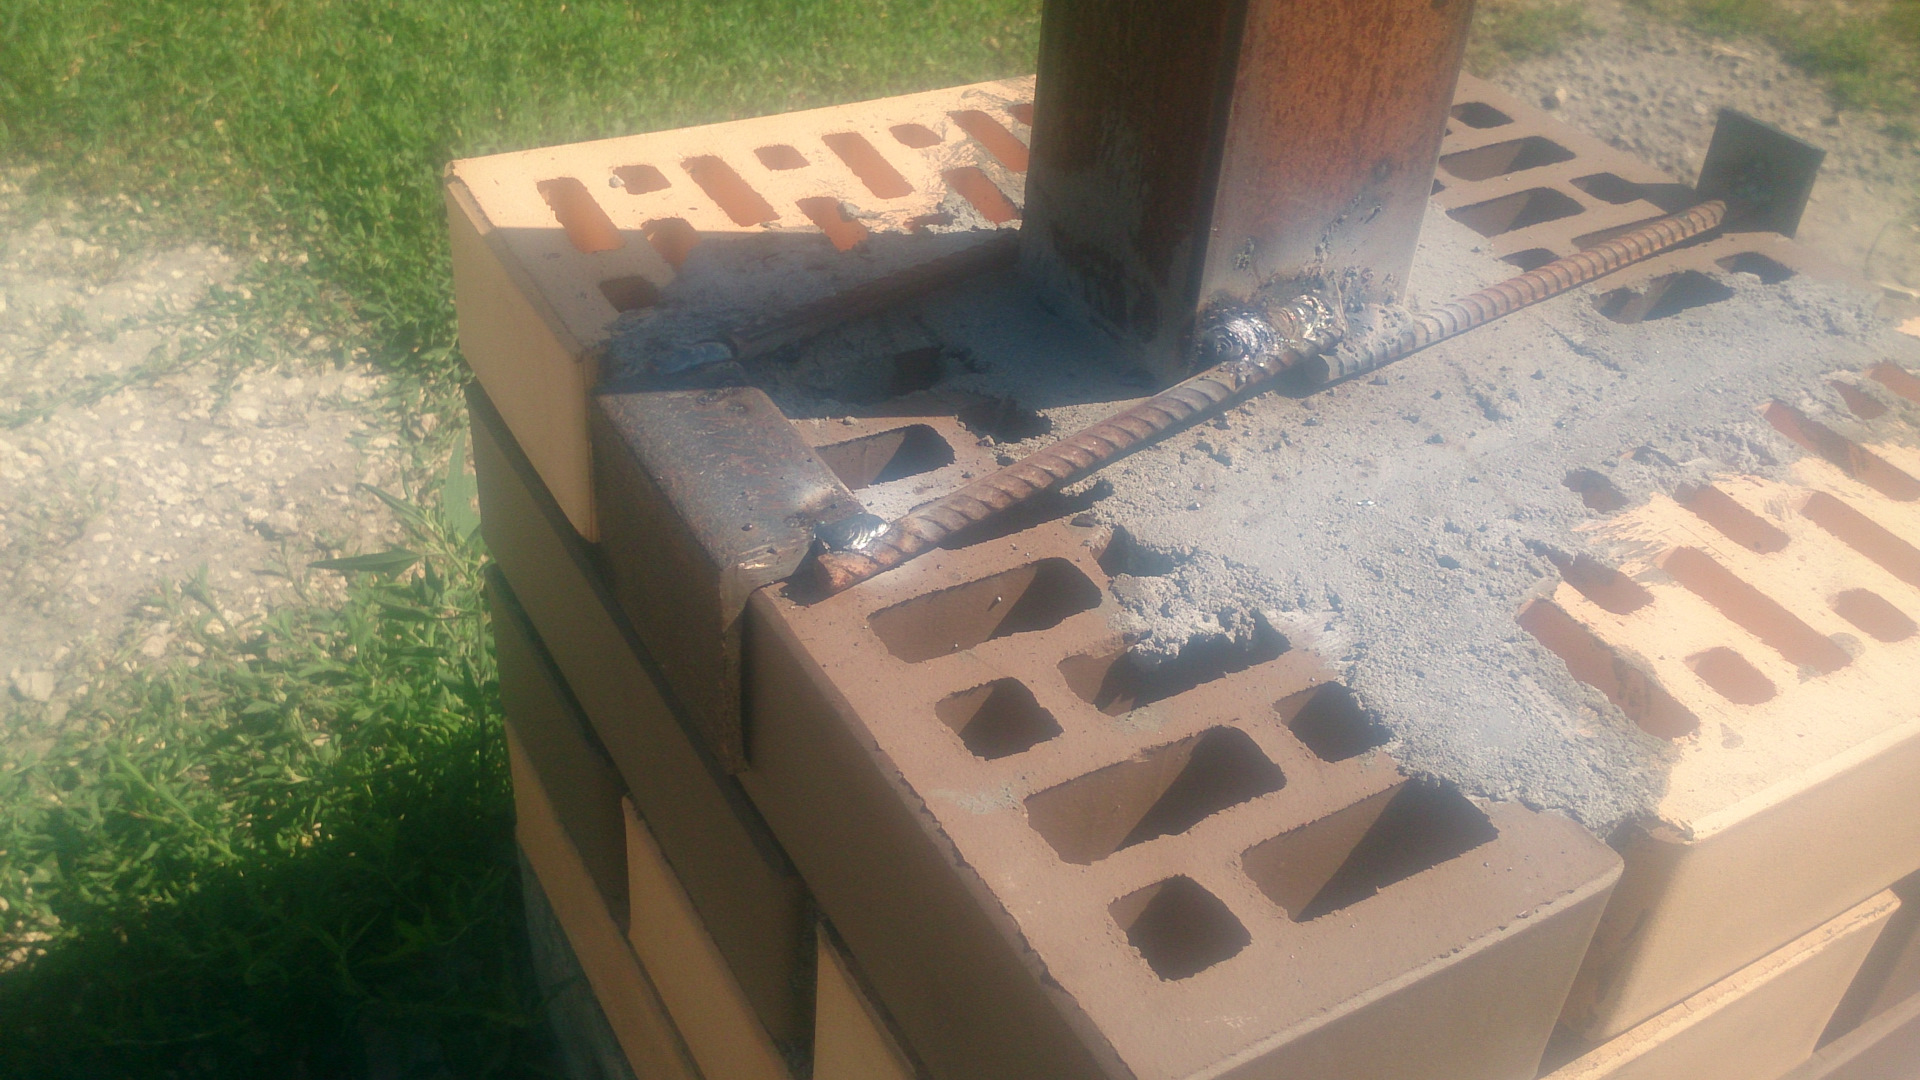
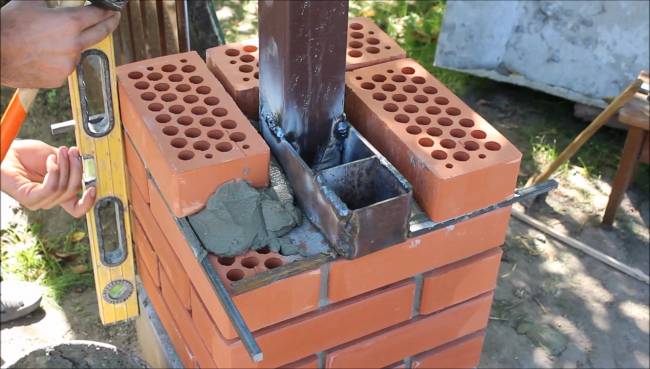
It is not necessary to completely lay a pipe or channel with bricks in the supports, since then there will be nothing to weld the gate to. At the same time, one side must necessarily be 1/3 dug into the ground, and the other side must rise above the brickwork, otherwise there will be nothing to fasten the gate to. Before installing the channel, either a sheet of metal or a flat stone is laid under it, after which everything is concreted. This design is necessary so that the channel does not sink into the ground under the weight.
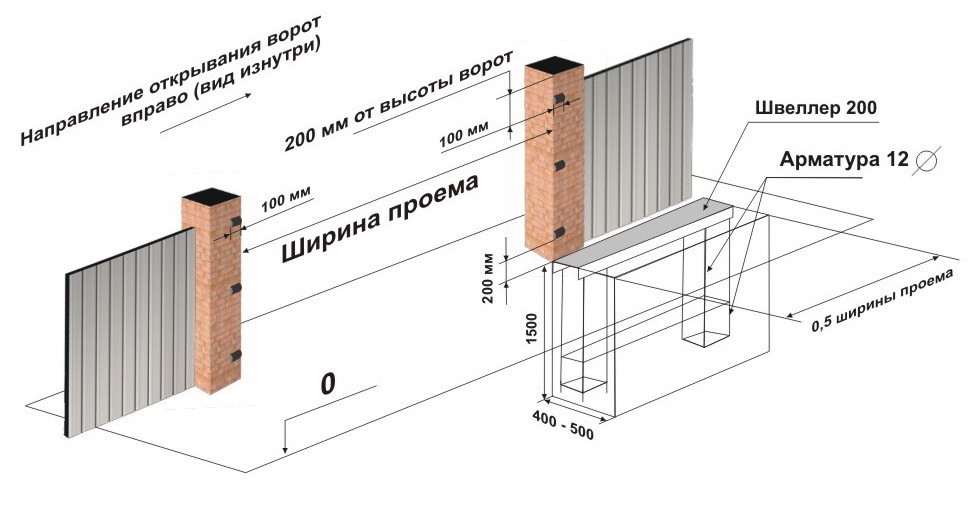
For the support posts under the gate, 160 mm channels are used, to which mortgages 80x80 mm in size are welded. Their fastening is carried out using a 50 mm wide angle. To prevent the corner from rusting, it must be covered with a solution on all sides. For each gate leaf, two or three mortgages are usually made (this depends on their severity).
In order for this structure to withstand the maximum weight of the metal gates, it is necessary to weld channels to the side channels at the level of the trench bottom and in the upper part of the box, the length of which is equal to the length of the door. Due to their heavy weight, brick pillars require a high-quality, reliable, solid foundation foundation.

Typical error
When the gates are attached to the brick supports with their own hands, one characteristic mistake is made. The mortgages are welded directly to the metal post in order to secure the future gate. But only two pillars should have mortgages, on the rest they are simply not needed. The gates will not receive high reliability, since they simply will not be held by small sections of bricks, from which a metal rod sticks out.
To install the gate, when the pillars are made of brick, you must first make a layout, mark those pillars that will become the main support of the gate. The doors are mounted using electric welding, which is cheaper than gas welding. It does not form a bead of metal.
Fence masonry: technology
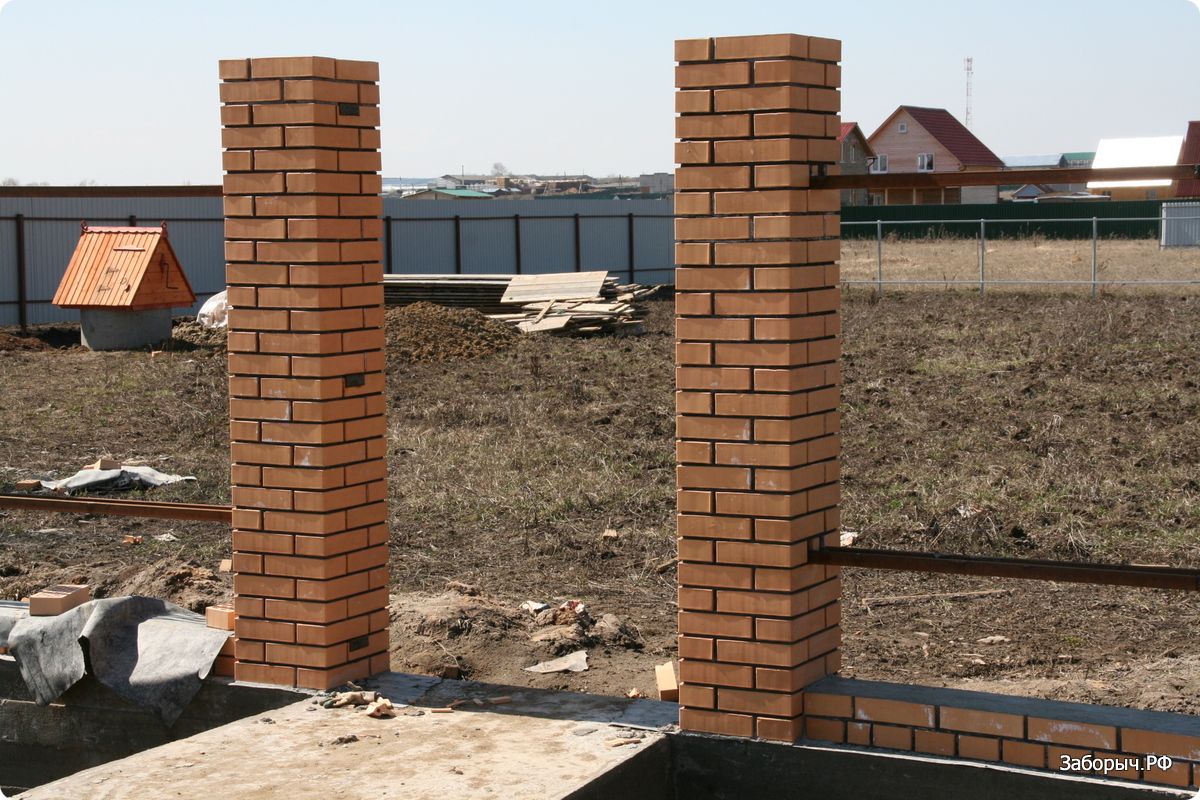
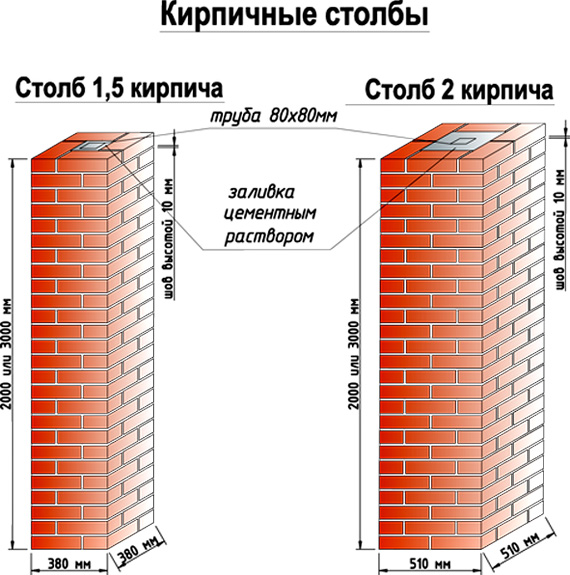
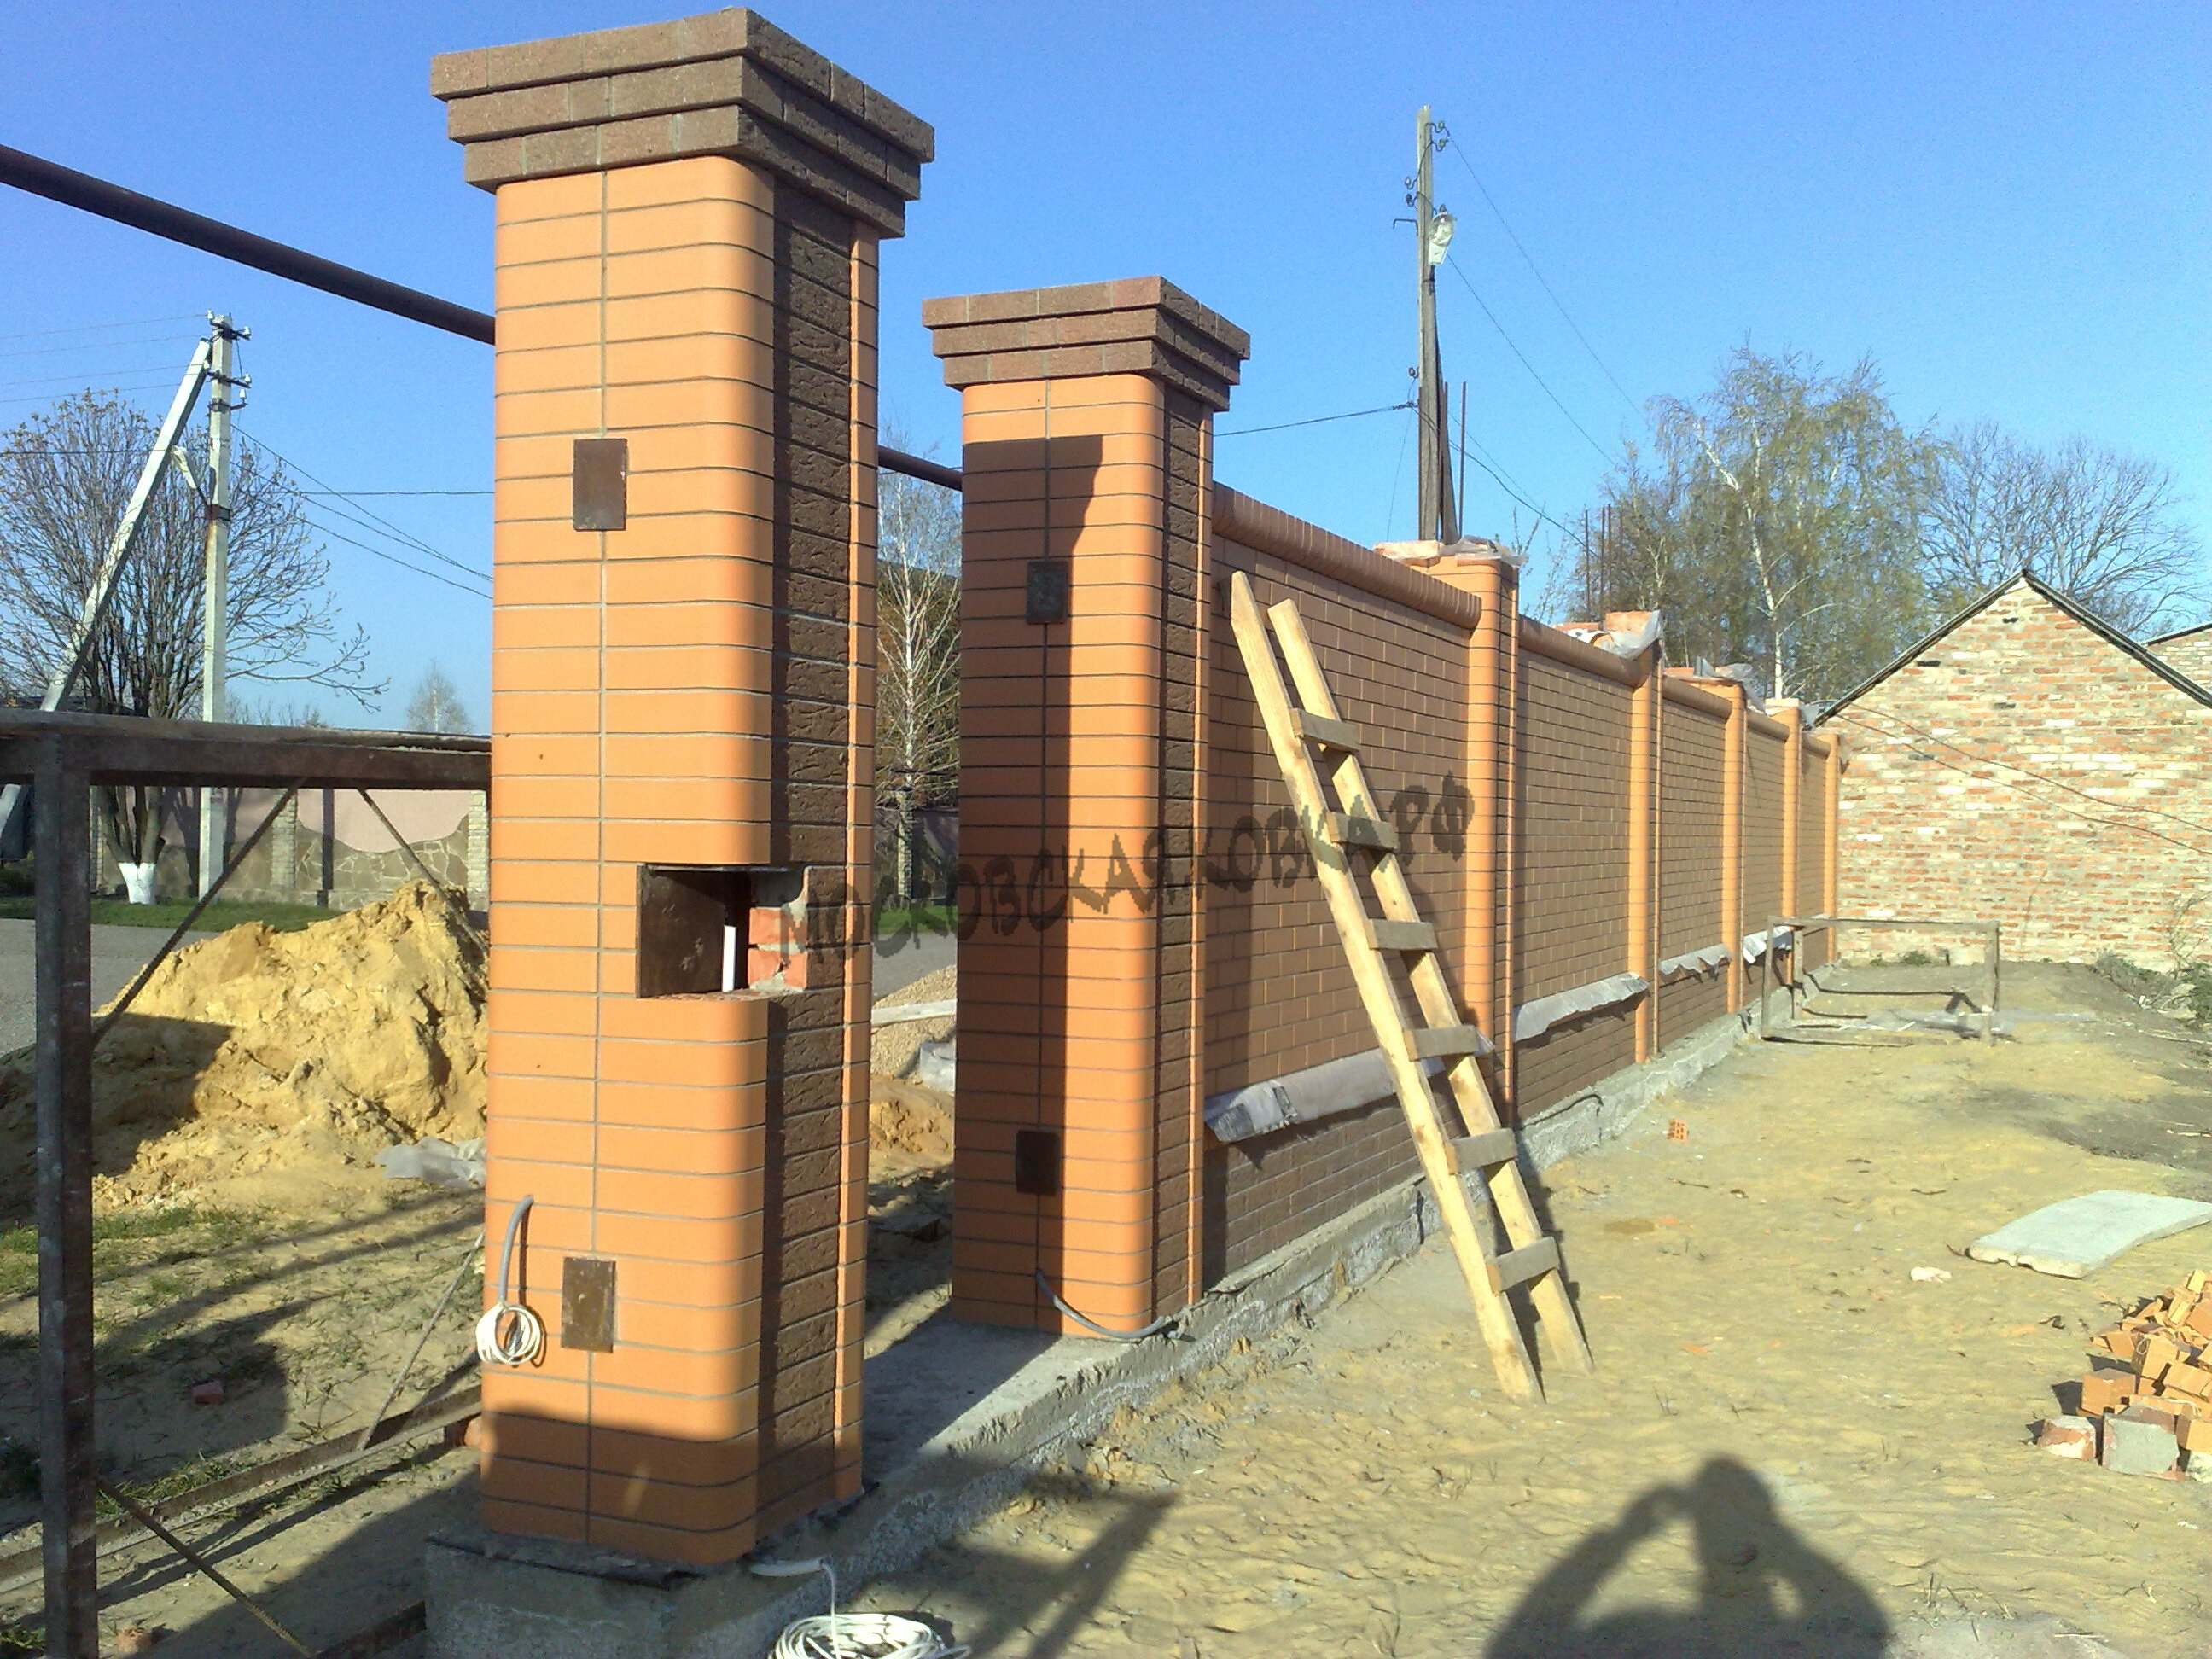
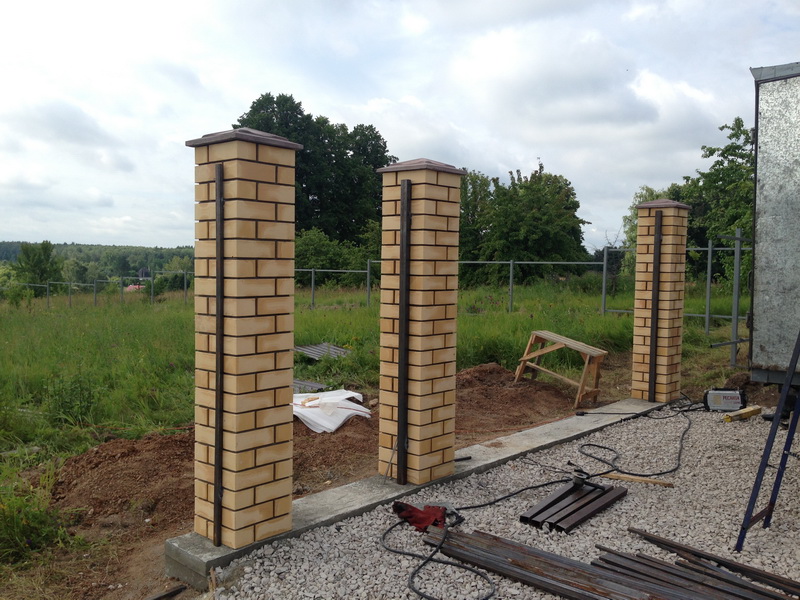
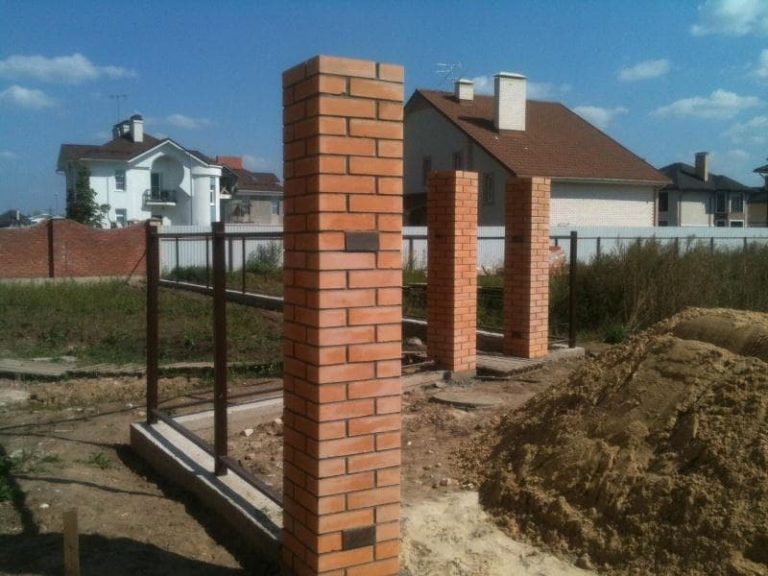
In most cases, the posts for the fence are made in 1.5 or 2 bricks, the section is 380 * 380 mm and 510 * 510 mm, respectively, the height is up to 3 meters.
The laying is carried out with a bandaging (offset) - the seam of the lower row is overlapped by the "body" of the brick lying on top. The seam is standard - 8-10 mm. The scheme of laying posts in one and a half and two bricks in the photo below.
Brick pillars in 1.5 and 2 bricks
Laying pillars: order of work
Cut-off waterproofing is spread on the finished foundation. It can be roofing material in two layers, but waterproofing on bituminous mastic is better. This layer is necessary so that the brick does not "pull" moisture from the soil. If wet brick freezes, it quickly begins to crack and crumble. Therefore, waterproofing is necessary.
According to the dimensions of the pillar, a solution is applied to the waterproofing with a layer of a little more than 1 cm.According to the scheme, bricks are laid on it. They are leveled vertically and horizontally by tapping with a special rubber mallet. Craftsmen can use the handle of the trowel, but in this case, the remains of the mortar can fly off the plane of the trowel, staining the hands and brick, and it is not wiped off the cement well.
Ceramic brick absorbs moisture very quickly, so if you hesitate a little, it will be difficult for you to "put" it in place. In order for the mortar to retain its plasticity longer, the brick is dipped in water for a few seconds before laying. The same maneuver makes it easier to wipe off the solution from the surface (it is removed immediately with a dry cloth).
Hammer down
The second row is also placed: a solution is spread on the bricks, bricks are placed on it, but with a dressing - unfolding so that the seam is blocked. Level again. Then they take a tape measure and check the dimensions of the stacked rows. Even a small offset of 1-2 mm is eliminated. Tap on the end of the brick (called "poke"), moving the bricks closer. Then, if the side edges were not coated, the vertical seams are filled. All subsequent rows are laid in the same way.
If there is a void between the inner reinforcement pipe and the brickwork, it is filled. If the distance is small, you can use a masonry mortar, if the void is significant, to save space, you can fill it up with rubble, tamp it, then spill it with a liquid cement-sand mortar.
Bar masonry
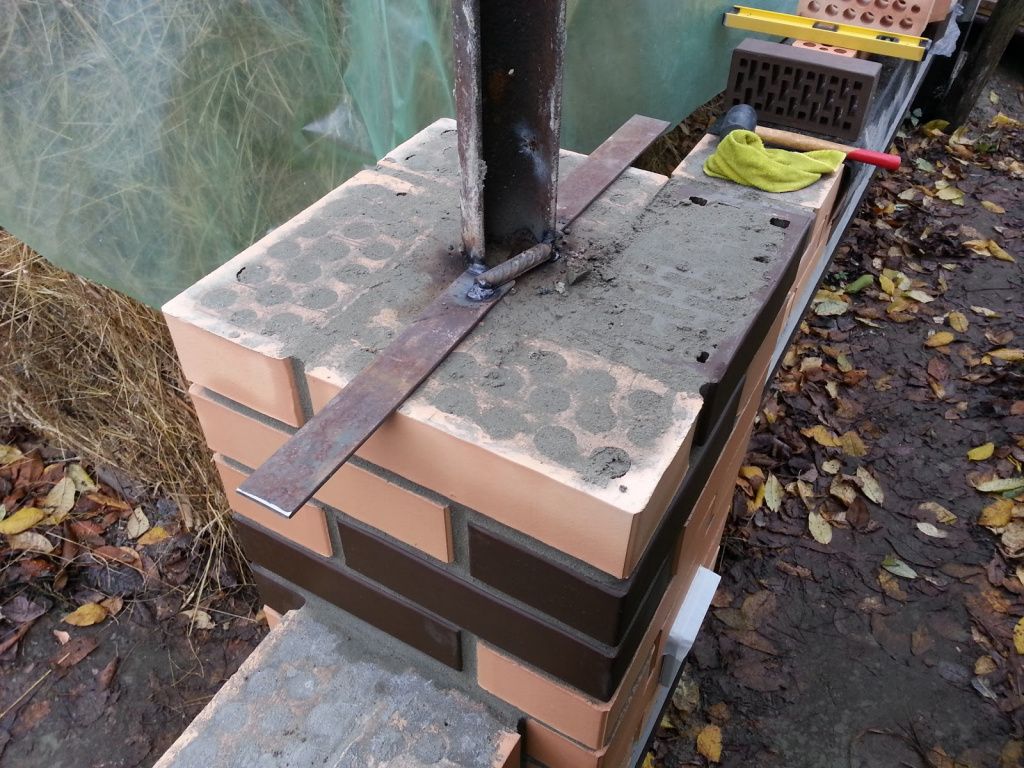
Such a laying of pillars has long been tested, but for beginners, it is difficult to maintain an even seam when self-made. Another problem - the solution crawls out of the seam, staining the surface. It turns out not very nice. To facilitate the work, they came up with a masonry for a bar. Take a square metal bar with a side of 8-10 mm, cut it into pieces, 10-15 cm longer than the size of the post.
Bar layout
Having laid the first row, a bar is laid on it along the edge of the brick. The site is filled with a solution with a small margin, and closer to the pipe, the layer is made larger. Then, leading with a trowel along the bar, remove the excess, cleaning the bar from the solution. But at the same time, the slope of the solution remains. They put a brick, level it. At the same time, the bar does not allow it to settle strongly, and the position of the other end is controlled by the level.
Apply the solution to the side face under the bar.
Then they take a short piece of a bar of about 10 cm (for a vertical seam), put it along the butt, apply the mortar with a trowel to the side of the laid brick, also removing the excess along the bar. The second brick is placed and leveled. After the level is set, the seam is pressed from above with a trowel, and the vertical bar is removed.
We take out the bar, holding the seam with a trowel
This is how all the bricks in a row are laid out. Then the rods are taken out, proceed to the next row. This technology of laying brick posts allows you to control the seams and make them neat. Even a novice amateur bricklayer can fold a pillar with his own hands.
It is only important in the process to control the parameters of each row.
Video lessons
A more complex version of a brick pillar - twisted with a screw
Features of working with ceramic bricks
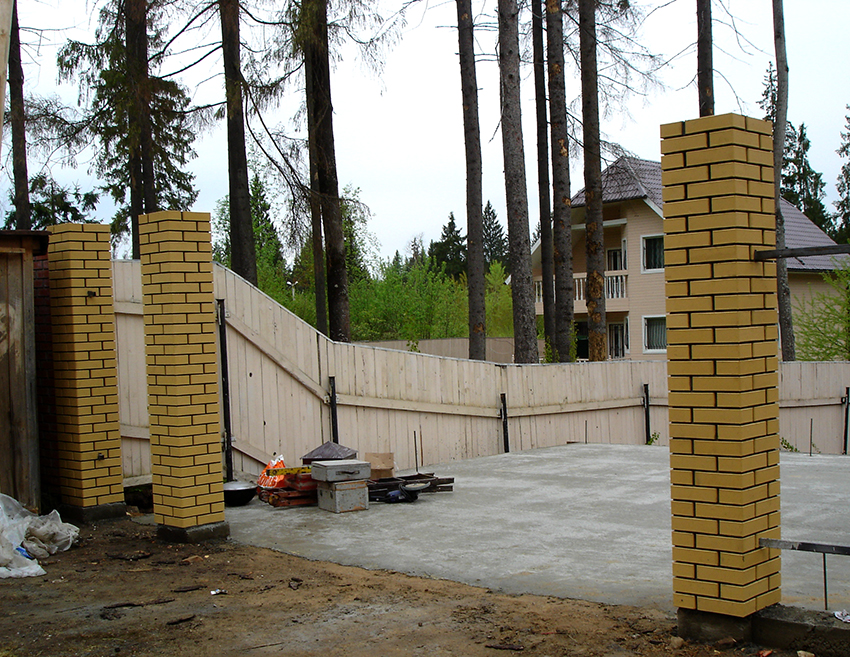
Choice of bricks for posts and material for fence sections
Choosing bricks for pillars, each developer comes from personal ideas about beauty.However, here, too, the practical side of the issue plays an important role. Ordinary smooth facing brick has not proven itself in the best way in such structures.
After several seasons, it begins to crumble and loses particles of the outer layer. This is partly due to the negligence of the owners, who do not cover the poles with reliable caps. Part of the blame lies with manufacturers who are unable to make quality material.
More resistant to precipitation and frost is textured brick for pillars, called "rock". A compromise option, both aesthetic and reliable, is a combination of the two mentioned types of bricks (photo # 4).
Photo No. 4 Combined masonry is a great option
In the photo, we see the rational combination of the grillage of the fence with its finish. Brick plays a double role here: formwork for concrete and decorative layer.
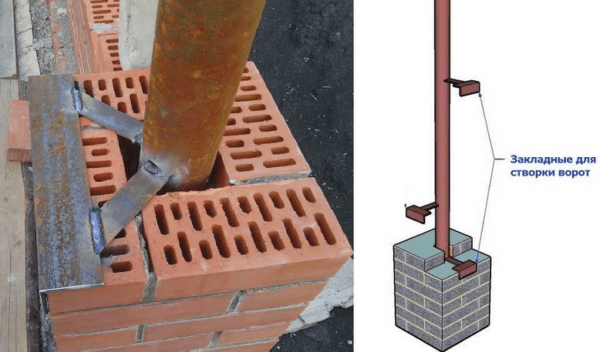
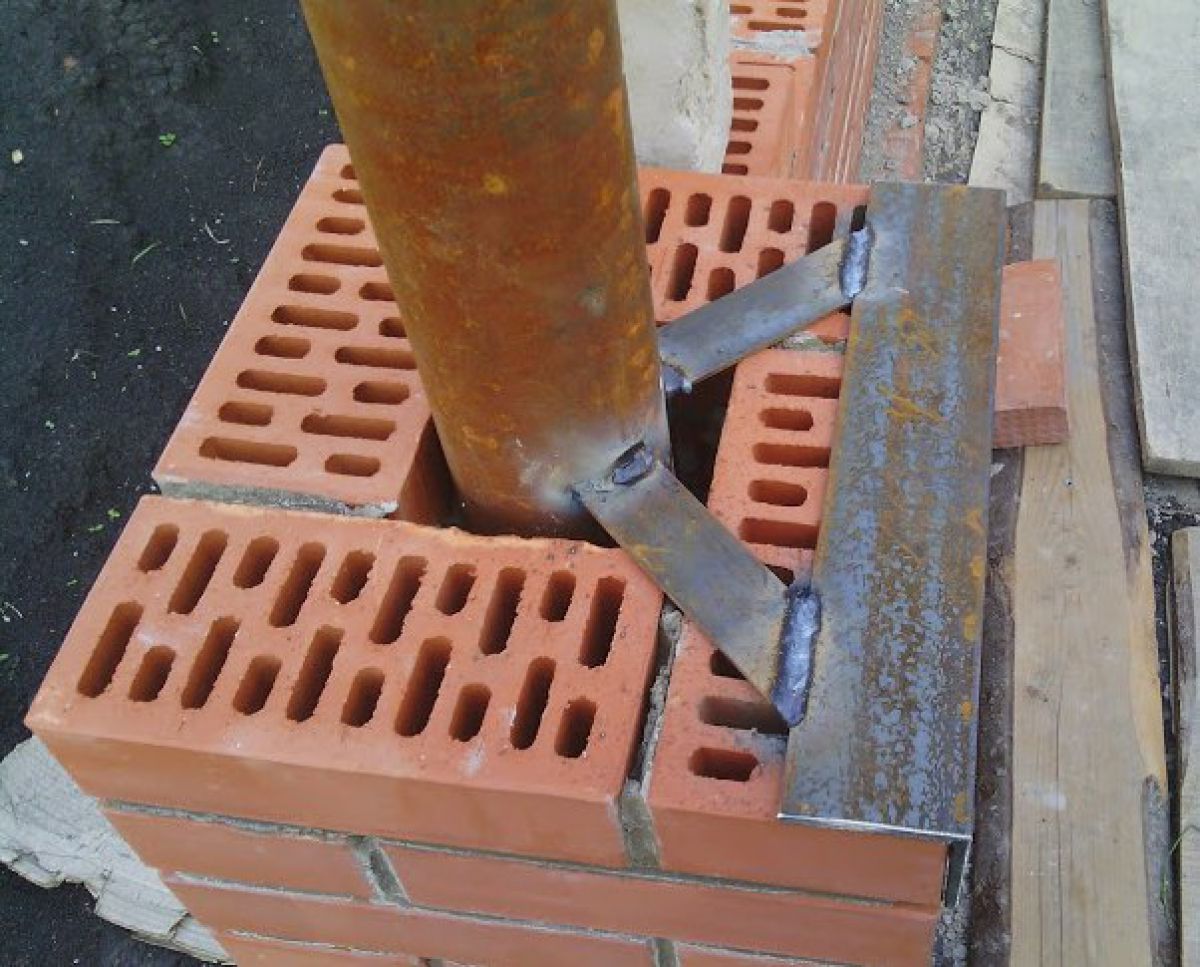
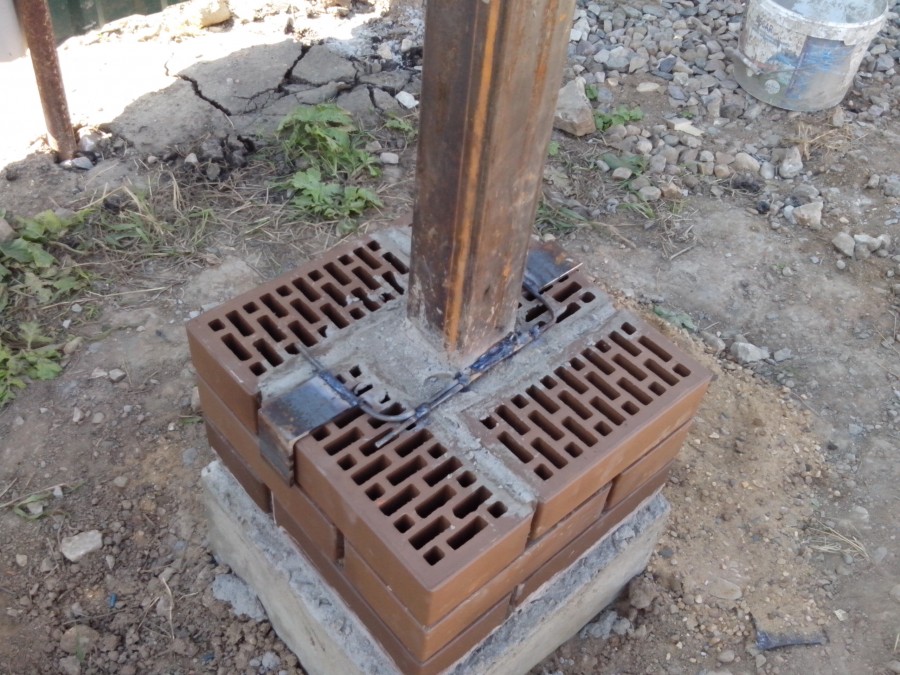
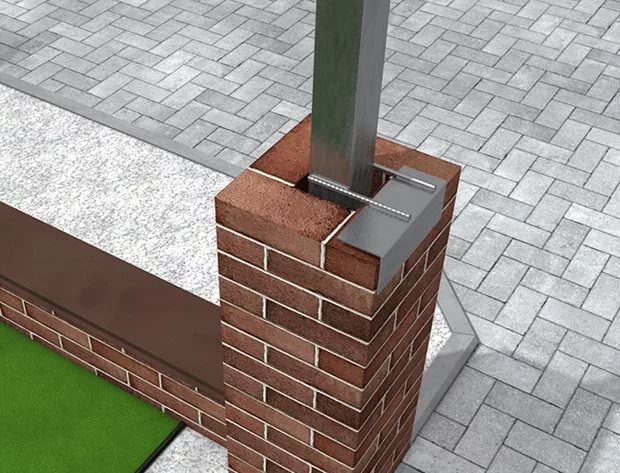
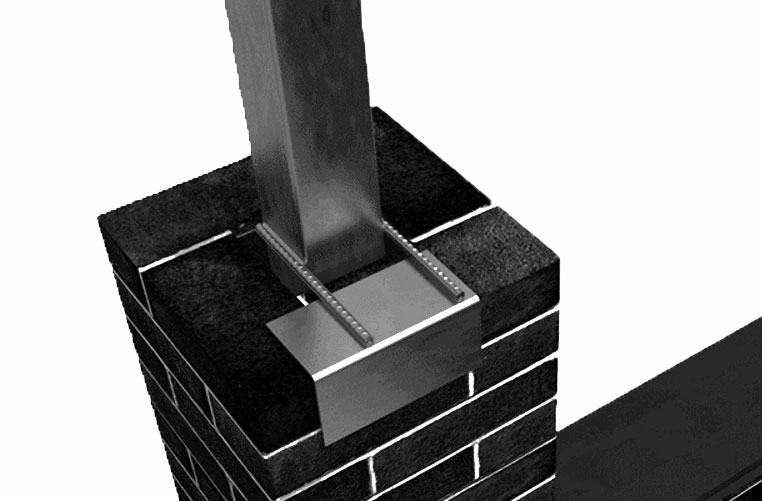
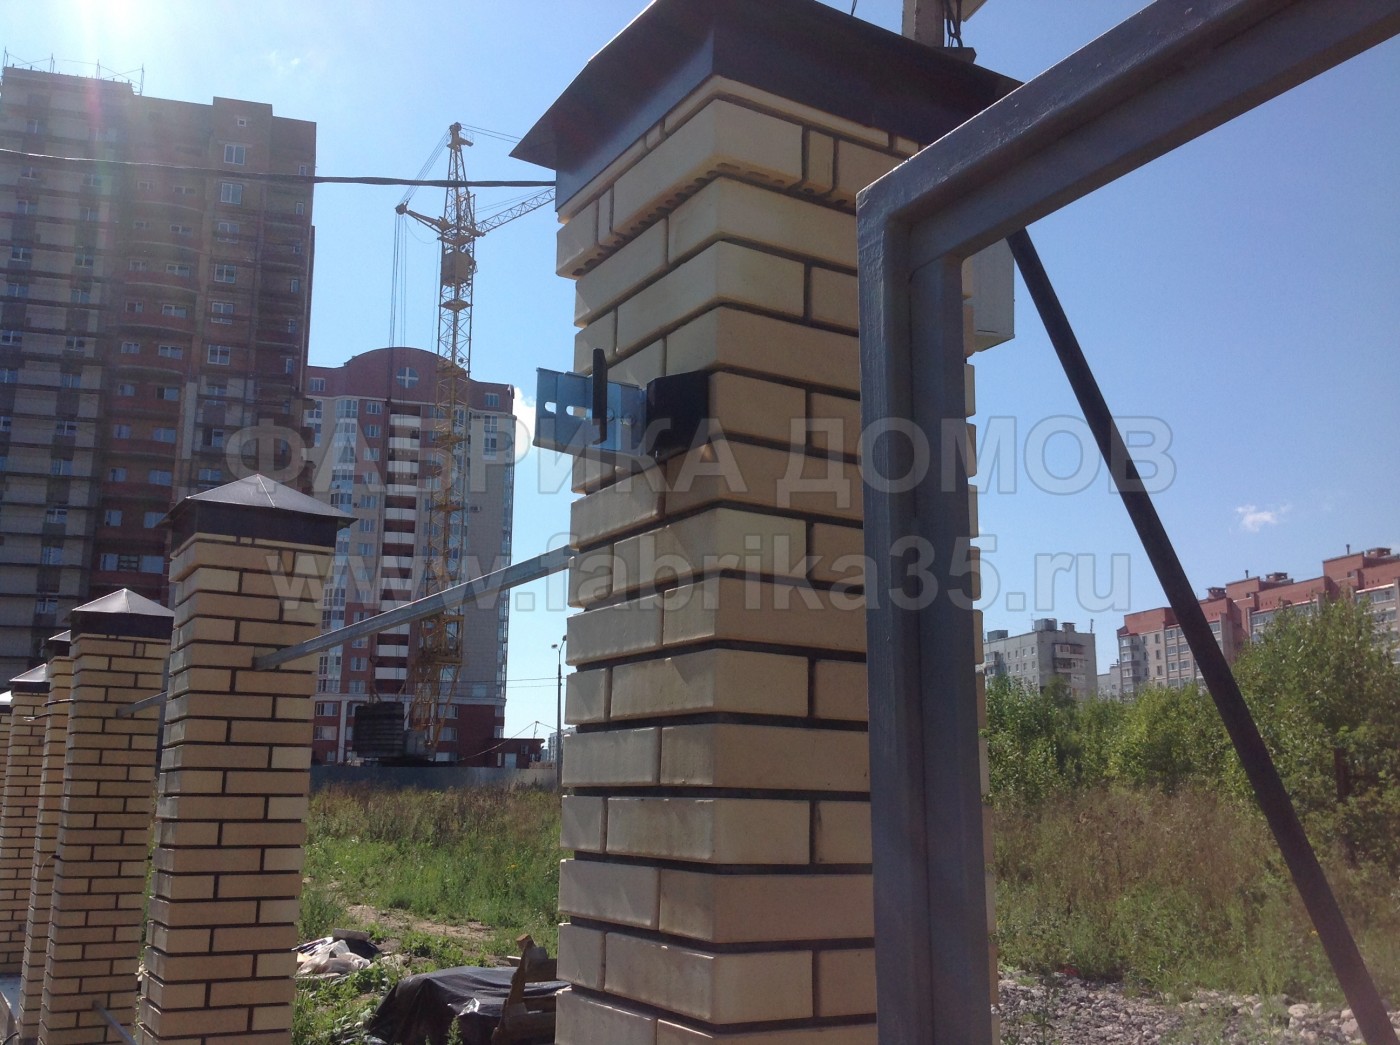
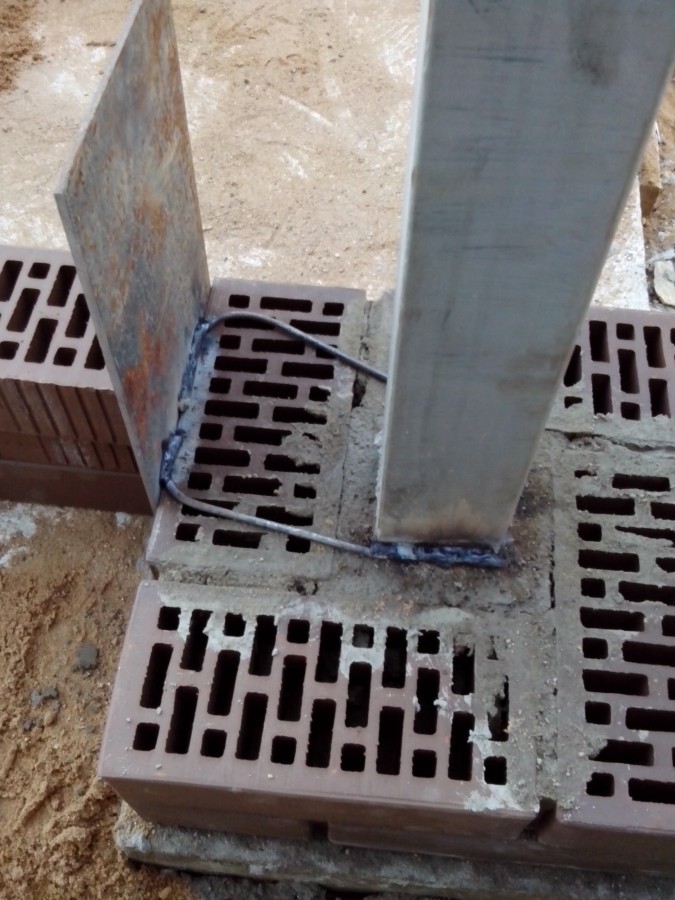
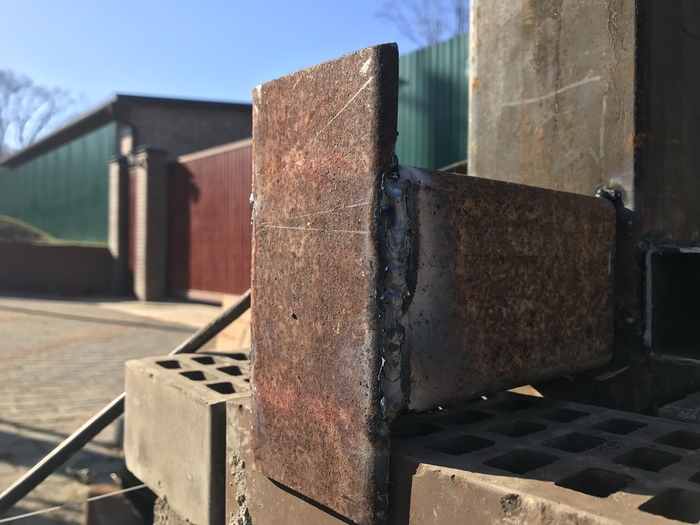
The design of pillars for gates and wickets has no fundamental differences from ordinary sections. To install heavy metal swing gates, the cross-section of the reinforcing cage or rack pipe is increased. In this case, the insertion plates should be thicker and wider so that the pivot joints do not tear them off the racks (photo # 5).
Photo №5 Embedded part of a post with a plate for hinging the gate and a plate for the automation engine
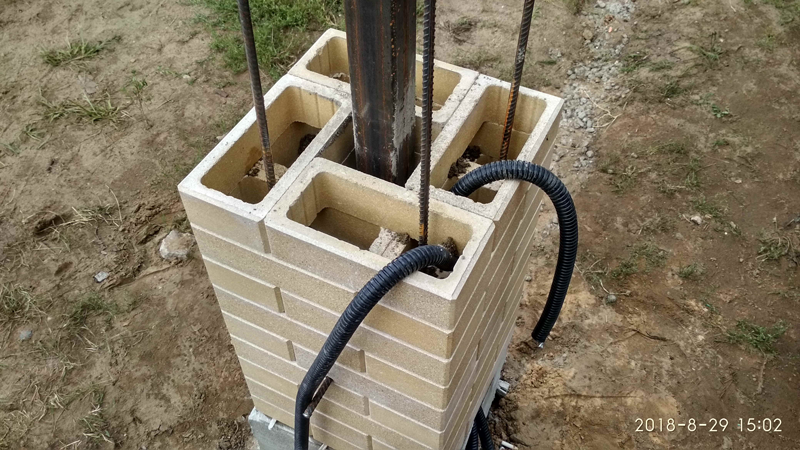
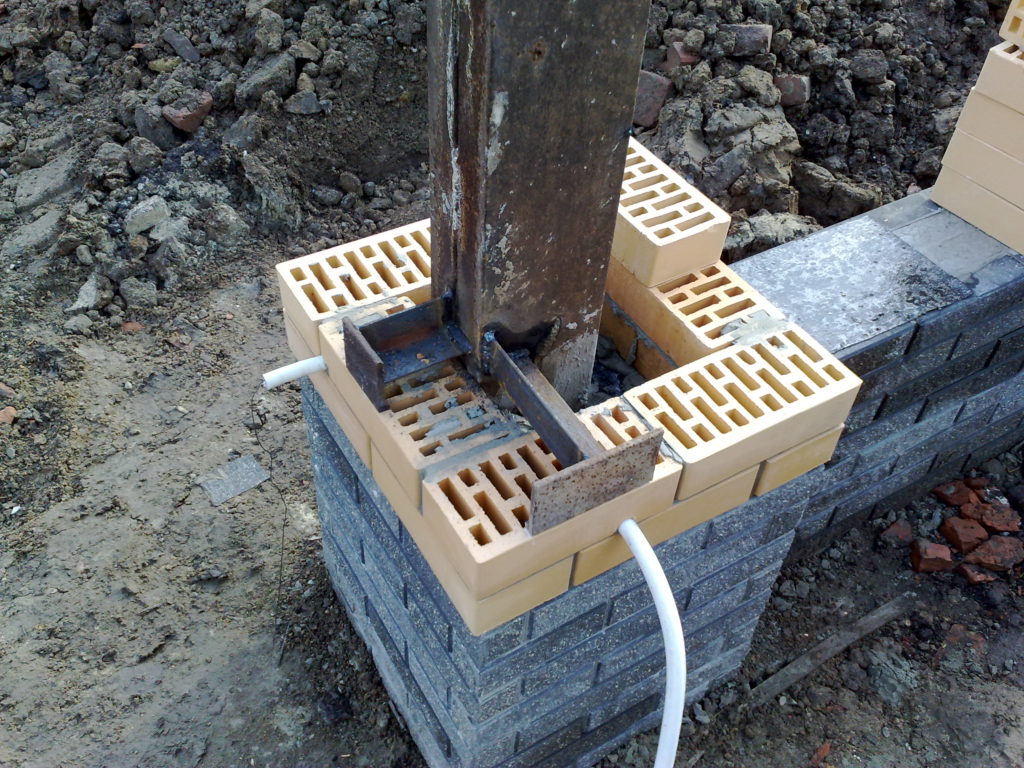
The front gates of the estate are often crowned with decorative lamps, and are also complemented with automation and an intercom. When intending to do this, do not forget to lay a corrugated cable with a wire in the masonry.
Photo # 6
Having decided from beginning to end to make pillars of bricks with your own hands, decide in advance on the material for filling the sections. The most common options include profiled steel sheet, forging, picket fence and unedged board.
The most expensive, but at the same time the most elegant option is forged lattices (photo № 7).
Photo №7 Forged gratings on brick pillars
The combination of brick with natural stone and forging is no less aesthetic and durable (photo # 8).
Photo # 8 Combined option (brick pillars + natural stone + forging)
Why is the combination of the three materials good? In it, each element contributes to the overall look. The grille can be ordered with a minimum area. She will perfectly fulfill the role of a decorative accent.
Photo # 9 shows a not very successful example of a combination of brick with forging and corrugated board.
Photo # 9 Profiled sheet looks out of place in such an environment
Having opened a part of the fence due to the forged lattice, the owner for some reason decided to close it again, placing a sheet of penetrated into the opening. The result is a ridiculous and strange combination.
Brick and wood are perfectly combined in any design, helping to create an inexpensive and beautiful fence (photo # 10).
Photo # 10 The classic version of the fence with brick posts and solid picket fence
A picket fence or a board in a section can be mounted not only vertically, but also horizontally (using the overlap method).
Photo # 11 Horizontal installation of boards between brick fence posts
The metal picket fence is growing in popularity. It is several times more durable than a wooden one, but it looks no worse (photo # 12).
Photo # 12 Metal picket fence - a close relative of the profiled sheet
An obligatory structural element is the caps on the brick pillars. Without them, the material will not last long. Moisture, freezing in the brick, will destroy it. On the market you can find two types of caps - metal and concrete.
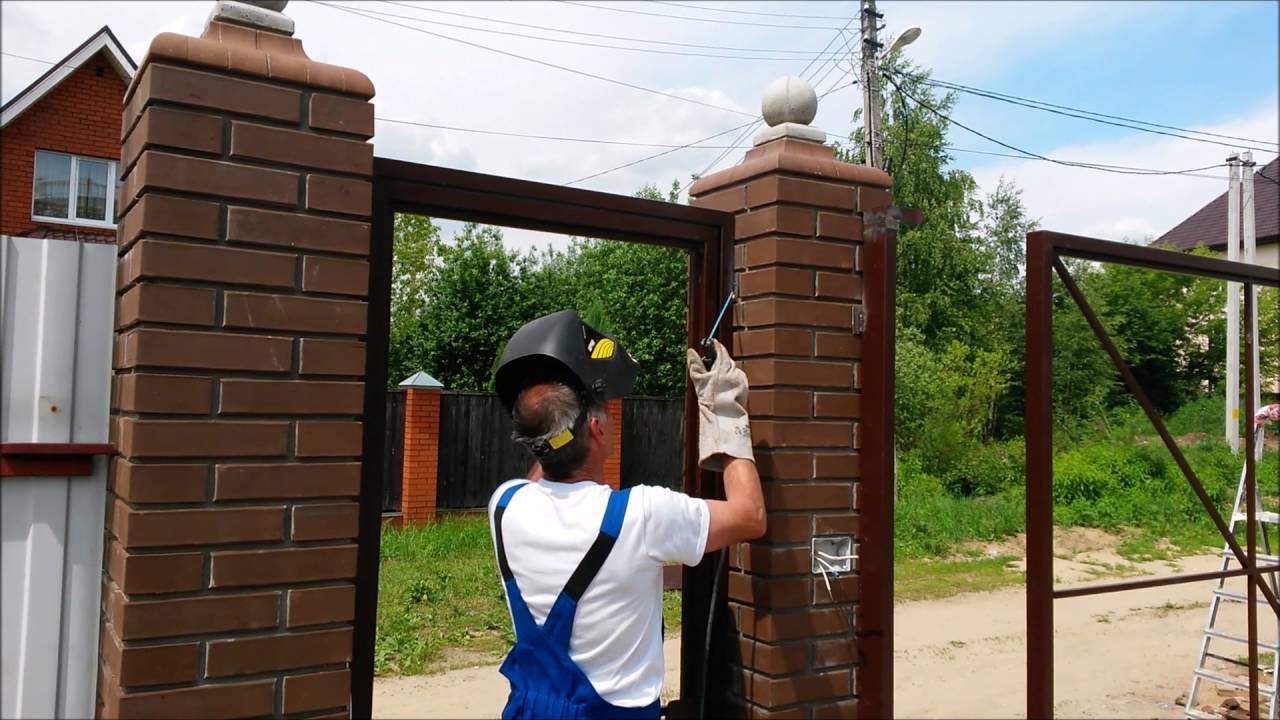

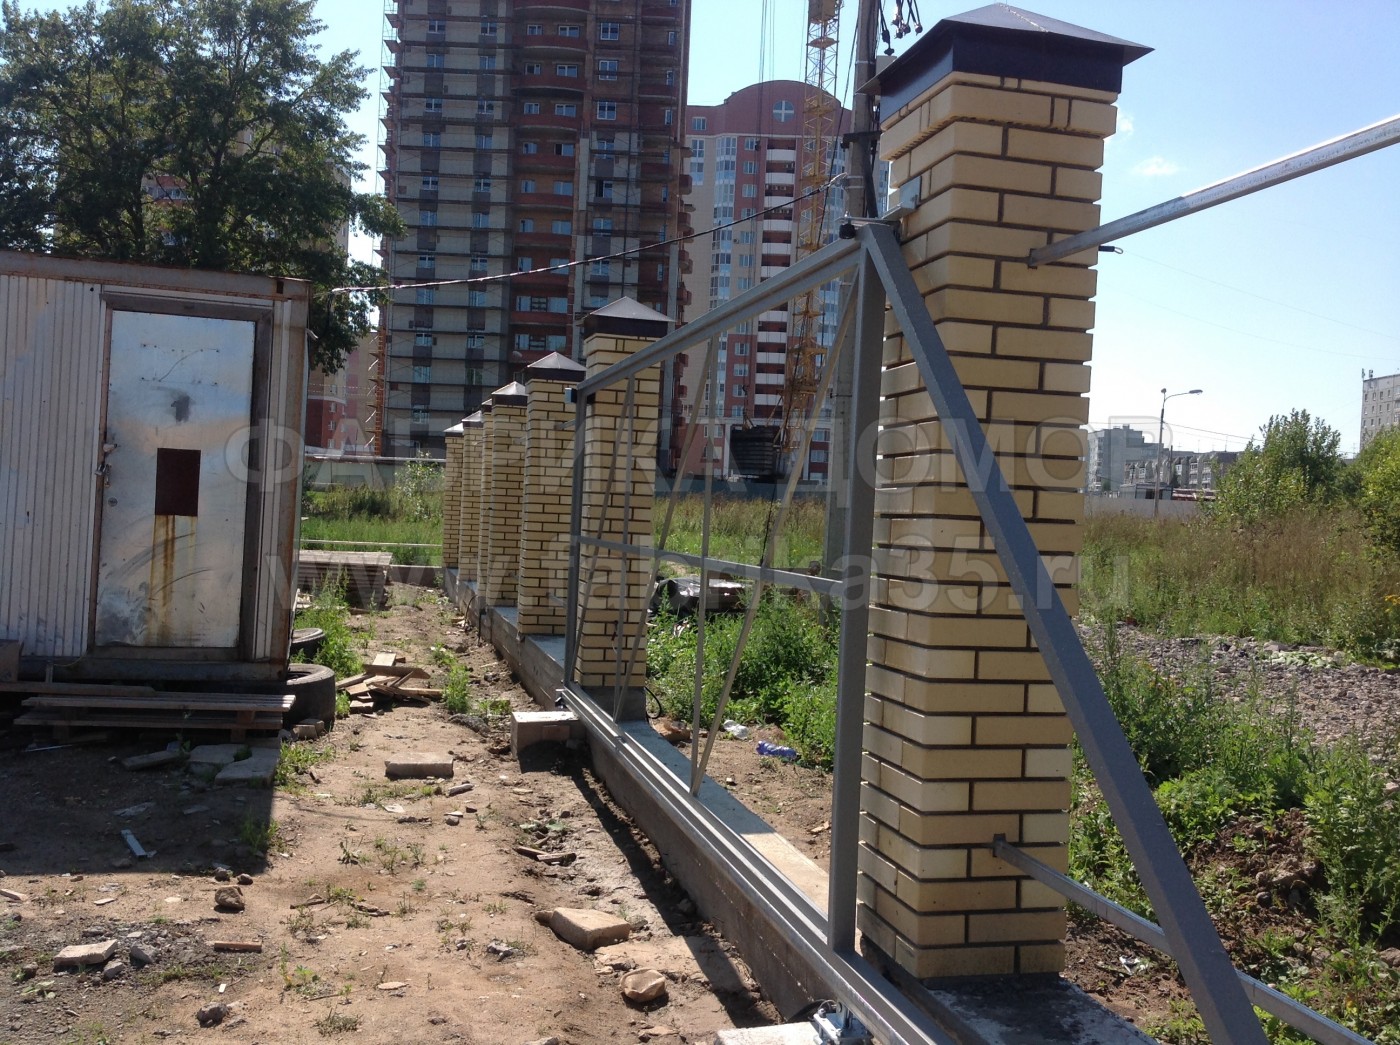
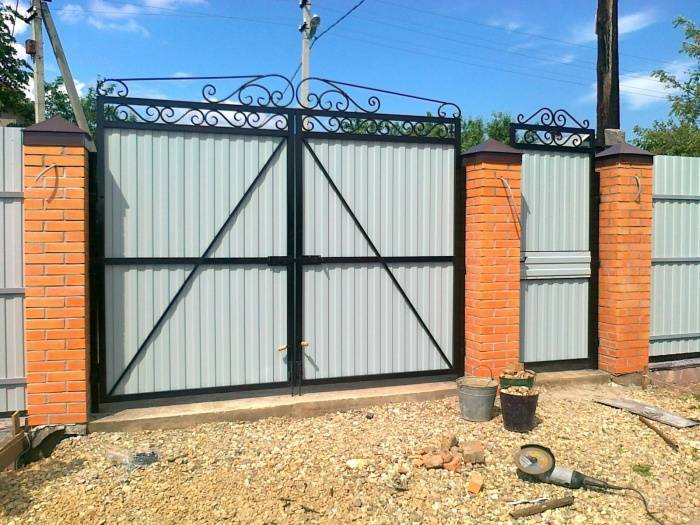
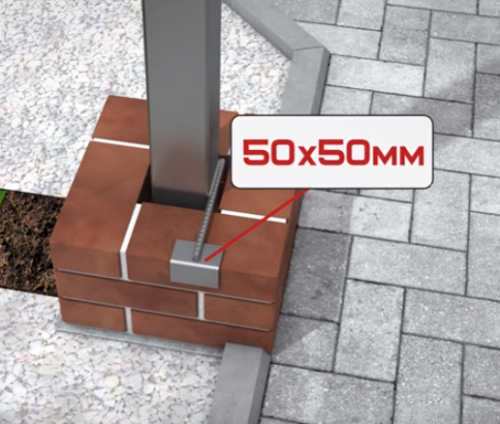
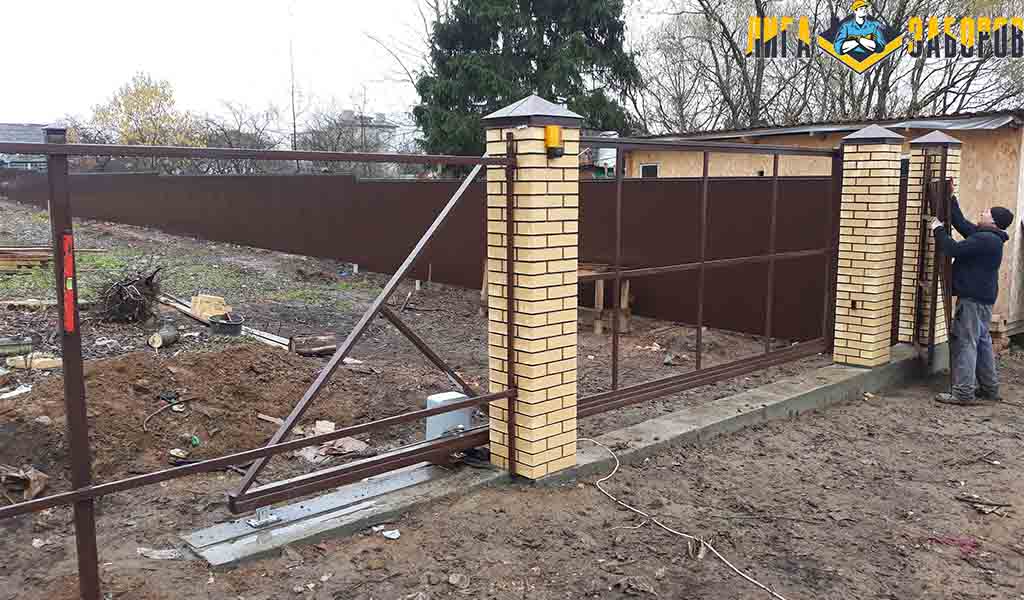
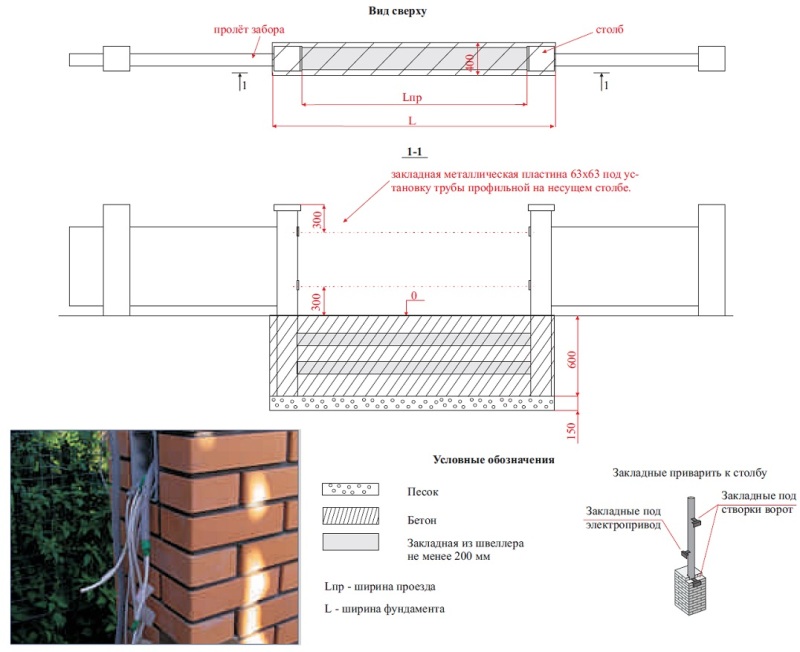
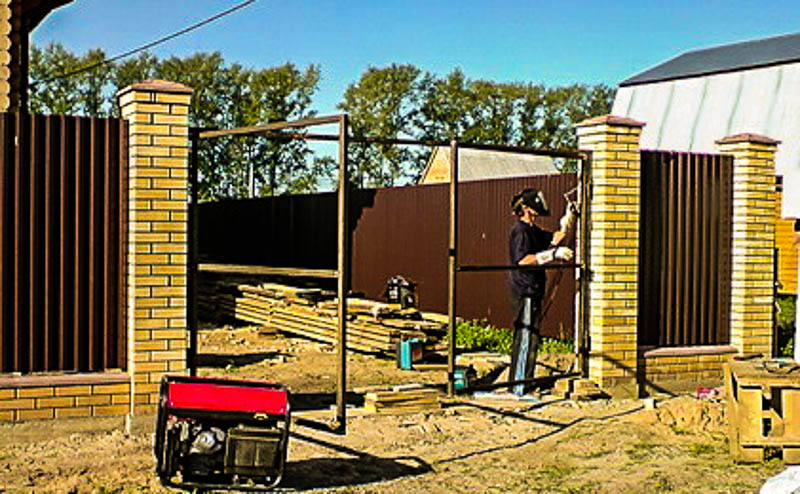
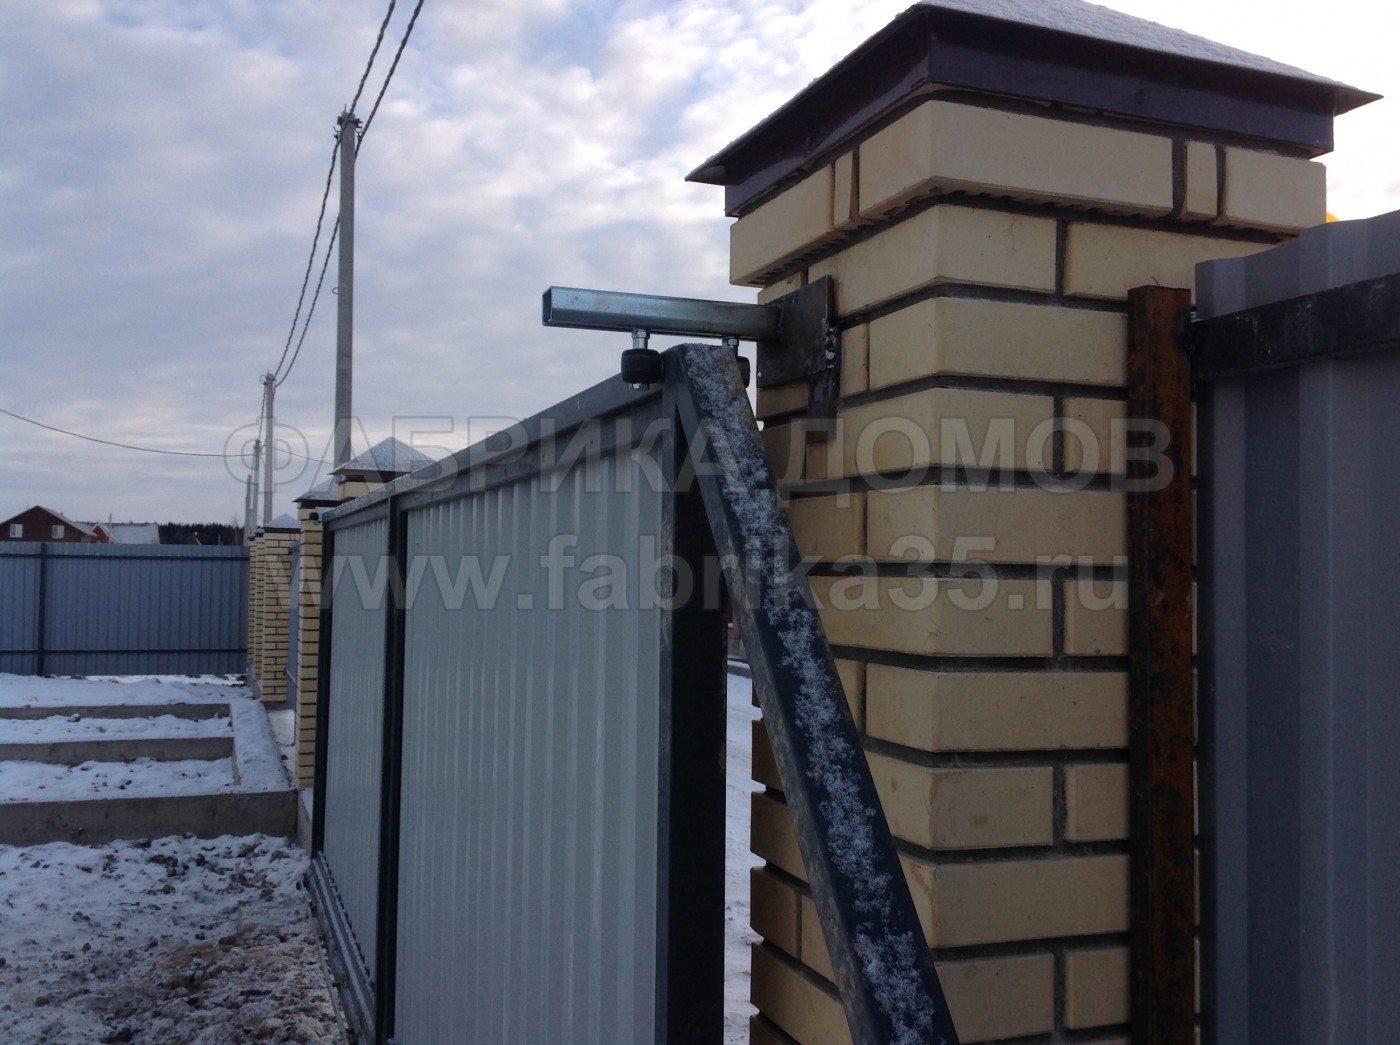
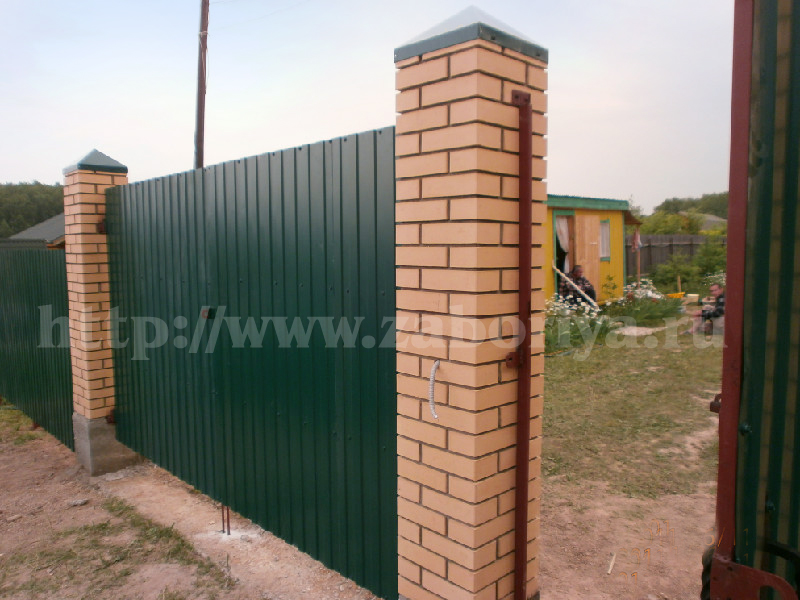
Photo # 13
The choice of material for protective caps is purely individual. It should be borne in mind that the metal on the pole will last longer than concrete, which is less resistant to frost and moisture.
Manufacturing of foundations and metal racks
First, the blanks are cut from which the gate will be made. For racks, pipes of 100 mm in diameter are prepared in advance. The length of the elements depends on the sum of the height of the sash and the depth to which each support will be buried. The last indicator is 0.8-1 m.if the height of the gate is 2 m, the blanks for the pillars are 3 m long.
The jumper used to connect the racks is made from a corner of 100x100 mm. The length of this element must be equal to the width of the gate. For standard structures, it is 3 m long.When choosing a metal pipe for supports, one corner shelf will have to be cut off, and then slightly bent so that the edges of the corner better adhere to the posts during welding.
Then the following actions are performed:
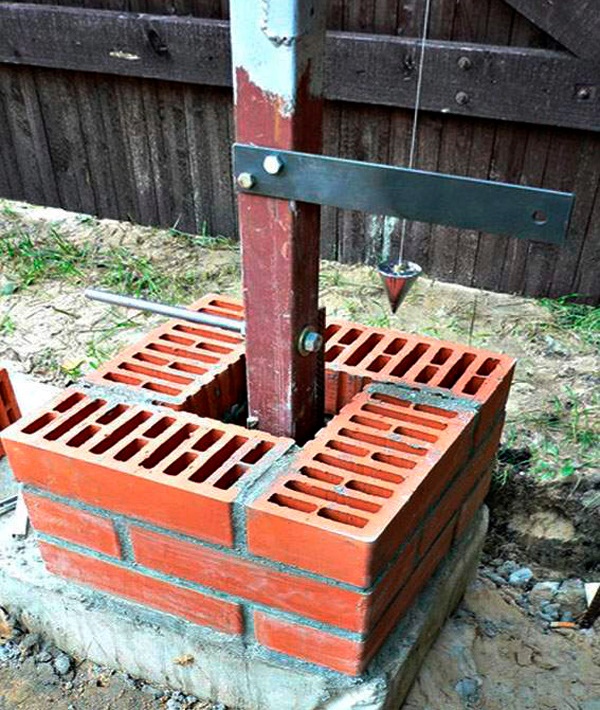
- The gate frame is being assembled. This work should be done on a flat piece of land. The frame should resemble the letter "H". It consists of two posts and a lintel. The last part should be placed at a distance of 2 m from the top of the structure. During operation, several conditions must be met - the racks must be parallel to each other, and the jumper perpendicular to them.
- The jumper is welded to the uprights. Any metal pieces should be welded to the jumper in three places. They should be directed downward.
- These elements will play the role of reinforcement that will connect the lintel to the foundation.
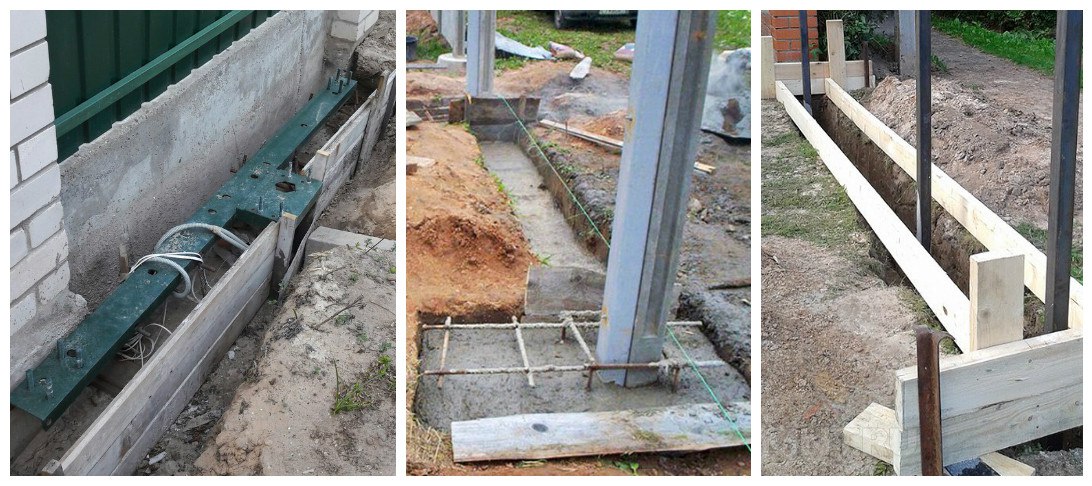
- Then you should dig a trench for the foundation. The pit width should be 350-400 mm. The length of the pit is 3.5 m - if necessary, the manufacture of a 3-meter gate. The required depth of the pit should be determined taking into account the level of soil water and freezing of the soil.
- It is necessary to make wooden boards - for this you need to prepare an edged board. Then the formwork is assembled. It should have dimensions of 0.3x3 m. The walls of the formwork are made with a downward expansion. This will eliminate the pushing out of the foundation by the soil.
- Then the gate is installed in the formwork. This must be done so that the jumper is level with the ground, and the racks are installed strictly vertically.

When performing work, the racks should be strengthened. For this, stone supports are placed under them. Then the pillars must be strengthened with stops. In order for the foundation to be strong, it should be reinforced with profile scraps. They are fastened with knitting wire.
Then the concrete mixture is prepared. It should contain four parts of sand and one part of cement powder. Then the formwork is filled with mortar. Broken bricks and stones are used to conserve mix. The mortar must harden before the gates are hung on the posts. You need to wait about a week.

Making swing gates - tools and materials
Having made sure that we can make them with our own hands, we will start construction.
The required tool for the manufacture of swing gates and consumables for it.
Tool
Mandatory for making the frame and arranging the racks:
- Bulgarian. Designed for cutting and grinding metal workpieces;
- rifled discs;
- grinding discs;
- welding machine;
- electrodes;
- roulette;
- building level;
- corner;
- hammer;
- shovel;
- Master OK.
Auxiliary:
- compressor, spray gun or brushes for painting posts and / or gates;
- drill. If necessary for fastening the door trim;
- riveter, as well as rivets to it.
Material
pipe for making the frame. It is preferable to use a profile pipe 60x40x1.5. 40x20x1.5 is also suitable. The final choice depends on the finishing material and the wind load;
pipe for the manufacture of racks. Here, too, the weight of the finished gate should be taken into account.
- gate weight within 150 kg. and below. A pipe 80x80x4 will do;
- gate weight from 150 kg to 300 kg. Pipe - 10x100x5;
- the weight of the gate exceeds 300 kg. Pipe -140x104x5.
Tip: The racks can be brick, concrete, or even wood. In any case, correlate the material properties with the expected load.
hinges for swing gates. Can be adjustable or non-adjustable. They must be made of quality material and have the ability to withstand a significant load;
locks. They can be mechanical and electromechanical. The choice is at your discretion;
dye.Needed for painting racks and / or cladding;
sheathing. There is also complete freedom of choice. The main thing is that it should be to your liking and affordable;
automatic equipment for swing gates. For the ability to make automatic gates. You can choose not to install at all or install later. But, if its installation is supposed, albeit in the distant future, it is better to make the frame of swing gates more durable.
Design features
For sliding gates
When installing sliding gates, there is no point in looking for drawings of embedded elements, they simply do not exist. Geometry and dimensions are chosen arbitrarily, because there is only one task to be solved: creating a base for installing rollers and a drive mechanism. Usually mortgages are made from channels numbered 10-20. There is a clear rule here: the heaviness of the gate increases - larger rolled metal is required.
Consider that a place for the engine should be provided behind this line in the yard. In order not to be mistaken, it is worth making the mortgage element equal in length to the "counterweight" of the gate.
Sometimes it can be less, but a maximum of 20 cm. If you plan to later install a drive with an electric motor, the site for its installation to the mortgage is welded in an arbitrarily chosen place. But some builders do it differently. At the time of construction of the gate, they do not prepare any basis for the motor. Only then, when its installation is performed, a steel plate is welded to the top of the mortgage, extending slightly to the side.
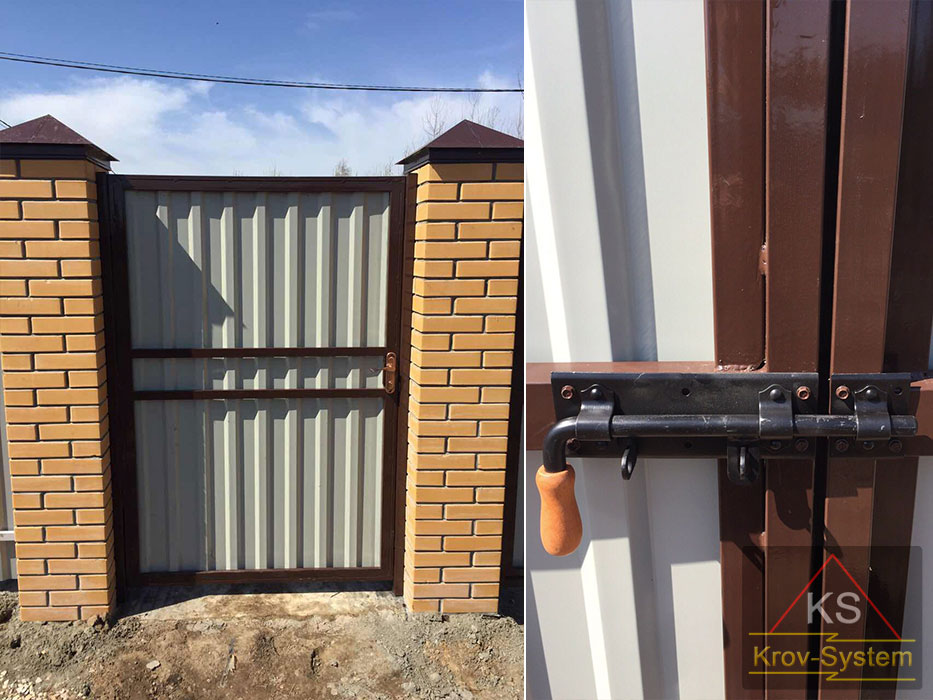
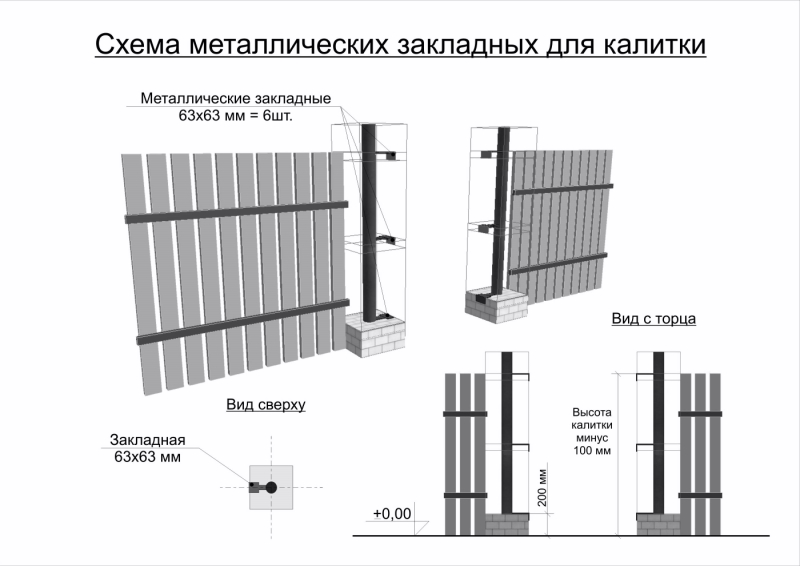
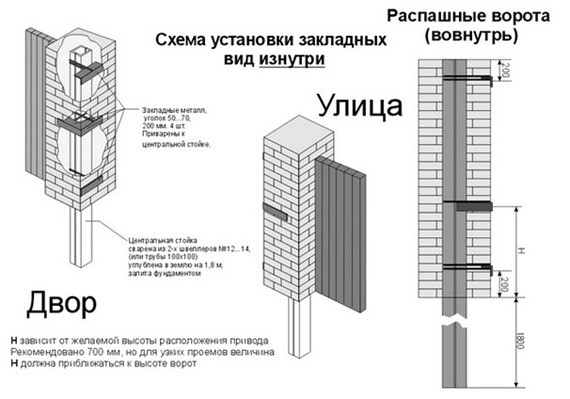
For wicket
The approach to such mortgages is somewhat different than to the elements holding sliding gates. There is no need to insert the rods inside the brick pillars. It is required to put them directly next to the supports, driving them into the ground. When this work is completed, the channel is welded.
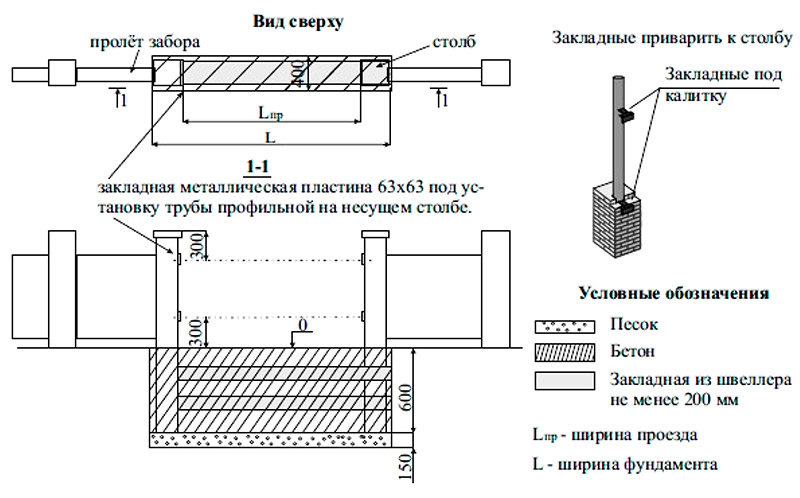

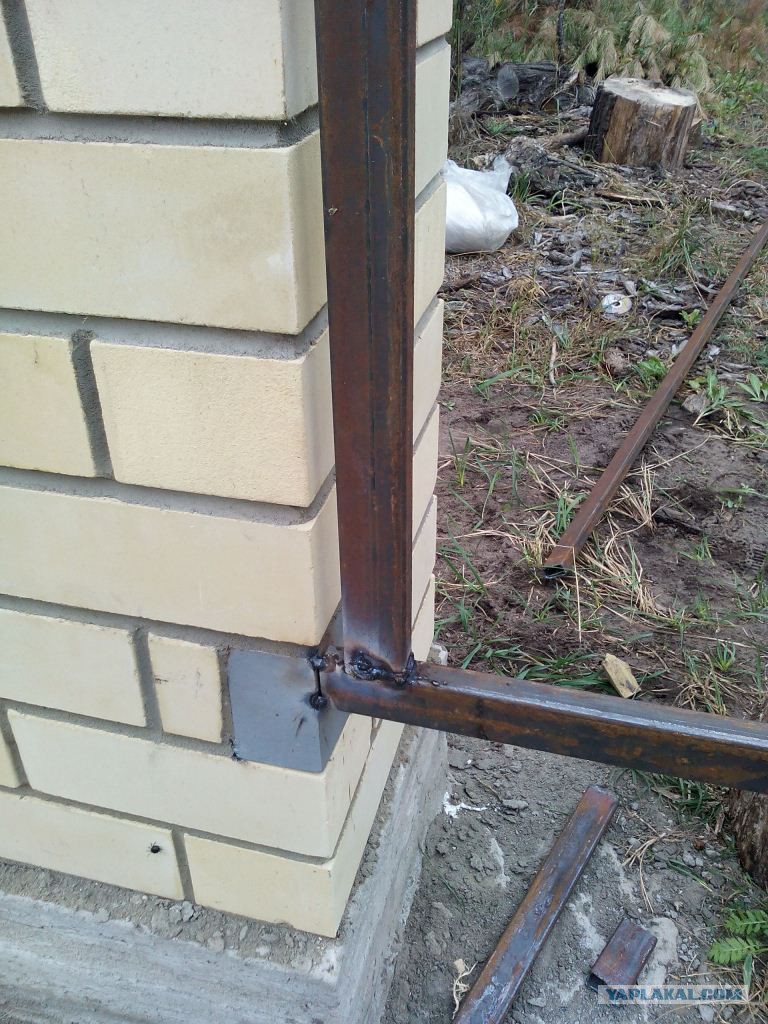
Since wickets are much lighter than conventional gates, mortgages should also not be too massive. But at the same time, it is recommended to bury the supports in the soil, then they will be more reliable.
For large gates with high posts, it is not enough to install vertical channels near both halves. At the bottom, they are fastened with a third channel, the length of which should coincide with the distance from the posts to the wicket.
You can often find statements that it is possible to weld mortgages to steel strips protruding from the posts. But in reality, these miniature ledges will not be able to hold even a small gate. In the case of swing gates, metal mortgages ranging in size from 5 to 7 cm are welded to the central posts of the pillars. This is quite enough for automatic structures, if they do not turn out to be too heavy.
Additional recommendations for selection and installation:
- For heavy swing gates, I-beams or rails can be welded between the posts. It will be safer if you do it with braces, and on the other hand, weld additional beams.
- In the absence of experience, it is better not to try to hide the mortgages, and then bring them out, it is extremely difficult.
- It is more correct to hammer (screw) a metal product through a hole prepared with a special tool.
- The holes in the brick are made at an angle of 45 degrees (deviation is permissible, but small, otherwise the brick will crack).
How to make mortgages with your own hands, see the video below.
Let’s block ads! (Why?)
Fence construction using brick pillars
Without a reliable connection with the foundation, a brick pillar, despite its solid weight, will not stand for a long time. A powerful wind load, acting on solid sections of the fence, inevitably leads to overturning of the column, which is not fixed in the foundation. In addition, you shouldn't forget about seasonal ground movements. Lowering and rising a couple of centimeters up and down during the year, the foundation must work in a single bundle with the posts and sections of the fence.
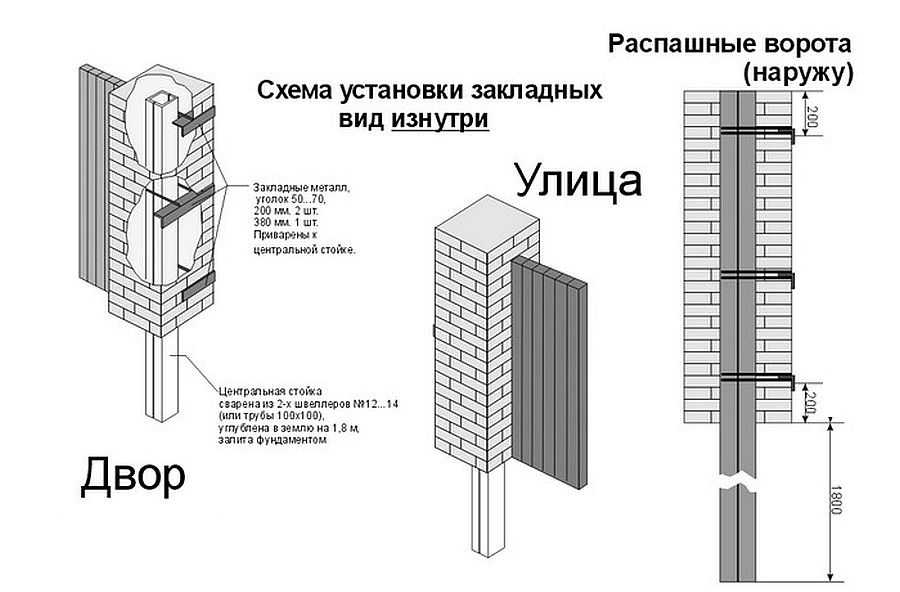
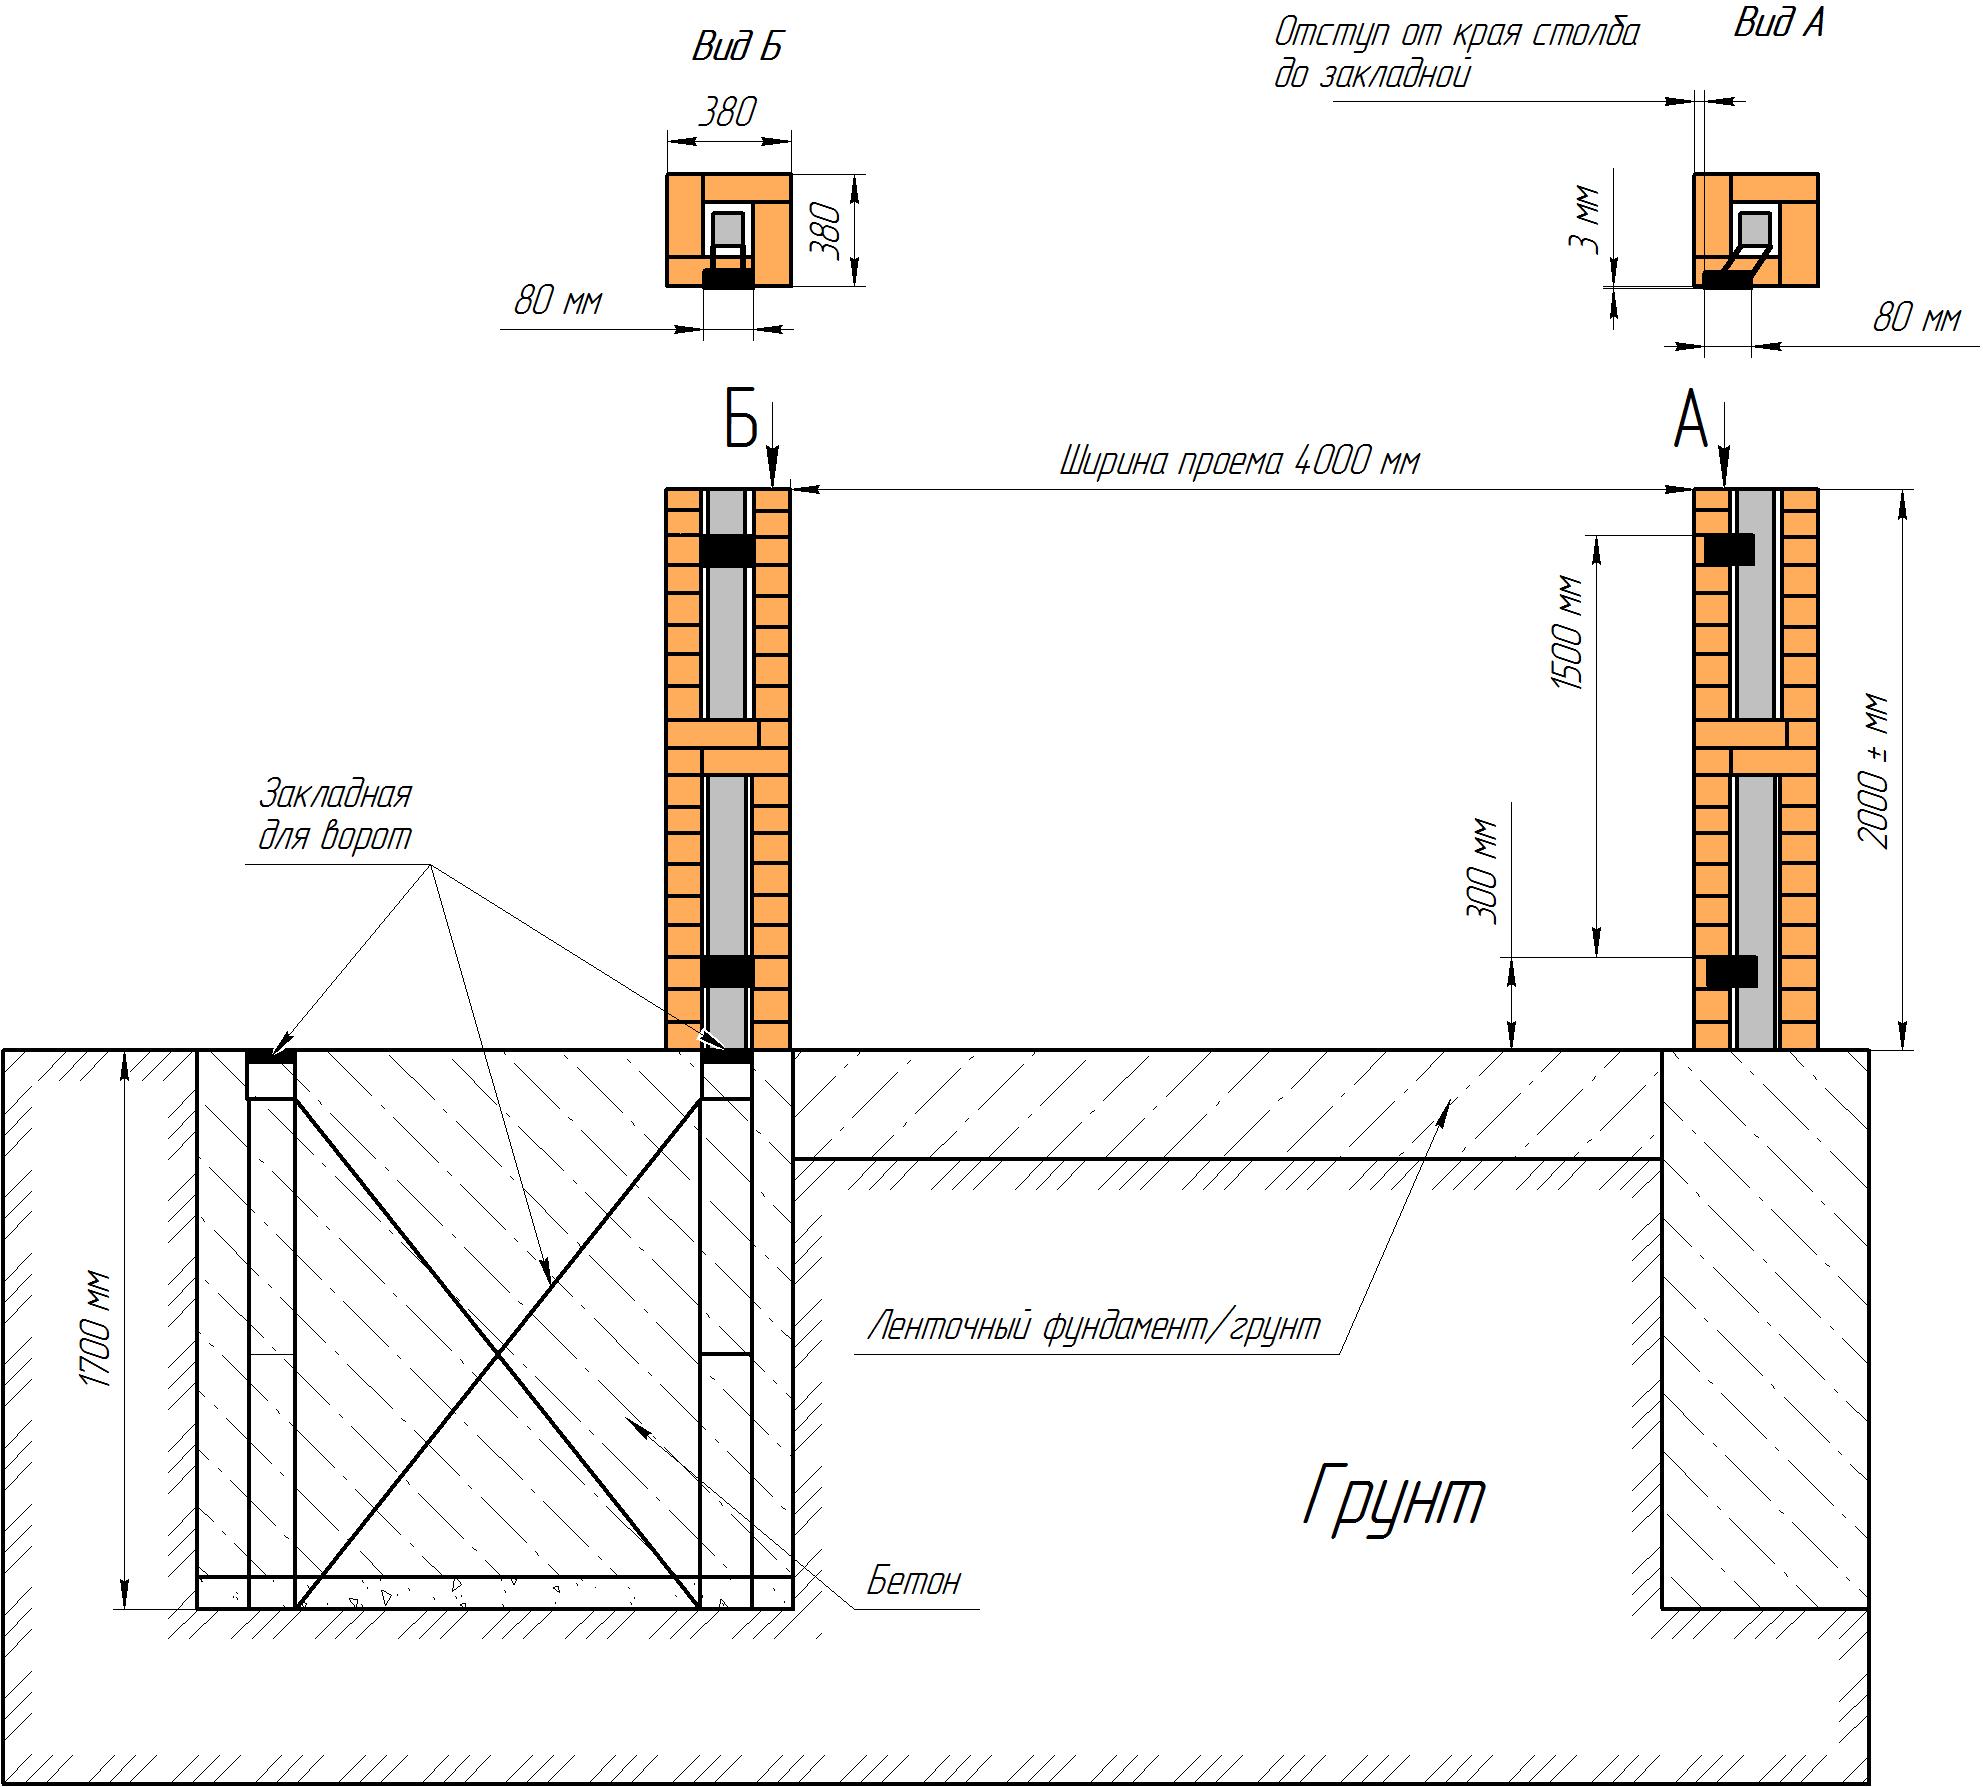
The optimal design of the foundation with brick pillars, designed for a fence made of corrugated board, is clearly illustrated by diagram No. 1.
Scheme No. 1
As can be seen from this diagram, a steel rod from a square pipe or reinforcing cage is installed in the brick posts. Embedded plates are welded to it. Steel girders are attached to them under the profiled sheet or picket fence.
Photo # 1
Foundation type - strip rubble concrete or concrete. A trench is dug under it, and pits with a diameter of 15-20 cm are drilled in the places where the posts are installed. First, concrete is poured into wells with posts of posts installed in them. After that, layer-by-layer concreting of the trench begins.
The main parameters of the foundation (depth, width, degree of reinforcement) and the height of the fence are determined by calculating the strength and stability.
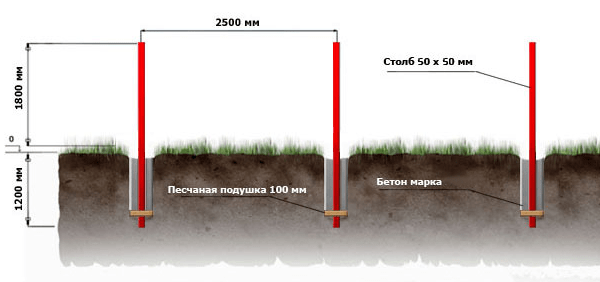
In a simplified version, tested in practice, the following sizes can be recommended:
- trench depth - 20-30 cm;
- the depth of the well for the installation of metal racks of brick pillars, counting from the surface of the earth - 90-100 cm;
- the height of the grillage (the upper part of the foundation, located above the earth's surface) - 40-60 cm;
- foundation width - 20-35 cm;
- the distance between the posts is from 2.5 to 3 meters;
- the height of the posts is from 150 to 180 cm (the cross-section of the masonry is 38x38 cm).
In wet soils, it is necessary to drill holes for racks below the freezing depth so that the forces of frost heaving do not deform the fence.
In weak and unstable soils, in the upper part of the foundation, before concreting it, it is advisable to lay a reinforcing cage of 4-6 rods with a diameter of 14-18 mm. It will preserve the integrity of the foundation and will absorb the loads that arise in the concrete when the soil subsides.
The laying of brick pillars begins no earlier than 2-3 weeks after concreting. Having laid the waterproofing under the posts, you can get to work.
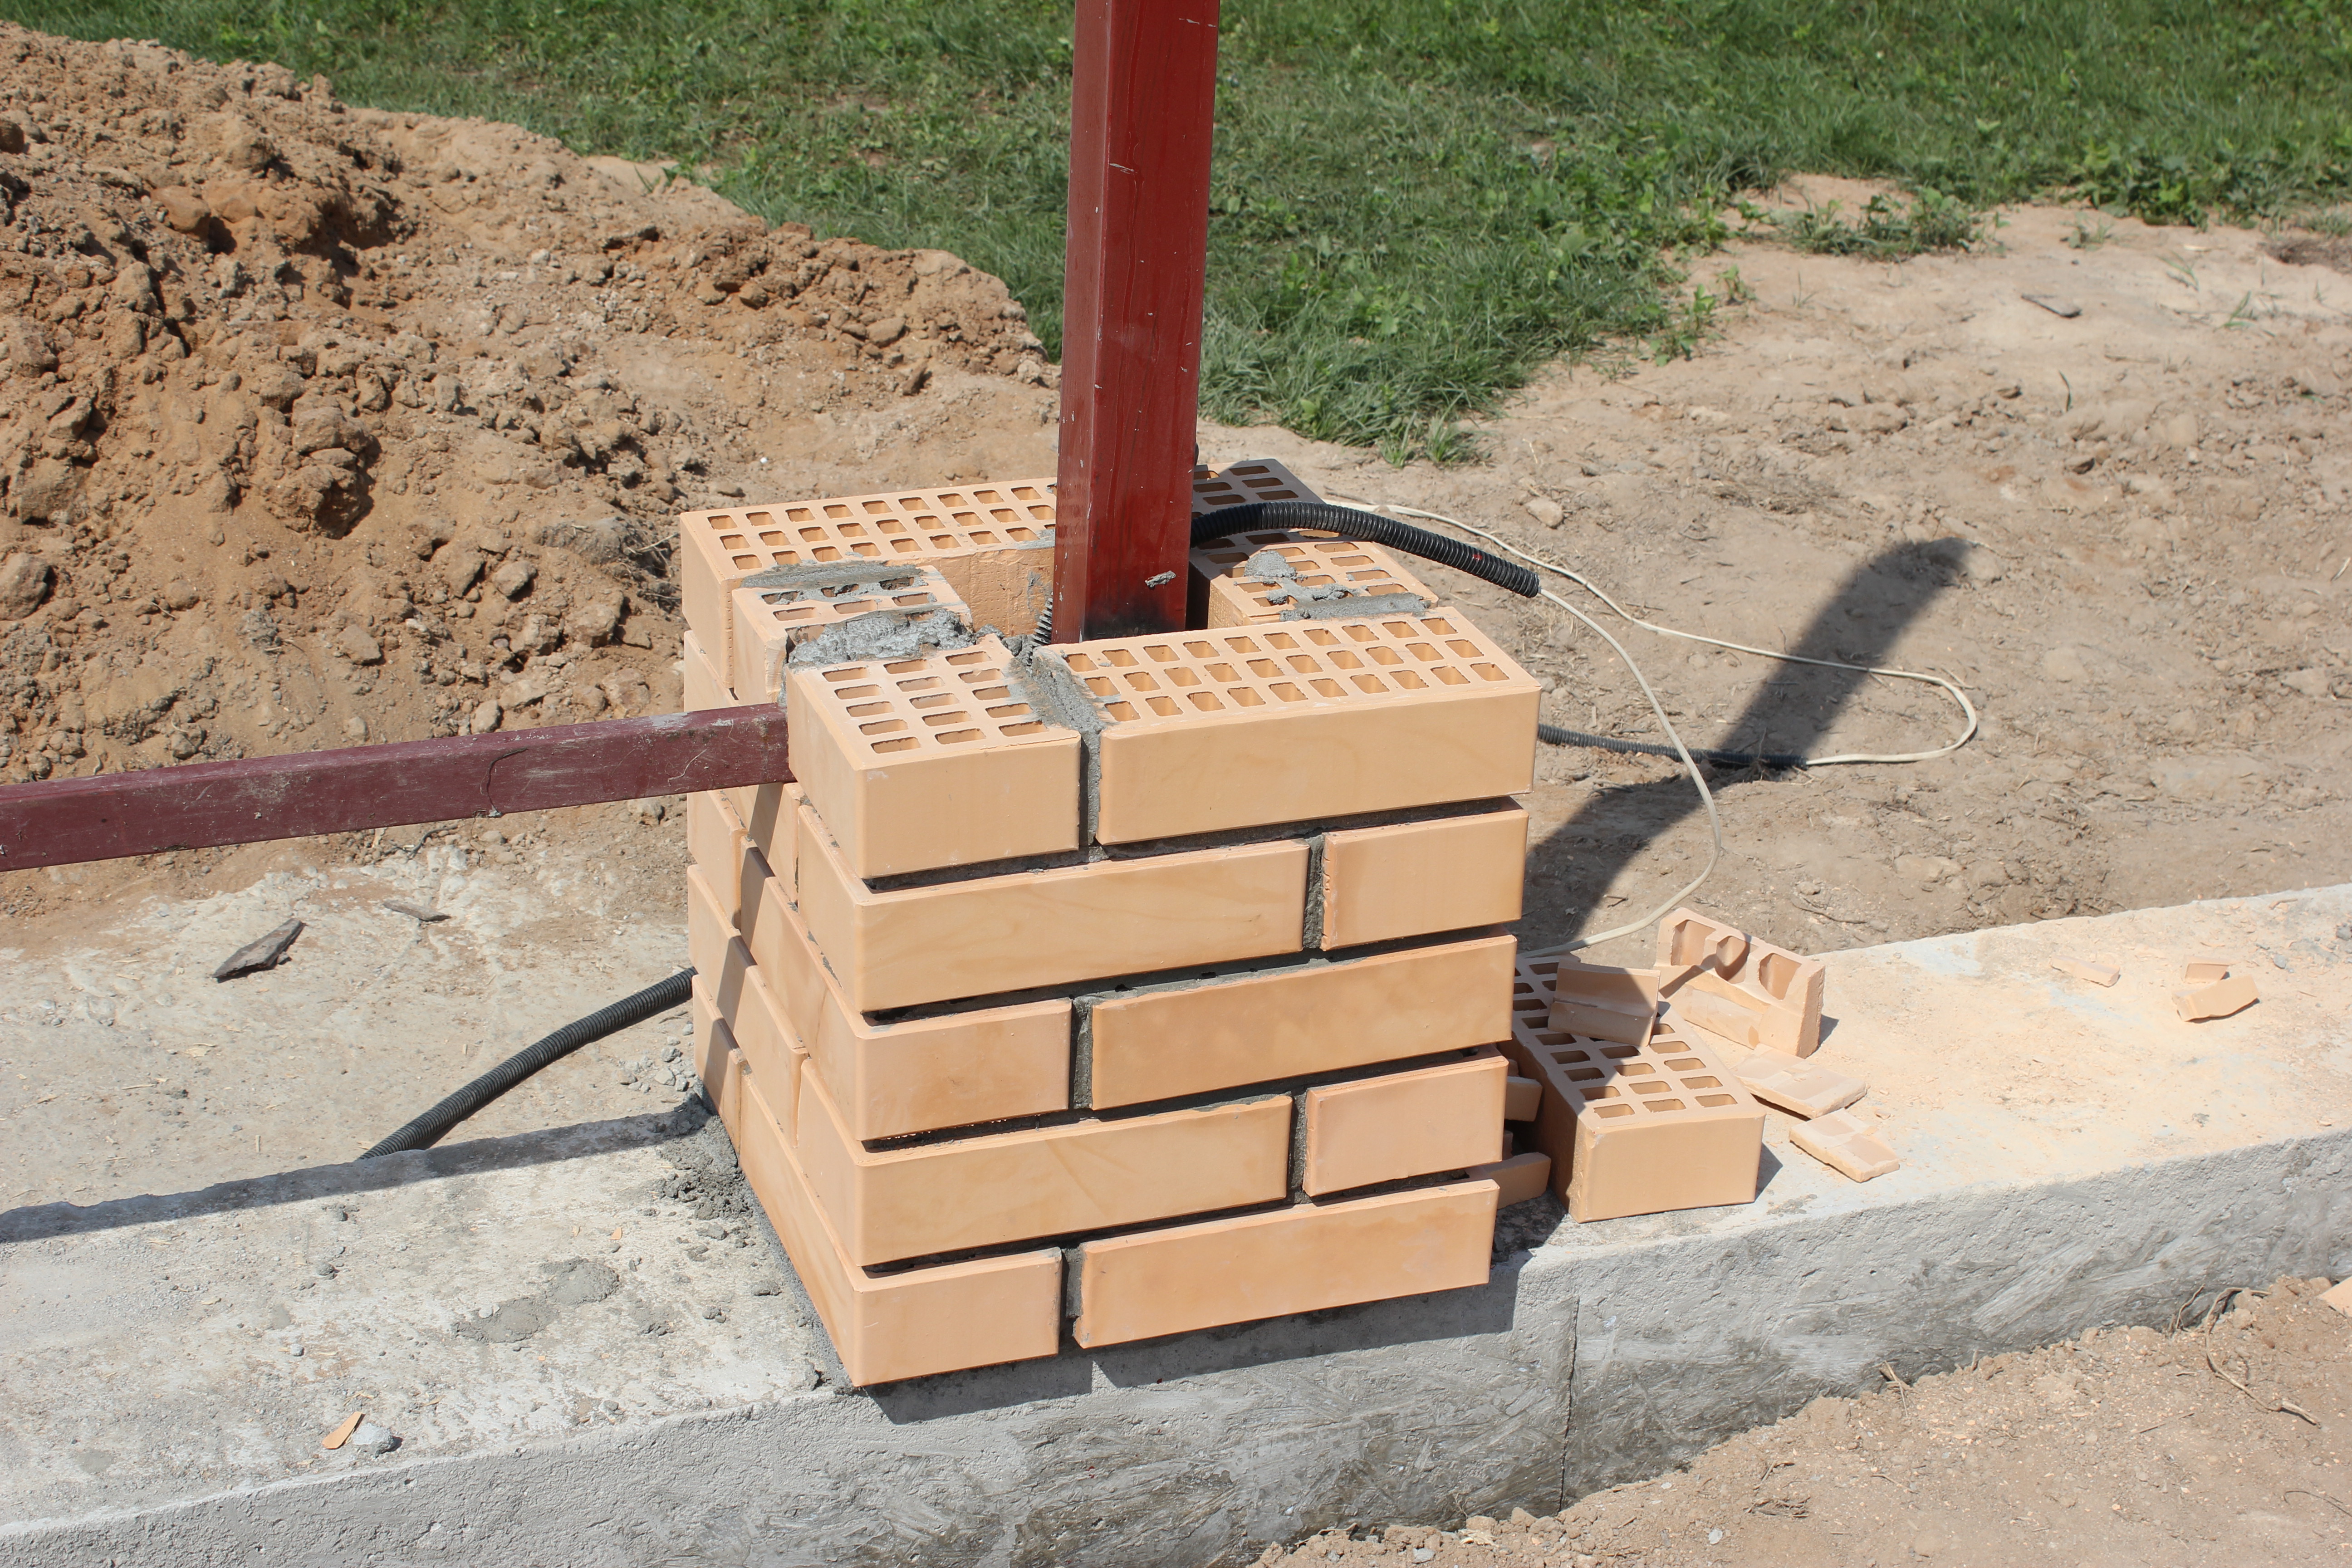
Smooth seams are a guarantee of an excellent appearance of brick posts. Experienced bricklayers use to simplify the work of cutting off a square bar, which serves as a seam template (photo # 2)
Photo # 2 Square steel bar - a template for laying a column
In the photo we see a fence under construction with pillars made of bricks with a section of 38x38 cm. Inside, for reinforcement, two reinforcing bars are installed. The space between them and the masonry is filled with fine-grained concrete or mortar.
For fences with a height of two or more meters, the size of the column section is increased to 51x63 cm or 64x77 cm. The dimensions of the reinforcing frame increase accordingly.
Scheme No. 2
In order to firmly connect the masonry with the concrete filling of the frame, some builders use a reinforcing mesh, running it inside the column by 3-5 cm (after 2-3 rows).
Photo # 3 Reinforcement mesh will connect brick to concrete