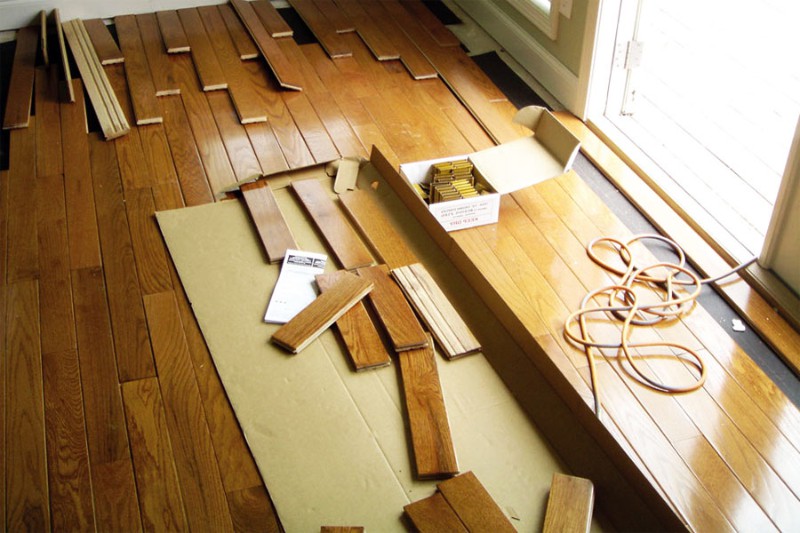
Option number 2. Parquet laying
According to GOST, the length of parquet planks should be from 21 cm to 49 cm, and the width should be from 5 cm to 7.5 cm.The optimal thickness for a living room is considered to be an indicator of 1.5-1.8 cm.

Parquet construction
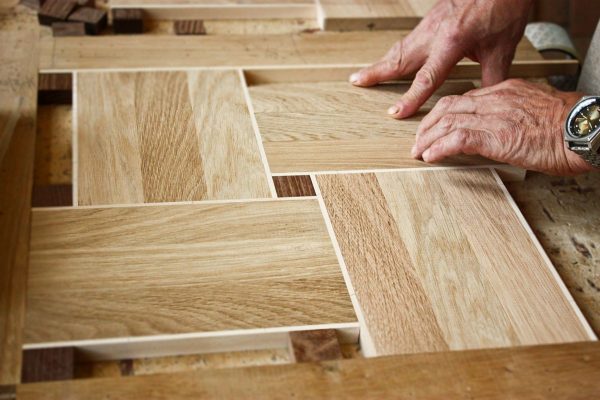
We also note that today parquet is sold in the form of ready-made parquet boards, which are modules and fragments assembled on a coniferous basis.
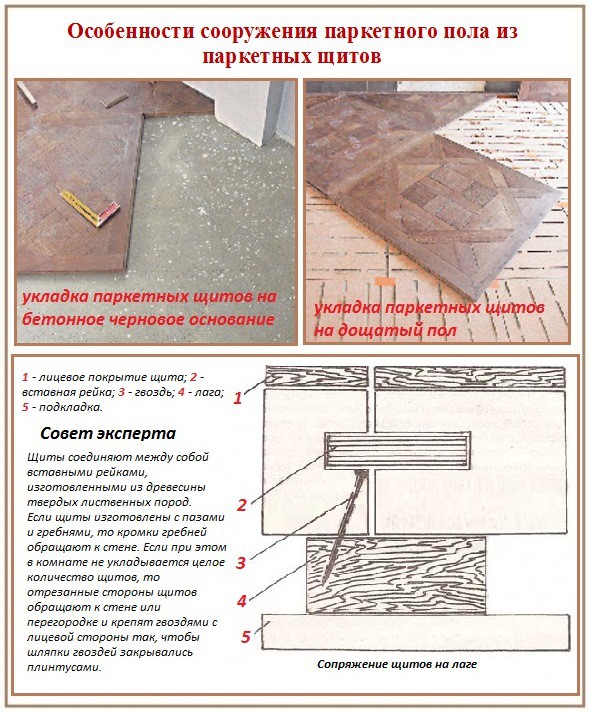
Assembly of parquet boards
Preparation of the base
Parquet can be laid both on plywood and directly on concrete screed. The first option is preferable, since plywood will serve as a stabilizing layer, therefore, it will be guided by this method of installation. Note, however, that when laying on a concrete base, a special elastic adhesive must be used, the base must be pre-sanded and primed in 2 steps.
If we talk about laying a parquet board over plywood, then there are 2 possible ways to level the surface.
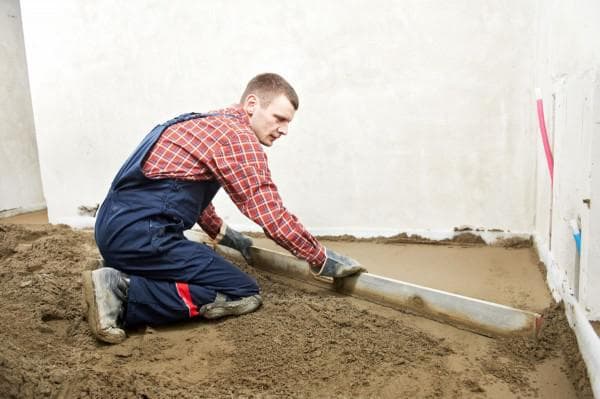
Cement strainer
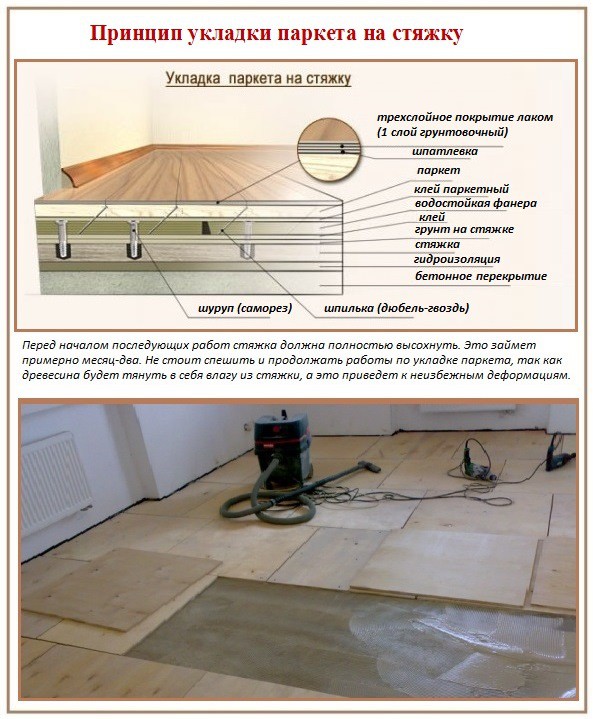
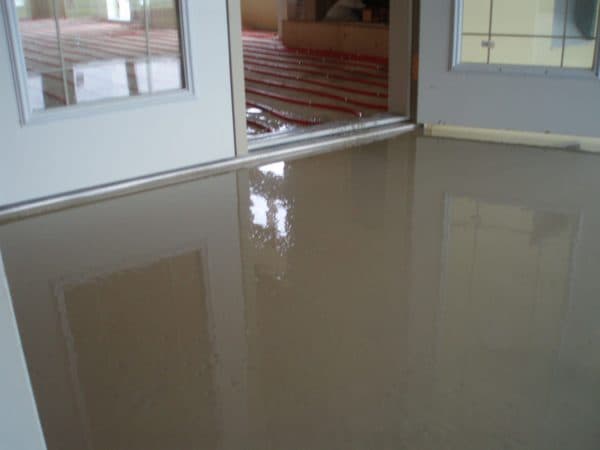
Laying parquet with plywood on a screed
The required thickness of the leveling screed is at least 4 cm, which will allow fixing the dowels. If the differences are too large, then the layer thickness, respectively, will be greater. The same goes for the drying time. So, if it takes about 2 weeks to completely dry concrete with a thickness of 4 cm, then with each additional centimeter, another week is added to this period. Further work can be started when the residual moisture level of the coating reaches at least 4% (otherwise, parquet boards that have absorbed moisture can go in waves).
After drying, the evenness of the finished screed is checked. To do this, you can put a flat board 2 m long on it: the gaps between it and the surface should be no more than 2 mm.
Floor screed. Examination
To obtain a perfectly flat base, self-leveling mixtures can be used, which is especially important when laying large parquet floors.
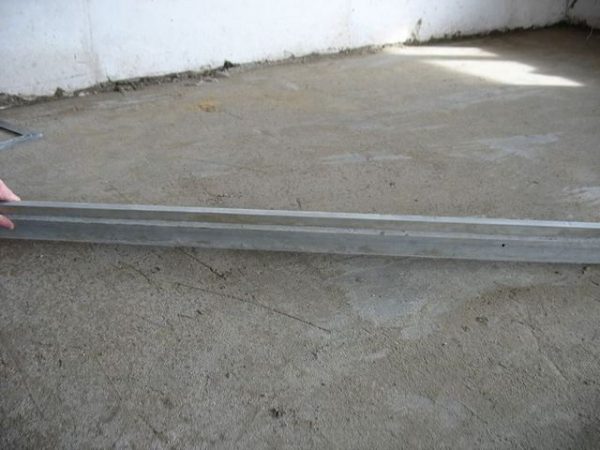
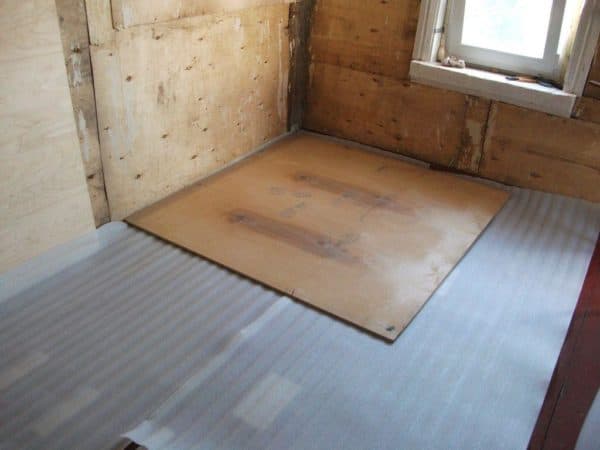
Lags

Laying on logs
They can significantly reduce the time spent on work. Lags can serve as boards (not even curved) 8-10 cm wide and 2.5-4 cm thick
It is important that the boards are well dried. Before installing these elements, a waterproofing layer is laid (roofing material is often used) so that the wood does not rot
The lags are fixed with bolts, by means of which the vertical adjustment of the position of the boards will subsequently be made. The step should be about 30 cm, if you make it large, then the coating can sag. Plywood sheets are attached on top of the finished frame.
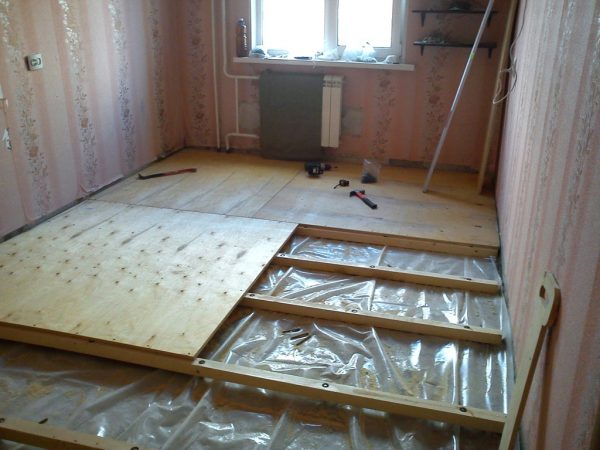
Laying plywood on logs
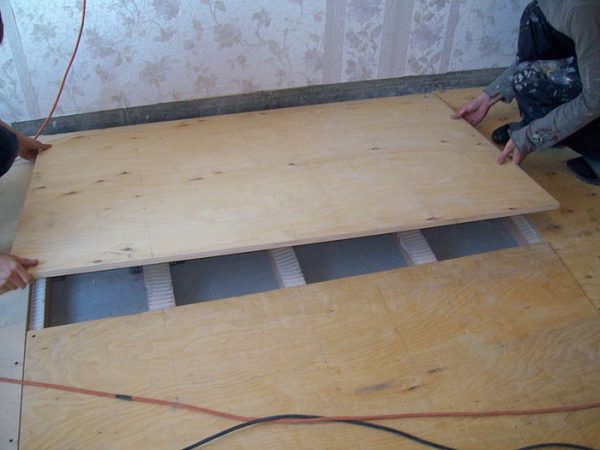
Plywood floor on logs
Instructions
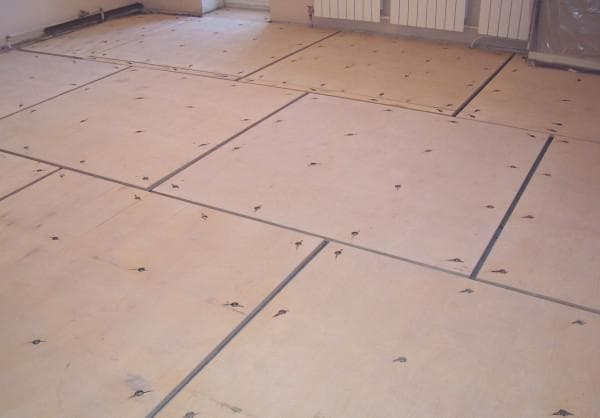
Stage 1. Plywood is laid on top of the finished base, which makes the structure more reliable. The sheets are attached with special glue, and then nailed (with screws of the appropriate length for lags or dowels for screed).
The plywood itself, by the way, must be waterproof and have a thickness of 1-2 cm. Often the thickness of the plywood substrate is 0.5 cm thinner than parquet.
Stage 2. The parquet must be glued to the plywood backing, and then additionally nailed at the ends. To do this, the surface is covered with a thin layer of two-component parquet glue (this must be done with a spatula), the latter is evenly distributed over it.
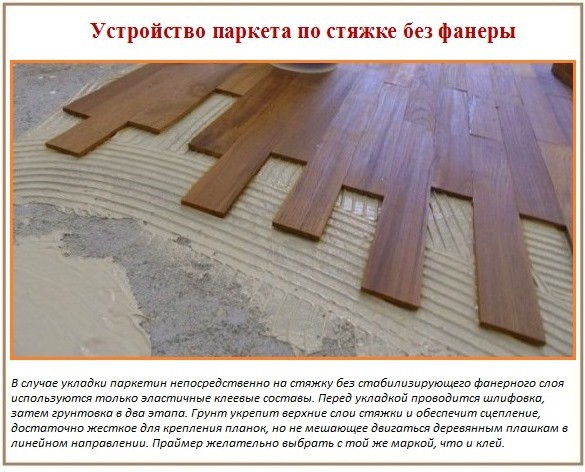
Laying without plywood
Stage 3. The parquet is glued in accordance with one of the possible schemes, after which it is additionally nailed (the number of the latter depends on the length of the planks).
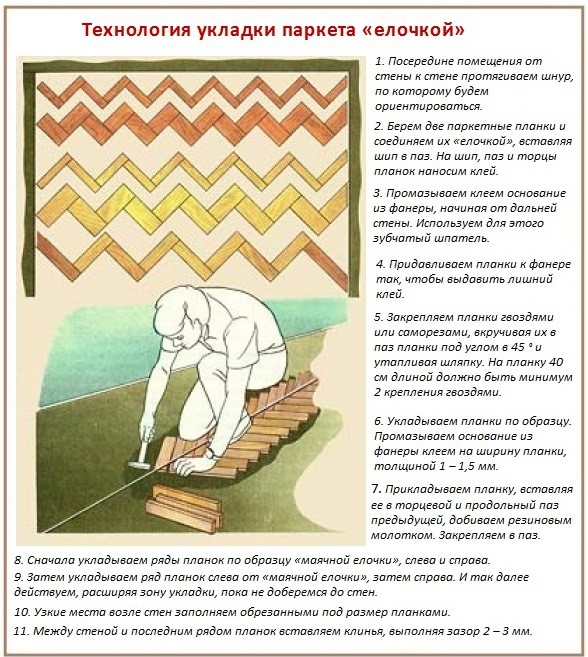
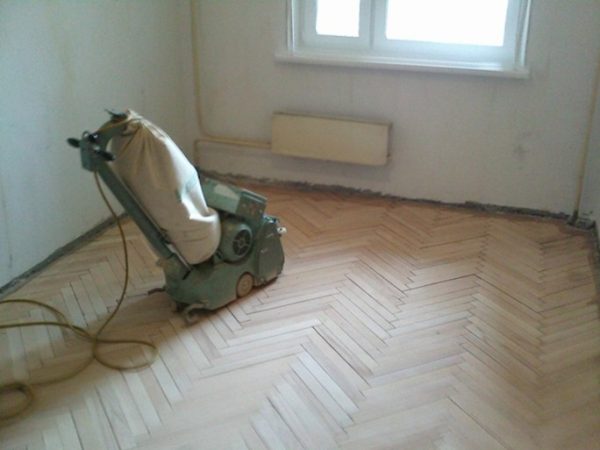
Herringbone pattern
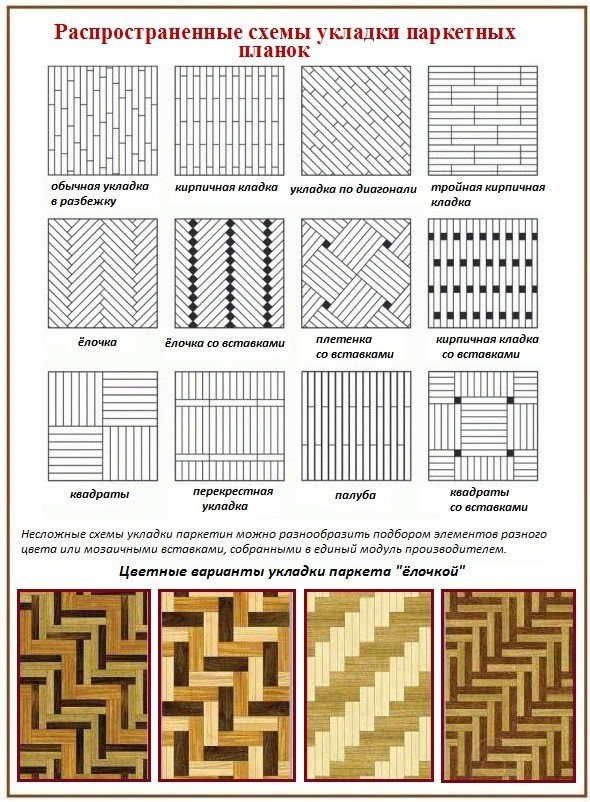
Laying schemes
For example, using the simplest deck layout, the installation procedure takes 7 to 10 days.The more complex the scheme, the longer the styling will last.
Laying parquet boards on a concrete floor
Artistic styling
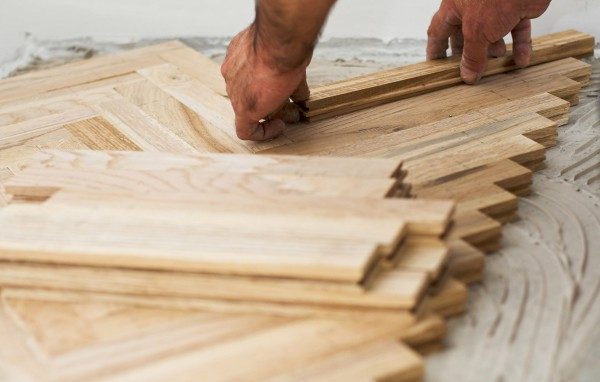
Laying block parquet
Stage 4. Upon completion of installation, you need to wait a week for the glue to dry completely. If the parquet floors have absorbed moisture from the glue and are deformed, then they will have to be sanded.
Further processing
Grinding can be done with drum grinders or flat grinders, which allow you to eliminate significant irregularities. After that, the surface is processed with a surface grinder to obtain a perfectly even coating.
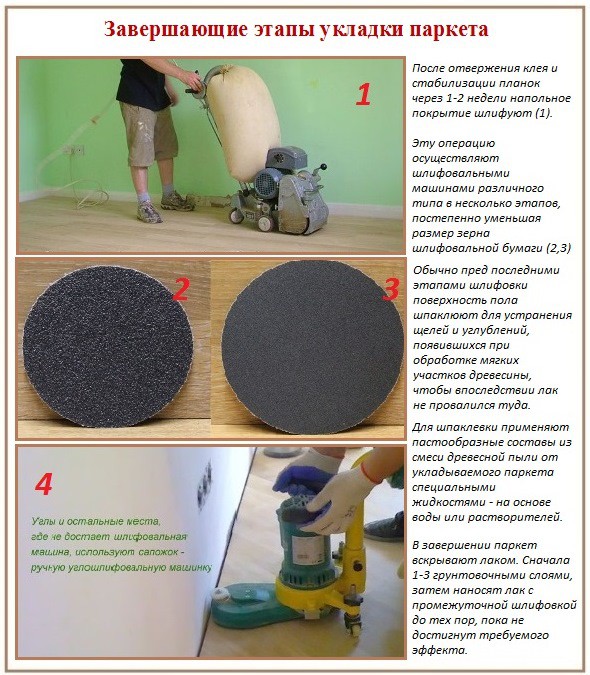
Grinding
Grinding parquet with a flat grinder
The floor is then oiled or varnished in accordance with the technical regulations. The varnish, which has two functions at the same time - decorative and protective, must be applied in several layers (usually up to 5), periodically polishing each of them.
Parquet varnishing is necessary for its protection and preservation for many years.
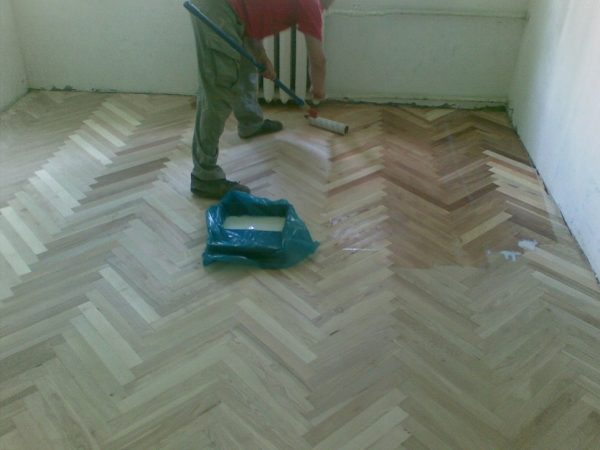
Varnish application
Selection of tiles and related materials
What kind of tile adhesive should you use?
For covering the floor, you must use a glue specially designed for this.
It can be in the form:
- ready mix based on polyurethane;
- dry mix requiring preliminary dilution with water.
Ready mixtures can be opened immediately before use.
For the floor, special compounds are produced that have increased plasticity, but before buying you need to make sure that the mixture can be used in bathrooms.
For the bathroom, it is recommended to choose an adhesive with water-repellent properties. It is more expensive, but it will increase the life of the floor covering in a room with high air humidity.
Read more about tile adhesive in the article - Knauf Fliesen tile adhesive: application features

Tile selection criteria
Experts identify 11 criteria to rely on when choosing floor tiles for a bath:
- Strength. The floor material must have a compressive strength of at least 300 MPa. This will prevent deformation and bending of the material structure.
- Refractoriness. Ceramic tiles do not burn and do not emit toxic substances.
- High thermal conductivity. When arranging a warm floor on such a tile, it will be comfortable to move around.
- Thickness. For the bathroom, you can use a material with a thickness of 9-11 mm.
- Low moisture absorption and anti-static. These properties make it possible to use the finishing material in rooms with high humidity and electrical appliances.
- Frost resistance. For interior work, the use of tiles of the III group is allowed.
- The size. A minimum deviation from the nominal parameters is allowed (for example, the indicated size is 20 cm, and the actual size is 19.8 cm).
- Tone and pattern. Tiles from the same collection, but different batches may differ slightly from each other.
- Texture. For the floor, it is better to choose a material with a matte surface.
- Slip resistance. You need to give preference to the material that has a special anti-slip coating.
- The weight. In proportion to the dimensions, the weight of the floor tiles should be 15-25 kg per 1 m² (while glazed is heavier than matte).
Laminate and uneven subfloors: looking for compromises
Laying the laminate flooring itself is a simple and fairly quick process. The most important thing is the procedure for preparing the rough base. If you have removed old parquet or other covering and found irregularities visible to the eye, do not leave this unattended.
Laminate is different: it is an artificial product made of fiberglass board. And he does not "forgive" uneven ground. There are a variety of options for installing laminate flooring on uneven floors.
Why can't laminate flooring be laid on uneven floors?
The maximum differences that are permissible when laying the laminate should be no more than 2 mm per meter.There are many instructions on how to properly lay laminate flooring, and such points are stipulated there. If you ignore this condition, you will soon expect the following problems:
- there will be a creak from each step and cracks on the panels;
- the locks will disperse under the influence of loads on the connections;
- the coating will last no more than a year.
What happens to the coating after laying on uneven surfaces? The thing is, the laminated coating is assembled from panel elements, which are interconnected by a groove-comb system. If the floor contains significant drops, then some of the boards simply hang over the void. With each attack, the panel begins to sag under load. Soon, the grooves, not withstanding such a test, begin to break, and, as a result, the entire coating simply diverges at the seams, turning into a set of unconnected boards.
As you can see, uneven flooring is the main cause of rapid damage to laminate flooring. Do not close your eyes to defects on the rough surface. Otherwise, you just throw money down the drain, laying on such a base such a demanding material as laminate.
Leveling underlay for laminate
- rolled porous substrate;
- coniferous underlay for laminate;
- cork;
- bituminous cork;
- polyurethane;
- foam backing;
- fiberboard backing.
Laying the underlayment under the laminate can compensate for small differences. The exact dimensions of irregularities that this or that substrate is capable of leveling are indicated on the packaging with the material. The leveling ability of the product depends on its thickness and density. Thus, a conventional 2 mm thick foamed polyethylene backing is capable of leveling the surface up to 1 mm / m. p. Fiber-wood products (ISOPLAAT or Quiet running) are more efficient. Plates with a thickness of 4 mm can compensate for differences of up to 3 mm / p. m., and material with a thickness of 12 mm - up to 5 mm / p. m.
Remember: the underlay is just a compromise alignment option with not very significant differences. In other cases, more radical preparatory work will be needed, the stages of which depend on the type of roughing base. So, the substrate can be mounted on concrete, wood and other surfaces (plywood, fiberboard linoleum). Even on a perfectly flat base, it will serve as a good material for insulation and soundproofing of the floor.
Difficulty laying tiles
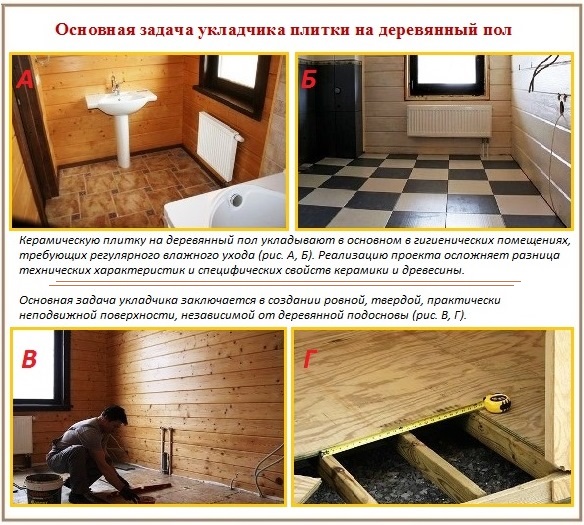
Floor tiles are one of the most comfortable coatings for a bathroom, bathroom, kitchen. Some people prefer this covering on the floor of the hallway. Owners of log floors often ask themselves whether it is possible to lay tiles on a wooden floor. Can. There are materials that make the idea real, but first, let's figure out the difficulties that can be expected.
 If floor mobility is not taken into account, tiles may bounce.
Wood floor mobility
To decide whether it is possible to lay tiles on your wooden floor, you need to examine the logs, boards. If the logs and boards are in good condition, the floor "does not walk" under your feet, tiles or porcelain stoneware will also lie without problems. Is there a slight deflection? Perhaps it will be eliminated by sheet material, which is still put on the boards under the tiles. If the deflection is large, it is better not to risk it. Still, the materials cost a lot.
If the floorboards are in poor condition or they sag, and the logs will stand for another thirty years, there are three options:
- Install logs more often, on them - boards removed earlier.
-
Lay a thicker floorboard. But under the tile, you can lay it not with a continuous flooring, but with a sub-floor type - with a distance. From above, sheet building / finishing material will still fit.
- Remove the boards, lay sheet material in two layers. Plywood or gypsum fiber board is preferred. You can have a combination - plywood + GVL.
The first option is the least realistic - it is an almost complete bulkhead of the floor. In this case, it is already better to make a floor screed on the ground.All the same, after all, the floor was practically dismantled, and the cement base is always safer and not only for tiles. And a warm floor can be done. There is only one remark. The screed can be done if the load-bearing capacity of the floor or foundation, or both together, allows.
 Loads that a wooden floor can withstand, depending on the section of the log, the step of their installation and the board
If the lags are not good for anything and the board is too, it is best to do a screed. You can - lightweight, you can - normal. It is necessary to look, as already said, in terms of bearing capacity, but laying tiles on rotten logs and boards - this will not lead to anything good.
Different temperature expansions
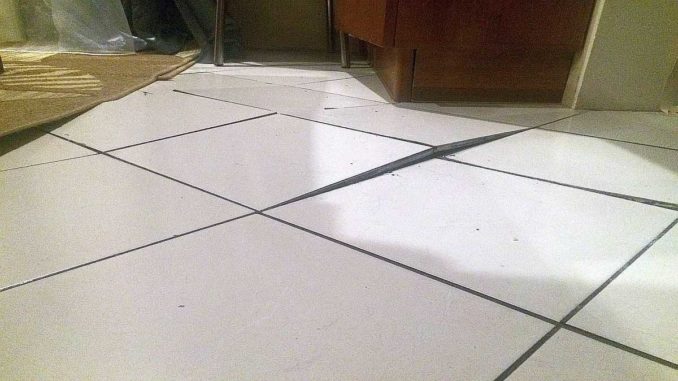
Wooden floor and tile or porcelain stoneware have different values of temperature and humidity deformations. To put it simply, when temperature and humidity change, they change their size in different ways. Wood changes a lot, ceramics only slightly. The difference is substantial. If you do not pay attention to this, the tiles will crack or cracks in the seams will appear. But there are methods for laying tiles on an unstable base and materials that can compensate for this difference.
- Tiles and porcelain stoneware are not placed immediately on the boards, but an intermediate layer is made. This layer has an intermediate expansion, which makes it possible to compensate for the difference in expansion.
-
Tiles on a wooden floor are placed on a special adhesive for unstable and difficult substrates. Its main difference is that it remains elastic after hardening. And he also compensates for the shifts.
- Elastic grout is used. It does not crack, as it can stretch and shrink. And this is also so that the tile on the wood floor behaves well.
This is how the problem of different expansion of the wooden floor and ceramics is solved. Let's say right away that tile glue and grout for wood flooring are more expensive than usual. This is because of the polymers that give the formulations elasticity. But it is clearly not worth saving and buying ordinary glue.
Option number 4. Tile
Floor tiles
Tiles are used in rooms with high humidity - kitchens, bathrooms, toilets. The process must begin with drawing up an accurate plan, in which the location of niches, plumbing fixtures, doorways, etc. should be indicated. Thanks to this scheme, you will be able to determine how many tiles are required. Then the material needs to be bought (with marking in the form of a sole) with a margin of 15%.
Ceramic tile
You will also need:
- primer;
- tile adhesive;
- plastic crosses;
- building level;
- gloves.
For waterproofing, you can use bitumen-based mastic or ordinary PET film.
A rubber hammer, a notched trowel, a level, plastic crosses - all of this you will definitely need
Surface preparation
The tiles should only be laid on a clean, dry and grease-free surface. It should be a screed made of cement or a self-leveling mixture, poured over concrete, or a wooden base lined with plywood sheets.
Surface preparation
The rough surface is covered with a waterproofing layer. The cement should be primed to heighten adhesion and to strengthen the structure of the next layer.
Performing markup
Basic schemes
Layout plan
It is better to start laying tiles from the wall opposite the door. If the scheme is simple, then you just need to designate the edge of strip No. 1 with the help of a coated cord, and then the rest. If the scheme is diagonal or you plan to create some kind of pattern, then you need to find the center of the room. In this case, the cord is pulled between points located in opposite corners. As a result, you will get 2 lines, the intersection of which will indicate the center of the room.
First, it is recommended to lay the tiles dry, that is, without glue, in order to find out where it is best to lay the trimmed elements.
Directly styling
Stage 1. Glue is prepared according to the manufacturer's instructions.The dry mixture is poured into water and mixed with a construction mixer until a homogeneous mass is obtained. The glue should be cooked in small portions, as it hardens quickly upon contact with air.
Ready-to-use tile adhesive
Stage 2. Using a spatula, the adhesive is applied to a small area of the floor (about 4 tiles), evenly spreading over the surface. The first tile is laid, scrolled slightly in one direction or the other to evenly distribute the adhesive, and fixed in accordance with the markings. For reliability, you should tap the tile with a rubber hammer.
Hammering
Stage 3. The following elements are stacked in the same way until row 1 is filled. The horizontal position is checked periodically, deviations are corrected by adding / removing glue.
Horizontal check
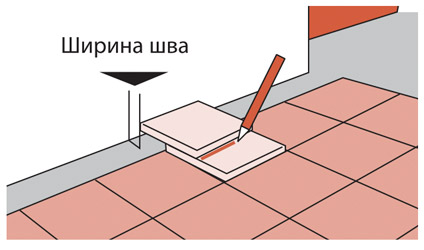
In addition, plastic crosspieces are installed on all seams, thanks to which the gaps will turn out to be even and beautiful. Also, a gap must be left along the contour of the room (about 1 cm), which can be done using wooden wedges. When the solution begins to harden, the crosses are removed.
Stage 4. Subsequent rows are laid. It is better to place cut tiles next to bedside tables, plumbing fixtures, etc. For trimming, it is not recommended to use a tile cutter that leaves unattractive jagged edges, but a grinder with a diamond blade.
Cutting
Stage 5. A day later, grout is applied to the seams. After about 30 minutes, the excess is removed with a wet rag, then within a few days the seams are periodically moistened.
Cleaning tile joints
Grouting tiles
Stage 6. After another week, the wedges are removed, the holes formed are filled with expanded polystyrene or pieces of rubber. At the end, a plinth is attached.
Some rules for laying tiles
In order for the laid material to be even and beautiful along the entire length of the path, it is necessary to lay out the initial row of tiles especially carefully. Stretch the line across the path, observing the drainage slope towards the curb. The first tile is installed 0.5 cm from the curb. In the longitudinal direction, the laying is level-controlled.
On the path, the tiles are laid diagonally and rammed with a mallet. Leave a 2 mm gap between the elements. The laid out row must be carefully examined and all errors must be corrected immediately. It is usually sufficient to adjust the amount of sand under the bulging or sinking elements. An evenly laid initial row is a guarantee that the entire path will turn out to be neat and beautiful.
 The rammer will speed up the paving work
If non-intact tiles are expected in the masonry, they must be laid out last. To correctly mark the cutting line, the tiles must be attached to the installation site. A hacksaw is fine for cutting tiles, but the work will go very slowly. Therefore, you need to cut the paving slabs with a grinder. A diamond disk is installed on it. You can use a special knife. You need to work in safety glasses.
Step 4. Laying the rest of the rows, cutting the tiles
Hurray, the first row is ready and now, guided by it, we can lay the second row of cut tiles (see the picture below), and then all the rest.
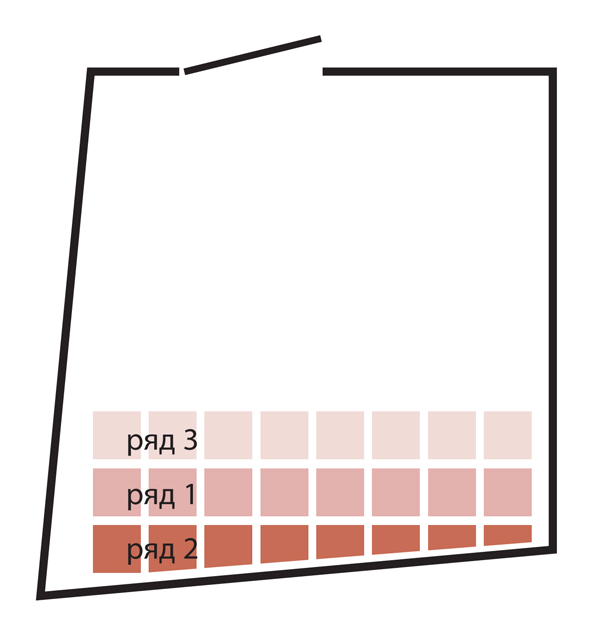
Attention! The first row consists only of whole tiles, the cut tiles are placed later (in the diagram, the "cut" row is designated as row 2)

How to cut the last floor tile adjacent to the wall? First of all, you need to determine the line of its cutting: put it on the penultimate tile already glued, put another tile on it and move it to the wall, but not reaching the wall at the distance of one seam. Along the outer edge of this tile, draw a line on the underlay tile. This line is the cutting line.
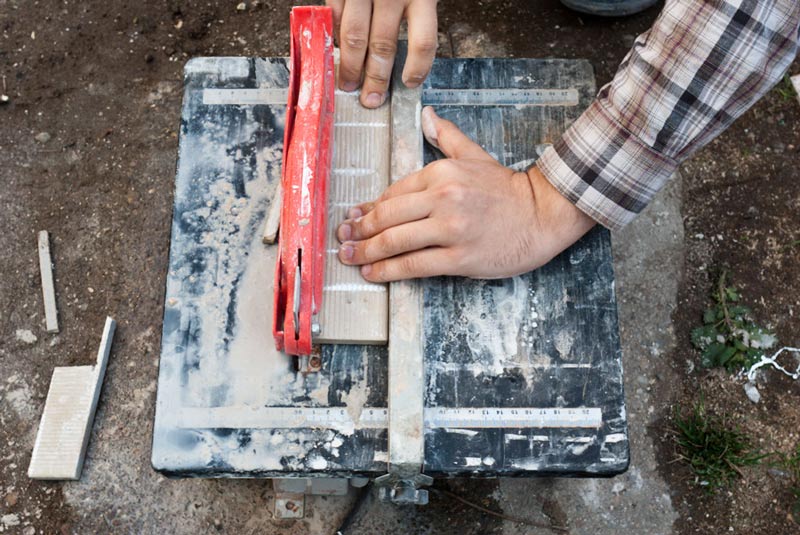
You can cut the tiles in different ways and with devices. Ideally, you should use a manual tile cutter or an electric tile cutter (see photo above), if there is no such tool, then use a grinder.However, if the floor tiles are ceramic and not very thick (up to 9 mm), then you can use an old construction trick and cut them ... with an ordinary glass cutter as shown in this video.
How to cut curved tiles? Apply masking tape to the tiles to be cut to prevent scratching of the decorative layer. Then, with a pencil, mark a rounded cutting line, say, under the pipe. Next, drill a few holes along the marked rounded line using a carbide drill (also suitable for porcelain tiles). Finally, use a pair of wire cutters, pliers, and tile tongs to gently break off the unwanted part. File the cut area with a file.
When you have covered the entire floor, make sure all the crosses are removed and leave to dry for 24 hours.
How to cut the floor tiles with an L-shaped grinder, for example, under the ledge of a ventilation duct, you can learn from this video.
Why is it undesirable to combine ceramics and wood
The cladding of wooden floors with a ceramic coating is reasonably considered not very sensible, because:
- there is no particular sense in covering a "warm" wood with "cold" tiles;
- under moisture-repellent floor ceramics, planted on tile glue, the tree hardly breathes, which is why it begins to rot and collapse;
- the service life of building ceramics significantly exceeds the service life of the timber and rough base boards;
- durable, low abrasion ceramics easily pricks with linear expansion of adjacent elements;
- the wooden floor does not differ in the static required for laying ceramic products.
Wood may be inferior to tiles in terms of aesthetic parameters, but this is not a very convincing argument either. After all, tiles are mainly used not because of the beauty of the pattern, but because of the sanitary and hygienic advantages. Its use as a protection of wooden floors from moisture is a controversial issue, although it can be the reason for laying ceramics in a wooden bath, in a shower room, in a kitchen or in a combined bathroom. In general, where constant wet cleaning is needed.
Suppose there is a reason, there is a material and a desire to lay the ceramic coating on a wooden base. It remains to find out how and in what ways this can be done, and to choose a rational technology.
Laying floor tiles in a new house should be flatly abandoned, as well as arranging floors with new wooden floors in any other building. It is necessary to wait until the end of intensive shrinkage. This is 2-3 years at least.
Tile benefits
- high wear resistance;
- moisture resistance;
- low sensitivity to blows with blunt objects;
- resistance to chemicals;
- the ability to absorb noise up to 19 dB;
- simplicity and ease of installation;
- the possibility of replacing a separate site;
- resistance to temperature fluctuations, suitable for underfloor heating;
- resistance to color fading from sunlight (subject to the purchase of a quality product);
- a wide range of compositions and colors;
- anti-skid;
- ease of care.
IMPORTANT! When caring for vinyl flooring, do not use solvents or products that have an abrasive structure. Dangerous exposure to acetone, which is the destruction of the protective layer of the tile.
How to choose a tile
Paving slabs in landscape design are used in different ways. Tiles can be laid out:
- tracks;
- decorative platforms;
- small courtyards;
- floor in the gazebo;
- adjoining parking lots.
 Different bases for different purposes of paving slabs
The purpose of the area on which the tiles will be laid is a defining moment when choosing a material. Thin tiles (up to 40 mm) can be used to cover paths and areas that will be walked or cycled. Medium thickness tiles (from 40 to 50 mm) can be used to decorate the entrance and parking area for a passenger car.
Thick tiles (over 60 mm) support the weight of a full-body truck. These tiles are usually in the form of small bars. This gives the cladding additional strength.
It is not difficult to figure out how to properly lay paving slabs. The main condition for a novice master is to choose a small-width area for the first experiments. A garden path is best. It is better to choose a tile of one color, square or rectangular.