Laying plywood on a wooden floor: basic rules
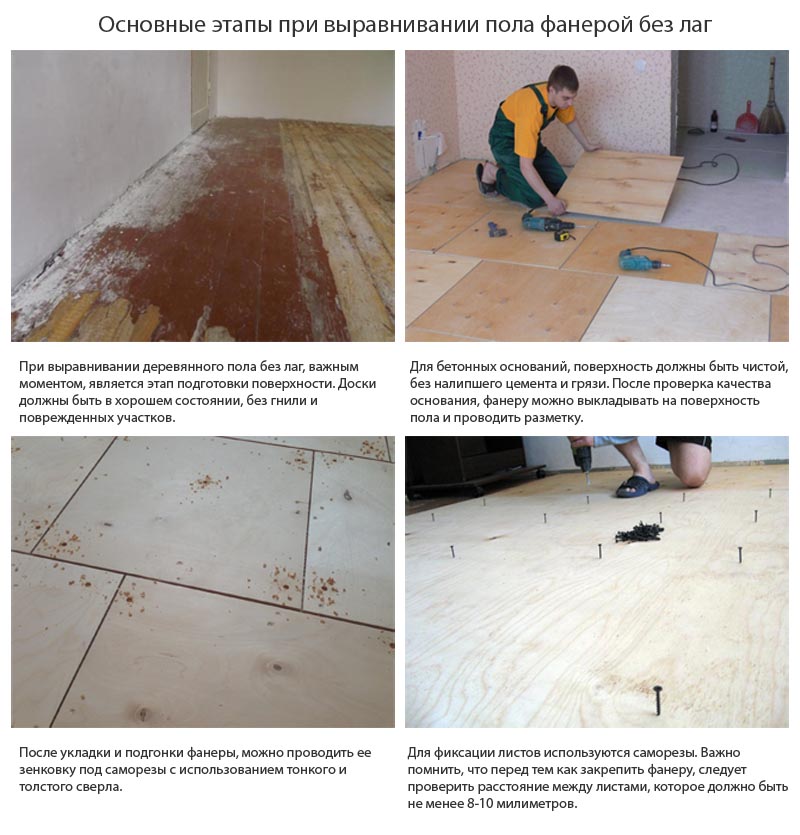
Laying plywood on a wooden floor becomes especially important when the plank floors are dry, loosened and become unusable. Plywood will allow you to make repairs in the most optimal way - quickly, inexpensively and reliably.
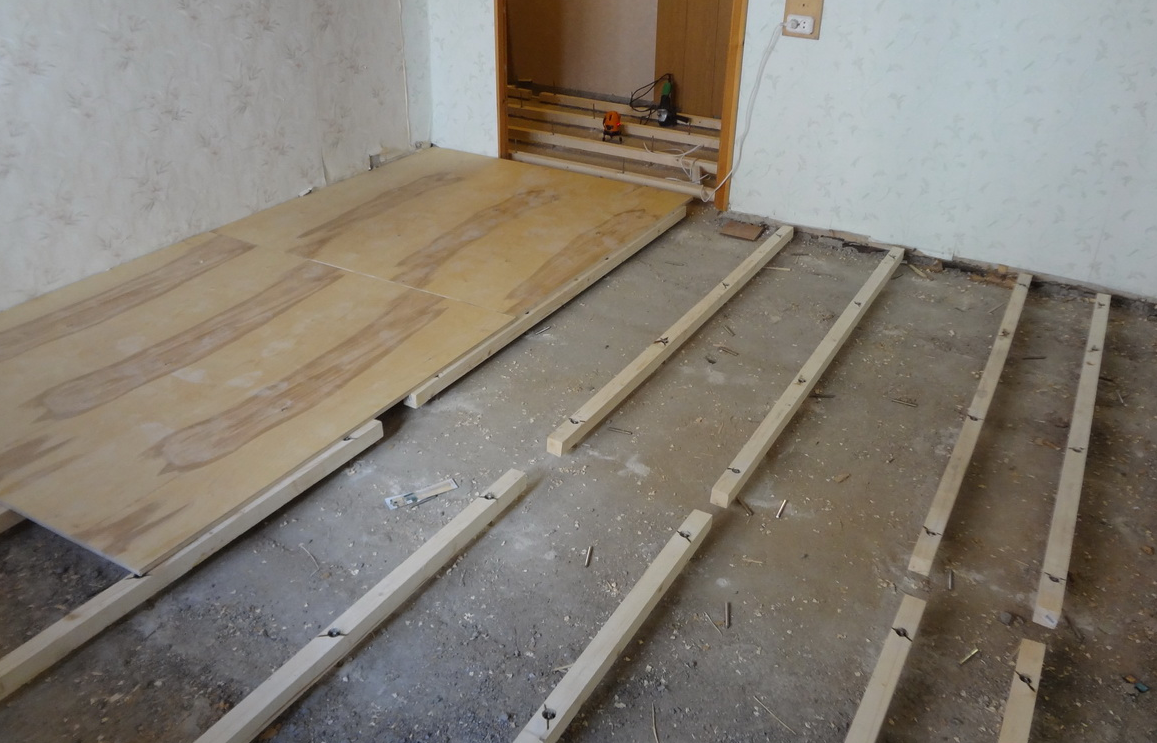
First of all, you should check whether the wooden floors do not bend along the logs (of course, if they are). If they bend, then you will have to completely disassemble the flooring and repair the base of the wooden floor. If it's not about logs, then the best way out is to lay plywood on a wooden floor.
Remember that plywood is not recommended to be used where there are too large changes in temperature and high humidity. Plywood is not suitable for bathrooms and unheated rooms. To check if your floor has high humidity, place a 1x1 meter sheet of polyethylene tightly on it and leave it for three days. If condensation does not appear on the inside of the polyethylene, the floor is suitable for further use.
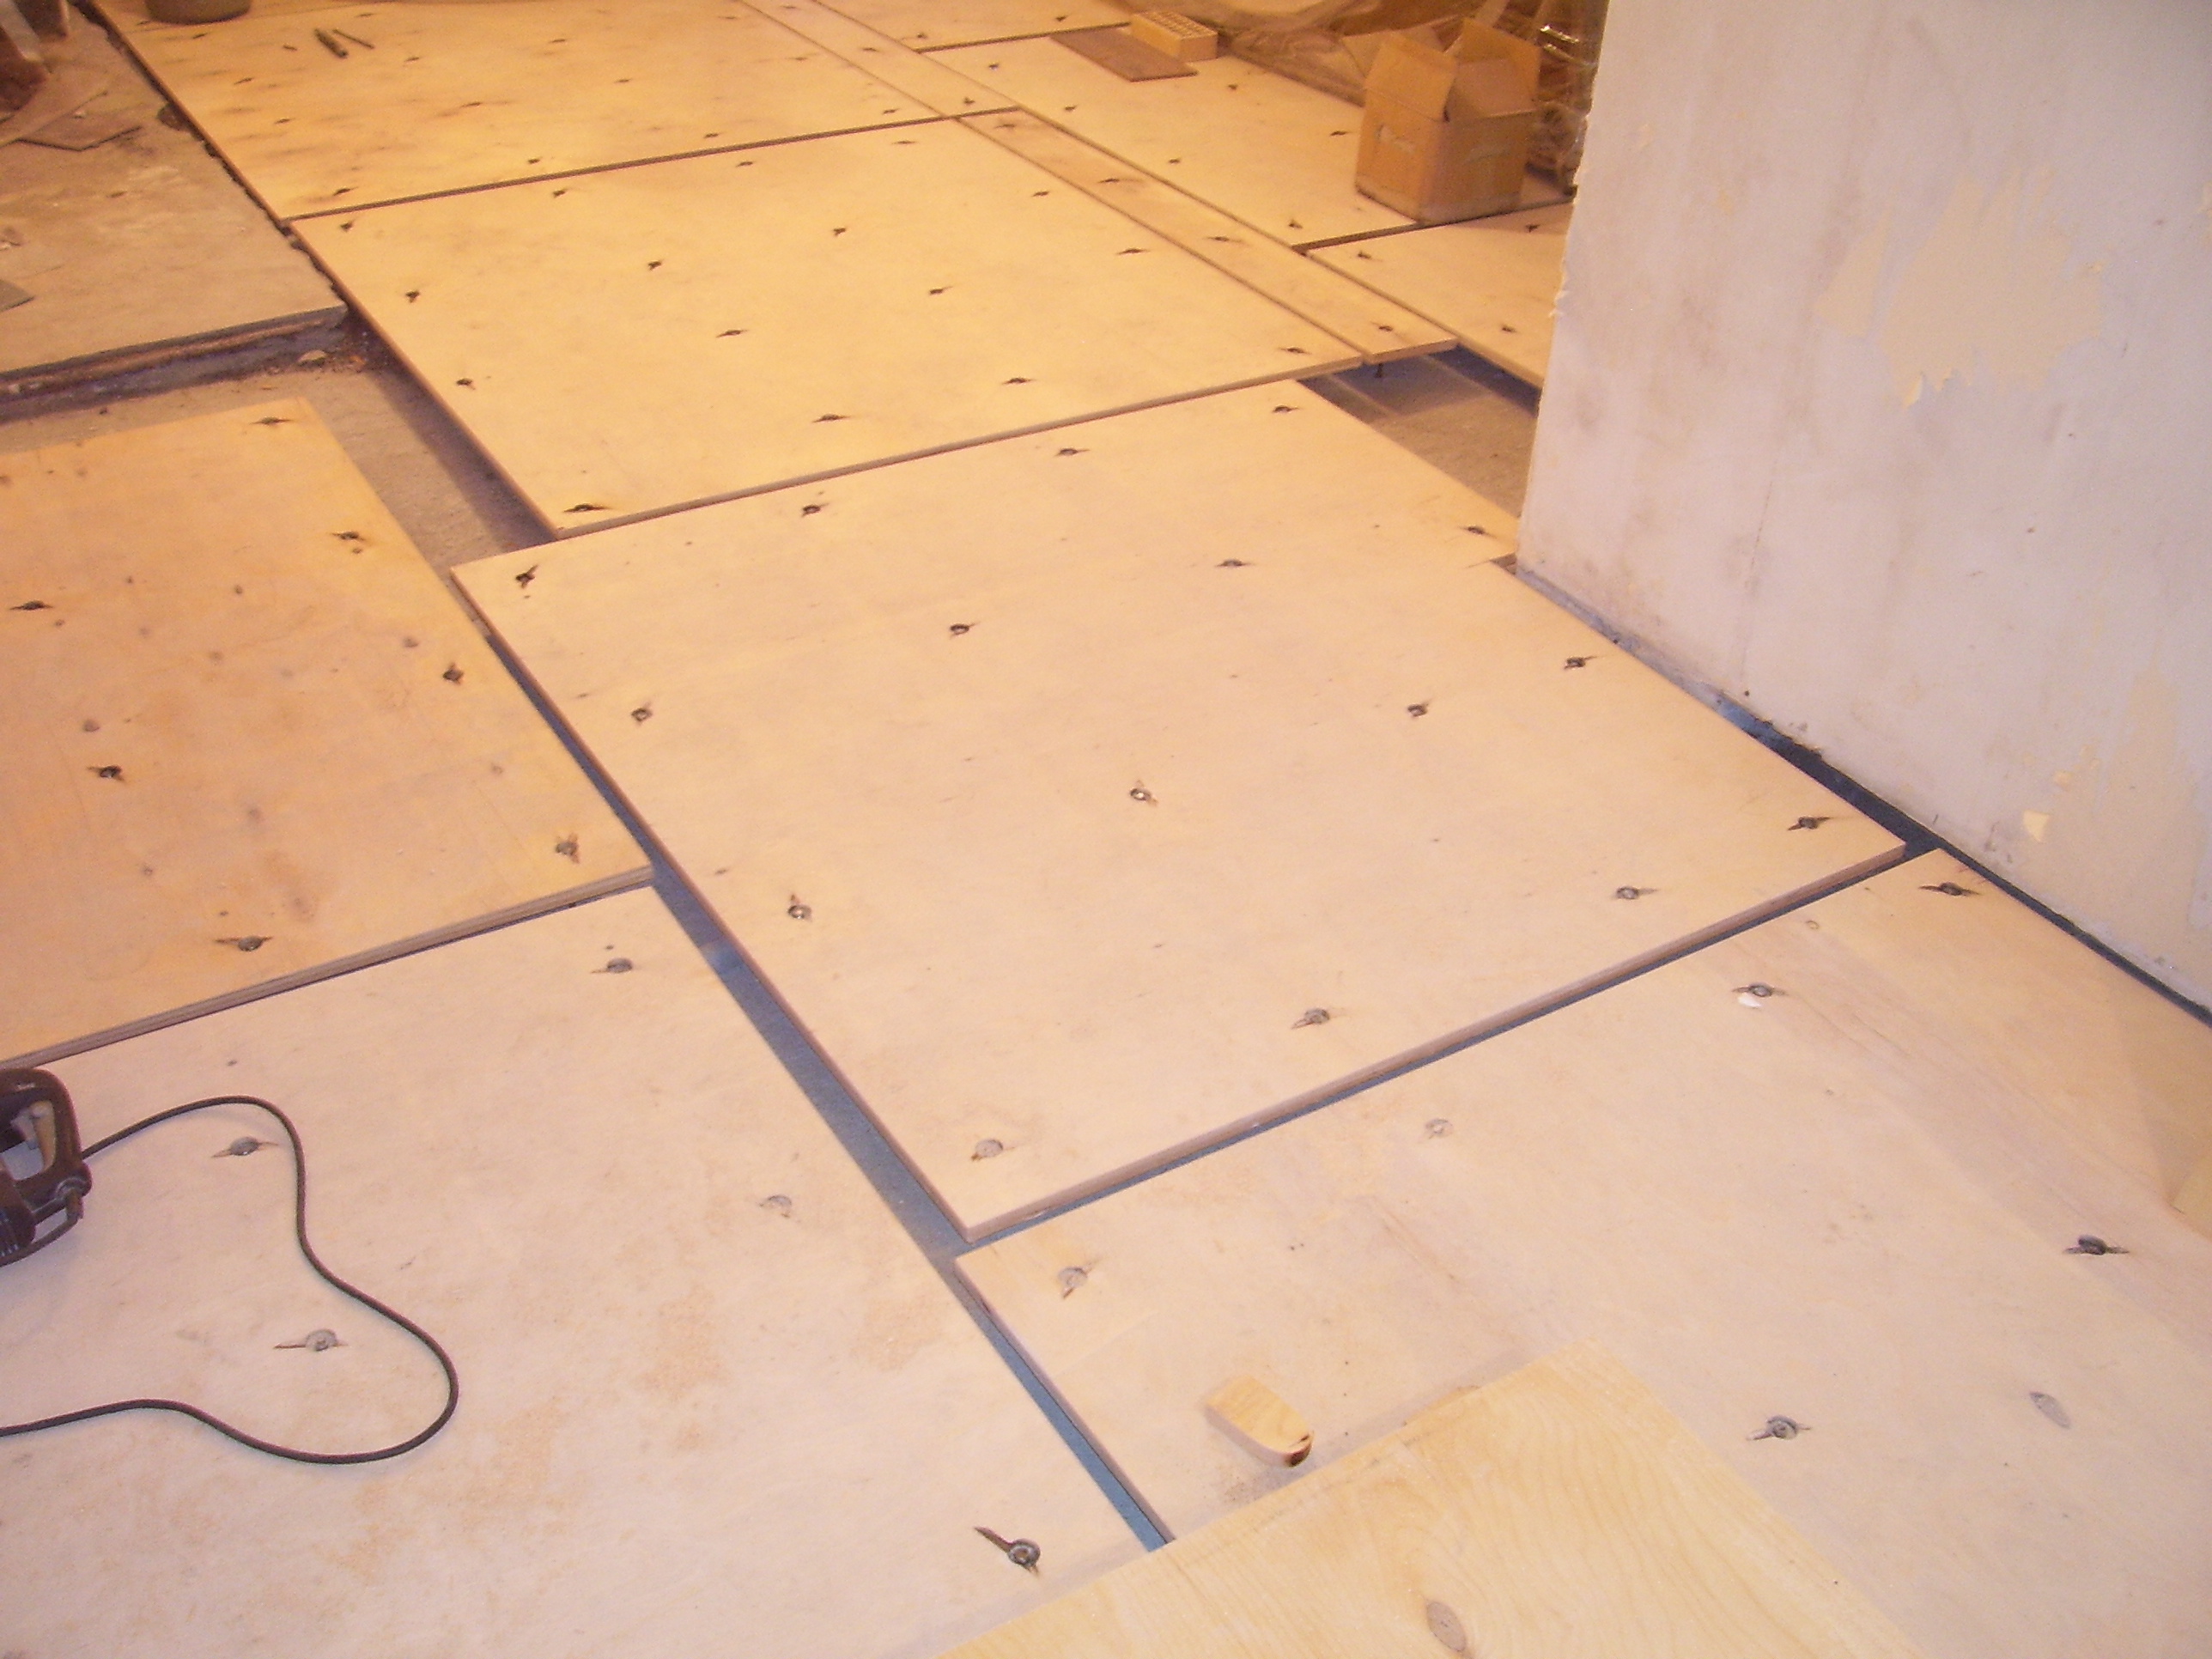
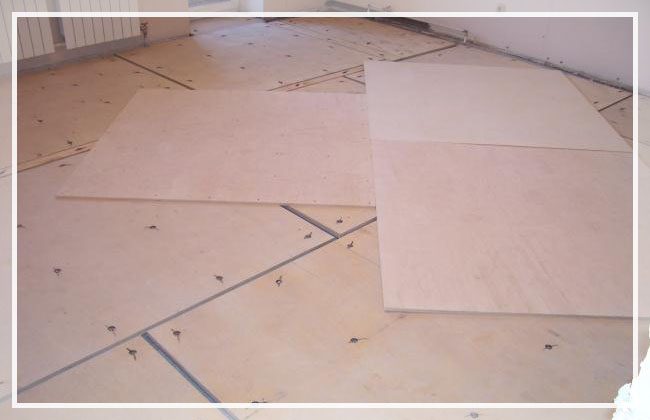
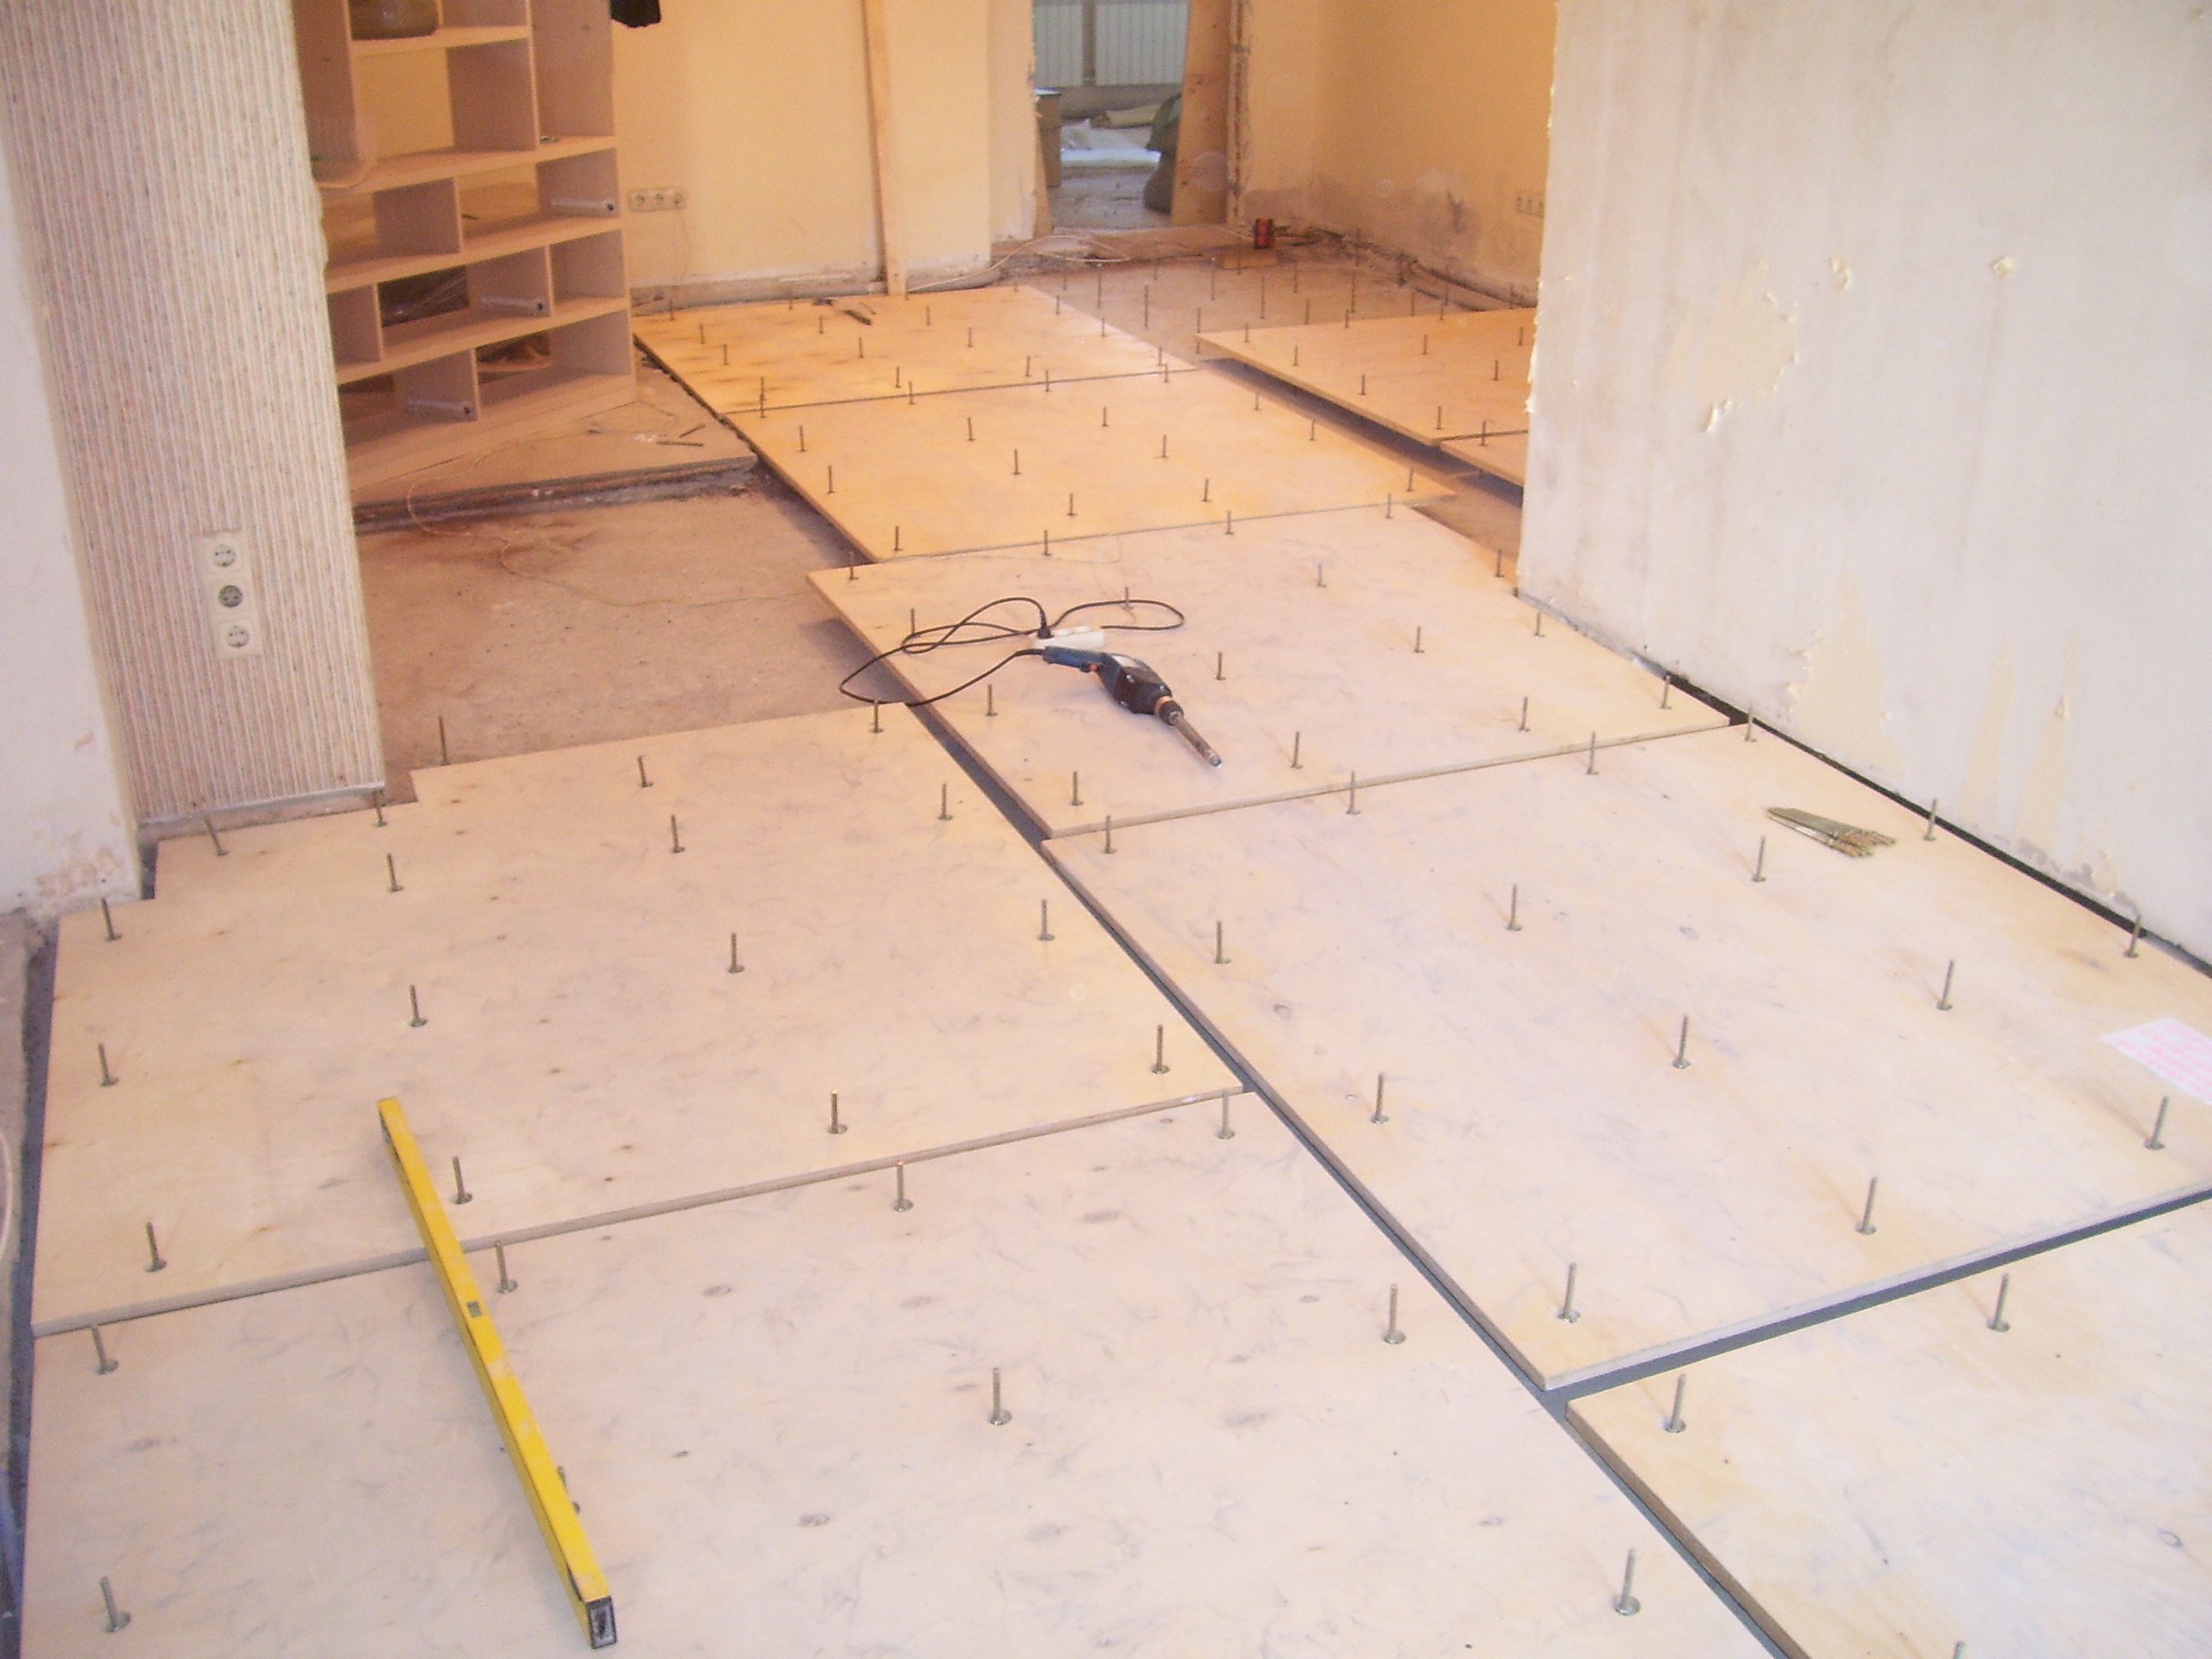
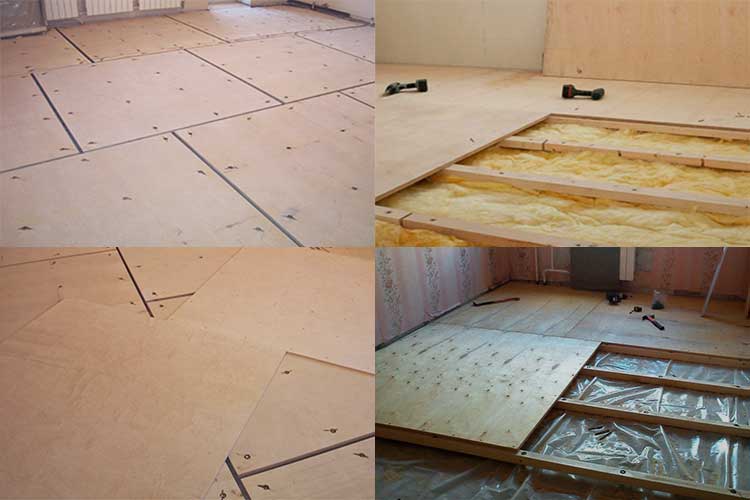
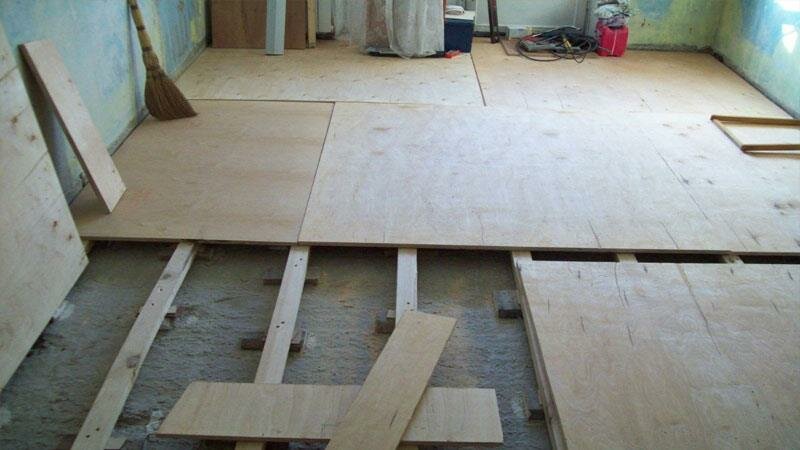
Plywood sheets are laid "dry" with an offset so that a maximum of three seams converge at one point. So individual sheets are adjusted to the size of the room, bypassing the protrusions and filling the niches. When carrying out this procedure, remember that a space of about 8-10 mm wide should be left between the scattered sheets - these are the so-called damper seams
It is important to know: there must be a gap of 15-20 mm between the extreme squares of the plywood and the walls. Do not worry that this will spoil the overall look, because later these indents will be covered with baseboards.
In order not to confuse the fitted sheets during the final assembly, it is worthwhile to number them and, focusing on the numbers, draw up a small plan diagram of their location.
When choosing plywood, keep in mind that the thickness of the plywood sheet should be at least 12 mm, and even better - 15 mm
On perfectly flat surfaces, sheets with a thickness of 8-10 mm are allowed. If you are planning to floor a solid board, then plywood less than 15 mm thick will not work for you.
It is recommended to cut the plywood sheets into squares with a side of 60 cm. This will give you the optimal number of damper joints. In addition, it is easier to detect delamination that is not visible in whole sheets.
Before finally laying the plywood, you should very carefully clean the base from dust and debris. In addition, it is recommended to carry out priming - this is the treatment of the floor with a special primer.
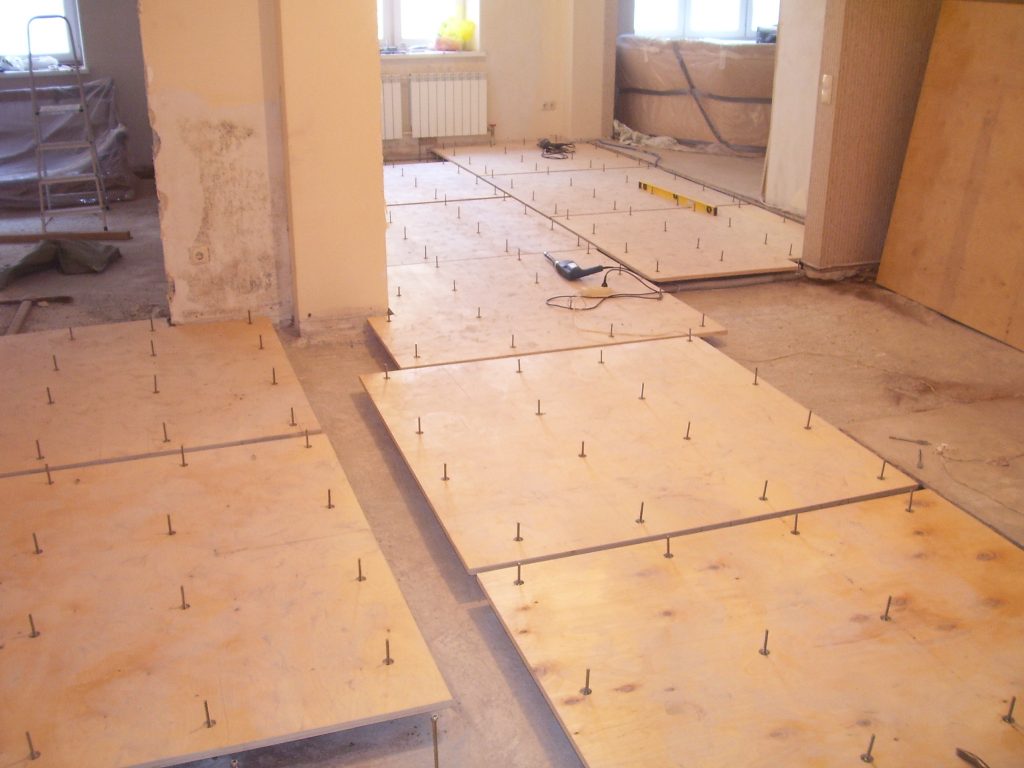
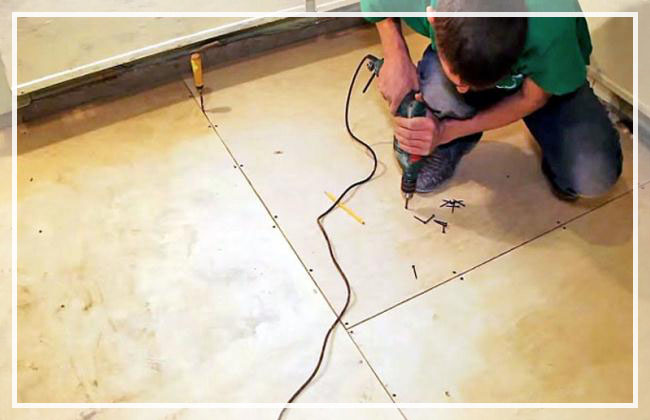
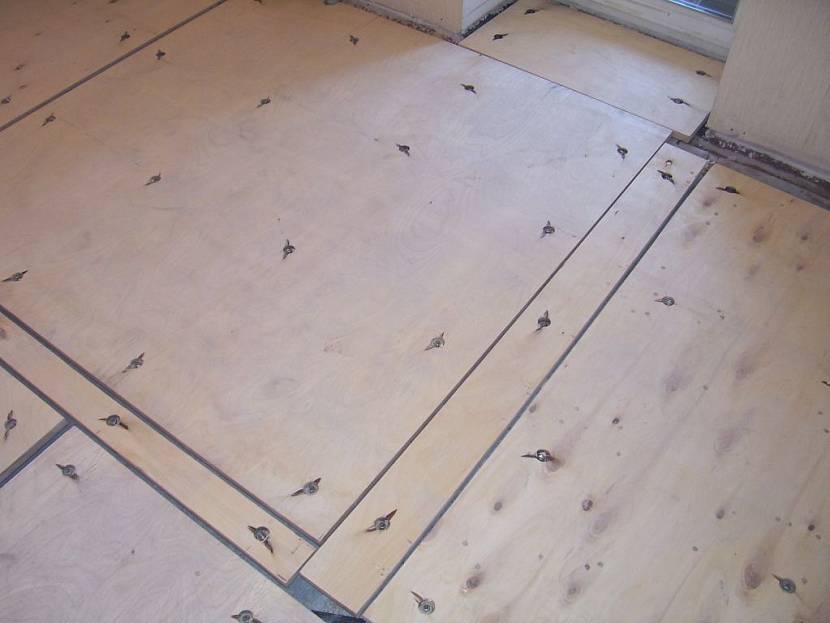
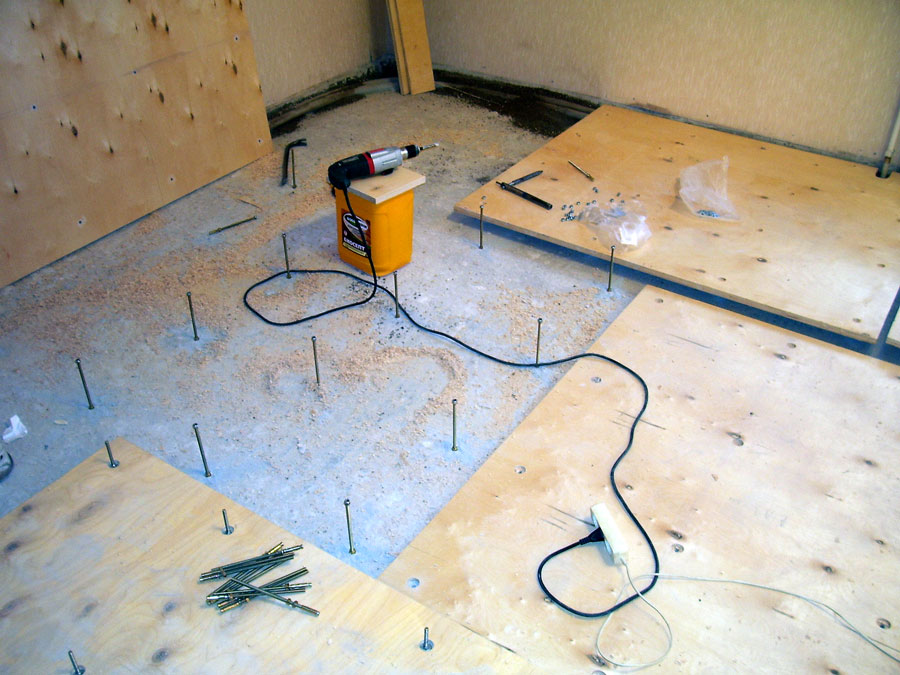
Better to put plywood on glue, but you can do without it. According to numerology, each sheet fits into its place and is fastened with self-tapping screws along the edges and diagonals with a step of 15-20 cm. Make an indent from the edges - 2 cm. It is imperative to sink the caps of the screws, countersinking the holes for fasteners.
It is important to know that the fasteners must be at least 3 times the length of the sheet thickness. For example, 40 mm self-tapping screws are suitable for a 12 mm sheet.
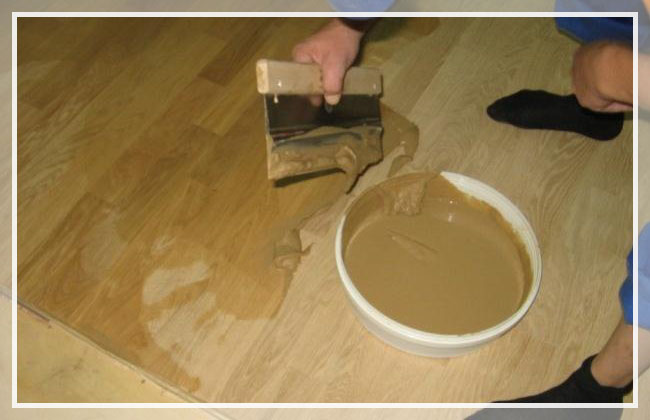
After installation, the surface must be carefully sanded. This can be done with a parquet sander and coarse sandpaper.
So, you have learned how to lay plywood on a wooden floor. Remember that a well-laid floor covering will delight all household members for many years!
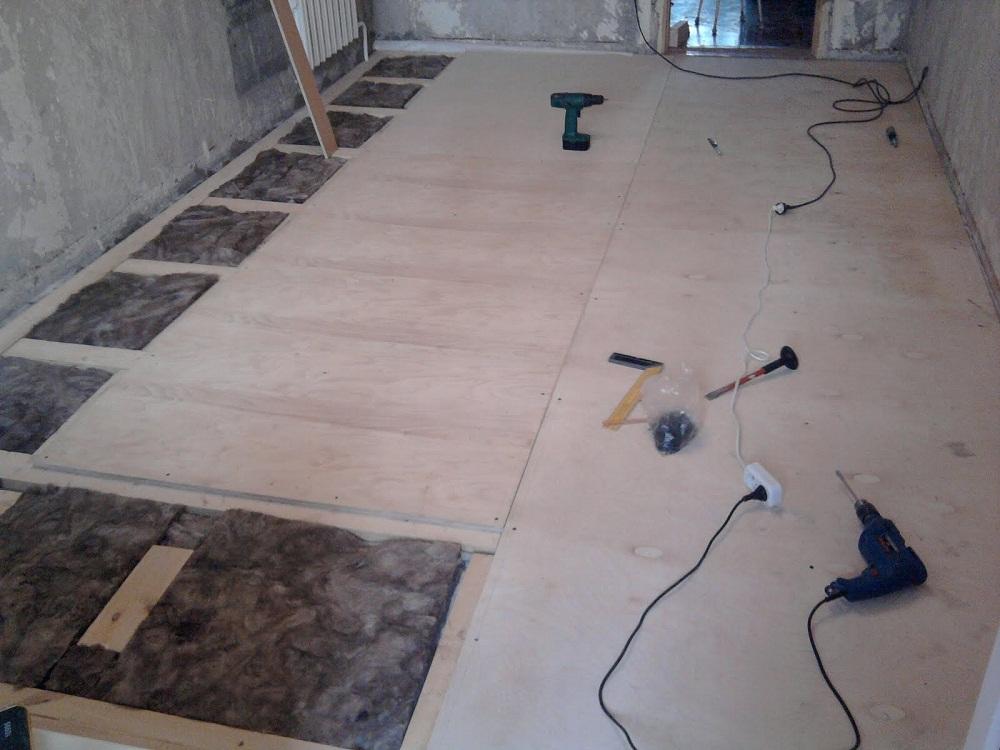
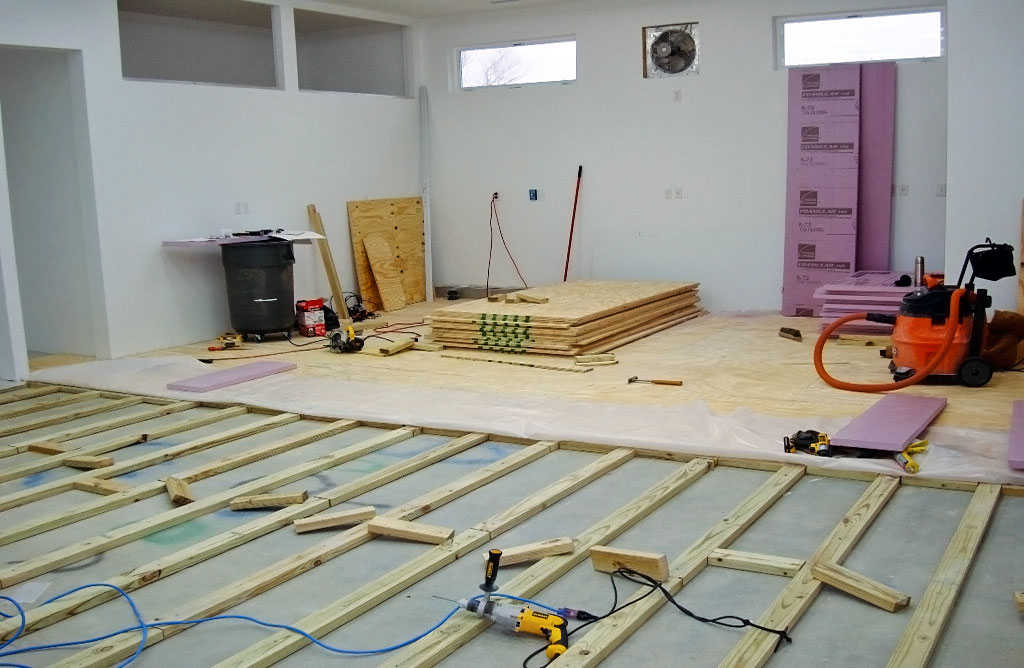
Preparation of the base according to the first option
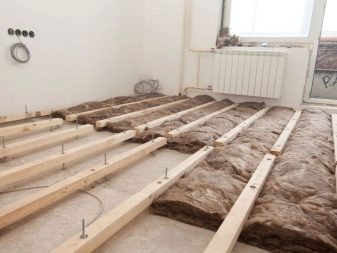
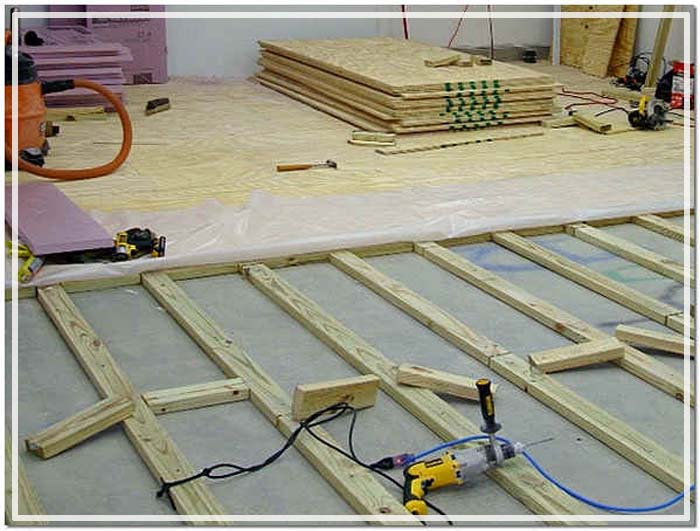
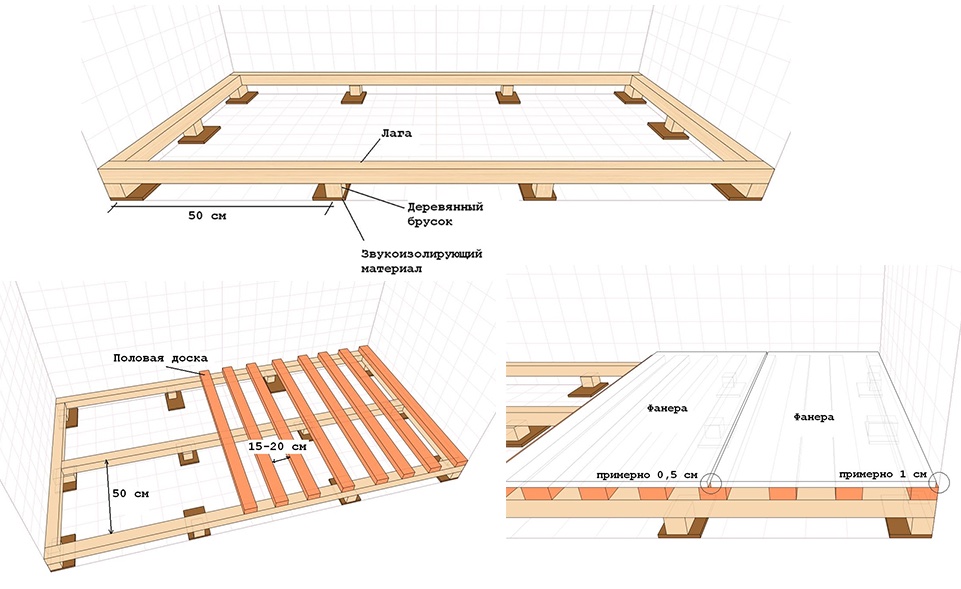
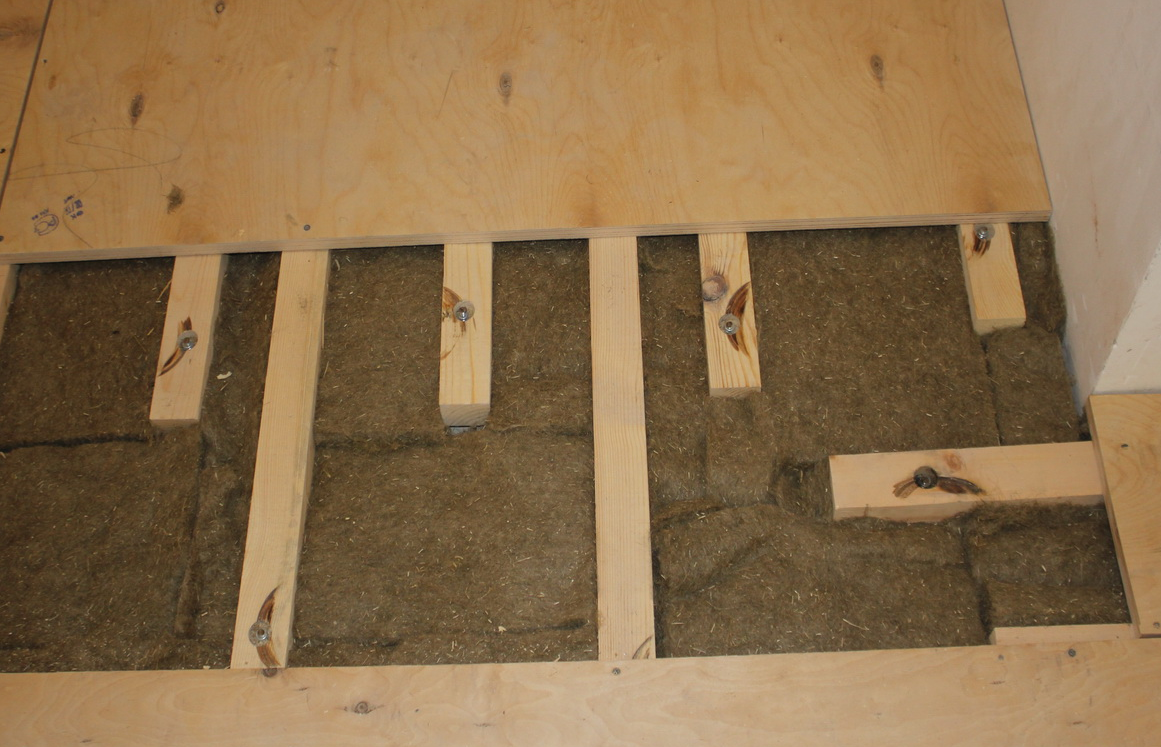
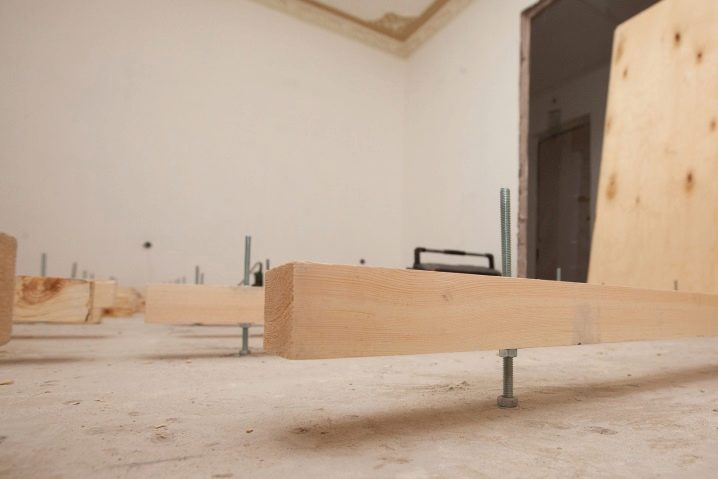
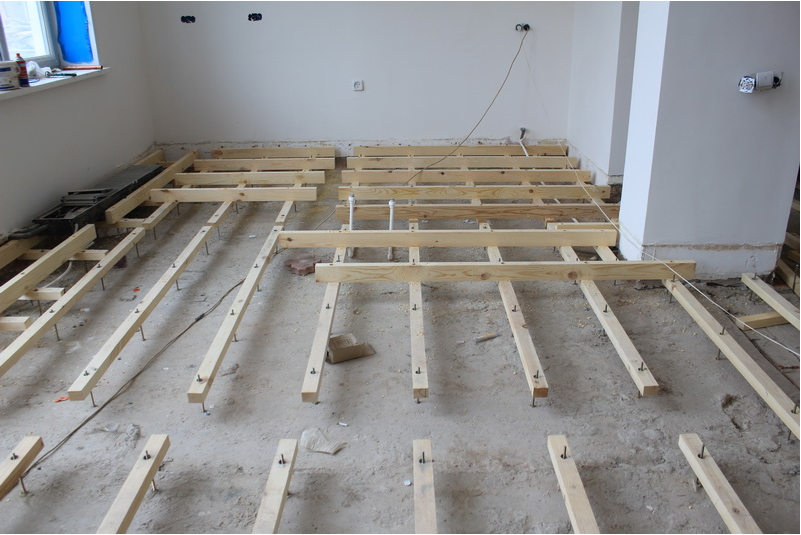
In any log house, the floors are laid on logs: wooden beams, laid at the stage of erection of the first crown of the walls.
- Subsequently, a rough floor is placed on these supports. Substandard boards are used for it.
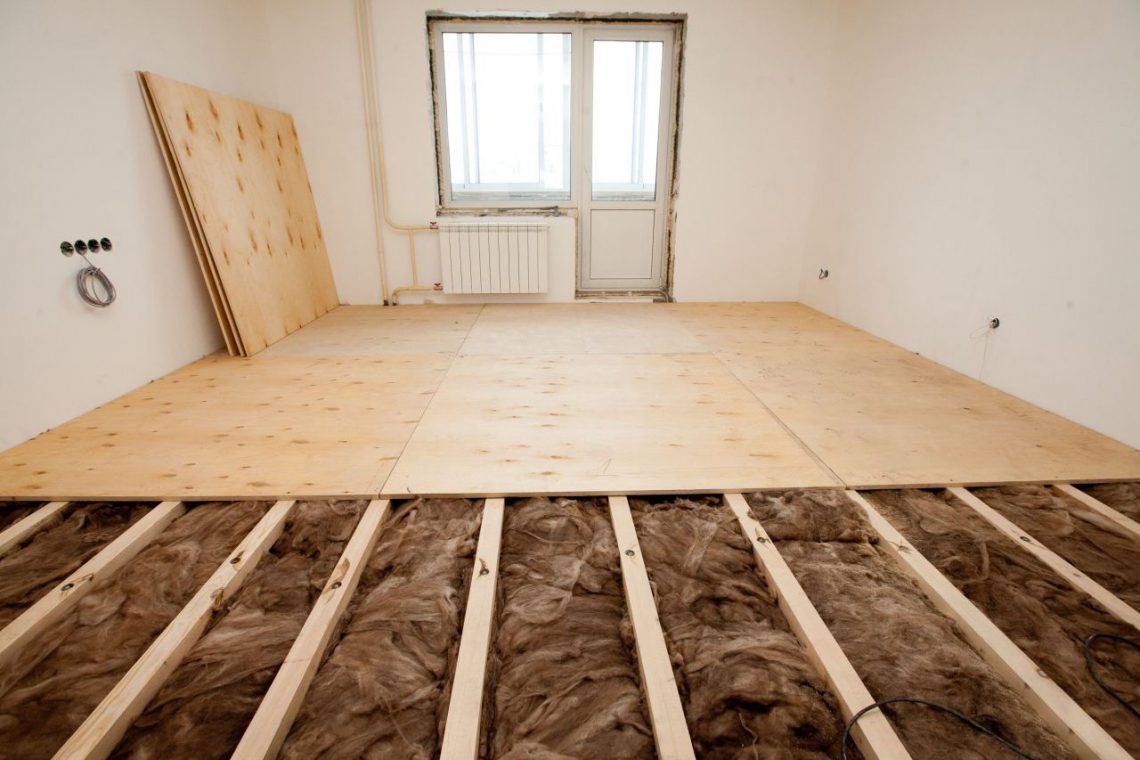
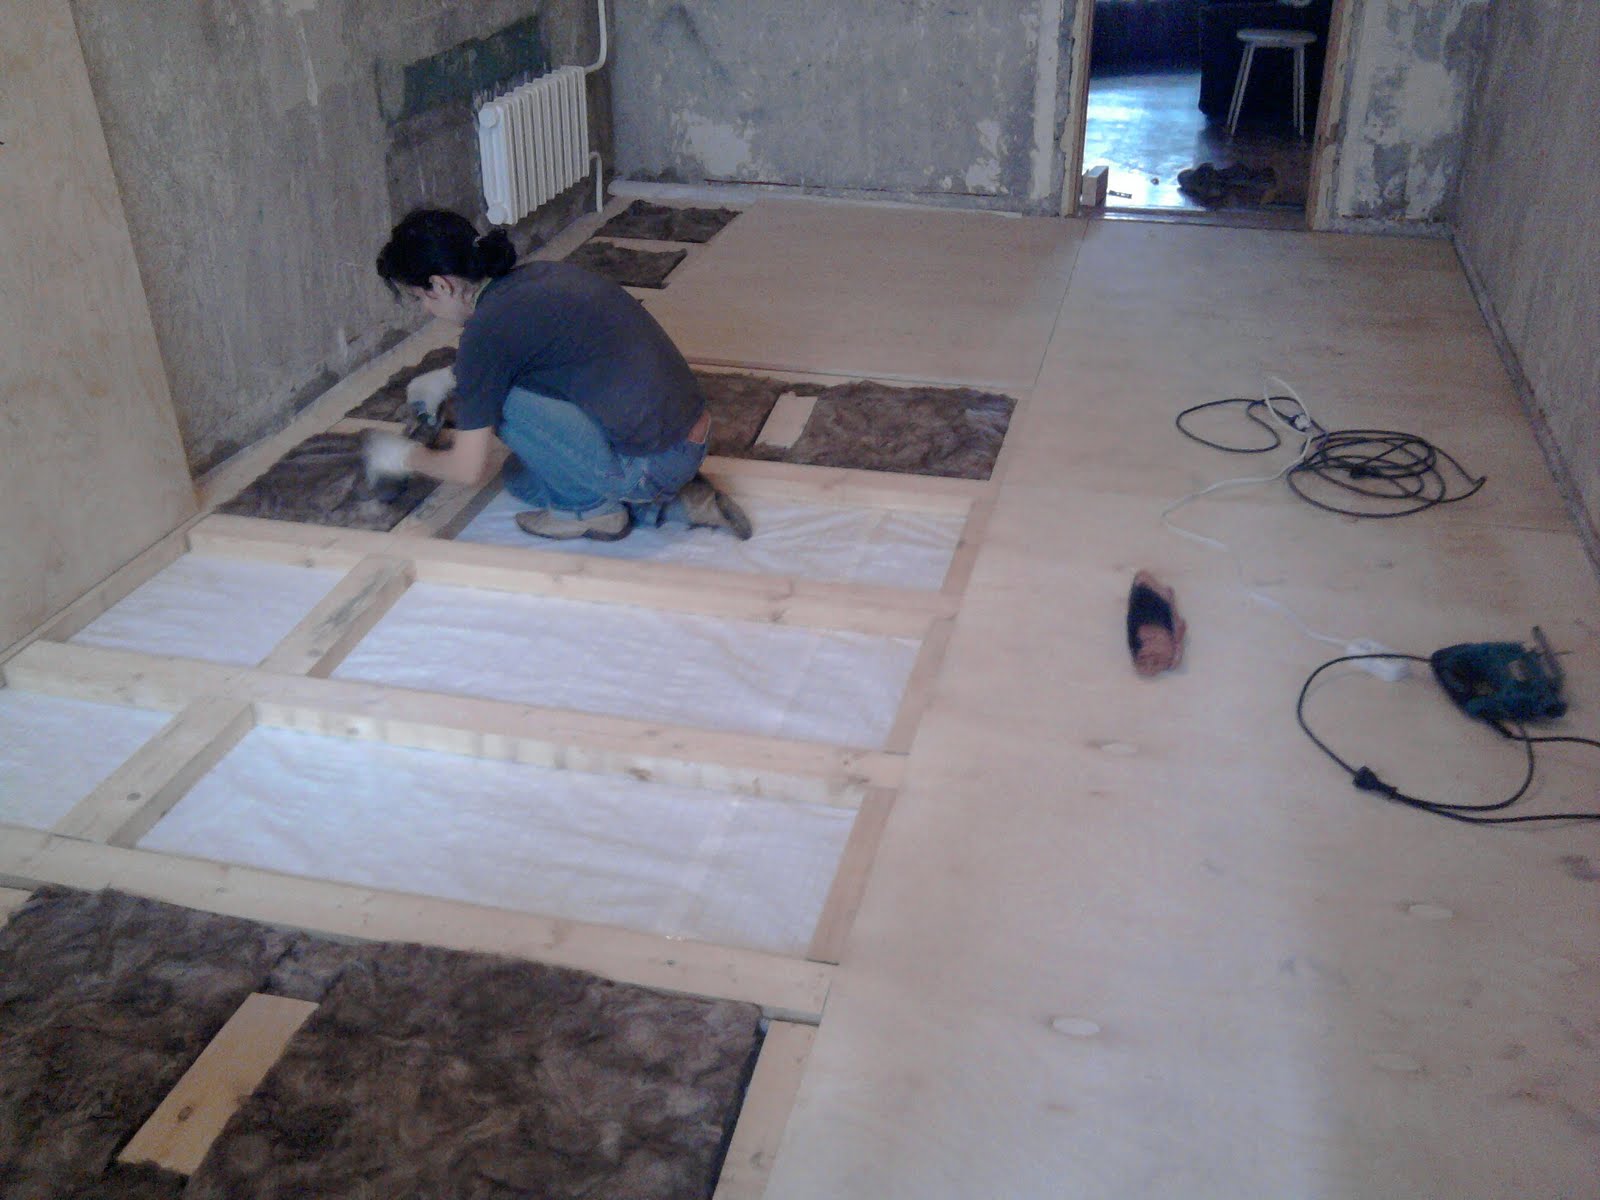
- When installing thermal insulation on the first layer of the base, the slats are filled with a step of 40-50 cm (they are guided by the dimensions of the insulation).
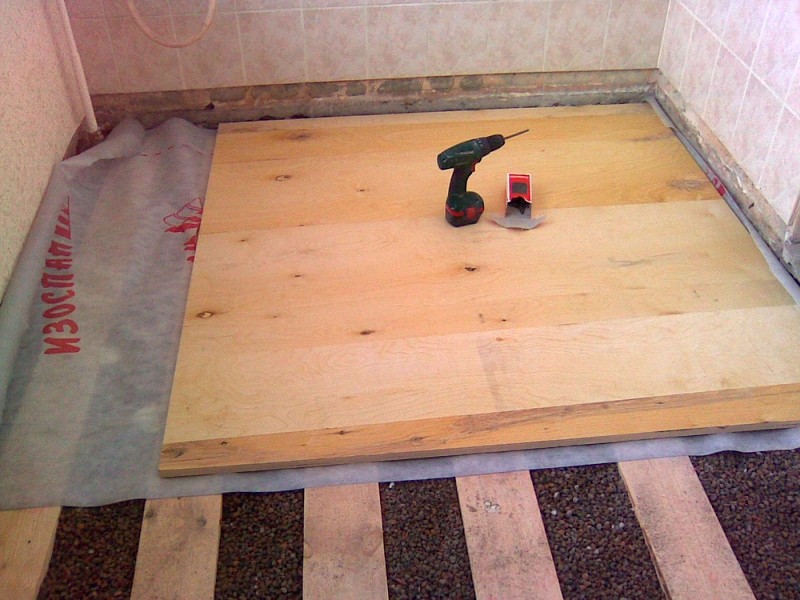
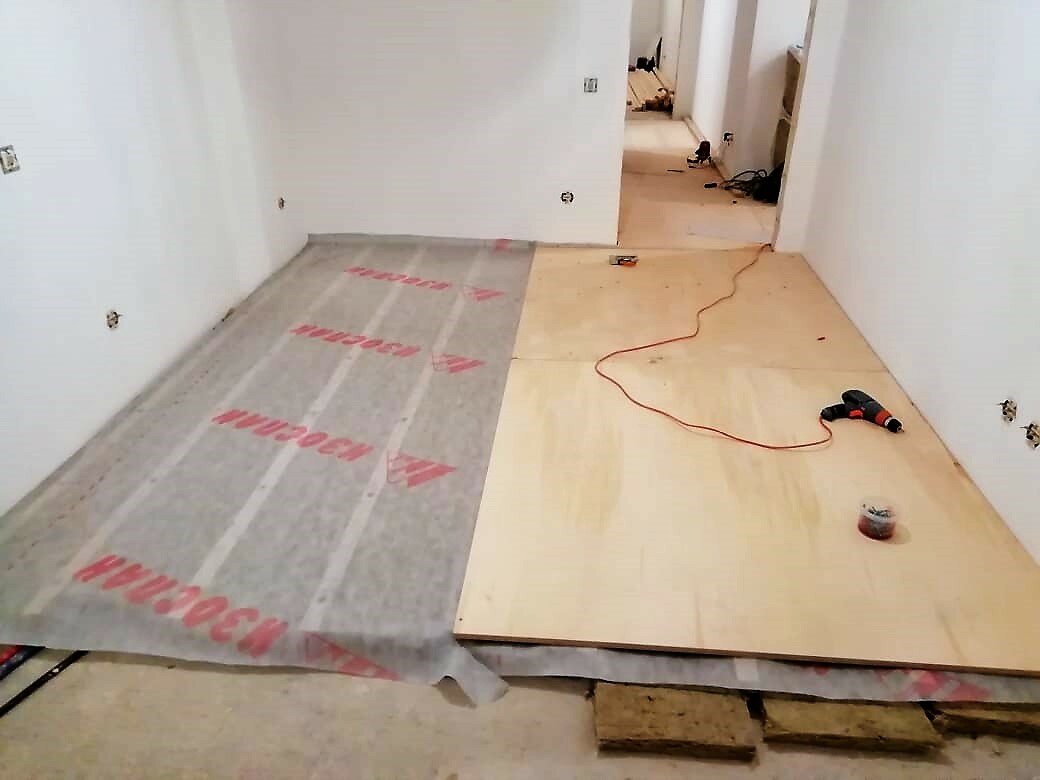
- This structure is closed with a waterproofing sheet without tension.
- In the intervals between the slats, mats (rolls) of mineral or basalt wool are freely placed. In some cases, bulk materials are used, for example, expanded clay. It serves as an excellent sound insulation.
- A vapor barrier material is placed on top of the constructed structure, slightly pinned to the slats.
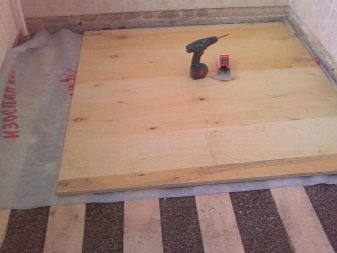
After that, plywood is laid to finally level the floors. Such a base for laminate is durable and reliable, has additional comfort conditions.
Do-it-yourself plywood leveling of the wooden floor
If the room has a wooden floor, then the best leveling method is to use plywood. The technology for installing such a coating is not very difficult, so you can do it yourself. The procedure is as follows:
- padding;
- screed manufacturing;
- priming;
- insulation;
- leveling the wooden floor with plywood.
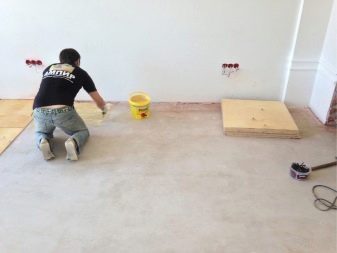
Priming is a necessary procedure that allows you to get rid of cracks, chips, level out the resulting potholes. Otherwise, the coating will not last long and will begin to creak.
The screed, which is designed as a base for plywood, is made of concrete. After its complete drying, priming is carried out, i.e. base primer. With this procedure:
- the surface of the base is cleaned, including from dust;
- the base is impregnated with a primer made of the same material with which the plywood will be attached to the screed.
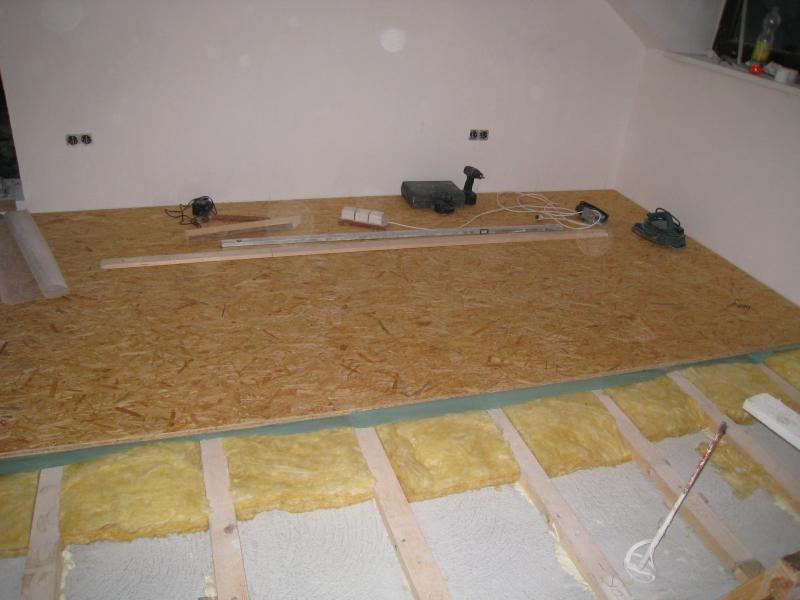
Then the insulation is laid, and on it - the sheets of plywood marked for laying.
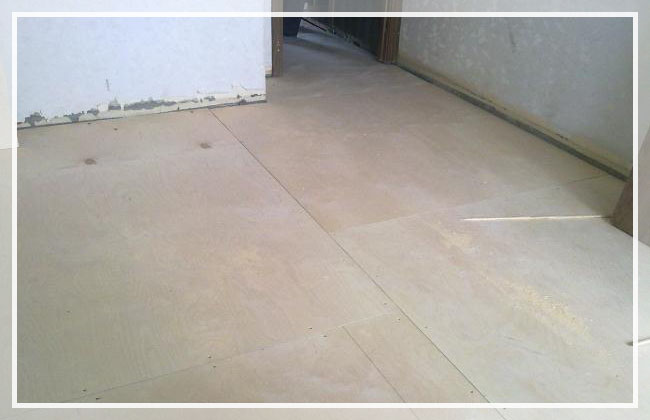
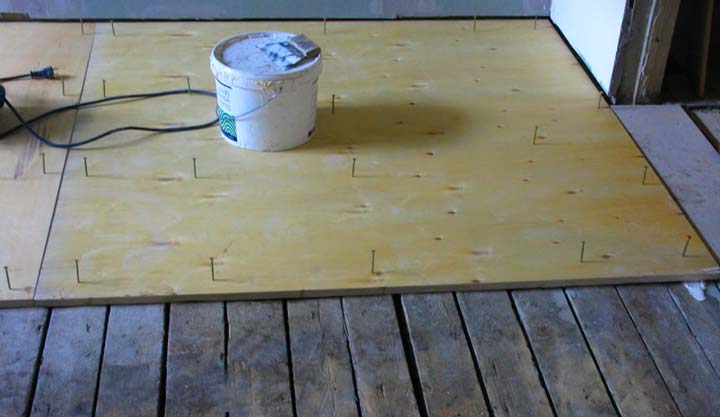
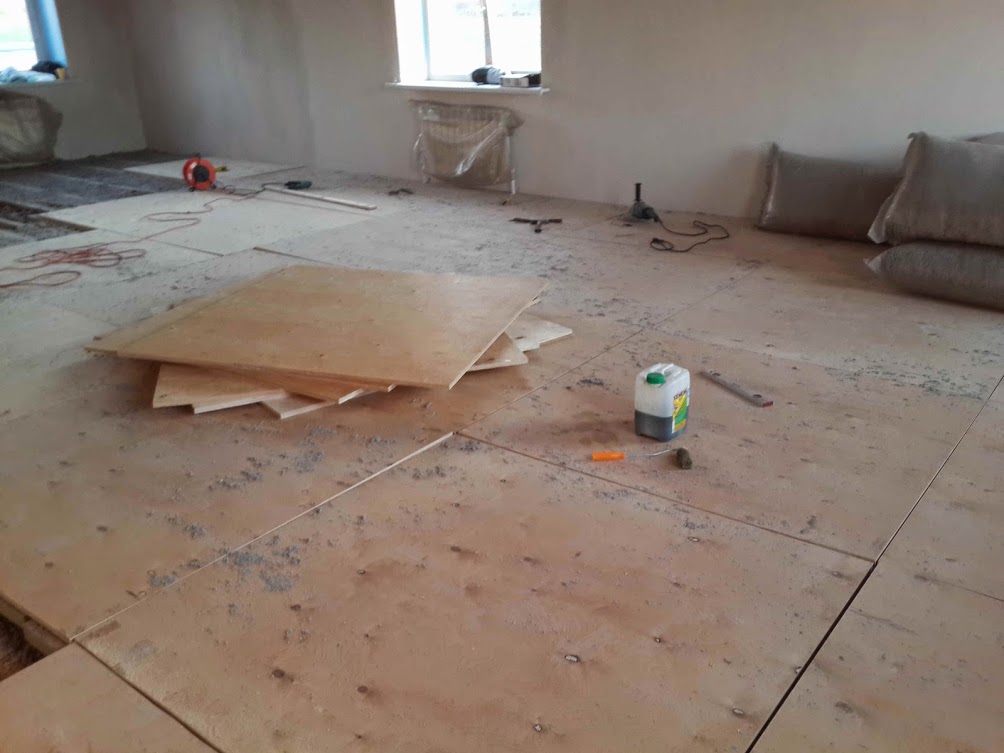
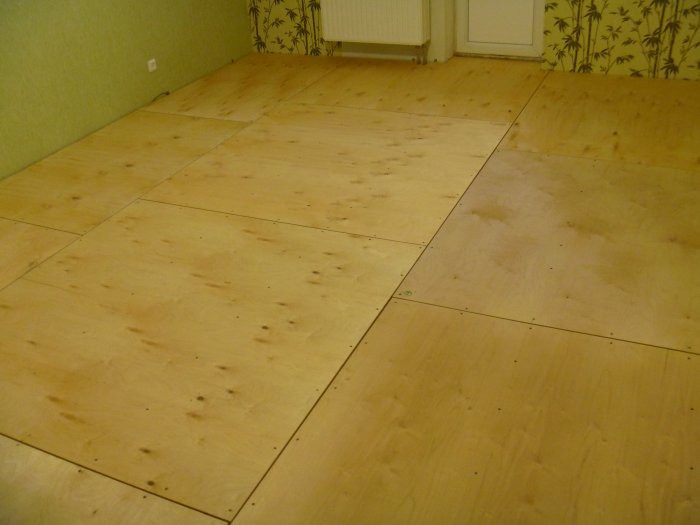
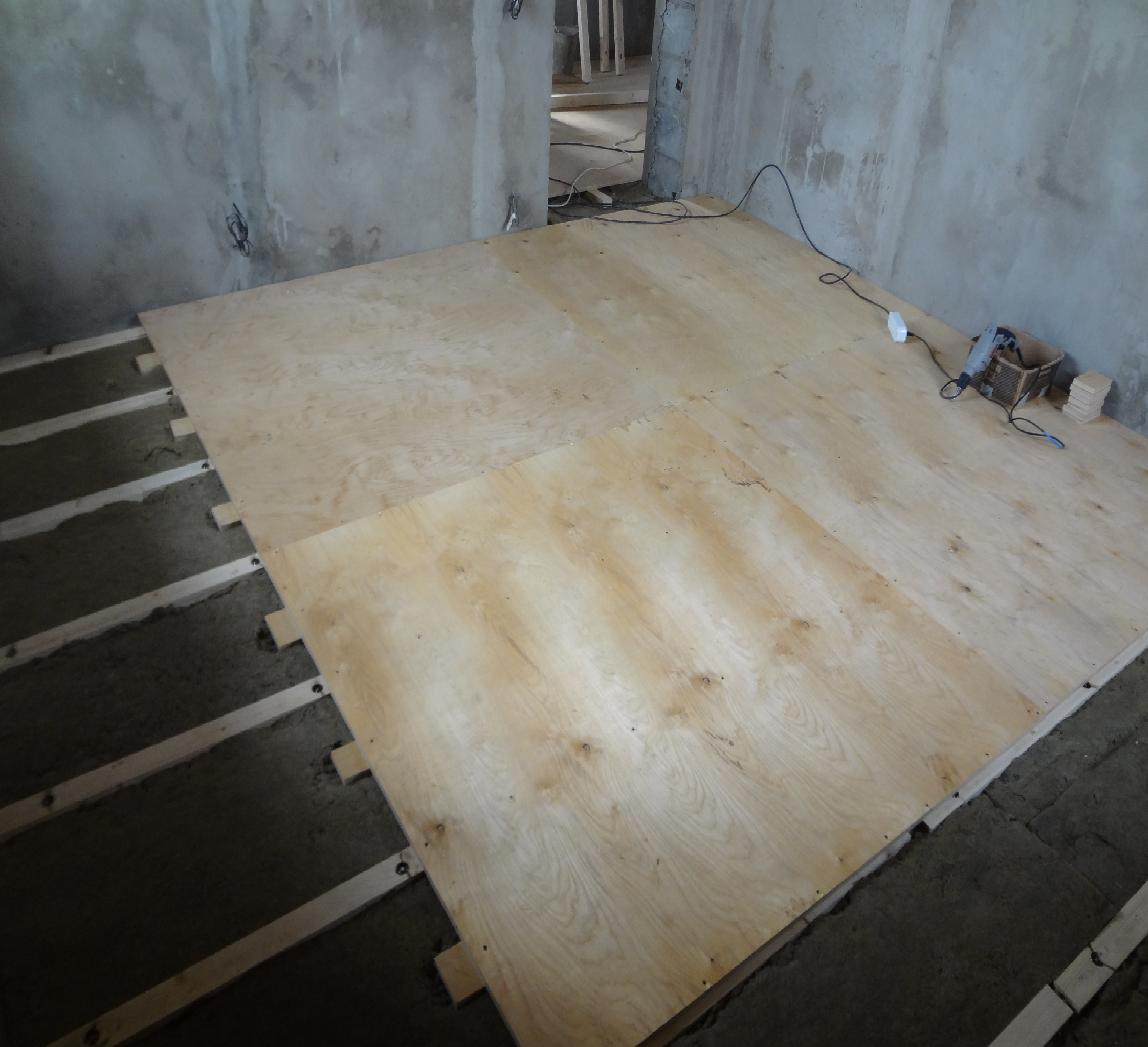
 Plywood is great for leveling wood floors.
Unevenness in the floor
Plywood is able to compensate for any imperfections in the foundation. It successfully copes with small dents in the subfloor, no less successfully resolves the problem of excessive slope, the presence of surface drops, a concave or curved floor plane.
With large differences in height, a subsystem of wooden blocks is used, leveling the floor plane to the required parameters; on bases with minor flaws, a plywood layer is simply laid on the floor and serves as a leveling coating.
All options require the correct selection of material capable of performing its functions in the required mode, not to bend when moving and not to create noise.
Materials used
Naturally, for installation, we need high-quality logs and plywood sheets. Wooden beams are effectively used as a lag.
It is most practical to use a lag with the following linear cross-sectional dimensions:
- width - 7 cm;
- height - 4-5 cm.
The length of one lag should be from 2 meters. The entire surface of the timber should be perfectly flat. The wood must be adapted to the room conditions. To do this, it is recommended to keep the material in the room where the installation will be carried out in order to check its resistance to deformation and drying.
As for which plywood to use for the floor along the logs, the following proportions of sheet sizes are popular: 15.25x15.25 or 12.2x24.4 centimeters. The thickness of the sheet should start from 1.2 centimeters, but in the case of a two-layer installation, you can stop at the option of 0.9 centimeters in thickness (in more detail: "What should be the thickness of the plywood for the floor on the logs"). It is imperative to check the material for defects. It is unacceptable that the sheets were deformed from either side.
If you need to make plywood flooring on logs as a rough base, then you can use a cheap type of material. This type is characterized by the marking "NSh" (unpolished). Parquet floors will work best with plywood that has been sanded on one side (grade "Ш1").Any of the above grades of plywood can be used indoors with an air humidity of up to 60%. If the humidity in the room is extremely high or intense contact with liquid is possible, then it is more expedient to use moisture-resistant plywood of the "FK" brand.
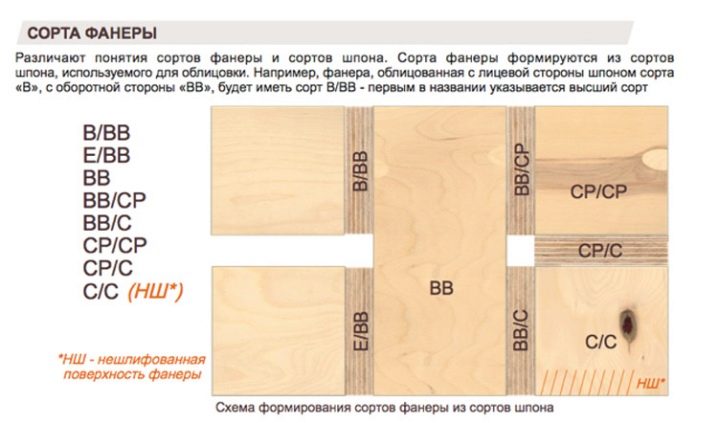
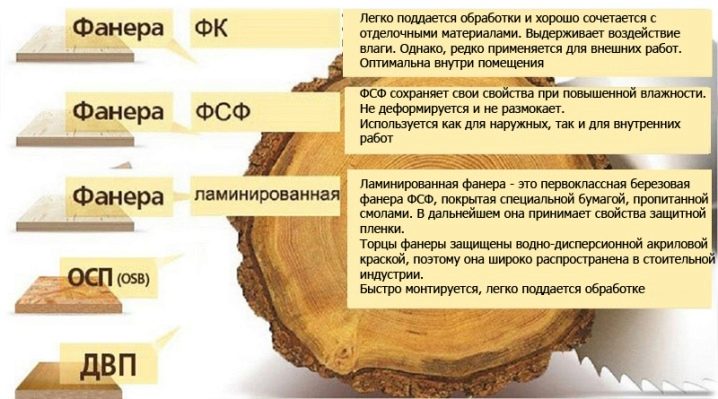
Plywood grades
To make a high-quality leveling of the floor with plywood under the laminate, you need to correctly select the brand of plywood. Each brand has distinctive properties, for example, an indicator of moisture resistance, toxicity, elasticity, strength, etc.


Properties that should be considered when choosing plywood for laying under laminate flooring are moisture resistance, toxicity and strength.
Plywood grades:
- Plywood brand FSF has the highest moisture resistance, but is completely unsuitable for leveling floors in an apartment. The whole problem of plywood of this brand is in the adhesives with which veneers are glued during its production. The glue is made on the basis of formaldehyde and has a high toxicity, which is undesirable in residential premises. FSF plywood is used for the construction of formwork during the construction of foundations, construction of roofs and wall cladding in the garage and other non-residential buildings.
- Plywood brand BS - high quality material that no alternative can match. Plywood is flexible and resilient, has very high strength rates, and is also resistant to various external influences, for example, moisture and wind, perfectly retains its size and shape. Despite all its qualities, it is not used for construction purposes, because the price of such material is very high. Plywood is used only for the construction of water and air transport.
- Plywood brand BV - has good strength indicators, however, its component veneer is glued together with water-soluble glue, which negatively affects its moisture resistance, which is completely absent. Even with a small amount of water, plywood begins to disintegrate, so the question of whether it is possible to put laminate flooring on BV plywood disappears immediately.
- Plywood brand FBA made on the basis of veneer glued with albuminocasein composition. Plywood is absolutely harmless to health, has good moisture resistance and strength.
- Plywood brand FC used for the manufacture of furniture, architectural structures and other structures that exclude prolonged contact with water, because plywood has a low moisture resistance due to the use of urea glue. The main advantage of this plywood is its naturalness.

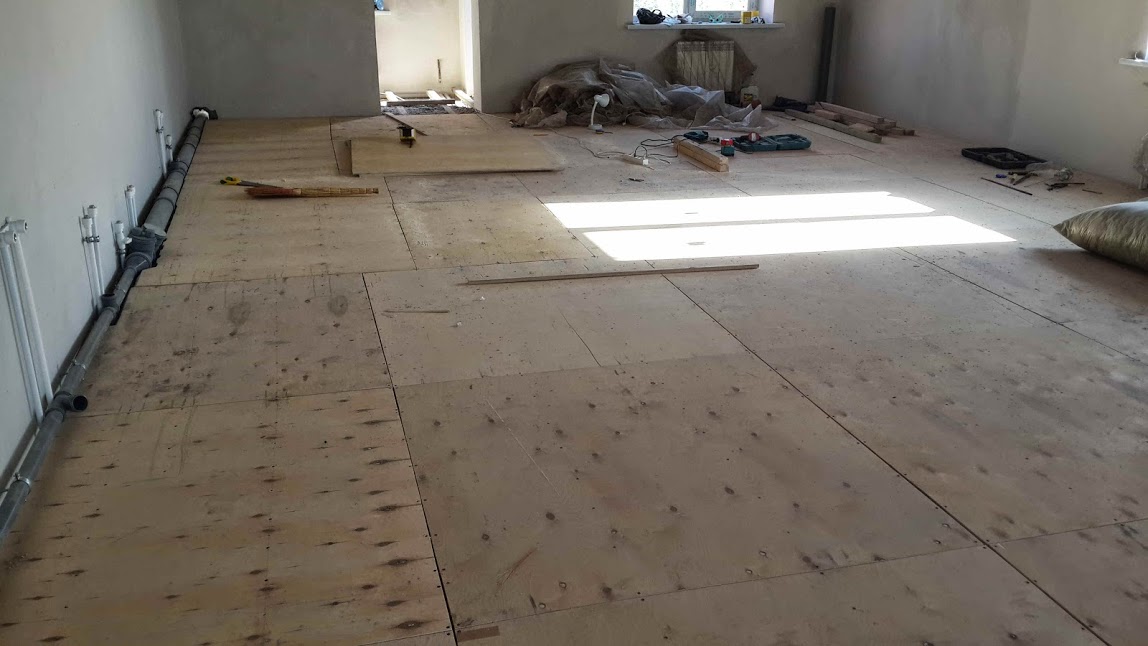
How to level the floor with your own hands
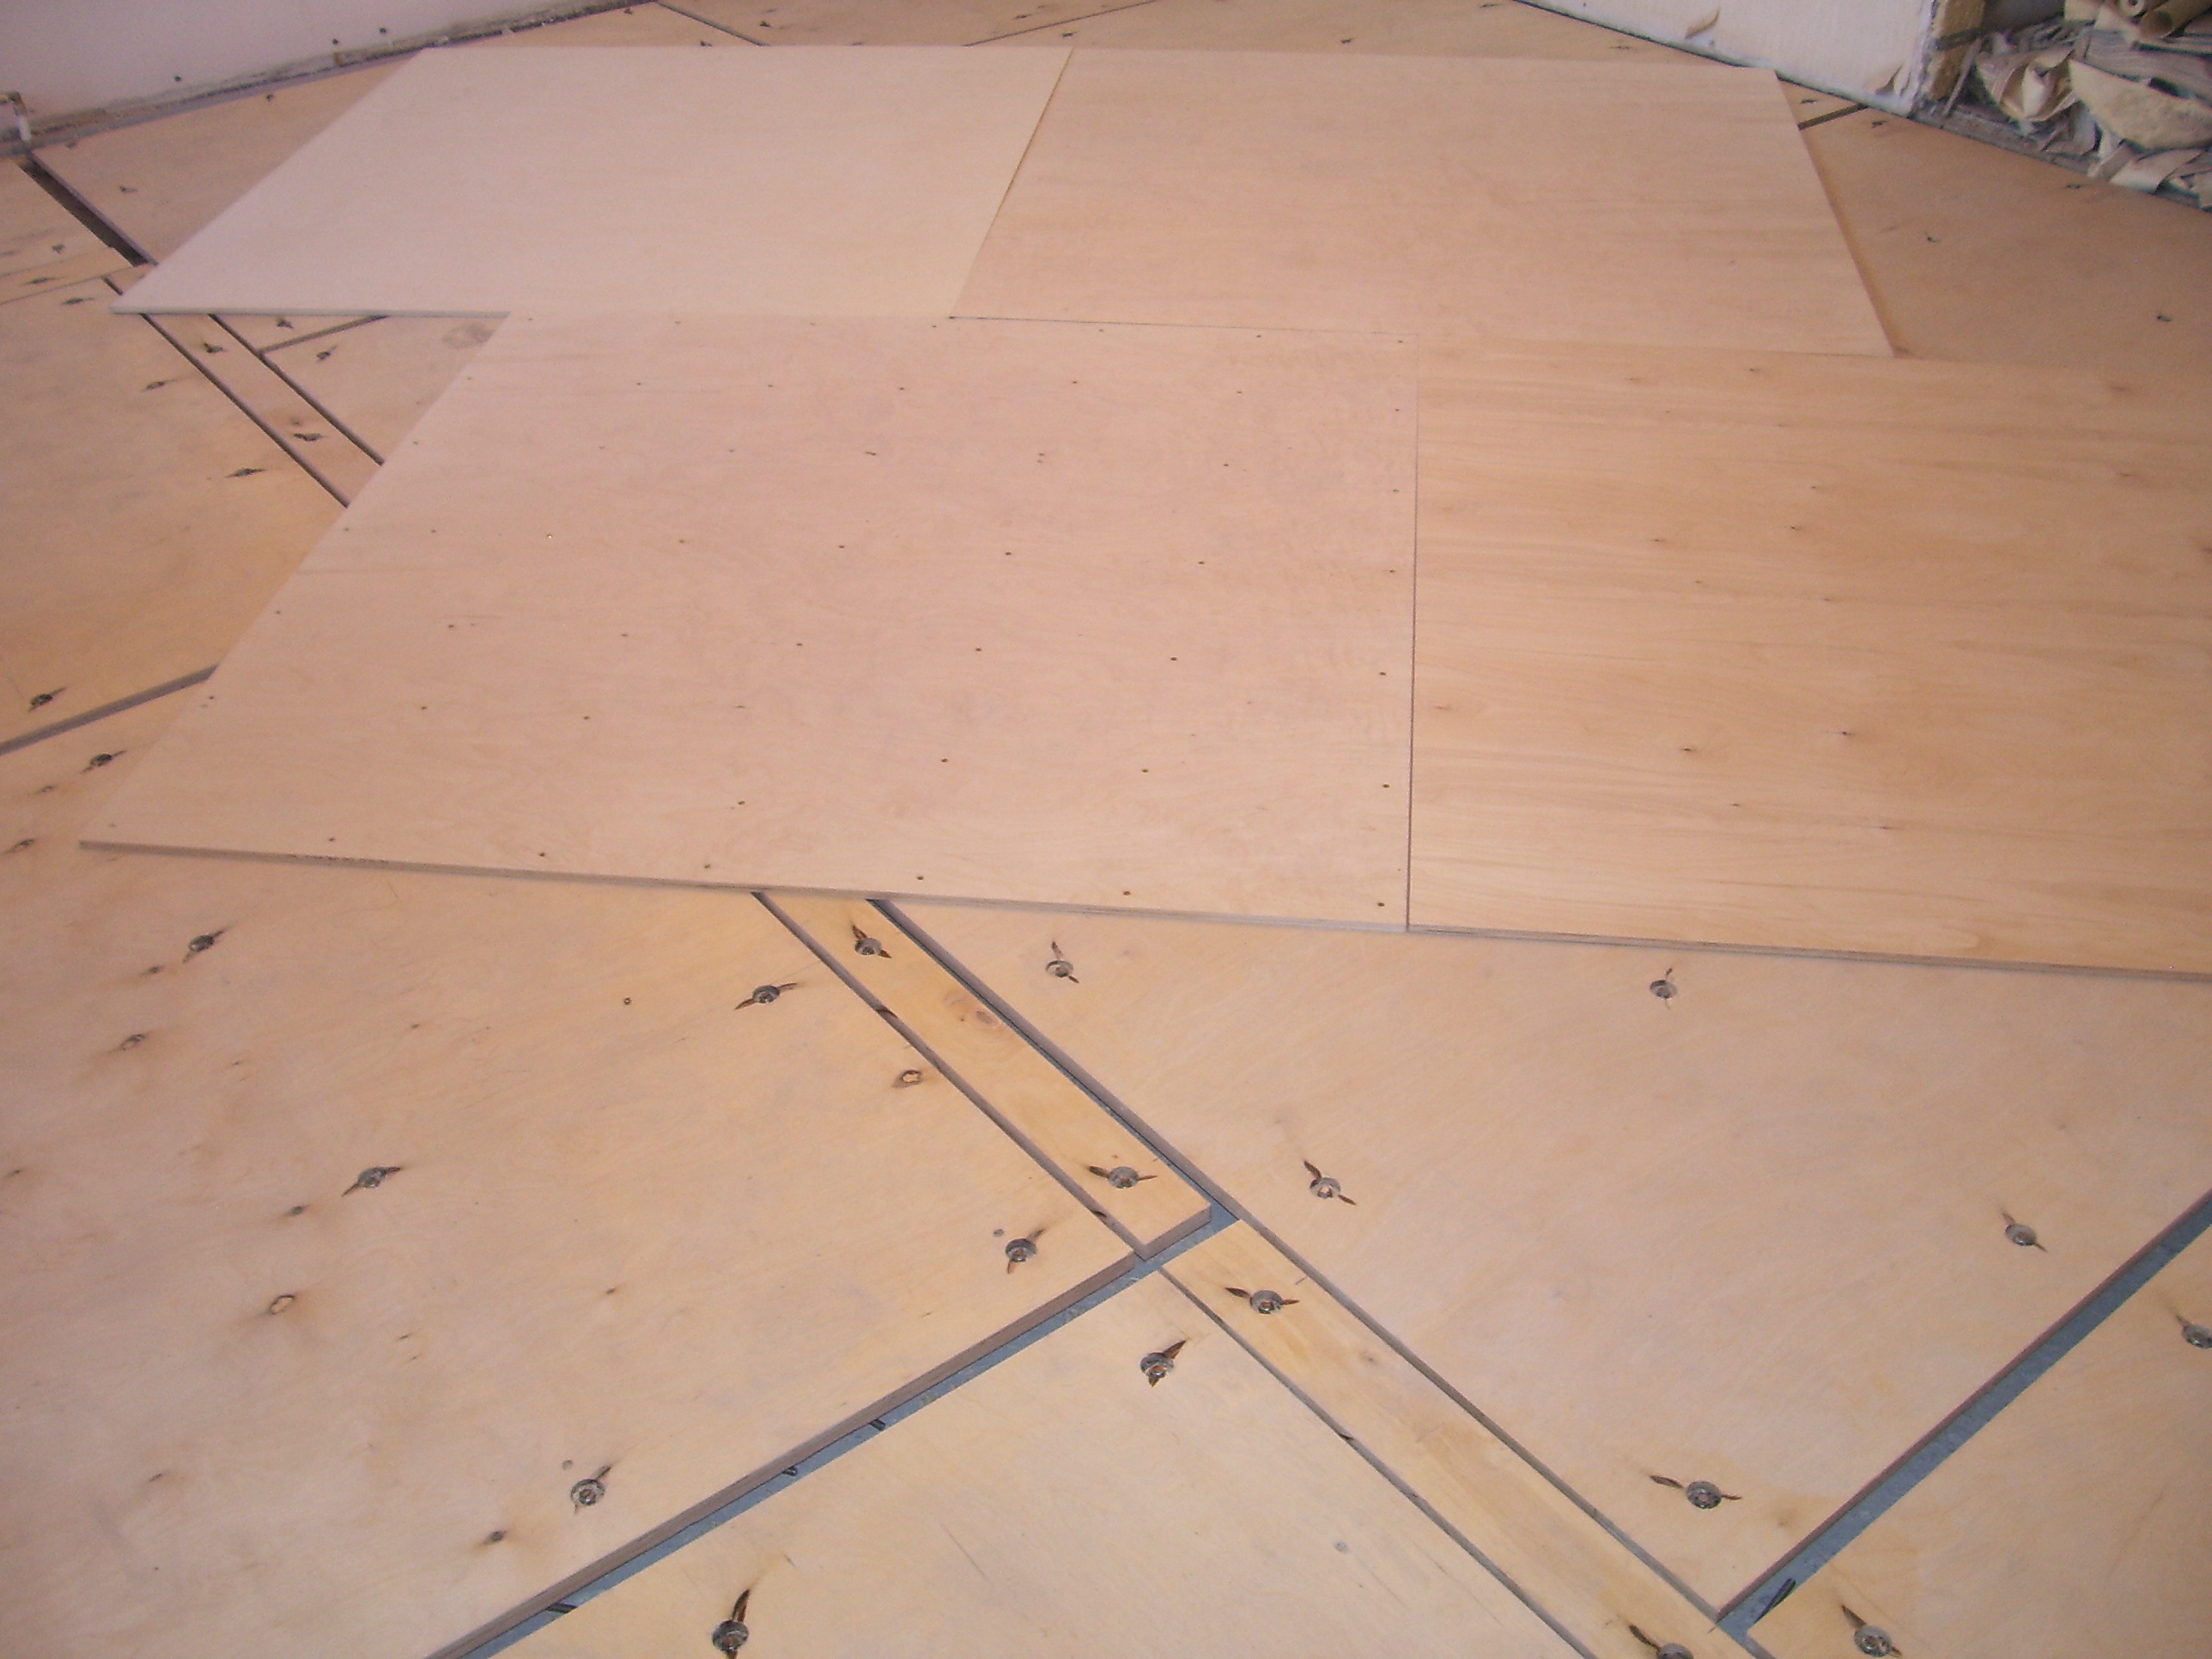
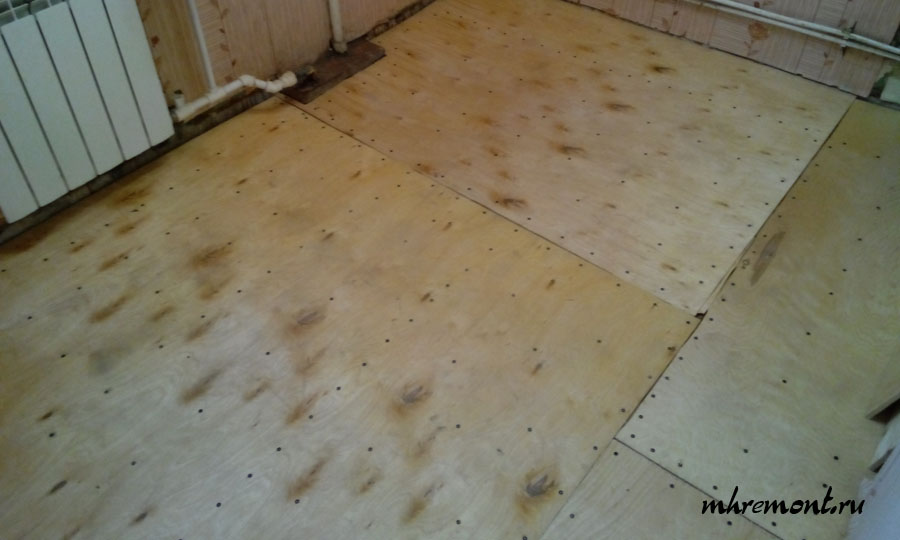
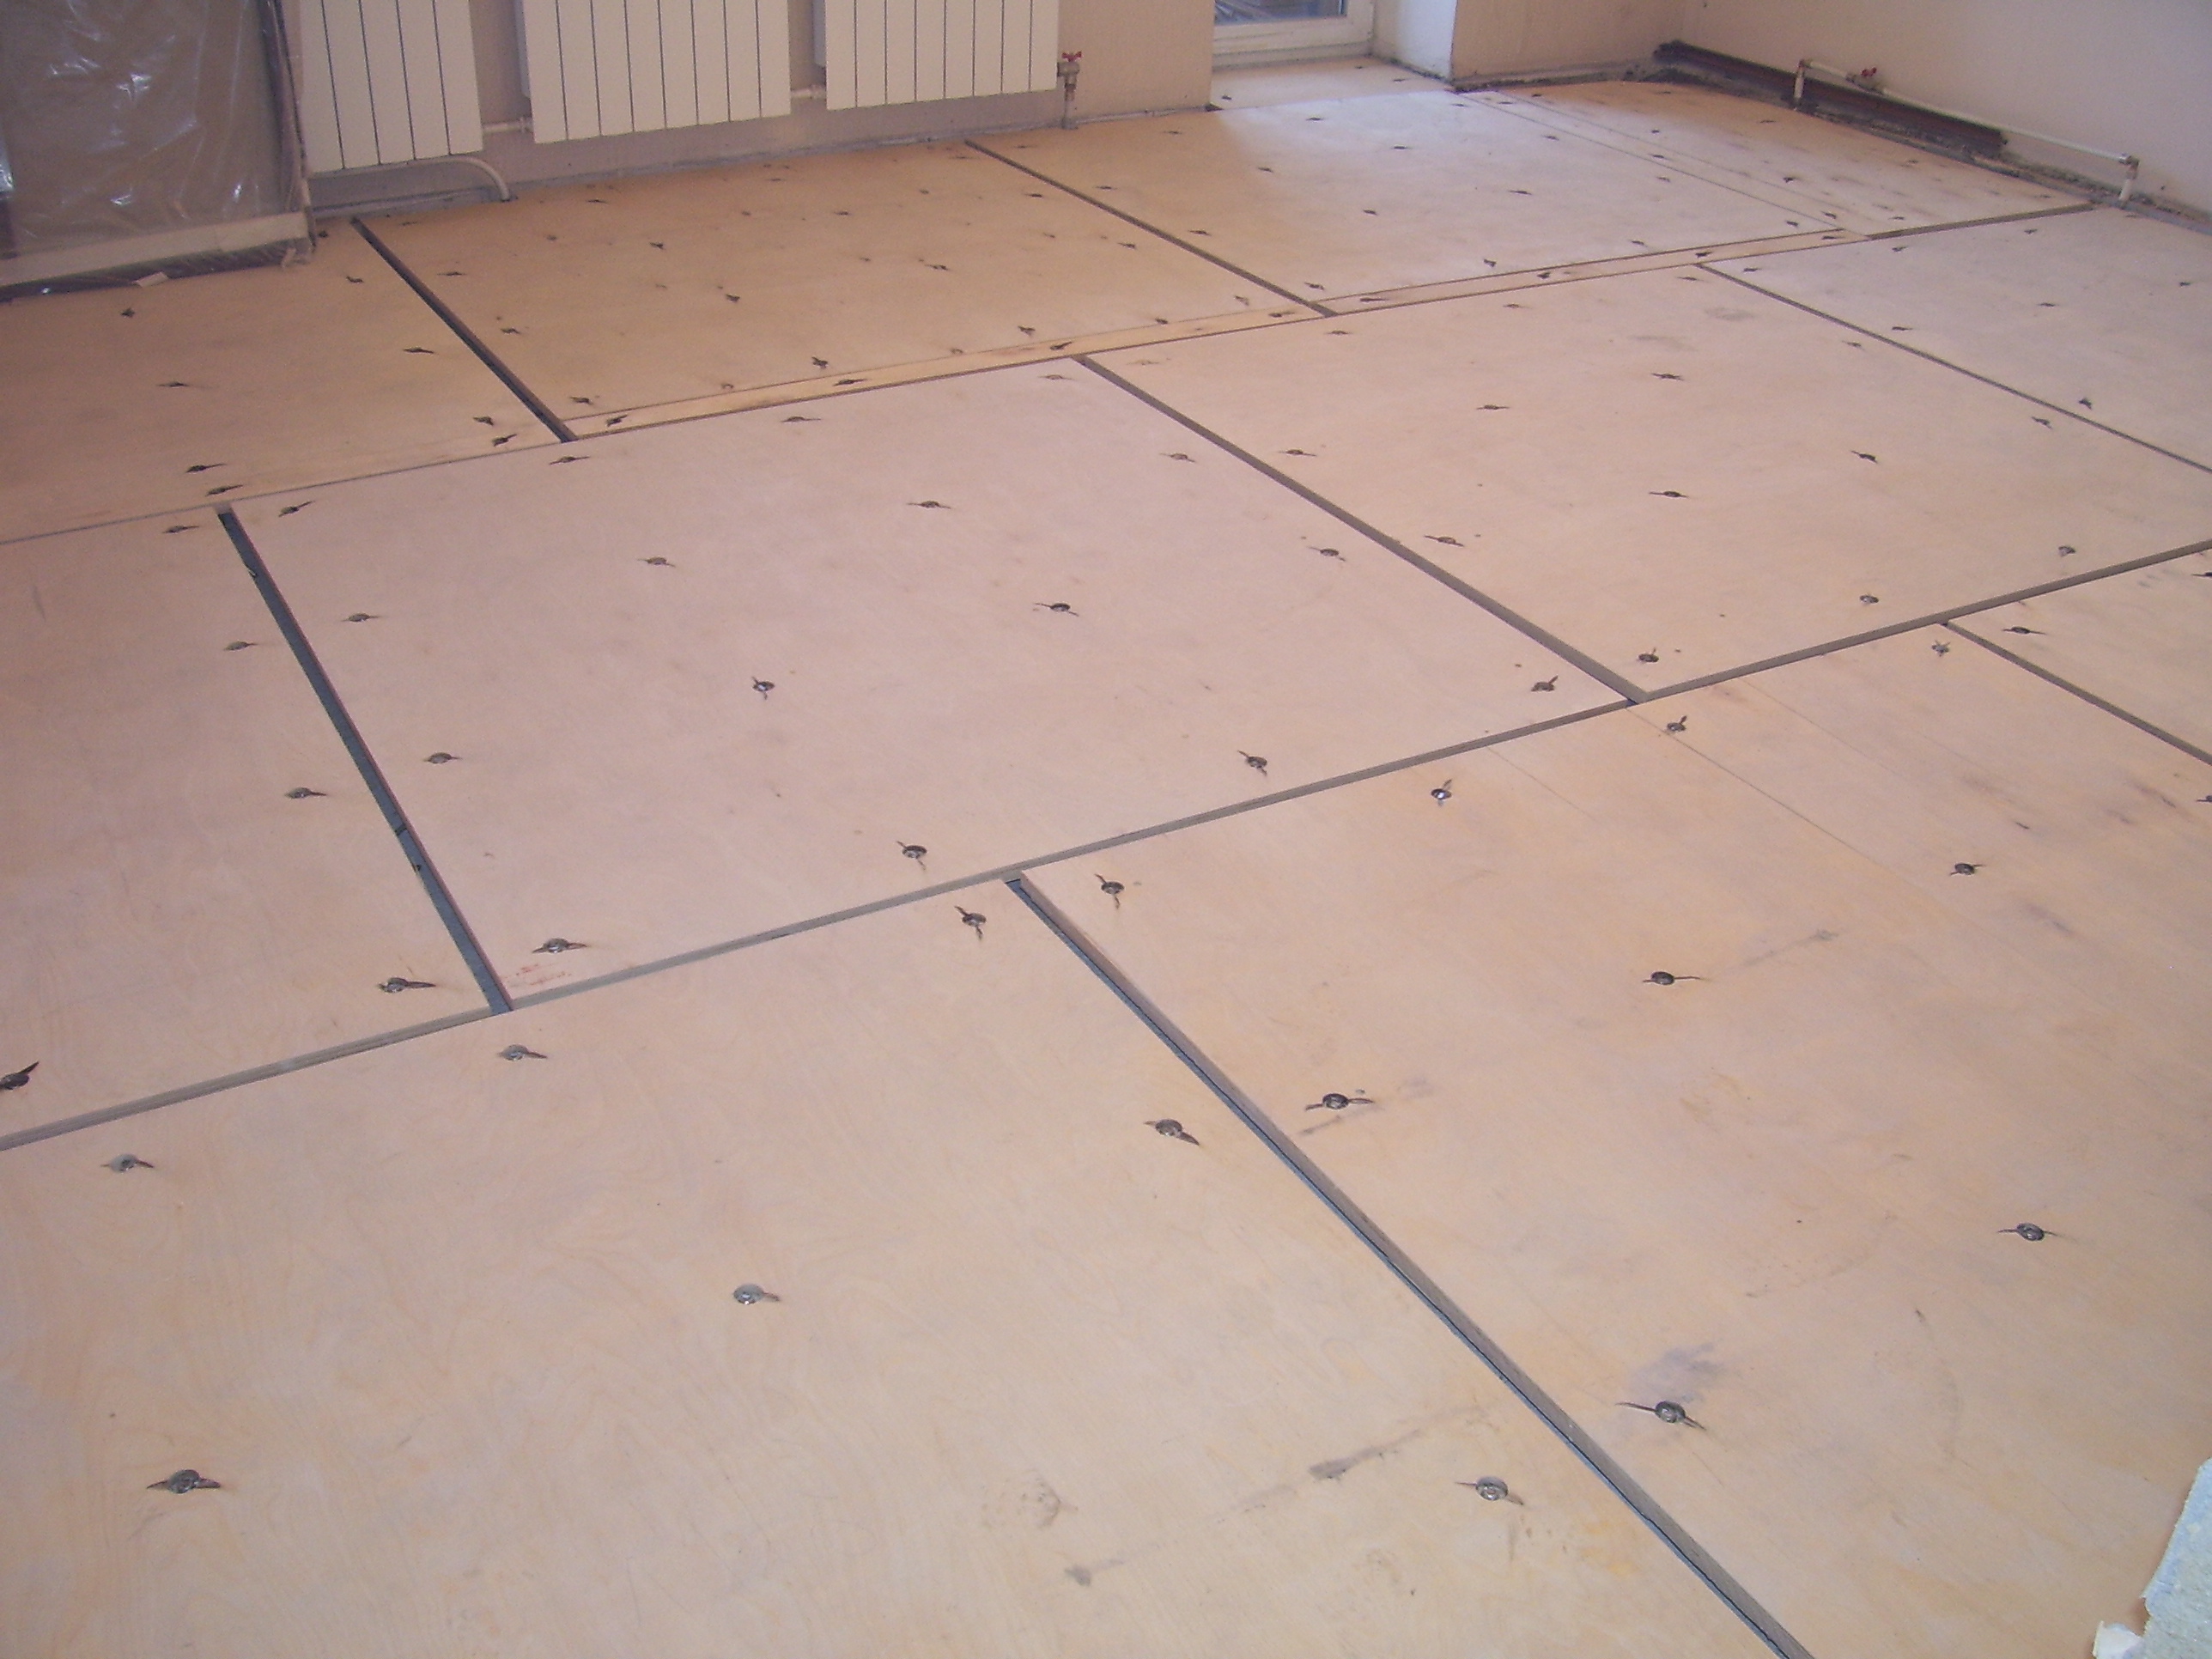
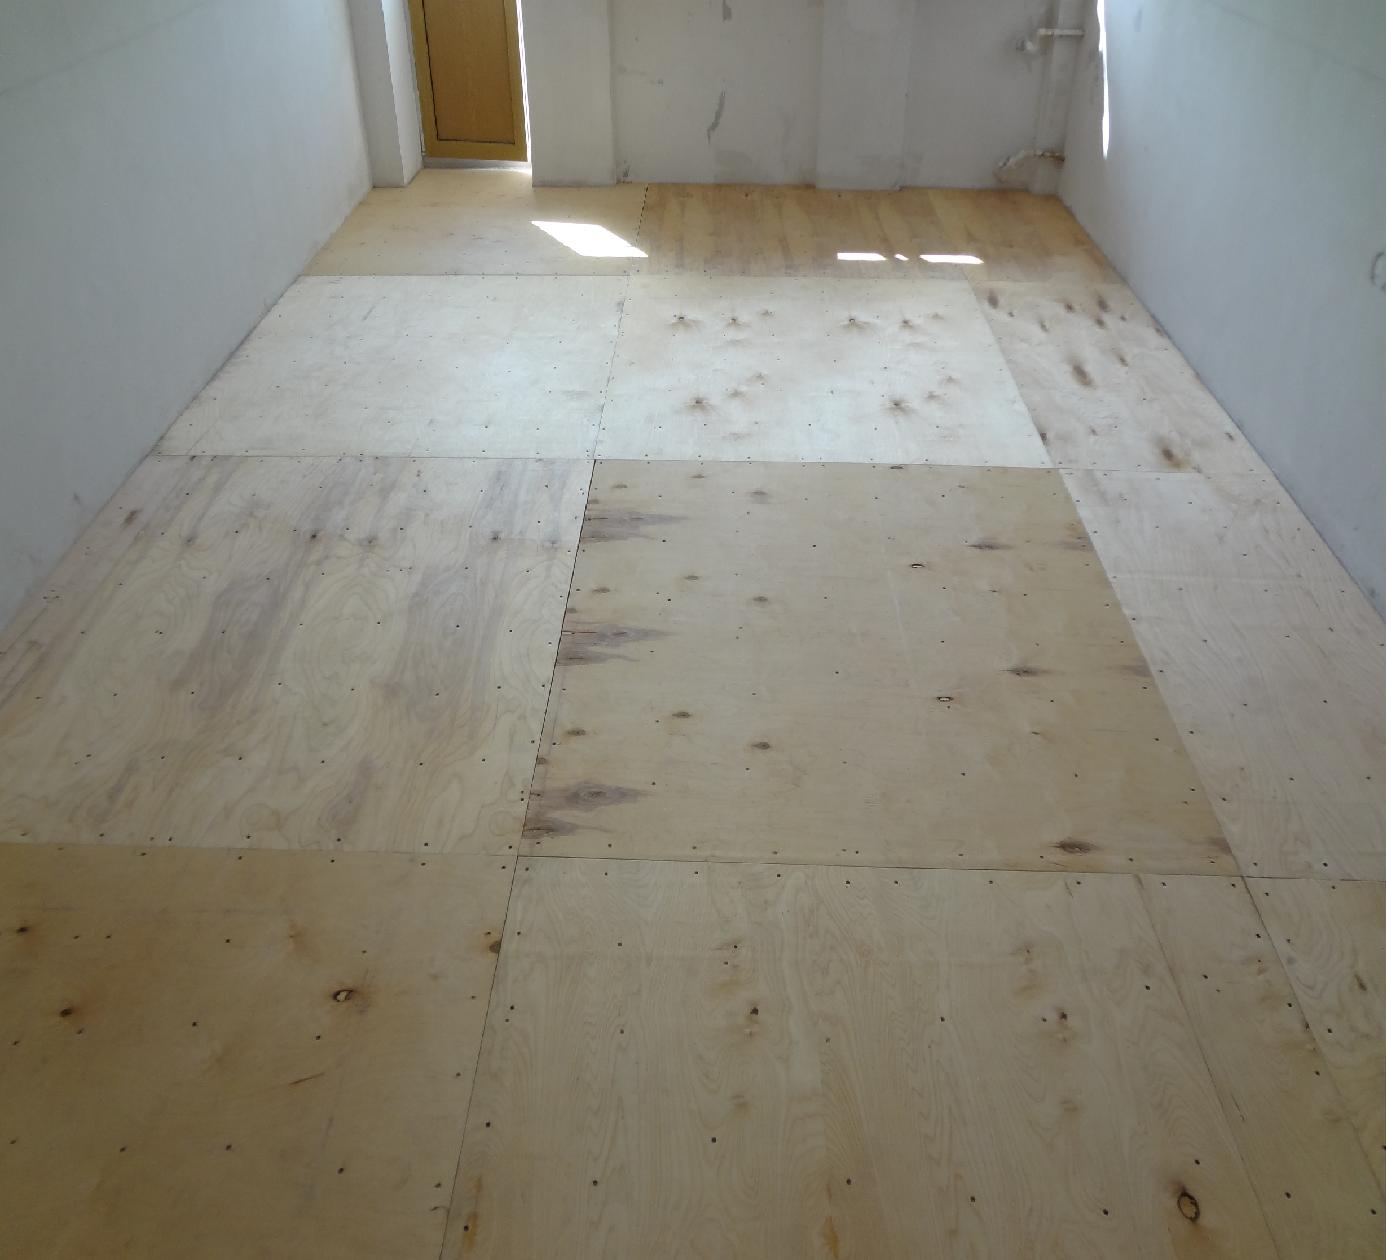
 Finished plywood floor
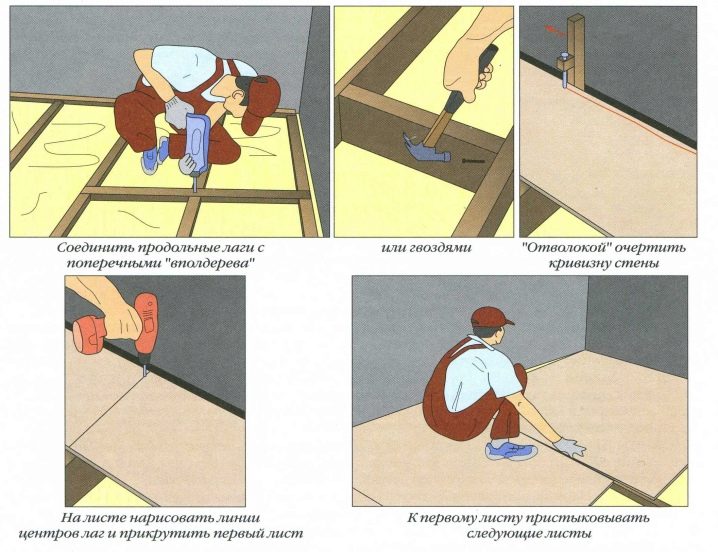
Knowing the simple rules for leveling different types of floors with plywood, you can easily do the work yourself. When laying plywood as a finishing floor, the sheets begin to be mounted from the middle of the room. Plywood must be fastened with self-tapping screws at a distance of at least 2 cm from the edge of the sheet. After the completion of the process, the coating is sanded and varnished.
The creation of a subfloor using plywood does not impose special requirements on the fastening and position of the sheets. If two layers of material are assumed, then it is laid with an offset of the sheets in order to prevent the seams of the upper and lower rows from overlapping. There are a number of methods for laying plywood sheets on concrete or wood floors.
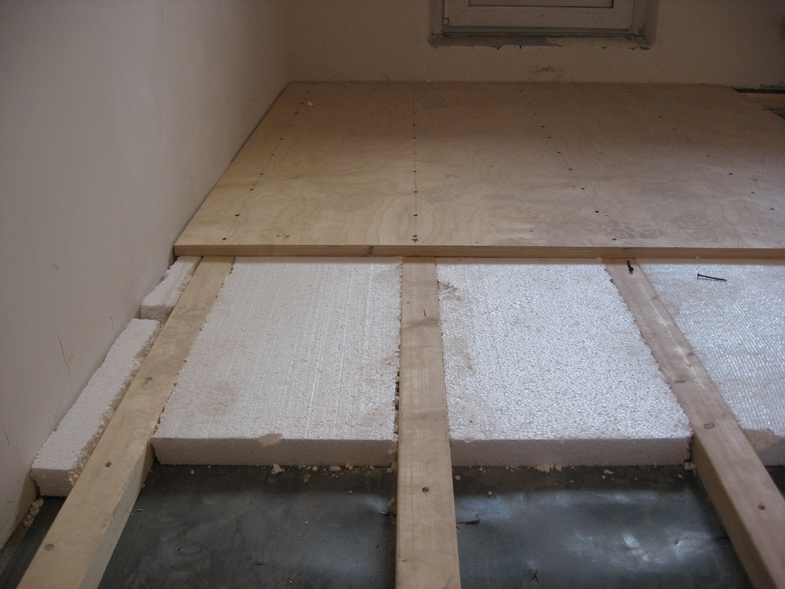
Leveling the floor without logs
 Laying sheets without lag
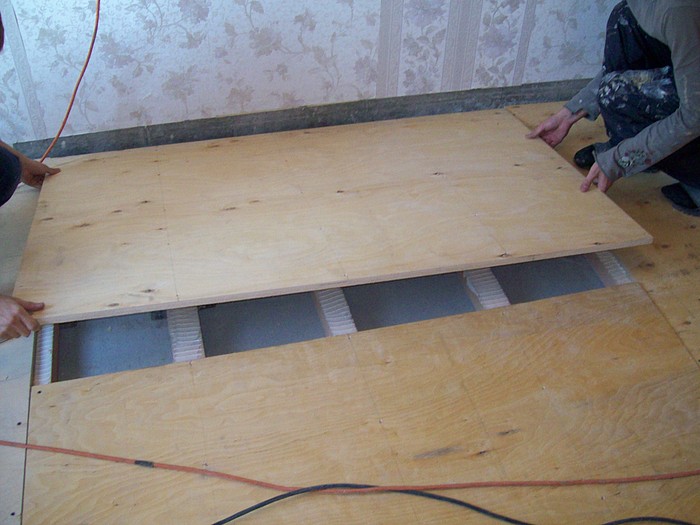
It happens that a concrete floor requires not only leveling, but also insulation. For this, the option without the use of a log is suitable, which is considered one of the simplest ways to level the floor with plywood. Working with plywood material begins only after it has been kept in a room for several days to get used to the conditions of the room.
The base for laying and the plywood sheet is treated with an antiseptic before laying it. To create the gap required by technology, bars are placed around the perimeter of the room.
 Sealing seams and irregularities
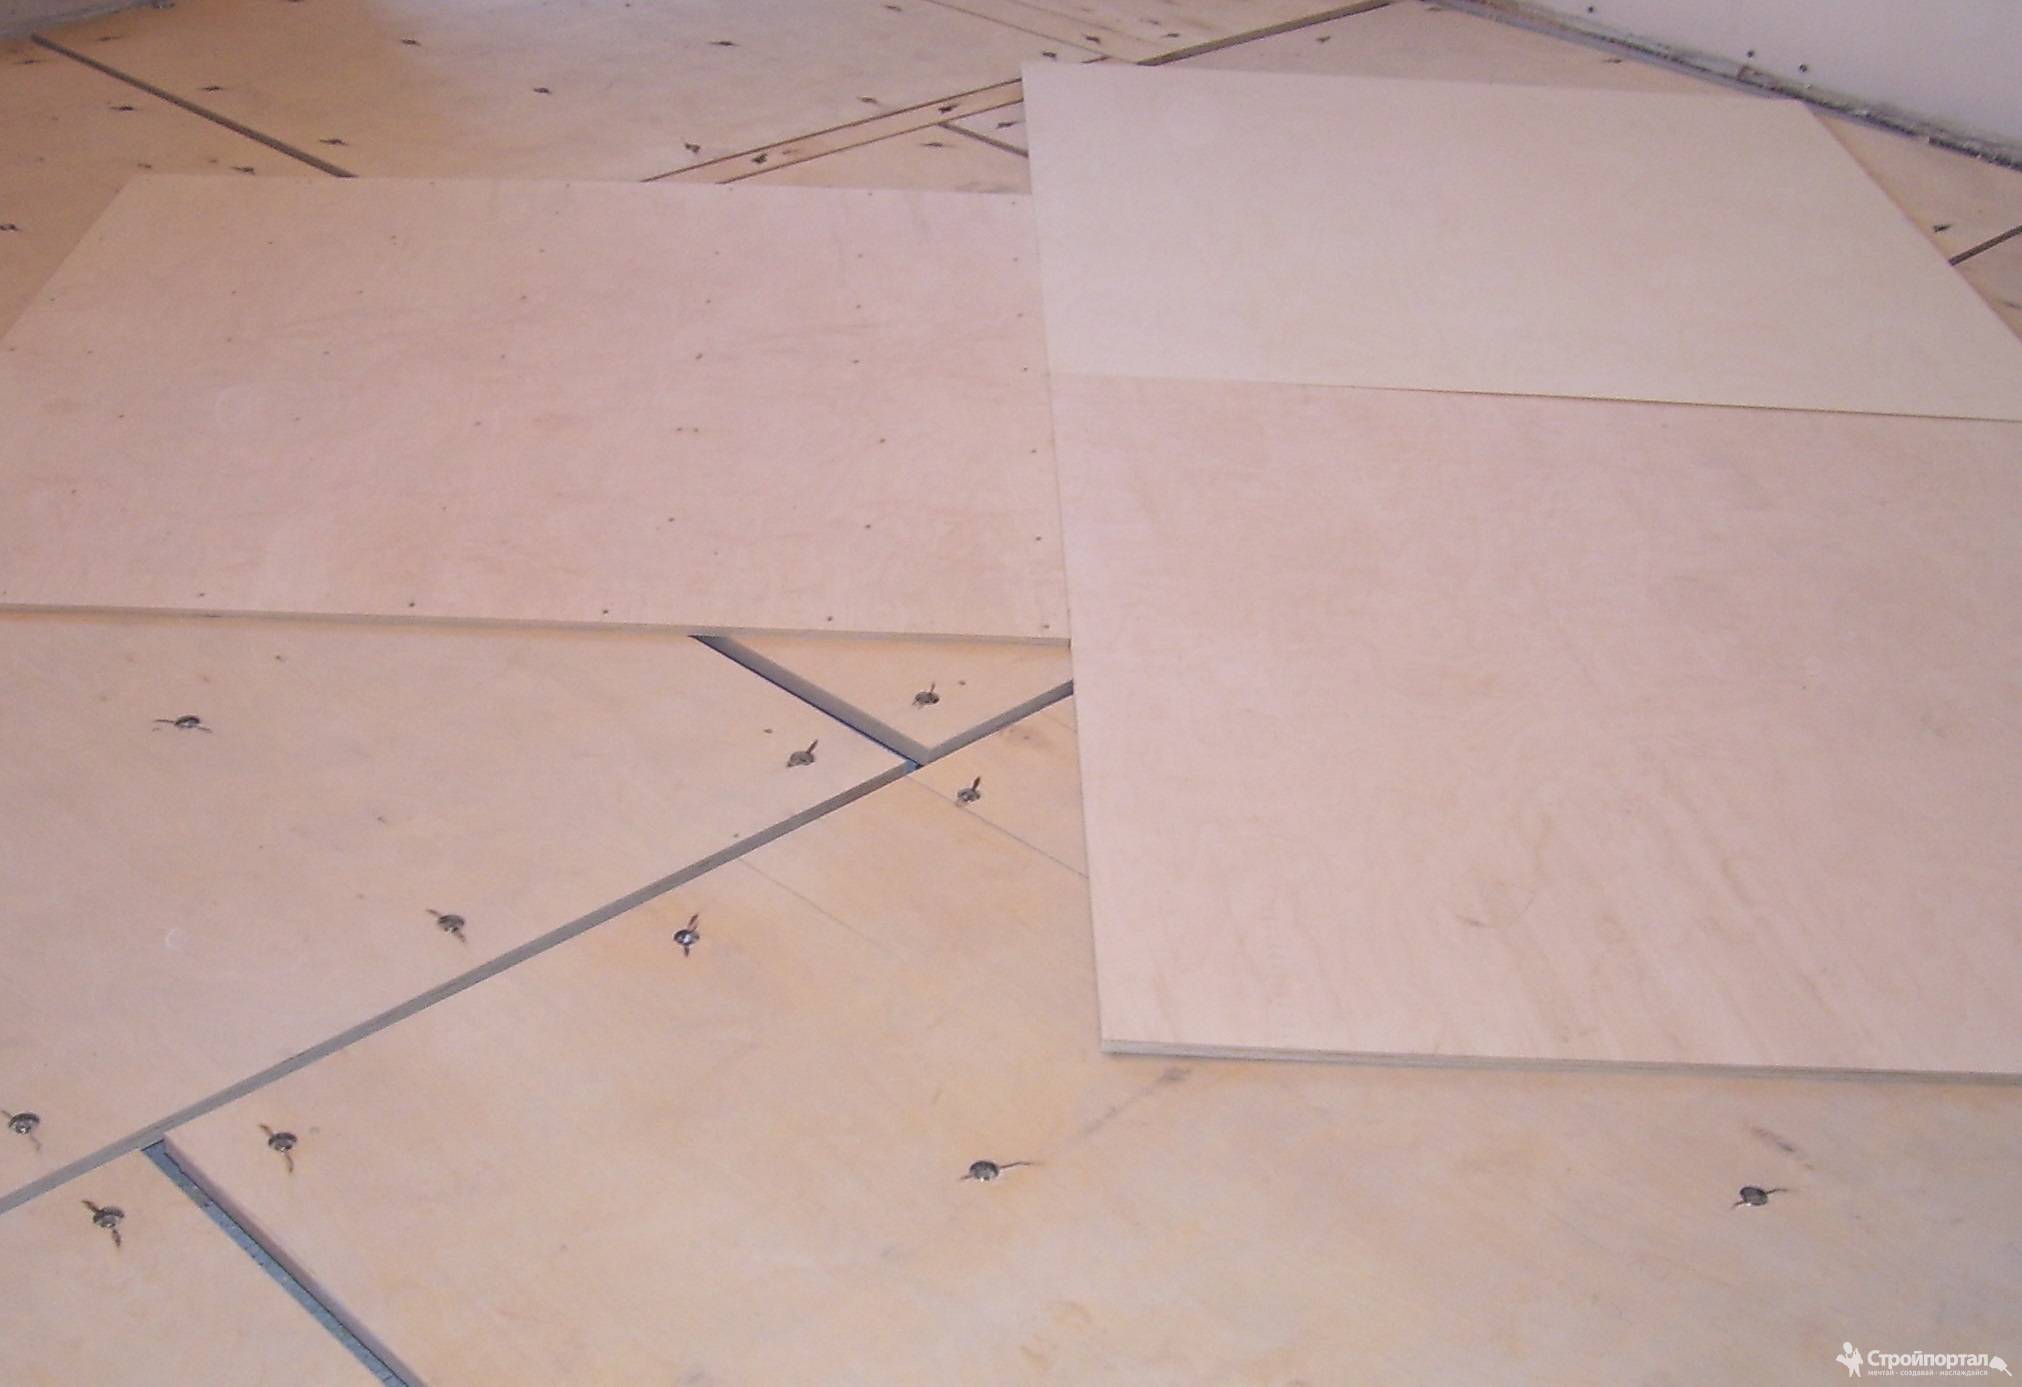
The arrangement of plywood sheets on the floor is carried out so that they are offset relative to each other (as when laying bricks). The material is fixed with screws evenly along the protruding points of the plywood.
All fasteners and seams are covered with a sealant, after which the surface is putty.
For a wooden floor that is not loosened and in good condition, you can also use plywood leveling without using a log.
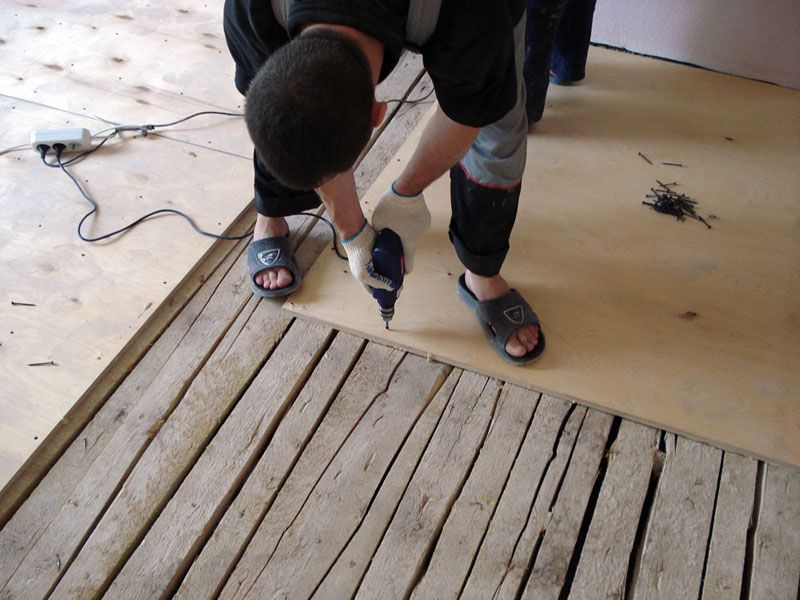
 Fastening with self-tapping screws
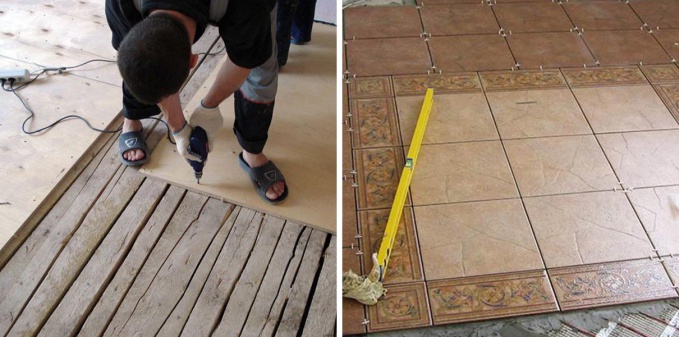
A floor made of wooden planks is treated with a sealant or putty. It is leveled with sand or sawdust mixed with resin. A vapor barrier film is laid on top, on which plywood is already laid out.
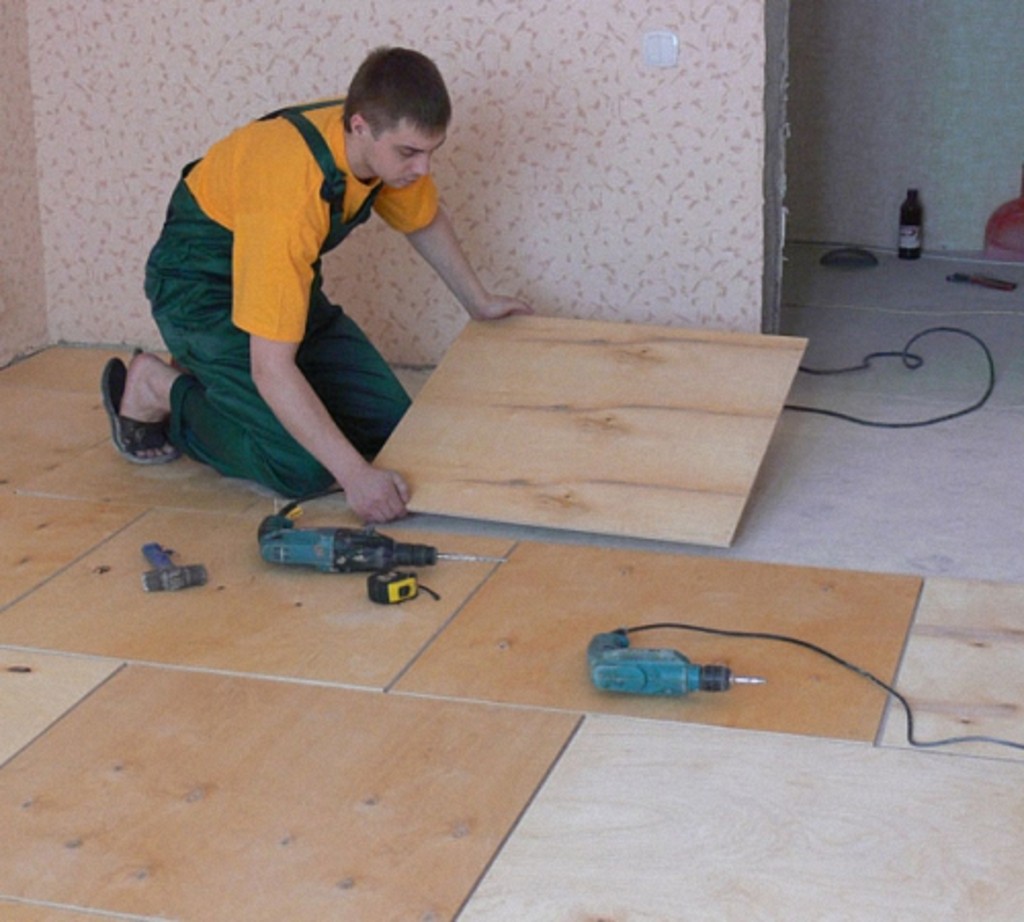
In order to prevent the plywood from protruding above the coating after fixing the plywood with screws, the holes are applied in several approaches. First, a hole is drilled to the size of a self-tapping screw, and then it is processed so that the screw head is level with the surface of the plywood sheet.
Leveling the floor with plywood on a strip support
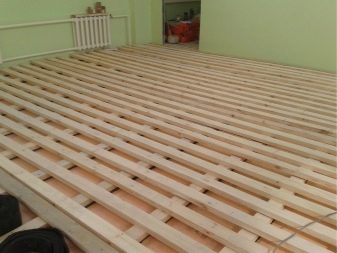
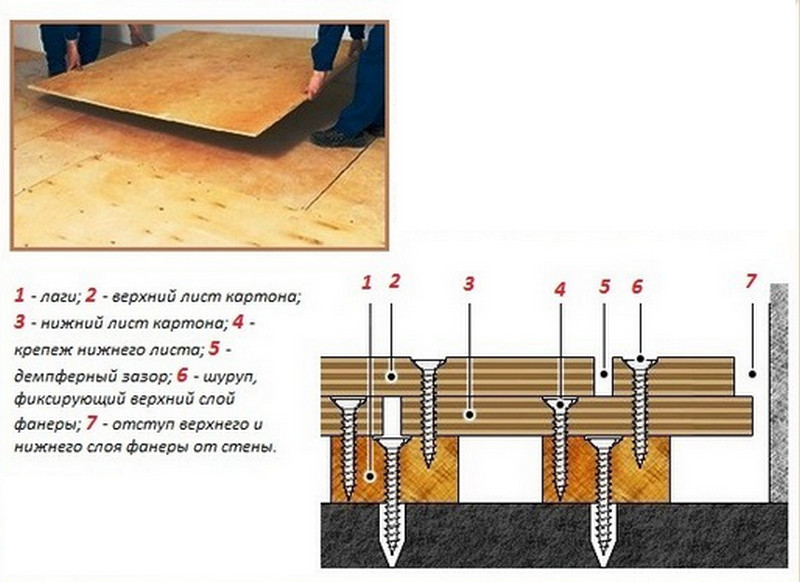
 Laying on logs
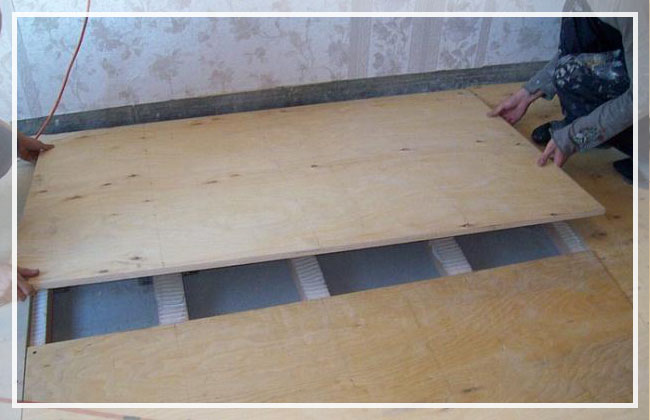
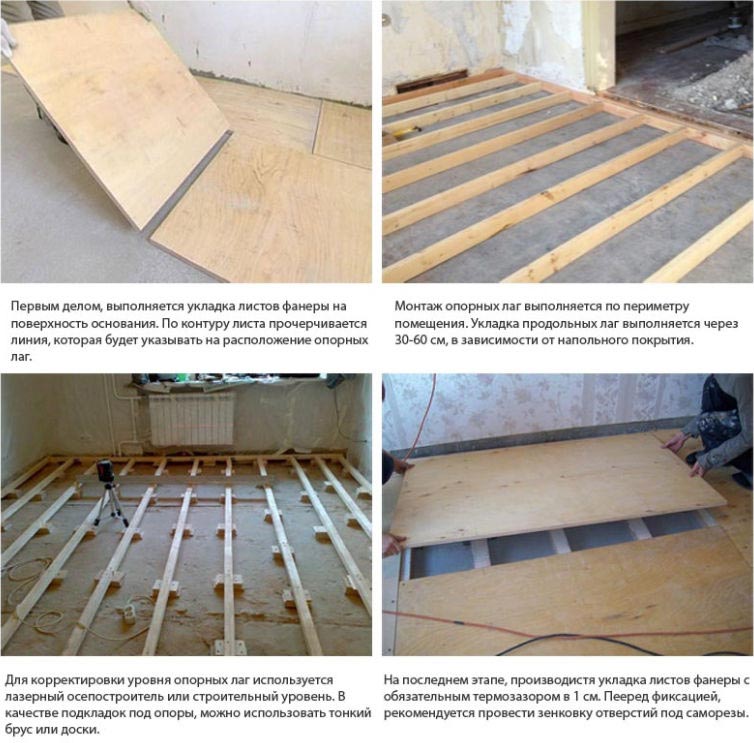
Leveling the floor with plywood on a strip crate can be used for laying under laminate, tile or linoleum. Such a support is created using square bars and plywood sheets. The logs are laid with a step of 30-50 cm, and with an indent from the walls at a distance of 20-30 mm. The transverse bars are fixed to the logs in a checkerboard pattern using screws. To give rigidity, you can fix them with metal corners.
To create sound and heat insulation between the crate, wood chips are poured mixed with glue. This mixture dries for 2-3 days. You can also use expanded clay or mineral wool for backfill.
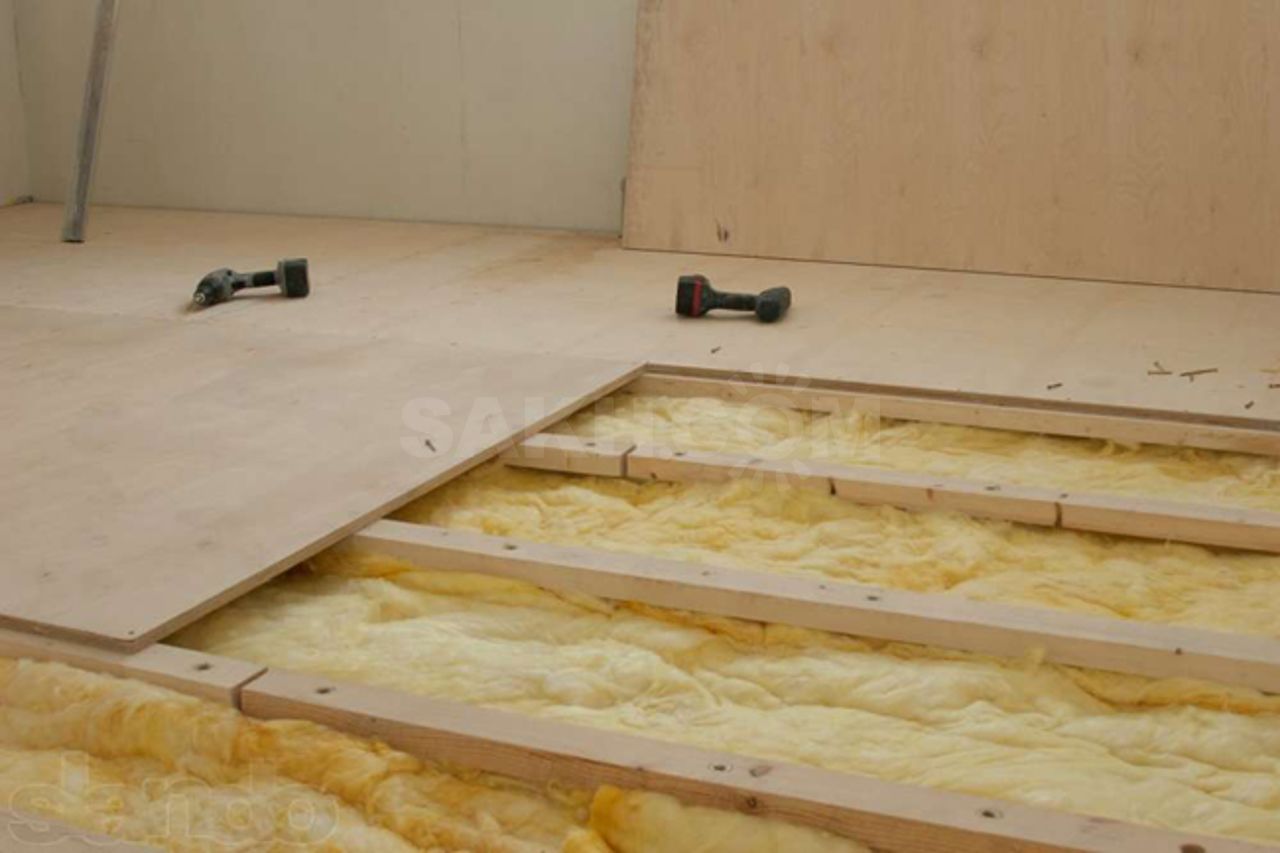
 Laying between the lag of the insulation
Plywood is attached to the support with self-tapping screws. After that, you can install any floor covering.
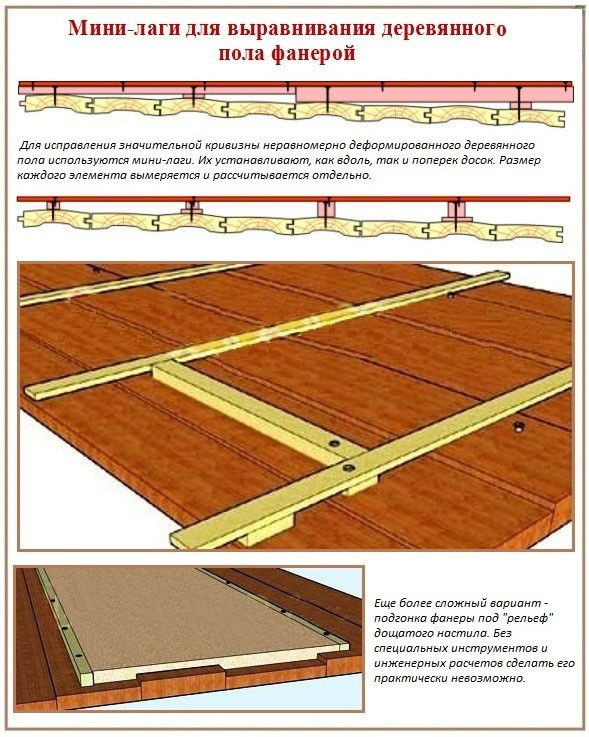
Mini-lag alignment
The method of leveling the floor with plywood along mini logs is selected when there is a slope, or the surface difference is up to 8 cm.
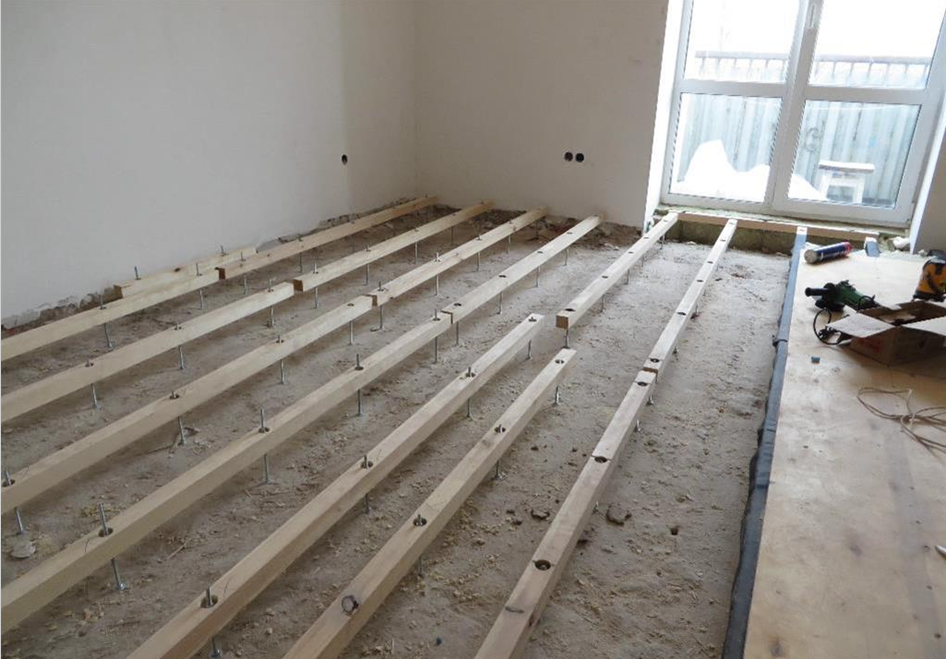
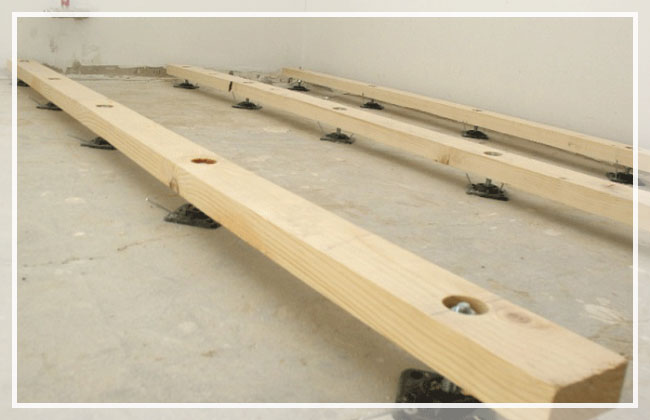 Adjustable lags
The surface of the floor is marked out for the installation of beams and underlays, which create the ideal structure for laying plywood sheets. This work requires careful calculations of the height of each support element with floor markings and preliminary fitting.
With such a flooring, all structural elements will be of different heights. Working in this way is not difficult, but requires a painstaking approach.
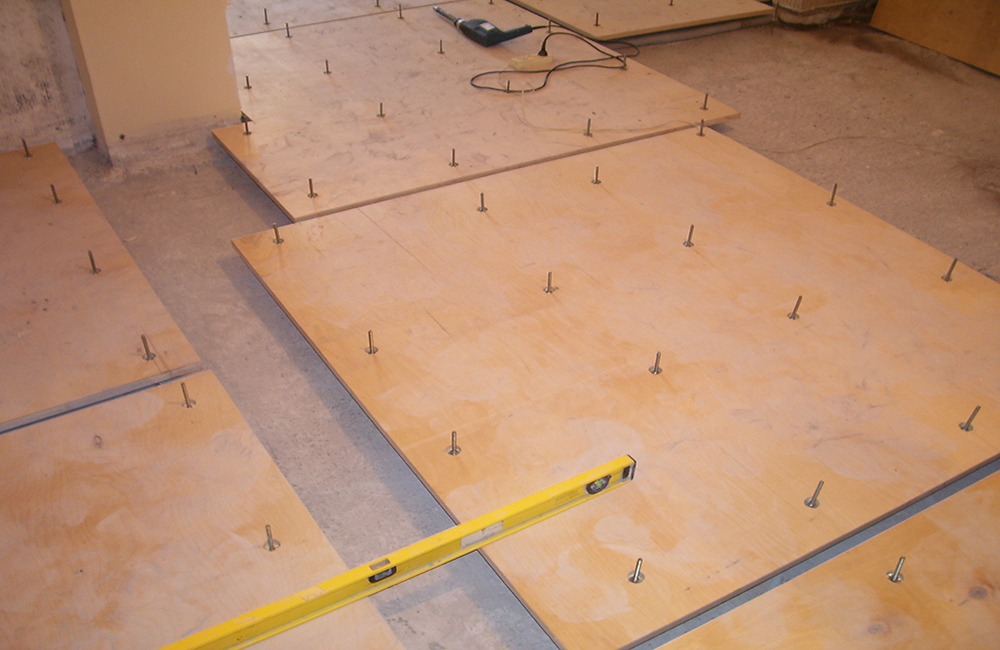
By point supports
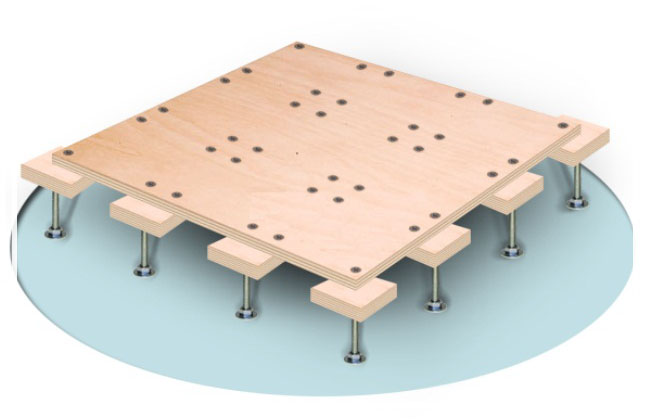 Laying scheme on point supports
This method of alignment requires the presence of supports, self-tapping screws, two layers of plywood and glue.
First, sheets are laid out for marking and numbering on the base. The sheets are removed and the height of the finished floor is marked on the wall.
Then threads are pulled across the room, which will show the height of the finished floor. Next, point supports are installed. As a result, a grid of supports will turn out, which are located at a distance of 30-45 cm from each other. This method is inferior in reliability and stability to alignment with a tape support.
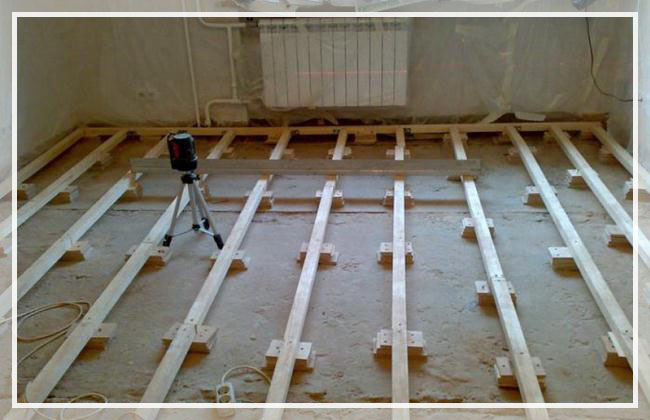 Lag alignment
After checking the height of the supports with a level, fix them to the base of the floor. Then we level the floor with plywood, laying and fixing the sheets on the supports.
Installation of plywood covering
It can be broken down into such stages.
- Cutting the material. Before it starts, measurements and calculations are carried out. Sawing of sheets should be carried out in such a way that the result is as few joints as possible. In addition, the dimensions of the elements are calculated taking into account the clearances for the damper. Between adjacent sheets, they should be 3-4 mm, between the extreme elements and wall surfaces, the distance increases to 8-10 mm. Damper joints are needed so that the plywood sheets do not swell under the influence of external conditions when the wood expands. The cut should be carried out exclusively on a firm and level surface. For large floor areas, the recommended dimensions of the elements are 500x500 or 600x600 mm.
- The blanks are inspected.If, when working with a jigsaw, the ends are delaminated, they should be sanded.
- The resulting items are numbered according to the intended layout. On the basis of the outline of the layout of the workpieces.
The process of laying itself has a number of subtleties that should be taken into account when laying the elements.
In some cases, a plywood underlay on a wooden floor is required. Almost always, it is located if the room being repaired is located on the ground floor. Separate strips are fixed with construction tape.
Holes for self-tapping screws must be marked and drilled before laying the plywood sheets. At the exit from the workpiece, they are countersinked under the caps, for which a slightly larger diameter drill is used.
Please note: the heads of the fasteners must be sunk into the material so that they are flush with its surface. If they have gone a little deeper, an alignment of the cavity is required, for which building plaster can be used.
First of all, plywood is laid in niches and any kind of protrusions
Then the installation is carried out from the center to the edges.
Ventilation vents are not closed.
At the end of the installation, the level checks the smoothness of the resulting surface. As a final touch, it is looped.
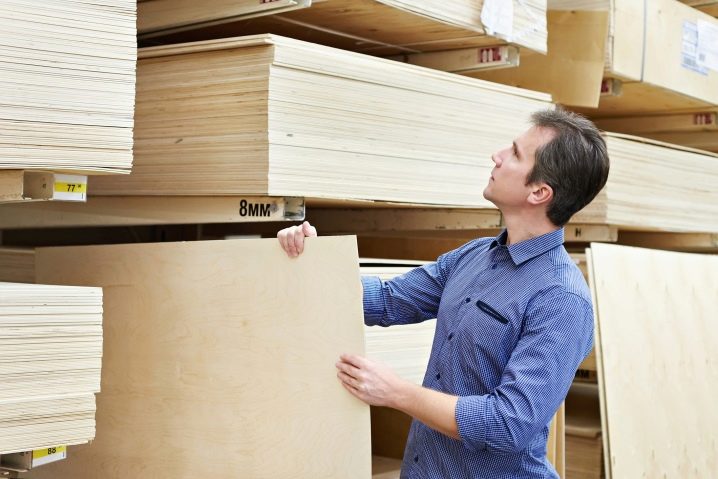
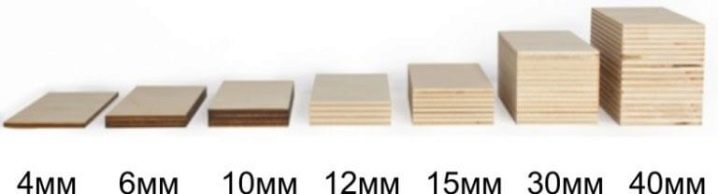
How to buy plywood correctly?
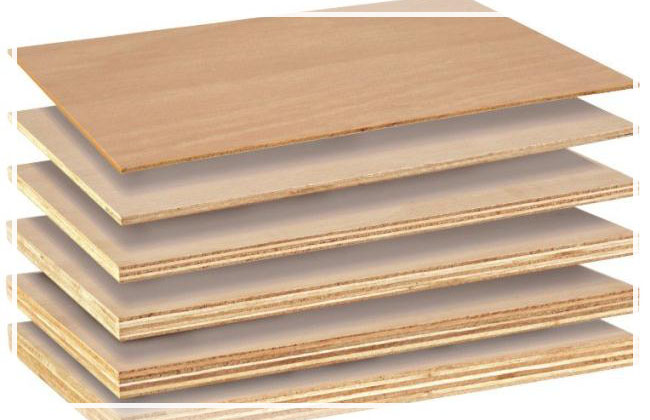 Plywood of different thickness
When buying plywood used for leveling, the following parameters should be taken into account:
- Brand;
- Class;
- Variety;
- Thickness;
- Material manufacturer.
Depending on the type of premises, preference should be given to different brands. For residential premises, preference should be given to the FC or FSF brands. Such plywood is safe, since there are no phenolic compounds in the composition. For wet rooms, it is preferable to choose FSF brands. Such plywood is moisture resistant and resistant to mechanical stress.
 Difference of plywood by grade
The grade of plywood indicates the level of emission of free formaldehyde particles into the air. There are two classes:
- E1 contains 10 mg of formaldehyde in 100 g of wood material;
- E2 contains 30 mg of formaldehyde in 100 g of wood material.
For living rooms, it is preferable to buy E1.
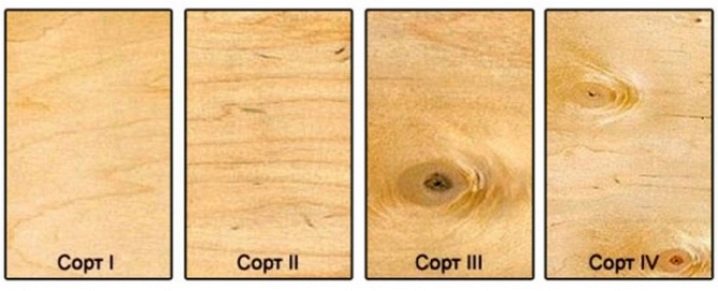
Plywood is produced in 4 grades. Grade 1 material is high quality plywood. The fourth grade is a material with a large number of flaws, chips and knots. Professional craftsmen recommend using grade 3 and 4 plywood for rough flooring. For the main floor, grades 1 and 2 are preferable.
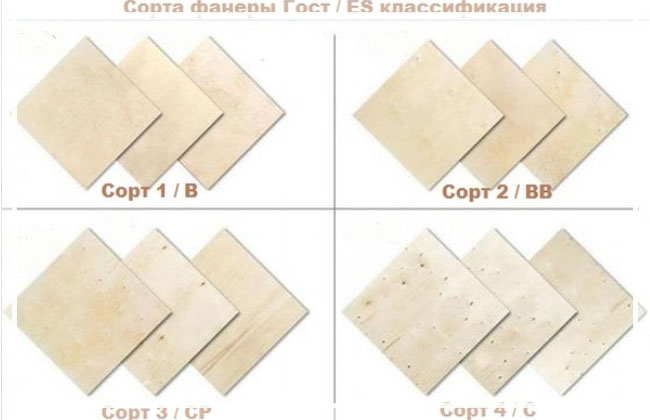 Varieties and classification
The thickness of the material is chosen depending on the leveling method, the curvature of the floor and the covering to be laid on top. The creation of a sub-floor for laying linoleum and carpet allows you to choose a material up to 10 mm thick. For laminate or parquet flooring, a plywood thickness of at least 12 mm is required to level the floor.
The manufacturer determines the quality of the plywood. European manufacturers guarantee the excellent quality of the material produced. But the sheets of Chinese production do not always meet the requirements of the consumer.
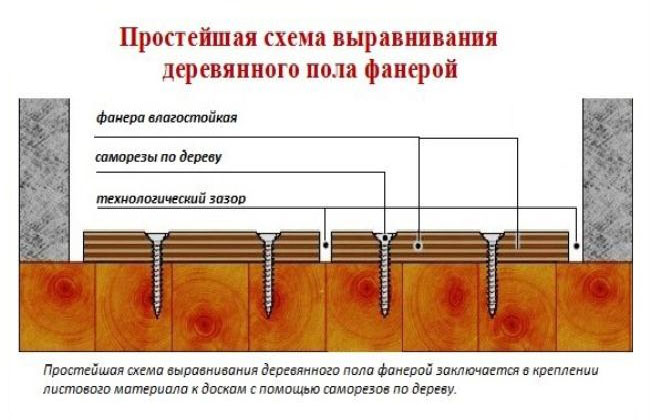 Floor leveling scheme
Plywood can also have a sanded or non-sanded side. If it is used as a subfloor, then it is laid so that there is a surface at the top without grinding. This will ensure good contact with the finishing material.
When using plywood as a finishing floor, the top layer must be sanded for subsequent opening with varnish.
Peculiarities
To choose plywood for leveling the floor, you need to understand the features and classification of the material on the market. Plywood varies in grade, thickness, moisture resistance and material of manufacture.
There are 4 types of plywood that can be distinguished visually:
- The fourth grade with defects on the surface, rough, there are holes from knots, since the lowest quality raw materials are used for production.
- The third grade is of higher quality than the previous one and there is less waste on the surface.
- The second grade has slight cracks, smooth.
- The highest quality and most expensive first grade is well polished, all sides are free from defects.
When choosing a variety, they are guided by price and quality. For the construction of the subfloor, plywood of the second and third grades is suitable. According to the processing method, the following are distinguished:
- Unsanded plywood.
- Sanded (one or both sides).
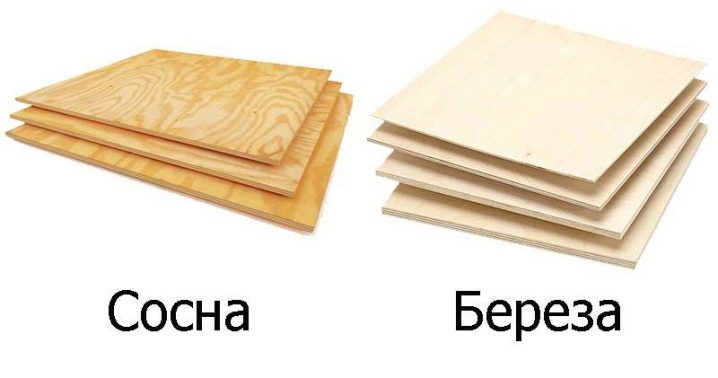
Plywood is made from deciduous and coniferous species of wood (more often from pine and birch). Wooden veneer is held together by natural and synthetic resins. The top layer can be treated with a varnished water-repellent compound.
According to resistance to moisture in residential premises, brands are distinguished:
- FBA.
- FSF.
- FC.
In bedrooms and other living rooms with low humidity, FK and FBA brands are laid, made on the basis of urea and albuminocasein glue. They are environmentally friendly and moderately resistant to moisture.
The thickness of the leaf is determined by the number of veneer layers. An odd number of them are stacked perpendicular to the previous one, creating a durable building material. For subflooring, plywood with a thickness of 10 mm and above is taken.
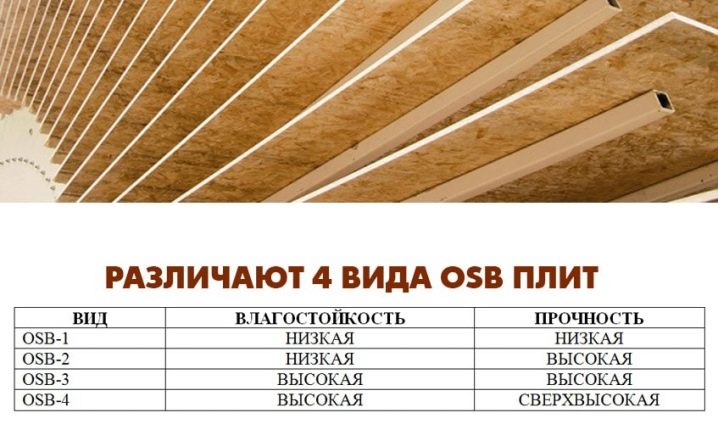
The analogue of plywood in the construction market is OSB - oriented strand board. Such materials have similar properties, but differ only in production. For plywood, wood veneer is used as raw material, and for OSB, wood chips are processed with natural resins.
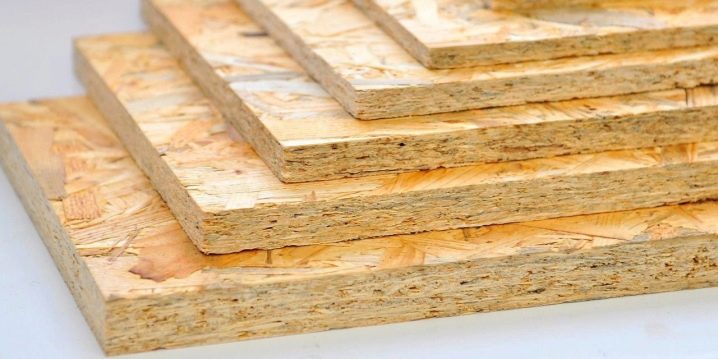
OSB is divided into different categories:
- The first one is suitable for minimal stress and dryness.
- The second is made for low-pass residential premises.
- The third is characterized by high moisture resistance and strength.
- The fourth is used in the construction of walls.
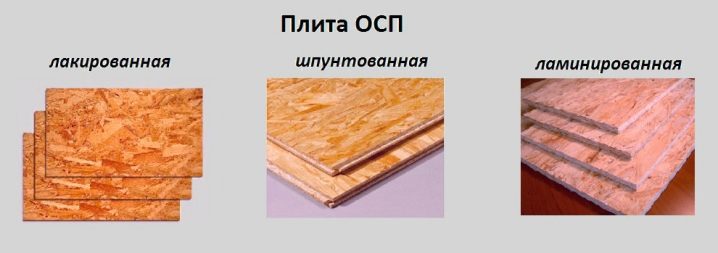
- Varnished or laminated - covered with a protective layer of varnish or laminate.
- Grooved - has a connecting groove at the joints.
The best solution for a subfloor would be OSB 3, grooved and easy to install. Such sheets are produced with a thickness of 0.5 cm to 4 cm.
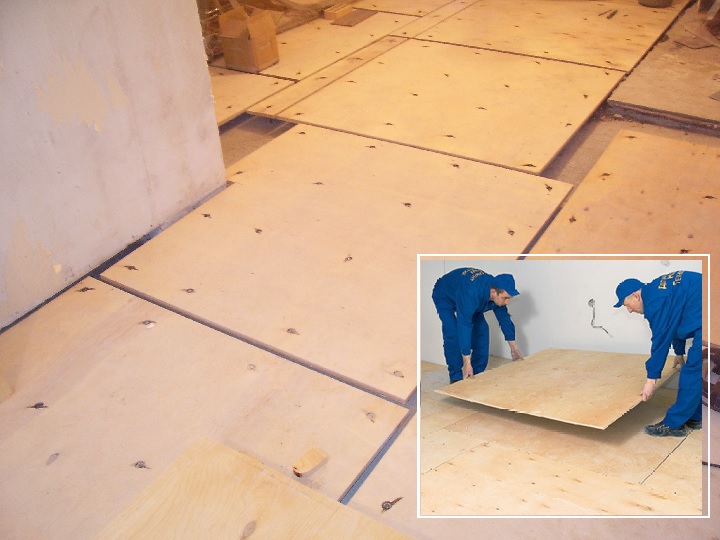
Stage 5. Formatting the sheets
Standard plywood sheets are usually 125x125 cm in size.Here is an example of their installation:

However, many experienced craftsmen consider it necessary to saw them into four more parts to get squares with a side of 60 cm
It is not only more convenient to work with such ones - they end up with much more damper joints at the joints, and this is important to compensate for moisture and thermal deformations. And the sheets themselves will be much stronger, because they are now less susceptible to deformation.
But after cutting the plywood, it is important to pay attention to the ends of the blanks - there should be no delamination in them. If there are any, then just change, the floor will turn out to be of poor quality
If you will be laying plywood in two layers, then divide the future thickness of the flooring by two:
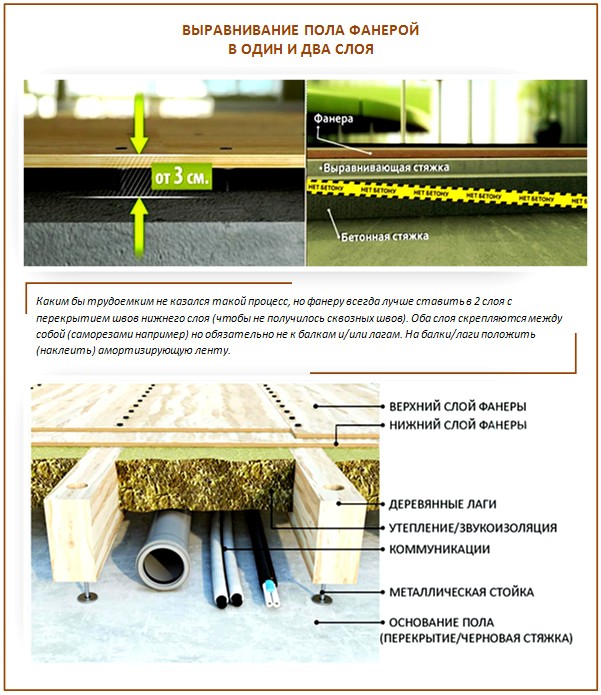
Keep the plywood sheets for several days in the room where you will lay them. Just lay them on top of each other so that no deformation occurs, even better - put them on the edge, if the sheets themselves are not too thin. This is necessary to acclimatize the sheets, but if you make a plywood floor right away, without such preparation, then later the laminate laid on top will go in "waves": the sheets will simply pick up moisture from the air, like everything that stands in such a room, and it will happen natural expansion. The plywood base will bulge and the laminate will lift in places, breaking fragile locks. Needless to say, the finish coat itself will not last long under such circumstances either.
And it is also important how different was the humidity and temperature in the warehouse. So, if the difference is small or the conditions are the same, it is enough to leave the plywood in the room overnight, if the difference is from 2 to 8 degrees - about three days, and with a larger one already - a whole week
Alignment methods
The leveling method depends on the evenness of the subfloor. Differences in height of more than 1.5 cm suggest plywood flooring along the joists. Minor irregularities are covered with plywood directly on the wooden floor.
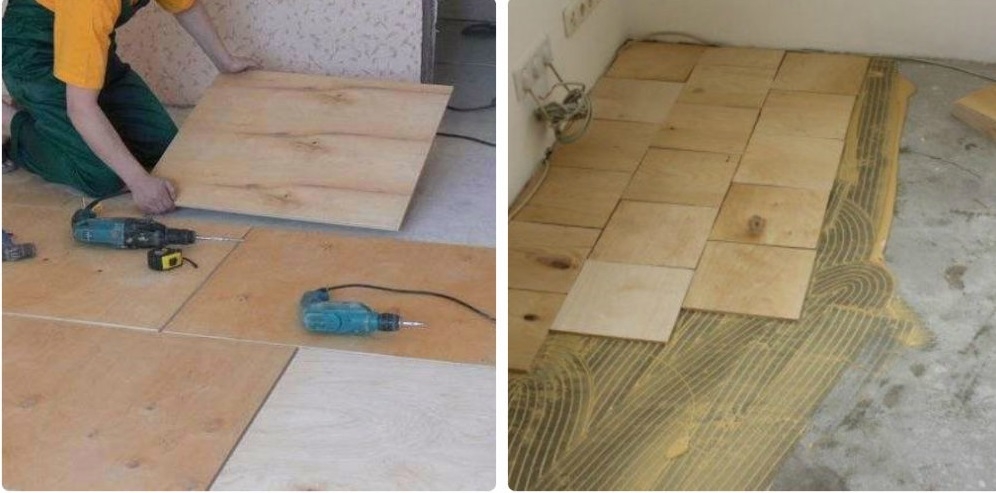
Plywood can be laid on the floor with or without a backing. A roll of lining is rolled out over the entire surface and sealed with tape. Plywood material is spread from above in accordance with the diagram, evenness is checked and fixed with self-tapping screws. In this case, sheets with a thickness of 1 cm or more are needed.
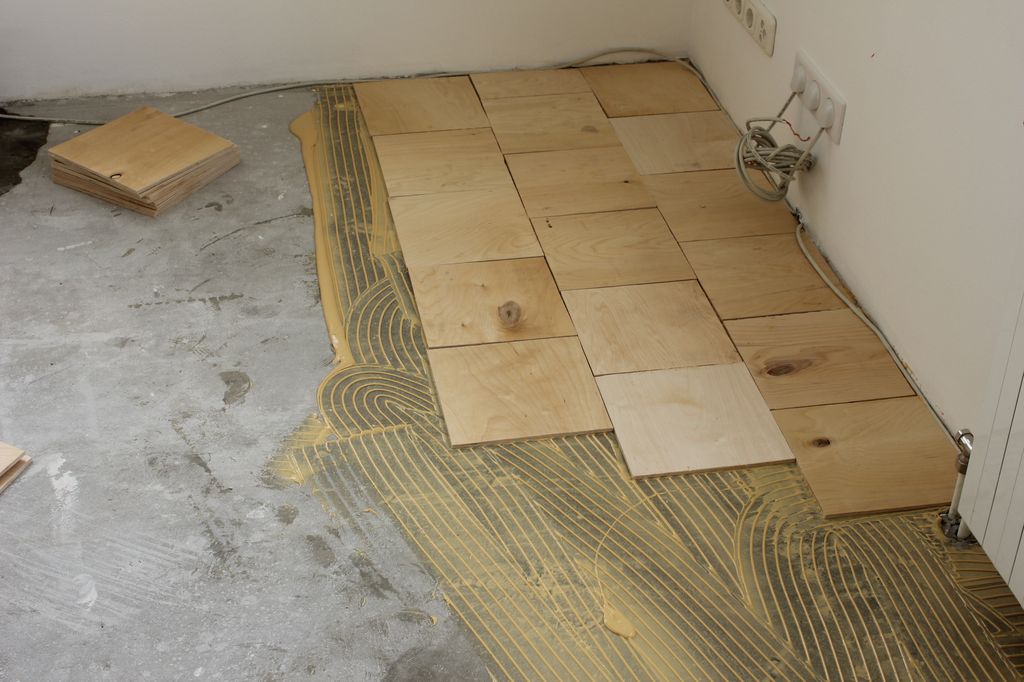
The adhesive method of fastening is used without the use of cushioning material. A small area of the room is covered with 2-3 mm glue, starting from the corner. A sheet of plywood blank is superimposed on top and pressed tightly. Additionally, several screws can be screwed on for better fixation. This method is used to install the rest of the room.
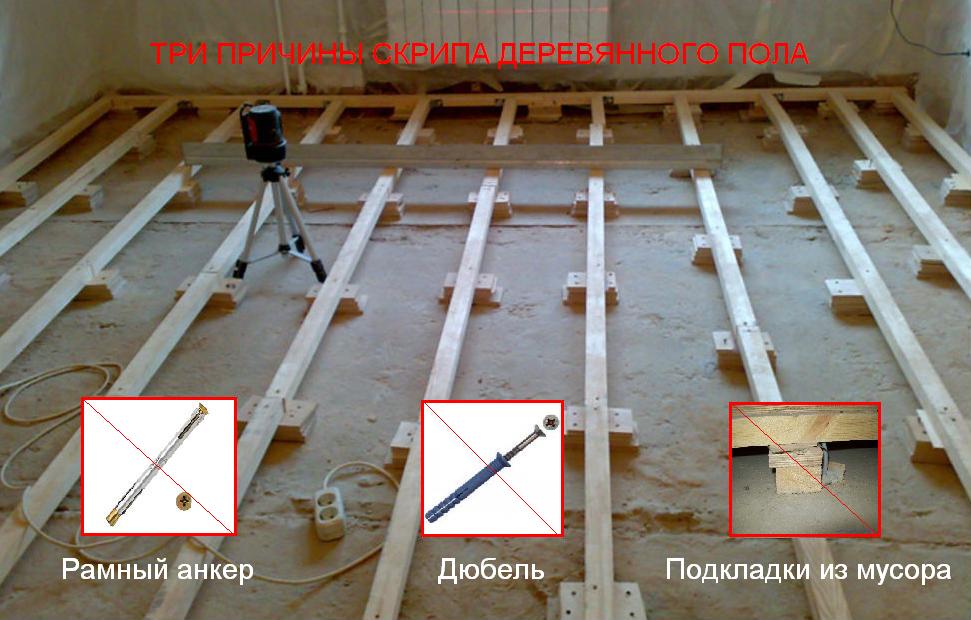
When the plywood sheet does not lie flat, bends, there are slight differences in height with other blanks, supports are used. Anchor points are placed in poorly adjoining places and are fixed through and through with self-tapping screws.
If there is fiberboard on the wooden base, then dismantling is carried out if the material is old, crumpled from moisture, crumbles and exfoliates at the edges. Fiberboard is not recommended to be laid on the floor, since the sheets deteriorate from moisture and have poor leveling properties due to their low thickness.
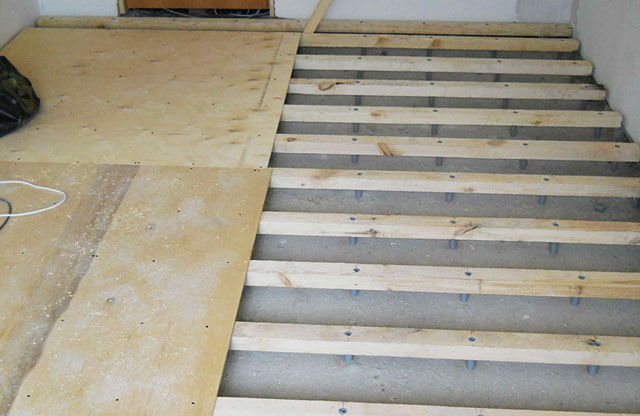
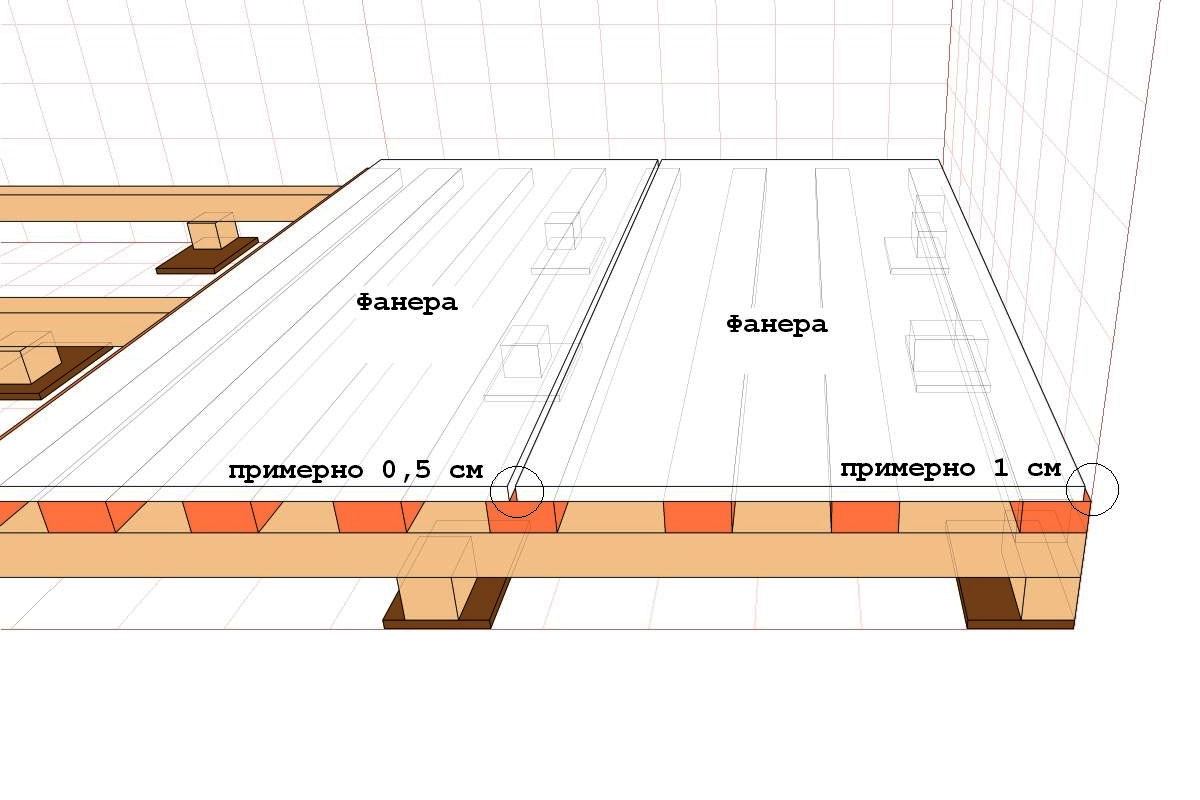
To neutralize significant differences in height, lags are used. As a lag, boards of the required length with a section of 3-5 cm by 7-10 cm or coniferous plywood slats of the same size are used. The location of the lag depends on the thickness of the plywood and the load during operation. Small thickness requires a smaller distance between the lags, starting from 40 cm.Do not use sheets less than 1.5 cm in height. The installation of the lag is designed in accordance with the layout of the plywood in the room, so that the joints fit into the middle of the timber.
The horizontal position of the lag installation is measured with a water or laser level. The evenness of the entire floor depends on the accuracy of the installation. The lags are fixed with glue and screwed. Bars are placed perpendicularly between them, obtaining a reliable crate on which plywood blanks are laid.
All panels are laid out on the crate, adjusting to size, not forgetting about the damper gaps. The plywood flooring is fixed by screwing the self-tapping screws to the logs in 20 cm increments.