Management
This guide aims to prevent you from making the same mistakes that I wasted my precious time and money on.
We'll go over all the components right down to the bolts, looking at the advantages and disadvantages of each type of each part. I will cover every aspect of the design and show you how to create a DIY CNC milling machine. I'll walk you through the mechanics to the software and everything in between.
LET'S START
STEP 1: Key design decisions
First of all, you need to consider the following questions:
- Determination of a suitable design specifically for you (for example, if you will make a wood machine with your own hands).
- Required processing area.
- Workspace availability.
- Materials.
- Tolerances.
- Construction methods.
- Available tools.
- Budget.
STEP 2: Base and X-axis
The following issues are covered here:
- Design and build the base or X axis base.
- Breakdown of various designs into elements.
- Fixed parts.
- Partially fixed parts, etc.
STEP 3: Design the Gantry Y-Axis
This clause addresses the following issues:
- Design and construction of the portal Y-axis.
- Breakdown of various designs into elements.
- Forces and moments on the portal, etc.
STEP 4: Z-axis assembly diagram
The following issues are covered here:
- Designing and assembling a Z-axis assembly.
- Forces and moments on the Z axis.
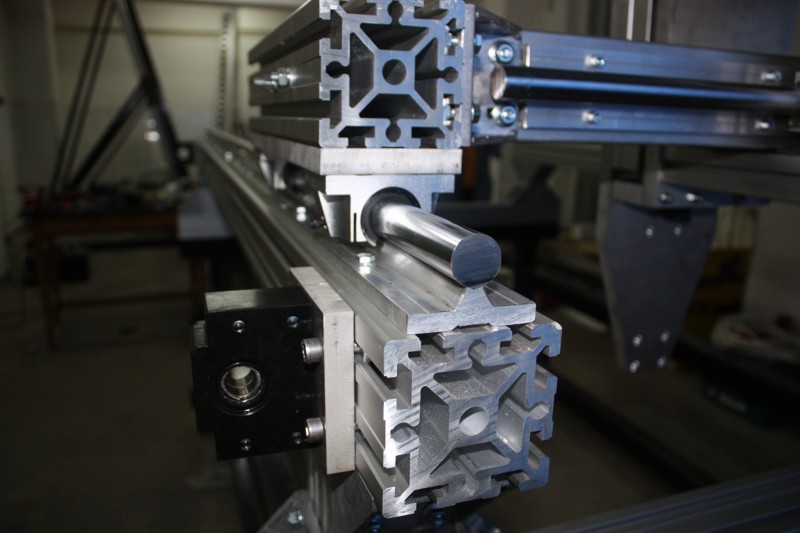
- Linear rails / guides and bearing spacing.
- The choice of the cable channel.

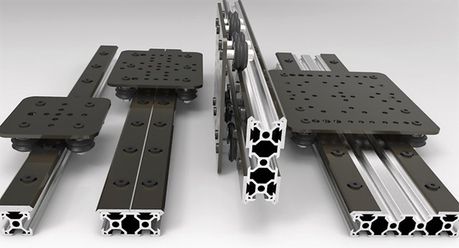
STEP 5: Linear Motion System
This clause addresses the following issues:
- Detailed study of linear motion systems.
- Choosing the right system for your machine.
- Design and construction of your own guides with a small budget.
- Linear Shaft and Bushings or Rails and Blocks?
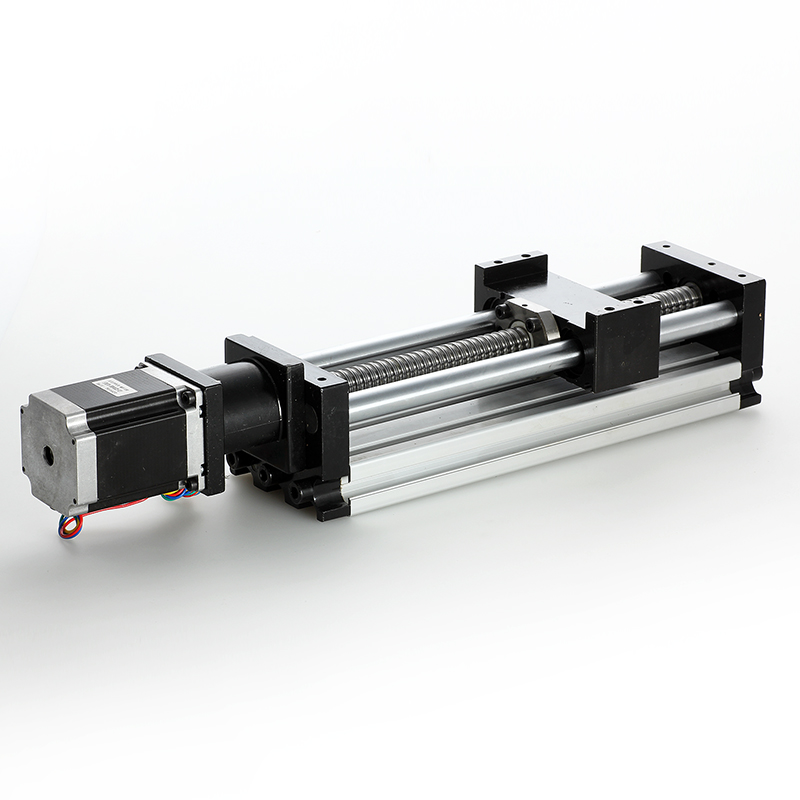
STEP 6: Mechanical Drive Components
This clause addresses the following aspects:
- Detailed overview of the drive parts.
- Selecting the right components for your machine type.
- Stepper or servo motors.
- Screws and ball screws.
- Drive nuts.
- Radial and thrust bearings.
- Coupling and engine mount.
- Direct drive or gearbox.
- Racks and gears.
- Calibration of propellers in relation to motors.
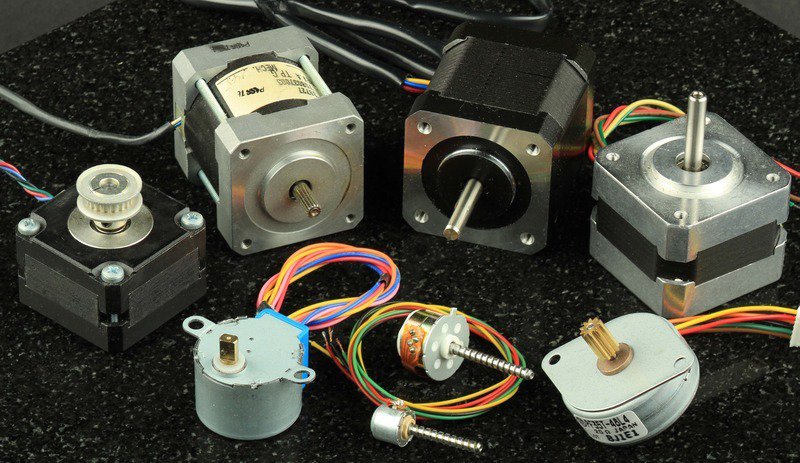
STEP 7: Selecting Engines
In this step, you need to consider:
- Detailed overview of CNC motors.
- Types of CNC motors.
- How stepper motors work.
- Types of stepper motors.
- How servomotors work.
- Types of servo motors.
- NEMA standards.
- Choosing the right engine type for your project.
- Measurement of motor parameters.
STEP 8: Cutting Table Design
This step addresses the following issues:
- Design and build your own tables on a small budget.
- Perforated cutting layer.
- Vacuum table.
- Overview of cutting table designs.
- The table can be cut with a CNC wood router.
STEP 9: Spindle parameters
This step addresses the following issues:
- Overview of CNC spindles.
- Types and functions.
- Pricing and costs.
- Mounting and cooling options.
- Cooling systems.
- Create your own spindle.
- Calculation of chip load and cutting force.
- Finding the optimal feed rate.

STEP 10: Electronics
This clause addresses the following issues:
- Control Panel.
- Electrical wiring and fuses.
- Buttons and switches.
- Lap MPG and Jog.
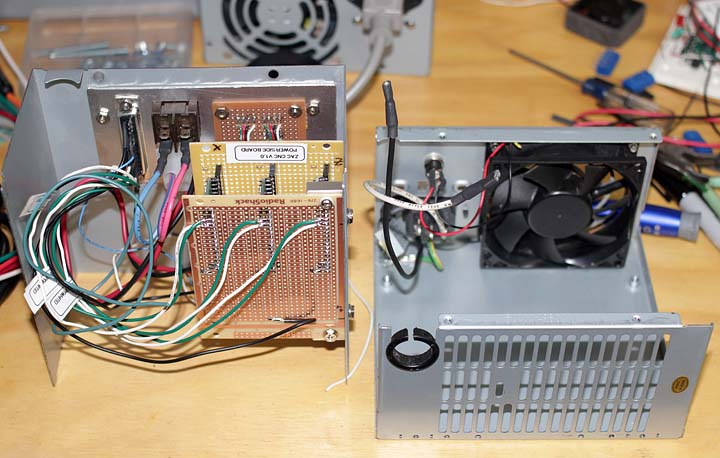
- Power supplies.
STEP 11: Program Control Controller Parameters
This step addresses the following issues:
- CNC controller overview.
- Controller selection.
- Available options.
- Closed loop and open loop systems.
- Controllers at an affordable price.
- Creating your own controller from scratch.
STEP 12. Choosing software
This clause addresses the following issues:
- An overview of software related to CNC.
- Selection of software.
- CAM software.
- CAD software.
- NC Controller software.

——————————————————————————————————————————————————–
Design
On machines, even the least critical, should not be allowed sheets with a thickness of less than 0.6 cm. In any case, this applies to the supporting and bearing parts of the assembly. Sometimes an exception is made for casings and other lightweight parts. However, even then you have to carefully weigh the pros and cons in order to give a correct assessment of the selected details. Mistakes in their selection can be fatal.
Some experts believe that a sheet with a thickness of 1 to 1.2 cm is sufficient for individual machines, for example, when it comes to a cutting table. Other experts proceed from the fact that parts of a large thickness are always needed, even for minor sections of the structure. There is also an opinion that bulky parts glued from medium-thick plywood are more effective in dampening harmful vibrations during occasional vibration. But true masters always give preference to considerations of reliability and safety. That is why they try to maximize the use of plywood sheets with a thickness of 19 mm or more, despite the severity and significant prices.
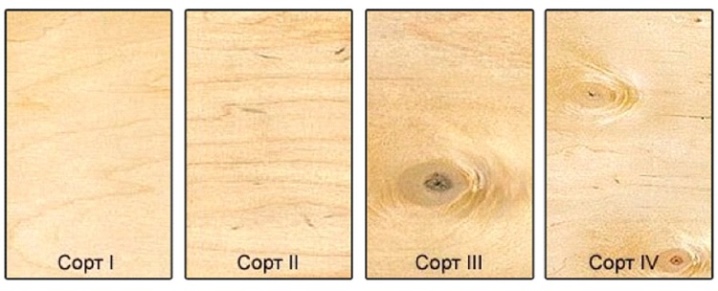
But you should not focus on only one thickness. It is imperative to take into account the type of original wood. Coniferous wood is lighter and softer, it is used mainly for minor nodes. Hardwood veneer is more expensive, and yet it is used more often. But the differences in the chemical composition of adhesives and the level of moisture resistance practically do not play a role, in most cases plywood of the FC grade is quite enough.
What's more important is the veneer category. An increase in the number of knots threatens cracking and delamination. Experienced professionals try to take sheets of the second grade and higher. You shouldn't try to buy very cheap raw material. It is almost impossible to bring it to the required parameters in artisanal conditions.
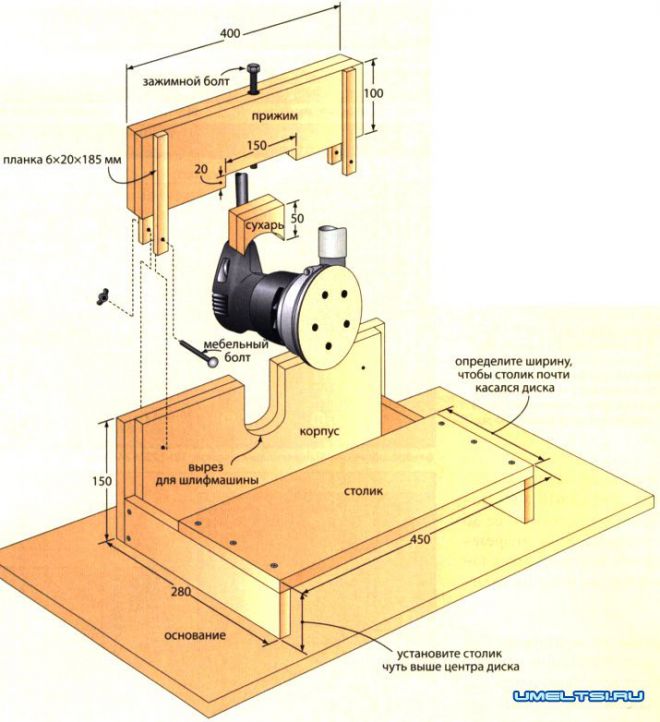
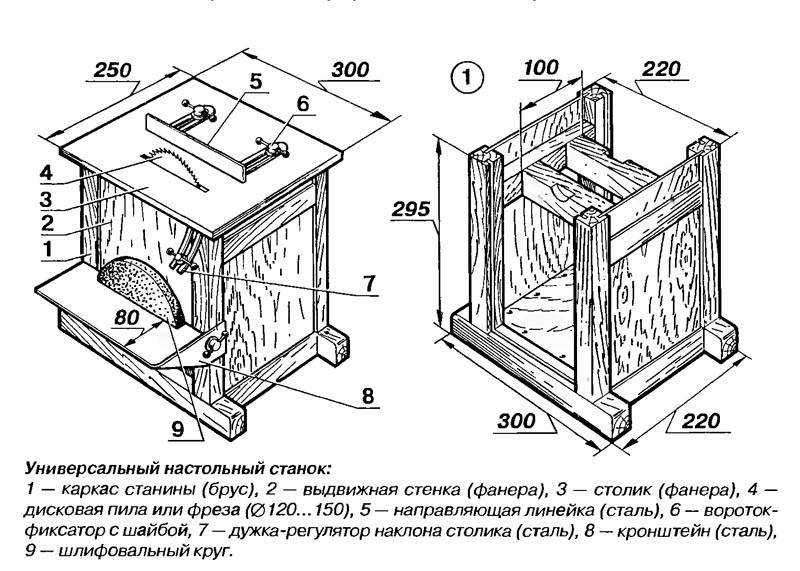
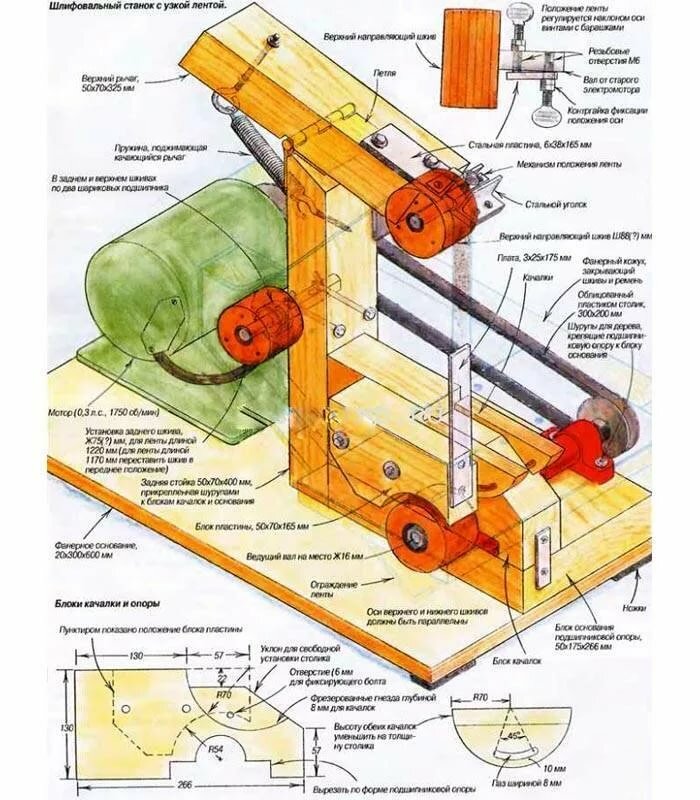
A 4-in-1 plywood machine can be considered as an optimal handicraft model. This design implies the use of a 54x32x88 cm box and a 65x98 cm table. Plywood for these parts is 10 and 18 mm thick, respectively. The section of the disc grinding unit will normally be 18 cm.To work on wood, a different apparatus is needed, the types differ sharply, namely:
- sawing on the basis of a hand-held circular saw;
- jigsaw;
- using a drill;
- universal model, suitable for hanging various attachments.
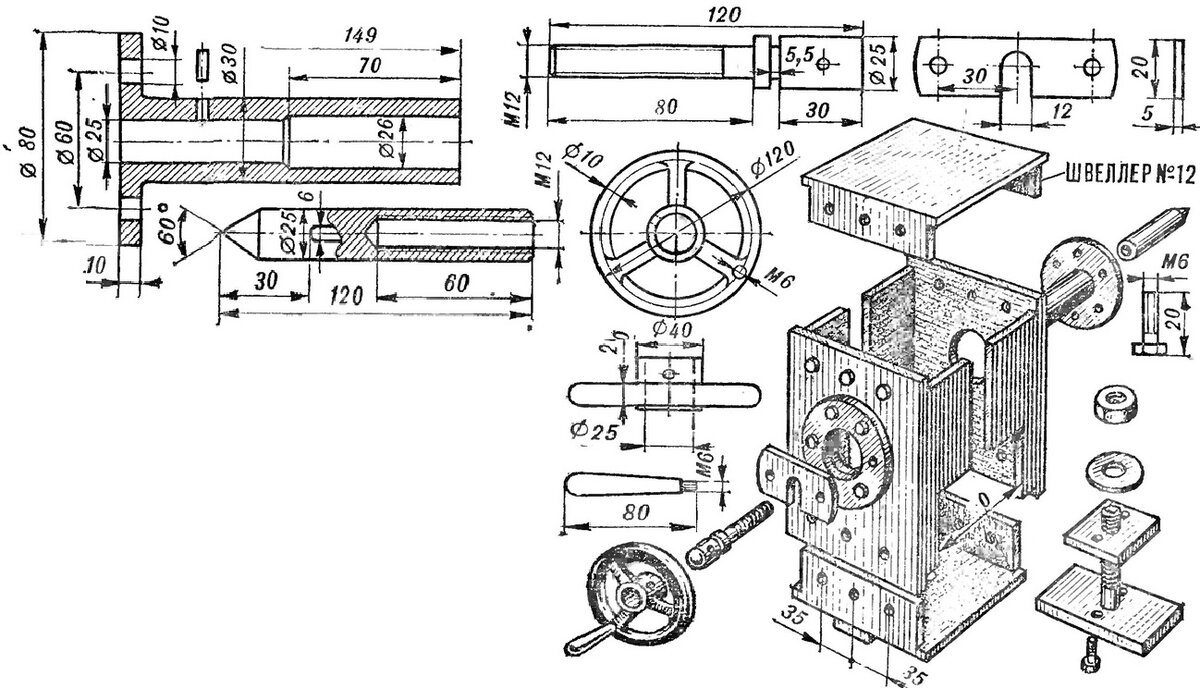
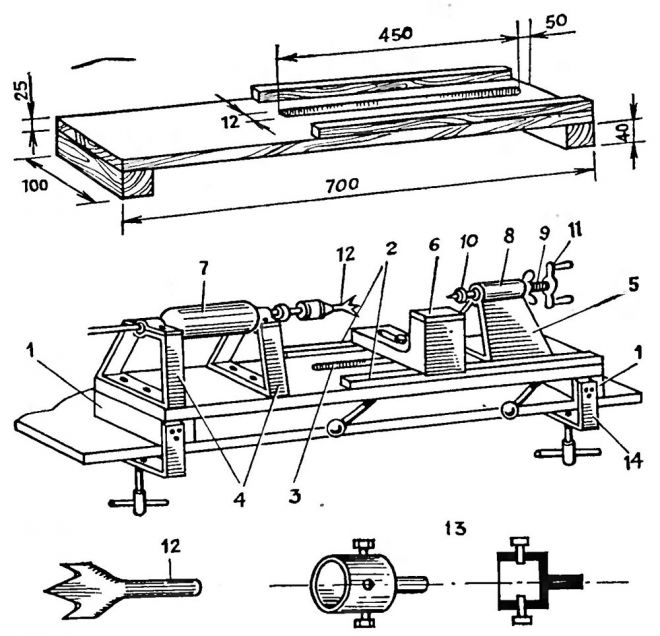
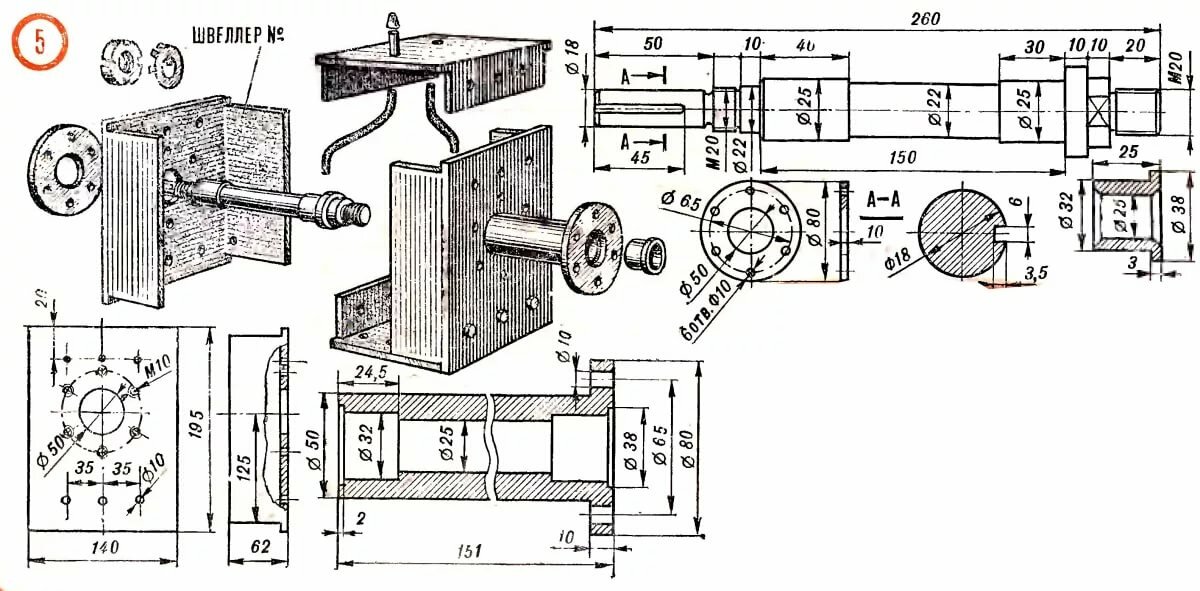
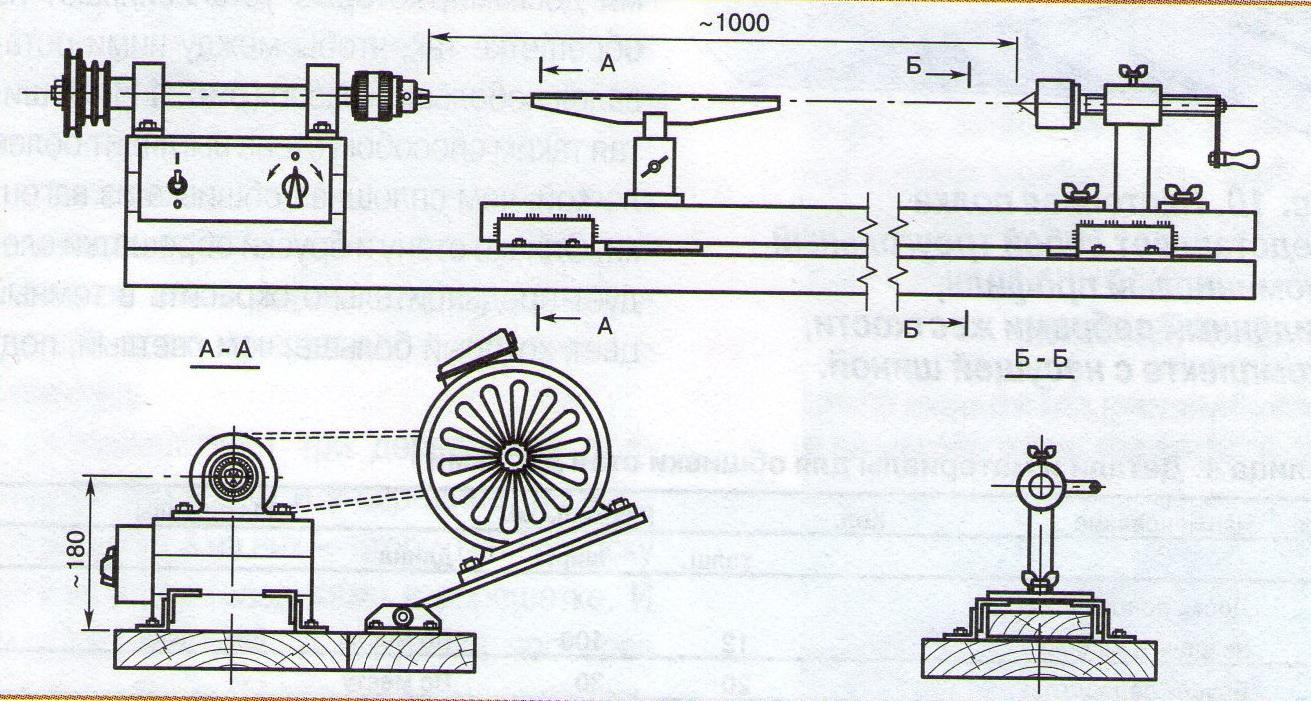
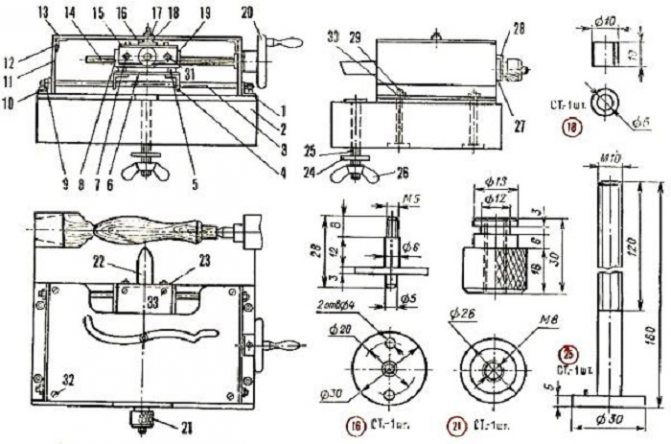
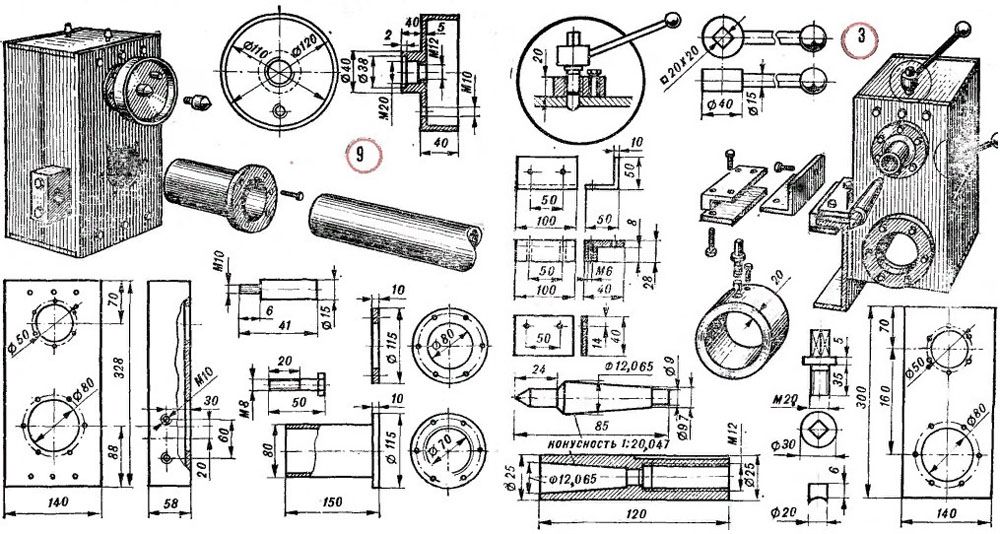
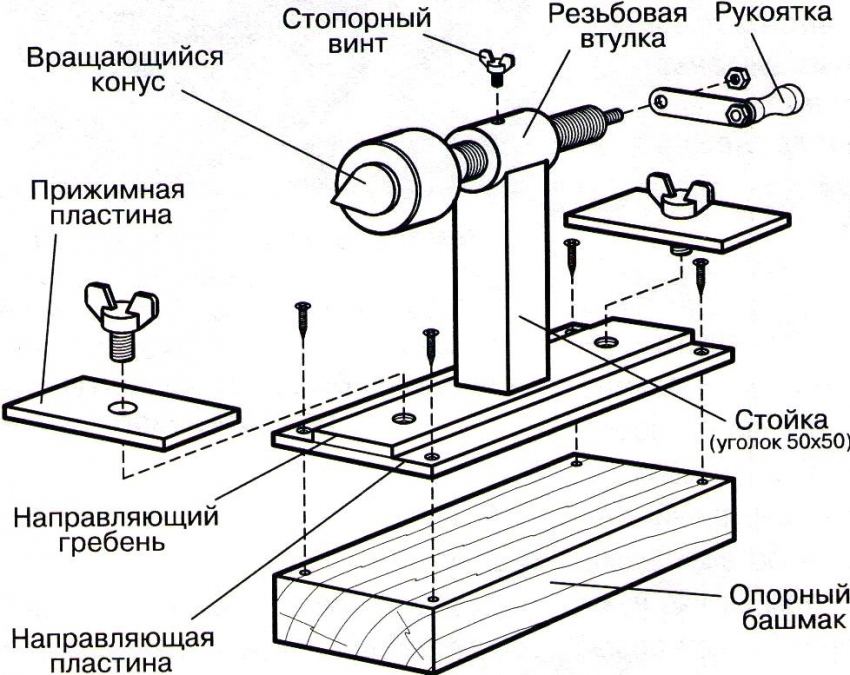
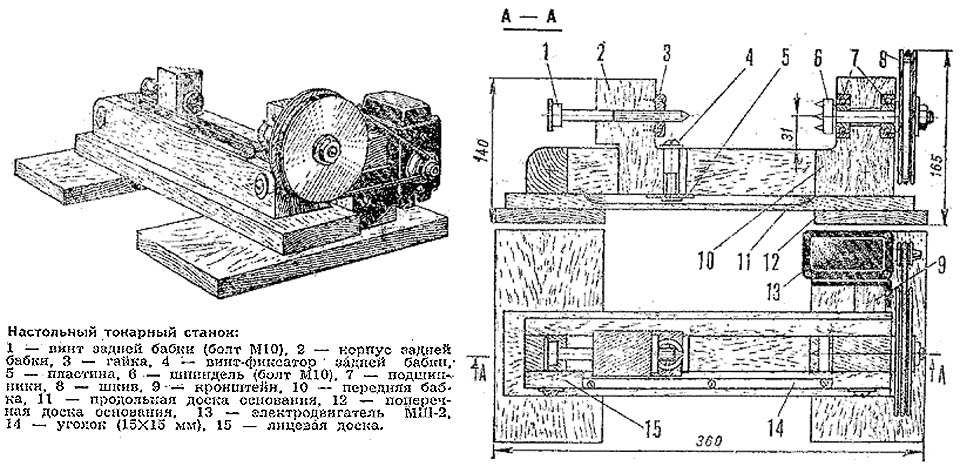
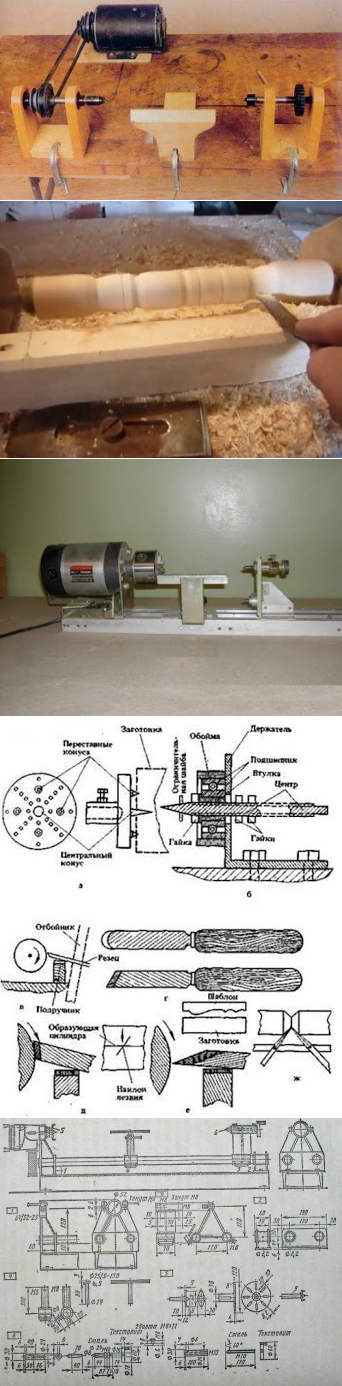
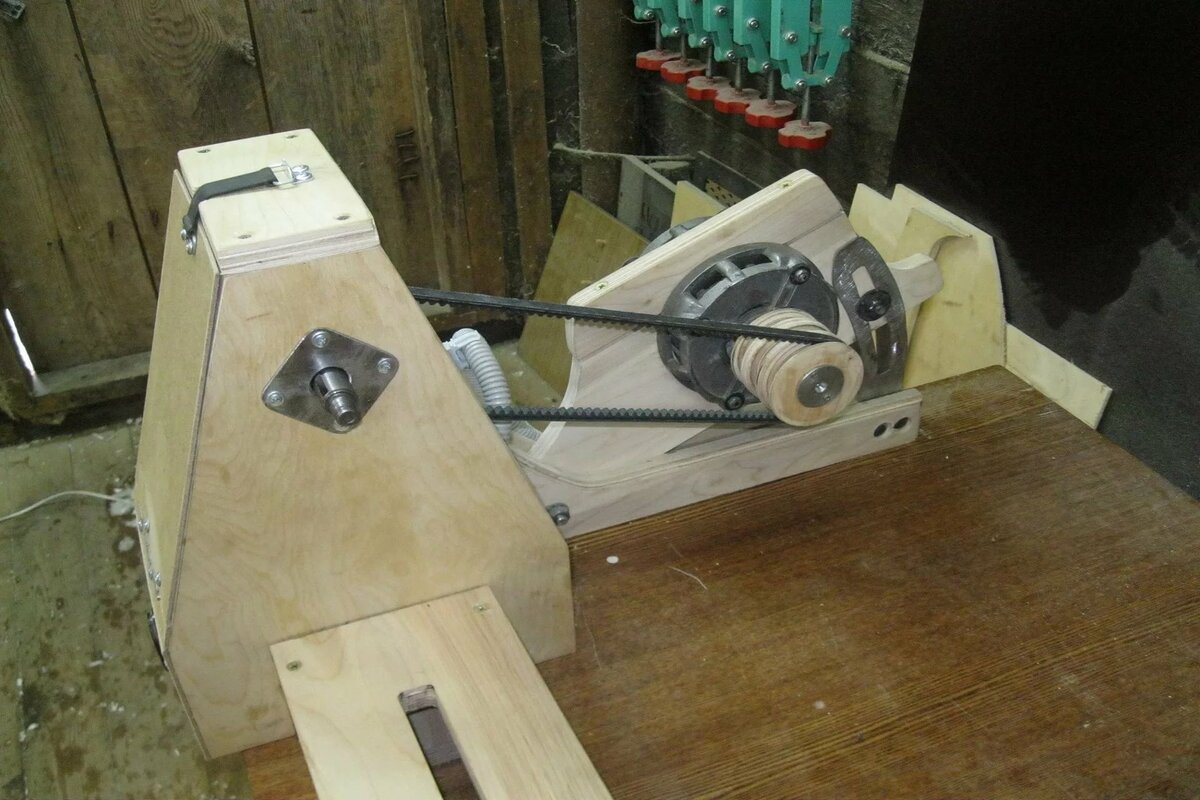
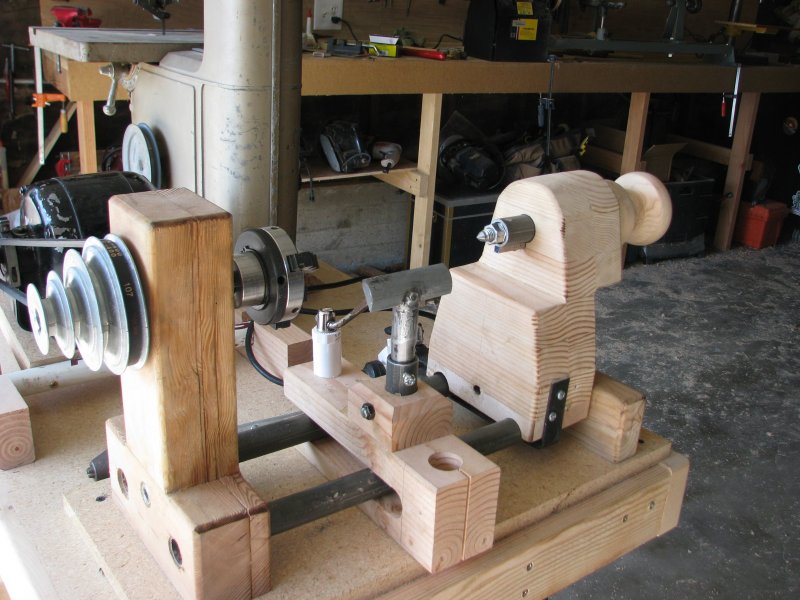
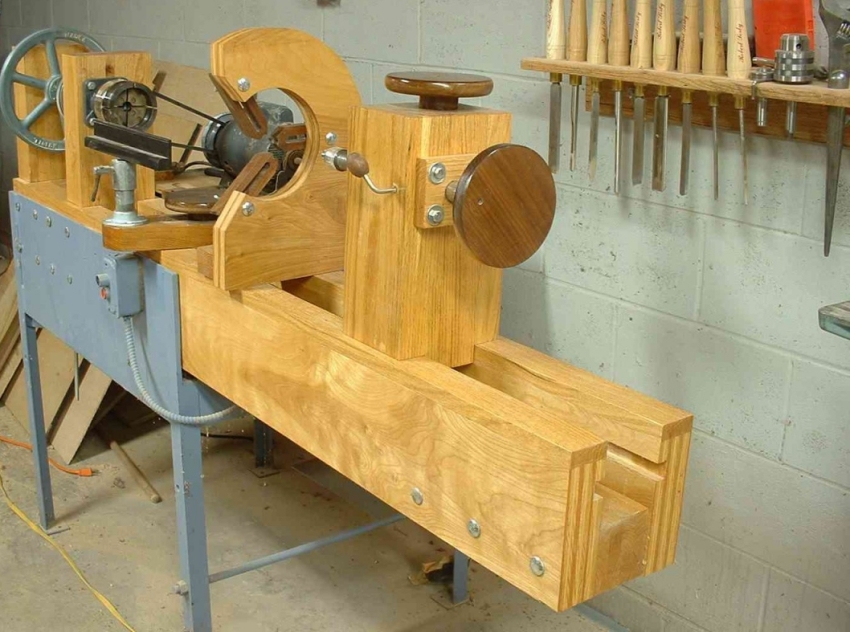
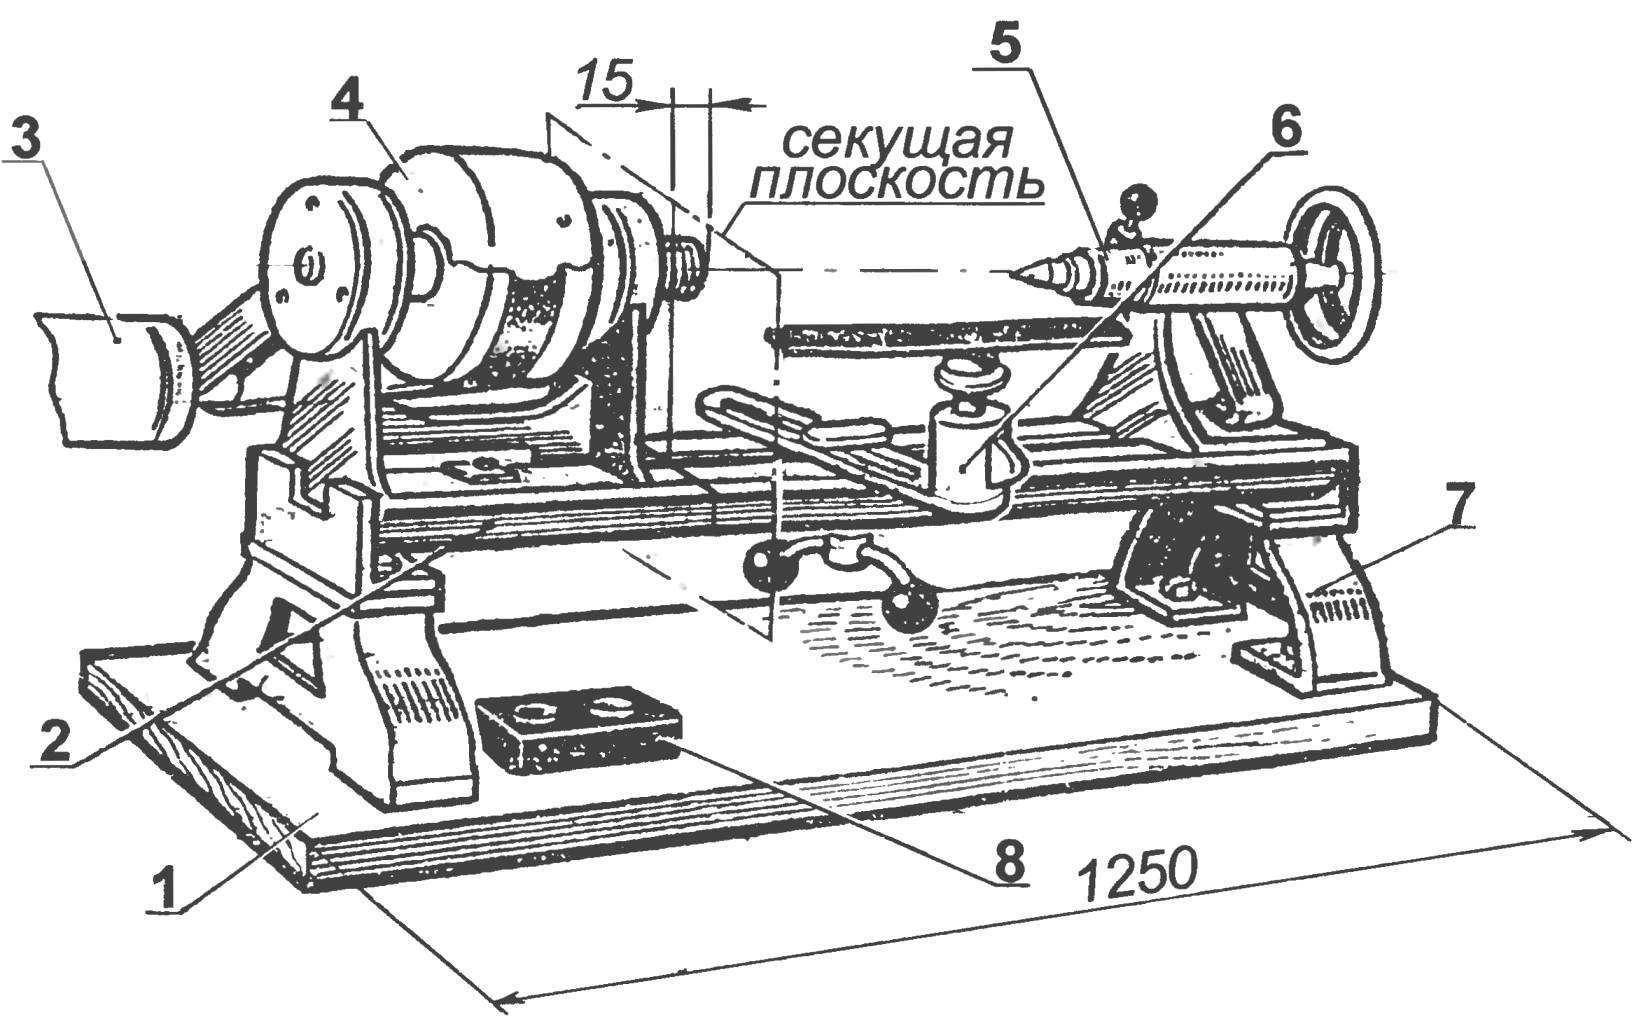
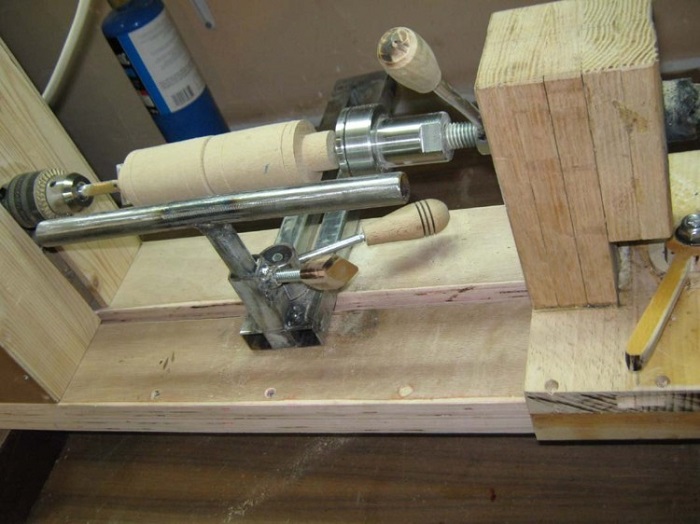
Installing the headstock and tailstock
One of the most important parts of the machine is the headstock and tailstock. The workpiece is clamped between them. The headstock directly rotates the product.
Important!
To make the base of the headstock - the spindle shaft - you need to contact professional metal turners or find a finished part or, in general, ready-made headstock modules in specialized stores.
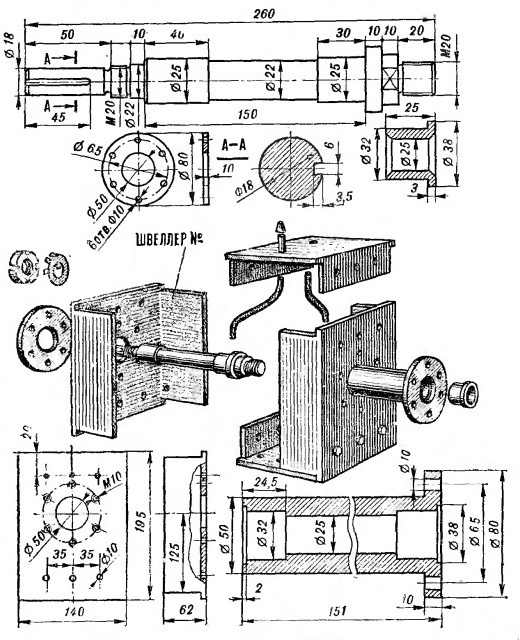
The front tank design consists of two S, V or U type bearings which are bolted to the base of a 40 mm diameter machined carbon steel shaft chuck for clamping the part.
The shaft is equipped with three or four pins to eliminate vibration. The shaft is passed through the bearing and pins are attached to it with a key or other lock of cylindrical parts, after which the shaft is fixed on a second bearing, which is already tightly attracted by bolts to the steel corners or the bed of the bed.
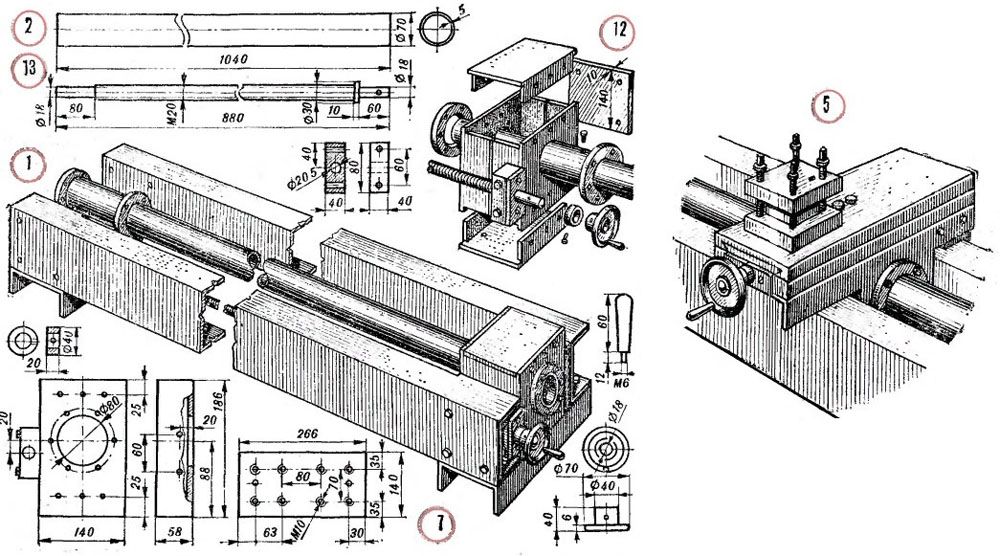
The tailstock also produces rotational movements, but does not move the product.It is especially important to fix the tailstock on the same axis with the front one, because all subsequent work will depend on this.
Reference. For subsequent inspection of the axle, the headstock can be designed with adjusting screws, which will allow for a slight change in the axis of rotation of the headstock.
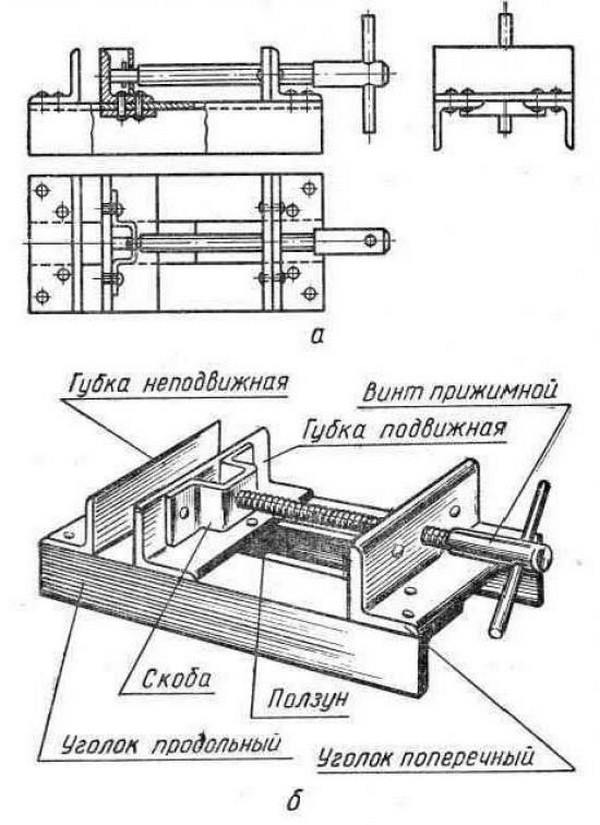
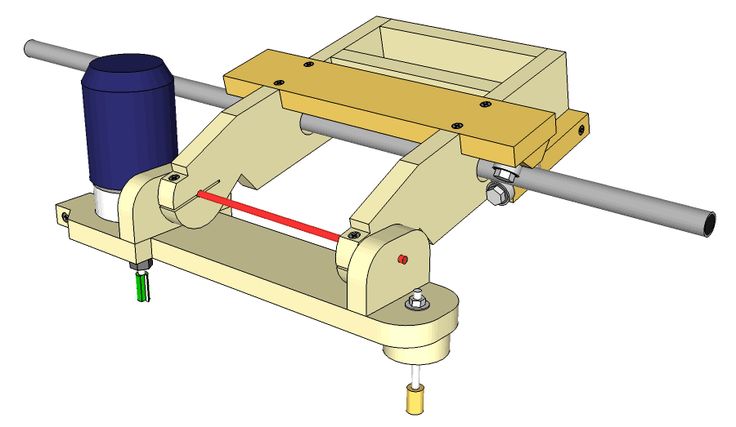
The tailstock consists of the following elements:
- A base of angle steel or similar material, similar to the base of a headstock.
- Guide tube.
- Inner tube or quill. It is made in such a way that it can be placed in the guide tube, and then the drive screw can be passed through the quill.
- Drive screw. Screw with nut thread for the quill tube. An 8 mm thread is provided for mounting the flywheel at the rear.
What other types of machines can you make?
Before creating your own lathe, you should study those varieties that have been invented by many interested people. Among the machines, both home-made and factory, the following types are distinguished.
Turning and milling
Such a machine is already a powerful modification of the previous machine options. Most often, a turning and milling machine is equipped with a CNC, because it is extremely difficult to manually control the milling cutter with high accuracy. However, such a machine has a right to exist and is widely used in household needs. Its construction consists of:
- Bed.
- Electric motor for headstock rotation.
- Hand-held milling cutter, placed on guides, which ensure its movement along the axis of rotation of the workpiece.
With copier
A lathe and copying machine is necessary when creating a large number of identical products, most often you can hear about dishes and balusters for stairs.
There are several options for making a copying lathe: with a milling cutter, with a circular saw and with a chisel. All these methods involve the use of a pattern. A mold is a profile of the future product, which is cut from thin plywood.
A handrail is attached along the lathe along the entire length of the workpiece. A mold is mounted behind the lathe. A milling cutter or a cutter is attached to the handrail, the movements of which are regulated by a stop that goes from the cutter, cutter or saw to the pattern.
Thus, during the rotation of the bar, the cutting tool completely repeats the silhouette of the plywood profile with sufficient accuracy.
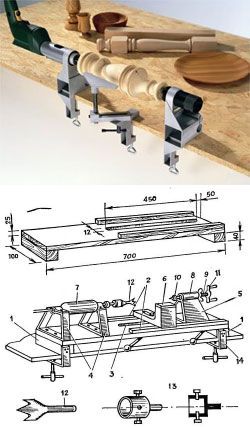
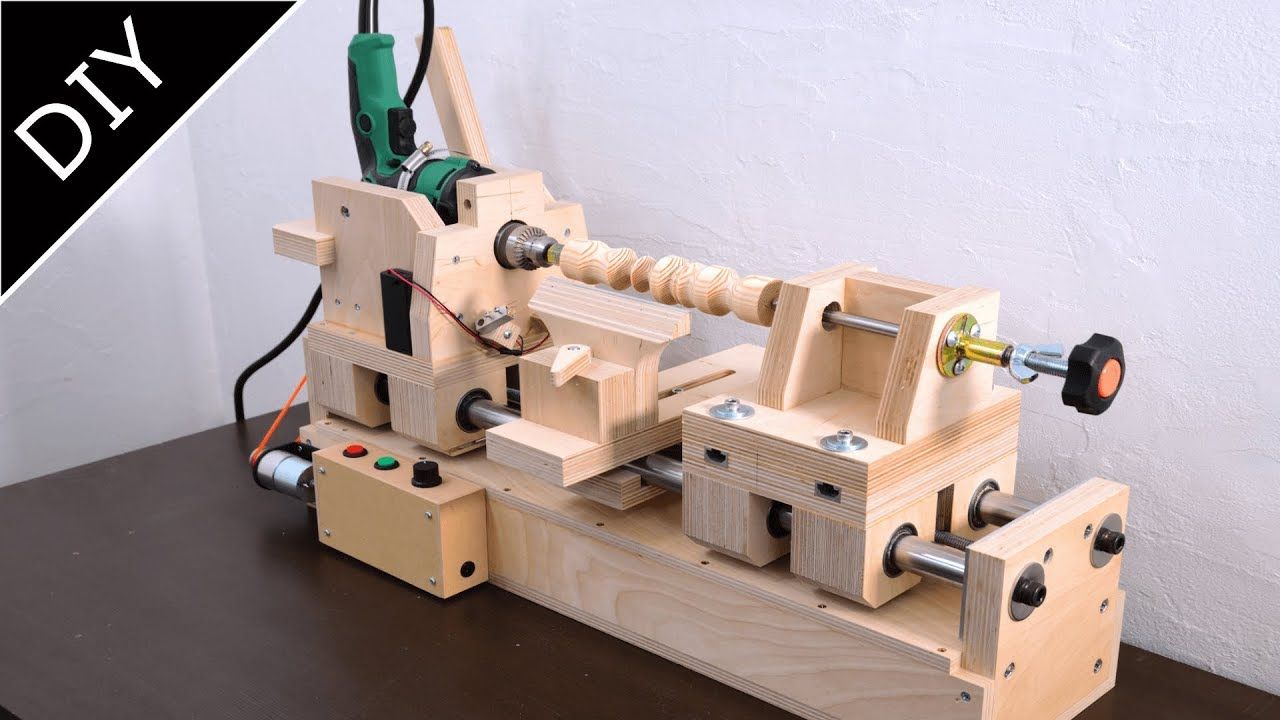
Mini
For many domestic needs, it is not necessary to create a unit of impressive size, capable of rotating a log with a radius of 300 mm. Sometimes a machine with an extremely simple design is enough, in which the drive from an old tape recorder powered by a power supply can act as a motor. For the bed of such a machine, you can use a board 150 * 20 and long, which depends only on the needs of the craftsman.
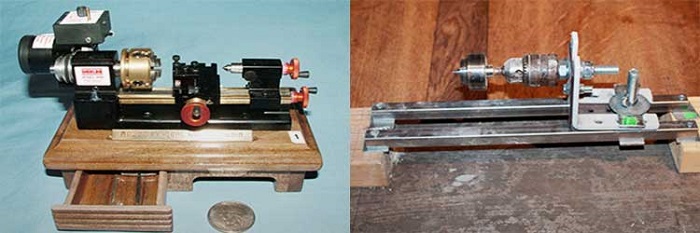
For such a mini-machine, the belt drive will be superfluous, therefore, most often the headstock is attached directly to the engine shaft. And as a faceplate is a drill head or a homemade chuck with three clamping screws.
The tailstock is made of a bar, in the center of which a hole is drilled for the shaft exactly along the height of the motor axis, which can be a dowel-nail. If you provide the machine with a power supply unit with output voltage regulation, you can get a unit with a speed controller.
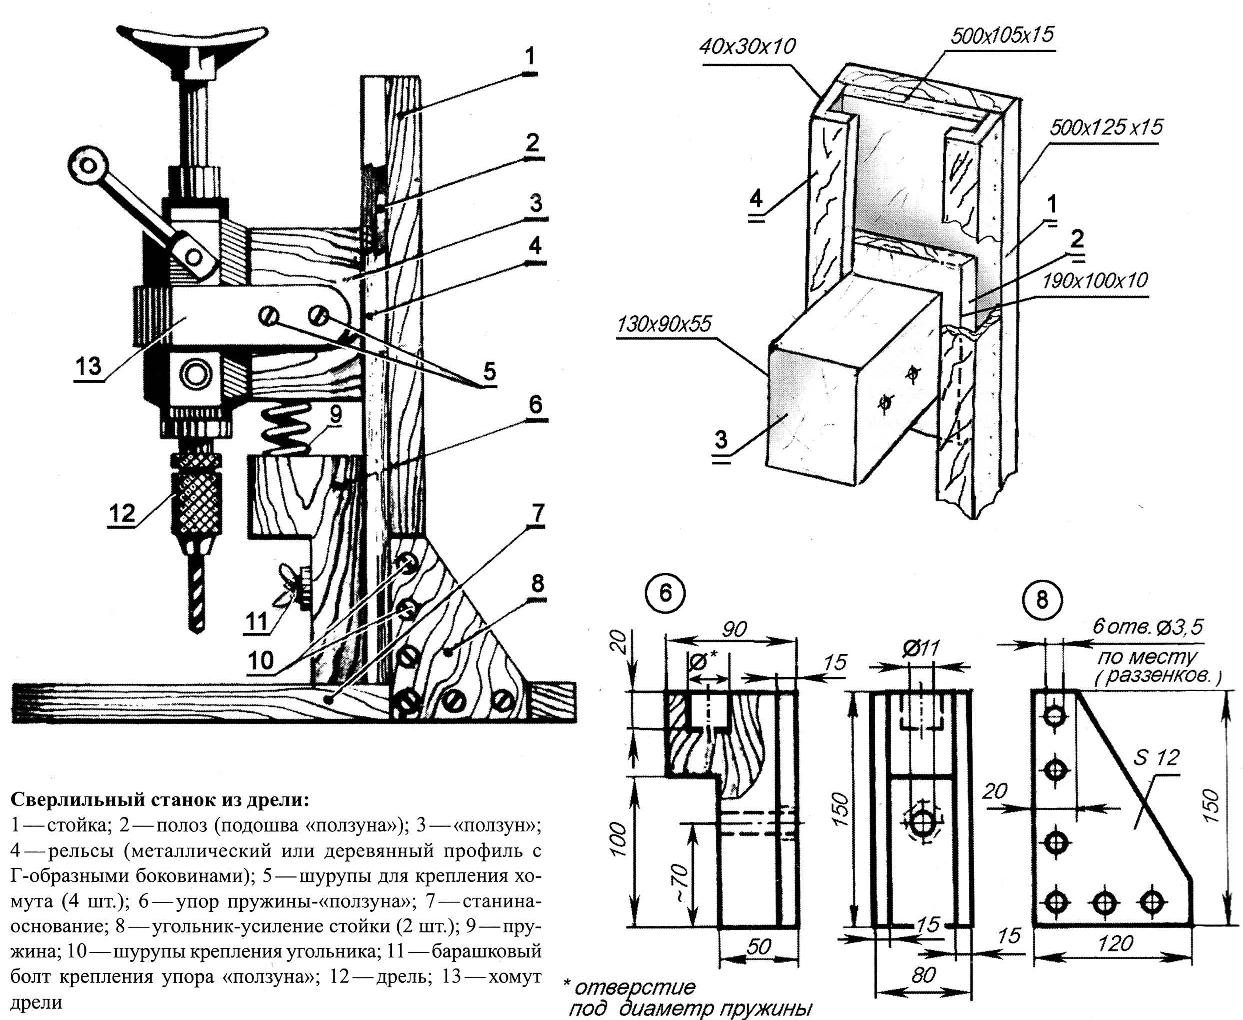
From an electric drill
An electric drill can be found in almost every home. The advantage of a machine driven by an electric drill is that there is no need to buy a separate motor. Drill-driven designs range from the most basic, where the drill is clamped to a table.
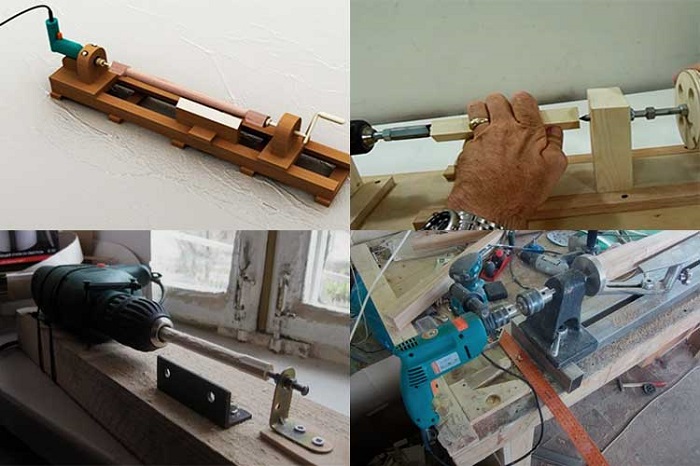
On the contrary, the tailstock is mounted using a pair of corners and a nail or a sharpened screw, to a more perfect one, in which the drill serves as a source of rotating force, but does not participate directly in the process of rotating the workpiece. The second method protects the motor from overheating and stalling during overloads.
From the motor of the washing machine
It is a standard diagram of a lathe with a motor, direct or belt drive, bed and two headstock.
When installing a lathe from a washing machine motor, it must be remembered that the household appliance motor is designed to circulate with an unbalanced load, but this does not mean that the tailstock can be abandoned. Its presence is mandatory, especially when working with long and heavy workpieces. The device of such a lathe is easy to implement at home. This requires:
Weld or bolt two steel pipes, at one end secure the engine from household appliances. Fasten a block between the pipes with the ability to move it along the bed, the corner of the handcuff will be attached to it. On the opposite side, the tailstock is equipped in accordance with the instructions above.
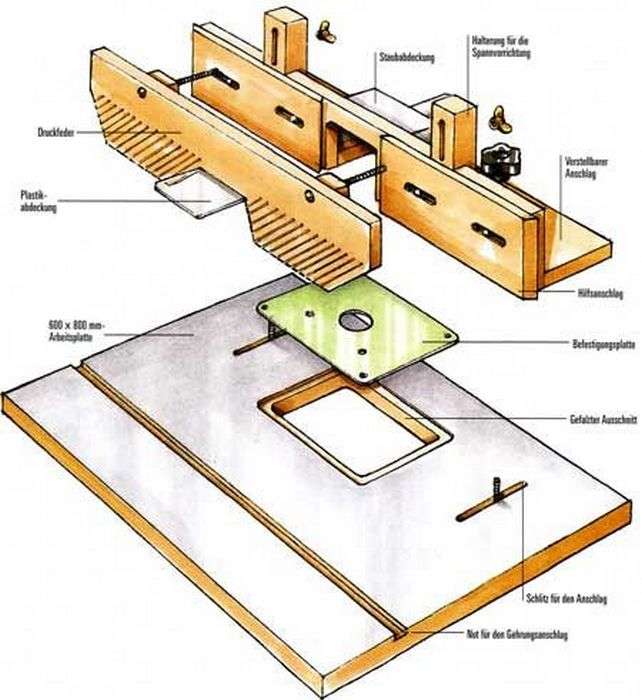
Preparatory work
To make a homemade CNC milling machine, there are two options:
- You take a ready-made running set of parts (specially selected units), from which we assemble the equipment ourselves.
- Find (make) all the components and start assembling a CNC machine with your own hands, which would meet all the requirements.
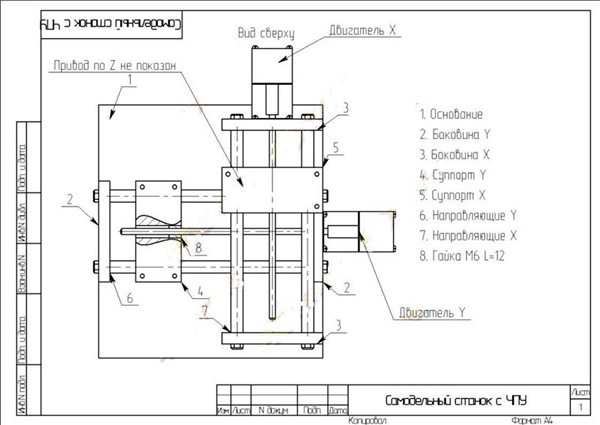
It is important to determine the purpose, size and design (how to do without drawing a homemade CNC machine), find schemes for its manufacture, purchase or manufacture some parts that are needed for this, acquire lead screws
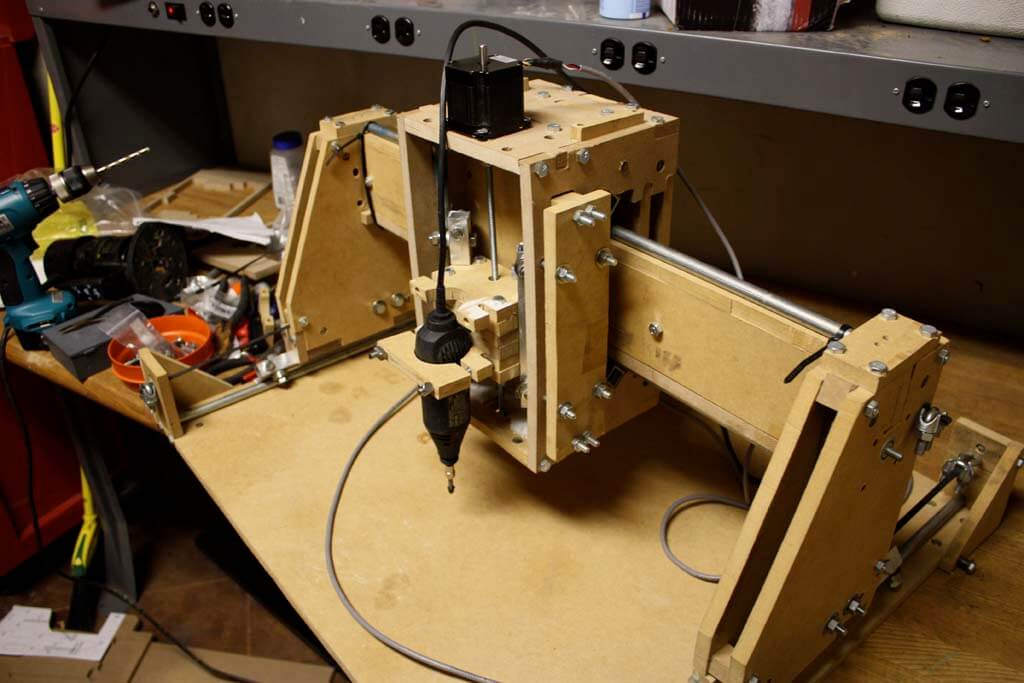
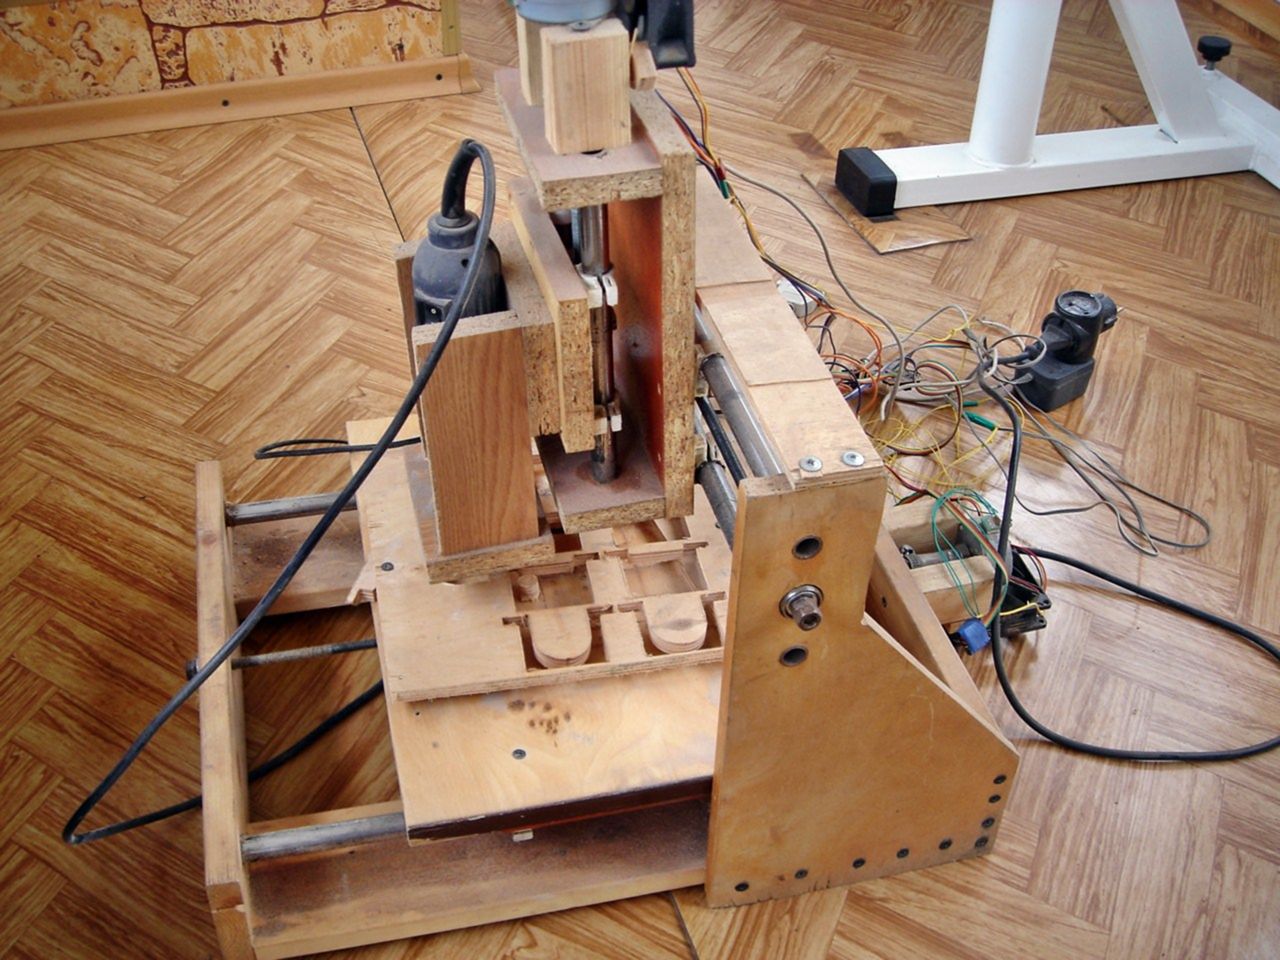
A scheme of a CNC milling machine is possible, in which they took, as a basis, an old drilling machine, and replaced the working head with a drill with a milling one.
And for this you need to design a mechanism (there is a bearing in its design), which is responsible for ensuring that the tool moves in three planes (along the axes). Usually it is assembled on the basis of printer carriages. When the assembly is completed according to such a schematic diagram, it remains to connect the software control to the device.

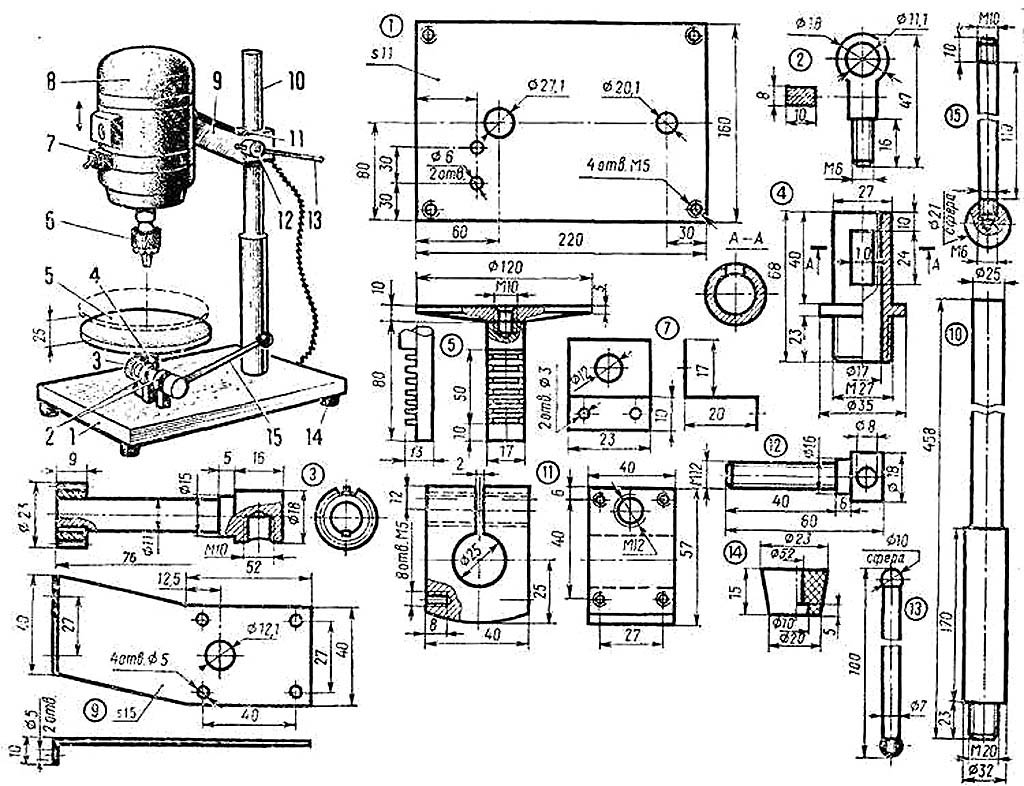
But on such a homemade machine, due to the insufficient rigidity of the carriages, it will be possible to master the production of printed circuit boards, to process only plastic blanks, wood and thin sheet metal. For a CNC machine tool and full-fledged milling operations on it, you need a powerful motor and good electronics. And, in particular, the printed circuit board.
Usually, having found a schematic diagram of the device, they first model all the details of the machine, prepare technical drawings, and then use them on a lathe and milling machine (sometimes it is necessary to use a drilling machine) to make components from plywood or aluminum. Most often, work surfaces (also called a work table) are plywood with a thickness of 18 mm.
Choosing an electric motor for woodworking operations
An equally important element of the machine is the engine. The main characteristic that needs to be paid enough attention is power. Regardless of the type of motor - single-phase or three-phase, the power can range from 1200 to 2000 W.
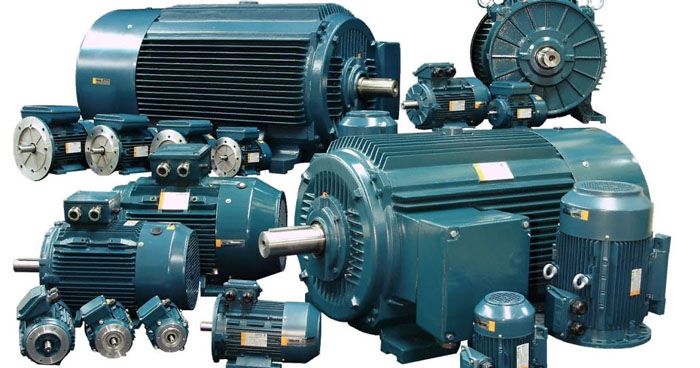
Engines are great:
From a washing machine, if a lathe is needed for small work and the size of the workpiece will not exceed 30–40 cm, in this case the exact maximum length is selected empirically. Such motors are capable of helping in the processing of small products, dishes, small knobs on the stairs and similar interior elements.
Some models of washing machines are equipped with an asynchronous electric motor, in which, by changing the winding, you can stepwise change the speed of rotation of the shaft. Such motors are also installed in floor fans, only there they are of lower power of the order of 40-100 W. This motor is enough for a mini-machine for small household products.
The motor from the washing machine produces about 300-500 watts, which is more than enough for the average needs of a wood turner.Motors in washing machines are much better suited for turning work, since in the drive itself, bearing assemblies are designed to withstand high loads on a shaft break. This will make it possible to process trunks with a slight deviation from the cylindrical shape.
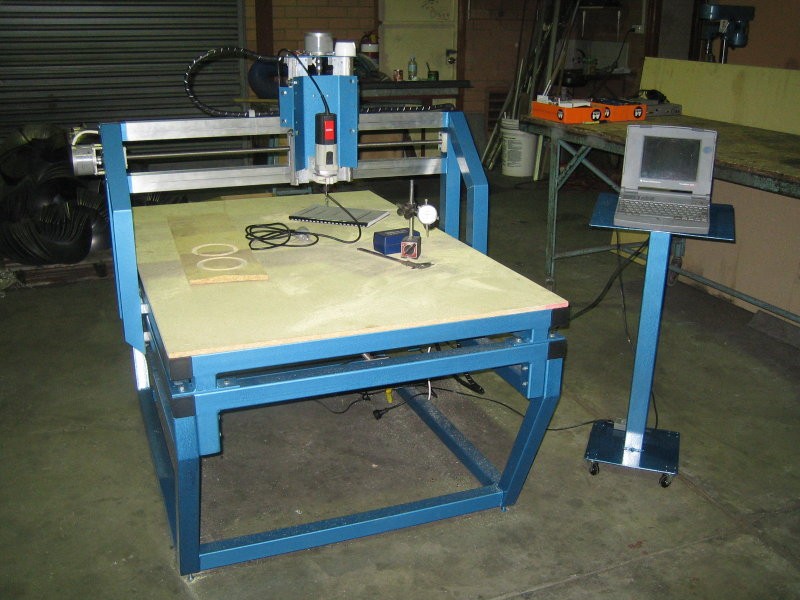
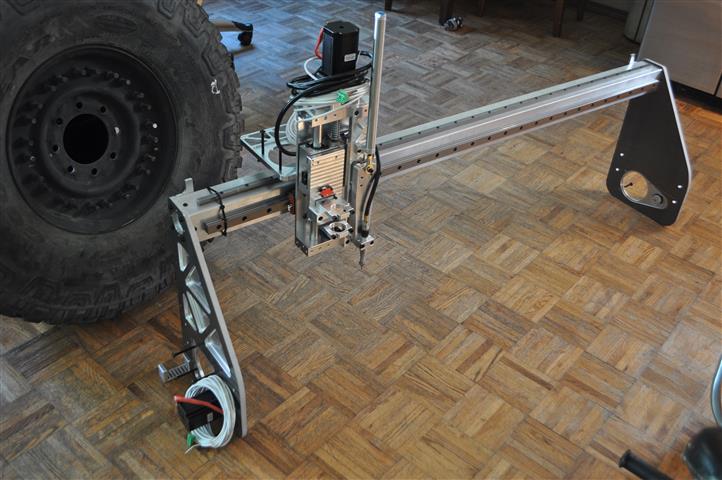
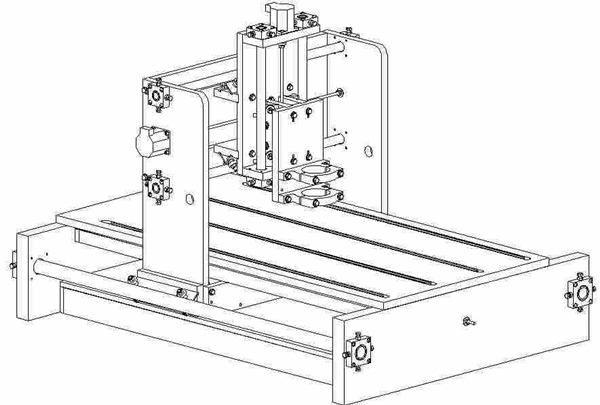
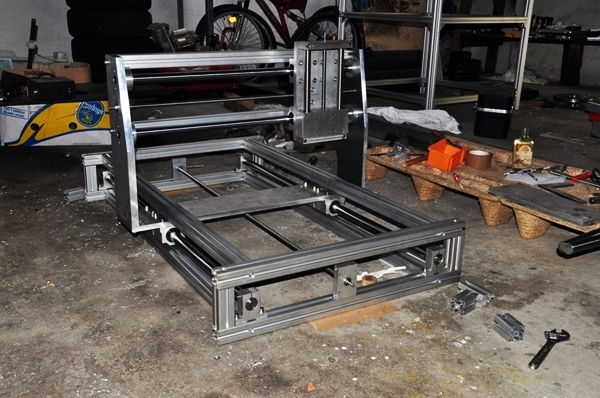
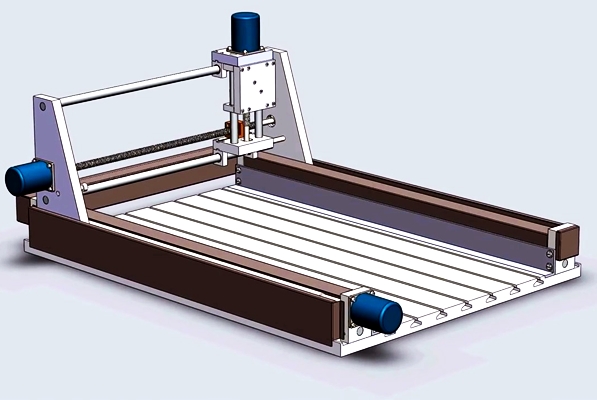
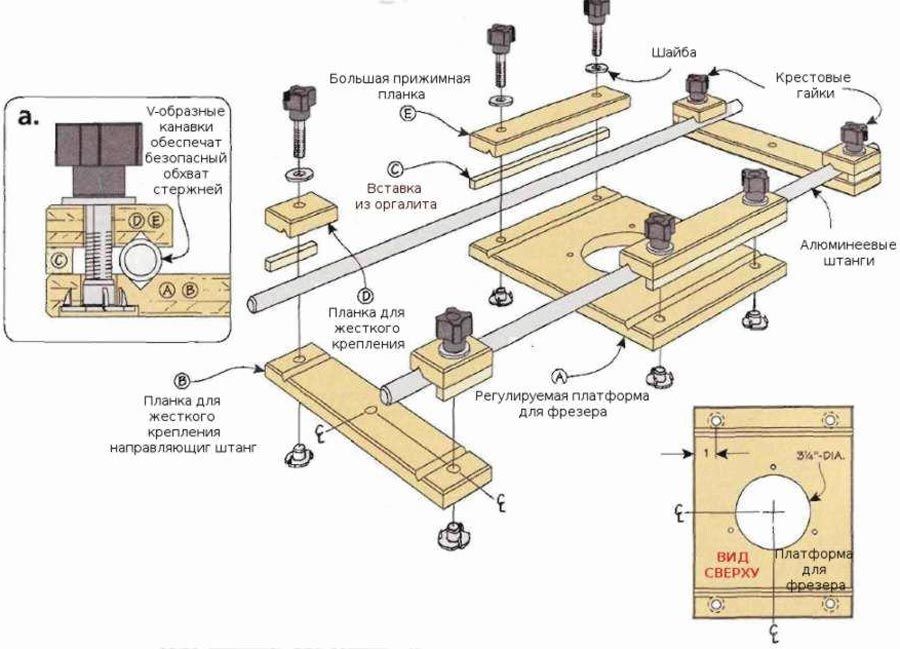
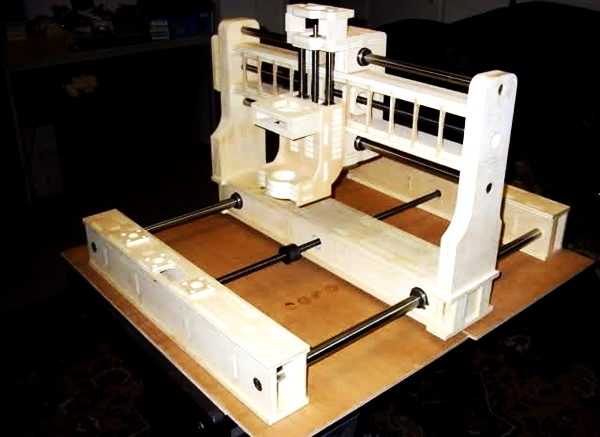
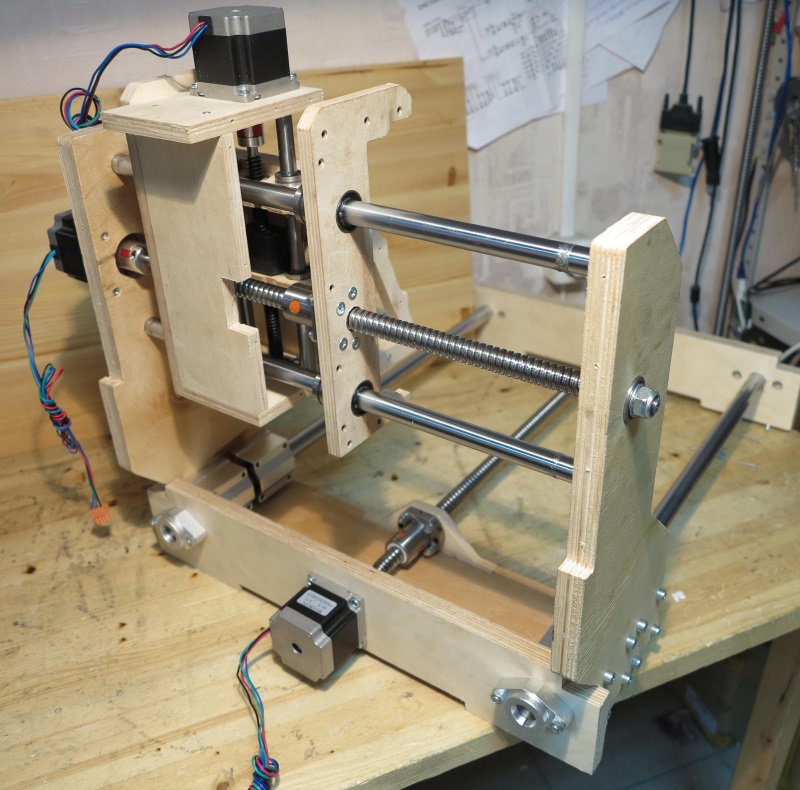
DIY CNC router
A CNC router is a relatively expensive device. When implementing business projects, the availability of start-up capital may be limited, and the purchase of such equipment will require significant costs. A do-it-yourself milling machine will solve the problem.
The unit is produced on a circular table and a drilling machine. Renting tools will provide cost savings. The machines themselves can be made of plastic. It is sold in hardware stores.
The assembly of the CNC router is carried out in several stages:
- creation of a diagram, material processing, drilling of bearing holes;
- manufacturing of bearing blocks using a circular saw and a drill (identical parts are produced that are connected and form a block);
- cutting of parts that form the base frame;
- assembly of base parts thanks to drilling;
- installation of struts and struts;
- making a threaded rod from a nut and a spring;
- installation of a milling part;
- assembly of the table for work (the table is assembled from high strength materials in convenient dimensions);
- production of couplings (you can use plastic);
- production of engine brackets (you can use a metal profile);
- assembly and testing of the unit.
Machine control is carried out thanks to the program. Most suitable is "kcam". The motor drivers are connected to the LPT. Another suitable program is the arduino numerical software. It assumes the presence of firmware and interface. No code is required to run. Milling is carried out along the contour to a given depth, or using a laser. Standard router firmware does not require software. When working with the device, you should take into account the safety rules.
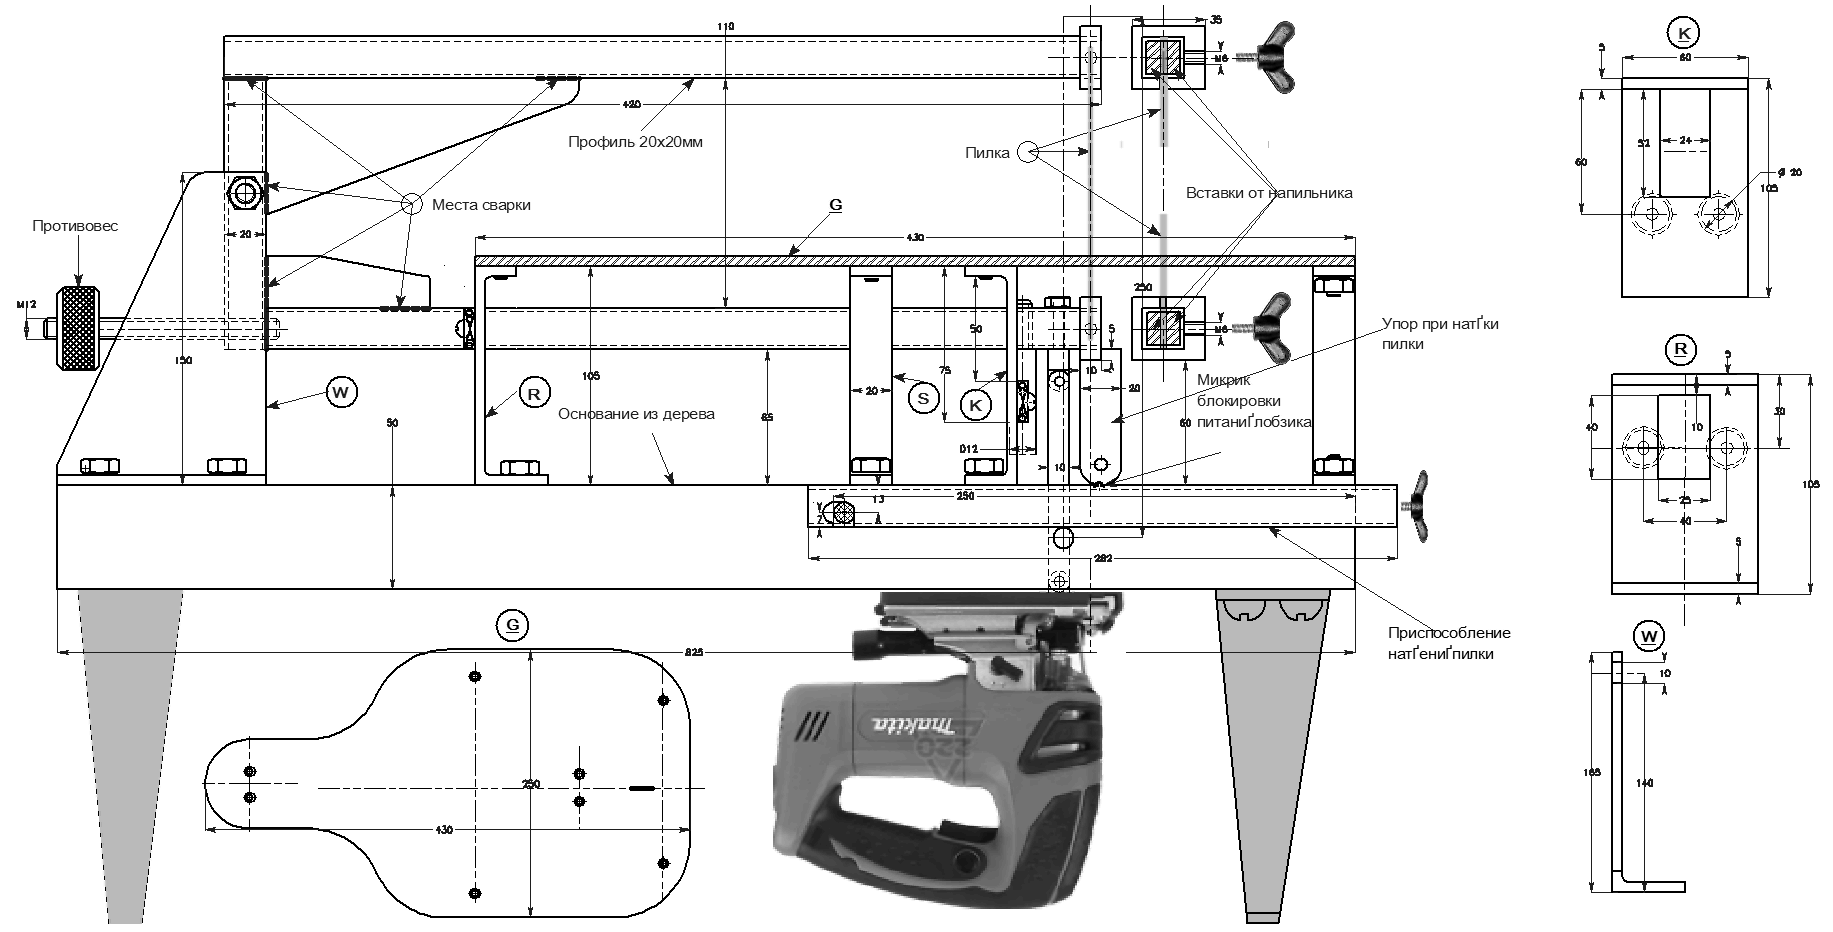
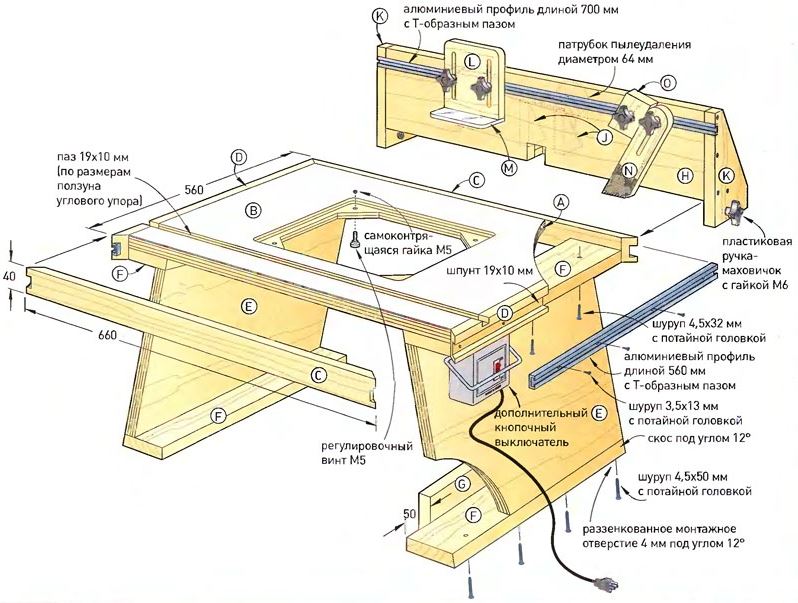
We make a stationary circular saw with our own hands
You can buy a ready-made stationary circular saw from 9 thousand rubles. It will ensure proper work safety and save time on sawing wood. But, you can not waste money and make your own machine according to drawings and blanks.
 Circular saw table
Despite the external complexity of the design, it is not so difficult to assemble it yourself at home. Any stationary saw model consists of several elements:
- table;
- disc with teeth;
- engine;
- side stop with the possibility of adjustment;
- shaft.
 Complete compact installation
To assemble all the parts of the circular saw, prepare:
- metal sheet from 8 mm thick;
- metal corner 45 by 45 mm;
- electric motor;
- disc with teeth;
- ball bearing;
- welding machine;
- a bar of wood;
- a piece of plastic or remnants of laminate.
In order to make all the elements correctly, it is worth choosing a drawing, which will indicate the dimensions of the table for a hand-held circular saw with your own hands, as well as all other dimensions and materials for work. Here are some examples of ready-made circuits:
 Uncomplicated table option
 Household Tool Disc Sizes
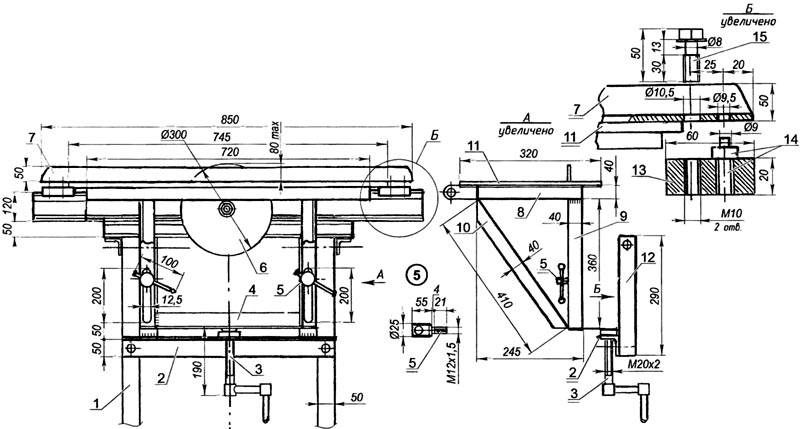 Detailed plan with all dimensions
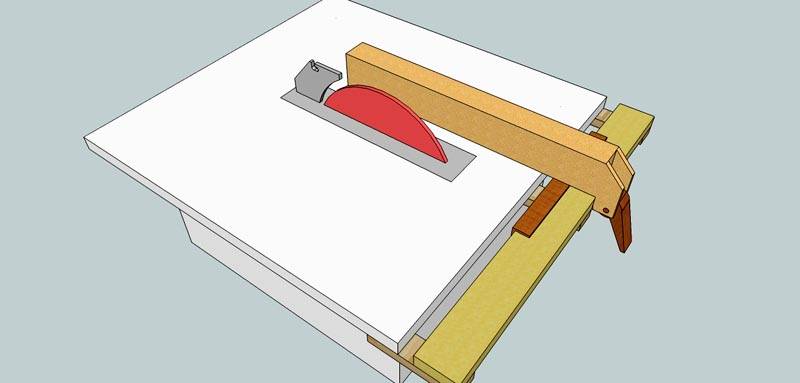 3D model of the table
The assembly of the structure itself will go according to a certain plan, regardless of the chosen scheme:
Illustration
Sequence of work
The tabletop must be made strong and stable. Use a sheet of metal according to your dimensions
If you plan to install other fixtures on the table, then equip the place for them with thick plywood.
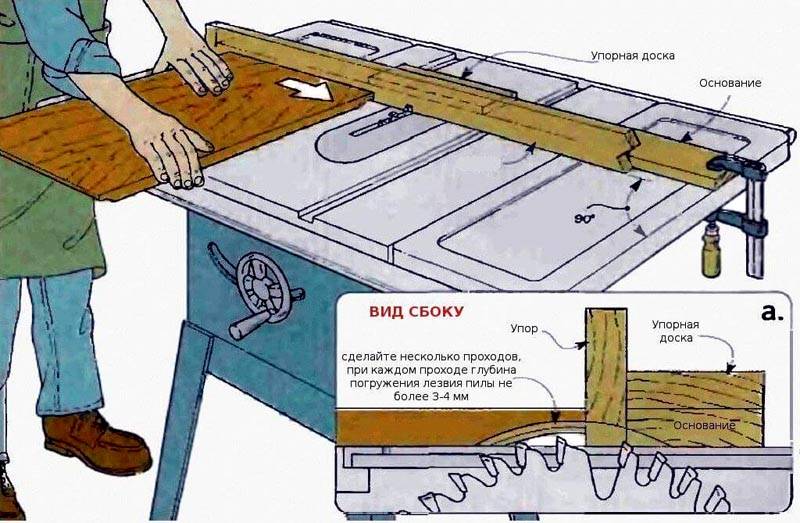
When making a guide for a circular saw with your own hands, pay attention to its height. It should protrude 12 cm above the table
So you will be able to process boards in width and thickness. To make a guide, take two corner pieces and a clamp.
Make the central saw with the ability to adjust in height.
For the motor, mount a separate platform on the same axis as the rocker arm. Fix it on a bolt with a diameter of 1.5 cm. On the side of the saw, install a metal plate, having previously made a hole in it through which the bolt with the fixed handles passes.


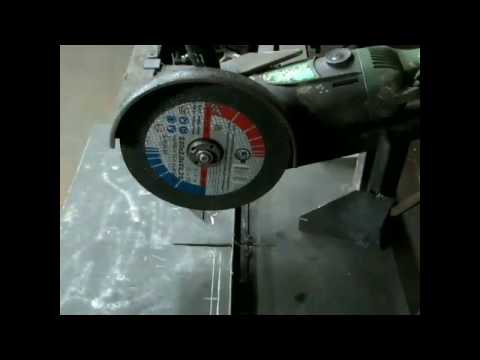
For more detailed instructions on making a stationary circular saw, see the video:
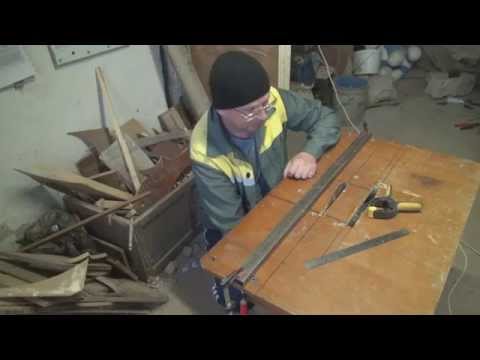
a circular saw
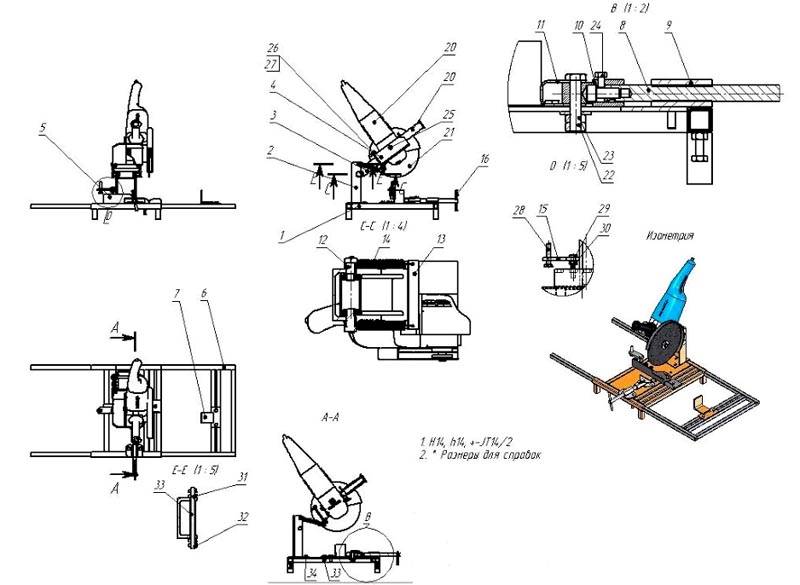
We make a circular saw from a grinder with our own hands: drawings and videos for manufacturing
To create a circular with your own hands, you need to prepare an engine from a grinder, a shaped rectangular pipe and steel corners. To get a real comfortable saw, it is worth considering the stop, the axial handle and the adjustment rods.
Here are some do-it-yourself grinder stand drawings. On them, you can assemble a stop that ensures the sliding of the saw.
 Drawing option for work
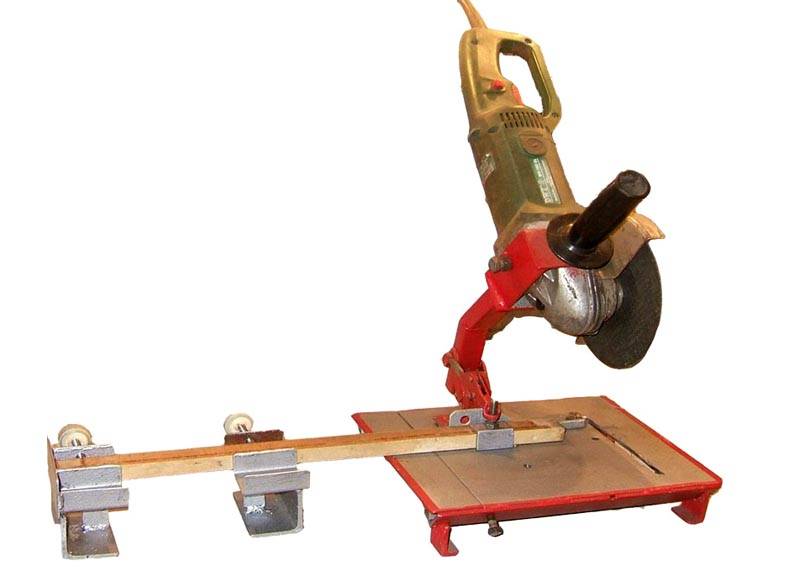 Assembled equipment
The assembly order of the stop will be as follows:
- Several metal angles are required for the standard “T” stop. Place them 3-4 mm apart on each side of the disc.
- The edges must be rounded at the bottom so that there are no scratches on the workpiece during work.
- Attach the corners to the bolts and nuts from the front and from the back side with cross ties. The slots are fixed with washers.
- Put a metal clamp on the body. Fasten the elements at the back so that the thrust stand and the clamp become one piece.
- Drill 2-4 mounting holes in the gearbox housing. It is more convenient to do this in the disassembled state of the element.
After assembling the stop, make an axial handle and an adjusting bar. Watch a video on how to make a bed for a grinder with your own hands according to the drawings:
After connecting all the elements, your home circular from the grinder will be ready. In addition to it, you can make various parts. Here are a few photos of do-it-yourself circulating saw attachments:
 Uncomplicated stop from a long wooden beam
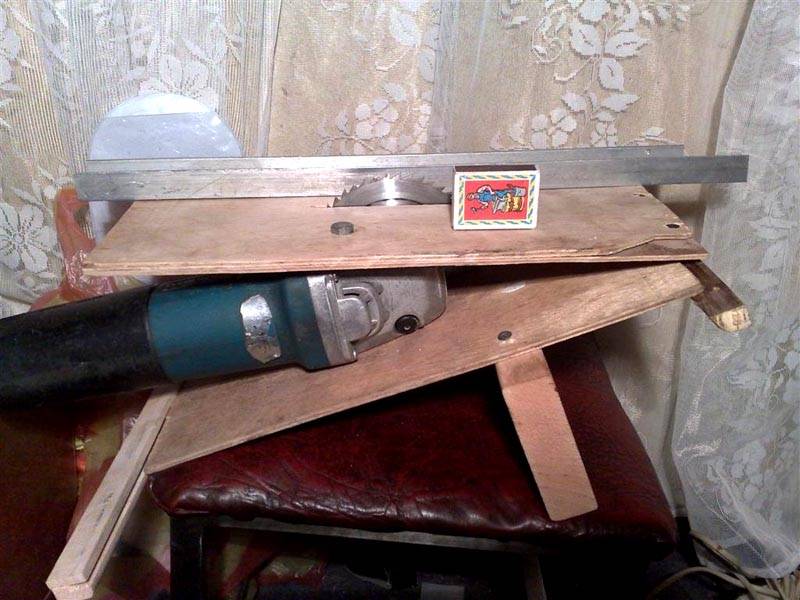 Fast version of the circular table
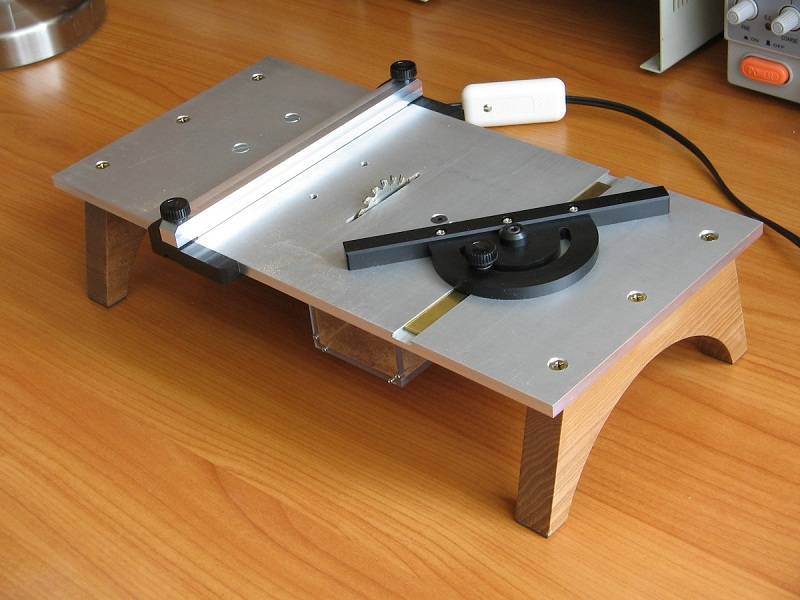 Cover for disc with teeth
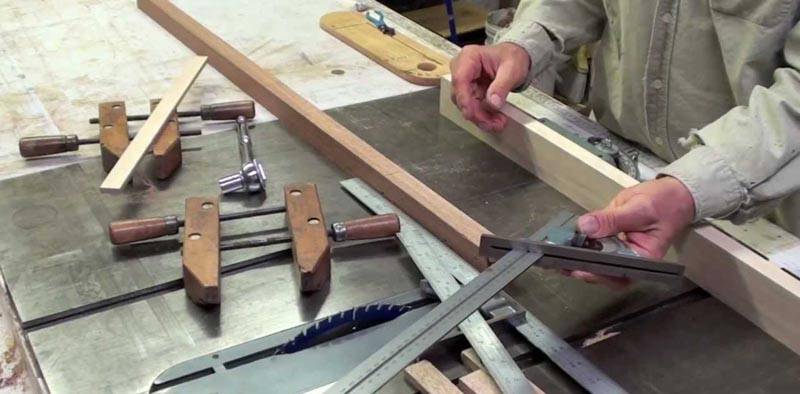 Convenient work desk
Original idea
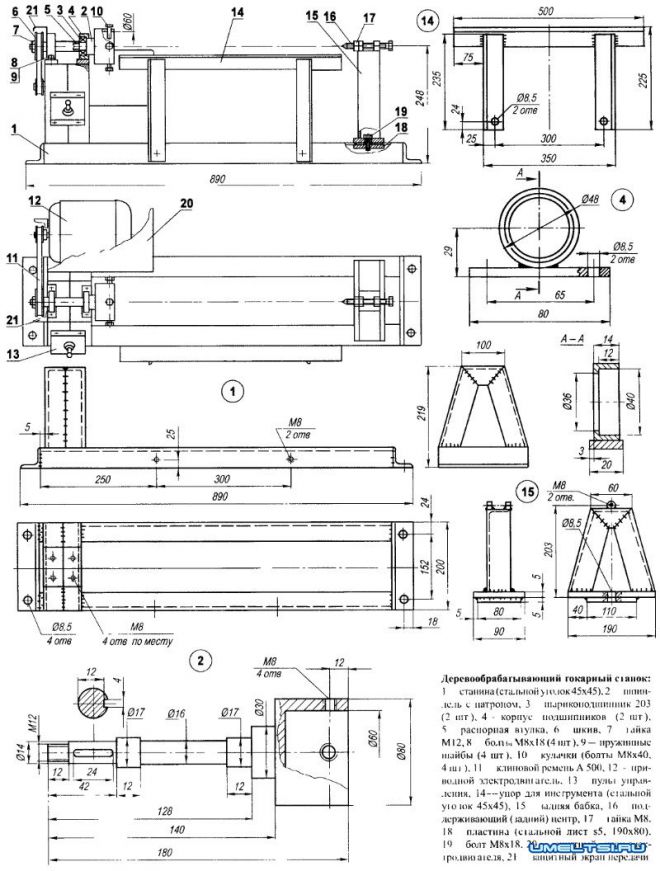
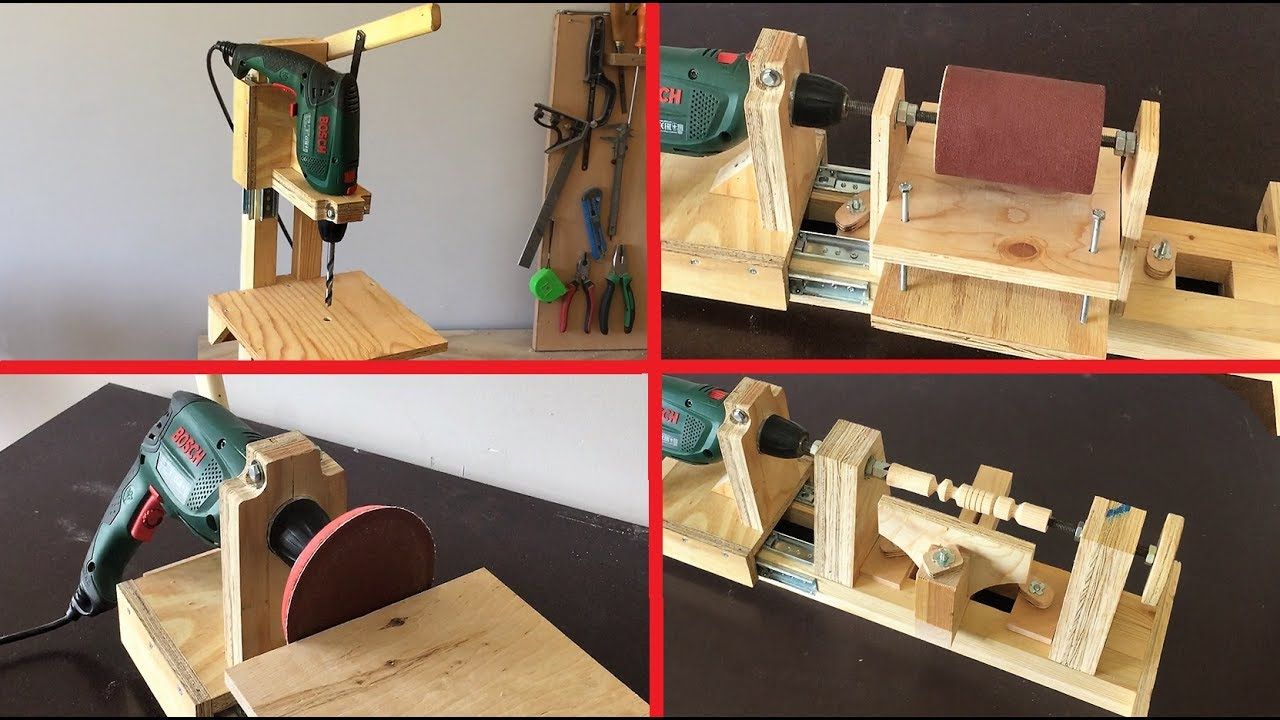
The originality of the idea lies in the fact that our homemade lathe will be made on the basis of the previously described drilling machine (see the article "Homemade drilling machine from a drill (screwdriver). Description, drawings, video."), As well as on the basis of the same drilling machine create two more other machines, which are described in the articles:
- Do-it-yourself planer: drawings, photos and videos.
- Do-it-yourself drill grinding machine. Drawings, photos and videos.
They also describe in detail all the technological operations of creation, there are photos and videos. Thus, it turns out that all four machines have one common base - this is quite convenient, versatile and unified.
| Drilling | Thicknesser | Grinding |
If necessary, having all the components at hand, you can assemble or disassemble the machine you need at the moment as needed.
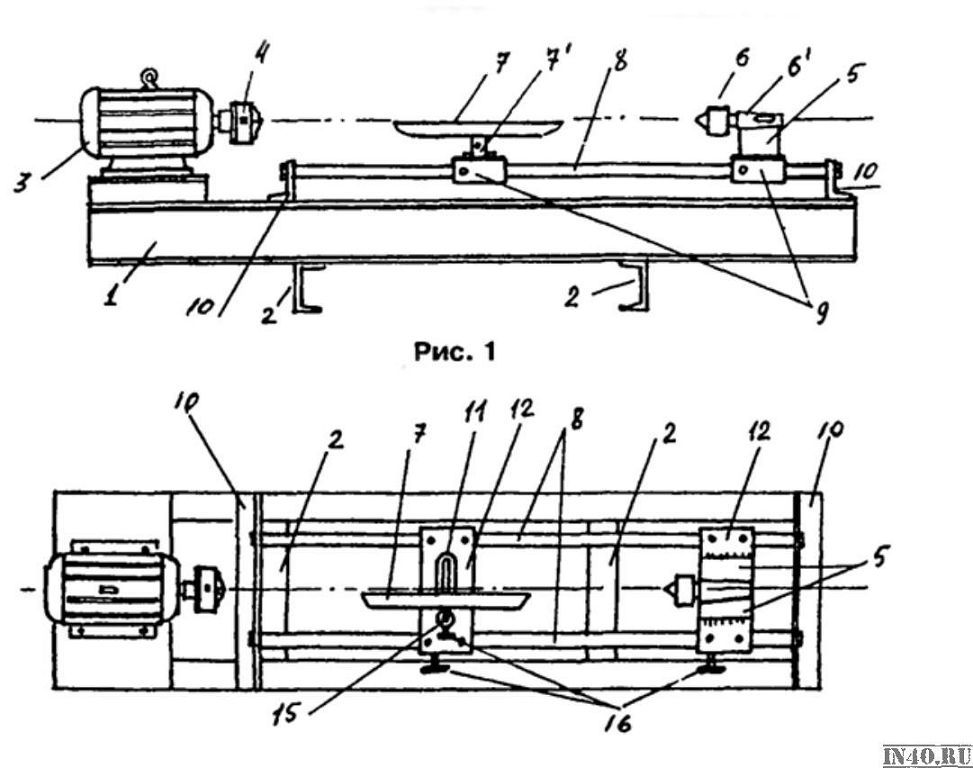
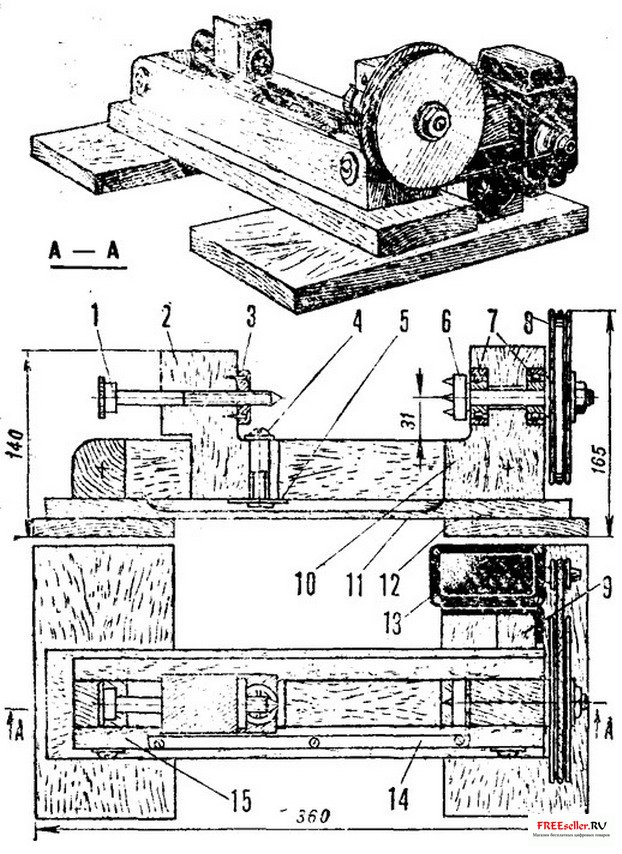
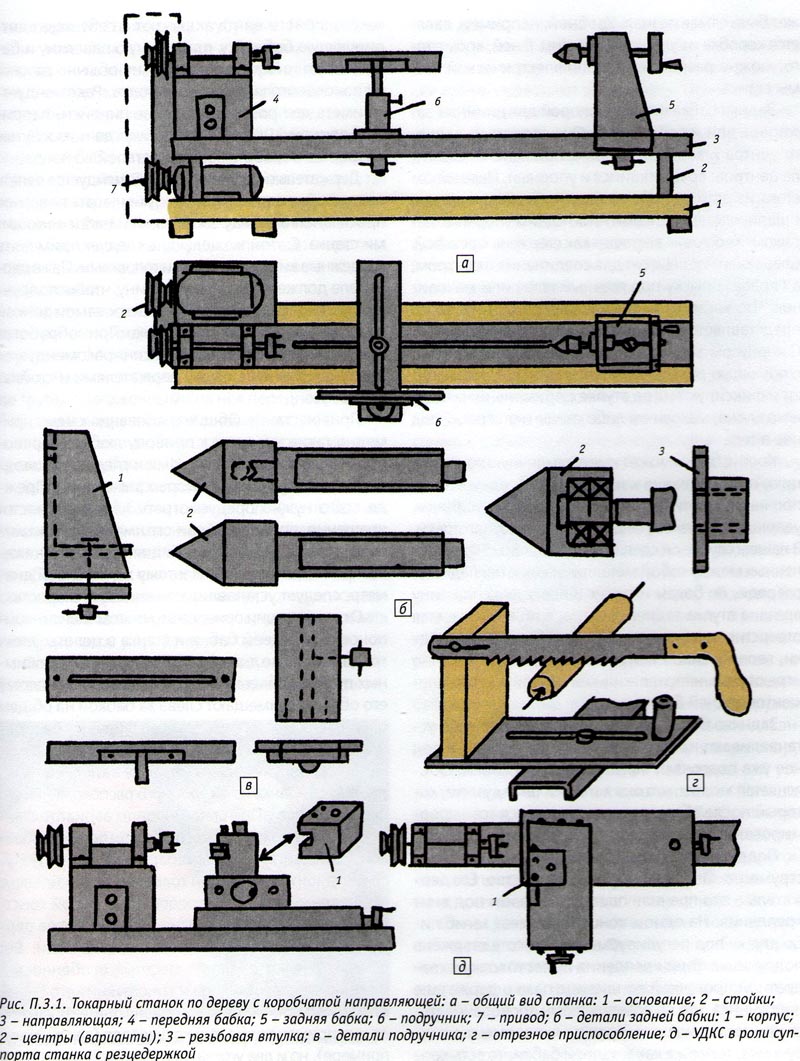
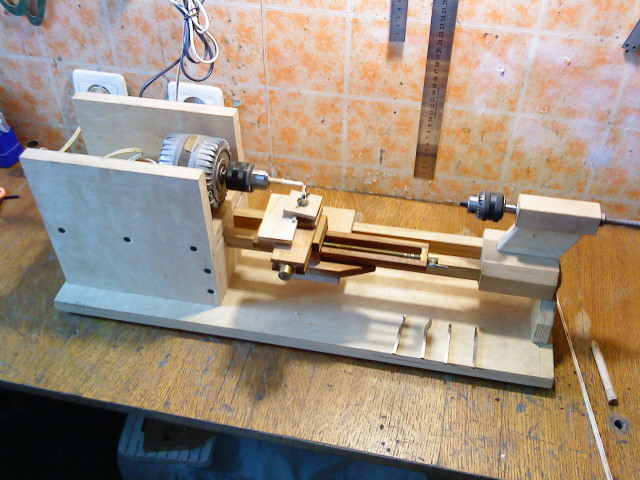
The general design and device of the home-made unit
When designing a homemade lathe for turning work, you can consider two options for designs: with an electric drive and without an electric motor. Despite the antiquity of the method of processing wood with the help of human musculature, this option has the right to exist in conditions when it is necessary to process wood, but there is no possibility to use electricity.
The main structural elements of the lathe are listed below.
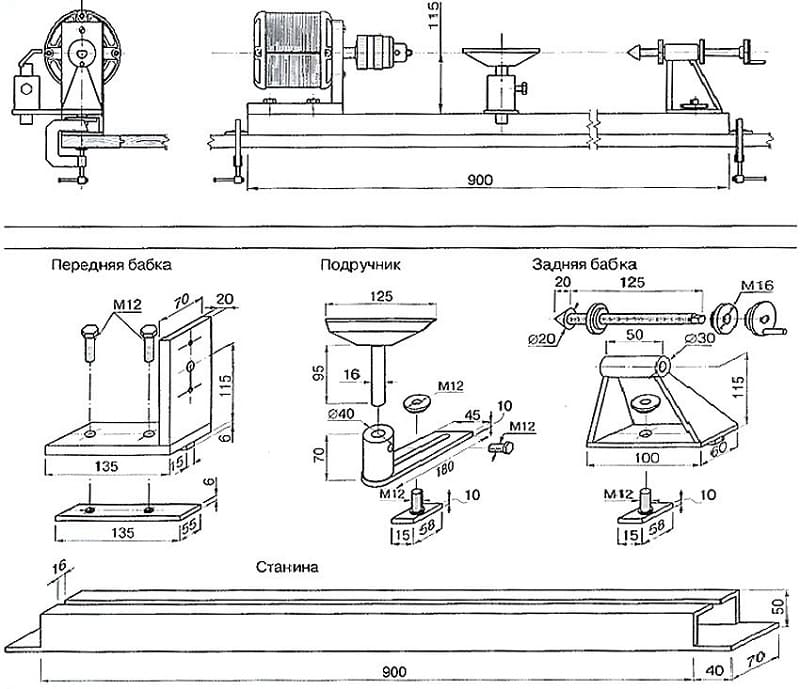
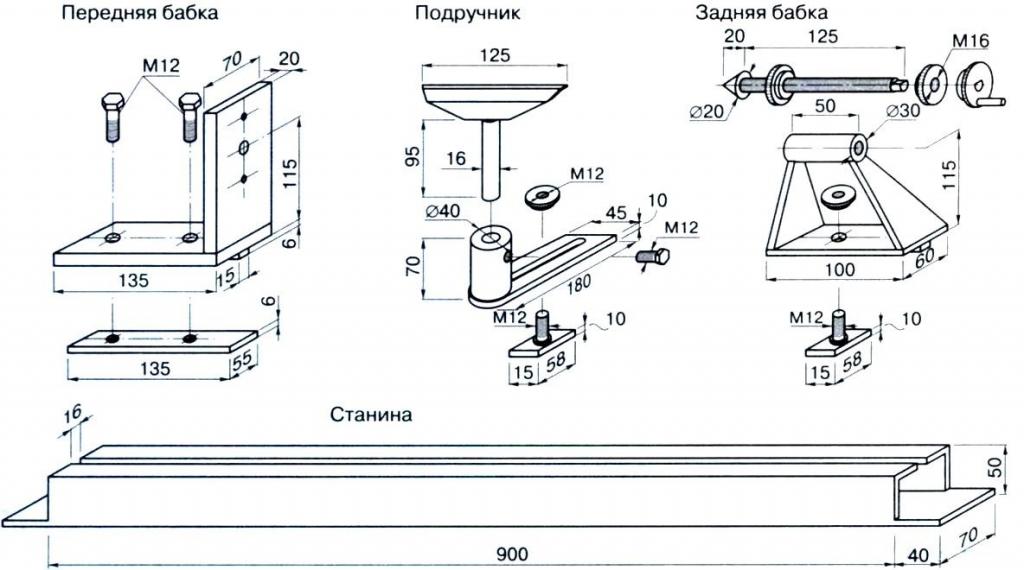
Stanina
The bed is the frame of the entire mechanism. The safety of the master and the quality of the future product depend on the reliability of the bed.
Drive: motor rotor or foot pedal.
Headstock
The headstock is a chuck for clamping the product and its subsequent rotation. Rotation from the engine is transmitted to it through a gear transmission, pulleys or a belt. At the end of the headstock there is a spindle with a faceplate for fixing the product.

Tailstock
The tailstock is needed for additional fixation of the workpiece, which will help improve the accuracy of the rotation axis and avoid unnecessary vibrations. It is a freely rotating sharper that can be moved along the axis of rotation of the product to adjust the distance between the headstock.
The assistant
A handguard is necessary to support the chisel during woodworking. Without a stand for a hand tool, it is impossible to maintain high accuracy of the blade tip hitting the sketch lines and it is extremely difficult to regulate the cutting force of the cutter.

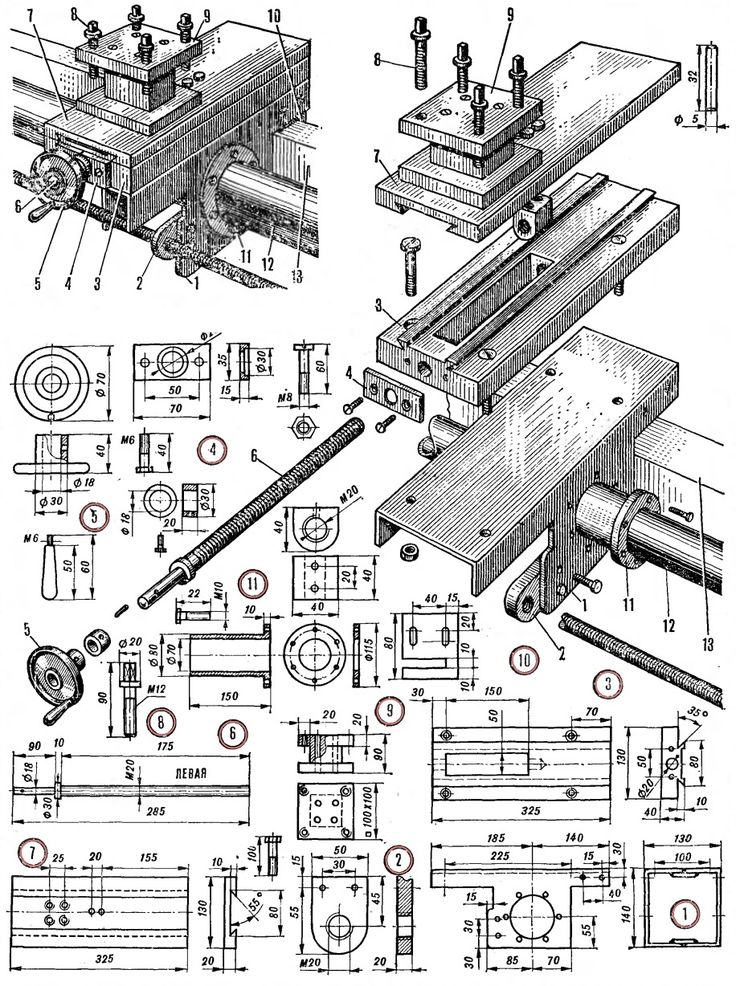
Assembling parts
When all the details are ready, they are assembled like a constructor
Assembly is carried out with great care, since plywood is a brittle material and can crack if handled carelessly. In the process of assembling the groove-and-tenon joint on the plywood sheet, PVA glue is passed along the entire length
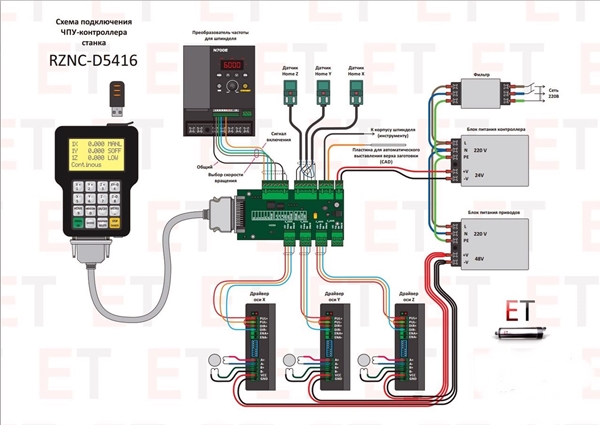
Bolted joints are supplemented with washers and engravers so that they do not loosen and unwind during work on machines. All cables are placed in PVC corrugation. The bed and table must be level. The controller must be located separately, it is placed in a cabinet. The assembly of parts can be carried out by looking at the photo, also in this case the diagram will help.
Errors and shortcomings that can be encountered
In the process of assembling the machine, you can encounter a number of problems, therefore, I recommend that before proceeding with the order and understand what you need to look for, decide on the dimensions of the machine, the dimensions of the products that you will process. So mistake number one - a drawing of the machine with the smallest details, from every screw to every wire, is not created.
The next mistake is the wrong selection of the spindle and frequency converter, so be careful.
And of course, mistakes arising due to lack of experience, here you can advise to think over the drawing more carefully and be guided by the proverb "The road will be mastered by the one walking."