Correct application
Regardless of whether wallpaper, paint or decorative plaster will be applied to the walls, at the first stage, the surfaces should be leveled and all gaps removed. After that, the walls are plastered and degreased.
The next step is surface priming. When the walls are dry, the starter putty can be applied. During such work, it is necessary to use a spatula correctly. The primer solution is prepared from a dry mixture and water. A homogeneous consistency should be obtained, for which it is recommended to use a construction mixer. The finished solution is taken from the container with a small spatula and applied to a wide one. The mixture is applied to the surface at an angle of 45 degrees. As soon as the excess solution on the large instrument begins to dry out, it is removed with a narrow blade. Otherwise, scratches will remain on the walls.
After the putty has dried, the surfaces are primed again and covered with paint, wallpaper or plaster. If decorative plaster is applied, then curly tools are used to obtain the desired effect.
Criterias of choice
Hardware stores offer a large selection of spatulas, among which you need to choose a convenient and high-quality tool for yourself. To do this, you need to heed the recommendations of professionals:
- For starting work, products with an iron or steel blade are best suited. To prevent the working blade from rusting, its surface must be coated with a special spray. After work, it is enough to wipe and dry the blade thoroughly. Store such a product in a dry place.
- For finishing work, a blade made of stainless steel is selected. If it is made from a different material, then traces may remain on the walls.
- Painting and facade tools must have an elastic canvas. It should not be too tough and at the same time should not bend from the slightest impact on it. It is inconvenient to apply the solution with a hard blade, and the mixture will simply fall off from a soft cloth.
- In hardware stores, you can see drop-shaped, trapezoidal and triangular products. The most reliable and convenient to use trapezoid blades.
- On sale you can see spatulas of various sizes. They can be short or long. Experts recommend choosing medium sized blades that are most comfortable to work with.
- An unsharpened canvas is used to apply the putty to the walls. The sharpened blade is designed to apply adhesive to tiles.
- The spatula must be examined carefully. There should be no jaggedness on it, and the blade should be perfectly straight.
Having chosen a tool suitable for work, you must hold it in your hands. If it is inconvenient to hold it, then the purchase should be abandoned.
Flatness control
The main methods of checking the quality of the sanded surface are touch control and control with the help of developing coatings.
Control with developing coatings
Developing coatings are of two types: dry, which are applied using applicators, and aerosol, in cans.
Apply a developer coat to the filled area before sanding. As you grind, the developing coat will fade away and you will see the lower spots where the developing coat remains. All you have to do is fill these black marks and repeat sanding. Remember to carefully remove the sanding dust before each filling.
 Working with a dry developing coating
Control by touch
The most sensitive areas of the palm
Run your palm over the sanded surface and the sensations will tell you where and what defects remain.If the sensations do not change, then the surface is flat, if they change, then there is still work to do.
There is nothing special to paint here, you will feel everything yourself. In the painting business, trained fingers are highly valued. There is something to train!
Solution for putty station
With the mechanized method of puttying, both powder compositions and ready-made mixtures are used. Cement and gypsum materials are the most popular among consumers. In addition to the main components, they include plasticizers and special substances that provide additional functions, such as elasticity.
When choosing a gypsum solution, it must be borne in mind that it can be used exclusively for interior decoration of buildings. Its characteristics do not allow using the mixture for finishing external facades and wet rooms. The advantage of gypsum is its porosity, due to which it dries quickly.
If it is necessary to carry out external finishing, preference is given to a cement putty, which has high strength and resistance to moisture. The disadvantages of the composition in this case are poor elasticity, shrinkage and prolonged drying.

Mechanical filling technology
Mechanized putty is made according to the following scheme:
- Surface pretreatment;
- Preparation of a machine for filling walls;
- Mixing supply;
- Coating alignment.
Each item has its own nuances:
The final result of the activity depends on the quality of the preliminary preparation stage. The main task is to create good adhesion. To achieve the goal, it is necessary to clean the surface from various dirt and dust. After that, treat the object with an anti-corrosion agent and apply a suitable primer.
The stage of setting up the device includes organizing its delivery to the place of mechanical plastering, connecting it to the water supply and heating network, as well as filling the receiver with material. After the performed manipulations, the master turns on the mixer and starts up the equipment, which begins to prepare the mixture for application to the work surface.
Mechanized work on the application of the solution is carried out in accordance with the observance of the necessary rules.
Surface sanding can be performed both manually and using a grinding machine.
Recommendations for mechanized wall putty are as follows:
The putty gun should be held at a distance of about 30 cm from the object;
The jet should be perpendicular to the wall;
You need to start working from the corners, paying special attention to the joints;
The width of the putty layer can be adjusted by adjusting the feed rate of the composition;
It must be remembered that the speed of the solution exit affects the delivery distance and occurs under high pressure.
Tips for choosing a spatula
Nowadays you can find many shops that sell construction accessories. But such a large selection gives rise to another problem: how to choose the best quality spatula. After all, there are so many of them on the shelves, they differ in size, shape, materials, manufacturer. How do you choose the right product?
When choosing a spatula for finishing work, you need to pay special attention to the metal from which the tool blade is made.
There are some tips:
- The instrument should be immediately taken in hand, if there is a feeling of awkwardness, then it does not fit. The canvas itself should be perfectly flat, the end (blade) should not have jags. Any defect indicates that the product is of poor quality and cannot be used.
- Spatulas are often found that have an uneven blade. It can be short or long. It is better to give preference to the medium size. So, it will be more convenient to work.
- In its shape, you can find: trapeziums, triangles, drop-shaped.The best ones are trapezoidal. They are more reliable and convenient to use.
- Facade and paint spatulas should not be very hard. It is better to select the canvas elastic, but not bending from the slightest impact. If the blade does not bend, it will be very inconvenient to apply the mixture to the wall. It will bend strongly, then the solution will simply fall off from it.
- The tool (its canvas) for finishing events is made exclusively of stainless steel. Other metal will rust and this will lead to marks on the walls.
- For starting work, you can choose a product with a steel (iron) canvas. It must have a special coating that prevents rust. Care for such products needs good: after work, wipe and dry, store in a dry room.
- The sharpened blade is not used for wall putty applications. It is used when applying glue to tiles.
There are many products for wall putty. They differ in shape and size. For the purpose of finishing, facade and painting spatulas are mainly used. They provide the right pace of work and lead to the desired result. Non-professionals should be aware that working with such a tool requires initial skills, but not as difficult as it might seem. Choosing a fixture for applying the mixture is easy, but you need to be careful. When purchasing cheap products that are made from second-rate materials, you cannot be sure that the end result will meet expectations.
Ceiling putty
As a standard, it is customary to putty ceilings for painting in two layers, in almost all cases this is enough
You should pay attention to the base, because this parameter depends on it.
- At the base of the ceiling, there should be no large holes, dimples and other cavities that increase your putty consumption and create difficulties during repair work. In other words, make sure that there are cavities with a cross section of more than 5 mm. They must be sealed with plaster or coarse putty.
- Before starting the putty, it is necessary to prime the surface well with a primer having deep penetration (1 layer). In this situation, you can use a wide brush, roller or spray gun. The best result will be with a roller, because then the surface will get direct contact with the material and it will be evenly distributed over the ceiling.
- When using a spray bottle, you must use a respirator to protect the respiratory tract. With the help of such a device, the work will take place twice as fast, however, the greatest drawback is a high waste of material, and the application is uneven.
- A primer with a brush is allowed, but it will be inconvenient for you and it will take a lot of time. The main goal of the primer is to strengthen the ceiling and create a certain “film” that will not absorb too much the water contained in the solution. In this case, the putty will not shrink and dry out in normal mode.
- It should be remembered before repair work that there are also coarse fillers used for rough leveling.
- For the final result, finely dispersed options are used.
- In the first case, the shrinkage coefficient of the building material will be an order of magnitude lower than that of the second option.
Correct selection of spatula or set
When planning to buy a spatula, take into account several varieties - for facade work and painting spatulas. It is not difficult to distinguish them, the latter have a smaller blade thickness and greater elasticity. The first are distinguished by their greater width, since they carry out a large front of work.
Pay attention to the handle. To purchase quality tools, make sure that the blade is made of quality material, otherwise the tool is disposable and cannot be used in the future.
It will be trite to deteriorate in the process of completing the first task. Choose a spatula with a comfortable rubberized handle with a comfortable surface that is tightly attached to the working part. In this case, it is guaranteed that it is convenient when applying the mixture to the walls.
 Types of spatulas
If you purchase painting spatulas, take into account that, due to flexibility, these tools do not differ in durability. Intensive use will quickly render them unsuitable for subsequent work.
Spatulas are also available with different working blade widths. Options for basic work are offered with a width of 40-60 cm, and "auxiliary", used for work in hard-to-reach places, offer a width of 6 to 15 cm.
Intending to purchase spatulas, they buy a set. It is convenient in the current situation and in the future. An excellent choice is the purchase of tools with a width of 50, 150, 400 and 600 mm. As for wide spatulas, they are purchased when they are convenient for the room where the work takes place. For a small room, putty on its walls, a spatula with a working surface width of 40 cm is enough.
If you do not install special corners in the corners of the room, then they acquire a corner spatula. Only a specialist can work with him. This tool creates even 90-degree corners, but since this requires experience and skill, the corner is best done using perforated elements, which are then puttyed.
Related
Ceiling insulation in a private house | DIY ceiling
Ceilings in the house are the most important point for keeping warmth inside the room. Therefore, they must be insulated competently and efficiently. Below we will tell you about the technology of ceiling insulation using mineral wool
How to paste over the ceiling with decorative plates.
Before proceeding with the gluing of decorative plates, it is necessary to level the surface on which they will be placed. When gluing decorative tiles to the ceiling, there are several ways how
False and false ceilings.
Nowadays, stitched and false ceilings are quite popular. The design of such a ceiling is difficult to call difficult. The basis for it is a frame made of wood or metal, which
The device of the ceiling of the frame house | DIY ceiling
In this section, we will consider the device of floors in a country frame house. In general, the floors in the house can be different: attic, interfloor and attic
How to mount PVC panels on the ceiling
Ceiling cladding with plastic panels does not involve serious labor costs and can be done very quickly. Therefore, many owners today use precisely PVC panels to decorate those
How to sheathe the ceiling with plastic panels with your own hands - our recommendations
The procedure for cladding with plastic ceiling panels is not so much problematic. Using this inexpensive and practical material, you can make a decent finish.
Work order
- It is easiest to start sealing the small grooves above the caps of the screws from the far lower corner of the wall in order to get used to it at first. The putty is laid with a surplus with a small spatula, it is pre-pounded, leveled, after which the surface is finally compared with a wide spatula, passing it from two three directions. In order to level the mortar along the plane, to remove the excess, it is better to hold the spatula at an angle of 60 ° in the direction of travel.
- Serpyanka tape is glued along the length of all drywall joints, where there are thinning along the edges, where only independently made chamfers, you can do without a grid so as not to create convex lines. Almost any tape made of polymer mesh for sealing joints has one side with a self-adhesive compound, so there should be no problems with sealing drywall joints.
- It is best to apply the mortar along the chamfers, the edges of the sheets, or with a 10 cm or even 30 cm spatula. A small portion of putty is applied to the middle of the spatula. Attaching a spatula to the wall from the bottom of the seam, the solution is distributed over the depression with a long, even upward movement. Press the spatula firmly, hold it at an angle of 45-55o to the line of movement. When the solution is already 2/3 spent, it is better to add it with a spatula. Otherwise, the gap may not be completely filled, bubbles form, which will not allow the solution to smooth out normally.
- It is better to smooth the seam with oblique movements at an acute angle from two directions. It is not worth going too many times. After that, putting a wide spatula to the surface under 60 °, drawing along the seam, the excess is removed. Further, the surface is smoothed.
You should not try to get rid of all the stripes that form along the edges of the trowel, if these are not potholes, it is easier to cut them off after drying with a grout.
- Now it is not the most difficult, but crucial stage, how to putty the corners of drywall. To do this, a metal corner with perforations is attached to the corner of the wall with a stapler. Next, a wide serpyanka tape is glued on top of it with an approach to both sides. It is better to putty and remove one side of the corner first. At the same time, a strip of putty can go onto the wall from the corner by 10-15 cm in order to smooth the transition from the corner to the drywall as much as possible, close the mesh.
- When the mortar has seized on one side of the corner, the edge is carefully compared with a knife, grout or spatula and the corners of the drywall are putty on the second side. This is how a perfectly even angle is obtained, which cannot be removed so efficiently by applying the solution simultaneously from both sides.
- When the solution is dry. With the help of a grout and a mesh with emery, the entire surface is compared, removing small irregularities, bumps of excess mortar.

This completes the sealing of drywall seams. Before further work, it is imperative that the entire surface of the wall is primed to get rid of gypsum dust, to ensure uniform adhesion to the next layers of the final finish. Having figured out how to properly putty drywall, it will become clear how much starting putty is required for sealing joints and useful skills will be obtained on how to carry out further work. For painting or pasting with thin wallpaper, you will need to open the entire area of the wall with a finishing putty, create a perfectly smooth surface, which will be discussed in the following articles.
Even more words will tell you how to properly putty drywall video in many ways:> Features of plastering drywall walls: step by step instructions
Criterias of choice
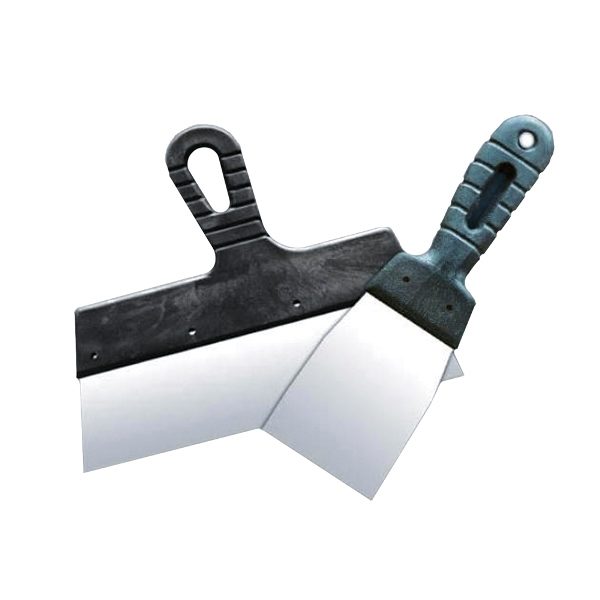
Spatulas with a width of 15-20 cm are rarely used for applying putty, they are usually used as auxiliary devices. They are very convenient to mix the putty, apply it to the working tool and distribute it over its surface. Small tools are indispensable for covering the caps of self-tapping screws on drywall, for sealing small defects and scratches. Narrow blade tools used in conjunction with a wide finishing trowel must meet the following requirements:
- made of stainless steel, blade thickness - not less than 1 millimeter;
- the handle is made of plastic or rubber, has a short length and is durable, in order to avoid splashing of the putty due to excessive springiness;
- width - 10 centimeters, this is the optimal size for picking up putty;
- the blade should resemble a square in shape, that is, the width of the working area should be approximately equal to its length so that the blade does not bend excessively.
If a triangular or trapezoidal tool is used, then it is quite difficult for them to pick up putty from a bucket. A tool with one sharpened edge is not suitable for puttying; they can remove old paints and varnishes, whitewash and other coatings.
When choosing a front spatula for putty, you need to be guided by the same requirements - its blade must be made of stainless steel, it must have sufficient elasticity and strength, without damage or defects, the handle must be comfortable. Tools that are too wide will bend under the putty. Facilitate and accelerate the work of a spatula with a mechanized handle.
It is important to take into account the width of the grip clamp so that the working area is no more than twice as long. Experts say that it is very convenient to putty with a spatula with a blade width of 30 to 50 cm
It is desirable that the handle is oblique, rubberized. It must be remembered that the main tool is correctly held in the right hand, and the additional spatula will be located in the left hand, with this in mind, you need to select products in the store.
How to putty walls: technology
The technology of plastering walls does not differ from the technology of plastering the ceiling. The only difference is that the walls are much more convenient to putty than the ceiling.
Preparation of putty
If you have chosen a dry mixture to level the walls, you must first prepare it. Follow the instructions on the packaging from the manufacturer. Usually, the mixture is mixed with water using a drill or a perforator with a mixing attachment to the consistency of sour cream.
Water at room temperature is poured into a container (it can be a bucket or a basin), then gradually add the mixture and stir well. Allow the mixture to settle for 10 minutes, then mix well again.
You can check the quality of the solution in this way: scoop up a small amount of the mixture with a spatula and turn it over. The mixture should drain smoothly from the spatula. If the mixture does not fall or run off, then the solution is too thick. Such a putty will not adhere well to the surface. It is necessary to add more water to the container.
If the mixture is poured from the spatula, or drips, then it is too runny. There will be sagging on the walls. In this case, add more mixture to your container and mix well.
Putty technique
Now we take our mixture with a narrow spatula and put it on a wide spatula.
Next, putting the spatula to the wall at an angle of about 30 - 45 degrees, smoothly run the spatula along the wall until all the mixture remains on it. It is better to start the middle of the wall from the corner and move from left to right, we make the upper part of the wall from top to bottom. We make the lower part of the wall from the bottom up.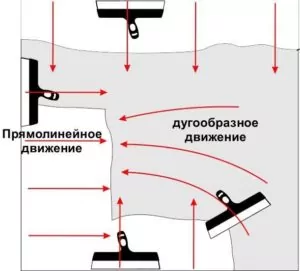
Put the next portion of the mixture on a wide spatula again and apply to the next area. To make the surface even, the layers must be overlapped. When sanding, then you will not get bumps or depressions on the wall.
The thickness of the layer of the starter putty on the wall can be up to 1.5 cm. It depends on your walls and their initial evenness.
It is best to use a corner trowel to putty the corners. Apply the putty along the entire height of the corner and level it with an angled spatula.
The spatula must be periodically cleaned of adhering mixture and lumps. To do this, do not forget to rinse it in water.
After completing the work, leave the layer to dry. The manufacturer also indicates the drying time of the mixture on the packaging.
How to sand walls after puttying
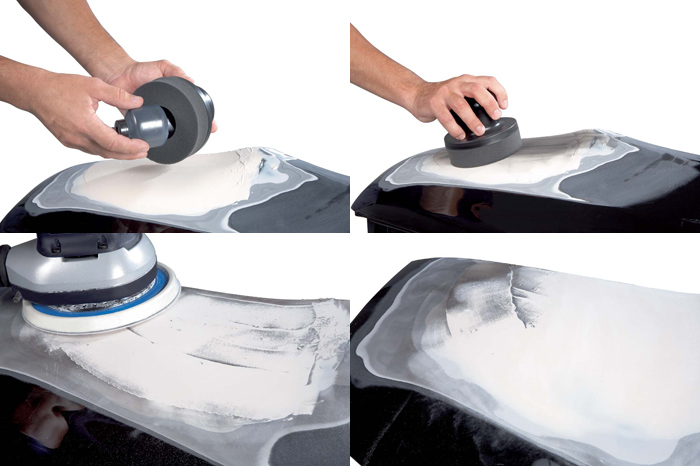
Once the mixture is dry, you can start sanding.
The starting layer can also be sanded with coarse sandpaper. For this, a special device is used - a grinding block. With smooth circular movements without strong pressure, we wipe out all the irregularities on our surface. It is desirable to illuminate the surface with additional light. This will allow you to see even the smallest flaws.
Remember to use protective masks and goggles as sanding is a very dusty job.
After sanding, if you intend to apply a finishing layer, the surface must be primed again.
How to putty walls with finishing putty
The purpose of the finishing putty is to make the surface perfectly smooth and beautiful.The putty technology does not differ from the starting putty. To achieve perfect smoothness, puttying is done with additional light. Typically, this is a portable lamp. It is applied in a very thin layer - up to 2 mm thick and is designed to eliminate small cracks and pores.
Wall and ceiling plastering tools
Finishing is carried out in several stages:
- Sets the thickness of the mortar, which should be used to plaster the wall.
- The volume of the mixture for work is determined.
- A set of tools is selected to control the horizontality and verticality of the finished surfaces.
- A set of tools is purchased to get the job done.
- Working mixtures are being prepared and finishing is being carried out.
- Sanding and sanding is performed to obtain a high quality surface.
A layer with a thickness of 2-3 mm is applied to the wall or ceiling at least, the maximum is not limited. In some cases, several layers are applied sequentially to achieve the desired quality. With multi-layer plaster, it is necessary to additionally reinforce the gaps between the layers in order to ensure strength.
Preparation for work
Many foremen before starting work for each room determine the volumes by filling in special tables. Below is a fragment of the calculation for a room of 3.6x4.8 m with a ceiling height of 2.6 m.
Tools for the job
Puttying the walls is performed with a set of tools (Fig. 3). First of all, spatulas are needed, with their help a layer of solution is applied and rubbed over the surface.
Rice. 3 Tools required for finishing walls and ceilings with wet mixes
Internal and external corners are processed using corner spatulas. Some craftsmen prefer to use a tool with a rubber or silicone blade. But most traditionally use metal blades.
After the layer has dried, it is finally leveled using sandpaper or graters with a set of meshes with different mesh sizes.
Features of storage and care
All necessary repair and finishing work will be performed correctly only with the help of high-quality tools.
It is important to take into account the recommendations for the use, operation, storage of spatulas. For example, after use, finishing devices must be washed and dried well.
The blade should not be subjected to heavy mechanical stress, therefore, it is not recommended to apply too heavy mixtures. The working base of the tool should be in contact with abrasive surfaces to a minimum.
It is better to store the spatulas vertically, neatly attached to the nail. It is not recommended to keep in tool boxes so that the blades do not bend.
It is necessary to choose a tool among a wide assortment in a practical way, based on the specifics of the required work. Correct use of the spatula will be the key to a high-quality finishing of the room.
Sizes: narrow, medium, wide
To make it easier to putty the walls, you need to choose the tools that are suitable for the dimensions.
- For lightly filling walls and leveling very uneven base, a wide one is used. They will be able to eliminate very massive, gross defects. It is intended for the application of the initial putty mortar, while the mixture is applied in a thick layer. Width - 30 cm.
-
The medium-sized puttying tool is available in widths from 15 to 25 cm. It is used to process large dents and irregularities that are still left after the initial treatment. A medium trowel can be used to smooth the filler layer. They fill in pits, eliminate visually perceptible irregularities.
After work, minor dents may remain, which are removed after the solution has completely dried with special ribbed paper.
-
Narrow has a working part width of no more than 10 cm. It is designed to handle minor irregularities that remain after applying the previous material.When working with a tool with a narrow blade, there are practically no irregularities or defects on the wall surface.
It can be used for maximum leveling of the surface and hard-to-reach places, it is convenient to draw up the solution, and then apply it to the work surface.