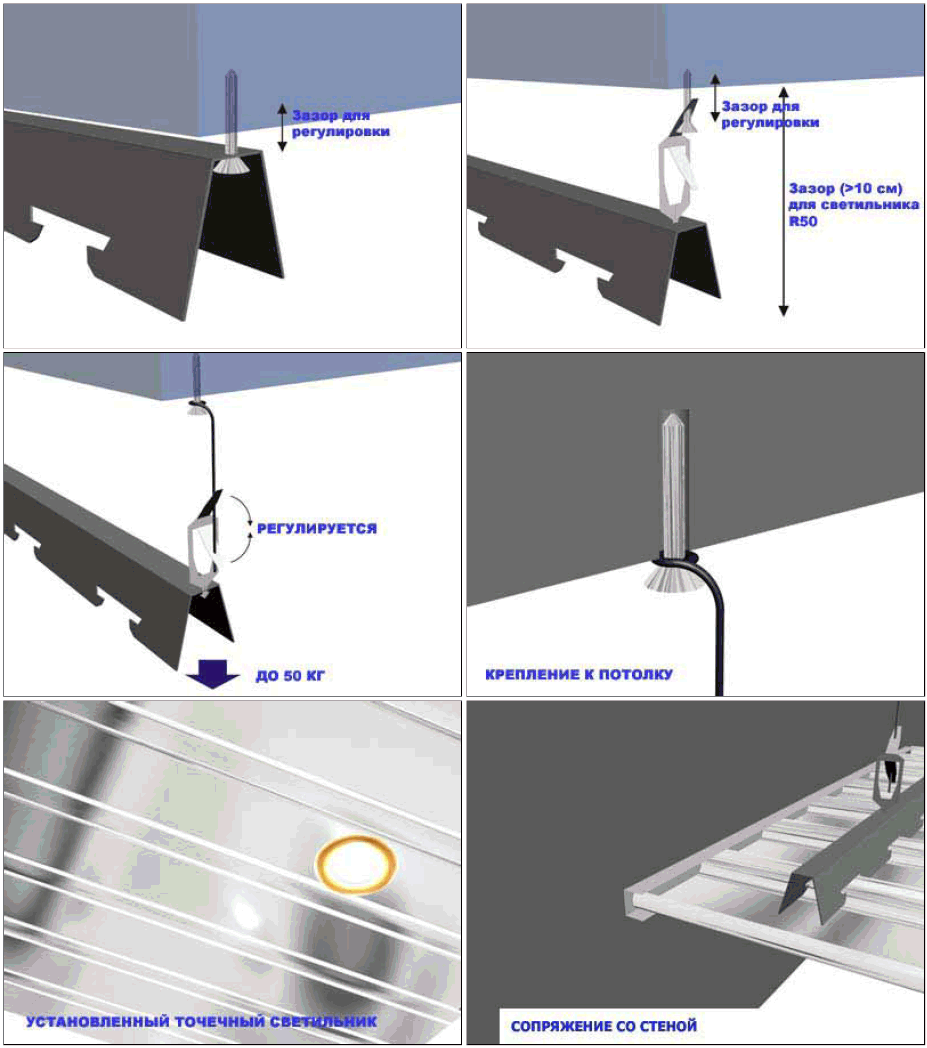
Installation of spotlights
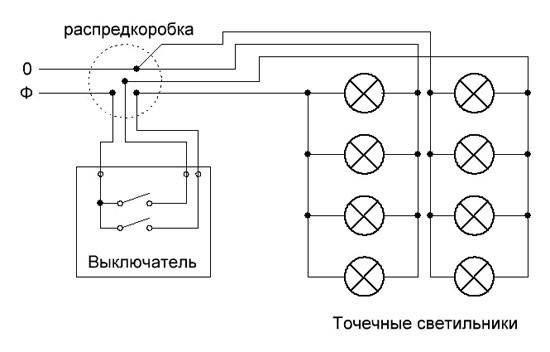
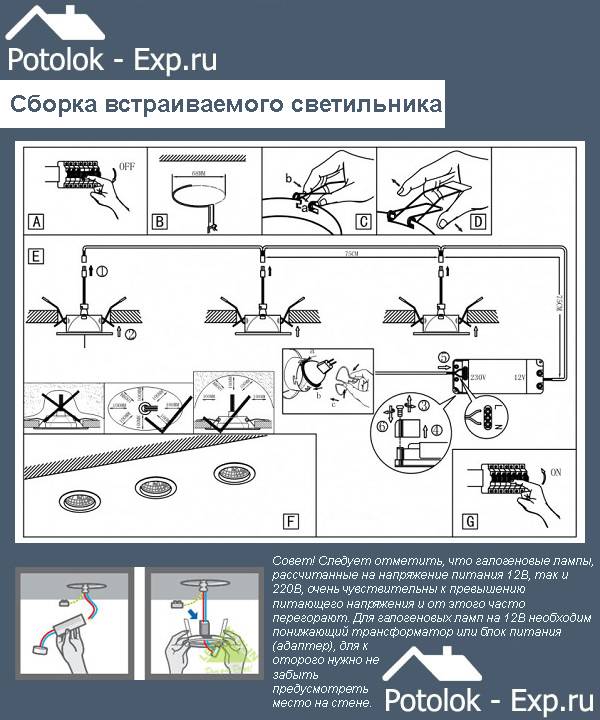
Connection diagram for 220V ceiling spotlights.
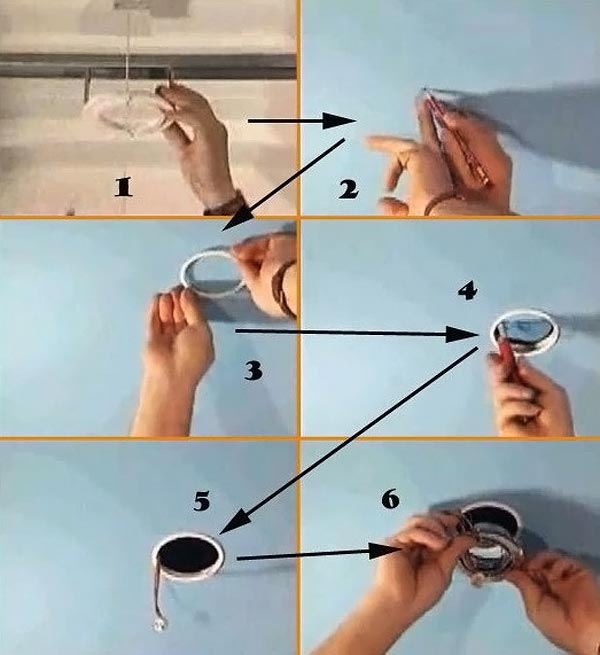
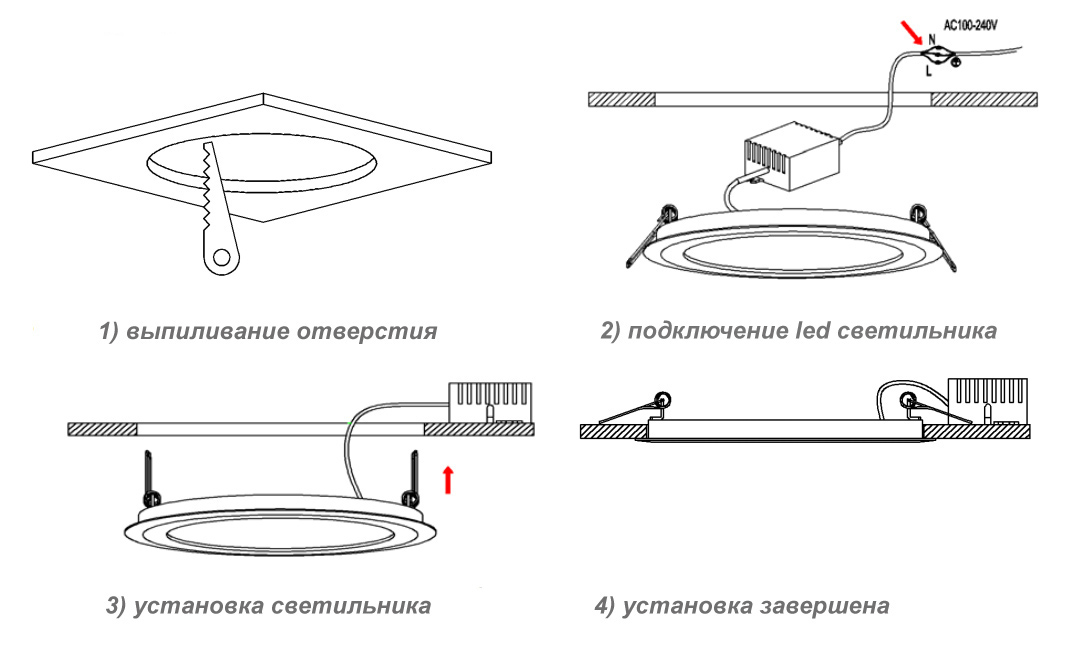
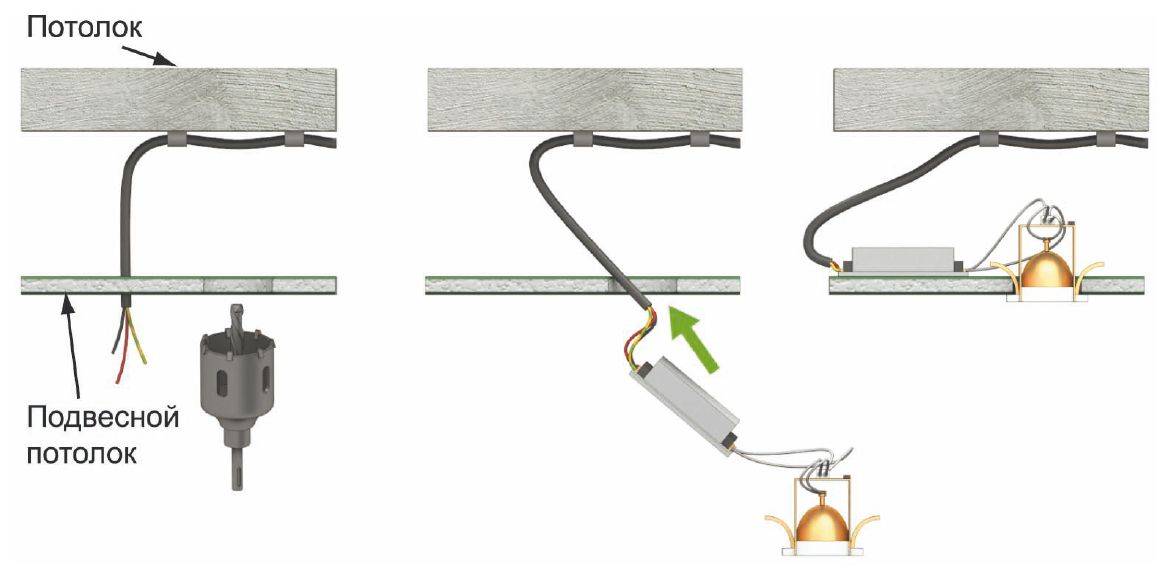
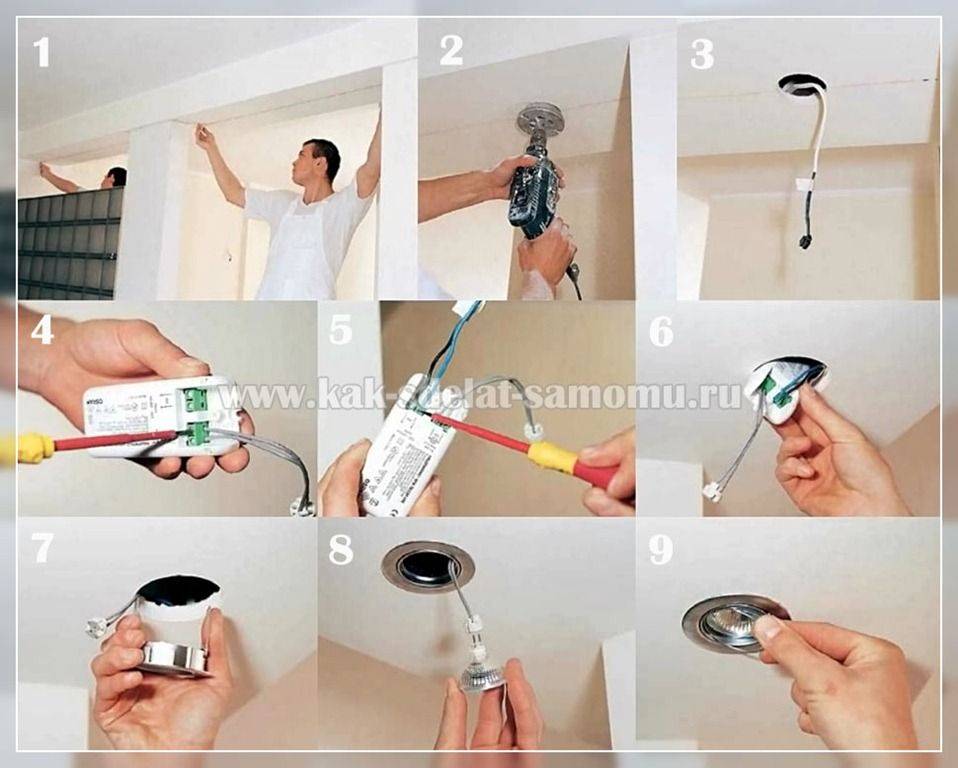
produced in the ceiling holes. To do this, a through hole is drilled in a plasterboard, wooden, suspended or OSB plate, PVC panel using a drill and a crown drill of the appropriate diameter. If the lamp is square, then the corners of the hole are cut with an electric jigsaw.
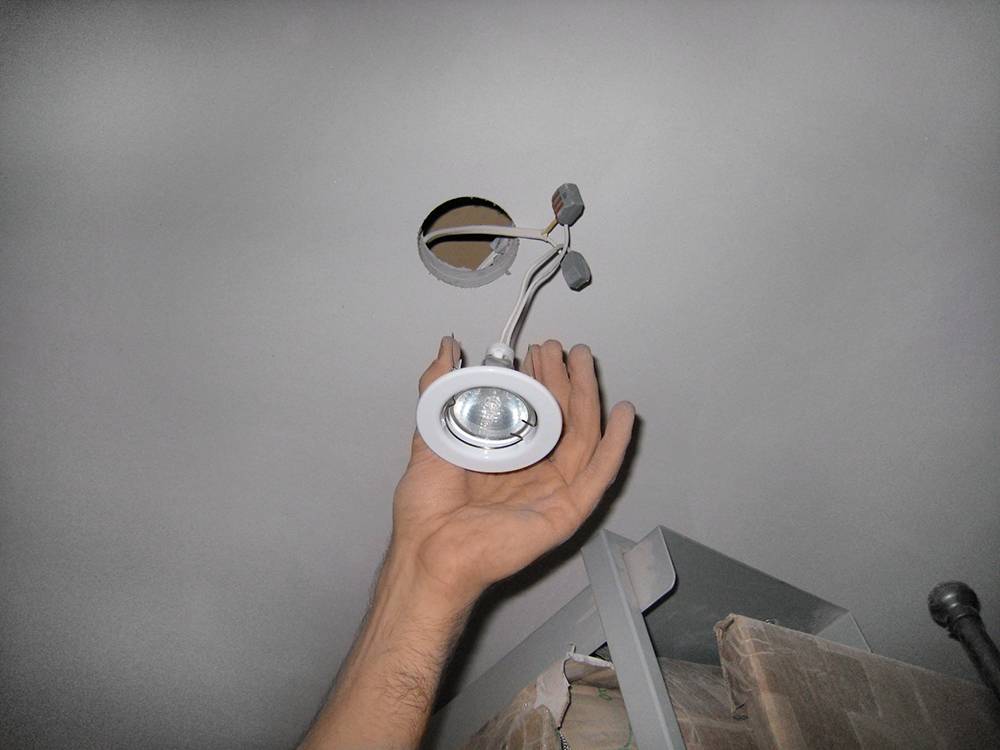
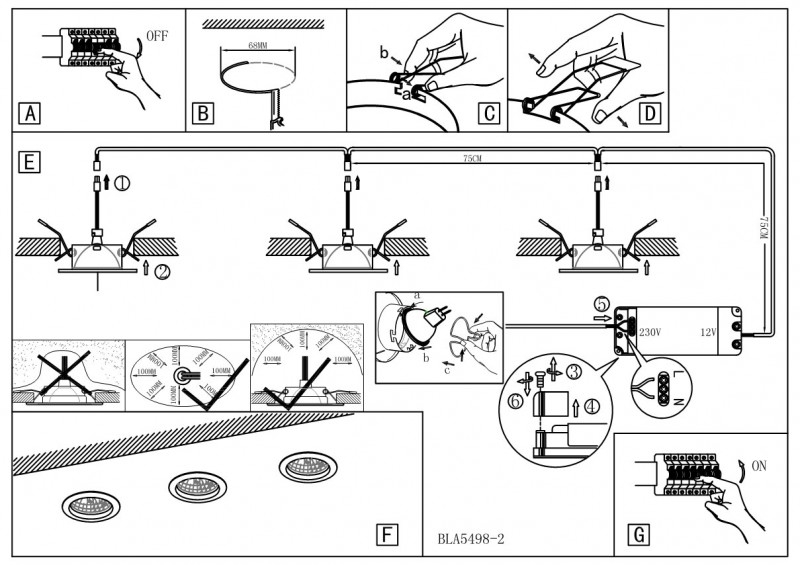
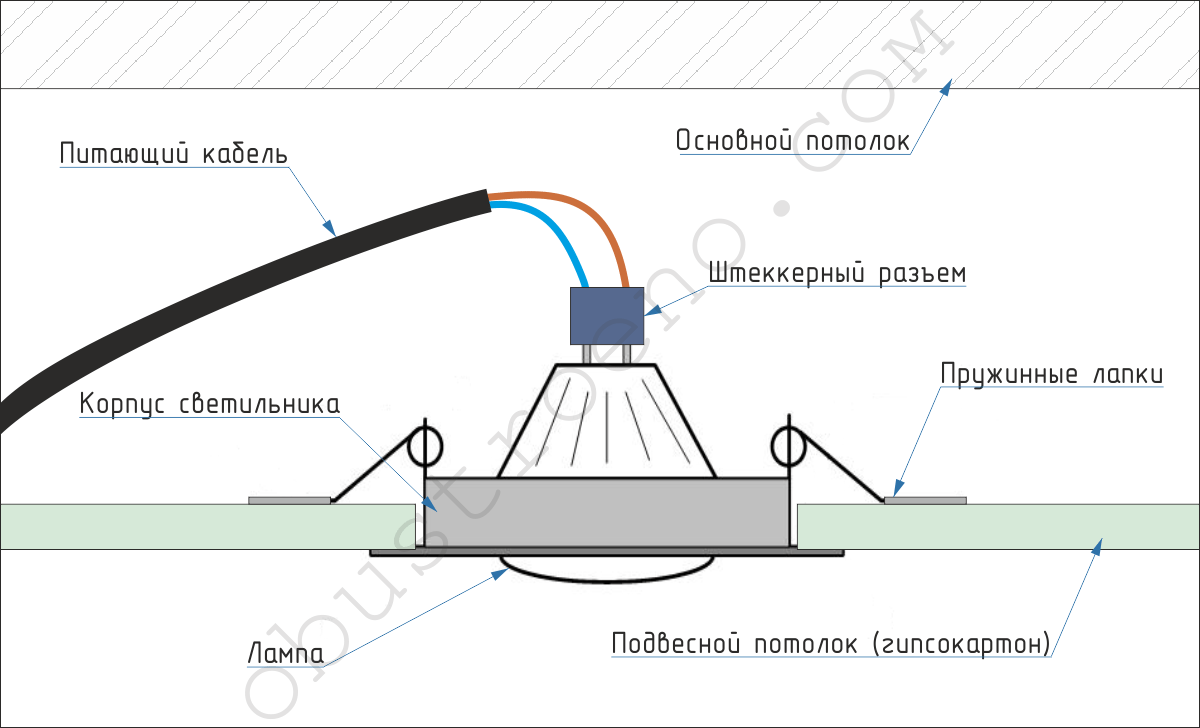
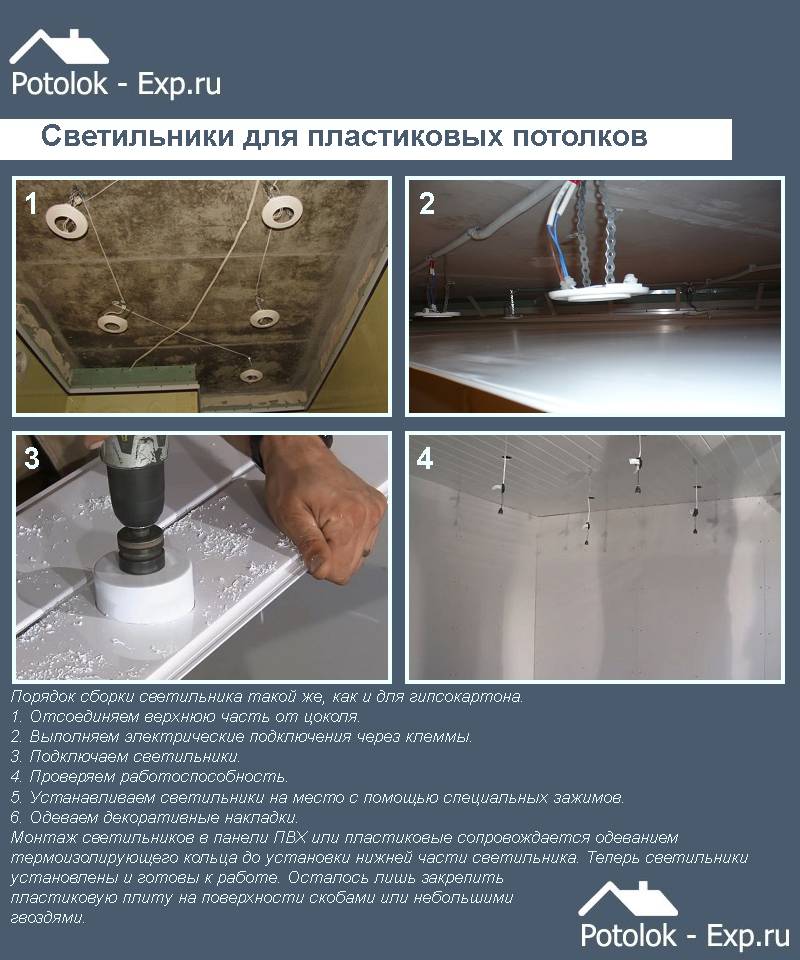
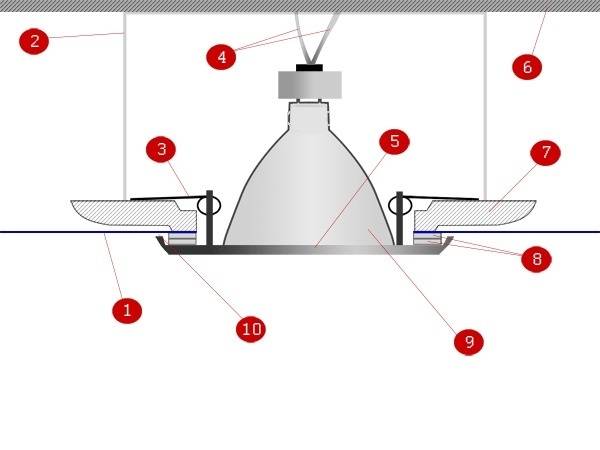
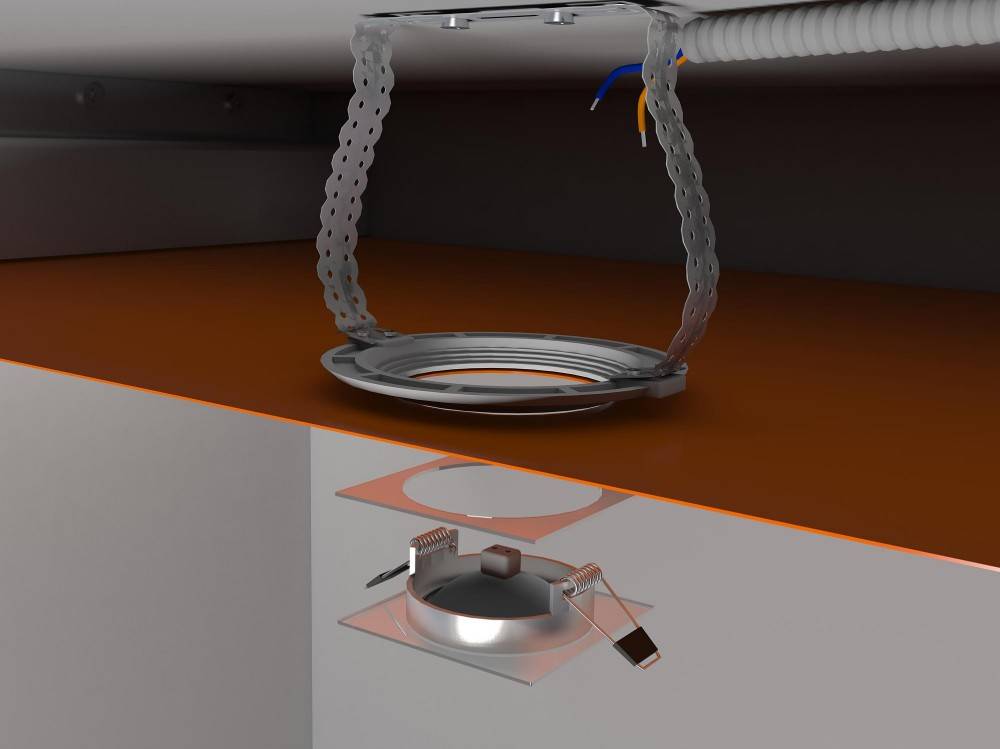
Through this hole, the end of the wiring is pulled, the ends of which are stripped of insulation in a section of 5-7 mm. These stripped ends are inserted into the luminaire terminal blocks and clamped into them by tightening the screws with a screwdriver. Then the springs of the lamp are compressed, inserted into the hole with it and released, and they unclenched, rest against the ceiling from the inside and attract the lamp to the outer surface of the shelf. Then it just remains to insert the light bulb by screwing or inserting it into the socket. When installing halogen lamps, take into account that they should not be touched with bare hands, and, if necessary, through a clean cloth or paper. If, nevertheless, this did not succeed, then you should wipe the lamp with a rag moistened with cologne or alcohol.
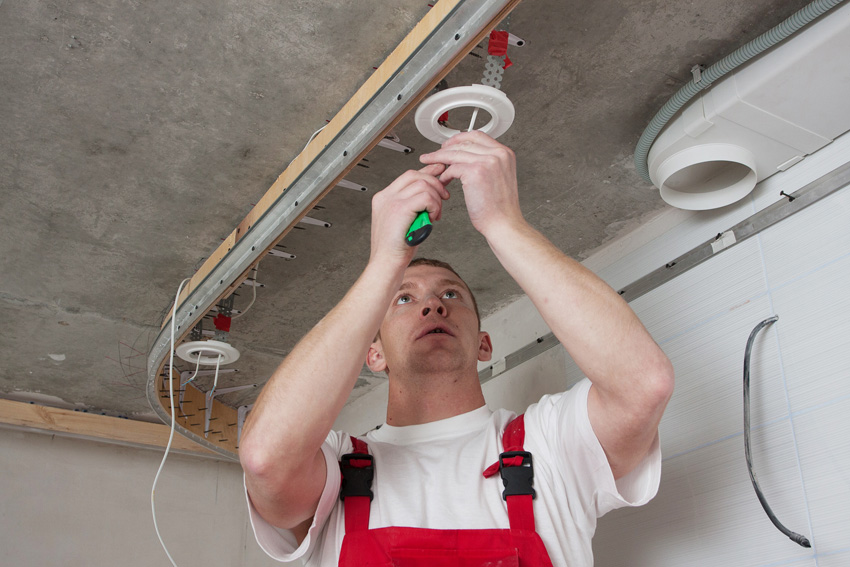
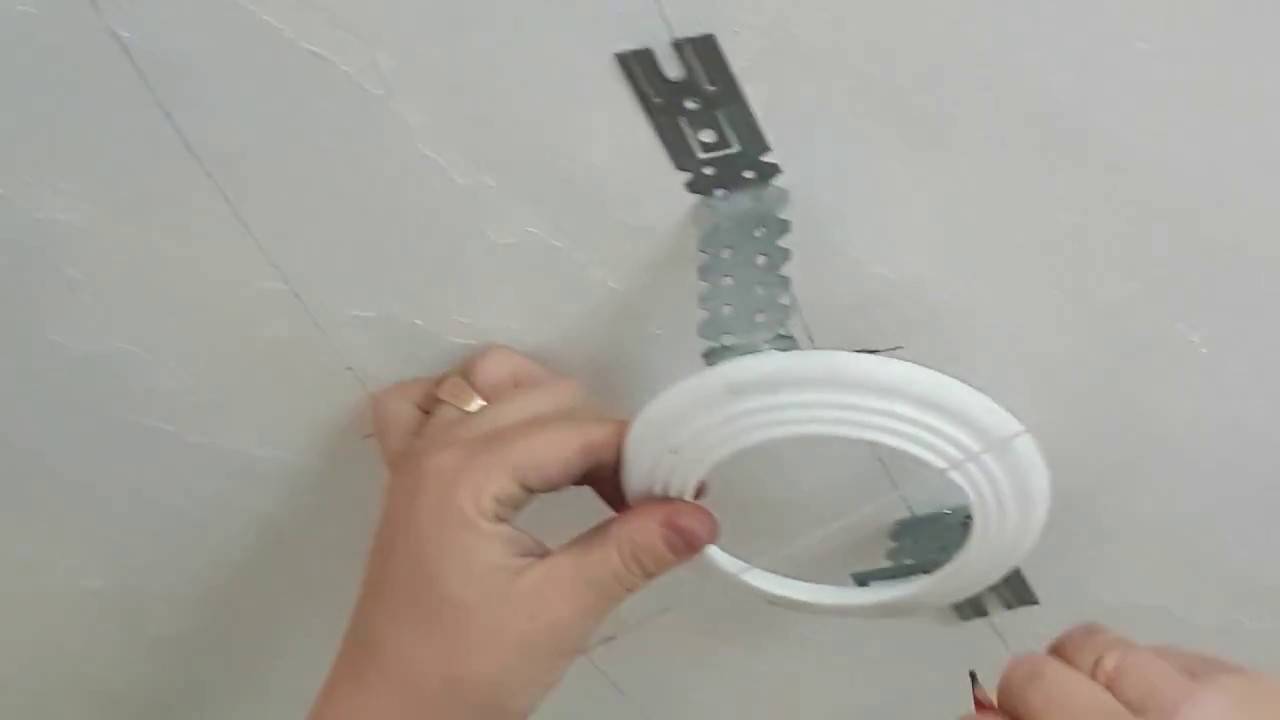
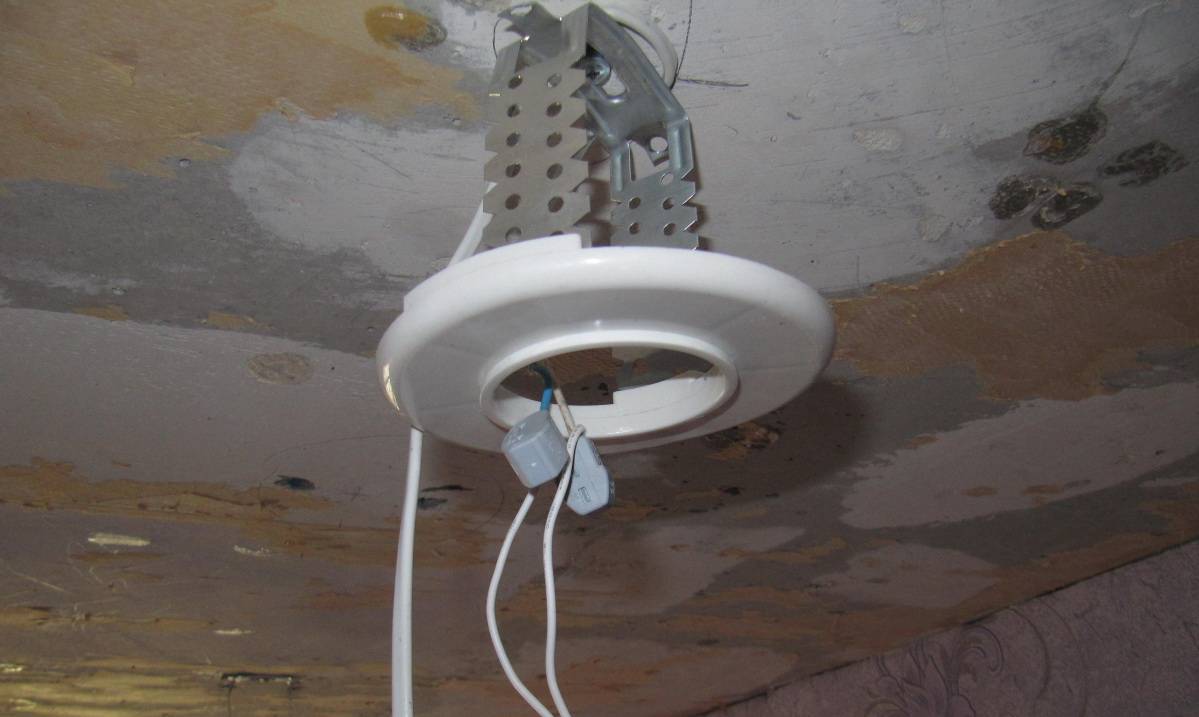
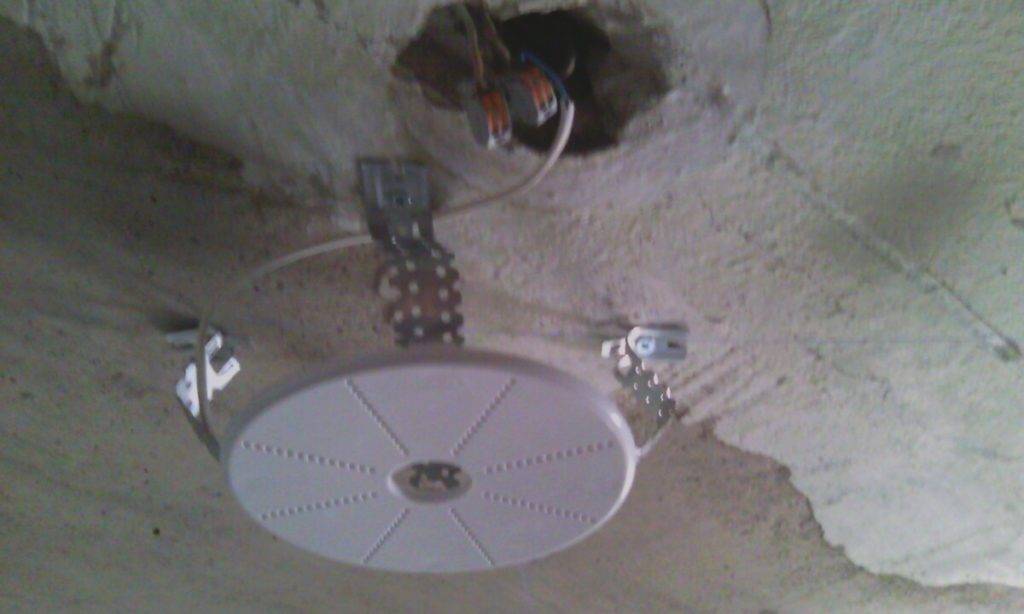
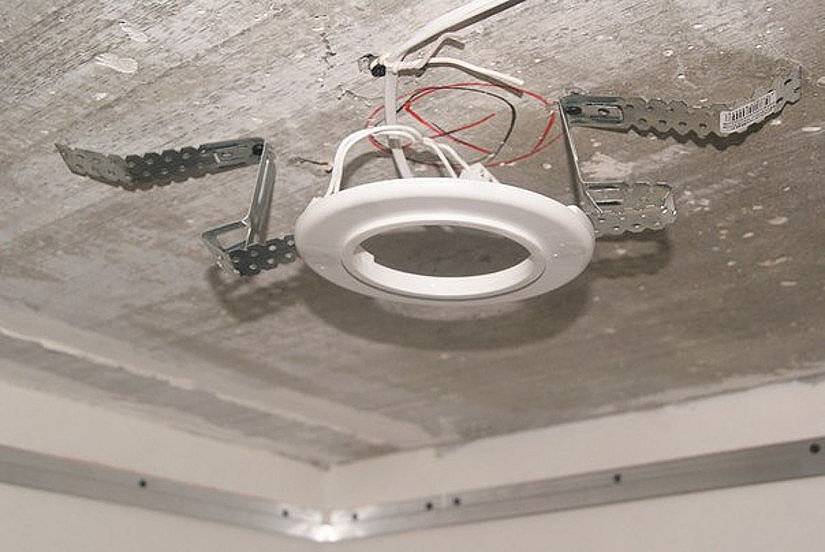
It is fundamentally different. Before stretching the ceiling, before overlapping, we install the lamp on the tin strips. At the same time, we control the hydraulic level so that they are mounting surfaces in the same plane with the future ceiling and fastening strips on the walls. If it is necessary to adjust the luminaires, we reinstall them to other holes in the mounting plates or bend them. We stretch the ends of the wires through the installation rings, and then the lamp should be installed in the same way as in the cases described above.
Installation of luminaires with 12 V halogen lamps provides for the presence of step-down transformers in such a quantity that the total power of the connected lamps does not exceed the rated power of the transformer.
What you need to install
The following elements will be needed from the material: spotlights; lamps; supply wire; terminal blocks or sleeves for connecting wires; insulating heat shrinkage, electrical tape; switch.
It is advisable to select lamps of the same type for each type of lighting. According to the type of construction, the lamps of the required amount are purchased.
It is important to strictly check for the presence of a conical reflective layer at the base of the incandescent lamp base and the technical specifications in accordance with the requirements for the luminaire.
For suspended ceilings, 40 W lamps are used, more powerful ones will significantly heat the material of the suspended ceiling and can lead to damage to the structure or even a fire. Halogen and LED versions of lighting elements are selected according to the power and spectrum of the light output.
The wire is selected depending on the material from which the suspended ceiling is made. So for drywall, which is a refractory material, an ordinary two-wire or three-wire VVG-2 (3) x1.5 wire is suitable. For materials such as MDF or plastic, it is necessary to select a fireproof version of the RKGM wire.
The wire must be soft, that is, each core is represented by many small veins, united under one insulation. To connect wires and connect lamps to them, you can use special terminal blocks, which are sold in any hardware store.
However, the bolted connection is serviceable. You will need to check the hold-down bolts for tightness at least twice a year. Otherwise, at the point of contact, the terminal blocks and wires may begin to heat up and char.A more reliable and durable option is fixing with copper or copper-tinned sleeves.
It is necessary to protect the connection points with electrical tape or using a special heat-shrinkable tube to insulate the supply wires.
Materials for mounting luminaires
Before starting the installation of luminaires, check for the presence of:
Luminaire with ready-made fixtures;
Electric drive;
Lamps (it is important that they match the base of the luminaire);
Sleeves or terminal blocks for connecting wires;
Standard electrical tape;
Light switch.
When buying a luminaire from a store, choose one type of luminaire. For example, you know that you will not have enough power from the main chandelier and will have to buy a few more small spotlights for it: choose options from the same collection. This way you will avoid confusion in the design and it will be easier for you to start installing the lighting.
Be sure to check if there is a reflective layer on the special cone of the bulb they have. Check for their compliance with the technical characteristics of the luminaires.
The power of the lamps should not exceed 40 watts. If you choose this power, then the lamp will not overheat and the drywall around it will remain intact. And LED and halogen lamps are better suited for this purpose: you just have to choose them according to the radiation power.
Also pay attention to the selection of the wire, or better, when buying, consult with experts on this issue. If your ceiling is plasterboard, then 2-core VVG-2x1.5 is perfect
Do not forget to purchase terminal blocks from a specialized store: they will need to be monitored after the installation is complete. Over time, they heat up without maintenance, so it is necessary to periodically tighten their bolts.
Instruments
To install ceiling lights with your own hands, you will need the following tools:
- drill;
- distribution boxes;
- cable of the selected length;
- screwdriver;
- construction knife;
- pliers;
- terminal blocks.
Some of these tools are usually found in every home.
Fixture mounting tools
Remote lighting control
You need to connect a remote lighting control system. What a great solution for dividing lighting into multiple zones without putting extra wires on the main switch. Such a controller does not require line-of-sight to the console. Radio encryption software reliably protects against interference from other consoles. Several controllers can be installed in the same room. Each controller only responds to its own console. The maximum console coverage is 8 meters.
Switching modes are also carried out by a switch without using a remote control. Instantaneous switching off and closing of the circuit breaker leads to sequential switching of modes. Continuous shutdown resets the controller to its original state. Maximum load: 3 × 1,000 watts. When connecting fluorescent or energy saving lamps, the load power should be calculated based on the output power. The initial power of fluorescent lamps exceeds the nominal capacity by 2-3 times.
Suppose you need to install a new lamp somewhere, in a place where there are no special connections for it, and this happens quite often. In such cases, it is enough to connect this lamp to the nearest socket and install a compact remote control connected to the remote control. You will then be able to use the lamp by controlling its operation with this remote control.
In addition, with the help of the LED system, you can divide existing lighting groups into several, change the operating modes of lighting devices and much more.
The difficulty in drawing up a remote control system, connecting a chandelier, is where the controller should be installed. The controller is one of the most important elements of the remote control system. It receives signals sent from a remote control or a fixed switch and carries out the switching signal that is presented for the set lighting mode.
The parameters can be very different:
- the inclusion of individual groups of lamps on the chandelier;
- lighting brightness control.
The stationary remote control has a search function on the remote control - the corresponding button is pressed and a signal is given, including a melody or tone on the remote control, which makes it much easier to find it. Typically, the controller is small and fits easily under a decorative chandelier cover that covers the ceiling wiring.
You can install the controller on the wall using a fixed switch or elsewhere by running wires to it from the chandelier and the fixed control panel. Different models of controllers have differences in wiring diagrams.
DIY lamp installation
The nuances of installing lamps depend on their variety. In order to avoid mistakes when performing installation work, you need to take into account the type of devices and follow the step-by-step instructions.
Point
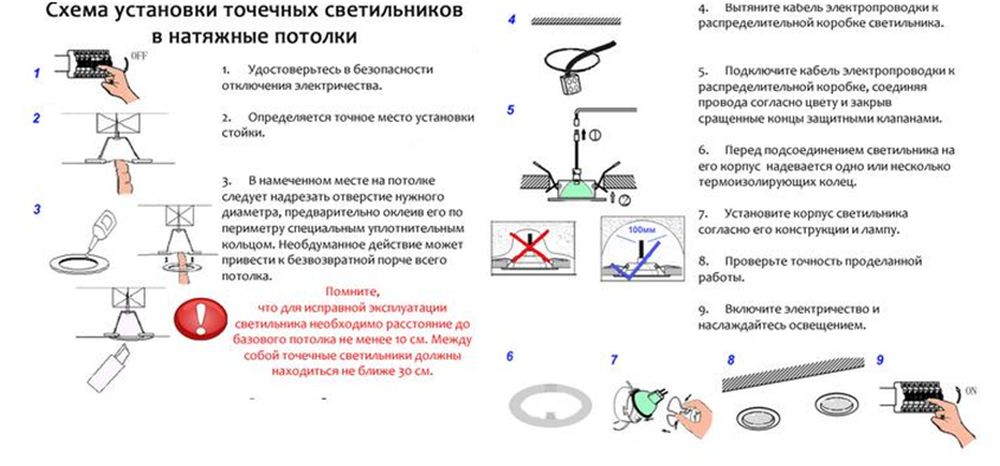
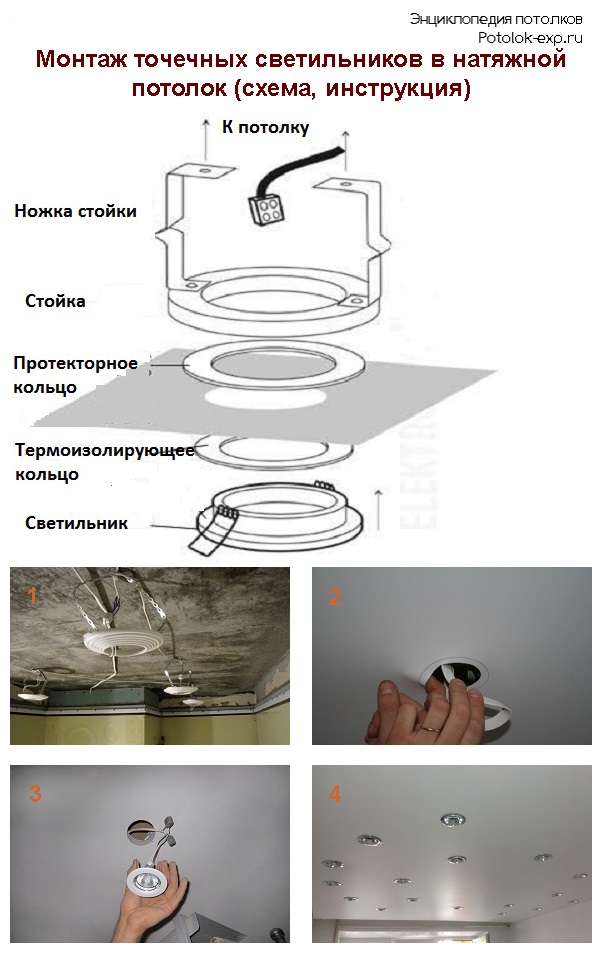
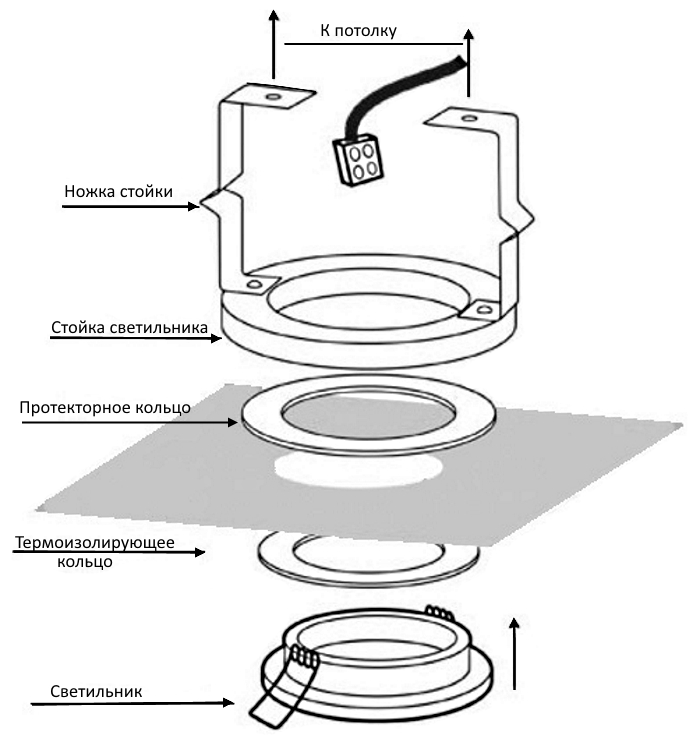
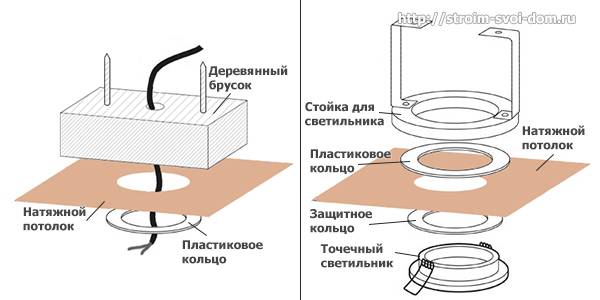
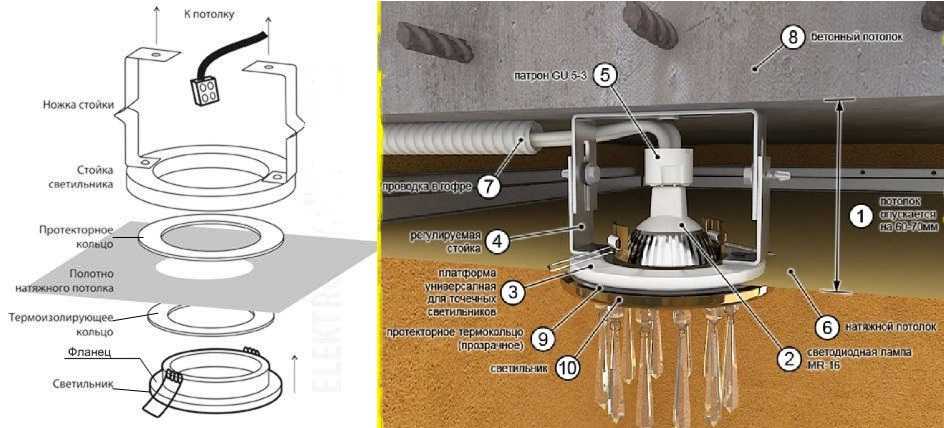
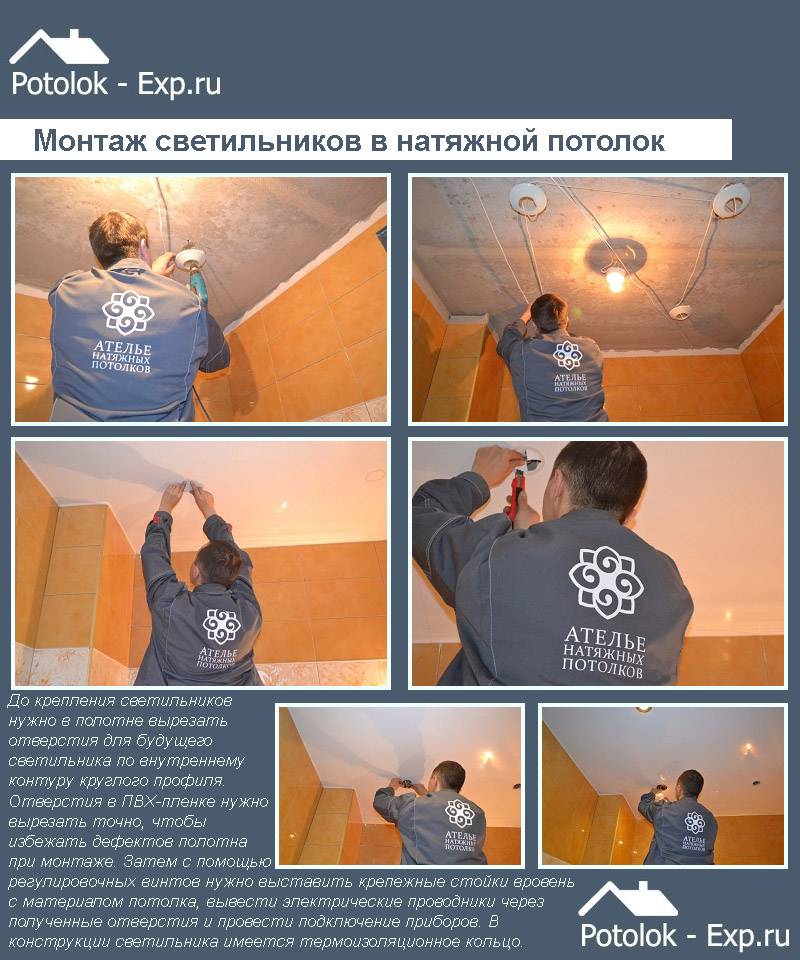
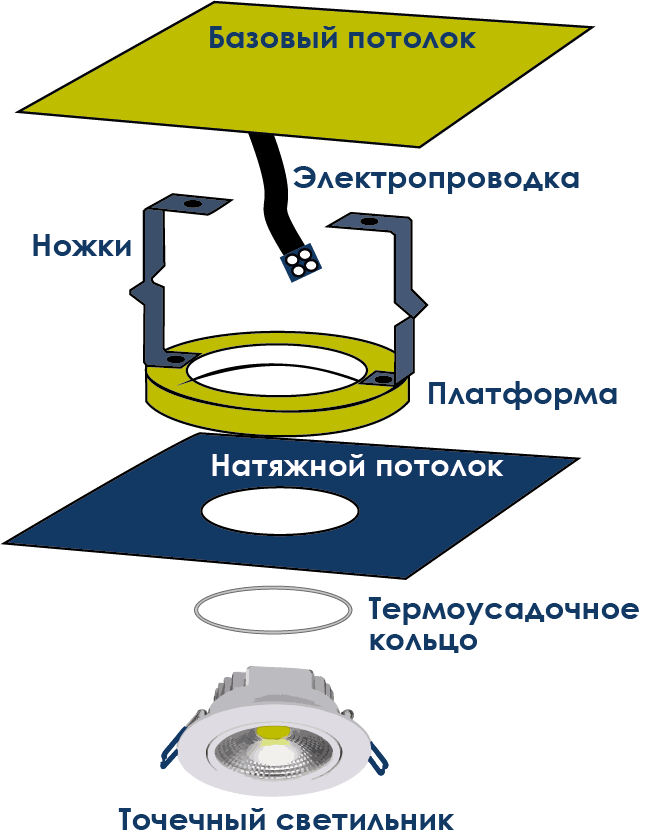
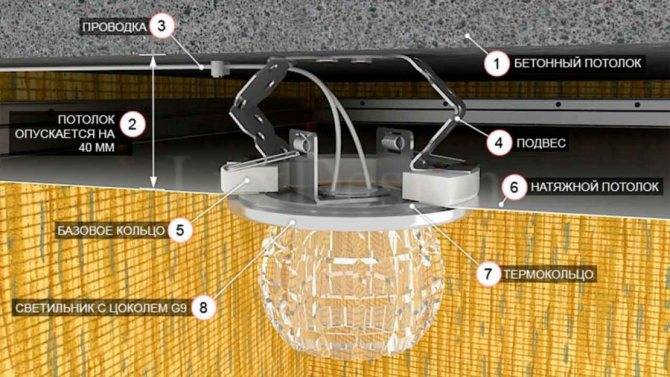
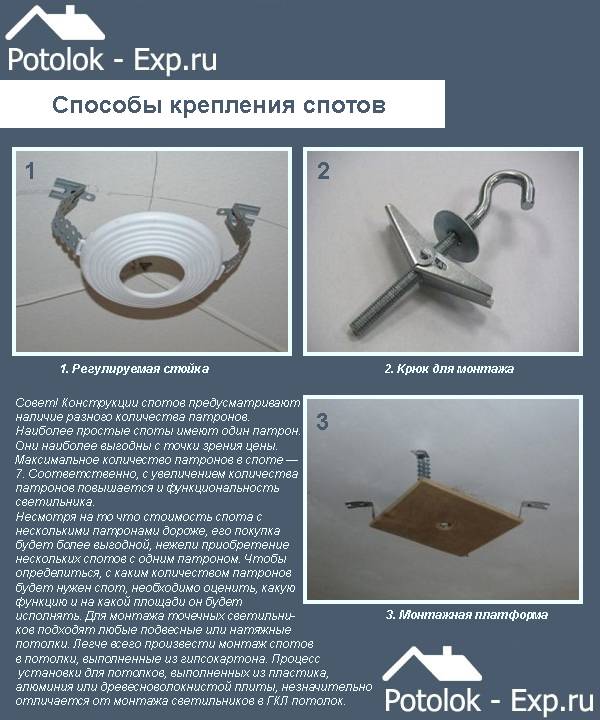
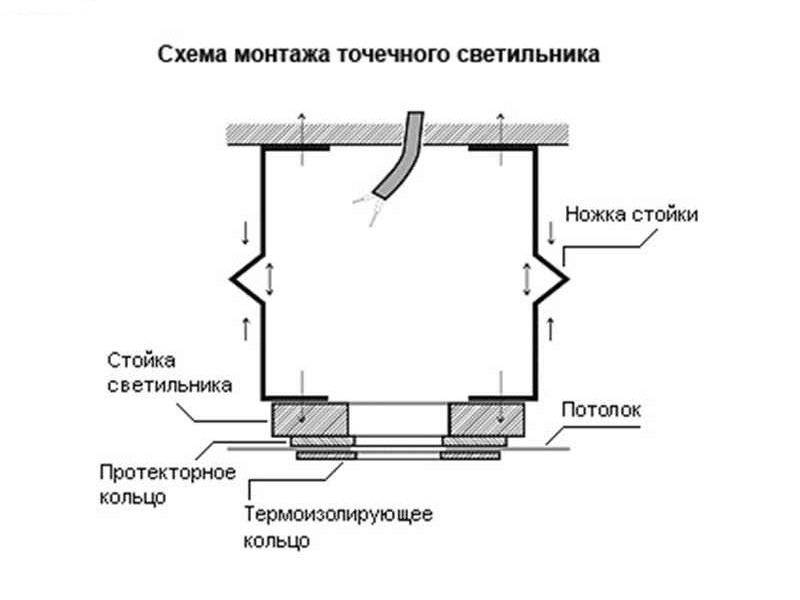
To install spotlights, you need to glue a rounded profile on the film at the locations of the fixing brackets. On the canvas, you need to make holes in advance for future lamps along the inner contour of the profile
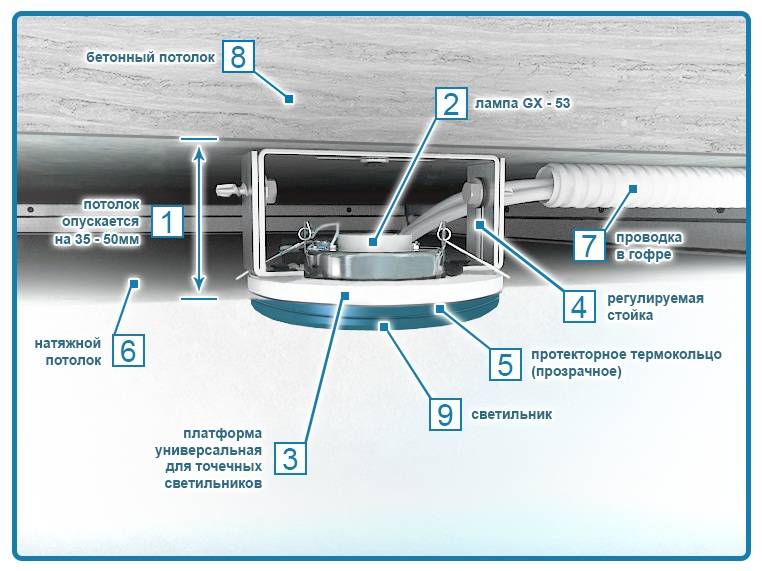
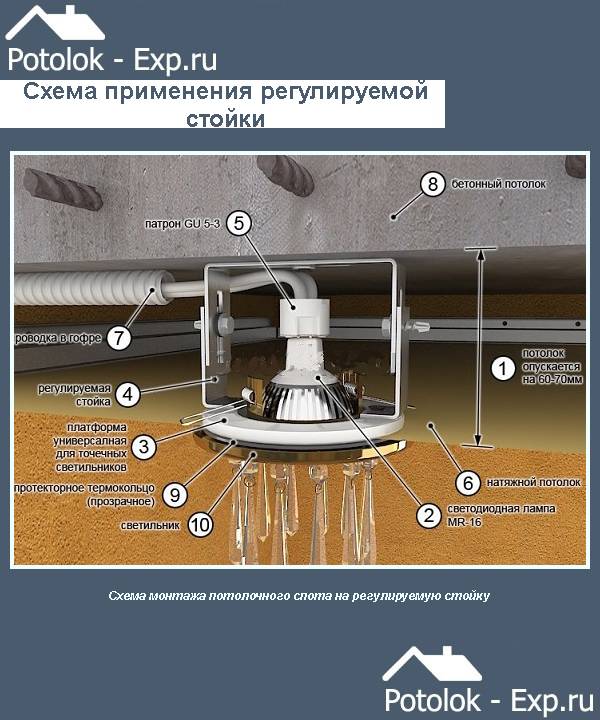
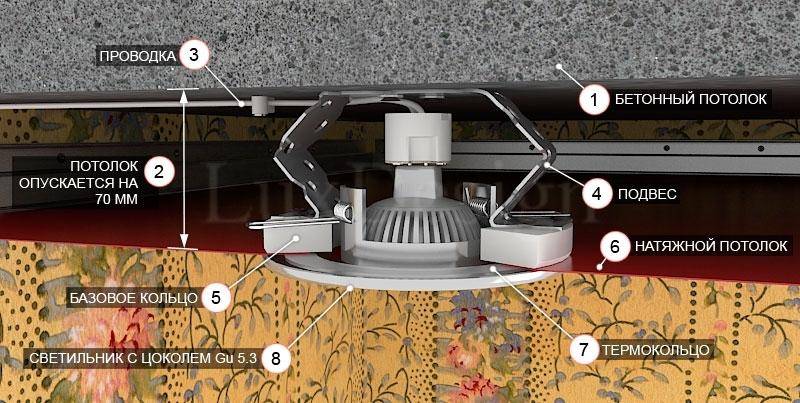
When cutting the holes, it is important to be careful not to damage the tensioning fabric. Then, the mounting posts are installed using adjusting screws, the electrical conductors are removed and the lamps are connected.
In conclusion, it remains to put the thermal ring on the body and install the lighting devices themselves.
Overhead
Overhead types of lamps can be supplied according to a scheme similar to the installation of a chandelier. The same principle is used due to the similar structure of the fastening part.
Ceiling chandelier
There are several ways to fix the chandelier to the stretch ceiling. You need to choose the appropriate method depending on the design features of the chandelier.
Hook
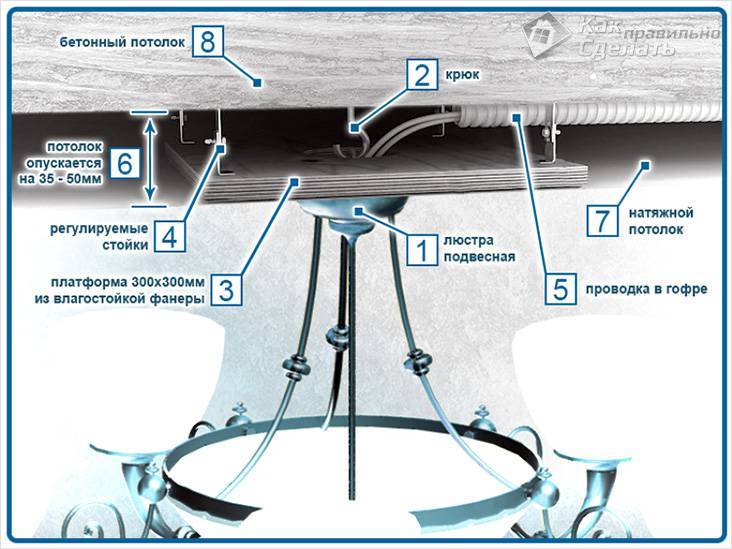
Most often, the chandelier is fixed on a special hook-shaped mount. The hook is mounted in the thickness of the concrete floor and pre-tested by hanging a special load. Further actions are performed according to the standard scheme - they lay a cable, cut a hole in the fabric, attach a thermal ring and hang a chandelier.
Plank
On the ceiling strip, to which the material is fixed, mark the mounting point of the chandelier. A thread is attached in the profile, stretched along the center of the fixation point of the lighting device. Taking into account the dimensions of the chandelier bowl, saw off the corresponding part of the bar. Then a hole is cut in the fabric, an insulating ring is installed and the chandelier is screwed on.
LED Strip Light
Fixing the LED strip is much easier than other lighting sources. The tapes are attached to the surface of the base slab before installing the stretch ceiling. To keep the LED strip securely in place, it is recommended to use extra strong glue, since it will be laborious to redo the work.
With driver
When purchasing LED fixtures, LED drivers are often included with them. The voltage is supplied to them, and not directly to the LED. The luminaire drivers can be built-in or outside the body and connected via a connector.
If the luminaire stops working, then there is a high probability that it was the driver that failed. If the driver is placed separately, it will be easier to fix or replace it.
Ceiling markings
Before making spotlights in a stretch ceiling, and even before installing the ceiling itself, you need to decide how the lighting fixtures will be placed
This rule is especially important if you plan to create a multi-level structure - in this case, each level is connected to its own circuit .. The average installation pitch of the luminaires is about 1 m, and the distance from the walls is about 60 cm
It is necessary to place the lamps in such a way that the points of their installation do not coincide with the baguettes of the stretch ceiling. The optimal distance between the hole for the spotlight and the baguette is 2-3 cm.
The average installation pitch of the luminaires is about 1 m, and the distance from the walls is about 60 cm. The luminaires should be placed in such a way that their installation points do not coincide with the stretch ceiling moldings. The optimal distance between the hole for the spotlight and the baguette is 2-3 cm.
Fastening systems
To figure out how to fix a chandelier on a stretch ceiling, and to do it correctly and reliably, you first need to determine the type of fixation. There are different types of fixture mounting.
Chandelier installation methods:
- To the hook. This method is one of the most reliable and proven. Mounting can be carried out using conventional mountings. When installed, the lamp is fixed through the ceilings. In some cases, a chandelier is attached to the hook on a special piece for installation, in the cavities of a concrete channel. And also the hook can be welded to the plate and fixed on the lid.
- On the mounting plate. This technique is suitable for the secure attachment of compact chandeliers. As a rule, the plate is additionally included in the model and is attached using special fasteners, screw fasteners and side parts.
- On fixed panels. This fixture is also commonly included in a chandelier. Suitable for mounting various medium sized models.
After clarifying the question of installation, which chandeliers are suitable for such ceilings, and choosing the type of fixation, you can proceed with the installation of the device. The work should begin at the stage of installing the profiles.
How to install spotlights in a stretch ceiling
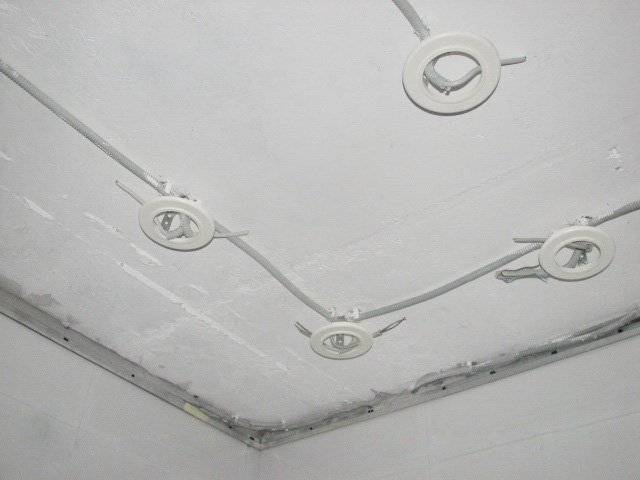
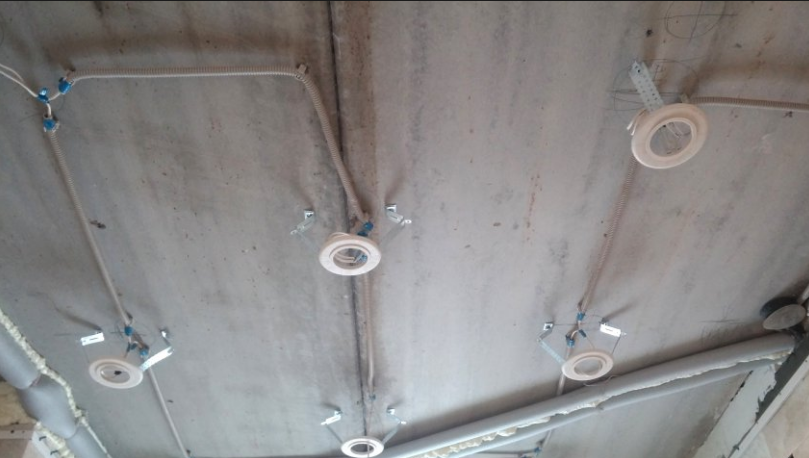
Route a 2-core wire or cable from hole to hole. Make loops from the wire at each hole. Carefully pull the hinges out into the holes where you plan to place the built-in spotlights with incandescent lamps or, as the best option, with LED lamps.
Cut the loops and expose them 2-3 centimeters. Installation of one luminaire requires two cores of wire, 8-12 cm each, taking into account those 2-3 cm for exposure. Connect one end to the luminaire terminal and the other end to the power wire from the switch.
A hidden view of the wiring is installed under the ceiling coverings, which is displayed in the center of the room, according to the wiring diagram. We advise you to watch the step-by-step instructions on how to connect ceiling lights in the video below. And read the following information about the wiring diagram.
Installation of ceiling lighting devices requires a clear execution according to the connection diagram. They come in several versions.
- Let's consider in the diagram how to connect ceiling lights:
- lamps are allocated in two groups and are connected to a two-button switch. Here all zero contacts are connected to the common wire. Then, through the terminal block, you need to connect to neutral;
- The phases are connected to the internal wiring according to their selected groups, then to two wires connected to the breaker. Through the switch - to the phase and to the home electrical network;
- connection diagram through a dimmer. A dimmer is a special electronic device that allows you to adjust the brightness of light bulbs. The device cannot control all bulbs, it depends on their power. You need to connect through a transformer;
- how to connect lamps on a false ceiling according to the scheme using self-tapping screws. All chandeliers and shades are equipped with special mounts for installation on the base ceiling. The fastening element can be a special hinge connected to the luminaire body;
- the following connection diagram for ceiling lamps is more complicated. The plafonds are fixed to the ceiling using holes in the bottom of the case. In the case of fixing the chandelier, a special strip is used, which is pre-mounted on the ceiling.
On the base ceiling made of wood, ceiling lighting fixtures are mounted according to the scheme of the first option. If the base coat is concrete, then the work will be somewhat more difficult.
Installation of luminaires
Fastening the chandelier to the mounting plate
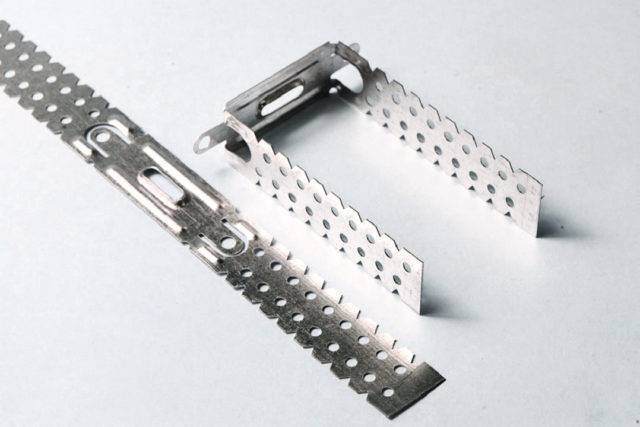
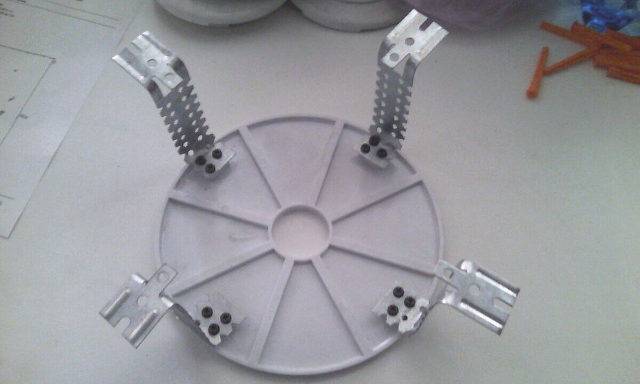
Before stretching the canvas, a mortgage is installed on the ceiling, to which the bar is subsequently attached. Ready-made platforms of several types are available: round, oval, square, cruciform. The product is selected depending on the size of the base of the lighting device. The platforms are made of high-strength plastic and have holes for self-tapping screws for easy attachment of the bar and hangers.
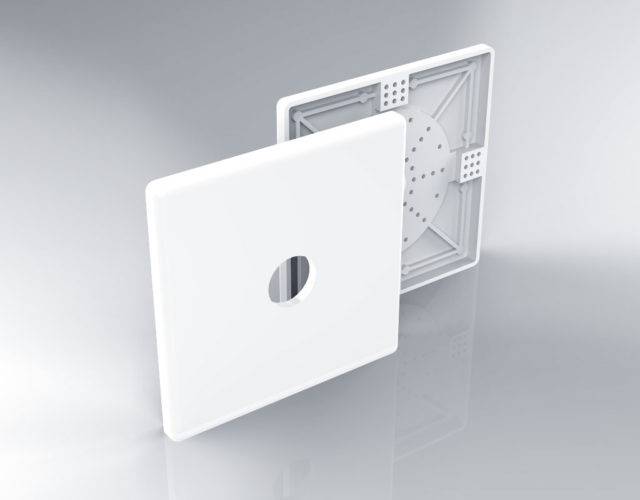


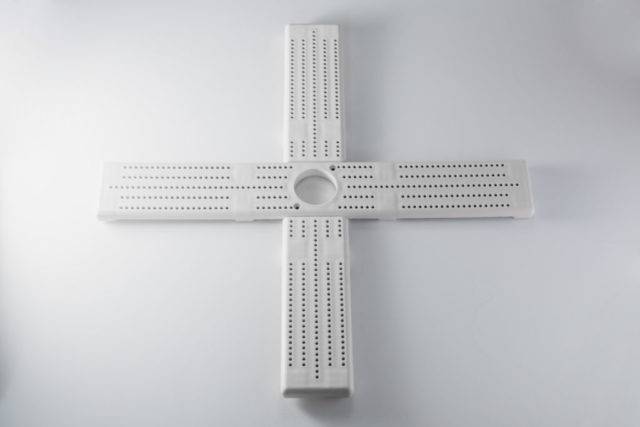
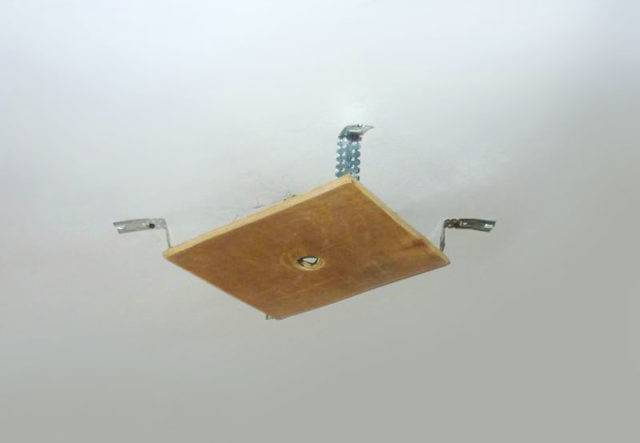

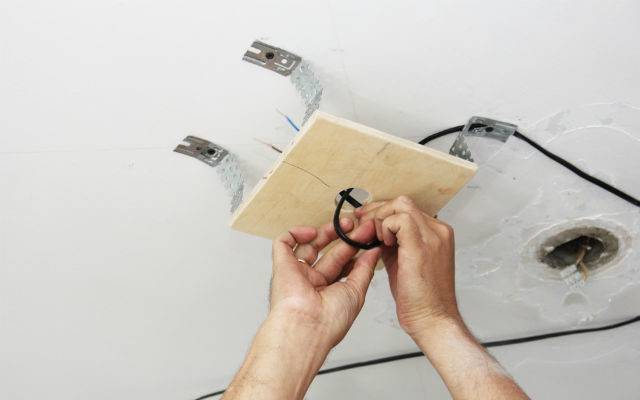
Consider the option of attaching a chandelier with a small longitudinal bar using a universal round platform. Such platforms are suitable for devices of relatively low weight, up to 10-12 kg.
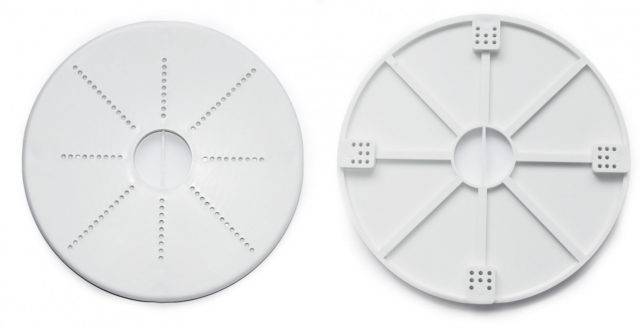
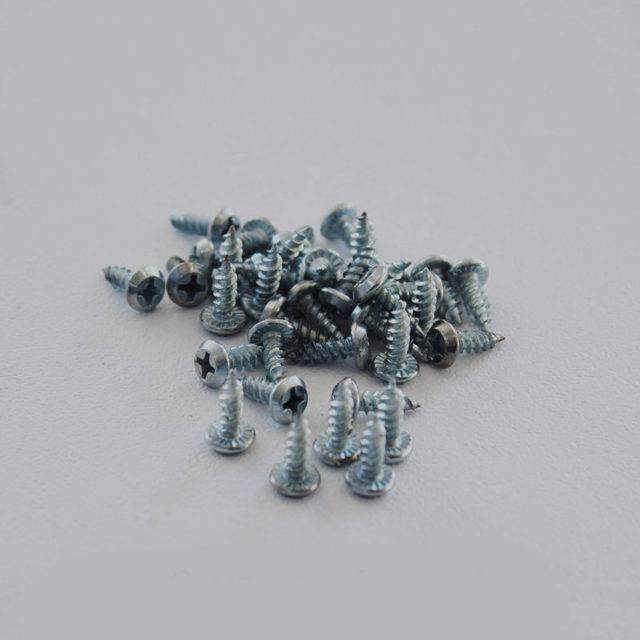
Before starting the installation, the location of the chandelier is determined and the markings are applied to the ceiling. Next, you need to screw flexible steel hangers or punched tape to the platform. Small self-tapping screws "bugs" (3.5x9.5 mm) are used as fasteners. For a small chandelier, four hangers are enough. The legs are then bent slightly accordion-like so that the height of the support can be adjusted.
Holes are drilled in the ceiling, plastic dowels are hammered in and the mortgage is fixed with long self-tapping screws (5x50 mm). The platform should be flush with the stretch ceiling frame. This can be verified by pulling the string attached to the baguettes on opposite walls. Then the electrical cable is brought in. The ends are inserted into the terminal block and fixed on the site so that they do not interfere with further installation.
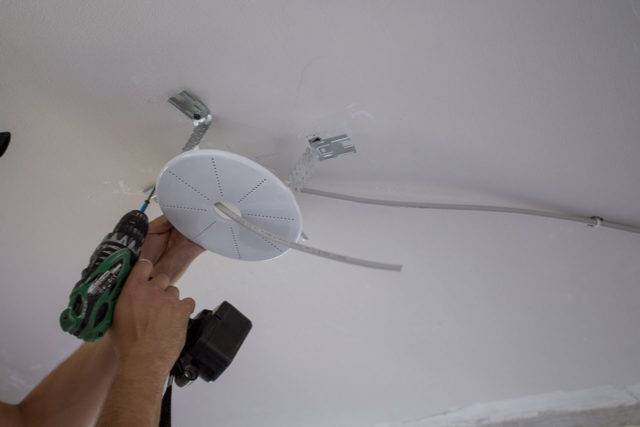
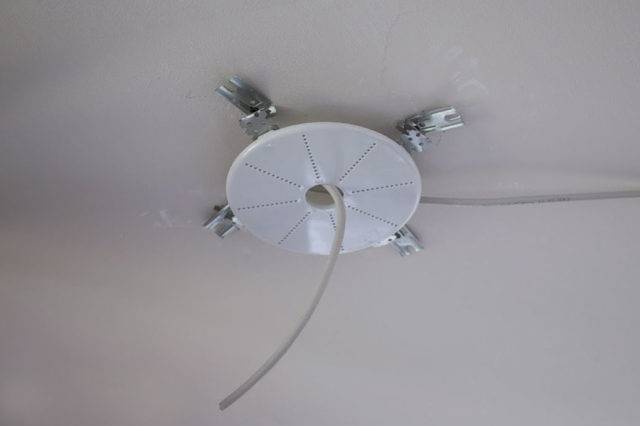
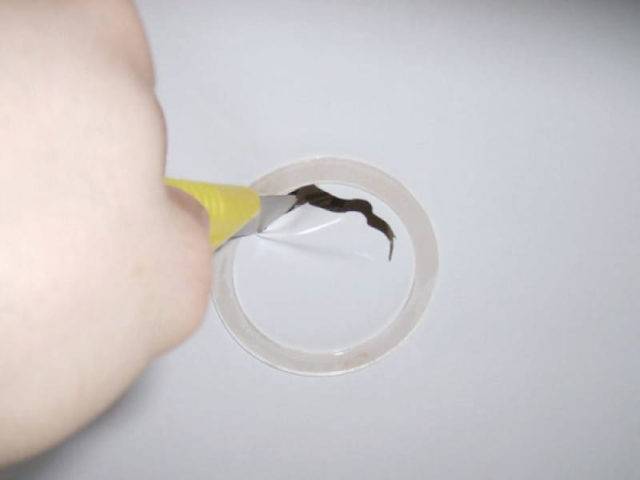
When the canvas is stretched, the location of the mortgage is found. A tread ring is glued in the center and the inner space is cut out.
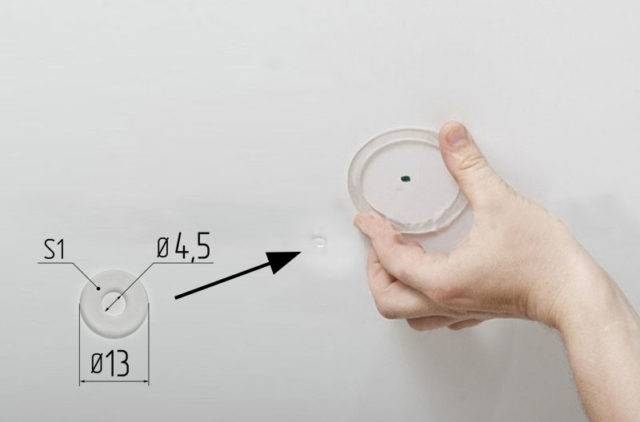
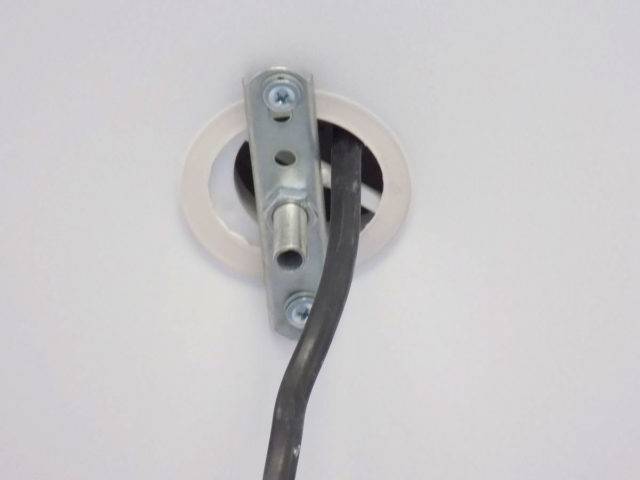
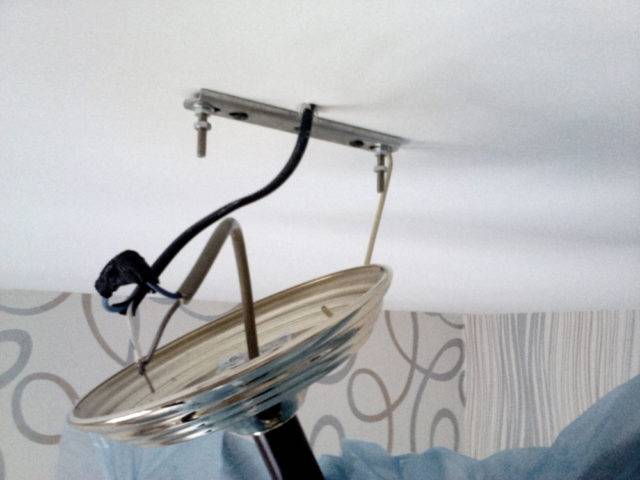
Then screw the bar to the platform. Then the chandelier is connected to the wiring. It is more convenient when it is held by a second person. If there is no assistant, the device is suspended on a rope. At the final stage, the chandelier is attached to a metal bar, shades are installed and bulbs are screwed in.

Chandelier installation instructions
To install the chandelier, the following devices are provided:
- hook fixed in the floor slab;
- linear or cross-shaped strip (linear products are used to fix track lights).
The hook is a hardware with a rounded bracket, screwed into a dowel hammered into the floor slab with a screw end.
This method of fastening is suitable for light chandeliers, and for massive products it is preferable to use hooks with butterflies, to fix which you will need to drill the plate to the void, where the petals are straightened.
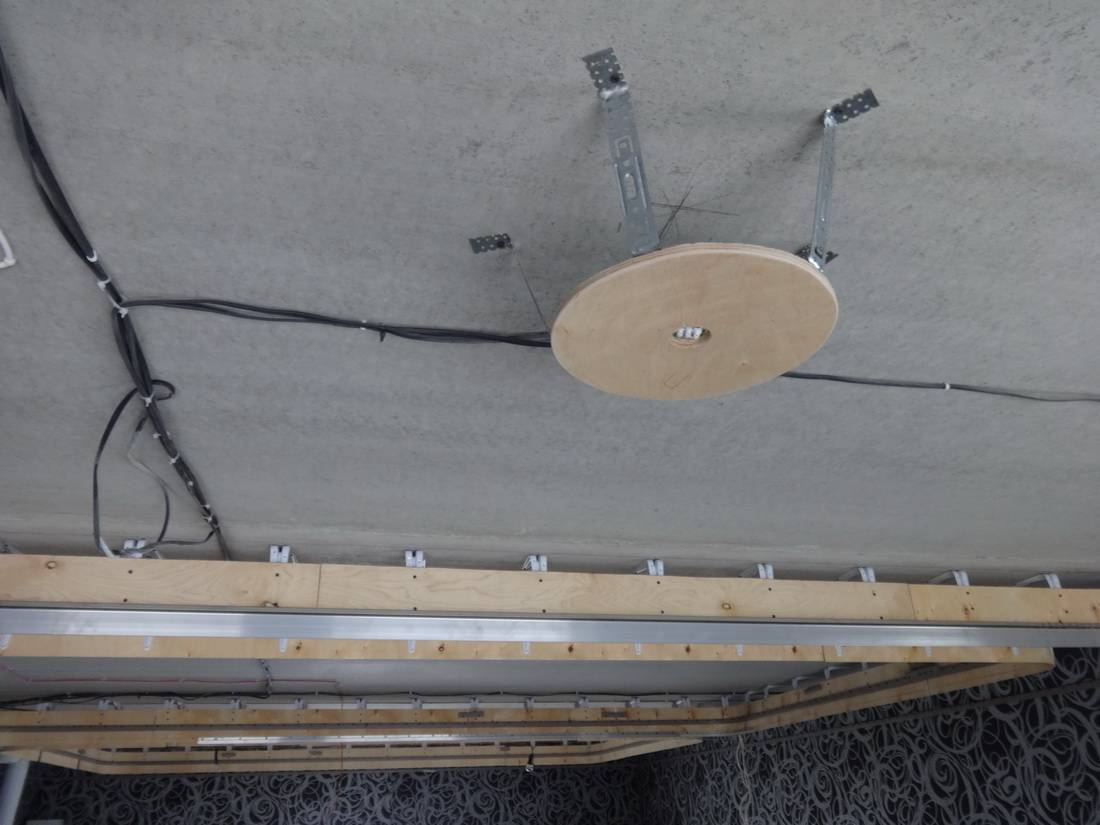
For a tight fixation of the chandelier cap, it is necessary to prepare a plywood base. In the middle of this base, a hole is drilled for wires and a hook, and this structure is attached, following the example of a support platform for point light sources, to punched tape.
The installation of the chandelier is carried out in the same way as the installation of spotlights:
- a plastic ring is glued to the place where the lighting fixture is attached;
- inside the ring, the tissue is removed with a clerical knife;
- pull the plywood base to the surface of the stretch ceiling;
- connection to the power supply is made;
- the chandelier is attached to the hook;
- the bezel rises until it touches the fabric and rests on the plywood base.
The technology for hanging a chandelier using a strip is more complicated, but the general principles of installation are preserved:
For fastening the overhead strips, it is necessary to provide a base in the form of bars. If one bar is used as a suspension, a bar 15-20 mm larger than the bar is attached to the floor slab on punched tape. If a cross suspension is provided, two segments are attached to the main bar at an angle of 90 degrees using corner fasteners. A hole is drilled in the middle of the base for the mounting bolt;
- The bar is attached to the bars, at the same time it is connected to the power supply;
- The chandelier body is mounted to the slats;
- The decorative strip rises to the attachment point, masking the wires and the strip.
Lighting Installation Instructions
The ceiling chandelier must be installed according to certain standards, otherwise you will not be able to achieve the desired result. An improperly installed chandelier to this type of ceiling can harm it, which will lead to a loss of quality and attractiveness of the entire structure. It is these factors that should be considered before proceeding with the installation and selection of the lighting product itself.
Independent work may not provide the level of quality required for this complex activity. This is due to the fact that the installation of a chandelier on a stretch ceiling is not as easy as it seems, therefore, professional workers with the necessary experience are often simply needed. Thanks to their work, all processes will take place as quickly as possible and the final result will satisfy even the most demanding customers. In any case, installing a chandelier on the ceiling requires compliance with certain rules.
As a result, it is possible to provide high-quality lighting in any room, and the organic use of all elements creates the most attractive interior that meets all the individual preferences of the customer.
Regardless of the type of lighting device purchased, its installation begins with the installation of a profile for fixing the false ceiling cover. Then, two lines are stretched between the profiles, at the intersection of which the chandelier will be located. After that, the fastening element is installed in the concrete base. As noted earlier, the product can be suspended using a variety of fasteners. Below are step-by-step instructions for installing a chandelier with each of the installation options.
Stretch ceiling installation
1. Before buying a canvas, it will be useful to draw up a ceiling plan with all sizes and structural elements applied to it.
This will allow you to correctly calculate the amount of material upon purchase, and will also help during installation.
2. Then you can start drawing the markings, according to which the profile will be attached to the wall.
In this case, the lowest angle should be determined and work should be started from it. The height of the ceiling space is determined by the height of the luminaires. Therefore, when choosing them, this factor should be taken into account, since with initially low ceilings, the height of the room can be significantly reduced.
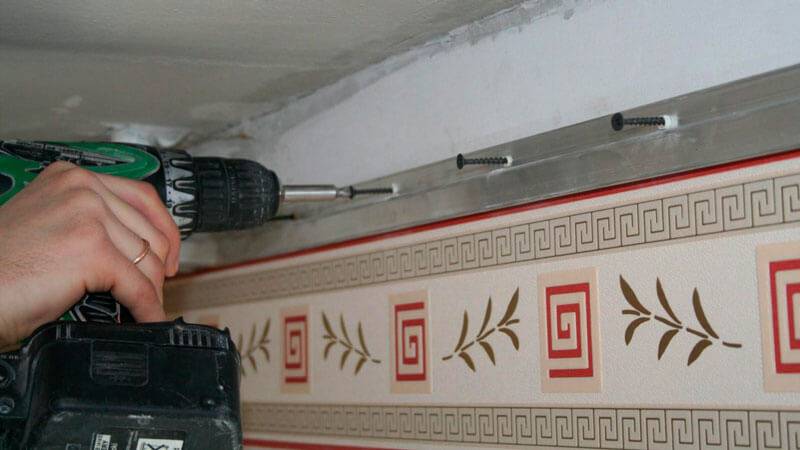
3. The profile is fixed at intervals of 8-10 cm exactly according to the previously applied markings, using dowels and self-tapping screws.
After that, you can proceed directly to the installation of the canvas, but before you print the packaging, you should:
- prepare a place for this, completely clean it of dust and dirt;
- use a heat gun to heat the room to a temperature of 40-45 ° C;
- further, with the help of clamps, fastening is performed in the corners of the room, while after the first corner, the diagonal opposite is installed;
- after that, the web is heated to a temperature of 65-70 ° C and fastening is performed in the corners of the room, and then the film is filled with a special spatula or spatula in straight sections.Moreover, if a canvas with seams is used, then these sections are attached first after the corners;
- when fixing the canvas, the principle of tensioning alternately oppositely located sections should be used - in this case, it will be easier to achieve a perfectly flat ceiling surface.
4. At the end of this stage of work, a decorative molding for stretch ceilings is installed, the main function of which is to close the profile and give the structure a complete and aesthetic look.
For the installation of fabric ceilings, the use of a heat gun is not required, and the installation process is carried out according to the same algorithm, but with the only difference that the tension of the material must be performed from the center to the edges, that is, crosswise.
Photos of some interesting options
There are so many variations and design options for stretch ceilings that you can easily make a unique development. The material is plastic, it can be combined with almost all materials. Even with those that do not seem to fit in texture, like wood, for example. But it only seems so. Several photo examples of stretch ceilings in a wooden house are given below. As you can see, everything goes well.
This is, perhaps, the technology that allows you to realize really any fantasy. Want gold on the ceiling - easily, you need velvet - no problem, photo - choose which one. The number of levels and their form is limited only by fantasy.
Installation of spot and LED lighting
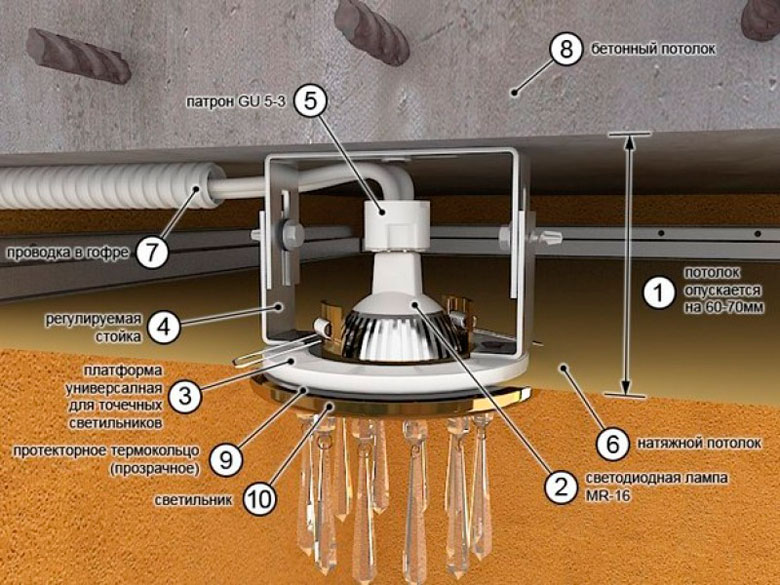
The connection diagram for spotlights is also not difficult. When installing, observe the distance (at least 10 cm) between the base and the suspended ceiling. Correct installation of lighting fixtures will close all wiring connections. The hulls will not be visible.
For point ceiling devices, a certain voltage is required. For this, several transformers are used, which lower the voltage and do not affect the ceiling sheet.
- Connection:
- simple installation - several bulbs that go separately are connected to one wire. To prevent the light bulbs from burning out, take care of the rectifiers in the circuit;
- another option. From the junction box, there is a separate wire connection to each light bulb. In this case, no rectifier is needed.
LED ceiling lights differ from other options in that the LEDs are mounted directly into the luminaire body. If the light bulb stops working, then it will not work to replace it - you need a complete replacement of the failed lamp.
To connect LED lights on the ceiling, you need to calculate their number and determine the location on the ceiling. The diagram should indicate how to connect the light bulbs in the false ceiling. Choose bulbs based on wattage.
Connecting LEDs is not easy.
- How to do it:
- make holes in the hanging fabric for LED connectors;
- after connecting the wires, fix them with dowels to the base surface;
- the connection of all luminaires should be carried out with a stranded wire and according to the scheme. You need to solder the wires before installing the overhead cover;
- after connecting to the mains, fix the LEDs to the ceiling by snapping them in.
Make sure that the bulbs do not get very hot. Otherwise, the ceiling sheet may be damaged.
How to connect luminaires in a false ceiling
One of the most common types of LED ceiling-mounted luminaires are spot models. Their installation can be carried out in several ways:
- Suspended.
- Overhead.
- Embedded.
The first two options are best suited when the indoor ceiling is made of difficult-to-machine monolithic material, such as reinforced concrete. Recessed, on the other hand, is ideal for tensile or suspended structures.
Depending on the material of the ceiling surface, its features and thickness, the following methods of mounting LED lamps are used:
- For slabs on a monolithic reinforced concrete base - fastening wires, hooks and brackets. Suitable for surface mounting of the luminaire. Fixation of the device into the material is carried out by means of special anchors and dowels.
- For the base of a small section - fixing elements with fastening on the outside. To suspend the luminaire, the ceiling is drilled through, hooks with stop plates or bolts with similar washers (where possible) are inserted into the hole.
- For wooden surfaces - threaded hook.
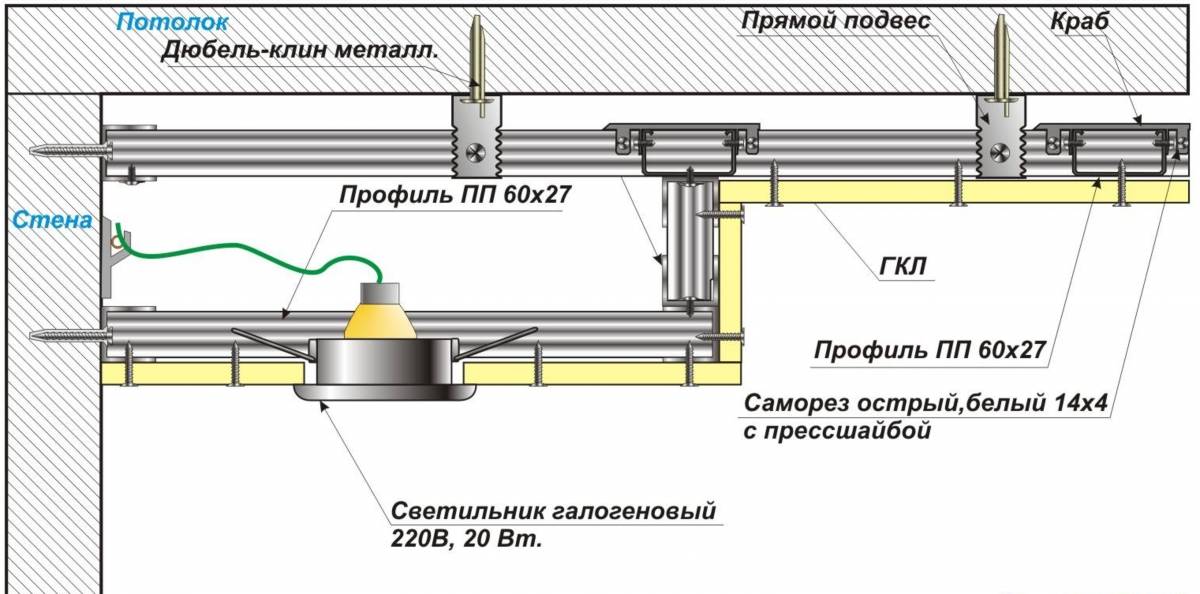
- For suspended versions - a system of mounting adapters located under the material (plasterboard, PVC panels or films and fabrics).

Similarly to the above example, LED lamps are connected in a suspended version of the ceiling. However, unlike it, when the spot is simply hung with a mounting latch on the back of the drywall sheet, a special fastening suspension is required here.
If it is not provided in the kit for the lighting device, you can buy or make it yourself from a mounting metal tape and a platform according to the following algorithm:
- The embedded universal platform must be adjusted to the diameter of the luminaire.
- Try on the body of the flashlight, making sure it fits.
- Measure the distance from the base ceiling to the bottom edge of the fabric fastening profile.
- Cut a piece of the required length from the mounting tape (depending on the diameter of the LED lamp) and give it a U-shape.
- Then fix the mortgage platform to its base using mini-self-tapping screws.
- Then, in the same way, make the required number of fixing pendants according to the number of ice lamps and, in accordance with the plan, carry out their installation on the ceiling.
Unlike PVC panels and drywall, the fabric of a stretch ceiling is very sensitive to heat - the slightest deviation from its operating conditions will lead to warping. Therefore, the installation of the LED luminaire must be carried out through a thermal insulating ring, which prevents direct contact of the lantern body with the material.
Choosing a frame for a stretch ceiling
It should be borne in mind that for the installation of PVC film and fabric, different accessories are used for stretch ceilings, which are attached around the perimeter of the room.
In addition, the choice of material is determined by the type of the ceiling itself, as well as the configuration of the room, the presence of protruding elements. For PVC films, an aluminum profile is used, which is of the following types:
- universal, which is used for the installation of straight structures;
- wall profile-sphere, the use of which is limited to small areas, for example, to create curved elements;
- ceiling, differs in the place of attachment and is used in cases where it is required to minimize the loss of height;
- the dividing profile is used when additional support for the ceiling is required, as well as if the area of the room exceeds 150-200 m2 - in this case, it serves for the joints of the ceiling elements. Indispensable when creating complex multi-level structures or made in 3D technology.
For tensioning the fabric ceiling, it is recommended to use plastic profiles AP and AM, which differ in width: in the first case, it is only 10 mm, in the second - 30 mm.
The AM profile is often used if the installation of a heat-insulating layer is required.
When cutting the canvases, it is important to take into account that during the installation process, the PVC film is stretched by 6-8%, and for a fabric ceiling it is necessary to leave at least 10 cm on each side for fixing in the profile, the method of which is determined both by the type of fasteners and the material used.There are three mounting methods in total:
- harpoon;
- glazing bead;
- wedge.
The vinyl ceiling is attached to aluminum profiles most often using the harpoon method, and fabrics using a wedge or glazing beads.
Conclusion
The installation of the stretch ceiling lighting system is not an easy job, therefore, without professional skills, it is better to entrust its execution to specialists. As a last resort, you can perform the installation in tandem with a professional, since conducting electrical wiring under a thin vinyl stretch ceiling is not the kind of work that allows you to make mistakes and correct mistakes painlessly for the final result.
An alternative to the described type of work is the installation of a PVC-cloth lighting system that consumes 12 V. The transition to this voltage will not only make lighting economical, but will also solve most of the safety issues.

