Tips from the masters
Various compounds are suitable for gluing, including liquid nails or hot melt glue. Before laying the mosaic, experts advise evaluating the following parameters:
- Bonding materials. The nature of the base and decor is taken into account.
- Place of work. The mixtures are selected taking into account humidity and temperature effects.
- Colour. White is only needed when gluing transparent parts. In other cases, the color does not matter.
- Evenness. Pre-leveling the substrate will reduce consumption per m2 and improve adhesion.
These recommendations will allow you to reduce costs without compromising the quality of finishing work.
The choice of glue depends on how firmly the mosaic will hold and whether it will not change color. Following the recommendations of the masters, you will be able to choose a composition that provides good adhesion and avoid unnecessary costs.
How to glue correctly
To achieve reliable fixation of the composition, it is necessary to take into account many features and strictly follow the technology.
Preparation of the base
First of all, it is recommended to prepare the base. It depends on what material the base is made of.
Tile
Mosaic tiles need a perfectly flat base. Therefore, it is recommended to level the surface of the walls with plaster. The prepared surface should be coated with a primer and the wall covering should be checked. This is done with a level.
Wood
The tiles can be laid on the wooden floor in different ways. First of all, it is recommended to strengthen the base well in order to avoid vibration during loading. The next step is to apply a primer and an elastic self-leveling compound.
Drywall
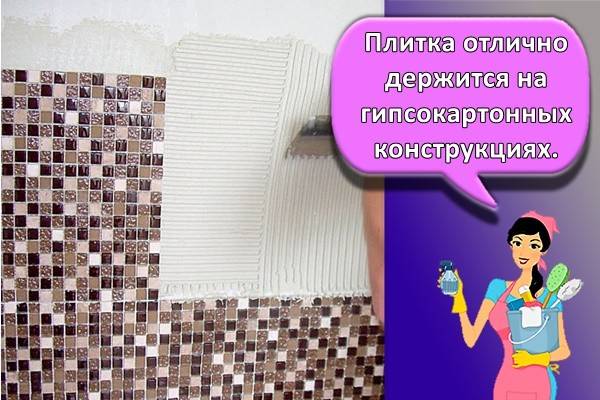
The tile adheres perfectly to plasterboard structures. However, they should be prepared in advance. First of all, it is recommended to treat the joints with a putty. This will help make the coating more consistent. After that, it is worth covering the surface with a primer and putting down the guides.
Markup
It is recommended to cover the prepared surface with markings. This will help to achieve a neat adhesion of the mosaic sheet. First, it is recommended to spread the tiles on the floor. Then it is worth taking measurements and transferring the scheme to the wall.
How to prepare an adhesive
In order to achieve reliable fixation, it is recommended to strictly observe the proportions and technology for making the solution. To do this, pour the building compound into a clean and dry container, add the required amount of water and mix with a mixer. The result should be a uniform texture. The finished product is left for a few minutes and then mixed again.
Glue application
To stick the tiles, the adhesive solution should be evenly applied to the wall. It is recommended to do this with a notched trowel. A suitable thickness is 2-3 millimeters. With more product, there is a risk of filling the seams. This will make grouting difficult.
Laying rules and principles
To be successful in laying mosaic tiles, it is recommended to follow a number of rules.
On the floor
To glue the material to the floor, do the following:
- perform markup;
- prepare epoxy glue;
- cover the surface and level with a notched trowel;
- put the first sheet and press it with a rubber bead;
- put the next sheet in the same way;
- evaluate the location of the tiles through the level;
- fix the tiles according to the markings, in time removing the excess composition from the seams;
- leave the glue to dry after completing the work;
- prepare the composition for grouting;
- distribute the composition over the surface of the tiles, filling the seams;
- complete grouting and wash the floor from the remains of the composition.
On the walls
To glue the mosaic on the wall, it is recommended to do the following:
dilute the glue according to the instructions;
apply the composition to the wall with an ordinary smooth spatula - it is recommended to fill the space for 3-4 tiles;
run over the coating with a notched trowel to form furrows;
glue the first sheet of tiles and press gently with a rubber bead;
glue the second sheet and separate it with special crosses;
fix the remaining sheets;
remove excess glue from the seams;
cut the tiles if necessary;
wipe the surface with a napkin to remove glue residues;
prepare a trowel;
apply it to the tile and level it on the surface - it is recommended to do this with a rubber spatula;
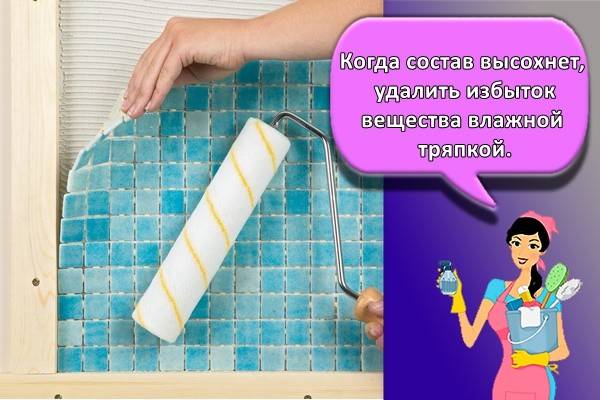
when the composition is dry, remove excess substance with a damp cloth.
Rounded surfaces and corners
The mosaic has a unique design. Due to this, it is possible to lay it on curved surfaces. This process has some peculiarities.
If there is a noticeable external bending of the surface, tiling is possible, but the result is a ribbed structure. With a pronounced bend inside, the distance between the tiles changes. Therefore, when independently developing the shape of walls or other structures, it is not recommended to allow sharp drops.
Fixing tiles in corners is no different from fixing tiles. For this, it is recommended to split the tiles along the seam. If the seam does not match the corner, you will have to cut the tiles.
This procedure is carried out one day after styling. To do this, you should use a rubber float. It is used to rub the compound into the seams. Excess material is removed with a damp cloth.
Preparatory work
The main difficulty with which the mosaic laying is directly related is the availability of a high-quality base. As a rule, in order to beautifully lay a mosaic on a wall or other surface, it must be made perfectly flat. Unlike tile, this material is flexible, and if the base is uneven, then it will simply repeat all shapes of the surface.
As a result, you will get a curved and ugly surface that even the highest quality mosaic will not save. It is for this reason that the base must be leveled in all ways available to you. Know how to plaster - please! Easy to work with drywall? Also normal.
An already leveled surface must be cleaned of dust and properly primed. None of the glue will properly hold the facing material on a dusty and quickly absorbent surface.
If the walls have been plastered, then the best option before laying the mosaic tiles, especially glass, would be to go through the starting putty. Otherwise, all black crumbs cement and sand will mix with glue and show through when grouting. So, it will be better to have a white base in the color of the glue than to get black blotches afterwards.
It is interesting: Enamel PF-266 - characteristics and application
Types of glue
Which mosaic adhesive to choose? It is important that the composition is resistant to moisture, good adhesion, and dries quickly. Depending on the degree of transparency of the tile, the color of the solution is also relevant.
If the base has small differences, then attention is paid to elasticity, leveling ability and degree of shrinkage.
What to glue the mosaic on? The main criterion for the material is the binder (base). So, there are 3 main types:
- cement (comes on sale dry);
- dispersive (ready-made mosaic adhesive with the addition of acrylic);
- two-component adhesive or reactive (epoxy or polyurethane-based, to be prepared before use).
The dry mix is made on the basis of white or gray cement. To the finished consistency, the glue is diluted with water or latex. If the tile is laid on a static base (concrete, brick), then the mortar is brought to a thick state. For a dynamic surface (with temperature fluctuations), a more elastic adhesive is recommended.
Dispersion adhesive for mosaic laying is sold in sealed plastic containers. The pasty mixture is ready to use and hardens within 40 minutes. Such a composition is recommended to be used for complex work with respect to shapes (architectural structural elements) and adhesion (has high performance).
The reactive composition is waterproof. Therefore, it is used for cladding rooms with high humidity (in the bathroom or pool). A smooth base made of metal, glass or plastic is allowed. Also, this material is suitable for gluing natural stone mosaics. The setting time is limited to approximately 3-5 minutes.
If you need to glue transparent glass tiles, then you can use an epoxy or polymer compound. They are distinguished by an almost colorless base.
Eggshell Mosaic
Eggshell mosaic is called very beautifully - "crackle". She looks dignified, giving subtlety and sophistication to any interior. And the material for it is prepared as follows:
- First, you need to soak the collected shells in a baking soda solution (2-3 days) to soften the organic matter.
- After that, the protein residues are carefully removed with a brush (but you do not need to touch the inner film).
- Next, the shell is dyed with food dyes for Easter eggs in the desired colors.
- At the very end, the multi-colored pieces of the shell are carefully dried.
The technique of "egg" mosaic is not too complicated, but it will require painstaking execution.
First you need to prepare the base - a sheet of paper or plastic tracing paper, grease it with PVA thickly and evenly, and then stand for 3 to 15 minutes until gelatinization (stringy tack).
The finished shells are laid out on the base with bulges upward, at intervals - it is necessary to achieve the appearance of a certain pattern, pattern. After that, the finished picture is pressed down with a special plate so that the shell is flattened and crushed into smaller fragments. Then the board is removed, and the image is smoothed with a special wooden stick. Then tissue paper dipped in flour paste is applied to the panel and left to dry completely.
After drying, the paper must be soaked and removed with a damp sponge along with the remnants of the paste. Next, the picture must be properly dried - within a few days (3-4, no less). And you can proceed to the final processing of the panel - the creation of craquelures, that is, beautiful "old" small cracks. To do this, you need to use mascara, consisting of shellac and bile.
Ink should be dripped onto the dried image from a pipette, then wait a few minutes and remove the rest of the coloring composition with a damp sponge. Bile allows the carcass to scatter along the cracks in the shell, and shellac polymerizes it there, giving the panel strength. It turns out very nicely.
In the end, the finished painting remains only to be polished with coated paper, without pressure.
Mosaic laying
Consider the step-by-step installation of the mosaic with your own hands:
- Apply a thin layer of mosaic adhesive to the surface, smooth with a 4-6 mm tooth comb. Considering the fast solidification, do not process a large surface, limit yourself to 1 sq.m. (9 matrixes of the mosaic). To improve adhesion, apply a thin layer of glue 1–2 mm to the inner surface of the mosaic. When choosing an adhesive, take into account the material of the base and the mosaic, the color of the adhesive (for transparent glass mosaics, choose a white color to match the grout).
- Glue the first mosaic sheet. Cover the processed area with a mosaic, keeping the spacing between the dies equal to the spacing between the mosaic cubes. Use a laser level or taut threads to maintain level and direction. To prevent heavy-duty mosaics from sliding off vertical surfaces, grab the die with small thin studs to the wall through the gaps between the cubes.
- Align the mosaic with a plastic wide area with an elastic surface.Tap the entire area. Remember that pressing individual elements into the adhesive with your hands will ruin rather than improve the appearance.
- Remove the paper from the paper-backed mosaic tile on the front side by first spraying a little water over the surface. Remove excess glue between the mosaic cubes with a thin spatula or screwdriver.
After 24 hours, start grouting the mosaic. Use a wide trowel with a rubber pad, carefully work the entire area, in all directions. Remove the waterproof grout from the mosaic itself immediately, in other cases, let the grout dry for 20-30 minutes in the joints, and remove the excess from the tile with a damp sponge.
Do-it-yourself mosaic laying is a creative and exciting process. Feel free to try it, experiment on an inconspicuous area of the room. Use the tips from the article and you will succeed!
Adhesive processing of the base
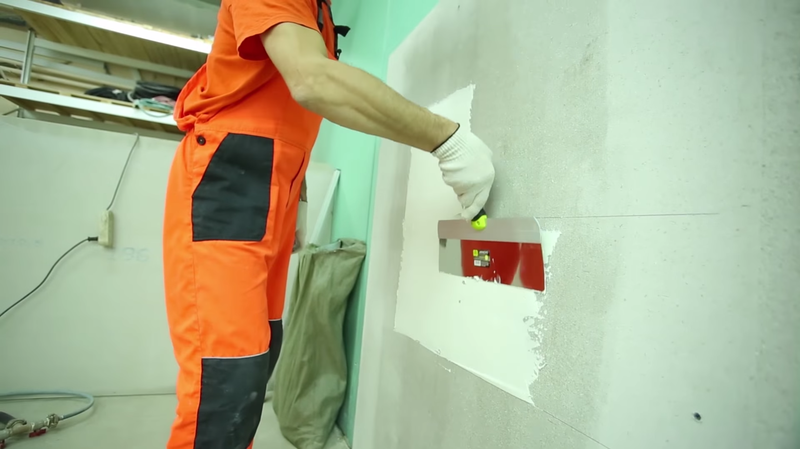
The next step after leveling and cleaning the base is to dilute the tile adhesive solution.

To apply the solution, they are armed with a spatula, the smooth surface of which spreads glue along the wall. The spatula is leaned against the wall with maximum density so that no air voids form. Then, with a spatula turned upside down on the ribbed side, once again smear the mixture on the base.
Before laying the mosaic tiles, coat it with an adhesive. In this case, the solution is applied to the canvas by means of the smooth sole of the spatula. The thickness of the adhesive layer should not be too large so that the mixture does not go beyond the boundaries of the seams. The main principle of applying the adhesive mixture is uniformity. Then the cladding elements are applied to the base. It is appropriate to use a metal trowel, rubber roller or wooden block.
Which mesh meets the standards
Of course, you should not lose sight of this moment. In addition to the base, it must be securely glued to the mesh and mosaic.
This can be verified quite simply. Take the net in your hand and move it easily. The mosaic should not fall off the grid. Even in sagging mode, the tesserae should remain on the net and should not fall off.
If the tesserae fall off the mesh, then the material should be replaced from the supplier, or asked to re-glue and bring it into line. If you use such material, it is more likely that the masters will have difficulties in laying and your interior may begin to ripple. In manual mode, laying the material exactly is quite problematic and not many mosaicists can do it. Even an art panel needs to be able to properly prepare for transportation and handover for installation. You can see how to put the mosaic on the net in the package in the photo. Two parts of the panel are laid face-to-face through the gasket and then rigidly fixed in the package. A lot of studios do it like a blooper, although it is very important for the entire styling process.
|
|
|
|
|
|
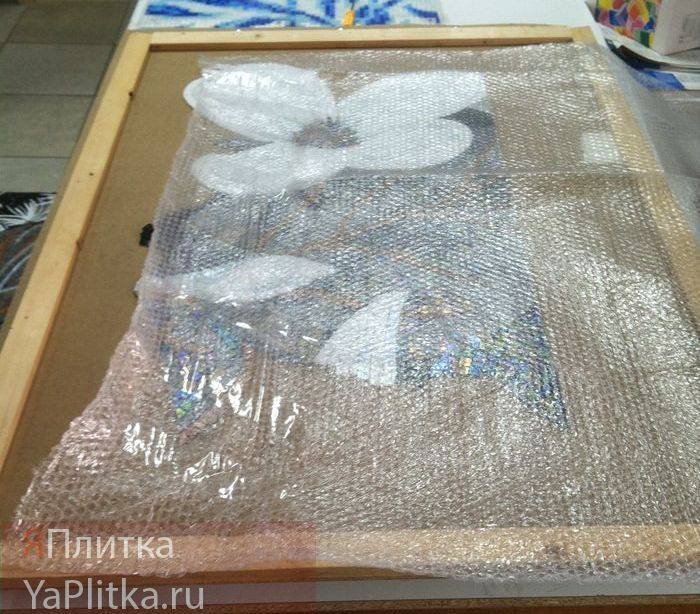 It is better to shift the mosaic of non-standard production with bubble wrap
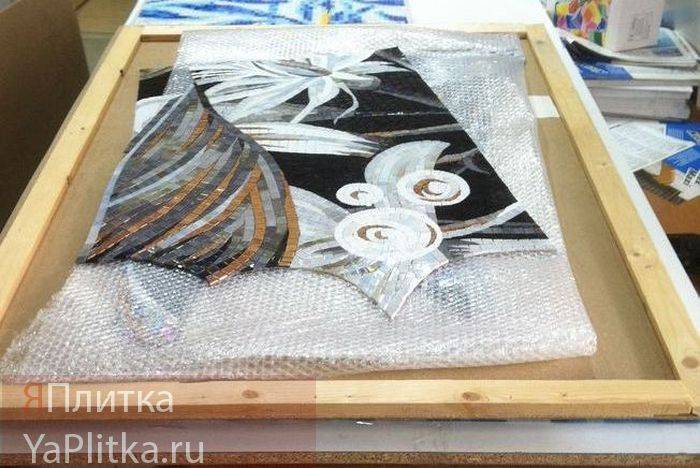 In this case, you do not need to lay too many rows so that the mosaic does not crack.
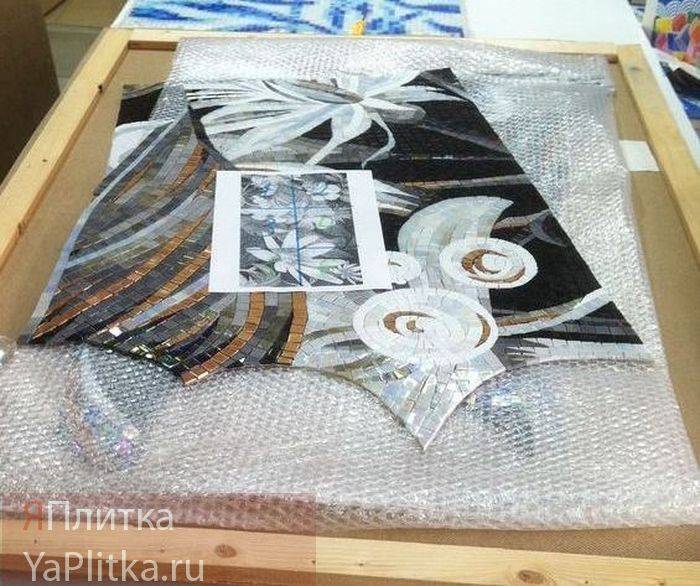 Provide the panel with a printout on which it is clear how it should look when assembled
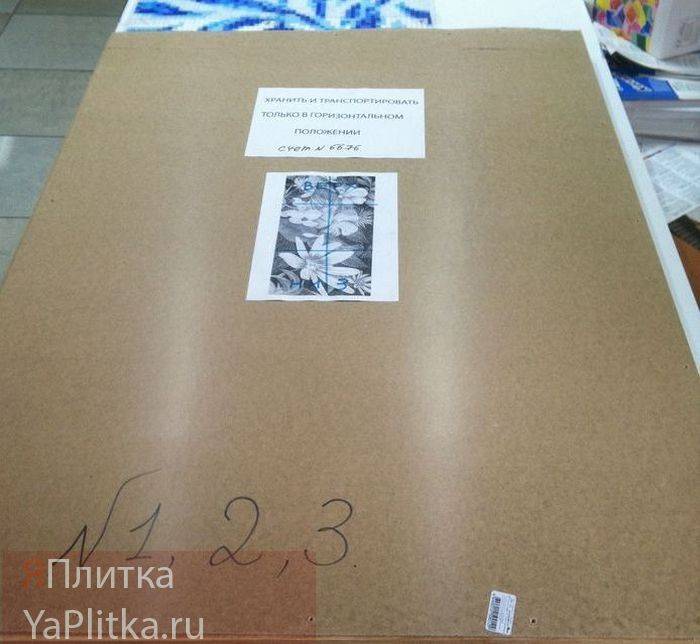 Packaging must be rigid and transported only in a horizontal position
Please note that nowadays marble mosaics on a grid are often forged and instead of natural stone, porcelain stoneware with a marbled surface is used, this material is cheaper than real marble. To protect yourself, ask the seller for a certificate for the material and shop in specialized stores
It is interesting: Combined drying oil brand K 3 - composition and characteristics
Stages of mosaic laying
Mosaic laying differs from tiles in the flexibility of the finished product. The glue is applied in a uniform thin layer, and the coating is leveled with a level and a rubber roller (or float).
How to glue a mosaic on a mesh:
Preparation of the base
It is important that the surface is smooth and level.The primer applied must dry.
The markings will allow you to keep the laying evenly.
Mosaic adhesive on mesh is applied with a notched trowel in 3 mm increments
It is recommended to cover a small area as the solution hardens relatively quickly.
The canvas is pressed with a rubberized tool. You cannot do this with your hands, otherwise individual elements will be recessed to a greater extent than required.
As a rule, the front side of the mosaic on the mesh is covered with a protective layer of paper. After the glue has set, it is washed with water using a sponge and removed.
How to remove excess glue from a mosaic? To do this, you can use a dry waffle towel or rubber spatula. If the solution is completely dry, you will have to remove the excess mechanically (with a blade).
Depending on the glue used, grouting is allowed 12 to 48 hours after installation. The task is carried out using a rubber spatula of medium hardness (it can be soft). After 20 minutes, the excess is removed with a dry cloth.
Listen carefully to the opinion of the professional on the video:
> The choice of adhesive should be based on the substrate and tile materials. The evenness of the surface is also taken into account. For glass mosaics, it is better to buy a white or colorless composition. Almost everyone can implement the event itself. The main thing is to maintain uniform pressure and control the seams. Then the result will be of high quality and durable.
Working with modules made of natural stone
No less popular is stone mosaic made from different species: tuff, jasper, onyx, marble. Natural material is distinguished by its incredible beauty and practicality, and with additional polishing and artificial aging it is able to display an amazing natural pattern.
Important
When choosing natural materials, it should be borne in mind that they have a more porous structure. When caring for natural stone, it is not recommended to use brushes with stiff bristles, as well as cleaning agents with abrasive additives, which can leave scratches on the polished porous surface.
The process of laying tiles on a grid is slightly different from the technology of installing modules with a paper backing. When it comes to mosaic mesh, the requirements for surface flatness are increased
Therefore, before gluing the mosaic on the mesh, it is important to ensure the restoration of a perfectly flat surface by puttying and plastering
When gluing the mosaic on the mesh, for better adhesion of the panel to the surface, experts advise applying the composition to the back of each module. It is better to start laying canvases with tiles from the most illuminated area on the surface. As practice shows, standard size meshes have to be cut to fit. And it will be better if their parts are located in less visible places closer to the edges. Due to the fact that the elements are pre-fixed on the base, it is much easier to maintain an equal distance between its fragments. Cleaning the surface and filling the seams of the webs on the mesh is performed by analogy with paper-based modules.
Working with two-component epoxy grout
Epoxy grout is most often used where tiles are exposed to temperature extremes, household detergents, and where they are constantly humid. As a rule, it is a bath and toilet, kitchen or pool. After drying, it is absolutely harmless: it does not react with food acids, it can withstand temperature changes. Therefore, it is often used to decorate not only kitchen aprons, but also countertops in the kitchen or bathroom.
When working with epoxy grout, the following rules must be observed: work with gloves and quickly, observe proportions and prepare as much material as you can use in 40 minutes. You will need a scale to accurately weigh the components. In addition, epoxy grout requires special tools.The materials from which they are made do not react with grout components. This is a special spatula, sponge and grater. Tools should be washed in cool water after each use.
1. Mix the required amount of grout strictly according to the instructions. We used a transparent grout with added glitters. It is better to mix the grout components with a construction mixer at low speeds: when heated, the hardening process is accelerated.
2. Take a small amount of grout on a spatula and rub in with small intermittent movements, press the grout into the grooves between the chips. As a rule, almost all work is carried out with the edge of a rubber spatula.  3. Place the trowel on the edge at a 45 ° angle to the seams in the top corner of the mosaic sheet and scrape off excess material. Such an inclination of the spatula allows you to remove only excess grout from the surface of the mosaic and at the same time not to move the grout that has already been tucked into the seams.
4. Soak a grater in water. It only needs to be squeezed out a little so that the water does not pour onto the floor. The grater must be very wet. Rub the surface of the mosaic in a circular motion so that the excess "epoxy" seems to start to wash. Thanks to this, the grout deepens into the seam, and the excess remains on the grater.  5. Use a damp cellulose sponge to wipe off any remaining grout and moisture from the mosaic. This process is also performed at a 45 ° angle to the seams.
6. Let the epoxy grout dry for at least 24 hours.
 When working with a two-component grout, it should be borne in mind that after hardening, nothing can be washed off the mosaic. It leaves a thin film on tiles and mosaics. If this effect does not suit you from the point of view of aesthetics, use a special composition to remove it.
Combination with tiles
The glue is selected depending on the appearance and operational requirements of the room, the type of tile and the finishing surface:
- Premises. It is much easier to decorate a simple living room with mosaics than objects that are constantly exposed to moisture and various power loads. For the pool, use a fixing agent with an adhesion level higher than 2.5 megapascals. It will reliably glue the glass and the waterproofing material of the pool together. This styling will last a long time. If you additionally add liquid latex to the glue, the fixation of the material will become several times stronger. The glue should set well and settle, therefore water is poured into the tank two weeks after its lining.
- Surface. Unlike a deformed base, it is much easier to work with a flat and solid surface. The adhesive is easy to apply, fixing the tiles to any screed without any problems. A highly elastic mosaic compound is used if the surface is uneven with an old finish or has a waterproofing coating.
- Tile type. Glass tiles are the most capricious of all. Everything under the glass elements is translucent. The panel on the wall will deteriorate if a gray retainer appears through the tile. Therefore, only white glue can be used for laying it. It is much easier to work with ceramic tiles. The density of the material allows the use of a composition with different colors. Natural stone tiles are fixed with reactive or quick-drying glue, since the effect of moisture negatively affects the stone material.
If the installation of the mosaic needs to be done in a short time, then choose a mixture that sets quickly.
White tile adhesive
For glass tiles and mosaics, white tile adhesive is used. It is convenient because it is invisible on glass material. Thanks to this, the overall exterior of the room is not distorted.
- White glue for mosaic "Ceresit" CM 115 perfectly adheres glass to the surface. It contains only one component.
- If you add Ceresit C. C. 83 emulsion to the mixture, then its composition will become more elastic. And great adhesion will protect the surface from cracking.This mixture is used for finishing swimming pools, stairs and uneven foundations.
- The amount of adhesive used will depend on the trowel used. Usually it leaves little. For example, 1 sq. meter for a thin mosaic with a width of 3 mm, you will need about 2 kg of glue.
The adhesive sets slowly when laying in damp conditions. Do not use a mixture that has been outside for a long time or has been unpacked.
Glass Mosaic Mix
Glass mosaics are used to decorate bathrooms, corridors, lobbies and other rooms. Fountains and facades of houses are often decorated with glass mosaics. To prevent the tiles from cracking and falling off over time, a mixture with special technical properties is selected for difficult areas. She must have:
- Moisture repellent and high durability.
- Have good tack.
- Match the color of the mosaic tiles.
These are the characteristics of the Axton product. Glass mosaic adhesive on a grid is used for interior and exterior decoration of premises. It fixes well stone and ceramic tiles 5 × 5 cm in size. A latex base is added to the mixture if the adhesive solution will be used for open objects such as terraces, pools, balconies.
Adhesives manufacturers
On sale you can find domestic and imported brands of mosaic adhesives. Many modern materials are imported from China. The most popular ones are described below.
Ceresit CM 115
Adhesive for marble tiles and glass mosaics Ceresit CM 115 ("Ceresit CM 115") is a white compound for exterior and interior work. It is used for fixing different types of tiles, stone, limestone, glass. Suitable for concrete, cement screeds and heated concrete floors. It is water- and frost-resistant, resistant to tile slipping, and environmentally friendly.
After the introduction of the "Ceresit CC 83" plasticizer, the adhesive mass will be suitable for attaching mosaics to wood, drywall, gypsum, old tile cladding. The glue does not leave stubborn stains and is very easy to use.
Bergauf mosaik
The Bergauf Mosaik glue for mosaics, tiles and pools is packed in 5 kg bags and is a white cement-based mixture. It also contains fractional sand, modifiers, polymers, mineral fillers.
Recommended for work on balconies, tiling and mosaics of facades, swimming pools, plinths, a number of critical substrates. It is possible to glue the tiles on underfloor heating systems with the resumption of heating 7 days after the end of work. Frost-resistant, has a high adhesive capacity, does not react to moisture.
Axton
Axton special tool is ideal for glass mosaics indoors (bathrooms, kitchens, lobbies, living rooms), as well as outside - fountains, facades. It is equally good at gluing together stone, ceramic tiles, and can be used in the decoration of swimming pools. For the arrangement of warm floors, the material is mixed with latex additives.
"Litokol K 55"
Tile glue "Litokol K 55" is a dry glue mixture for indoor and outdoor use, based on white cement. Helps to glue all types of tiles and mosaics, including glass and natural stone. Can be used in wet rooms, swimming pools. White color does not change the shade of the base material, does not shine through. The composition has high plasticity and excellent adhesion, excludes slipping of mosaics and tiles on vertical bases.
"Mapei"
Mapei Adesilex P10 also belongs to the group of white cement based adhesives. It helps to glue even such complex types of mosaics as mirror and glass, it is used for products from tiles, ceramics, marble. Distinctive qualities of "Mapei" - does not slip and stays open for a long time, without spoiling. The product is supplied in 25 kg bags.
What material is used?
Glass is a heat-resistant material that is resistant to aggressive environments, strong and reliable. An apron made of glass mosaic will delight the eyes for several decades. Due to the catchy refraction of rays in the sun, the richness of the palette of colors, this material looks very effective.
A real stone. A multi-format mosaic is made of real stone: in the form of squares, rectangles, circles. Sometimes they even leave small embossed stones completely. The advantage of the material is that it is virtually permanent, the disadvantages are a limited palette of colors and a high price. Real stone mosaics are often black, brown or gray. For the most part, small parts are glued to a mesh base so that it can be very easy to put with your own hands.
Smalt is made from small glass particles pressed under high temperature with the addition of metal oxides. It has the widest palette of colors, brighter and richer than glass. Smalt frescoes were made back in Rome, at the same time they approached the 21st century without losing either integrity or beauty.