Roof chimney trim
Finishing work includes works on sealing the joints of the chimney and roof, equipment for protecting chimneys and ventilation ducts from moisture and heat insulation work. An important point is to give a beautiful look to all structures on the roof.
Chimney cladding is done in the case of using low-quality bricks, when there is a risk of destruction under the influence of precipitation. If the draft level is insufficient, and the height of the chimney installation meets the above requirements, a layer of thermal insulation made of non-combustible materials is laid behind the casing.
Sewing materials and methods
Regardless of the finishing method, the manufacture of a supporting frame is required, on which insulation and sheathing material will be attached. For the chimney, the frame is made only of metal. The profile for fastening drywall sheets is excellent for this. The fasteners must also be metal.
The optimal material for cladding is galvanized sheet or corrugated board. Such cladding has a low cost and is easy to install. The galvanized coating is fastened with self-tapping screws with silicone or rubber sealing washers placed under the head.
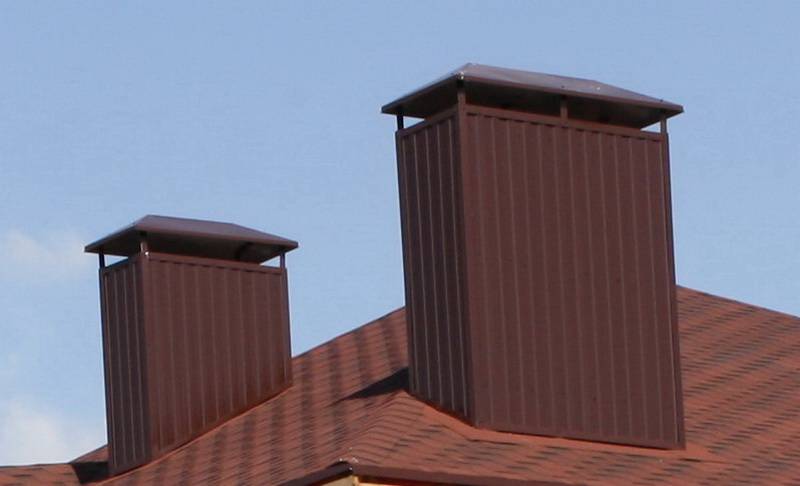
The chimney can be finished with the same material from which the roof is made
The decoration is also done with natural or artificial stone. In this case, it is necessary to additionally fix the stone to the surface of the chimney using dowels.
Stone decoration perfectly decorates the chimney and gives it the appearance of a small medieval turret
The upper part of the chimneys is protected from moisture ingress by means of hoods. Since the installation of the hood has properties to impair traction, the height of the hood should not be less than 150 millimeters. What the cap will be made of depends only on the personal preferences and material capabilities of the owner of the chimney - you can make it from ordinary galvanized steel or use a beautiful forged structure with a weather vane.
Plating of chimneys must be carried out in accordance with the requirements of fire regulations. The combustion products that are removed from fireplaces, stoves and solid fuel boilers have a high temperature. In gas-fired boilers, the temperature at the exit from the pipe is much lower, so they can be considered safe. But all the same, for all types of stoves and boilers, the chimney must provide good draft. The main requirement is to use only non-combustible materials.
In the case when the chimney and ventilation ducts are located in the same box, the chimney cut should be located much higher than the ventilation cut.
For proper operation of the chimney, it is required to clean it from soot, inspect and eliminate comments with a frequency of 2 times a year. The boiler must be operated strictly in accordance with the rules and must not be used for other purposes.
Stage three. Chimney assembly procedure
Consider the installation technology using the example of the most popular heating system - a double-circuit.
Step one. First, connect the sandwich pipe to the corresponding hole of the heater (in most cases, the boiler), then secure it with a plug. Remember that a small section of the pipe near the boiler should be left uninsulated due to too high a temperature. No matter how high the quality of the pipe you use in the construction of the chimney, the section near the boiler will exhaust its resources in a short time, in other words, it will burn out.
Step two. Insert each new inner tube into the previous one. Then put on the outer channel
Pay special attention to the fact that the pipes dock with the previous narrower side, otherwise during operation the condensate, which inevitably forms, will flow into the seams, and not freely flow down
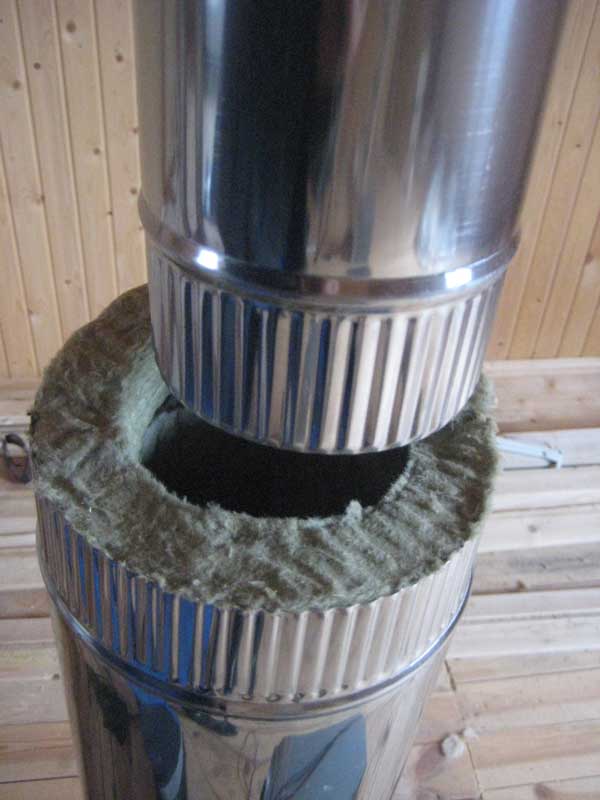
DIY chimney installation from sandwich pipes
Step three. After installing all chimney segments, fix the tees with the brackets prepared in advance. Then seal all connections with iron clamps and additionally secure with nuts.
Step four. If you wish, you can install special sealed couplings. They are often advised to be installed if the system is constantly operating at high pressure.
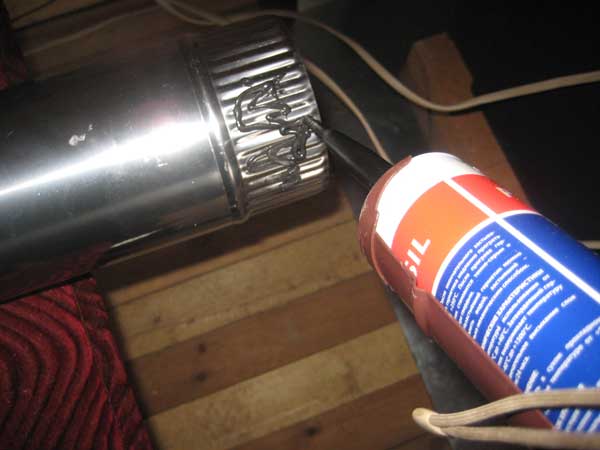
Applying heat-resistant sealant to the chimney
Step five. After completing the installation, peel off the protective film from the parts and apply a fire retardant sealant to them. This sealant must necessarily retain all its properties even at a temperature of 100 ° C.
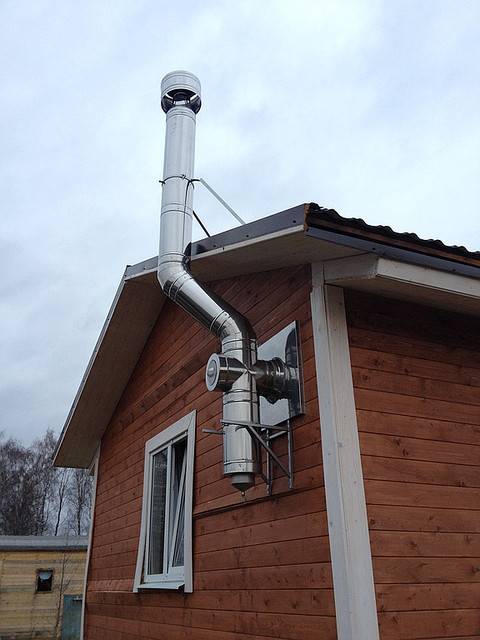
Chimney exit to the facade of the house
Conditions for normal operation of the chimney
When equipping a stove in a bathhouse, the closest attention is paid to the installation of the chimney. Smoke - a product of combustion of fuel (wood), containing carbon monoxide, causing human poisoning (before death) must be properly removed outside the premises
For this, a chimney for the furnace is installed - a vertical pipe device that removes the combustion products into the atmosphere, the action of which is based on the draft due to the pressure difference. Design, installation of chimneys and chimneys is done in accordance with Building Standards (SNiP 41-01-2003) in force in Russia.
- The air ducts are made of non-corrosive materials with a protective coating.
- The smoke channel does not touch the communications, in the places of wiring through the walls, the roof is insulated with heat-resistant insulating materials. Heating of building structures next to the pipe no more than 50 ° C.
- The gaps between the outer walls of the chimney and the battens, rafters, wall, roof are made at least 13 cm.
- Goes strictly vertically. There are no horizontal sections. Connections of chimney parts are not allowed in ceilings.
- The cross-sectional area of the chimney is not less than the size of the boiler pipe. The inlet pressure exceeds 5Pa.

Calculation of chimney parameters
The basis for calculating the height and diameter of the chimney is the power indicator.
The efficiency of the boiler or furnace is directly influenced by the height of the chimney. For household appliances, it is 5 m. This characteristic is provided for by the requirements of SNiP for stoves of residential buildings. The measurement is carried out from the grate of the device to the hood. At a lower altitude, the natural draft in the furnace will not ensure efficient fuel combustion, it will smoke and will not generate an optimal amount of heat. However, the ability to increase the height is limited. Experiencing the natural resistance of the pipe walls, the air will slow down if the channel is too long, which will also lead to a decrease in thrust.
Rules for selecting the length of the chimney
For a private house, the calculation of the chimney height is based on certain rules:
- The pipe must be at least 5 m.
- The excess of the end of the chimney above a conventionally flat roof is at least 50 cm.
- For a pitched roof, a pipe, the axis of which is no further than 1.5 m from the ridge, and if there are superstructures, then from their highest point, the excess value is 0.5 m.
- When the distance to the ridge is 1.5–3.0 m, the end of the pipe should be no lower than the level of the ridge.
- When removing the chimney at a distance of more than 3 m from the ridge, in particular, for outdoor installation, the angle between the level of the horizon and the conditional straight line between the ridge and the end of the pipe must be at least 10 degrees.
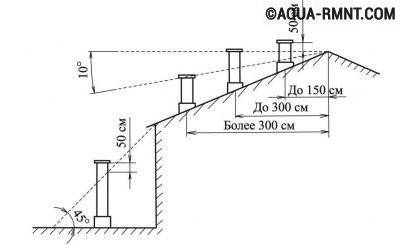
The height of the pipe depends on its location
When choosing a place for the outlet of the chimney through the roof, it should be borne in mind that it should not be located near dormers and other similar devices in order to avoid creating fire hazardous situations.
Calculation of the cross section of the chimney
The procedure for determining the channel size given below is valid for a circular cross section.It is the optimal form, since the flue gases do not move in a monolithic straight stream, but a swirl of the flow occurs, and they move in a spiral. In rectangular channels, vortices are formed at the corners, inhibiting the movement of gases. To calculate the cross-section value, the result obtained should be multiplied by 1.5.
You will need the following initial data:
- Furnace power, that is, the amount of heat generated by the device per unit of time when fully loaded.
- The flue gas temperature at the outlet of the furnace is usually taken in the range of 150-200 degrees.
- The speed of movement of gases along the channel (is 2 m / s).
- Chimney height.
- The amount of natural draft (4 MPa per 1 m of the smoke channel).
The dependence of the size of the chimney section on the volume of fuel burned is obvious.
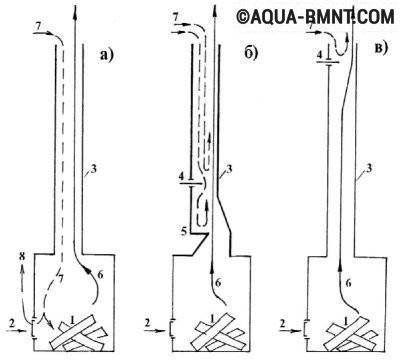
Smoke does not move in a straight line
To perform the calculation, you need to use the converted formula for the area of a circle: D2 = 4 x S * Pi, where D is the diameter of the smoke channel, S is the cross-sectional area, Pi is the pi number equal to 3.14.
To calculate the cross-sectional area, you need to determine the gas volume at the point of their exit from the furnace into the chimney. This value is calculated depending on the volume of combustion fuel and is determined from the ratio Vgas = B x Vtop x (1 + t / 273) / 3600, where Vgas - volume of gases, B - amount of fuel burned, Vtop - the tabular coefficient, which can be found in GOST 2127, t is the temperature of the gases at the outlet of the furnace, usually taken as a value in the range of 150-200 degrees.
The cross-sectional area is determined by the ratio of the volume of passing gases to the speed of its movement, that is, by the formula S = Vgas/ W. In the final version, the desired value is determined by the ratio D2 = Vgasx4 / PihW.
Having made the necessary calculations, you will get the result - the diameter of the chimney should be 17 cm. This ratio is true for a stove in which 10 kg of fuel burns per hour with its moisture content of 25%.
The calculation is made for cases when non-standard heating units are used. If the power of the device is known, it is enough to apply the parameters of the chimney recommended by specialists:
- for devices up to 3.5 kW - 140 x 140 mm;
- at 3.5-5.0 kW - 140 x 200 mm;
- at a power of 5.0–70 kV - 200 x 270 mm.
For chimneys with a circular cross-section, its area should not be less than the calculated value of a rectangular one.
Organization of a node through the walls of a house or bath
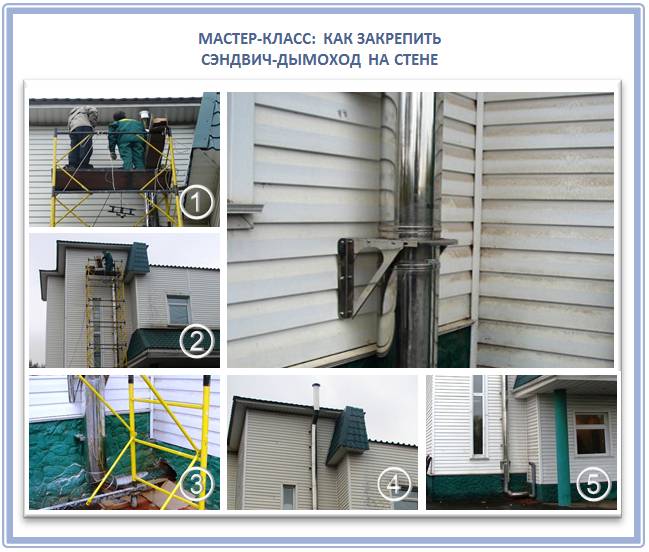
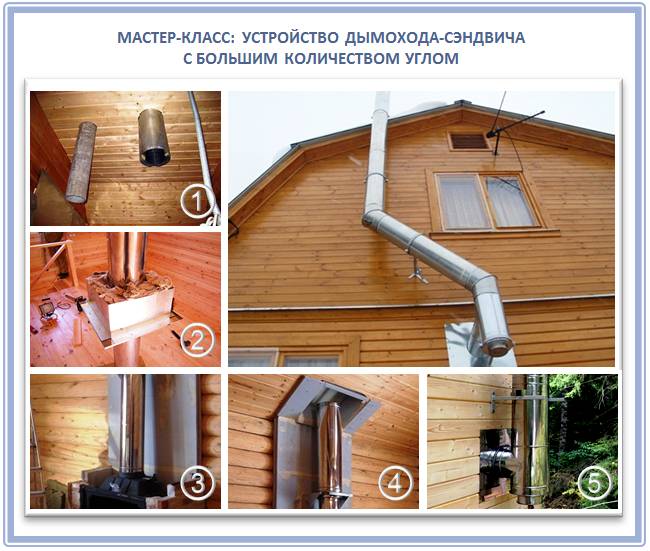
Today, sandwich chimney installation is practiced in two main ways: inside the house or down the street. Indeed, more and more often you can see that chimneys are mounted directly through the wall to the street, and from the first floor - and from there they are already directed vertically upward. And this has its own meaning: this way the chimney cools down much faster and does not pass through fireproof ceilings and the roof. On the other hand, the chimney that rises through the attic usually serves as an additional heating element. But the risk of fire here, of course, will already be higher.
Surprisingly, the stainless steel outer casing of the sandwich is not far from the temperature of a single-circuit chimney. Indeed, in fact, such a chimney was originally designed to improve traction, and therefore the gases that come out of the furnace usually have a temperature of 800 degrees Celsius, and the outer casing is capable of heating up to 300 degrees! And this is far from a fireproof surface.
A modern sandwich chimney is led out both through the roof and directly through the walls of a residential building:
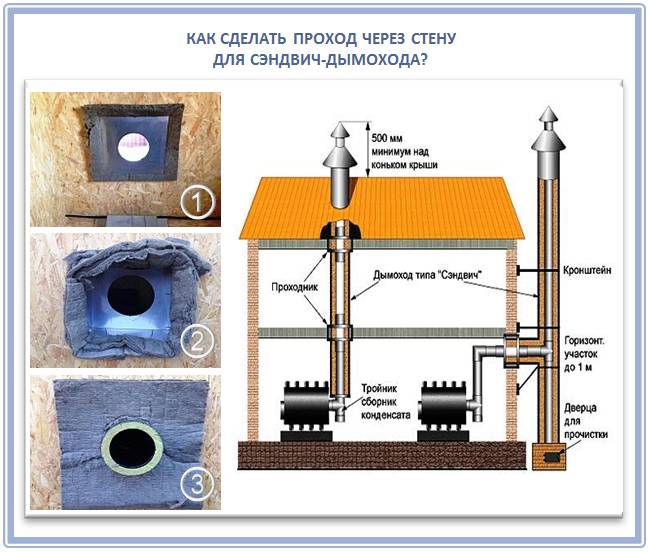
You can see the node in more detail in this illustration:

So, the following step-by-step instructions will help you organize the correct angle of passage of the sandwich chimney through the walls:
- Step 1. Before starting work, be sure to calculate the length of the horizontal sandwich pipe, which will need to be passed through the wall. And also consider the tee that you will be installing. Calculate the slope of the roof so that the chimney does not get too close to the eaves.
- Step 2. Fill the box that you insert into the wall with non-combustible basalt material.
- Step 3.Close the lead-through assembly with a lid so that the basalt cardboard gasket remains visible.
- Step 4. Close the edges of such a knot cover with a casing from the components of the exterior decoration of the house, for example, siding.
- Step 5. Seal the edges of the box with a colorless roofing sealant.
- Step 6. Install a revision at the exit from the chimney from the wall.
- Step 7. Secure the chimney with special wall brackets, one for each 1.5-2 meters.
- Step 8. So, after you have installed the pipe, check its verticality using a level.
- Step 9. Be sure to make sure that the seam is turned towards the house.
After all, the most important rule is as follows: the chimney passage through the wall of a house or a bath should be protected from fire as much as possible. Here's a good example of such a node:

In order for the horizontal element of the sandwich chimney to be installed securely, it must be correctly supported with a metal corner:
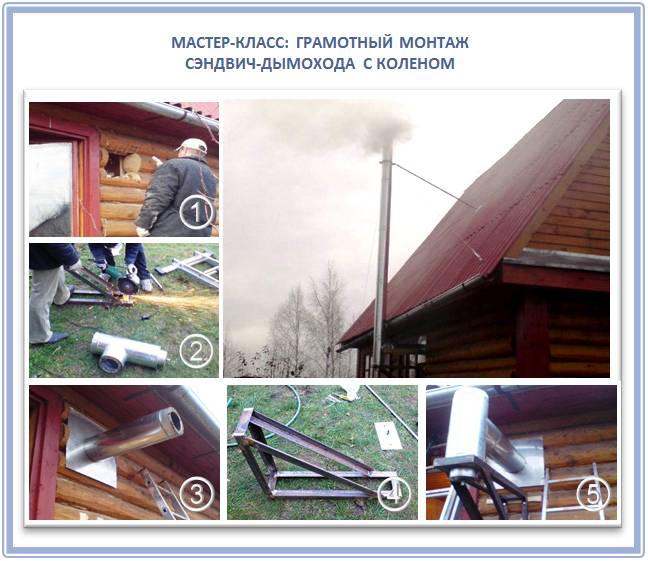

Special designs will also help to fix such a chimney to the wall in a strictly vertical position:
Believe me, at this stage the work is not over yet, especially if your chimney has a complex design (which we highly do not recommend to you):
How to remove a pipe from a bath through the ceiling with your own hands

When designing a bath, it is important to provide for a well-equipped chimney so that the combustion products leave the room without hindrance, without posing a danger to those who are steaming. How to get the pipe out of the bath through the ceiling correctly with your own hands in steps? We will consider this issue in this article.
One of the options for the outlet of the chimney is its outlet through the ceiling space and the roof. This option is more reliable and durable.
To make such a chimney, you can use different types of materials, but, in any case, you must follow the rules of finishing technology.
Metal sandwich chimney
For craftsmen who assemble a chimney from a sandwich pipe, ready-made systems will be useful, which include straight pipes, bends, clamps. A sandwich pipe is a metal structure in which an element of a smaller diameter is placed in a pipe with a large cross-section. The space between the pipes is filled with heat-resistant insulating material. The metal removal system has good traction, little clogging, since the surface is smooth, the cross-section is round, soot has nowhere to settle.
The flue duct is cooked rigidly into a solid circuit or assembled according to the scheme; during the assembly process, the diameters of the abutting sections must match. In the case of a larger section of one of the components, the connection is made through reduction adapters, the joints are sealed.
Installation principle
There are 2 ways to assemble pipes for a metal bath stove:
- According to the condensate, the lower, narrower part of the pipe section is inserted into the already installed element, which is larger in cross section. This type of assembly is common when arranging baths. During the operation of the furnace, drops of condensate flow into the sump without getting into the insulation.
- For smoke - the narrowed part of the pipeline sections is located upward. With this mounting scheme, traction is improved. Made for systems with high exhaust gas temperatures.
Also, the chimney line is placed inside the bath (in a thicket of everything), behind the wall of the building.
Tools, materials
In the production of steel chimneys, galvanized, stainless steel of various grades (ferritic, martensitic, chromium-nickel, etc.), sandwich elements are used. Pipes made of complex-alloyed steel (stainless) are used mainly for the external location of the system in combination with low-temperature heat sources. Stainless steel has advantages over galvanized steel in terms of strength, heat resistance, lack of reaction to an aggressive environment, but the cost of material and work is high.Installation of a gas outlet network for a bath from sandwich pipes is the optimal solution for a bath.
For installation you will also need:
- grinder, wheels;
- drill, set of drills;
- jigsaw, saw for metal;
- hammer;
- screwdriver, screws;
- screwdrivers;
- plumb line;
- elements equipped with a revision;
- crimping clamps;
- brackets;
- silicone-based heat-resistant sealant;
- material for thermal insulation (layer 10 cm thick).
Chimney sandwich installation diagrams
The assembly of the smoke circuit is done in stages, starting from the stove to the roof. The peculiarity of the chimney for a bath made of stainless steel, another metal - it is located at the support wall (but not on it, not in full), often a brick shaft is built around the pipeline (from foam blocks).
Preparatory stage
- Draw a diagram of the chimney, highlighting all structural elements.
- Calculate the cross-sectional areas of the elements, their lengths, bending angles.
- Apply axial placement markings to the load-bearing wall, outline the holes in the floor, roof.
- Cut holes in the pipe passages in the bath through the ceiling and roof.
- Think over the mounting scheme.
- Insulate the adjoining wall with heat-resistant material.
It is possible to mount a smoke exhaust network both inside the bath and outside. An internal chimney is made more often, this saves firewood, material, effort, money.
Detailed design of the chimney in the sauna for a wood-burning stove, installed indoors:
- Attach a straight single-layer pipe, at least 1 m long, made of refractory alloy steel to the furnace branch pipe. With a strictly vertical arrangement, bends, tees are not made. Further, the pipe can be made from sandwich pipes.
- When installing a condensate collector at a height of 0.5 m from the furnace, make an angular outlet (45 °), lead an inclined section, insert a tee. Next, a vertical line is sent up, a container for condensate is taken down.
- Connect the pipeline elements, fixing the joints with a fire-resistant sealant, clamps.
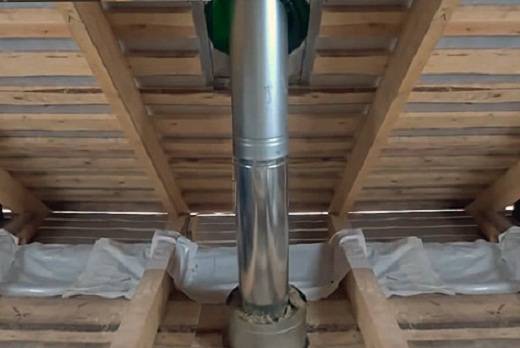
- The passage through the ceiling, the ceiling passage unit, is mounted in the form of a metal box with a central, rigidly fixed hole that coincides with the axis of the line. Sections of a sandwich pipe protrude beyond the overlap levels by at least 7 cm. Static holes are provided by overhead plates. Inside the PPU, the pipe must be one-piece. The free space in the box is filled with non-combustible insulation, most often mineral wool.
- At the exit through the roof, install a flexible overhead collar (master-flush), which ensures the tightness of the roof to the flue system. The diameters of the buffer zone between the hot pipe and the roof: for slate, metal roofing - 15 cm more, for bituminous coating, soft roofing material - 30 cm more.
After assembling the pipe (the height above the roof is not less than 0.5 m), decorate the head with a protective element by placing a weather vane, deflector, and a cap.
Metal construction
The most favorite material for building a bath for many years has been wood. In addition to all its unique positive properties, the tree also has an increased flammability, which is why the bath needs fire insulation.
In order to avoid fires, to insulate the pipes in the bath with their own hands, as well as to insulate the walls and ceiling, they used a lot of different materials: asbestos, clay, various insulation plates. The most important thing in insulation is low thermal conductivity.
How to wrap: heat insulation
 Thermal insulation is a relatively new type of insulating material. It consists of foamed polyethylene with a foil surface on both sides.
Thermal insulation is distinguished by excellent resistance to high temperatures, which is why it is so often used for pipe insulation in a bath. The thickness of this material varies from two to ten millimeters. The indicator of the maximum temperature that it can withstand directly depends on the thickness of the insulation layer:
- Material with a thickness of two to five millimeters is capable of withstanding from -30 to +100 degrees;
- From five to ten millimeters - from -60 to +150 degrees.
Before wrapping the pipe in the bath with thermal insulation, it is necessary to stock it with metallized tape or wire, since you will need these materials in the insulation process, which is completely simple and does not require outside help.
How to wrap in the attic: folgoizol
 Folgoizol is also perfect for thermal insulation of the chimney, due to its resistance to temperature extremes. It consists of a double layer of foil and insulation.
For the manufacture of folgoizol, a rather dense food foil is used, due to which it is distinguished by its harmlessness.
Folgoizol is able to withstand temperatures from -60 to +200 degrees, which is why it is used not only for insulating pipes, but also for insulating walls and ceilings. Folgoizol is an excellent heat, hydro and vapor barrier material for a relatively low price.
Major mistakes
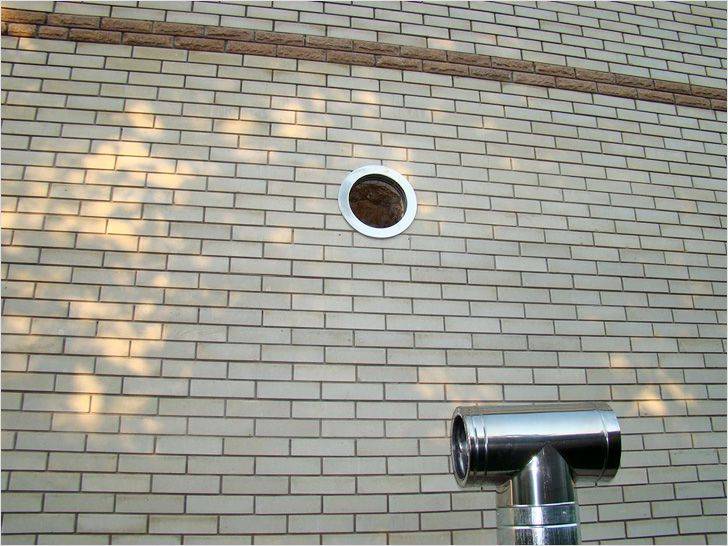 Exit through the wall
Some mistakes made during construction can cause fire or carbon monoxide poisoning. The consequences include the costly alteration of the chimney. You need to choose the right masonry material. So, for some species stoves and fireplaces ordinary brick will do, but in others its use will be simply unacceptable.
- poor insulation;
- improper installation of the ventilation system, which leads to the ingress of smoke and carbon monoxide into the house;
- making changes to the design or repairs without preliminary calculations.
These are all the nuances of building a chimney, but you need to know them when starting construction. Carefully study the requirements for creating a heating system and laying a fireplace, as in the case of negligence and lack of qualifications, the risk of an accident is very high. Get a consultation from the master or invite him to inspect the built chimney.
Safety regulations
The passage of the pipe through the ceiling of the bath is regulated by SNiP 41-01-2003. This document states that:
- the passage of the bath pipe in the ceiling should be located at a minimum distance of 350 mm from flammable structures and 250 mm from hardly flammable elements;
- It is considered ideal to leave this distance not closed (air). However, such a design will lose a lot of heat;
- the specified distance is filled with non-combustible materials;
- the hole must be closed with metal sheets (stainless steel is more often used, which does not spoil the appearance of the room);
- the pipe in the bath through the ceiling and roof should not have joints. This factor must be taken into account when designing a chimney;
- the maximum length of the pipeline passing through the ceiling or roof should not exceed 1 m;
- the chimney should not be rigidly attached to the ceiling or roof.
The choice of thermal insulation material
The following materials can be used as a heat insulator:
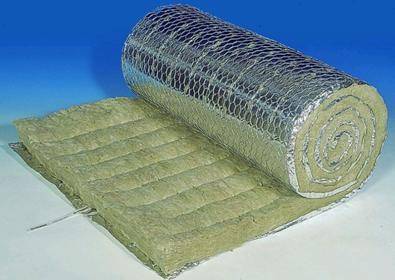
basalt or mineral wool. The insulation is able to withstand heating up to 600 ° C. The main disadvantages are: the release of formaldehyde, since the material contains resins and the instability of protective qualities when wet, which is possible in case of condensation;
expanded clay. The material has excellent properties. When wet, expanded clay quickly restores its functions. However, to arrange the floor, you will have to additionally install containers in which the material will be located;
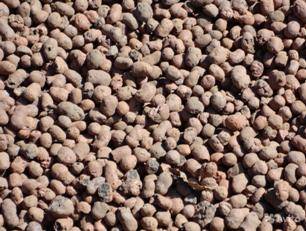
Expanded clay of medium fraction
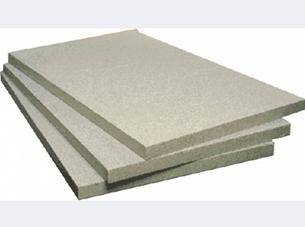
minerite. The material consists of cement, cellulose and mineral fillers. Minerite tiles can withstand temperatures up to 600 ° C. When heated, it does not emit harmful substances, and when water gets in, it does not lose its properties;
- asbestos. It is a good insulating material, however, with strong heating, it emits substances harmful to humans;
- sand or clay. The materials were used as heat insulators earlier, before the advent of modern heaters.However, some experts prefer to use natural materials rather than artificial ones.
Insulation of pipe joints
To make the joints tight, use:
- high-strength sealants capable of withstanding large temperature differences;
- special clamps made of the same material as the chimney.
Advantages and disadvantages of sandwich chimneys
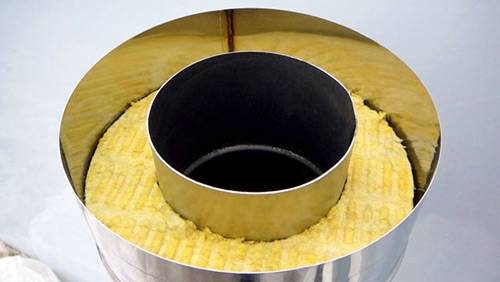
Advantages and disadvantages of sandwich chimneys
The undoubted advantages of chimneys of this type include the following properties:
- insignificant weight;
- compatibility with all heating devices;
- the possibility of condensation is minimized;
- aesthetics;
- compactness;
- versatility, which manifests itself in the possibility of both indoor and outdoor installation;
- slight contamination with soot during operation;
- corrosion resistance;
- mobility - the chimney does not have to be made straight;
- fire safety;
- no need to install an additional base.
With regard to the shortcomings, sandwich chimneys have few of them, more precisely, only two - the possibility of loss of tightness and high cost. If everything is clear with the cost, then the loss of tightness requires some explanation. The fact is that it occurs only after a long operational period, because all sections of the pipe are permanently expanding and narrowing under the influence of temperature differences.
Due to the lightness of the sandwich chimney, it can be installed without preliminary installation of the base, which is considered another advantage of the design.
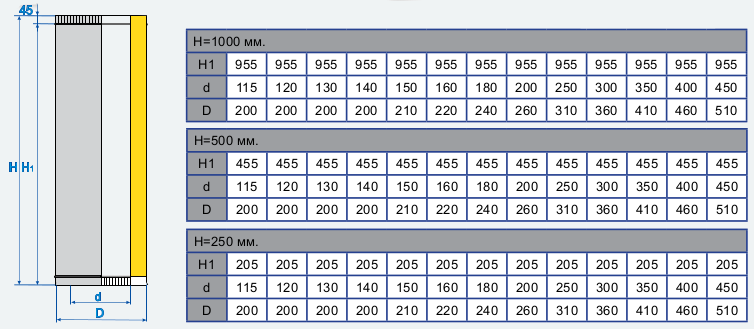
Sandwich chimney dimensions
What is required in the work
In addition to standard components, take care of the necessary materials and tools:
- wall brackets;
- fasteners;
- clamps;
- couplings;
- stub;
- marker;
- refractory sealant.
Now - directly to the installation.
Basic rules for the installation of any chimneys
When figuring out how to properly make a chimney in a house, you should consider a few general rules:
- The elements of the system are mounted from the bottom up.
- The inner pipe of the system should be inserted into the previous element, but the part of the outer contour is put on the previous one. This will prevent condensation from entering the insulation located inside the circuit.
- To fasten chimney pipes with outlets, tees, and similar elements, clamps are used.
- The joints should be located outside the thickness of the slabs.
- A tee usually requires a support bracket to be installed.
- For every two meters of the chimney, there should be one fixing to the wall.
- When fixing the chimney on the wall, make sure that the chimney does not bend.
- Contact of the smoke channel with any communications: gas pipe, electrical wiring, etc. is not allowed.
- When passing through the roof and ceilings, an indent of 150 mm for pipes with insulation and 300 mm for pipes without insulation should be made.
It is not allowed to create horizontal sections of the chimney with a length of more than 1 m.
In accordance with building regulations, when installing the chimney, the joints should not be in the thickness of the floors or roofing cake
Also, when installing a steel chimney, it is necessary to take into account the possibility of thermal deformation of the system. For this, a special flexible adapter is installed. If for some reason this element is absent, it is necessary to fasten the pipe to the bracket not rigidly, but with a margin of 10-15 mm. Otherwise, the chimney may move when heated.
If the roof of the building in which the chimney is installed is made of combustible materials, a special spark arrester must be installed on the chimney. It is made of a metal mesh, the holes of which do not exceed 5X5 mm.
The height of the chimney depends on how close the chimney is to the ridge.If the distance to the ridge is less than 1.5 m, then the pipe should rise 500 mm above the ridge.
Metal chimneys
Chimneys from sandwich pipes (see Sandwich pipe for a chimney) have gained a well-deserved popularity:
- Convenience and quick installation.
- Lightweight structures do not require a separate foundation, do not provide for a foundation.
- Filling with mineral (basalt) wool of the required thickness provides the necessary thermal insulation.
- The smoothness of the inner walls prevents the accumulation of soot and does not disturb the draft air flow.
- The pipe has a complex structure, an acid-resistant grade of stainless steel is used for the inner channel, this guarantees the durability and safety of the smoke removal system.
Sandwich pipe device diagram.
When choosing a chimney, one should not forget about the flue gas temperatures set out in Table 1.
Therefore, the thickness of the inner stainless wall of the pipe should be:
- from 0.5 mm for gas, diesel and pellet boilers;
- from 0.8 to 1.0 mm for stoves, sauna stoves and fireplaces;
- from 1.0 mm for coal-fired boilers.
The thickness of the thermal insulation layer should be up to 100 mm in the case of stoves, fireplaces and coal boilers, and in the case of automated boilers, the layer thickness should be up to 50 mm.
Overlapping
I repeat once again that the availability of ready-made elements for all occasions is an undoubted convenience. If one supplier does not, then we can easily find another supplier who will be able to supply all the necessary kit.
- In the case of an interfloor overlap, we take a ready-made cut of the factory design.
- This cutting is called attic or interfloor cutting.
- The inner diameter must match the outer diameter of the sandwich pipe.
- We cut out a square hole between the beams, corresponding to the size of the square part of the groove, you can make a margin to wrap the metal with another 1-2 layers of non-combustible basalt canvas.
- We draw a chimney through a round hole.
- We fill the space with basalt wool
Factory cutting.
Cutting mounted. The space between the pipe and the metal wall is also filled with mineral wool.
Roof
The problem of how to lead a chimney through the roof is solved in about the same way as in the case of overlap. We take ready-made elements, in particular, a finished roof cut, some call it a roof cut. They come in a variety of sizes and angles.
Roof cutting.
- It is still much more difficult to install the roof passage assembly than the device of the floor passage assembly.
- The distance from the pipe to the tree must be at least 250 mm on each side. The hole and the chimney are closed from above with a special element - a rat.
- This rat is brought from above under slate or shingles, and from below it is placed on top of the shingles.
- On top of the roof, a flue is put on the chimney pipe and clamped with a clamp. This provides protection from precipitation.
- The space between the chimney and the rafters is filled with non-combustible mineral (basalt) wool and covered from below with a metal reflector.
Roof passage.
Walking through the wall
Often, pipes in a sandwich design are taken outside the house and run along the outer wall. This has its positive aspects in that it is not necessary to carry out time-consuming passes through the ceilings and the roof. And the fire hazard is also reduced. In this case, a horizontal passage through a vertical wall is added (see How to lead a chimney through a wall).
The chimney is external.
From the point of view of thermal insulation, this node of the passage through the wall is no different from the node of the passage through the interfloor floor. Installation is complicated only by the fact that the log wall can shrink. And there should be a sliding cut fit.
DIY chimney installation
The degree of readiness of parts of a metal chimney for installation is so high that its assembly is a sequential execution of a number of elementary operations that do not require either special skills or special knowledge.
The whole process might look like this:
-
Installation of the stove in the place of its permanent placement, fixing.
- Installation of the adapter from the branch pipe of the fuel unit to the main chimney. To do this, a pre-prepared part, after applying sealant to the seat, is put on the console and secured with a clamp.
- Installation of a branch with the desired angle of rotation (90, 30, 45, 60 degrees). To do this, it is enough to put the part on the landing site with the applied sealant up to the flange and install the clamp. Further actions are not varied and are performed in the same way.
-
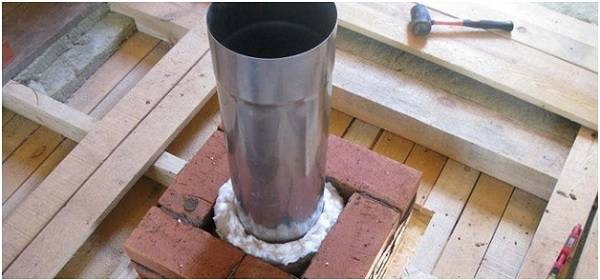
If you need to pass a pipe through a wall, you need to make an opening in it. On the brick partition, after installing the pipe, it is enough to seal the cracks with cement mortar. When passing through a wooden wall or any combustible material, the hole size should be 2–2.5 times the pipe diameter. At the intersection, it must be isolated. To do this, you can use an asbestos sheet or cord that is wrapped around a pipe, basalt wool or a slab. Further, a metal sheet made of galvanized or stainless steel is installed on the wall from the inside and outside.
-
Installation of the second branch in the form of a tee, the lower hole of which is used for mounting on a condensate collector. In this place, you need to install a support platform with its fastening either to the wall or supported on the ground.
- Installation of a straight pipe section.
-
Fastening the bracket to the wall.
- Fixing the pipe.
- Installation of a cap on the pipe to protect its mouth.
- If necessary, installation of stretch marks.
If the chimney is planned to pass the ceiling and the roofing pie, the same technology for protecting the structures is used as for the wall.
On the pitched roof, an umbrella is set up on a smoke-free roof to protect the opening in the roof from precipitation.

All joints of the chimney with the wall and roof must be insulated
The installation process is greatly simplified when using sandwich pipes, since the temperature on their surface is much lower than on single pipes.
A significant advantage of steel chimney assembly is that no welding is involved.
Metal pipe: step by step process
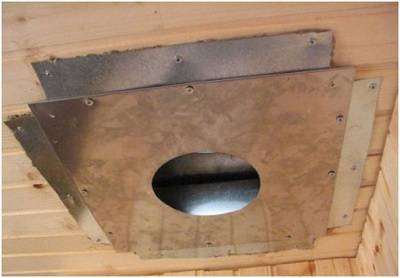 In saunas with an installed stove, it is better to use brick chimneys, since refractory bricks retain heat for a long time.
Many people wonder how to decorate the walls in the bathhouse near the stove, because these places also need protection.
Usually, in places where the chimney meets the roof and ceiling, sheets of asbestos or galvanized steel are used.
Also, galvanized steel sheets are also used to protect the walls near the furnace.
A metal pipe without an insulating layer is the most fire hazardous option for arranging a chimney. In this case, there must be a distance of 60 cm, not less, between it and the nearest combustible elements.
The most popular and simplest option for pipe insulation is the use of heat-resistant insulation for winding it. Basalt wool is most often used as such a heater, which is protected from above with plaster or a metal sheet.
Isolation occurs as follows:
- The first step is to stock up on mineral wool slabs, the thickness of which should be more than 5 mm. Next, an insulation material is used to completely wrap the pipe. The insulation is fixed with a steel wire, which also needs to be wrapped around the pipe;
- Above the pipe equipped with a heat-insulating layer, it is necessary to construct a reinforced mesh. Next, a cement-limestone mortar is made, with which the mesh is plastered;
- Instead of plaster, you can use a metal sheet.
To do this, it must be rolled around the pipe with insulation and riveted the edges at the point of attachment.
