Execution of penetration depending on the different types of roof
Roof penetration will differ depending on the shape of the chimney and the material that covers the roof. So, for the output of a sandwich pipe, the installation of a heat-insulating box is not required, since here the insulation was laid during manufacture. For penetration through the roof of a brick or ceramic chimney, it is necessary to construct a thermal insulation box to protect the building from fire.
Elastic penetration for round pipe
The simplest but most versatile penetration is for a sandwich pipe. It is a rubber or silicone pyramid that is put on the pipe and fixed to the roof. Moreover, the smoothness of the roofing in this case does not matter much - the elastic insulating apron is equally hermetically fixed on the ribbed surface of the profile, corrugated tiles, on a soft ondulin. Manufacturers offer ready-made elastic penetration for a sandwich chimney of any cross section.
Installation of elastic penetration is carried out as follows:
- A hole is cut out in the roof to output the pipe so that at least 38 cm remains from the pipe wall to the combustible materials of the roof.
- On the inside of the roof, a galvanized metal sheet with a hole for the chimney is fixed. The distance from the outer wall of the pipe to the edge of the sheet hole is at least 14 cm.
- The pipe is taken out and fixed in the desired position.
- The elastic penetration pyramid is cut to a level corresponding to the pipe diameter and put on the pipe through the top.
- The protective apron of the penetration is applied to the chimney passage, having previously coated the edges with a fire-resistant sealant.
- A metal fastening ring (flange) with holes is placed on top, fixed with self-tapping screws.
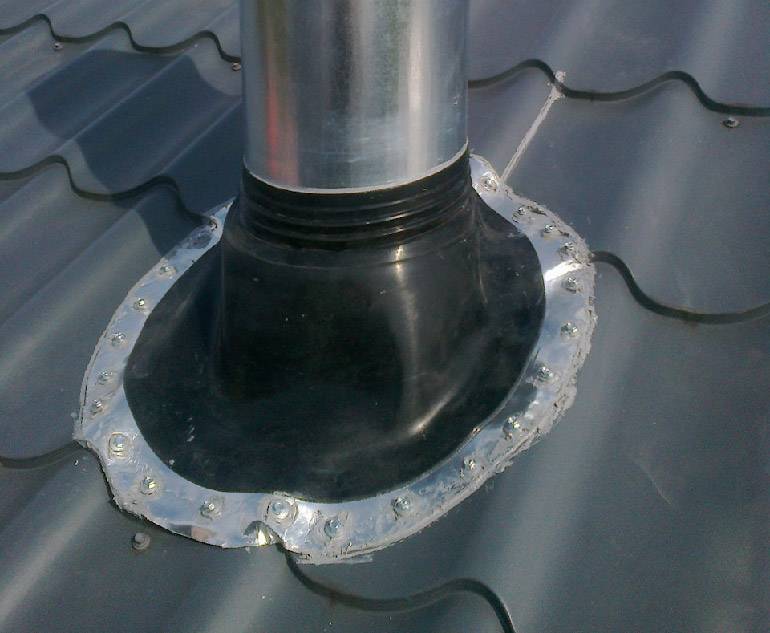
For roofs with a steep slope, manufacturers produce special elastic penetrations, where the slope of the pyramid and apron is more pronounced.
Metal penetration for round pipe and smooth roof
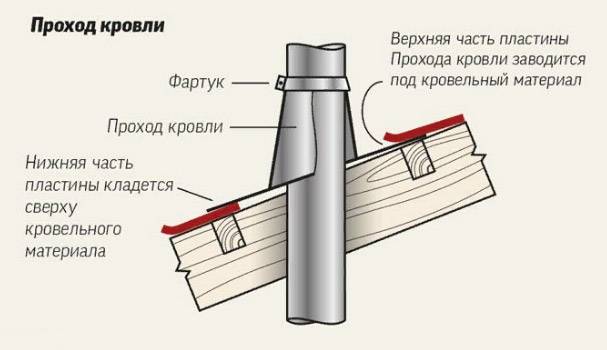
A metal lead-through for a round pipe can also be purchased ready-made. It is a metal cone, the upper opening of which corresponds to the diameter of the chimney pipe. When choosing a metal penetration, you need to know the angle of inclination of your roof.
Installation diagram of metal penetration:
- the opening in the roof and the inner part of the protective structure are designed as for elastic penetration;
- a pass-through pipe is put on the chimney, the edges of the lower part are coated with a fire-resistant sealant;
- fix the protection with self-tapping screws with rubber caps to seal the mounting holes.
Transit for rectangular pipe
The output of a brick chimney through the roof has its own characteristics. To design the penetration, you will need a grinder, a screwdriver, metal scissors and galvanized iron in sheets or stainless steel.
The installation of the brick chimney penetration begins with the construction of a box for thermal insulation. Its size is calculated based on the size of the chimney section plus 15 cm on each side. The material for the box must be non-flammable. Use sheet metal or asbestos.
The space between the pipe and the box walls is filled with basalt wool. This material can withstand significant temperatures and has excellent thermal insulation properties. The lower part of the box is made out with a metal sheet.
Street protection has a complex composite structure. The roof material for a brick pipe does not matter much, since it must be removed in any case when it is removed. The drainage tie is brought out over the roof covering, regardless of its type.
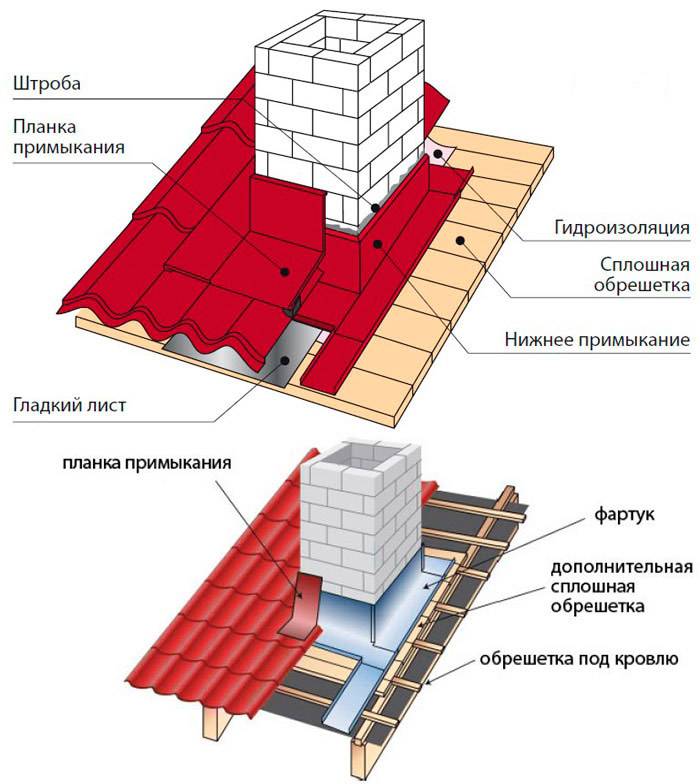
The casing bushing consists of the following elements:
- four (by the number of sides) internal protective wall profiles;
- four external decorative elements;
- drainage tie.
If the protection is installed over a flat roofing material, then it is glued with a fire-resistant sealant. When installing under a corrugated (profile, slate, tile), a wall profile is installed on the pipe, fixing it in a pre-made groove on the pipe. The upper parts of the apron are brought under the roofing material, the lower ones are fixed from above.
Norms and requirements
High-quality installation of the chimney passage through the roof is so important for the safety of the building and residents that the state has officially enshrined the rules and regulations for its arrangement. The document that takes into account sanitary and hygienic, fire hazardous, corrosive and other loads on structures and materials is called SNiP 41-03-2003 "Thermal insulation of equipment and pipelines."
The routing of the pipe through the roof is planned during the construction phase. If the stove is reconstructed, changed or repaired during operation, then the chimney is usually left in the old place. A fundamental condition for a quality chimney is the location of the chimney in relation to the roof ridge.
To ensure optimal traction, the best place to lead the pipe to the roof is its highest point - the ridge. This allows the main part of the pipe to be guided through the attic space, which protects it from moisture and cold. The difficulty lies in the fact that it is necessary to violate the integrity of the horizontal beam by installing additional supports on both sides of the chimney. Most often, the pipe is taken out at a short distance, which makes it possible to limit the street part of the pipe to a minimum of fifty centimeters.
There is the following dependence of the height of the chimney on its distance from the ridge:
- the distance to the ridge does not exceed 1.5 m - the pipe rises 50 cm above it;
- distance from 1.5 to 3 m - it is enough to bring the chimney flush with the ridge;
- if the chimney outlet is more than 3 m from the ridge, the chimney height may be lower than the top of the roof (the difference should be 10 degrees).
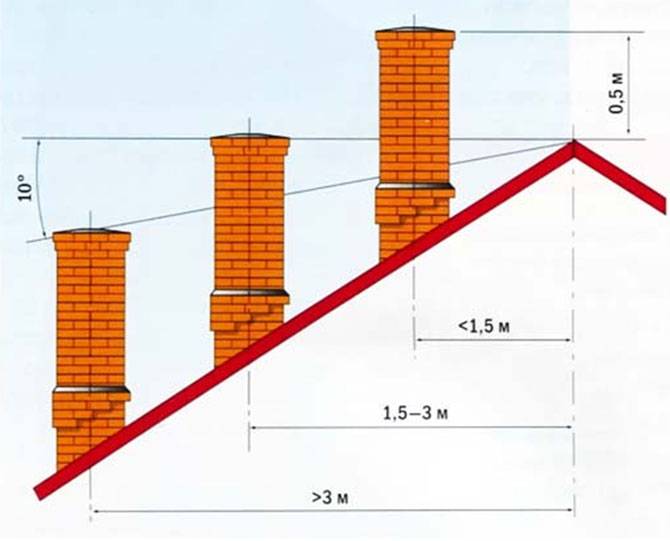
The optimal pipe height is from 0.5 m to 1.5 m. The outlet is located between the rafters so as not to violate their integrity and leave a distance of 15-25 cm to them.
If the straight vertical outlet of the pipe falls on a similar merger of two roofs, then the roof penetration should be shifted half a meter to the side, adding a horizontal section to the chimney (up to 1 m). Snow and ice accumulate in the deepening in winter, which creates an additional threat to the occurrence of leaks.
An unsuccessful location for the roof penetration for the chimney is the lower part of the roof. Here, the pipe can be damaged by the descent of masses of snow and ice. In addition, a large section of the pipe has to be taken out into the street to ensure normal traction, which contributes to its freezing and the formation of condensation on the inner walls.
Chimney box
In order to properly lead the chimney through the roofing pie, you should equip your own rafter system around the pipe. It must be spaced from the chimney at the distance specified in SNiP. The structure consists of side rafter legs and horizontal crossbeams from the bottom and top, which are made of a bar of the same section as the rafters.
To insulate the structure, it is necessary to use non-combustible heat-insulating materials, such as glass wool or stone wool - it is stuffed between the pipe and wooden structural elements.
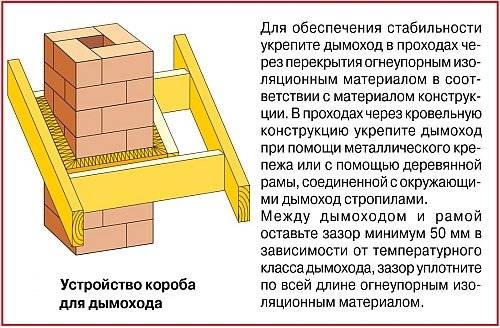
When passing the chimney through the roofing pie of the operated roof, the steam and waterproofing is cut crosswise, like an envelope, the edges should be tucked up and fastened with nails or staples to the rafter system.
Roof chimney waterproofing requires special attention.When installing a chimney box for a pitched roof, the vapor barrier and waterproofing membrane are fastened as follows: the edges of the films are tucked in and tightly fixed with brackets to the box, in addition, the attachment points should be additionally sealed with a sealing tape or some other adhesive material. On the outside, on top of the roofing, protective elements are mounted that do not allow moisture to pass into the joints of the box with the roofing pie.
It is important to take into account that the installation of the box can negatively affect the air exchange in the under-roof space. To avoid deterioration of moisture removal, additional ventilation systems can be installed, for example, ventilation tiles, roof aeration grilles, etc.

The slope is a small roof of its own, which diverts water and snow from the pipe. Its installation is quite complicated, since all layers of insulation are part of the slope, in addition, it should be qualitatively combined with the main roof using curly elements. To avoid the installation of the slope, it is worth making the pipe smaller.
Using ready-made kits
Standard modular chimneys ("sandwich") greatly simplify the process of passing the pipe through the roof. A wide range of materials are used for the manufacture of structures, including:
The choice of a modular chimney depends on the fuel used, since they differ significantly in their technical characteristics. The advantage of such systems is the ability to install the pipe at a non-right angle. This is especially true when installing a chimney in an operating building and allows you to choose almost any place for installing a fireplace, stove or automatic boiler.
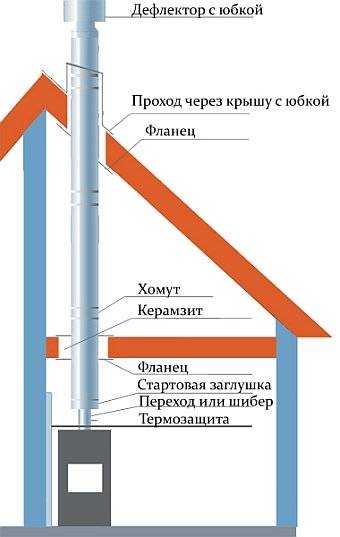
A modular chimney passes directly through the roof, consisting of parts such as :
- deflector (a device that enhances the draft in the chimney by using a stream of hot air);
- a clamp for stretching (allows you to additionally fix a high pipe on the roof);
- skirt (an element that protects the place where the pipe exits through the roof);
- roof passage (element with a fixed apron, which is directly mounted in the roofing cake).
Modular chimneys have an attractive appearance.
Steel chimneys can be installed if the flue gas temperature is not more than 500 ° C. Forbidden for installation on coal-fired stoves. For asbestos-cement pipes, this parameter is 300 degrees; for coal stoves, such chimneys are also unsuitable.
If the chimney is made of concrete or brick, or a ready-made factory passage is installed, the structure should not be rigidly attached to the roofing system. Under the influence of external factors, the roof can deform, and these forces will be transferred to the chimney, which can lead to its destruction. When the chimney exits through the roof, all connections between the chimney and the roof are made using flexible elements.
Round roof penetrations and chimney connections
Round metal systems always need additional fixation. Such elements must be secured with crimp clamps. For every two meters of such a chimney, they are installed along a bracket that fixes them to the wall, and for a tee - another support bracket. Also, special brackets are used to fasten steel pipes.
The node of the chimney passage itself depends on its section and shape, the slope of the roof, as well as on the type of roofing material used:
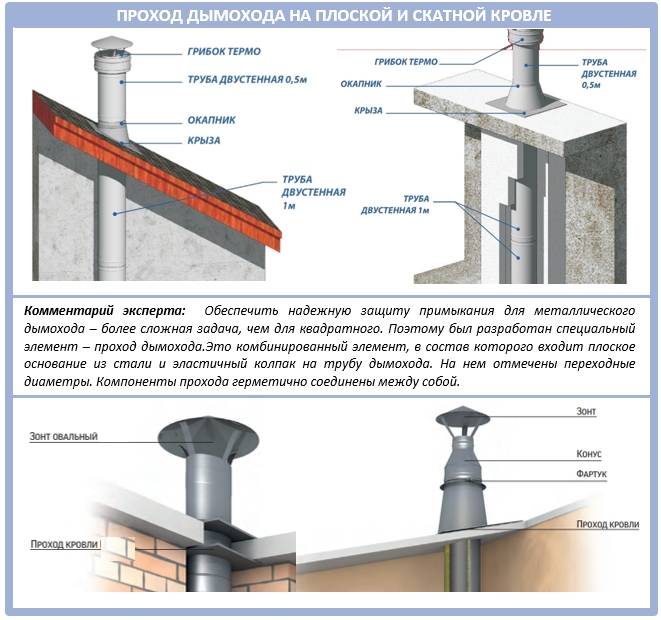
Here is a very detailed video clip of a chimney with a circular cross section on the roof:
A round pipe is a little more difficult to get around than a square one. But for this today, a roofing penetration for chimneys is produced in the form of a universal glass or a master flush:

What is such a penetration? This is a special chimney nozzle in the form of an elastic material made of silicone or EPDM rubber. Both options tolerate temperatures from -74 to + 260 ° C well.The penetration itself rests on a steel sheet, which is well anchored to the roof.
Pull this collar onto a round pipe using soapy water, and then coat it with roofing sealant under the flange
This penetration is good in that it is able to take any shape, and therefore it does not matter at what angle of the slope it is mounted. The whole process turns out to be much faster and more accurate than in the case of a brick chimney.
So, this elastic apron must be applied directly to the passage and pressed with a metal sheet in the form of a circle or rectangle (in advance, make holes in it for self-tapping screws).
Further, at the place of contact with the roof, it is necessary to apply a special fire-resistant sealant (and not an ordinary roofing) and fix the entire structure with a screwdriver.
This is how a competent chimney through the roof looks like in practice:
In the case of arranging chimneys on a roof without a relief (not always), instead of flexible pass-through products, a metal pass-through pipe is used. These are also finished products, painted or galvanized steel:

Such nozzles are made mainly of alloy steel of standard sizes and at standard roof slope angles.
Here the instruction is already slightly different:
- Step 1. Make a suitable hole in the roof. To do this, use a marker and a suitable tool - a grinder, jigsaw or scissors.
- Step 2. Carefully remove the insulation from the hole and saw off the grating that will get in the way.
- Step 3. Attach a sheet of fire retardant material to the inside of the roof so that there is a 15 cm margin for each side in a circle.
- Step 4. Lay the chimney and secure it with a clamp.
- Step 5. Put on the pass-through and fix it to the roof surface with screws and special sealant.
- Step 6. Continue to build up the pipe segments to the desired height until the pipe itself is at least one meter taller than the ridge.
If you want to insulate the entire structure in the place where the pipe passes, then use only a non-combustible heat insulator, like stone wool. It can simply be stuffed between the wooden structural elements and the chimney itself. It is needed so that condensation does not occur in this place.
A couple more important points. If the chimney rises on the roof more than 2 meters, then additional braces must be installed for it:

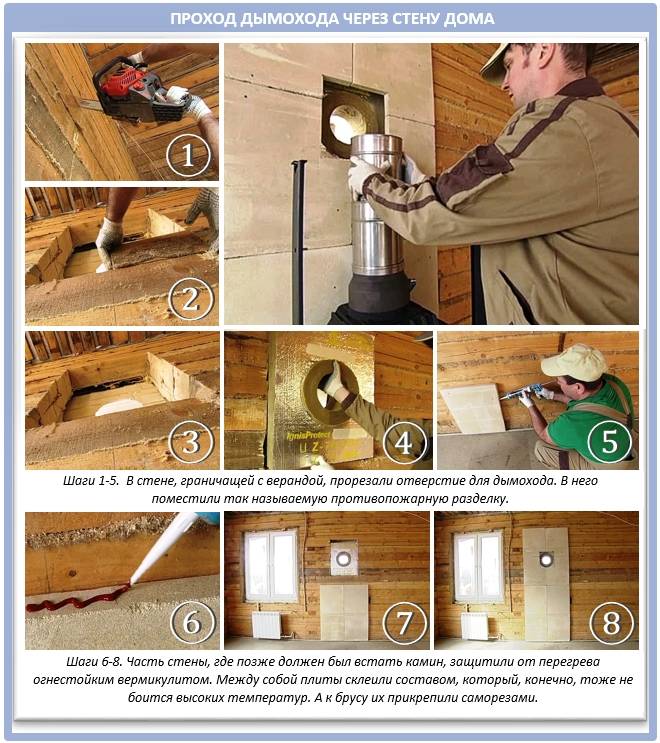
Round chimney pipes also tend to complicate the whole process by the fact that they have bends in their path and sometimes they even have to be carried through the walls, and only then through the roof:

Flexible duct for round chimney
Usually, in private residential construction, one has to deal with the arrangement of chimney and ventilation pipes of a circular cross-section. How can a chimney be installed through the roof elements in order to also ensure the sealing of the passage? For this, a special design is used - an elastic passage element of the roof. This product is made of special durable silicone or rubber. The shape resembles a funnel with wide fields of a round or square shape. These fields are called an apron. The elastic bushing, due to the flexibility of the material, can accept any configuration. This allows it to be used on roofs with any slope angle and any final coating. The material from which it is made must withstand the lowest and highest temperatures possible, as well as be resistant to environmental influences. Elastic penetrations are available in a variety of colors and configurations.

When choosing which penetration to purchase, you need to focus on the diameter of the chimney and the color of the roof finish. Versatile products are available, similar to a stepped pyramid, they are suitable for any pipe diameter. The size is adjusted using scissors, which cut the penetration to the required level.
Installing an elastic apron on the roof is quite simple.To do this, it is necessary to attach it to the chimney passage, press it from above with a metal circle in which holes for self-tapping screws are provided, apply a fire-resistant sealant to the place of contact with the roof and screw it with a screwdriver or screwdriver.
For roofs with extremely steep corners, a special type of penetration with a fixed angle of the clamping flange must be used.
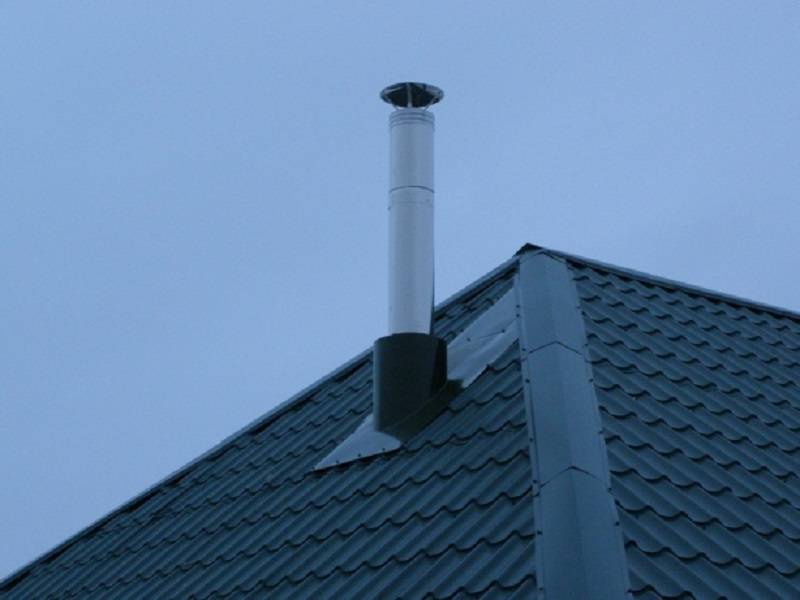
Chimney passage through flat roof
When installing the chimney on a flat roof, it is important to remember that its height above the roof surface must be 500 mm in accordance with SNiP standards. A round pipe, a rectangular chimney box or a brick chimney can be led out through the concrete slab. The round pipe passage assembly will be considered separately, and for other cases, two basic principles of installation are used.
The round pipe passage assembly will be considered separately, but for other cases, two basic principles of installation are used.
Features of the arrangement of the passage through the pitched roof
How to fix the chimney on the roof? On the chimney from the inner side of the roof, it is required to mount a flange that is rigid enough to take the loads from the crate - the chimney outlet forces part of the girders to be dismantled, and without installing the flange, the structure will remain in a suspended state.
The flange is usually a steel sheet with stiffeners welded to it. The sheet thickness should be at least 2-3 mm. A non-combustible heat insulator - basalt cardboard should be laid on the flange. This will prevent heat transfer from the chimney to the battens. If the chimney structure is not reliable enough to take on some of the loads on the roof, a rafter structure or additional posts are mounted around the perimeter of the hole so that the load is transferred to the attic floor.
Around the pipe, all layers of the roof must be cut to a gap corresponding to the standards specified in SNiP (depending on the type of pipe and the degree of its heating). The resulting gap must be filled with a non-combustible heat insulator - basalt or glass wool, basalt cardboard.
The principle of sealing the abutment of the roofing material to the chimney depends on factors such as:
To ensure that the chimney led out through the pitched roof is not damaged by snow melting, it is recommended to install snow holders higher up the slope. If the chimney width (across the slope) is over 800 mm, a special structure should be mounted on the slope above it, which diverts the water flow.
Outlet through the roof of pipes with a circular cross-section
It is very difficult to waterproof the junction of the roof to a circular pipe without using special roof penetrations. The construction market offers a wide selection of pipe assemblies that differ in diameter and material of manufacture.
A universal option is an aluminum flange fitted with a silicone or rubber bellows. Several standard sizes of these elements are available, so you can choose a penetration for a chimney of any popular diameter. The flange face is covered with a material similar to that of the corrugation and provided with grooves for filling with a sealant. The top of the corrugation cone is cut to the required diameter, after which the penetration must be pulled over the chimney. The flange must be coated with sealant and attached to the roof with self-tapping screws, which are included in the kit. If the roof covering is not made of metal, the flange is attached with dowels or long self-tapping screws directly to the batten.
For roofs with different slope slopes, penetrations are offered in which the corrugation is located at different angles to the flange. You can purchase a split design, which is used if it is not possible to pull the corrugation onto the pipe due to the presence of protruding parts or the high height of the mounted chimney. Such a penetration is equipped with clamps, due to which the corrugation is tightly squeezed around the pipe.
Fastening the chimney to the roof can be done using penetrations, in which a hinge segment is used instead of a corrugation. This is a universal option for roofs with any slope of the slope: the surfaces of the docking elements are spherical and can be fixed relative to each other at any angle.
It is not uncommon for roofing material manufacturers to offer prefabricated chimney penetrations with a pre-formed flange for the appropriate roof covering. Such a penetration is attached to the roof lathing with the necessary overlap. To achieve the same diameters, the apron cone is cut off. Passages from roofing manufacturers have several standard slope angles. To seal the joint, a second conical apron is mounted overlapping the first.
Fighting leaking joints
To create the maximum possible tightness of the roofing material to the pipe at the points of contact, using the lower strips, an inner apron is made.
Arrangement of the chimney passage through the roof.
To make an inner apron, you need the following tools:
- marker;
- long metal ruler;
- grinder with a disc 2 mm thick;
- pliers;
- hammer.
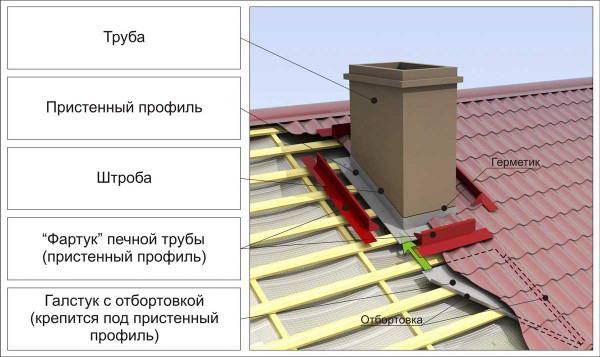
In order to do this, the plank is applied to the walls of the chimney pipe, making marks on the upper part of the plank. The next step along the previously marked line is punched through the strobe.
The installation of the inner apron should start from the bottom wall. The edge of the apron is inserted into the groove, after which it is installed on the remaining walls. The overlap should be 15 cm. Then the edge of the film is sealed, inserted into the strobe. Having cut the lower planks, they are installed, and then fastened with self-tapping screws.
After installing the lower apron, you can start installing the tie, which is a sheet of waterproofing material, wound under the elements of the inner apron from below. The main function of the tie is to drain the water.
After finishing work on the arrangement of the tie and apron, which protect the joints, the roofing material is laid. Then the outer apron is mounted. To do this, use the upper abutment strips.
The installation of the apron from the outside is carried out in the same way as the device of the apron from the inside. The difference is the absence of a groove and the upper edge is fixed directly to the chimney wall.
Important: today the building materials market offers products that are designed specifically for chimneys with a circular cross section. They are roof passages that consist of a base (flat steel sheet) and an apron cover. A round chimney is drawn inside the passage
A round chimney is drawn inside the passage.
Chimney outlet principles
When arranging a chimney, it is important to remember about fire safety. For the construction of the roof of a private house, a large number of materials are used that can have varying degrees of flammability
For example, wood used for rafters and battens is prone to fires. The materials used for insulation and waterproofing are also dangerous. Do not forget that the hot smoke pipe heats up quite a bit. That is why all parts of the roof, if possible, should have a certain level of fire safety and be located at a distance of at least 13 cm from a pipe made of brick, concrete, and ceramics. If you use pipes that do not have thermal insulation, then the distance will have to be increased to 25 cm.
Thus, at the place of laying the pipe, it is necessary to equip a significant opening through which, willy-nilly, heat losses will occur. And here its own rafter system will be equipped, a certain type of insulation will be used. As for the waterproofing materials, if the arrangement of the chimney takes place in an already finished house, these materials are cut out with an envelope, and their edges are then fixed to the rafter system.If we are talking about square pipes, then it is necessary to deal with the arrangement of both internal and external aprons, the purpose of which is to prevent leaks.
The shape of the chimney passage will directly depend on the shape of the pipe used. It can be round, square or rectangular in cross-section.
With regard to water, there are two main problems that arise when arranging a chimney. This is the need to divert (redirect) the water flowing down the roof away from the pipe, and to ensure the necessary level of protection from the liquid that tends to get inside the house. That is, moisture flowing down the wall of the chimney must also be sent to the roof in order to drain from it. That is why aprons are made of metal, or special factory cut-outs are used.
Selecting the output location
The choice of a convenient place for making a hole in the roof from corrugated board under the chimney pipe is half the success. Naturally, the decisive factor in this matter is the location of the oven. Professional stove-makers recommend placing the chimney strictly vertically, but there are more subtle nuances:
- It is best to place the chimney hole at the highest point of the roof, that is, closer to the ridge. The optimal distance from the ridge to the pipe is 50-80 cm.
- It is advisable that the hole in the roof made of corrugated board for the pipe does not fall on the elements of the rafter system. To get around them, use taps, corner sections of the chimney. They can be used to set the rotation to 90 or 45 degrees.
- The length of the chimney segments is calculated in such a way that the joints are above or below the places where the floors and roofing from corrugated board pass. Otherwise, it will be problematic to make a high-quality connection.
- To ensure good traction, the system should be 1-1.5 more than the roof ridge. If the chimney is too high, the smoke stream will have time to cool down as it passes through it, leading to condensation.
To check if you have correctly identified the exit point of the future chimney, draw a mark on the roof made of corrugated board with a marker and check its temperature at the end of the day - the chimney should be located in the "cold zone", that is, stay in the shade for almost the whole day.
Preparatory stage of work
So that during the installation of the pipe there are no difficulties, you need to prepare the place of work and tools in advance. The hole from the corrugated board is cut according to the following technology:
- After determining the configuration of the chimney, they outline where the exit to the roof will be located. As a reminder, it is best to place the pipe vertically.
- The size of the chimney cross-section is selected based on the recommendations of the heater manufacturer. The thicker and higher the chimney, the better the smoke is removed from the stove.
It is important that all segments are of the same section and fit together, inserted without creating a gap.
- On the roof of the corrugated board, the contour of the pipe is outlined using a permanent marker.
- A grinder with a thin metal cut out a hole, stepping back from the marked line a couple of centimeters inward. It is necessary to work with the corrugated board carefully and slowly so that the cut edge is even, without chipping, which can be injured in the process of removing the pipe.
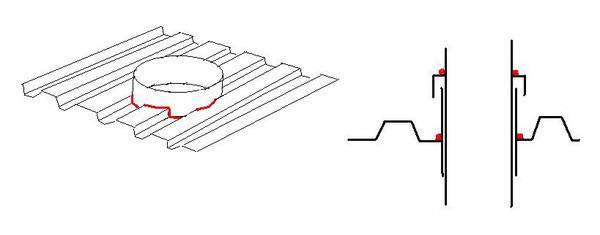
- In the corners of the hole, you need to make short cuts to bend the edges of the corrugated board up.
- Saw out the same weight in the ceiling.
- A metal box is mounted that will connect the pipe to the rafters. The chimney will pass through a hole inside the box, the distance between their walls must be at least 15 cm.
- Insulation, waterproofing film, vapor barrier membrane are removed from the hole made in the roof. It is necessary that the hole comes out through.
Chimney outlet to the roof
All the preparatory work has been done, it remains only to correctly connect the pipe and put the chimney into operation. To bring the chimney to the roof, you must:
- Push the chimney through the hole in the box and direct it to the roof. Using adhesive tape, the edges of the waterproofing film and vapor barrier membrane are securely fixed to the chimney surface.
- Fill the expanded clay tightly or lay mineral wool in the box. These types of insulation are not susceptible to fire, therefore they insulate the pipe and protect against sudden ignition of the wooden elements of the rafter system and the sheathing.
- A rubber or silicone seal is put on the pipe, which protects against moisture seepage at the outlet. To provide better waterproofing, the sealant is glued to the corrugated board with a fire-resistant sealant.
- New segments are added to the chimney to the required height, tightening the joints with clamps made of galvanized steel.
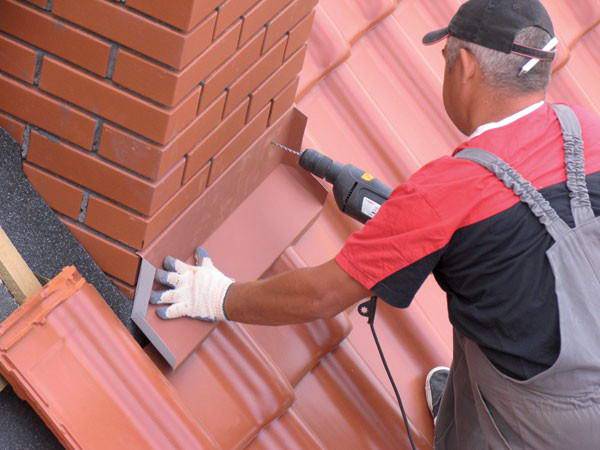
- After that, it remains only to bring beauty - to install an external apron in the color of the metal tile, which covers the rubber seal and the box.
Do not be afraid of overheating of the waterproofing film from the chimney surface, it is reliably protected from fire by mineral wool or expanded clay, embedded in the box.
Even a novice craftsman can carry out the conclusion of the chimney to the roof, the main thing is not to forget that negligence in this matter can lead to a fire and loss of your property.
Fire safety
The wooden truss system and some layers of the roofing cake (waterproofing, vapor barrier) do not withstand heating and can ignite or melt. The safety of system elements that do not differ in fire resistance is ensured by installing a special box around the perimeter of the hole in the roof.

The box is mounted from a wooden block, it should be located flush with the crate, on the outside of the roof. Along the perimeter of the box, from the outside, the edges of the vapor barrier are fixed - a carpet made of roofing material or other waterproofing material, as well as the edges of the vapor barrier membrane from the side of the room, if we are talking about an insulated roof. In both cases, a cross-shaped incision is made in the panel and triangular fragments of material are tucked inward. For fastening, nails with wide heads or staples are used, and a sealant or adhesive tape allows you to achieve the tightness of the abutment of materials around the perimeter of the wooden box.
The passage through the roof of the chimney provides for thermal insulation of the chimney with basalt wool or other non-combustible materials. If possible, an air gap of 5-7 cm wide is left between the layer of insulation and the chimney itself.
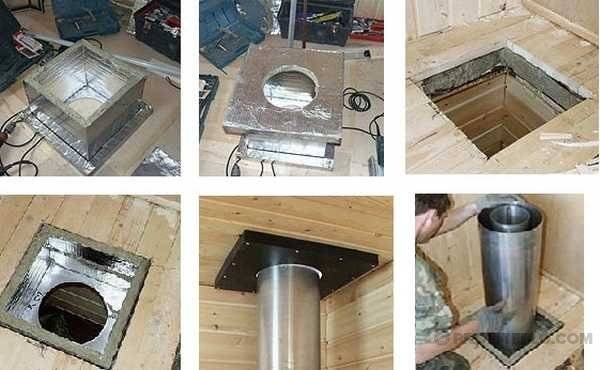
If the installation of the chimney involves the use of a special element - penetration, when choosing it, first of all, make sure that the element is made of a material that is resistant to temperature extremes.
Strengthening the rafter system
Often, when carrying out a chimney, the question arises of strengthening and strengthening the rafter system, because it is necessary to form a hole for the pipe in the roof pie. That is, you need to install a couple of spacers. When creating a roof from metal, the step between the rafters is rare, and the formed opening or the distance between the rafters may be too large. Therefore, it is necessary to install vertical spacers.
Sometimes you have to break the integrity of the rafter leg, that is, cut it. Then, in certain situations, girders or girders are also sawn. In this case, in the place where the rafter leg was cut, it must be fastened to the neighboring ones, not damaged. For this, additional spacers are also used, between which the bars are inserted vertically. Their function is to replace the rafter leg at the chimney passage.
Possible installation errors and how to avoid them
Errors during the installation of the chimney can lead to a fire in the ceiling, roof or wall.
It is important to observe the minimum distances between flammable objects and the chimney
Errors and remedial measures:
- A common mistake is saving space. Sandwich pipes should not heat up as long as they are in good condition. But over time, it is possible for warm air to pass through the thermal insulation layer. In this case, nearby flammable materials may ignite. The presence of sufficient space between the chimney and building materials excludes this possibility.
- Another mistake is neglecting the tightness of the compared parts. It is recommended to cover all joints between the constituent parts of the chimney with a layer of sealant, otherwise the passage of combustion products from the chimney into the environment is possible. The joints between the pipes can be additionally tightened with special clamps.
- The third common mistake is matching pipes only by the type "by smoke" or "by condensate". Smoke matching means that the bell of the overlying pipe is pushed onto the underlying pipe. In this case, smoke will not accumulate in the pocket formed between the pipes, but condensation can drain there. Condensate matching means that the funnel of the underlying pipe is pushed onto the overlying pipe. Condensation cannot drain into the resulting pocket, but smoke will accumulate there. In the first case, there will be a lot of condensation in the chimney, in the second - soot. In order to take advantage of both options in a sandwich pipe, it is sufficient to match the inner cylinders “by condensate” and the outer ones “by smoke”. Matching both cylinders in the same way can quickly clog the chimney.
- A gross mistake is the use of general construction insulation instead of thermal insulation. Many insulating materials are used in construction, but when arranging a chimney, it is necessary to choose materials with the best thermal insulation. This material is mineral wool. When installing external insulation, the use of basalt wool is allowed, but if the pipe warms up significantly from the outside, after a few hours the basalt wool will begin to heat up.
What is a sandwich pipe
Sandwich - this type of pipe received this name for its layering by analogy with the named product. The inner and outer layers of such pipes are represented by metal cylinders, and the middle layer is a layer of thermal insulation.

Metal for the chimney began to be used a long time ago. A simple example is the pipe of an ordinary potbelly stove. However, soon after commissioning, it became clear that metal pipes have a number of disadvantages. The problem was that metals, having good thermal conductivity, quickly heat up and give off heat to the environment, and there is always a danger of ignition.
The solution turned out to be simple - the metal pipe was wrapped in a layer of thermal protective material. However, such material does not tolerate environmental conditions well and is not very attractive from an aesthetic point of view.
Sandwich pipes are the next solution in the evolution of metal chimneys. Another metal pipe is placed on top of the thermal insulation layer, which protects the inner two layers from external influences and does not spoil the appearance of the building.
The inner cylinder is made of stainless steel. This material is less corroded by combustion products. The steel must be of high quality and high-tech. They give preference to those options, the seams of which are welded using the TIG method - the most reliable and wear-resistant, but also the most expensive.

The middle layer provides thermal insulation and protects the surrounding surfaces from heat. For these purposes, mineral wool is used, the density of which is not less than 120 kg / m3. The thickness of this layer depends on the temperature inside the chimney. This parameter should be selected individually.
The outer cylinder is also made of steel.It is worth giving preference to stainless material, but to save money, you can choose galvanized steel. The durability of the chimney will depend on its quality to a lesser extent than on the quality of the inner cylinder. In addition, there are sandwich pipes with decorative outer cylinders on sale.
