The principle of operation of pyrolysis boilers and their features
By creating pyrolysis boilers with their own hands, people tend to save money in their wallet. If gas equipment is quite cheap, then solid fuel units are simply striking in their price. A more or less decent model with a capacity of 10 kW will cost 50-60 thousand rubles - it is cheaper to conduct gas if a gas main would pass nearby. But if it is not there, then there are two ways out - to purchase factory equipment or do it yourself.
It is possible to make a pyrolysis boiler for long burning with your own hands, but it is difficult. Let's first figure out what pyrolysis is for. In ordinary boilers and stoves, firewood is burned in the traditional way - at a high temperature, with the release of combustion products into the atmosphere. The temperature in the combustion chamber is about + 800-1100 degrees, and in the chimney - up to + 150-200 degrees. Thus, a substantial part of the heat simply flies out.
Direct combustion of wood is used in many heating units:

Solid fuel pyrolysis boilers can use several types of fuel, including waste from woodworking production and agricultural processing.
- Solid fuel boilers;
- Fireplace stoves;
- Fireplaces with water circuits.
The main advantage of this technique is that it is simple - it is enough to create a combustion chamber and organize the removal of combustion products outside the equipment. The only regulator here is the blower door - by adjusting the clearance, we can adjust the intensity of combustion, thereby affecting the temperature.
In a pyrolysis boiler, assembled by hand or bought in a store, the process of fuel combustion is somewhat different. Firewood burns here at low temperatures. We can say that this is not even combustion, but slow decay. At the same time, the wood turns into a kind of coke, while simultaneously releasing flammable pyrolysis gases. These gases are sent to the afterburner, where they are burned with the release of a large amount of heat.
If it seems to you that this reaction will not give a special effect, then you are deeply mistaken - if you look into the afterburner, you will see a roaring flame of a bright yellow, almost white color. The combustion temperature is slightly higher than +1000 degrees, and more heat is released in this process than with standard wood combustion.
For this self-assembled pyrolysis boiler was able to show maximum efficiency, firewood with a low moisture content is needed. Damp wood will prevent the equipment from reaching full capacity.
The pyrolysis reaction is familiar to us from the school physics course. In a textbook (and maybe in a laboratory room), many of us saw an interesting reaction - wood was placed in a glass sealed flask with a tube, after which the flask was heated over a burner. After a few minutes, the wood began to darken, and pyrolysis products began to come out of the tube - these are flammable gases that could be ignited and watched the yellow-orange flame.
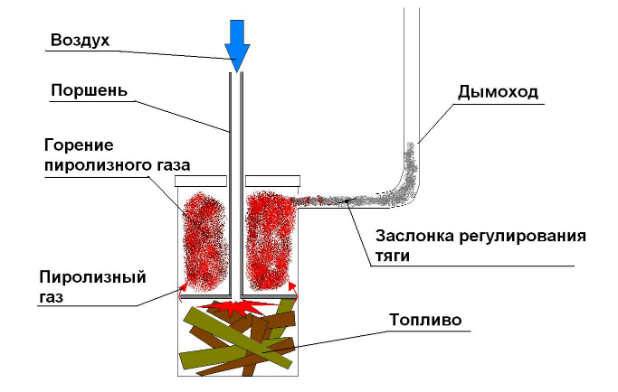
The pyrolysis boiler, assembled by hand, works in a similar way:
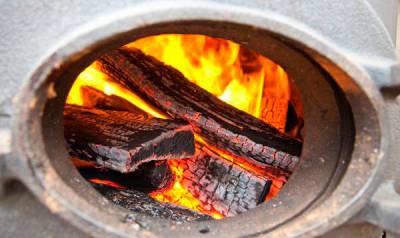
Pyrolysis boilers operate on one fuel load for about 4-6 hours. So a large and stable stock of firewood should be taken care of in advance.
- Firewood is kindled in the firebox until a steady flame appears;
- After that, the oxygen access is blocked, the flame is extinguished almost completely;
- The blower fan starts up - a high-temperature flame appears in the afterburner.
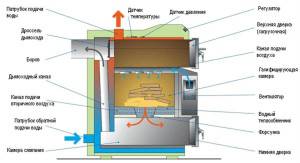
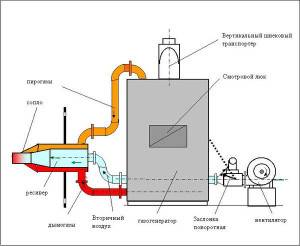
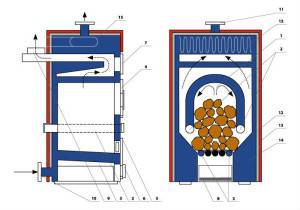
The pyrolysis boiler device is quite simple. The main elements here are: a combustion chamber, in which firewood is stored, and a post-combustion chamber, in which pyrolysis products are burned. Heat transfer to the heating system is carried out through a heat exchanger
In the scheme of the pyrolysis boiler, special attention is paid to it.
The thing is that the heat exchangers in self-assembled pyrolysis boilers are not arranged in the same way as in gas equipment. Combustion products with air pass here through many metal pipes washed by water. To increase efficiency, the boiler water washes not only the heat exchanger itself, but also all other units - a kind of water jacket is created here, which removes excess heat from the hot elements of the boiler unit.
Instructions for the manufacture of a pyrolysis boiler
The most optimal for assembly is a pyrolysis boiler with a capacity of 25 kW or more. It is capable of heating large rooms from 180 m2.
For its manufacture, the following materials are required:
- metal sheets with a thickness of at least 0.8 mm;
- 15-20 pieces of fireclay (refractory bricks);
- temperature sensor system;
- grate;
- 3 pipes with a diameter of 5.7 cm, 3.2 cm and 16 cm (for supplying cold and hot water, as well as for the supply line of the boiler circuit);
- 2 professional pipes (for emergency line and outlet branch pipes);
- blower fan;
- temperature sensor;
- drawing and table of dimensions for assembling the boiler;
- 2 doors for the firebox and ash pan;
- baked wire fasteners for doors;
- grinding wheels -10 pieces.
Required tools:
- electric welding machine;
- Bulgarian;
- angle grinder.
Manufacturing process
- 4 boiler walls must be cut out of steel sheets. Make holes in the front wall for the firebox and the ash pan located under it.
- Cut out the holes for the smoke exhauster and for the pipe fittings. Connect all metal walls (except for the back one) using a welding machine, and the joints between the sides of the future boiler must be sanded.
- Next, the heat exchanger is assembled, as shown in the figure. The pipes are welded using a welding machine. Before welding, the pipes themselves must be "put on" grinding wheels to remove joints and seams between them.
- Then it is necessary to mount the heat exchanger in the future boiler as shown in the figure. Before closing the device with the back wall, it is necessary to check it for leaks with a compressor. If there are none, the back of the boiler is welded.
- Next, it is necessary to install a grate, which will separate the place of gasification and fuel combustion. The lower section, where the fuel will be burned, is equipped with an air duct and lined with chamotte (refractory) bricks from all sides, including the bottom.
- Then it is necessary to attach the doors to the corresponding compartments for the fuel supply and for the ash pan. They must fit snugly against the sides of the boiler.
- At the end, the finished boiler is installed on a brick surface and attached to a pipe insulated with a non-combustible insulation (for example, foil mineral wool). Without this, tar will settle on the walls of the pipe, which will significantly shorten the life of the boiler. A water circuit and a smoke pump are connected to the device.
- In order for the boiler to work automatically, just like the production one, it is necessary to install a temperature control system. It is needed in order to regulate the operation of the exhauster, as well as the air supply.
- The installation of the boiler does not end there. It is necessary to check its efficiency. If, after turning on the boiler, you did not detect the smell of carbon monoxide from the escaping smoke, then its efficiency is high enough and the equipment is safe for use.
Thus, if you have the initial skills in working with a grinder and a grinder, if you understand basic drawings, you can easily assemble a pyrolysis boiler yourself. And this is not only comfort and warmth in your home, but also a very profitable saving of financial resources.
Pyrolysis Boiler Size Chart
- A-controller, boiler circuit
- B - loading door
- C-ash pan door
- D - smoke exhauster
- E-coupling
- F - emergency line
- G - boiler supply line
- H - cold water supply
- K - Hot water supply
- L - Return line of the heating circuit
- M - Drain and expansion tank
Size table (dependence of the power of the future boiler on the size of the parts).
Long burning boiler manufacturing guide
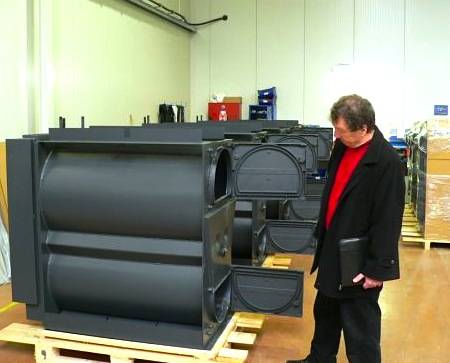
Pyrolysis boiler RMNT
The first stage is the preparation of the necessary devices. It is better to collect all the materials and tools in advance, so as not to be distracted by this in the future.
Set for making a homemade pyrolysis boiler
- Barrel. A metal container with a volume of 200 liters will do.
- Channel.
- Steel pipe. Divide it into 2 sections immediately.
- Hammer.
- Plumb line.
- Level.
- Yardstick.
- Hacksaw.
- Axe.
- Welding machine with a set of electrodes.
- Steel sheets.
- Mallet.
- Red brick.
- Mix for laying bricks.
- Reflector. Not required, but highly desirable.
The second stage is the preparation of the container. Equip yourself with a cutting tool, for example, a grinder, and cut off the top of the barrel. Do this carefully, the cut off part will still come in handy in the future. In the absence of a barrel, the boiler body can be made from a piece of pipe. It is only necessary to select a product of the appropriate diameter.
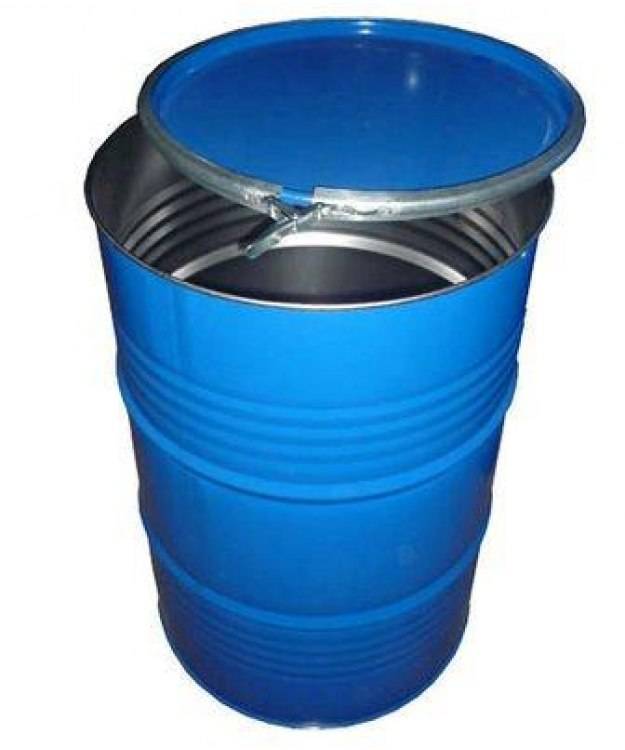
The second stage is the preparation of the container
If you will be using a pipe, weld a round bottom, previously cut from a steel sheet, to it. If desired, the bottom can be made square. This is an even more preferable option, because the square plate will provide more stability for the boiler.
The third stage is the preparation of the main internal elements. Take a sheet of steel and cut a circle out of it, the diameter of which would be slightly less than the inside diameter of the pipe or barrel. In the prepared circle, you need to cut another circle with a diameter of about 100 mm. A pipe will enter this hole, so be guided by the dimensions of the product you have. In practice, it has been established that it is a 10 cm pipe that is the most optimal option.
Weld a piece of pipe to the steel pancake you prepared earlier. At this stage, you will need a welding machine.
Weld the channel sections to the bottom of the steel "pancake". They should pass into the body of the future boiler without any effort. These channels will press down on the fuel while the equipment is running. Select the length of the pipe (the one with a diameter of 10 cm) so that it is about 20 cm longer than the barrel or main pipe.
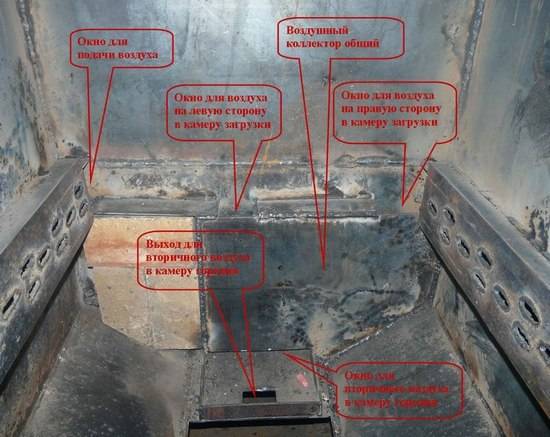
Boiler diagram
The fourth stage is the preparation of the lid. Make a cauldron lid from the top of the barrel cut off at the very beginning. The cover can be hinged or left unattached.
The fifth stage is the construction of the firebox. Make a hole in the housing for loading fuel. To the prepared hatch, you need to weld a homemade or previously purchased door. Below the hole in the firebox, make another hole through which you can remove combustion waste. Place the grate in the container so that it divides the barrel or pipe into two vertical sections.
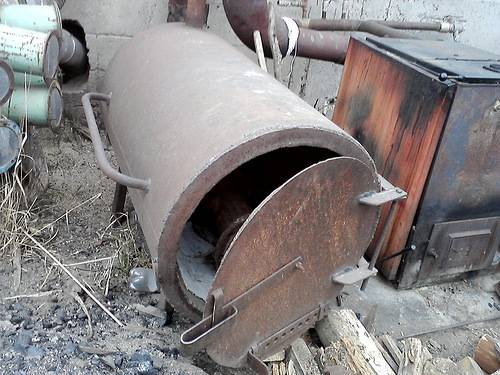
Making a pyrolysis boiler
Pancake thickness
This value is inversely proportional to the inner diameter D. It is necessary to achieve optimal pressure of the piston on the fuel tab. If the pressure is insufficient, this will lead to a decrease in the return coefficient. As a result, the backfire of the furnace may occur with further release of smoke through the chimney. If the piston is very heavy, this will noticeably reduce the air gap necessary for high-quality combustion: as a result, the flame will extinguish.
The relationship between the inner diameter and the thickness of the pancakes is approximately as follows:
- 30 cm - 6-10 mm.
- 40 cm - 6-8 mm.
- 60 cm - 4-6 mm.
- 80 cm - 2.5-4 mm.
Step-by-step instructions on how to make a pyrolysis boiler with your own hands
To work, you will need an impressive list of tools. You will need a drill, welding machine, grinder, fan, thermal sensor. You will also need electrodes, metal sheets, a set of various pipes and steel strips.
The thickness of the steel should be 4 mm.To save on the boiler body, a thinner material is used. Enough 3 mm thickness.
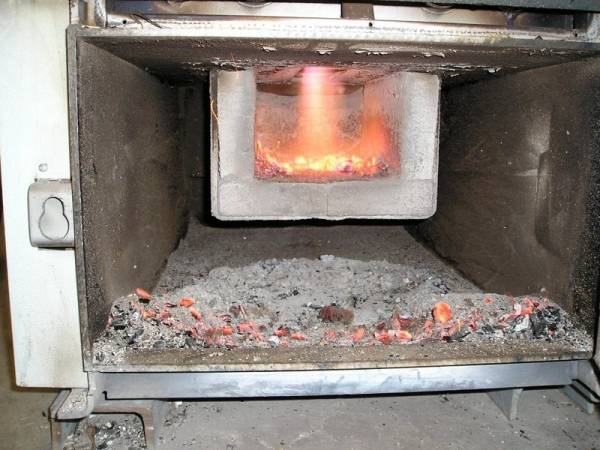 Using step-by-step instructions, you can make a pyrolysis boiler yourself
After studying all plans and drawings, you can make a hydrolysis boiler. All parts of the system are cut with a grinder. A welding machine is used to fasten them together. But step-by-step instructions, taking into account all the nuances, will help to do the job correctly.
Recommendations for the equipment of the pyrolysis chamber:
- The feed hopper must be positioned higher than conventional fuel structures;
- The burner provides for a special restrictor to control the air supply;
- The limiter is made of a pipe with a cross section of 70 mm, the length must be greater than the body of the device;
- A steel disk is welded to the lower compartment of the limiter, which creates a gap of 4 cm with the pipe walls;
- The installation of the limiter provides for a hole in the boiler lid;
- The feed hopper must have a rectangular shape;
- A steel plate is used as a door;
- The lower attachment has a hole for the removal of combustion products;
- To improve the heat transfer of the pipe inside the boiler, it is performed with a slight bend;
- The control of the amount of coolant is carried out using a valve.
Correct installation is determined after the first start-up of the boiler. The combustion products must be free of carbon monoxide. The operation of the boiler requires regular checking of the tightness of the welded seams. You will also need to clean the stove on wood or coal from ash and soot.
Pyrolysis boilers are often used in conjunction with water heating. But you can try parallel operation with an air heating system. Air travels through pipes and returns along the floor.
How to make a pyrolysis boiler with your own hands
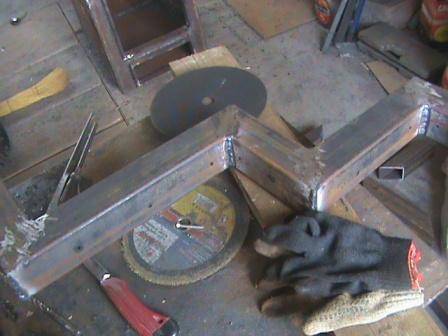
Welding work in the manufacture of the boiler
The finished heating unit has a rather high price: some boilers cost more than $ 2,000. If you construct a boiler yourself, then the savings will amount to more than $ 1,400.
Materials for a homemade boiler
- Sheet metal for the internal parts of the boiler, having a thickness of at least 0.4 cm. For the manufacture of the boiler, you will need 8 m2. You can save on metal thickness by using a 0.3 cm sheet for the body.
- A metal pipe with a diameter of 6 cm, with a wall thickness of at least 3.5 mm. Pipe length - 8 m.
- A metal pipe having a diameter of 16 cm and a wall thickness of 4.5 mm. The pipe length is half a meter.
- Refractory bricks for grate - 15-18 pieces.
- A metal pipe with a diameter of 3.2 cm and a wall thickness of 3.2 mm. The pipe length is 1 meter.
- A steel strip having a width of 2 cm and a thickness of 4 mm. A total of 8 meters of strip are required.
- Protruba 6 cm × 3 cm, having a wall thickness of 2 mm. Length - 1.5 meters.
- Protruba 8cm × 4cm with a wall thickness of 2 mm - 1 meter. Steel strip, 3 cm wide and 4 mm thick - 1.5 meters.
- Steel strip having a width of 8 cm and a thickness of 5 mm. You need 1 meter.
- Also, for welding the structure, 6 packs of electrodes are required.
- Cutting and grinding wheels are needed for cutting and grinding metal.
- It is recommended to purchase a fan to create traction.
- You also need a temperature sensor to adjust the boiler output.
There is a possibility that other materials will be needed during the boiler assembly process, which will not significantly affect the cost and speed of assembly of the unit.
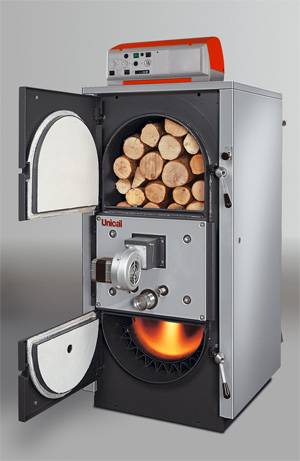
Industrial pyrolysis boilers
Boiler making tools
- Drill.
- Professional grinder.
- DC welding machine.
Schematic representation of a homemade pyrolysis boiler
Schematic representation of a homemade pyrolysis boiler
Explanations for the diagram
A - controller that maintains the set temperature;
B - the door of the loading chamber, into which the solid fuel is placed;
C - ash pan door, in which ash accumulates;
D - chimney or fan creating artificial draft;
E - clutch in which the temperature fuse sensor is located;
F - branch pipe for connecting the emergency valve;
G - window for air supply;
H - supply of cold liquid to the heat exchanger;
K - hot liquid supply;
L - outlet for secondary air into the combustion chamber;
M - hot water tank and distributor for connection to the heating system of the house.
When manufacturing a pyrolysis boiler, it is recommended to adhere to this scheme. This boiler is designed to heat a living space of 100 sq. m
Also, when developing your own boiler scheme, it is important to calculate the appropriate power for heating a room defined by the area. The optimal power is 1 kW per 5 m2 of heated room area
Safety requirements and operating rules
Long-burning boilers, like any other heating equipment, are fire hazardous, since combustion processes in such a device can reach very high temperature indicators. When installing and using it, the following recommendations must be observed:
- the boiler is placed on a concrete or brick base, a metal sheet with a thickness of 2 mm or more is placed in front of the firebox to protect the floor from accidentally dropped out coals;
- the distance to the walls is at least 20 cm, and as far as possible from the furniture;
- it is desirable to have a separate boiler room, the opening for ventilation in it must be at least 100 sq. cm;
- it is also recommended to carefully insulate the chimney through which combustion products are discharged. Lack of thermal insulation will not only lead to heat loss, but will also cause the formation of tar and condensation, which contribute to premature wear of the equipment and numerous breakdowns;
- automatic equipment with temperature sensors will allow to establish autonomous operation of the boiler and ensure fire safety. It is the automation that regulates the correct mixing of combustible gas with air according to a special scheme;
- the boiler safety group must be installed: a pressure gauge, an automatic air vent and an emergency valve that will release air in case of overpressure;
Building or assembling a long-burning boiler is not easy and not cheap. Having made all the costs, calculations and performing all the work strictly according to the technology once, the zealous owner receives an economical and high-performance boiler, which in the process of work will save the family budget and time, make the house warm and cozy in the winter cold. Subject to the rules of operation, this stove will heat the rooms and heat the water, it will work properly for many years.
Performing calculations
The first step is to select the dimensions of the nozzle opening. The easiest way is to purchase a finished product designed for a certain power, such are available for sale for installations from different manufacturers, for example, ATMOS. Another way is somewhat more difficult, but much cheaper: to make an opening of the required section in fireclay brick, which will be laid on the bottom of the furnace. The overall dimensions of the slotted opening for different power values are presented in Table 1.
Table 1
| Power consumption, kW | 25 | 32 | 50 | 80 | 100 |
| Opening length, mm | 120 | 140 | 150 | 200 | 200 |
| Opening width, mm | 30 | 30 | 30 | 30 | 40 |
A homemade pyrolysis boiler for long burning can be made with arbitrary dimensions of the furnace, which are calculated according to the following scheme:
- The heat of combustion of wood is 2.8 kW / kg, density is 400 kg / m3. To provide a power of 10 kW, you need to burn 10 / 2.8 = 3.6 kg of firewood in 1 hour.
- Considering that there is empty space between the logs in the firebox, you need to take a fill factor of 0.5. Then the useful volume of the chamber for 1 hour of operation will be: 3.6 / 400 / 0.5 = 0.018 m3.
- Taking the length of the log to be 0.6 m, and the height of the primary chamber - 0.5 m, its useful width for 1 hour of operation is calculated: 0.018 / 0.6 / 0.5 = 0.06 m.
- To load fuel once every 10 hours, the useful volume must be: 0.018 x 10 = 0.18 m3. Then, with the same depth and height values, the useful width will be: 0.18 / 0.6 / 0.5 = 0.6 m.The final dimensions are 0.6 mx 0.6 mx 0.5 m.
Homemade pyrolysis boiler
The next step is the selection of a fan - blower, which is installed on homemade pyrolysis boilers and provides air supply to both chambers. Devices are selected according to their performance, which depends on the capacity of the installation, this data can be taken from Table 2.
table 2
| Installation power, kW | 25 | 32 | 50 | 80 | 90 | 100 |
| Blower capacity, m3 / h | 98,5 | 195,9 | 242,2 | 253,2 | 284,8 | 316,5 |
| Useful volume of the furnace, m3 | 0,22 | 0,24 | 0,35 | 0,42 | 0,47 | 0,52 |
The flue gases leaving the secondary chamber are at a fairly high temperature. In order not to waste this heat on the street, a fire-tube scheme for manufacturing a pyrolysis boiler is used. In accordance with it, the flue gases passing through the smoke tubes of the heat exchanger are cooled to a temperature of 150-200 С, giving their heat to the water jacket. To calculate the useful area of heat exchange, you need to determine the following initial data:
- coolant temperature in the supply and return pipelines t1 and t2;
- temperature of flue gases at the entrance to the heat exchanger and at the exit from it Т1 and T2.
Further, the temperature difference ∆t = t1 - t2 and ∆Т = Т1 - T2... After that, you can calculate the value of the temperature head τ, ⁰С:
τ = (∆Т - ∆t) / ln (∆Т / ∆t)
The heat exchange surface area S (m2) is found by the formula:
S = Q / k / τ
In this formula:
- Q– required power of the boiler plant;
- k - coefficient of heat flux transfer, taken as 30 W / m2 ⁰С.
You can check the result according to Table 3, which shows the enlarged values of the heat exchange surface area depending on the power of the unit.
Table 3
| Boiler power, kW | 25 | 32 | 50 | 80 | 100 |
| Smin, m2 | 4,5 | 6,3 | 8,5 | 14,5 | 16,5 |
| Smax, m2 | 5,2 | 7,8 | 10,2 | 15,2 | 16,7 |
Making pyrolysis boilers for long burning with their own hands, craftsmen often install the chimney pipe "by eye", while the efficiency of the unit itself depends on the correct operation of the chimney. Therefore, the cross-sectional area of the pipe, and then its diameter, is best determined by the formula:
F = L / 3600ϑ
In this formula:
- ϑ - flue gas velocity, taken equal to 0.5 m / s;
- L - gas consumption, corresponds to the fan capacity, m3 / h;
- F - cross-sectional area of the chimney pipe, m2.
Through the formula for the area of a circle, the value of the pipe diameter is found.
Manufacturing material
Pyrolysis boilers are characterized by an increased temperature of the working area. Combustion does not occur in the gasification chamber; however, the return heat flow is capable of heating the walls up to 500–600 ° С. The bottom of the gas generating compartment is exposed to the greatest temperature effect - it is this part that comes into contact with flammable gases and experiences a serious thermal load. It is recommended that the bottom of the bookmark chamber be made in the form of a cast iron grate or a special refractory product with a thin slot or a number of small holes.
The main difficulty in the independent manufacture of boiler equipment lies in the selection of a suitable steel grade that can be processed at home without special equipment. The most suitable in this regard are considered to be steels of the austenitic and austenite-ferritic class with a moderate content of chromium and nickel. Examples of grades of such steels are 12X18H9T, 08X22H6T or AISI 304.
The welding technology of such metals is recognized as moderately complex, but reproducible in artisanal conditions using arc welding with covered electrodes without a protective medium. The main factor that degrades the quality of a welded structure is the formation of hot and cold cracks due to a high temperature difference in a relatively small linear section of a metal product.
To eliminate the negative factors of thermal effects, the following technological methods are used:
- Cutting parts with a smooth feed of the cutting tool, which excludes overheating of the edges.
- Limiting the density of the welding current by 20–25% compared to structural steel, welding in soft modes.
- Limiting the temperature of the weld pool, making a multi-pass seam at high speed without lateral vibrations.
- Correct cutting of the joined edges according to GOST 5264 and their cleaning with a metal brush.
- Lining under the seam of the seam of the metal heat sink, forging the seam in the process of cooling.
And, of course, the correct choice of the content of alloying additions in the electrode rod should be made in order to ensure the ferrite content in the weld structure of the order of 5–8%. Recommended for use are electrodes of the brands TsT-15 and TsT-16, as well as special electrodes 6816 MoLC or ROST 1913.
After welding the structures, it is recommended that they be initially annealed at a temperature of at least 700 ° C for 2.5–3 hours. It is enough to load the inside of the welded body with coal and ignite the fuel, providing a weak forced blowing. Before annealing, it is advisable to pickle the welding seams with a special paste corresponding to the steel grade used.
What fuel to use
For economical and efficient operation of a pyrolysis boiler, you can use any solid fuel: wood, coal, peat, pellets, and other combustible materials. The main condition necessary to maintain the pyrolysis combustion process is a low humidity indicator, no more than 20%. Wetter fuel must be specially dried to the required level.
The possibility of using waste from wood, sewing, oil mill and other types of production, makes this oven even more profitable in operation. In this case, the wood content must be at least 70%.
For the operation of the pyrolysis boiler, it is recommended to choose solid fuel
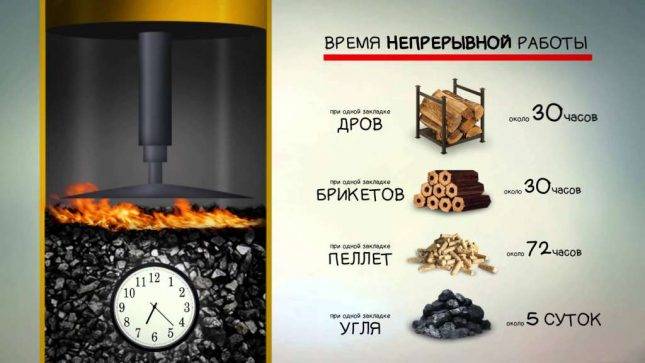
In conventional ovens, firewood must be added every two to three hours. For the winter period, about 10 cubic meters of firewood is consumed. In pyrolysis boilers, wood burning lasts 12 hours, saving up to 40% over the winter.
Coal burns much longer, up to five days, thus saving not only fuel, but also time. There are models that are equipped with an automatic device for feeding fuel pellets, that is, they work autonomously for a long time.
The device and principle of operation of the boiler
It has already been said that boilers of this type have chambers. The furnace is divided into a gasification chamber, into which fuel is loaded and directly into a combustion chamber.
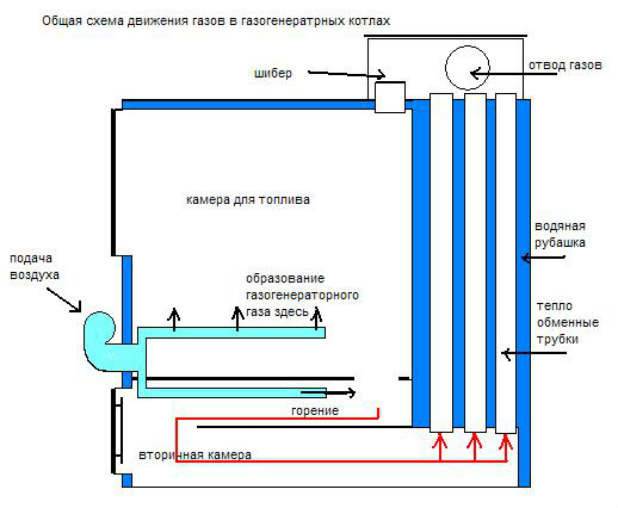
The diagram shows the internal structure of a solid fuel boiler of pyrolysis type
The first chamber, where the air flow is limited, is loaded with fuel. The boiler starts up and operates normally. With slow combustion, the fuel begins to pyrolyze, wood gas is released, which enters the second part of the furnace, into the combustion chamber. From this moment, the solid fuel boiler goes into operation. Now begins the processes that fundamentally distinguish the pyrolysis type of combustion, solid fuel heating boilers for long burning from the direct combustion process and from traditional boilers.
Heat losses in the first chamber are minimized. Usually, in models of solid fuel boilers for long burning, the space between the first and second chambers is filled with grate bars, on which the fuel is laid.
The second part of the firebox is the combustion chamber, where combustible wood gas is supplied. The chamber is filled with heated secondary air. The principle of double blowing is already at work here.
After the boiler reaches its normal operating mode, air access to the first chamber is significantly limited. The combustion process practically stops, passing into a state of decay. Fuel burns out gradually.Each previous layer of fuel gradually uses the next layer in the smoldering process. Slow smoldering is accompanied by the constant evolution of wood gas. Due to this process, solid fuel pyrolysis boilers are also called long-burning boilers.
In the second, the main combustion chamber, only wood gas burns, which, in contact with secondary air (heated to t 3000 C), gives a huge amount of thermal energy. Only now does thermal energy come into operation, heating the coolant circulating in the heat exchanger. That is, in the construction of solid fuel boilers of the pyrolysis type, heating of the coolant is carried out not due to the direct combustion of solid fuel, but already due to the combustion of the secondary combustion product - pyrolysis gas, a combustible gaseous substance. This is the main difference between boilers of this type and solid fuel boilers of other types.
What is meant by the name pyrolysis
Pyrolysis - the generation of combustible gas and its subsequent combustion - occurs in all solid fuel boilers, to a greater or lesser extent. The same process takes place in an ordinary stove - when burning wood or coal, there is not enough oxygen in some place, carbon monoxide appears, then it finds the missing oxygen and burns, releasing heat, turning from poison into ordinary carbon dioxide - CO2 ...
As experiments in the 1950s, a scheme of boiler equipment was developed, where at first the fuel smoldered with a lack of oxygen, then the resulting CO was afterburned in the secondary chamber. But the ideas were not implemented, as they did not give any advantages with significant disadvantages and were expensive.
Now in advertisements poisonous carbon monoxide CO is called - "wood gas".
Work principles
All boilers operating on the pyrolysis principle function in the same way:
- In the chamber, where gasification takes place, the fuel is smoldering. Primary air enters it from outside.
- A certain amount of oxygen present in it is spent to ensure that smoldering does not stop and provides the temperature required for gasification.
- Hilo-passing gases released during pyrolysis move into the combustion chamber.
- Secondary air enters it, and the process of combustion of pyrolysis gases takes place.
- In the presence of a catalyst, which is the carbon of the fuel, a reduction reaction of a portion of the pyrolysis gas takes place. The result is carbon monoxide and nitrogen oxides. This process requires the consumption of thermal energy.
- In the afterburner, the components obtained during the reduction are oxidized with the release of heat.
- The combustion products that have reacted move through the heat exchanger of the hot-water register, and then are sent to the chimney.
- To maintain the required temperature at which complete combustion occurs, a special temperature control system is used.
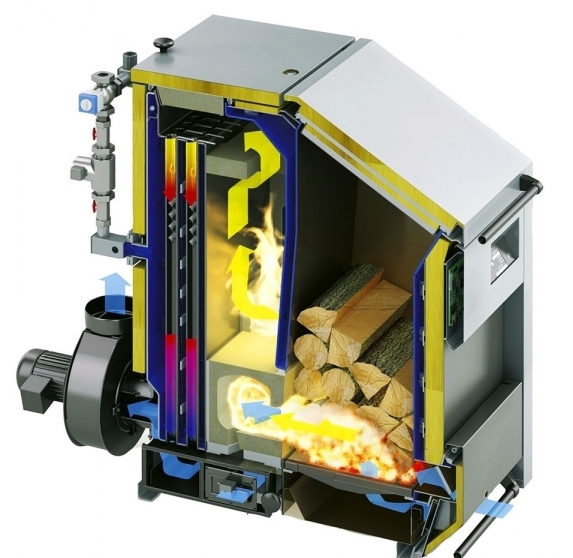 Pyrolysis boiler
Features of the manufacture of a pyrolysis boiler
Materials (edit)
The body of the pyrolysis boiler is best made of sheet steel (from 2 mm, depending on the design power). Boiler models that are assembled from a thick-walled pipe are hardly suitable for organizing heating a private house. Basically, such installations are used to heat various utility rooms, garages or temporary huts.
Larger pyrolysis boilers are mounted on the pattern of most heat generators - rectangular. In some cases, if the model is powerful, it is advisable to lay out its walls (from the inside) with fireclay bricks.
Dimensions of pyrolysis boilers
One of the most interesting and "mysterious" questions on this topic. All calculations are made in relation to a specific house, its heating system, with all its nuances, schemes, and so on. The author will not give mathematical calculations and asks to take a word. It is better to entrust the design of a pyrolysis boiler to a specialist. Development of documentation costs money, but in any case it will cost less than purchasing an industrial plant.
And if we consider that errors in calculations will entail additional costs (and very tangible) associated with various kinds of alterations and modernizations, then the advisability of just such a decision is more than obvious.

The specifics of the operation of pyrolysis boilers
Without knowing some of the nuances of using such equipment, it makes no sense to start making such a model of a heat generator.
Quite "stringent" criteria for the moisture content of the combusted fuel. For example, for firewood, the maximum value is 33 ± 2%. What is the reason for this? An increase in temperature initiates the evaporation of moisture contained in the product. Naturally, the steam will begin to mix with pyrolysis gases and negatively affect the intensity of the combustion process. The use of wet fuel sharply reduces the efficiency of the installation.
Not all solid fuels are suitable for combustion in pyrolysis boilers. Taking into account the specifics of their work, it is possible to use only materials characterized by high gas production during combustion. The lack of volatile substances affects the efficiency of the pyrolysis models. Simply put, a lot of firewood is consumed, but the sense is minimal.
For heating a house with such a boiler, it is advisable to use dry wood and its waste, pellets, briquettes, coal (but only brown). The introduction of individual design improvements to the scheme of the pyrolysis boiler allows you to heat with coke and some brands of coal (for example, "Orekh1").
In conclusion, it can be pointed out that the cheapest model (with a small capacity) costs around 48,000 rubles. In conclusion, it can be pointed out that the cheapest model (with a small capacity) costs around 48,000 rubles. And it is not a fact that such a pyrolysis installation will completely suit the owner. For example, dimensions in accordance with the chosen place for installation. If you think about it, making a pyrolysis boiler with your own hands, according to individual drawings, is a good solution to the problem of heating a private house, especially if it is impossible to connect it to the gas supply line.
(Visited 475 times, 1 visits today)
Foundation preparation and chimney installation
The boiler in question must be equipped with a chimney. For its manufacture, use a pipe with a diameter of 150 mm. Select the length of this pipe so that it is slightly longer than the length of the body. Make a hole in the boiler lid of a suitable diameter and weld the chimney to it. The chimney can be bent if necessary. The maximum allowable bend is 45 degrees. The pipe is led out through the roof or wall. Try to keep the chimney as few bends as possible.
Chimney for pyrolysis boiler
If the boiler is installed in a room with a small area, it is recommended to complete it with a special reflector. Thanks to this element, the most efficient distribution of heat fluxes will be ensured, which will contribute to the creation of comfortable operating conditions for the boiler.
Earlier it was noted that factory units for the most part require connection to the mains. A homemade pyrolysis boiler is independent of electricity.
For more efficient heating in the gas combustion chamber, fittings can be welded, which will accumulate additional heat, thereby increasing the heating intensity.

Such equipment can be melted with sawdust, coal and other suitable materials.
