Changing the cartridge: progress of work
After all the reasons have been considered, the material has been purchased, you can proceed to consider the practical side of the issue of how to replace the cartridge in the chandelier. The given step-by-step instructions will allow you to independently perform all the manipulations:
- First of all, you need to protect yourself: relieve tension from the chandelier. To do this, the entire apartment is de-energized or the automatic machine responsible for the lighting group is turned off (depending on the configuration of the switchboard);
- After that, remove the decorative cover from the chandelier, which covers the electrical connection, as well as the place where the lamp is attached to the ceiling. We make sure that there is no voltage on the contacts: we check them with an indicator or probe;
- Now you can safely remove the chandelier. You can change the cartridge without removing the lamp, but practice shows that this is very inconvenient: hands quickly become numb and the process is delayed;
- To get to the cartridge, you need to remove the lampshade. It is better to remove them all so as not to damage them during operation (even if it is necessary to change one). For the same reason, you need to unscrew all the bulbs.
If the reason for removing the lamp is an inoperative cartridge, you can try to repair it. To do this, you need to disassemble and inspect the contacts that are under the screw cap:
- Quite often, copper contact plates bend, oxidize and even rust (in damp rooms). Such contacts must be cleaned with sandpaper or a file. If necessary, carefully bend the contacts so as not to short-circuit them;
- The next step is to inspect the contact screws that are located on the back of the ceramic bottom. To do this, the base is carefully pulled back, the screws are examined, cleaned and tightened if necessary;
- Now you can assemble the socket and screw the lamp into it, and insert the ends of the chandelier wires into the carrier. If the light bulb works, the repair was successful.
If the light bulb does not light up or the original goal was to install new elements, then you should proceed as follows:
- We de-energize the chandelier, then we disassemble the cartridge: as in the case of the repair, we need to get to the contact screws, which can be completely unscrewed to remove the ceramic bottom;
- Now it remains to remove the base of the cartridge from the chandelier. There is no definite answer on how to do this. It all depends on the model and design of the luminaire: somewhere the base is held on separate bolts, and in some luminaires on latches or internal threads. The only thing that can be advised in this matter is not to rush, carefully inspect the product and not make excessive efforts: the base should be removed relatively easily;
- Having removed the base of the old cartridge, in the same way we install a new element, we connect the wires;
- If necessary, change all other cartridges in the same order. After you figured out the design of the chandelier, the process will go much faster.
The chandelier is connected according to a pre-sketched scheme. If earlier the connection was twisted, it is better to install modern terminal blocks: this is faster, more reliable and safer.
Cartridge selection
When choosing this product, first of all, you should give preference to a well-known and proven brand.
To avoid mounting difficulties, the design of the new socket must match the type of product previously used in the chandelier. It is better to give preference to a ceramic product due to its reliability during operation.
Basic selection requirements:
- the power of the lamp to be connected;
- diameter corresponding to the type of chuck;
- marking;
- parameters: dimensions, power;
- the price should not be too low.
The cost depends on many factors, in particular on the type of product and its manufacturer. Today the market provides the consumer with a wide selection of both Russian and imported brands.
The price range is quite large:
-
E27 type:
- domestic production - 25 rubles;
- China - 45 rubles;
- Italy - 130 rubles.
-
E14 type:
- domestic production - 20 rubles;
- China - 20 rubles;
- Italy - 90 rubles.
-
For halogen lamps:
- domestic production - 15 rubles;
- China - 30 rubles;
- Italy - 150 rubles.

Possible problems and errors
When installing a new cartridge, it is easy to make a number of mistakes without any practical experience. There is also a chance of encountering problems that depend on third-party factors. Common errors and problems include the following:
- Attempting to fix a live lighting fixture. If the room is not de-energized beforehand, there is a risk of injury.
- Wiring problems. During operation, you may notice damage to the wiring, and you will need to replace it. Without restoring the wiring, you can later face more complex malfunctions.
- Incorrect connection of contacts. As a result of this error, the lighting fixture will not function properly and may be damaged.
Share link:
How does a standard cartridge work?
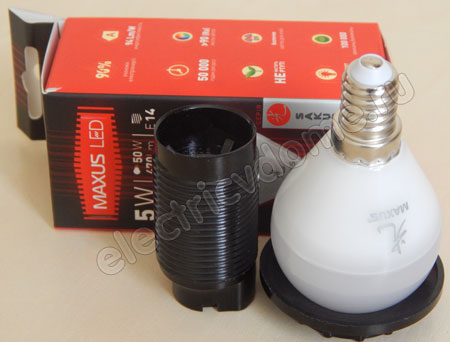
To replace the cartridge in a chandelier, you need to understand its structure and types. For a 220 V network, there are 3 types of this product:
- E14;
- E27;
- E40.
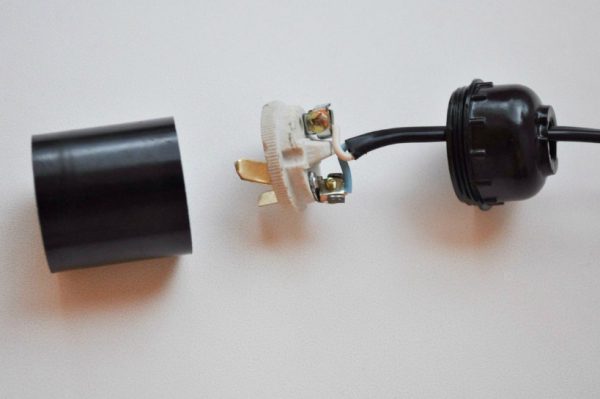
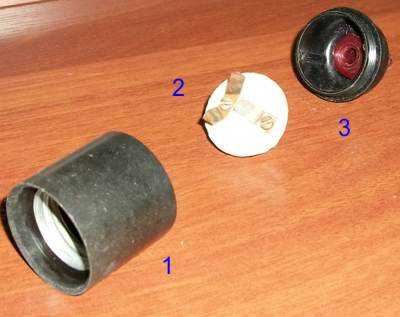
Depending on the lamp base used in the luminaire, you need to choose one or another type. There are such parts of the cartridge:
- cylindrical body;
- bottom;
- ceramic insert.
The first contains an Edison-threaded sleeve into which a lamp is screwed. The holder body, depending on the model and purpose, can be made of the following materials:
- plastic;
- carbolite;
- ceramics;
- metal;
- silicone.
Older models were made of ceramics. But at high temperatures, they crumbled and deteriorated. Now the most common material is plastic. Products should be used according to the marking, since exceeding the power of electric lamps with their prolonged use will lead to a change in the properties of the plastic, and, consequently, to its destruction. Even in modern ceramic lampholders, the contacts burn out at high temperatures.

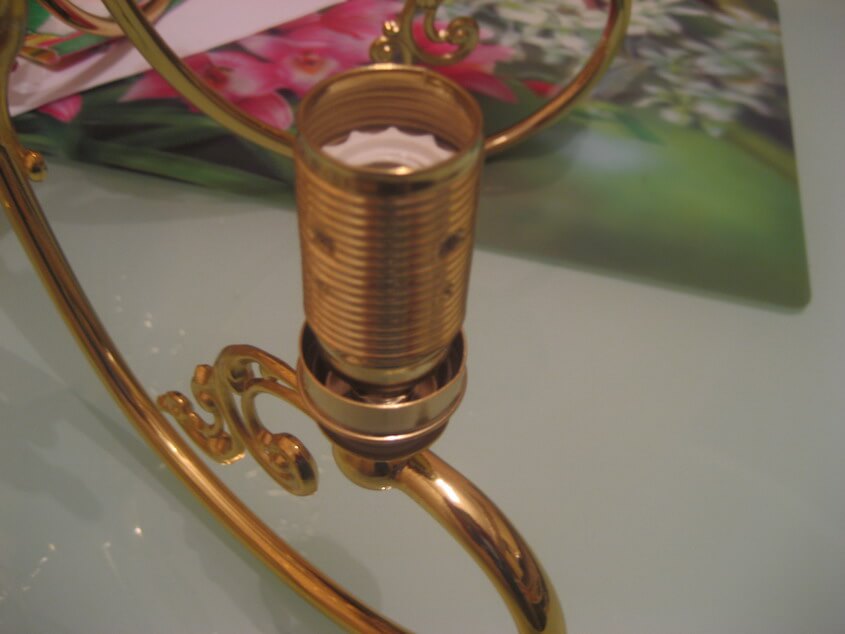
Most often, holders of the E14 and E27 type are used in everyday life. Their differences lie in the method of fastening, which happens:
- suspended from the ceiling with threaded washers;
- with a straight flange, which allows you to fix the product on the surface;
- with inclined flange for surface mounting.
When the cover is attached to the support, washers are used to mount and secure the holder. Holders for fastening to the nipple have clamps instead of screws. This allows you to make the connection of conductors without breaking their insulation. While threaded holders are easier to use, they are less durable. This is especially true of cartridges that are used for a long time.


Varieties and marking of chandelier holders
Threaded electric holders are marked with the letter "E". Also, the marking indicates the diameter of the base (millimeters). The specification can be seen on all product housings.
The principle of operation of all cartridges is the same. They differ only in that they have different overall dimensions and different designs. The enterprises produce three types of cartridges, which are designed for 220 V in the electrical network, and have full compliance with the state standard:
- E14. This type of cartridge is used in order for the backlight to work in a microwave oven, refrigerator or table lamp.Usually the maximum current consumption for them is 2A (440 W).
- E27. Used for many luminaires. The maximum current consumption is 4A (880 W).
- E40. Cartridges of this type are used in street lighting and are rated for 16 A (3500 W).
Chandelier cartridge replacement process
Before performing work on replacing the cartridge in the chandelier with your own hands, you need to ensure electrical safety. For this purpose, the circuit breakers are turned off in the electrical panel, which are responsible for supplying electricity to the chandelier. After that, the de-energized chandelier is removed, since if it is suspended from the ceiling, it will be inconvenient to replace the cartridge.
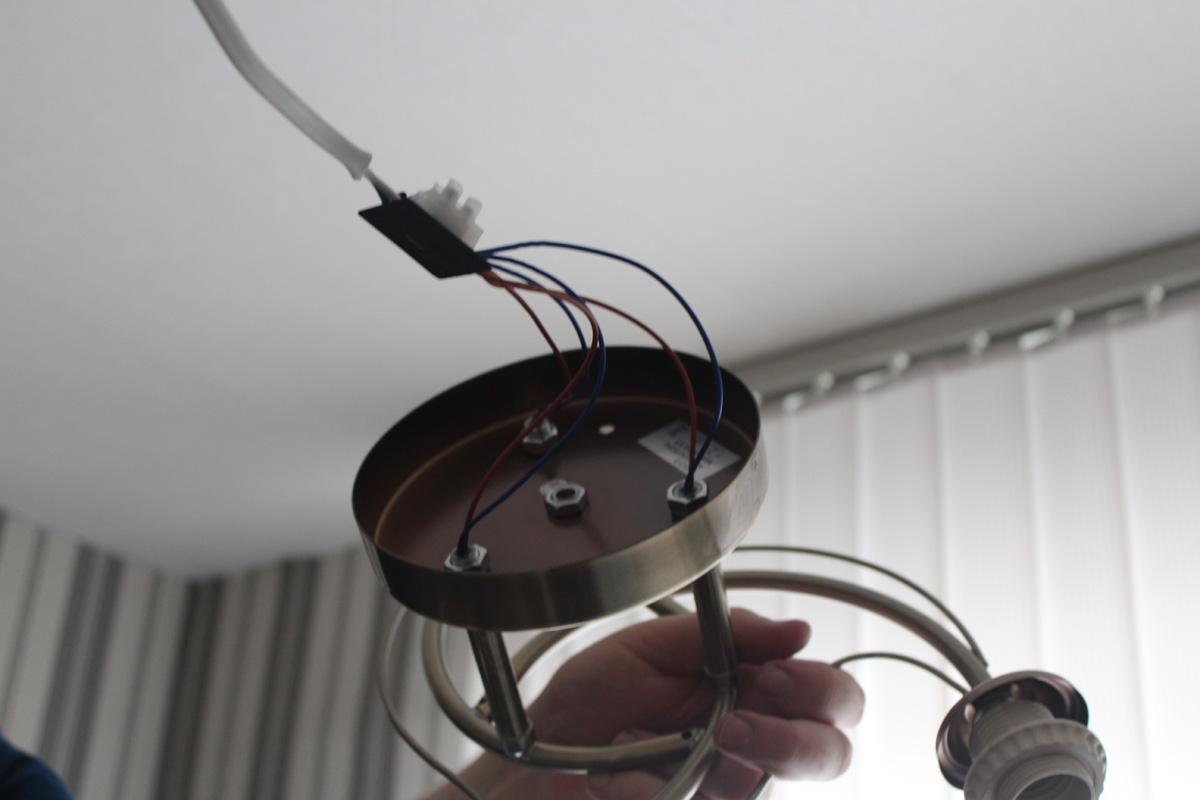
First you need to get close to the place where the wires are connected. This place is located under the ceiling - it is covered by the top cover of the chandelier with a protective cap
The electrical tape is removed in the place where the wires are connected, and the supply wire is carefully disconnected from the wires with which the chandelier is equipped

Recommendations for replacing the electric cartridge in the chandelier.
All this work is carried out with extreme caution, since if the wiring was carried out in Soviet times, then aluminum wire was used for this. Since school, we all know the characteristics of aluminum - a brittle metal that is easy to break
If you find a twisted connection, and the wires are copper and aluminum, then, after replacing the cartridge, try to connect these wires in the chandelier with wago brand self-clamping terminal blocks.
How to check if the device is working properly?
There are two types of chandeliers
- those that are controlled by a one-button switch or dimmer;
- those that are controlled by a two-rocker switch.

- If the device shows that the resistance is close to zero, this indicates the presence of a short circuit. Then the chandelier must be disassembled and repaired.
- If the device shows that the resistance tends to infinity, you need to install the bulbs in the bases, screw them in and apply voltage according to a temporary circuit through the outlet. The chandelier is operational and ready for use if all the lights are on when turned on.
- If one or more of the lights are off, the test is continued to find the fault. To do this, turn off the power to the luminaire and again with a multimeter or tester, the presence of a circuit between the terminals of the chandelier and the contacts of its cartridges is checked.
- If all circuits ring, then the lamp itself is faulty. The reason may be the sticking of the central contact petal of the cartridge. Then you will need to turn off the power and carefully bend it towards you to ensure contact with the base.
If the device is controlled by a two-rocker switch, the test is carried out as follows
- Find and mark the common wire if there is no marking. The common wire must have contact with all the cartridges, and the other two - only with cartridges of its own group. This can be checked with a tester or multimeter in ohmmeter mode.
- The same devices check the resistance between the common wire and the other two (together or separately).
- If the devices do not signal a short circuit, then you can screw in the lamps and make a test switch.
- It is necessary to apply voltage between the common wire and the terminals of each of the groups to make sure they are connected correctly.
Chandelier cartridge replacement: detailed instructions
Now how to change the cartridge in the chandelier. To do this, you will need a stepladder and an assistant who will support the lamp during its dismantling and reinstallation:
-
After de-energizing the apartment, unscrew the bulbs and remove the shades from the chandelier;
-
Remove the lamp from the hook or bracket, having previously sketched its connection diagram and cut (unscrewed) the wires;
-
Disassemble the cartridge and take the wires away from the block. To do this, you will have to separate the base from the lamp;
-
Installation of a new one is carried out in the reverse order;
- When assembling the luminaire, be vigilant and carefully insulate the wires to eliminate the risk of short circuits;
- Put on the shades and screw in the lamps;
- Hang the chandelier on a hook or attach it to a bracket using decorative fasteners, connecting the wires accordingly (you should not forget which colors of the wires were connected to each other). If you forgot, you will have to look for zero and phase again with an indicator screwdriver;
- Restore the electrical supply to the apartment and test the lamp. If it functions correctly, you did everything right.
Please note that changing the chuck is a great reason to check the condition of the chandelier wiring. If it is dilapidated, then it must also be replaced.
Removing the old wire and screwing in a new one is a matter of diligent and patient people.
It is only important not to confuse the method of connecting the lamps, which was used initially. A cable with two or three cores can be used as wires, as well as separate wiring
How to replace the cartridge in a chandelier
Now let's look directly at how to replace the cartridge in the chandelier. Before performing work, you need to take care of electrical safety, for this, in the dashboard, you need to turn off the machines from which the chandelier is powered. Next, we completely remove the chandelier, since it is not very convenient to perform any work in the suspended position.


First you need to get to the place where the wires are connected, they are located under the ceiling behind the top cover of the chandelier (protective cap). We remove the electrical tape at the junction and carefully disconnect the supply wire from the wires of the chandelier.

All this must be done very carefully, since the wiring is still Soviet and is made with aluminum wire (aluminum is a very fragile metal and can break off at any time)

As I thought, the connection was made by twisting, and copper and aluminum are connected, but nothing, after replacing the cartridge in the chandelier, I will try to connect these wires using wago self-clamping terminal blocks.

It may seem that changing the cartridge will be easy, even without removing the chandelier from the ceiling. However, practice shows that when creating comfortable working conditions, all manipulations are made much more organized and faster.

Having removed the chandelier from the ceiling, we proceed to dismantle the cartridge itself. It should be disassembled, and then disconnected the wire from the ceramic block. Further, the base of the cartridge is separated from the chandelier. The separation method depends on the attachment method. It can be different in different designs.
Most often, an electrical cartridge is attached to a metal tube. Such a connection is the most common, since it allows you to significantly expand the range of design solutions due to the ability to hold heavy structures.

The entire load is taken not by the cartridge, but by the metal pipe. Additional nuts are often screwed onto the tube. Thanks to this, any shades and various decorative caps are reliably attached to it.

The wire to the cartridge is passed directly along the inner surface of the tube. If the old wiring is seriously outdated, and there are doubts about its reliability, then it is necessary to replace it. To do this, the wire is removed from the tube, and a new two-core wire is pulled instead.

Installation of the electric cartridge is carried out in the reverse order. In this case, you should be careful not to damage the insulation in order to avoid short circuits in the future.

After the replacement of the cartridge in the chandelier is completed, you can proceed directly to connecting our modernized chandelier. As I said above, to connect the wires of the chandelier I will not use twisting, but wago connecting terminal blocks.


With their help, you can very quickly and conveniently make the connection, no tools or additional insulating materials are required, the contact is very reliable.
A little advice on how to remove the base from the chuck
Sometimes an old incandescent lamp cannot be removed from the socket. The base is firmly stuck in it, and when the bulb is unscrewed, only the glass bulb is separated. Without solving this problem, the cartridge cannot be used. How to get out of the situation?
As always, the first step is to de-energize the lighting fixture. Then we unscrew the cylindrical part of the cartridge body, holding it by the bottom. Now it becomes much easier to remove the plinth.
If it was not possible to unscrew the upper part of the cartridge, then you can try to pull out the base with pliers. To do this, grab the edge of the base and turn it in the chuck. Often, knowledgeable people advise in such a situation to use an ordinary plastic bottle.
Its neck is melted on fire, which is then placed in a stuck base. After some time, when the plastic hardens, it will be possible to easily unscrew the base remaining in the cartridge.
I hope this article on how to replace the cartridge in a chandelier was useful, see you in the next issues, dear readers.
Similar materials on the site:
- Benefits of Energy Saving Lamps
- Outdoor sensor for lighting
Design
Electric cartridges have different designs, depending on the series of the device. Most often, a lineup equipped with Edison carving is used in everyday life. It has a cylindrical body, inside of which the rest of the elements are contained.
 Chuck design
Core
This is the bottom part of the chuck, which has a wide sole and holes for fastening. It can have in its design various bushings and inserts for bringing out the wire. Most often attached to the chandelier body.
Screw clamp
Looks like threaded fastening strips. With their help, an electric current is supplied to the core.
Clamping contact
It is made of brass, most often it is a non-separable part of the device. Also responsible for supplying current to the light bulb.
Thread
The presence of a thread allows the use of various types of lamps - both incandescent and LED. It is most versatile in the models of cartridges e14 and e27.
 Electric chuck body
Frame
The cartridges can be equipped with a body of various materials. Their characteristics and application possibilities depend on this. To figure out how to remove a cartridge from a chandelier, you need to know its design, including the type of case. The following varieties are on sale:
- Ceramic - made of heat-resistant ceramics, so they are able to withstand heating to high temperatures. As a rule, they are non-separable. Screw terminals are built into the base, with the help of which the connection is made. This is done using a regular screwdriver. The disadvantage of such cartridges is their low strength.
- Plastic - they are unable to withstand high temperature heating, which is why they lose much to ceramic ones. Designed for use with bulbs no more powerful than 60 watts. The design is usually collapsible, the contacts are located in the inner part. The connection to the cover is made using self-clamping terminals.
- Carbolite - they are characterized by increased strength and resistance to heat. They have a collapsible design, they are connected to the network using brass contacts and a screw connection.
Chandelier cartridge replacement process
To replace the cartridge in the chandelier, you must perform the following steps:
- turn off the electricity supply on the dashboard;
- disconnect the electrical wiring;
- remove the chandelier from the ceiling;
- disassemble the lamp;
- remove the faulty cartridge;
- install whole;
- after replacement, install the chandelier.
Turning off the light on the dashboard
Before replacing the cartridge, you must turn off the power supply to the room.To do this, the machines on the dashboard, which provide power to the ceiling chandelier, should be put into an inactive state.

Disconnecting wires
All wires that supply power to the luminaire are insulated and routed to the sides so that a short circuit does not occur.
Removing the chandelier from the ceiling
To remove the chandelier, you need to take an indicator screwdriver and a stepladder. First you need to check the switch to make sure there is no electricity. Then follow these steps:


- remove such fragile parts from the chandelier as the plafond, decorating elements, lamps;
- unscrew the fixing screw and cap that covers the wire connection under the ceiling;
- if there is a hook under the hood, the wires are disconnected and routed to prevent a short circuit;
- if there is a strip, loosen the clamping bolt or remove if necessary.

Fixation of the chandelier to stretch ceilings is carried out using disposable fasteners of the butterfly type. Therefore, it is advisable not to take them off. Otherwise, purchase a new mount in advance.
Disassembly of the lamp
Most of the chandeliers have 3 or 5 seats for lamps pointing in different directions. If the chandelier worked before dismantling, you need to wait for the temperature inside the lamp to drop. First, the shades are removed. In old-style chandeliers, they are fixed by means of carving. Others are held on to special latches or small bolts.
A plastic threaded ring is most often used to attach this element. It is screwed onto the outer thread of the holder, so you need to be careful not to break the insulating part of the element.
Removing the cartridge
The method of dismantling depends on the type of construction and the method of attachment in the body of the lighting fixture. Most often, fixation takes place on several bolts. The part is removed immediately or it is disassembled, removing the core. In this case, remove the latch of the cartridge, take out the middle part and disconnect the wires. The last one to unscrew the nut securing the body.
When replacing the screw-type chuck is required, loosen the bolts and pull out the wires. Some E14 holders have terminal blocks. In most cases, they are disposable, so they need to be replaced.

The ceramic cartridge is dismantled as follows:
- the plates are wrung out from the central contact;
- unscrew the bolts from the plate, which is opposite the ceramic base;
- the central terminals are bent to the level of the side contacts.
Sometimes it is enough to clean the ceramic products and tighten the terminals in order to ensure the high-quality operation of the cartridge.
Installing a new cartridge
To replace the socket in the luminaire, you need to connect all the wires. They are wound through the bottom of the product, and form rings from the stripped ends. They are installed on screws, fixed with plates and clamped. If fastening is carried out using terminals, the bare ends of the wires are twisted so that the hairs do not puff up. Then they are inserted into the retainers and clamped with pliers.
The phase is applied to the central contact.
Additionally, they check whether the cross-section of the wires corresponds to the power consumption of the chandelier. At the end of the replacement, the luminaire is assembled and installed in the reverse order.
Cartridge design options, their features
Types of products by design:
- screw;
- pin.
Their main difference is in the technology of fixing the light source. Filament lamps are usually equipped with a screw base. Accordingly, they are suitable for lighting fixtures with screw holders.
Expert opinion
Ivan Zaitsev
Lighting specialist, consultant in the building materials department of a large chain of stores
Ask an expert
For your information! Modern energy-saving light sources (halogen, fluorescent, LED lamps) are produced with both screw and pin bases.
Removing power
Well? Let's start looking?
In general, I strongly recommend replacing the cartridge during the day, because at night you have to do everything by touch - the end results can be very surprising. On the dashboard with machine guns, we find the one that is responsible for powering the group to which the chandelier is connected, and remove it. Such a phenomenon that all the cartridges immediately on the chandelier would suddenly need to be replaced - rather, from the category of fantasy, and for sure, at least one, but will work.


How to determine which machine is needed? You can go by the elimination method until the chandelier goes out when the switch is on. Although not everyone may like this method, especially if you start such a search in some institution in the middle of the working day and without warning.
This is interesting: How to choose a floodlight for the street: 7 useful recommendations
How to replace
The installation of a new holder in the chandelier must be carried out according to the sequential instructions. By following the basic rules, dangerous situations and common mistakes can be avoided.
Turning off the light on the switchboard
Before starting the direct replacement, it is required to de-energize the room where the work will be performed. For convenience, you can de-energize the entire apartment.
Disconnecting wires
Having cut off the electricity, you can proceed to unscrewing the fixing elements that hold the chandelier. As a rule, such elements are hidden bolts on the body or a suspension hook and a set of wires.
Dismantling the chandelier
It is possible to install a new cartridge without dismantling the lighting fixture, but this will be more difficult. For the convenience of work, you need to remove the chandelier by disconnecting the conductors, and then carefully lift it from the mount.
Parsing the lamp
To disassemble the light source, you need to unscrew the lamp and remove the cover. In most situations, this does not require specialized tools, and it is possible to do all the work by hand.
When disassembling a luminaire, it is important to be careful not to break fragile structural elements

Removal of the old cartridge
In the process of replacement, unscrew the visible part of the electric cartridge and disconnect the connected wires. In some types of lighting fixtures, the contacts are located on the bases, in which case it will be necessary to unscrew the clamping screws.
Installing a new cartridge
For direct replacement, connect the phase to the central contact of the base, and zero to the second contact. If you have any difficulties in identifying suitable wires, it is recommended that you first familiarize yourself with the color coding of the contacts.
Chandelier installation
The final stage of the work is the installation of the chandelier, which is performed in the reverse order. First, they connect the wires, after which they hang the lighting device on the bar or hook.