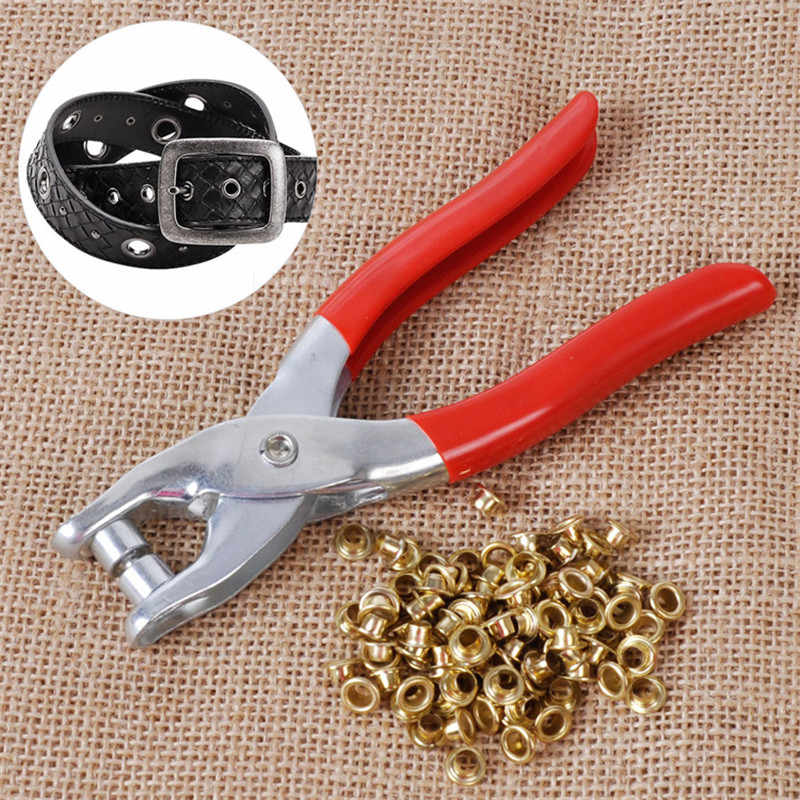
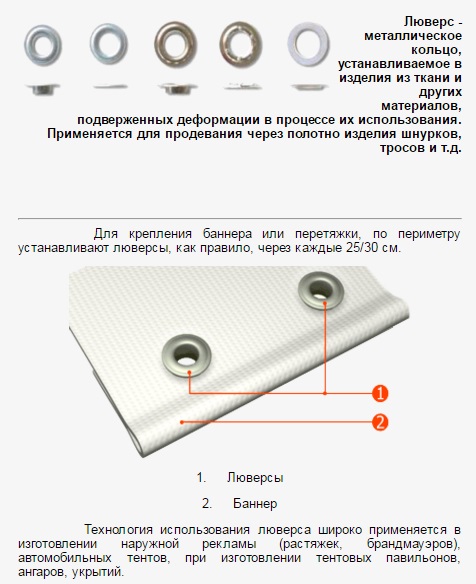
Punch for eyelets: description, scope
To install eyelets, round holes of a certain diameter are required, which are very difficult to make at home with an improvised tool. Experience came to the rescue from industries where accessories are used in the production of footwear, printing, textile products and leather goods.

The main purpose of the eyelet is to protect the edges of the hole from destruction.
Large firms use the eyelet stapler as a tool for filing documents, while the rivets are often decorated with corporate symbols. In industrial plants, eyelet punches are used. Today, many firms offer for sale options for punching punch for home use. Such a hole punch allows you to solve several problems at once, it perforates the material, folds its edges, so that additional processing of edges is not required.

Instrument compatibility is checked individually each time.
There are the following types of eyelet punch:
- manual;
- semi-automatic;
- automatic.

The choice of tool for installing eyelets depends on what products you want to install.
Let's try to figure out which option you should opt for
It is important to understand with the material, what strength the work will be done, what will be the grommet itself, its shape and range of sizes. The choice of the size of the rings will depend on the functional load of the product.
Products are different in color, shape and material of manufacture.
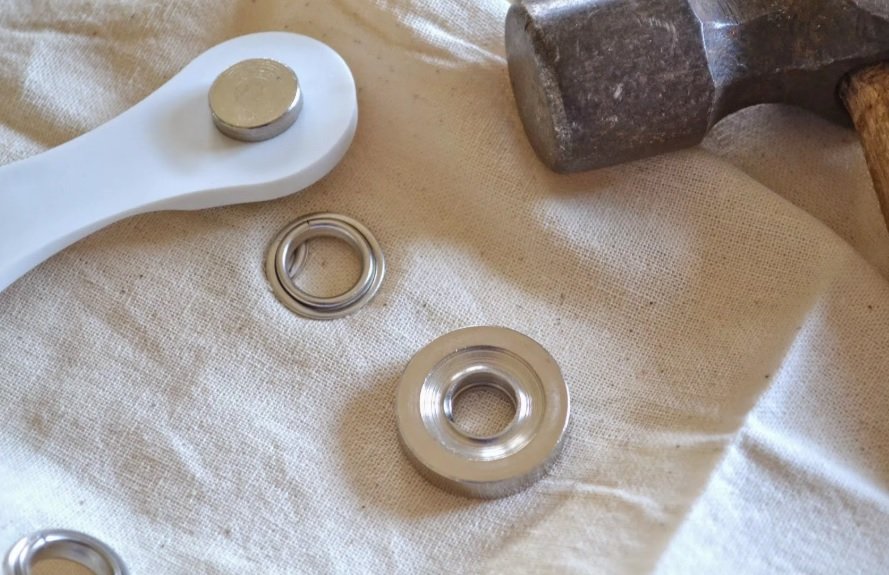
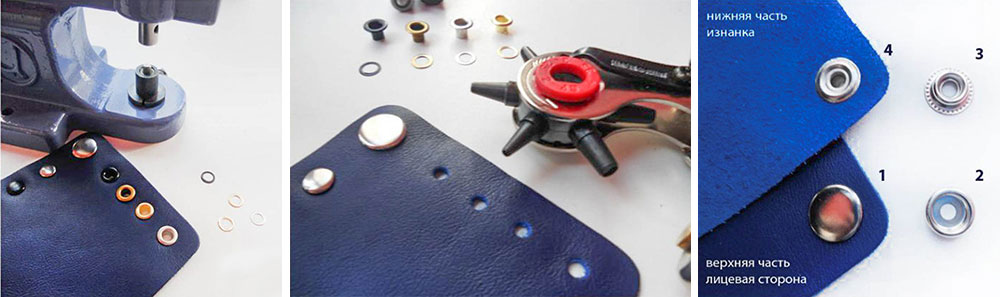
The variability of the eyelet itself will also affect the choice, you can use a metal version of brass or steel, wood, plastic, coated and uncoated, of various shapes and sizes. Regardless of the type and shape, the fittings consist of two component parts: bushings and washers, so the principle of operation of the punch is approximately the same everywhere.

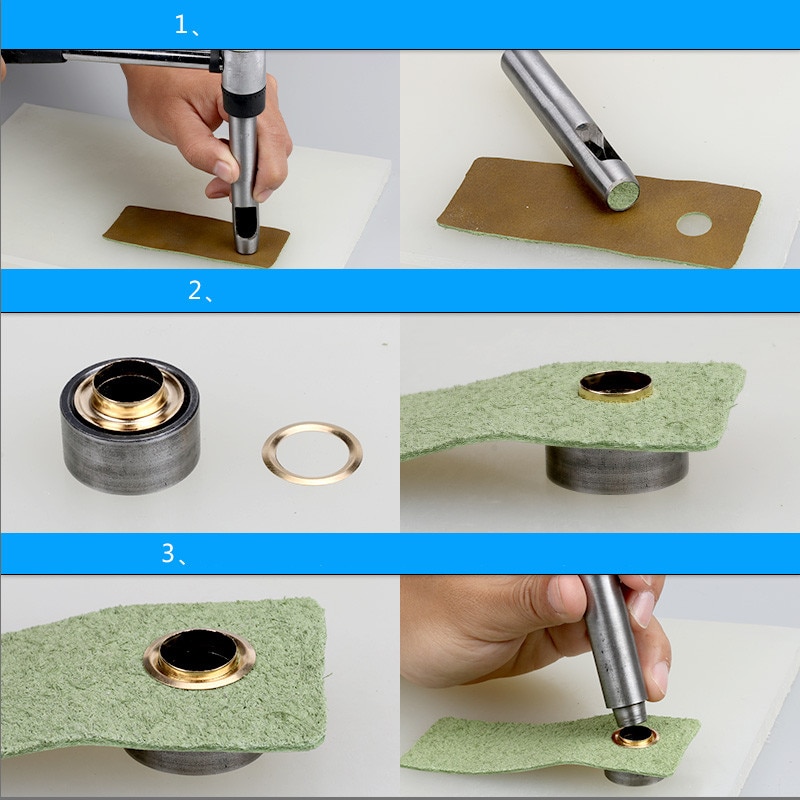
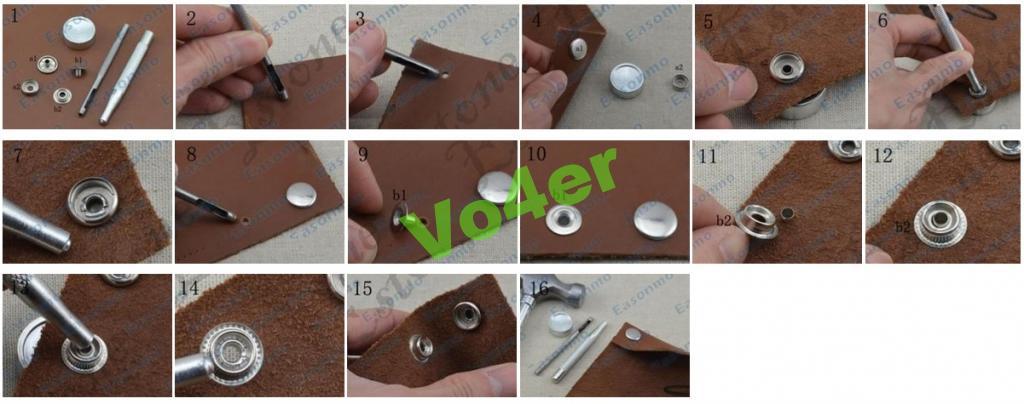
A hole is made with a punch, a sleeve and a washer are applied and fixed with a tool.
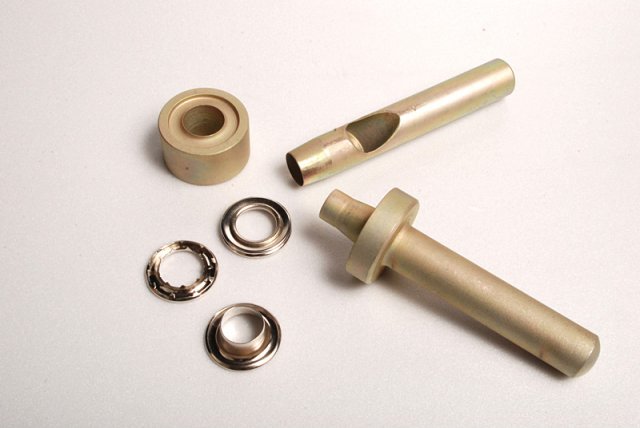
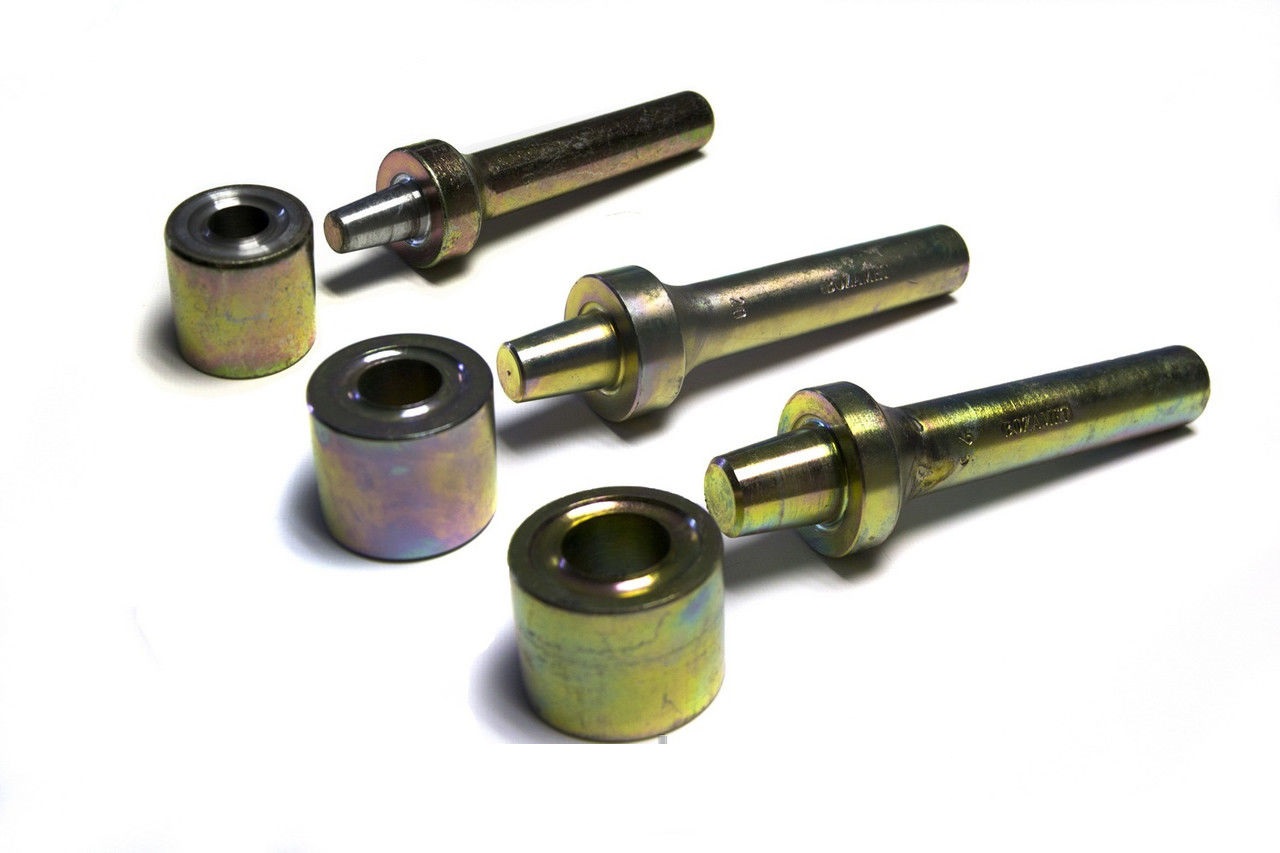
At the same time, the manual version of the hole punch is in great demand due to its low cost and ease of use in the original version.It usually includes a punch, with which the hole itself is made directly, the matrix into which the sleeve and washer are inserted, and the embossing, by pressing on which they are fixed component parts of the eyelet on the material.
Experts recommend purchasing devices in whole sets, but the use of universal, multifunctional ones is no less convenient.
Disadvantages of the manual option:
- for different variants of the eyelet, you will need the corresponding attachments for the embossing;
- with a high density of the material used, the laboriousness of the process of piercing the material;
- not suitable for leather goods.
For small things, a hand tool with capabilities limited in terms of the size of the installed products is suitable.
Pros:
- availability;
- home use.

In order for any eyelet installer to serve as long as possible, it must be kept clean, periodically visually inspected, and lubricated with machine oil.
The semi-automatic hole punch is suitable for working with materials of increased strength, since the hole itself is punched automatically by the sharp edge of the sleeve itself
If you dwell on this option, then the choice of the eyelets themselves is of particular importance.

Hole punch eyelets must have a sharp edge.
Minuses:
Purchase of specialized eyelets.
Pros:
- versatility (even suitable for working with tarpaulin);
- availability;
- minimum effort;
- performance.
Pliers-installer are not universal - a clip for eyelets, blocks of different sizes is selected individually.
In industrial production, automatic punches are used.
Pros:
versatility in the materials and sizes of the eyelets.
High performance.
- minuses:
- high price;
- punch weight and dimensions.

For large eyelets, more serious equipment is needed.
Special tool for installing eyelets
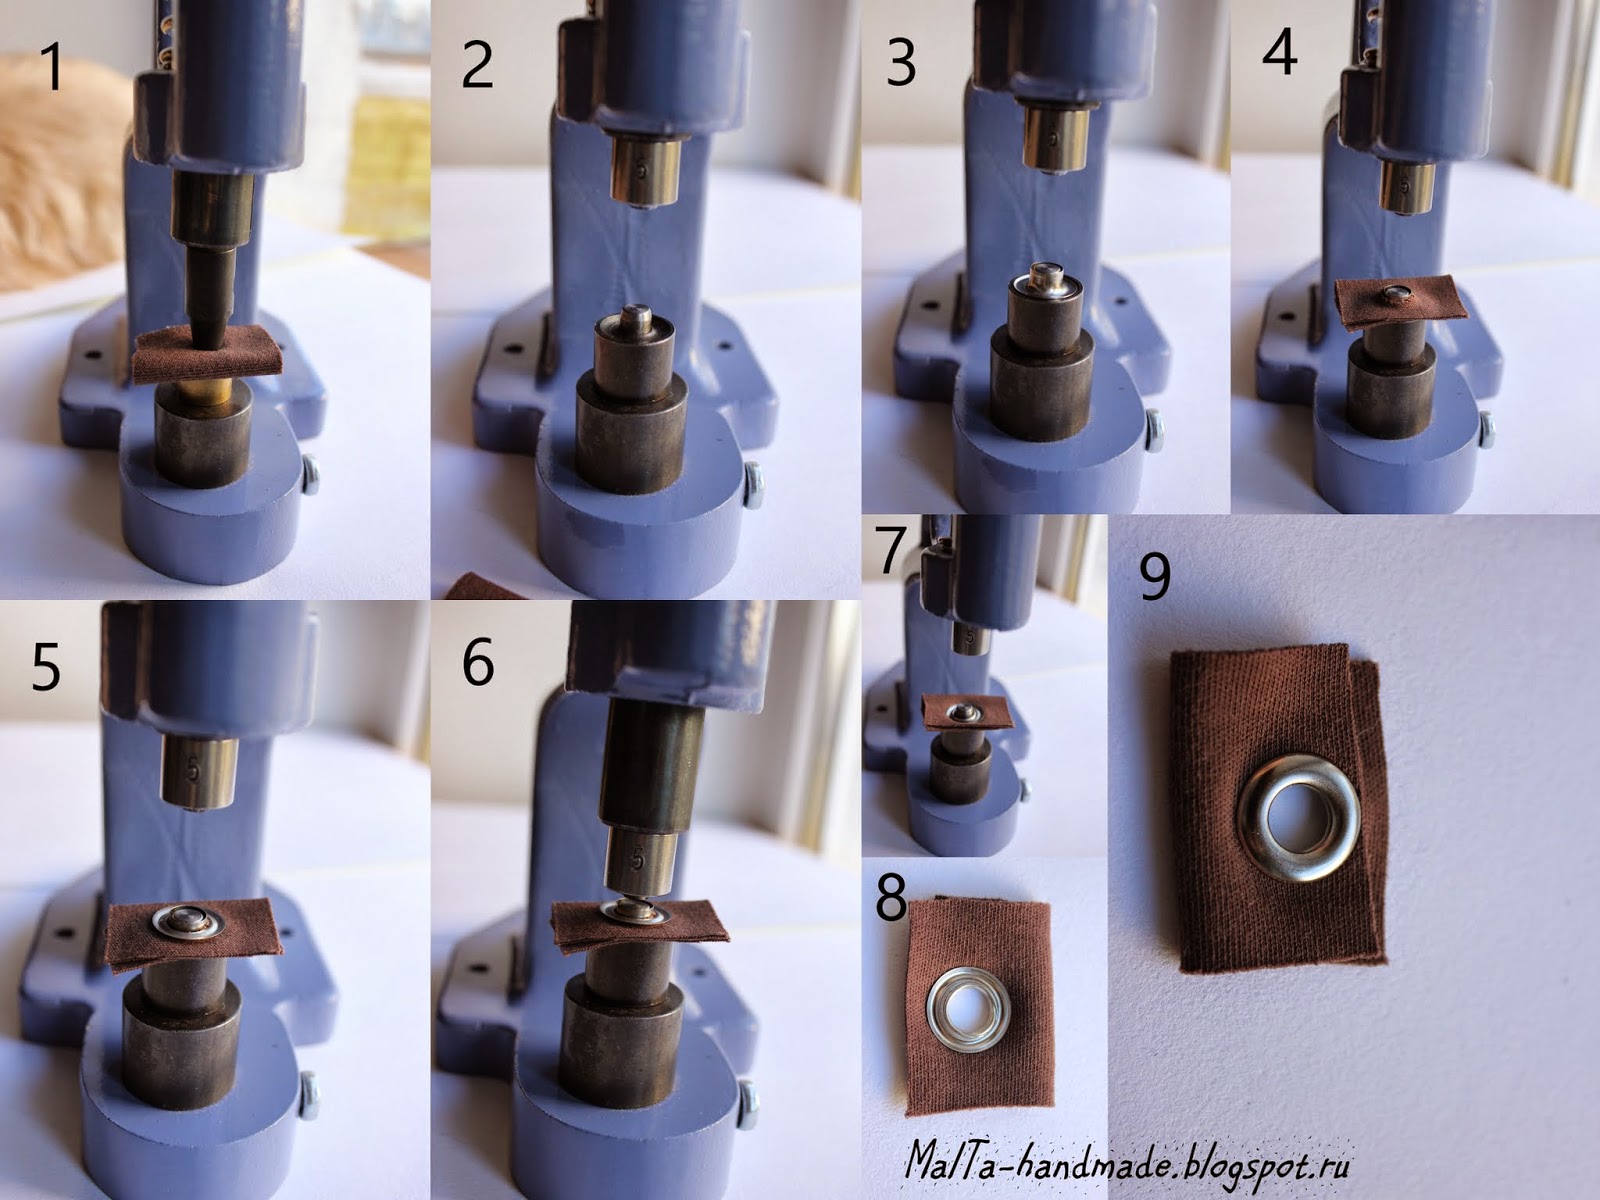
The most powerful and reliable unit for framing through holes in various materials, from plastic to silk, is a mechanical press, for example, TEP-2. This heavy unit sits on a solid, non-wobbly surface and allows you to instantly attach the eyelets, whether with a washer or the simplest. The walls break into separate petals and twist slightly inward - a neat circle is obtained on the front and back sides. The device is supplied with spare parts that allow you to work with blocks of different diameters. The main disadvantages of the device are high cost and cumbersomeness.


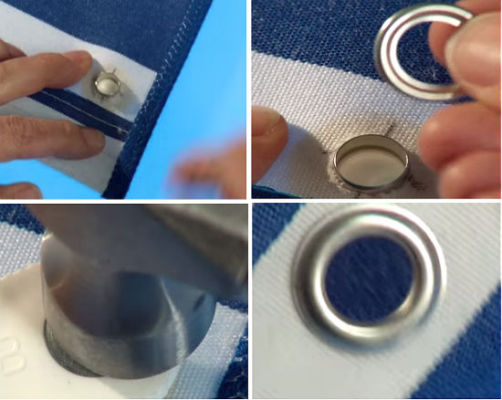


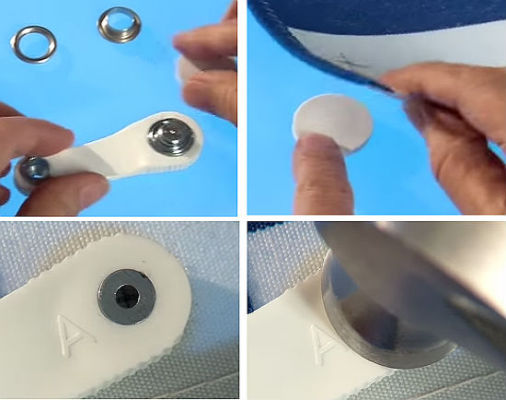
Operating procedure:
- Place the grommet in the finished hole.
- Place on the bottom platform, face down.
- Place the washer on the protruding walls.
- Push the lever to engage the press.
Pliers are the most popular special tool for eyelets. They are compact, relatively inexpensive (although there are samples for several thousand rubles) and do an excellent job.

The best and popular tongs:
- Crop-A-Dile is a reliable, high-quality and stylish device of American production, the only drawback is the high cost, about 3 thousand rubles;
- Crop — A — Dile BigBite - large table tongs, an intermediate version between the press and the tongs, allow you to put blocks at a greater distance from the edge of the material, cost around 4 thousand rubles;
- Micron is a Taiwanese-made (and Russian-made) and mid-range instrument. Both simple pliers-press and pliers-punch-press, revolving type are produced (change is made by rotating the circle with nozzles clockwise until it clicks). A distinctive feature of the last version is rubber “lips”, in which the grommet is fixed and which protects from scratches. The disadvantage is that after a while the convergence of the platforms becomes not accurate enough.
- "Zubr" is a Russian brand instrument that is produced in Taiwan. Refers to the middle price category and the same quality segment. Reviews of the forceps are controversial, so it is difficult to recommend them for professional use.
- Punch is a Chinese company that produces, among other things, eyelet pliers. Average price, but the quality is far from perfect. Many users note the inconvenience of the tool.
What to look for in the store
When choosing tongs for blocks, you should be picky: evaluate the quality of the steel, the power of the structure (the effort should be on the levers, not on the hands), a big plus - rubberized or plastic handles, the material of which does not smell. For revolving models, the drum should rotate with little effort, but without interference. As an anti-example, some Chinese pliers have to loosen and tighten the safety screw in order to turn the wheel from the hole punch to the press - this is extremely impractical.
Installation instruction by yourself
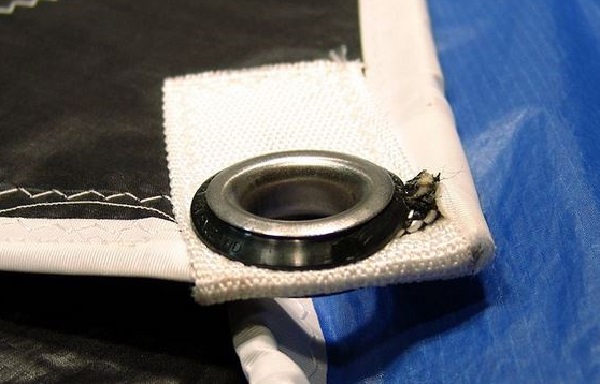
Having at hand all the necessary materials and tools, anyone can independently make an awning or canopy with eyelets at home, which can be used on the farm. Such a product can be used in various areas, from a tarpaulin curtain at the entrance to a garage to sheltering an outdoor pool from foreign objects and dirt.

Eyelets are great for securing a tarpaulin curtain to a gate
Regardless of the area where the use of an awning with eyelets is planned, first of all, you should get high-quality blocks and rings, the overall strength of the eyelets will depend on them. Experts recommend purchasing ready-made kits in specialized stores.

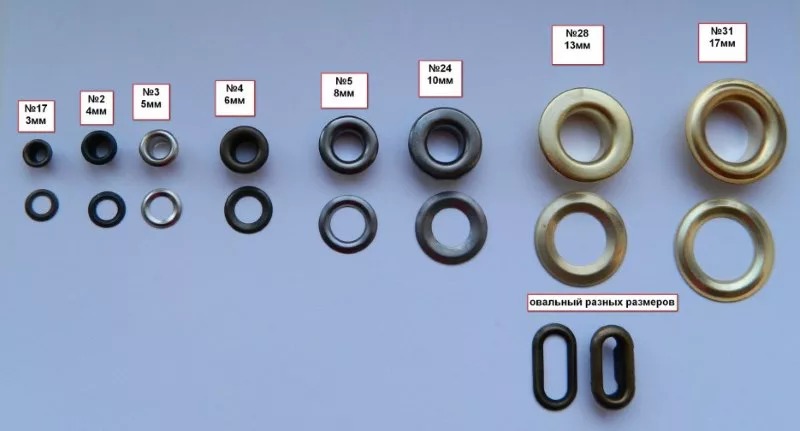
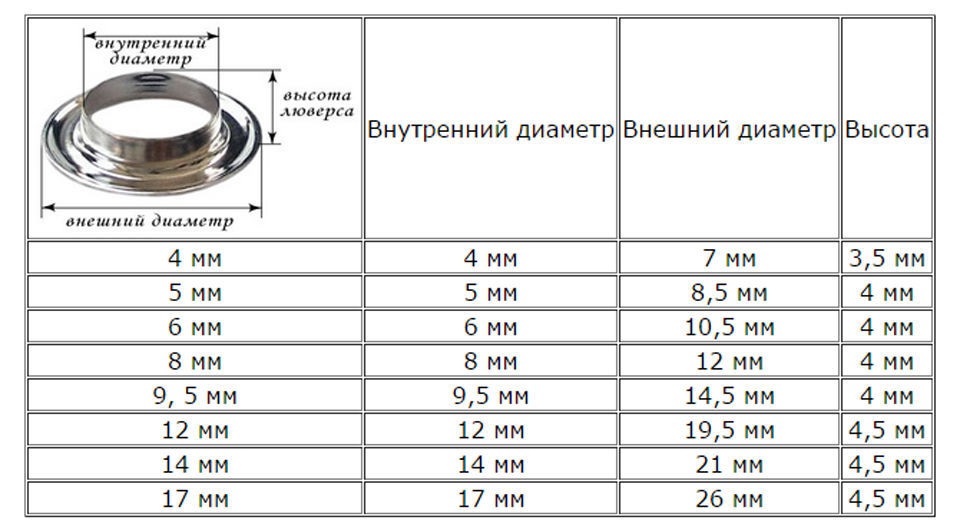
Typical sizes of eyelets
As for the tarpaulin, its choice should be made based on the purposes of its purpose, based on the characteristics of strength, moisture resistance, frost resistance, and the like. The shape and size are selected individually.
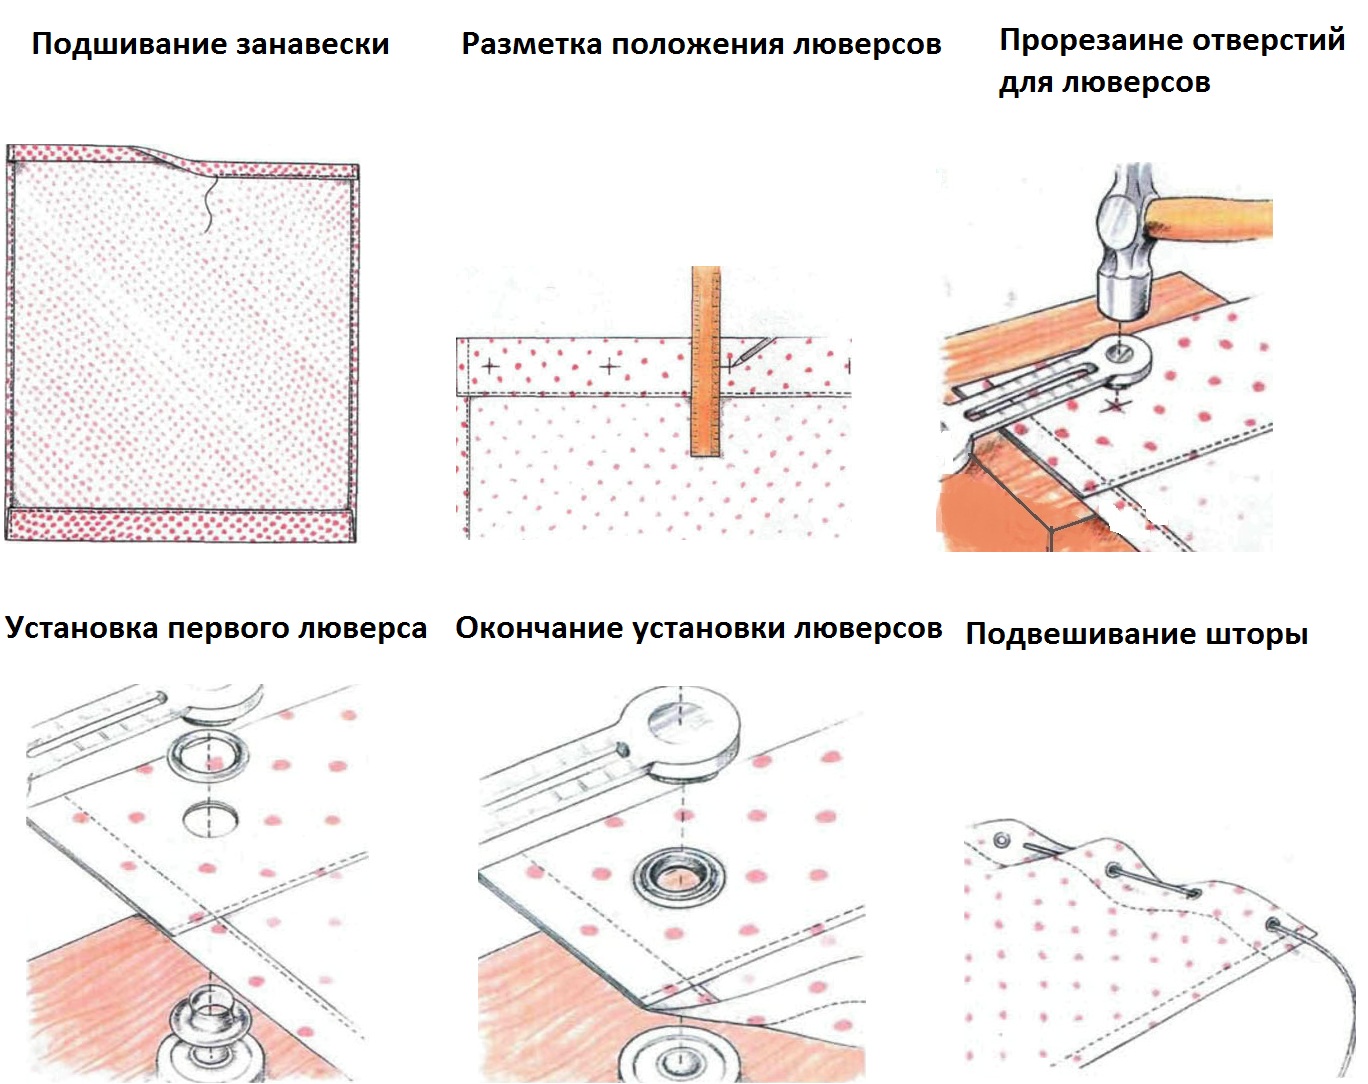
Preparing the tarpaulin for the installation of eyelets
Having prepared all the necessary components and choosing the tarpaulin for installing the eyelets, you can proceed to the next step - punching holes in the tarpaulin, for which you will need the following tools:
- Ruler.
- Pencil, marker.
- Punch.
- Hammer.
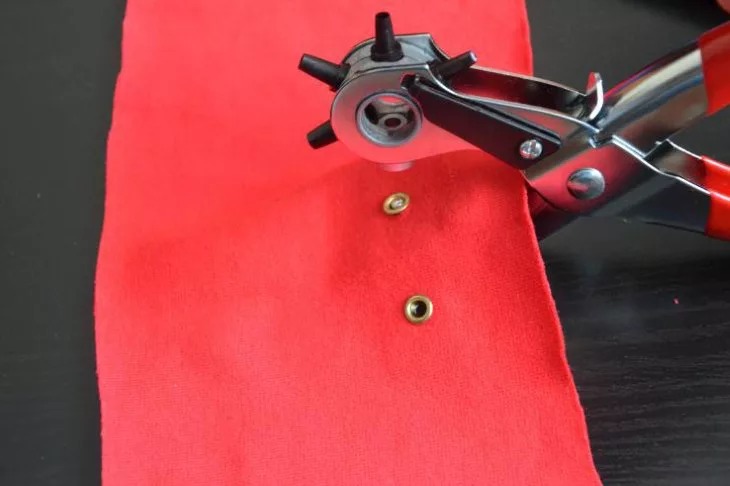
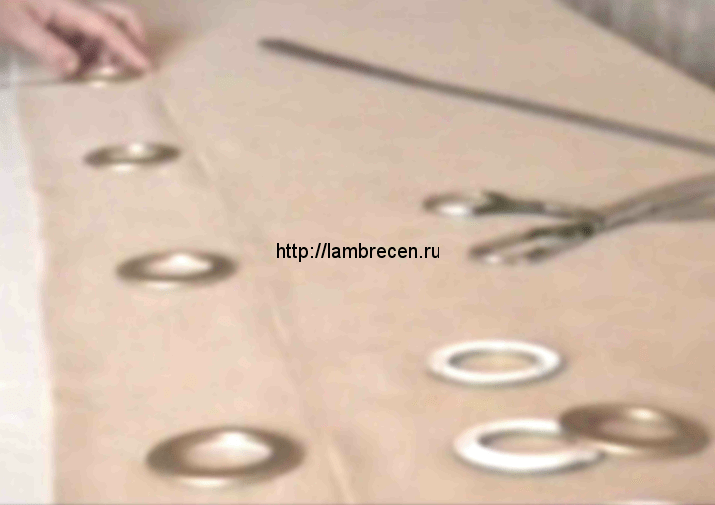
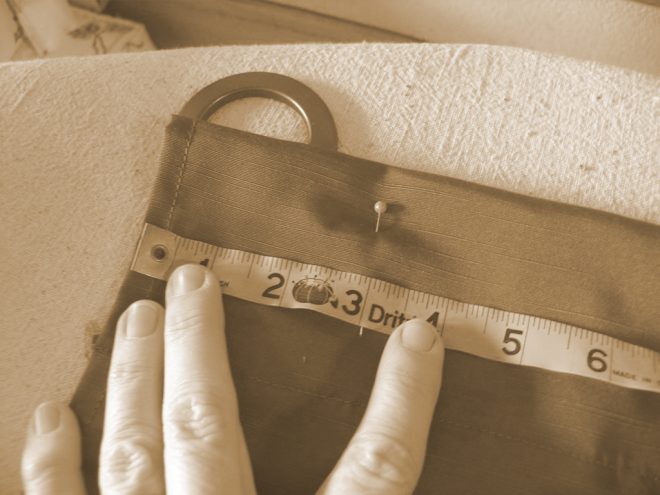
Using a pencil and a ruler, find and mark the area on the tarp where the eyelets will be placed. The mark should be made according to the diameter of the ring, evenly, at the same distance from each other. After that, using a punch and a hammer, holes are made in the tarpaulin, in accordance with the marked marks.
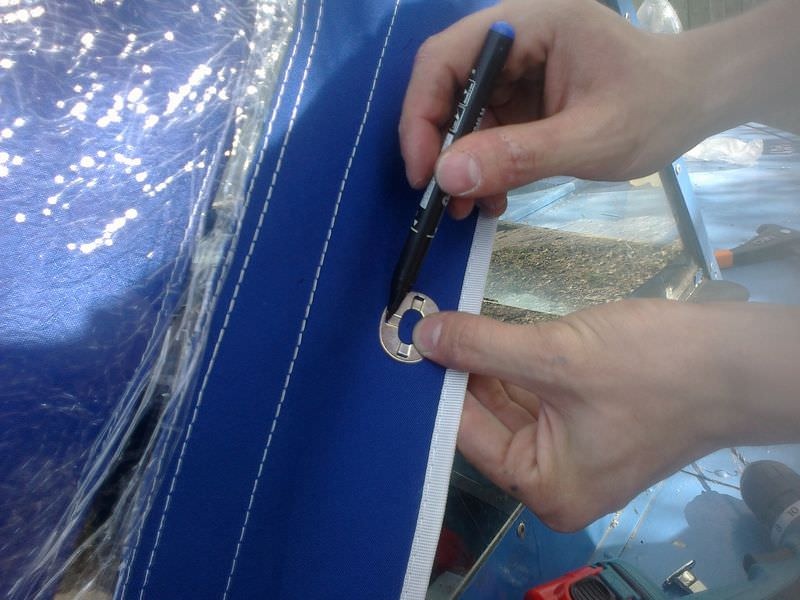
It is necessary to accurately determine the location of the eyelets so as not to make unnecessary holes
If the tarp is thin, you can use a piece of sturdy cloth or use plastic or brass washers.
Before punching holes, a wooden board is placed under the tarpaulin, which serves as a shock absorber in the event of a collision of a hammer and a punch.
Installing eyelets on the awning yourself
Having done all of the above manipulations, it remains to fix the grommet in a tarpaulin awning, which, subject to all conditions, will not be difficult.
To do this, you need the following tools:
- Flaring work.
- Hammer.
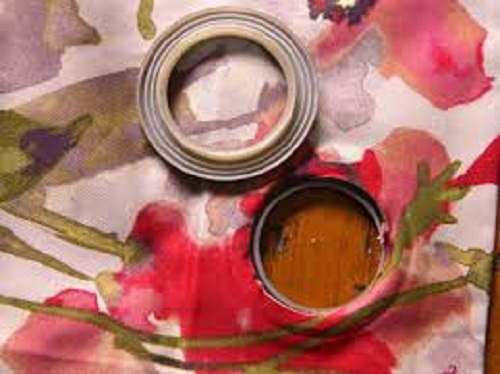
A block and a ring are placed in the previously prepared holes on the tarpaulin on both sides, opposite to each other, after which they are securely fixed on the material using a flaring and a hammer.
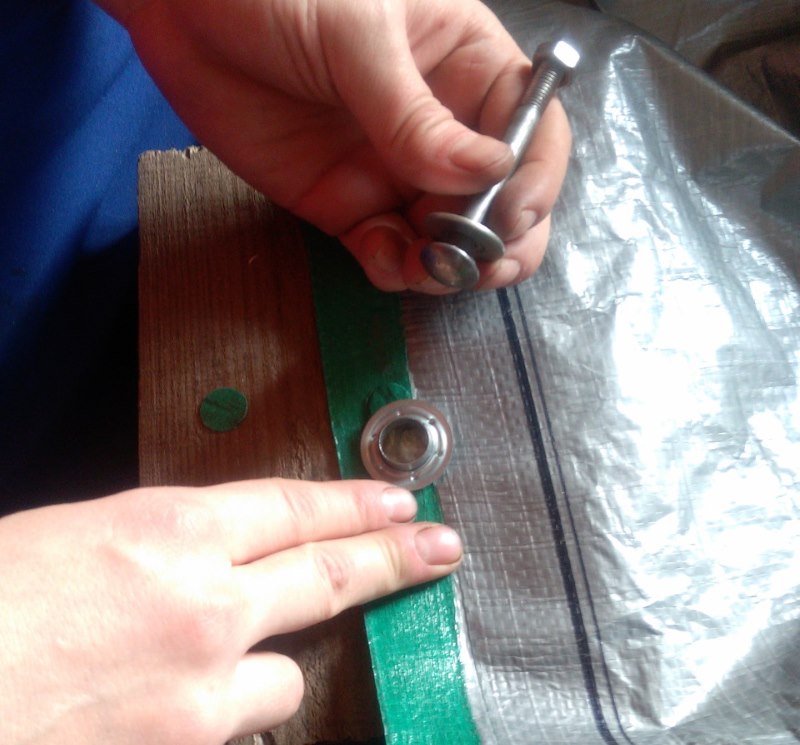
A furniture bolt with a wide head is suitable as a flare tool.
This method allows you to quickly and efficiently install eyelets on the awning for further use as intended.

As you can see in the photo, flaring can be done quite efficiently even without a special tool.
In addition, there are special manual presses for installing eyelets, which allow you to install eyelets on any kind of material as quickly and easily as possible. This method is more suitable for installing eyelets for commercial purposes.
Installation of eyelets: features

Installation of eyelets on curtains.
A similar element is attached to the curtains without much difficulty. The following tools and materials will come in handy for their successful installation:
- the eyelets themselves;
- a hole punch that can be easily replaced with fine fabric scissors;
- small ruler;
- pencil;
- product.
Part of a special tape is fixed to the top of the curtain.
Then you need to pick up the edge of the curtain and iron it
It is important not to overheat the iron in order to maintain the original appearance of the product. The folded edge can be ironed well with an iron.
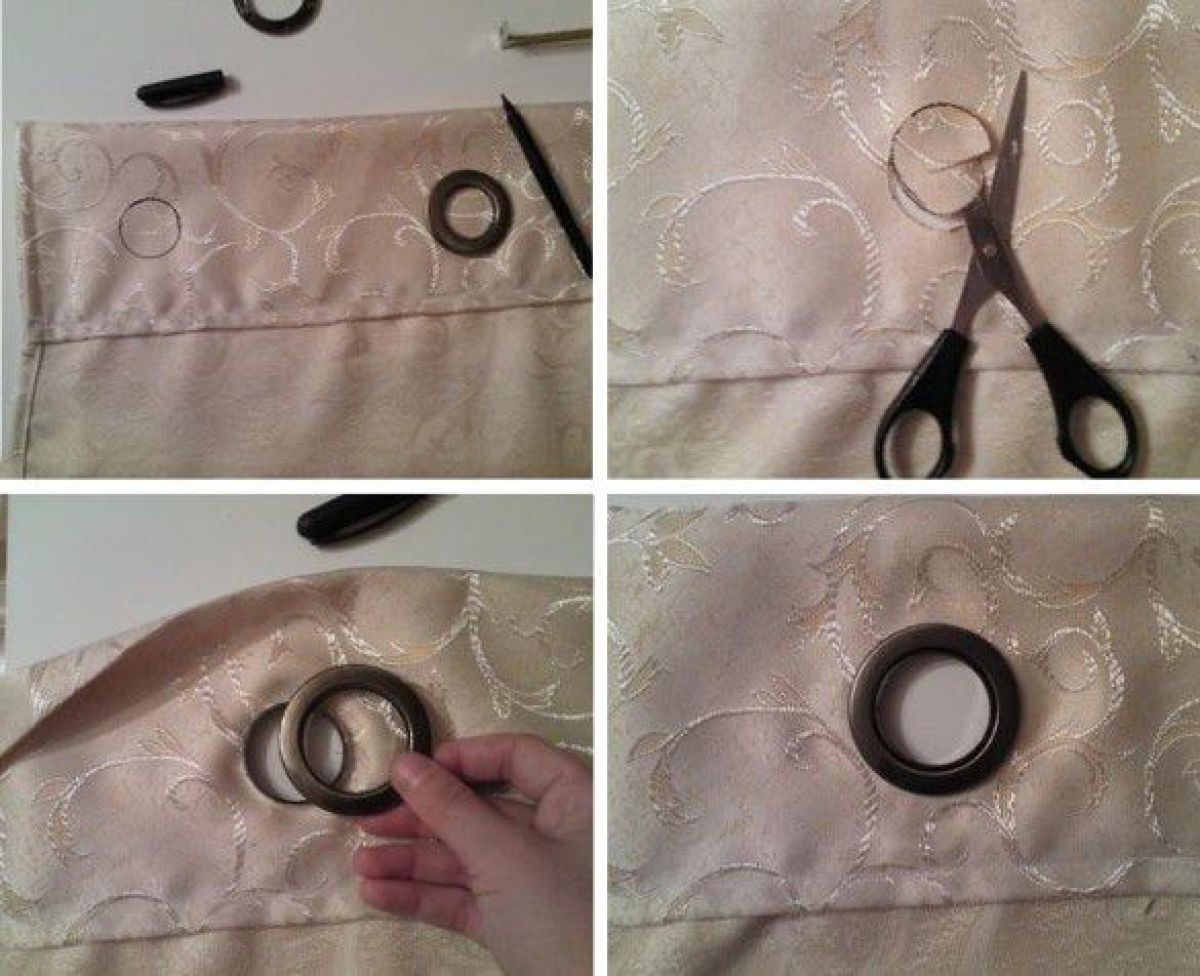
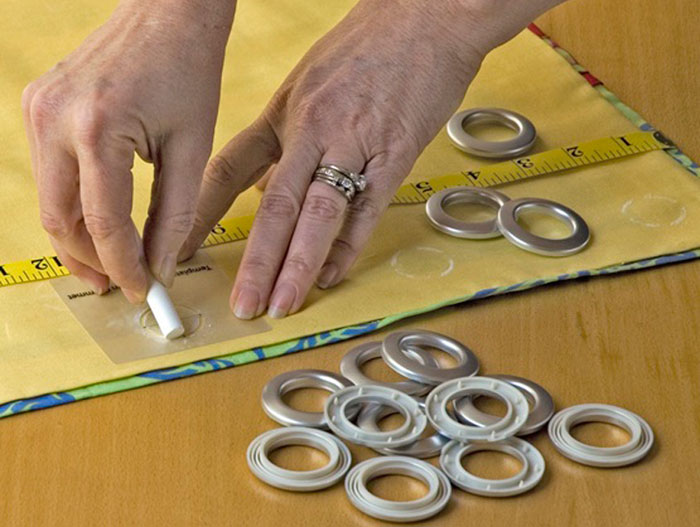
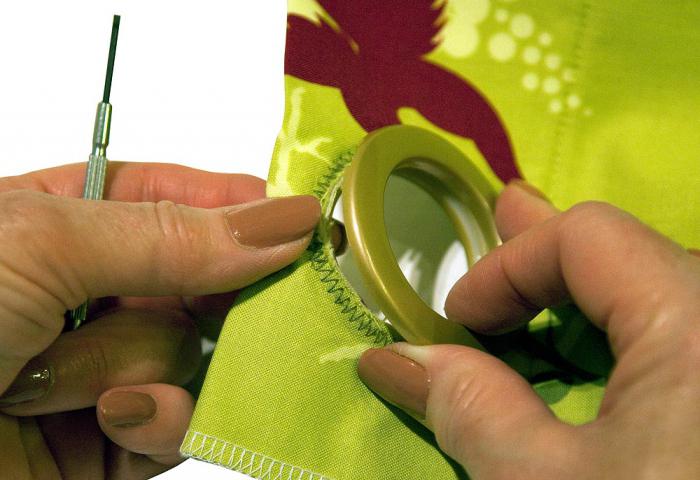
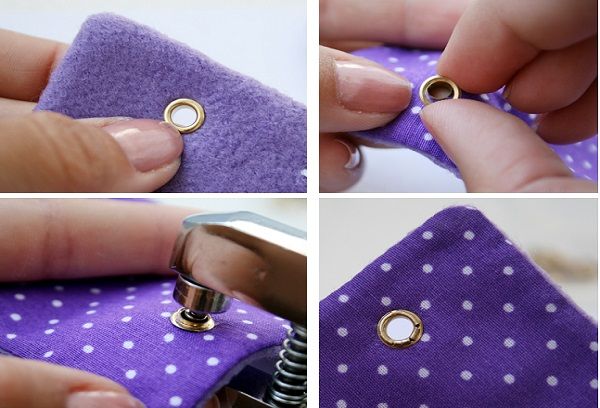
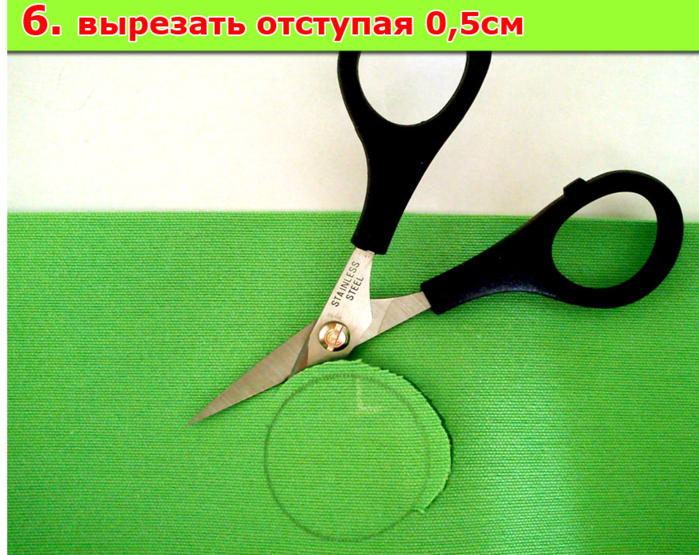
Place the eyelets in the desired position and use a pencil to draw a circle using the inner base
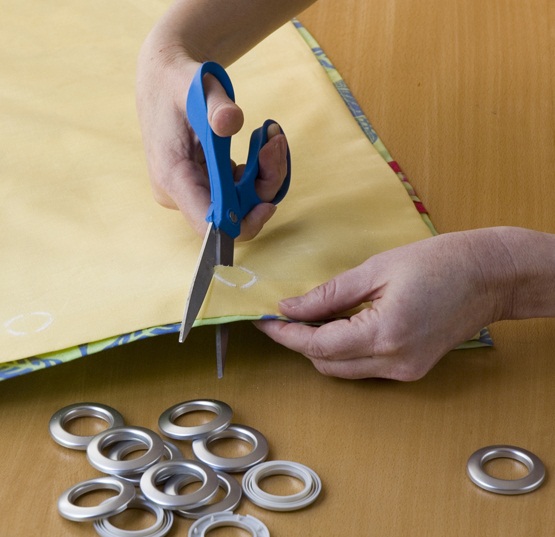
The marked place must be cut out, making an indent from the edge by 5 mm.
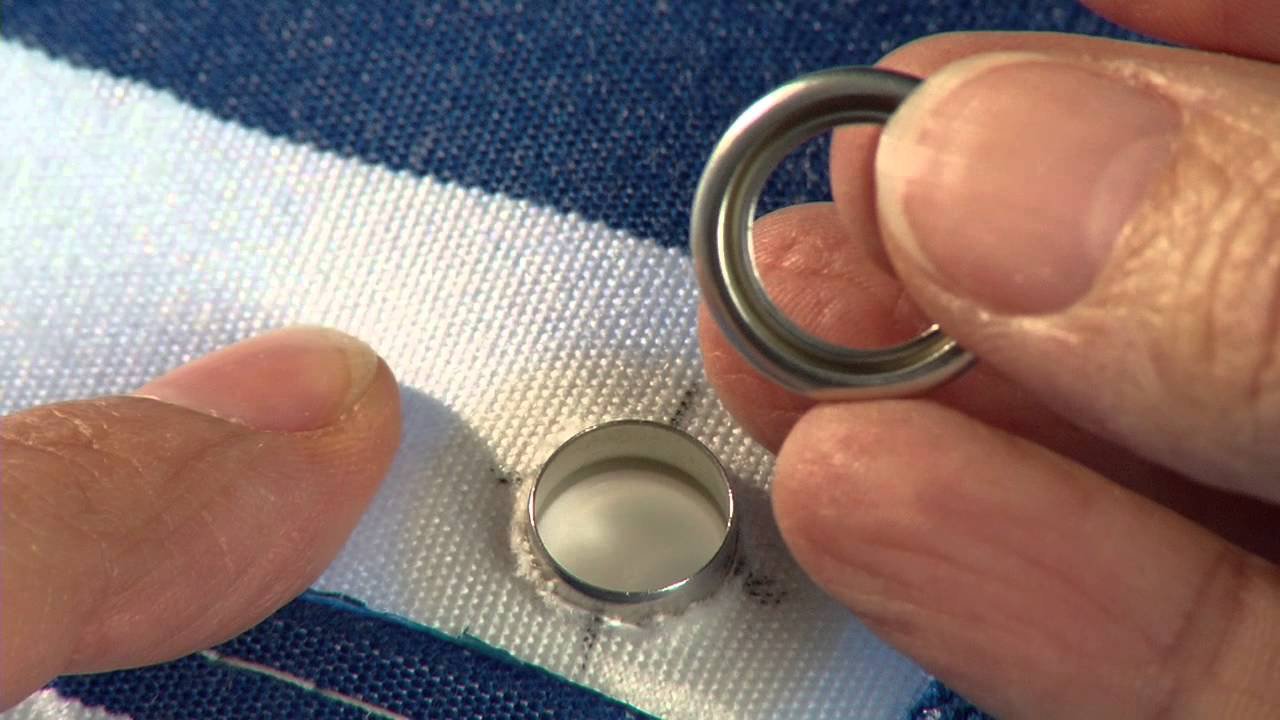
Put the existing washer-lining on the curtain and dock it with the circle cut out earlier. There must be a supply of fabric. It is important to ensure that no gaps remain.
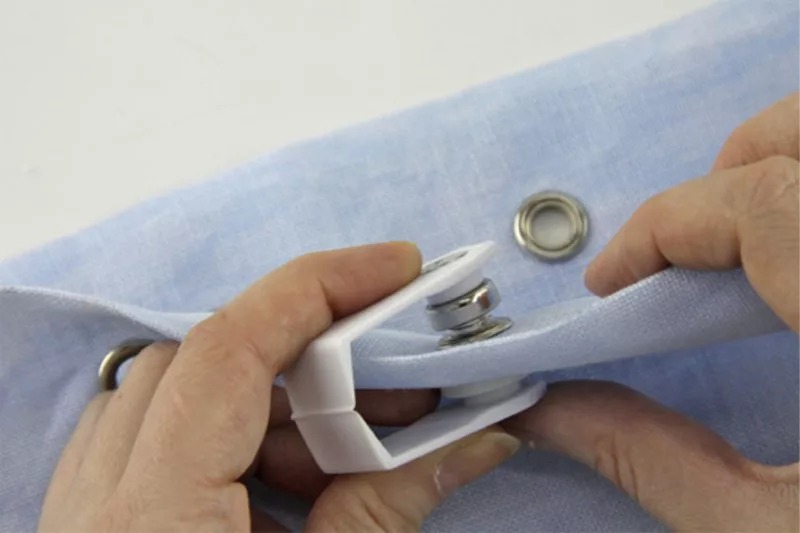
The final moment is to apply the decorative element and squeeze it all the way, you should hear a click.


Calculating the required distance
For the correct installation of the eyelets, it is important to make an accurate calculation of the required distance between them. It is necessary to do some small calculations regarding the width
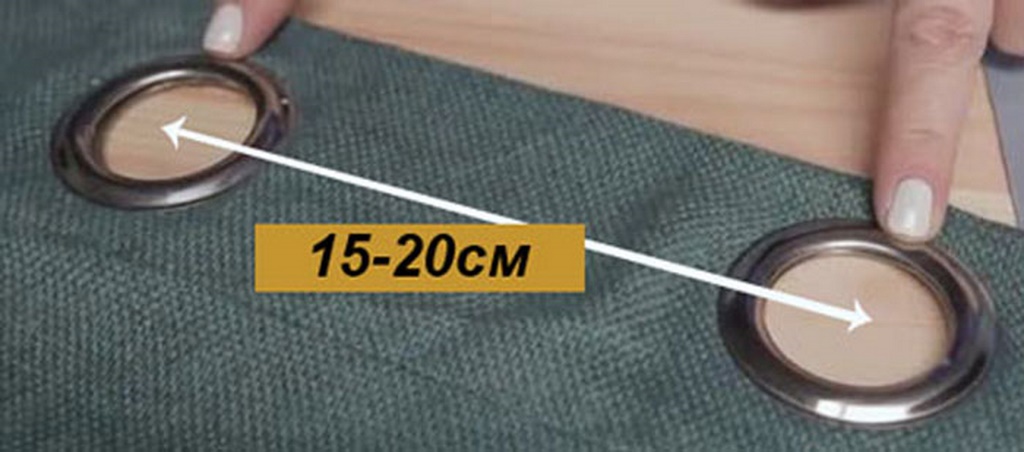
6 cm are subtracted from its numerical indicators, they will be used for finishing the cuts in the side.Subtract 5 cm from the resulting number, then divide by the number of loops and subtract one. The resulting number will determine the distance between adjacent eyelets. So, it often happens that small elements have a border of 10-12 cm, large ones - 15-20 cm.
Manufacturing technology of curtains on eyelets ↑
Curtains on rings are valued for beautiful uniform drapery waves, for which you need a lot of fabric - usually 2.5-3 widths are taken, you should not save and take less than 2.5, this will noticeably affect the appearance.

To decorate such large windows, a large amount of fabric will be required.
A swing larger than 4 may also not give the expected decorative result, because they can turn out to be cumbersome and heavy, more like shields. The choice of length is individual - in the kitchen, the length varies more freely - from the floor to the window sill or to the middle of the window.
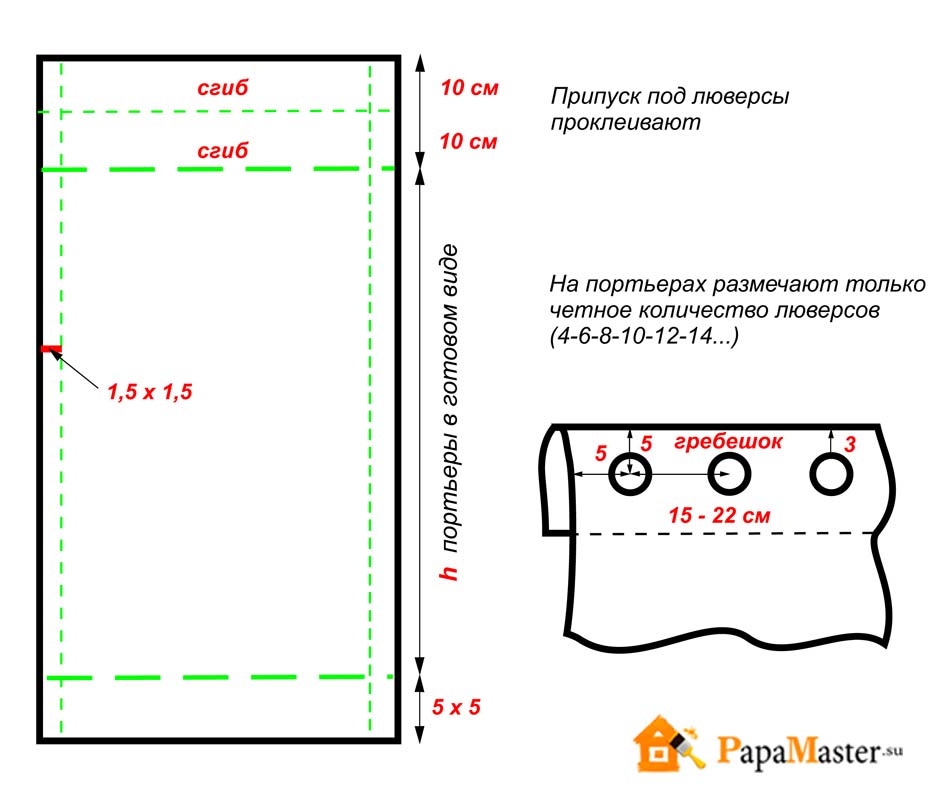
We must not forget that the edges of the fabric will have to be tucked and stitched, add another 3-4 cm on the sides and bottom and a little more on top - it will not work well to install rings on one layer of fabric. To calculate the amount for the top hem, you need to take into account the density of the material - the denser it is, the more you can fold it (professionals recommend leaving 13 cm on dense fabric). It is imperative to take into account the diameter, because it is directly connected with the cornice, for the smooth movement of the curtains it should be 1.5 cm larger. Otherwise, the eyelets will cling to the cornice and get stuck on it.
In order to sew, you need: fabric, eyelets, scissors, pencil, eyelet tape (non-woven or dublerin can replace it), an iron for gluing it and skills in working with a sewing machine (the entry level is quite enough).
Determine the distance between them in advance, based on the desired depth of the folds - if you need deep relief folds, then install the rings at a distance of 22 cm from each other, if the folds should be softer, then 15 cm is enough.Large intervals between the rings can lead to sagging fabrics, especially dense, and small ones will not give the expected aesthetic effect. The optimal distance is 18 cm.

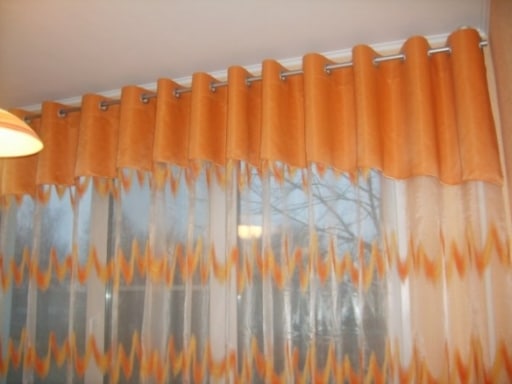
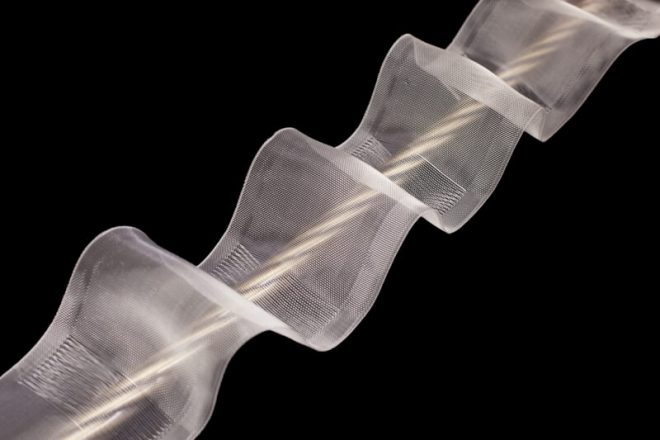
Deep embossed wave allows for a fresh look at their pattern
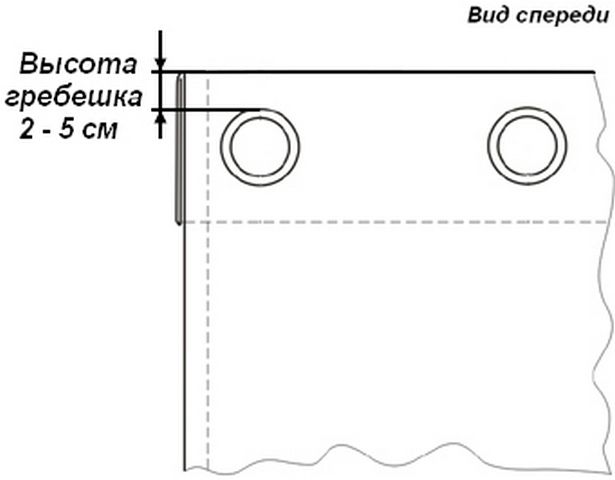
It is important to determine the indent from the top edge, here it is better to focus on the density of the material. Soft fabric holds its shape worse, the bend from the upper edge is about 5-6 cm for organza or tulle, if the fastening rings installed on them have an outer diameter of 3.5-4 cm
Eyelets can be installed on loose fabrics, but placed closer to the top edge
Feel free to cast aside all doubts - organza, mesh, veil, tulle can compete with other types of curtain fabrics and will harmoniously fit into the interior of the room.
On such a fabric, the main condition is to be located closer to the upper edge of the product.
If the combination of lightweight fabrics and fastening rings does not inspire confidence, you can make an original upholstery from a denser fabric, and at the same time show your design skills.
Such a bright trim will emphasize the elegance and sophistication of organza.
Before installing them, you need to make sure that the curtain is completely ready - the edges are processed and the top of the product is reinforced with an eyelet tape or its analogs. Now you can start the most important part of the work - marking the fabric. Marks are made where the rings will be installed, holes are carefully cut.

When marking the fabric, you must take into account the possibility of its displacement.
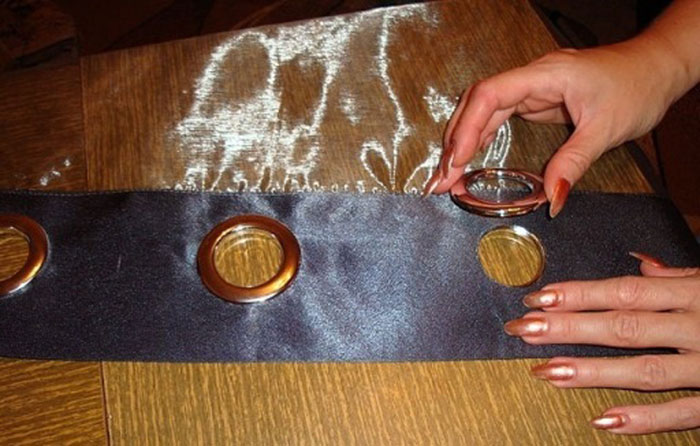
Eyelets are installed on both sides and snap into place, or pressed with a press, if ordinary.

After the markings are made and the holes are cut, you can safely install the fastening rings themselves
If professional manufacture is not included in the immediate plans, then a special installation tool is not needed. But the punch and flare tool will greatly facilitate and speed up the installation.
How to install eyelets without a tool
It is quite possible to rivet the grommet so that it closes the hole without special units, in some cases the result will be better, especially when compared with cheap, low-quality tongs.
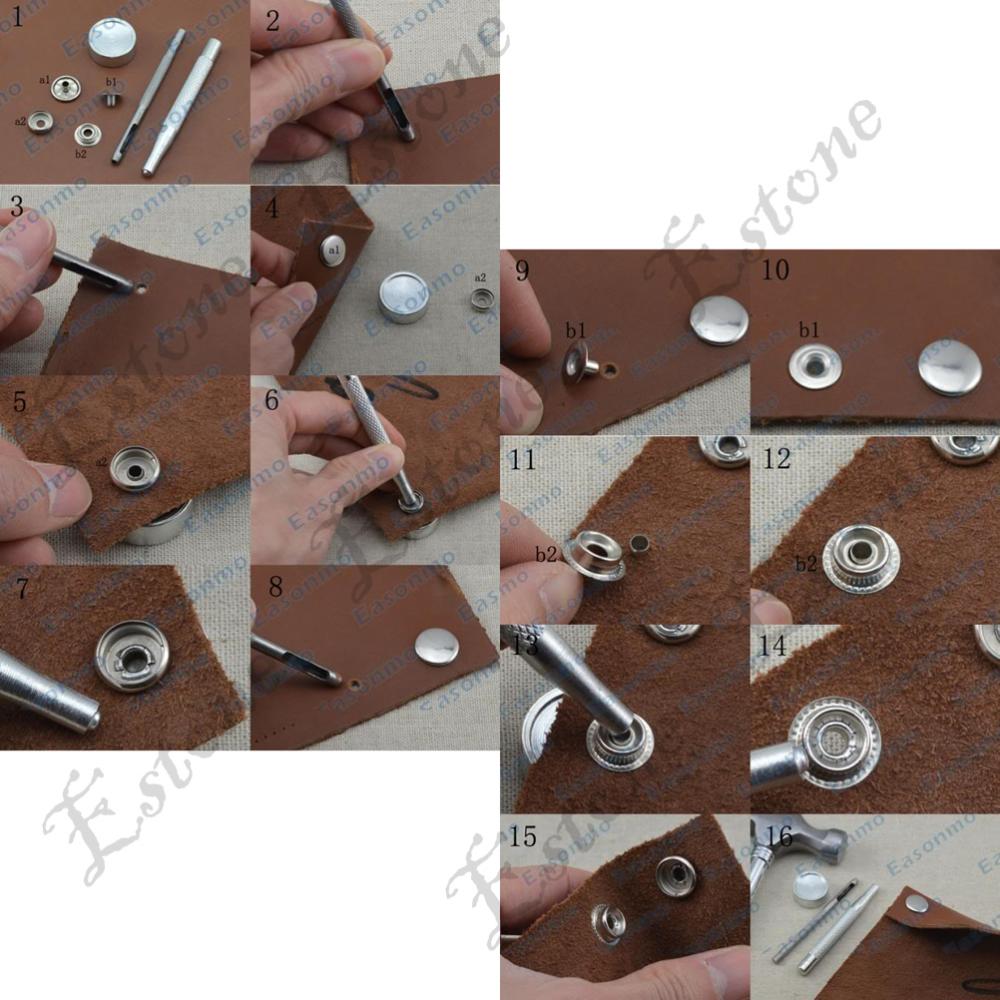
Ways to put the eyelets with improvised means:
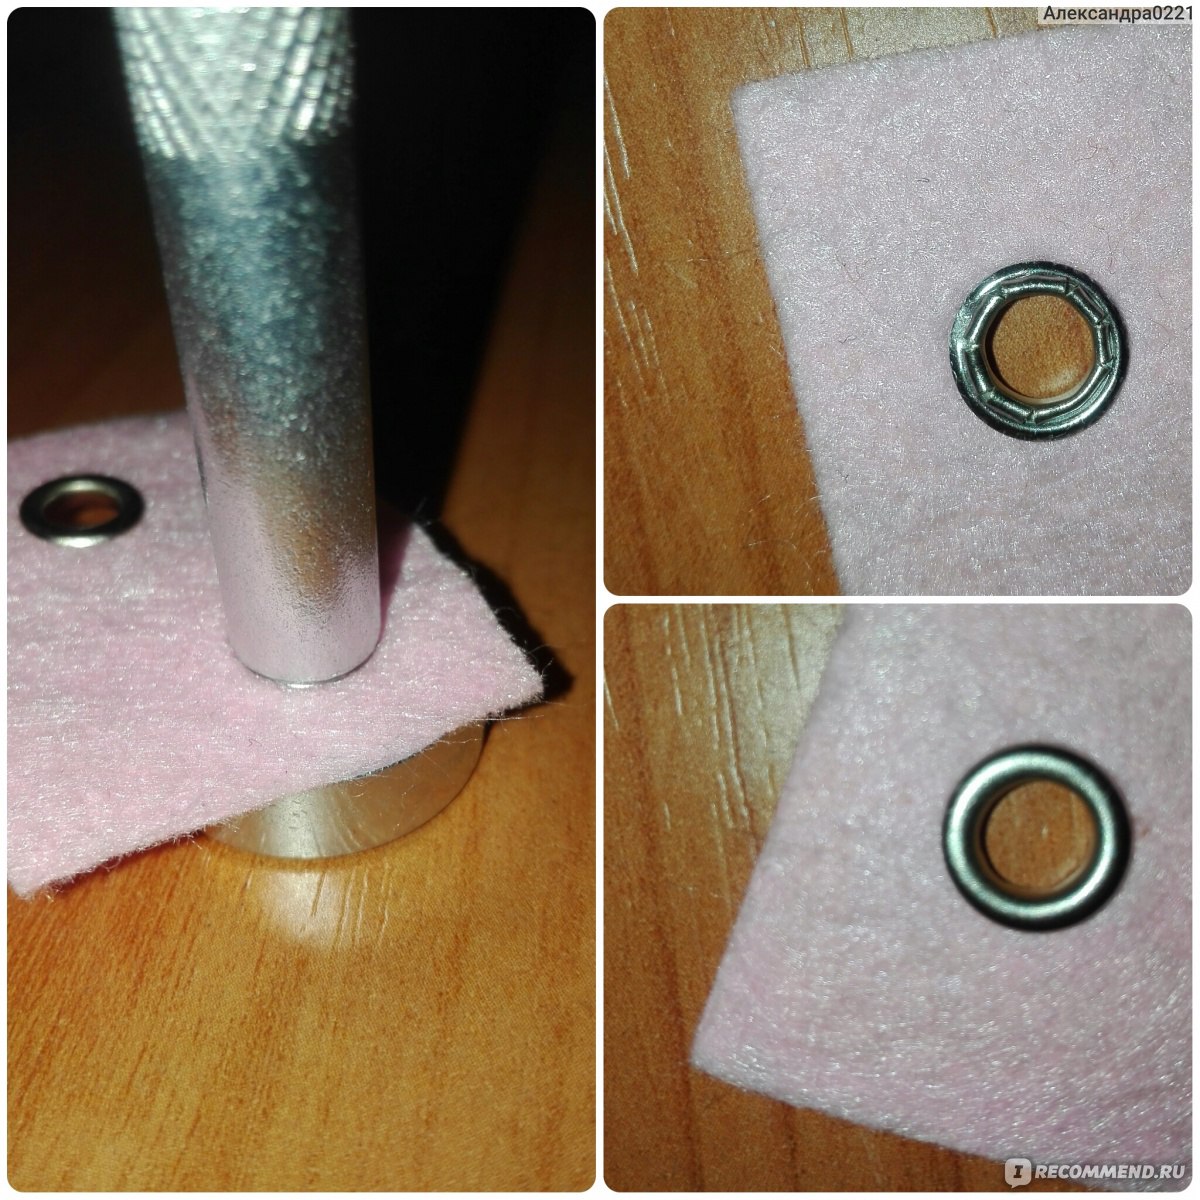
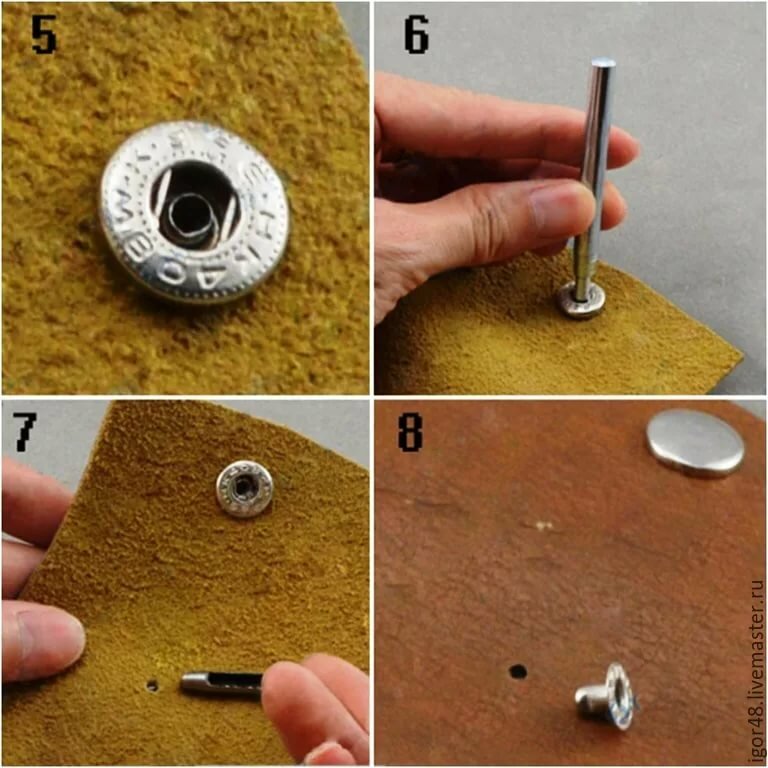
- A round head bolt with a slightly larger diameter than the grommet. Instead, a bearing, a steel ball, etc. is also used. The bump stop is placed on the walls of the eyelet and hit once or twice with a cloth, then the "petals" are bent with a hammer, striking from the center to the edge of the eyelet.
- Phillips screwdriver (or screwdriver attachment). The sting is placed in the center of the eyelet, from the seamy side and lightly hit with a hammer on the handle, like a hand punch. It turns out a quadrilateral - the part is turned 90 degrees and the blow is repeated. The walls part and are tapped with a hammer to make the edging flatter.
- With a knife blade. It is installed across the block and hit with a hammer from above so as to cut the walls almost to the very fabric (or other material). Turn 90 degrees and repeat the operation. You will need 3-4 such cuts. Then the "petals" are bent and flattened with a hammer.
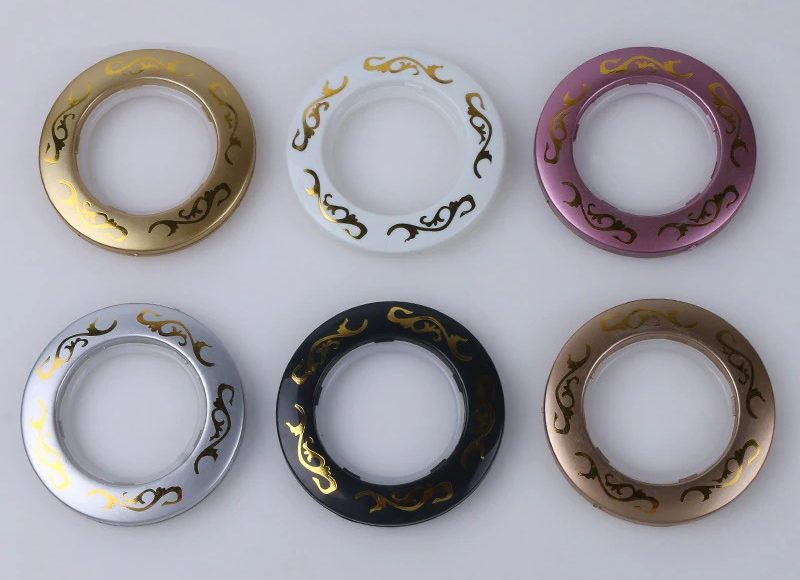
Varieties of eyelet rings
The materials from which this type of fastening is made are varied - from metal to plastic of various shapes and colors.
Installation methods also directly depend on this. The grommet made of plastic is much easier to install, but a heavy load on it is unacceptable! If you wish, you can remove it and apply it again, but there will be very poor fixation of the edges of the fabric - they crumble and deform, and the product looks sloppy.


Colored metal eyelets are much more reliable than plastic ones - they perfectly hold the fabric, preventing it from tearing.
Steel fasteners are considered the most reliable for fixing fabrics, leather parts, cardboard. But before you install the eyelets without a tool on clothes or shoes, you will need to practice on unnecessary pieces of cloth. This is necessary in order to understand how the work is going, and not to spoil the thing.
The most popular use for eyelets is to attach them to curtains. For this, an eyelet tape is additionally required, which is sold in specialized stores. The edge of the fabric is glued with it, creating rigidity.
The mount itself can have a completely different shape - from circles to animals. The color palette is huge too.
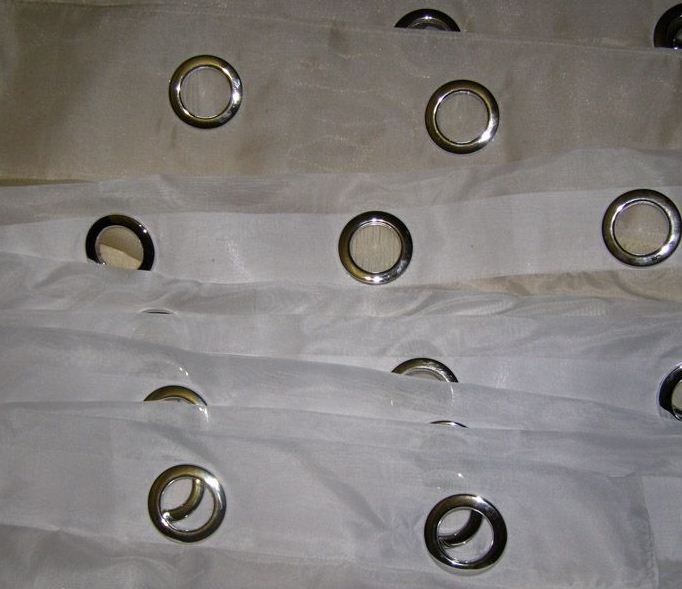
Curtain eyelets will help to form even, interesting and neat folds. In order to move such a curtain on the cornice, no effort is needed. The fabric does not rub against the curtain rod, and, accordingly, its service life is longer.
Purchased or homemade?
A wide variety of models of roller blinds, roman, pleated and other compact-gathering curtains on sale does not necessarily guarantee that there is an ideal product among the offered range. The main characteristics of industrially produced options are:
- standardized sizes. Typical size range - length, width - is designed for the popular dimensions of metal-plastic and wooden windows;
- neutral colors. For the most part, ready-made curtains have calm, subtle tones that suit different interiors. Colored and printed items are more expensive;
- use of non-woven or woven synthetic materials as a base fabric. Their advantages are resistance to ultraviolet radiation, ease of cleaning, durability, strength. It is the synthetic nature that is considered the main disadvantage;
- standard open / close mechanisms;
- typical finish or lack thereof.
For many users, all of these features are pluses.But with a non-standard window size, a desire to create an individual design, a desire for natural materials, it is better to try to order a suitable model or create roller blinds for plastic windows with your own hands.
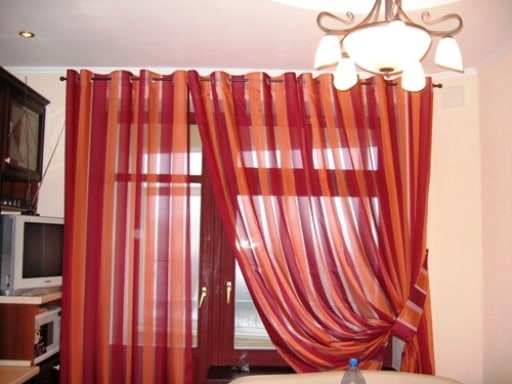
Hall curtains
The design adds coziness to the room. Made in a single image create a sense of unity.

The decorations for the hall are designed to bring beauty and aesthetics into the house.
Look great with different interior styles.
Styles:
- minimalism;
- modern;
- Scandinavian;
- provence;
- high tech;
- madder;
- loft;
- modern.
It is important to choose the right patterns, tones, combine, combine color with objects in the room in order to put emphasis on something. Provence maintains warm, pastel colors
The layering of products is appropriate in country, modern.

A minimalist style is perfect for a living room. Refinement, sophistication is its foundation.
The right mix of decor in a room style is the right choice for decorating your home. By combining the colors of the product and the rings, you can completely transform it.
DIY sewing
Ready-made models are on sale, but you can sew it yourself. Sewing will not take much time, it will not be difficult.
Step-by-step instruction
When purchasing rings, you need to focus on the color of the fabric. If you select for decorative elements, for example, for grabs, then you need to focus on them. In special kits for completing the installation on the cornice, there are not only eyelets, but also clips, hooks, hairpins.

You need to choose natural materials, high quality and durable.
It will not be difficult to install. You can also string on your own curtains. Calculate a certain number of rings. Commensurate with the width of the matter. The number is divided by the length of the web. The distance is 15 to 25 cm.
Important! The sealing tape must be used when installing the elements. Sewing fabrics:
Sewing fabrics:
- dense curtains;
- smart;
- tulle;
- velvet, velor, wool.
A dense curtain fabric is most often selected for a living room or bedroom. Velvet, velor are combined with the style of the room. Light linen fabrics are more suitable for the kitchen. They do not absorb odors, do not fade in the sun.
When choosing a fabric, you do not need to save on material. Take this into account for the upper seam allowance. Leave stock at the bottom, as it should not hang down to the floor.
Important! Good tools contribute to a well-done installation
The style, color, density or lightness of the fabric is selected at the discretion
But it is important that they harmoniously fit into the design of the room
Tools for the job
- Hole punch for making holes.
- Small, tailor's scissors.
- Forceps.
- Chalk or just soap.
- Centimeter.
- Iron or press.
- Sewing machine.
- Eyelet tape.
Installation:
- It is necessary to process the side sections of the product.
- Marking is carried out along the width of the canvas. Keep in mind that you need to leave 2 cm from the edge and a little more for the allowance.
- On the seamy side, the tape is smoothed with an iron. Use gauze, delicate items require careful handling.
- Sew on the sewing machine with the allowance folded down.
- Punching a hole in the tissue is done with scissors or punches.
- Excess material is cut out. A cross-cut is made according to the previously made marks.
- The diameter of the element must correspond to the cut made in the fabric.
-
Eyelets are inserted. On the seamy side, one detail, on top the second. Excess threads are removed with scissors, the protruding matter is refueled. The eyelets are pressed on both sides, and so is every detail.
-


The methods of attachment to the cornice are not limited to this. Hang on a bar, use special clamps, string on a cornice, a rope.
Eyelets combine practicality, ease of use, structural reliability, and ensure the durability of the product. Suitable for all rooms, they are durable. Feel free to choose and combine curtains.Installation doesn't take long. At the same time, the resulting design will delight for many years.

Sometimes even a change in one detail can change a room beyond recognition, and beautiful curtains on the eyelets may well be it.
How to sew curtains
 This option window decoration on today it is considered the most popular. In addition to the previously listed basic materials for sewing curtains, you will need an eyelet tape, the glue base of which will help to attach the product with high quality. The tape can be purchased from a specialist store where it is available in widths from 5 to 12 cm.
In order for the curtains to have an aesthetic appearance, you need to correctly calculate the number of fastening elements. How to make eyelets on curtains? If an even number of eyelets is installed on the curtain, then the edges of the product will be directed in one direction. The standard distance between them can range from 15 to 20 cm. If the distance is greater, then the folds will turn out to be larger.
The first and last fastening element is installed 5–7 cm from the edge. If the distance is greater, then the curtains will bulge; and if less, then the part may fall into the fold and not fix.
When all instructions have been carefully read, you can start sewing. Do-it-yourself curtains on eyelets step by step instructions.
Master Class.
- The top edge of the curtain is folded 2 cm inside out and ironed.
- The next hem size will depend on the width of the eyelet. It is wrapped and ironed.
- An eyelet tape is placed between the fabric, under a large hem. It should be shorter than the width of the curtain by the amount of side folds.
- Having straightened everything carefully, we proceed to ironing. In order not to spoil the fabric of the curtains with the hot temperature of the iron, you need to put a cotton fabric on top of the curtains, only then iron it.
- To prevent the tape from falling off over time, it must be sewn with a machine stitch along the upper edge of the hem.
- The next step is to process the bottom of the product and the side edge.
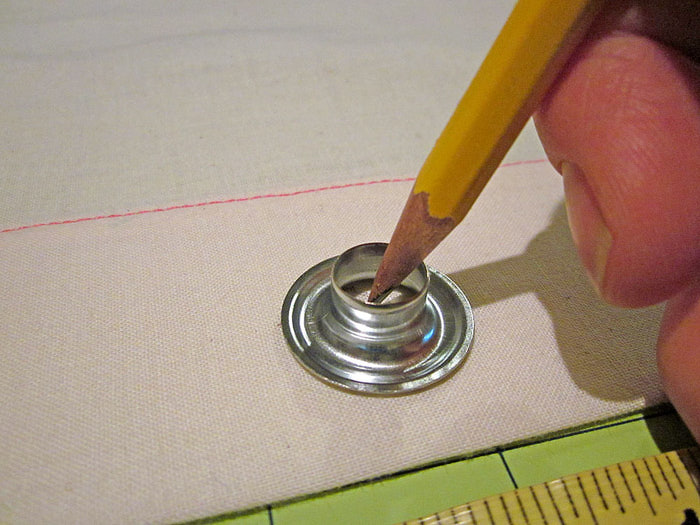
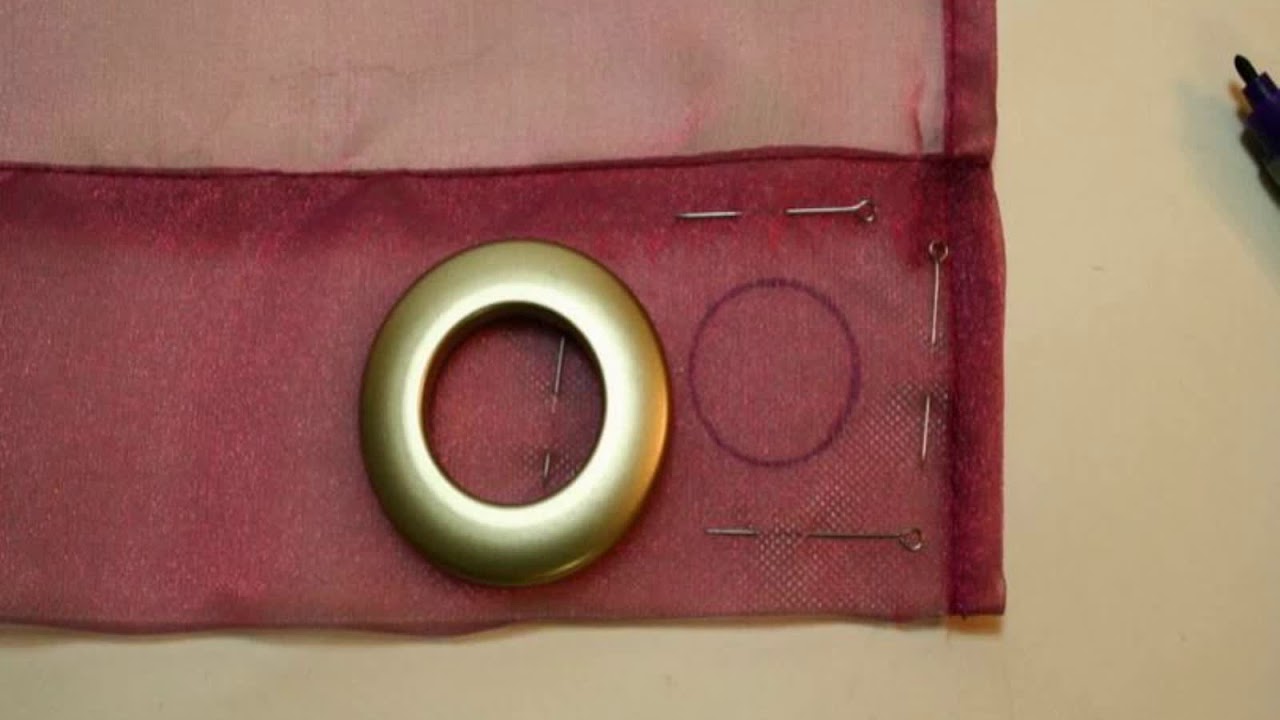
- We install the eyelets according to the markings made in advance. To do this, you need to attach a ring and draw its inner circle on the fabric. When all the elements are outlined, you can cut out the holes with sharp scissors, you get a kind of loops. In order for the eyelets to neatly attach to the fabric, you need to cut out a slightly larger diameter than the one drawn. Two parts of the eyelet are applied to the resulting hole and squeezed until a characteristic click.
 Advantages of curtains:
- Many people like the sound with which the curtains on the windows slide in and out. But this only happens when metal serves as the material for making the eyelets.
- When the curtains are closed, the wave is uniform - it will not be disturbed after washing.
- Thanks to the eyelets, the fabric wears out more slowly, regardless of how much the curtain is closed.
- The design is very simple: even a child can open and close the curtains.
- If you accidentally pull on the curtain, it will not break off. The mount is quite strong, the main thing is to install it correctly.
Distinctive features
Thanks to them, the curtain closes easily and quickly. They are located so freely that they do not impede the movement of the canvas. They move smoothly and calmly along the cornice. They do not sag, hold evenly, do not form folds. When moving, they do not affect it, ensuring the durability of any model.
A distinctive feature is the attachment to the curtains. Looks like they are installed on special hardware. In fact, even a layman can fix them. The time and effort spent will not keep you waiting long. The neatly hung curtains make up for the effort.

In places where there are slits, beautiful natural folds are created along the entire length of the curtains, which allows you to create romantic coziness.
Preliminary work
Preliminary preparation is important in any business to obtain a quality result. Before thinking about how to make eyelets for curtains, you should:
- Make the necessary calculations.
- Buy the material of the desired color for curtains and lining.
- Purchase dublerin or eyelet tape, eyelets. The width of the tape should be chosen 2 centimeters larger than the outer diameter of the fastener.
- Find a level surface to work with: You can work on the floor or use an ironing board.
Calculation of the footage of fabric
To calculate the required amount of fabric, you should find out the length of the cornice and determine the height of the finished product. The length of the cornice should be multiplied by a factor to give the product beautiful folds. The coefficient will be equal to:
- For light fabrics - 1.5.
- For dense materials - 2 or 2.5.
The calculation also includes material for lateral allowances (up to 15 cm), upper and lower allowances (at least 25 cm). Approximately this is how the calculation looks with a cornice length of 1.5 meters: 1.5 2 + 0.15 = 3.15 meters or 315 centimeters.
Counting the number of mounts
To purchase the required number of fasteners, a preliminary calculation of materials should be carried out. To calculate the required number of eyelets, it is required to measure the inner and outer diameter of the fastener, taking into account the standard properties:
- You must purchase an even number of eyelets.
- The rings should be fastened at a distance of about 18 centimeters. The optimal distance for attaching them ranges from 15 to 20 centimeters. When using a double curtain rod, take into account the distance between the rods so that the curtains do not touch.
- The distance between the side edge and the center of the first eyelet must be at least 7 centimeters. This parameter depends on the width of the hem and the outer diameter of the attachment. For the reliability of fastening the fittings, it should be placed so that the fasteners do not find themselves on the seam.
Preparation of fabric for cutting and processing of seams
The curtain for the installation of eyelets is prepared in advance. Before installing the rings, you should:
- Design the curtain fabric. This procedure is carried out by wetting, drying to a damp state, and ironing the fabric. After such treatment, the fabric does not shrink after washing.
- Sew on lining and finish seams.
The seams are processed in a strict sequence. First of all, the top seam is processed. The material is processed in compliance with the technology:
- The matter is laid out on a flat surface.
- The seamy side is folded over and ironed 2 cm.
- One more turn is made to the width of the eyelet.
- Having released the width of the hem from the edges, lay a tape between the layers of fabric.
- The strip with tape is glued with an iron. Iron small sections of the tape until the sides are completely glued. Only after obtaining a high-quality result do they move on to the next section.
- A fabric is sewn along the edge of the lapel, stepping back from the edge of 2 centimeters.
Side seams can be sewn using a hem seam. It is not necessary to use an eyelet tape - you can use a regular curtain tape, having previously removed the tightening cords from it. You can hem the bottom of the product after installing the eyelets at home in order to measure the desired length of the curtain to the floor. In order not to spoil the fabric due to lack of experience, you can carry out all the necessary work on a small piece of fabric.
How to sew curtains and tulle on eyelets on your own - step by step instructions
Sewing curtains on your own using eyelets will take some time. However, unlike products purchased or ordered from an atelier, hand-made production will cost significantly less. The costs will be associated only with the purchase of the required material.
Calculation of fabric
Having determined the total amount of material, calculations are made taking into account the folds, where the allowance is:
- bottom edge - 8-10 cm;
- the upper part can be up to 25 cm. Such a stock is required, since the eyelets must be attached to several layers of fabric;
- lateral edges - 3-4 cm.

In the case of sewing a curtain consisting of two parts, to fit the pattern, the material is taken with a margin.
Tools and materials
To attach the eyelets to the curtains you will need:
- eyelet tape;
- scissors;
- ruler;
- pins for labels;
- chalk with a pointed end;
- pliers.
To install the metal rings, you also need a hammer drill, a hammer, and a rubber gasket. The latter is necessary to soften the hammer blows on the fittings during fastening.
Initial material processing
Before fixing the rings, the fabric is pre-compacted. After all, even a dense material is not able to withstand the loads from the fittings installed on it for a long time. This applies to both plastic and metal products.

Therefore, to reduce the load on the curtain, an eyelet tape is preliminarily attached. However, if it is not possible to use such a tape, then dublerin can act as an alternative seal. Although this material is inferior in its characteristics, it will still fit in the role of a reinforcing element. In any case, the tape is selected in such a way that its width is greater than the outer diameter of the rings.


The upper part of the fabric is folded twice to the width of the tape to be installed, and the fold is ironed with an iron. In turn, from the sides, the seal is cut off with a margin equal to the fold width. After the performed manipulations, the canvas unfolds, and the tape is fitted along the intended upper fold and fixed with an iron. So that no traces of a hot electrical appliance remain on the canvas, the work is carried out through a sheet of paper. For a more reliable fastening of the eyelet tape, a seam is made along the very edge of the fold.
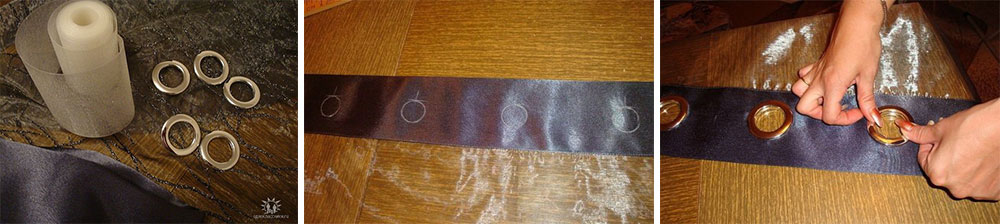
Marking for eyelets
After the eyelet tape is fixed, points are applied to the curtains, indicating the centers of the hardware location. The marked places are marked with pins. Then the contours of the holes along the inner diameter of the eyelets are marked on the fabric, along which the intended part is cut out with a margin of 2 mm. After that, rings are installed on both sides and snapped in or pressed with a press.
Tip: Use a flare tool and punch for quicker and easier work.

At this stage, the main task is to evenly apply the center points. In order for the edges of the curtain to be in the same position, there must be an odd number of gaps between the eyelets.
Conclusion
Eyelets appeared a very long time ago, and for many centuries the principle of their use has hardly changed. However, linings can now be found not only on sailing ships, but also on car tarpaulins, outdoor advertisements, bags, and even on clothing, shoes and other haberdashery products. Despite their widespread use, eyelet elements have a significant drawback. Any fabric finished with overlays tends to tear at the junction. One careless movement is enough, and the product will be damaged. Moreover, repairing such damage is a very difficult task. Nevertheless, everyone can independently calculate and make an eyelet tape for curtains right at home. Finding tools and materials will be easy. It is only necessary to connect the strip, select the parts of the correct shape, make holes for them and, in fact, fix them. Detailed step-by-step instructions will help you achieve perfect results.