How to make a church out of paper?
To craft it, take:
- whatman;
- cardboard;
- acrylic paints;
- a plastic bottle with a domed top;
- acrylic paint of different colors, including gold and silver;
- scissors;
- glue;
- blue colored paper;
- marker;
- ruler;
- scanned on paper icons.
Before making a church, provide a pedestal for it. Make it from a sheet of thick cardboard, and cover it on top with paving stones printed on a color printer. Now let's start painting the details. To make the walls, you will need to cut four such blanks by connecting them.
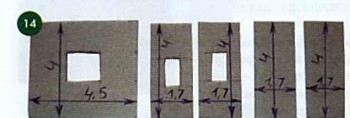
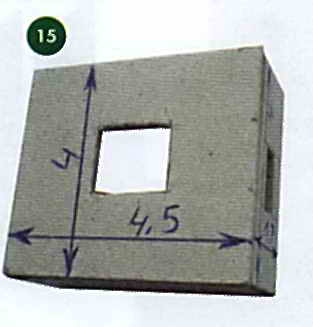
Cut out rectangles from blue paper, using a ruler and a black marker, draw these future windows as follows.
Cut the door out of brown cardboard, on top of it you need to glue both rectangular and semicircular elements so that this part becomes more voluminous and it is clear that there are stones or bricks on it.

Cut two door handles from yellow cardboard. To make the steps for entering the church, you will need to cut semicircles of different sizes from cardboard, then glue them in order, starting with the smallest ones and ending with the large ones at the bottom.

To make a dome for a church, cut off the top from the matching bottle. All of it needs to be pasted over with plasticine, close the hole in the neck area and make this part more elongated. Then glue over the dome with pieces of newspaper, wetting them in PVA glue.

Prime the dome using real primer or white paint.


By this time, the primer has dried, now you can paint the dome with gold acrylic paint in two or three layers.

Glue the windows to the corresponding markings. Glue the dome on top.
See how you need to assemble and arrange the workpiece. After gluing the windows to the walls, attach a brown tape with small windows from below, then glue the model of the church to make it three-dimensional. Do not forget to glue the icons in the appropriate places. Glue the paper on top to become the roof.


Paint it with silver paint interspersed with brown. And with the same composition, designate the forged elements above the visor of the first door, and the other column should be painted with brown paint. Glue a silver cross to the dome, then glue the tower in the center of the composition.
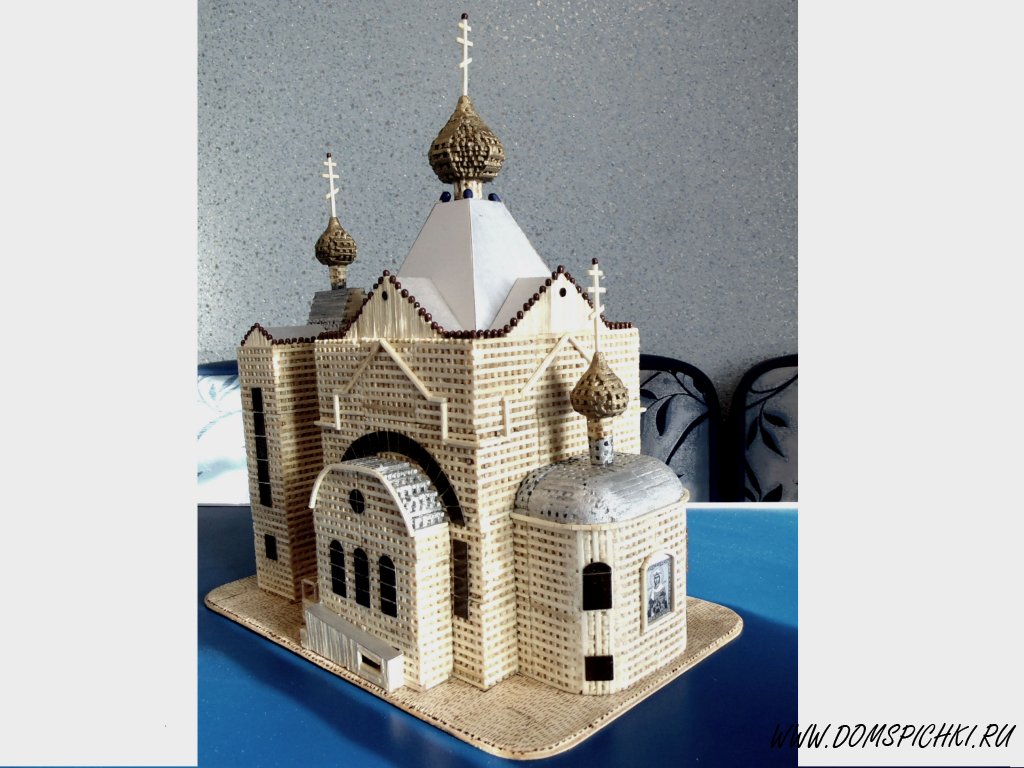
Here's how to make a paper church. The process is very interesting, but you and your child will create such a significant thing from scrap materials. This is a model of the church called "Hodegetria of Jerusalem" and it is located in Taganrog.
The next master class will also be easy for the child if you help him.
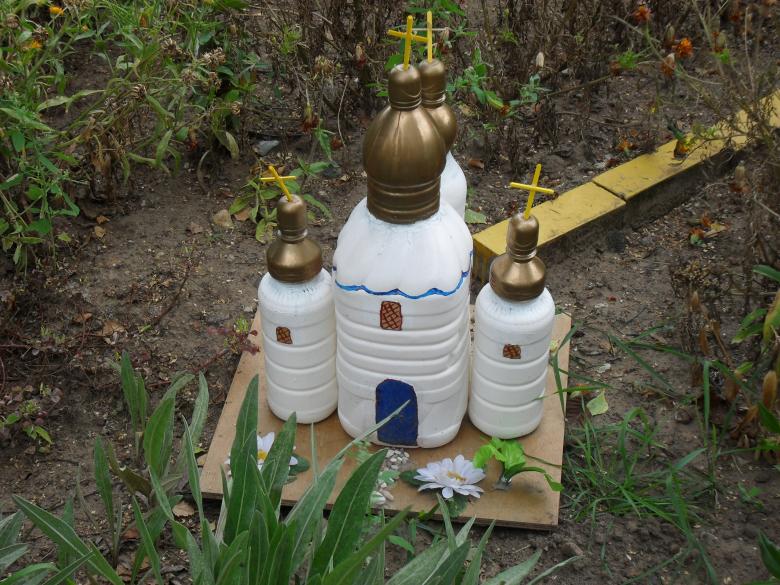
Church from a plastic bottle
This is a medium difficulty craft. The probability that something will not work out is small, but a lot of work will have to be invested.
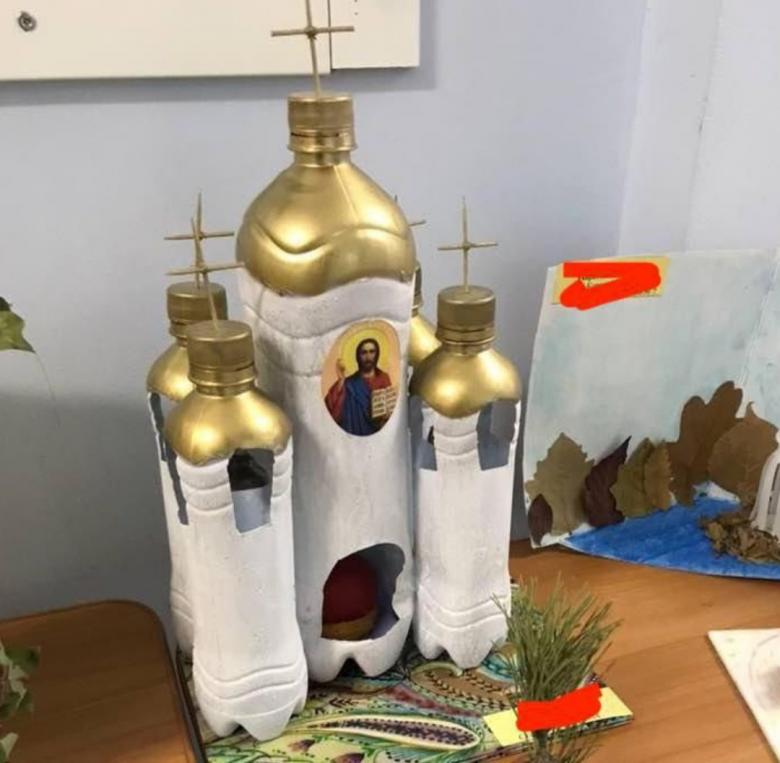
Preparation
Prepare materials and tools in advance:
- a plastic bottle with a domed top, from mineral water;
- shoe box cover;
- a rather long rope;
- a piece of colored wire;
- lace and braid for decoration;
- colored plasticine (you can play with shades depending on the coloristic solution of the project. Use blue + white, red + green, red + gold, other combinations are possible, just do not use black);
- cardboard;
- scissors;
- knife;
- a piece of cotton wool;
- white paint;
- PVA glue;
- brush;
- double sided tape.
Algorithm: church in 14 steps
- We start from the base of the building. Take a brush and paint the box lid white. We leave it to dry.
- We proceed to the boards for the future fence - we will install it around the church. First, we recommend cutting out a stencil with a pointed top edge - this looks more realistic, and then draw and cut a sufficient number of strips along it.
- Glue the boards to the base.
- We begin to make the church itself. Cut the bottom off the bottle - about one quarter.
- Now you need to cut off the neck. This is not an easy task - there is thick plastic here. A tip to make it easier: heat the knife before cutting.
- We are getting ready to install the future building. We measure 2 cm from the bottom edge, draw a line in a circle in this place and cut the plastic between the edge of the bottle and the line into even narrow strips. We unbend them outward with a "flower". The structure has become more stable.
- We make the dome of the temple from plasticine.
- Now you need a cross. Take a long piece of wire and make a narrow high loop in the middle. This is the top of the cross. We retreat down the wire by about 1.5 cm and make two shorter loops to the sides - we get the sidewalls. Choose decorative wire, matching the color of your church, or gilded. If there is no decorative wire, wrap it with regular foil.
- Cut off the excess from the bottom of the cross and stick it into the dome.
- Place double-sided tape around the bottle. Wrap the rope gently over the top so that it sticks. The whole church should be closed - from the foot to the dome.
- Stick the decorations: a strip of lace on top, a door and three windows from it, two to the right and left of the entrance, one on the back of the building.
- We decorate the dome. Take the plasticine in the base colors of the craft. Roll balls out of it, turn them into cakes and glue them to the surface of the dome. Start at the bottom, glue slightly overlapping horizontally. As you move to the top of the dome, the cakes become smaller in diameter.
- We install the church. Glue the double-sided tape to the bottom of the flower on the bottle. Place the structure on the base and press down.
- Now the territory is decorated. The landscape can be summer or winter. Use green paint for summer, and cut and install trees. For winter, arrange cotton drifts and glue them.

The craft is ready. This graceful church will be an excellent decoration for the interior of a Sunday school or a gift for a holiday, for example, for the New Year (of course, in the winter version).

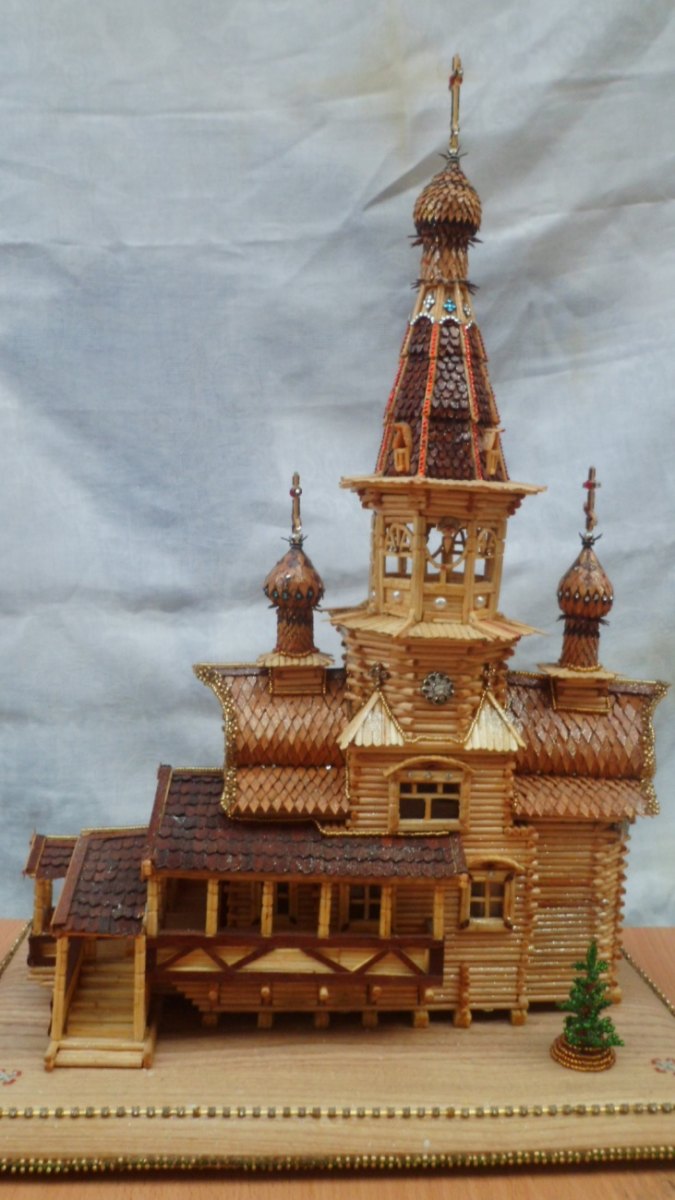
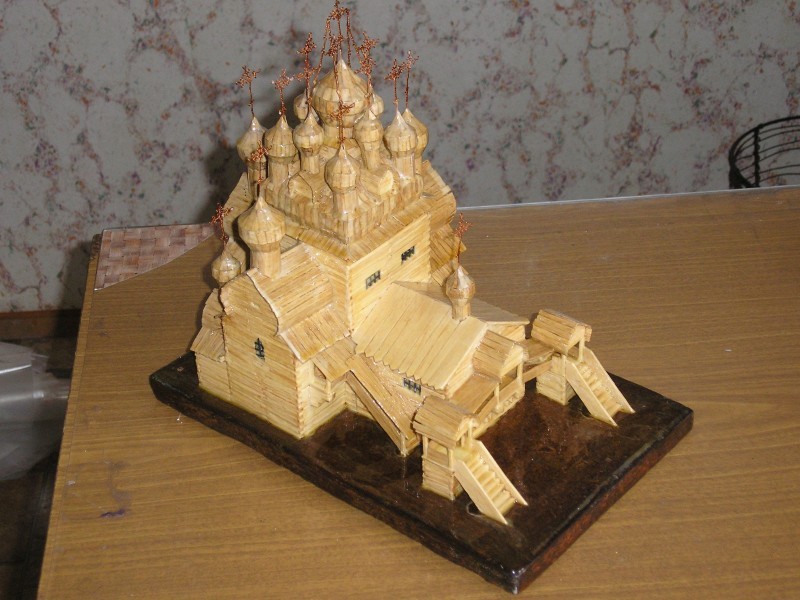
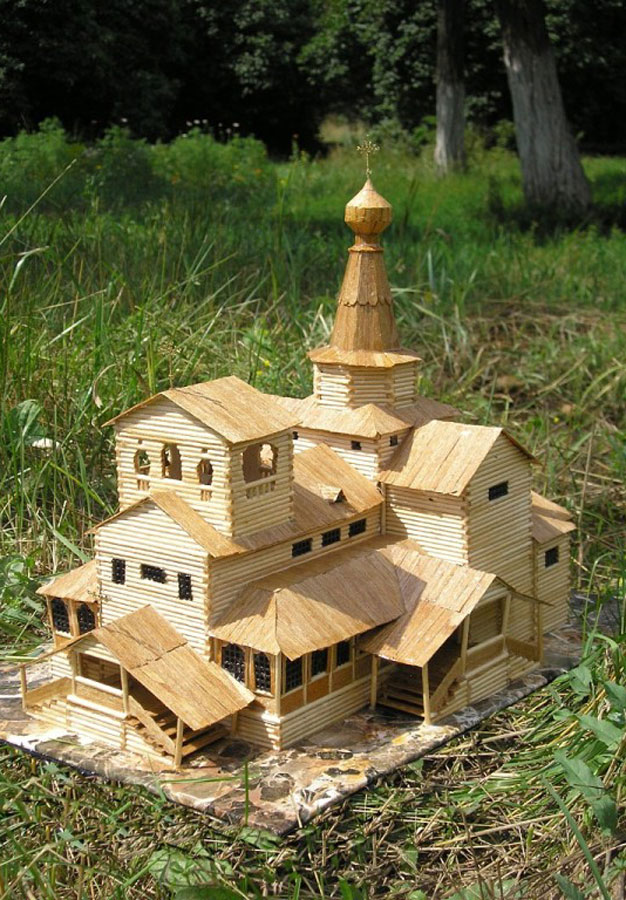
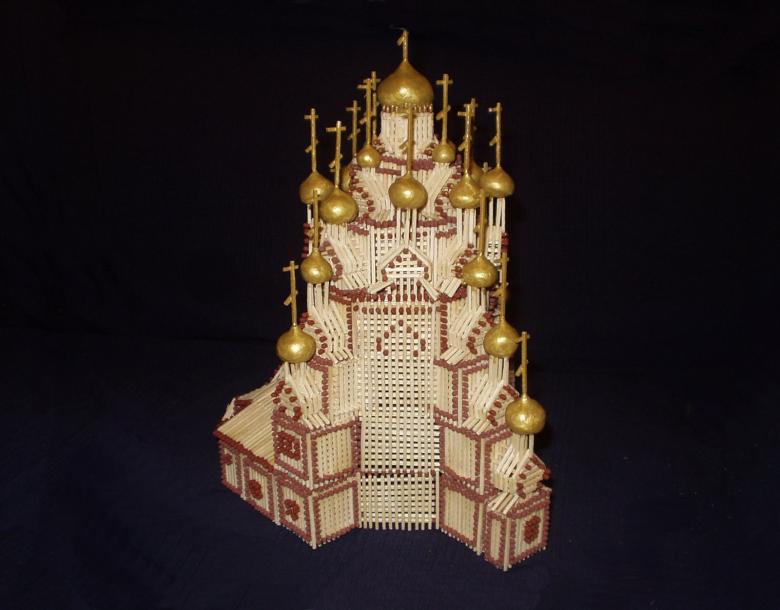
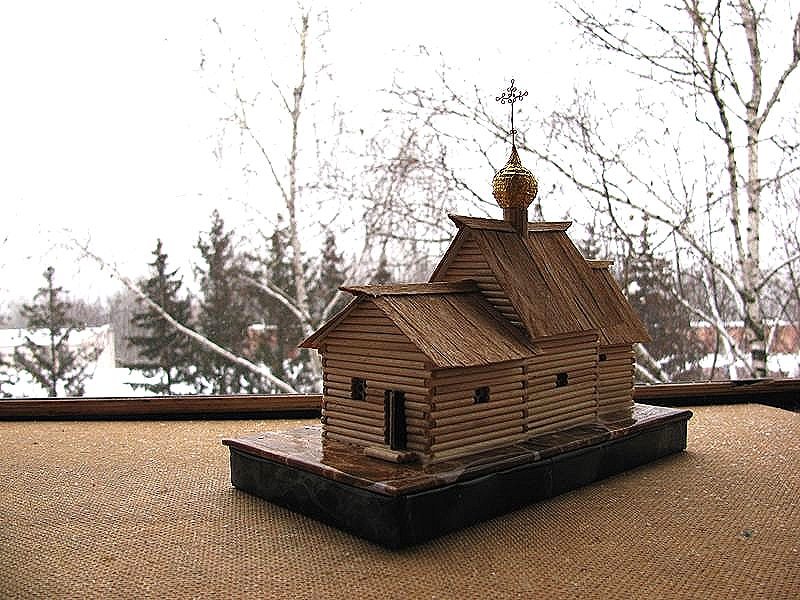
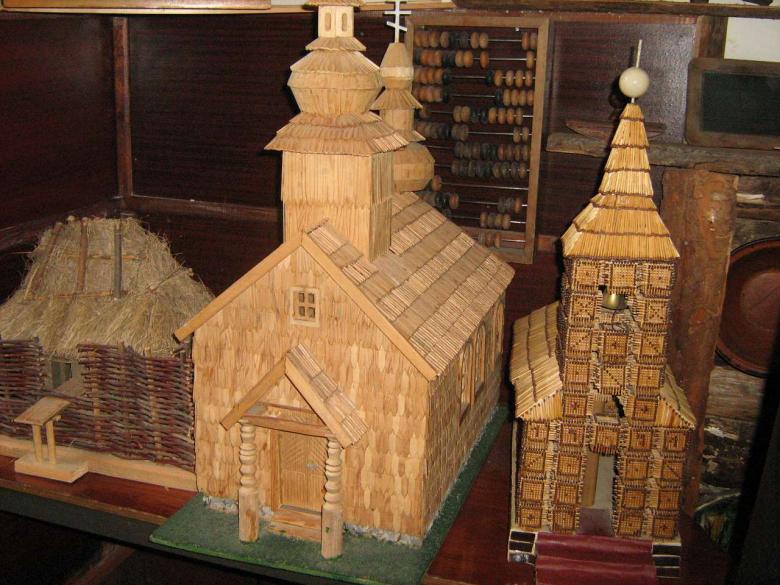
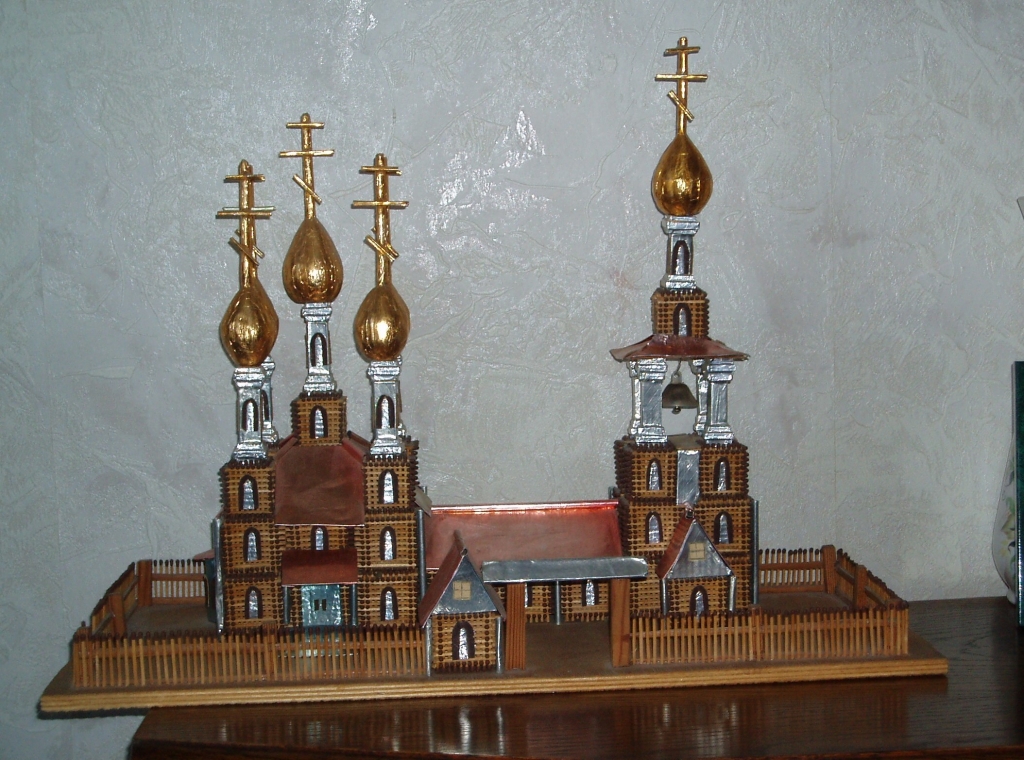
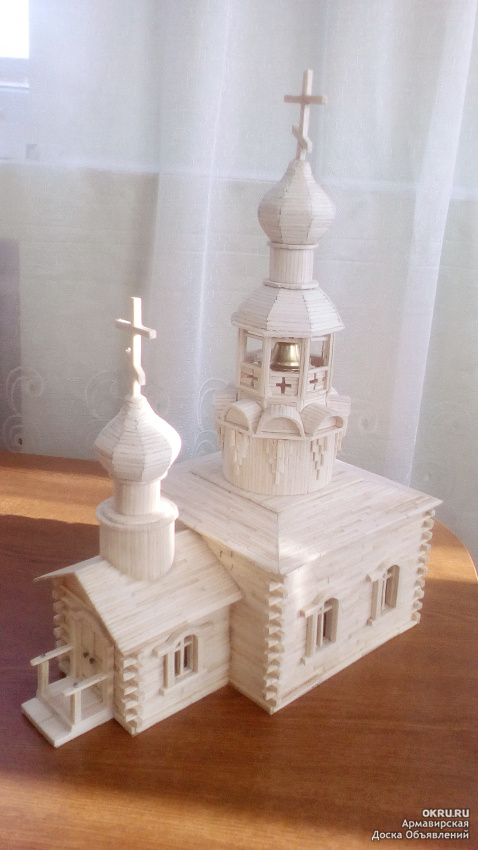
Wooden church
This option is not suitable for small children and novice craftsmen. Even experienced ones do not succeed the first time. But when the craft is successfully completed, it turns out to be a real work of art.
Preparation
A little materials are required:
- wooden skewers. The required diameter is 3 mm, the material is only birch, by no means bamboo;
- ice cream sticks or those used to stir coffee;
- matches;
- toothpicks;
- bamboo napkins. Take the ones with the flattest sticks;
- moss.
When making a church out of wood, more than in any other case, good tools are important. You will need:
- sharp knife (construction, with the possibility of replacing the blades);
- modified PVA glue;
- file.

In addition, you will need a photo of the source, preferably more than one and from different angles. Using it, you will calculate in advance the scale of the building in height, length and width.
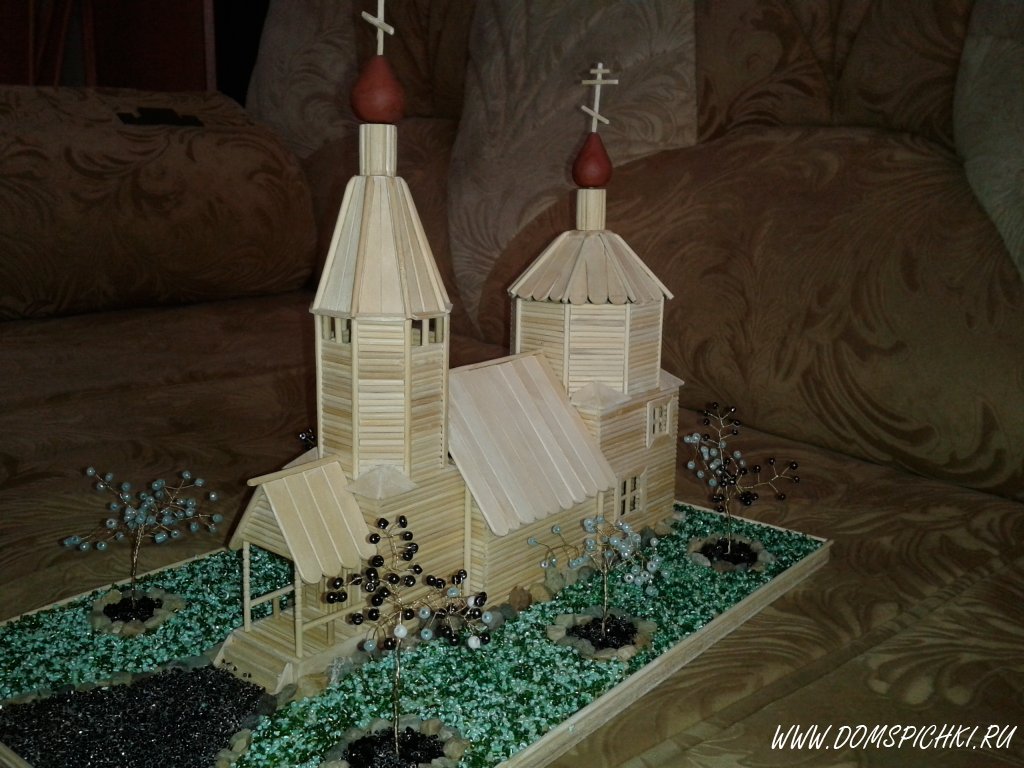


Step by step algorithm:
- Unpack the skewers and look at them. You should immediately remove curves, ugly, etc. About a third of the package will be disposed of. If you do buy bamboo skewers, be prepared to throw out more than half.
- We unweave the bamboo napkins and clean the sticks from the remnants of glue and threads.
- In half of the "logs", notches are made about a centimeter from each edge. They are laid with a "well", so that the notch falls on the edge of the perpendicular "log".
- Between the first and second logs, lay a floor from the elements of the former bamboo napkin.
- Work the walls all the way to the top, gluing each layer. Treat irregularities with a file.
- Form the upper part: set the boards from the napkin "house". Lay logs between them, fasten everything with glue.
- Secure the planks to the roof.
- It is better to have the dome ready. You can make it yourself only on a lathe.
- Decorate the windows along the edges with frames from the same elements of napkins, matches or toothpicks, three in a row.
- Run two long, narrow strips of wood along the ridge of the roof to cover the joint.

Your church is ready. Making it is an extremely time-consuming process that does not always go smoothly. Much does not work the first time and you have to redo it. So, before starting such a craft, please be patient.
If desired, the skewers could be painted with wood stain before proceeding with the craft - this is more beautiful and more durable.
It is better to do all churches with your own hands, relying on photo layouts on the Internet. So before starting work, be sure to see what result you should get, and strive for it.
Step by step instructions for beginners
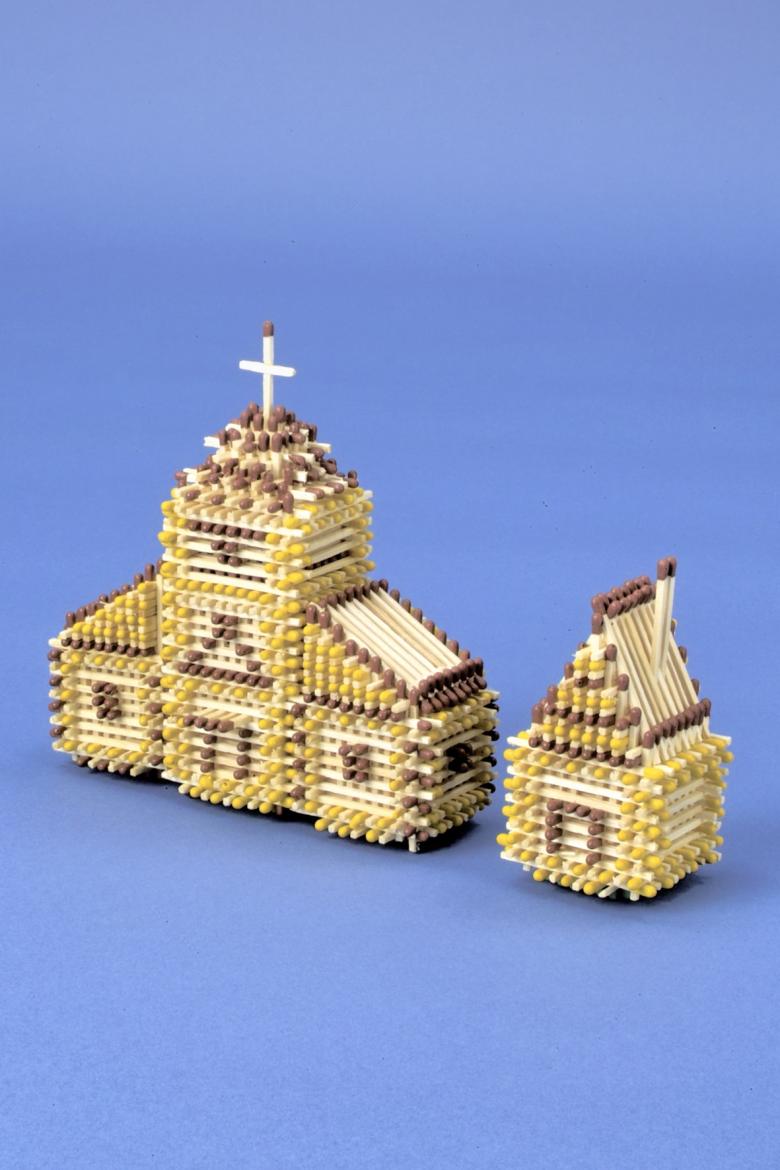
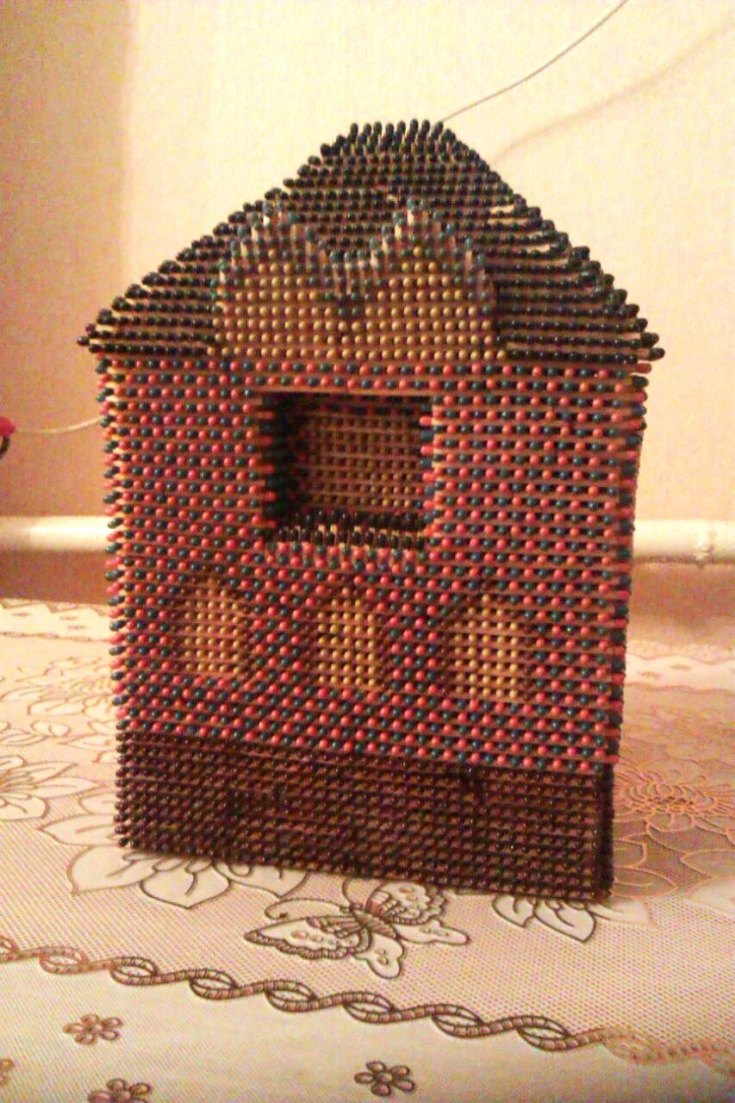
To quickly assemble a house from matches, you need to figure out how to do it in stages.
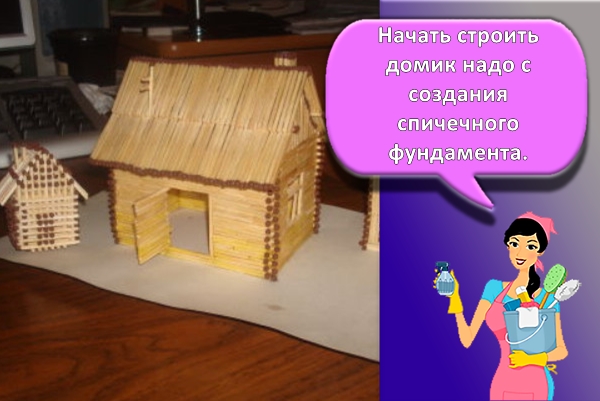
Foundation
You need to start building a house by creating a match foundation. During the creation of the base, four matches are laid out on a horizontal surface. At the same time, they are placed in such a way as to form a square. After that, the cavity formed inside is completely filled with matches. The resulting base will be the foundation and floor of the house.
Walls
After creating the foundation, you need to glue the walls. Matches are laid horizontally along the edges of the foundation.
Window
Having laid out the walls, a small window is made on each of them
To create a window opening, you need to carefully cut a rectangular cavity in the wall with a file. Above the window opening, 2-3 rows of matches are laid out, which are the basis for laying the roof
Roof
The last step in creating a match house is laying the roof. Many people make a flat roof, as it is much easier to make it than a gable roof. To do this, completely overlap the upper cavity between the walls.
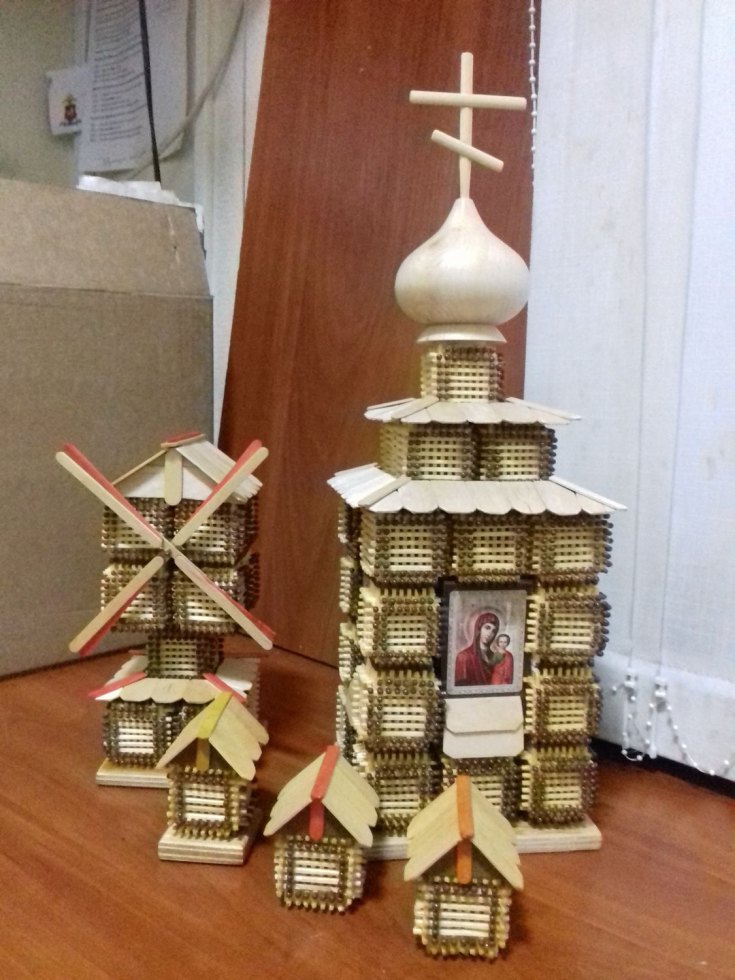
Figures from matches
Handicrafts made from matches made in the form of figurines are simple and elegant. These can be cubes, wheels, trihedrons. Basic elements that are easy to make can be used in the further construction of fortresses, castles, ships, planes. For example, making a wheel may not require glue, and the work itself will be as follows:
- draw a diagram of a circle with 15 elements of equal size;
- make a panel for weaving - fill holes with nails around the circumference, where to insert matches;
- for weaving, 90 elements will be required - they need to be laid with an overlap between the supports, lifting the first stick - it will fix the entire structure;
- the pre- and last elements need to be pushed under the previous ones, securing them especially securely;
- each layer is squeezed, pressed through, and at the end the support pieces are carefully removed.
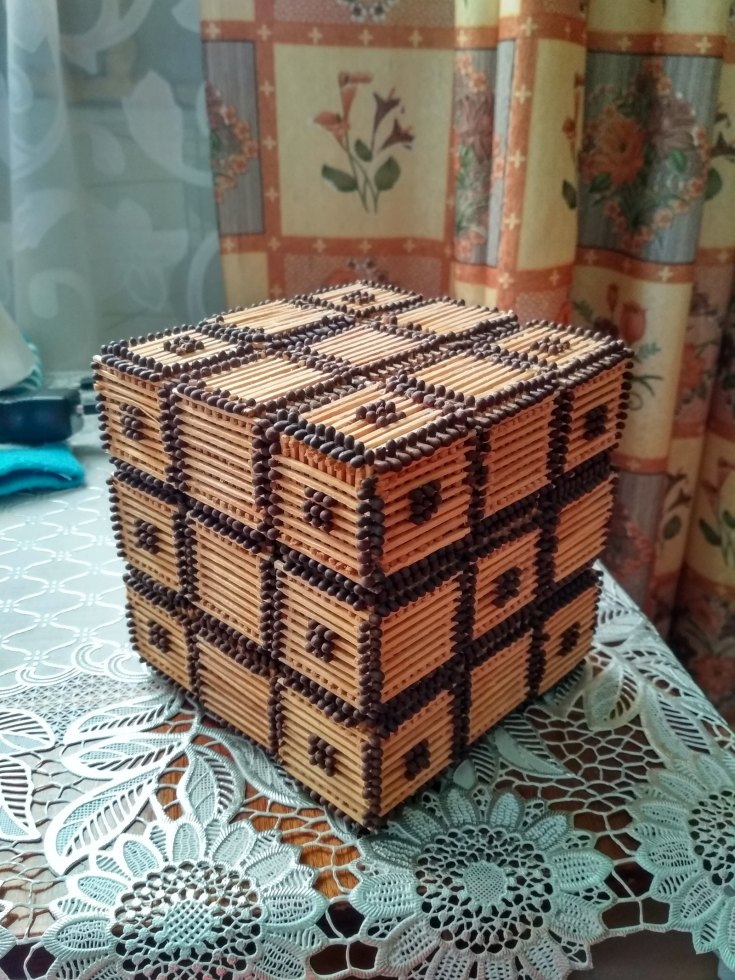
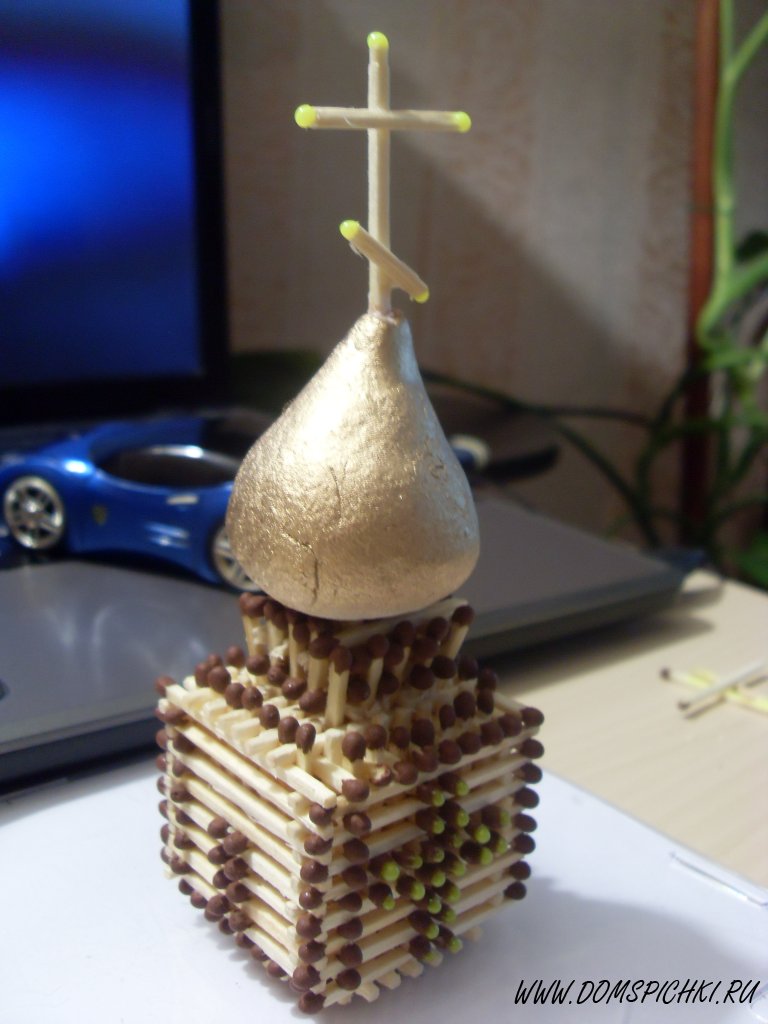
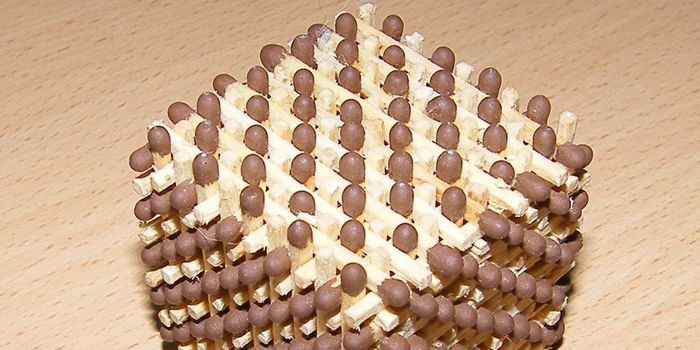
How to make a match cube
The basis for crafts from matches is a cube, to facilitate the manufacture of which you can take a stand with holes along the entire perimeter. In these holes you need to insert the missing elements, between which lay out the bottom. Then the perimeter is assembled - the elements are laid perpendicular to the base, ramming in each layer. The finished model is removed from the stand, reinforced by gluing 4 missing matches. The result is a rigid structure that will stand for a long time.


Preparing to build a church
Before you actually start cutting anything, you need to free up your workspace by removing all unnecessary things and paper. This must be done to avoid the likelihood of losing small parts. Before cutting out the components from the sheet, lightly push all the folds with a ballpoint pen with a dried-up core, or something similar. The main thing is not to scratch the surface of the paper. This simple solution will help to make the curves along the line much more accurate.
Advice
It's a good idea to use a ruler when folding straight sections of paper. To create an inner fold, place the ruler along the fold line. Then lift the paper up against the edge of the ruler.
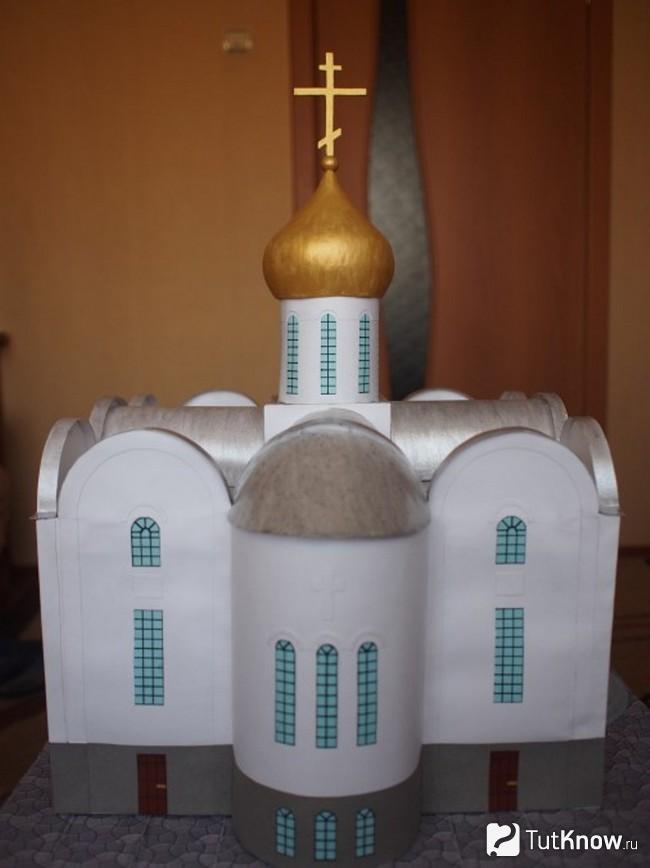
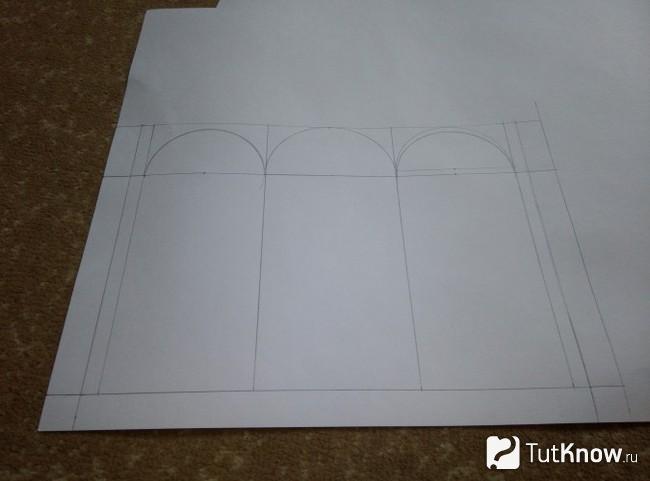
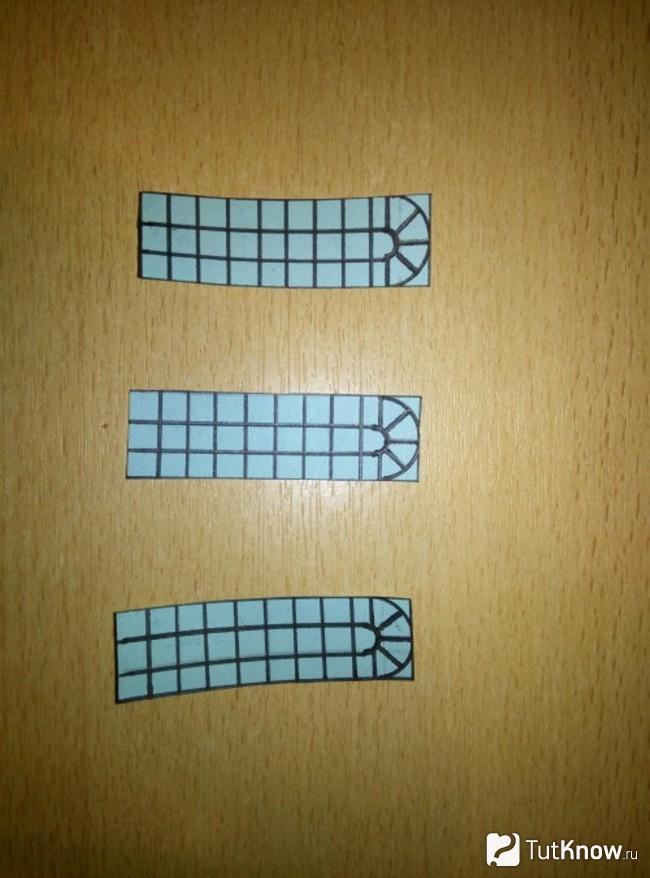
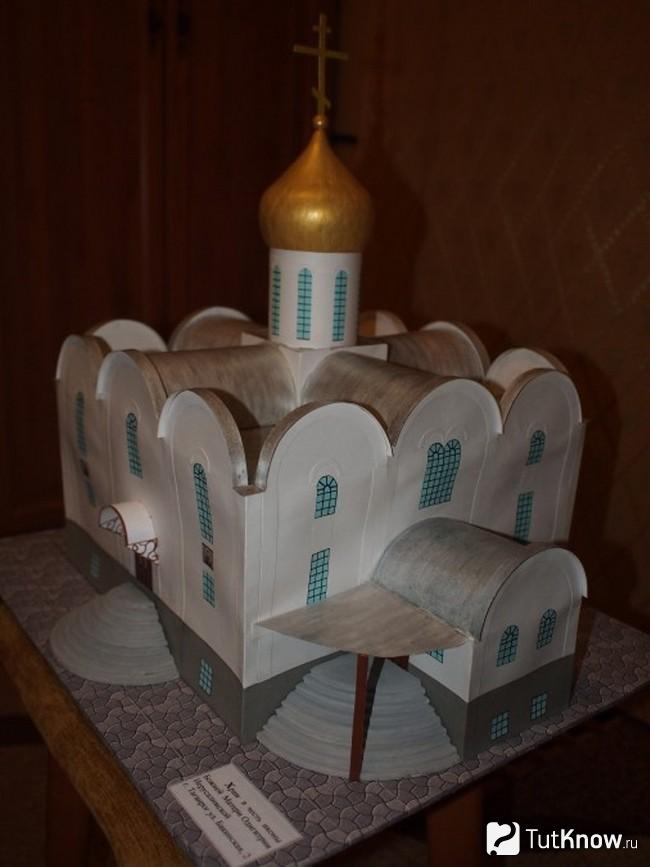
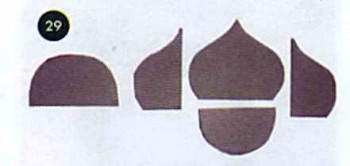
A church made of paper is an excellent decoration, as well as a great gift in which you can put all your warmth, care and love. The first thing to start with is to draw the so-called "building pattern". It is advisable to do this on thick white paper. Next, all the components must be carefully cut out. You can find a pattern on the Internet - there are a great many different options. If you don't have experience, start with the simpler one. When all the parts have been successfully cut, bend them along the pre-marked fold lines. Thus, the walls at your church are ready, it remains to carefully glue them to the cardboard platform - the base of the church.
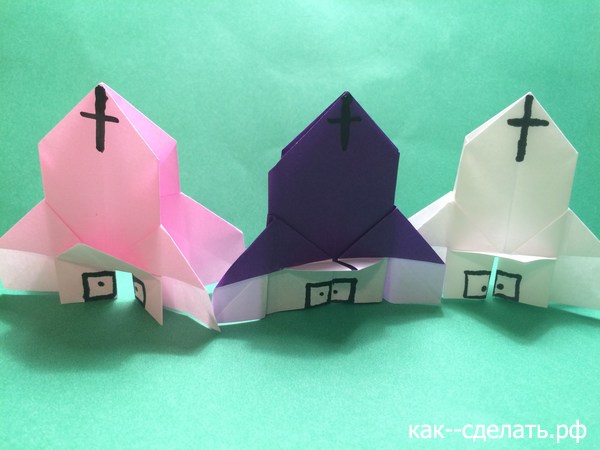
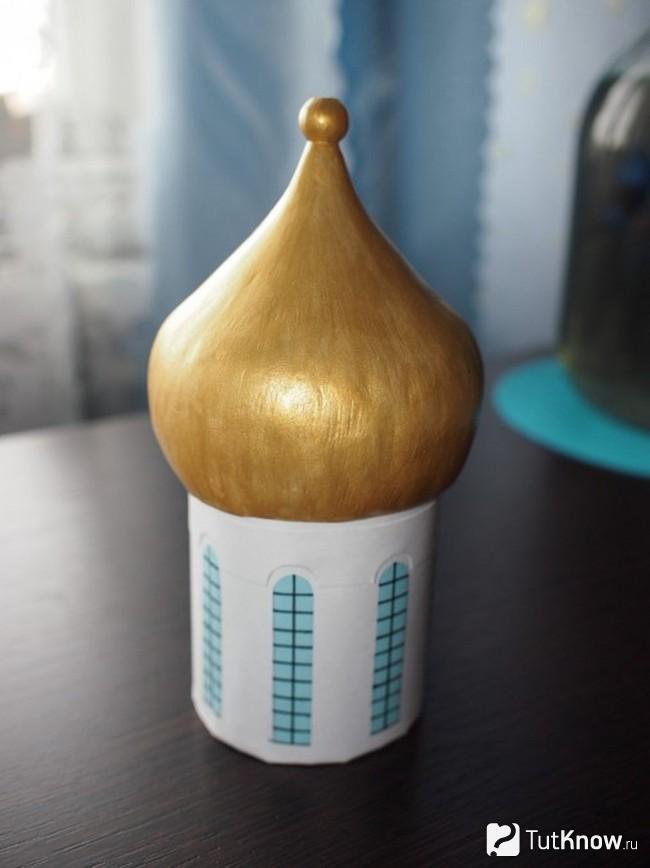
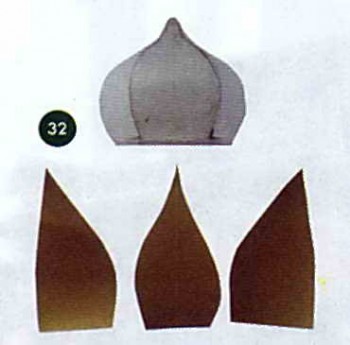
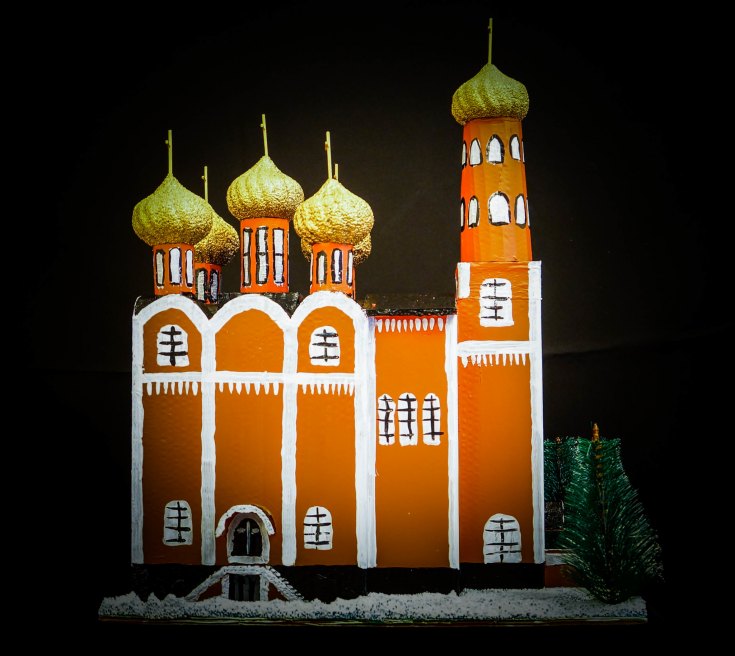
Domes are an obligatory element of any temple. This means that paper construction also needs them. Their "pattern" can be found on the same drawing as the "patterns" of the walls for the church. Alternatively, you can simply search for it separately on the Internet. It goes without saying that church domes should not be white. It all depends solely on your imagination. So, blanks for domes can be pasted over with yellow or orange paper, or you can use silver and gold foil for this.

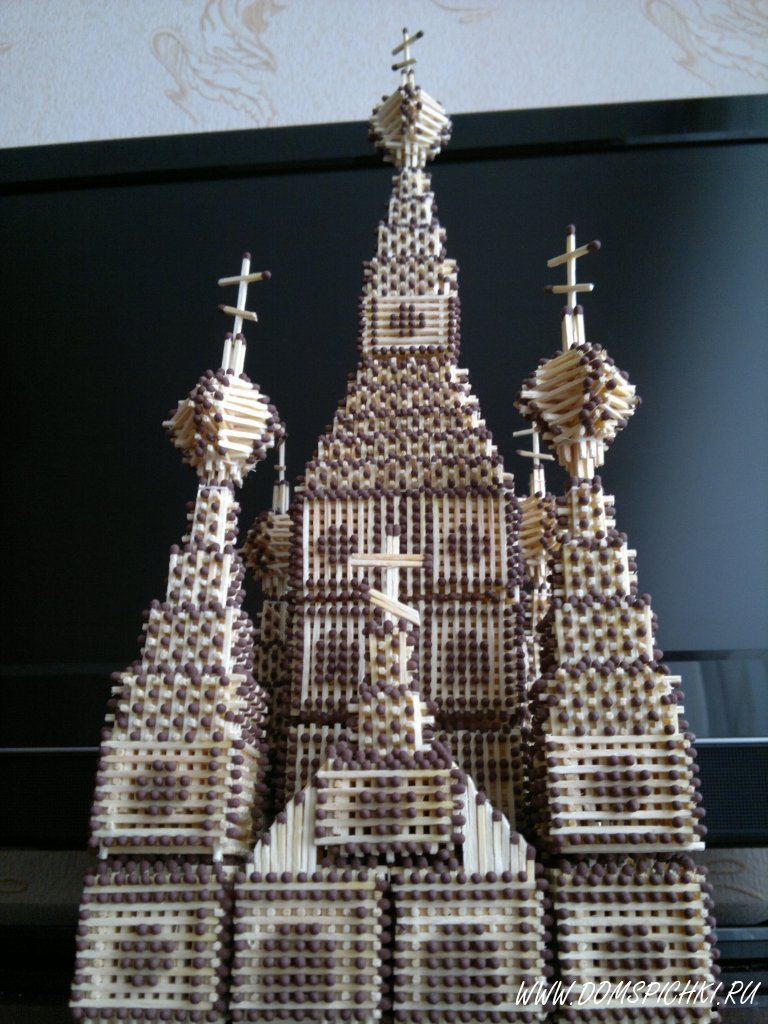
How to make a church or temple with your own hands
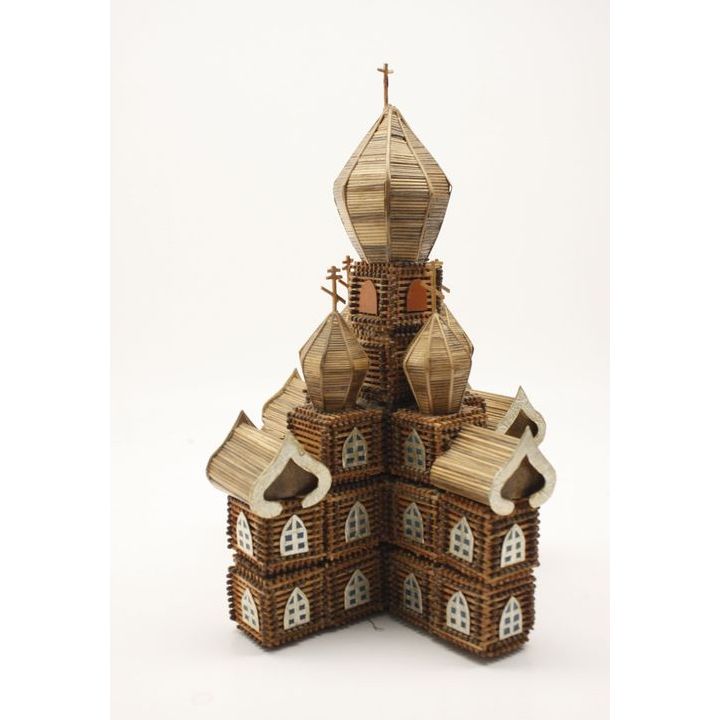
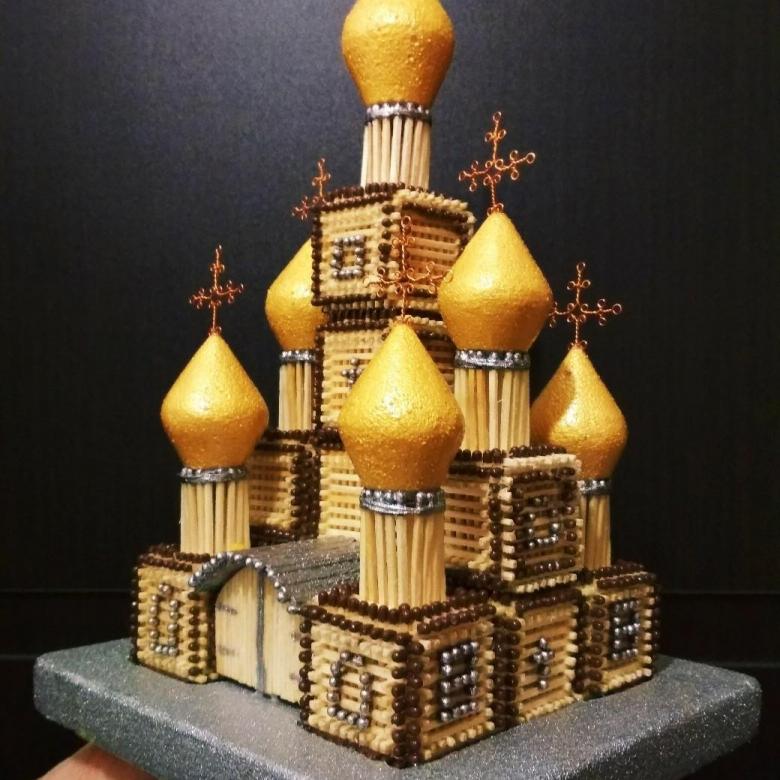
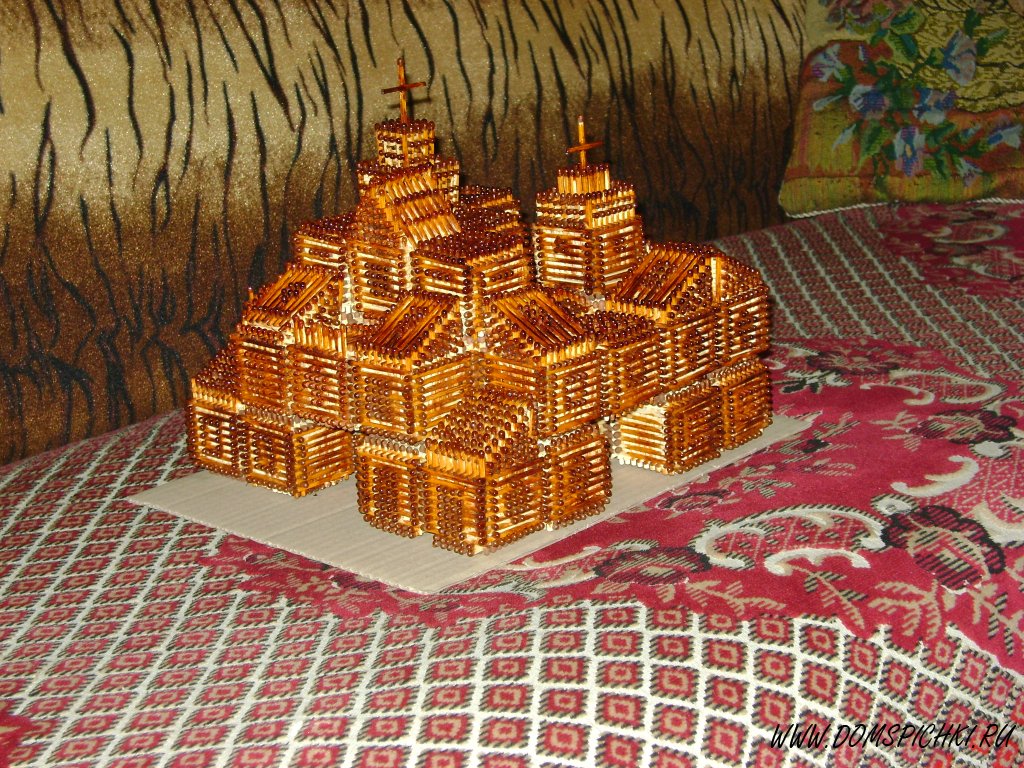
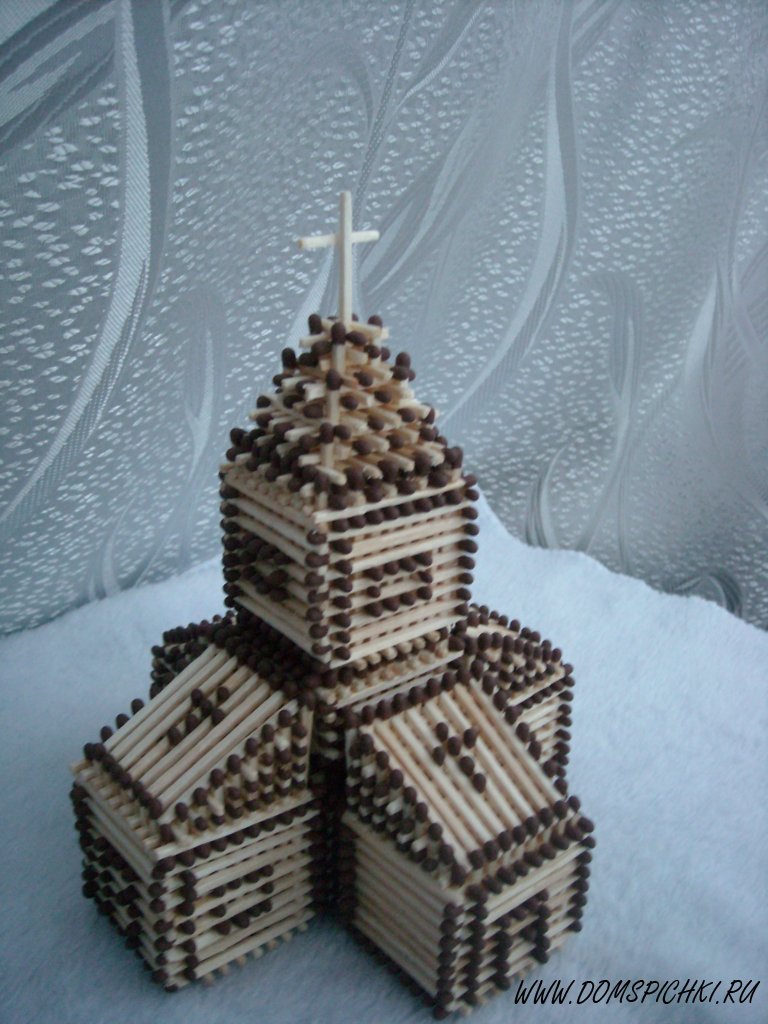
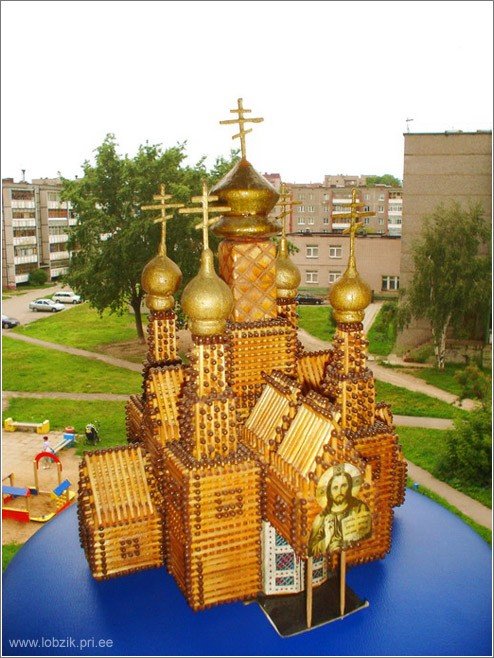
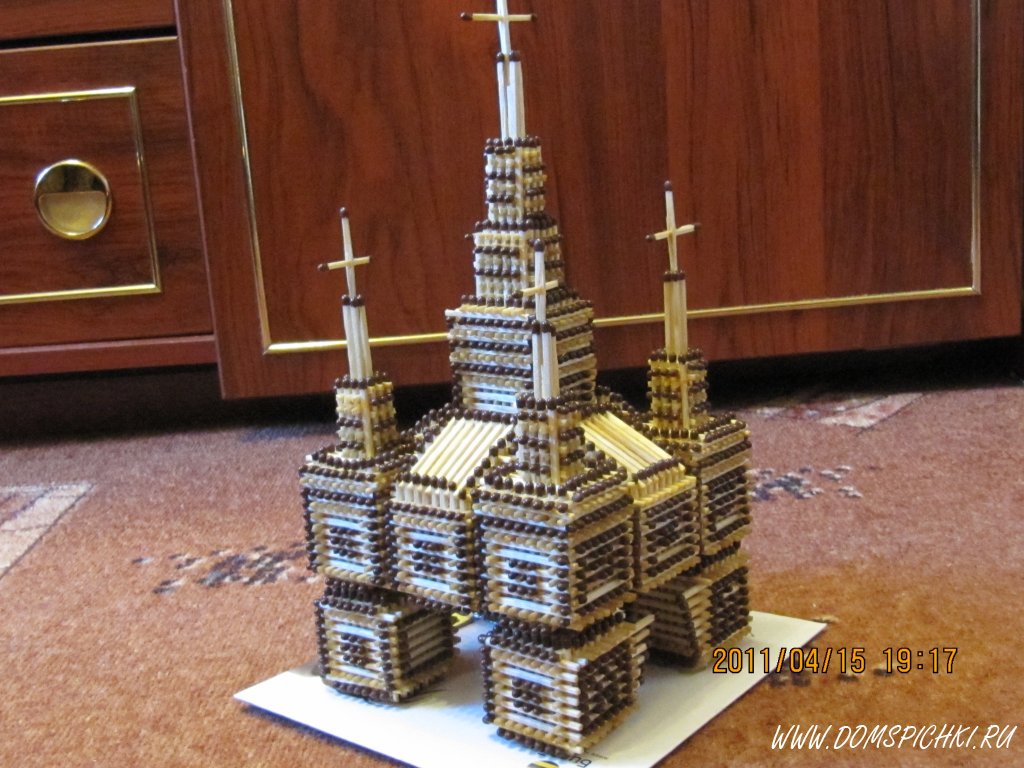
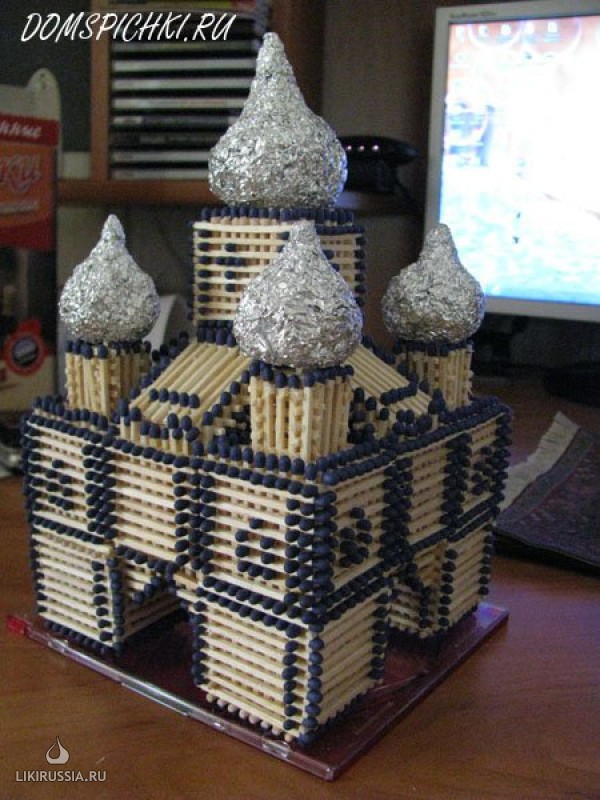
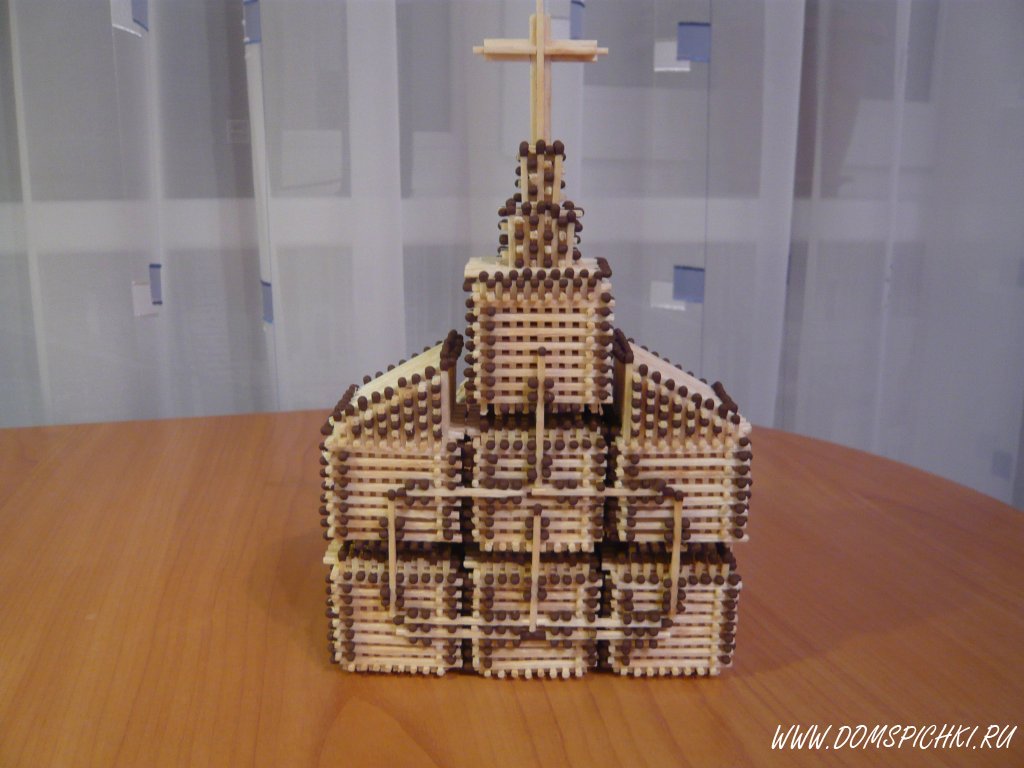
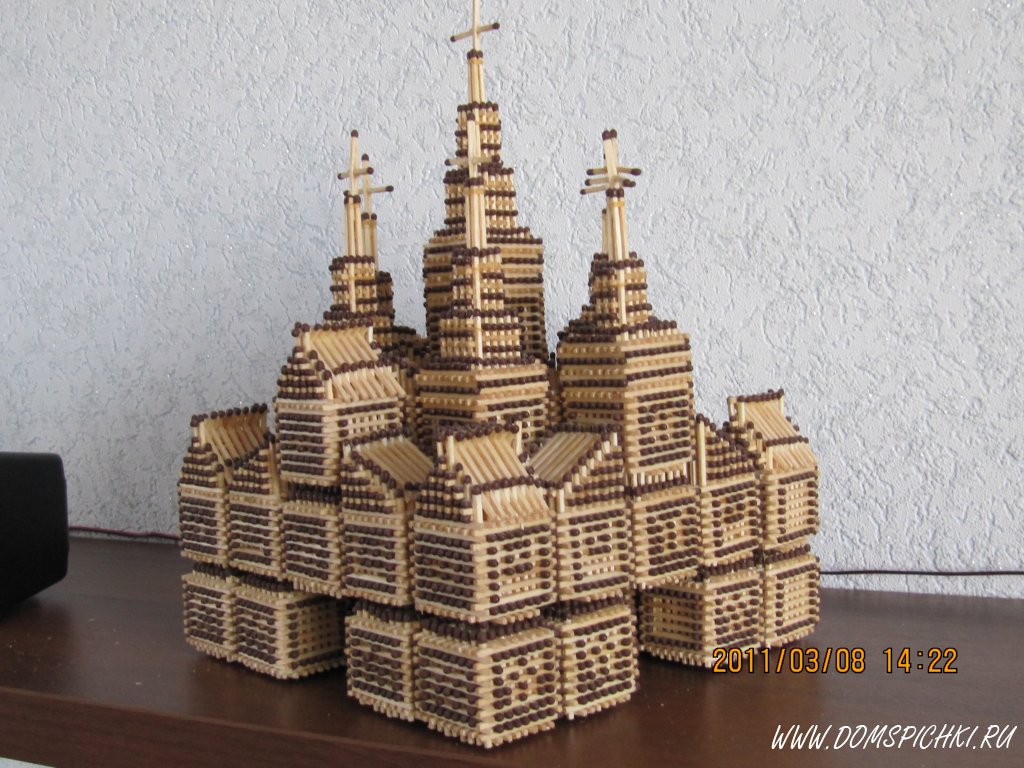
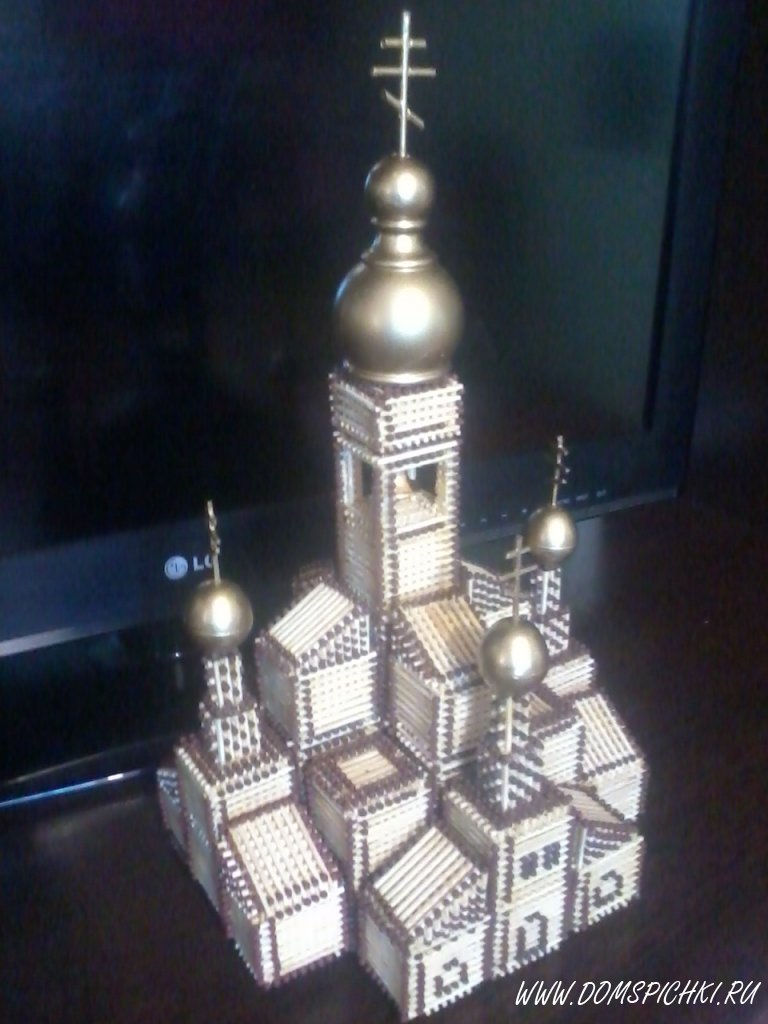
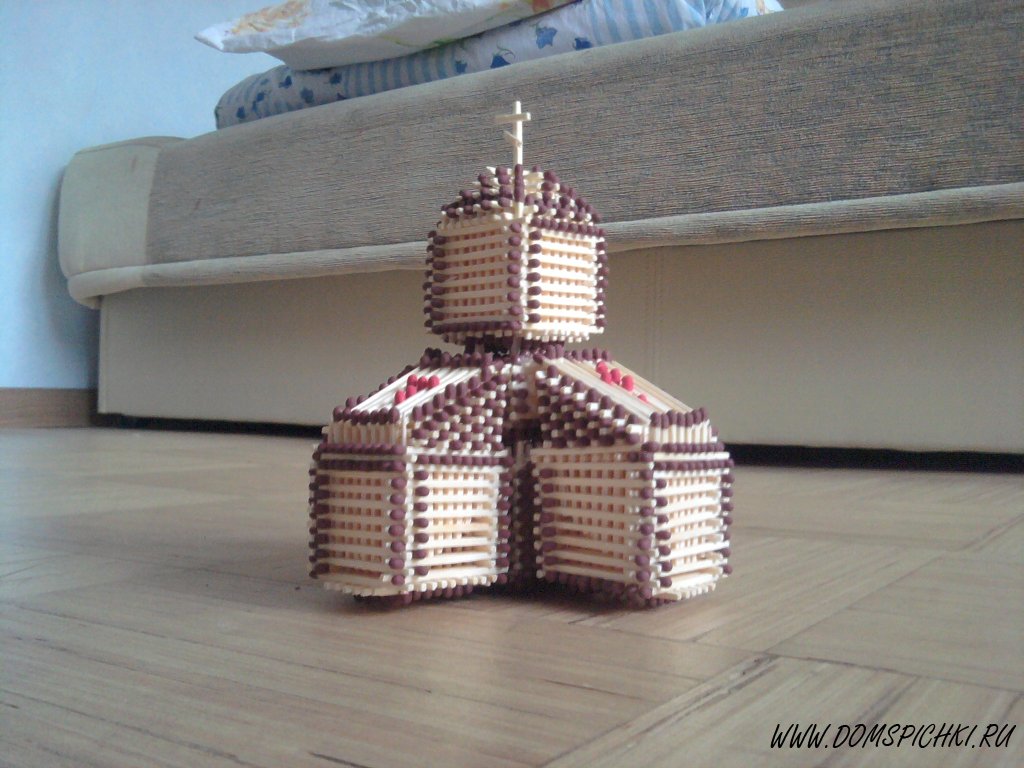
Making a church is a rather complicated process. This may take about 2,000 matches. To do this, you should follow these steps:
- It is recommended to start creating a structure with a single-layer square. When building it, matches should be placed in one direction.
- The second square should be assembled so that the fragments of matches with gray are located exclusively on top and on one side. Excess sulfur will have to be cleaned off.
- In the first square, make the vertical walls one more layer.
- Build another layer of walls. This is done so that all the sticks point in the same direction.
- Collect the same square as the first, but place the sticks in a different direction.
- Place the cubes next to each other. On average, make another layer of walls. They are placed on the sides where they do not touch other squares.
- Trim matches on each side if the cubes are not too tight.
- Connect the cubes by pushing wooden sticks through them. Clean the back wall with a blade.
- Duplicate construction.

- Make a standard square. In this case, sulfur should be removed from above.
- Trim the cube. For this, it is recommended to trim the logs.
- Trim the area of the cube on the plank.
- Place 8 sticks in the prepared structure. They are used to attach the cube to the bar.
- Fasten the parts in the prepared place.
- Make a second leg and prepare a square on the plank. For a firm fixation, inserted matches should be pushed through. Make an arch under the middle square. Thanks to this, it will hold up perfectly.
- Repeat the same steps for the second plank.
- Prepare the middle plank. Construct 3 cubes.
- Insert the logs horizontally in the 2 outermost cubes in front. On the other sides, place them in the same way, but vertically. Smoothen the structural elements to make the surface smooth.
- Insert vertical logs into the middle square. They need to be made even. Parts are inserted horizontally from the front and back.
- Fasten the cubes.
- Connect the structure with ready-made strips using matches.
- Make ramps. To do this, it is enough to push the sticks from the inside.
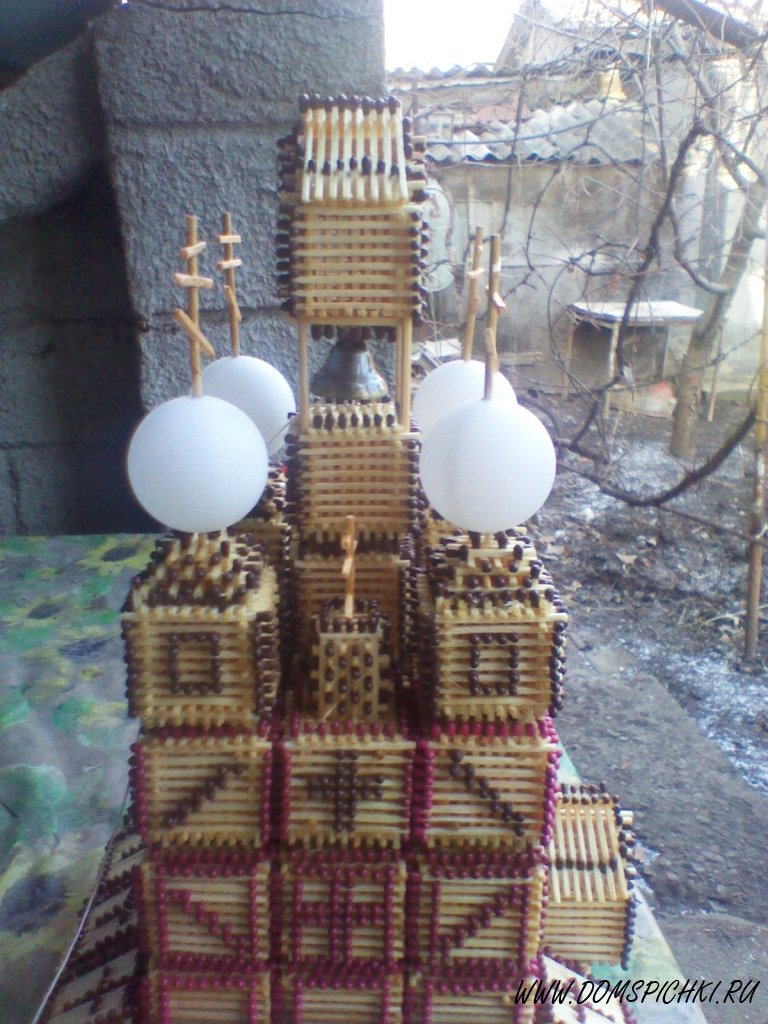
- Craft 4 small towers on the sides.
- Make domes from foil. You can decorate the church with crosses. It is also permissible to use windows and doors.
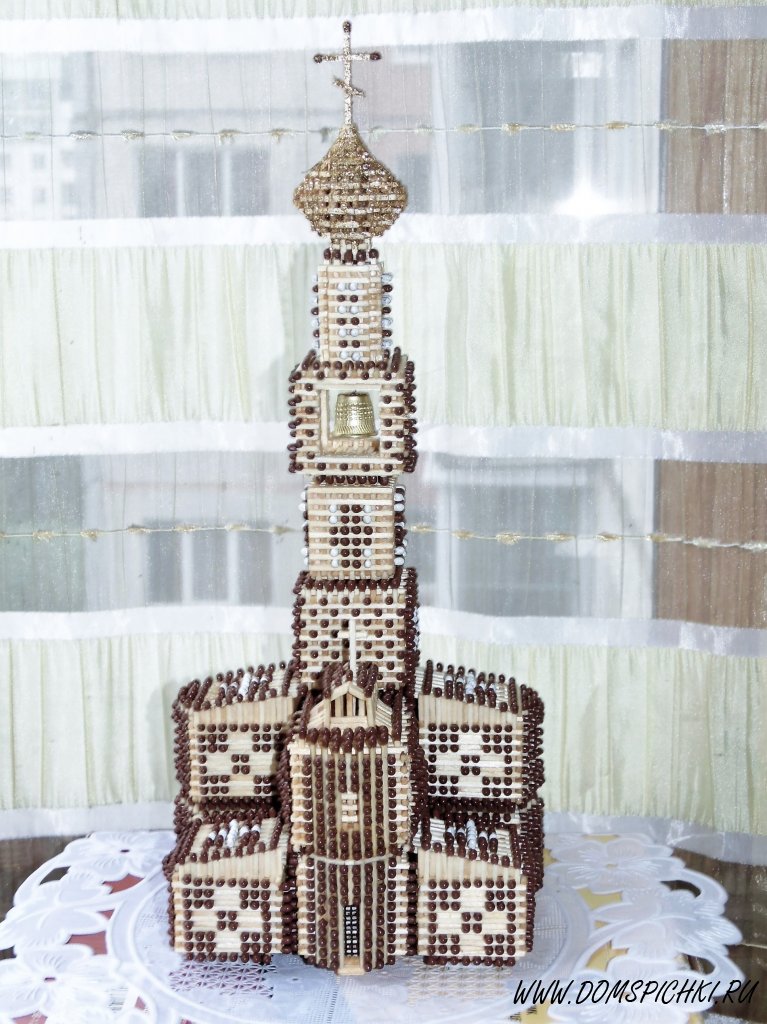
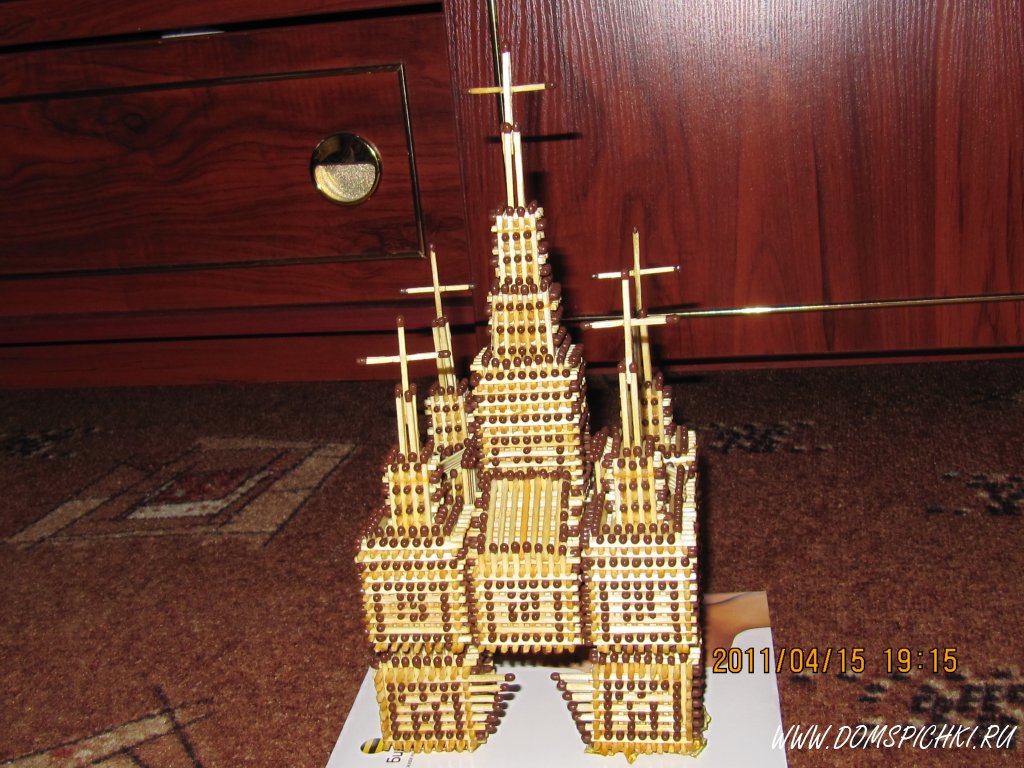
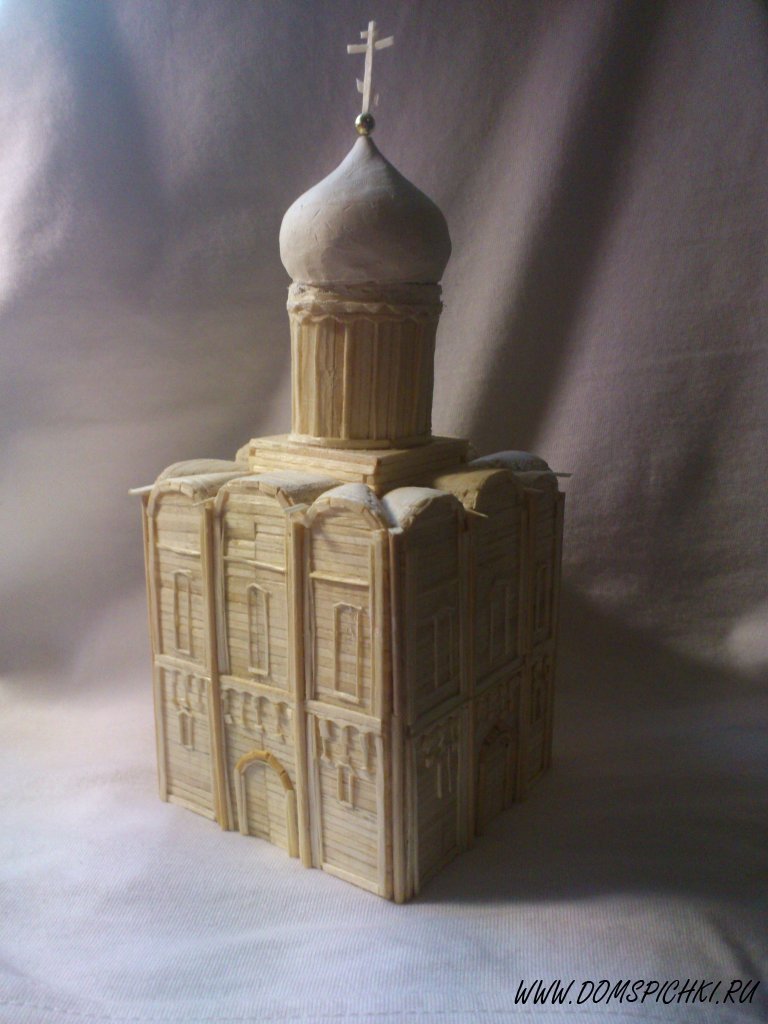
Third tier
- The third tier of the church is smaller than the second, and there is only one window on its front wall - that's all the differences. We cut out the necessary parts from the cardboard.
- We glue the third tier in the form of a box and coat all joints with glue from the inside.
- We glue the window openings with matches painted with stain, and the walls with vertically arranged matches.

- From the inside of the blank, glue colored foil onto the window openings, and then glue pieces of cardboard on top.
- To the size of the third tier blank, cut out a rectangle from the cardboard and glue it onto the blank as a back wall.

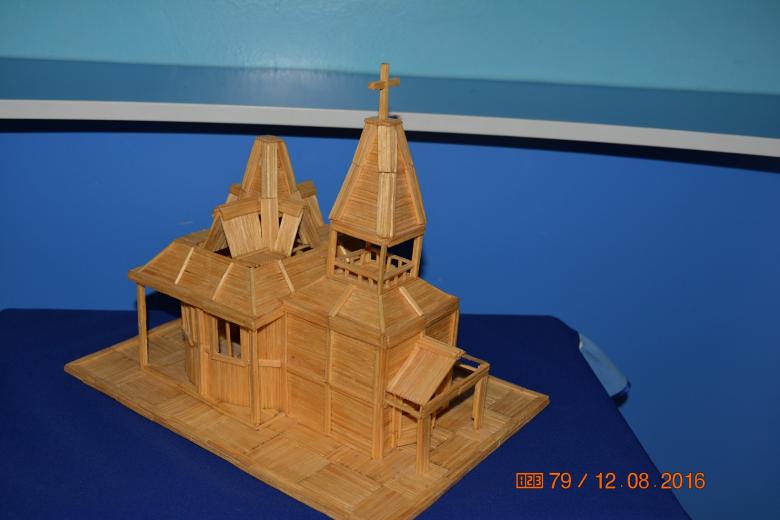
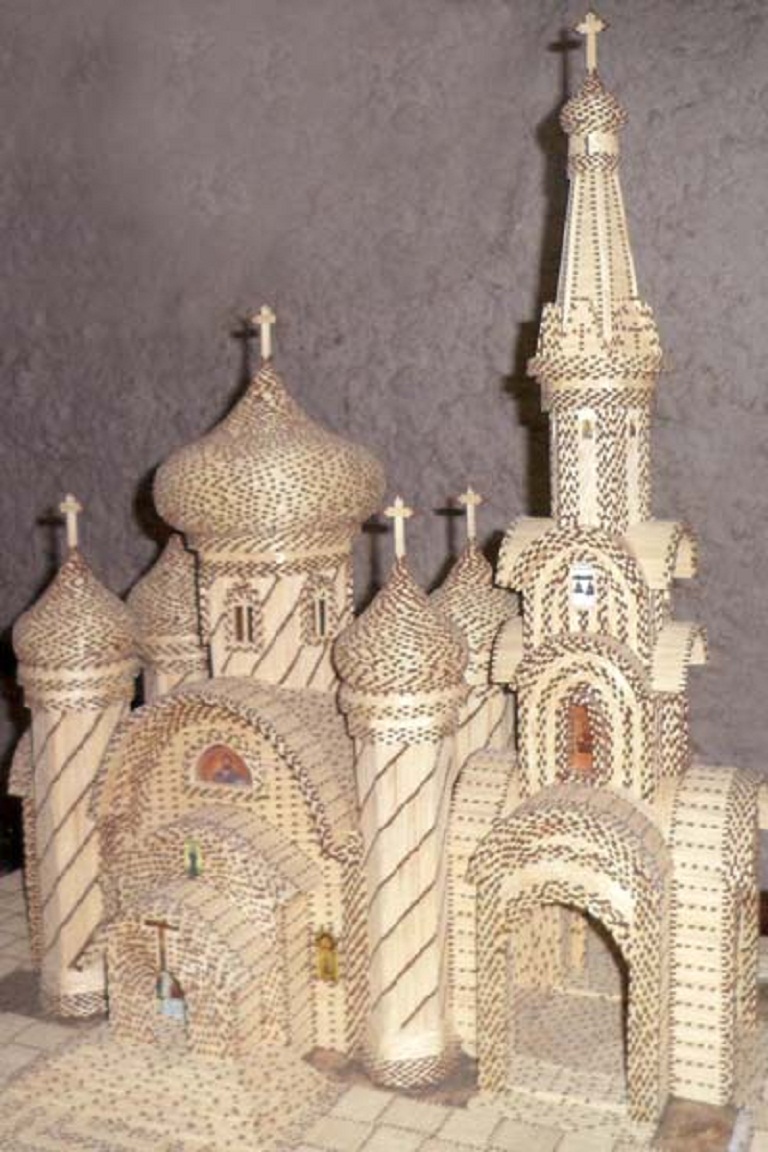
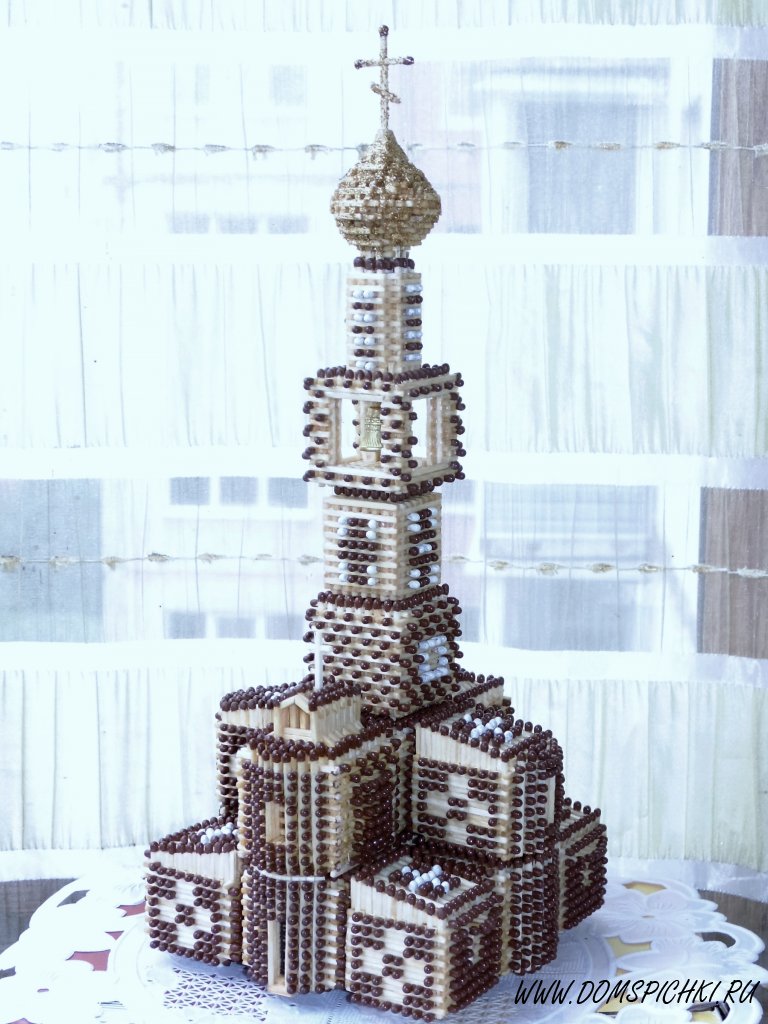
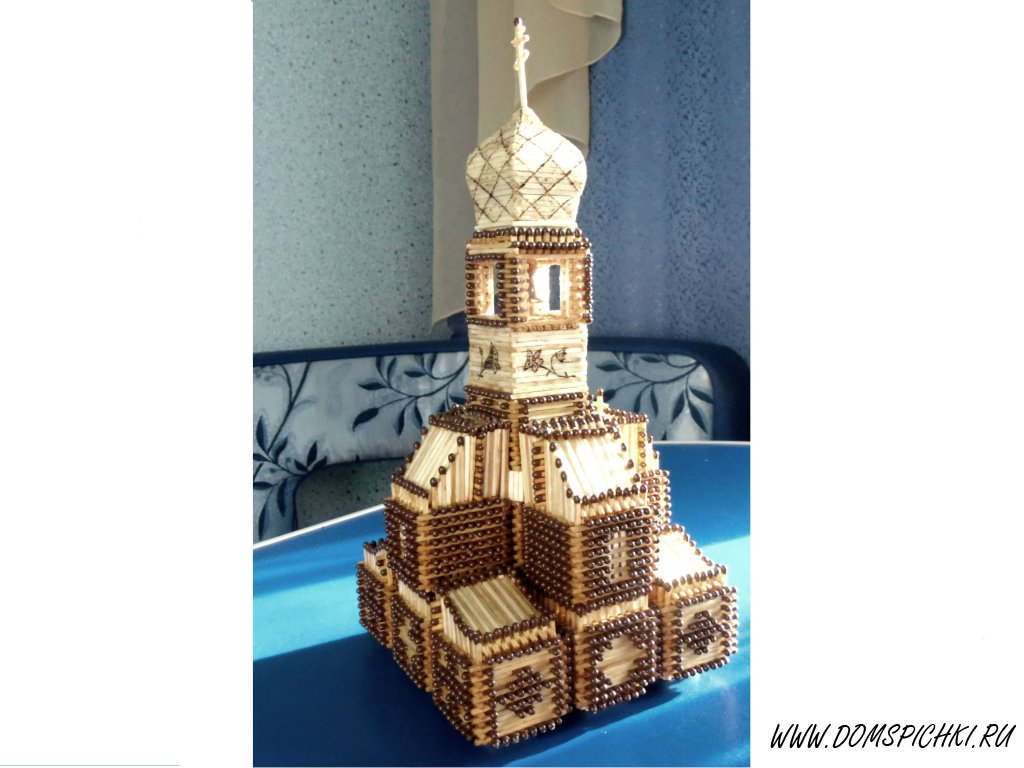
Assembling the church and dome
- On the first tier of the church, we glue the second tier of matches strictly in the center, and on the second, we also glue the third tier strictly in the center. In this case, all the rear walls should be in the same plane, exactly one above the other.
- We measure the required dimensions according to the layout and cut out blanks for roofs from cardboard for all three tiers at once. The roof on the second tier should be smaller than on the first, and on the third - less than on the second.
- We glue the details of the roofs with gray, green or brown paper or ice cream. We glue the finished roof details on each tier: first the side elements, then the front ones.

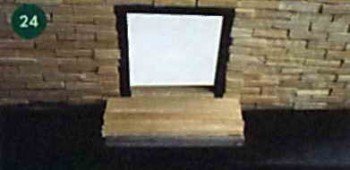
- Focusing on the width of the picture frame, we cut out the base from the cardboard, the width of which should be 1-1.5 cm wider than the model of the building, and glue the base over with a material of suitable quality and color.
- We glue the building of the church onto the finished base of the picture. If you used leerine to decorate the base, then it is better to use a hot glue gun for adhesion strength, or partially cut off the top layer of leerine from the base at the bonding point.


- Cut out a strip of cardboard 0.5-0.7 cm wide and a length equal to the width of the door opening plus 1 cm. Glue this strip in front of the door and glue it with matches of the required length.
- In accordance with the size of the door opening, we cut out the door part from the cardboard. We cut it in half and glue each half with veneer or some other suitable material. Cut out 4 columns from fireplace matches or barbecue sticks to decorate the porch. We glue two of them on the wall to the left and right of the door, and two are already on the threshold, stepping back at the same distance from the wall.

- To make a visor over the entrance to the church, cut out a strip of cardboard 0.5 cm wider than the threshold and 2 times longer. Having cut the strip across in half, we bend it, trying on the roof of the visor to the layout. Having determined the bending angle, we cut out a triangle from the cardboard of the required size and glue it to the roof.
- We glue the roof of the visor with colored paper or other suitable material. On the triangle in front, we glue the same triangle made of white paper, and then strictly in the center we glue a cross made up of pieces of matches painted with stain. Glue the finished visor on the porch posts and to the front wall of the first tier.
- We decorate the windows and walls of the second and third tier with matches painted with stain.
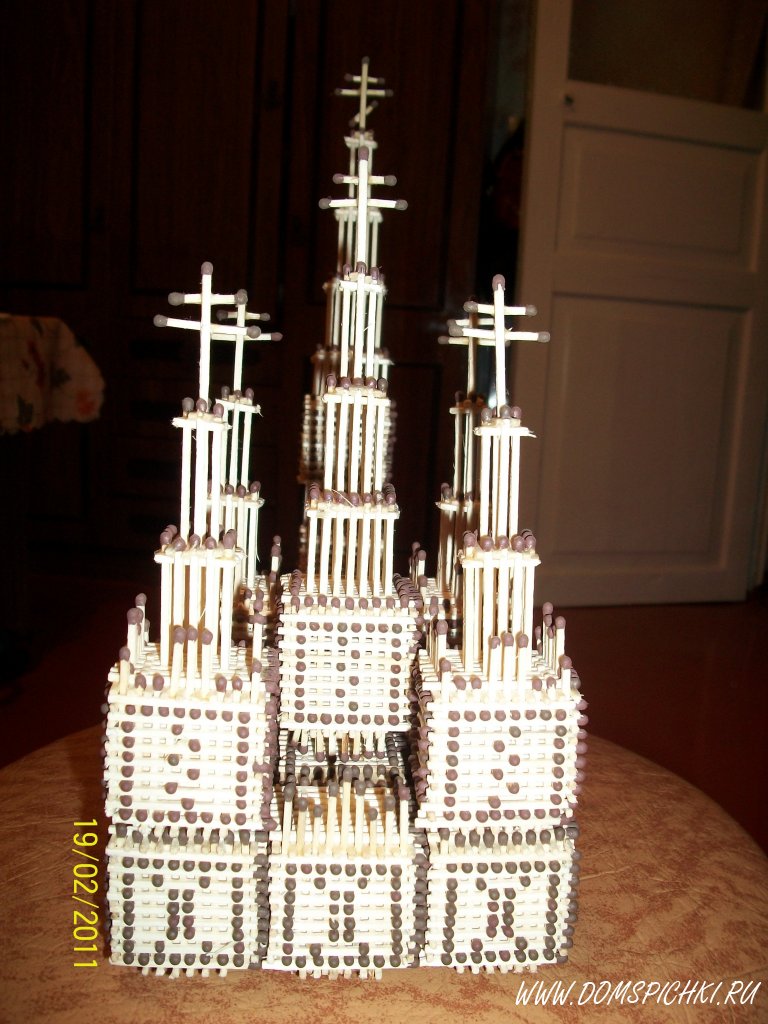
- The building is already ready, we are starting to create the dome. Cut out the necessary parts from the cardboard: a support for the dome, the base of the dome, the back wall of the dome in the form of a poppy, and two supporting ribs.

- We glue the support for the dome with the same material as the roofs of the tiers (a), and glue the dome itself like this: glue the back wall at right angles to the base, then glue the supporting ribs into the blank (b - front view, c - top view).
- We glue the areas between the ribs and the back wall of the dome with petal-shaped parts cut from thick paper or thin cardboard. After the joints have dried, we grind them very carefully with fine-grained emery paper.

- We glue the dome with petal-shaped parts cut from golden foil or from a sticky film. First, we glue the side sections of the dome, and then the central one.
- On the cardboard base of the frame we selected, we glue a suitable background. At the bottom in the corners, you can glue images of trees or bushes.
- We glue the finished model of the church from matches on the base to the background, then glue the finished dome. At the bottom of the church, you can arrange a plinth, and on the left and right, lay out toothpicks and glue a small fence.
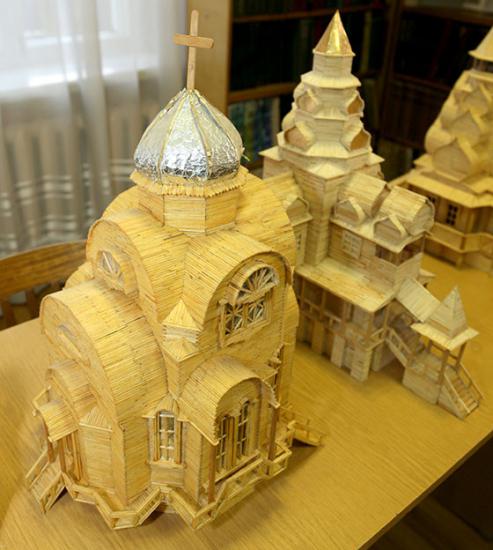
Next to such a church, it would be appropriate to make a castle from matches - it will be beautiful and correspond to the times of the era.
Category: Crazy hands
Decoupage of a table lamp made of clay master class
2 options for a lampshade for a lamp master class
Glass matting master class
How to make a shelf with a spice drawer
Craft from matches - decorative plate: photo
House of matches. Step-by-step production with photo
Crafts from matches, what they are and what you need for work
How to make unusual curtains for a summer residence from improvised material
Which glue is best for
In the process of making a match model, it is recommended to use an adhesive solution, which will help to reliably connect individual small parts. The figure made with the use of glue will retain its appearance for a long time and will not disintegrate into matches.


PVA
PVA glue is considered universal and is used in a large number of areas, including solving everyday household tasks. PVA has a number of comparative advantages, including the following:
- High adhesive power. The solution creates a strong bond, so the finished products do not crumble under external influences.
- Fast drying. PVA glue quickly grabs the parts with each other and dries completely in 12-24 hours, depending on the ambient temperature.
- Resistant to moisture. Accidental splashing or storage of the craft in places with high humidity does not impair the characteristics of the applied glue.
- Environmental friendliness. The solution does not emit toxic substances and is absolutely safe to use.
- Economical consumption. A small amount of solution is spent on crafts from matches.
"Moment Joiner"
Moment Stolyar moisture resistant glue is suitable for all types of wood and reliably glues small parts, including matches. After application, the solution grabs the parts in 15 minutes. The solution contains no toluene, solvents and harmful components, therefore "Moment Joiner" can be used when creating crafts with children.

"Moment Montage Instant Snap"
A distinctive feature of the "Moment Installation Instant Grip" glue is setting after the first seconds of application. The solution is resistant to moisture, temperature extremes. When using this type of glue, it is recommended to remember the following nuances:
- If, when connecting the sticks, excess solution appears through the slots, you can remove the glue with an unnecessary plastic card or thick paper.
- To prevent the glue from protruding beyond the adhesion surfaces through the gaps, a toothpick technique is used. Glue is applied to one match, put a thin edge of a toothpick on top and connected to another match. A toothpick will provide a small gap and a layer of glue will remain between the matches.
Universal matches
Manufacturers supply building material for crafts of various formats, match size:
- standard - 5 cm;
- for a gas oven - 8.5 cm;
- fireplace medium 10 cm;
- large fireplaces 20 cm.

They are available with color boxes: brown is considered the standard color, green is the second most popular. Souvenir matches are usually painted pink or red. By combining a variety of matches, craftsmen create amazing masterpieces.

Crafts for girls made of beads and paper - a description of the technique, interesting ideas, photo examples
Crafts from natural material - ideas for making, photos, tips
All types of matches are used for original crafts. They are made voluminous and flat, with and without glue. Adhesives help to fix matches in a plane and bulk products. They are often used by beginners when making boxes, decorative panels and real paintings.

Inventions of the almost impossible
There are amazing things. For example, a pasta church craft. It is done as follows. First, the foundation is made. Hexagon walls are made of cardboard. Closes in a ring.
Then they start working with the upper part of the church. Where the bell should be. This place is arranged like this. In place of each face of the hexagon, round pasta are laid out in columns at the top.

And then a separate hexagon is made. Cardboard is used. Just cut out the hexagon. To fit - cover the top of the structure.On this cardboard, glue a cardboard cone in the center.

All this is pasted over with flat noodles. Still separately - glue the dome from round pasta. Glue a cross on it - from noodles or pasta. The dome is neatly glued to the middle section.


All this is installed and glued on a hexagonal base, with glued pasta. Additionally, a porch is being made - the entrance to the church.
Here, too, you must first make cardboard blanks, which are then pasted over with pasta. It remains only to make a bell from foil and hang it under the dome.