Stage 2: Making the seat frame
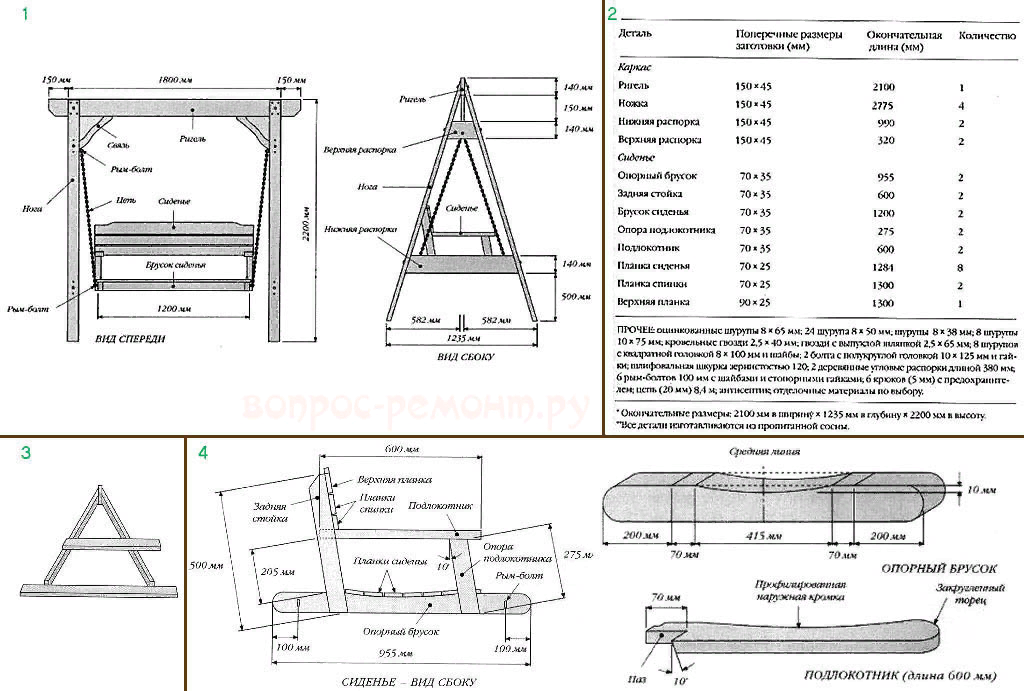
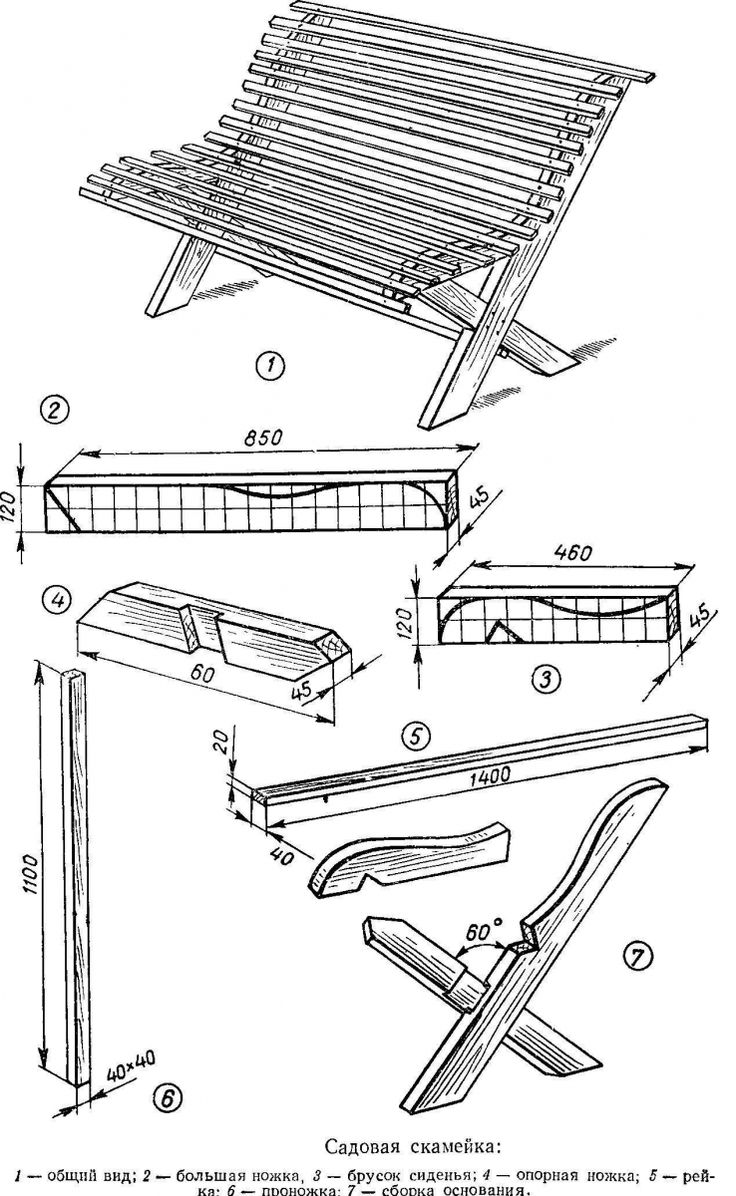
To assemble the entire seat, you need to prepare the following parts:
- Support bar with a section of 70 x 35 mm and a length of 955 mm - 2 pcs.;
- Bars for the rear pillar and armrest 70 x 35 mm, length 600 mm - 4 pcs.;
- Bars for sitting 70 x 35 mm, length 1200 mm - 2 pcs.;
- Armrest supports 70 x 35 mm, length 275 mm - 2 pcs.;
- Sitting slats 70 x 25 mm, length 1284 mm - 8 pcs.;
- Backrest strips 70 x 25 mm, length 1300 mm - 2 pcs.;
- Top bar 90 x 25 mm, length 1300 mm - 1 pc.
Step 1: On each support bar, measure the vertical lines of the boundaries, stepping back 200 mm from each edge. We retreat another 70 mm and connect a line from the edge with the last marks with a perpendicular stroke. Mark the center of each bar with a perpendicular line. Mark 10 mm from the center of the line and drive in a nail. Now you need to give the curvature to the seat. To do this, use a piece of flexible wood (veneer). Lean the line edge against the support board. The center must be pressed against the hammered nail and bent to 70 mm lines. Mark the bend line with a pencil. Now you need to cut the bar along the marked line and grind the cut.
Step 2: Next, we retreat 200 mm from the ends along the inner surface of the edges of the support bars and draw marking lines across (perpendicularly). We retreat from them another 35 mm and outline all sides with a straight line. Now we need to use a thickness gauge, which we set to 10 mm, to mark both edges between the notch lines of the bars. Saw off the rough side along the markings.
Step 3: Prepare the rear uprights. The upper outer edges must be cut at an angle of 100, as shown in the photo drawing. We carry out a joint with a support. We measure 72 mm for the slope line parallel to the corner cut. We draw such lines along each face. Using a thickness gauge set at 17 mm, draw a line across the end, along the edges of each part. So we mark both racks. With a saw, we make grooves according to the markings.
Step 4: The armrest supports are also beveled by 100 on all sides. The grooves are cut in the same way as for the C-pillars. Treat two beams of the seat with an antiseptic, grind and insert into the grooves on the side of the support beams.
Step 5: Connect the support bars from the outside with screws to the rear uprights and armrest supports along the 200 mm marking lines.
Step 6: We install the armrests. On the front side, mark 70 mm from one end and draw a line. Next, on the inside, we draw a perpendicular at an angle of 100 through the lower part. From the edge to the line, measure 35 mm through the end and back. We cut this corner with a hacksaw. We grind the armrests. Now we retreat 205 mm from the top of the support bar along the rear pillar. On top of the mark, we fix the armrest and drill a hole in the rack along the line. We fix the armrest and the stand with screws.
Instructions for making wooden swing
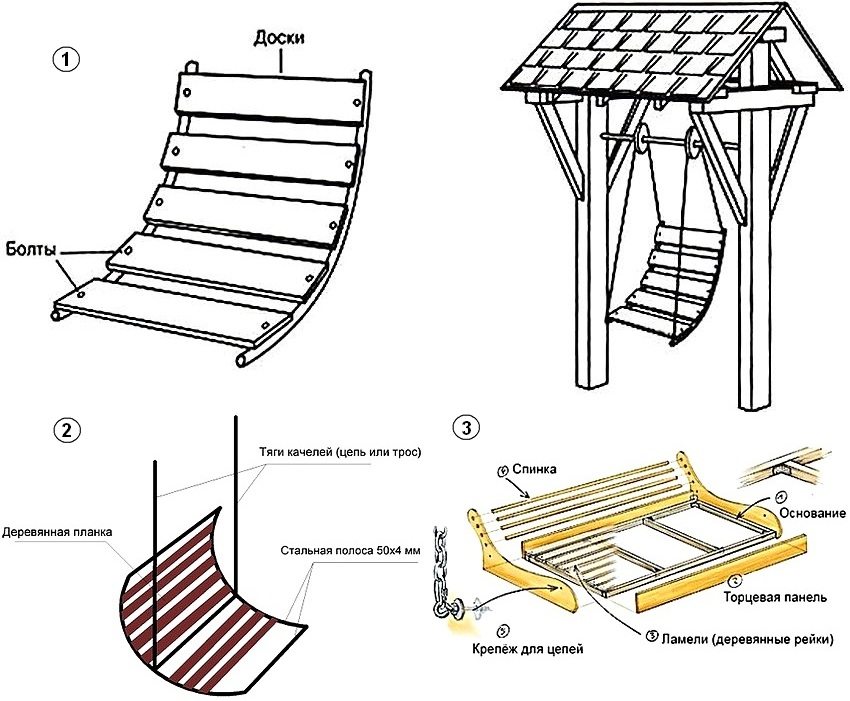
We make arched supports from 22 mm thick boards (preferably pine) and 12 mm plywood. You need to make 6 support arcs.


We outline the core using plywood blanks. The middle part is made of glued board. In the extreme arcs we make holes for fastening the rope.

We connect the parts of the arcs with a waterproof adhesive. For reliability, the parts must be fixed with clamps.

We clean the edges of the arcs with an angle grinder. The edges should be rounded.

We make round parts from the board that fix the rope. For this, it is better to use a drill bit.

Covering parts with a primer or atmospheric paint.

Through the round holders we screw steel fasteners for the rope into the arcs. We paint all the wooden parts of the structure with acrylic paint.

We level the picket fence for the manufacture of the bench. We drill the mounting holes in the strips.


We fasten the armrests to the arches. For their manufacture, we also use a picket fence.


We attach the rope to the previously prepared metal fasteners. You need to tie the rope with a sea knot, and then additionally fix it with wire.

We simply cut off the excess rope.The rope should be fixed at the top of the backrest and at the end of the seat, creating a triangle shape.

With the help of carabiners, we attach the rope to the crossbar. In the latter, special metal fasteners should be provided for this.

More details about the process can be found in the video of making a garden swing. The main thing is to use only durable and reliable materials, since safety depends on this.

Do-it-yourself hanging swing
Swing hammock
A frame is not provided for such a swing. We will only make a seat, which we will later attach with chains or ropes to ceiling beams or thick branches.
Tire swing
Option 1. The simplest swing is an old tire tied with a rope and suspended from a tree. Alternatively, you can use a chain and secure it with a screw and nut.
Chain fixing option Chain fixing option
Option 2. Place the tire horizontally. We cut 3 or 4 holes, insert metal hooks into them, which we fix with washers and nuts. We put ropes or chains into the loops of the hooks.
Tire swing
Option 3. This is the most difficult option, which will require skill in using a grinder. The tire should be cut according to a certain pattern, bent and fixed with long hairpins so that it looks like an animal or a bird. One of the ways to make a country swing can be found below.
Tire swing
Swing from boards
Swing from boardsSinging from boards and rope
A swing made from a board (saw cut of a log, a wooden lattice, etc.) and ropes is a classic. It is enough to make 4 holes at the corners of the wide board and insert the ropes.
Instead of a board, you can use an old highchair by sawing off the legs and tying it with ropes.
Swing out of a chair
Hoop swing
Hoop swing
A metal (steel or aluminum) hoop must be equipped with rope weaving so that a spider web-seat forms in the center. It is advisable to wrap the edges of the hoop with foam rubber and sheathe it with a dense fabric. And in order to hang the swing, you will need several strong ropes, metal rings or other fasteners, which must be fixed at at least four points around the circumference.
Hoop swing
As one of the options, you can consider a swing-hoop, inside which a metal basin is inserted. The edges of the pelvis should be firmly attached to the hoop. Subsequently, the structure is easy to disassemble and retrain into a flower garden.
Swing from a hoop and a pelvis
Swing made of tarpaulin
Swing made of tarpaulin
To make such a swing, you will need two wide metal triangles, rivets and the material itself - a tarp. We fold it in several layers, stitch it around the perimeter, insert triangles and fasten it with rivets. It remains only to hang the swing on a branch or beam.
Children's swing with their own hands
A separate group of products, which in most cases is a boat or a chair hanging in the air. Children's swing must comply with all safety and reliability standards.

Suitable for adult children, and small ones can only use with the help of their parents.

The size of a garden swing in most cases depends only on you. You can also make children's swings in large sizes.

By the type of construction, the swing is also variable:


Swing in the shape of a hammock. Such swings are located on wooden or metal beams. A person who sits on such a swing feels that he is hovering above the ground. On such a swing, it is especially great to read books and listen to music.

Single swing. The designs can be variable, and the installation of crossbars is not even required. Installation of such a swing is not a very complicated process. You can install them absolutely anywhere. Most often it is a pipe swing. These are metal pipes.

Hanging swing.Question: "How to make such a swing?" does not have a difficult answer, because everything is very simple.


You see how many options for creating a garden swing you have in your arsenal.

The key point, of course, is to take care of safety while relaxing on the swing. All possible circumstances should be taken into account, and the swing should be provided with maximum reliability and comfort.

Do not forget about the aesthetic properties of creating a swing, too. Beautiful and original swing, made in a special style, will attract the eyes of neighbors and guests, and children and relatives will enjoy relaxing on such a swing.

DIY garden swing
In order to make a swing with your own hands, you need
- Determine where the swing will stand, and from this determine the size.
- To install the swing, it is advisable to choose a flat place.
- It is advisable to place the swing under a canopy or along a spreading tree in the yard. In order for the structure to be less exposed to external influences (sun, rain, snow)
What is the advantage of making a garden swing with your own hands
- The cost of a swing will be much lower if you have various boards lying around, perhaps tree stumps, which is often the case with our brother when he has a private house.
- You can make a swing according to your own design project, which will ensure the individuality of your furniture. This, for lovers "not like everyone else"
- Environmental friendliness of the material in comparison, for example, with plastic
- Aesthetically, wooden furniture near the house, in the courtyard, looks much more spectacular and more comfortable than its plastic counterpart bought in a store
Further, as soon as we have decided on the place of installation of the swing on our site, we need to draw up a drawing. (When choosing a place, they did not forget that the swing will "swing")

Making a swing with your own hands is not difficult.
The drawing will be necessary so that during the manufacture, the swing itself does not have problems. To do this, in the drawing, we indicate all materials and parts, their dimensions and location. Based on the drawing, you can easily understand which parts for your masterpiece need to be bought or purchased.
If there is a choice of wood, from which we will make a swing, then it is better to give preference to pine. Before making a swing, the wood should be treated with antiseptics and other means to protect the wood. The stores sell special compounds for wood processing, consultants will help you choose the composition for specific purposes.
Support "legs" for the swing:
- From the end of each "leg" we apply a strip for an oblique cut with a pencil, a pen, something sharp. The cut should be at the same angle. For this we use a square.
- Lay the “legs” with the letter “X”. At the bottom, the width should be about 1 meter 20 cm. Above and below, we fasten the beam. Between the two "X", depending on the width of the swing, we put a beam across.
- We make the frame for the seat itself in the shape of the letter L. The dimensions, again, depend on your sketch.

- To attach the swing to the base, a metal chain is most often used. The thickness of the chain should be taken at least 2.5 cm. If you do not want to listen to the "swing creak", you can use a thick cable for fastening, instead of a chain.
- It is most convenient to hang the seat 30-35 cm from the ground. As a rule, a swing is made this way. But this is your masterpiece and you can do as you like.
- At the end of the work, it would be very nice to treat the finished swing with varnish. This will increase the lifespan and add "shine" to your masterpiece.
- You can decorate a garden swing as you like. Everything here is limited only by the imagination of the master.
Below are some examples of self-made, wooden garden swing.




Making a garden swing: step by step instructions
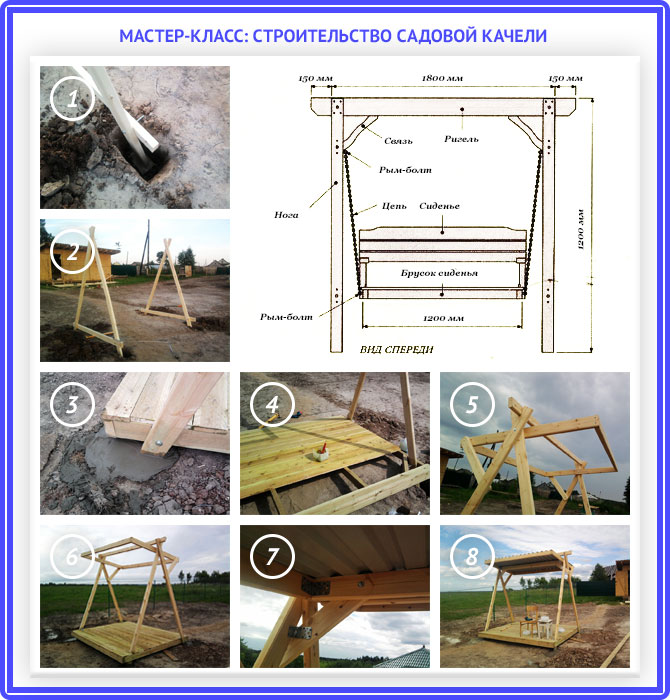
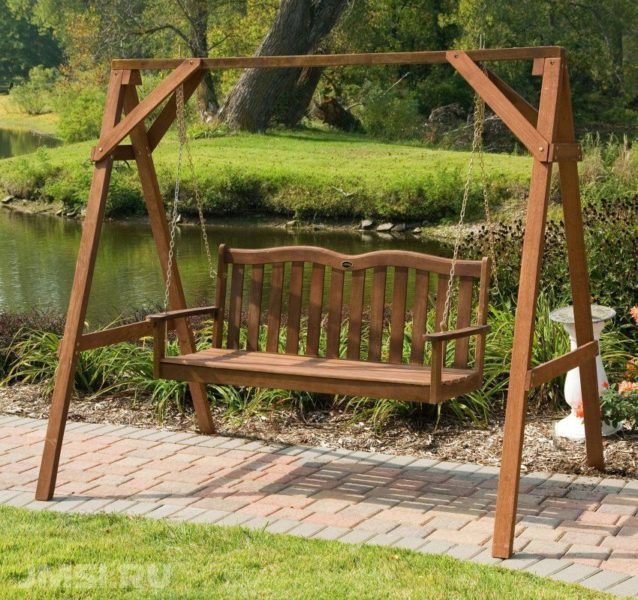
Doing a garden swing yourself is an interesting and not as complicated process as it might seem. We bring to your attention a step-by-step instruction with a photo of making a swing made of wood with an A-shaped frame.
Choosing a location is the first and very important step.You cannot install a swing in a place you just like. You should choose a surface with a perfectly flat relief. This will simplify the installation process. In addition, it is better to choose a place for installation away from prying eyes. Then it will bring peace and satisfaction.
Selection of inventory and purchase of material
For a wooden structure, you will need a beam of good quality, without cracks and knots. Oak, birch, spruce or cedar are fine. For the frame base, you will need:
- cedar timber (10 * 10 cm) - 4 units. 3 running meters each (for side supports);
- cedar timber (8 * 8 cm) - 1 unit. 2.5 running meters (for the manufacture of a crossbar);
- edged board (3 * 10 * 60 cm) - 1 unit. (for side brace).
For the bench you will need additionally:
- cedar timber (4.5 * 5.6 cm) - 12 running meters;
- sheathing board (2.6 * 4.6 cm) - 18 running meters;
- pillows - for decoration (if you wish, you can make it yourself);
- suspension and fastening (chain, metal corners, suspensions, furniture bolts, various self-tapping screws).
 Beam for the construction of a swing
As for the construction tool, for the manufacture of a garden swing, store the following necessary items in your inventory:
- Bulgarian.
- Plane.
- Screwdriver.
- Level.
- Electric drill.
Well the preparatory work is completed, it's time to start making a home-type swing.
Creation of side racks
Advice. The base of the side posts should be at least 0.5 m wider than the seat.
- First you need to calculate the upper corner of the rack.
- Then you need to draw out the dimensions and work with a jigsaw.
- The next step is to connect the structural parts.
 Side swing posts
- It is necessary to connect the upper parts of the beams, fastening with furniture bolts.
- Next, you should proceed with the side ties. Externally, the racks should resemble the letter A. Therefore, you will need to mark the bars from the height of the soil.
- Then the screeds are marked. Parts are cut and fixed with screws and corners.
Seat installation
To make a comfortable seat, you will need to make two frames with dimensions of 20 * 5 cm. And one more (back) - 20 * 6.5 cm.
- Their inner contour is fixed with stiffeners.
- Then you need to connect the back and the seat using corners and screws.
- Sheathe the seat with a special board.
Attention! Armrests can be mounted on request. Then attach the suspension to the seat by means of eye bolts.
Then attach the suspension to the seat by means of the eyebolts.
Swing installation
Almost all work has been completed and there is very little time left before your site will be decorated with an eco-friendly and comfortable swing made of wood.
- Install the bearing support on the uprights using self-tapping screws.
- Dig holes for the support posts.
 Fastening
- Pour crushed stone into the pits, install racks and fill everything with concrete.
- Correct the inclination of the side struts with a spirit level.
- Secure the uprights with rope ties. They should be in this state until the concrete hardens completely.
- Before installing a garden swing, the wooden structure must be varnished.
The final stage
Check the fixation of the crossbeam.
 Swing frame
- Drill holes in the beam to hold the eyebolts.
- Install the seat.
- The swing is ready. Enjoy the fruits of your own labors!
A garden swing is a great option for relaxation in the country. It is especially pleasant when they are made by hand. It will take a little time to make them, but you can enjoy the result every day!
Advantages and disadvantages of a profile pipe
If you take a closer look at the advantages of a profile pipe, you get the following list.
- The shape of the pipe is optimized for fast production, which means it is very simple and convenient to work with.
- A very economical material, especially when compared with reinforcement structures.
- Stiffening ribs that are located on the structure greatly increase the upper limit of permissible loads.
- The material perfectly resists mechanical damage - it is difficult to deform it with an impact.
However, along with the advantages, the swing from the profile pipe also has its disadvantages:
- Most of the operations that can be done on a pipe do not require sophisticated equipment. Except for one - flexion. It is very difficult to bend it, and all because of those very stiffening ribs. For this you need a special machine.
- Carbon steel rusts easily and lends itself to the destructive effects of moisture. This disadvantage can be eliminated using the galvanizing procedure, but it also greatly increases the price of the final structure.

DIY construction of a wooden swing for a summer residence: drawings and selection of materials
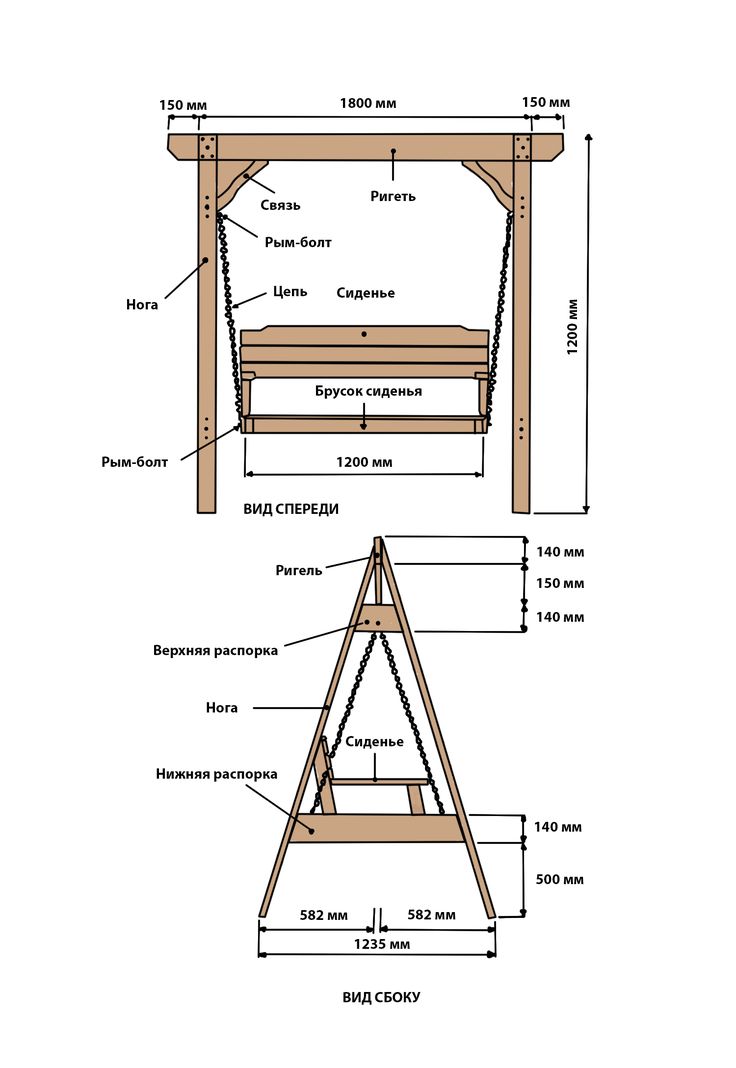
Dimension table for creating blanks:
| Detail in construction | Dimensions of the transverse part of the workpiece, cm | Final length, cm | Required number of blanks, pcs. |
| Frame part of the structure | |||
| Spacer (top) | 4.5x14 | 23 | 2 |
| Spacer (bottom) | 4.5x14 | 96 | 2 |
| Leg | 4.5x9 | 198,7 | 4 |
| Rigel | 4.5x14 | 210 | 1 |
| Seat details | |||
| Rear pillar | 3.5x7 | 60 | 2 |
| Bar (support) | 3.5x7 | 95,5 | 2 |
| Bar (for seat) | 3.5x7 | 120 | 2 |
| Armrest | 3.5x7 | 60 | 2 |
| Backrest plank | 2.5x7 | 130 | 2 |
| Armrest support | 3.5x7 | 27,5 | 2 |
| Seat strip | 2.5x7 | 128,4 | 8 |
| Upper bar | 2.5x9 | 130 | 1 |
In addition, to connect the above blanks together into a single structure, you will need fasteners with different parameters.
Related article:
Types of garden swings
If you systematize all garden swings produced today, then they can be quite clearly divided only according to one key criterion, namely, structural material.
Metal swing
The most affordable for our buyer, as before, are metal products. This product, if desired, can be purchased for five thousand rubles, only such consumer goods will not last long. Really high-quality models start at fifteen to twenty thousand domestic money and reach a price tag of 50-60 thousand rubles.
A real Klondike for all kinds of crooks. You buy a penny product from China and sell it for five or six times more. Isn't it a business? The worst part is that it can be quite difficult for an inexperienced buyer to distinguish a brand from a fake.
Swing made of combined materials
Swings made of combined materials are even more expensive. There, along with the profile pipe, wooden parts are also used. It is they who give their owners the most trouble.
Whatever one may say, but the metal is much more durable and does not require such careful maintenance. In short, if you decide to buy such a product, you must be ready to take care of it.
Wooden swing
And yet the price leader is the fully wooden swing. They are made from timber and planks and, as a rule, are very demanding to maintain. But if you seriously decided to buy just such a toy for adults, then, most likely, you will have enough funds for professional care.
In a word, in the world of swings there is a buyer for each product.
Garden swing design, drawings
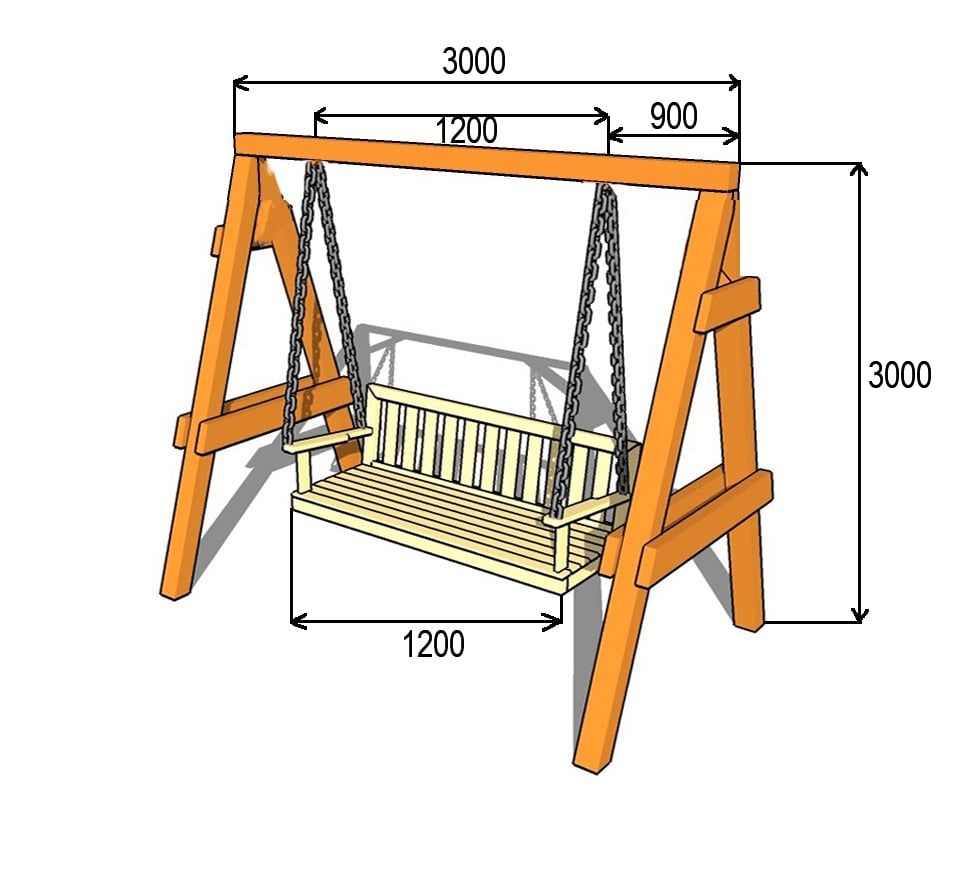
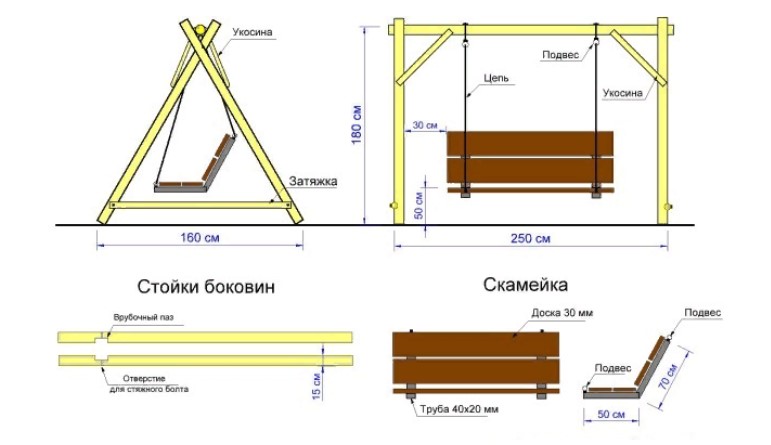
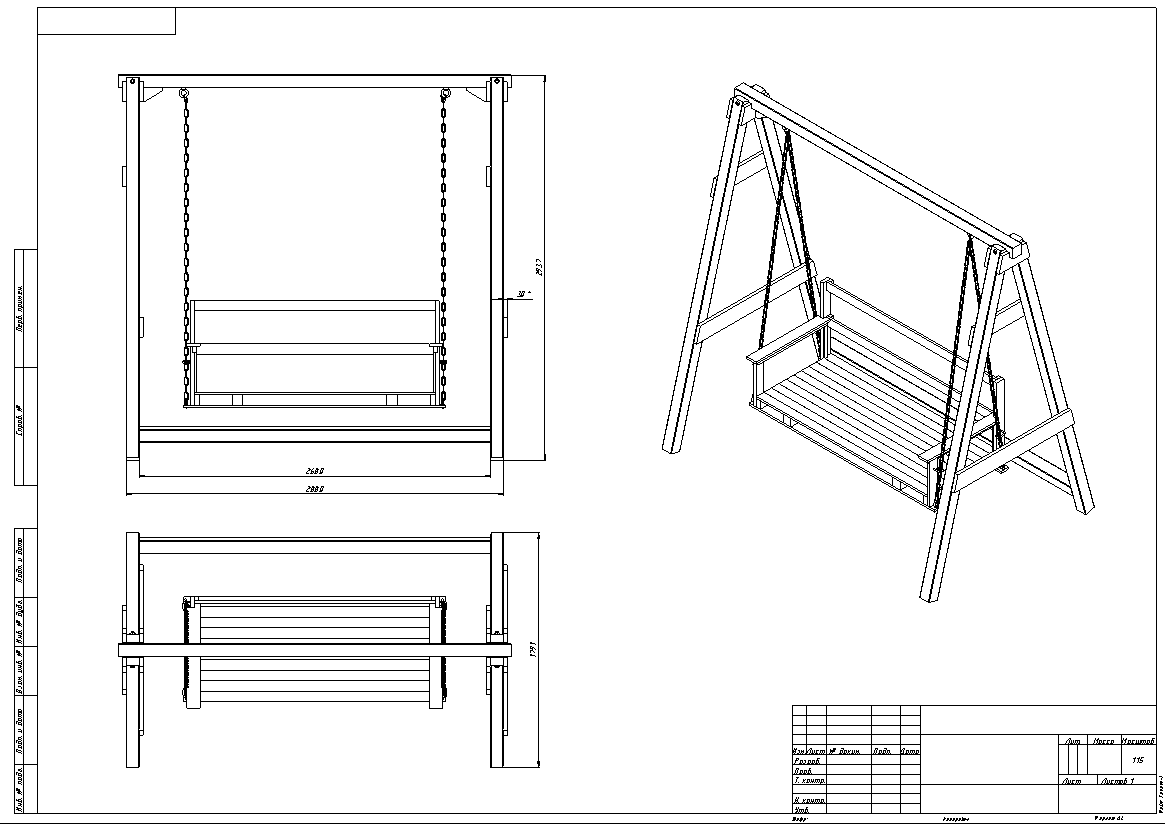
To indicate the scope of work and calculate the approximate consumption of materials, they draw up a drawing that you can do yourself or use a ready-made one from the Internet. For example, such a simple option

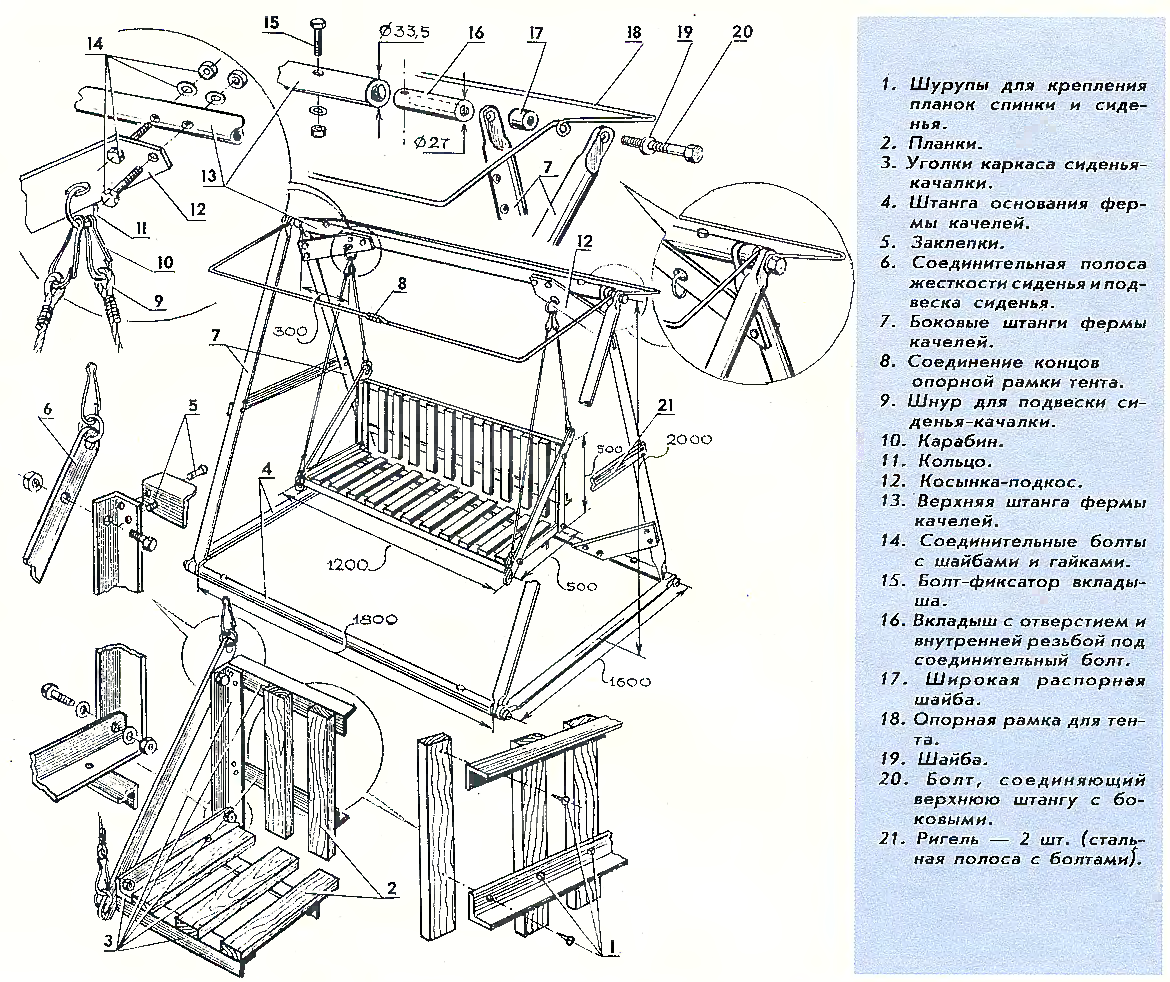
The design is more complicated with composite struts and jibs
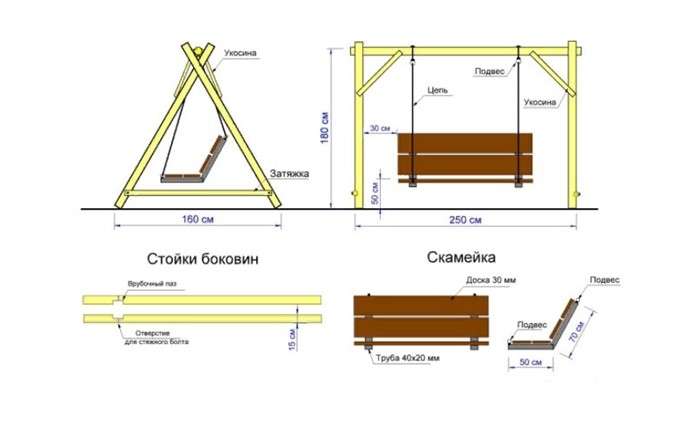
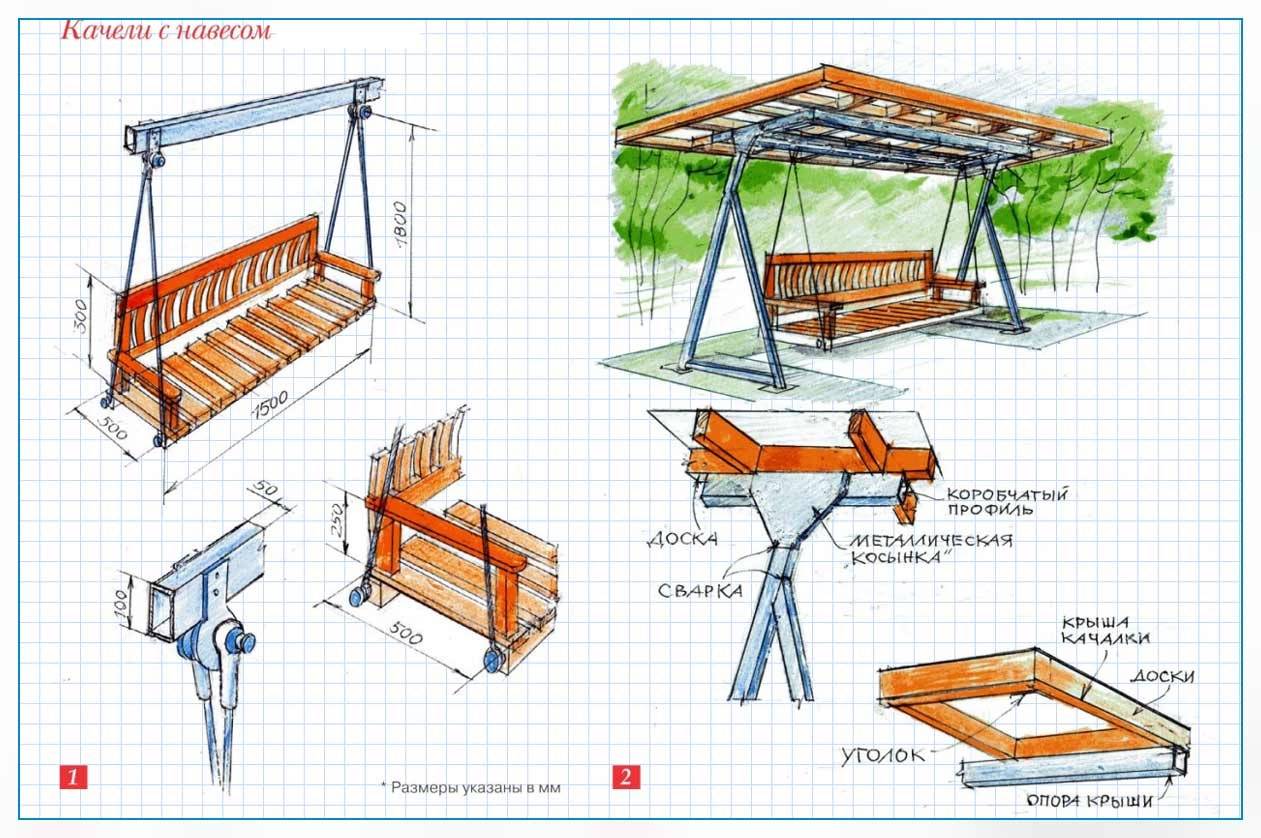
Scheme of a swing with a canopy
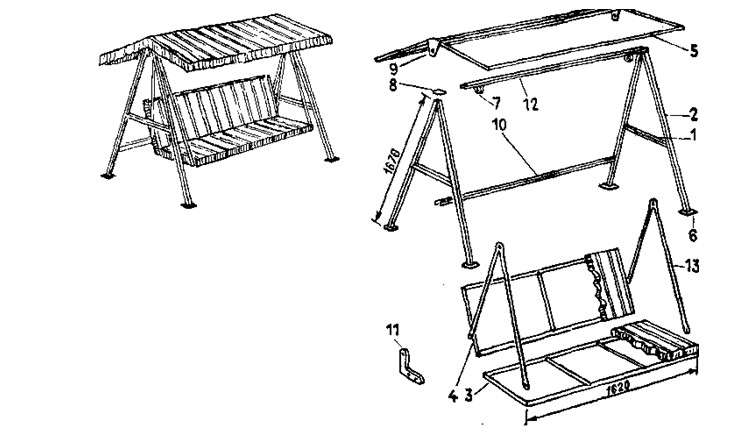
Double swing for those who like challenging but interesting tasks

The design of the simplest wooden garden swing includes:
- supports made of timber, boards or cleaned round timber of small diameter, which can be A-, X- or U-shaped, with lateral elements of a triangular or trapezoidal shape;
- seats made of wooden planks with or without backrests, armrests;
- suspensions - chains, polypropylene ropes, ropes;
- fastening elements.
If a canopy will be arranged, a light, durable frame is erected for the installation of roofing material.
All wooden elements are twisted together with bolts, self-tapping screws, it is possible with additional gluing of the joints. In some joints, nails, staples, and overlays are used. The fasteners must be corrosion resistant.

For garden swings, inexpensive lumber is usually used - pine, spruce. Larch has the highest moisture resistance. Critical parts are made from it that are in direct contact with the ground.
For convenience, you can put pillows on the seat or sew soft removable covers. A mosquito net will help protect against flies and mosquitoes.
MODEL SIX - garden swing bench.
I have already told and shown many photos of this swing bench model. All ideas for the design and construction of such a swing can be found in my article "Swing for a summer residence - 20 WAYS to do it yourself."

and I also have a step-by-step lesson on creating EXACTLY THE SAME swing with a bench, as in the photo below - ARTICLE "How to make a swing - STEP-BY-STEP LESSON with a photo." There, a Korean dad does just such a hanging bench, step by step.
As you can see in the photo, such a garden wooden swing with a bench can be suspended both on ropes and on chains - I have already told in great detail about the methods of fastening the swing and special carabiners-holders.
The same swing models can be made from Bent timber.

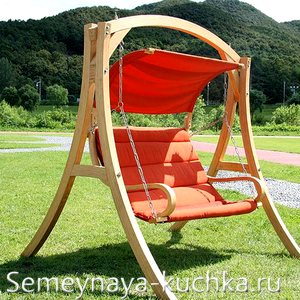
QUESTION - what kind of seat should such a swing with a bench have?
ANSWER - so that there is where to sit and where to lean on ... And the design is at your discretion ...

The variety is great ... so great - that I realized ONE: I will have to create a separate article for this topic.
Anyone who needs a garden swing-bench is exactly where I invite ... to the article "Swing-benches - 12 WAYS to make with your own hands" Ayda ... learn from the experience of foreign artisan thought
P.S.
Wrote (and in some places and drew) this article - a woman.
Because ... only a woman can inspire a man to create beauty. What I actually did these five days, beaten 38 hours.
So go and build (but I will go and finally eat ...)
And when you succeed (and you will definitely succeed) ... and you will kindle to me with a reciprocal feeling of well-deserved gratitude - here are the addresses of my electronic wallets
web money R172889385212
YAD 410012568032614
(I accept even the smallest gifts))) ... Motivation is a great thing.
An encouraged author - will always find the strength and perseverance to create good and useful articles over and over again.
but That's not all…
I decided to continue this topic, and I will tell you more about other ways to make a garden swing for a summer residence.
- article "SWING for a summer residence - 20 WAYS to do it yourself."
- article "Swing benches - 12 WAYS to do it yourself."
- article "Outdoor swing - STEP BY STEP to do it yourself."
- article "Arbor-SWING for four - 4 WAYS to do it yourself."
And also on our site there is a cycle of educational articles dedicated to gazebos. There, I also explain and show in the most simple and detailed way (just for beginners) how an unprepared urban gentle person can FALL IN LOVE WITH THE IDEA to make a gazebo in the country - with his own hands.
- Pergolas for summer cottages WITH DOUBLE ROOF (15 ways to do).
- DIY gazebo (21 WAYS + important points).
- Country gazebo with your own hands (20 options).
Olga Klishevskaya, specially for the site "Family Heap"
Take care of the family heaps ... These are your legs and hands. These are your ears and eyes ... and a source of warmth and affection.
How to complement the design
Lovers of outdoor recreation value comfort and coziness, which is why after completing work on the swing, it is necessary to take care of additional equipment of the structure. For this purpose, soft pillows or covers are sewn from suitable materials. Outdoor textiles must meet the following requirements:
- waterproofness;
- high density;
- strength, durability;
- ease of cleaning and care.
The listed conditions are met by polyester, polyester, PVC.Foam rubber is often used as a filler. Covers protect do-it-yourself swings from a profile pipe or tree from negative external factors, insects. Products neutralize the effects of sunlight, decorate structures.
The capes are sewn in accordance with the size of the swing. Covers should fit snugly to the surface, cover the sidewalls and the upper parts of the structures. Otherwise, the gaps will be filled with rainwater, dirt, foliage.
To figure out how to make a swing correctly, detailed master classes with diagrams and indicating the size of the elements will help. A variety of models allows you to choose the best option for your garden or suburban area. When installing, take into account safety standards. Ropes and chains should not be twisted; it is recommended to cover metal hangers with an ordinary garden hose. All wooden parts are carefully sanded with a plane and varnished to reduce the risk of abrasions and splinters. The fasteners are completely driven into the materials so that no protruding parts remain. The landing area is covered with crushed tree bark or sand to soften the impact of a fall. One frame, even a large one, is always designed for only one swing, otherwise the seats may collide when swinging. Compliance with the listed standards will help make outdoor recreation pleasant, comfortable and safe.
Classic swing from the board
How to do
1. Cut a piece of board about 50 cm long with a hacksaw or other saw at hand.

2. Paint the resulting seat to protect it from precipitation and make it more aesthetically pleasing.

3. With a drill a couple of millimeters larger than the thickness of the rope being used, make two holes - at both ends of the board. Step 2–3 cm away from the edge to prevent the seat from breaking, and drill exactly in the center of the vertical for an even suspension.

4. Divide the rope into two equal pieces, make loops at the ends and fasten to a suitable branch. Place the ropes approximately equal to the width of the seat.

5. Pass the ends of the ropes through the holes in the board and tie a couple of knots to the desired height.

6. Try to swing.

We mount the fastening mechanism
 We use an old car tire
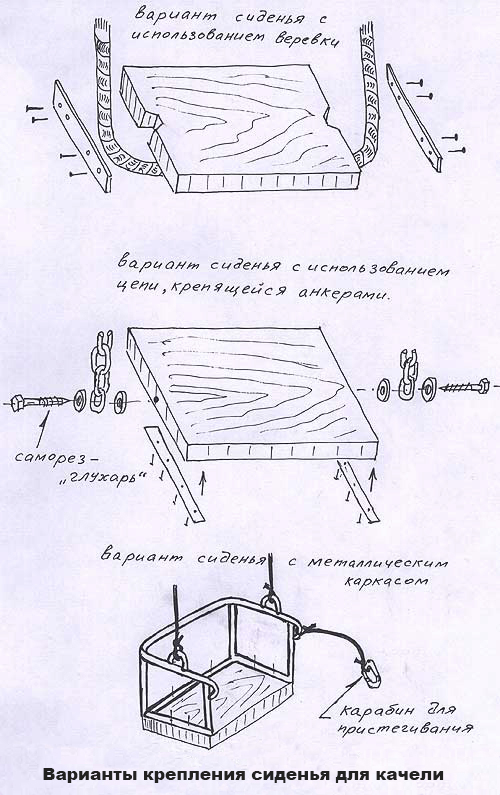
In order to hang the seat from the crossbar, you need to attach special hooks or staples to it. If you decide to use cables as a suspension, then you will need clamps. Pull a cable, rope or chain through the holes. It is better to use chains with large links. This is due to the fact that they are more durable, are not afraid of bad weather and temperature extremes. Chains, among other things, perfectly decorate landscape design.
The place where the suspension will be fixed should be especially strengthened. If your seat will be wooden, then decorate it with pillows, pull up an awning, or lay a mattress. All these details will only improve your rest and the rest of your children.
Swing is an integral part of your leisure time. You will never regret the effort spent, because your construction will delight your family throughout the summer season!
Have you already worked on creating such a structure? What ideas did you manage to bring to life? Maybe you were having difficulties in the manufacturing process? What helped you cope with them? Write your comments to the article, we appreciate your work and experience!
We recommend reading:
- do-it-yourself brick street grill;
- do-it-yourself braziers made of metal (sizes).
Buyers Tips
This chapter is especially for those who have already decided on an expensive purchase, but do not know how not to be led by swindlers and want to buy a really high-quality product. We read and remember.
The swing test should begin by checking its rigidity. Try to loosen the structure. Determine how stable it is, how tightly fit the parts. Believe me, if the structure already seems to be slack, then over time it will turn into junk altogether.
Take a closer look at the material of construction.Reputable firms use pipes, while handicraftsmen use a profile. Take a closer look at the curves along the way. They should not be reinforced with anything. Various additional plates there say that "garage" technologies were used in the production, since the factory bend calmly withstands a load of 300 kg, which is enough for the eyes for a swing.
Next, look at what the chains are attached to. For them, special lugs must be provided. A rope thrown over a beam or a chain threaded right through a pipe is again a sure sign of "handicraft".
Now about painting. Factory items are powder coated, while crooks use acrylic lacquer or synthetic enamel. Dampen a piece of cloth with cellulose thinner and lightly rub the frame with it. If there is paint on the rag, there is no smell of powder paintwork here, which means that you should not buy these swings.
Lift the pillows and see where they lie. Ideally, this should be a shell mesh. Well, in the worst case, welded, but certainly not canvas. The latter is used only in the cheapest models.

Speaking of the pillows themselves. Avoid items with polyurethane chips. They are very short-lived and wear out quickly. Brands use only a solid massive sheet, this will last for more than a decade.
More difficult with covers. So, dralon burns out under ultraviolet light, but it serves for years. Cotton is not as durable, but it is more pleasant to the touch and is not afraid of sunlight. Here, everyone is his own advisor.
The canopy is much easier to deal with. If there is polyester, good. Mesh polyethylene - we pass by. He won't survive three seasons.
Be sure to check that the mosquito net is included with the swing. You will miss this item, you will buy mosquito protection separately, and even think about how to attach it later.
Last but not least, check the comfort of the product. There are different supports in the armrests, the mobility of the back. You may be surprised, but if your swing has successfully passed all the previous "nit-picking", then the manufacturer probably took care of the pleasant little things.
How to assemble the rack?
The advantage of this type of swing is its incredible stability on flat surfaces - concrete, asphalt, a veranda with a wooden or tiled surface, well-tamped ground. Due to their weight, they stand securely on supports, however, if desired, two adult men can move them from place to place.
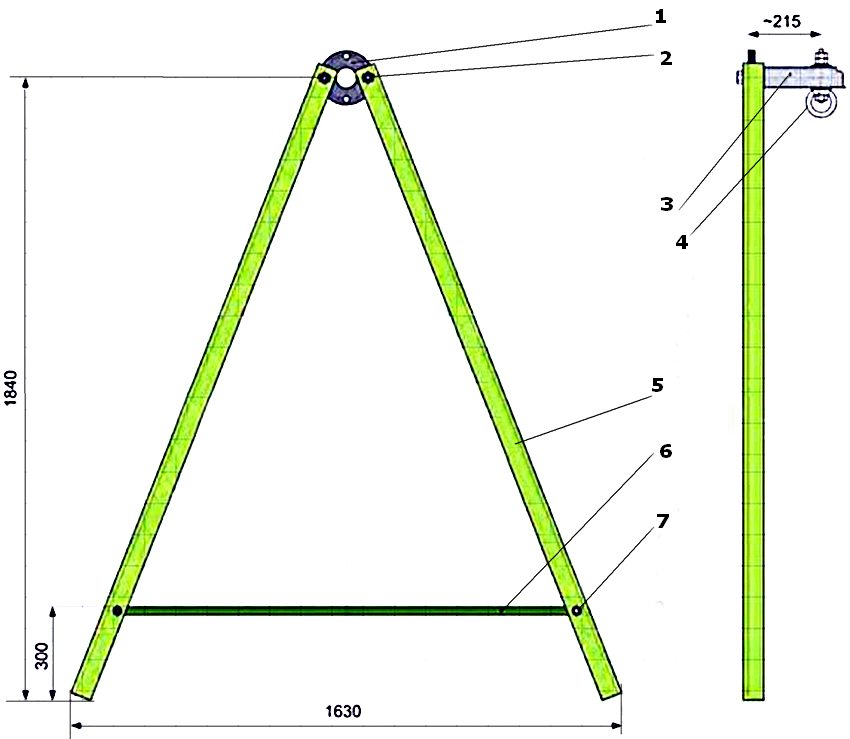
The type of structure is called A-shaped, because the support consists of two beams fastened at an angle and connected by a crossbar in the form of the letter "A". A crossbar is attached to these two supports.


The height of the support is 215 cm, the distance between the two divorced ends of the beams must be at least 160 cm. The angle of inclination of the legs of the support in relation to each other should be 40 degrees. The distance between the two supports is from 180 to 220 cm. The 15 cm wide crossbar, which holds the two beams, can be duplicated. One at a height of 20 cm from the ground, the second - about 100 cm from the ground.


If you cannot attach the swing with brackets, then the timber will have to be dug in, respectively, the height of the timber for the support is taken 50 cm more than initially. Before installation, the base must be treated with antiseptics and bioprotective oils (you can simply immerse the ends of the timber in recycled oil). Put the racks in the holes, sprinkle with gravel and pour concrete.

Additionally, pull the crossbar with two beams, fasten with nails. Pull the racks themselves together with pins. You can also nail additional fasteners on nails and pins in the area where the racks are connected (like fastenings under the shelves in the closet), and put a horizontal bar on top and pull it with pins to the racks.
We select the material
 On metal chains
The above-mentioned variations in the manufacture of the simplest swing implied the use of improvised materials.But, if you want to create a more sophisticated design, then you can use the appropriate wood and metal. It can be supplemented with a backrest and a crossbar located in the front, which will ensure safe operation.
The list of materials required for manufacturing may be something like this:
- Larch boards.
- Self-tapping screws of different sizes.
- Carbines.
- Chain for securing.
- Ring screws.
To create a structure, you need a typical set of tools. It includes a drill with various drill sizes. A hacksaw and a saw, a plane, a jigsaw, a hammer may be useful. For measurements, you will need a tape measure, square, chalk, or, perhaps, a pencil, marker.
If you want to create a stable support, then you should definitely dig four pillars into the soil to a depth of about 80 cm. Subsequently, they will need to be concreted, then connect the racks and the crossbar. If you chose metal pipes as the racks, then they need to be connected using a welding machine. If you use wooden supports, then before installing them, you should treat the material with an antiseptic preparation. Connect them with bolts and nuts. To make a seat, prepare 2 frames that will serve as a back and seat. Attach the plywood, and then join the frames at an angle of 120˚.
 Fastening and mounting
Now you need to attach special hooks or staples to the seat, which will allow you to pass chains, cable or ropes through them. In this state, the swing can be suspended from the crossbar. Note that the feet of a seated person should touch the ground with their toes. In fact, country swing can be very diverse, here, perhaps, it all depends on the power of the flight of your imagination.
Manufacturing a structure from metal

To make metal structures, you need to prepare the following set of tools and materials:
- Welding machine with electrodes.
- Capacity for mixing the solution.
- File / sandpaper for metal.
- Ingredients for mixing the mortar: water, cement, crushed stone, sand.
- Grinder for cutting metal elements.
- Fasteners: bolts and nuts.
- Bolt wrenches.
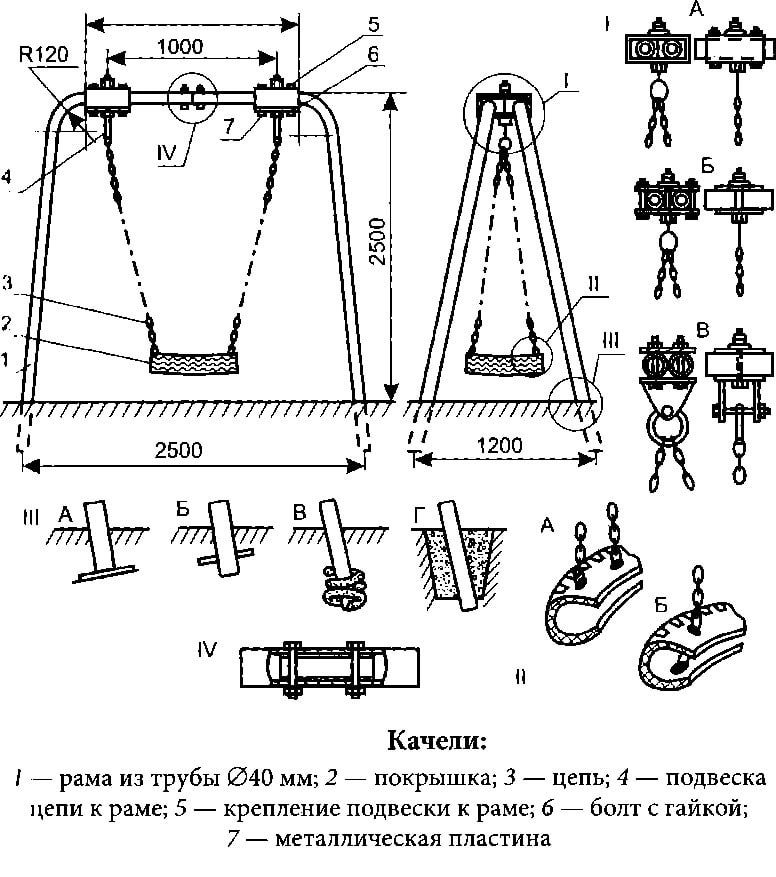
- Metal pipes.
- Shovel.
Technological sequence

First, cut the pipes:
- Side racks 2 m long - 2 pcs.
- Crossbeam 1.5–2 m long - 1 pc.
- For the base there are 2 pipes on each side (arbitrary length).
After cutting the pipes, remove any burrs from them. This can be done with a metal sandpaper / file. The pipes forming the base of such a structure must be welded at an angle of 45º, as shown in the diagram. Then weld the crossbar at right angles to the uprights.
Dig 2 trenches with a depth of 80 cm and a width corresponding to the resulting tripod. The distance between them should correspond to the width of the crossbar. Supports (tripods) will be inserted into these trenches. Before the support pillars are laid in the trenches, make a 10–20 cm sand cushion, tamp the sand. Set up tripods and fill them with concrete. It must be made on the basis of a ratio of 1: 2: 1 - cement - sand - crushed stone. Add water to this mixture. You should get a homogeneous, not too liquid mass.
After that, you can weld hooks to the crossbar, on which the seat will be fixed on cables / metal beams. Weld the seat to the metal beams, secure the seat. The finished structure can be painted.


