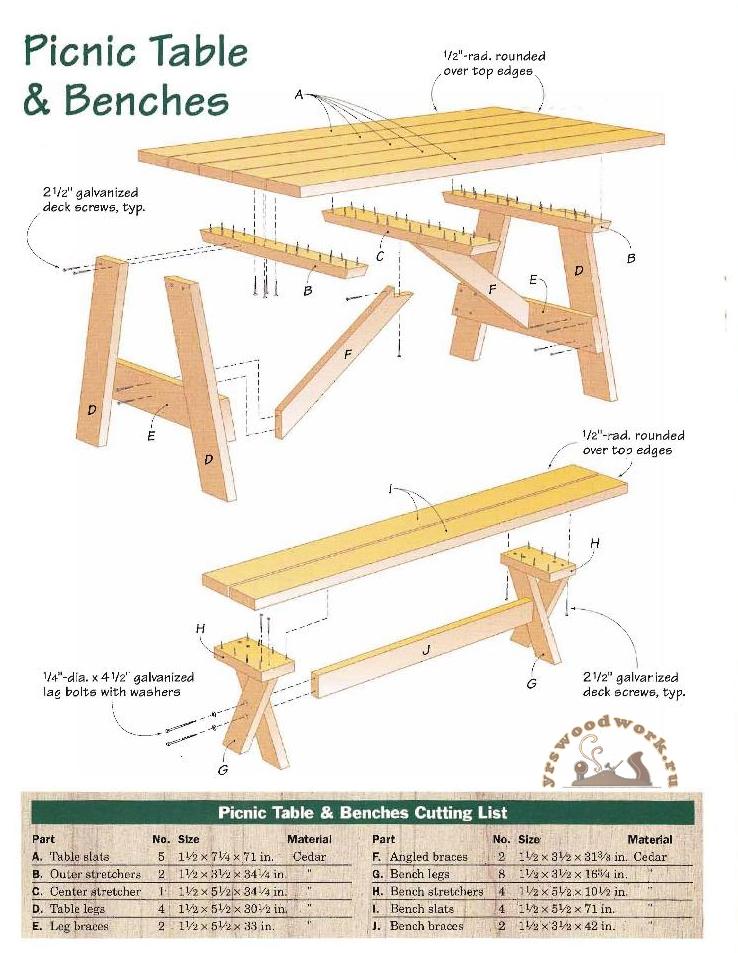
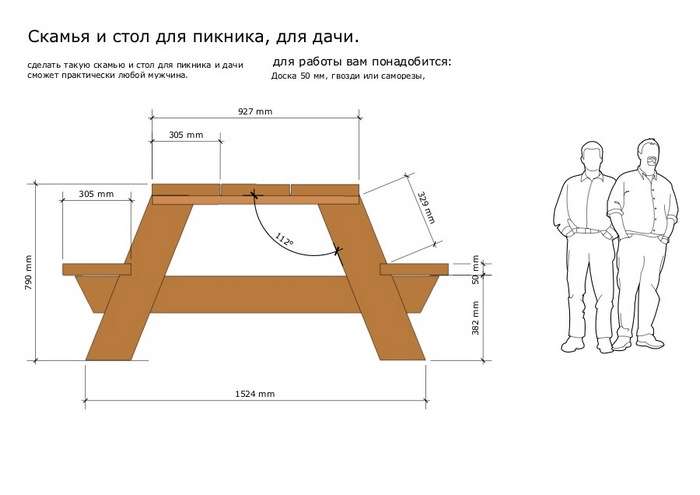
Tables
For a garden, this element should have a simple but reliable design. You can make a table from a metal profile, a bar, or assemble it from other materials at hand, such as building pallets.
Let's consider these options in more detail.
Classical
For manufacturing, it is better to use edged boards 4 cm thick and 14 cm wide. Fastening is carried out with self-tapping screws.
For work you will need:
- hacksaw;
- electric drill / screwdriver;
- grinder;
- measuring instruments;
- paint brushes for varnishing.
Tables come in different shapes
All work is carried out according to the following scheme:
- First, a countertop is made. For this, a canvas of the required width is assembled from 7-8 boards, reinforced with a pair of jumpers.
- Holes are drilled in the jumpers for the diameter of the connecting bolts.
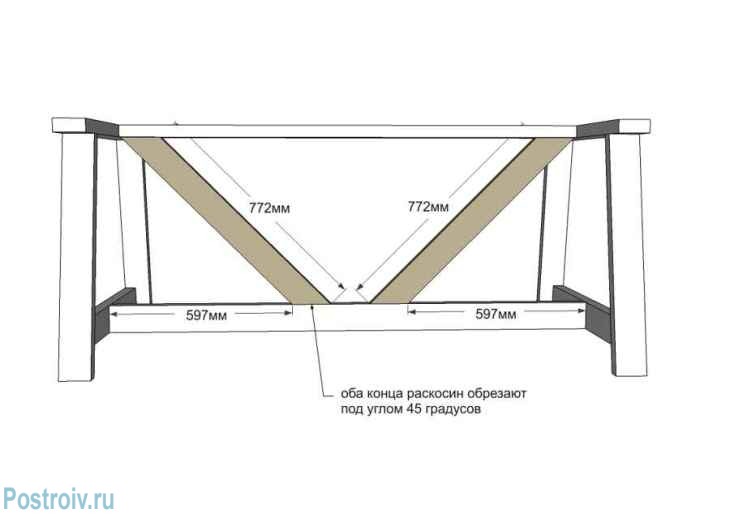
- Make supports. It is better that they intersect; for this, the ends of the timber are cut at an angle of 45 °. Use measuring tools to keep the corner straight.
- We fasten the details of the structure into one whole. We check the finished table for strength.
In conclusion, it is recommended:
- polish a piece of furniture;
- soak the entire surface with linseed oil;
- let dry, then paint or varnish.
Good to know: how to assemble a reliable garden table with your own hands.
From pallets
The availability of such materials in the right amount immediately facilitates the process of creating garden furniture. Using imagination, it is possible to build very creative options for a table, bench and even a corner for rest. Pallets can either be bought (their cost is low), or they can be picked up near a construction supermarket.
The simplest version of the table is to process the pallet, giving it a design look, then install it on brick blocks, a chipboard slab or build legs from fragments of logs.
At the same time, we will explain how to build a recreation area out of pallets, for which there will certainly be a place in the country by a lake or in the shade of trees. For this you need:
- pallets: 8 pcs. for seats, 6 pcs. as a backrest;
- 2 small pallets under the table;
- fasteners;
- paint, varnish and brushes.
You will also need a bottom layer of pallets, which will form the base.
All work is performed as follows:
- In the selected place, pallets of the base are folded, forming the letter "G", fastening with connecting elements.
- The pallets for the formation of seats and backs are sanded, painted and varnished.
- When the paint and varnish are dry, we collect the corner itself on the finished basis. The backs are nailed to the seats.
- In front of the seats, a table is assembled from two small pallets fastened together.
- For convenience, the entire area is covered with pillows and soft materials. Now you can even sleep here, covered with a blanket.
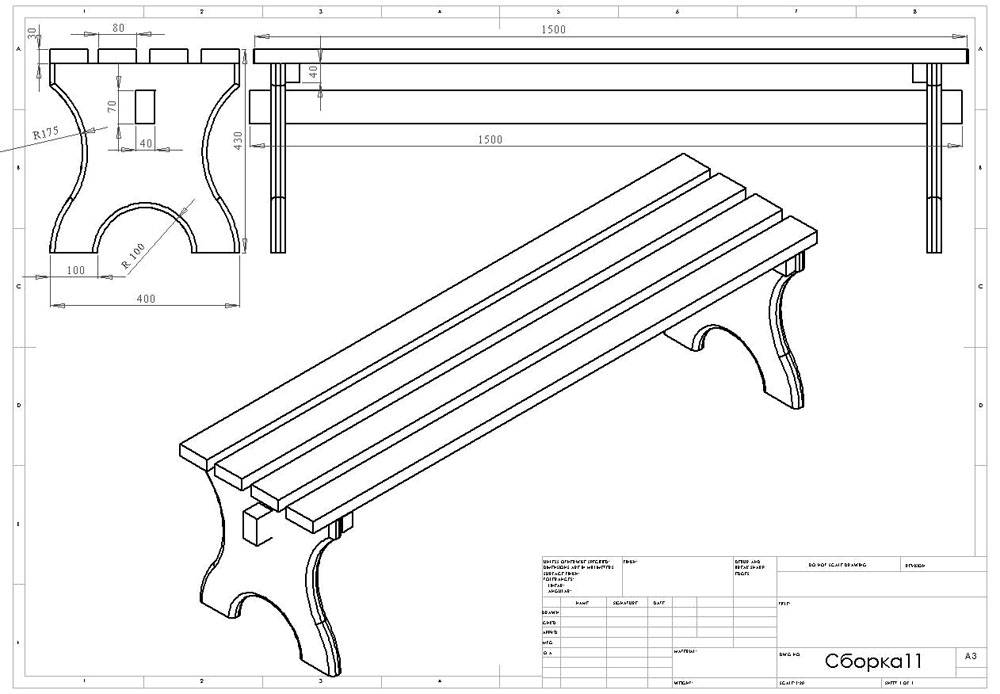
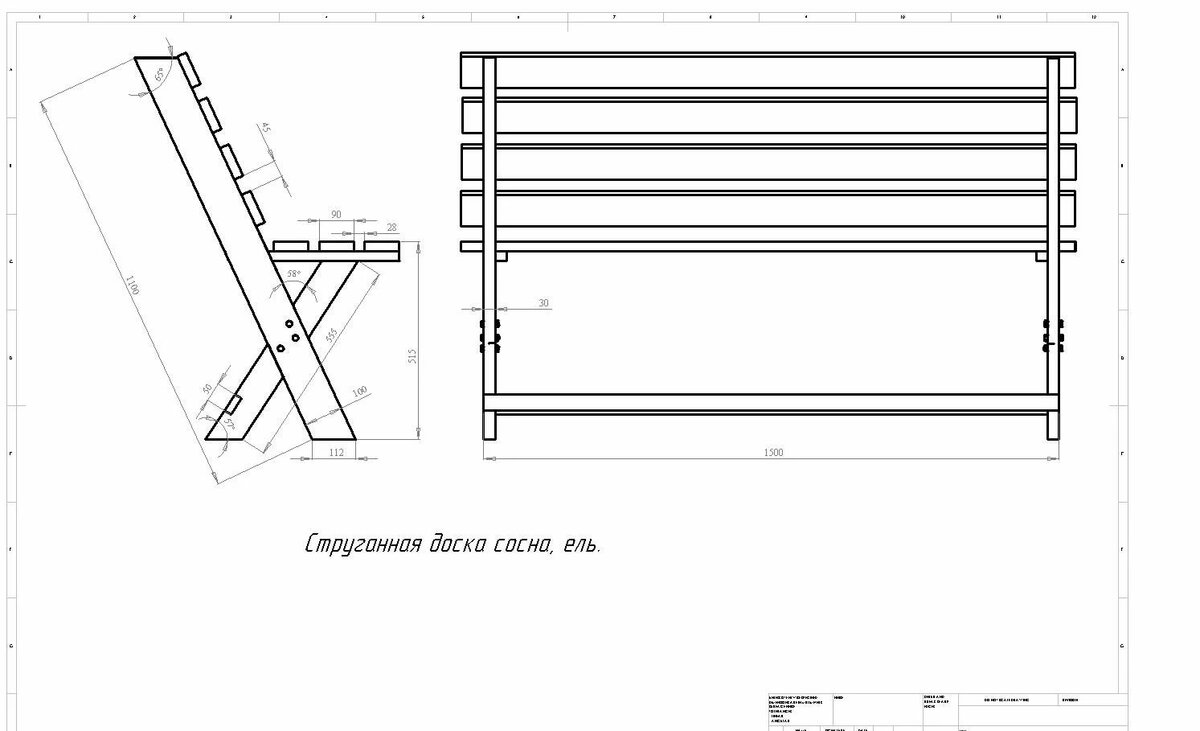
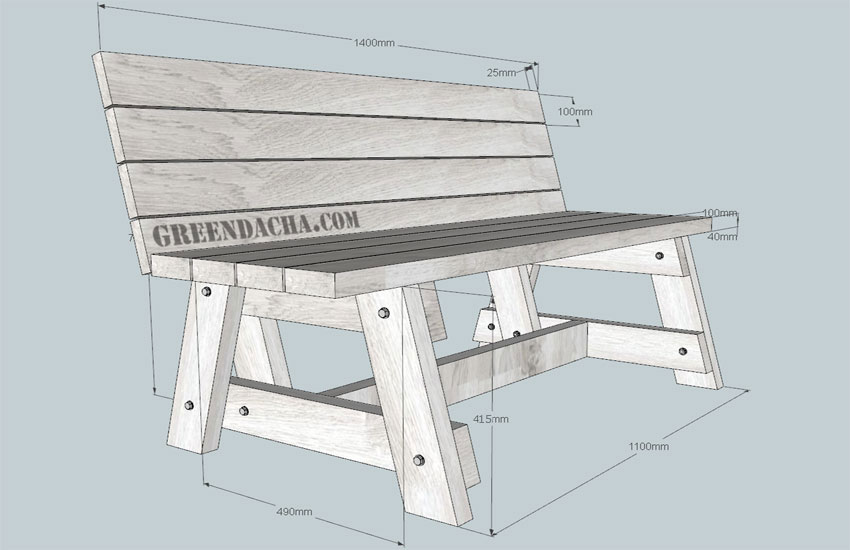
Bench
The bench is perhaps the most irreplaceable element of the suburban area. It rests well after a hard day, in front of it you can set a folding table and organize evening gatherings in the open air.
There are many different schemes of garden benches on the network, we choose the simplest one and get to work.
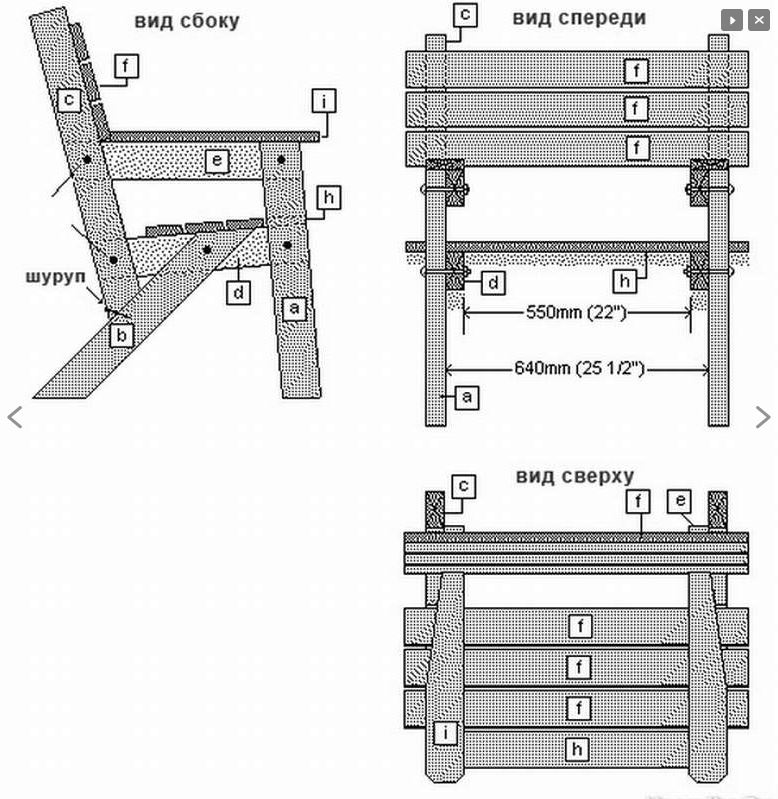
You will need 18 parts 15 cm wide, 5 cm thick and long:
- 4 things. - 36.6 cm (detail A);
- 2 pcs. - 56.5 cm (detail B);
- 1 PC. - 96.0 cm (detail B);
- 2 pcs. - 48.5 cm (seat support slats);
- 2 pcs. - 76.0 cm (detail D);
- 7 pcs. - 140.6 cm (strips D).
The bench will need a lot of parts.
Next, the assembly is carried out according to the existing drawing. The stages are as follows:
- Parts A and B are fastened together, a support rail is connected to them.
- Part G. is attached to the resulting structure.
- The slats are pressed with bolts.
This is how one leg of the future bench is assembled. The second is mounted in the same way. Then comes the turn of detail B. The last strips are fastened D. Between them there should be centimeter gaps.
For beauty and practicality, the finished bench is sanded, then varnished.
This is interesting: more about wood benches.
Material for the country table
In the summer season, outdoor furniture is regularly exposed to the sun, wind, rain. Therefore, only durable building materials are suitable for it. A country table can be made of metal, natural stone, natural wood. Some summer residents make outdoor furniture from scrap materials.

Wood
Not every type of wood is suitable for the construction of an outdoor table. In conifers, the structure is light and loose. There is a lot of resin in their wood, which quickly ignites. Thick droplets are constantly released from the fibers, spoiling dishes and textiles. Therefore, before making furniture from coniferous wood, the parts are impregnated with moisture-resistant agents.
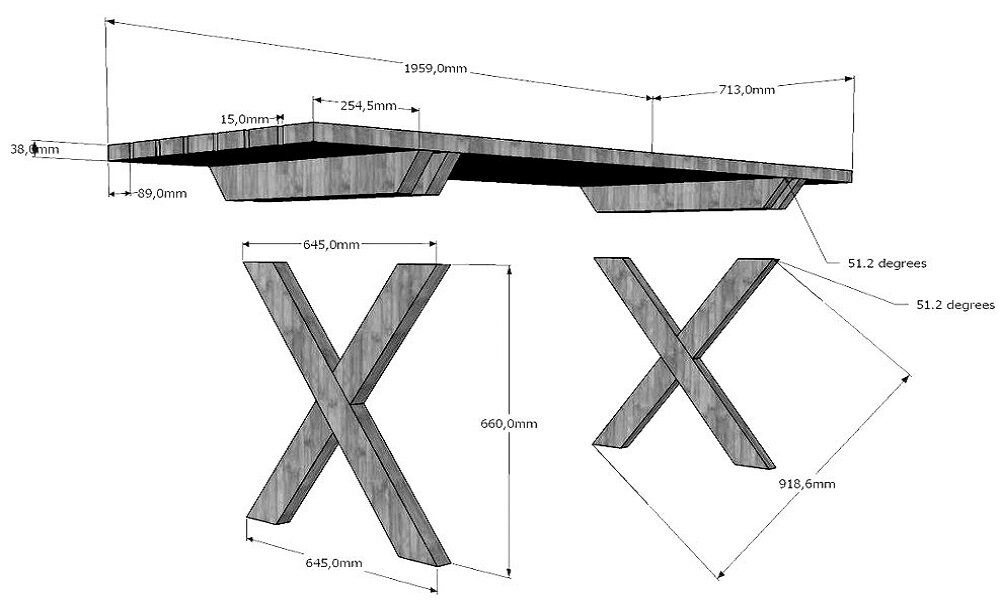
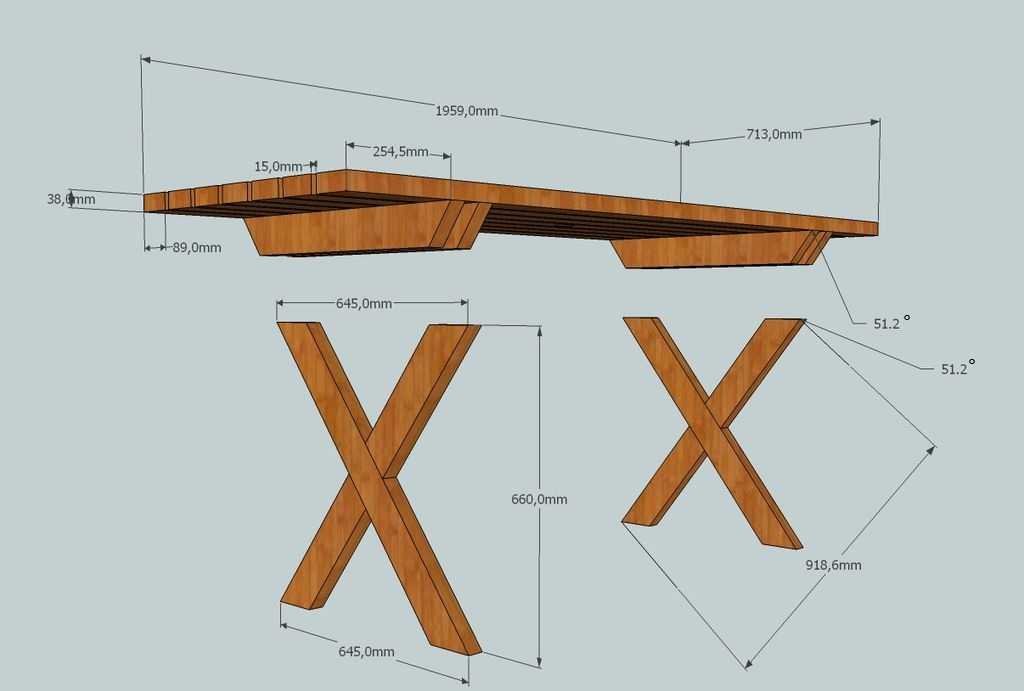
Hardwoods are often used to assemble a work or dining table. Parts are made from boards with a thickness of 50 mm. Legs are made straight or crossed in the form of the letter X. All surfaces are carefully sanded to give them smoothness. Then they are impregnated with antiseptic agents to protect them from decay.
Important! To extend the service life and increase the strength, tables made of timber or boards are covered with furniture varnish in several layers.
Stone
Natural stone furniture is monumental, majestic and beautiful. But its ready-made price is very high. To reduce costs, they make the base for a bench or table on their own. To do this, take building boards, blocks and bricks, natural stone. Stone furniture suits any style of landscape design and is in harmony with buildings. Many people use artificial stone to reduce the cost of making household items for the garden.
Metal
Chairs, benches, tables and other outdoor furniture are often made of metal using a welding machine. To make it look light and graceful, openwork inserts are made. Under the influence of moisture, the material gradually collapses. An anti-corrosion coating will help to avoid this. Forged parts look much more interesting. They are made to order in special workshops. The forging base is combined with wood, glass or stone elements. Therefore, many summer residents acquire a base and supplement it with details from other materials on their own.
Step-by-step instruction
The advantages of hand-made garden furniture are its cheapness, originality and replaceability. If the furniture gets bored over time, it is easy to replace it with new products, created with your own hands. Among the popular models for the garden are the following types of furniture:
- Bench;
- Chaise lounge;
- Sol;
- Pallet furniture;
- Braided options.
To better understand how to make any of these items, it is worth considering the step-by-step assembly instructions. In the course of describing the manufacture of garden furniture with your own hands, successful homemade products, photos and drawings will be presented below.
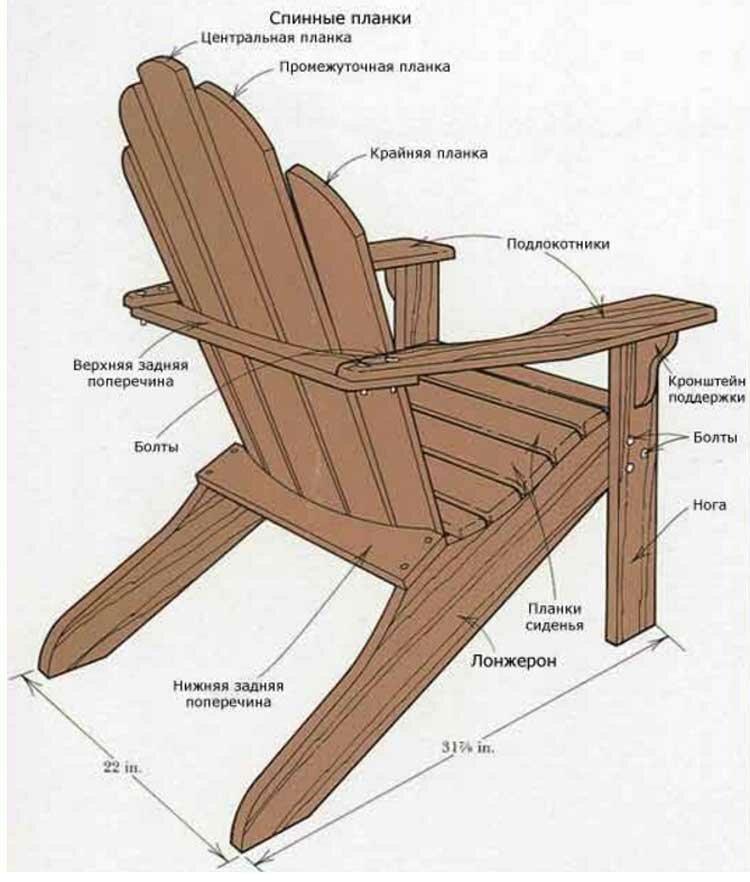
The easiest way to make a garden bench is to use wooden log cabins. Products made from such material add special comfort to the summer cottage, adding natural textures and colors. You can place the bench anywhere on the site: on the porch, in the gazebo, under the trees, near the bushes and even near the reservoir.
For self-production, you will need 2 logs, one of which should be thicker than the other. You also need tools for working with wood and thick blocks. It is worth noting that the part used for the seat must be smooth. This is achieved using a milling machine. If it is not possible to use the machine, purchase a pre-rounded log.
Before you start creating a bench for a summer cottage, you should decide on its type. The bench can have a backrest, be round, made of solid logs, or have fixed seats.
In this material, it is proposed to make a garden bench with a back.To do this, you should follow the algorithm of actions:
- Saw a thick log into logs and place them in the chosen location. The distance between them should not exceed 90 cm;
- The length of the logs should be longer than the seat of the future shop. For this, it is worth leaving gaps of 20 cm;
- Saw out the grooves on the logs for inserting the seat. To do this, it is worth measuring the diameter of a thin log and making the appropriate cuts;
- A thin log is sawn lengthwise into 2 long halves. One of them is attached to logs, flat side up. This will be the seat;
- The bars are attached to the base of the logs - their length will be the height of the back;
- The second part of a thin log is attached to the bars, making out the back.
At the end of the work, all the details of the bench are opened with a protective varnish in several layers. To create a decor, you can draw a drawing on the seat yourself or involve children in such a fun activity.
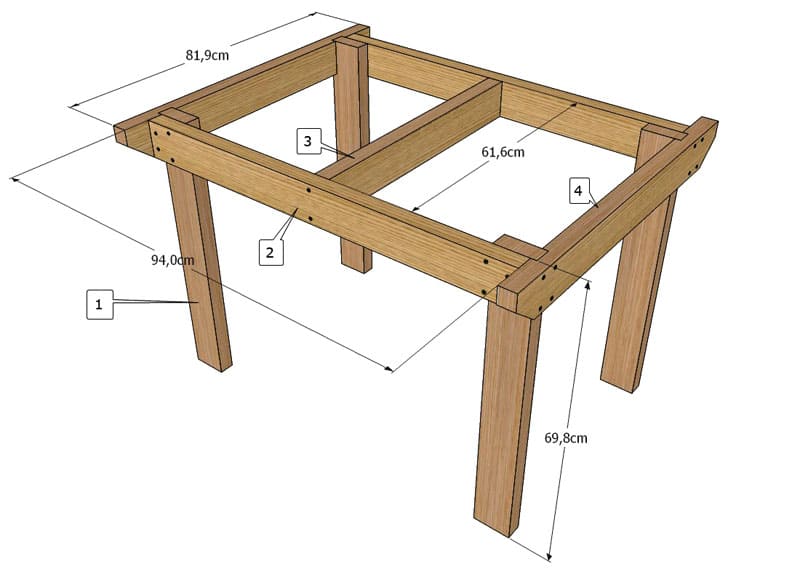
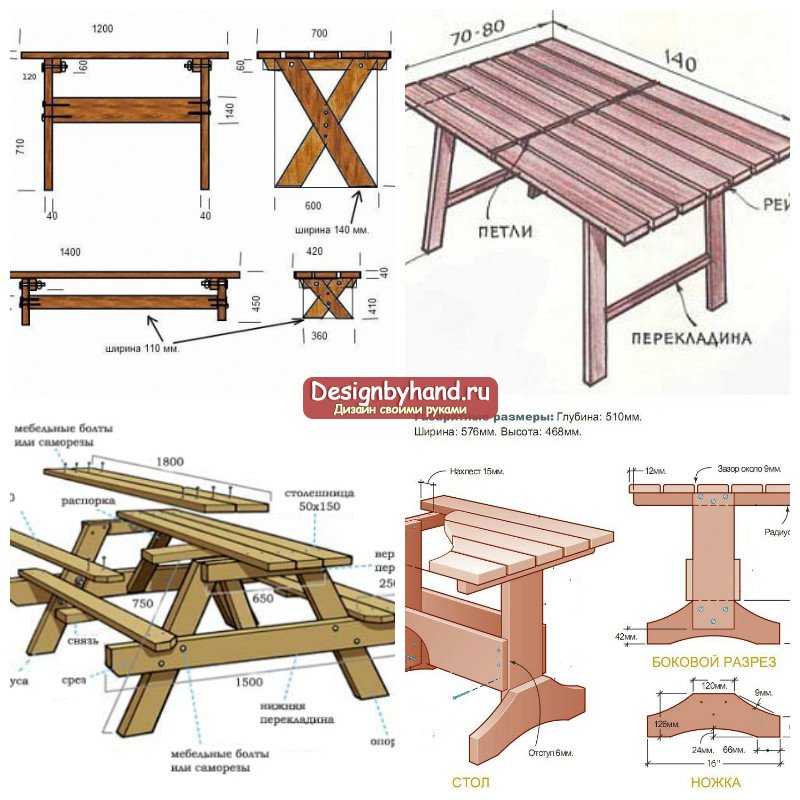
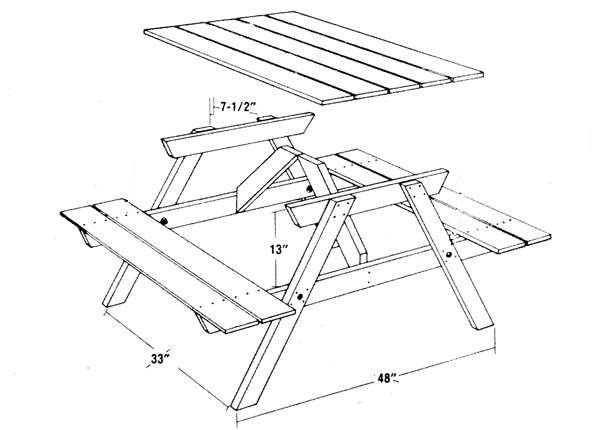
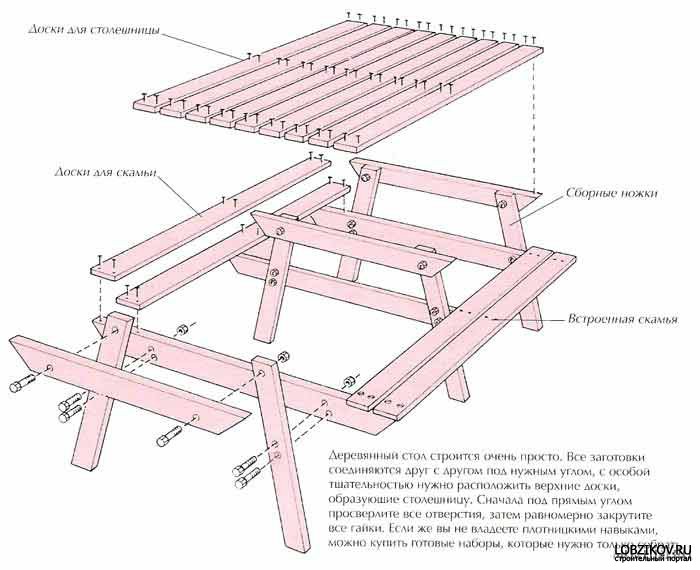
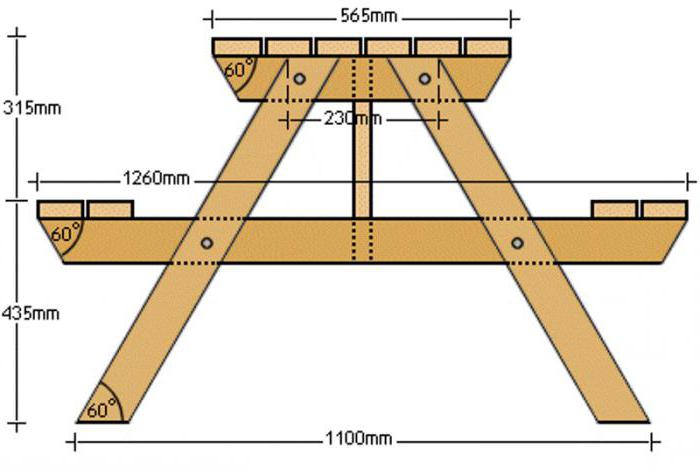
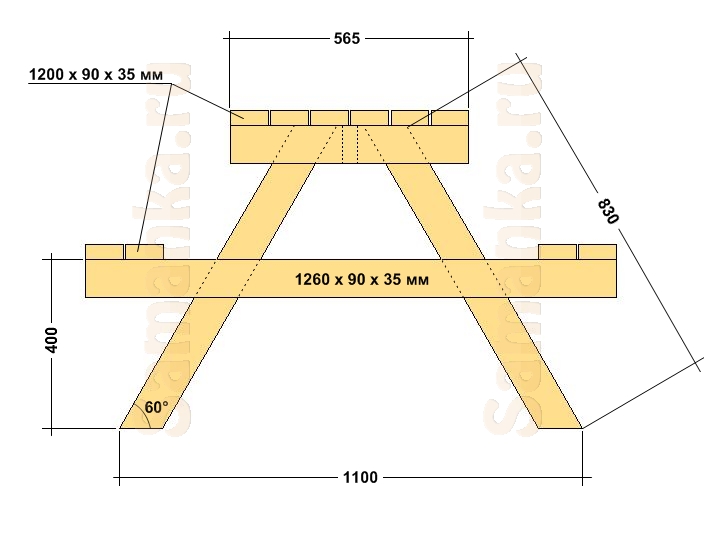
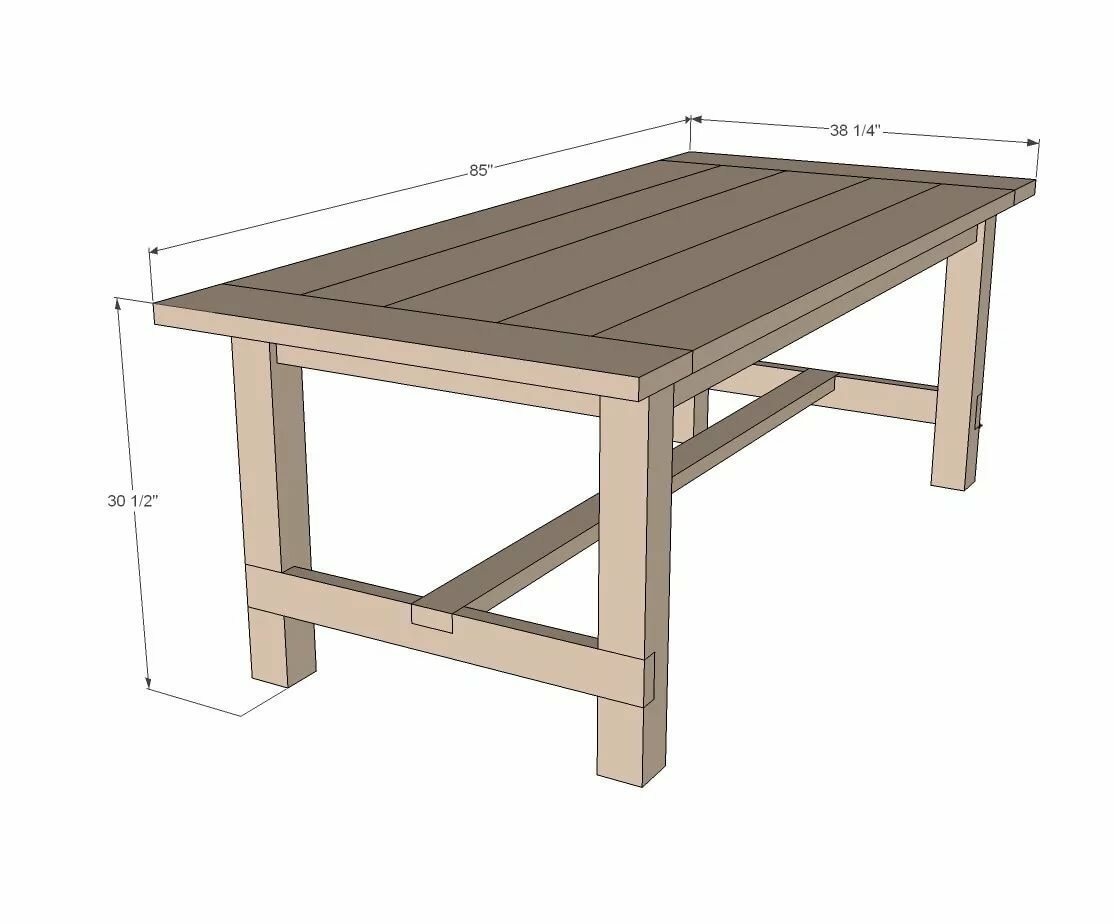
The simplest table made of boards with your own hands: assembly on self-tapping screws
Let's analyze one of the easiest structures to work with: a rectangular table with four square legs, a sideboard made of a board, without additional parts.
For a table with dimensions of 80x120x70 cm you will need:
- timber 40x40x680 mm, 4 pcs;
- board 10 ... 20x76 mm, 2 pcs. length 650 mm and 2 pcs. 1050 cm;
- board 20mm, length 1200mm. Depending on the width of the board, the required amount is selected until the total width of the tabletop is 800 mm (8 pcs. 100 mm, 4 pcs. 200 mm);
- board for strengthening the corner joints of the drawer side, section 20x75 mm, 4 pcs. length 100 ... 200 mm;
- wood screws 20 ... 50 pcs.
Important: in this model, the parts are fastened using self-tapping screws screwed at an angle. To maintain a uniform angle for all drilled holes, it is convenient to use a simple device - a jig.
Assembly sequence:
after trimming the parts to size, the frame is assembled - the drawer side and the legs. To do this, the parts are placed on a flat, smooth surface and temporarily fastened with clamps (when working with an assistant, there is no such need). It is convenient to perform operations one by one - two tsars and a leg. It is necessary to maintain the right angles between the drawers as accurately as possible. To connect the elements, holes are drilled at an angle and the parts are fastened with self-tapping screws;
after assembling the frame, it is necessary to reinforce it in the corners. For this, you can also use metal plates or, as already suggested, a board. If the second option is used, the edges of the board are cut off at an angle of 45 degrees for a snug fit to the sidebars, after which the board is screwed in with self-tapping screws;
the prepared frame is checked for stability, if necessary, the length of the legs is adjusted;
arrange the tabletop by fixing the boards to the frame


For this, as well as for attaching the legs to the sidebars, self-tapping screws and holes drilled at an angle are used.
Important: the length of the self-tapping screws is selected so that they do not go through the tabletop!
The end of the work will be the processing of wooden parts with varnish or paint.
Safety instructions for work
Getting started, you need to remember about your own safety. Here are some simple rules to help you avoid injury:
it is advisable to cut boards by wearing gloves - inadvertently grasping the material, you can injure your finger or drive a thorn (which is not always easy to remove);
with an electric plane and a circular saw, on the contrary, it is better to work without gloves - often the "spools" hanging from them are able to instantly wind up on the rotating shaft of the plane or the teeth of the disc, which is fraught with serious injury, the same applies to long sleeves on shirts;
when dissolving the boards on a circular saw, the still untreated part of the workpiece is fed onto the disk using a wooden support (by no means by hand);
It is better to paint in the fresh air (or at least in a well-ventilated room) - in a warm and unventilated location, its vapors can cause headaches or dizziness;
well, and, of course, use only a serviceable tool (there should not be any "walking" handles on chisels or loosely fixed discs on circular saws).
Did you know? One of the trends in the world of furniture are hammock tables (under their main plane, a hammock shelf is attached, in which a pet like a cat can easily fit).
In general, be careful. And some charge of patience will come in handy. On the other hand, the efforts made will be rewarded with the appearance of a beautiful element of the country design.
Now you can imagine how to assemble a table for a gazebo on your own, and what is needed for this. As you can see, given the free time and initial skills to work with tools and wood, this is a very real task. We hope the result will meet expectations, and the table assembled in this way will become another favorite location for relaxation. Good luck in this work!
Sun lounger
Those who use the dacha just as a place to relax will surely appreciate this useful piece of furniture. His very presence creates an atmosphere of comfort and idleness. It is desirable to make with your own hands an option with an adjustable backrest, which allows you to select the desired angle of inclination.
For manufacturing you will need:
- back boards: 3 pcs. size 5x10 and length 40 cm, 2 pcs. - 90 cm and 1 pc. - 60 cm;
- frame boards: 2 pcs. cross bar 50 and 215 cm long;
- bars for legs: 6 pcs. 35 cm long (for a chaise longue, this height is considered optimal);
- seat slats: 13 pcs. size 2.5x8x60 cm;
- backrest slats: 6 pcs. size 2.5x8x88 cm (it is advisable to round them).
We start the assembly from the frame:
- A rectangle is made from the frame parts, connecting the fragments with screws. Then an adjustable seat is constructed in the form of a second frame.
- The frame bed is sheathed with transverse slats with gaps of 1–2 cm.
- Legs are assembled from bars, in pairs at the legs, piece by piece at the head. Attach them in the corners with self-tapping screws.
- The backrest frame is mounted in the frame body, with some clearance so that nothing interferes with the movement. We trim the back longitudinally with the corresponding slats.
- The backrest is connected to the bench, stepping back from the edge of 9 cm. The slope is adjusted using four grooves on the frame.
- The entire structure is also sanded, varnished and painted with a paint that does not fade in the sun.
See also: step-by-step instructions on how to make a sun lounger with your own hands.
The choice is small - for the material
In stores you can buy interesting tables made of stone, metal, plastic and glass. All these materials require skills, so wood is still the most beloved one - it is environmentally friendly, easier to process, and feels perfect in almost any interior.
Each of the tree species has its own characteristics, they must be taken into account. In the furniture industry, they often use:
- Birch. Its strengths are strength, resistance to cracking, deformation. Achilles' heel is the fear of permanent moisture, which provokes rotting wood. This weakness is eliminated by antiseptic treatment.
- Beech. The material is easy to work with, malleable, although it belongs to hard rocks. Not so resistant to deformation upon drying. Rotting also refers to the disadvantages that are eliminated by treatment with antiseptics.
- Oak is a beautiful wood, it is distinguished by a noble texture, special strength, much greater resistance to decay than previous representatives.
- Spruce is knotty wood. When processing, it shows a tough disposition, is capricious when impregnated with an antiseptic.
- Larch. It has strength, is able to resist deformation, decay. Minus - craving for cracking, not suitable for rooms where temperature and humidity changes are frequent.
- Aspen. Easy to process, does not crack, almost does not rot. The disadvantage is softness, leading to mechanical damage even from a pencil or pen.
- Fir is a good material for amateurs, as it is easy to process.Fir products are very afraid of moisture, therefore they are not suitable for outdoor furniture.
- Pine. Differs in lightness, but strength, softness and pliability. The deformation is insignificant, it is well treated with antiseptics.
Despite the fact that soft woods promise easy work, it is better to choose a harder material. Among the favorites are beech, oak, larch, pine. With them, the novice carpenter can be sure that his first table will become a reliable, durable piece of furniture.
Why is wood the best material?
Before you start developing a garden design and making garden furniture for a summer cottage, you need to decide on the material and style. The best material, of course, is wood, here's why:
- Wooden models are comfortable and beautiful, they are not considered the most expensive. In addition, they are easy to make with your own hands. The main problem of such garden furniture is the fragility of the tree and the likelihood that garden pests will start. But all these problems can be easily solved by special processing of finished products.
- Stone garden furniture, very strong and most durable, is ideal for decorating a summer cottage, but it may not be the most convenient and not the most affordable. How much it will cost to make a particular model determines the type of selected stone.
- Metal or wrought iron models are the choice for those homeowners who want to enjoy both the look and the traditional comforts of a garden. Of course, the aesthetic appeal of wrought iron is beyond competition, but such furniture can only be made by professionals.
- The secret of the Japanese garden is that its furnishings can be made of any material, the main thing is comfort and subtle fusion with the environment. Accessories such as lanterns, matching garden designs, and ornamental grass are good ideas for Japanese-style designs.
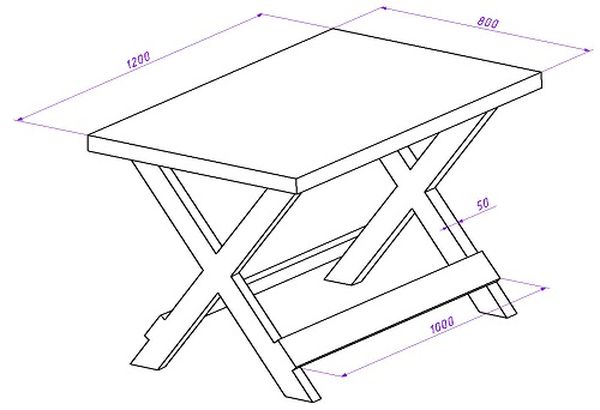
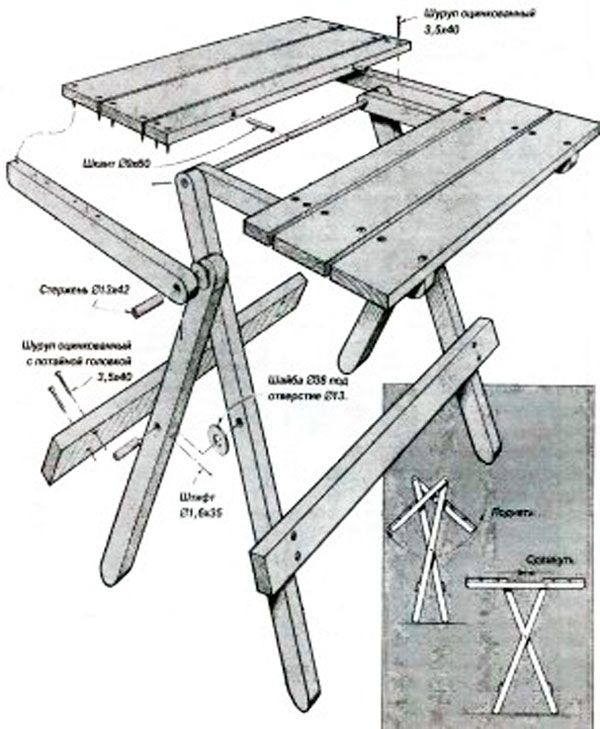
Folding table from available tools
A folding table is an indispensable thing not only in a personal plot, but also in a garage or a country house. It will perfectly fit into any interior and will not take much time and effort to manufacture. The main advantages of such a table are its compactness and portability.
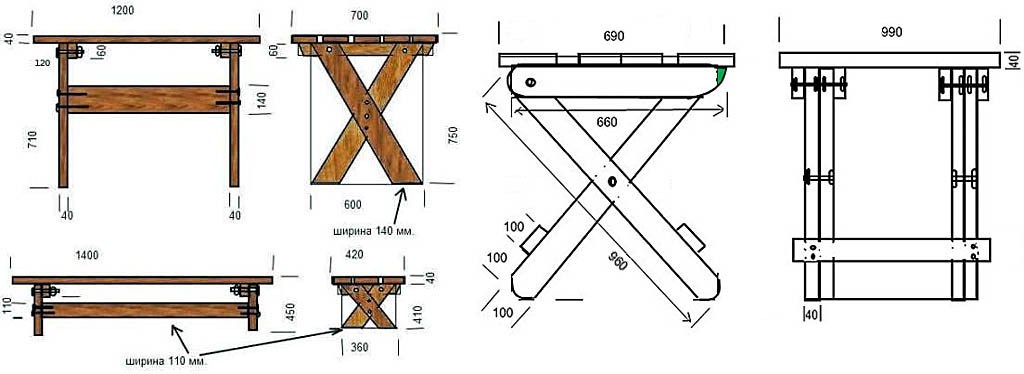
You can take it with you to a picnic in nature or put it in the garden, it does not take up much space. The folding table can be of various shapes and design complexity.
Consider the simplest, but at the same time, reliable version of a folding table. For manufacturing, you will need several bars, sawn on a circular saw and a tabletop, which can be used as a box, chipboard sheet, wood saw cut, etc.
After processing the structural parts with a jigsaw and a grinder, we assemble the table, fastening the legs and foot supports to each other with a bolt. The tabletop will be attached to the base with self-tapping screws according to the previously applied markings. After assembly, it is recommended to apply a protective compound against chips and dirt.
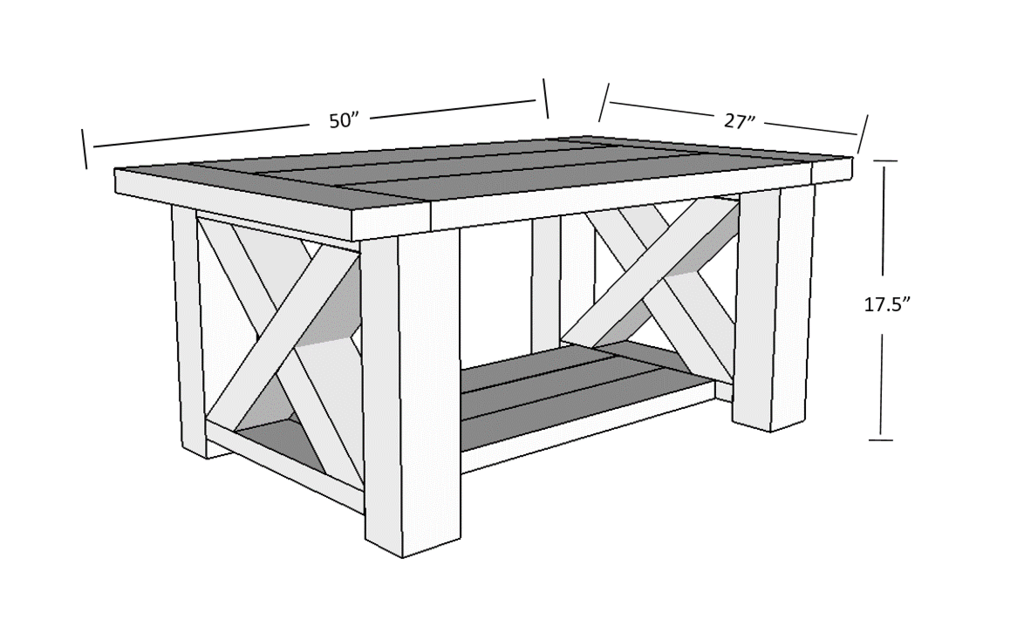
Wood is a classic material for the garden
There is no material more suitable for garden furniture than wood. It is quickly processed and looks noble even without additional coating. In addition, wood is considered the most environmentally friendly material.
Externally, wooden objects in the suburban space look beautiful and interesting. The decor with ribbons, live plants and flowers, designer pillows or charming soft toys adds uniqueness and grace to them.
The combination of wood with materials such as stone or metal looks spectacular. For example, a bench or gazebo made of solid wood goes well with stone or metal accessories. Wicker furniture has a special charm. She is not only very cozy, but also looks pretty.
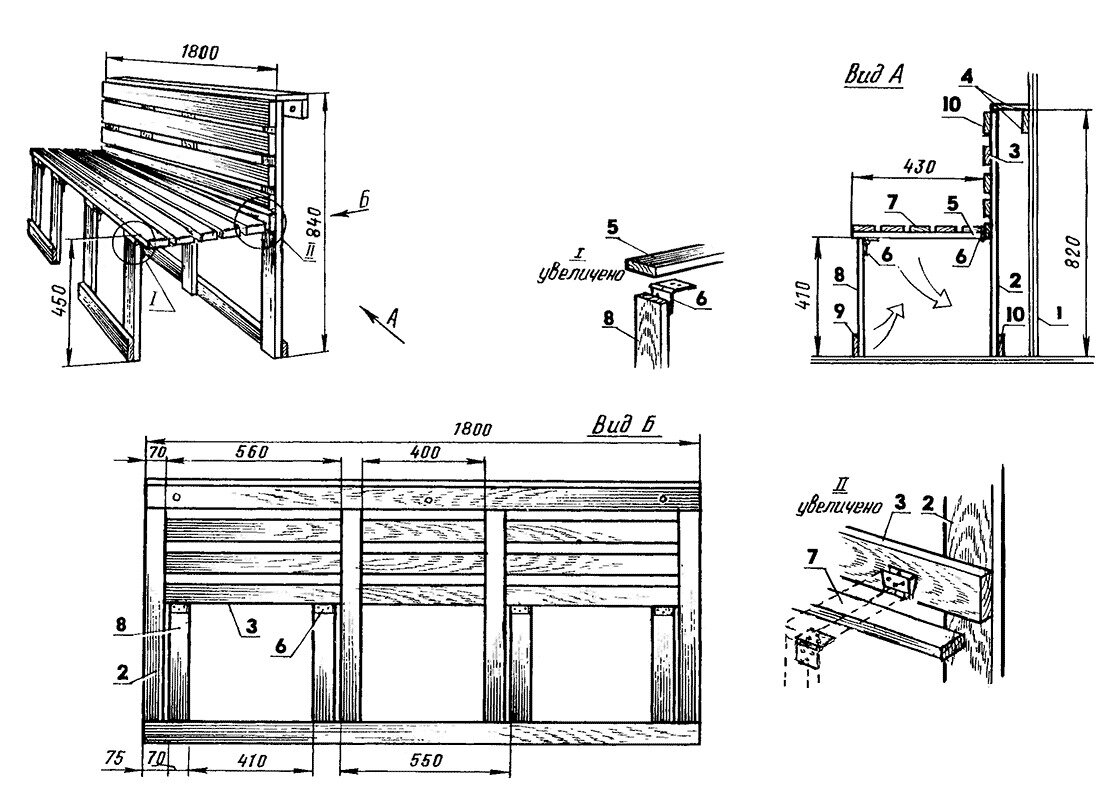
Garden bench made of wood and metal
The strength of solid wood furniture depends on the quality and type of the raw material, as well as on correct assembly. Tips for choosing a material for work:
- The most demanded in this business are beech and oak.They do not rot, serve for a long time and are highly durable.
- Coniferous logs give off resin. If the wood is not degummed, the finished products will stain the clothes and skin of everyone who touches them. However, they are characterized by increased strength and durability.
- Furniture made of spruce, pine and larch can be easily repaired, withstands both rain and sun very well. Externally, objects from these rocks look aesthetically pleasing and attractive.
- Another great option is teak wood. Teak is resistant to any climatic changes, it is not for nothing that its wood is used in shipbuilding. Teak furniture looks impressive thanks to the natural patterns on the wood.
- Ready-made slats, bars, lintels and boards are the easiest material to work with.
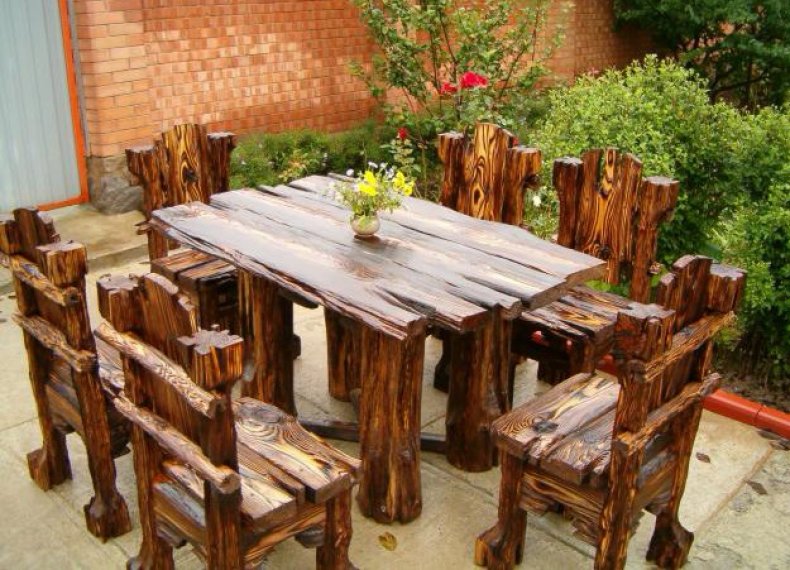
- Stumps and logs will help to build unusual furniture with a minimum of effort and time. With imagination, you can create truly creative products.
- For the manufacture of wicker masterpieces from flexible varieties of trees, bird cherry branches are suitable. They are pliable, soft and pliable.
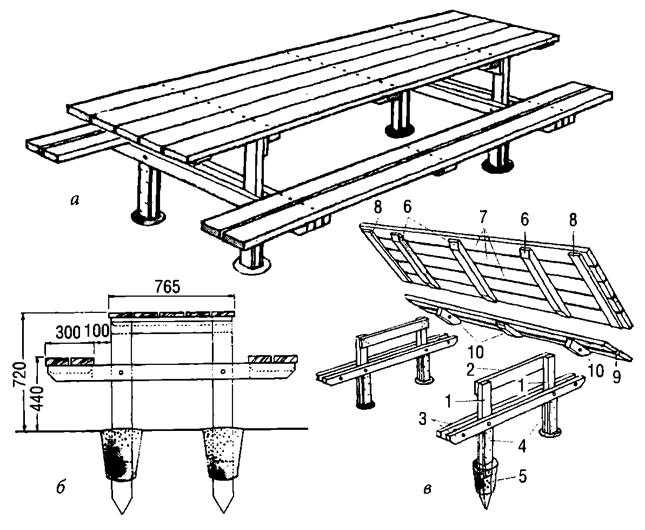
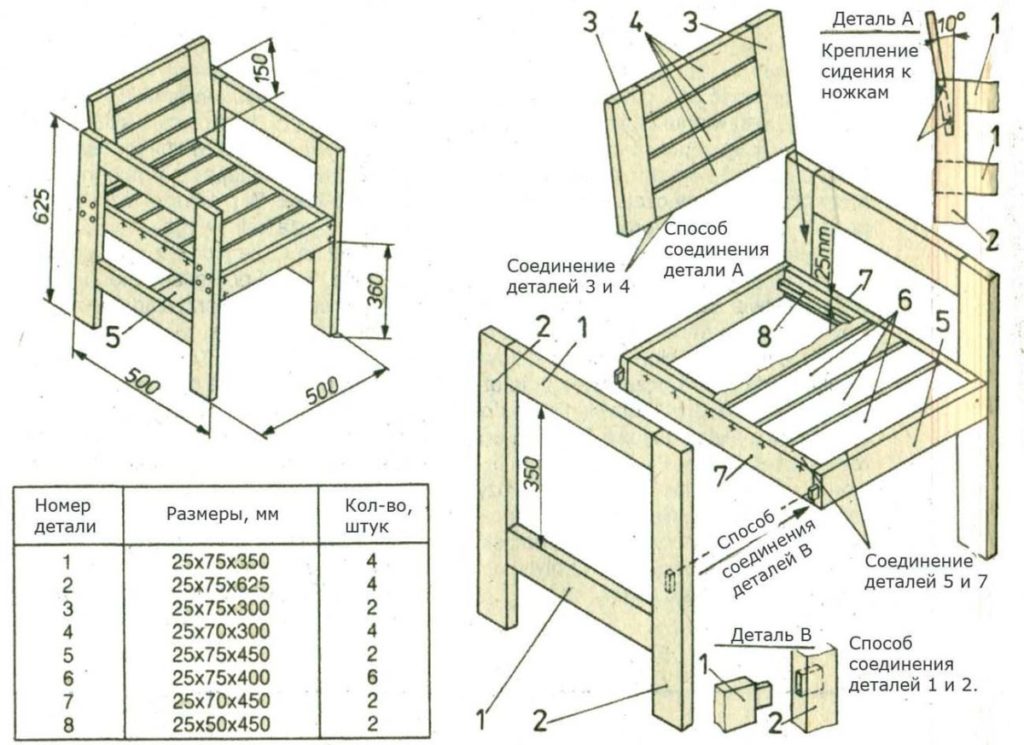
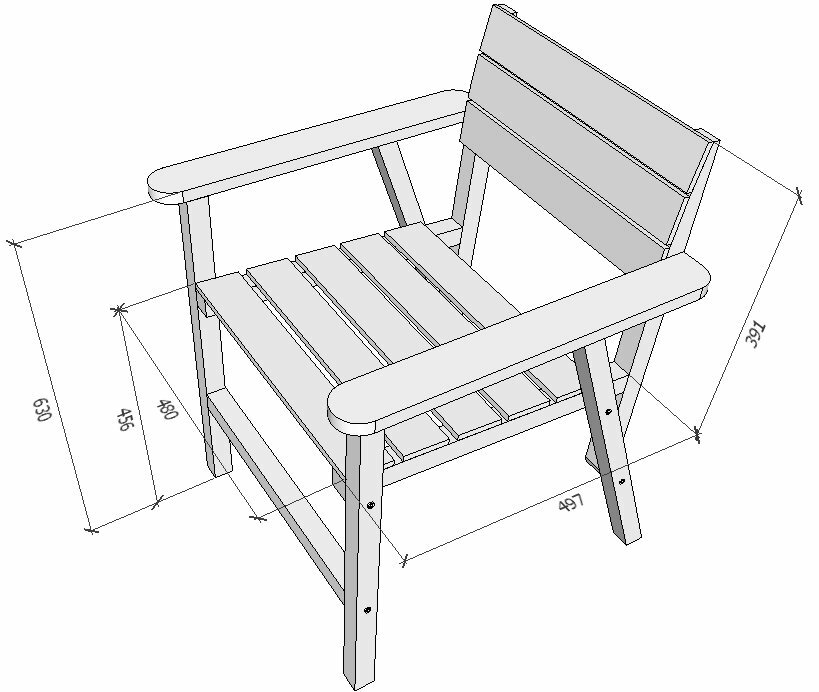
Use our drawings to build your own sturdy and reliable garden furniture.
Materials and tools
To make a country table you will need:

Boards - you can buy them at the lumber warehouse, pine boards 25X200 mm are quite suitable. It is advisable to purchase dried wood, since a damp board deforms when it dries and can burst.

You can disassemble old pallets, boxes, from which to make strips for fixing tabletop elements, or even use them as a tabletop if the boards are thicker than 15-20 mm. Talking about a thinner countertop is, to say the least, frivolous.
From the tool, a grinder, a jigsaw, a screwdriver, a hacksaw, a tape measure. A hand router is also useful for giving a decorative look to the table top using a profile cutter.

Fasteners - studs, nuts, wood screws.

PVA glue, two-component glue, paints and varnishes - solvent, stains and varnishes, brushes and sponges for applying paintwork materials, sandpaper with grain P80-P240, acrylic putty for wood.

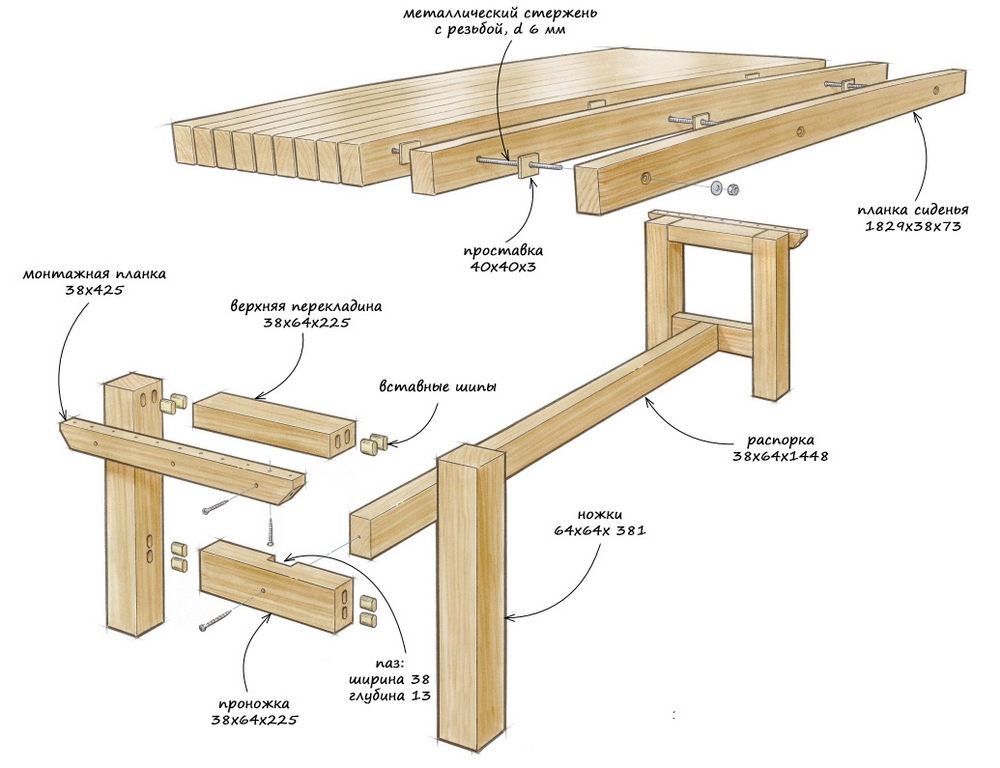
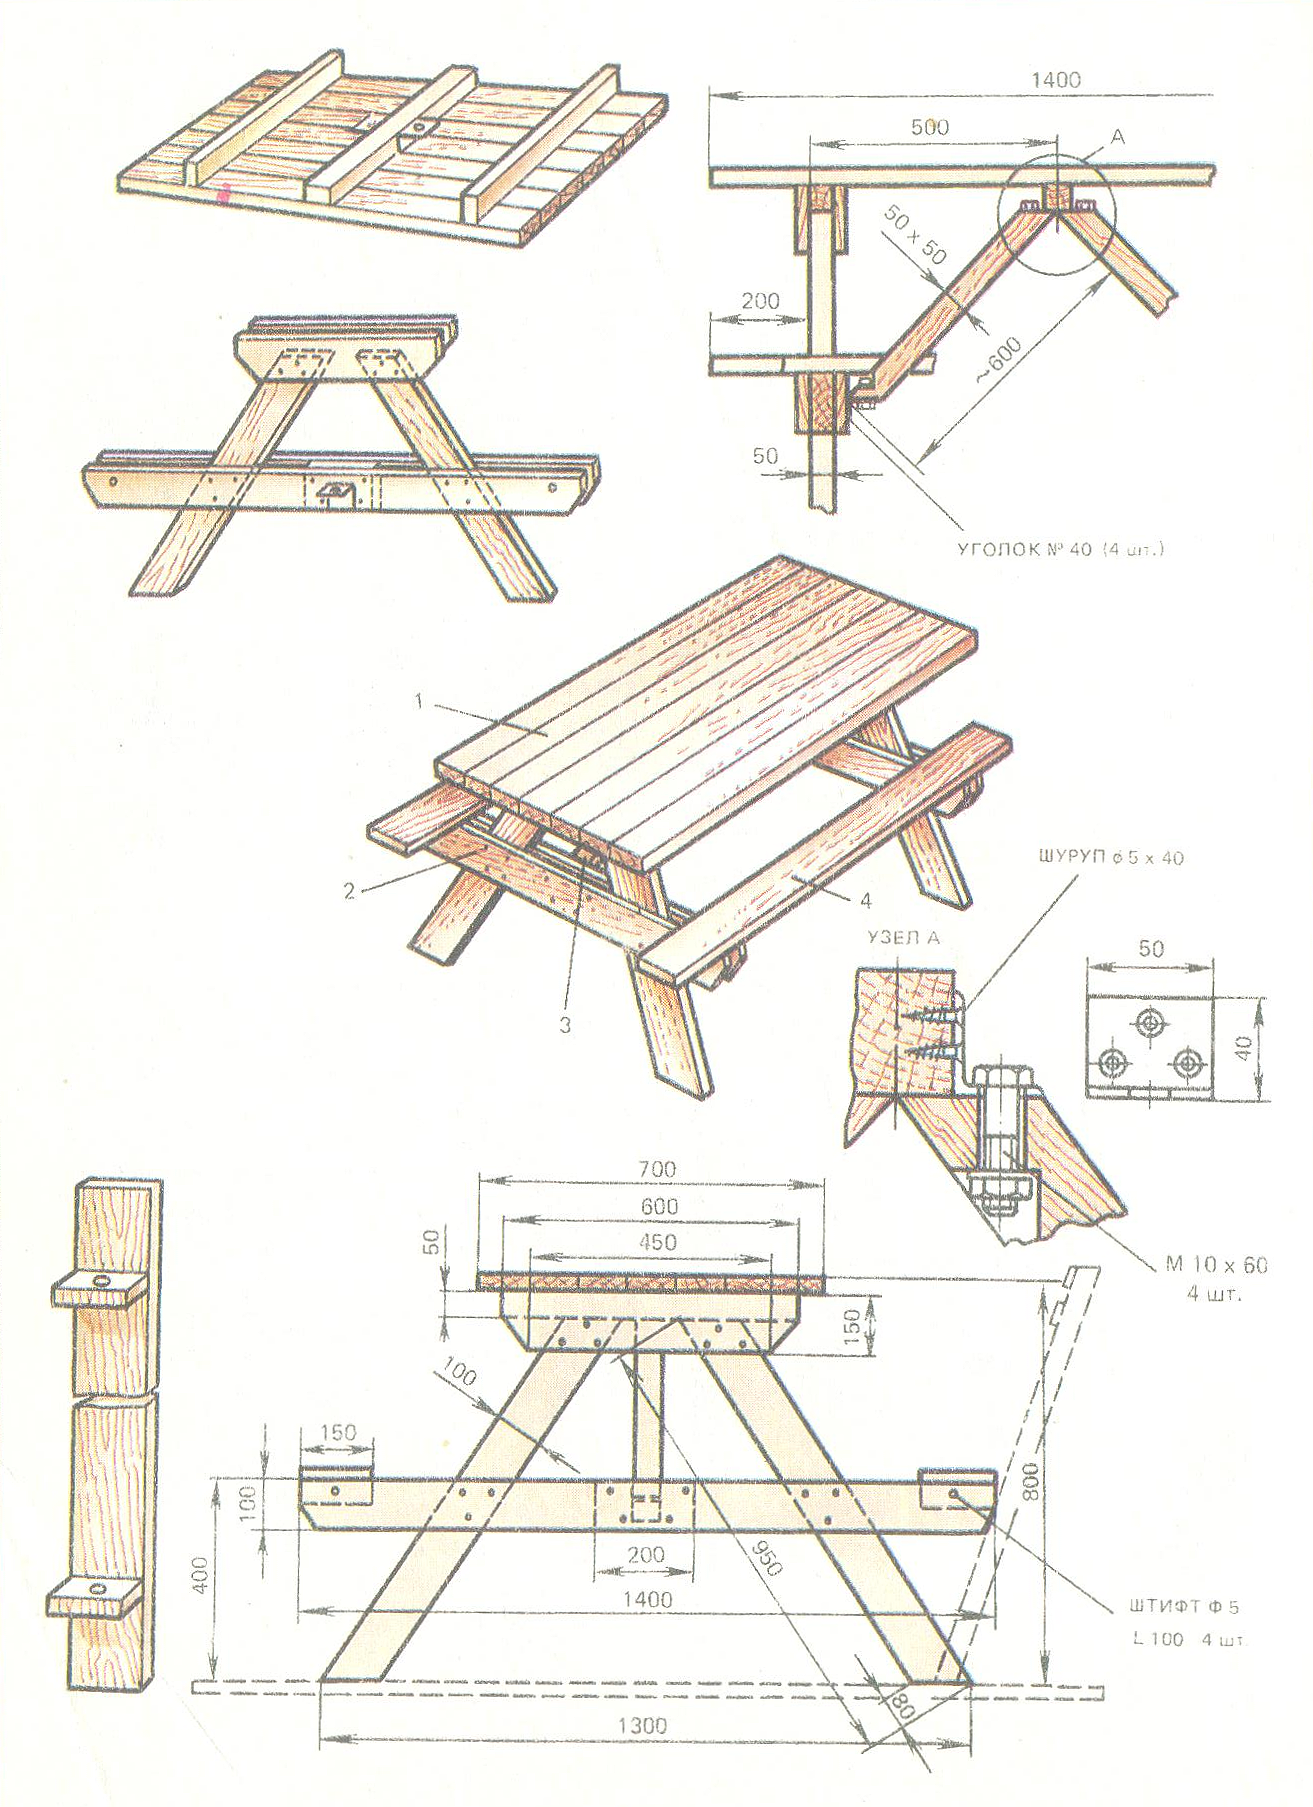
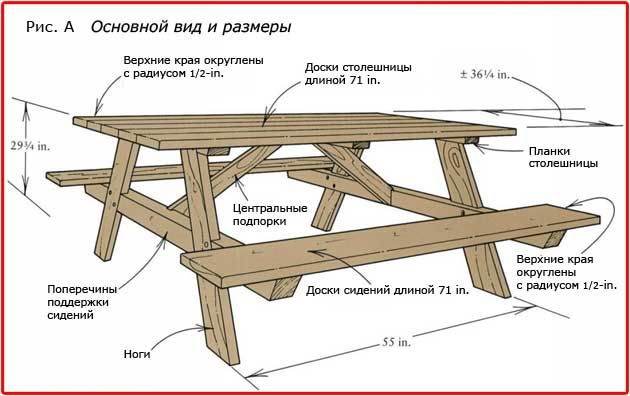
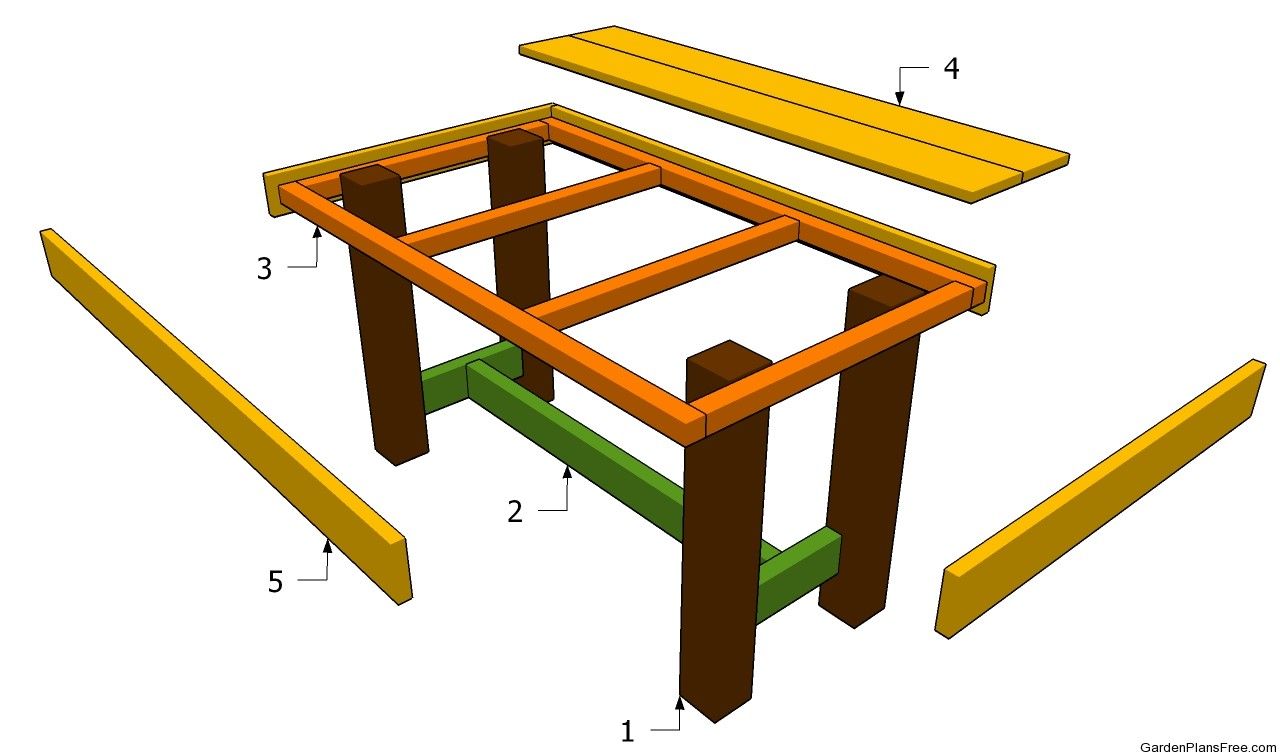
Table assembly process
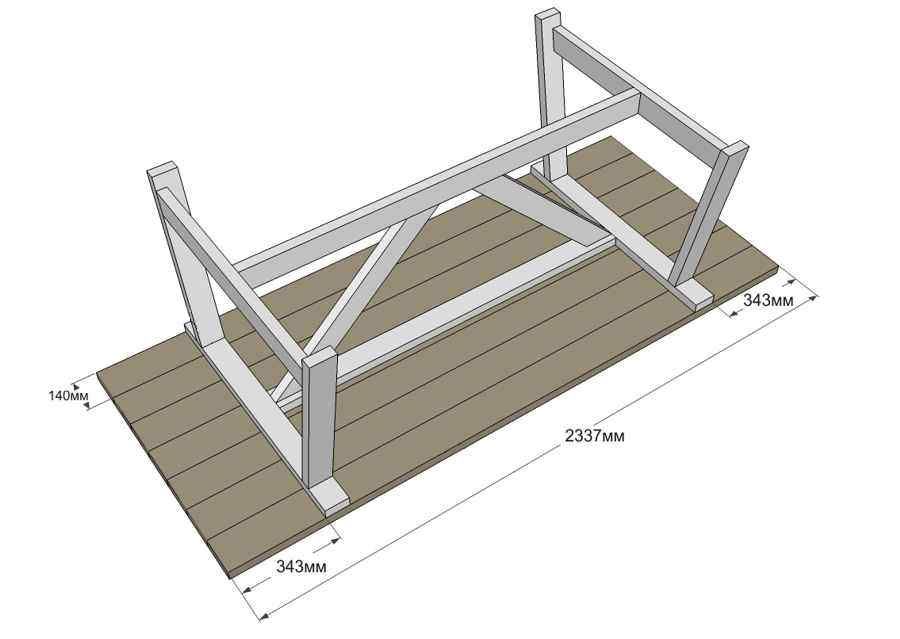
Wooden garden table support assemblies
- Make cuts on the leg blanks at the top and bottom at an angle of 22 degrees.
- Lay the legs at an angle so that one side of them is overlapped by the upper crossbar, and the distance along the centers of the other ends is 1400 mm.
- The bottom bar must be positioned 300 mm from the bottom of them.
- Both supports must be completely identical. It is necessary to drill two holes at each junction of the legs with the rungs.
- After that, you can completely fasten them with bolts or studs.
Assembling a table top for a country table
- After pre-processing the ends of the boards with a plane, number them with a pencil on the back side. Place all the boards on a flat surface according to the numbering provided. Find the center of the future countertop and fix the stiffener to it using self-tapping screws.
- The length of the self-tapping screws must be sufficient to securely fix to the table surface. But screws that are too long can pierce it through, so measure the thicknesses in advance and select the optimal self-tapping screws.
- Flip the tabletop over and, with the help of a partner, place it on the established supports. Temporarily fasten it to the supports using nails or self-tapping screws.
- Then, when the structure is rigidly connected, you can drill holes for the bolts already in fact. Each board should have one hole connecting it to the top rungs on both sides. In the countertop, make the stays for the bolt heads using a larger diameter drill. Insert metal washers into them, in order to prevent the board from pushing through the bolt while fixing with a wrench.
Installation of street table spacers for summer cottages
After the table is assembled, measurements should be made with a tape measure between the edge of the tabletop stiffening rib on each side, to the lower crossbar, and sawed off with a small margin of the workpiece from the bar 100x50 mm.
An example of using spacers as a footrest.
The stock is needed to wash down the corners of the spacers. Saw off one side of the spacer at the desired angle and, with it attached, measure the second angle. Do the same with the second spacer.


They are fastened with nails or self-tapping screws, but you can try and make a bolted connection, in which case you will have a completely collapsible outdoor table for a summer residence. It remains to grind it with sandpaper and open it with varnish.
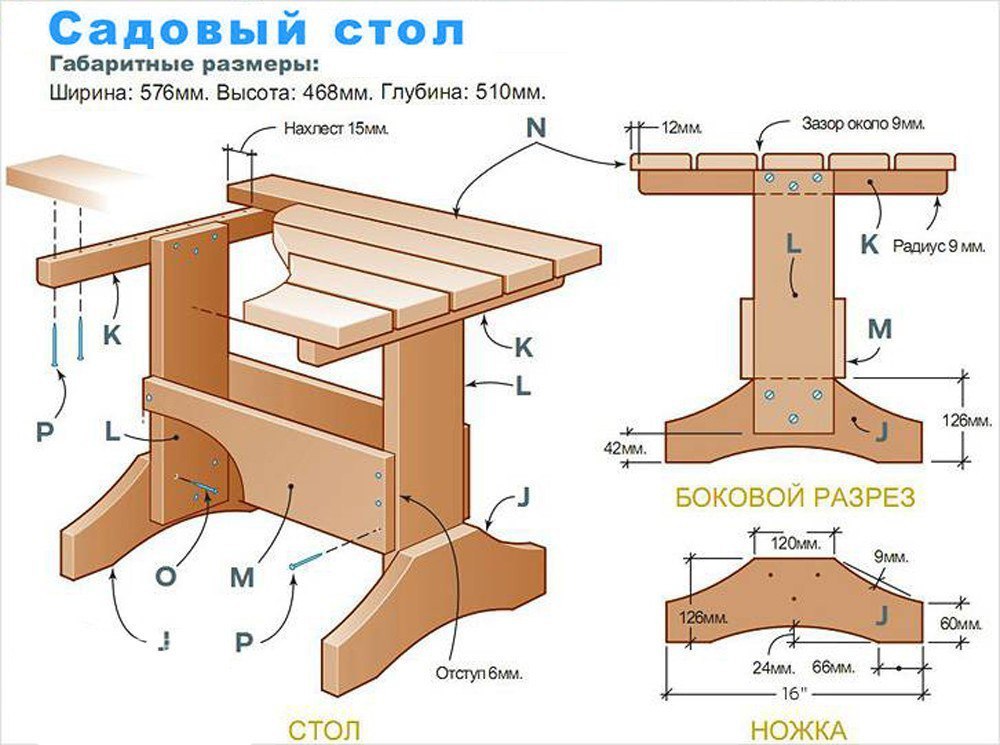
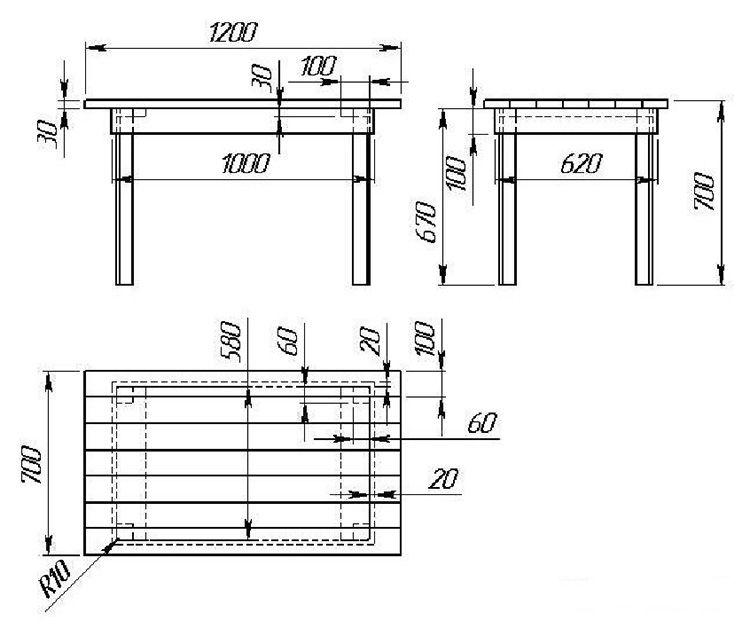
Making a garden table
This item is multifunctional and can be used not only outdoors, but also in the house. In this case, you do not need special carpentry knowledge, everything is quite simple and accessible.
Materials and tools
During the first stage, you should prepare:
- shields - 2 pcs., dimensions - 2000x300x28 mm (spruce, pine or larch);
- slats - 3 pcs., dimensions - 2000x100x28 mm;
- legs - 4 pcs.;
- countertop;
- screws or self-tapping screws;
- electric drill;
- grinder;
- coarse and fine-grained emery paper;
- hacksaw;
- paint brushes;
- polyurethane matt varnish.
Tip: you can use any type of wood, but conifers are much softer and easier to make furniture from.
Making garden furniture from wood with your own hands is an interesting and creative process
Below you are offered detailed instructions that will help you figure it out:
- Make a tabletop using drawings of garden furniture made of wood with your own hands, it is not difficult to do this, just observe the dimension. You can also use a ready-made one, bought specially in a store.
- Connect the two backboards together and place the countertop face down on them.
- Secure narrow shields to the long sides of the table to form a support frame.
- Measure the shield and divide it into 3 pieces so that the pieces fit between the frame: one is in the middle of the table, the other two are at the edges.
Tip: when tightening the screws, make sure that the shields do not split. We recommend using a medium force, a low pace and not slowing down when pressing.
- Screw the table legs at a distance of 60-70 mm from the edge of the product.
- Turn the table over and round the sheets with fine sandpaper. It is better if this work is carried out with a grinder.
- Run over the countertop with sandpaper, and then remove the dirt with a cloth.
- Apply a thin layer of polyurethane varnish to the surface of the wood to protect the table from moisture and stains.
- After the product has dried, it should be sanded with a coarse emery cloth and another layer of varnish should be applied.
Another option for a garden table
A table for a summer residence or in a gazebo on carpentry connections
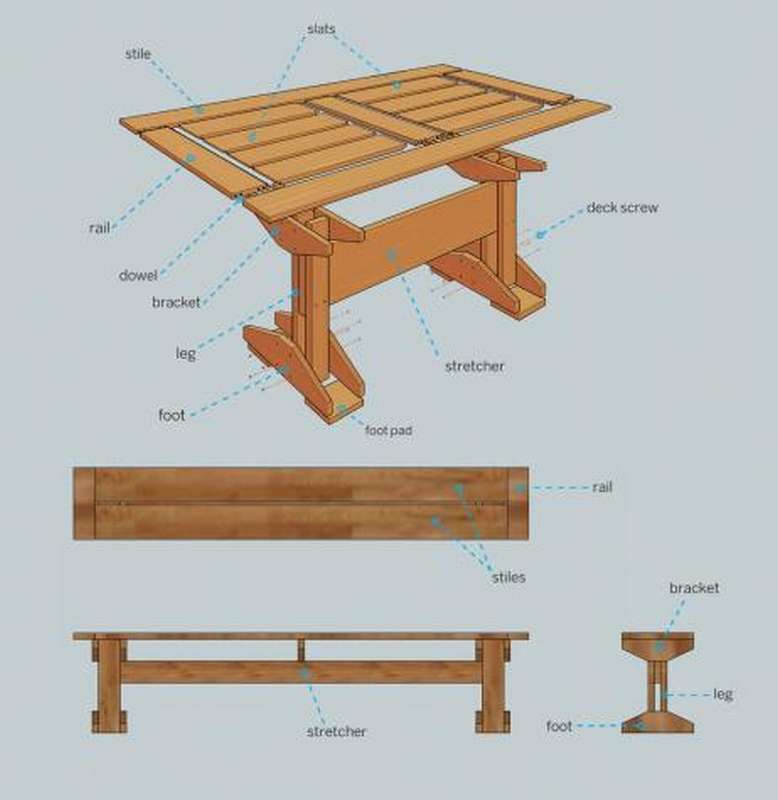
In such products, so-called deaf ones are used, that is, parts made only to a part of the depth, grooves and assembly "without a single nail" (adjusted for modern realities, without metal parts).
As can be seen from the diagram, the connection of the side bars and the legs in this case is performed using grooves, additionally secured with dowels (dowels). Wedge connections are also used.
Another version of the table with a partially hinged lid.
Important: for joinery joints do not use "prickly" wood - pine, spruce. Preferred hardwoods, deciduous, well dried and processed .. From scrap materials (pallets, boards and second-hand timber, plywood, and so on) it is better to assemble models on self-tapping screws
It is better to assemble models on self-tapping screws from scrap materials (pallets, boards and used timber, plywood, and so on).
If ready-made chiseled or carved table legs with already made grooves are used in the assembly, it is better to strengthen the structure with special metal ties.
The first steps
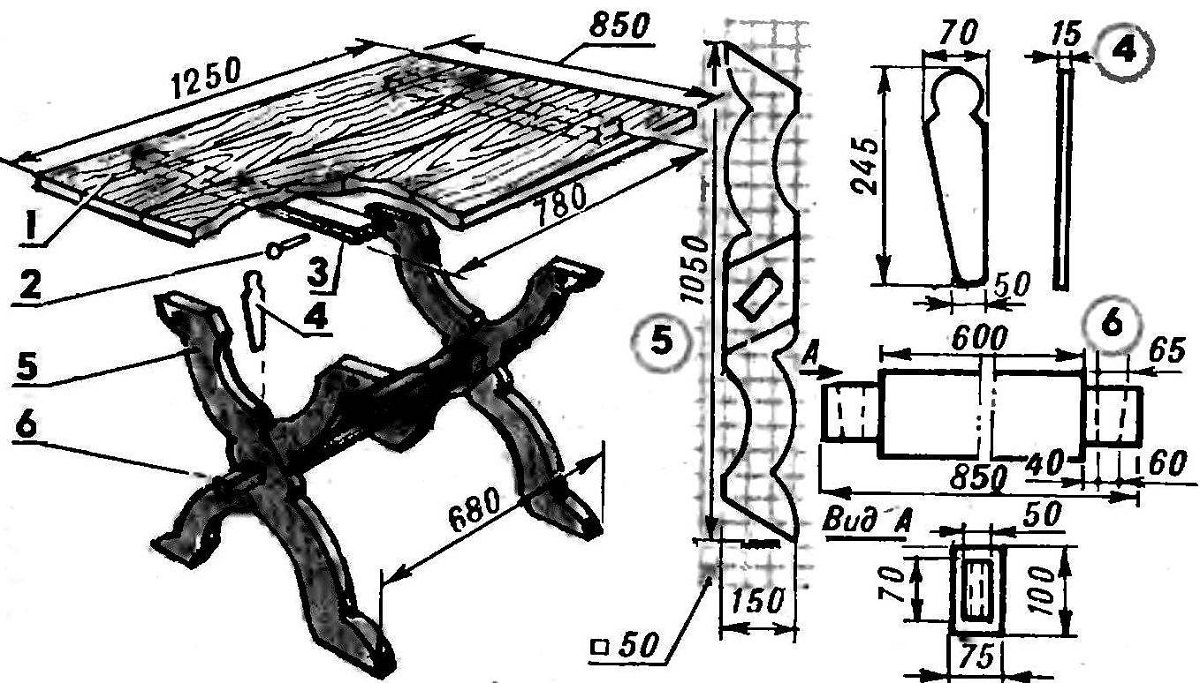
The country table is the first of the homemade ones. If there are 1-2 brick pallets left from the construction site, then the pallet table will be the first of the first.Not only because it is extremely simple, but also because it is very useful on the farm.
From one pallet, sanded, impregnated and varnished, you get a garden table like a coffee table, on the left in Fig. If you have a couple, you can make a wall-mounted desk-rack in just half an hour, in the center and on the right. Chains for him can also be weaved from soft wire, covered with a PVC tube or, better, heat-shrinkable. To fully raise the table top, the small tool is placed on the shelf of the wall pallet.
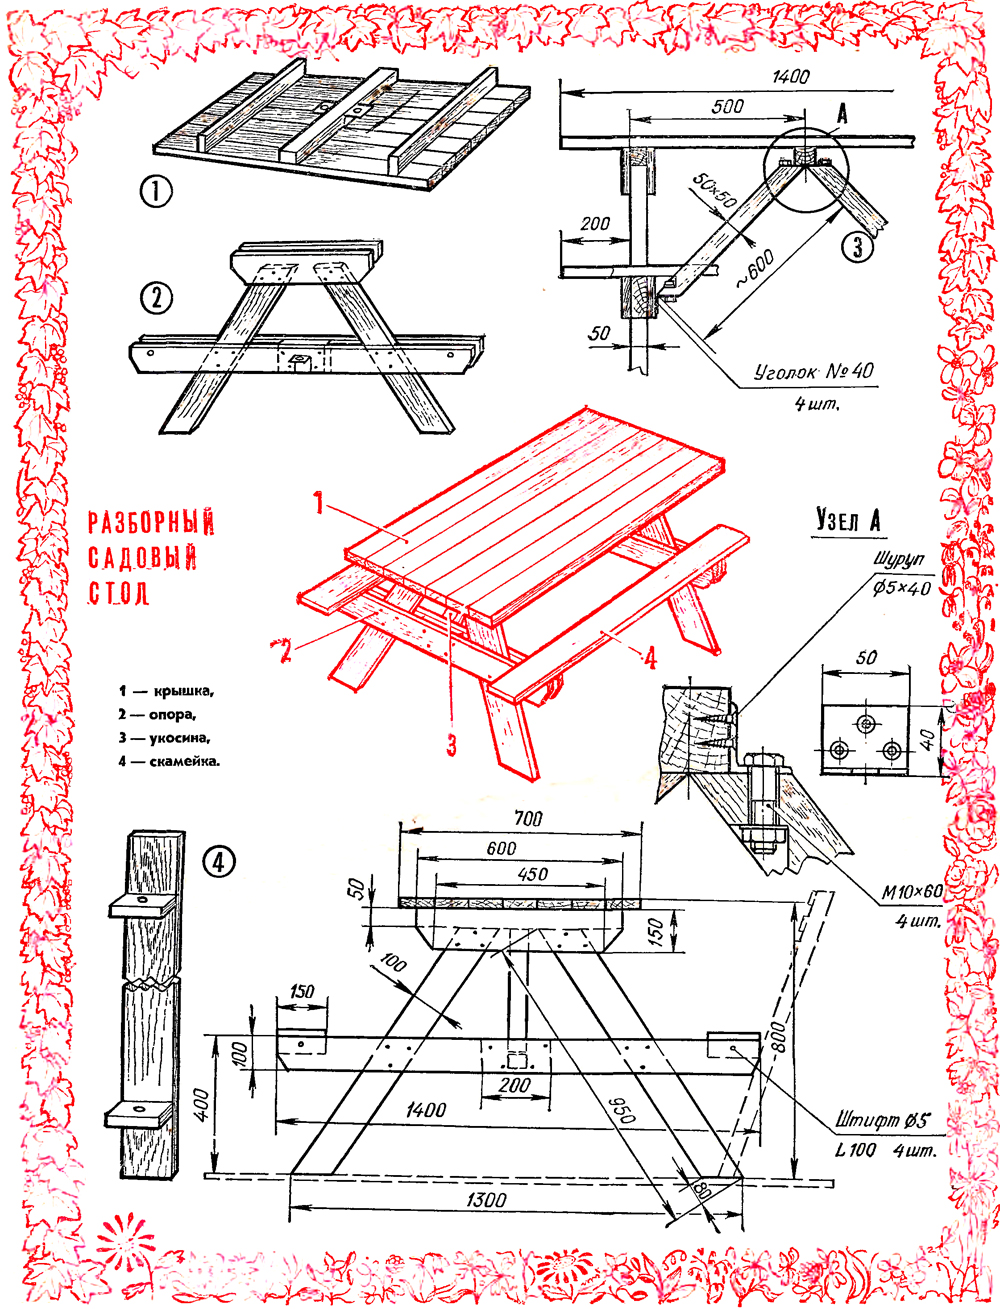
Country tables made of pallets
With a little more work, a collapsible cutting table for a summer residence is made from one pallet, which allows you to transfer the summer-autumn harvesting campaign to the street, without littering with husks and without treading on stumps. For the winter, this table is assembled in a compact package. The design is clear from the pic; a bucket is placed under the hatch in the countertop.
Folding pallet cutting table
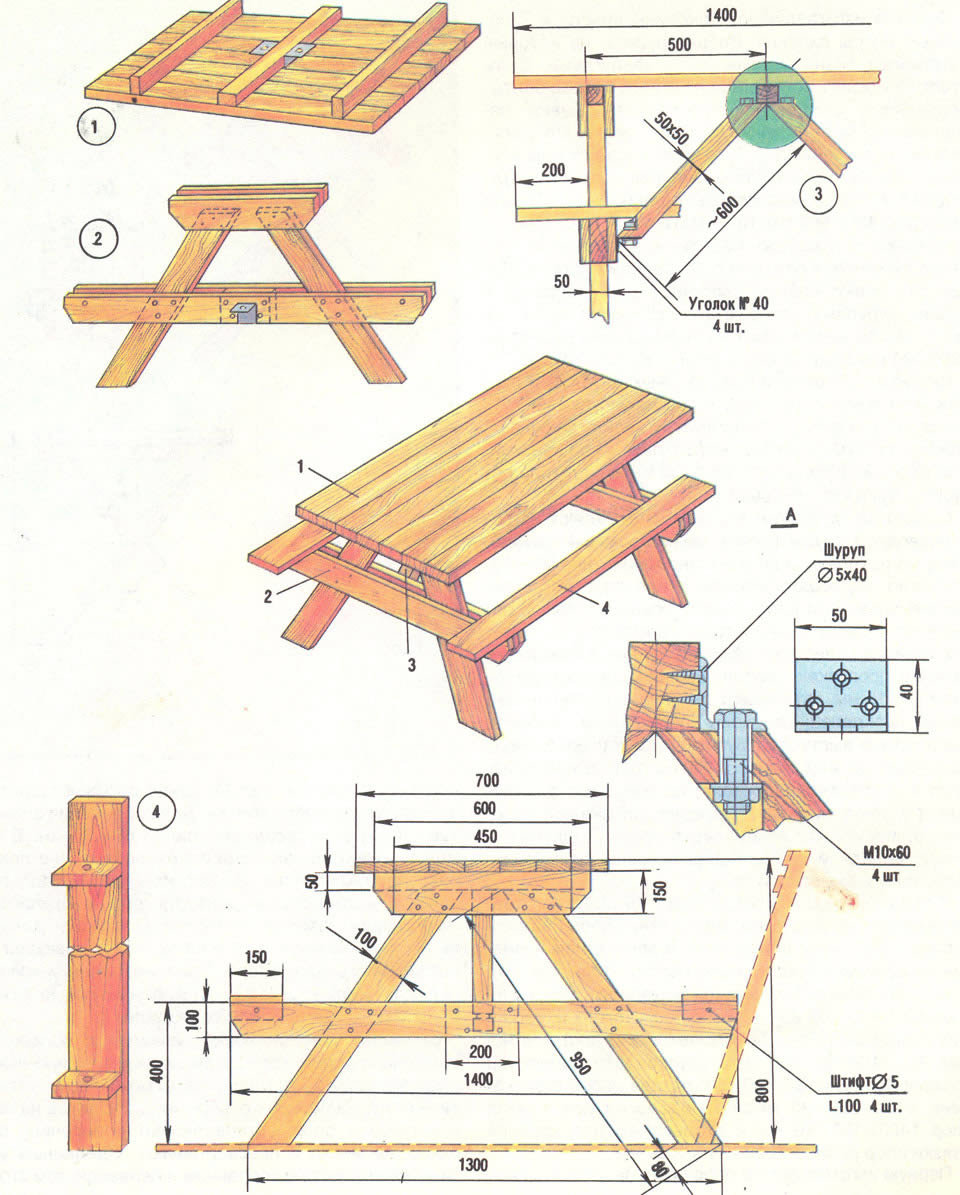
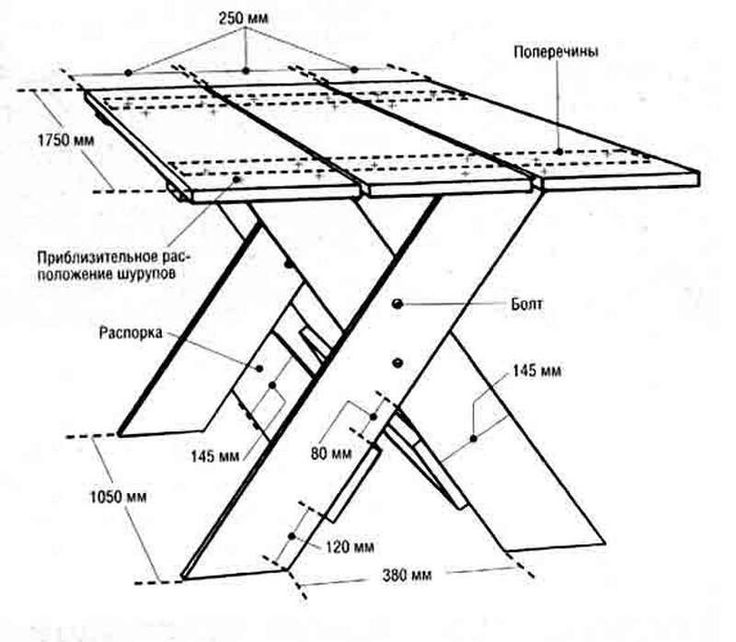
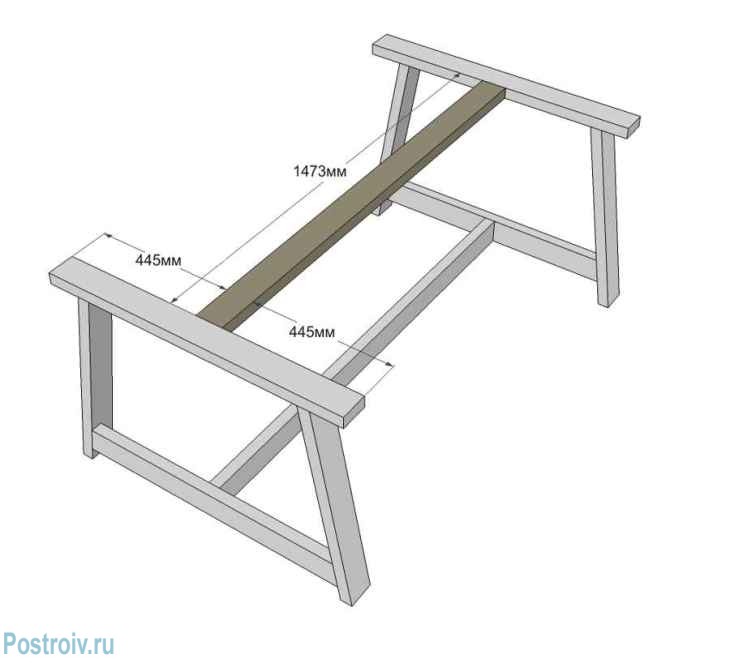
The next in order of complexity is the well-known country table-goat, in common parlance a goat. Its 40mm plank construction is shown on the left in the figure, and in addition to it is a bench of the same device. And on the right is a suburban folding table based on the same principle. It has hinge connections (bolts М8-М12, washers and nuts with locknuts); in the place indicated in green, a boss-stop is placed on the nails between the crossbars of the tabletop. When folded, this table fits in the trunk of a car, so it will also go for a picnic. If this is not foreseen, or the trunk is larger, the tabletop can be made longer.
Simple garden tables
Finally, the table for the gazebo also does not require special tools and skills, see fig. below. The material is the same forty board and some inexpensive fasteners.
Gazebo table