Basic rules for sewing elastic bands
Since there are many ways in which an elastic band can be sewn into fabric, the rules for each method have their own.
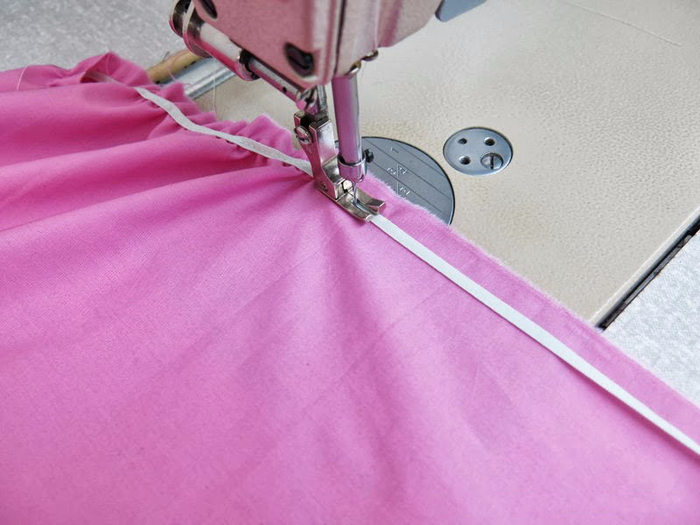
 It is better to sew rubber threads parallel to each other
Sewing rubber threads in a spool
It has already been mentioned above that this method is performed using a machine and rubber threads. The finished work will stretch well and will not tear under strong tension. This method is good for use on fragile and stretchy fabrics: silk, knitwear, satin. But jeans or thick cotton are unlikely to work.
 When sewing, you need to pull on the tape
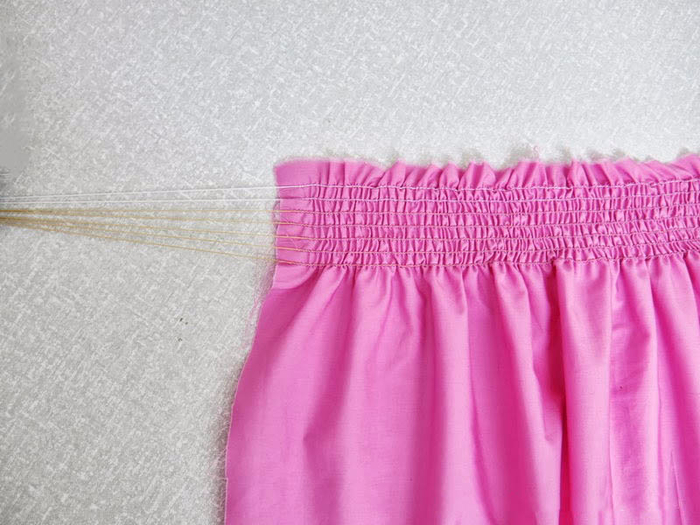
Before sewing, the stretching threads must be threaded into the spool, and regular threads must be used as the other face thread. If the sewing is done with a simple straight stitch, then it is better to wind the fabric in several parts separately. So the shape of the finished garment will be uniform and symmetrical, it will not fold in one place, and stretch in another.
Tying elastic bands tightly
This method is used for clothing with a complex structure and tailoring, which has many details, folds and various assemblies. First, they designate the line on which the elastic will be sewn, for example, at the waist or leg. Then the tape is divided into two parts, one will be sewn separately in the front, and the second in the back. On the sides at the end of the work, both ends are neatly and inconspicuously attached to each other. When sewing, the elastic can be pulled at your discretion.
 Compression ratio must be measured in advance
For your information! The tighter the tension, the more noticeable and voluminous the folds will look.
Gum Compression Ratio
It is worth considering the compression ratio of the thread, especially when assembling fabric over a large area of fabric. This method is widely used for processing belts and belts of skirts with trousers.
 The final product must have uniform folds and gathers
To measure the compression ratio of a rubber band, you first need to take a piece of tissue to sample. Then sew with a line to the end, turn the work 90 degrees and sew a row again on a typewriter. When sewing, be sure to stretch the fabric while holding it with your hand. Next, the resulting stitches and distance are measured. And then, if necessary, you can make a decrease or increase in the width of the stitch.
Elastic gathering
Gathering on elastic tape is recommended for thick materials or multi-layer clothing. Simply put, a regular linen elastic is sewn to it. Its width should not be less than 5 millimeters, otherwise it will not have a tightening effect on thick fabric. Elastic tapes are sewn in several rows parallel to each other.
 A wide tape should be sewn into the belt of the trousers.
You need to place the elastic on the wrong side of the material and pull from the bottom of its edge. You need to sew it on with a straight regular machine stitch. To sew several elastic bands together, it is better to immediately draw the lines along which they will be attached, otherwise the final thing will turn out to be crooked and deformed.
What you need to work
First, you need to decide where the elastic (ribbon) will be located: inside the belt or outside, that is, instead of the belt. If this element is inserted inside the belt sewn to the skirt, then you can buy any waist or linen elastic band. The main thing is that its width is slightly less than the width of the belt. Otherwise, it simply will not fit inside the belt. The standard width of the belt is 2-2.5 or 4-6 centimeters.
If this detail will be sewn to the top of the skirt instead of the belt, it is advisable to pay attention to the color. Elastic tape should match in tone or contrast with the main garment
Usually buy a wide (5-6 cm wide) waist or cuff elastic. You can buy a lurex ribbon.
For work, you will need scissors, a centimeter, a sewing machine, thread matching the tone. You can buy elastic tape at any sewing accessory store.
In addition to color, you need to pay attention to density. For thin chiffon, silk or cotton fabrics, soft braid is suitable.
For wool, knitwear or leather, it is better to buy a thicker elastic band. The length of the tape should correspond to the waist circumference, then this value can be adjusted.


How to sew an elastic band to panties
Sewing an elastic band to your panties is not so difficult, but it is worth noting that it can quickly stretch and lose its elasticity. In this case, you must adhere to certain actions. This method is suitable for sewing and repairing linen not only for an adult, but also for a child.
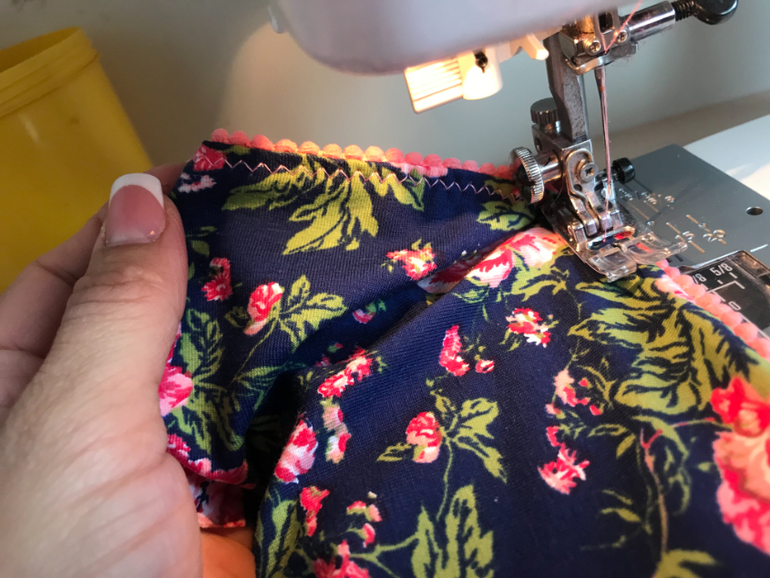
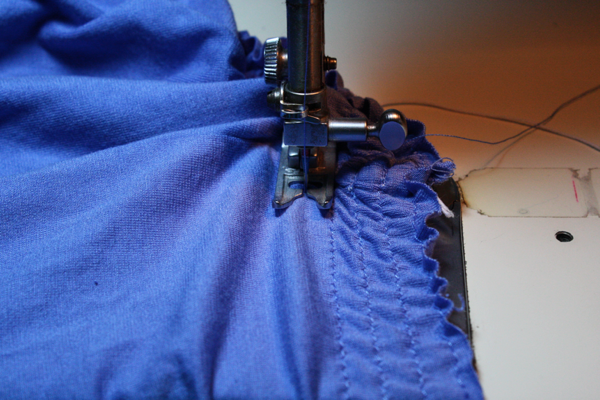
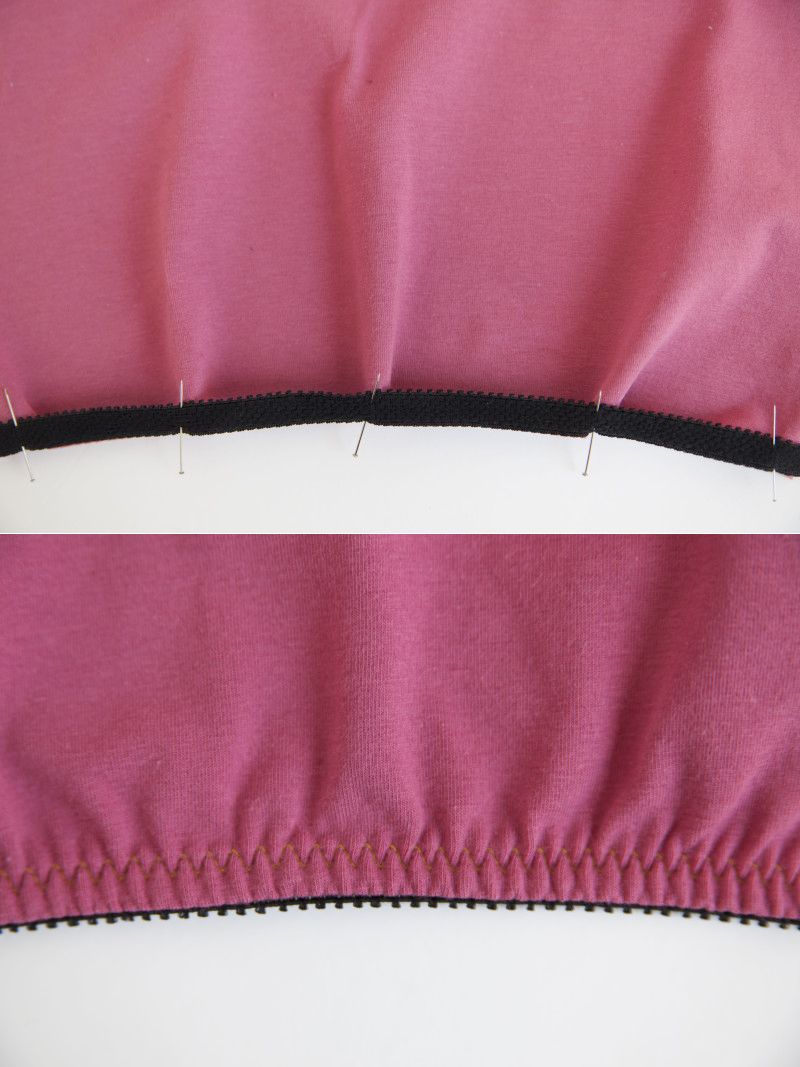
For sewing lingerie, it is better to use decorative openwork elastic bands. They need to be sewn on from the front because of the decorative patterns. Leave 5 millimeters around the edge of the fabric. Fasten the elastic with the fabric with safety pins and sew with a line on a typewriter. Now you can cut off the edges of the material that are visible from the elastic band.
 The elastic under the drawstring will not deform the fabric
Then you need to switch the sewing machine sewing mode to zigzag. If the machine is multifunctional, then you need to choose "elastic zigzag". You need to sew the elastic closer to the line of the upper seam.
Sewing an elastic band into the belt of trousers or pants
Before you sew an elastic band into the belt of your trousers, it is worth noting that it is very difficult to do it manually. Therefore, if there is no typewriter, it is better to give the item to the atelier.
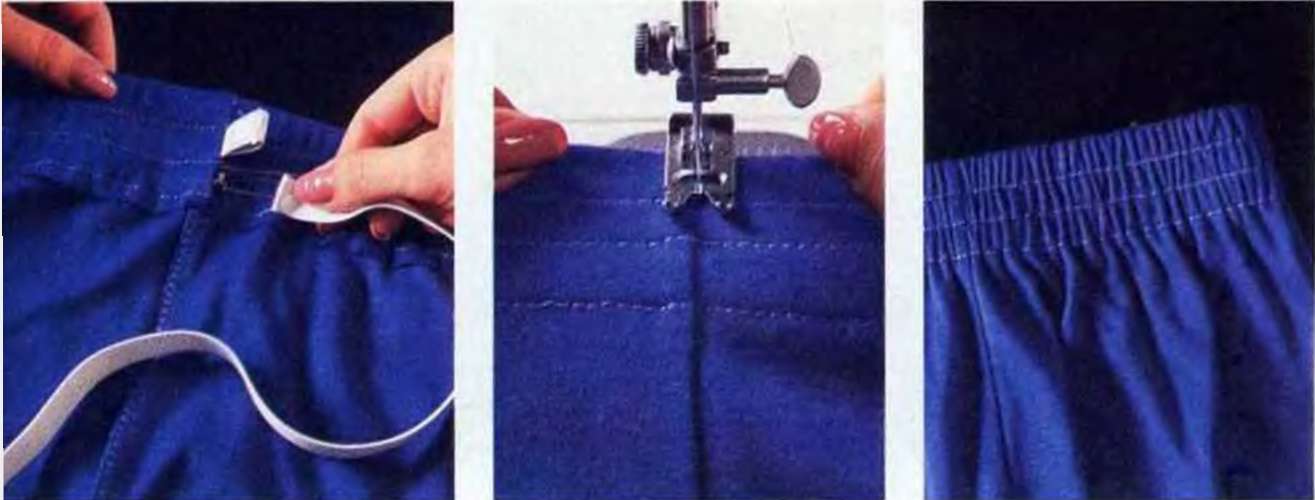
On a typewriter, the elastic is sewn into the belt of the pants as follows:
- An elastic tape with a width of at least 2 centimeters is taken. To determine its exact length, you first need to wrap it around your waist and pull it to the required girth.
- On the typewriter you need to set the "knitted stitch" mode and set the interval on the scale - 3. Set the foot to the zigzag.
- Join the edges of the elastic band and sew.
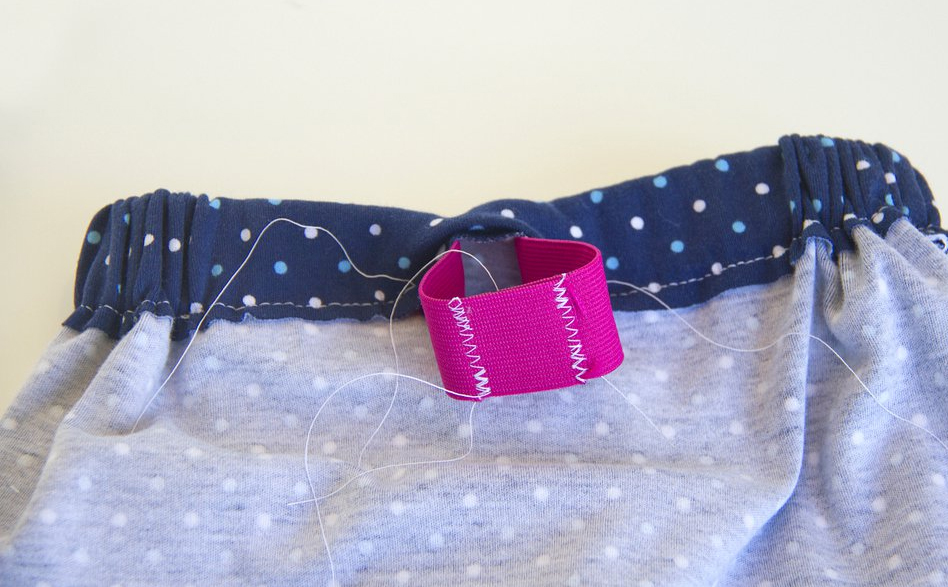
 Pins help even sewing
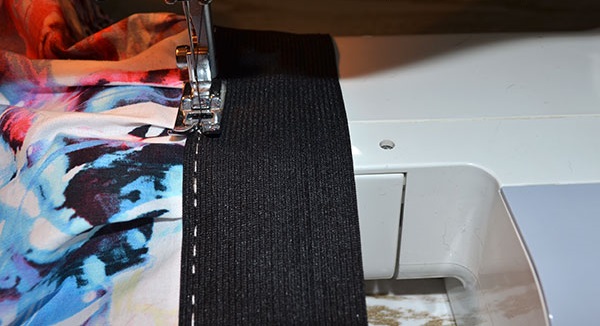
- Turn the trousers to the wrong side and sew the elastic along the edge of the belt. To make it sewn evenly, you need to attach it with a pin to the belt in some places.
- Finish all edges so that the elastic tape cannot come out of the seams. To do this, put the machine's foot on the overcasting mode and select the overlock stitch.
- At the very end, it is recommended to put the foot on the usual sewing method and sew the elastic from the bottom, stepping back 1–2 centimeters from the edge.
 Before you start sewing, you need to attach the tape evenly with pins.
Archives
ArchivesChoose a month January 2019 December 2018 November 2018 October 2018 April 2018 March 2018 February 2018 December 2017 July 2017 June 2017 May 2017 April 2017 March 2017 February 2017 January 2017 December 2016 November 2016 October 2016 September 2016 August 2016 July 2016 June 2016 May 2016 April 2016 March 2016 February 2016 January 2016 December 2015 November 2015 October 2015 September 2015 August 2015 July 2015 May 2015 April 2015 March 2015 February 2015 January 2015 December 2014 November 2014 October 2014 September 2014 August 2014 July 2014 June 2014 May 2014 April 2014 March 2014 February 2014 January 2014 December 2013 November 2013 October 2013 September 2013 August 2013 July 2013 June 2013 May 2013 April 2013 March 2013 February 2013 January 2013 December 2012 November 2012 October 2012 September 2012 August 2012 July 2012 June 2012 May 2012 April 2012 March 2012 February 2012 January 2012 December 2011 November 2011 October 2011 September 2011 August 2011 July 2011 June 2011 May 2011 April 2011 March 2011 February 2011 January 2011 December 2010 November 2010 October 2010 September 2010 August 2010 July 2010 June 2010 May 2010 April 2010 March 2010 February 2010 January 2010 December 2009 November 2009 October 2009
Easy ways to sew rubber bands
Simple ways to sew elastic into fabric include using simple stitches. Such a seam can be made either by hand or on a sewing machine. However, in the latter case, it is safest to use a zigzag stitch.
 There are several ways to sew an elastic band with a machine.
Note! Zigzag seam contributes to good tension of the fabric without the formation of deformed areas
Using a typewriter
Sewing in an elastic band with a typewriter is an easier method than doing it by hand.Better, of course, to use those devices that have many functions to help facilitate and speed up the process. The most effective for this purpose are sewing machines of the Janome, Singer or Brother brands.
Using a sewing machine, an elastic band can be sewn into fabric in several ways:
- Marked. This can be done even on the most common typewriters. Before stitching the elastic to the fabric on a typewriter, you must first mark on it a line along which the sewing will take place.
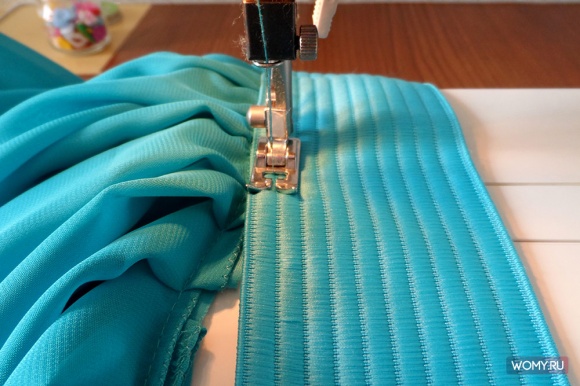
- Zigzag. A very convenient way. You need to attach a circular stretching tape to the canvas with the same length and press it tightly with the machine's foot. Before work, you need to set the zigzag size adjuster to the maximum width.
- Backstage or backstage. Additionally, you need to prepare a separate strip of fabric so that it is slightly wider than the elastic, and in length reaches the length of the piece of fabric on which it will be sewn.
- Bobbin or bobbin. In this case, not the elastic itself is sewn, but special stretching threads are used, which are threaded into the machine along with ordinary threads.
 The manual method is not practical.
Manual method
You can manually sew an elastic band not only with a regular straight stitch, but also with a zigzag stitch. In order for everything to sew evenly, you must first divide the length of the fabric into several equal parts. Then apply a round elastic band and pull it out along the entire working length and fasten in the previously indicated places. This method will greatly facilitate the work, and it will not have to be redone several times.
How to sew an elastic band with a skirt: basic rules
To simplify the work, a novice needlewoman should be guided by some general rules:
- For wide or flared skirts, the elastic is measured a few centimeters more than the waist circumference.
- If you plan to sew a skirt of a strict style, then the length of the material for the belt should be equal to the waist circumference.
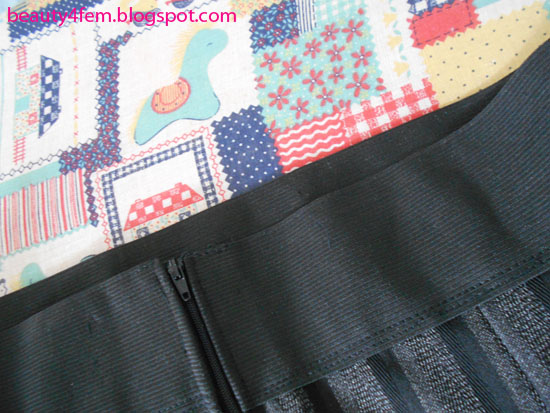
- When choosing a pencil skirt, everything will depend on the chosen material. So, for elastic fabric, the elastic is taken exactly at the waist, and for non-stretching materials, in addition to the stretching belt, an insert of a zipper should be provided.
Additional Information. When sewing the tape to the skirt, be careful not to tear the rubber streaks with a needle. Otherwise, the product will last much less than the required period.
How to sew correctly
First of all, you need to determine the length of the elastic band. This is done in two ways. The first is to measure the length of the tape at the waist. It should fit snugly against the body, but not squeeze the abdomen.


Before cutting off the extra centimeters, you need to add 1.5 cm of the sewing allowance for the braid.
The second way is to calculate the length of the ribbon using the formula. It looks like this: OT (waist circumference): 5x4.5. If the waist circumference is 60 cm, then 60: 5x4.5 = 54 cm. To this length it is imperative to add 1.5 cm of the allowance for sewing the braid. The total length of the tape will be 54 + 1.5 = 55.5 cm.
Elastic band instead of a belt
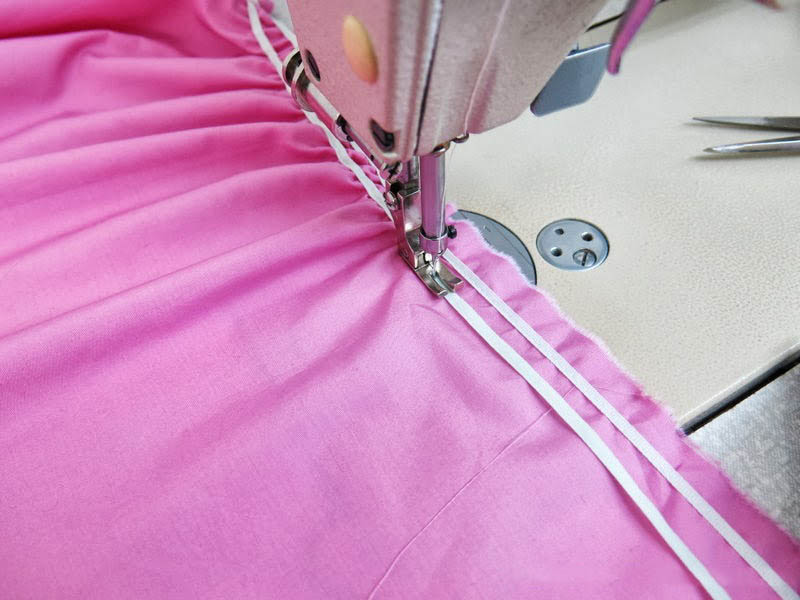
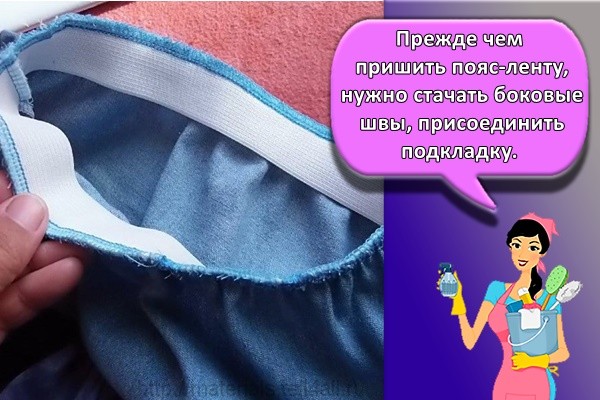
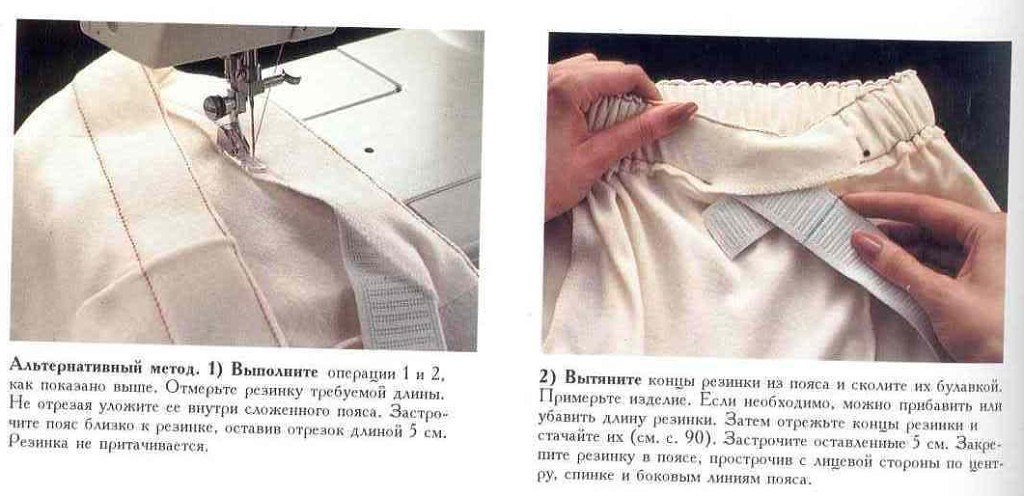
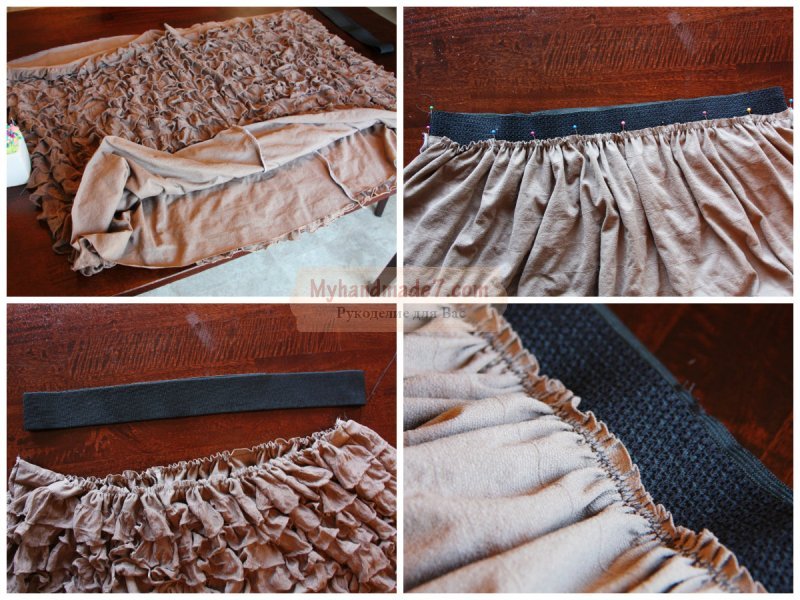
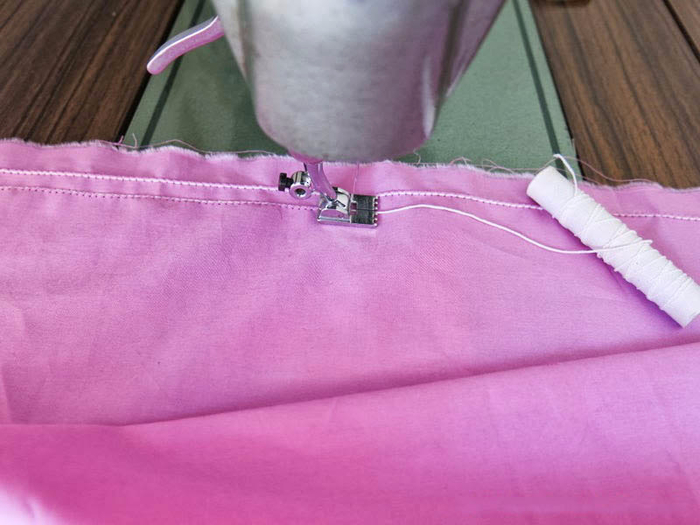
Usually an elastic tape instead of a belt is sewn to a flared skirt, the top of which is gathered and adjusted to the hip circumference plus 2-5 centimeters. Before you sew on the belt-tape, you need to sew the side seams, attach the lining. It is desirable to process the edges with overlock or zigzag. We recommend that you sew the top of the skirt with a wide stitch and tighten one of the threads to create even folds. The length of the upper part of the outfit should correspond to the hip circumference plus 2-5 centimeters.
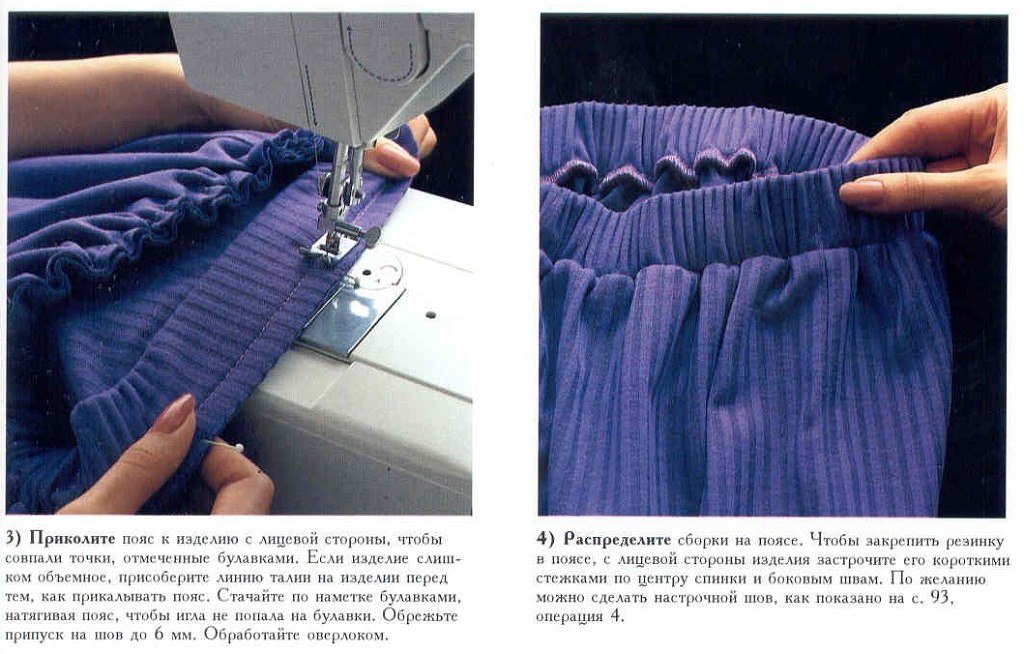
To the top, assembled to the required size, you need to sew a ribbon. To the upper part of the outfit from the front side, retreating from the edge of 0.3-0.5 cm, apply, without bending the material, an elastic ribbon. If the fabric is very thin, you can use a closed hem hem seam. First, the tape must be swept over the piece by hand. The tape needs to be stretched a little while attaching to the fabric. You can do this: divide the elastic into four equal segments. Make four marks at the end of each.Then divide the upper edge of the skirt into four equal parts and also outline the points. Now you can connect the marks on the tape to the points on the product.
After this preliminary work, the elastic tape must be sewn to the top of the skirt, stretching the tape to the required size.
It is recommended to pre-sweep the elastic by hand, and then sew on a typewriter. You can sew the tape with a twin needle to create two parallel stitches. The needle of the car must pass between the rubber streaks, otherwise they will burst. You can use a zigzag stitch, in which case the stitches will jump over the rubber fibers in the middle.
Elastic waist
If a belt is sewn to the top of the product, you can make a small hole in it from the seamy side and insert an elastic tape inside. An ordinary pin will help to stretch the elastic in a circle. It must be attached to the end of the string and inserted into the belt. The pin along with the tape should go around the entire circumference and come out from the back side. Then the ends of the tape are connected, and the hole itself is sewn.

How to insert elastic in a flared skirt
If there is a belt at the top of the product, then the elastic band is inserted inside this part using an ordinary pin. A small hole is made from the seamy side. If the skirt does not have a belt, then a waist elastic is sewn to the top of the product. During the sewing process, the elastic tape is stretched to the required size.
Features of working with a tulle skirt
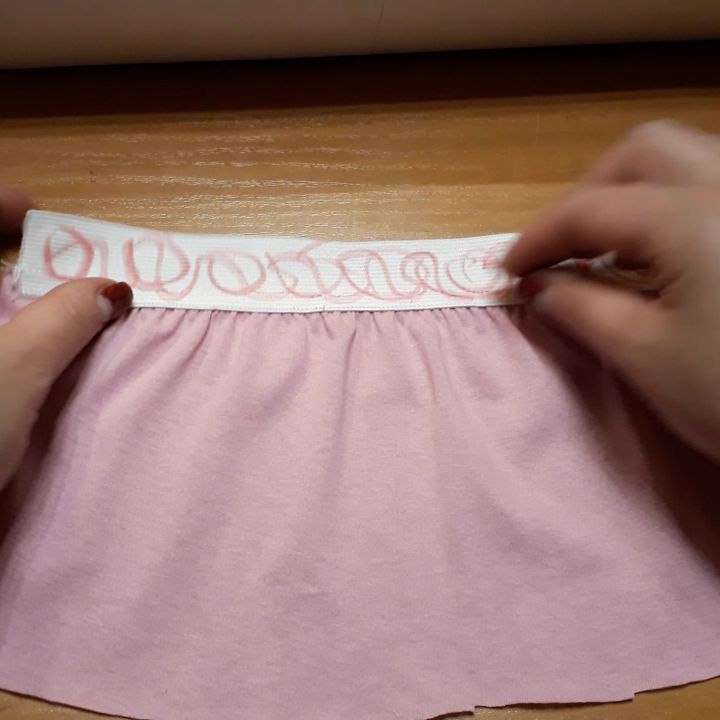
A fluffy, airy tulle skirt is made on a sewn-on elastic band. The color of the elastic band must match the color of the product. There is no zipper in this outfit. The elastic is attached to the waist.
First, the upper part of the skirt must be assembled to a length equal to the hip circumference plus 2-5 centimeters. Then they take a wide (5-6 cm) elastic tape 2-3 cm less than the waist circumference and sew its ends. To the upper part of the skirt, stepping back 0.3-0.5 cm from the edge of the product, sew a ribbon, stretching it a little. The line is done on a typewriter.
How to sew by hand
If you don't have a sewing machine, the ribbon can be sewn to the skirt by hand. First, you need to collect the upper edge of the skirt to the required length. The length of the top should be equal to the circumference of the hips plus 2-5 centimeters. The edge of the product is processed manually with an oblique or buttonhole stitch. Then an elastic band is sewn to the top of the skirt. In the process of sewing, it is stretched a little. For sewing parts, a manual seam is used, which resembles a machine stitch.
Variants of skirts with elastic
For beginner needlewomen who decide to sew a skirt with their own hands, the choice with an elastic band instead of a belt will be the most optimal and simplest. It is sewn on very easily and is suitable for different models of this clothing. Using an elastic band, you can make various options for skirts:
- tatyanka;
- Sun;
- half sun;
- product with different hem length.
At the same time, depending on the style, you can choose almost any fabric for sewing... It is also worth remembering that a wide stripe will further emphasize a slender waist. For those with more curvaceous forms, it is better to use a thin hidden elastic band.
In addition to the proposed options, there are several more ways to sew an elastic band to a skirt. So, when sewing a tulle product, a knitted elastic fabric folded in half is used as a belt. With its help, the edging and hiding of the mesh sections are made.
 Tulle skirt with knitted belt
In the case when a product is sewn with a lining, the belt should be fastened from the front side, and the inner surface should be treated with an inlay or a cover stitch.
If you need to attach a tape with a decorative edge to the product, for example, for a children's skirt, then the basic principle of sewing the tape should be applied, that is, apply it from the upper edge of the skirt on the front side.
 Kids skirt
Thus, with the help of a simple elastic band or elastic band, you can easily sew a comfortable and stylish skirt from any fabric and any style.To do this work, you do not need any special skills in sewing - it is enough to acquire all the necessary tools and materials, and soon you will be able to boast of this piece of clothing made with your own hands.


Elastic under the drawstring
Many needlewomen are wondering how to sew an elastic band to the fabric so that it stretches. However, most people think that there is only one most convenient way to do this - using a zigzag stitch. Another good method is to insert an elastic band under the drawstring. A drawstring is a strip of fabric that is sewn over the elastic. It can be either small or large, depending on the working area of the material.
 Kuliskaya treats clothes for pregnant women
Before starting work, measure the required length of the elastic band and the same amount of fabric. The material is stitched in the form of a "pipe", then the end of the elastic band is pierced with a pin and passed through the drawstring. The edges are joined and processed.
This method is well suited for sewing sportswear, children's clothing, as well as products for pregnant women. The elastic will not pull too much and rub the skin, and it will also be possible to avoid gathering of the material and unnecessary folds. Therefore, with the help of a drawstring, you can sew clothes from thick and coarse fabrics, for example, chintz, cotton and jeans.
 Drawstring draws evenly into folds
Note! If you process clothes with a drawstring on the belt, you can even do without a button, this method is used to repair clothes for pregnant women and children.
Where are rubber bands used?
Elastic bands are very often used when sewing clothes and even bed linen.
 An elastic band is an indispensable thing when sewing clothes
Often they are used to process the edges of mattress toppers and sheets for ease of use. But for clothes, elastic tape can be used in a variety of ways.
 Any garment may need assembly
They use an elastic band for completely different purposes:
- maintaining the belt of clothing - skirts, trousers, shorts, some types of dresses;
- waist dragging on tops, dresses, blouses and sundresses;
- narrowing of the sleeves and bottom of the legs on trousers, blouses, shirts;
- sewing underwear and swimwear.
 Using a sewing machine will speed up the process
On any clothes, you can additionally sew an elastic band for convenience or giving it a more beautiful appearance. A regular elastic tape is recommended to be sewn on the shoulders, sleeves, belt, neck or under the chest itself. In this case, the clothes will acquire more accurate reliefs and will fit the figure beautifully.
Materials and tools
- Fabric in the size of the length of the product with allowances for processing with a width of 140-150 cm. If the length is longer than the width of the fabric folded in half, it is necessary to process the side seams, which increases the consumption of material.
- Elastic tape 3 cm wide and wider. Rubber bands are available in plain and decorative colors. The length is approximately equal to the girth of the waist. No tight elasticity is required in the sock.
- A centimeter tailor's tape for measurements and work with a pattern.
- Cutting scissors and pins.
- Sewing threads to match the fabric.
- Sewing machine with decorative wide stitching function.

Skirt construction
To calculate the design of the model, cut along the oblique, it is enough to measure the waist circumference and the length of the finished product.

- Prepare paper, pencil, long ruler. The silhouette pattern is built on paper or directly on the material.
- From the left corner, set aside the measurement of the length of the waist circumference + 2 cm divided by the number 6.28.
- Draw an arc to the perpendicular side of the paper. For control, measure the resulting arc with a measuring tape placed on the edge: its length should be ¼ of the measurement of the waist circumference.
- Set aside the desired length of the product down from the arc.
- Bring the arc of the bottom edge to the perpendicular edge of the paper and cut out the resulting pattern.
- Fold the fabric along the lobe, making four layers. Create a pattern, add seam allowances.
- Cut out a single piece without side cuts. When unrolling, you should get a full circle with a hole, the length of which is equal to the length of the waist.


How to sew a skirt with an elastic band
22 Mar 2016
Do you love knitwear the way I love them?
And I also have knitted skirts. They are sewn in an hour, and it is convenient and practical to wear.


You can cut them according to the patterns of skirts made of ordinary fabric, you can do it without darts at all, if the buttocks are not very protruding.
The zipper can be inserted if the fabric is dense, or it can be omitted if the fabric is stretched enough
I needed to change the stretched elastic on my skirt, and at the same time I will show you how to arrange an elasticized belt for a skirt without a zipper.
There is an option when the line runs along the top. This option is suitable if you wear blouses over a skirt.
Everything is simple here:
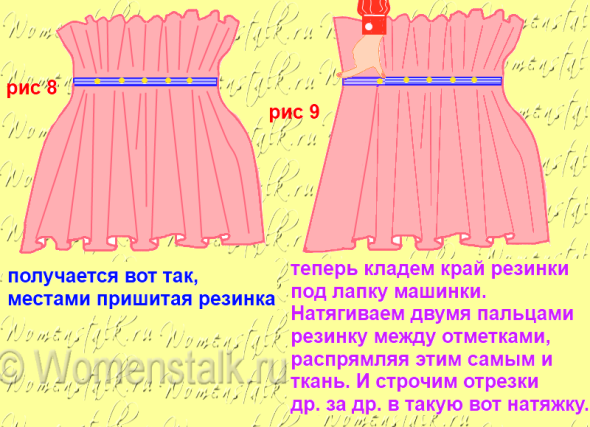
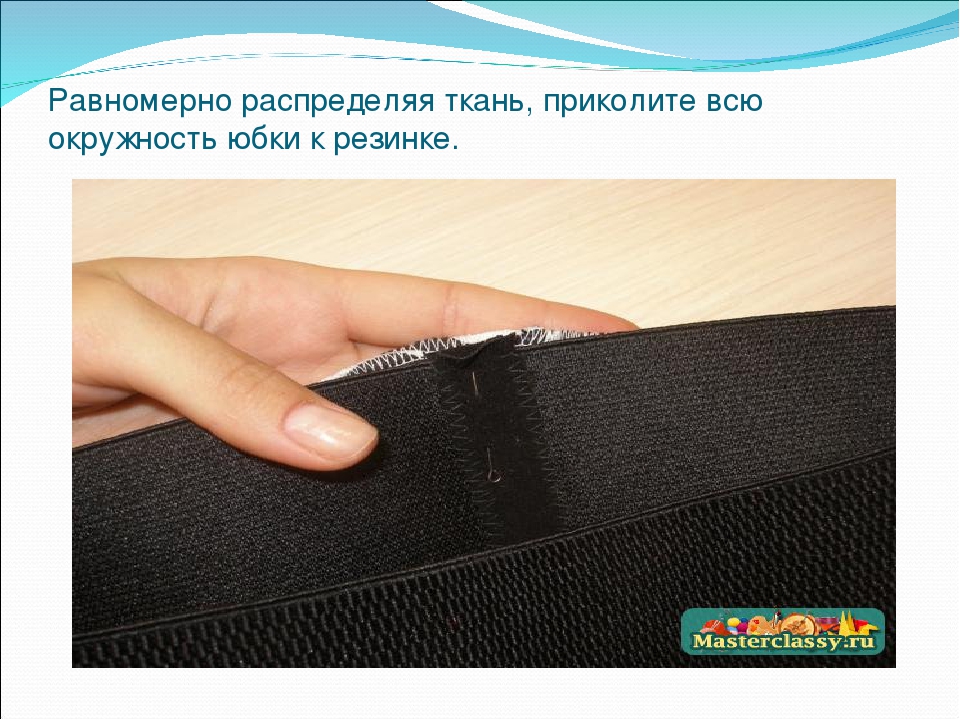
1. Sew an elastic band into a ring. Divide the gum in half, put the marks, divide it in half, put the marks. It turns out 4 equal parts and 4 marks at equal distances from each other.
2. In the same way, we divide the top of the skirt
3. We apply the elastic to the wrong side of the skirt (the edge of the elastic to the upper cut of the skirt), aligning the marks on the skirt and on the elastic, pin. We sew along the edge with an overlock or zig-zag, connecting the skirt and elastic, and at the same time processing the cut

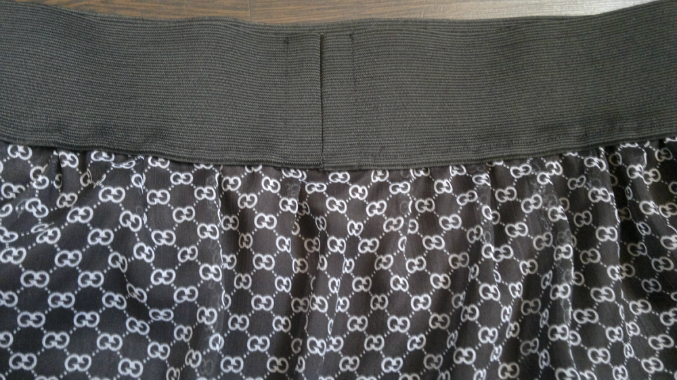
4. Tuck the elastic band on the wrong side, pin it, lay a line on the overlock. The stitching in this case is visible on the face of the skirt.
And there is an option when the lines are not visible on the front side of the skirt. It's also very simple here:
The first steps are the same as in the first version: we connect the elastic to the top of the skirt with an overlock or zig-zag.
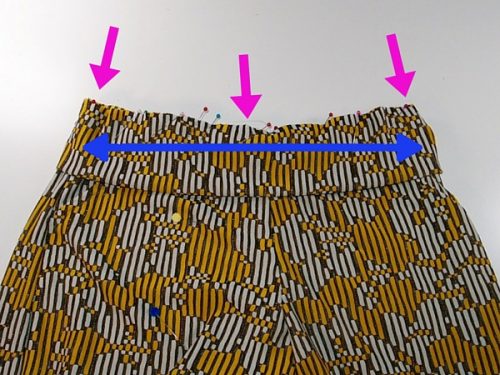
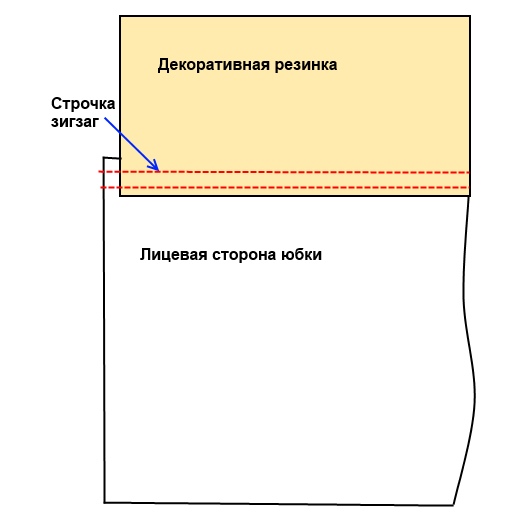
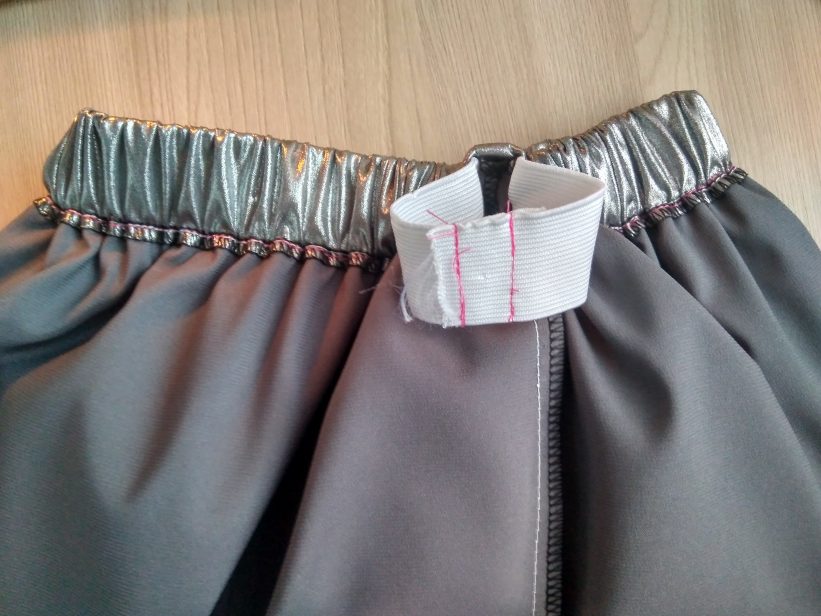
We wrap the elastic band on the wrong side and fasten it with lines ONLY along the vertical seams (pink lines in the picture below). We lay the line exactly in the groove of the seam of the front and back panels of the skirt. It can only be side seams, there can be some other embossed seams. At the same time we sew on a hanger loop.

The second way I spied on a finished skirt in a boutique.
On the figure, the rubber band is stretched and does not turn outward. There are no stitches on the front side, and you can wear a blouse tucked into a skirt.
There are also ways to process the top of a knitted skirt. I'll post master classes later
Details of measurements, construction of patterns and sewing of a knitted skirt are discussed in the course "Mini wardrobe from jersey".
Elastic band instead of a belt
Decorating a ready-made belt is not a big deal, your imagination and materials that you can easily find at home will help you with this.
Completing of the work 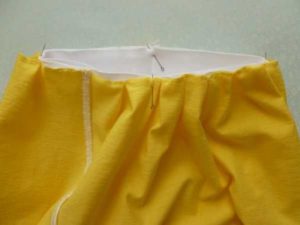
- Decide on the length of the belt. Measure the waist with a centimeter and add 8 cm. The belt should not be too tight so as not to squeeze the belly.
- Use a ruler to measure 8 cm from each edge.
- We measure a rectangle 10 * 16 cm on a piece of leather.
- Bend the rectangles in half with the right side inward and join the edges with a 1 cm seam.
- We turn out the blanks. Insert the ends of the tape into the resulting pockets and secure on the typewriter with a finishing line.
- Sew the belt to the skirt.
- Now we sew buttons to both sides of the belt.
An interesting belt is ready! It can be made as an independent item, then you can wear it with a dress, with a spring light coat, long shirts or tunics.
Elastic waist
If you have a sewing machine and school sewing skills, you can, without spending a lot of time, effort and money, make a light outfit by yourself and correctly sewing the elastic to the skirt.
Insert the elastic into the silk flared skirt
Several methods should be noted on how to insert the ribbon into the sun skirt.
The easiest option is to take a wide elastic band and make a hole in the belt. Its width should be equal to or greater than the elastic by 0.5 cm.


Using a pin, attach one end of the elastic to the belt, and the other pin on the elastic and slowly begin to pull through the hole until it goes through the entire belt. Connect the ends of the tape, and sew the hole in the waistband.
Elastic band in tulle skirt
To facilitate the work, the lumpy method is often used when sewing a skirt. In other words, pieces of tulle should be fixed on the elastic. As a result, the skirt will come out fluffy and immediately on the belt. However, there is also a classic method for sewing elastic bands.
Progress
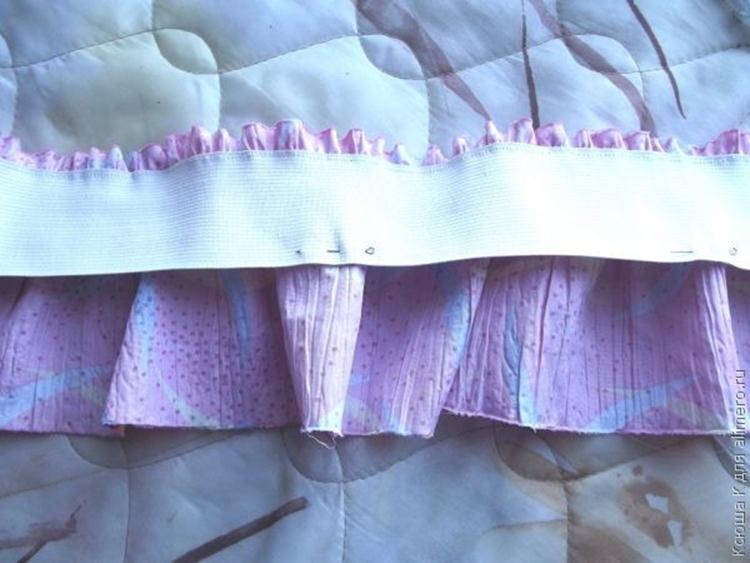
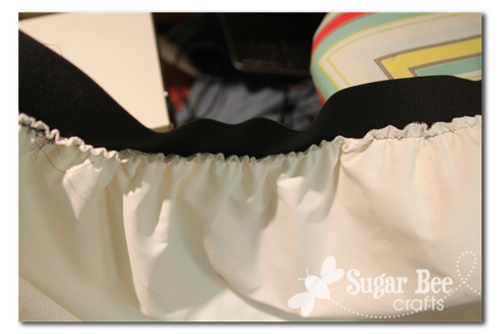
Basically, the belt for such fluffy skirts is made overhead. This allows you to close all the attachment points of the patches and seams.
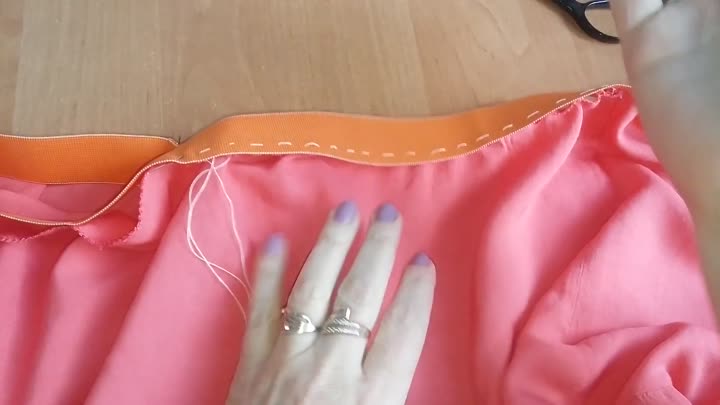
- Attach the tape to the front of the garment and attach the pins every 10 cm.
- Pulling on the belt, sew on a sewing machine.
How to sew a rubber band by hand 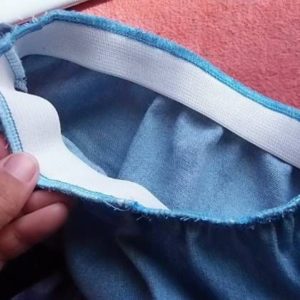
Sewing an elastic band is much more difficult without a typewriter, because in this case neither quality nor appearance should suffer. This is a more time consuming process. The braid must be kept taut at all times and be careful not to overtighten. If you do not adhere to all these points, then you will not be able to put on the product, or it will subside.
Progress
- Treat the fabric to prevent fraying. Gather the material and secure with studs.
- Prepare an elastic a couple of centimeters smaller than your waist. Sew the edges of the tape to the base of the skirt.
- Stretch the ribbons, flattening the edges of the fabric, and pin at four locations.
- Sew on the elastic with a needle-forward seam using neat stitches.
- Walk again, but insert the needle into the gaps between the finished stitches. As a result, you will have a line.
How to sew an elastic band on a sewing machine 
Perfectly elastic tape will only look on some models of skirts. Wear it long or in a "Doll" style with ruffles to add a touch of romance to your look.
Progress
All preparatory work must be done before sewing on the ribbon. Namely: cut the canvas of the desired size and indicate the places of the grooves.
- Attach the tape to the fabric over the top of the fabric so that it is on the right side.
- Using safety pins, secure the tape in four places on the prepared item.
- Make sure the elastic is slightly taut. There should be a little more fabric under it, otherwise the skirt will slip.
- We sew the finished workpiece with a machine. Be sure to make sure the ends of the tape come together.
IMPORTANT! If you have problems attaching the tape (the machine skips stitches or the thread breaks continuously), make sure it is set correctly. Observe the folds of the fabric, they should be gathered evenly
If this is not the case for you, fasten the tape more often and do the same with the top of the skirt. In the process of work, constantly make sure that the marks coincide
Observe the folds of the fabric, they should be gathered evenly. If this is not the case for you, fasten the tape more often and do the same with the top of the skirt. In the process of work, constantly make sure that the marks coincide.
Materials and tools for work
In order to get started, you must prepare the following tools in advance:
- To take measurements and draw patterns, you will need a measuring tape.
- Tailor's scissors and pins.
- Threads matching the color of the fabric.
- A sewing machine is recommended for ease of use.
 Required tools
It is also worth preparing materials for starting sewing:
- Elastic tape more than 30 mm wide. You can choose from plain or multi-colored.
- Skirt fabric.
Important! The amount of material is taken based on the selected style of the garment. For a half-sun skirt or pleated skirt with a length of not more than 60 cm, a piece of fabric measuring 150 × 160 cm is taken
 Ribbon selection